Embed Size (px)
Citation preview

INSULATING YOUR HOME
LEARN MORE ABOUT INSULATING YOUR HOME AT MENARDS.COM
MADE IN THE U.S.A.
FORMALDEHYDE-FREE
WHY INSULATE?
REDUCE NOISE
You could save up to 20%* on cooling and heating.
Stay cooler in summer, and warmer in winter.
Wall insulation minimizes indoor and outdoor sounds.
SAVE MONEY YEAR-ROUND COMFORT
BOOST RESALE VALUE
Homebuyers prefer energy-saving homes.
*Results vary.
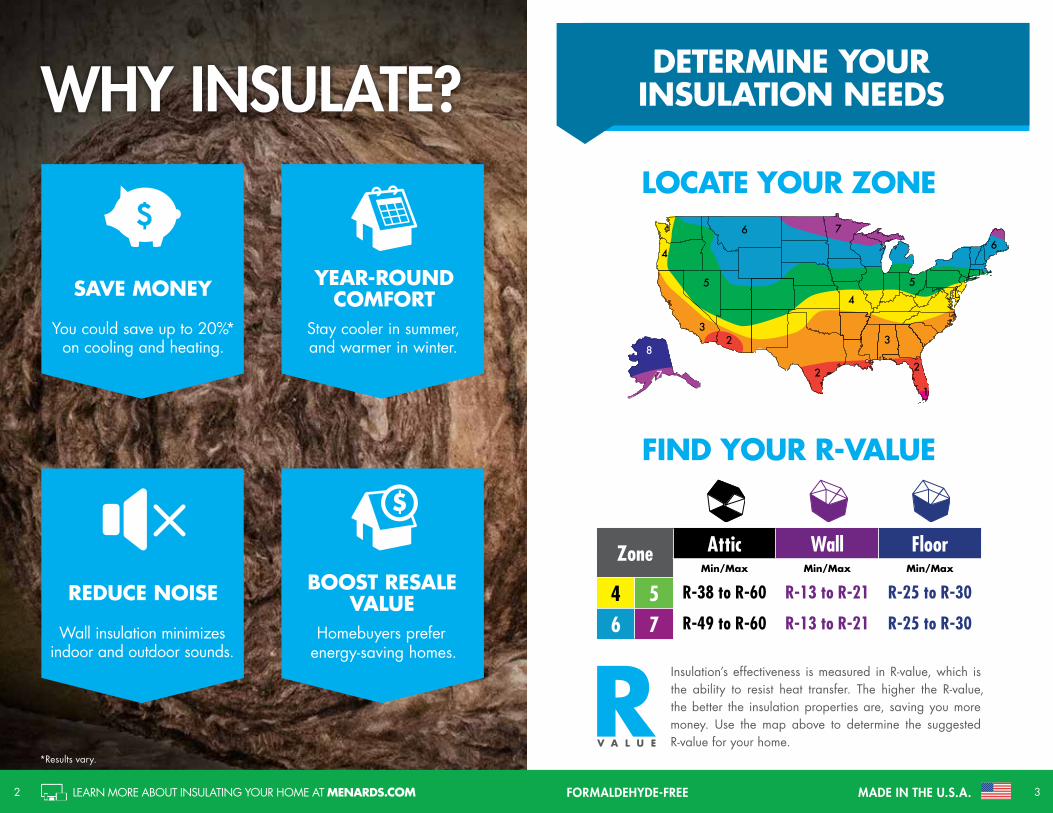
LOCATE YOUR ZONE
FIND YOUR R-VALUE
Zone Attic Wall FloorMin/Max Min/Max Min/Max
4 5 R-38 to R-60 R-13 to R-21 R-25 to R-30
6 7 R-49 to R-60 R-13 to R-21 R-25 to R-30
Insulation’s effectiveness is measured in R-value, which is the ability to resist heat transfer. The higher the R-value, the better the insulation properties are, saving you more money. Use the map above to determine the suggested R-value for your home.
RV A L U E
4
45 5
66
7
332
2 2
1
7
1
8
4
45 5
66
7
332
2 2
1
7
1
8
DETERMINE YOUR INSULATION NEEDS
LEARN MORE ABOUT INSULATING YOUR HOME AT MENARDS.COM MADE IN THE U.S.A.2 3FORMALDEHYDE-FREE
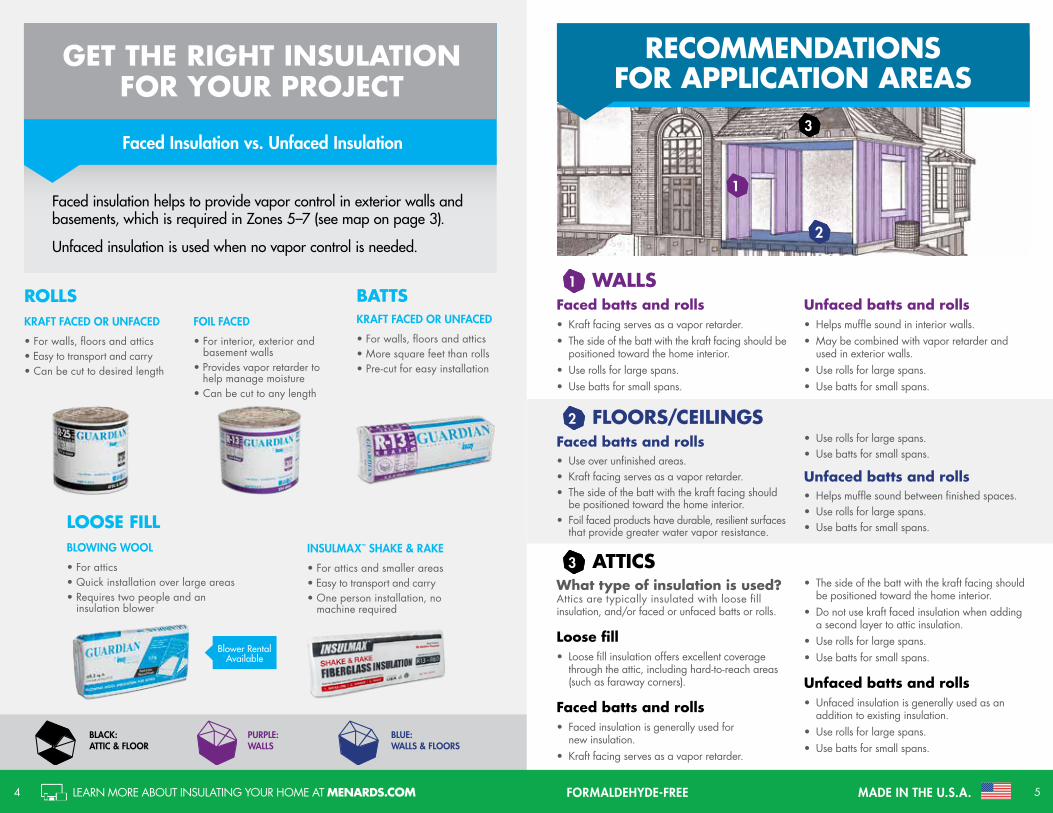
1 WALLS Faced batts and rolls • Kraft facing serves as a vapor retarder.• The side of the batt with the kraft facing should be
positioned toward the home interior.• Use rolls for large spans.• Use batts for small spans.
Unfaced batts and rolls • Helps muffle sound in interior walls.• May be combined with vapor retarder and
used in exterior walls.• Use rolls for large spans.• Use batts for small spans.
LOOSE FILLBLOWING WOOL
• For attics• Quick installation over large areas• Requires two people and an
insulation blower
BATTSKRAFT FACED OR UNFACED
• For walls, floors and attics• More square feet than rolls• Pre-cut for easy installation
ROLLSKRAFT FACED OR UNFACED
• For walls, floors and attics• Easy to transport and carry• Can be cut to desired length
FOIL FACED
• For interior, exterior and basement walls
• Provides vapor retarder to help manage moisture
• Can be cut to any length
Blower Rental Available
BLACK:ATTIC & FLOOR
PURPLE:WALLS
BLUE:WALLS & FLOORS
GET THE RIGHT INSULATION FOR YOUR PROJECT
Faced Insulation vs. Unfaced Insulation
Faced insulation helps to provide vapor control in exterior walls and basements, which is required in Zones 5–7 (see map on page 3).
Unfaced insulation is used when no vapor control is needed.
INSULMAX™ SHAKE & RAKE
• For attics and smaller areas• Easy to transport and carry• One person installation, no
machine required
RECOMMENDATIONS FOR APPLICATION AREAS
2 FLOORS/CEILINGSFaced batts and rolls • Use over unfinished areas.• Kraft facing serves as a vapor retarder.• The side of the batt with the kraft facing should
be positioned toward the home interior.• Foil faced products have durable, resilient surfaces
that provide greater water vapor resistance.
• Use rolls for large spans.• Use batts for small spans.
Unfaced batts and rolls• Helps muffle sound between finished spaces.• Use rolls for large spans.• Use batts for small spans.
3 ATTICSWhat type of insulation is used?Attics are typically insulated with loose fill insulation, and/or faced or unfaced batts or rolls.
Loose fill• Loose fill insulation offers excellent coverage
through the attic, including hard-to-reach areas (such as faraway corners).
Faced batts and rolls • Faced insulation is generally used for
new insulation.• Kraft facing serves as a vapor retarder.
• The side of the batt with the kraft facing should be positioned toward the home interior.
• Do not use kraft faced insulation when adding a second layer to attic insulation.
• Use rolls for large spans.• Use batts for small spans.
Unfaced batts and rolls• Unfaced insulation is generally used as an
addition to existing insulation.• Use rolls for large spans.• Use batts for small spans.
1
3
2
LEARN MORE ABOUT INSULATING YOUR HOME AT MENARDS.COM MADE IN THE U.S.A.4 5FORMALDEHYDE-FREE
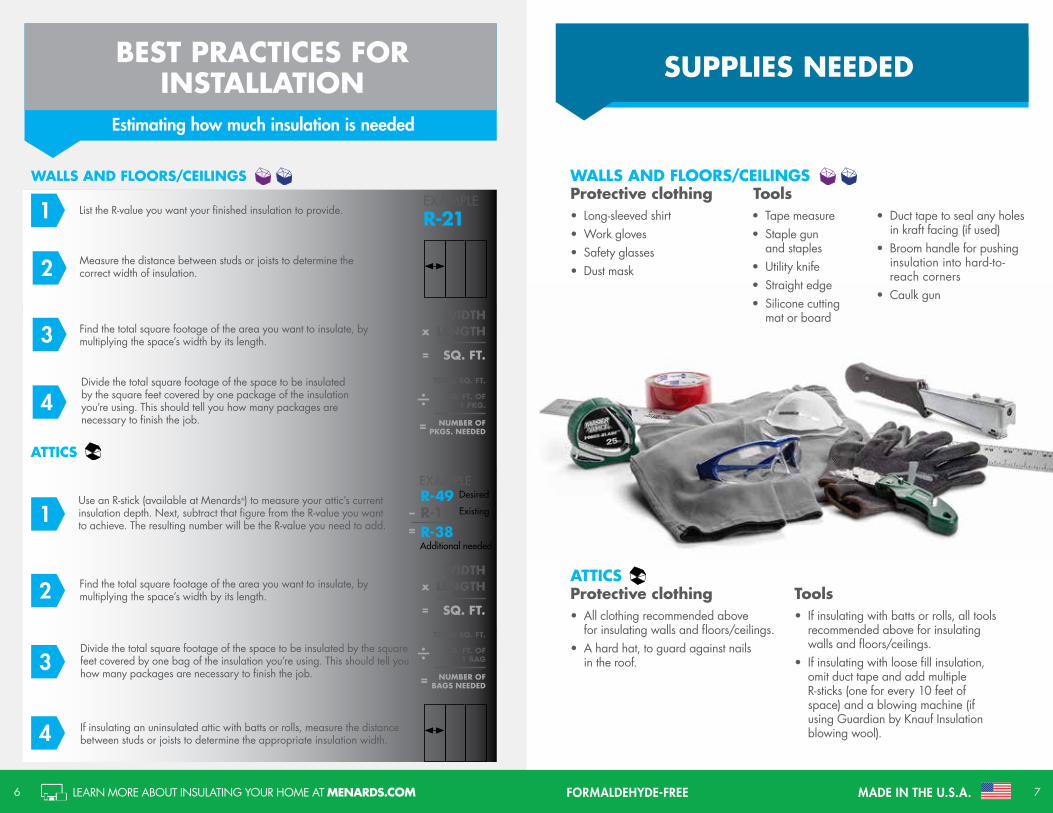
BEST PRACTICES FOR INSTALLATION SUPPLIES NEEDED
Estimating how much insulation is needed
Use an R-stick (available at Menards®) to measure your attic’s current insulation depth. Next, subtract that figure from the R-value you want to achieve. The resulting number will be the R-value you need to add.
WALLS AND FLOORS/CEILINGS WALLS AND FLOORS/CEILINGSProtective clothing• Long-sleeved shirt• Work gloves• Safety glasses• Dust mask
Tools• Tape measure• Staple gun
and staples• Utility knife• Straight edge• Silicone cutting
mat or board
• Duct tape to seal any holes in kraft facing (if used)
• Broom handle for pushing insulation into hard-to-reach corners
• Caulk gun
List the R-value you want your finished insulation to provide.
Measure the distance between studs or joists to determine the correct width of insulation.
Find the total square footage of the area you want to insulate, by multiplying the space’s width by its length.
Divide the total square footage of the space to be insulated by the square feet covered by one package of the insulation you’re using. This should tell you how many packages are necessary to finish the job.
1
1
2
2
3
3
4
4
WIDTHLENGTH
SQ. FT.
x
=
WIDTHLENGTH
SQ. FT.
x
=
EXAMPLE R-21
TOTAL SQ. FT.
SQ. FT. OF 1 PKG.
NUMBER OF PKGS. NEEDED=
—
TOTAL SQ. FT.
SQ. FT. OF 1 BAG
NUMBER OF BAGS NEEDED=
—
ATTICS
Find the total square footage of the area you want to insulate, by multiplying the space’s width by its length.
Divide the total square footage of the space to be insulated by the square feet covered by one bag of the insulation you’re using. This should tell you how many packages are necessary to finish the job.
If insulating an uninsulated attic with batts or rolls, measure the distance between studs or joists to determine the appropriate insulation width.
R-49 Desired
R-11 Existing
R-38Additional needed
EXAMPLE
=–
ATTICSProtective clothing• All clothing recommended above
for insulating walls and floors/ceilings.• A hard hat, to guard against nails
in the roof.
Tools• If insulating with batts or rolls, all tools
recommended above for insulating walls and floors/ceilings.
• If insulating with loose fill insulation, omit duct tape and add multiple R-sticks (one for every 10 feet of space) and a blowing machine (if using Guardian by Knauf Insulation blowing wool).
LEARN MORE ABOUT INSULATING YOUR HOME AT MENARDS.COM MADE IN THE U.S.A.6 7FORMALDEHYDE-FREE
• Seal and caulk any holes or openings.• Make sure insulation fits snugly against the top, bottom and all sides of the framing.• When installing insulation with a vapor retarder (such as kraft facing), be sure the faced side
is positioned toward the home’s interior.• When installing batts, start at the top and gently work your way down, stapling the paper’s
edge (or flange) to the inside edge of the wall studs, every eight inches. Fit tightly against the bottom framing.
• Do not compress the insulation.• If using unfaced insulation, a separate vapor retarder should be applied.• Faced batts are flammable, and should not be left exposed. Once insulation is in place, cover
with drywall or another approved finish material.• For garage walls, place insulation between studs, and point the vapor retarder toward the
garage interior. Again, because the facing is flammable, it should not be left exposed.
• Place insulation between floor/ceiling joists, starting at one end and working away.
• Make sure the batt is flush against the bottom of the floor above, and that its ends fit snugly against the band joists.
• When installing insulation with a vapor retarder (such as kraft facing), be sure the faced side is positioned toward the home’s interior.
• Insulation should be pushed against the subfloor.
• If the home is on pilings and the floor’s underside is easily accessible, cover the insulation with an exterior material, to keep it safe from weather and other abuse.
• To insulate bridging or cross bracing of floor/ceiling joists, split a batt vertically down the middle, putting one half in the upper opening and the other in the lower opening. (You may also butt the batt to the bridging, then fill the bridging space with scrap insulation.)
Adding insulation to exterior sidewalls
Securing installed insulation
Cavities with narrow frames Faced and unfaced batts or rolls
Interior walls
Wall cavity depth
INSTALLING INSULATION IN WALLS INSTALLING INSULATION IN FLOORS/CEILINGS
• When insulating framed spaces with non-standard widths, cut the faced batt one inch wider than the space to be filled. After stapling the insulation’s flange, pull the facing on the cut side to the other stud, stapling it to the stud through its vapor retarder.
• Make sure insulation is an appropriate distance from heat-generating, fossil-fuel appliances. Consult the National Fire Protection Association (NFPA) or the appliance manufacturers’ recommendations for specifics.
• When insulating between wood framing and masonry chimneys, use only unfaced insulation. Avoid placing insulation in air spaces next to fireplaces or metal chimneys.
• Seal and caulk any holes or openings.• Split insulation to fit snugly around wiring, ductwork and plumbing. Be sure the cavity is
filled completely.• Once insulation is in place, cover it with drywall or another approved finish material.
Use the proper thickness of insulation for your wall cavity’s depth. Typically, 2" x 4" assemblies have a depth of 3-1/2," and 2" x 6" assemblies have a depth of 5-1/2."
• When insulating floors/ceilings in an unfinished or unheated basement, use faced batts or rolls to limit moisture.
• If a vapor retardant is already in place, use unfaced batts or rolls.
SUPPORT WIRESYou may choose to use rigid wire fasteners, sold for joist spacing, to hold your insulation in place. Wedge the fasteners between the joists, and bow them upwards, so the insulation is pressed gently up to the subflooring. Keep insulation from sagging by spacing fasteners 12" to 24" apart, no more than six inches from the ends of the batt or roll.
FLOOR/CEILING CAVITY DEPTHUse the proper thickness of insulation for your floor/ceiling cavity’s depth. Typically, 2" x 8" assemblies have a depth of 7-1/4," 2" x 10" assemblies have a depth of 9-1/4," and 2" x 12" assemblies have a depth of 11-1/4."
LEARN MORE ABOUT INSULATING YOUR HOME AT MENARDS.COM MADE IN THE U.S.A.8 9FORMALDEHYDE-FREE
PREPARING THE ATTIC• Seal and caulk any holes or openings.• Place protective plastic baffles over all attic ventilation, such as soffit or eave vents, to keep
them from being blocked.• Lay plywood planks across joists, and walk only on those two surfaces.
ADDING INSULATION TO PREVIOUSLY INSULATED ATTICS• Measure the existing insulation with an R-stick to determine how much insulation must be
added to achieve your desired R-value.• If the height of the existing insulation does not reach the top of the joist, lay unfaced batts
in the joists, on top of the old.• When joists are full to the top, place additional unfaced batts at right angles to the existing
insulation, to further protect against air gaps.• Begin by laying insulation at the outer edges, and work toward the middle.• Keep insulation at least three inches away from vents, and any heat-producing devices
(such as motors or lighting fixtures).• Only IC-rated lighting fixtures may be touched directly by insulation.• When necessary, cut insulation to fit around obstructions.• Staple a piece of batt insulation over the top of the attic access door.
INSTALLING IN NON-INSULATED ATTICS• If there is no pre-existing insulation in the attic, faced insulation should be used, with the
facing side directed toward the home’s interior.• Otherwise, installation of faced batts and rolls is identical to the installation of unfaced
batts and rolls (above).
Insulating with batts and rolls
Insulating with loose fill insulation
Insulating with loose fill insulation (cont.)
Insulating with Insulmax™ Shake & Rake
INSTALLING INSULATION IN ATTICS
PREPARING THE ATTICPrepare attic as you would for insulation with batts or rolls—caulking openings, keeping air vents from being blocked, and laying plywood over joists. In addition:• Seal any unsound duct joints.• Install a barrier around the attic access opening, to keep insulation from falling out.• Install baffling around heat-generating sources, to keep at least three inches of space
between them and the blown insulation. (Again, only IC-rated lighting fixtures may safely touch insulation.)
• Staple R-sticks on joists or vertical framing (placing one stick about every 10').• Make sure the bottom of each R-stick is level with the bottom of your attic’s existing insulation.• When insulation is blown, it should reach the desired R-value on the R-stick.
RENTING A BLOWING MACHINE• Installing Guardian by Knauf Insulation blowing wool into your attic will require the rental of a
blowing machine (available at Menards®) and a second person to help operate the machine.• Carefully read all instructions on the blowing machine before operating it.
BLOWING THE INSULATION IN• Keep the blowing machine outside or in your opened garage, and feed only the hose
up to the attic.• Once the blowing machine is started, begin by blowing insulation at the points furthest
from the attic’s access.• As each attic section is filled, the installer should move slowly backward toward the
access door.• Again, care should be taken not to block any ventilation in the attic.• Continue to blow insulation until you have reached your desired R-value.• Run blowing machine until machine and hose are both empty.
• Measure existing insulation.• Open bag, slitting from one end to the other.• Shake insulation into attic space.• Spread to desired thickness using a garden or leaf rake.
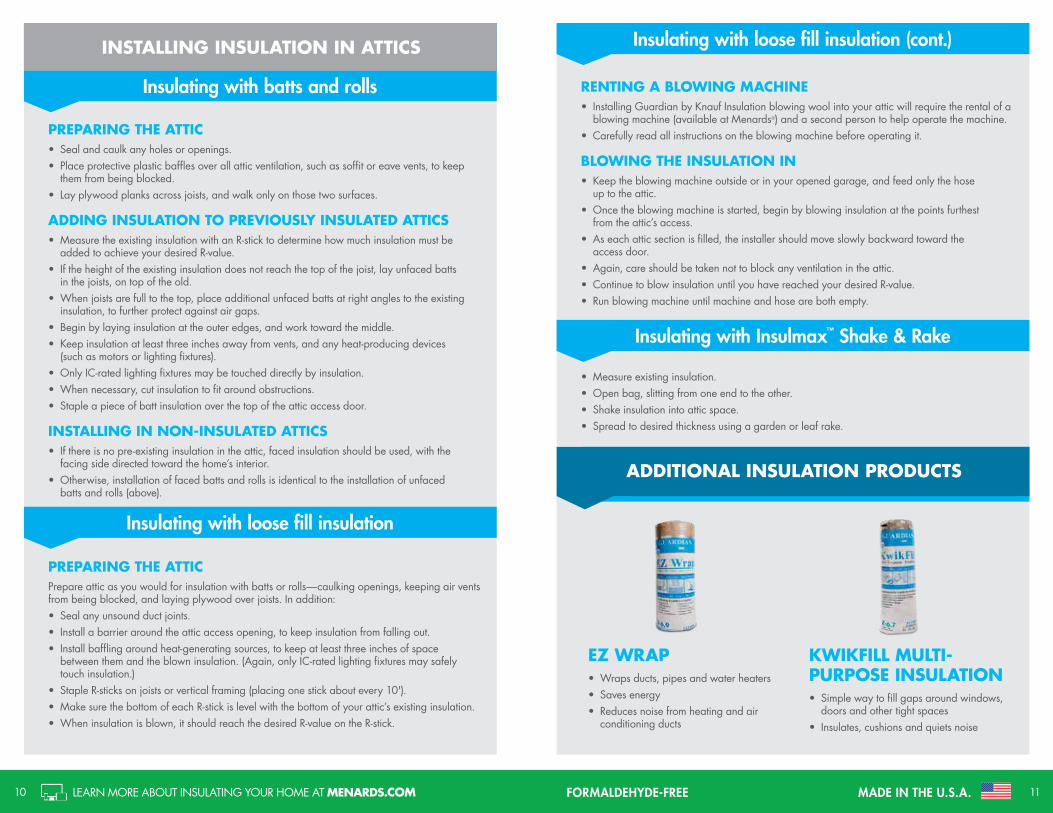
EZ WRAP• Wraps ducts, pipes and water heaters• Saves energy• Reduces noise from heating and air
conditioning ducts
KWIKFILL MULTI-PURPOSE INSULATION• Simple way to fill gaps around windows,
doors and other tight spaces• Insulates, cushions and quiets noise
ADDITIONAL INSULATION PRODUCTS
LEARN MORE ABOUT INSULATING YOUR HOME AT MENARDS.COM MADE IN THE U.S.A.10 11FORMALDEHYDE-FREE

LEARN MORE ABOUT INSULATING YOUR HOME AT MENARDS.COM
• Formaldehyde-Free
• Made in the U.S.A.
• Sustainably Manufactured
• Environmentally Safe
WHY GUARDIAN?
MN-BRR 7/15