Embed Size (px)
Citation preview
INSTRUCTIONS ONUSING
THE EXAMUS
TESTING SERVICE
Table of Contents
1 The Rules of Using Proctoring System “Examus” and Examination procedure using the Examus service
3
2 Getting started.............................................................................................................. ............. 4 2.1 Authentication............................................................................................................... .... 4
2.2 Computer’s check..……........................................................................................................ 4
3 Testing………..…........................................................................................................................ 5 3.1 Start of the test…........................................................................................................... ..... 6
3.2 Identification of the participant….......................................................................................... 6
3.3 Testing process………………………………................................................................................... 7
3.4 End of testing ……………………………........................................................................................ 9
4 Technical support…………………………............................................................................................ 9
5 FAQ ............................................................................................................................................. 9 5.1 Problems with logging in..…………………................................................................................... 9
5.2 Check is not happening ..………………….................................................................................. 10 5.3 Problems during the exam …..…………................................................................................. 13
1. The Rules of Using Proctoring System “Examus” (hereinafter referred to as The Proctoring System).
1. Regulations of testing
1. Users are admitted to a test if they are registered in The Proctoring System or in any other partners' platform.
2. After logging into the The Proctoring System using an internal account or a partner's platform account User gets an access to the list of available tests/exams (or to the partners’ web page), where he/she can choose an available exam (or perform other actions according to partners' platform regulations).
3. After choosing the exam The User goes through the identification process according to the instructions of the system and the proctor.
4. After successful identification, The Proctoring System gives an access to the test.
5. During the test The Proctoring System records video and audio of all User’s actions, records the desktop of the User’s PC (hereinafter referred to as The Materials) and transfers The Materials to The Proctor.
6. After the test/exam The Materials can be given to third parties (e.g. to the test organizers) for the further
analysis.
2. User Requirements
1. User agrees not to pass the access details of his/her account to third parties. 2. User must provide all necessary conditions for the work of The Proctoring System:
o an adequate level of illumination o a low noise level o a document identifying the User o no interference in transmission of video and audio signal o fulfillment of technical requirements for User’s equipment (see below)
3. User agrees that the Person, whose ID and image were stored in The Proctoring System after the first login, is the owner of the account in The Proctoring System.
4. User should use the original ID for his/her identification. 5. User must not leave the observed zone of webcam during the test. 6. User must keep the microphone switched-on during the test. 7. During the test User agrees to use only one display device (a monitor, a TV, a projector), one keyboard, one
pointing device (a computer mouse, TrackPoint, etc.). 8. User is not allowed to get third parties' assistance during the test. 9. User is not allowed to give an access to his/her computer to third parties during the test.
10. User is not allowed to participate in conversations with third parties, to use reference materials (books, cheat sheets, audio recordings), cell phones, pagers, calculators, tablets and computers, except the one that is used directly during the test.
11. User agrees that Proctor has the right to terminate the testing process in the event of breaking these Rules or violations of ethical standards by the User.
3. Requirements for the User’s equipment
1. ОS Windows 7, 8, 8.1, 10, Mac OS 10.9 and higher 2. Google Chrome web browser (the latest version) 3. Working and switched-on webcam (including built-in cameras in laptops) 4. Working and switched-on microphone (including built-in microphones in laptops) 5. Installed Chrome app “Examus” 6. Stable internet connection with data rates of not less than 1 Mbps
7. The ability to transfer video using WebRTC protocol (you can check at https://test.webrtc.org/).
Examination procedure using the Examus service Install the Google Chrome web browser (https://www.google.com/chrome/);
Using Google Chrome web browser, go to the following page: https://hse.student.examus.netandclick on Entrance Examination, log-in and
have your e-mail account verified;
On the examination day, at the appointed time (or 10 minutes before it), go to https://hse.student.examus.net and click on the name of the test which you wish to take;
Take a photo of your identification document and send it to the proctor for verification;
You can start the exam now;
Upon the completion of the exam click on ‘End the exam’ button;
Close the Examus tab.
Requirements for the User’s PC
1. A PC or a laptop (mobile devices are not supported);
Windows operating system (Windows 7,Windows 8,Windows 8.1,Windows 10) or
Mas OS X Yosemite (version 10.10, or a newer version);
You should have the latest version of the Google Chrome web browser (at the moment
when you take the test) installed (for the latest updates of the web browser, please see chrome://help/);
4. Your computer (or laptop) must be equipped with a functioning external or built-in web cam;
5. You need to make sure that the mic is functioning and has been switched on
(including built-in mics);
6. You should have a steady Internet connection with a speed of not slower than 1 Mbps per second (however, the recommended speed is 2 Mbpsper second);
7. Your computer should successfully pass the ‘Computer setup’ test. This test is
available after the installation of the ‘Examus’ application. You need to install the
application and log in using your login and password;
8. You need to make sure that your network is set up so that the following ports:
443/TCP;
80/TCP;
3478/UDP;
3478/TCP;
are open to the following IP addresses:
188.128.30.79;
188.128.30.71;
188.128.30.72;
81.177.100.134
81.177.100.135.
IMPORTANT: If your computer does not meet these requirements or fails to pass the
‘Computer setup’ test, the option of taking an exam with proctoring services shall not be
available.
How to prepare your workplace before taking a test:
1. Make sure your room is properly lit;
2. Check if your web cam and mic are on and the camera lens is not covered;
3. Have your ID document on hand;
4. Plug your laptop in (battery operation can affect the device’s performance);
5. Clear the browser’s cache;
6. Restart the computer;
7. Using Task Manager (Ctrl+Shift+Esc), shut down unused or running programs,
especially those that utilize the webcam or mic (the Processes tab);
8. You cannot use the VPN service, or a remote management service (e.g.,
TeamViewer, RAdmin, Windows Remote Desktop, etc.);
9. Deactivate the antivirus’ function to filter network traffic;
10. If, during testing, you experience problems with video or webpages downloading, restart
your browser (to do this, please input chrome://restart in a new tab and press Enter).
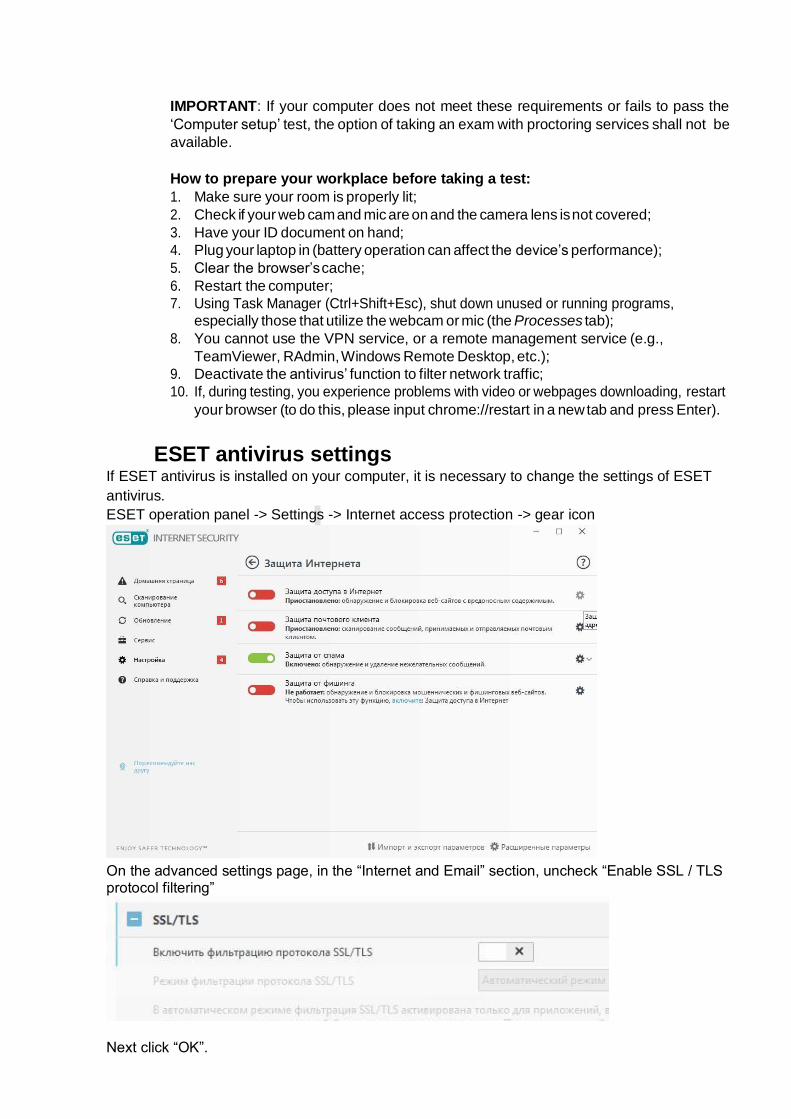
ESET antivirus settings If ESET antivirus is installed on your computer, it is necessary to change the settings of ESET
antivirus.
ESET operation panel -> Settings -> Internet access protection -> gear icon
On the advanced settings page, in the “Internet and Email” section, uncheck “Enable SSL / TLS protocol filtering”
Next click “OK”.
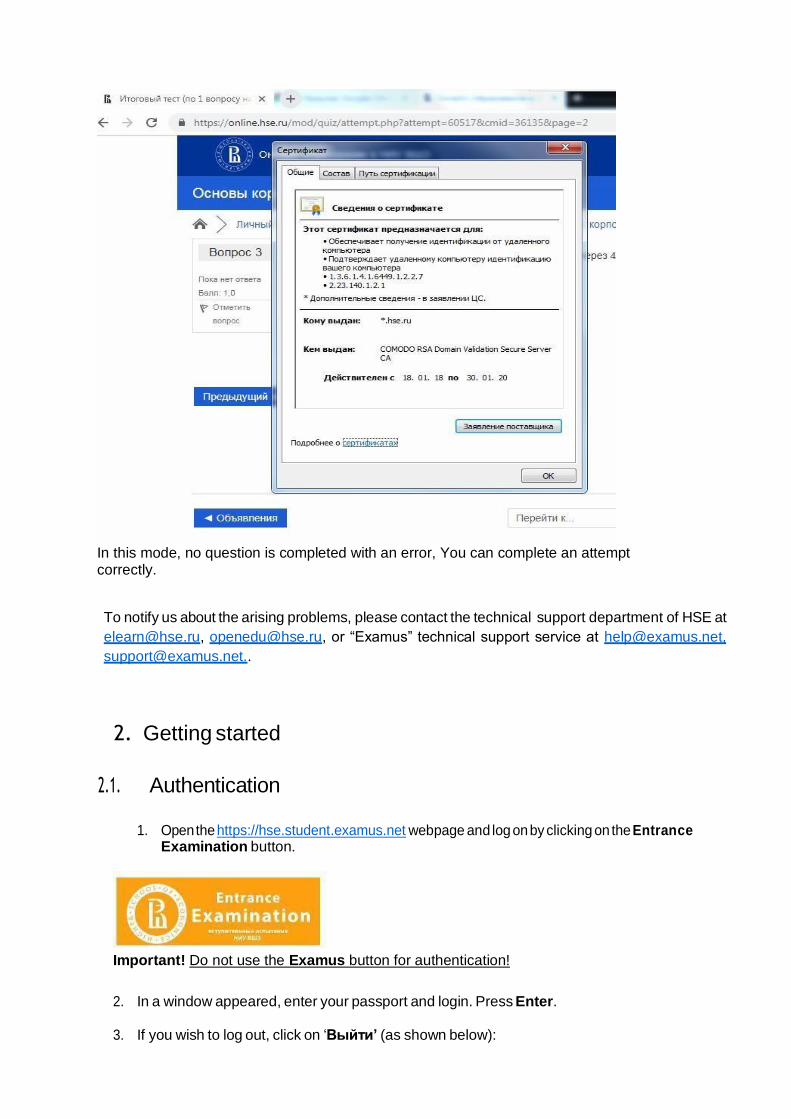
In this mode, no question is completed with an error, You can complete an attempt correctly.
To notify us about the arising problems, please contact the technical support department of HSE at
[email protected], [email protected], or “Examus” technical support service at [email protected],
2. Getting started
2.1. Authentication
1. Open the https://hse.student.examus.net webpage and log on by clicking on the Entrance
Examination button.
Important! Do not use the Examus button for authentication!
2. In a window appeared, enter your passport and login. Press Enter.
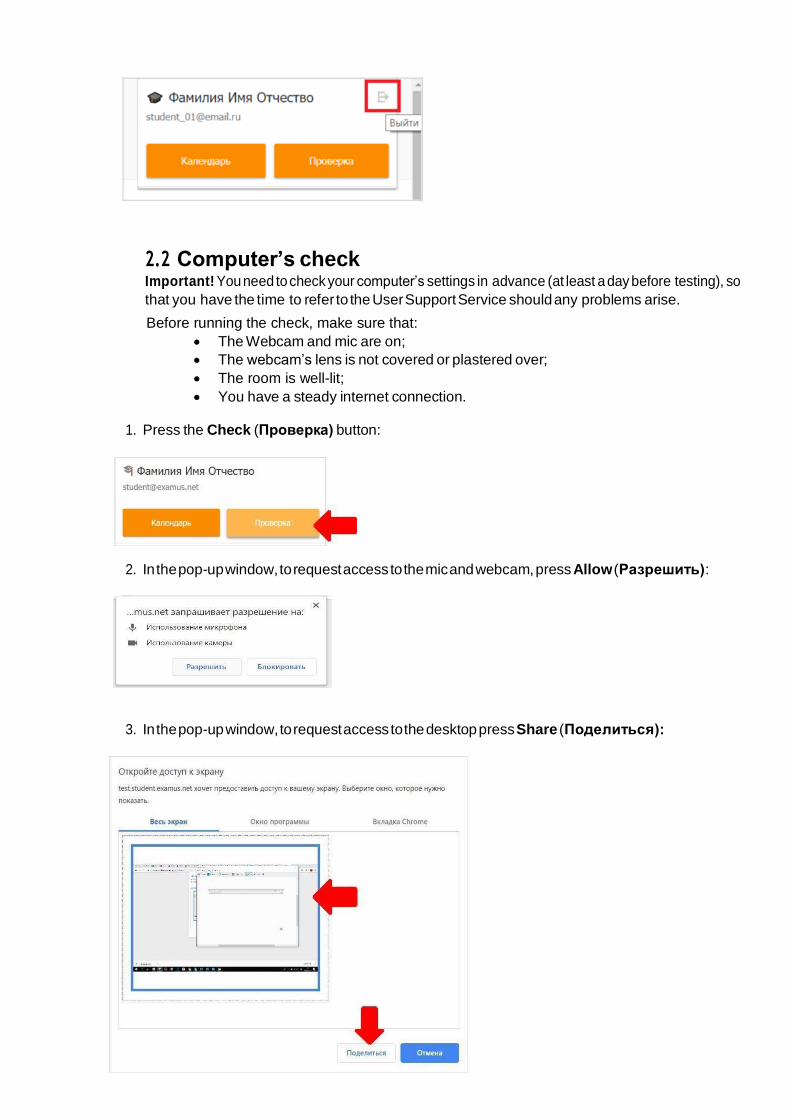
3. If you wish to log out, click on ‘Выйти’ (as shown below):
2.2 Computer’s check Important! You need to check your computer’s settings in advance (at least a day before testing), so
that you have the time to refer to the User Support Service should any problems arise.
Before running the check, make sure that:
The Webcam and mic are on;
The webcam’s lens is not covered or plastered over;
The room is well-lit;
You have a steady internet connection.
1. Press the Check (Проверка) button:
2. In the pop-up window, to request access to the mic and webcam, press Allow (Разрешить):
3. In the pop-up window, to request access to the desktop press Share (Поделиться):
IMPORTANT! Do not disregard this step! Otherwise, it will be impossible to run the check.
If the Share (Поделиться) button is disabled (unclickable), click on the image of the desktop so that
it would be highlighted by the blue frame (see the screenshot above).
4. Wait for the completion of the checking process. If the checking process fails (i.e., a red symbol appears against one of the points, or the checking process freezes), refer to the recommendations set out in p. 5.2 Checking Is not Happening and repeat the process.
3. Signing up for proctoring
In order to take an exam, you need to confirm your registration for the proctoring.
1. When the button Signup for the proctoring is clicked, a window with a calendar pops
up where there are available slots for you to sign up for an exam.
2. Loading the list of your exams might take some time. However, if after waiting you still do not
see your exam, click on Refresh at the top left corner.
3. The first step is choose in gan exam. You need to choose one from the list of available variants.
4. Pay attention to the following: on the right of this page you will see a list of exams that
you signed up for. If you click on an exam from this list, this will cancel your
registration.
You can cancel your registration on an exam not later than 24 hours before it starts.
5. After you choose an exam, a page with a calendar will be available, there will be slots for
signing up for proctoring. Grey colored slots are not available–other people have already
taken all the places.
6. Pay attention to the fact that proctoring for each exam is limited by dates of conduct I in
gan exam that the university sets up and by the fact whether there are any available
proctors at a particular time.
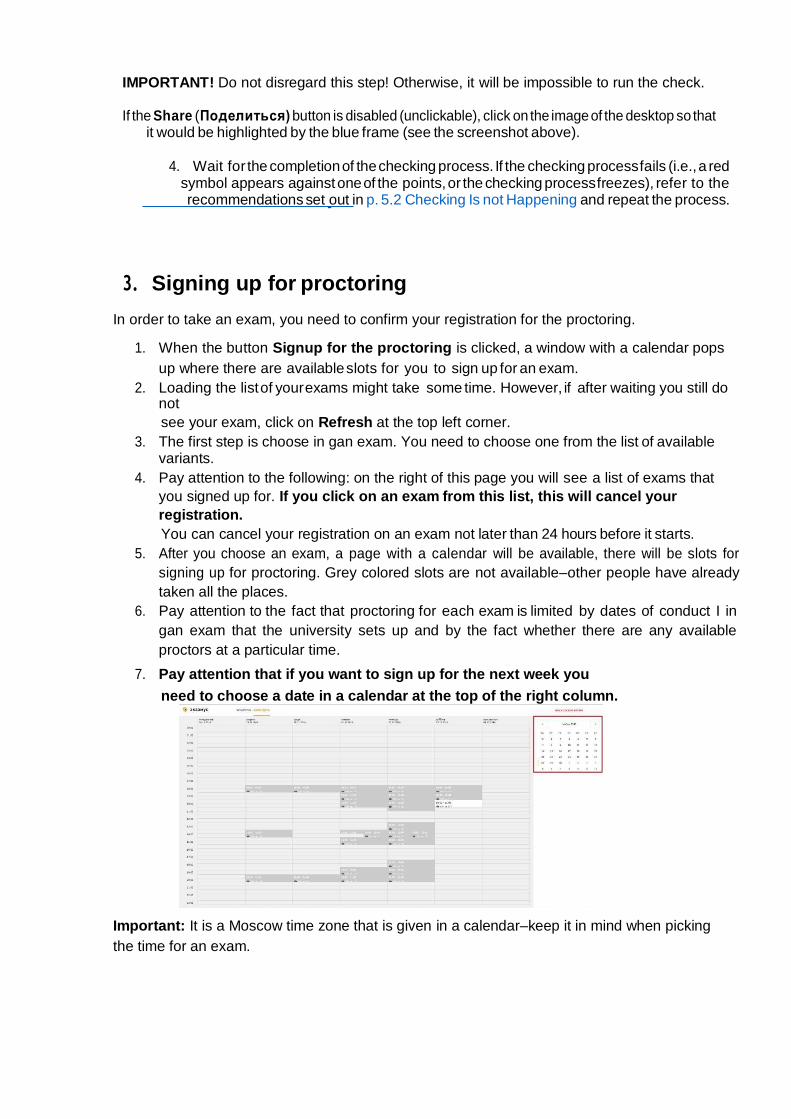
7. Pay attention that if you want to sign up for the next week you
need to choose a date in a calendar at the top of the right column.
Important: It is a Moscow time zone that is given in a calendar–keep it in mind when picking
the time for an exam.
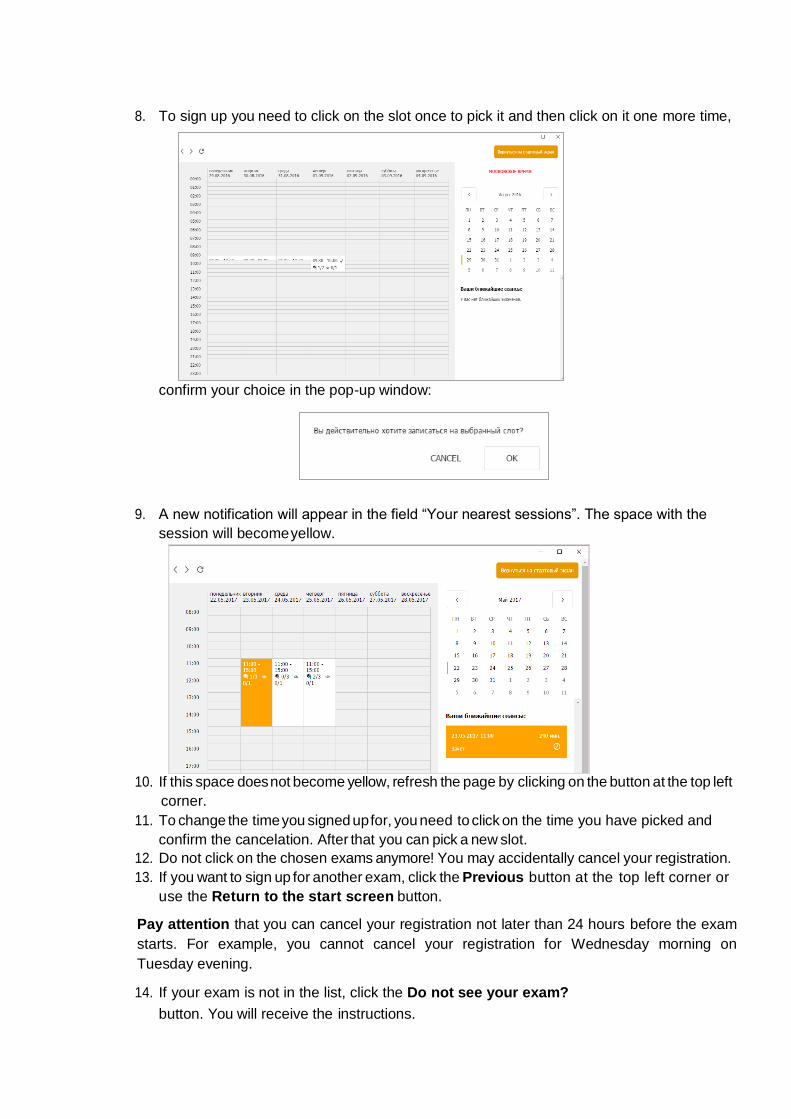
8. To sign up you need to click on the slot once to pick it and then click on it one more time,
confirm your choice in the pop-up window:
9. A new notification will appear in the field “Your nearest sessions”. The space with the
session will become yellow.
10. If this space does not become yellow, refresh the page by clicking on the button at the top left
corner.
11. To change the time you signed up for, you need to click on the time you have picked and
confirm the cancelation. After that you can pick a new slot.
12. Do not click on the chosen exams anymore! You may accidentally cancel your registration.
13. If you want to sign up for another exam, click the Previous button at the top left corner or
use the Return to the start screen button.
Pay attention that you can cancel your registration not later than 24 hours before the exam
starts. For example, you cannot cancel your registration for Wednesday morning on
Tuesday evening.
14. If your exam is not in the list, click the Do not see your exam?
button. You will receive the instructions.
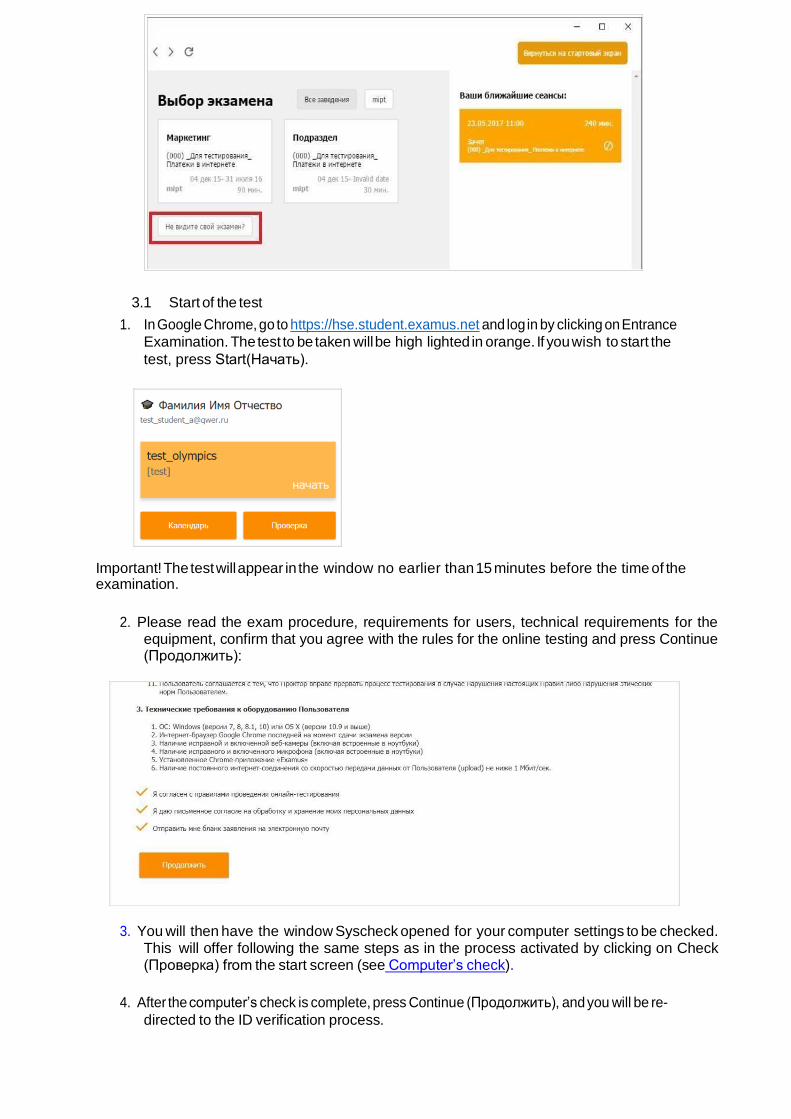
3.1 Start of the test
1. In Google Chrome, go to https://hse.student.examus.net and log in by clicking on Entrance
Examination. The test to be taken will be high lighted in orange. If you wish to start the
test, press Start(Начать).
Important! The test will appear in the window no earlier than 15 minutes before the time of the examination.
2. Please read the exam procedure, requirements for users, technical requirements for the
equipment, confirm that you agree with the rules for the online testing and press Continue (Продолжить):
3. You will then have the window Syscheck opened for your computer settings to be checked. This will offer following the same steps as in the process activated by clicking on Check (Проверка) from the start screen (see Computer’s check).
4. After the computer’s check is complete, press Continue (Продолжить), and you will be re-
directed to the ID verification process.
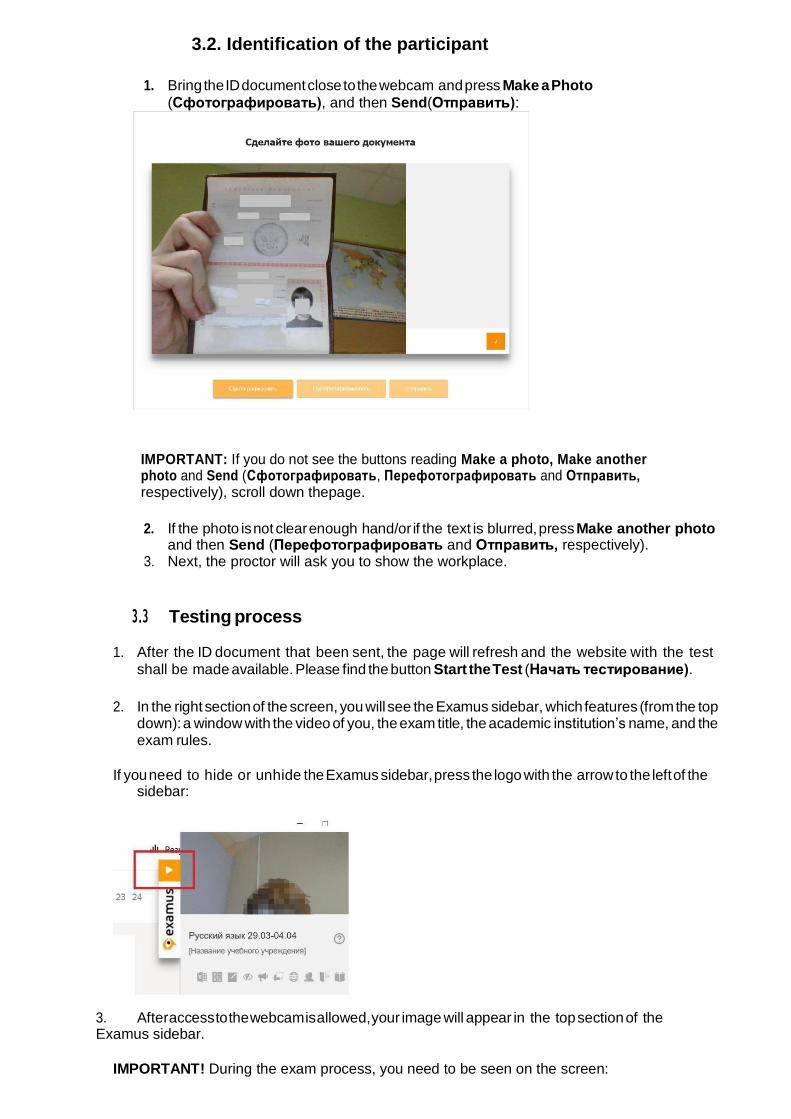
3.2. Identification of the participant
1. Bring the ID document close to the webcam and press Make a Photo
(Сфотографировать), and then Send(Отправить):
IMPORTANT: If you do not see the buttons reading Make a photo, Make another photo and Send (Сфотографировать, Перефотографировать and Отправить, respectively), scroll down thepage.
2. If the photo is not clear enough hand/or if the text is blurred, press Make another photo
and then Send (Перефотографировать and Отправить, respectively). 3. Next, the proctor will ask you to show the workplace.
3.3 Testing process
1. After the ID document that been sent, the page will refresh and the website with the test
shall be made available. Please find the button Start the Test (Начать тестирование).
2. In the right section of the screen, you will see the Examus sidebar, which features (from the top
down): a window with the video of you, the exam title, the academic institution’s name, and the exam rules.
If you need to hide or unhide the Examus sidebar, press the logo with the arrow to the left of the
sidebar:
3. After access to the webcam is allowed, your image will appear in the top section of the Examus sidebar.
IMPORTANT! During the exam process, you need to be seen on the screen:
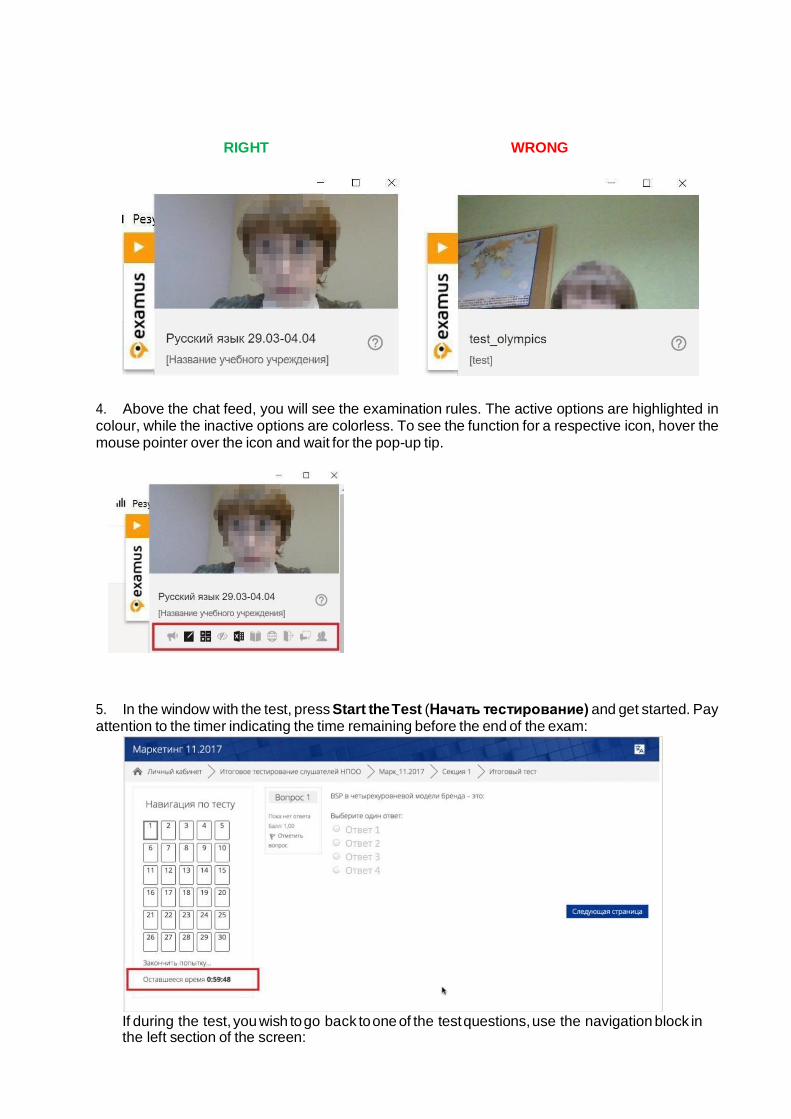
RIGHT WRONG
4. Above the chat feed, you will see the examination rules. The active options are highlighted in colour, while the inactive options are colorless. To see the function for a respective icon, hover the mouse pointer over the icon and wait for the pop-up tip.
5. In the window with the test, press Start the Test (Начать тестирование) and get started. Pay attention to the timer indicating the time remaining before the end of the exam:
If during the test, you wish to go back to one of the test questions, use the navigation block in the left section of the screen:
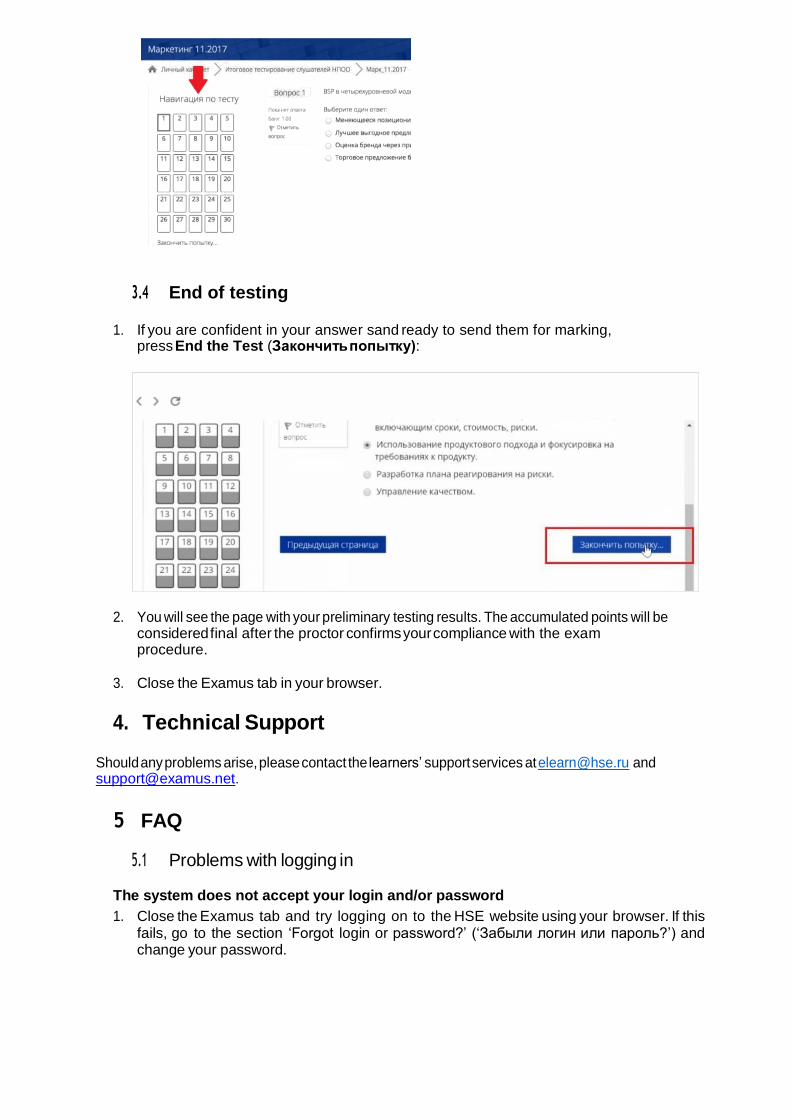
3.4 End of testing
1. If you are confident in your answer sand ready to send them for marking, press End the Test (Закончить попытку):
2. You will see the page with your preliminary testing results. The accumulated points will be
considered final after the proctor confirms your compliance with the exam procedure.
3. Close the Examus tab in your browser.
4. Technical Support
Should any problems arise, please contact the learners’ support services at [email protected] and [email protected].
5 FAQ
5.1 Problems with logging in
The system does not accept your login and/or password
1. Close the Examus tab and try logging on to the HSE website using your browser. If this fails, go to the section ‘Forgot login or password?’ (‘Забыли логин или пароль?’) and change your password.
2. If you have successfully logged into the website using your browser, make sure that you access Examus by clicking on the Entrance Examination button. You should not use the Examus button to login!
When trying to recover your pass word, you do not get thee-mail with the link to reset
your access To get your account details restored, you need to log out of Examus, open up the
HSE website and use the form for resetting your password to the website. After you
complete the password recovery procedure, you can go back to work with Examus.
5.2 Checking is not happening
Make sure that you use the latest version of the Google Chrome browser. For this, type in chrome://help in the URL bar and, if needed, upgrade the browser;
Clear the cache (Ctrl + Shift + R for Windows, Command + Shift + R for MacOS) and restart
your browser(input on the new tab chrome://restartandpress Enter), and re-enter
after this;
Check the version of the operating system (OS) of your computer. For the correct operation
of the software, the OS must be one of the following: Windows 7, Windows 8, Windows 8.1, Windows 10 or Mac OS X Yosemite (10.10, and newer);
Press the Repeat Checking (Повторить проверку) button several times (sometimes
checking can start only after the second or third attempt);
Checking may be hindered if the room is scarcely lit or your camera lens is plastered
over;
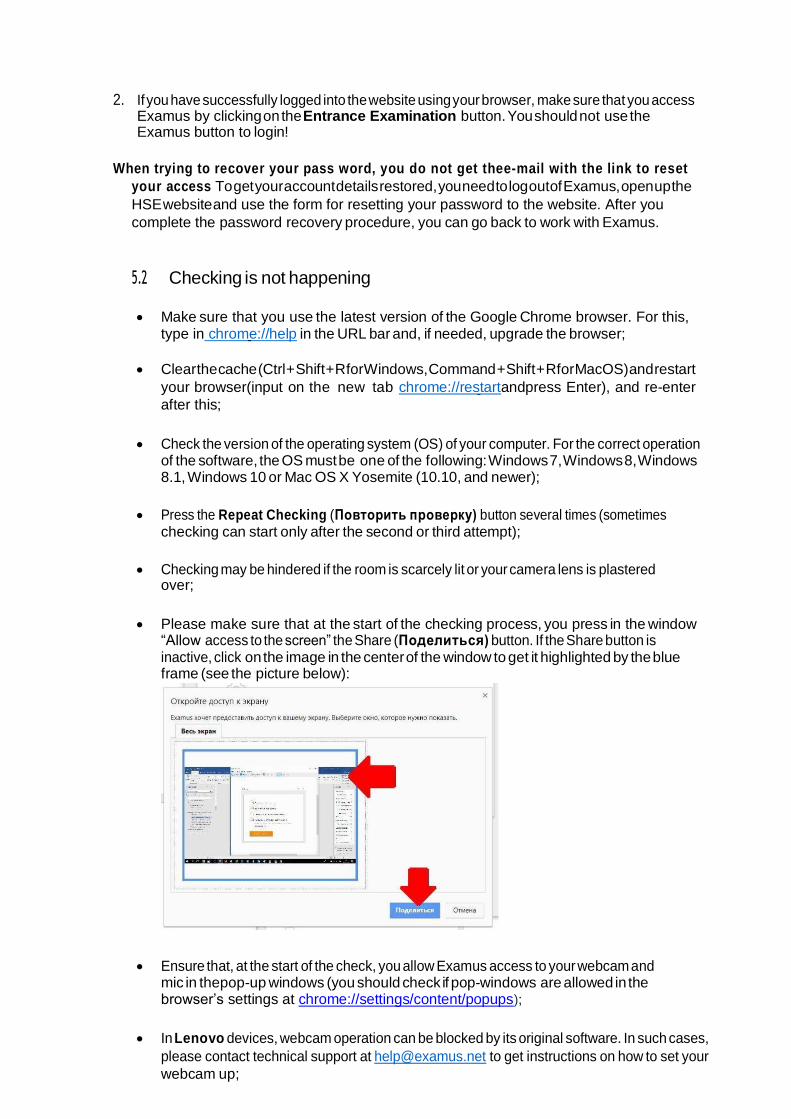
Please make sure that at the start of the checking process, you press in the window
“Allow access to the screen” the Share (Поделиться) button. If the Share button is inactive, click on the image in the center of the window to get it highlighted by the blue frame (see the picture below):
Ensure that, at the start of the check, you allow Examus access to your webcam and
mic in thepop-up windows (you should check if pop-windows are allowed in the browser’s settings at chrome://settings/content/popups);
In Lenovo devices, webcam operation can be blocked by its original software. In such cases,
please contact technical support at [email protected] to get instructions on how to set your
webcam up;
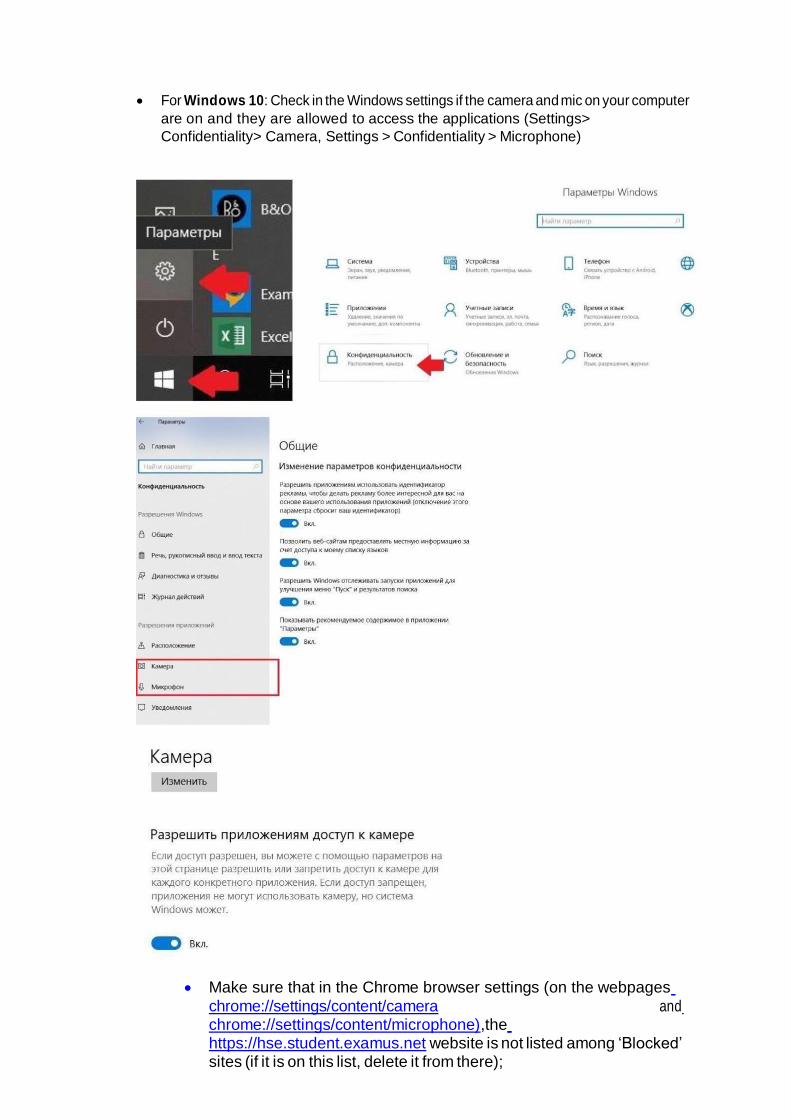
For Windows 10: Check in the Windows settings if the camera and mic on your computer
are on and they are allowed to access the applications (Settings>
Confidentiality> Camera, Settings > Confidentiality > Microphone)
Make sure that in the Chrome browser settings (on the webpages
chrome://settings/content/camera and chrome://settings/content/microphone),the https://hse.student.examus.net website is not listed among ‘Blocked’ sites (if it is on this list, delete it from there);
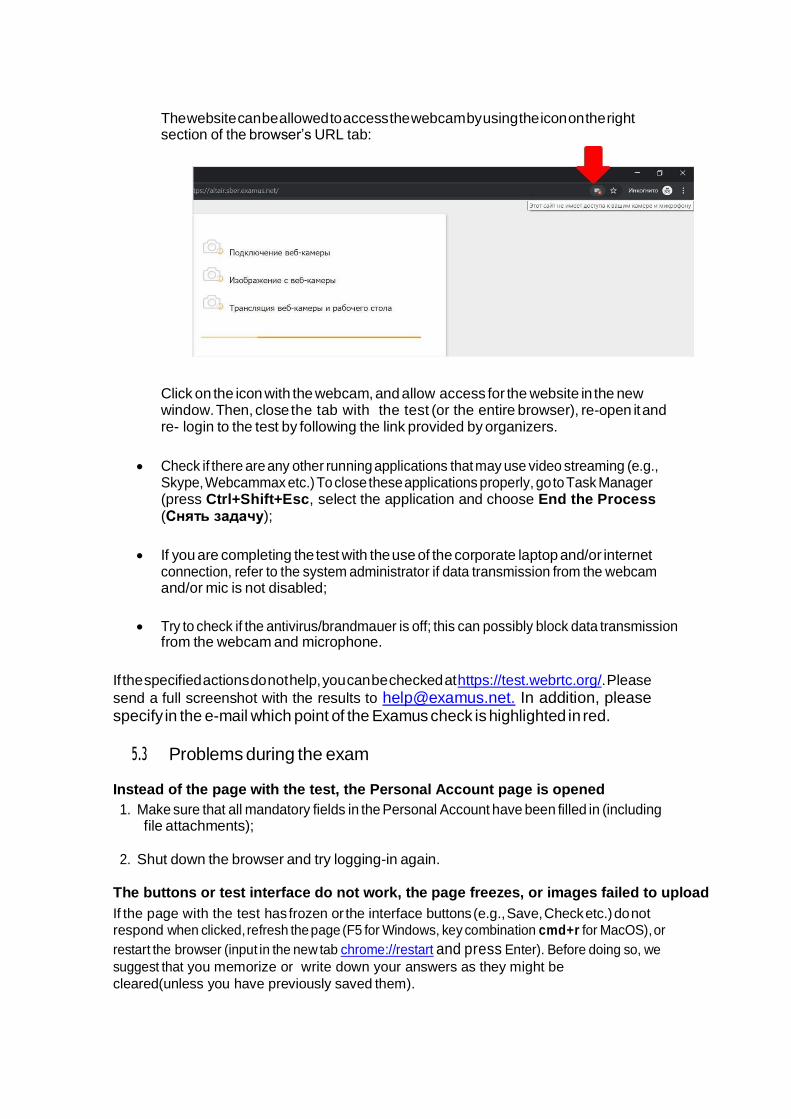
The website can be allowed to access the webcam by using the icon on the right section of the browser’s URL tab:
Click on the icon with the webcam, and allow access for the website in the new window. Then, close the tab with the test (or the entire browser), re-open it and re- login to the test by following the link provided by organizers.
Check if there are any other running applications that may use video streaming (e.g.,
Skype, Webcammax etc.) To close these applications properly, go to Task Manager (press Ctrl+Shift+Esc, select the application and choose End the Process (Снять задачу);
If you are completing the test with the use of the corporate laptop and/or internet
connection, refer to the system administrator if data transmission from the webcam and/or mic is not disabled;
Try to check if the antivirus/brandmauer is off; this can possibly block data transmission
from the webcam and microphone.
If the specified actions do not help, you can be checked at https://test.webrtc.org/. Please
send a full screenshot with the results to [email protected]. In addition, please specify in the e-mail which point of the Examus check is highlighted in red.
5.3 Problems during the exam
Instead of the page with the test, the Personal Account page is opened
1. Make sure that all mandatory fields in the Personal Account have been filled in (including file attachments);
2. Shut down the browser and try logging-in again.
The buttons or test interface do not work, the page freezes, or images failed to upload
If the page with the test has frozen or the interface buttons (e.g., Save, Check etc.) do not
respond when clicked, refresh the page (F5 for Windows, key combination cmd+r for MacOS), or
restart the browser (input in the new tab chrome://restart and press Enter). Before doing so, we
suggest that you memorize or write down your answers as they might be
cleared(unless you have previously saved them).

Testing has been disrupted (due to a failed internet connection, the device was switched off, or other reasons)
You can re-enter the test within five minutes from the moment your session went down. If more than five minutes have passed, you cannot re-enter (this is an anti-cheating measure). Request a repeat try from the test’s organizer at [email protected] and give a detailed account of the technical disruption.