Embed Size (px)
Citation preview
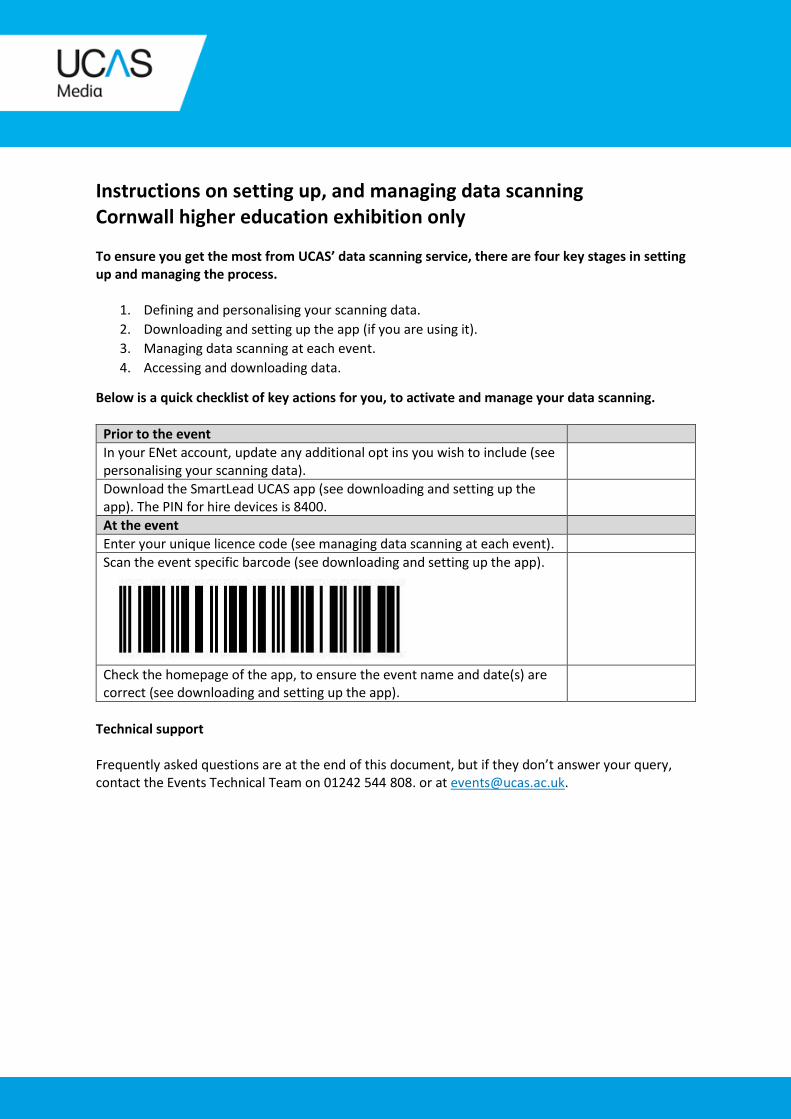
Instructions on setting up, and managing data scanning Cornwall higher education exhibition only To ensure you get the most from UCAS’ data scanning service, there are four key stages in setting up and managing the process.
1. Defining and personalising your scanning data.
2. Downloading and setting up the app (if you are using it).
3. Managing data scanning at each event.
4. Accessing and downloading data.
Below is a quick checklist of key actions for you, to activate and manage your data scanning.
Prior to the event
In your ENet account, update any additional opt ins you wish to include (see personalising your scanning data).
Download the SmartLead UCAS app (see downloading and setting up the app). The PIN for hire devices is 8400.
At the event
Enter your unique licence code (see managing data scanning at each event).
Scan the event specific barcode (see downloading and setting up the app).
Check the homepage of the app, to ensure the event name and date(s) are correct (see downloading and setting up the app).
Technical support Frequently asked questions are at the end of this document, but if they don’t answer your query, contact the Events Technical Team on 01242 544 808. or at [email protected].

1. Defining and personalising your scanning data
In addition to those already predefined by UCAS’ event registration process, you can set up your own additional tags in your ENet account. These will determine your own, ongoing communication with those you scan.
1. Select Data scanning > Manage data.
2. You’ll automatically be directed to the Tags area, where you’ll see that opt in tags have
already been set up for you (these cannot be changed). Using these tags, you can ask those
you scan what their communication preference is, and easily record their answer.
There are an additional seven tags for your own use, which can be used to ask specific
preferences related to your organisation. e.g. whether they’d like to receive a prospectus.
Click this ab icon to change the tag titles.
Tags area

You’ll be prompted to change the title, and name this whatever you like, e.g. email prospectus.
Click OK. This will then update your list and your app (when you connect the app to the internet).
You’re ready to use tags once you get to this point. Or you can continue to add additional custom tags (up to seven). Note: UCAS ask for email, SMS and post preference information at event registration. The responses determine how UCAS can use the data. We provide this information to exhibitors as part of the reporting because you can use these preferences as a guide for the initial communication. Your own tags, and the data collected against them, should define how you communicate with them going forward. For your information, the text on the tickets sent to visitors is as follows: “When you arrive at the event, UCAS will scan your barcode ticket so that we know you’ve arrived. Keep your ticket handy – if you would like to receive further information from particular exhibitors, you can scan your barcode at their stand. If you do this, we will give them your contact details so that they can send you information such as course details or invites to open days. If you do not want an exhibitor to have your contact details, then simply do not scan your barcode.
Visit ucas.com/exhibitions for:
• preparation tips
• exhibitor information
• venue details
• health and safety information”

2. Downloading and setting up the app
SmartLead UCAS is the app used for data scanning at UCAS higher education exhibitions. You can download it from the Google Play Store or Apple App Store. If you’re downloading the app to an iPad, please change the filter to iPhone only. Note: As a minimum requirement, your device needs to use operating system Android 5 or iOS 7, and should have at least a five mega pixel camera (the better the camera, the more reliable the scan). To set up the app
1. Create a password 2. Enter the licence key 3. Confirm
You’ll be prompted to choose a four-digit passcode (and confirm it), which can be used to sign in to the app on your chosen device.
Enter your unique licence code, which can be found in the ‘Manage data’ section of your ENet account.
Confirm your licence by clicking the ‘confirm’ button. Your app is now ready to use.

To navigate the app
Menu Home Scanner page
Access the menu in the top left-hand corner of the screen. To exit, you need to use your device controls, as there’s no exit button in the app.
This page shows you:
• the licence you’re using
• your device ID
• the event you’re attending
• the dates of the event
• how many unsynchronised contacts you have
The details page provides all the key information about the last visitor to be scanned (this will not include any personal details when you first use the app).
Stats Settings About
Track your scanning stats here. Use this section to:
• synchronise your data
• change event
• reset your app (not recommended)
Information about the app provider and UCAS.

3. Managing data scanning at the event
Two things need to be in place to ensure you accurately scan data.
1. All exhibitors should be using their own licence code to set up their scanners. The licence code can be found in the Manage data section of your ENet account, and a different one is needed for each event. It will only be activated when used to scan the specific event barcode in the scanning app.
To find your allocated licence codes, select Unassigned Licences. Ensure the Select event drop-down says Account details & unassigned licences. This is the selection you will always need to manage your licences.
Click this ab icon to change the Friendly Name (which will have a default name of Smartlead device) of the licence, so you can easily identify how each item is used. You can match the licence name to the event and user, e.g. David Smith Bristol.
The PIN number is created on your scanner device when you add the licence. It’s recorded in your ENet account, so you can look it up if you forget it.
A licence code is needed for each scanner device, and is only used for one event (however many days it lasts). You can activate one by adding it to the SmartLead UCAS app when prompted, and then scanning the event barcode we give you. The licence will link the data to the individual event report.

2. A sample delegate barcode is provided for each event, which should be the first one you
scan after entering your licence code. This barcode is event specific. Once scanned, this
will ensure all your data goes into your account, rather than the test account.
As a reminder, the barcode for the Cornwall higher education exhibition is below.
Scanning delegates
• Select the scanner option on the menu.
• This page will provide a view of the last person scanned.
• You can view full details of the last person scanned.
• Scan a barcode to scan your next barcode.
• Once you scan the barcode, you’ll see a page containing the visitor details, as shown in the
image.
• Image 2 and 3 show how to add additional information for the scanned visitor.
• If you’d like to scan another barcode, click the back arrow in the top left-hand corner, and
click Scan barcode.
1. Details 2. Notes 3. Tags
The details page loads with all the key information about the last visitor scanned.
The notes page allows you to write notes about the visitor, for your reference.
Three default tags have been set up for you to manage your visitors’ preferences. Seven tags remain blank for you to programme. See ‘personalising your scanning data’ for more information.
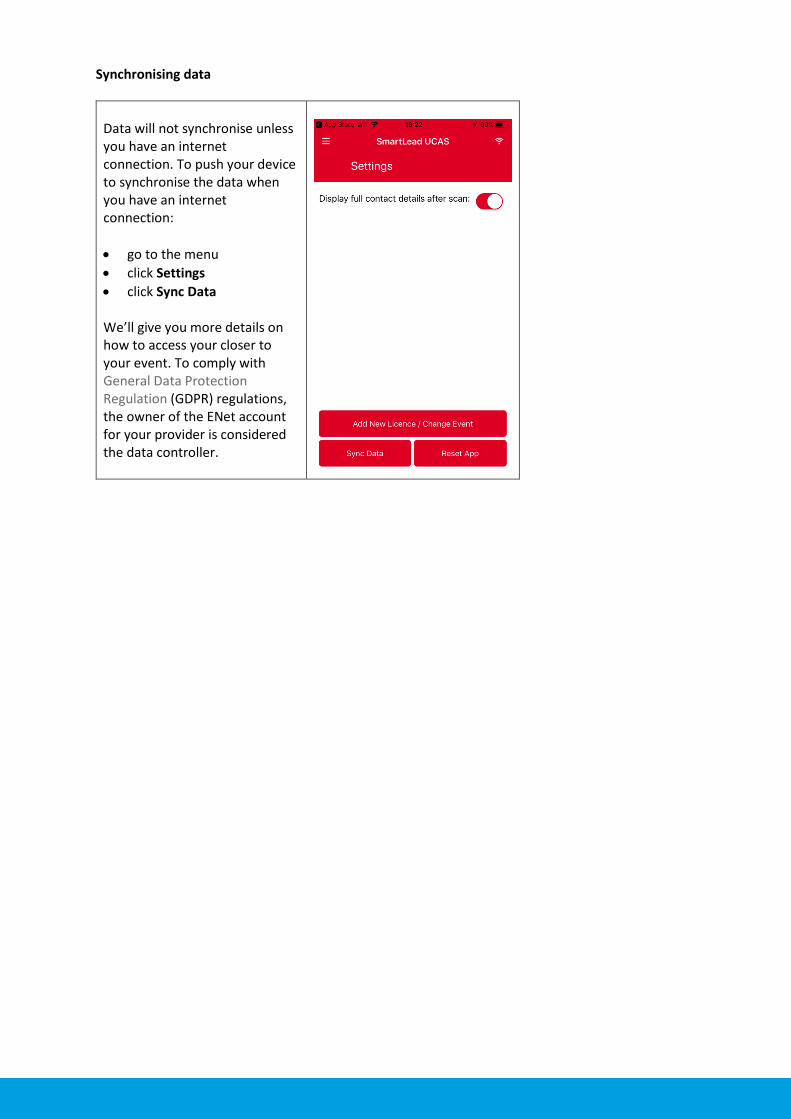
Synchronising data
Data will not synchronise unless you have an internet connection. To push your device to synchronise the data when you have an internet connection:
• go to the menu
• click Settings
• click Sync Data
We’ll give you more details on how to access your closer to your event. To comply with General Data Protection Regulation (GDPR) regulations, the owner of the ENet account for your provider is considered the data controller.

1. Accessing and downloading data
1. In your ENet account, select Data scanning > Manage data, and then the event or exhibition
you wish to view the data for.
2. A summary of the data collected will appear as below.
Select EXPORT TO EXCEL to export the event data to an Excel spreadsheet.
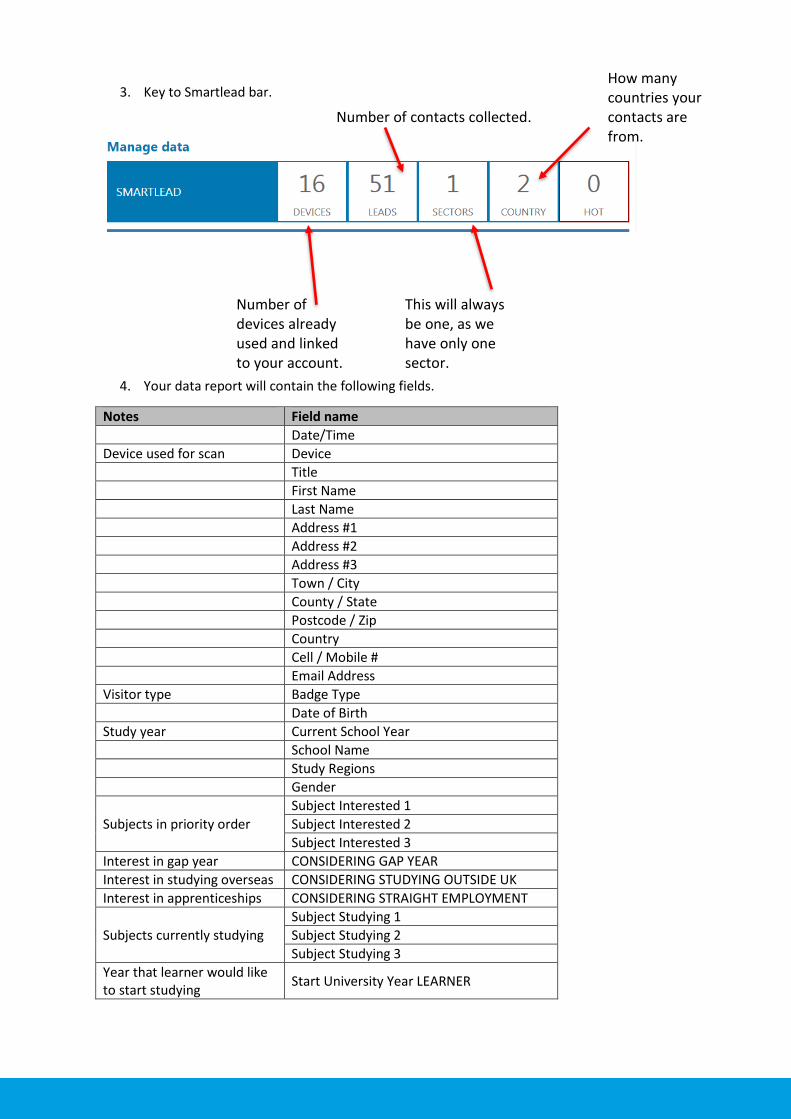
3. Key to Smartlead bar.
4. Your data report will contain the following fields.
Notes Field name
Date/Time
Device used for scan Device
Title
First Name
Last Name
Address #1
Address #2
Address #3
Town / City
County / State
Postcode / Zip
Country
Cell / Mobile #
Email Address
Visitor type Badge Type
Date of Birth
Study year Current School Year School Name
Study Regions
Gender
Subjects in priority order
Subject Interested 1
Subject Interested 2
Subject Interested 3
Interest in gap year CONSIDERING GAP YEAR
Interest in studying overseas CONSIDERING STUDYING OUTSIDE UK
Interest in apprenticeships CONSIDERING STRAIGHT EMPLOYMENT
Subjects currently studying
Subject Studying 1
Subject Studying 2
Subject Studying 3
Year that learner would like to start studying
Start University Year LEARNER
Number of devices already used and linked to your account.
This will always be one, as we have only one sector.
How many countries your contacts are from.
Number of contacts collected.
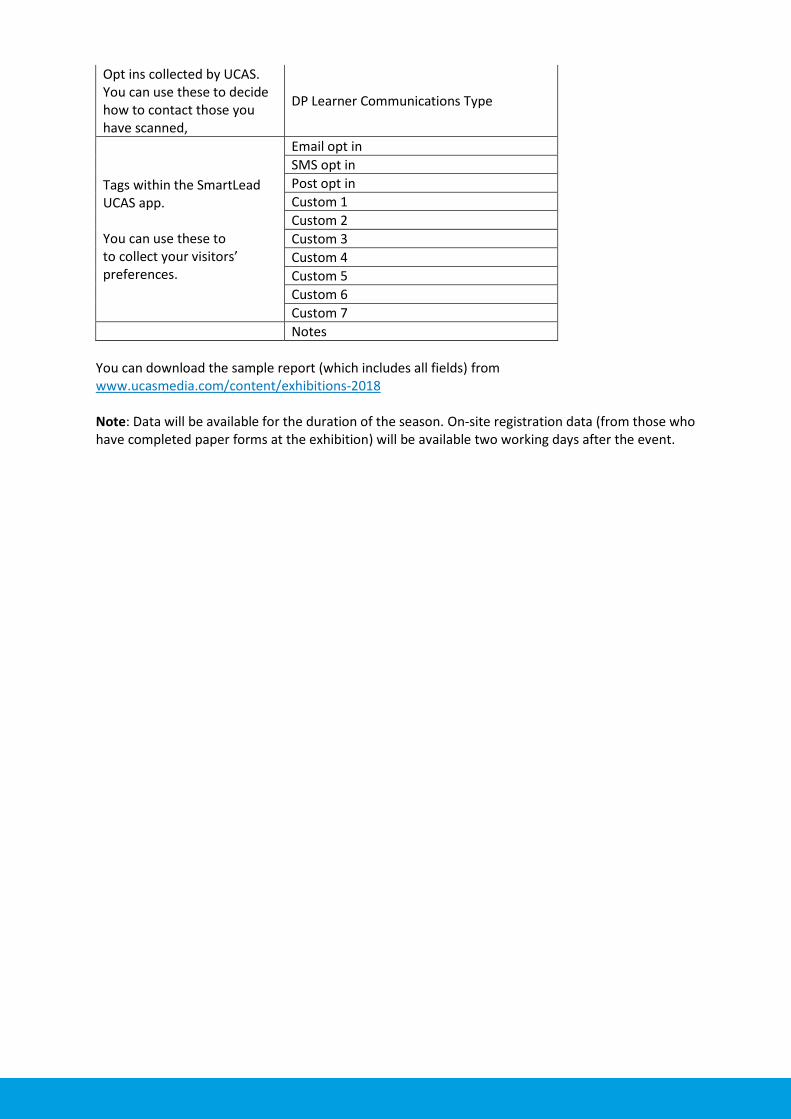
Opt ins collected by UCAS. You can use these to decide how to contact those you have scanned,
DP Learner Communications Type
Tags within the SmartLead UCAS app. You can use these to to collect your visitors’ preferences.
Email opt in
SMS opt in
Post opt in
Custom 1
Custom 2
Custom 3
Custom 4
Custom 5
Custom 6
Custom 7
Notes
You can download the sample report (which includes all fields) from www.ucasmedia.com/content/exhibitions-2018 Note: Data will be available for the duration of the season. On-site registration data (from those who have completed paper forms at the exhibition) will be available two working days after the event.

Frequently asked questions 1. Data error This is due to a lack of data on the device. The user can either turn off all internet connections and synchronise at the end of the event, or top up their data.
2. Test code licence used by mistake Synchronise device and change licence code to purchased licence code, found in your ENet account. Advise UCAS of this issue, so data can be moved to the correct event in your ENet account.
3. Test barcode scanned and licence not linked to the exhibition. Synchronise device and change licence code to alternative purchased licence code, found in your ENet account. Scan exhibition licence code, and check home screen displays correct event. Advise UCAS of this issue, so data can be moved to the correct event in your ENet account.
4. Unresolved barcode • The barcode may be damaged – try rescanning.
• The camera specification may not be sufficient (minimum of 5 megapixels needed). You could
use a hire device, if available.
• This could be related to a test barcode being scanned at the beginning of the event, so the
wrong event is assigned to the licence – refer to number 3.
• This could be because the barcode is for a different event. This problem cannot be resolved,
other barcodes should scan without issue.
5. Notes and tags buttons not visible when scanning with iPad We’re working with the supplier to resolve this issue. This has only affected a small number of records, and this should be resolved by Friday 9 March.
6. Scanned not matching contacts Scans are the number of barcodes scanned. Contacts are the number of individual contacts who should pull through to your ENet account.
7. Internet connection intermittent Take device offline – you will still be able to scan, but will not see the individual data. You’ll need to synchronise data at close of the event.