Embed Size (px)
Citation preview

1
Instructions for using Tandberg Audio Video equipment in Conference Room
The conference room is equipped with the following:
• Dell Optiplex 745 Computer and LCD monitor • Mobile cart also has hookup for a laptop computer (VGA and Audio
speaker cable on top) • Panasonic Projector (remote control is in the mobile cart drawer) • Tandberg Hi-Def camera (remote control is in the mobile cart drawer) • Two microphones on the table tops • Speakers in the ceiling • Polycom SoundStation2 Phone
To use the Dell Optiplex 745:
• Push the power button on the LCD display on top of the mobile cart (to make sure the screen has power) • Push the power button on the front of the Dell Optiplex 745 computer. • Log into the computer using your IU User name, and Password.
To use the Panasonic Projector:
• Acquire the Panasonic, and Tandberg remotes from the mobile cart drawer. • Aim the Panasonic remote at the projector, and push the red power on button. • On the screen you will see a connection menu…use the arrow keys, and the
center button of the arrow keys to select COMPUTER 1. All the other selections have no effect. If it say “NO SIGNAL”, push any button on the Tandberg remote to wake it up the Tandberg. The “NO SIGNAL” message should change to “XGA”. Press the center button of the arrow keys on the Panasonic remote to select COMPUTER1.
You should now see your computer screen on the large projector screen.
“NO SIGNAL” means you need to wake up the Tandberg system by pushing a button, or shaking the Tandberg remote.
2
To use the Tandberg Hi-Def Camera system remote:
• Acquire the Tandberg remote control from the mobile cart drawer if you haven’t already done so.
• To Display Menu - To make the menu Appear or Disappear press the Cancel button.
• To Display Computer – To display the computer on the projection screen, press the blue Presentation button. To switch back to video, press the blue Presentation button once more.
• To Turn Microphone Off/On – to mute your microphones, press the Yellow Mic Off button. To turn the microphones back on press the Mic Off button once more.
• To Make a call – press the Phonebook button; Navigate the directory list with the Arrow Down button; press the green call button.
• To Hang Up Call / Turn Off Room – Press the red Hang Up button (once for hangup, twice for “system standby”).

3
WALK THRU – Using the Computer on the projection screen
If you are using the Desktop computer :
• Power on the LCD Monitor, and the Dell Desktop computer. • Log onto the system using your IU Login account & password.
If you are using a Laptop computer:
• Cable the video connector, and speaker cable to your laptop. • Power on your Laptop, and direct it to use external video (refer
to your laptop user manual if you are not sure how to do this).
Next:
• Acquire the Panasonic, and Tandberg remotes from the mobile cart drawer.
• Push any button on the Tandberg remote to wake up the system. • Aim the Panasonic remote at the Panasonic projector overhead, and push the Red power button to power
it on. • Select COMPUTER1 as the input for the Panasonic projector
using the Panasonic remote (if COMPUTER1 say’s “NO SIGNAL”, you need to wake up the Tandberg by shaking the Tandberg remote, or pushing a button on the Tandberg remote…COMPUTER1 should say “XGA”). This step may happen automatically if the Panasonic detects the signal from the Tandberg.
• Press the Blue Presentation button on the Tandberg remote to display computer screen. Press it once more to turn off computer projection display (toggles on/off).
Shutting down the system:
• Press the Blue Presentation button on the Tandberg remote to switch from the computer display to the Tandberg video room display.
• Press the Red Hangup button on the Tandberg remote twice for “system standby”. • Aim the Panasonic remote at the Panasonic projector, and push the Red O/I
button twice to power the projector down. • Log off, and shut down the computer. • Power off the computer LCD display. • Put remotes back in the PC Cart drawer.
4
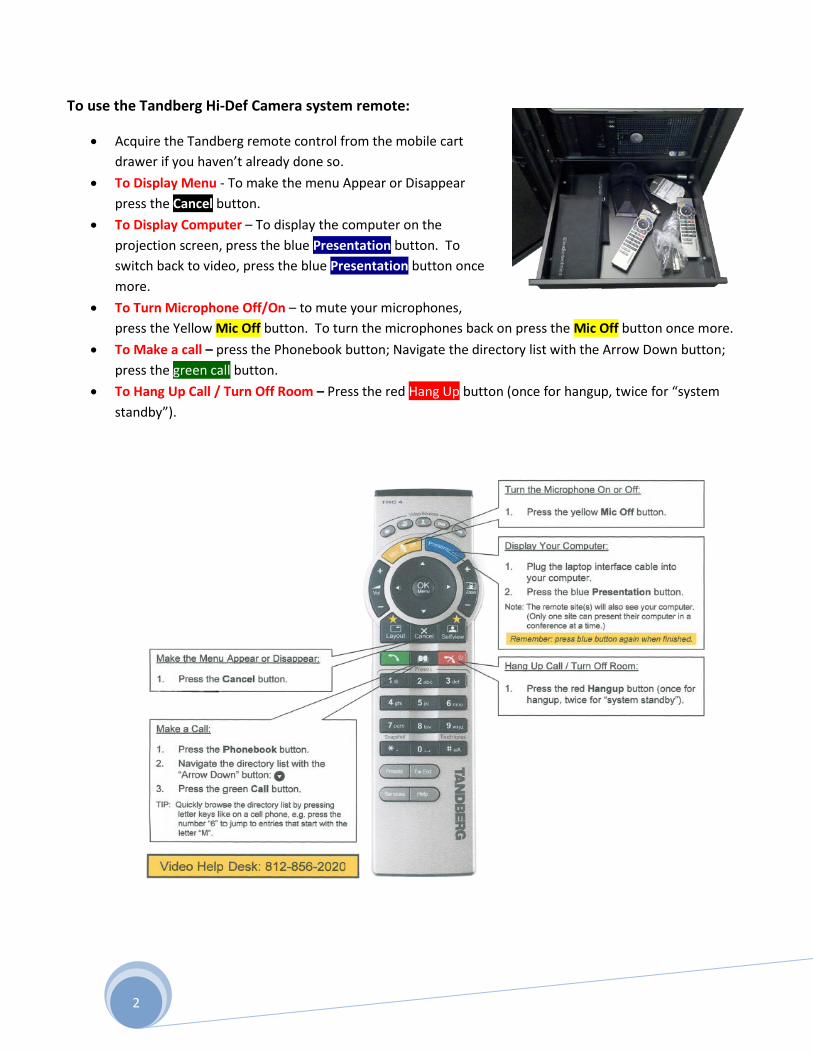
WALK THRU – Point to Point Video Conference with Copy Bird
If you are using the Desktop computer :
• Power on the LCD Monitor, and the Dell Desktop computer. • Log onto the system using your IU Login account & password.
If you are using a Laptop computer:
• Cable the video connector, and speaker cable to your laptop. • Power on your Laptop, and direct it to use external video (refer
to your laptop user manual if you are not sure how to do this).
Next:
• Acquire the Panasonic, and Tandberg remotes from the mobile cart drawer.
• Push any button on the Tandberg remote to wake up the system. • Aim the Panasonic remote at the Panasonic projector overhead, and push the Red power button to power
it on. • Select COMPUTER1 as the input for the Panasonic projector
using the Panasonic remote (if COMPUTER1 say’s “NO SIGNAL”, you need to wake up the Tandberg by shaking the Tandberg remote, or pushing a button on the Tandberg
remote…COMPUTER1 should say “XGA”). This step should happen automatically if the Panasonic detects the signal from the Tandberg.
• Press the Call button on the Tandberg remote. • Arrow up to the phone number text box, and key in 22200 (Copy
Bird’s number) • Press the Call button to initiate the phone call.
You should now be connected to Copy Bird…he will repeat what he hears if you would like to test out the microphones, and speakers.
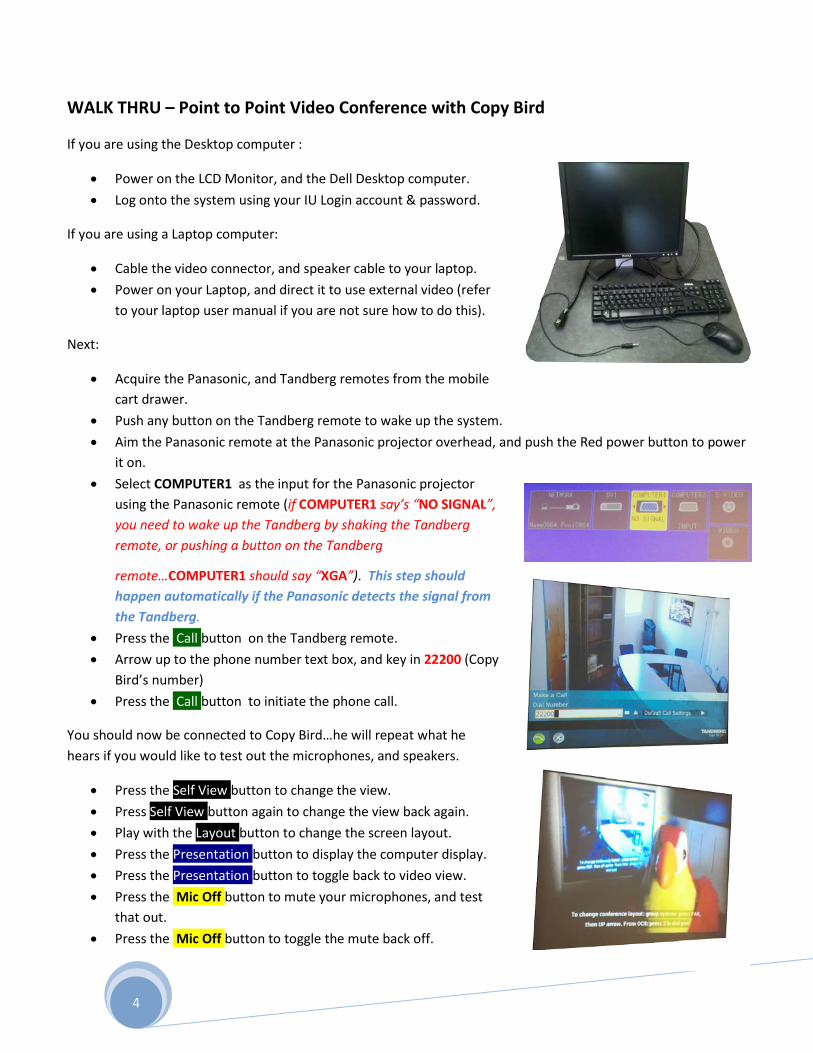
• Press the Self View button to change the view. • Press Self View button again to change the view back again. • Play with the Layout button to change the screen layout. • Press the Presentation button to display the computer display. • Press the Presentation button to toggle back to video view. • Press the Mic Off button to mute your microphones, and test
that out. • Press the Mic Off button to toggle the mute back off.

5
(Self View Example) (Layout practice example)
• Talk to Copy Bird, and adjust your speaker volume with the Tandberg remote. • Press the Hang up button twice to end the session.
Let’s call Copy Bird again, but this time using the Phone Directory.
• Press the Phone Book button (black button with a white open book between the green, and the red buttons). You should now see the phone directory on the screen.
• Arrow down using the arrow keys on the Tandberg remote, and highlight [email protected]
• Press the Green Call Button on the Tandberg remote to call CopyBird.
• Press the Presentation button to display your computer on the projection screen.
• Press the Red Hang up button twice.

6
(Presentation view using Layout Button) (Pressing the Self View button)
(Session won’t end close Presentation)
Note: Notice the session will not close while your computer is displayed on the projection screen. Press the Presentation button to toggle back to Video View, then click the red Hang Up button twice.

7
WALK THRU – Video Conference using an ADHOC Video Bridge
If you are using the Desktop computer :
• Power on the LCD Monitor, and the Dell Desktop computer. • Log onto the system using your IU Login account & password.
If you are using a Laptop computer:
• Cable the video connector, and speaker cable to your laptop. • Power on your Laptop, and direct it to use external video (refer
to your laptop user manual if you are not sure how to do this).
Next:
• Acquire the Panasonic, and Tandberg remotes from the mobile cart drawer.
• Push any button on the Tandberg remote to wake up the system. • Aim the Panasonic remote at the Panasonic projector overhead, and push the Red power button to power
it on. • Select COMPUTER1 as the input for the Panasonic projector
using the Panasonic remote (if COMPUTER1 say’s “NO SIGNAL”, you need to wake up the Tandberg by shaking the Tandberg remote, or pushing a button on the Tandberg
remote…COMPUTER1 should say “XGA”). This step should happen automatically if the Panasonic detects the signal from the Tandberg.
• Press the Call button on the Tandberg remote. • Arrow up to the phone number text box, and key in 22 and
make up a 4 or 5 digit number for your ADHOC Video Bridge (example: “223126”)
• Press the Call button to initiate the phone call. • You will be prompted for a Security PIN number. If you would
like to use one, key in the number followed by the # key. If you choose not to use a PIN just wait a few seconds, and the Video Bridge Conference will be established.
There are 3 ways that someone can join in on the Video Conference: 1. From another H323 (protocol Tandberg system uses) equipped room they would call the Video Bridge
number you set up (in this example we are using “223126”) followed by PIN and # (if using a PIN). 2. From a PC using Office Communicator (in this example they would connect to [email protected], right
click, and select “Start a video call”). 3. From a telephone (by dialing 812-856-7060, then entering the Video Bridge number (in this example
we are using “223126”) followed by PIN and # (if using a PIN)) .

8
Scheduling a Video Bridge
• Open Outlook and click the arrow to the right of “New” • Select “Meeting Request”
• Click “Add Attendees”
• Type “BL-SERVICE” and click “GO” • Select CONFERENCE ROOM 112 • Click “Resources” to add the room
Note: A Video Bridge scheduled as a resource CANNOT be secured with a PIN #. If you require a secure meeting please use an ADHOC Video Bridge with a PIN # and inform the participants when you make a Meeting Request what numbers you will be using.

9
• In the search field key in “Video Bridge” • Click “GO” • Select a Video Bridge from the list • Click “Resources” • Add additional Attendees • Click “OK”
At this point the Scheduling assistant will display when the resources, and attendees are available. Adjust the schedule accordingly then click the “Appointment” button to add additional meeting details.

10
In the example shown below, I’ve added connection instructions for the various ways of joining this Video Bridge Conference. Notice the three different ways listed below. In this example we used Video Bridge 107 as a resource.
• Click Send to finish the appointment. • If there are scheduling conflicts for either the Video Bridge, or the Conference room, you will be notified
by email.
11
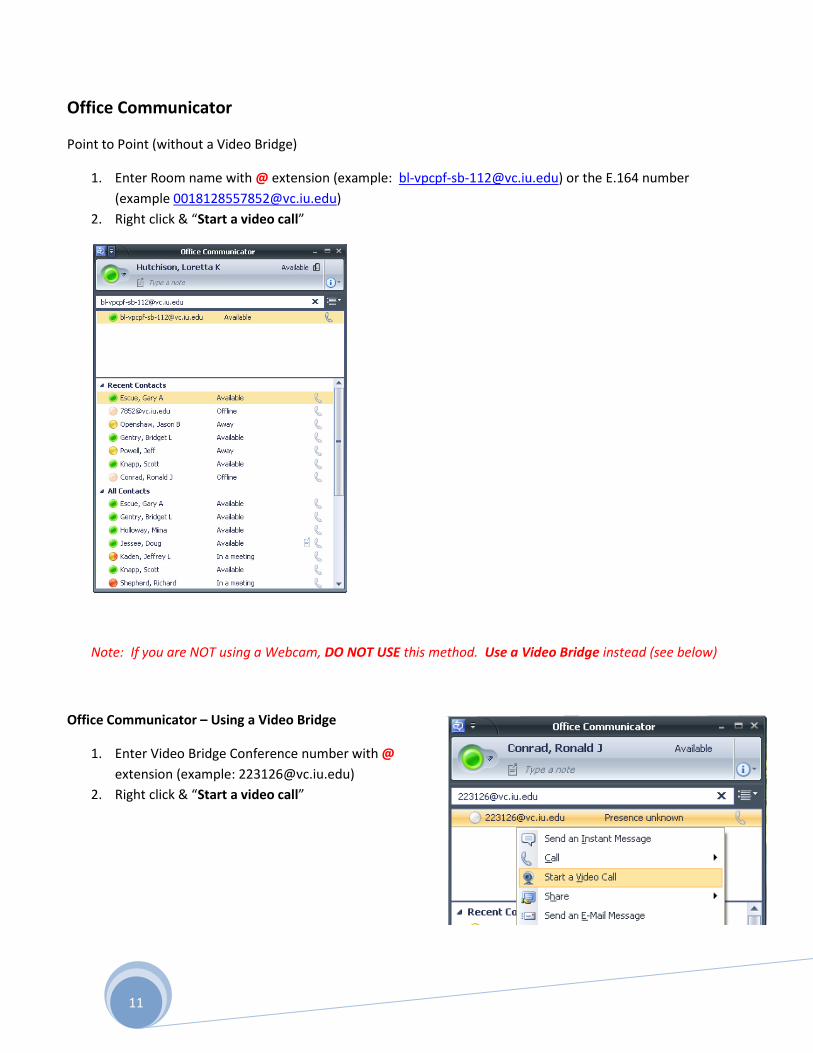
Office Communicator
Point to Point (without a Video Bridge)
1. Enter Room name with @ extension (example: [email protected]) or the E.164 number (example [email protected])
2. Right click & “Start a video call”
Note: If you are NOT using a Webcam, DO NOT USE this method. Use a Video Bridge instead (see below)
Office Communicator – Using a Video Bridge
1. Enter Video Bridge Conference number with @ extension (example: [email protected])
2. Right click & “Start a video call”
12
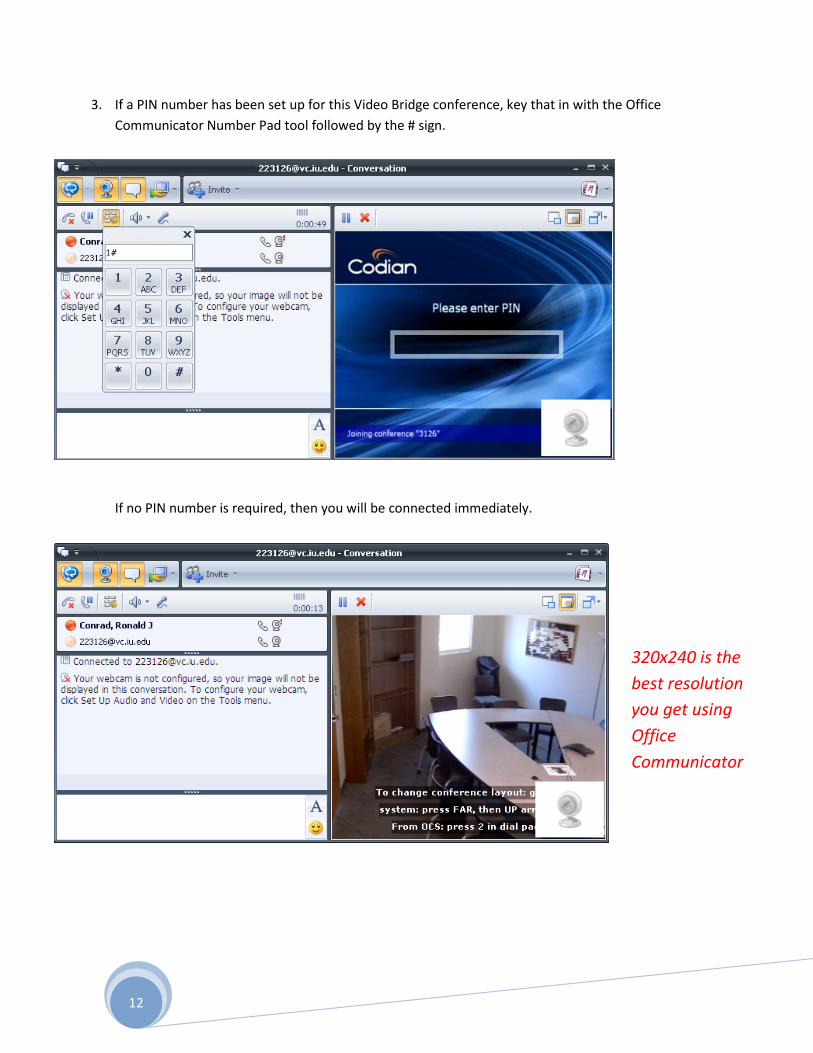
3. If a PIN number has been set up for this Video Bridge conference, key that in with the Office Communicator Number Pad tool followed by the # sign.
If no PIN number is required, then you will be connected immediately.
320x240 is the best resolution you get using Office Communicator

13
For a complete list of Video Conference Rooms across the IU campus, navigate to
http://www.indiana.edu/~video/vidcon/db_room.php using your Internet browser.
14
Questions & Answers:
Question: Can I join a video conference using Office Communicator outside the office?
Answer: Yes, but you will have to use a VPN connection to actually video conference.
Here is the actual reply I received:
” OCS can video conference from off campus. You must be sure to use the VPN which should be explained in the KB document which told you how to use OCS from home.”
http://kb.iu.edu/data/axbd.html this link mentions using OCS from outside our domain. Although it says you don’t need a VPN connection, the video technician told me that it was required if you wanted to join a video conference.
Question: during the demonstration, we had put a video call on hold by accident. How do we take it off hold, or if there is a second call, while one is on hold, how do you switch to that call, and back?
Answer: “There is no hold button exactly. When a second call is initiated, the first call is placed on hold. This hold comes off when the second call hangs up. Hold is not really a function, it is more a way for not losing the first call if the second call comes in”.