Embed Size (px)
Citation preview

Instructions for Use for
i-control
Document Part No.: 30018668 2011-03
Document Version No.: 1.8 Software Version No.: 1.8

2 Instructions for Use for i-control No. 30018668 Rev. No. 1.8 2011-03
Warnings, Cautions, and Notes The following types of notices are used in this publication to highlight important information or to warn the user of a potentially dangerous situation:
Note Gives helpful information.
CAUTION INDICATES A POSSIBILITY OF INSTRUMENT DAMAGE OR DATA
LOSS IF INSTRUCTIONS ARE NOT FOLLOWED.
WARNING INDICATES THE POSSIBILITY OF SEVERE PERSONAL INJURY,
LOSS OF LIFE OR EQUIPMENT DAMAGE IF THE INSTRUCTIONS ARE NOT FOLLOWED.
Trademarks The following product names and any registered and unregistered trademarks mentioned in this document are used for identification purposes only and remain the exclusive property of their respective owners: • i-controlTM, magellanTM, Infinite®, MultiCheckTM, NanoQuant PlateTM , Tecan®
and the Tecan Logo are registered trademarks of Tecan Group Ltd., Männedorf, Switzerland
• Windows® and Excel® are registered trademarks of Microsoft Corporation, Redmond, WA, USA
• BRET2 TM is a trademark of Perkin Elmer Corporation, MA, USA • Chroma-GloTM is a trademark of Promega Corporation, WI, USA • Greiner® and µClear® and are registered trademarks of Greiner Labortechnik
GmbH, Frickenhausen, Germany • HTRF® is a registered trademark of CisBio International, France
• Hellma® is a registered trademark of Hellma GmbH & Co. KG, Müllheim, Germany
2011-03 Instructions for Use for i-control No. 30018668 Rev. No. 1.8 3
WARNING CAREFULLY READ AND FOLLOW THE INSTRUCTIONS PROVIDED
IN THIS MANUAL BEFORE OPERATING THE INSTRUMENT.
Notice Every effort has been made to avoid errors in text and diagrams; however, Tecan Austria GmbH assumes no responsibility for any errors which may appear in this publication. It is the policy of Tecan Austria GmbH to improve products as new techniques and components become available. Tecan Austria GmbH therefore reserves the right to change specifications at any time with appropriate validation, verification, and approvals.
We appreciate any comments on this publication. Manufacturer
Tecan Austria GmbH Untersbergstrasse 1A A-5082 Grödig/Salzburg AUSTRIA / EUROPE T +43 6246/8933 F +43 6246/72770 E-mail: [email protected] www.tecan.com
Copyright Information The contents of this manual are the property of Tecan Austria GmbH and are not to be copied, reproduced or transferred to another person or persons without prior written permission. Copyright Tecan Austria GmbH All rights reserved. Printed in Austria.
About the Instructions for Use This document describes i-control, which is a software to control Infinite Series Tecan microplate readers. It is intended as a reference and instruction for the user. This manual instructs how to: • Install the software • Operate the software
Remarks on Screenshots Data and parameters displayed in screenshots vary depending on the instrument connected. Details and examples are described in the respective Instructions for Use of the connected instrument.

4 Instructions for Use for i-control No. 30018668 Rev. No. 1.8 2011-03
Tecan Customer Support Address Contact
Tecan Asia Pte Ltd. 18 Boon Lay Way, #09-140 TradeHub 21 Singapore 609966, Singapore
T +65 6444 1886 F +65 6444 1836 [email protected]
Tecan Australia Pty Ltd. 10-22 Hornibrook Esplanade Clontarf Qld 4019 Australia
T 1300 808 403 (free in Australia) T +61 7 3105 5010 F +61 7 3283 7922 [email protected]
Tecan Austria GmbH Untersbergstrasse 1a A-5082 Grödig Austria
T +43 6246 8933 256 F +43 6246 72 770 [email protected]
Tecan Benelux bvba Businesspark E19 Battelsesteenweg 455 B 2800 Mechelen, Belgium
T +32 15 709 054 (english) T +32 15 709 055 (french) F +32 15 421 612 [email protected]
Tecan Benelux bvba Industrieweg 30 NL-4283 GZ Giessen Netherlands
T +31 20 708 4773 F +31 183 44 80 67 [email protected]
Tecan Group Ltd., Beijing Representative Office
Room 2502, Building A Jianwai SOHO No. 39 Dongsanhuan Zhong Rd. 100022 Beijing, China
T +86 10 5869 5936 F +86 10 5869 5935 [email protected]
Tecan Deutschland GmbH Werner-von-Siemens-Straße 23 D-74564 Crailsheim Germany
T +49 1805 8322 633 or T +49 1805 TECAN DE F +49 7951 9417 92 [email protected]
Tecan France S.A.S. 26 avenue Tony Garnier F-69007 Lyon France
T +33 820 88 77 36 F +33 4 72 76 04 99 [email protected]
Tecan Ibérica (Spain) Sabino de Arana 32 E-08028 Barcelona Spain
T +34 93 409 1237 F +34 93 411 2407 [email protected]
Tecan Ibérica (Spain) N VI - km 23,300, c/ Pollensa, 4 - Oficina 8 E-28230 Las Rozas de Madrid, Spain
T +34 91 151 71 07 F +34 91 151 7120 [email protected]
Tecan Ibérica (Portugal) Quinta da Fonte Edificio Pedro I P-2780-730 Paço D'Arcos, Portugal T +35 21 000 8216
Tecan Italia S.r.l. Via Brescia, 39 I-20063 - Cernusco Sul Naviglio (MI) Italy
T +39 (02) 800 112 291 F +39 (02) 92 72 90 47 [email protected]
Tecan Japan Co. Ltd Kawasaki Tech Center 580-16, Horikawa-cho, Saiwai-ku Kawasaki, Kanagawa 212-0013 Japan
T +81 44 556 7311(Kawasaki) F +81 44 556 7312 (Kawasaki) T +81(0) 6305 8511 (Osaka) [email protected]
Tecan Nordic AB Taljegårdsgatan 11B SE-431 53 Mölndal Sweden
T +46 317 54 40 00 F +46 317 54 40 10 [email protected]
Tecan (Shanghai) Trading Co., Ltd. Unit 621, Tower 1, German Center 88, Keyuan Road, Zhangjiang Hi-tech Park Pudong New Area 201203 Shanghai, P.R. China
T +86 21 2898 6333 F +86 21 2898 6844 [email protected]
Tecan Schweiz AG Seestrasse 103 CH-8708 Männedorf Switzerland
T +41 44 922 82 82 F +41 44 922 84 84 [email protected]
Tecan Systems Inc. Technical support for components
2450 Zanker Road San Jose, CA 95131 USA
T +1 408 953 3100 F +1 408 953 3101 Toll Free in the US: T +1 866 798 3226 [email protected]
Tecan UK Theale Court 11-13 High Street, Theale UK-Reading RG7 5AH United Kingdom
T +44 118 930 0300 F +44 118 930 5671 [email protected]
Tecan US Technical support for Tecan instruments
4022 Stirrup Creek Road, Suite 310 Durham, NC 27703 USA
T +1 919 361 5200 F +1 919 361 5201 Toll Free in the US: T +1 800 TECAN US or T +1 800 832 2687 [email protected]

2011-03 Instructions for Use for i-control No. 30018668 Rev. No. 1.8 5
Table of Contents 1. Introduction .................................................................................. 7
1.1 Area of Application .......................................................................... 7
1.1.1 i-control Intended Use .............................................................. 7
1.2 Specifications .................................................................................. 7
1.2.1 Hardware Requirements ......................................................... 7 1.2.2 Reader Compatibility .............................................................. 9 1.2.3 CE Declaration for Europe ...................................................... 9
1.3 Software Installation ..................................................................... 10 1.3.1 Software Installation under Windows Vista, Windows 7 ........ 11 1.3.2 Hardware Wizard (only valid for WindowsXP) ....................... 13
1.4 Starting i-control .............................................................................. 16
1.4.1 Connected Instrument .......................................................... 16 1.4.2 Simulated Instrument ............................................................ 18
2. Measurement Parameter Editor ................................................ 21
2.1 Introduction ................................................................................... 21 2.2 Control Bar..................................................................................... 22
2.2.1 Lab Ware .............................................................................. 23 2.2.2 Measurements ...................................................................... 25 2.2.3 Actions ................................................................................. 43 2.2.4 Kinetic .................................................................................. 48 2.2.5 Miscellaneous ....................................................................... 50
2.3 Workflow Pane ............................................................................... 52
2.3.1 Hierarchy of Elements .......................................................... 53 2.4 Info Pane ........................................................................................ 53
3. Defining Measurements ............................................................ 55
3.1 Defining End Point Measurements ............................................... 55
3.1.1 Plate Size – Part of the Plate ................................................ 57 3.2 Defining Multilabel Measurements ............................................... 58 3.3 Defining Kinetic Measurements ................................................... 62
3.3.1 Defining Well Kinetic Measurements with Injections ............. 64 3.3.2 The Difference between “Inject” and “Dispense” ................... 65
3.4 Indenting and Releasing Program Elements ............................... 66 3.4.1 Ways to Indent or Release Program Elements ..................... 67
4. Menus .......................................................................................... 69
4.1 Menu Bar ........................................................................................ 69
4.1.1 File Menu ............................................................................. 69 4.1.2 Edit Menu ............................................................................. 70 4.1.3 View Menu ............................................................................ 70 4.1.4 Instrument Menu................................................................... 71 4.1.5 Settings Menu ...................................................................... 74

6 Instructions for Use for i-control No. 30018668 Rev. No. 1.8 2011-03
4.1.6 Help Menu............................................................................. 87 4.2 Toolbar ............................................................................................ 88
5. Batch Processing ....................................................................... 91
5.1 Introduction .................................................................................... 91 5.2 Microplate Requirements for Batch Processing .......................... 91 5.3 Start Stacker Run ........................................................................... 92 5.4 Restacking ...................................................................................... 93 5.5 Stacker Kinetics (available for Infinite F500 and M1000) ............. 93
Index .................................................................................................. 95
1. Introduction
2011-03 Instructions for Use for i-control No. 30018668 Rev. No. 1.8 7
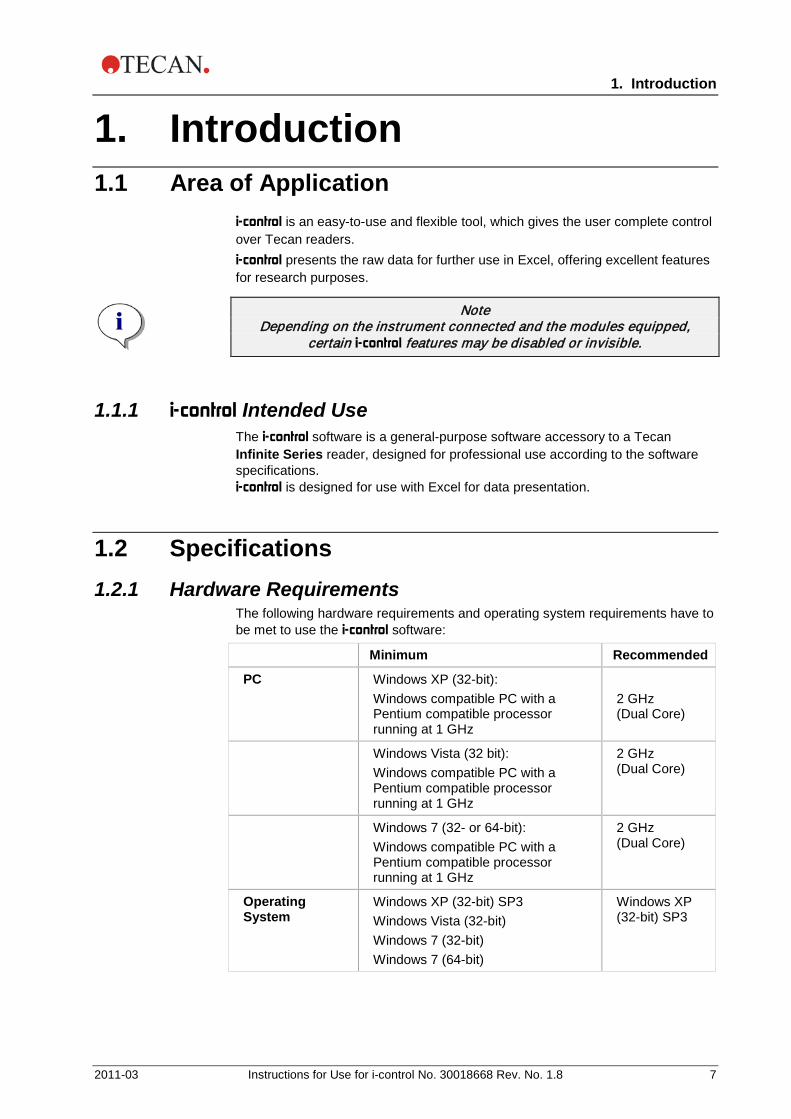
1. Introduction 1.1 Area of Application
i-control is an easy-to-use and flexible tool, which gives the user complete control over Tecan readers. i-control presents the raw data for further use in Excel, offering excellent features for research purposes.
Note Depending on the instrument connected and the modules equipped,
certain i-control features may be disabled or invisible.
1.1.1 i-control Intended Use The i-control software is a general-purpose software accessory to a Tecan Infinite Series reader, designed for professional use according to the software specifications. i-control is designed for use with Excel for data presentation.
1.2 Specifications 1.2.1 Hardware Requirements
The following hardware requirements and operating system requirements have to be met to use the i-control software:
Minimum Recommended
PC Windows XP (32-bit): Windows compatible PC with a Pentium compatible processor running at 1 GHz
2 GHz (Dual Core)
Windows Vista (32 bit): Windows compatible PC with a Pentium compatible processor running at 1 GHz
2 GHz (Dual Core)
Windows 7 (32- or 64-bit): Windows compatible PC with a Pentium compatible processor running at 1 GHz
2 GHz (Dual Core)
Operating System
Windows XP (32-bit) SP3 Windows Vista (32-bit) Windows 7 (32-bit) Windows 7 (64-bit)
Windows XP (32-bit) SP3

1. Introduction
8 Instructions for Use for i-control No. 30018668 Rev. No. 1.8 2011-03
Minimum Recommended
Memory Windows XP: 512 MB RAM Windows Vista (32-bit): 1 GB RAM Windows 7 (32-bit): 1 GB RAM Windows 7 (64-bit): 2 GB RAM
1 GB RAM 2 GB RAM 2 GB RAM 3 GB RAM
Space Requirements
700 MB 1 GB
Monitor Super VGA Graphics
Resolution 1024 x 768 1280 x 1024
Color Depth 256
Mouse Microsoft mouse or compatible pointing device
Communication 1 x USB 2.0 2 x USB 2.0 1 x RS232 (Serial)
Devices 1 x CD-ROM drive Windows Vista: DirectX 9 graphics and 32 MB of graphics memory (for Home Basic); 128 MB of graphics memory plus WDDM support for all other versions Windows 7: DirectX 9 graphics device with WDDM 1.0 or higher driver
.NET Microsoft .NET Framework 2.0 If this version is not present, the install/upgrade program will install it side-by-side with any existing installation of the .NET Framework.
Windows Installer
3.1 If this version is not present, the install/upgrade program will install it.
Microsoft Excel 2002 2003 2007 2010 (32-bit) – Starter edition NOT supported!

1. Introduction
2011-03 Instructions for Use for i-control No. 30018668 Rev. No. 1.8 9
1.2.2 Reader Compatibility The following Tecan readers can be used with i-control:
Instrument Types Measurement Mode
Infinite M200 Infinite M200 Pro Fluorescence / Absorbance / Luminescence
Infinite F200 Infinite F200 Pro
Fluorescence / Absorbance / Luminescence / Fluorescence Polarization
Infinite F500 Fluorescence / Absorbance / Luminescence / Fluorescence Polarization
Infinite M1000 Fluorescence / Absorbance / Luminescence / Fluorescence Polarization
Infinite F50 Absorbance
Note The Connect stacker can be used together with several instruments in
order to measure batches of plates. Please refer to the Connect Instructions for Use for more information.
With the Infinite M1000 instrument, only the built-in stacker can be used.
1.2.3 CE Declaration for Europe i-control is not a CE-marked product. Therefore no CE declaration for Europe is available.

1. Introduction
10 Instructions for Use for i-control No. 30018668 Rev. No. 1.8 2011-03
1.3 Software Installation
CAUTION YOU MUST HAVE ADMINISTRATIVE RIGHTS TO INSTALL THE
SOFTWARE.
CAUTION INSTALL THE SOFTWARE BEFORE PLUGGING THE INSTRUMENT
INTO THE COMPUTER.
The i-control software is installed using the following procedure: 1. Insert the installation CD into the appropriate disk drive or CD ROM drive. 2. Open the Windows Explorer and browse to folder Software on the
installation CD. Double-click i-Control <version>.exe to start the installation procedure.
3. First of all Setup Prerequisites have to be installed:
Depending on your operating system different prerequisites have to be
installed. Click Next to continue. 4. A message box indicates that the prerequisites have been installed
successfully. Click OK to continue.

1. Introduction
2011-03 Instructions for Use for i-control No. 30018668 Rev. No. 1.8 11
5 In the course of the installation a series of dialog boxes will appear. Read
each one, enter any necessary information and click Next to continue. The files are installed and the program icon is created.
6. When the Installation Complete dialog box appears, click Finish and the i-control program is ready to be used.
1.3.1 Software Installation under Windows Vista, Windows 7 When installing the software under Windows Vista, for security reasons, the user has to decide whether to install the device driver software or not. The following dialogs appear (example):
Click Install on both to continue. In the right bottom screen corner, the operating system informs you on the progress of installation:
Clicking Click here for status and the system displays in detail which driver has been installed. The following window appears:

1. Introduction
12 Instructions for Use for i-control No. 30018668 Rev. No. 1.8 2011-03
If Click here for status is not clicked, several windows appear with information in appearing and fading balloons about the current status of the installation (this screenshot shows the last balloon, confirming successful installation of the software):

1. Introduction
2011-03 Instructions for Use for i-control No. 30018668 Rev. No. 1.8 13
1.3.2 Hardware Wizard (only valid for WindowsXP) If the instrument is plugged in after the software has been installed, the following Hardware Wizard dialog boxes appear: Depending on system configuration and installed drivers, this dialog box may appear first:
Select No, not this time and click Next.
Select Install the software automatically and click Next.

1. Introduction
14 Instructions for Use for i-control No. 30018668 Rev. No. 1.8 2011-03
The Hardware Wizard searches for the device.
After the device has been found, click Next. Depending on existing previous drivers, the following dialog box appears:
The wizard suggests the appropriate device. Select Next to complete the New Hardware Wizard.

1. Introduction
2011-03 Instructions for Use for i-control No. 30018668 Rev. No. 1.8 15
Click Finish to complete installation. The software is ready for use.

1. Introduction
16 Instructions for Use for i-control No. 30018668 Rev. No. 1.8 2011-03
1.4 Starting i-control i-control can be used either with a connected instrument or in simulation mode.
1.4.1 Connected Instrument
CAUTION INSTALL THE SOFTWARE BEFORE CONNECTING THE INSTRUMENT
TO THE COMPUTER.
Connect the instrument to your computer and switch the instrument on. Start the program by selecting Programs/Tecan/i-control from the Windows Start menu.
Select Connect from the Instrument menu or click the connect button and the following dialog box appears: Example for the Infinite 200 instrument:
In the Connect to: dialog box select the instrument name. In the Additionally connect to: field, select Connect, if a Connect stacker is connected (for batch processing).

1. Introduction
2011-03 Instructions for Use for i-control No. 30018668 Rev. No. 1.8 17
Example for the Infinite M1000 instrument:
In the Connect to: dialog box select the instrument name. Connect built-in stacker: With the Infinite M1000 instrument, only the built-in stacker can be used (see screenshot). Click OK to start i-control.

1. Introduction
18 Instructions for Use for i-control No. 30018668 Rev. No. 1.8 2011-03
1.4.2 Simulated Instrument Start the program by selecting Programs/Tecan/i-control from the Windows Start menu. In the Connect to Instrument dialog box, select Show simulated instruments; from the Instrument Name list, select the demo instrument to connect to. After selecting the simulated instrument, a drop-down list appears offering several options, depending on the instrument selected above. For the Infinite 200, for example, these options are: • Filter: F200 normal or F200 enhanced or F200 with FP Option • Monochromator: M200 normal or M200 enhanced For the Infinite 200 Pro, for example, these options are: • F200PRO_(PMT=NORMAL) • F200PRO_(PMT=ENHANCED) • F200PRO_WITH_FP_OPTION_(PMT=NORMAL) • M200PRO_(PMT=NORMAL) • M200PRO_(PMT= ENHANCED)
For the Infinite F500, for example, these options are: • GF500_(PMT=NORMAL)_384 • GF500_(PMT=ENHANCED)_1536/384 • FI.TOP/ABS/HEA/SHK_ONLY_(PMT=Normal)_1536/384 • GF500_WITH_FP_(PMT=NORMAL)_384

1. Introduction
2011-03 Instructions for Use for i-control No. 30018668 Rev. No. 1.8 19
For the Infinite M1000, for example, these options are: • M1000_384/1536 • M1000_FP_INJ_STACKER • M1000_384/1536 LCE • M1000_FP_INJ_STACKER LCE For the Infinite F50, for example, these options are: • F50PRO_4_FILTERS • F50PRO_8_FILTERS
Connect built-in stacker: With the Infinite M1000, the built-in stacker can be simulated. See selections as shown in the screenshot above. For a more detailed description on defining parameters for the respective instrument, please refer to the instructions for use for the connected or simulated instruments. Select Reconnect to the selected instrument at next start up in case the same instrument remains attached to one and the same computer. Click OK to start i-control.


2. Measurement Parameter Editor
2011-03 Instructions for Use for i-control No. 30018668 Rev. No. 1.8 21
2. Measurement Parameter Editor
2.1 Introduction The main window of the i-control software is the Measurement Parameter Editor, which is used to set up workflows. Each workflow is easily created by dragging and dropping the process steps into a sequence according to the application. The application workflow is then visible to the user in the workflow pane and can be saved for future use. Each process step, that is each program element, can be copied and pasted (menu Edit – Copy – Paste or using the Windows standard shortcuts Ctrl-C, Ctrl-V) and moved to the desired position in the workflow. Data can be exported easily to Windows compatible formats (Excel). Start the software and connect an instrument as described in the previous chapter or select the simulation mode. The i-control main window appears displaying the Measurement Parameter Editor:
Menu bar Tool bar
Control bar Status bar
Workflow pane Info pane

2. Measurement Parameter Editor
22 Instructions for Use for i-control No. 30018668 Rev. No. 1.8 2011-03
The Measurement Parameter Editor consists of the following items which are described in detail in the subsequent chapters:
• Menu bar • Status bar
• Tool bar • Workflow pane
• Control bar • Info pane
In the left bottom corner of the main window, two tabs appear: Standard: is displayed for standard applications Application: is displayed for applications with NanoQuant plates which are currently only available with the Infinite 200, Infinite 200 Pro, Infinite F 500 (DNA quantification only) and Infinite M 1000 available for FW 2.0 and higher (Ref 30061442). Please consult the Quick Guide for NanoQuant Plates and the respective Instructions for Use of the instrument connected.
2.2 Control Bar The Control bar is divided into five sections. Each section contains program elements used to create an individual workflow. Depending on the instrument connected and the modules installed, these available program elements may vary; e.g. if the instrument is not equipped with an FP module, the FP element is not visible in the measurement section. Create a workflow either by double-clicking the selected program element or by dragging and dropping it into the workflow pane. The following program elements are available:
Lab Ware Plate Part of Plate Well Cuvette (M200 and M200 Pro)
Measurements Absorbance Absorbance Scan (M200, M200 Pro and M1000) Fluorescence Intensity Fluorescence Intensity Scan (M200, M200 Pro and M1000) Fluorescence Polarization (F200, F200 Pro, F500 and M1000) Luminescence Luminescence Dual Color Luminescence Scan (M1000 – available for FW 2.0 and higher - Ref 30061442)
Actions Temperature Shaking Injection Dispense Move Plate Move Cuvette (M200, M200 Pro)
Kinetic Kinetic Cycle Kinetic Condition

2. Measurement Parameter Editor
2011-03 Instructions for Use for i-control No. 30018668 Rev. No. 1.8 23
Miscellaneous Comment User Request Wait for Temperature Wait (Time) Incubation
2.2.1 Lab Ware
Plate The Plate program element is used to select a plate format from the Plate definition drop-down list. Click Details... to see further information on the selected plate. If a plate with cover is used, select the Plate with cover checkbox. The measurement will automatically measure all selected wells of the plate. If you want to measure a specific well or a range of wells, click the link Use a part of the plate in the lower right corner. See Part of Plate below.
Under Details… it is possible to apply a filter so that only certain plate definition files are shown.
The Infinite F500 and M1000 may optionally be equipped with a barcode scanner. Select the checkbox Read Barcode to have the barcode read.
The Read Barcode checkbox appears only if the instrument has a barcode reader or if a stacker is connected and has a barcode reader. For further details on the Barcode Scanner option refer to the Instructions for Use of the respective instrument manual.

2. Measurement Parameter Editor
24 Instructions for Use for i-control No. 30018668 Rev. No. 1.8 2011-03
Part of Plate The Part of Plate program element is displayed according to the selected plate format (number of wells). To measure individual wells, click the desired well or to measure a range of wells drag a frame around the desired range.
Independent Parts of Plate Clicking on Details…, the plate preview can be zoomed and independent parts of the plate can be selected:
A second range of wells can be selected by pressing the Control key on the keyboard and dragging a frame over the wells to be selected.
Well Use the Well program element to perform measurements well by well. Without this program element, all measurement steps are done plate-wise.

2. Measurement Parameter Editor
2011-03 Instructions for Use for i-control No. 30018668 Rev. No. 1.8 25
Cuvette The Cuvette program element allows performing absorbance measurement in fixed wavelength and scan mode. This option is only available for the Infinite M200 and M200 Pro.
2.2.2 Measurements For detailed information on measurement methods, refer to the respective Instructions for Use of the instrument connected.
Absorbance The Absorbance program element is used to perform absorbance measurements. Enter or select the respective parameters: • Wavelength • Reference • Read/Flash • Multiple Reads per Well • Label The Reference wavelength may be selected to correct for flash variations. For filter instruments, two drop-down lists display the available measurement and reference filter wavelengths, according to the inserted absorbance filter slide. If the drop-down lists are empty, the absorbance filter either has not been inserted into the reader or has not been defined. Example for the Infinite 200
Example for the Infinite F50

2. Measurement Parameter Editor
26 Instructions for Use for i-control No. 30018668 Rev. No. 1.8 2011-03
Absorbance Scan The Absorbance Scan program element is available with the Infinite M200, M200 Pro and M1000.
Enter or select the respective parameters:
Wavelength From: The lower wavelength limit To: The upper wavelength limit Step: Enter a valid value.
Read Number of flashes: Indicates the number of flashes (select a number between 0 – 100). Settle time: The time between movement of the plate and starting of the read (selectable from 0 – 1000 ms).
Label Name: Enter a label name.
Fluorescence Intensity The Fluorescence Intensity program element contains fields for the selection of excitation and emission wavelength, top or bottom reading mode, integration and lag time, flash number and gain settings. A checkbox for multiple reads per well gives access to additional function.

2. Measurement Parameter Editor
2011-03 Instructions for Use for i-control No. 30018668 Rev. No. 1.8 27
Example when connected to an Infinite M200 Pro:
Example when connected to an Infinite F200 Pro:

2. Measurement Parameter Editor
28 Instructions for Use for i-control No. 30018668 Rev. No. 1.8 2011-03
When connected to an Infinite F500, this program element looks different: parameter fields for Mirror and Z-Position are added:
When connected to an Infinite M1000, this program element looks different: parameter fields for Bandwidth, Show/Hide TRF settings and additional flash modes are available.
The following are the Fluorescence Intensity parameters:
Wavelength Specify an Excitation and an Emission wavelength. For filter instruments, two drop-down lists display the available measurement filter wavelengths. If the spin box of fixed values is empty, the excitation and emission filters have not been inserted into the reader or have not been defined. In the Infinite M200, M200 Pro and M1000 both wavelengths can be entered as fixed values or selected by clicking the up or down buttons.

2. Measurement Parameter Editor
2011-03 Instructions for Use for i-control No. 30018668 Rev. No. 1.8 29
Bandwidth For the Infinite M1000 instrument, the bandwidth for excitation and emission can be selected.
Read Specify a certain Number of flashes and, if required, Settle time before the next measurement. The number of flashes is selectable from 1 – 100 (up to 200 for M1000 only). Settle time: Enter a value to specify the time before the start of the measurement.
Flashes When connected to an Infinite M1000 instrument, select one of the following options and, optionally, enter a Settle Time: • On-the-fly • Mode 1 (400 Hz) • Mode 2 (100 Hz) On-the-fly measurements with one flash per well are possible with all plate types. In order to obtain a good measurement precision it is recommended to perform fluorescence measurements with the number of flashes that is set as a default value for the respective instrument. Infinite M1000 allows switching between two flash frequencies for the Fluorescence Intensity and Fluorescence Intensity Scan mode: 100 or 400 Hz (corresponding to 100 or 400 flashes per second, respectively). The energy of one flash is app. 0.1 Joule for the 400 Hz mode and app. 0.4 Joule for the 100 Hz mode. For standard fluorescence measurements it is recommended to use the 400 Hz mode. For TRF (time resolved fluorescence) measurements the 100 Hz mode is recommended to improve the results.
Mode Select Top or Bottom.
Label Enter a label name.
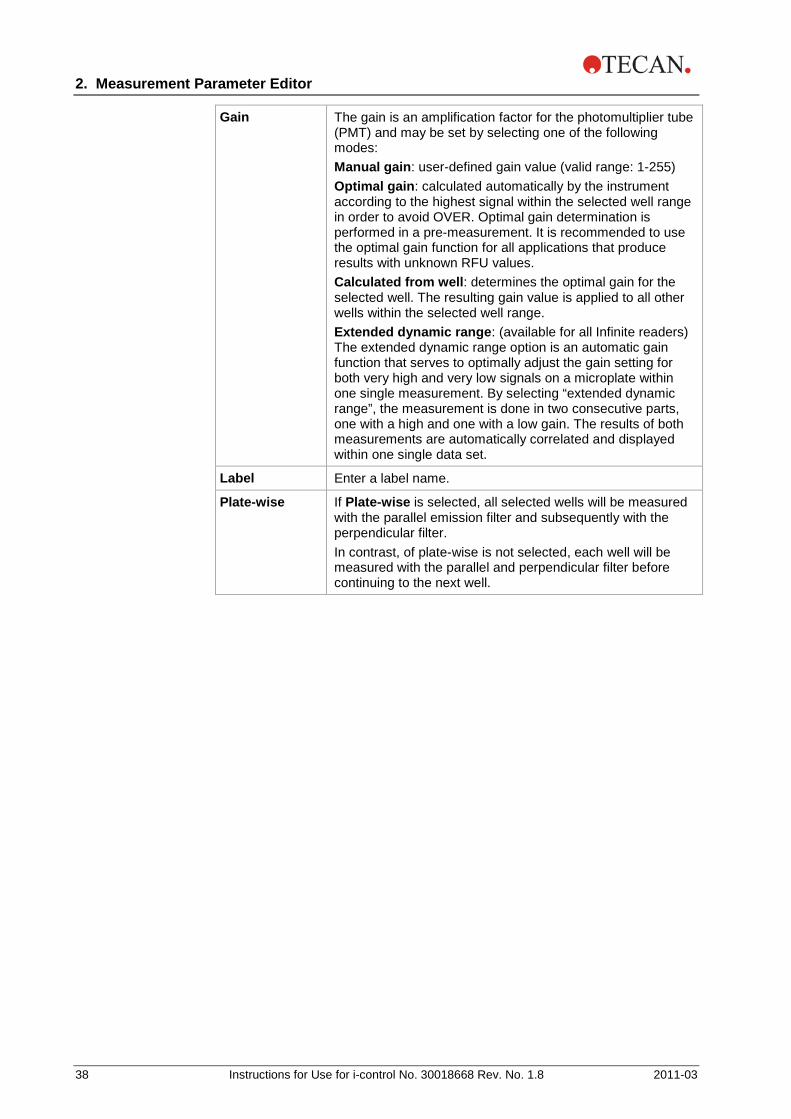
Gain The gain is an amplification factor for the photomultiplier tube (PMT) and may be set by selecting one of the following modes: Manual gain: user-defined gain value (valid range: 1-255) Optimal gain: calculated automatically by the instrument according to the highest signal within the selected well range in order to avoid OVER. Optimal gain determination is performed in a pre-measurement. It is recommended to use the optimal gain function for all applications that produce results with unknown RFU values. Calculated from well: determines the optimal gain for the selected well. The resulting gain value is applied to all other wells within the selected well range. Extended dynamic range: (available for all Infinite readers) The extended dynamic range option is an automatic gain function that serves to optimally adjust the gain setting for both very high and very low signals on a microplate within one single measurement. By selecting “extended dynamic range”, the measurement is done in two consecutive parts, one with a high and one with a low gain. The results of both measurements are automatically correlated and displayed within one single data set.

2. Measurement Parameter Editor
30 Instructions for Use for i-control No. 30018668 Rev. No. 1.8 2011-03
Hide/Show TRF settings: Integration/Lag time
Integration time: duration of signal recording per well (valid range: 20-2000 µs). Lag time: time between flash and the start of signal integration. While lag time is an optional function, the integration time is a mandatory parameter determining the duration of signal recording. The default values for standard fluorescence intensity measurements are 0 µs lag time and 20 µs integration time. TRF measurements typically require a lag time according to the respective application.
Mirror Mirror (available for Infinite F200 Pro and F500) The availability of mirrors depends on the selected plate format and on the types of dichroic mirrors that are installed. The mirror selection for Infinite F500 looks as follows:
The mirror selection for Infinite F200 Pro is limited to the options 50% mirror, Automatic and Dichroic 510 (e.g. fluorescein). According to the selected filter wavelengths the appropriate mirror may be set by the instrument (selection “automatic”) or manually. Custom dichroic mirrors may be installed and defined by the user (Infinite F500 only). For further details on mirrors and mirror selection refer to the Instructions for Use of the Infinite F200 Pro and F500 instrument, respectively.
Z-Position Z-Position (available for Infinite M200 Pro, F500 and M1000) The Z-position represents the height of the measurement head above the microplate. It can be determined as follows: Manual (default value: 20000 µm) Calculated from well: the instrument automatically calculates the optimal Z-position for one selected well and applies this value to all other wells within the selected well range. Same as: may be used for measurements with more than one measurement label. The Z-position is equal to that of the previous label. Instrument / Z-position control: may be used to determine the appropriate Z-position using a graphical scheme. The resulting value is applied to all further measurements until a different Z-position is entered. The Z-position control in the Infinite M200 Pro and Infinite M1000 also allows for defining two wells as Blank and Signal, respectively, and setting the Z-position to the value that gives the best Signal-to-Blank (S/B) ratio. For more detailed information on Z-positioning refer to the Instructions for Use of the Infinite M200 Pro, F500 and M1000 instrument, respectively.
2. Measurement Parameter Editor
2011-03 Instructions for Use for i-control No. 30018668 Rev. No. 1.8 31
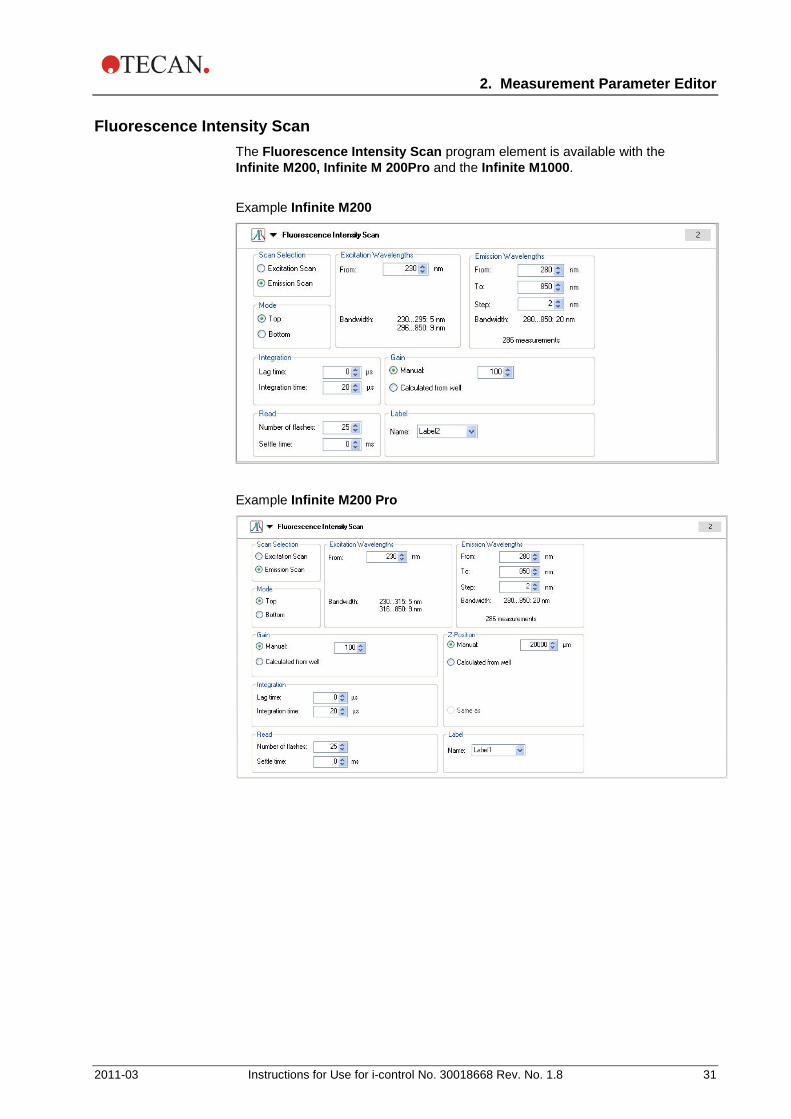
Fluorescence Intensity Scan The Fluorescence Intensity Scan program element is available with the Infinite M200, Infinite M 200Pro and the Infinite M1000. Example Infinite M200
Example Infinite M200 Pro

2. Measurement Parameter Editor
32 Instructions for Use for i-control No. 30018668 Rev. No. 1.8 2011-03
Example Infinite M1000
Enter or select the respective parameters:
Scan Selection Select either Excitation Scan or Emission Scan. With the Infinite M1000 instrument, also the option 3D Scan can be selected.
Excitation Wavelength Values can only be entered if Excitation Scan is selected. From: Specify the range of the excitation by entering a value. To: Specify the range of the excitation by entering a value. Step: Enter a valid value.
Emission Wavelength Values can only be entered if Emission Scan is selected. From: Specify the range of emission by entering a value. To: Specify the range of emission by entering a value. Step: Enter a valid value.
Bandwidth For the Infinite M1000 instrument, the bandwidth for excitation and emission can be selected.
Mode Select Top or Bottom.

2. Measurement Parameter Editor
2011-03 Instructions for Use for i-control No. 30018668 Rev. No. 1.8 33
Hide/Show TRF Settings: Integration/Lag time
Integration time: duration of signal recording per well (valid range: 20-2000 µs). Lag time: time between flash and the start of signal integration. While lag time is an optional function, the integration time is a mandatory parameter determining the duration of signal recording. The default values for standard fluorescence intensity measurements are 0 µs lag time and 20 µs integration time. TRF measurements typically require a lag time according to the respective application.
Gain The gain is an amplification factor for the photomultiplier tube (PMT) and may be set by selecting one of the following modes: Manual gain: user-defined gain value (valid range: 1-255) Calculated from well: determines the optimal gain for the selected well. The resulting gain value is applied to all other wells within the selected well range.
Read Specify a certain Number of flashes and, if required, a Settle time before the measurement.
Flashes When connected to an Infinite M1000 instrument, select one of the following options and, optionally, enter a Settle Time: Mode 1 (400 Hz) Mode 2 (100 Hz) In order to obtain a good measurement precision it is recommended to perform fluorescence measurements with the number of flashes that is set as a default value for the respective instrument. Infinite M1000 allows switching between two flash frequencies for the Fluorescence Intensity and Fluorescence Intensity Scan mode: 100 or 400 Hz (corresponding to 100 or 400 flashes per second, respectively). The energy of one flash is app. 0.1 Joule for the 400 Hz mode and app. 0.4 Joule for the 100 Hz mode. For standard fluorescence measurements it is recommended to use the 400 Hz mode. For TRF measurements the 100 Hz mode is recommended to improve the results.
Label Type in a label name.

2. Measurement Parameter Editor
34 Instructions for Use for i-control No. 30018668 Rev. No. 1.8 2011-03
Fluorescence Polarization (available for F200, F200 Pro, F500 and M1000) The Fluorescence Polarization (FP) program element is used to measure the rotational mobility of a fluorescent compound. Fluorescence polarization measurements are based on the detection of the extent of depolarization of fluorescence emission light after excitation of a fluorescent molecule by polarized light. Example when connected to an Infinite F200 instrument:

2. Measurement Parameter Editor
2011-03 Instructions for Use for i-control No. 30018668 Rev. No. 1.8 35
When connected to an Infinite F500, this program element looks different: parameter fields for Mirror, Z-Position and Plate-wise are added:
Example when connected to an Infinite M1000 instrument:

2. Measurement Parameter Editor
36 Instructions for Use for i-control No. 30018668 Rev. No. 1.8 2011-03
Enter or select the respective parameters:
Wavelength Filter instruments configured for Fluorescence Polarization (FP) measurements are delivered with a standard FP filter slide. The filter slide is equipped with filters and polarizers for excitation and emission, at 485 and 535 nm respectively, and can be applied, for example, for fluorescein-based FP applications.
Bandwidth For the Infinite M1000 instrument, the emission bandwidth can be entered.
Hide/Show Details: Integration
Integration time: duration of signal recording per well (valid range: 20-2000 µs). For Infinite M1000 instruments the integration time is defined by the number of flashes. 1 to 1000 flashes can be selected (1 flash is 10 ms integration time). Lag time: time between flash and the start of signal integration. While lag time is an optional function, the integration time is a mandatory parameter determining the duration of signal recording. The default values for standard fluorescence intensity measurements are 0 µs lag time and 20 µs integration time. TRF measurements typically require a lag time according to the respective application.
Mirror Mirror (available for Infinite F500) The availability of mirrors depends on the selected plate format and on the types of dichroic mirrors that are installed.
According to the selected filter wavelengths the appropriate mirror may be set by the instrument (selection “automatic”) or manually. Custom dichroic mirrors may be installed and defined by the user. For further details on mirrors and mirror selection refer to the Instructions for Use of the Infinite F500 instrument.

2. Measurement Parameter Editor
2011-03 Instructions for Use for i-control No. 30018668 Rev. No. 1.8 37
Z-Position Z-position (available for Infinite F500 and M1000) The Z-position represents the height of the measurement head above the microplate. It can be determined as follows: Manual (default value: 20000 µm) Calculated from well: the instrument automatically calculates the optimal Z-position for to one selected well and applies this value to all other wells within the selected well range. Same as: may be used for measurements with more than one measurement label. The Z-position is equal to that of the previous label. Instrument / Z-position control: may be used to determine the appropriate Z-position from a graphical scheme. The resulting value is applied to all further measurements until a different Z-position is entered. For more detailed information on Z-positioning refer to the Instructions for Use of the Infinite F500 or M1000 instrument.
Measurement If the Measurement Blank range should be defined, click Change.
G-Factor The G-Factor compensates for differences in optical components between the parallel and perpendicular measurement. The G-Factor is the correction factor that can be determined for the wavelengths of the fluorophore by measuring a sample with a known polarization value. Uncalibrated G-Factor: If no calibrated G-factor is available, the default value of 1 will be displayed and marked as Uncalibrated G-Factor. In order to enable the measurement, confirm this value or select a new one by either clicking the up and down arrows or by entering a value manually. Calibrate: When selecting Calibrate, the G-factor is determined for the current measurement parameters and used for the following FP measurement. In order to perform the G-Factor calibration, please define: Reference value: Select a polarization value that shall be used for reference e.g. 20 mP. Reference range: Click on Change and select the wells filled with the reference fluid, e.g. 1 nM fluorescein. Blank range: Click on Change and select the wells filled with the reference blank. Select Same as measurement blank if the reference blank is the same as the measurement blank. For further details see the respective Instructions for Use of the instrument connected.
Read Specify a certain Number of flashes and, if required a Settle time before the measurement.
2. Measurement Parameter Editor
38 Instructions for Use for i-control No. 30018668 Rev. No. 1.8 2011-03
Gain The gain is an amplification factor for the photomultiplier tube (PMT) and may be set by selecting one of the following modes: Manual gain: user-defined gain value (valid range: 1-255) Optimal gain: calculated automatically by the instrument according to the highest signal within the selected well range in order to avoid OVER. Optimal gain determination is performed in a pre-measurement. It is recommended to use the optimal gain function for all applications that produce results with unknown RFU values. Calculated from well: determines the optimal gain for the selected well. The resulting gain value is applied to all other wells within the selected well range. Extended dynamic range: (available for all Infinite readers) The extended dynamic range option is an automatic gain function that serves to optimally adjust the gain setting for both very high and very low signals on a microplate within one single measurement. By selecting “extended dynamic range”, the measurement is done in two consecutive parts, one with a high and one with a low gain. The results of both measurements are automatically correlated and displayed within one single data set.
Label Enter a label name.
Plate-wise If Plate-wise is selected, all selected wells will be measured with the parallel emission filter and subsequently with the perpendicular filter. In contrast, of plate-wise is not selected, each well will be measured with the parallel and perpendicular filter before continuing to the next well.

2. Measurement Parameter Editor
2011-03 Instructions for Use for i-control No. 30018668 Rev. No. 1.8 39
Multiple Reads per Well The i-control software allows the user to define multiple reads per well (MRW) in Absorbance, Fluorescence top and Fluorescence bottom mode. The MRW feature is not available for well wise measurements. The Reference wavelength on the absorbance program element is not selectable in combination with multiple reads per well. For Infinite M1000 instruments there is a minimum Settle time of 10 msec required as soon as Multiple reads per well is selected. The multiple reads per well function can be activated on an absorbance or fluorescence intensity program element by selecting the Multiple reads per well check box:
Note The function Multiple reads per well is only available for the fixed
wavelength reading modes Absorbance, Fluorescence intensity top and Fluorescence intensity bottom. The function is not available for scan
measurements.
More details on defining parameters for multiple reads per well, are available in the respective Instructions for Use of the instrument connected. The multiple reads per well function is available for plate formats with up to 384 wells. 1536 well plates are not supported.

2. Measurement Parameter Editor
40 Instructions for Use for i-control No. 30018668 Rev. No. 1.8 2011-03
Optimal Read Similar to the MRW read mode, the "Optimal Read" function is a measurement on multiple, spatially separated spots inside the well. The spots are arrayed to cover the whole well area in order to achieve maximal well illumination. The total number of individual measurement spots per well is reflected by the size of the Fluorescence Intensity Bottom fiber and is optimized for plate formats from 6 to 96 wells (see Table: “Optimal Read” spot patterns in different plate formats). 384-well plates are optimally illuminated by a single-spot read. Example for Infinite 200 Pro, Infinite F 500:
Plate Pattern Size Spots
384-well “Optimal Read” function not available
96-well Circle 2x2 4
48-well Circle (filled) 4x4 12
24-well Circle (filled) 5x5 21
12-well Circle (filled) 7x7 37
6-well Circle (filled) 10x10 76
Table: “Optimal Read” spot patterns in different plate formats Example for Infinite M1000:
Plate Pattern Size Spots
384-well “Optimal Read” function not available
96 wells Circle (filled) 3x3 5
48 wells Circle (filled) 5x5 21
24 wells Circle (filled) 7x7 37
12 wells Circle (filled) 9x9 61
6-well “Optimal Read” function not available
Changing the total number of flashes per well (1-100) will result in the automatic adjustment of the number of flashes per spot, giving the user the possibility to obtain representative results in each well. The total number of flashes is automatically distributed over all measured spots. A minor imprecision occurs if an entered flash number is not divisible without a remainder by the default number of spots for the used plate format. In this case the next possible flash distribution that is integrally divisible by the number of spots per well is calculated, e.g. a measurement with a total of 25-28 flashes in a 96-well plate is performed with 7 flashes per spot, whereas a total flash number of 29 results in 8 flashes per spot.
The standard MRW function for Fluorescence Intensity Bottom reads is disabled when “Optimal Read” is activated and vice versa.

2. Measurement Parameter Editor
2011-03 Instructions for Use for i-control No. 30018668 Rev. No. 1.8 41
Luminescence The Luminescence program element is used to determine the activity of a luminescent compound. Example for the Infinite 200
Example for the Infinite200 Pro
Enter or select the respective parameters:
Attenuation For strongly luminescent samples it may be necessary to apply neutral density filters to reduce the luminescent signal. Select the desired attenuation option. The options depend on the instrument connected:
F/M200 F/M200 Pro F500 M1000
M1000 FW 2.0
and higher
(Ref 30061442)
None OD1 Automatic (OD1)
Automatic (OD2)
By selecting Automatic, only those wells that require attenuation are attenuated by a factor of 10 using an OD1 filter or by a factor of 100 using an OD2 filter depending on the instrument connected.
2. Measurement Parameter Editor
42 Instructions for Use for i-control No. 30018668 Rev. No. 1.8 2011-03
Filters Use of Color Filters for Single Luminescence: (available for Infinite F500 and M1000) All filters that are available for dual color luminescence may be used in single luminescence measurements as well. Besides the attenuation functions an additional dropdown list in the attenuation field displays the filters for GREEN, GREEN1, BLUE and MAGENTA to be selected individually for single luminescence applications.
Integration time
Enter a value to specify the duration of integration. All wells will be measured with this fixed user-defined integration time.
Settle time Enter a value to specify the time delay between a plate transport movement and the start of integration.
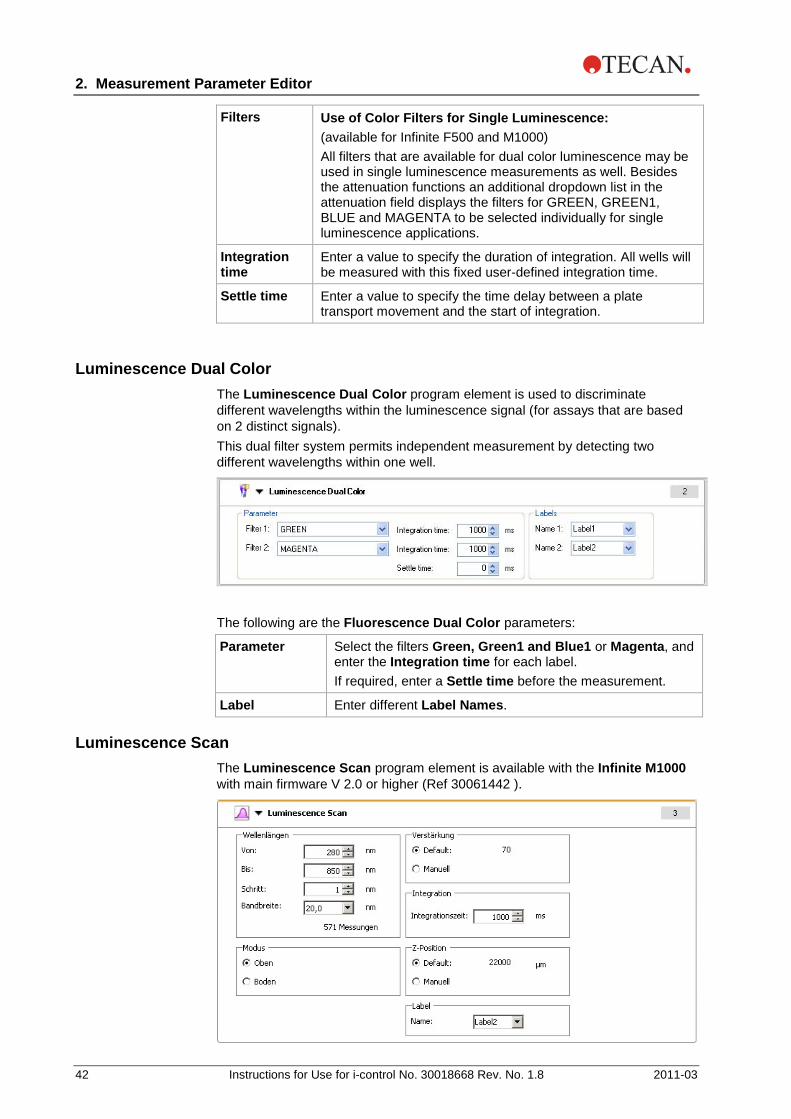
Luminescence Dual Color The Luminescence Dual Color program element is used to discriminate different wavelengths within the luminescence signal (for assays that are based on 2 distinct signals). This dual filter system permits independent measurement by detecting two different wavelengths within one well.
The following are the Fluorescence Dual Color parameters:
Parameter Select the filters Green, Green1 and Blue1 or Magenta, and enter the Integration time for each label. If required, enter a Settle time before the measurement.
Label Enter different Label Names.
Luminescence Scan The Luminescence Scan program element is available with the Infinite M1000 with main firmware V 2.0 or higher (Ref 30061442 ).

2. Measurement Parameter Editor
2011-03 Instructions for Use for i-control No. 30018668 Rev. No. 1.8 43
Wavelengths From: Select the starting wavelength for the scan. To: Select the endpoint wavelength for the scan. Step: enter a valid value Bandwidth: Select a value from the drop down list.
Mode Select Top or Bottom.
Gain Default: this value is instrument specific (see also 30036266_IFU_InfiniteM1000) Manual: User-defined gain value (valid range 1-255)
Integration Integration time: enter a value to specify the duration of integration.
Z-Position Default: 22000 µm Manual: The Z-position represents the height of the measurement head above the microplate.
Label Type in a label name.
2.2.3 Actions
Temperature Select the Temperature program element to enter a certain target temperature.
Select On to enter a target temperature value. Click on the link Wait until temperature is reached
The measurement only starts if the current instrument temperature is within the specified range. See
to define the Minimum and/or Maximum temperature values. The heating of the instrument starts when clicking the Start button. For pre-heating the instrument, select Heating… in the Instrument menu and click the On button.
2.2.5 Miscellaneous/Wait for Temperature.

2. Measurement Parameter Editor
44 Instructions for Use for i-control No. 30018668 Rev. No. 1.8 2011-03
Shaking Select the Shaking program element if the plate is to be shaken, either before the measurement or between kinetic cycles.
Enter the respective parameters:
Duration Enter the duration of the shaking process.
Mode Select between the options Linear, Orbital and Double Orbital from the drop-down list. The Mode Double Orbital is available for Infinite M1000 for FW 2.0 and higher (Ref 30061442.
Amplitude Enter the required Amplitude value from the drop-down list.
Intensity
The Infinite F50 offers the possibility to use pre-defined shaking modes by selecting a shaking Intensity from the drop-down list. The corresponding shaking frequency and amplitude are displayed automatically with the selected Intensity mode.
Shaking Modes; Example for the Infinite F50
Shaking Modes; Example for the Infinite F50
Clicking the link Wait a couple of seconds 2.2.5
inserts a new program element. See Miscellaneous/Wait (Timer).

2. Measurement Parameter Editor
2011-03 Instructions for Use for i-control No. 30018668 Rev. No. 1.8 45
Injection The Injection program element is dependent on a precedent well strip to inject liquid into one well after the other. See also 3.3.2 The Difference between “Inject” and “Dispense”.
Example for the Infinite M200 Pro
The following are the Injection parameters:
Select Injector Select either Injector A or B if the instrument is equipped with two injectors.
Volume: Specifies the volume to inject into a single well.
Speed: Specifies the speed of liquid flow during injection.
Refill Speed equal to Injection Speed: Clear the check box to enter the refill speed which may be different than the injection speed. The syringe can be filled faster, even if the injection speed is low.
Refill Mode Select either Standard or Refill for every injection.
Standard: Injection occurs as long as the syringe contains enough liquid. As soon as the liquid in the syringe is used up, the syringe is refilled with the entered refill volume (200 Pro, M1000 – for FW 2.0 and higher - Ref 30061442).

2. Measurement Parameter Editor
46 Instructions for Use for i-control No. 30018668 Rev. No. 1.8 2011-03
Refill for every injection: Refilling of the syringe occurs for each injection step.
Click the link Wait after injection2.2.5
to define the time for starting the next workflow. See Miscellaneous - Wait (Timer).
Dispense The Dispense program element is always used plate-wise to fill the plate (or part of plate) with liquid. See 3.3.2 The Difference between “Inject” and “Dispense”.
Example for the Infinite 200 Pro

2. Measurement Parameter Editor
2011-03 Instructions for Use for i-control No. 30018668 Rev. No. 1.8 47
The following are the Dispense parameters:
Select Injector Select either Injector A or B if the instrument is equipped with two injectors.
Volume: Specifies the volume to inject into a single well. Speed: Specifies the speed of liquid flow while dispensing. Refill Speed equal to Dispense Speed: Clear the check box to enter the refill speed which may be different than the injection speed. The syringe can be filled faster, even if the dispensing speed is low. Read time like dispense time: By selecting this check box, the dispense function and the timing of the measurement is linked. Usually, the measurement is performed much faster than dispensing a reagent. Therefore, the time interval differs considerably between dispensing and measuring from the first to the last wells. The overall dispense time is divided by the number of wells to be processed to calculate the measurement delay for every well. However, there is no delay in dispense if the dispense time is shorter than the measurement time.
Refill Mode Select either Standard or Refill for every injection. Standard: Dispensing occurs as long as the syringe contains enough liquid. As soon as the liquid in the syringe is used up, the syringe is refilled with the entered refill volume (200 Pro and M1000 – for FW 2.0 and higher - Ref 30061442). Refill for every dispense: Refilling of the syringe occurs for each dispense step.
Move Plate/Cuvette Select the program element Move Plate/Cuvette to move the plate/cuvette out of or into the instrument at a certain moment during the workflow. If the plate/cuvette is moved out of the reader during a workflow (e.g. to pipet some liquid into the wells of the microplate), it must be followed by a subsequent Move in step, so that the measurement can be finished.

2. Measurement Parameter Editor
48 Instructions for Use for i-control No. 30018668 Rev. No. 1.8 2011-03
2.2.4 Kinetic
Kinetic Cycle Use the program element Kinetic Cycle to perform several consecutive measurements, which may be executed in certain intervals.
Enter the respective parameters:
Cycles Number of cycles: Enter a number or click the up or down arrows for the number of actual measurement steps (2 – 1000 cycles) Duration: Enter the duration, format hh:mm:ss.
Kinetic Interval
Use kinetic interval: Enter the time interval (hh:mm:ss or ms).
Plate-wise kinetic measurements Each cycle of the kinetic measurement is performed on all selected wells. Plate-wise kinetic measurements may contain a maximum of ten independent measurement stripes that do not need to be of the same measurement type.
Well-wise kinetic measurements All cycles of the kinetic measurement are first performed in one well before continuing to the next well. Well-wise kinetic measurements may be composed of a maximum of four measurement stripes of the same type, e.g., four absorbance stripes. The Infinite M1000 allows five measurement stripes of the same type within well-wise kinetic measurements.

2. Measurement Parameter Editor
2011-03 Instructions for Use for i-control No. 30018668 Rev. No. 1.8 49
After having started the measurement, it is possible to interrupt a plate-wise kinetic measurement clicking the Pause button and to continue:
Kinetic Condition Use the Kinetic Condition program element to define which actions should be executed at a certain cycle.
If 3 is entered for Execute command at cycle within a kinetic measurement containing, e.g. a Shake step, shaking is performed only at cycle 3.
Note Kinetic conditions such as Shake, Inject and Dispense should be inserted
right after a Kinetic Cycle program element in order to ensure optimal result reproducibility.
Users are advised to set up suitable scripts prior to the measurements and to use the same script for all similar kinetic measurements in order
to obtain comparable results.

2. Measurement Parameter Editor
50 Instructions for Use for i-control No. 30018668 Rev. No. 1.8 2011-03
2.2.5 Miscellaneous
Comment Use the program element Comment to enter a remark or statement for the current measurement in the text field. This text is shown together with the measurement in the Excel output sheet.
User Request The User Request program element informs the operator of the instrument to execute a definite action during the workflow at a certain time.
If for example the Move Plate program element is used to move the plate out to perform a certain action, then the entered text should inform the operator to perform these actions. A dialog box shows the message and the measurement process stops until OK is clicked. If the plate should be moved in after pipetting for example, then the text Move Plate In informs the operator to move the plate in after pipetting to continue the workflow.
Wait for Temperature Use the program element Wait for Temperature to define a valid temperature range for the assay.
This is typically used after a Temperature program element.
Wait (Timer) Use the Wait (Timer) program element to define a certain waiting period before the next step within a workflow is executed. In the Wait time field enter the required time.

2. Measurement Parameter Editor
2011-03 Instructions for Use for i-control No. 30018668 Rev. No. 1.8 51
Enter the respective parameters:
Timer Enter the Wait time (hh:mm:ss)
Options Wait for injection: The time for injection is included in the wait time. Ignore wait at last kinetic cycle: When the program step Wait (Timer) is the last action within a kinetic run, the wait time will be ignored in the last cycle.
Incubation Incubation is always done at the heating position to ensure inside the instrument proper temperature distribution. Incubation can consist of shaking and waiting steps (up to 2 shaking steps and up to 2 waiting steps are allowed in any combination). The Remaining Wait step waits until the overall incubation time is over (including shaking and waiting times). The incubation program element is typically used to perform shaking and waiting at a certain temperature for a certain time.
The incubation stripe of the Infinite F50 contains only an input field for the Incubation time. Example for the Infinite F50
Enter the appropriate parameters for incubation:
Incubation time Enter the total time (min. 5 s)
Actions Available actions: Shaking, Wait (Timer) 2 wait and 2 shaking actions are allowed. Select actions by double-clicking or use the arrow keys. Organize actions by using the up/down keys. Remaining Wait (Timer): mandatory, cannot be deleted or edited (duration 3 s)

2. Measurement Parameter Editor
52 Instructions for Use for i-control No. 30018668 Rev. No. 1.8 2011-03
2.3 Workflow Pane The main window in i-control is the Workflow pane, where the measurement script is visible and where parameters are defined and edited. There are two ways to insert a program element from the Control bar into the Workflow pane: • Select a program element from the Control bar; by double-clicking it, it is
inserted into the Workflow pane directly after the previous program element. • Click the program element in the Control bar and drag it into the Workflow
pane to the respective position. The program elements are numbered according to their sequence. Once a program element has been inserted into the Workflow pane, settings and parameters for this element can be entered or edited. Single program elements inside the Workflow pane can be collapsed to display the most important information or expanded to access all editable functions. Click
one of the triangles next to the title of the program element, or , to switch between the two view modes. By default, i-control starts with the Plate element and the Part of Plate element in the Workflow pane. This can be modified in the Settings menu – User Settings (see 4.1.5 Settings Menu - User Settings...). Currently selected program elements within the Workflow pane are displayed with a yellow line on the upper border. If a program element contains errors or is invalid within the current workflow, the element will be flagged with an error mark and the number of the element is highlighted in red. In the Status bar, the number of Errors appears in red. If the Info pane is active, detailed information on the error is displayed. If the workflow contains errors, the measurement script can neither be saved nor started. It is recommended to always save the workflow before starting a measurement. You can define this feature as default in the Settings menu – User Settings… – Options (Select Save the script before it is started).

2. Measurement Parameter Editor
2011-03 Instructions for Use for i-control No. 30018668 Rev. No. 1.8 53
2.3.1 Hierarchy of Elements The hierarchy of elements in the Workflow pane is as follows:
1. Plate 2. Part of Plate (Range) 3. Well
Any desired measurement step can be inserted directly after a plate, range or well element. Use the Release and Indent options in the Edit menu to modify the sequence of execution of the single strip component. Select an element in the Workflow pane, click the right mouse button and select Release or Indent. Other elements from the Control bar can be inserted into the hierarchy of a workflow as follows: The first Range element is inserted directly after the Plate element; then all subsequent Range elements can be inserted. Well elements can only be inserted directly after a Range or a Plate element. Only measurement steps of the same mode (e.g. absorbance only with different wavelengths) are allowed within one well element. Kinetic steps are possible within a Plate, Range or Well element. Dispense steps are possible within a Plate or Range element. Injections steps are possible within a Well element. User Request, Comment, Wait and Wait until temperature is reached steps are possible within a Plate, Range or Well element.
2.4 Info Pane The Info pane on the right side of the screen displays information that is relevant for the currently selected program element. Any warnings and errors are shown.

3. Defining Measurements
2011-03 Instructions for Use for i-control No. 30018668 Rev. No. 1.8 55
3. Defining Measurements The following chapter describes some examples to illustrate the definition of different measurements. The Infinite M1000 instrument offers the Quick-Start-Script button in the front right corner on the top cover of the instrument. It may be used to start favorite measurement scripts directly from the instrument.
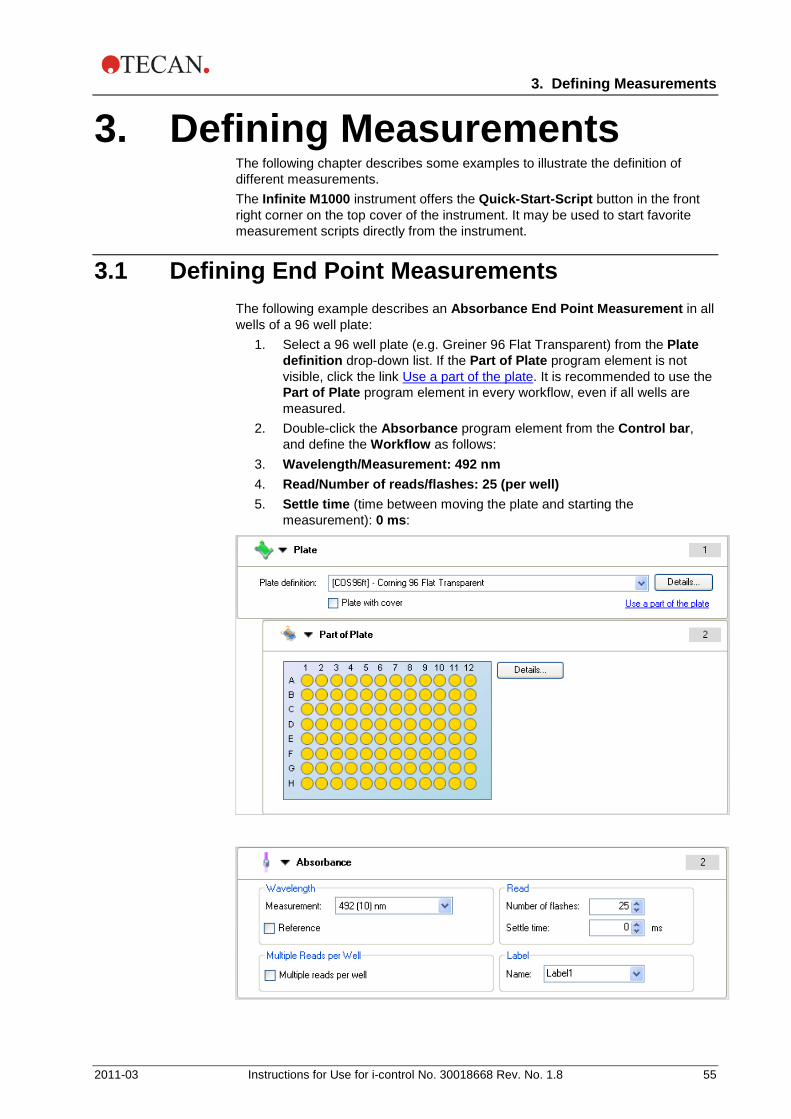
3.1 Defining End Point Measurements The following example describes an Absorbance End Point Measurement in all wells of a 96 well plate:
1. Select a 96 well plate (e.g. Greiner 96 Flat Transparent) from the Plate definition drop-down list. If the Part of Plate program element is not visible, click the link Use a part of the plate
2. Double-click the Absorbance program element from the Control bar, and define the Workflow as follows:
. It is recommended to use the Part of Plate program element in every workflow, even if all wells are measured.
3. Wavelength/Measurement: 492 nm 4. Read/Number of reads/flashes: 25 (per well) 5. Settle time (time between moving the plate and starting the
measurement): 0 ms:

3. Defining Measurements
56 Instructions for Use for i-control No. 30018668 Rev. No. 1.8 2011-03
If the plate shall be moved out of the instrument after measurement, insert a Move Plate program element and select the Out radio button.
If a Move Plate program element is not defined after the measurement, the plate will stay inside the instrument until Move Plate Out is clicked. After finishing the definition as described above start the measurement by clicking
the button on the toolbar. When clicking the Start button, Excel opens automatically and the results are displayed in a worksheet.

3. Defining Measurements
2011-03 Instructions for Use for i-control No. 30018668 Rev. No. 1.8 57
3.1.1 Plate Size – Part of the Plate Use the Plate program element in the workflow pane to choose a plate format. Select the desired plate format from the Plate definition drop-down list (e.g. a black Greiner 96 well plate). To measure a particular well or a range of wells on the plate click the link Use a part of the plate. In the Part of Plate program element click the desired well or drag a frame over the range of desired wells (e.g. A1 to F7). The selected wells are displayed in yellow; unselected appear in blue.
Wells can be selected by dragging a frame over the plate. Further ranges can be selected by holding down the Ctrl key on the keyboard and dragging another frame around the wells to be selected. By clicking on Details... the plate is zoomed in; well selection can be done also in the zoomed window.

3. Defining Measurements
58 Instructions for Use for i-control No. 30018668 Rev. No. 1.8 2011-03
3.2 Defining Multilabel Measurements Multilabel measurements are measurements with multiple consecutive reading modes, e.g. with multiple absorbance, fluorescence, luminescence labels or with mixed measurements. The following example describes the definition of a multilabel measurement in a 384 well plate:

3. Defining Measurements
2011-03 Instructions for Use for i-control No. 30018668 Rev. No. 1.8 59
Label 1 – Absorbance Measurement in all wells
1. Select a 384 well plate (e.g. Greiner 384 Flat Transparent) from the Plate definition drop-down list; select all wells in the Part of Plate.
2. Insert the Absorbance program element from the Control bar, and define as follows:
3. Wavelength/Measurement: 492 nm 4. Read/Number of reads: 25

3. Defining Measurements
60 Instructions for Use for i-control No. 30018668 Rev. No. 1.8 2011-03
Label 2 - Fluorescence Intensity in all wells 1. Insert the Fluorescence Intensity program element from the Control bar
and define as follows: 2. Wavelength/Excitation: 483 nm 3. Wavelength/Emission: 535 nm 4. Read/Number of reads: 25 5. Gain: Optimal

3. Defining Measurements
2011-03 Instructions for Use for i-control No. 30018668 Rev. No. 1.8 61
Label 3 – Fluorescence Intensity in all wells 1. Insert a second Fluorescence Intensity program element from the
Control bar and define as follows: 2. Wavelength/Excitation: 612 nm 3. Wavelength/Emission: 670 nm 4. Read/Number of reads: 25 5. Gain: Optimal
After finishing the definition as described above start the measurement by clicking
the button on the toolbar. When clicking the Start button, Excel opens automatically and the results are displayed in a worksheet.

3. Defining Measurements
62 Instructions for Use for i-control No. 30018668 Rev. No. 1.8 2011-03
3.3 Defining Kinetic Measurements The following example describes a kinetic measurement of a 96 well plate: 1. Select the 96 well plate (e.g. Greiner 96 Flat Transparent) from the Plate
definition drop-down list, and select all wells in the Part of Plate program element.
2. Double-click the Kinetic Cycle program element and define as follows: 3. Cycles/Number of cycles: 50 4. Kinetic Interval (intervals between measurements): select Use kinetic
interval and enter: 2 minutes 30 seconds. 5. Double-click the Absorbance program element and define as follows 6. Wavelength/Measurement: 492 nm 7. Read/Number of reads: 25
After having finished the definition as described above start the measurement by
clicking the button on the toolbar. When clicking the Start button, Excel opens automatically and the results are displayed in a worksheet.
3. Defining Measurements
2011-03 Instructions for Use for i-control No. 30018668 Rev. No. 1.8 63
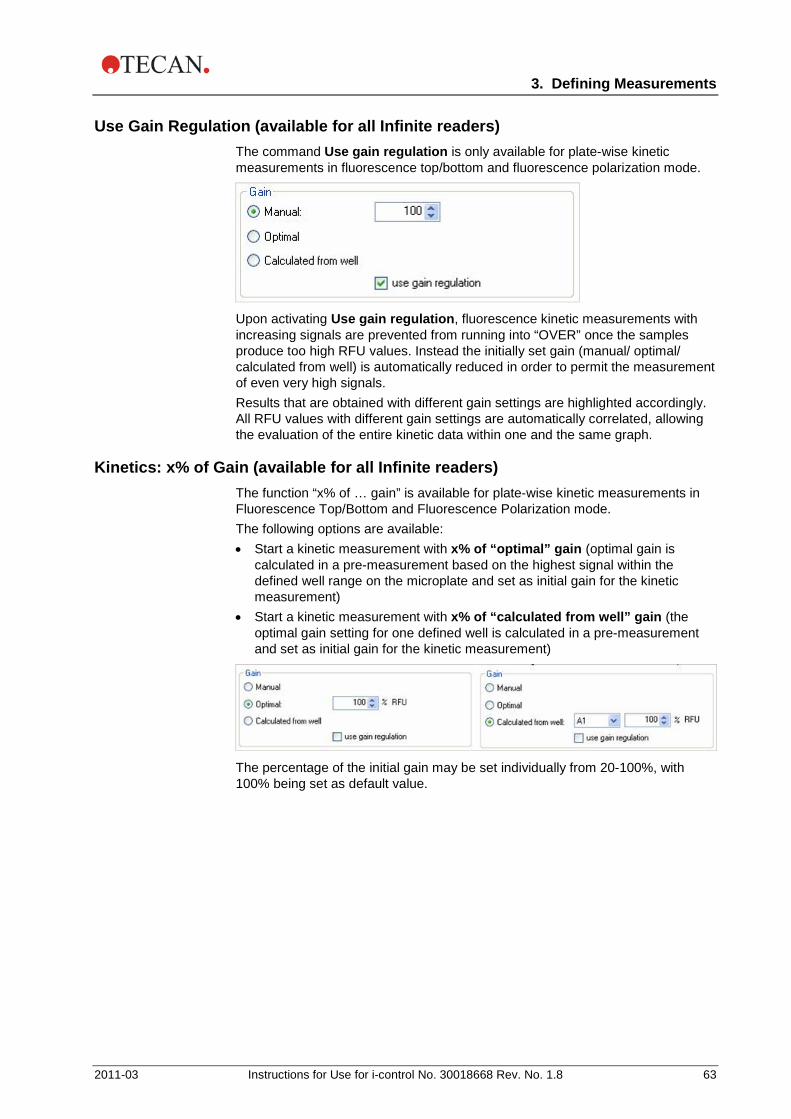
Use Gain Regulation (available for all Infinite readers) The command Use gain regulation is only available for plate-wise kinetic measurements in fluorescence top/bottom and fluorescence polarization mode.
Upon activating Use gain regulation, fluorescence kinetic measurements with increasing signals are prevented from running into “OVER” once the samples produce too high RFU values. Instead the initially set gain (manual/ optimal/ calculated from well) is automatically reduced in order to permit the measurement of even very high signals. Results that are obtained with different gain settings are highlighted accordingly. All RFU values with different gain settings are automatically correlated, allowing the evaluation of the entire kinetic data within one and the same graph.
Kinetics: x% of Gain (available for all Infinite readers) The function “x% of … gain” is available for plate-wise kinetic measurements in Fluorescence Top/Bottom and Fluorescence Polarization mode. The following options are available: • Start a kinetic measurement with x% of “optimal” gain (optimal gain is
calculated in a pre-measurement based on the highest signal within the defined well range on the microplate and set as initial gain for the kinetic measurement)
• Start a kinetic measurement with x% of “calculated from well” gain (the optimal gain setting for one defined well is calculated in a pre-measurement and set as initial gain for the kinetic measurement)
The percentage of the initial gain may be set individually from 20-100%, with 100% being set as default value.

3. Defining Measurements
64 Instructions for Use for i-control No. 30018668 Rev. No. 1.8 2011-03
3.3.1 Defining Well Kinetic Measurements with Injections A Kinetic Measurement means that the whole plate is measured in several consecutive cycles with the same settings. To define a Well Kinetic, select Well from the Control bar by double-clicking or drag the Well program element from the Control bar into the Workflow pane and drop it between Part of Plate and Kinetic Cycles. If necessary, a Kinetic interval can be defined. Injectors’ parameters can be defined using the Injection program element from the Control bar. Double-click it or drag and drop it between Kinetic cycles and Absorbance in the Workflow pane. Define volume and speed. In the Kinetic Condition program element, define after which kinetic cycle the injection should be performed. Drag it between Kinetic Cycle and Injection in the Workflow pane and define at which kinetic cycle (e.g. after kinetic cycle 3) the injection (=command) should be executed. It is very important to Release the Absorbance program element to the same indentation as the Kinetic Condition for kinetic measurements. See also 3.4 Indenting and Releasing Program Elements and 3.4.1 Ways to Indent or Release Program Elements. The Workflow pane appears as shown in the screenshot:
After having finished the definition as described above start the measurement by
clicking the button on the toolbar. When clicking the Start button, Excel opens automatically and the results are displayed in a worksheet.

3. Defining Measurements
2011-03 Instructions for Use for i-control No. 30018668 Rev. No. 1.8 65
3.3.2 The Difference between “Inject” and “Dispense” The action which is associated with inserting one of these program elements is identical: a defined volume of a liquid is injected into each selected well. The only difference is the workflow: Injecting is done well-wise, which means that the liquid is injected into the first well, and then this well is measured as defined, before the liquid is injected into the second well and so on. Dispensing is done plate-wise, which means the liquid is first dispensed into all wells of the plate, and the whole plate is measured thereafter.

3. Defining Measurements
66 Instructions for Use for i-control No. 30018668 Rev. No. 1.8 2011-03
3.4 Indenting and Releasing Program Elements The decision to indent/ release a program element will modify the workflow of the instrument during measurements. The actions of all program elements with the same indentation are performed sequentially. The only dependence between these program elements is that the next action starts directly after the previous action is finished. A program element that is indented more than the previous program element shows dependence between the two program elements. This means the parameters defined in the first program element are also active for the second (indented) program element. The following is an example of how to define a Multilabel kinetic with two Absorbance labels. The example shows that the two Absorbance program elements depend on the Kinetic Cycle program element, which depends on the Part of Plate program element, which depends on the Plate program element. Define the parameters for an example as follows:
1. Plate: 96 well plate, e.g. Greiner 96 Flat Transparent 2. Kinetic Cycle/Number of cycles: 5 3. Absorbance/ Wavelength: 260 nm 4. Number of reads: 25 5. Label Name: Label1 6. Second Absorbance/Wavelength: 280 nm 7. Number of reads: 25 8. Label Name: Label2
The Workflow pane appears as shown in the screenshot:

3. Defining Measurements
2011-03 Instructions for Use for i-control No. 30018668 Rev. No. 1.8 67
The above definition results in the following workflow: The Absorbance of all wells of a 96 well plate is first measured at 260 nm and then at 280 nm. Both Absorbance measurements are performed in 5 kinetic cycles. Indenting the second Absorbance program elements on a level with Kinetic Cycle item changes the workflow. Select the second Absorbance program element and click the right mouse button. Select Release Strip from the context sensitive menu. The Parameter window appears as shown in the screenshot:
In this workflow, an Absorbance Kinetic measurement with 5 cycles is done first at 260 nm; finished this loop, Absorbance Endpoint measurement at 280 nm is performed.
3.4.1 Ways to Indent or Release Program Elements Select a program element from the Workflow pane. • Click Edit and Indent/Release.
• Use the / buttons in the Tool bar to release or indent the selected element.
• Click the right mouse button and click Release or Indent.


4. Menus
2011-03 Instructions for Use for i-control No. 30018668 Rev. No. 1.8 69
4. Menus 4.1 Menu Bar 4.1.1 File Menu
New This command opens a new measurement workflow. If an empty document is to be opened, you will be asked to save the current workflow. Click Yes to save the current workflow or click No to create a new workflow without saving the previous one. Click Cancel to leave the dialog box.
Open This command opens an existing i-control workflow (*.mdfx) from the selected folder. If you want to open an existing workflow while another one is still open, you will be asked if you want to save the workflow. Click Yes to save the current workflow to a certain destination or click No to create a new workflow without saving the previous one. Click Cancel to leave the dialog box.
Save This command saves the current script.
Save As… This command saves the current workflow under a different name.
Open from Template (available for all Infinite readers) Templates are predefined scripts that are similar to common i-control scripts, but contain some additional information, e.g. a short description of the measurement parameters. Templates may be assigned to distinct groups and may be annotated individually. By default, the Open from template dialog opens when i-control is started. The User settings dialog contains a checkbox that can be used to hide the Open from template dialog by default.
Note All templates are designed as example scripts for common applications.
It is the responsibility of the user to validate all parameters for the purpose of the particular application before using a template.
All templates are designed as example scripts for common applications. It is the responsibility of the user to validate all parameters for the purpose of the particular application before using a template.
List of most recently used script files A list of the most recently saved workflow files is displayed. Define how many files are to be included in this list in the Settings menu User settings.
4. Menus
70 Instructions for Use for i-control No. 30018668 Rev. No. 1.8 2011-03
Exit This command exits and closes the program. If you are still connected to an instrument, you will be asked if you want to disconnect and to close the program. Click Yes if you want to exit or click No if you want to return to the program.
4.1.2 Edit Menu
Cut This command cuts the selected program element, which can be pasted again.
Copy This command copies the selected program element.
Paste This command pastes the selected program element.
Delete This command deletes the selected program element.
Release Strip This command releases the selected program element.
Indent Strip This command indents the selected program element.
Select All This command selects all program elements in the workflow pane.
4.1.3 View Menu
Info Pane This command shows or hides the info pane.
Toolbar This command shows or hides the toolbar.
Status Bar This command shows or hides the status bar (located at the bottom of the window).
Collapse All This command collapses all program elements in the workflow pane to view only one line of text.
Expand All This command expands all program elements in the workflow pane to extended view and shows all visible parameters.

4. Menus
2011-03 Instructions for Use for i-control No. 30018668 Rev. No. 1.8 71
4.1.4 Instrument Menu
Disconnect/Connect This toggle command connects or disconnects an instrument to or from i-control. To connect to an instrument select the instrument name from the list.
Start This command starts the measurement process. If the measurement is started, a small window informs that the measurement is in progress. Excel opens automatically and the results are displayed in a worksheet.
Start Stacker Run If the reader is connected to a Connect stacker, it is possible to perform batch processing. Select Start Stacker Run and the defined i-control script is performed on all available plates in the input stack.
Movements… Choose this command to define plate, cuvette and filter movements. Click Plate Out to move the plate carrier out or click Plate In to move the plate carrier in. Click Filter Out to move the selected filter carrier out. Click Cuvette In/ Out to move the cuvette correspondingly. When a measurement is started, the plate is moved into the instrument automatically.
Heating… This command is used to set the target temperature of the instrument manually. Select or enter the Target temperature and click Set and On to start instrument heating. Click the Read button to display the current temperature inside the instrument or click the Auto check box to have it read automatically. Click Off to stop heating.
Click the down button, , to display the heating graph and click the up button,
, to hide it. Click the close button, , to exit the Heating dialog box.

4. Menus
72 Instructions for Use for i-control No. 30018668 Rev. No. 1.8 2011-03
Z-Position For a detailed description of optimizing the Z-position, refer to the Instructions for Use of the Infinite F500, M1000 and M200 Pro.
Stacker Control If the reader is connected to a Connect stacker, the Stacker Control option appears in the Instrument menu.
• Select Restack to return the processed plates from the output stack to the
input stack in their original order. After Restack is selected, a dialog box appears in which the plate type must be selected and confirmed with OK, before the restacking procedure is performed.
• Select Park to move the gripper into the park position. • Select Teaching to start the Positioning Wizard. For details, see the
Instructions for Use for Connect, chapter 5. Positioning Wizard in i-control and magellan.
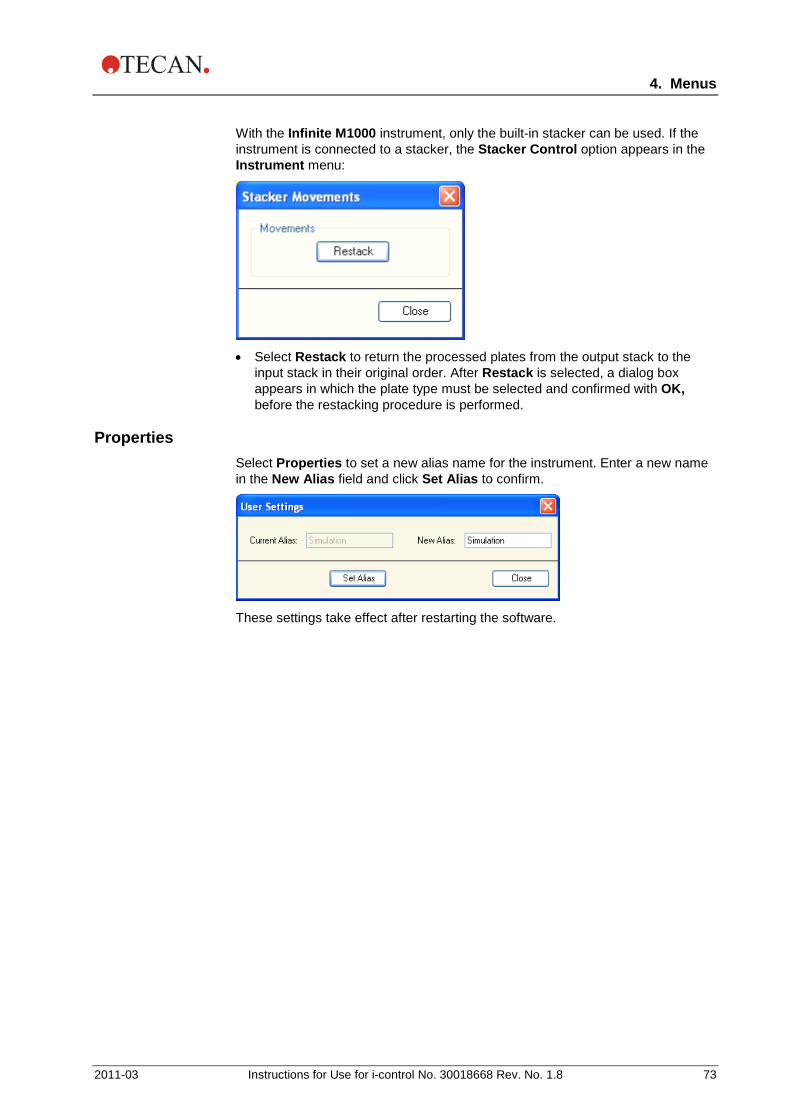
4. Menus
2011-03 Instructions for Use for i-control No. 30018668 Rev. No. 1.8 73
With the Infinite M1000 instrument, only the built-in stacker can be used. If the instrument is connected to a stacker, the Stacker Control option appears in the Instrument menu:
• Select Restack to return the processed plates from the output stack to the
input stack in their original order. After Restack is selected, a dialog box appears in which the plate type must be selected and confirmed with OK, before the restacking procedure is performed.
Properties Select Properties to set a new alias name for the instrument. Enter a new name in the New Alias field and click Set Alias to confirm.
These settings take effect after restarting the software.

4. Menus
74 Instructions for Use for i-control No. 30018668 Rev. No. 1.8 2011-03
4.1.5 Settings Menu
Injectors... This command opens the injector maintenance dialog box containing the following procedures:
Prime (Example for the Infinite F500)
Select injector A, B or both A and B. Depending on which injector is selected the corresponding group box can be edited. Select the Prime Volume and the Prime Speed depending on the instrument connected. Click Start prime to start the priming procedure. Refer to the Instructions of Use of the connected instrument for further details and examples.

4. Menus
2011-03 Instructions for Use for i-control No. 30018668 Rev. No. 1.8 75
Backflush (Example for the Infinite F500)
Select injector A, B or both A and B. Depending on which injector is selected the corresponding group box can be edited. Select the Piston Strokes and the Backflush Speed depending on the connected instrument. One piston stroke corresponds to the total volume of the used injector syringe. Click Start backflush to start the reagent backflush procedure. Refer to the Instructions of Use of the instrument connected for further details and examples.

4. Menus
76 Instructions for Use for i-control No. 30018668 Rev. No. 1.8 2011-03
Wash (Example for the Infinite F500)
Select injector A, B or both A and B. Depending on which injector is selected the corresponding group box can be edited. Select the Piston Strokes and the Wash Speed depending on the connected instrument. Click Start wash to start the washing procedure.
Waste Tub Click Empty Waste Tub only when the waste tub has been emptied manually. The software will then alert the user if the waste tub needs to be emptied again. Refer to the Instructions for Use of the connected instrument for further details and examples.
4. Menus
2011-03 Instructions for Use for i-control No. 30018668 Rev. No. 1.8 77
Filter Definitions (Infinite F200, F200 Pro, F500) Select the appropriate filter position and enter the new wavelength, bandwidth, and measurement mode for each new filter:
Measurement Mode:
Choose from the dropdown list ‘FI’ for fluorescence intensity, ‘ABS’ for absorbance measurements, FP for fluorescence polarization and ‘Empty’ for filter-free positions.
Wavelength: Enter the filter wavelength. For fluorescence intensity and fluorescence polarization measurements, set the filter wavelength within the allowed range of the connected instrument. Absorbance filters are definable between 230 and 1000 nm (Excitation only).
Bandwidth: Enter the bandwidth (nm) of the filter.
Description: This field can be used for individual user remarks about the filter, e.g. filter name, application, etc.
Purchase Date: This option enables the user to enter the purchase or installation date of the filter.
Flash Counter: The flash counter monitors the number of flashes through a filter. The flash counter number provides the user only with additional information about the filter in use. For a new filter, set the counter to 0. For a previously used filter, enter the last collected flash number if the number is available. The flash counter number is saved together with other information about the filter on the filter slide microchip. If you replace a filter, this information will be lost unless the last filter flash number is manually documented by the user.
Confirm the new filter values by clicking Save. Close the Filter Definition dialog and the system is ready to perform measurements with the new filters. Refer to the Instructions of Use of the connected instrument for further details and examples.

4. Menus
78 Instructions for Use for i-control No. 30018668 Rev. No. 1.8 2011-03
Plate Definition... This command allows you to choose a plate file from the drop-down list of available plates. The plate definition files contain all relevant parameters of a specific plate type, e.g. coordinates of measurement points, number of columns, number of rows, well form, well diameter, plate height, plate height with cover…). A graphic element at the bottom of the dialog visualizes the parameter which is currently defined. The available plate types are dependent on the instrument connected. The following plate formats are already included in i-control:
Manufacturer / Pdfx-Name Cat.-No. Drawing-No.:
Greiner
GRE6ft 657 160 657 185
AC-9909
GRE12ft 665 180 665 102
AC-9910
GRE24ft 662 160 662 102
AC-9911
GRE48ft 677 180 677 102
AC-9912
GRE96ft 655 101 655 161
AC-9701
GRE96fb_chimney 655 079 655 086 655 077 655 076
AC-65507x
GRE96fw_chimney 655 073 655 083 655 074 655 075
AC-65507x
GRE96ut 650 101 650 161 650 160 650 180 650 185
AC-6501xx
GRE96vt 651 101 651 161 651 160 651 180
AC-6511xx
GRE384fb 781 079 781 086 781 077 781 076 781 094 781 095
AC-0205

4. Menus
2011-03 Instructions for Use for i-control No. 30018668 Rev. No. 1.8 79
Manufacturer / Pdfx-Name Cat.-No. Drawing-No.:
GRE384ft 781 061 781 101 781 162 781 185 781 186 781 165 781 182
AC-0205
GRE384fw 781 073 781 080 781 074 781 075 781 097 781 096
AC-0205
GRE384sb 784 209 AC-8808
GRE384st 784 201 AC-8808
GRE384sw 784 207 AC-8808
GRE1536fw 782 075 782 074
AC-782061/ AC-78207x/ AC-782101
GRE1536ft 782 101 782 061
AC-782061/ AC-78207x/ AC-782101
GRE1536fb 782 076 782 077
AC-782061/ AC-78207x/ AC-782101
GRE96ft_half area 675 161 675 101 675 801
AC-675801
GRE96fw_half area 675 074 675 075 675 094 675 095
AC-675801
GRE96fb_half area 675 077 675 076 675 097 675 096
AC-675801
Corning
COS6ft 3506 3516
DWG00673
COS12ft 3512 3513
DWG00674
COS24ft 3524 3526 3527
DWG01261

4. Menus
80 Instructions for Use for i-control No. 30018668 Rev. No. 1.8 2011-03
Manufacturer / Pdfx-Name Cat.-No. Drawing-No.:
COS48ft 3548 DWG00676
COS96fb 3916 3915 3925
DWG00120
COS96ft 3370 3628
DWG00120
COS96fw 3362 3912 3922
DWG00120
COS96rt 3360 3367 3788 3795 3358
DWG01123
COS96ft_half area 3690 3695 3697
DWG00122
COS384fb 3708 3709 3710
DWG00679
COS384ft 3680 3700 3701 3702
DWG00679
COS384fw 3703 3704 3705
DWG00679
COS384fb_low volume 3820 3821 3822
DWG02035
COS384fw_low volume 3824 3825 3826
DWG02035
COS384sb_round bottom 3677 3676 3678
DWG01378
COS384sw_round bottom 3673 3674
DWG01378
COR96fb clear bottom 3631 DWG00678
COR96fw clear bottom 3632 DWG00678
COR96fb half area 3694 DWG00123
COR96fw half area 3693 DWG00123
COR96fb half area clear bottom
3880 DWG01471

4. Menus
2011-03 Instructions for Use for i-control No. 30018668 Rev. No. 1.8 81
Manufacturer / Pdfx-Name Cat.-No. Drawing-No.:
COR96fw half area clear bottom
3883 DWG01471
COR96fc UV transparent 3635 DWG00678
COR96fc half area UV transparent
3679 DWG00678
COR384fb clear bottom 3711 DWG00682
COR384fw clear bottom 3706 DWG00682
COR384fc UV transparent 3675 DWG01479
COR1536fb 3724 DWG01840
COR1536fw 3725 DWG01840
COR1536fb clear bottom 3891 DWG01543
Nunclon
NUN96ft 439 454 442 404 475 094 269 620 269 787
MTP-0001
NUN384ft 242 765 242 757 164 688 464 718 265 196
MTP-0002
NUN384fb 264 556 164 564 460 518
MTP-0002
NUN384fw 264 572 164 610 460 372
MTP-0002
NUN96ut 143 761 163 320 262 170 262 162 475 434 449 824
MTP-0003
NUN96fb_LumiNunc FluoroNunc
137 101 137 103 237 105 237 107 237 108 437 111 437 112
MTP-0004
NUN96fw_LumiNunc FluoroNunc
136 101 136 102
MTP-0004

4. Menus
82 Instructions for Use for i-control No. 30018668 Rev. No. 1.8 2011-03
Manufacturer / Pdfx-Name Cat.-No. Drawing-No.: 236 105 236 107 236 108 436 110 436 111
BD Falcon
BD24_FluoroBlok 351155 351156 351157 351158
PD801712
BD96_FluoroBlok 351161 351162 351163 351164
MTP-0006
Tecan
NanoQuantPlate - MTP-0007
To make a custom plate definition file, choose one from the list as a template. After the appropriate settings have been defined, save it under a different name. Click Save as to save the selected plate definition as a *.pdfx-file.
User Settings...

4. Menus
2011-03 Instructions for Use for i-control No. 30018668 Rev. No. 1.8 83
Tab Start Up: Behavior at start up can be set. 1. Select a default plate. 2. Determine if the workflow pane should start with an empty workflow, plate
only, or plate and part of plate. 3. Select whether the last used instrument should be reconnected 4. Select whether the ‘Open Template’ dialog at startup should be skipped.
Tab General: General options can be set. 1. Ask to save the workflow (when changed) before the measurement
starts. 2. Determine if i-control window should be minimized while the
measurement is performed. 3. Determine the length of the list of recently used plate files (combo box for
plate selection in the plate program element). 4. Determine how many recently used workflow files are to be listed in the
file menu.
Tab Measurement: Certain measurement settings can be saved as default settings. 1. Absorbance: Select default number of flashes. 2. Fluorescence: Select default number of flashes, default value for manual
z-position and default value for manual gain.
Tab Language: 1. Select the language of the i-control software (English and German are
currently available). Click OK to save your settings or click Cancel to leave the dialog box without saving any changes.

4. Menus
84 Instructions for Use for i-control No. 30018668 Rev. No. 1.8 2011-03
Result Presentation... This command offers the following tabs to determine the output settings of the measured results in Excel:
Depending on the connected instrument, different tabs are visible. The Infinite F500 and M1000 have for example an additional tab for fluorescence polarization.

4. Menus
2011-03 Instructions for Use for i-control No. 30018668 Rev. No. 1.8 85
General Presentation:
Destination: Select between New workbook, New worksheet, Use previous worksheet or Use existing workbook.
If New workbook is selected, a new workbook is opened every time a measurement script is performed. If New worksheet is selected, a new worksheet of the existing workbook is created. If no workbook is open a new one is created.
If Use existing workbook is selected, a workbook and a worksheet must be selected. First select the workbook (an Excel file), and then select the sheet the results should be placed into.
View Mode: Select between Matrix and List. If Matrix is selected, the data alignment corresponds to a microplate; times per well cannot be displayed. Not relevant for kinetic result presentation. If List is selected, choose between: Align, Rotation, Display Times.
Note The option Use previous worksheet must not be used with i-control
versions lower than version 1.5.
Show: Select between All and Measured. If All is selected, the whole plate geometry, including all possible rows and columns, is displayed. If Measured is selected, only the results of the measured wells are displayed.
Align: Select between A1A2 or A1B1. If A1A2 is selected, the results are arranged in rows (of the microplate). If A1B1 is selected, the results are arranged in columns (of the microplate).
Rotation: Select between Columnwise or Rowwise. If Columnwise is selected, the results are displayed in a column (in the Excel sheet). If Rowwise is selected, the results are displayed in a row (in the Excel sheet).
Display Times: Select between No time or Time per well. If No Time is selected, only the values are displayed. If Time per well is selected, a timespan for each value is displayed.
Polarization Result:
Show polarization: Shows polarization data
Show anisotropy: Shows anisotropy data
Show total intensity: Shows total intensity data
Intermediates:
Show parallel intensity: Shows parallel intensity data
Show perpendicular intensity: Shows perpendicular intensity data
Show parallel raw data: Shows parallel raw data
Show perpendicular raw data: Shows perpendicular raw data

4. Menus
86 Instructions for Use for i-control No. 30018668 Rev. No. 1.8 2011-03
Kinetic Result:
Rotation: Select between Columnwise or Rowwise. If Columnwise is selected, the results are displayed in a column (in the Excel sheet). If Rowwise is selected, the results are displayed in a row (in the Excel sheet).
Align: Select between A1A2 and A1B1. If A1A2 is selected, the results are arranged in rows (of the microplate). If A1B1 is selected, the results are arranged in columns (of the microplate).
Display Times: Select between Time per cycle and Time per well. If Time per cycle is selected, a timespan per cycle is displayed. If Time per well is selected, a timespan for every well is displayed.
Cycles:
Range: Select All to display all cycles. Specified range is currently not available.
Wavelength Scan
Result:
Show Wavelength Scan data
Wavelength:
Presentation: Select between Wavelength over well or Wells over wavelength. If Wavelength over well is selected the wells are displayed in a column (in Excel) and the appropriate wavelength data in the row. If Wells over wavelength is selected the wells are displayed in a row (in Excel) and the appropriate wavelength data in the column below. Align: select between A1A2 and A1B1. If A1A2 is selected the results are arranged by rows. If A1B1 is selected the results are arranged by columns.
Show Wavelength chart
This command appends an Excel chart per well to the worksheet; in this chart, values over wavelength are displayed (X-axis: wavelength, y-axis: values).
NanoQuant Show Raw Data Select the Show Raw Data box to display the raw measurement values of Nucleic Acid Quantification and Labeling efficiency measurements.

4. Menus
2011-03 Instructions for Use for i-control No. 30018668 Rev. No. 1.8 87
Exception History… The Exception History dialog box shows a list of exceptions (instrument errors, software failures) with date and time. Every time an exception occurs and an error box is displayed, all relevant information is collected and saved in a zip-file. Each of these zip-files leads to an entry in this list. Relevant information is: The error message and number, communication log-files and system information (like operating system version, free amount of disc space). Every entry (which corresponds with a zip-file) can be saved as a separate file to a user-defined location using the floppy disc symbol at the lower left corner of the dialog box. This information is helpful to the customer support or help desk to track problems.
4.1.6 Help Menu
Contents This command opens the online help file and allows you to browse through the different topics.
Index This command opens the online help file and allows you to enter the first letters of your search query; a selection of help topics will appear.
Search This command opens the online help file and allows you to enter your search query.
Tecan Homepage This command opens your favorite browser and navigates to the Tecan homepage.
About… This command lists the version numbers of the software and hardware components of the currently installed i-control.

4. Menus
88 Instructions for Use for i-control No. 30018668 Rev. No. 1.8 2011-03
4.2 Toolbar The following commands are accessible via the toolbar:
Opens a new measurement workflow
Opens an existing file
Saves the current workflow
Releases the selected program element
Indents the selected program element
Starts the measurement
Starts Stacker Run (only available with stacker)
Connects or disconnects an instrument
Moves plate out
Moves plate in
Moves cuvette out (M200, M200 Pro)
Moves cuvette in (M200, M200 Pro)
Moves filter out (F200, F200 Pro)
Moves ExFilter out (F500)
Moves EmFilter out (F500)
Restacks (only available with stacker)
Parks gripper (only available with stacker)
Shows or hides the info pane
For starting favorite measurement scripts directly from the instrument (M1000 only)
Opens the i-control help file

4. Menus
2011-03 Instructions for Use for i-control No. 30018668 Rev. No. 1.8 89
Select Quickstart Script (M1000 only) The currently visible workflow can be saved and started directly from the instrument:
When the favorite script has been saved and is active in the text field, pressing the Quick-Start-Script button on the instrument will start this script.
Saved favorite scripts can also be deleted.


5. Batch Processing
2011-03 Instructions for Use for i-control No. 30018668 Rev. No. 1.8 91
5. Batch Processing 5.1 Introduction
If the reader is connected to a Connect stacker, it is possible to perform batch processing. The defined i-control script will be performed on each of the available plates in the input stack.
CAUTION DO NOT USE MICROPLATES WITH COVERS, WHEN USING THE
CONNECT STACKER TO PERFORM BATCH PROCESSING.
Note The defined script will be performed on each of the available plates in the
input stack. It is not possible to run the entire stack through more than once per script.
With the Infinite M1000 instrument, the built-in stacker can be used. Please refer to the respective Instructions for Use.
5.2 Microplate Requirements for Batch Processing The use of plate types is limited according to the specifications of the connected instrument; see the corresponding Instructions for Use for details. Any common microplate ranging from 6 to 1536 well formats conforming to the ANSI/SBS standards (ANSI/SBS 1-2004; ANSI/SBS 2-2004, ANSI/SBS 3-2004 and ANSI/SBS 4-2004) may be used with the Connect or built-in stacker for batch processing. Microplates with covers cannot be used with the stacker.
PARAMETERS CHARACTERISTICS
Overall plate height From 7.3 mm to 20 mm
Infinite M1000: from 7.0 mm to 23 mm
Footprint Length = 127.76 mm ± 0.5 mm Width = 85.48 mm ± 0.5 mm
Minimum difference between plate height and skirt height
≥ 6 mm (only relevant if a Connect stacker is installed)

5. Batch Processing
92 Instructions for Use for i-control No. 30018668 Rev. No. 1.8 2011-03
5.3 Start Stacker Run Once a script has been defined, batch processing can be started by selecting Start Stacker Run from the Instrument menu or by clicking the
button on the toolbar. The output stack of the Connect stacker must be empty before starting a run. The Stacker Operations dialog box appears:
• Select Skip topmost plate if the plate shall be neglected for measurement.
The topmost plate will not be processed and will be moved to the output stack. • Select Restack after last plate to return all plates in their original order to the
input stack after all plates have been processed. Click OK to confirm the settings and start batch processing. Excel opens automatically and the measurement results of each plate measurement will be saved in a separate worksheet. If Read barcode has been selected in the Plate program element, the worksheets will be named according to the corresponding barcode number; otherwise they will be named Plate 1, Plate 2 etc.
CAUTION IF THE READER IS OPERATED WHILE POSITIONED ON THE CONNECT STACKER BUT WITHOUT USING THE CONNECT
STACKER, MAKE SURE THAT THE GRIPPER IS IN THE PARK POSITION AND DOES NOT HINDER ANY OF THE READER’S MOVEABLE PARTS (E.G. PLATE CARRIER, CUVETTE CARRIER,
FILTER SLIDE, ETC.).

5. Batch Processing
2011-03 Instructions for Use for i-control No. 30018668 Rev. No. 1.8 93
5.4 Restacking The Infinite M1000 allows restacking of plates without a preceding measurement. Restacking is also possible when the input stack contains plates.
5.5 Stacker Kinetics (available for Infinite F500 and M1000)
In contrast to kinetic measurements on one plate, stacker kinetics allow for the analysis of multiple plates in a time-dependent manner. After all plates in the input stack have been measured (cycle 1), the plates are automatically restacked in their original order and measured again until the user-defined number of cycles is completed on all plates. A maximum of 300 cycles is possible. To facilitate data evaluation, a separate results sheet is generated for each plate and named according to the plate number or barcode (if installed). Results of subsequent cycles are automatically added to the corresponding results sheet. Stacker kinetics are operable with any plate-wise kinetic measurement script, and combinable with all available kinetic conditions. Note that temperature settings can only be maintained when the plate is located inside the instrument, not in the input/output stack. In order to perform a stacker kinetic measurement, the workflow / script can be set up in the same way as a usual kinetic measurement and started using the button Start Stacker Run. A Stacker Operations dialog opens to provide access to additional functions specific for stacker measurements. By selecting the box Run Kinetic as Stacker Kinetic, the script is automatically executed as a stacker kinetic measurement.


Index
2011-03 Instructions for Use for i-control No. 30018668 Rev. No. 1.8 95
Index A
Alias ................................................................. 73
B
Batch Processing ............................................. 91
C
Changing Plate Size ........................................ 57 Comment ......................................................... 50 Connected Instrument ..................................... 16 Control Bar
Actions ......................................................... 43 Kinetic .......................................................... 48 Lab Ware...................................................... 23 Measurements ............................................. 25 Miscellaneous .............................................. 50
Cuvette ............................................................ 25
D
Disconnect/Connect ........................................ 71 Dispense .......................................................... 46
E
Exception History... .......................................... 87
F
Filter Definitions ............................................... 77
H
Hardware Requirements .................................... 7 Heating... ......................................................... 71
I Incubation ........................................................ 51 Indenting and Releasing Program Elements ... 67 Info Pane ......................................................... 53 Injection ........................................................... 45 Injectors...
Backflush...................................................... 75 Prime ............................................................ 74 Wash ............................................................ 76 Waste Tube .................................................. 76
Installation........................................................ 10 under Windows Vista ................................... 11
Intended Use ..................................................... 7
K
Kinetic Condition .............................................. 49 Kinetic Cycle .................................................... 48 Kinetic Measurements ..................................... 62
M
Measurement Parameter Editor ...................... 21
Measurements Absorbance .................................................. 25 Absorbance Scan ........................................ 26 Fluorescence Intensity ................................. 26 Fluorescence Intensity Scan ....................... 31 Fluorescence Polarization ........................... 34 Luminescence .............................................. 41 Luminescence Dual Color ........................... 42
Menu Bar Edit Menu ..................................................... 70 File Menu ..................................................... 69 Help Menu ................................................... 87 Instrument Menu .......................................... 71 Settings Menu .............................................. 74 View Menu ................................................... 70
Microplate Requirements ................................ 91 Move Cuvette .................................................. 47 Move Plate ...................................................... 47 Move Plate/ Cuvette ........................................ 47 Movements... ................................................... 71 Multilabel Measurements ................................ 58 Multiple Reads per Well .................................. 39
N
NanoQuant ...................................................... 86
P
Park ................................................................. 72 Part of Plate ..................................................... 24 Plate ................................................................ 23 Plate Definition ................................................ 78 Properties ........................................................ 73
Q
Quickstart Script .............................................. 89
R
Reader Compatibility ..........................................9 Requirements
Suitable microplates for batch processing ... 91 Restack ..................................................... 72, 73 Restacking ....................................................... 93 Result Presentation... ...................................... 84
S
Shaking ........................................................... 44 Simulated Instrument ...................................... 18 Stacker Control ................................................ 72 Stacker Kinetics ............................................... 93 Stacker Movements ......................................... 72

Index
96 Instructions for Use for i-control No. 30018668 Rev. No. 1.8 2011-03
Start Stacker Run ............................................ 92
T
Teaching .......................................................... 72 Temperature .................................................... 43 Toolbar ............................................................. 88
U
User Request ................................................... 50 User Settings... ................................................ 82
W
Wait (Timer) ..................................................... 50 Wait for Temperature....................................... 50 Well .................................................................. 24 Workflow pane ................................................. 52
hierarchy ...................................................... 53
Z
Z-Position ........................................................ 72


![Untitled-54 [] · Title: Untitled-54.eps Created Date: 12/30/2011 10:46:42 AM](https://img.pdfslide.us/doc/110x75/5f1a9e888b30777d8d6850ac/untitled-54-title-untitled-54eps-created-date-12302011-104642-am.jpg)