Embed Size (px)
Citation preview
Laith M Jazrawi, MD
Professor of Orthopedic Surgery Chief, Division of Sports Medicine T 646-501-7223
NYU Langone Orthopedic Center 333 E 38th St, New York, NY 10016 T 646-501-7223 F 646-754-9505 www.NewYorkOrtho.com
INSTRUCTIONS FOR SURGERY Inordertomakeyouradmissionandhospitalstaysmoothandmorepleasant,pleasecomplywiththefollowinginstructions:
c IfyoursurgeryisonMONDAY,pleasereportto:
NYULangoneOrthopedicHospital301East17thStreetNewYork,NY10003
Ifindicatedbyyourphysician,scheduleyourpre-surgicaltesting,locatedat
3032ndAvenue,1stFloorSuite16
NewYork,NY10003
c IfyoursurgeryisonFRIDAY,pleasereportto:
NYULangoneOutpatientSurgeryCenter339East38thStreetNewYork,NY10016
Ifindicatedbyyourphysician,pleasecall212-263-5985toscheduleyourpre-surgicaltesting,locatedat
240East38thSt.
NewYork,NY10016MezzanineLevel
*Onebusinessdaypriortoyoursurgery,hospitalstaffwillcontactyoutofinalizeyoursurgerytime.
A. Bringjogging/warm-uppants,shorts/skirtifhavingkneesurgery.
B. Bringashirt/blousethatbuttonsopeninfrontinsteadofapulloverifhavingshoulder/elbowsurgery.
C. Ifyouowncrutches,bringthemwithyou,ifhavingknee,ankleorhipsurgery.
D. Bringallmedicationsoralistofcurrentmedicationsyouaretakingwithyou.Alsobringalistofany
allergies.
E. Bloodpressuremedicationshouldbetakenasusualwithasipofwaterthemorningofsurgery.DONOTtakeadiureticorfluidpill.Seizuremedicationsmaybetakenbeforesurgery.
F. DONOTtakeoraldiabetesmedications(pills)thenightbeforeorthedayofsurgery.Ifyouareoninsulin,DONOTuseinsulinthemorningofsurgeryunlessyouarea"problemdiabetic"inwhichcaseyouneedtoconsultyourphysicianregardingtheproperinsulindoseforyoutousepriortosurgery.
Laith M Jazrawi, MD
Professor of Orthopedic Surgery Chief, Division of Sports Medicine T 646-501-7223
NYU Langone Orthopedic Center 333 E 38th St, New York, NY 10016 T 646-501-7223 F 646-754-9505 www.NewYorkOrtho.com
G. PleaseDONOTwearmakeupornailpolishthedayofsurgery.Youwillneedtoremovecontactlens
(includingextendedwear),denture,orbridgespriortosurgery.Pleasebringyourowncontainersforstorage.
H. Leavealljewelryandvaluablesathome.Thehospitalwillnottakeresponsibilityforlostormissingitems.
I. Youneedtoreportanyskinirritation,fever,cold,etc.,toDr.Jazrawi.
J. Youwillneedtobringyourinsurancecard/informationwithyou.
K. DONOTeat,drink(includingwater),chewgum,candy,smokecigarettes,cigars,usesmokelesstobacco,etc.,aftermidnightthenightbeforesurgeryorthemorningofyoursurgery.Theonlyexceptionisasipofwatertotakenecessarymedicationsthemorningofsurgery.
L. Youmustarrangesomeonetodriveyouhomewhenreadytoleavethehospital.Youwillnotbeallowed
todriveyourselfhomeaftersurgery.Wecanassistyouifyouneedtransportationtotheairportorhotel,however,youneedtoletusknowinadvance(ifpossible)sowecanmakethearrangement.
M. NOTE:DONOTtakeanyaspirin,aspirinproducts,anti-inflammatories,CoumadinorPlavixatleast5days
priortosurgery.YouareallowedtotakeCelebrexuptoyourdayofsurgery.Ifyourmedicaldoctororcardiologisthasyouonanyoftheabovemedications.Pleasecheckwithhim/herbeforediscontinuingthemedication.YoumayalsotakeTylenolorExtra-StrengthTylenolifneeded.
NonsteroidalAnti-Inflammatory(Arthritis)Medications:
SomeofthemostcommonnamesforfrequentlyusedNSAID'sinclude:Motrin,Indocin,Nalfon,Naprosyn,Naprelan,Arthrotec,Tolectin,Feledene,Voltaren,Clinoril,Dolobid,Lodine,Relafen,Daypro,Advil,Aleve,Ibuprofen.Yourfirstfollowupappointmentisusuallyscheduledforapproximately2weeksafteryoursurgeryatthe333East38thstreetoffice.Thedateandtimeofyourfollow-upis__________________________.Ifyoucannotmakethisappointmentorneedtochangethetime,pleasecontacttheoffice.Ifyouhaveanyquestionsregardingyoursurgery,pleasecontacttheofficeat646-501-7223option4,option2orviatheinternetatwww.newyorkortho.com
Laith M Jazrawi, MD
Professor of Orthopedic Surgery Chief, Division of Sports Medicine T 646-501-7223
NYU Langone Orthopedic Center 333 E 38th St, New York, NY 10016 T 646-501-7223 F 646-754-9505 www.NewYorkOrtho.com
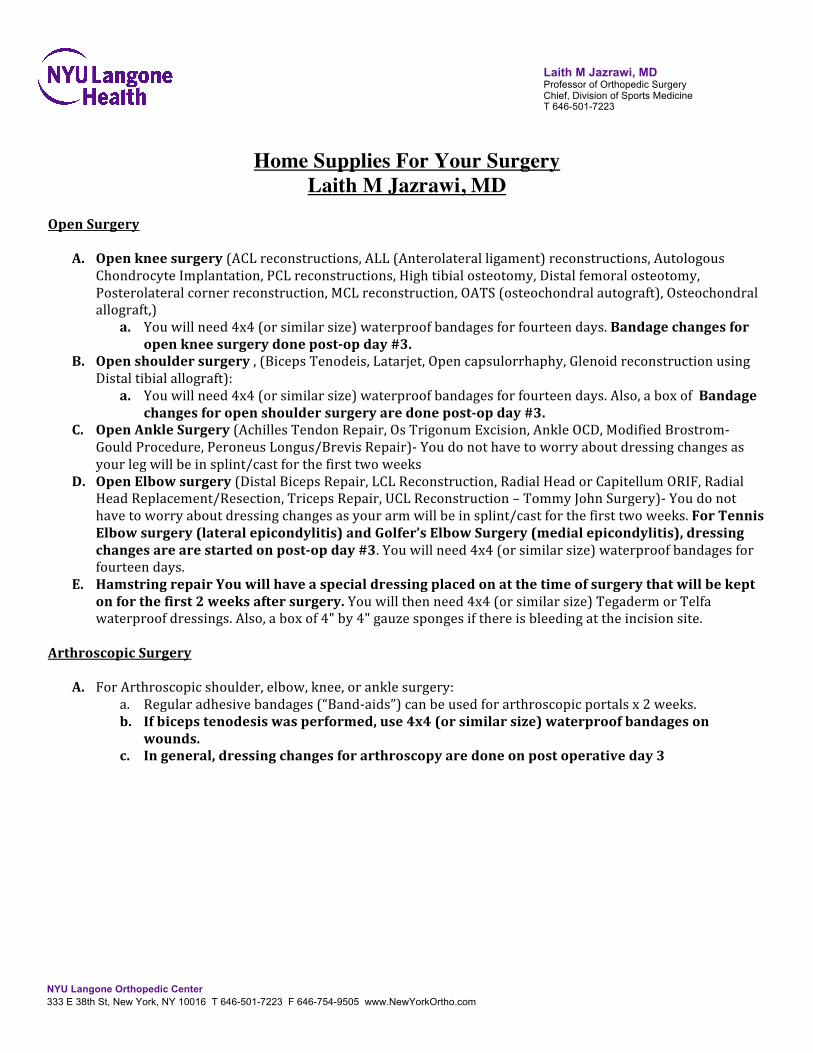
Home Supplies For Your Surgery Laith M Jazrawi, MD
OpenSurgery
A. Openkneesurgery(ACLreconstructions,ALL(Anterolateralligament)reconstructions,AutologousChondrocyteImplantation,PCLreconstructions,Hightibialosteotomy,Distalfemoralosteotomy,
Posterolateralcornerreconstruction,MCLreconstruction,OATS(osteochondralautograft),Osteochondral
allograft,)
a. Youwillneed4x4(orsimilarsize)waterproofbandagesforfourteendays.Bandagechangesforopenkneesurgerydonepost-opday#3.
B. Openshouldersurgery,(BicepsTenodeis,Latarjet,Opencapsulorrhaphy,GlenoidreconstructionusingDistaltibialallograft):
a. Youwillneed4x4(orsimilarsize)waterproofbandagesforfourteendays.Also,aboxofBandagechangesforopenshouldersurgeryaredonepost-opday#3.
C. OpenAnkleSurgery(AchillesTendonRepair,OsTrigonumExcision,AnkleOCD,ModifiedBrostrom-GouldProcedure,PeroneusLongus/BrevisRepair)-Youdonothavetoworryaboutdressingchangesas
yourlegwillbeinsplint/castforthefirsttwoweeks
D. OpenElbowsurgery(DistalBicepsRepair,LCLReconstruction,RadialHeadorCapitellumORIF,RadialHeadReplacement/Resection,TricepsRepair,UCLReconstruction–TommyJohnSurgery)-Youdonot
havetoworryaboutdressingchangesasyourarmwillbeinsplint/castforthefirsttwoweeks.ForTennis
Elbowsurgery(lateralepicondylitis)andGolfer’sElbowSurgery(medialepicondylitis),dressing
changesarearestartedonpost-opday#3.Youwillneed4x4(orsimilarsize)waterproofbandagesfor
fourteendays.
E. HamstringrepairYouwillhaveaspecialdressingplacedonatthetimeofsurgerythatwillbekeptonforthefirst2weeksaftersurgery.Youwillthenneed4x4(orsimilarsize)TegadermorTelfa
waterproofdressings.Also,aboxof4"by4"gauzespongesifthereisbleedingattheincisionsite.
ArthroscopicSurgery
A. ForArthroscopicshoulder,elbow,knee,oranklesurgery:a. Regularadhesivebandages(“Band-aids”)canbeusedforarthroscopicportalsx2weeks.
b. Ifbicepstenodesiswasperformed,use4x4(orsimilarsize)waterproofbandagesonwounds.
c. Ingeneral,dressingchangesforarthroscopyaredoneonpostoperativeday3
Laith M Jazrawi, MD
Professor of Orthopedic Surgery Chief, Division of Sports Medicine T 646-501-7223
NYU Langone Orthopedic Center 333 E 38th St, New York, NY 10016 T 646-501-7223 F 646-754-9505 www.NewYorkOrtho.com
Post-Operative Medication Administration
Knee Arthroscopy
• Pain- Motrin 800mg. 1 tab three times daily, as needed • Adjunctive pain: Percocet (Oxycodone/Acetaminophen) 5/325 (5 tabs); One tab every 6 hours as
needed for adjunctive pain* Meniscal Repair, Meniscal Root Repair
• Pain- Percocet (Oxycodone/Acetaminophen)10/325; One tab every 6 hours as needed* • Constipation – Docusate (Colace) 100mg; 1 tab twice daily as needed. • DVT prophylaxis- Aspirin 81mg; 2 tabs daily x 14 days • ****** Aspirin starts post-operative day #1
Knee Ligament Reconstruction
• Pain- Percocet (Oxycodone/Acetaminophen) 10/325; One tab every 6 hours as needed* • Antibiotic – Keflex 500mg; One tab 4 times daily x 4 days
o Keflex allergy – Clindamycin 300mg; One tab twice daily x 7days. • Constipation – Docusate (Colace) 100mg; 1 tab twice daily as needed (Max 3 tabs) • DVT prophylaxis- Aspirin 81mg; 2 tabs daily x 28 days • *****Antibiotics and Aspirin starts post-operative day #1
Non-weight bearing Lower Extremity Surgery (Distal Femoral Osteotomy, High Tibial Osteotomy, Tibial Tubercle Osteotomy, Cartilage Transplant)
• Antibiotic – Keflex 500mg; One tab 4 times daily x 4 days o Keflex allergy – Clindamycin 300mg; One tab twice daily x 7days.
• Pain- Percocet (Oxycodone/Acetaminophen) 10/325; One tab every 6 hours as needed* • Constipation – Docusate (Colace) 100mg; 1 tab twice daily as needed (Max 3 tabs) • DVT prophylaxis- Aspirin 81mg; 2 tabs daily x 28 days • ******Antibiotics and Aspirin starts post-operative day #1
Shoulder/Elbow Surgery
• Antibiotic – Keflex 500mg; One tab 4 times daily x 4 days o Keflex allergy – Clindamycin 300mg; One tab twice daily x 7days.
• Pain- Percocet (Oxycodone/Acetaminophen)10/325; One tab every 6 hours as needed* • Constipation – Docusate (Colace) 100mg; 1 tab twice daily as needed.
Laith M Jazrawi, MD
Professor of Orthopedic Surgery Chief, Division of Sports Medicine T 646-501-7223
NYU Langone Orthopedic Center 333 E 38th St, New York, NY 10016 T 646-501-7223 F 646-754-9505 www.NewYorkOrtho.com
Ankle fracture surgery & Achilles Tendon Surgery
• Antibiotic – Keflex 500mg; One tab 4 times daily x 4 days o Keflex allergy – Clindamycin 300mg; One tab twice daily x 7days.
• Pain- Percocet (Oxycodone/Acetaminophen)10/325; One tab every 6 hours as needed* • Constipation – Docusate (Colace) 100mg; 1 tab twice daily as needed. • DVT Prophylaxis - Aspirin 81mg; 2 tabs daily x 28 days • ****Antibiotics and Aspirin starts post-operative day #1
Ankle arthroscopy +/- Microfracture
• Pain- Percocet (Oxycodone/Acetaminophen) 10/325; One tab every 6 hours as needed* • DVT Prophylaxis - Aspirin 81mg; 2 tabs daily x 14 days • ****Aspirin starts post-operative day #1
Hamstring repair
• Antibiotic – Keflex 500mg; One tab 4 times daily x 4 days o Keflex allergy – Clindamycin 300mg; One tab twice daily x 7days.
• Pain- Percocet (Oxycodone/Acetaminophen)10/325; One tab every 6 hours as needed* • Constipation – Docusate (Colace) 100mg; 1 tab twice daily as needed. • DVT Prophylaxis - Aspirin 81mg; 2 tabs daily x 28 days • ****Antibiotics and Aspirin starts post-operative day #1
* No refills of narcotic pain medication will be given. You must transition to over the counter Aleve or Motrin after your initial course of narcotic pain medication is completed. If you have any stomach issues you may transition to Extra Strength Tylenol instead.
*** HIGH RISK DVT Patients – patients on oral contraceptives, smokers, or history of previous DVT or embolus
• Will receive o Xeralto (Rivaroxaban) 10mg; 1 tab daily x 14 days o Followed by aspirin 81mg; 2 tabs daily x 14 days
Laith M Jazrawi, MD
Professor of Orthopedic Surgery Chief, Division of Sports Medicine T 646-501-7223
NYU Langone Orthopedic Center 333 E 38th St, New York, NY 10016 T 646-501-7223 F 646-754-9505 www.NewYorkOrtho.com
Post-Operative Instructions ACL + MCL Reconstruction
Dayofsurgery
A. DietastoleratedB. Icingisimportantforthefirst5-7dayspost-op.Whilethepost-opdressingisinplace,icingshouldbedone
continuously.Oncethedressingisremovedonthethirdpost-operativeday,iceisappliedfor20-minuteperiods3-4timesperday.Caremustbetakenwithicingtoavoidfrostbite.Alternatively,CryocufforGame-readyicecuffcanbeusedasperinstructions.
YouwillbecontactedbyEastCoastOrthoticsregardinganicecompressionunittobeusedaftersurgery.Thishelpswithpainandswellingbuttypicallyisnotcoveredbyinsurance.Thecostis$200-300fora2-weekrental.Alternatively,icegelpackswithashoulderorkneesleevecanbeprovidedbythehospitalforaminimalcharge.Videoinstructionsforyourbracecanbefoundathttps://www.youtube.com/watch?v=jyRZkSyFBOQ
C. Painmedicationasneededevery4-6hours(refertopainmedicationsheet).D. Makesureyouhaveaphysicaltherapypost-opappointmentscheduledduringthefirstweekaftersurgery.
FirstPost-OperativeDay
A. ContinueicingB. Painmedicationasneeded.
SecondPost-OperativeDayUntilReturnVisit
A. Continueicepackasneeded.B. Unlessotherwisenoted,youcanbearasmuchweightontheaffectedlegasyoucantolerate.Mostpatients
usecrutchesforthefirst2-3weeks.C. Callouroffice@646-501-7223option4,option2toconfirmyourfirstpostoperativevisit,whichis
usuallyabout1-2weeksaftersurgeryifyouhavenotbeengivenatime.Ifyouareexperiencinganyproblems,pleasecallourofficeorcontactusviatheinternetatwww.newyorkortho.com.
ThirdPost-OperativeDay
A. Youmayremovesurgicalbandageandshowerthisevening.Apply4x4(orsimilarsize)waterproofbandagetothesewoundspriortoshoweringandwhenshoweringiscompleteapplyfreshwaterproofbandage.Pleaseensurethatthebandageislargeenoughtocompletelycovertheincision.Youwillneedtofollowthisroutinefor2weeksaftersurgery.
4monthsPost-op
A. Pleasecallthenumberbelowtoscheduleacustomkneebracefitting.Thisfunctionalkneebraceshallbewornfor1yearafterreturningtosports.
EastCoastOrthotic&ProstheticCorp.
145E.32ndStreet4thFloorNewYork,NY10016
Phone:(347)389-1755or(347)449-0945Fax:631-918-5776

Dr. Laith M. Jazrawi Chief, Division of Sports Medicine
Associate Professor Department of Orthopaedic Surgery
Rehabilitation Guidelines for Knee Multi-ligament Repair/Reconstruction
333 38th St. ▪ New York, NY 10016 ▪ (646) 501 7047 ▪ newyorkortho.com!
Back View Supraspinatus
Infraspinatus
MinorTeres
Front View
Subscapularis
MM
A B
AB
MedialCollateralLigament(MCL)
LateralCollateralLigament(LCL)
ACL
Menisci
ACL
PCLLCL
TibiaMCL
MM LM
Femur
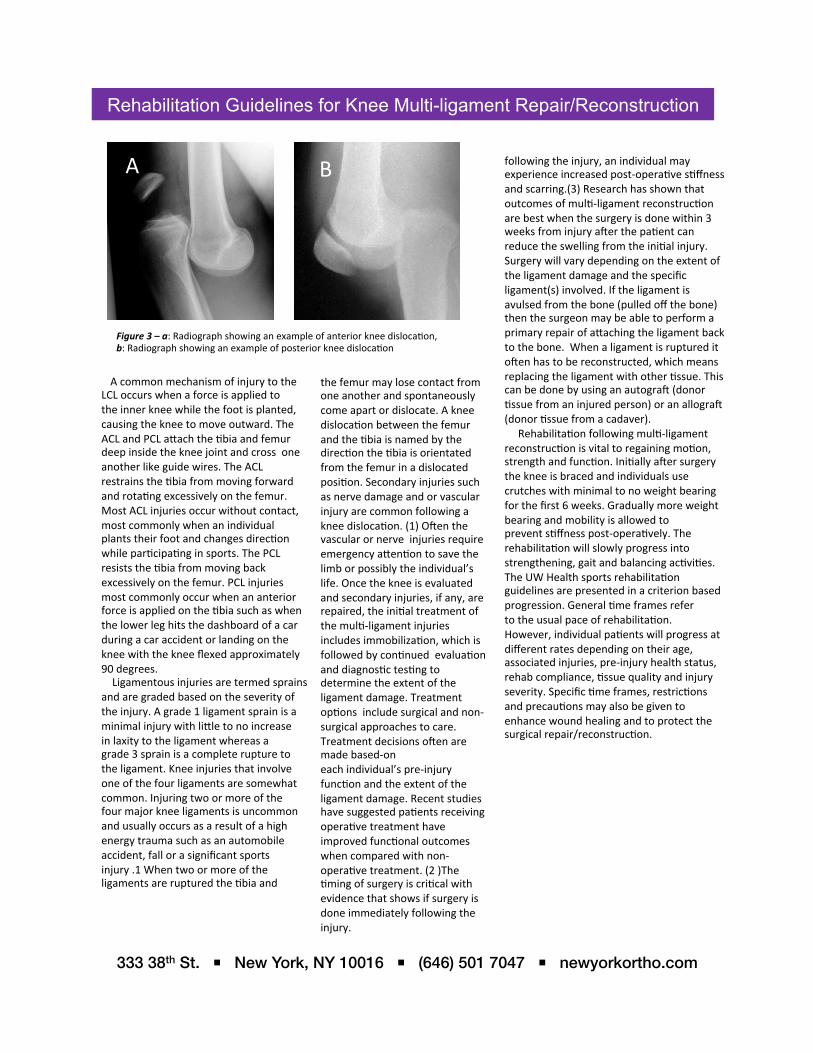
Figure2aFigure2b
Figure1aFigure1b
Figure1a:Medialorinnerviewofthekneeshowingthemedialcollateralligament,b:Lateralorouterviewofthekneeshowingthelateralcollateralligament.Figure2a:Anteriororfrontviewofthekneeshowingtheanteriorcruciateligament(ACL),b:Posteriororbackviewofthekneeshowingtheposteriorcruciate(PCL)
ThekneejointiscomprisedofanarCculaConofthreebones:thefemur(thighbone),Cbia(shinbone),and
patella(kneecap).Thefemurhasamedial(inside)anda
lateral(outside)condylethatformsaradialorrounded
boEomthatcomestogether,formingatrochleargrooveforthepatellatomove.Themedialandlateralcondylesit
ontopoftheCbia,whichhasaflatsurfacecalledtheCbial
plateau.
Thekneealsoiscomprisedoftwomenisci,whichare
fibro-carClaginousstructuresandeachmeniscusisthinner
towardsthecenterofthekneeandthickertowardtheperipheryoftheknee,givingitawedgeshaped
appearance.
Themedialmeniscusformsa“c”shapeandislocated
betweenthemedialfemoralcondyleandthemedial
aspectoftheCbia.Thelateralmeniscusformsanovalshapeandislocatedbetweenthelateralfemoralcondyle
andthelateralaspectoftheCbia.Themenisci
acttoimprovestabilitybetweentheCbiaandthefemur
secondarytoitswedgeshapethatactstolimittranslaCon.
Thekneealsohasfourmajorligaments,whichconnectbonetoboneandprovidestabilitytothejoint.These
ligamentsaretermedthemedialcollateralligament(MCL)
(Figure1a),lateralcollateralligament(LCL)
(Figure1b),anteriorcruciateligament(ACL)(Figure2a),
andposteriorcruciateligament(PCL)(Figure2b).TheMCLconnectsthefemurandCbiamedially(ontheinside)and
resistsvalgus(kneebucklingin)kneemoCon.
AcommonmechanismofinjurytotheMCLoccurswhen
aforceisappliedtotheouterkneewhilethefootisplanted,causingthekneetomoveinward.TheLCL
connectsthefemurandthefibulalaterally(onthe
outside)andresistsvarus(kneebucklingout)knee
moCon.
Rehabilitation Guidelines for Knee Multi-ligament Repair/Reconstruction
333 38th St. ▪ New York, NY 10016 ▪ (646) 501 7047 ▪ newyorkortho.com!
AcommonmechanismofinjurytotheLCLoccurswhenaforceisappliedtotheinnerkneewhilethefootisplanted,causingthekneetomoveoutward.TheACLandPCLaEachtheCbiaandfemurdeepinsidethekneejointandcrossoneanotherlikeguidewires.TheACLrestrainstheCbiafrommovingforwardandrotaCngexcessivelyonthefemur.MostACLinjuriesoccurwithoutcontact,mostcommonlywhenanindividualplantstheirfootandchangesdirecConwhileparCcipaCnginsports.ThePCLresiststheCbiafrommovingbackexcessivelyonthefemur.PCLinjuriesmostcommonlyoccurwhenananteriorforceisappliedontheCbiasuchaswhenthelowerleghitsthedashboardofacarduringacaraccidentorlandingonthekneewiththekneeflexedapproximately90degrees.Ligamentousinjuriesaretermedsprainsandaregradedbasedontheseverityoftheinjury.Agrade1ligamentsprainisaminimalinjurywithliEletonoincreaseinlaxitytotheligamentwhereasagrade3sprainisacompleterupturetotheligament.Kneeinjuriesthatinvolveoneofthefourligamentsaresomewhatcommon.Injuringtwoormoreofthefourmajorkneeligamentsisuncommonandusuallyoccursasaresultofahighenergytraumasuchasanautomobileaccident,fallorasignificantsportsinjury.1WhentwoormoreoftheligamentsarerupturedtheCbiaand
Figure3–a:RadiographshowinganexampleofanteriorkneedislocaCon,b:RadiographshowinganexampleofposteriorkneedislocaCon
A B
thefemurmaylosecontactfromoneanotherandspontaneouslycomeapartordislocate.AkneedislocaConbetweenthefemurandtheCbiaisnamedbythedirecContheCbiaisorientatedfromthefemurinadislocatedposiCon.SecondaryinjuriessuchasnervedamageandorvascularinjuryarecommonfollowingakneedislocaCon.(1)OYenthevascularornerveinjuriesrequireemergencyaEenContosavethelimborpossiblytheindividual’slife.Oncethekneeisevaluatedandsecondaryinjuries,ifany,arerepaired,theiniCaltreatmentofthemulC-ligamentinjuriesincludesimmobilizaCon,whichisfollowedbyconCnuedevaluaConanddiagnosCctesCngtodeterminetheextentoftheligamentdamage.TreatmentopConsincludesurgicalandnon-surgicalapproachestocare.TreatmentdecisionsoYenaremadebased-oneachindividual’spre-injuryfuncConandtheextentoftheligamentdamage.RecentstudieshavesuggestedpaCentsreceivingoperaCvetreatmenthaveimprovedfuncConaloutcomeswhencomparedwithnon-operaCvetreatment.(2)TheCmingofsurgeryiscriCcalwithevidencethatshowsifsurgeryisdoneimmediatelyfollowingtheinjury.
followingtheinjury,anindividualmayexperienceincreasedpost-operaCvesCffnessandscarring.(3)ResearchhasshownthatoutcomesofmulC-ligamentreconstrucConarebestwhenthesurgeryisdonewithin3weeksfrominjuryaYerthepaCentcanreducetheswellingfromtheiniCalinjury.Surgerywillvarydependingontheextentoftheligamentdamageandthespecificligament(s)involved.Iftheligamentisavulsedfromthebone(pulledoffthebone)thenthesurgeonmaybeabletoperformaprimaryrepairofaEachingtheligamentbacktothebone.WhenaligamentisruptureditoYenhastobereconstructed,whichmeansreplacingtheligamentwithotherCssue.ThiscanbedonebyusinganautograY(donorCssuefromaninjuredperson)oranallograY(donorCssuefromacadaver).RehabilitaConfollowingmulC-ligamentreconstrucConisvitaltoregainingmoCon,strengthandfuncCon.IniCallyaYersurgerythekneeisbracedandindividualsusecrutcheswithminimaltonoweightbearingforthefirst6weeks.GraduallymoreweightbearingandmobilityisallowedtopreventsCffnesspost-operaCvely.TherehabilitaConwillslowlyprogressintostrengthening,gaitandbalancingacCviCes.TheUWHealthsportsrehabilitaConguidelinesarepresentedinacriterionbasedprogression.GeneralCmeframesrefertotheusualpaceofrehabilitaCon.However,individualpaCentswillprogressatdifferentratesdependingontheirage,associatedinjuries,pre-injuryhealthstatus,rehabcompliance,Cssuequalityandinjuryseverity.SpecificCmeframes,restricConsandprecauConsmayalsobegiventoenhancewoundhealingandtoprotectthesurgicalrepair/reconstrucCon.
Rehabilitation Guidelines for Knee Multi-ligament Repair/Reconstruction
333 38th St. ▪ New York, NY 10016 ▪ (646) 501 7047 ▪ newyorkortho.com!
Precautions Brace ROM: locked in full extension Weight bearing/ROM: touch down, weight bearing
Range of Motion Exercises
Weight bearing/ROM: Touch down, weight bearing then proceed to as tolerated by patient
Therapeutic Exercises
Quad Sets Ankle pumps Cryotherapy device Elevation Heel slides Seated flexion Prone flexion Wear knee brace for at least six weeks after post op
Phase I (Post-op Day 1 to 1 week after surgery)
Phase II (2 week to 5 week after surgery) Precautions Brace ROM: locked in full extension
Weight bearing/ROM: touch down, weight bearing
Range of Motion Exercises
Weight bearing/ROM: Touch down, weight bearing then proceed to as tolerated by patient
Therapeutic Exercises
Week 2-3 : straight leg raises with no weight Week 4-5: straight leg raises with 1 lbs. of weight Should have 90 degrees of flexion
Phase III (6 week to 12 week after surgery)
Precautions Brace ROM: discontinue brace when quadriceps strengthening allows, neoprene sleeve with alteral buttress optional
Range of Motion Exercises
Weight bearing/ROM: full:; should have normal ROM
Therapeutic Exercises
Week 6-7: start stationary bike Weeks 8-12: continue stationary bike Start shuttle jumps at week 12 Treadmill Isotonic leg press Toe press Leg curl Stool scooter
Rehabilitation Guidelines for Knee Multi-ligament Repair/Reconstruction
Phase IV ( 3 moths to 6 months following surgery)
333 38th St. ▪ New York, NY 10016 ▪ (646) 501 7047 ▪ newyorkortho.com!
Range of Motion Exercises
Brace ROM: Full; no brace Weight bearing: full
Therapeutic Exercises
Initiate progressive jogging program Advance to cutting and sport-specific drills Return to regular sports if cleared by MD
References 1. Rihn,Groff,Harner,Cha.Theacutelydislocatedknee:EvaluaConandManagement.JAmAcadOrthopSurg2004;334-346.2.Levyet.Al.DecisionMakingintheMulCligament-InjuredKnee:Evidence-basedSystemaCcReviewJourofArthroscopicandRelatedSurgeryApril2009430-38.3.Jari,shelbourne.NonoperaCveordelayedsurgicaltreatmentofcombinedcruciateligamentsandmedialsidekneeinjuriesSportsMedArthroscRev2001:185-192.
Laith M Jazrawi, MD
Professor of Orthopedic Surgery Chief, Division of Sports Medicine T 646-501-7223
NYU Langone Orthopedic Center 333 E 38th St, New York, NY 10016 T 646-501-7223 F 646-754-9505 www.NewYorkOrtho.com
Rehabilitation Protocol: ACL and MCL Reconstruction
Name:____________________________________________________________ Date:___________________________________
Diagnosis:_______________________________________________________ DateofSurgery:______________________
EARLYPHASE(Weeks0-4)• WeightBearingandRangeofMotion
o 0-6weeks:toe-touchweightbearingw/crutcheso ROM:A/AAROM0-90° astolerated
• BraceUse:o LockedinfullextensionatalltimesotherthanPT
• TherapeuticElements:o Modalitiesasneededo PatellaMob;SLR’swithelectricstim.;co-contractions,pronehangso Estim;Cocontractionso Noabductionofhiporlegatanytime.o NopronehangsifPCLreconstruction!!
• Goals:o a/aa/ROM:0-0-90o Controlpain/swellingo Quadcontrol
RECOVERYPHASE(Weeks5-8)• WeightBearingandRangeofMotion:
o Discontinuecrutchesatweek6• BraceUse:
o Atalltimes,opentoAROM;discontinueatweek8• TherapeuticElements:
o Continueaboveo Gentlehipabductionwithnoresistancebelowkneeo Wall-sits0-45o Mini-squatswithsupport0-45o Carpetdrags(notwithPCLreconstruction!!)o Pooltherapyo Treadmillwalkingby8weeks
• Goals:o a/aa/ROM:0-0-110by6weeksandfreeby8weekso SLRx30o Noeffusion
STRENGTHENPHASE(Weeks8-12)• WeightBearingandRangeofMotion:
o Full• TherapeuticElements:
Laith M Jazrawi, MD
Professor of Orthopedic Surgery Chief, Division of Sports Medicine T 646-501-7223
NYU Langone Orthopedic Center 333 E 38th St, New York, NY 10016 T 646-501-7223 F 646-754-9505 www.NewYorkOrtho.com
o Continueabovewithincreasedresistanceo Step-downso Treadmillo Stretchingo BeginpronehangsandHSL(ifPCLreconstruction)
• Goals:o Walk1-2milesat15min/milepace
REINTEGRATIONPHASE(Months3-5)• WeightBearingandRangeofMotion:
o Full• BraceUse:
o Noneo Ifreturntosport,fittingforcustombraceby5monthso Canstartjogging/runningat6months
• TherapeuticElements:o Slideboardso Beginagilitydrillso Figure8’so Gentleloopso Largezig-zagso Swimmingo Beginplyometricsat4months
• Goals:o Treadmill(walk1-2milesat10-12min/milepace)o Returntocompetitiveactivities
Comments:Frequency:______timesperweek Duration:________weeksSignature:_____________________________________________________ Date:___________________________
Laith M Jazrawi, MD
Professor of Orthopedic Surgery Chief, Division of Sports Medicine T 646-501-7223
NYU Langone Orthopedic Center 333 E 38th St, New York, NY 10016 T 646-501-7223 F 646-754-9505 www.NewYorkOrtho.com
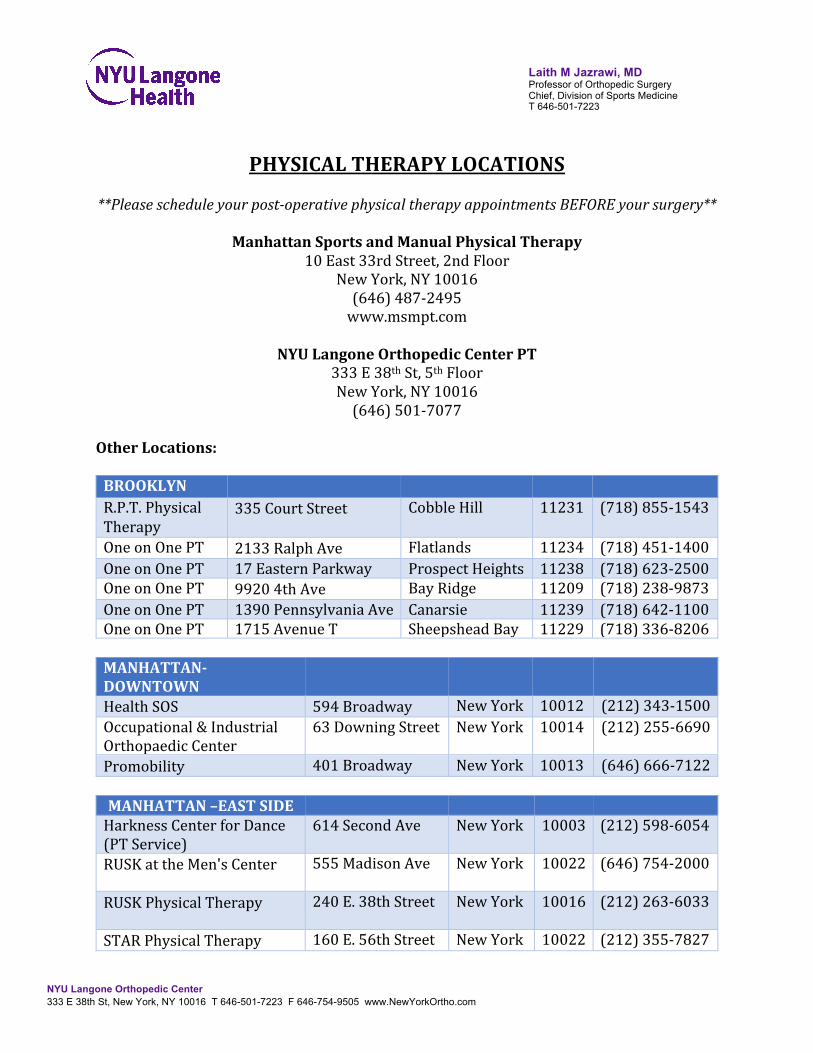
PHYSICALTHERAPYLOCATIONS**Pleasescheduleyourpost-operativephysicaltherapyappointmentsBEFOREyoursurgery**
ManhattanSportsandManualPhysicalTherapy
10East33rdStreet,2ndFloorNewYork,NY10016(646)487-2495www.msmpt.com
NYULangoneOrthopedicCenterPT
333E38thSt,5thFloorNewYork,NY10016(646)501-7077
OtherLocations:BROOKLYN R.P.T.PhysicalTherapy�
335CourtStreet� CobbleHill 11231
(718)855-1543
OneonOnePT 2133RalphAve� Flatlands 11234 (718)451-1400OneonOnePT 17EasternParkway ProspectHeights 11238 (718)623-2500OneonOnePT 99204thAve� BayRidge 11209 (718)238-9873OneonOnePT 1390PennsylvaniaAve Canarsie 11239 (718)642-1100OneonOnePT 1715AvenueT SheepsheadBay 11229 (718)336-8206MANHATTAN-DOWNTOWN
HealthSOS� 594Broadway� NewYork 10012 (212)343-1500Occupational&IndustrialOrthopaedicCenter
63DowningStreet
NewYork
10014 (212)255-6690
Promobility� 401Broadway NewYork 10013 (646)666-7122MANHATTAN–EASTSIDE HarknessCenterforDance(PTService)
614SecondAve NewYork 10003 (212)598-6054
RUSKattheMen'sCenter�� 555MadisonAve NewYork
10022 (646)754-2000
RUSKPhysicalTherapy� 240E.38thStreet NewYork
10016 (212)263-6033
STARPhysicalTherapy� 160E.56thStreet NewYork 10022 (212)355-7827

Laith M Jazrawi, MD
Professor of Orthopedic Surgery Chief, Division of Sports Medicine T 646-501-7223
NYU Langone Orthopedic Center 333 E 38th St, New York, NY 10016 T 646-501-7223 F 646-754-9505 www.NewYorkOrtho.com
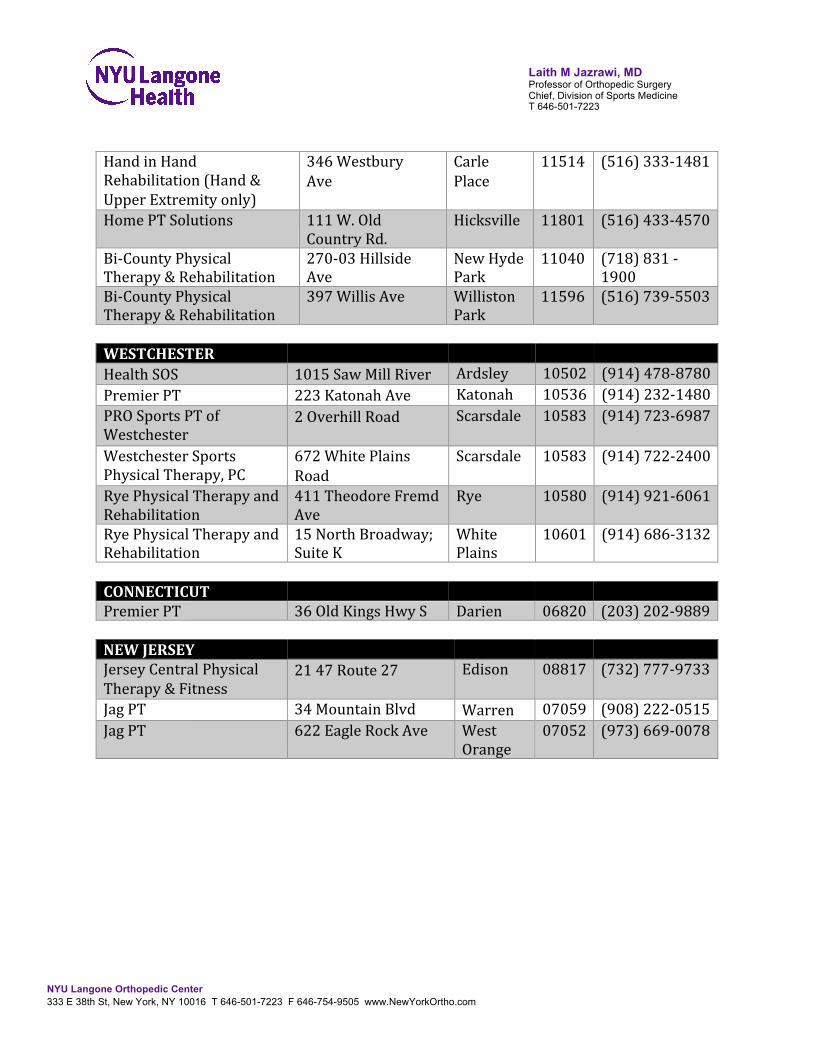
TherapeuticInspirations 144E.44thSt NewYork
10017 (212)490-3800
MANHATTANUPPEREASTSIDE
HealthSOS� 139E.57thStreet NewYork 10022 (212)753-4767PremierPT��� 170E.77thStreet NewYork 10021 (212)249-5332RuskPTatWomen'sHealthCenter
207E.84thStreet NewYork
10028 (646)754-3300
SPEARPT 120E.56thStreet NewYork 10022 (212)759-2211SportsPTofNY� 1400YorkAve NewYork 10021 (212)988-9057MANHATTANUPPERWESTSIDE
PremierPT� 162W.72ndStreet NewYork 10023 (212)362-3595SportsPTofNY� 2465Broadway NewYork 10025 (212)877-2525MANHATTANWESTSIDE SportsMedicineatChelsea 22West21stStreet
Suite400NewYork 10010 (646)582-2056
ChelseaPhysicalTherapy&Rehabilitation
119W.23rdStreet NewYork
10011
(212)675-3447
SPEARPhysicalTherapy 36W.44thStreet NewYork 10036 (212)759-2280QUEENS ErgoPhysicalTherapyP.C.�
107-40QueensBlvd
ForestHills
11375
(718)261-3100
SusanSchiliro,PT(Hand&UpperExtremityonly)
99-3266thRoad RegoPark 11374 (718)544-1937
STATENISLAND OneonOnePT 31NewDorpLane
1st,FloorStatenIsland
10306
(718)979-4466
OneonOnePT 33RichmondHillRd
StatenIsland
10314 (718)982-6340
LONGISLAND HealthSOS� 375DeerParkAve Babylon� 11702 (631)321-6303
Laith M Jazrawi, MD
Professor of Orthopedic Surgery Chief, Division of Sports Medicine T 646-501-7223
NYU Langone Orthopedic Center 333 E 38th St, New York, NY 10016 T 646-501-7223 F 646-754-9505 www.NewYorkOrtho.com
HandinHandRehabilitation(Hand&UpperExtremityonly)�
346WestburyAve�
CarlePlace�
11514 (516)333-1481
HomePTSolutions 111W.OldCountryRd.
Hicksville 11801 (516)433-4570
Bi-CountyPhysicalTherapy&Rehabilitation
270-03HillsideAve
NewHydePark
11040 (718)831-1900
Bi-CountyPhysicalTherapy&Rehabilitation
397WillisAve WillistonPark
11596 (516)739-5503
WESTCHESTER HealthSOS� 1015SawMillRiver� Ardsley 10502 (914)478-8780PremierPT� 223KatonahAve� Katonah 10536 (914)232-1480PROSportsPTofWestchester
2OverhillRoad� Scarsdale�
10583
(914)723-6987
WestchesterSportsPhysicalTherapy,PC
672WhitePlainsRoad�
Scarsdale�
10583 (914)722-2400
RyePhysicalTherapyandRehabilitation
411TheodoreFremdAve
Rye 10580 (914)921-6061
RyePhysicalTherapyandRehabilitation
15NorthBroadway;SuiteK
WhitePlains
10601 (914)686-3132
CONNECTICUT PremierPT 36OldKingsHwyS Darien 06820 (203)202-9889NEWJERSEY JerseyCentralPhysicalTherapy&Fitness�
2147Route27�
Edison
08817
(732)777-9733
JagPT 34MountainBlvd Warren� 07059 (908)222-0515JagPT 622EagleRockAve West
Orange07052 (973)669-0078
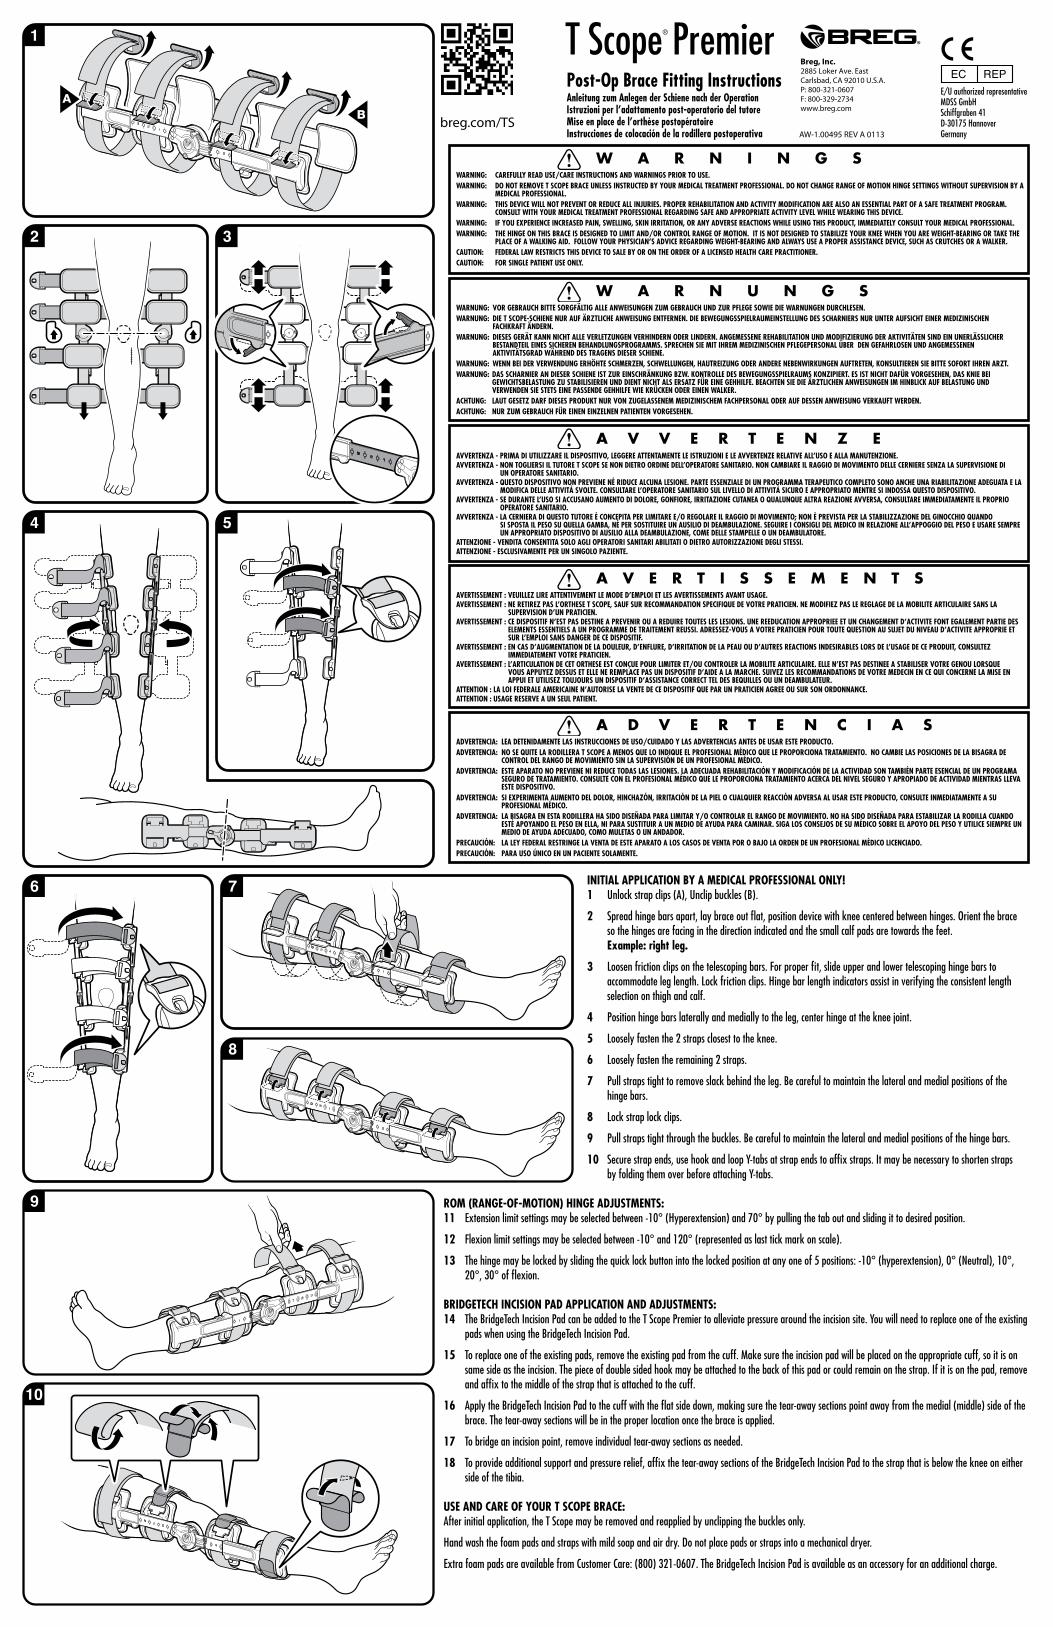
breg.com/TS
Post-Op Brace Fitting InstructionsAnleitung zum Anlegen der Schiene nach der OperationIstruzioni per l’adattamento post-operatorio del tutoreMise en place de l’orthèse postopératoireInstrucciones de colocación de la rodillera postoperativa
T Scope® Premier
INITIAL APPLICATION BY A MEDICAL PROFESSIONAL ONLY! 1 Unlock strap clips (A), Unclip buckles (B).
2 Spread hinge bars apart, lay brace out flat, position device with knee centered between hinges. Orient the brace so the hinges are facing in the direction indicated and the small calf pads are towards the feet. Example: right leg.
3 Loosen friction clips on the telescoping bars. For proper fit, slide upper and lower telescoping hinge bars to accommodate leg length. Lock friction clips. Hinge bar length indicators assist in verifying the consistent length selection on thigh and calf.
4 Position hinge bars laterally and medially to the leg, center hinge at the knee joint.
5 Loosely fasten the 2 straps closest to the knee.
6 Loosely fasten the remaining 2 straps.
7 Pull straps tight to remove slack behind the leg. Be careful to maintain the lateral and medial positions of the hinge bars.
8 Lock strap lock clips.
9 Pull straps tight through the buckles. Be careful to maintain the lateral and medial positions of the hinge bars.
10 Secure strap ends, use hook and loop Y-tabs at strap ends to affix straps. It may be necessary to shorten straps by folding them over before attaching Y-tabs.
ROM (RANGE-OF-MOTION) HINGE ADJUSTMENTS: 11 Extension limit settings may be selected between -10° (Hyperextension) and 70° by pulling the tab out and sliding it to desired position.
12 Flexion limit settings may be selected between -10° and 120° (represented as last tick mark on scale).
13 The hinge may be locked by sliding the quick lock button into the locked position at any one of 5 positions: -10° (hyperextension), 0° (Neutral), 10°, 20°, 30° of flexion.
BRIDGETECH INCISION PAD APPLICATION AND ADJUSTMENTS: 14 The BridgeTech Incision Pad can be added to the T Scope Premier to alleviate pressure around the incision site. You will need to replace one of the existing pads when using the BridgeTech Incision Pad.
15 To replace one of the existing pads, remove the existing pad from the cuff. Make sure the incision pad will be placed on the appropriate cuff, so it is on same side as the incision. The piece of double sided hook may be attached to the back of this pad or could remain on the strap. If it is on the pad, remove and affix to the middle of the strap that is attached to the cuff.
16 Apply the BridgeTech Incision Pad to the cuff with the flat side down, making sure the tear-away sections point away from the medial (middle) side of the brace. The tear-away sections will be in the proper location once the brace is applied.
17 To bridge an incision point, remove individual tear-away sections as needed.
18 To provide additional support and pressure relief, affix the tear-away sections of the BridgeTech Incision Pad to the strap that is below the knee on either side of the tibia.
USE AND CARE OF YOUR T SCOPE BRACE:After initial application, the T Scope may be removed and reapplied by unclipping the buckles only.
Hand wash the foam pads and straps with mild soap and air dry. Do not place pads or straps into a mechanical dryer.
Extra foam pads are available from Customer Care: (800) 321-0607. The BridgeTech Incision Pad is available as an accessory for an additional charge.
W A R N I N G S
W A R N U N G S
A V V E R T E N Z E
A V E R T I S S E M E N T S
A D V E R T E N C I A S
WARNING: CAREFULLY READ USE/CARE INSTRUCTIONS AND WARNINGS PRIOR TO USE.WARNING: DO NOT REMOVE T SCOPE BRACE UNLESS INSTRUCTED BY YOUR MEDICAL TREATMENT PROFESSIONAL. DO NOT CHANGE RANGE OF MOTION HINGE SETTINGS WITHOUT SUPERVISION BY A MEDICAL PROFESSIONAL.WARNING: THIS DEVICE WILL NOT PREVENT OR REDUCE ALL INJURIES. PROPER REHABILITATION AND ACTIVITY MODIFICATION ARE ALSO AN ESSENTIAL PART OF A SAFE TREATMENT PROGRAM. CONSULT WITH YOUR MEDICAL TREATMENT PROFESSIONAL REGARDING SAFE AND APPROPRIATE ACTIVITY LEVEL WHILE WEARING THIS DEVICE.WARNING: IF YOU EXPERIENCE INCREASED PAIN, SWELLING, SKIN IRRITATION, OR ANY ADVERSE REACTIONS WHILE USING THIS PRODUCT, IMMEDIATELY CONSULT YOUR MEDICAL PROFESSIONAL.WARNING: THE HINGE ON THIS BRACE IS DESIGNED TO LIMIT AND/OR CONTROL RANGE OF MOTION. IT IS NOT DESIGNED TO STABILIZE YOUR KNEE WHEN YOU ARE WEIGHT-BEARING OR TAKE THE PLACE OF A WALKING AID. FOLLOW YOUR PHYSICIAN’S ADVICE REGARDING WEIGHT-BEARING AND ALWAYS USE A PROPER ASSISTANCE DEVICE, SUCH AS CRUTCHES OR A WALKER.CAUTION: FEDERAL LAW RESTRICTS THIS DEVICE TO SALE BY OR ON THE ORDER OF A LICENSED HEALTH CARE PRACTITIONER.CAUTION: FOR SINGLE PATIENT USE ONLY.
WARNUNG: VOR GEBRAUCH BITTE SORGFÄLTIG ALLE ANWEISUNGEN ZUM GEBRAUCH UND ZUR PFLEGE SOWIE DIE WARNUNGEN DURCHLESEN.WARNUNG: DIE T SCOPE-SCHIENE NUR AUF ÄRZTLICHE ANWEISUNG ENTFERNEN. DIE BEWEGUNGSSPIELRAUMEINSTELLUNG DES SCHARNIERS NUR UNTER AUFSICHT EINER MEDIZINISCHEN FACHKRAFT ÄNDERN.WARNUNG: DIESES GERÄT KANN NICHT ALLE VERLETZUNGEN VERHINDERN ODER LINDERN. ANGEMESSENE REHABILITATION UND MODIFIZIERUNG DER AKTIVITÄTEN SIND EIN UNERLÄSSLICHER BESTANDTEIL EINES SICHEREN BEHANDLUNGSPROGRAMMS. SPRECHEN SIE MIT IHREM MEDIZINISCHEN PFLEGEPERSONAL ÜBER DEN GEFAHRLOSEN UND ANGEMESSENEN AKTIVITÄTSGRAD WÄHREND DES TRAGENS DIESER SCHIENE.WARNUNG: WENN BEI DER VERWENDUNG ERHÖHTE SCHMERZEN, SCHWELLUNGEN, HAUTREIZUNG ODER ANDERE NEBENWIRKUNGEN AUFTRETEN, KONSULTIEREN SIE BITTE SOFORT IHREN ARZT.WARNUNG: DAS SCHARNIER AN DIESER SCHIENE IST ZUR EINSCHRÄNKUNG BZW. KONTROLLE DES BEWEGUNGSSPIELRAUMS KONZIPIERT. ES IST NICHT DAFÜR VORGESEHEN, DAS KNIE BEI GEWICHTSBELASTUNG ZU STABILISIEREN UND DIENT NICHT ALS ERSATZ FÜR EINE GEHHILFE. BEACHTEN SIE DIE ÄRZTLICHEN ANWEISUNGEN IM HINBLICK AUF BELASTUNG UND VERWENDEN SIE STETS EINE PASSENDE GEHHILFE WIE KRÜCKEN ODER EINEN WALKER.ACHTUNG: LAUT GESETZ DARF DIESES PRODUKT NUR VON ZUGELASSENEM MEDIZINISCHEM FACHPERSONAL ODER AUF DESSEN ANWEISUNG VERKAUFT WERDEN.ACHTUNG: NUR ZUM GEBRAUCH FÜR EINEN EINZELNEN PATIENTEN VORGESEHEN.
AVVERTENZA - PRIMA DI UTILIZZARE IL DISPOSITIVO, LEGGERE ATTENTAMENTE LE ISTRUZIONI E LE AVVERTENZE RELATIVE ALL’USO E ALLA MANUTENZIONE.AVVERTENZA - NON TOGLIERSI IL TUTORE T SCOPE SE NON DIETRO ORDINE DELL’OPERATORE SANITARIO. NON CAMBIARE IL RAGGIO DI MOVIMENTO DELLE CERNIERE SENZA LA SUPERVISIONE DI UN OPERATORE SANITARIO.AVVERTENZA - QUESTO DISPOSITIVO NON PREVIENE NÉ RIDUCE ALCUNA LESIONE. PARTE ESSENZIALE DI UN PROGRAMMA TERAPEUTICO COMPLETO SONO ANCHE UNA RIABILITAZIONE ADEGUATA E LA MODIFICA DELLE ATTIVITÀ SVOLTE. CONSULTARE L’OPERATORE SANITARIO SUL LIVELLO DI ATTIVITÀ SICURO E APPROPRIATO MENTRE SI INDOSSA QUESTO DISPOSITIVO.AVVERTENZA - SE DURANTE L’USO SI ACCUSANO AUMENTO DI DOLORE, GONFIORE, IRRITAZIONE CUTANEA O QUALUNQUE ALTRA REAZIONE AVVERSA, CONSULTARE IMMEDIATAMENTE IL PROPRIO OPERATORE SANITARIO.AVVERTENZA - LA CERNIERA DI QUESTO TUTORE È CONCEPITA PER LIMITARE E/O REGOLARE IL RAGGIO DI MOVIMENTO; NON È PREVISTA PER LA STABILIZZAZIONE DEL GINOCCHIO QUANDO SI SPOSTA IL PESO SU QUELLA GAMBA, NÉ PER SOSTITUIRE UN AUSILIO DI DEAMBULAZIONE. SEGUIRE I CONSIGLI DEL MEDICO IN RELAZIONE ALL’APPOGGIO DEL PESO E USARE SEMPRE UN APPROPRIATO DISPOSITIVO DI AUSILIO ALLA DEAMBULAZIONE, COME DELLE STAMPELLE O UN DEAMBULATORE.ATTENZIONE - VENDITA CONSENTITA SOLO AGLI OPERATORI SANITARI ABILITATI O DIETRO AUTORIZZAZIONE DEGLI STESSI.ATTENZIONE - ESCLUSIVAMENTE PER UN SINGOLO PAZIENTE.
AVERTISSEMENT : VEUILLEZ LIRE ATTENTIVEMENT LE MODE D’EMPLOI ET LES AVERTISSEMENTS AVANT USAGE.AVERTISSEMENT : NE RETIREZ PAS L’ORTHESE T SCOPE, SAUF SUR RECOMMANDATION SPECIFIQUE DE VOTRE PRATICIEN. NE MODIFIEZ PAS LE REGLAGE DE LA MOBILITE ARTICULAIRE SANS LA SUPERVISION D’UN PRATICIEN.AVERTISSEMENT : CE DISPOSITIF N’EST PAS DESTINE A PREVENIR OU A REDUIRE TOUTES LES LESIONS. UNE REEDUCATION APPROPRIEE ET UN CHANGEMENT D’ACTIVITE FONT EGALEMENT PARTIE DES ELEMENTS ESSENTIELS A UN PROGRAMME DE TRAITEMENT REUSSI. ADRESSEZ-VOUS A VOTRE PRATICIEN POUR TOUTE QUESTION AU SUJET DU NIVEAU D’ACTIVITE APPROPRIE ET SUR L’EMPLOI SANS DANGER DE CE DISPOSITIF.AVERTISSEMENT : EN CAS D’AUGMENTATION DE LA DOULEUR, D’ENFLURE, D’IRRITATION DE LA PEAU OU D’AUTRES REACTIONS INDESIRABLES LORS DE L’USAGE DE CE PRODUIT, CONSULTEZ IMMEDIATEMENT VOTRE PRATICIEN.AVERTISSEMENT : L’ARTICULATION DE CET ORTHESE EST CONÇUE POUR LIMITER ET/OU CONTROLER LA MOBILITE ARTICULAIRE. ELLE N’EST PAS DESTINEE A STABILISER VOTRE GENOU LORSQUE VOUS APPUYEZ DESSUS ET ELLE NE REMPLACE PAS UN DISPOSITIF D’AIDE A LA MARCHE. SUIVEZ LES RECOMMANDATIONS DE VOTRE MEDECIN EN CE QUI CONCERNE LA MISE EN APPUI ET UTILISEZ TOUJOURS UN DISPOSITIF D’ASSISTANCE CORRECT TEL DES BEQUILLES OU UN DEAMBULATEUR. ATTENTION : LA LOI FEDERALE AMERICAINE N’AUTORISE LA VENTE DE CE DISPOSITIF QUE PAR UN PRATICIEN AGREE OU SUR SON ORDONNANCE.ATTENTION : USAGE RESERVE A UN SEUL PATIENT.
ADVERTENCIA: LEA DETENIDAMENTE LAS INSTRUCCIONES DE USO/CUIDADO Y LAS ADVERTENCIAS ANTES DE USAR ESTE PRODUCTO.ADVERTENCIA: NO SE QUITE LA RODILLERA T SCOPE A MENOS QUE LO INDIQUE EL PROFESIONAL MÉDICO QUE LE PROPORCIONA TRATAMIENTO. NO CAMBIE LAS POSICIONES DE LA BISAGRA DE CONTROL DEL RANGO DE MOVIMIENTO SIN LA SUPERVISIÓN DE UN PROFESIONAL MÉDICO.ADVERTENCIA: ESTE APARATO NO PREVIENE NI REDUCE TODAS LAS LESIONES. LA ADECUADA REHABILITACIÓN Y MODIFICACIÓN DE LA ACTIVIDAD SON TAMBIÉN PARTE ESENCIAL DE UN PROGRAMA SEGURO DE TRATAMIENTO. CONSULTE CON EL PROFESIONAL MÉDICO QUE LE PROPORCIONA TRATAMIENTO ACERCA DEL NIVEL SEGURO Y APROPIADO DE ACTIVIDAD MIENTRAS LLEVA ESTE DISPOSITIVO.ADVERTENCIA: SI EXPERIMENTA AUMENTO DEL DOLOR, HINCHAZÓN, IRRITACIÓN DE LA PIEL O CUALQUIER REACCIÓN ADVERSA AL USAR ESTE PRODUCTO, CONSULTE INMEDIATAMENTE A SU PROFESIONAL MÉDICO.ADVERTENCIA: LA BISAGRA EN ESTA RODILLERA HA SIDO DISEÑADA PARA LIMITAR Y/O CONTROLAR EL RANGO DE MOVIMIENTO. NO HA SIDO DISEÑADA PARA ESTABILIZAR LA RODILLA CUANDO ESTÉ APOYANDO EL PESO EN ELLA, NI PARA SUSTITUIR A UN MEDIO DE AYUDA PARA CAMINAR. SIGA LOS CONSEJOS DE SU MÉDICO SOBRE EL APOYO DEL PESO Y UTILICE SIEMPRE UN MEDIO DE AYUDA ADECUADO, COMO MULETAS O UN ANDADOR.PRECAUCIÓN: LA LEY FEDERAL RESTRINGE LA VENTA DE ESTE APARATO A LOS CASOS DE VENTA POR O BAJO LA ORDEN DE UN PROFESIONAL MÉDICO LICENCIADO.PRECAUCIÓN: PARA USO ÚNICO EN UN PACIENTE SOLAMENTE.
E/U authorized representativeMDSS GmbHSchiffgraben 41D-30175 HannoverGermanyAW-1.00495 REV A 0113
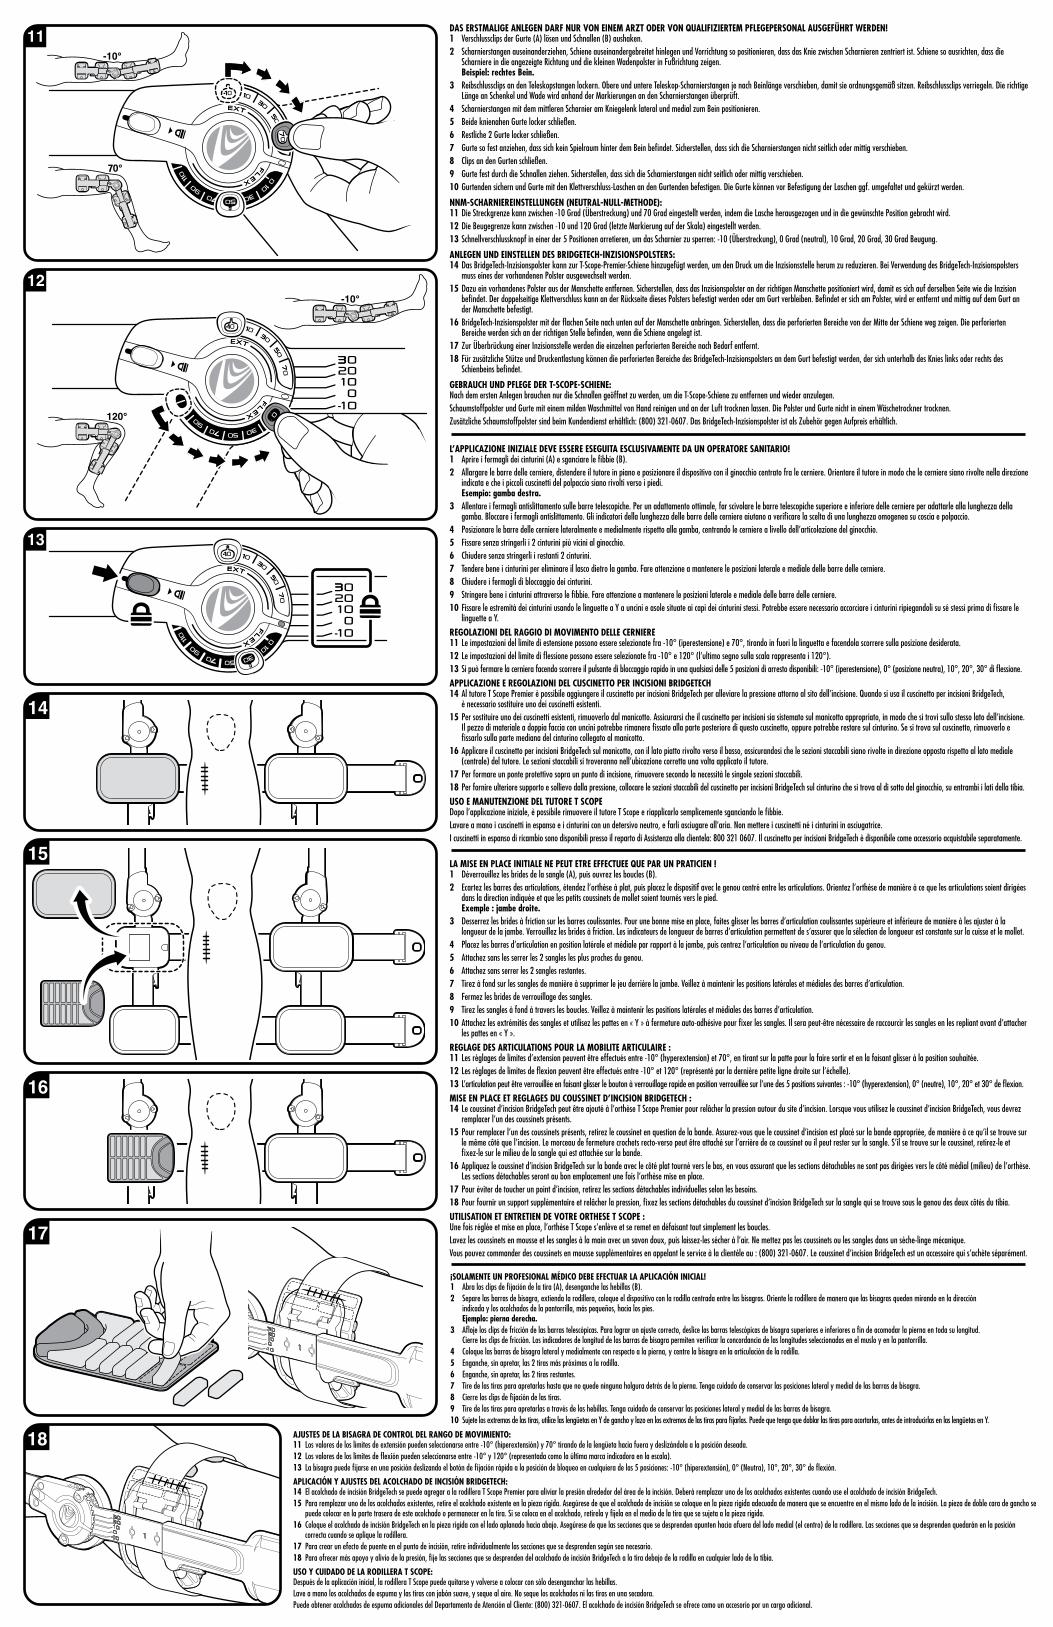
17
18
15
16
14
DAS ERSTMALIGE ANLEGEN DARF NUR VON EINEM ARZT ODER VON QUALIFIZIERTEM PFLEGEPERSONAL AUSGEFÜHRT WERDEN! 1 Verschlussclips der Gurte (A) lösen und Schnallen (B) aushaken.2 Scharnierstangen auseinanderziehen, Schiene auseinandergebreitet hinlegen und Vorrichtung so positionieren, dass das Knie zwischen Scharnieren zentriert ist. Schiene so ausrichten, dass die Scharniere in die angezeigte Richtung und die kleinen Wadenpolster in Fußrichtung zeigen. Beispiel: rechtes Bein.3 Reibschlussclips an den Teleskopstangen lockern. Obere und untere Teleskop-Scharnierstangen je nach Beinlänge verschieben, damit sie ordnungsgemäß sitzen. Reibschlussclips verriegeln. Die richtige Länge an Schenkel und Wade wird anhand der Markierungen an den Scharnierstangen überprüft.4 Scharnierstangen mit dem mittleren Scharnier am Kniegelenk lateral und medial zum Bein positionieren.5 Beide knienahen Gurte locker schließen. 6 Restliche 2 Gurte locker schließen.7 Gurte so fest anziehen, dass sich kein Spielraum hinter dem Bein befindet. Sicherstellen, dass sich die Scharnierstangen nicht seitlich oder mittig verschieben.8 Clips an den Gurten schließen.9 Gurte fest durch die Schnallen ziehen. Sicherstellen, dass sich die Scharnierstangen nicht seitlich oder mittig verschieben.10 Gurtenden sichern und Gurte mit den Klettverschluss-Laschen an den Gurtenden befestigen. Die Gurte können vor Befestigung der Laschen ggf. umgefaltet und gekürzt werden.
NNM-SCHARNIEREINSTELLUNGEN (NEUTRAL-NULL-METHODE): 11 Die Streckgrenze kann zwischen -10 Grad (Überstreckung) und 70 Grad eingestellt werden, indem die Lasche herausgezogen und in die gewünschte Position gebracht wird.12 Die Beugegrenze kann zwischen -10 und 120 Grad (letzte Markierung auf der Skala) eingestellt werden.13 Schnellverschlussknopf in einer der 5 Positionen arretieren, um das Scharnier zu sperren: -10 (Überstreckung), 0 Grad (neutral), 10 Grad, 20 Grad, 30 Grad Beugung.
ANLEGEN UND EINSTELLEN DES BRIDGETECH-INZISIONSPOLSTERS: 14 Das BridgeTech-Inzisionspolster kann zur T-Scope-Premier-Schiene hinzugefügt werden, um den Druck um die Inzisionsstelle herum zu reduzieren. Bei Verwendung des BridgeTech-Inzisionspolsters muss eines der vorhandenen Polster ausgewechselt werden. 15 Dazu ein vorhandenes Polster aus der Manschette entfernen. Sicherstellen, dass das Inzisionspolster an der richtigen Manschette positioniert wird, damit es sich auf derselben Seite wie die Inzision befindet. Der doppelseitige Klettverschluss kann an der Rückseite dieses Polsters befestigt werden oder am Gurt verbleiben. Befindet er sich am Polster, wird er entfernt und mittig auf dem Gurt an der Manschette befestigt.16 BridgeTech-Inzisionspolster mit der flachen Seite nach unten auf der Manschette anbringen. Sicherstellen, dass die perforierten Bereiche von der Mitte der Schiene weg zeigen. Die perforierten Bereiche werden sich an der richtigen Stelle befinden, wenn die Schiene angelegt ist.17 Zur Überbrückung einer Inzisionsstelle werden die einzelnen perforierten Bereiche nach Bedarf entfernt.18 Für zusätzliche Stütze und Druckentlastung können die perforierten Bereiche des BridgeTech-Inzisionspolsters an dem Gurt befestigt werden, der sich unterhalb des Knies links oder rechts des Schienbeins befindet.
GEBRAUCH UND PFLEGE DER T-SCOPE-SCHIENE:Nach dem ersten Anlegen brauchen nur die Schnallen geöffnet zu werden, um die T-Scope-Schiene zu entfernen und wieder anzulegen.Schaumstoffpolster und Gurte mit einem milden Waschmittel von Hand reinigen und an der Luft trocknen lassen. Die Polster und Gurte nicht in einem Wäschetrockner trocknen.Zusätzliche Schaumstoffpolster sind beim Kundendienst erhältlich: (800) 321-0607. Das BridgeTech-Inzisionspolster ist als Zubehör gegen Aufpreis erhältlich.
L’APPLICAZIONE INIZIALE DEVE ESSERE ESEGUITA ESCLUSIVAMENTE DA UN OPERATORE SANITARIO! 1 Aprire i fermagli dei cinturini (A) e sganciare le fibbie (B).2 Allargare le barre delle cerniere, distendere il tutore in piano e posizionare il dispositivo con il ginocchio centrato fra le cerniere. Orientare il tutore in modo che le cerniere siano rivolte nella direzione indicata e che i piccoli cuscinetti del polpaccio siano rivolti verso i piedi. Esempio: gamba destra.3 Allentare i fermagli antislittamento sulle barre telescopiche. Per un adattamento ottimale, far scivolare le barre telescopiche superiore e inferiore delle cerniere per adattarle alla lunghezza della gamba. Bloccare i fermagli antislittamento. Gli indicatori della lunghezza delle barre delle cerniere aiutano a verificare la scelta di una lunghezza omogenea su coscia e polpaccio.4 Posizionare le barre delle cerniere lateralmente e medialmente rispetto alla gamba, centrando le cerniere a livello dell’articolazione del ginocchio.5 Fissare senza stringerli i 2 cinturini più vicini al ginocchio.6 Chiudere senza stringerli i restanti 2 cinturini.7 Tendere bene i cinturini per eliminare il lasco dietro la gamba. Fare attenzione a mantenere le posizioni laterale e mediale delle barre delle cerniere.8 Chiudere i fermagli di bloccaggio dei cinturini.9 Stringere bene i cinturini attraverso le fibbie. Fare attenzione a mantenere le posizioni laterale e mediale delle barre delle cerniere.10 Fissare le estremità dei cinturini usando le linguette a Y a uncini e asole situate ai capi dei cinturini stessi. Potrebbe essere necessario accorciare i cinturini ripiegandoli su sé stessi prima di fissare le linguette a Y.REGOLAZIONI DEL RAGGIO DI MOVIMENTO DELLE CERNIERE 11 Le impostazioni del limite di estensione possono essere selezionate fra -10° (iperestensione) e 70°, tirando in fuori la linguetta e facendola scorrere sulla posizione desiderata.12 Le impostazioni del limite di flessione possono essere selezionate fra -10° e 120° (l’ultimo segno sulla scala rappresenta i 120°).13 Si può fermare la cerniera facendo scorrere il pulsante di bloccaggio rapido in una qualsiasi delle 5 posizioni di arresto disponibili: -10° (iperestensione), 0° (posizione neutra), 10°, 20°, 30° di flessione.APPLICAZIONE E REGOLAZIONI DEL CUSCINETTO PER INCISIONI BRIDGETECH 14 Al tutore T Scope Premier è possibile aggiungere il cuscinetto per incisioni BridgeTech per alleviare la pressione attorno al sito dell’incisione. Quando si usa il cuscinetto per incisioni BridgeTech, è necessario sostituire uno dei cuscinetti esistenti. 15 Per sostituire uno dei cuscinetti esistenti, rimuoverlo dal manicotto. Assicurarsi che il cuscinetto per incisioni sia sistemato sul manicotto appropriato, in modo che si trovi sullo stesso lato dell’incisione. Il pezzo di materiale a doppia faccia con uncini potrebbe rimanere fissato alla parte posteriore di questo cuscinetto, oppure potrebbe restare sul cinturino. Se si trova sul cuscinetto, rimuoverlo e fissarlo sulla parte mediana del cinturino collegato al manicotto. 16 Applicare il cuscinetto per incisioni BridgeTech sul manicotto, con il lato piatto rivolto verso il basso, assicurandosi che le sezioni staccabili siano rivolte in direzione opposta rispetto al lato mediale (centrale) del tutore. Le sezioni staccabili si troveranno nell’ubicazione corretta una volta applicato il tutore.17 Per formare un ponte protettivo sopra un punto di incisione, rimuovere secondo la necessità le singole sezioni staccabili.18 Per fornire ulteriore supporto e sollievo dalla pressione, collocare le sezioni staccabili del cuscinetto per incisioni BridgeTech sul cinturino che si trova al di sotto del ginocchio, su entrambi i lati della tibia.USO E MANUTENZIONE DEL TUTORE T SCOPEDopo l’applicazione iniziale, è possibile rimuovere il tutore T Scope e riapplicarlo semplicemente sganciando le fibbie.Lavare a mano i cuscinetti in espanso e i cinturini con un detersivo neutro, e farli asciugare all’aria. Non mettere i cuscinetti né i cinturini in asciugatrice.I cuscinetti in espanso di ricambio sono disponibili presso il reparto di Assistenza alla clientela: 800 321 0607. Il cuscinetto per incisioni BridgeTech è disponibile come accessorio acquistabile separatamente.
LA MISE EN PLACE INITIALE NE PEUT ETRE EFFECTUEE QUE PAR UN PRATICIEN ! 1 Déverrouillez les brides de la sangle (A), puis ouvrez les boucles (B).2 Ecartez les barres des articulations, étendez l’orthèse à plat, puis placez le dispositif avec le genou centré entre les articulations. Orientez l’orthèse de manière à ce que les articulations soient dirigées dans la direction indiquée et que les petits coussinets de mollet soient tournés vers le pied. Exemple : jambe droite.3 Desserrez les brides à friction sur les barres coulissantes. Pour une bonne mise en place, faites glisser les barres d’articulation coulissantes supérieure et inférieure de manière à les ajuster à la longueur de la jambe. Verrouillez les brides à friction. Les indicateurs de longueur de barres d’articulation permettent de s’assurer que la sélection de longueur est constante sur la cuisse et le mollet.4 Placez les barres d’articulation en position latérale et médiale par rapport à la jambe, puis centrez l’articulation au niveau de l’articulation du genou.5 Attachez sans les serrer les 2 sangles les plus proches du genou. 6 Attachez sans serrer les 2 sangles restantes.7 Tirez à fond sur les sangles de manière à supprimer le jeu derrière la jambe. Veillez à maintenir les positions latérales et médiales des barres d’articulation.8 Fermez les brides de verrouillage des sangles. 9 Tirez les sangles à fond à travers les boucles. Veillez à maintenir les positions latérales et médiales des barres d’articulation.10 Attachez les extrémités des sangles et utilisez les pattes en « Y » à fermeture auto-adhésive pour fixer les sangles. Il sera peut-être nécessaire de raccourcir les sangles en les repliant avant d’attacher les pattes en « Y ».REGLAGE DES ARTICULATIONS POUR LA MOBILITE ARTICULAIRE : 11 Les réglages de limites d’extension peuvent être effectués entre -10° (hyperextension) et 70°, en tirant sur la patte pour la faire sortir et en la faisant glisser à la position souhaitée.12 Les réglages de limites de flexion peuvent être effectués entre -10° et 120° (représenté par la dernière petite ligne droite sur l’échelle). 13 L’articulation peut être verrouillée en faisant glisser le bouton à verrouillage rapide en position verrouillée sur l’une des 5 positions suivantes : -10° (hyperextension), 0° (neutre), 10°, 20° et 30° de flexion.MISE EN PLACE ET REGLAGES DU COUSSINET D’INCISION BRIDGETECH : 14 Le coussinet d’incision BridgeTech peut être ajouté à l’orthèse T Scope Premier pour relâcher la pression autour du site d’incision. Lorsque vous utilisez le coussinet d’incision BridgeTech, vous devrez remplacer l’un des coussinets présents. 15 Pour remplacer l’un des coussinets présents, retirez le coussinet en question de la bande. Assurez-vous que le coussinet d’incision est placé sur la bande appropriée, de manière à ce qu’il se trouve sur le même côté que l’incision. Le morceau de fermeture crochets recto-verso peut être attaché sur l’arrière de ce coussinet ou il peut rester sur la sangle. S’il se trouve sur le coussinet, retirez-le et fixez-le sur le milieu de la sangle qui est attachée sur la bande.16 Appliquez le coussinet d’incision BridgeTech sur la bande avec le côté plat tourné vers le bas, en vous assurant que les sections détachables ne sont pas dirigées vers le côté médial (milieu) de l’orthèse. Les sections détachables seront au bon emplacement une fois l’orthèse mise en place.17 Pour éviter de toucher un point d’incision, retirez les sections détachables individuelles selon les besoins. 18 Pour fournir un support supplémentaire et relâcher la pression, fixez les sections détachables du coussinet d’incision BridgeTech sur la sangle qui se trouve sous le genou des deux côtés du tibia. UTILISATION ET ENTRETIEN DE VOTRE ORTHESE T SCOPE :Une fois réglée et mise en place, l’orthèse T Scope s’enlève et se remet en défaisant tout simplement les boucles.Lavez les coussinets en mousse et les sangles à la main avec un savon doux, puis laissez-les sécher à l’air. Ne mettez pas les coussinets ou les sangles dans un sèche-linge mécanique.Vous pouvez commander des coussinets en mousse supplémentaires en appelant le service à la clientèle au : (800) 321-0607. Le coussinet d’incision BridgeTech est un accessoire qui s’achète séparément.
AJUSTES DE LA BISAGRA DE CONTROL DEL RANGO DE MOVIMIENTO: 11 Los valores de los límites de extensión pueden seleccionarse entre -10° (hiperextensión) y 70° tirando de la lengüeta hacia fuera y deslizándola a la posición deseada.12 Los valores de los límites de flexión pueden seleccionarse entre -10° y 120° (representada como la última marca indicadora en la escala).13 La bisagra puede fijarse en una posición deslizando el botón de fijación rápida a la posición de bloqueo en cualquiera de las 5 posiciones: -10° (hiperextensión), 0° (Neutra), 10°, 20°, 30° de flexión.APLICACIÓN Y AJUSTES DEL ACOLCHADO DE INCISIÓN BRIDGETECH: 14 El acolchado de incisión BridgeTech se puede agregar a la rodillera T Scope Premier para aliviar la presión alrededor del área de la incisión. Deberá remplazar uno de los acolchados existentes cuando use el acolchado de incisión BridgeTech. 15 Para remplazar uno de los acolchados existentes, retire el acolchado existente en la pieza rígida. Asegúrese de que el acolchado de incisión se coloque en la pieza rígida adecuada de manera que se encuentre en el mismo lado de la incisión. La pieza de doble cara de gancho se puede colocar en la parte trasera de este acolchado o permanecer en la tira. Si se coloca en el acolchado, retírela y fíjela en el medio de la tira que se sujeta a la pieza rígida.16 Coloque el acolchado de incisión BridgeTech en la pieza rígida con el lado aplanado hacia abajo. Asegúrese de que las secciones que se desprenden apunten hacia afuera del lado medial (el centro) de la rodillera. Las secciones que se desprenden quedarán en la posición correcta cuando se aplique la rodillera.17 Para crear un efecto de puente en el punto de incisión, retire individualmente las secciones que se desprenden según sea necesario.18 Para ofrecer más apoyo y alivio de la presión, fije las secciones que se desprenden del acolchado de incisión BridgeTech a la tira debajo de la rodilla en cualquier lado de la tibia.USO Y CUIDADO DE LA RODILLERA T SCOPE:Después de la aplicación inicial, la rodillera T Scope puede quitarse y volverse a colocar con sólo desenganchar las hebillas.Lave a mano los acolchados de espuma y las tiras con jabón suave, y seque al aire. No seque los acolchados ni las tiras en una secadora.Puede obtener acolchados de espuma adicionales del Departamento de Atención al Cliente: (800) 321-0607. El acolchado de incisión BridgeTech se ofrece como un accesorio por un cargo adicional.
¡SOLAMENTE UN PROFESIONAL MÉDICO DEBE EFECTUAR LA APLICACIÓN INICIAL! 1 Abra los clips de fijación de la tira (A), desenganche las hebillas (B).2 Separe las barras de bisagra, extienda la rodillera, coloque el dispositivo con la rodilla centrada entre las bisagras. Oriente la rodillera de manera que las bisagras queden mirando en la dirección indicada y los acolchados de la pantorrilla, más pequeños, hacia los pies. Ejemplo: pierna derecha.3 Afloje los clips de fricción de las barras telescópicas. Para lograr un ajuste correcto, deslice las barras telescópicas de bisagra superiores e inferiores a fin de acomodar la pierna en toda su longitud. Cierre los clips de fricción. Los indicadores de longitud de las barras de bisagra permiten verificar la concordancia de las longitudes seleccionadas en el muslo y en la pantorrilla.4 Coloque las barras de bisagra lateral y medialmente con respecto a la pierna, y centre la bisagra en la articulación de la rodilla.5 Enganche, sin apretar, las 2 tiras más próximas a la rodilla.6 Enganche, sin apretar, las 2 tiras restantes.7 Tire de las tiras para apretarlas hasta que no quede ninguna holgura detrás de la pierna. Tenga cuidado de conservar las posiciones lateral y medial de las barras de bisagra.8 Cierre los clips de fijación de las tiras.9 Tire de las tiras para apretarlas a través de las hebillas. Tenga cuidado de conservar las posiciones lateral y medial de las barras de bisagra.10 Sujete los extremos de las tiras, utilice las lengüetas en Y de gancho y lazo en los extremos de las tiras para fijarlas. Puede que tenga que doblar las tiras para acortarlas, antes de introducirlas en las lengüetas en Y.