Embed Size (px)
Citation preview
Instructions for Installing Hawaiian Fonts and Keyboard on Mac OS X
©2006 by the Hale Kuamoÿo, Ka Haka ÿUla O Keÿel ikölani, UH-Hilo Page 1
Introduction “HI” fonts are fonts that will allow you to print and type the ÿokina (glottal) and kahakö (macron) when typing with the Papa Pihi HI keyboard resource provided on Kualono. You must use these fonts and this keyboard when using Leokï, however, they may still be used in other programs as well. Please read through the instructions carefully if you are not familiar with the installation of fonts and keyboard resources on Macintosh OS X. Instructions For Installing the “HI” Fonts This is how you correctly install the Hawaiian “HI” fonts on Macintosh OS X:
1) Login to your computer using the Administrator account which was created when you first configured your system. Many times this account is entitled “admin”, however, another user name may have been used. If you have only one account on your computer, it will be the administrator account. If there is a different administrator account and you do not have the password for it, you need to locate the individual who has this information and seek his assistance on the installation of these resources.
2) Download the Hawaiian keyboard and font resources from Kualono which are
linked at this URL:
http://www.olelo.hawaii.edu/enehana/mac_osxhi.php
3) Extract the .sit or .zip file, and you will see a folder entitled “mac_fonts Folder” on your desktop (or whatever location on your computer that you have selected to download files). The contents of this folder are displayed to the right.
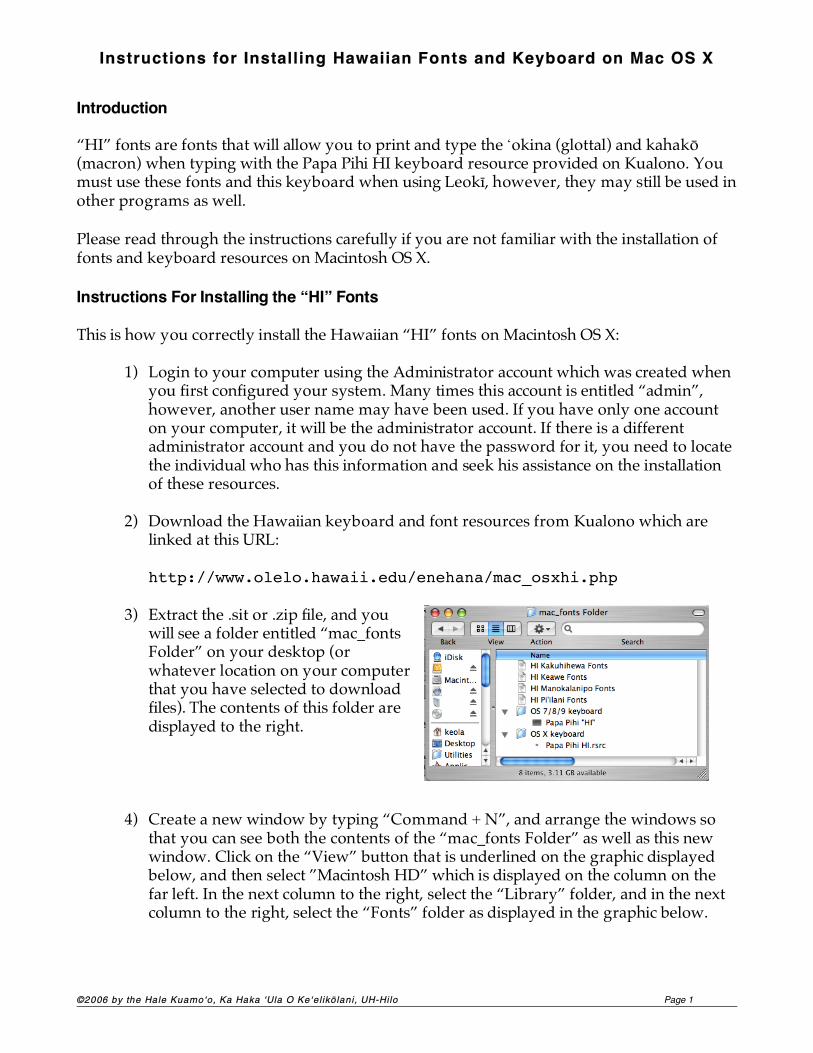
4) Create a new window by typing “Command + N”, and arrange the windows so
that you can see both the contents of the “mac_fonts Folder” as well as this new window. Click on the “View” button that is underlined on the graphic displayed below, and then select ”Macintosh HD” which is displayed on the column on the far left. In the next column to the right, select the “Library” folder, and in the next column to the right, select the “Fonts” folder as displayed in the graphic below.
Instructions for Installing Hawaiian Fonts and Keyboard on Mac OS X
©2006 by the Hale Kuamoÿo, Ka Haka ÿUla O Keÿel ikölani, UH-Hilo Page 2
“mac_fonts Folder” “Macintosh HD/Library/Fonts/”
5) Drag the four “HI” fonts from the “mac_fonts Folder” to the “Fonts” folder in the “Library” folder. You may be asked for the administrator password in order to install the fonts, if so, please type the password and click “OK”.
If you wish to install the Papa Pihi “HI”, please continue with these instructions without logging out of the administrator account. Instructions For Installing the Papa Pihi HI This is how you correctly install the the Papa Pihi HI on Macintosh OS X:
6) Look in the “mac_fonts Folder” for the folder entitled “OS X Keyboard.” You will find the Papa Pihi HI located within it.
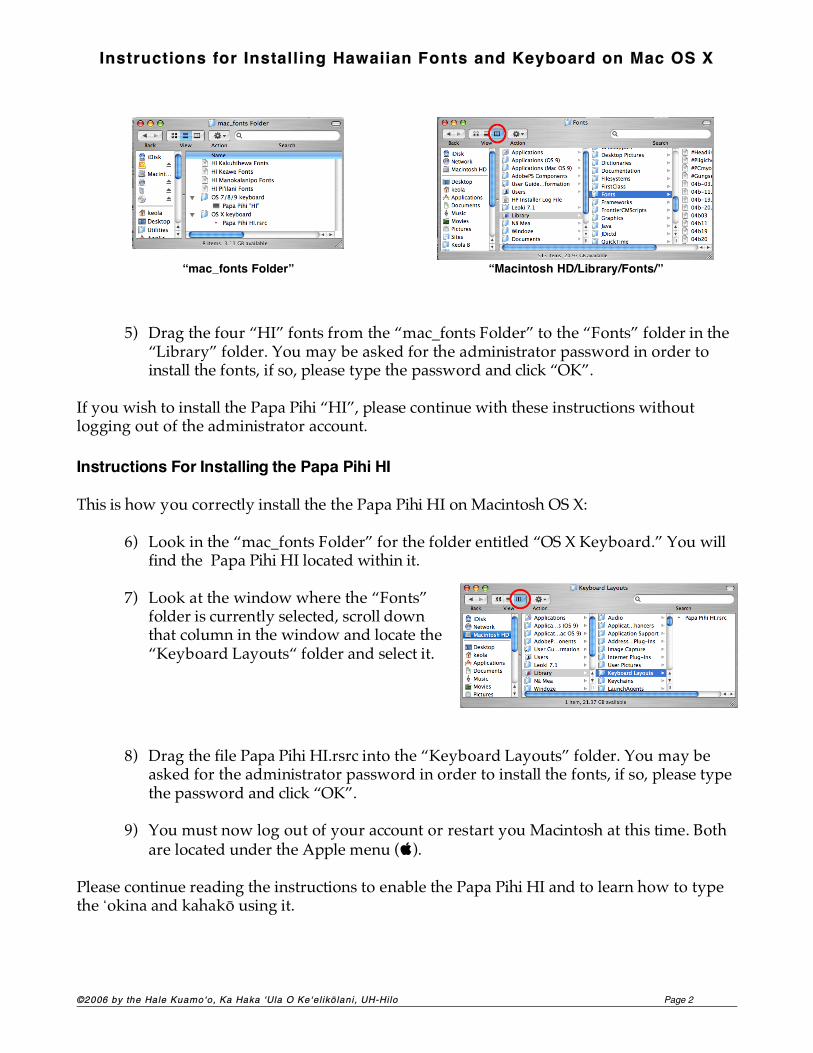
7) Look at the window where the “Fonts”
folder is currently selected, scroll down that column in the window and locate the “Keyboard Layouts“ folder and select it.
8) Drag the file Papa Pihi HI.rsrc into the “Keyboard Layouts” folder. You may be asked for the administrator password in order to install the fonts, if so, please type the password and click “OK”.
9) You must now log out of your account or restart you Macintosh at this time. Both
are located under the Apple menu (). Please continue reading the instructions to enable the Papa Pihi HI and to learn how to type the ÿokina and kahakö using it.
Instructions for Installing Hawaiian Fonts and Keyboard on Mac OS X
©2006 by the Hale Kuamoÿo, Ka Haka ÿUla O Keÿel ikölani, UH-Hilo Page 3
Selecting The Papa Pihi “HI” Though your Papa Pihi HI is now available to all accounts on the computer, you must enable the keyboard layout on all accounts that wish to use it. this is how you enable the keyboard layout:
1) Go to the Apple menu , and select “System Preferences”.
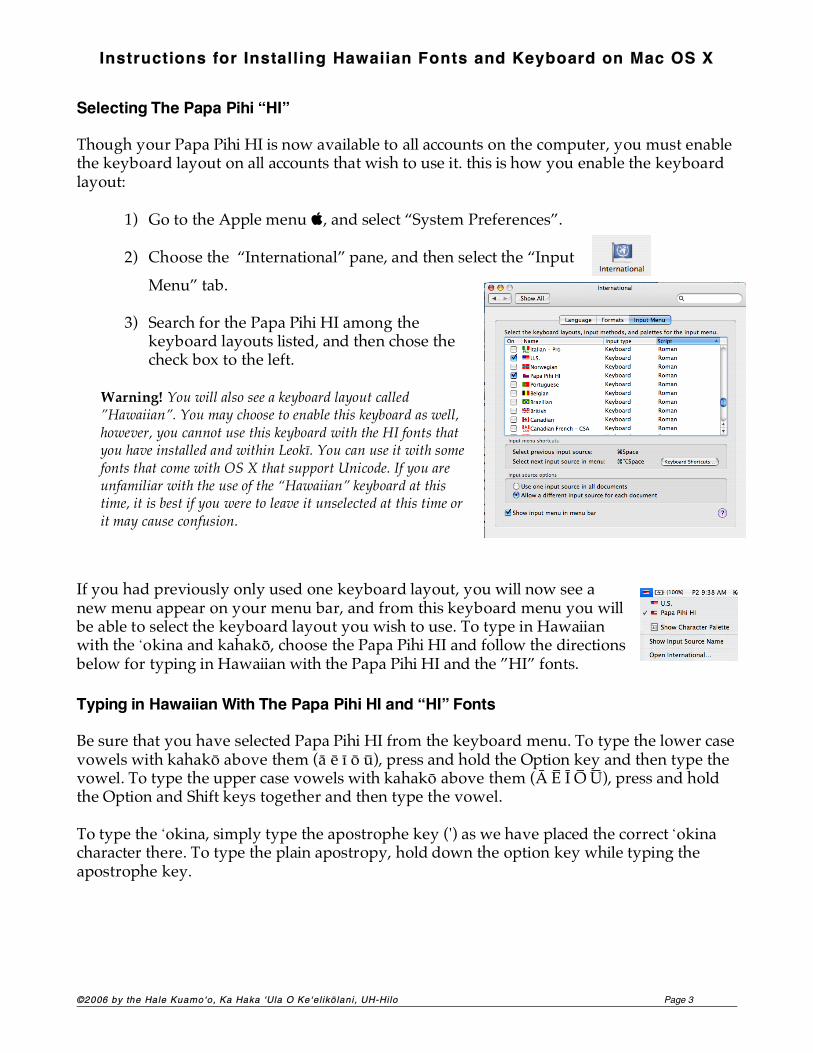
2) Choose the “International” pane, and then select the “Input
Menu” tab.
3) Search for the Papa Pihi HI among the keyboard layouts listed, and then chose the check box to the left.
Warning! You will also see a keyboard layout called ”Hawaiian”. You may choose to enable this keyboard as well, however, you cannot use this keyboard with the HI fonts that you have installed and within Leokï. You can use it with some fonts that come with OS X that support Unicode. If you are unfamiliar with the use of the “Hawaiian” keyboard at this time, it is best if you were to leave it unselected at this time or it may cause confusion.
If you had previously only used one keyboard layout, you will now see a new menu appear on your menu bar, and from this keyboard menu you will be able to select the keyboard layout you wish to use. To type in Hawaiian with the ÿokina and kahakö, choose the Papa Pihi HI and follow the directions below for typing in Hawaiian with the Papa Pihi HI and the ”HI” fonts. Typing in Hawaiian With The Papa Pihi HI and “HI” Fonts Be sure that you have selected Papa Pihi HI from the keyboard menu. To type the lower case vowels with kahakö above them (ä ë ï ö ü), press and hold the Option key and then type the vowel. To type the upper case vowels with kahakö above them (Ä Ë Ï Ö Ü), press and hold the Option and Shift keys together and then type the vowel. To type the ÿokina, simply type the apostrophe key (') as we have placed the correct ÿokina character there. To type the plain apostropy, hold down the option key while typing the apostrophe key.