Embed Size (px)
Citation preview

7/28/2019 Instructions for creating instructions for Pre-literate Cultures
http://slidepdf.com/reader/full/instructions-for-creating-instructions-for-pre-literate-cultures 1/11
Instruction guide or the productiono assembly instructions orpreliterate cultures.
ByJames Burchill

7/28/2019 Instructions for creating instructions for Pre-literate Cultures
http://slidepdf.com/reader/full/instructions-for-creating-instructions-for-pre-literate-cultures 2/11
Goal o thisbooklet
This booklet provides inormation on the correct productiono instructions to be provided to pre-literate cultures,
The goal o these instruction was to nd reliable ways ocommunicating in picture orm about the complicatedprocesses.
The end instructions were able to communicate to all userstested how to assemble a rig o my major project.
An important point to be made is that these instructionswere designed to cater to the least technically ableindividuals. I they were catered to then anyone couldpotentially assemble the devices using these instructions
Those who are very good with instructions and problemsolving in general will also benet but may nd certainparts o these instructions ‘childish.’

7/28/2019 Instructions for creating instructions for Pre-literate Cultures
http://slidepdf.com/reader/full/instructions-for-creating-instructions-for-pre-literate-cultures 3/11
Rule 1Perspectiveo photos
The ruleWhen taking photos try to take pictures rom a consistentperspective which only varies by small degrees.
It is also important to not change the cropping o thephoto and stay at a single zoom setting.
Doing this helps people stay orientated with the process.Changing angle o view abruptly can lead to conusionresulting in errors in construction.
RecommendationsTake photos orm a 3/4 perspective to the product. It allowsthe most visibility.
When taking photos try to include humans in the image asit also provides reerence to both scale and orientation.
Use a consistent platorm or set or the process as this alsoaids orientation.
Pick your scale ater looking through all components andprocesses involved in the assembly. Being cropped towide can cause problems i the project has many smallcomponents.
7/28/2019 Instructions for creating instructions for Pre-literate Cultures
http://slidepdf.com/reader/full/instructions-for-creating-instructions-for-pre-literate-cultures 4/11
Rule 2Changingangle
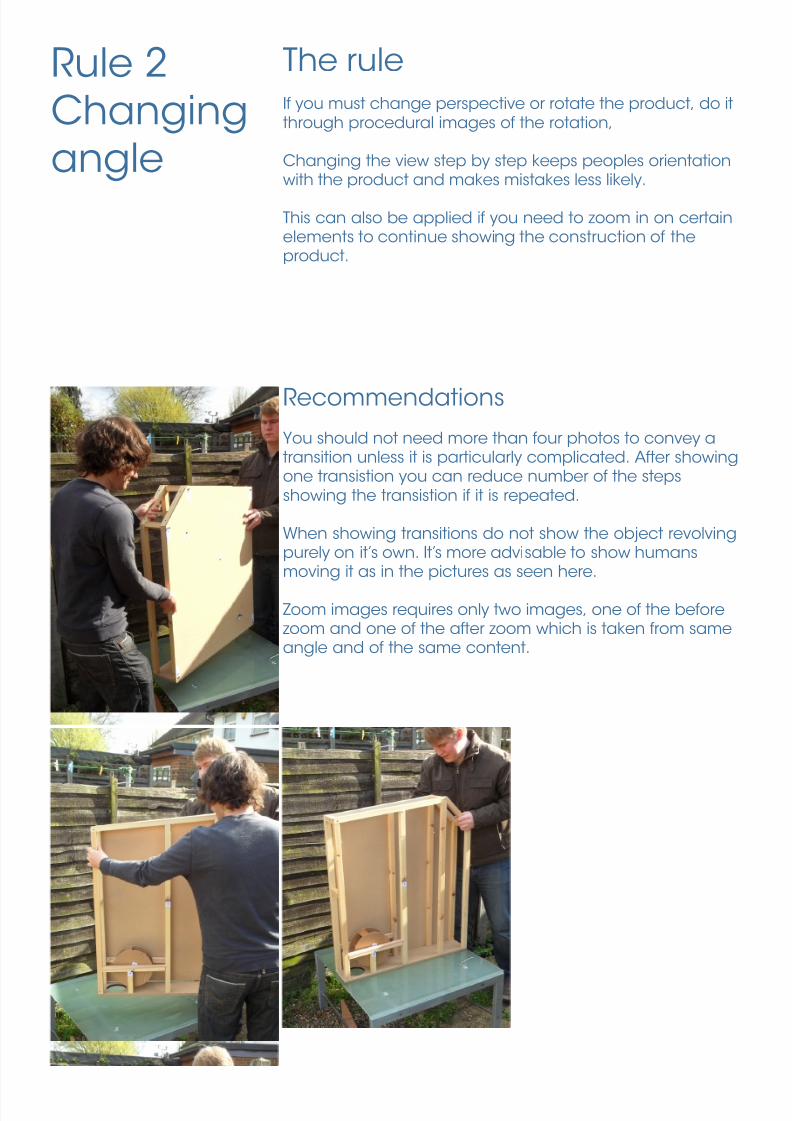
The ruleI you must change perspective or rotate the product, do itthrough procedural images o the rotation,
Changing the view step by step keeps peoples orientationwith the product and makes mistakes less likely.
This can also be applied i you need to zoom in on certainelements to continue showing the construction o theproduct.
Recommendations
You should not need more than our photos to convey atransition unless it is particularly complicated. Ater showingone transistion you can reduce number o the stepsshowing the transistion i it is repeated.
When showing transitions do not show the object revolvingpurely on it’s own. It’s more advisable to show humansmoving it as in the pictures as seen here.
Zoom images requires only two images, one o the beorezoom and one o the ater zoom which is taken rom sameangle and o the same content.

7/28/2019 Instructions for creating instructions for Pre-literate Cultures
http://slidepdf.com/reader/full/instructions-for-creating-instructions-for-pre-literate-cultures 5/11
Rule 3Oneprocess
per image
The ruleOnly complete one process per image.
By only having one process per image the instructions aremuch less likely mis interpreted. Each image has only onething to communicate and so individuals nd easier to
notice what is going on in each image.
This also goes or repetitive tasks. For example do nottry to show multiple screws being placed in one image just because they are the same process. This can lead toindividuals missing components or not perceiving everyscrew.
Recommendations
When taking pictures o processes do not expect users todo anything they have not been instructed to. An imageo a nut on a screw thread is not enough to communicatethat nut must be done up.

7/28/2019 Instructions for creating instructions for Pre-literate Cultures
http://slidepdf.com/reader/full/instructions-for-creating-instructions-for-pre-literate-cultures 6/11
Rule 4Propertool use
The ruleWhen showing instructions relating to processes suchas tightening screws show procedural images to implydirection o movement.
Using two photos instead o one to show a user tightening
up a nut has been more eective in improving users use otools. Many users or go the use o tools and just use ngersi not properly instructed.
Recommendations
When taking photos try to make the movement asunambiguous as possible. In two pictures adjacent youcan see the arm clearly move clockwise. This can beperceived because it would be highly unlikely or the armto go rom the rst step to second in counter clockwisemanner.
In processes requiring precision or small amounts o orce
this method can also be used to communicate a need ora gentle touch. This is done by showing pictures o verysmall movements which help communicate the need ordelicacy..

7/28/2019 Instructions for creating instructions for Pre-literate Cultures
http://slidepdf.com/reader/full/instructions-for-creating-instructions-for-pre-literate-cultures 7/11
Rule 5Showingdetails
The ruleWhen communicating small details use zoomed in imageso the details reerencing a larger image which is o asimilar ormat to the rest o the instructions.
This helps users keep a consistent view on the assembly
but allows detailed views o important components andi the are details that may be missed this tool helps bringattention to them
Recommendations
When using these detailed images only use one per image.
Format the picture dierently in this example a zoomedsection has an outline and is circular so it instantly warnsusers that the image is dierent to standard images.
Place the zoomed in image close to the larger image soit is apparent they are connected. There can problems
when individuals believe they are being instructed to do anadditional process.
Try to keep enough detail in the zoomed image to allowuser to see where you are reerencing the larger imageas this also helps alleviate the problems mentioned in theparagraph above.

7/28/2019 Instructions for creating instructions for Pre-literate Cultures
http://slidepdf.com/reader/full/instructions-for-creating-instructions-for-pre-literate-cultures 8/11
Rule 6Colourcoding.
The ruleUse colour coded icons on pieces and tools to help usersidentiy components and where they should go. Being ablesee this colour coding will allows users to know where toplace items like screws or nuts.
Colour coding should also be linked to tools to identiywhich tools are used on which components.
Recommendations
It is also advisable to use minor variations in shape aswell as colour or benet o the colour blind. For examplehexagonal nuts relate to a blue hexagon (as in top letpicture) and a circular screw head might relate to a redcircle
When using colour coding it is a support tool and shouldnot be relied upon to communicate processes such as
where to place nuts and screws, the still needs to beimages depicting their placement.

7/28/2019 Instructions for creating instructions for Pre-literate Cultures
http://slidepdf.com/reader/full/instructions-for-creating-instructions-for-pre-literate-cultures 9/11
Rule 7Separatesections
The ruleBreak up the instructions into clear sections using colour.The sections should change when a dierent componentsare introduced or there is a change rom a repetitiveprocess to a new process.
This is to stop a common problem in which users skippedthrough sections o the instruction guide and missing smalldetails. By adding this they can see rom the side bar whenthey have reached the end o repetitive process and drawsattention to changes in the instructions.
Recommendations
Using layout like a side bar o colour that correspond withthe colour coding o the components used in that section.In the example images the colour down the side andround the zoom image are the same as the componentsinvolved in the process.
Do not be araid o having sections a hugely dieringlength.
I you need to depict a change in process but still using thesame colour coding break up the sections using a reviewimage as explained in the next section.

7/28/2019 Instructions for creating instructions for Pre-literate Cultures
http://slidepdf.com/reader/full/instructions-for-creating-instructions-for-pre-literate-cultures 10/11
Rule 8Parts andreview
images
The ruleBegin each section with a picture showing the componentswhich will be used in that section. The components shouldbe laid out clearly and grouped so that the numberrequired o each components can be clearly seen,
At the end o each section include an image or imageswhich serve no purpose but to aid as a tool to review theprocesses completed in that section. The images shouldallow users to see i they have made any errors at thispoint. They do not need to bring attention to the processesinvolved as long as they can be seen in the image.
Recommendations
Review images should be larger than other images toestablish they serve a dierent purpose.
Both types o image should not include a human presenceas this might make those using the instructions think theimage depicts a process. It also helps establish that thisimage is dierent to regular images.
The review image should not use a colour coding bar soas not to imply there is a process taking place and allowswhen ficking through to quickly nd the end o the section.

7/28/2019 Instructions for creating instructions for Pre-literate Cultures
http://slidepdf.com/reader/full/instructions-for-creating-instructions-for-pre-literate-cultures 11/11
Generalrules andadvice.
Contact
No icons should be used, the use o iconography can beconusing i not properly implemented. This includes arrowsand any icons you may consider standard. This is due to apotential dierence in culture.
Use the smallest amount o tools possible to complete the job.
Always use more images rather than less.
Use o shapes added to components can be helpul todierentiate pieces.
Components o similar size should be colour coded verydierently so it is immediately obvious what is being used.
No text should be used either as a support or to explainwhat is going on in the picture, it may lead those whocannot read to believe they are missing inormation.
The layout o the instructions should be consistentthroughout the publication as to reduce anymisconceptions.
I using pictures are unclear as to exactly whatcomponents they are using place small images o thecomponents being used by the side o the image.