Embed Size (px)
Citation preview

Instructional Strategy for
Teaching Science at
Standard V based on the
Theory of Multiple Intelligences
___________________________________________________________________________________________________________
This instructional strategy for teaching science at standard V based on the theory of Multiple Intelligences was developed by Mr. Mogera Praful
Premvadan, NCERT Doctoral Fellow (2009-2012) for the degree of Doctor of Philosophy in Education under the guidance of Dr. Anjali
Khirwadkar, Assistant Professor, Department of Education (CASE), Faculty of Education and Psychology, The M. S. University of Baroda,
Vadodara, Gujarat, India.

1
Lesson 2 Learn Preparing Groups
General Objectives: (1) Students will develop the concept that a substance possesses more than one property by observation and
experimentation. (2) Students will learn the formation of group on the basis of properties of substances. (3) Students will relate the importance of
forming group (on the basis of properties) in day-to-day life.
Introduction The teacher asked the students to give the names of objects around them - the things they eat, the toys that they play, and the things that they use
daily. The teacher asked them questions such as: Whether all the objects were same in size, shape, and colour? How do objects varied from each
other?
The teacher explained shape, size, and colour are the properties of the objects that make each object unique form others. The teacher also told
some of the properties you learnt in standard III like smoothness of surface, differences in colour and taste. Today, we will Learn Preparing
Groups – Lesson 2 in which you will prepare group of objects / substance based on similar properties. We will also learn the benefits of
preparing groups in our daily lives. In this lesson, the activity of preparing groups will help us to work fast and easily without wasting our
precious time.
Sr.
No.
Instructional
Objective
Description of
Activity
Classroom Interaction Time
Required
1. Students will identify
the similarities and
dissimilarities among
various things /
substances.
Students will explain
that the group has
objects / substances
showing at least one
common
characteristic.
Activity 1
(Logical-
mathematical)
Study of similarity
and dissimilarity
of object and
concept of group
Process skill:
Classification
The teacher showed them the bag having different objects/substances
put together like tennis ball, cricket ball, key-chain, key, cotton, ball
pen, rubber, white chalk and salt. The teacher asked the students to
arrange such things in group. The teacher asked the reasons for
grouping the objects / substances into particular groups. Thereafter, the
teacher explained that we keep the things of same colour together,
objects having same shape together, and the things that are used for
similar purposes together. Thus, objects or things are grouped based on
similar characteristics such as colour, their uses, and shape or taste
also. Thereafter, the teacher asked the students to explain the concept
of group in their own words.
15 mins.

2
Sr.
No.
Instructional
Objective
Description of
Activity
Classroom Interaction Time
Required
2. Students will
group the
objects as
manmade and
nature’s gift.
Activity 2
(Logical-
mathematical)
Classification of
objects into
manmade and
nature’s gift
groups.
Process skill:
Classification
The teacher showed different objects to the students. Some were naturally
available and some were manmade things. The different objects given were
glass, plastic bowl, bark of tree, teaspoon, toothbrush and neem tree’s
leaves. The teacher asked the students to classify the objects / things into
naturally available things / objects in the given activity sheet 2 which is
mentioned on the page no. 3. The students were instructed to put ‘X’ if the
object is naturally available and ‘√’ if the object is manmade. The students
classified the objects / materials and put appropriate tick marks in the given
activity sheet for activity 2. After collecting the activity sheets, the teacher
explained naturally available things and manmade things with illustrations.
20 mins.

3
Activity Sheet for Activity 2
Classify the given below objects into manmade and nature’s gift by putting the ‘√’ or ‘X’ in given table. Things/Objects: Glass, Plastic bowl, Bark of tree, Neem tree’s leaves, Toothbrush, Football, Table, Boat, Rose, Jasmine, Bamboo, Wool and
Jute
Objects Manmade Nature’s gift
Plastic bowl
Tooth brush
Glass
Neem tree’s leaves
Bark of tree
Football
Table
Boat
Rose
Jasmine
Bamboo
Wool
Jute

4
Sr.
No.
Instructional
Objective
Description of
Activity
Classroom Interaction Time
Required
3. Students will
classify the
objects into
the material
from which
the objects are
made.
Activity 3
(Logical-
mathematical)
Classification of
objects based on
the material from
which object is
made.
Process skill:
Classification
The teacher wrote the names of various objects and asked from which material
(like wood, paper, iron, glass and plastics) the objects were made. The objects
are denoted as under.
Objects: chair, table, toys, belt, purse, cloth, notebook, newspaper, artificial
flowers, glass, rod, nail, bars, measurement-weights, pencil, desk, duster and
plastic bottle. The teacher classified the objects into different categories such as
objects made up of wood, iron, glass, and plastic material based on students’
answers. The teacher drew the schematic diagram for the objects made from
wood and glass on blackboard based on the students’ responses. One such
schematic diagram for objects made from wood is mentioned in figure 2.1.
20 mins.
Chair
Table
House / Hut
Ruler Writing Pad
Boat Chopsticks,
Toothpicks
Board games,
Pawns for chess
Figure 2.1 Objects Made from Wood
Wood

5
Sr.
No.
Instructional
Objective
Description of
Activity
Classroom Interaction Time
Required
4. Students will
write prediction
about which
objects /
substances will
sink or float.
Students will
report the correct
observation of
sinking and
floating of the
objects /
substances based
on
experimentation.
Activity 4
(Logical-
mathematical
and Musical)
Putting
substances into
tub filled with
water, and
singing of the
song
Process skill:
Prediction
The teacher explained the meaning of the term ‘predict.’ Thereafter the teacher
showed students the various substances and told them to predict whether
objects / substances will sink or float over water and instructed them to write
their predictions in activity sheet. Then, the teacher called different students to
drop various objects / substances into the tub filled with water one by one and
instructed them to observe. The teacher told them to write their observations in
the activity sheet for activity 4 which is mentioned on page no. 6. The teacher
asked students about their predictions and actual observations for the objects /
substances when kept into the tub filled with water. The teacher asked them to
collect easily available objects and do the same activity at their homes after
taking parents’ permission. Next day, the teacher asked them what they
observed and what were the differences in their prediction and observation for
particular objects / substance. The teacher encouraged the students to sing the
below mentioned song with claps and bodily movements. (Source: Floating
and sinking. Retrieved March 1, 2009 from
http://www.k12.hi.us/~shasincl/poems_prop_cycle_weather.html)
Floating and Sinking “Why do things float?
Why do things sink?
What do you think?
What do you think?
Things that float
Are lighter than water.
That's why they float.
That's why they float.
Things that sink
Are heavier than water.
That's why they sink.
That's why they sink”.
20 to 25
mins.

6
Activity Sheet for Activity 4
Name of Student: Date: Look at the objects given to you and think which object will sink in water and which object will float. Write down the objects in below table
accordingly.
Objects: Egg, Rubber ball, Cooking oil, Kerosene, Banana, Lemon, Wooden block, Nail
Table 1
Table 2 Put the objects one by one in a tub filled with water and record your observation in below table. Now compare it with what you have written in
table I. Object Result
Egg
Rubber ball
Cooking oil
Kerosene
Banana
Lemon
Wooden block
Nail
Objects I think will sink Objects I think will float

7
Sr
No.
Instructional
Objective
Description of
Activity
Classroom Interaction Time
Required
5. Students will
display correct
observations for
the objects /
substances under
study.
Students will
classify the
substances /
objects on the
basis of various
characteristics.
Activity 5 (Logical-
mathematical, Musical
and Interpersonal)
Classification of
objects based on its
characteristics like
dissolving in water,
edible, floating or
sinking, softness,
transparency and
shape.
Process skill:
Classification
It was the group activity. The teacher explained the acronym-
DCEFPTS where D dissolves in water? C= Colour, E=Edible,
F=floats or sinks in water? P=Pressed? T= Transparent? and S=
Shape.
Then, the teacher encouraged the students sing below mentioned
song with clapping. The song is mentioned as under.
Song on Characteristics of Objects “Different objects
So have different properties.
So Use DCEFPTS
To make group, group.
D means dissolving in water.
C means see the colour.
E means edible
F means float, float.
P means press, press.
T means see through the object.
S means see the shape, shape”.
The teacher instructed the students to sit in groups. After that, the
teacher provided various objects to them in groups and asked them
to test various objects using DCEFPTS approach. The teacher took
care that all the students would have enough chance to do the
activity in their groups. The teacher told them to write their
observations and predictions in the activity sheet.
35 mins.

8
Activity Sheet for Activity 5
Name of Student: Date:
Study the things mentioned in table. Put ‘√’ in the columns of the table where applicable. Put ‘X’ where the thing is not applicable. Write the
name of colour and shape in respective columns.
Things D =
dissolves in
water?
C= Colour E=Edible F=Can
float?
S=Sinks
in water
P=Can be
pressed?
T= Transparent? S= Shape
Oil
Chalk
Butter
paper
Plastic
Material
Sand
Cotton
Rubber
Ball
Thermocol
Ball
Table salt
Crushed
paper
Sponge

9
Now classify all above things in suitable groups as under.
l. Things that dissolve in water:
2. Things that float over water:
3. Things that sink in water:
4. Things that cannot be pressed easily:
5. Things that can be pressed easily:
6. Transparent Things:
7. Edible Things:
8. In how many colours and shapes can we classify above things? Classify things in different colours and shapes.
Sr.
No.
Instructional
Objective
Description of
Activity
Classroom Interaction Time
Required
6. Students will
write reasons
(in their own
words) for the
importance of
systematic
working and
classification of
objects /
substances into
group which
make daily
tasks easy.
Activity 6
(Linguistic and
Intrapersonal)
Completing the
statements related
to importance of
classification of
groups/objects in
daily life based on
personal reflection
Process skill:
Communication
The teacher asked the students about the things they kept in bookracks,
kitchen shelves, study table, computer table and school bags. The
teacher told them if things were not kept at proper places, what the
situation would be. The students gave their views about the difficulty
they would face if they did not take care to place the things where it
should be, and in proper way. Then, the teacher told them to read the
incomplete sentences from the activity sheets and asked them to
complete the statements with reasons.
20 mins.

10
Activity Sheet for Activity 6
Student’s Name: Date:
Complete the below given statements with proper reasons.
1. When I will be free, I will help mother to keep the edible things at one place…
2. I will keep notebooks, pen, pencil, textbooks, and assignments on the study table…
3. Textbooks and workbooks should be kept separately because…
4. School uniforms should be kept at a place in my cupboard because…
5. I learnt from this chapter to organize………………as that will help to keep my work…
Recapitulation: Multiple Intelligence: Logical-mathematical
Process skill: Classification
The teacher wrote the below motioned instruction and items on blackboard and asked the students to classify the objects/substances based on the
similarities among them.
Classify the following items as per the similarities.
Plastic scale, pencil, wooden block, sweets, neem leaves, Ginger, aero plane made from paper, paper, glass, oil, milk, salt, sugar and boat.

11
Lesson 3 Living - Non Living
General Objectives: (1) Students will understand the characteristics of living. (2) Students will understand the characteristics of non-living.
(3) Students will demonstrate the understanding of differences between living and non-living. (4) Students will develop interest to study living.
(5) Students will develop due regard and sensitivity for living.
Introduction: Questioning Session
The teacher asked following questions to introduce the concept of living and non - living.
1. What is the similarity between aeroplane and birds?
2. How do we make distinction between aeroplane and birds?
3. Does bird feel sensation like pain?
4. Do cat, dog and tortoise give birth to young ones?
5. What will happen to dog or goat if you beat them with a stick?
6. What changes do you observe in plants around you?
After asking above mentioned questions, the teacher explained living is sensitive towards changes in surrounding such as hot and cold. They
give birth or lay eggs and show movement which are the characteristic features of living. The teacher told non - living does not show such
features. Today, we will learn such characteristic features that differentiate living from non - living.

12
Sr.
No.
Instructional
Objective
Description of Activity Classroom Interaction Time
Required
1. Students will
list down the
names of
various living
and non - living
from given
word block.
Students will
classify living
from non -
living on the
basis of
characteristics.
Activity 1 (Linguistic,
Logical-mathematical,
Interpersonal and
Musical) Students were
given the activity sheet
containing a word block.
On each word block,
letters were written and
students were instructed to
make different names of
objects, fruits, trees,
animals by encircling.
Thus, they made names of
various living and non -
living from the word
block.
From the word block, the
different names of living
and non - living were with
the students. Then, the
students in pair attempted
to differentiate living from
non - living on the basis of
their characteristics.
Process skill:
Classification
The teacher distributed the activity sheet containing a word
block to the students and asked them to make a meaningful
word for living and non - living. The teacher instructed the
students to encircle the letters meaningfully to find out the
names of living and non - living.
The students followed the teacher’s instruction from time to
time to time and they made the names of living and non -
living from the given word block.
The teacher discussed the characteristics that made living
different from non - living (Figure 3.1 on blackboard which
is mentioned on page no. 13). The teacher gave the activity
sheet to the students wherein they were asked to write the
names of living and non - living by recalling various names
of living and non - living made by them from the word block.
They were also given freedom to write the names of the
living and the non - living other than that they found in the
word block. Before proceeding for the activity, the teacher
made pairs of students and instructed one student in each pair
to raise the query to other, and other student to reply. After
putting tick mark in the characteristic features of the living in
the activity sheet, each pair was asked to derive the
conclusion why specific things were classified as living or
non - living. The teacher encouraged the students to sing the
song mentioned below in rhythm with claps and bodily
movements. The activity sheet is mentioned on page no. 14.
20-25
mins.
13
Sr.
No.
Instructional
Objective
Description of
Activity
Classroom Interaction Time
Required
1. Song on Characteristics of Living
“Plants and animals
are living
Living feels pain
Living takes food
Living shows growth
Living shows movement
Living reproduces and respires.”
Figure 3.1 Schematic Diagrams for Characteristics of Living and Non - Living
14
Lesson 3 Living –Non Living
Activity Sheet for Activity 1
Group Name: Date:
Students’ Names:
The box below shows letters. Find out the names of objects / fruits / trees / animals and encircle them.
Word Game: Living – Non Living
R S P A R R O W R I Q B
S O D R R D I N O U S A
R F G S W I O P R S M I
O D H H M C A K O B N K
C L B O A T S R A O A S
K I T L N R H I T O B A
E O G Q G Z O N L K S K
T K J P O C K Q S O W T
X R A U N B A L B W R A
E A P B I A O A D M J B
R I T J O N L S A X G L
S P O N T A E W I Z E E
I N B S R N O A K Y R M
R I C U E N W N Q U S A
I O L T F W S T R N V C
P A P P Y A L A S K I S
E G A U N G O H I O O O
A W H E M O N K E B A T

15
Lesson 3 Living-Non Living
Activity Sheet for Activity 1
Group Name: Date:
Students’ Names:
Recall the names of trees, objects, and animals that you have framed in earlier activity. Write those names in the given table. Now check
their characteristics and classify them by writing ‘Yes’ or ‘No’ in below mentioned table.
Table 1: Classification into Living and Non-Living
No. Things Characteristics Conclusion
(Write
Living or
Non-living)
Does
it
move
on its
own?
Has it
sensitivity?
Does it
take
food?
Does it show
respiration?
Does it
Excrete?
Does it
Reproduce?
1.
2.
3.
4.
5.
6.
7.
8.
9.
10.

16
Sr.
No.
Instructional
Objective
Description of
Activity
Classroom Interaction Time
Required
2. Students will write
the appropriate
characteristics of
living and non -
living in the Venn
diagram.
Activity 2 (Logical-
mathematical)
Writing
characteristics of
living and non-living
in Venn diagram
Process skill:
Communication
The teacher explained the concept of Venn diagram and how to
write the characteristics of living and non - living in Venn
diagram by asking the questions mentioned as under.
Questions:
• What is the similarity between living and non - living?
• What makes living different from non - living?
The students replied to teacher’s query and they mentioned the
characteristics of living and non - living in the Venn diagram.
The students also drew the Venn diagram for aeroplane and bird
in their notebooks. The teacher completed the Venn diagram for
aeroplane and bird with the help of the students.
10 mins.

17
Figure 3.2 Venn Diagram of Aeroplane and Bird
Aero plane Bird
Aero plane is flown by man while birds fly by their wings.

18
Activity Sheet for Activity 3
Student’s Name: Date:
Write the answers under each question.
1. Which trees’ and plants’ leaves do you have?
2. What was the colour of leaves before keeping it in the sunlight?
3. What was the colour of leaves after keeping it in the sunlight?
4. Do you find any change in a non-living thing after keeping it in sunlight for two days?
5. How can you say that plants are living?
Sr.
No.
Instructional
Objective
Description of Activity Classroom Interaction Time
Required
3. Students will
explain that
plants are
living after
observing the
effects of
sunlight over
the plants’
leaves.
Activity 3 (Logical-
mathematical and
Naturalist) Students will
do an experiment by
plucking leaves of plant
and keeping them in sun
and note the changes in
leaves.
And preparing scrapbook
for leaves
Process skill:
Observation
The teacher told the students to collect leaves of plants or trees
from neighbourhood and instructed them to keep the leaves in
open air / sunlight for two days in their home. The teacher
instructed them to observe the leaves during two days and write
their observations in their notebooks. The teacher told them to
prepare the scrapbook for leaves of different plants.
The students performed the activity at their home. Next day, the
teacher collected the activity sheets and discussed their
observations about the effect of sunlight over the leaves. In this
way, the teacher helped them to deduce that plants are living.
The activity sheet for activity 3 is mentioned on page no.18.
15 mins.

19
Sr.
No.
Instructional
Objective
Description of
Activity
Classroom Interaction Time
Required
4. Students will
explain that
plants are
living on the
basis of their
growth in
sunlight.
Students will
explain that
plants are
living by
measuring
their growth
under two
different
conditions.
Activity 4 (Logical-
mathematical and
Naturalist)
Plants are living.
Take two pots with
plants.
Situation 1: Put one
pot in sunlight and
water it regularly.
Situation 2: Put
other pot in darkness
and do not water this
plant.
Now observe the
difference in both
the plants after 15
days.
Process skill:
Measurement
The teacher brought two plants of the same height in the class and
instructed students to place one plant in dark without giving water (plant
in Pot A). The teacher also instructed the students to keep one plant in
sunlight and water it regularly (plant in Pot B). The teacher asked them to
measure the height of both the potted plants. The teacher told them to
observe the changes in the plant kept in sunlight daily. The students
regularly observed the changes in the plant kept in sunlight and wrote in
their notebooks. After 15 days, the teacher asked the students to measure
the height of the plants kept in two different conditions. The teacher asked
questions noted below.
• How the plant in pot A looked after 15 days?
• How the plant in pot B looked after 15 days?
• Which plant grew better?
• What is the height of both the plants?
• Why the plant in pot B grows better in comparison to plant in pot
A?
The teacher wrote the important points regarding effect of sunlight over
the growth of plant on blackboard and instructed the students to write the
same in their notebooks.
10 -15
mins.

20
Sr.
No.
Instructional
Objective
Description of
Activity
Classroom Interaction Time
Required
5. Students will
explain that
plants are
living on the
basis of
Jagdish
Chandra
Bose’s work.
Students will
explain that
plants should
not be cut.
Students will
write uses of
plants.
Activity 5 (Musical
and Intrapersonal)
Explanation of
scientist Bose’s
work and inner
reflection of plant
life.
(CD, Folder-
Lesson 3, File- Dr
Bose)
Process skill:
Communication
The teacher played pop and classical music in the class and instructed the
students to listen. (CD, Folder – Lesson 3, Files- X-files, jugal Track 02)
(1. Source for X-files: Top 50 MP3 Groovy Instrumental Hits, 26 number
– x –files marketed by ME2 Records a division of Virgin Records (India)
Pvt. Ltd. Sewri (W), Mumbai -15 & 2. Source for jugal Track 02: Volume
1, Track 2, jugalbandi – an impeccable blend by Reader’s Digest Book and
Home Entertainment India Pvt. Ltd.) The teacher asked questions as under.
• Which music do you feel soft in hearing?
• Do you feel music should be played while you do some activity? If
Yes, Why?
• Do you think music can make us feel better?
Then, the teacher gave brief outline of the research conducted by the
Indian scientist Jagdishchandra Bose for the effect of music over the plant.
The teacher also showed them photograph of scientist Jagdishchandra Bose
using PowerPoint Presentation (CD, Folder- Lesson 3, File- Dr Bose).
Then, the teacher distributed the activity sheet 5 to the students and
instructed the students to write the questions after reading the given
paragraph.
The students read the paragraph given in the activity sheet 5 and answered
the question. Thus, the students related themselves with the life of plants
and understood that the plants are living and we should not harm or cut
them. The teacher collected the activity sheets from the students and
discussed the uses of neem tree and the reasons for not cutting it. The
teacher also explained that living feels sensation. The teacher wrote
important points about uses of plants and plants’ sensitivity on blackboard
and instructed the students to write the same in their notebooks.
25 mins.

21
Activity Sheet for Activity 5
Student’s Name: Date:
Read the following passage carefully.
I am neem tree. My leaves are bitter in taste. I am a big tree. I provide home to all birds. I am useful to man. Neem soap and some medicines are
made from my leaves. Mosquitoes run away when my leaves are burnt. I give coolness in summer. I do not harm man but I feel unhappy and
upset when man cuts me.
Review Questions: (1) How is neem tree useful to man?
(2) Should we cut neem tee? If not, why?
Sr.
No.
Instructional
Objective
Description of
Activity
Classroom Interaction Time
Required
6. Students will explain
plants are living
because plants show
sensitivity when it is
touched.
(Based on the example
of ‘touch-me-not-
plant’)
Students will explain
that the living is
sensitive towards the
changes occurring in
their nearer
surroundings.
Activity 6
(Visual spatial
and Naturalist)
Touching a
‘Touch-me-not-
plant’
Process skill:
Communication
The teacher showed ‘touch-me-not-plant’ to the students and
engaged them in drawing the leaves of the touch-me-not plant.
The students drew the picture of leaves of ‘touch-me- not-plant’.
The teacher asked them regarding the colour of the leaves of
‘touch-me-not plant’ and its branches, and size of stem. The
teacher called one student, asked him to touch it, and asked the
other students what happened while touching. The students
answered the teacher’s query. The teacher asked the students to
note such behaviour of plant in one word and asked them to
explain why the plant is living.
The teacher explained the effect of heat to humans when we
switch off fan. The teacher also explained dogs pant to keep them
cool. Thereafter, the teacher asked students to explain the
sensitivity of plants and animals towards the changes in
surrounding.
15 mins.

22
Sr.
No.
Instructional
Objective
Description of
Activity
Classroom Interaction Time
Required
7. Students will
explain plants are
living by
measuring change
in their height.
Activity 7
(Logical-
mathematical and
Naturalist)
Observing the
potted plant and
measuring the
height of plant
periodically
Process skill:
Measurement
The teacher brought potted plants in the class and conducted the
activity. The teacher formed the groups, gave them string, activity
sheets and told them to measure the height of the plant after a week
for four consecutive weeks using string and scale. After a week, the
teacher asked what was the height of the same plant at the end of
first, second, third and fourth week? What will you say for plant
based on change in its height?
The students measured the height of the plant weekly. They noted
down the changes in the plants, and reported in activity sheet. The
activity sheet 7 is mentioned as under.
15 mins.
Activity Sheet for Activity 7
Group Name:
Students’ Name:
Weekly Observation of Plant
Days Height in
Centimeters
Changes in Plants
1st week
2nd
week
3rd
week
4th
week
Conclusion: Height of plant increases on four weeks, so we can say that plant is….

23
Sr.
No.
Instructional
Objective
Description of
Activity
Classroom Interaction Time
Required
8. Students will
draw the picture
of germinated
‘mung’ seed.
(Based on
observation.)
Students will
explain
germinated
‘mung’ seed as a
living. (Based on
observation.)
Activity 8 (Visual
spatial, Logical-
mathematical and
Naturalist)
Demonstrating the
Sprouted seeds of
mung
The glass has lump
of soil covered
with piece of paper
and seeds of mung
are kept between
the paper and the
glass.
Process skill:
Inference
The teacher showed students the sprouted seeds of ‘mung’ and asked
them to observe. Thereafter, the teacher took a piece of paper and
kept in beaker in such a way that shallow space in beaker could be
created. The teacher put a lump of soil in this shallow space created
in the beaker. The teacher put 4-5 sprouted seeds of ‘mung’ between
piece of paper and wall of beaker so that students can observe the
growth of sprouted seeds of ‘mung’. The teacher asked them to
observe the sprouted seeds of ‘mung’ after adding water to the lump
of soil for three days. The figure of this demonstration is mentioned
in figure 3.3. The teacher told them to observe the sprouted seeds of
the ‘mung’ and asked them to draw the picture of the same in the
activity sheet. The students drew the picture of sprouted seeds of
‘mung’.
The teacher asked the students why did root of sprouted ‘mung’ seed
increase in size upon adding water and keeping it for 2-3 days? The
teacher asked questions as under.
• Do we classify sprouted seed as a living? Why?
The students wrote about how seeds germinated in their notebooks.
The teacher explained that root of sprouted seeds of ‘mung’ moved
towards the lump of soil because root showed sensitivity towards
water and soil. The teacher told students to do the activity at home
after taking their parents’ permission and instructed them to report
their observations to the teacher.
20 mins.

24
Figure 3.3 Studying Germination of Seed (Source of Figure 3.3: Science and Technology, Standard V, Gujarat State Board of School Textbooks, Gandhinagar)
Activity Sheet for Activity 8
Student’s Name: Date:
Draw the picture of Germinated Seed.
Conclusion: Complete sentence by giving reason.
Germinated seed is living / non-living. (Cross the inadequate word) because…………….

25
Sr.
No.
Instructional
Objective
Description
of Activity
Classroom Interaction Time
Required
9. Students will
explain plants
are living
based on the
experimental
evidence for
respiration in
plant.
Activity 9
(Naturalist,
Logical-
mathematical,
Intra-
personal and
Musical)
Carbon
dioxide gas
emitted by
plant
Process skill:
Inference
The teacher attempted to demonstrate the activity of plant showing carbon
dioxide emitted by the plant makes limewater milky. For this activity, teacher
took a potted plant having broad and big leaves and tied a plastic bag filled with
lime water to its twig and kept it darkness for a whole day. The teacher could not
show limewater turned milky and explained that it was difficult to show lime
water turns milky due to absence of air-tight apparatus. The teacher showed them
the freshly prepared lime water and lime water turned milky after passing Carbon
dioxide through lime water. The teacher asked to name the gas which is inhaled
and exhaled by human. The teacher explained that carbon dioxide gas turns lime
water milky. Thereafter, the teacher asked the question: What can be deduced
about the plant? The students wrote observation and conclusion in the activity
sheet which is mentioned on page no 26. The teacher encouraged the students to
sing the song mentioned below with claps and action.
The Plant Song
Lyrics by Kate Steffer
“I'm a little plant that grew and grew.
Photosynthesis is what I do.
Energy and water and CO2
Help me make my growing food”.
(Source of the song: The plant song, to the tune of "I'm a Little Teapot", Lyrics
by Kate Steffer. Retrieved 10 January, 2009, from http://suzyred.com/plantsong.html)
20 mins.

26
Activity Sheet for Activity 9
Student’s Name: Date:
Materials required for above activity 9:
Time Taken:
Observation:
Write your observation here.
Conclusion:
Write appropriate word to make sentence true.
1. Plant emits………………gas during respiration.
Write scientific reasons. 1. We should not sleep below the trees at night because…
Sr.
No.
Instructional
Objective
Description of
Activity
Classroom Interaction Time
Required
10. Students will
derive from their
own experiences
that living does
respiration.
Activity 10
(Bodily-
kinesthetic and
Logical-
mathematical)
Inhaling and
Exhaling exercise
Process skill:
Inference
The teacher instructed the students to take deep breathe inside and stop
inhaling and wait for a few seconds. The students repeated the exercise.
Then, the teacher told students what they experienced. The teacher asked: If
living stops taking breath, what would happen then? The students took part
in discussion and replied the questions asked.
10 mins.

27
Recapitulation: Crossword based on characteristics of living and non - living
Multiple Intelligences: Linguistic
Process skill: Communication
The teacher gave the activity sheet (mentioned on page no. 28) to the students in a group and instructed them to complete the crossword by
supplying word using horizontal and vertical keys. The teacher discussed the answers of both the vertical and horizontal keys after collecting the
given activity sheets.

28
Review -Activity Sheet
Student’s Name: Date:
Read the vertical and horizontal keys carefully. Fill the below shown crossword with appropriate words using vertical and horizontal
keys.
7
12
6
8
13
5
15
19
2
3
9
14
1
16
10
17
18
4
11

29
The Horizontal keys
1. I fly but I am not living. .….. (Plane) (5)
4. Plants are living. They release carbon dioxide gas because they …….. (Respire) (7)
5. I slide and I am poisonous and I am ……… (Snake.) (5)
6. I float and I am ………(boat) (4)
9. When a seed germinates shows ……..(root) (4) which has sensitivity towards soil and water.
10. Plants prepare …….. (Food) (4) by photosynthesis.
11. Scientist ………. (Bose) (4) showed that plants are affected by music.
14. False tears of man in Gujarati language is compared with the tears of …………… (Crocodile) (9) animal of water.
16. I have four legs; people make use of me for writing and dinning. I am …….. (5) (table)
17. I can jump. I make a typical voice in rainy season and I am ……..(frog) (4)
The Vertical keys
1. I am an animal. I feel discomfort and (pain)…………., when man hits me. (4)
2. In old times, I was used as a carrier but I am non-living. (3) (cart)
3. Plants are ……. (9) because they feel pain and happiness. (sensitivie)
7. Plant requires ……..(5) to grow. (water)
8. Plant emits………….( carbon Dioxide) gas at night. (13)
12. Train ……. (moves) (5) but it is non-living.
13. A huge animal of Jurassic era, ……………(Dinosaur)(8) is an extinct animal.
15. In old times, train used …….. to produce energy ( coal) (4) and emits smoke but it is non-living.
18. My height increases. I am living because I……….. (grow) (4)
19. Plants are living because they ……….( reproduce) (9) the same plant from the seed.

30
References for Audio Clips used for Activity 5
1. Top 50 MP3 Groovy Instrumental Hits. ME2 Records a division of Virgin Records (India) Pvt. Ltd. Sewri (W), Mumbai -15 (Source for X-
files instrumental song, song number 26) (CD, Folder – Lesson 3, Files- x-files)
2. Jugalbandi – an impeccable blend. Volume 1, Track 2. Reader’s Digest Book and Home Entertainment India Pvt. Ltd.( Source for jugal
Track 02) (CD, Folder – Lesson 3, Files- x-files, jugal Track 02)
31
Lesson 4 Let Us Know the Soil
General Objectives: (1) Students will understand various components of soil. (2) Students will understand that different types of soil are made
up of different components in varying proportion. (3) Students will appreciate the types of soil. (4) Students will understand the concept of
moisture holding power and filtration power of soil. (5) Students will know that soil is a treasury of wealth. (6) Students will develop the attitude
to conserve soil.
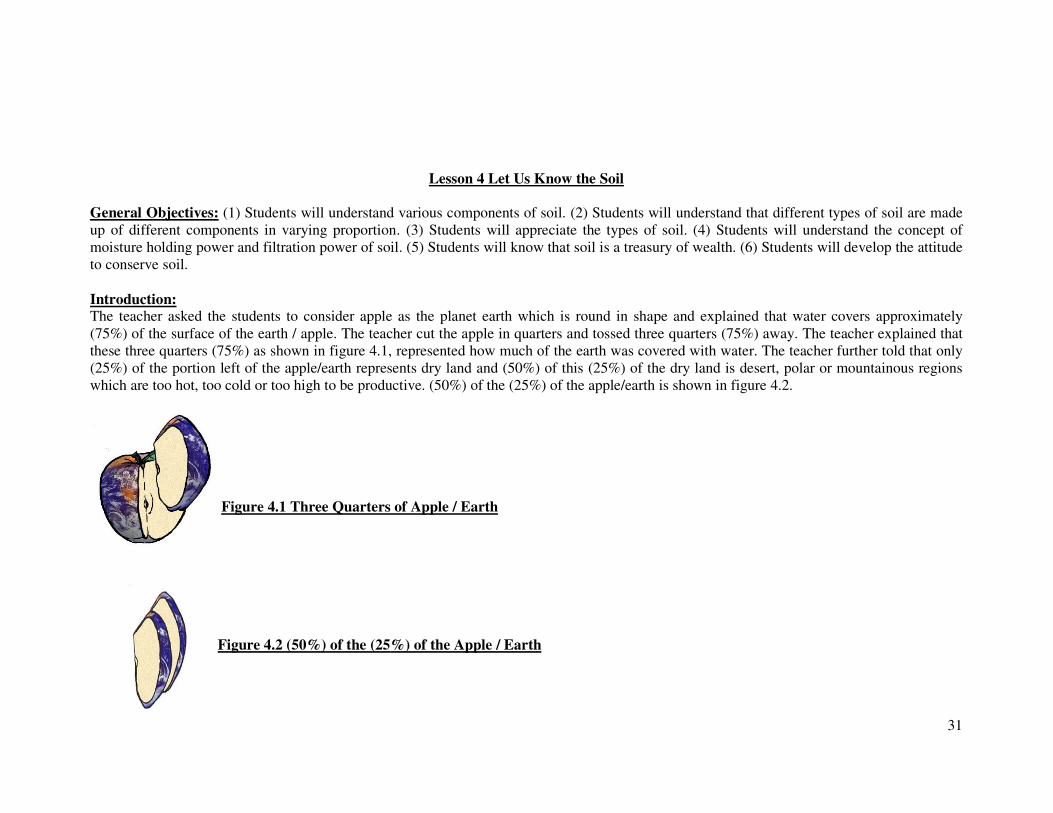
Introduction: The teacher asked the students to consider apple as the planet earth which is round in shape and explained that water covers approximately
(75%) of the surface of the earth / apple. The teacher cut the apple in quarters and tossed three quarters (75%) away. The teacher explained that
these three quarters (75%) as shown in figure 4.1, represented how much of the earth was covered with water. The teacher further told that only
(25%) of the portion left of the apple/earth represents dry land and (50%) of this (25%) of the dry land is desert, polar or mountainous regions
which are too hot, too cold or too high to be productive. (50%) of the (25%) of the apple/earth is shown in figure 4.2.
Figure 4.1 Three Quarters of Apple / Earth
Figure 4.2 (50%) of the (25%) of the Apple / Earth

32
The teacher told we will remove this (50%) of the (25%) of the apple/earth and so, we will have (12.5%) of the original apple/earth. (40%) part
of the apple/earth of this (12.5%) is severely limited by terrain, fertility or excessive rainfall. It is too rocky, steep, shallow, poor or too wet to
support food production. Therefore, we will remove (40%) of the (12.5%) of the apple/earth. In doing so, we have small portion of the apple
which contains approximately (10%) of the original apple/earth. These approximate (10%) of the apple/earth (shown in figure 4.3) covers small
fragment of the land area on which we depend for the world's food supply. This fragment also provides other needs - housing, cities, schools,
hospitals, and shopping centers.
Figure 4.3 (10%) of the Apple / Earth, shows the Soil
(Source of above activity including figures 4.1, 4.2, 4.3: National Aeronautics and Space Administration, Goddard Space Flight Center. Soil
Science Education. How Much Soil Is There? A Learning Activity to illustrate the amount of soil on planet Earth. Retrieved from January 5,
2009, from http://soil.gsfc.nasa.gov/index.php?section=70)

33
Sr.
No.
Instructional
Objective
Description of Activity Classroom Interaction Time
Required
1. Students will give
examples of
wealth available
from the crust of
earth.
Students will give
reasons for
conservation of
the soil.
Students will
colour the
pictures of
creatures living
inside soil.
Activity 1 (Visual-spatial
and Logical-mathematical)
PowerPoint Presentation of
various uses of soil included
buildings that can be built on
land, trees are planted on it,
various metals, and
petroleum is taken from it.
Rabbits, ants and earthworms
are making home inside soil.
(CD, Folder – Lesson 4, File-
Presentation for soil)
Two pictures-
1. Most of our food is grown
in soil!
2. A teaspoon of soil
contains more creatures…
than there are people on the
earth.
Process skill:
Communication
The teacher showed PowerPoint Presentation (CD,
Folder – Lesson 4, File- Presentation for soil) of
various uses of soil to the students. The students
watched the PowerPoint Presentation carefully. The
teacher initiated the discussion by asking below noted
questions.
Questions:
• What did you see in this presentation?
• How soil is useful to you?
• What does soil give us upon digging?
• Explain in brief- soil should be conserved.
The teacher distributed activity sheet to each student.
The activity sheet contained either of the two pictures
and instructed them to read the sentence on the
picture carefully and colour the picture. Both the
pictures are shown in figures 4.4 and 4.5 on next
page.
10 mins.
25-30 mins.

34
Figure 4.4 Picture related to Soil Figure 4.5 Picture related to Soil
(Source of Figure 4.4: Activity: Colour Me! Retrieved January 1, 2009, from http://www.soil-
net.com/sm3objects/activities/Colouring_2.pdf)
(Source of Figure 4.5: Activity: Colour Me! Retrieved January 1, 2009, from http://www.soil-
net.com/sm3objects/activities/Colouring_5.pdf)

35
Sr.
No.
Instructional
Objective
Description of
Activity
Classroom Interaction Time
Required
2. Students will state
the differences in
the texture of soil
based on their
observations.
Activity 2
(Bodily-
kinesthetic,
Logical-
mathematical and
Interpersonal)
Experiment:
Sieving the soil.
Process skill:
Observation
The teacher showed the students the lump of soil and distributed
the required apparatuses in group along with the lump of soil. The
teacher asked a student to grind the lump of soil into fine powder.
The teacher instructed the students to sieve soil, and told them to
observe. The teacher instructed students to touch and mark out the
differences in soil particles on slight rubbing and pressing. (To
feel the texture of soil particles for its smoothness and roughness.)
The teacher asked the students to share their observations in pairs.
The teacher instructed them to write the answers in the group-
activity sheet which is mentioned as under.
30 mins.
Activity Sheet for Activity 2
Experiment: Sieving the Soil
Group Name:
Student’s Names: Date:
Type 1 Sieve: Sieve used for wheat
Type 2 Sieve: Sieve used for flour
Type 3 Sieve: Cotton cloth
Questions:
Write the answer in one sentence. 1. What type of particles of soil do you see above the type 1 sieve?
2. What is the difference between particles of soil obtained above and below the type 1 sieve?
3. Write the difference between particles of soil obtained below type 2 sieve and type 1 sieve.
4. Which sieve gives smallest particles of soil after sieving?

36
Sr.
No.
Instructional
Objective
Description of
Activity
Classroom Interaction Time
Required
3. Students will
deduce the
presence of
water in soil.
Activity 3 (Logical-
mathematical and
Visual- spatial)
Deduce water remains
present in soil.
Process skill:
Inference
The teacher showed the students the lump of soil packed in a plastic
bag which was kept in the sunlight for more than one hour. The
teacher told them to observe. After giving some time for
observation, the teacher asked the students to tell what they
observed. The students recorded their observations in the activity
sheet which is mentioned as under.
10 mins.
Activity Sheet for Activity 3
Experiment: Keeping Packed Soil in Sunlight
Student’s Name: Date:
Observations:
Read the following statements carefully. Write your observation in one or two lines to make the statement meaningful.
The airtight plastic bag having lump of soil was kept in sunlight for more than one hour. When I observed the lump of soil by magnifying glass, I
saw……………………….
Conclusion:
Therefore, I conclude soil contains …………………

37
Sr.
No.
Instructional
Objective
Description of
Activity
Classroom Interaction Time
Required
4. Students will
deduce the presence
of air and organic
matter while adding
the lump of soil in
water.
Students will infer
that organic matter
is lighter than water
so it floats.
Activity 4
(Logical and
Visual- spatial)
Experiment-
Deduce air and
organic matter
remain present in
soil.
Process skill:
Inference
The teacher demonstrated the activity of adding lump of soil in
the glass filled with water and gave prior instructions to observe
what happened while doing this activity. The teacher, thereafter,
distributed the activity sheet to note down their observations. The
activity sheet is mentioned as under. After collecting the activity
sheets, the teacher asked questions which are mentioned as under.
• Which materials are required for doing present activity?
• From where do the bubbles come?
• What do you observe in the glass filled with water?
• What do you observe on the surface of the water?
• Which type of material / object can float?
• What can you say about the weight of organic matter
found in soil?
The discussion was followed by the teacher’s explanation in
detail about the organic matter found in the soil.
10 mins.
Activity Sheet for Activity 4
Experiment: Adding Lump of Soil in Glass Filled with Water
Student’s Name: Date:
Add the lump of soil in a glass filled with water. Observe it carefully. Write your observation in one or two sentences.
Observation:
Draw the figure showing various layers seen when lump of soil is dropped into glass filled with water.
Conclusion: Therefore, I can say soil……………………….

38
Sr.
No.
Instructional
Objective
Description of
Activity
Classroom Interaction Time
Required
5. Students will
represent the
components of soil
(gravel, sand, mud
and clay) in both -
umbrella form of
chart and in diagram
of hand.
Activity 5 (Visual-
spatial)
Schematic
representation of soil
components in chart
form
Process skill:
Communication
The teacher asked the students “how many components
are there in soil and what are they?” The teacher drew the
schematic diagram of components present in the soil on
the blackboard mentioned in figure 4.6 and instructed
students to draw the same schematic presentation in their
notebooks. The teacher distributed chart papers to each
student and instructed them to draw the shape of their
hands showing four fingers and thumb. The teacher told
the students to write the components of soil in the shapes
of fingers and thumb and in the strips of umbrella.
8 mins.
Figure 4.6 Schematic Diagram of Components of Soil
COMPONENTS
OF SOIL
GRAVEL
SAND
CLAY
MUD

39
Sr.
No.
Instructional
Objective
Description
of Activity
Classroom Interaction Time
Required
6. Students will
classify the
samples of soil
on the basis of
colour and the
components
present in
them.
Activity 6
(Visual-
Spatial and
Logical-
mathematical)
Classification
of soil based
on colour and
components
present in it.
Process skill:
Classification
The teacher displayed the different coloured soil samples - black, red and
brownish questioned how the different types of soil can be classified based on
the characteristics they observe. After knowing the students’ responses, the
teacher explained that one can classify soil on the basis of colour and
explained the characteristics of sandy, clayey, and muddy soil in brief. The
teacher presented the characteristics of sandy, clayey, and muddy soil on the
blackboard in diagram. The teacher asked the questions as under.
• In how many ways can we classify the soil?
• On the basis of components present in soil, what are three different
types of soil?
12 mins.

40
Sr.
No.
Instructional
Objective
Description
of Activity
Classroom Interaction Time
Required
7. Students will
classify the
sample of
soils into
clayey and
muddy soil by
experimenta-
tion.
Activity 7
(Logical-
mathematical,
Interpersonal
and Visual-
spatial)
Differences
between field
and river bed
soil
Process skill:
Inference
The teacher explained different layers of components present in the soil sample
by demonstration. The teacher used a plastic jar for that purpose. For the
demonstration, the teacher placed a lump of soil in a plastic jar and added water,
shook the mixture with the glass rod, allowed soil particles to settle down, and
discussed what they observed, how many layers, and what they were. The teacher
called the students to come on the stage to observe in groups. The students
observed the settled lump of soil along with the layers found in the plastic jar.
Thereafter, the teacher provided two samples (field and river bed) of soil to the
students. The teacher pasted the stickers showing the sample of soils taken for
study on outer surface of the plastic jar. The teacher told the students to do the
activity using plastic jar, and glass rod to stir the solution. The teacher told them
to observe the activity carefully and write their observations in a group activity
sheet after sharing, and discussing their observations with their group members.
The students worked in groups and noted down their observations in the given
group activity sheet mentioned as under.
45 -55
mins.
Activity Sheet for Activity 7
Experiment: Adding Lump of Soil in Glass filled with Water to Study the Type of Soil
Group Name: Date:
Students’ Name:
Observations:
No. Sample of soil Taken Are sand, gravels
found maximum?
Is clay seen more? Are organic matter
and mud seen
more?
Type of Soil
1 Field
2 River Bed

41
Conclusion: The soil of field is different from river bed because ……………………………………
Sr.
No.
Instructional
Objective
Description
of Activity
Classroom Interaction Time
Required
8. Students will
explain the
process of
measurement
of water using
measuring
cylinder.
Activity 8 (Visual-
spatial and Musical)
Showing the movie
clip of Measurement
song
(CD, Folder – Lesson
4, File -Measuring
volume)
Process skill:
Communication
Before showing the movie clip, the teacher instructed the students
to listen to the music in movie clip carefully and catch the words
sung. The teacher showed the students the movie clip (CD, Folder
– Lesson 4, File -Measuring volume) on LCD screen about how to
measure liquid using measuring cylinder. The students watched the
movie clip on how to measure the liquid using measuring cylinder
carefully. Afterwards, the teacher asked questions as under.
• What have you watched?
• Name the equipment used for measuring liquid.
• What was the volume of the liquid as shown in movie clip?
The students took part in the discussion and replied as per their
understanding. The teacher asked students to summarize the
procedure to measure volume of water by means of measuring
cylinder.
15 mins.

42
Sr.
No.
Instructional
Objective
Description
of Activity
Classroom Interaction Time
Required
9.
Students will
compare the
filtration capacity of
sandy, muddy and
clayey soil.
Students will infer
sandy soil has
highest, muddy soil
has moderate and
clayey soil has the
least filtration
power.
Students will draw
the bar graph of
filtration capacity of
soil. (sandy, muddy
and clayey)
Activity 9a
(Logical-
mathematical and
Visual- spatial)
Checking the
water holding and
filtration capacity
of given sample.
Process skill:
Inference
Activity 9b
(Logical-
mathematical and
Visual- spatial)
Drawing the bar
graph
Process skill:
Communication
The teacher explained the apparatus (beaker, funnel, measuring
cylinder and filter paper) used in this experiment. The teacher
explained the concept of filtration power and moisture holding
power of soil. The teacher explained the meaning of ‘hypothesis’
and asked the students to hypothesize which sample of soil
would not absorb more water and instructed to write the
hypothesis in the activity. The teacher took the help of the
students in arranging the apparatus and for the experiment. The
teacher demonstrated the entire experiment and instructed the
students to observe experiment carefully. The teacher instructed
them to measure the level of water (filtrate) in the measuring
cylinder and to note down the same in the activity sheet. The
format of activity sheet 9a is mentioned on page no. 45-46.
The teacher explained the procedure of plotting the graph and
instructed the students to draw the bar graph of filtration power
of soil samples in graph papers.
45 mins.
25 mins.

43
Song on Soil “All soils have various properties
Like color, texture and fertility
A soil’s ability to retain water
Or hold it
Is known as its water capacity
Each of these properties
Play a large role
While determining
A specific type of soil
Topsoil’s dark
And rich with organic materials
Like tiny bits of plants and animals
Sr.
No.
Instructional
Objective
Description
of Activity
Classroom Interaction Time
Required
10. Students will write a
letter narrating which
soil sample is better
for agriculture-
purpose on the basis
of filtration capacity
and organic matter
found in soil.
Activity 9c
Musical and
Linguistic
Writing a letter.
Process skill:
Communication
The teacher motivated students to sing the song on ‘soil’
mentioned below. The teacher discussed them the letter-writing
format with the students which is mentioned on page no. 44-45.
The teacher explained the different parts of letter writing like-
introduction, middle, and last section of the letter. The teacher
distributed the activity sheets and instructed them to write the
letter at homes. The format of activity sheet 9c is mentioned on
page no. 46-47.
The teacher asked questions as under.
• Why sandy soil does not hold water on filtration?
• Which soil contains the highest amount of organic matter?
• Which soil is the fertile soil?
• Which soil do you think should be used for growing crop?
Why?
15 mins.

44
It retains a lot of water... Top soil
So think of it
Like a big kitchen sponge
Sandy soil drains very well
So its water capacity is a bit low
The sandy grains
Don’t stick together too well
And contain little organic material
Clay soils are very sticky
And the texture of clay
Is very fine
Mix wet clay and straw
To make adobe
A great building material
If you have the time”.
(Source of the Song: Soil - Musically Aligned. Retrieved from April 10, 2009 http://www.songsforteaching.com/earthsciencegeology/soil.htm)
(The song is shortened)
The letter-writing format discussed is as under.
What will I tell Farmer Green?
Planning Sheet for My Letter
Introduce myself:
____________________________________________________________________________________________________________________
________________________________________________________________________________
Tell him what I think about the field he is interested in buying:
____________________________________________________________________________________________________________________
_______________________________
Tell him what I found out about the 3 soil samples:
__________________________________________________________________________________________________

45
Sample 1:__________________________________________
Sample 2:_________________________________________
Sample 3:_________________________________________
(Source of the Letter writing format: What will I tell Farmer Green? Planning Sheet for My Letter. Retrieved April 10, 2009, from
http://www.google.co.in/url?sa=t&rct=j&q=&esrc=s&source=web&cd=1&cad=rja&ved=0CDEQFjAA&url=http%3A%2F%2Fsoilscientists.wi
kispaces.com%2Ffile%2Fview%2FLetter%2BWriting%2BPlanning%2BForm.doc&ei=LvXuUOanGoTVkAW8yYCwCg&usg=AFQjCNEIRPx
5KFhT9CU6RYYmjhy1jhxYxQ&bvm=bv.1357700187,d.dGI)
Activity Sheet for Activity 9a
Student’s Name: Date:
Hypothesis:
Write the type of soil, which you think, has the maximum filtration power.
Observation
Take the sample of sandy, muddy, and clayey soil one by one and measure its filtration power in Milliliters. Note down your observation in
given table.
Table - Study of the Filtration Capacity of the Different Types of Soil
No. Type of Soil Volume of Water
Added (Mililitres)
Volume of Water Obtained
after Filtration
(Mililitres)
1. Sandy Soil
2. Muddy Soil
3. Clayey Soil

46
Question:
Write the answer in one sentence.
1. Which soil takes long time to filter? Why?
2. Which soil dries fast? Why?
Conclusion: Fill in the blank with appropriate word.
1. The filtration capacity of …………………….soil is minimum.
2. The filtration capacity of …………………….soil is maximum.
Activity Sheet for Activity 9b Graph paper was given to draw.
Activity Sheet for Activity 9c
Letter Writing
Student’s Name: Date:
You have tested the filtration power of sandy, clayey, and muddy soil. You also know which soil has higher amount of organic material.
Ramjibhai Patel is a farmer who wants to buy soil to grow crop. So, write a letter to Ramjibhai Patel telling him clearly to buy the best soil to
grow the food with reasons.
Turn your page to write the letter in given format.

47
Activity Sheet for Activity 9c
Letter Writing
From:
Date:
To,
Ramjibhai Patel
A-3,Nehru Nagar Society,
Sultnanabad,
At & Post: Dumas,
Surat.
Yours faithfully,
XYZ

48
Project: Save the Soil (A Group Project)
Instructional Objective
• Students will relate the adverse effects of acidic solution on the growth of plants in their own words.
• Students will suggest the different ways to make soil fertile.
Multiple intelligences: Logical-mathematical and Linguistic intelligences
Process skill: Inference
The teacher added acidic solution to plant of vinca and instructed students to observe its growth for a week. The teacher gave activity sheets to
them for writing their observations after a week. The teacher asked students how soil is useful to man. The teacher explained various activities
that pollute soil and motivated them to prepare different slogans to save the soil. The students participated in groups. They observed the plant’s
growth for a period of one week and wrote the answers in the given project sheet.
Project sheet – Save the Soil
Group Name: Date:
Students’ Names:
Observation:
Observe the teacher’s activity carefully. Check the growth of plants after a week. Write your observation in the table below.
Chemical Added in Plant Effect of Added Acidic solution to the Growth of Plant
Acidic Solution added to
Plant
Write the Ways to Make Soil Useful for Farming

49
Recapitulation The teacher divided the whole class into two major groups. The teacher told students that one group is going to sell land in cities like
Ahmedabad, Surat, Vadodara, Rajkot and Bhavnagar. The teacher instructed the seller group - students to ask the questions related to the lesson
on soil. The buyer-group students were supposed to reply. The teacher instructed that seller group can remove land in one city from selling if
buyer group gives one wrong answer. This way, the revision of the content was carried out by game and the roles of the buyer and seller group
were also exchanged. The teacher made tally on the blackboard for correct answers on blackboard.
References for Movie Clip:
1. Measuring volume by Peter Weatherall. Retrieved from December 13, 2008 http://www.youtube.com/watch?v=Wl6VDFaNn10 (CD,
Folder – Lesson 4, File -Measuring volume)

50
Lesson 5 Seed and Its Germination
General Objectives: (1) Students will understand different seeds differ in terms of their sizes, ridges, smoothness and colour. (2) Students will
understand the monocot and dicot seeds. (3) Students will know the conditions required for germination of seed by experimentation. (4) Students
will appreciate the factors responsible for the dispersal of seed.
Introduction
The teacher showed the students the PowerPoint Presentation of seeds (CD, Folder – Lesson 5, File- Presentation for seeds) which included the
animated slide of growth of plant along with the slides of seeds like sunflower and cantaloupe, and various seeds. The PowerPoint Presentation
also contained slides of different stages of growth of plants. The teacher asked the students to summarize in their own words about what they
saw in PowerPoint Presentation and inquired about their basic understanding of the seed and its germination. Thereafter, the teacher explained
that plant is living and it shows growth as child grows. The teacher further told them that we also see various plants grown in monsoon season on
grounds and on the corner of roads too. You might have question that no one has sown the seeds but why we do see the plant in our surrounding.
A seed germinates in proper environmental conditions, grows and it develops into a plant with increase in height and with new leaves. So, today,
we will learn together about the reasons for the growth of plant including types of seed and its germination process by experimentation.

51
Sr.
No.
Instructional
Objective
Description of
Activity
Classroom Interaction Time
Required
1. Students will
name various
seeds.
Students will
differentiate
seeds on the
basis of
characteristics
like size,
smoothness,
colour and
ridges.
Activity 1
(Naturalist, Bodily-
kinesthetic and
Logical-
mathematical)
Differentiation of
seeds on the basis
of colour,
smoothness and
ridges and size
Process skill:
Observation
The teacher told the students that we eat different fruits like apple, orange
and mango. When we cut the fruit, we find the seeds from it. No two
different plants have the same seeds. Even, the seed of the same plant also
vary in size and shape. So, today we will see how each seed differs from
others.
The teacher provided them various seeds in groups and instructed them to
observe the colour, smoothness, ridges and size with reference to peanut.
The teacher gave the activity sheets to the students which is mentioned on
page no.52 and instructed them to note down the observations in the given
activity sheet. Then, the teacher initiated the discussion by asking the
students about the characteristics of particular seed with reference to its
size (compared to peanut), smoothness, colour and ridges. The teacher
told them to prepare a scrapbook on seeds including its characteristics.
25 mins.

52
Activity Sheet for Activity 1
Student’s Name: Date:
Observe the seeds carefully. Write your observation in the given table.
Name of
Seed
Is it larger
when
compared
to peanut?
Is it ridged? Is its
surface
smooth or
rough?
Colour
Watermelon
Mango tree
Papaya
Ladies-
finger
Neem tree
Maize
Gram
(Chana)
Bottle Guard
(Dudhi)
Cotton Plant
Methi
Muskmelon
Sapota
(Chiku)
Orange
Blackberry
(Jambu)
Lichee
Peach
Lemon
Cherry
Jack Fruit
(Fanas)

53
Sr.
No.
Instructional
Objective
Description of
Activity
Classroom Interaction Time
Required
2. Students will
differentiate
the seeds into
monocot and
dicot.
Activity 2
(Logical-
mathematical
and Musical)
Classification
of seeds into
Monocot and
Dicot
Process skill: Classification
The teacher showed various 8 to 10 seeds soaked for 8-10 hours to the
students. The teacher called the students one by one and asked them to
press the soaked seed between first finger and thumb. Here, the teacher
developed the chart of types of seeds on blackboard as shown in figure 5.1.
The teacher asked questions such as: What happened upon pressing the
soaked seed? Could it be easily pressed? Could the seed divided into two
parts? The teacher instructed students to note down their observations in
the given activity sheet which is mentioned on page no. 55.
Then, the teacher explained that the seed which is not divided into halves
is known as the monocot seed. While the seed which is divided into halves
upon pressing, is known as dicot the seed. The teacher also explained that
‘mono’ means ‘one’ and ‘di’ means ‘two’. The students wrote the
definitions of monocotyledon and dicotyledon seeds in their notebooks.
The teacher encouraged the students to sing the following mentioned song
on the varieties of seed with claps.
Song on Varieties of Seed
“Seeds so wonderful
Big and small
Having different colours
Smooth and rough surfaces
Can be monocot or dicotyledon
So small
Plants grows from them
I am surprised! Surprised!”
20 mins.

54
The blackboard work is as shown in figure 5.1
Figure 5.1 Types of the Seeds
DICOT
Green Gram,
Bean, Peanut
and other pulses
MONOCOT
Maize, Bajra,
Wheat, Juwar
TYPES OF SEEDS
PRESS BETWEEN FIRST
FINGER AND THUMB
IS SEED DEVIDED INTO
TWO PARTS?
YES NO

55
Activity Sheet for Activity 2
Student’s Name: Date:
Hold the soaked seeds between thumb and first finger. Press the seed. Write your observation in the table below.
Name of Seed Can seed be divided into
two parts on pressing?
Monocot or Dicot?
Wheat
Green Peas (Vatana)
Juwar
Mung
Maize
Beans (Val)
Peanuts
Bajara
Gram (Chana)
56
Sr.
No.
Instructional
Objective
Description of
Activity
Classroom Interaction Time
Required 3. Students will
conclude
conditions
required for
germination of
seed in their
own words
based on the
experiment.
Activity 3
(Logical-
mathematical and
Bodily-
kinesthetic)
Demonstration of
conditions
required for seed
germination.
Visual-spatial
Two small clips
(CD, Folder -
Lesson 5, File -
bean sprout
germination and
File - Time lapse
radish seeds
sprouting, top and
roots growing)
Process skill:
Inference
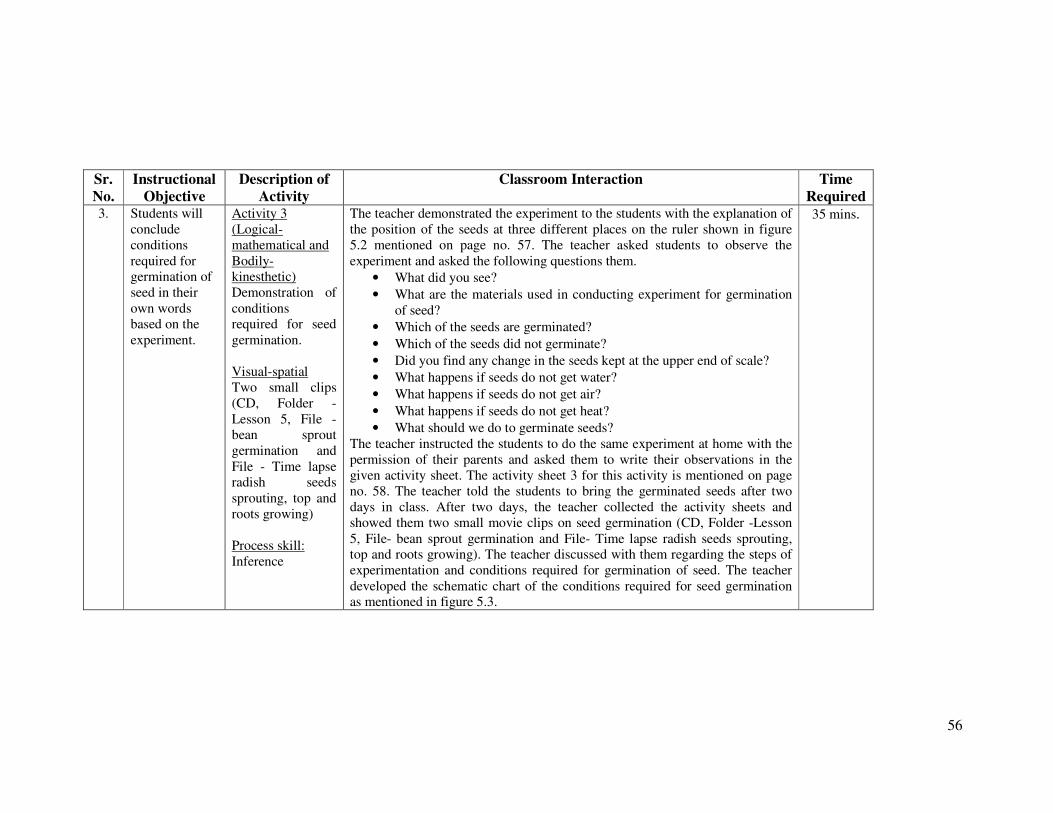
The teacher demonstrated the experiment to the students with the explanation of
the position of the seeds at three different places on the ruler shown in figure
5.2 mentioned on page no. 57. The teacher asked students to observe the
experiment and asked the following questions them.
• What did you see?
• What are the materials used in conducting experiment for germination
of seed?
• Which of the seeds are germinated?
• Which of the seeds did not germinate?
• Did you find any change in the seeds kept at the upper end of scale?
• What happens if seeds do not get water?
• What happens if seeds do not get air?
• What happens if seeds do not get heat?
• What should we do to germinate seeds?
The teacher instructed the students to do the same experiment at home with the
permission of their parents and asked them to write their observations in the
given activity sheet. The activity sheet 3 for this activity is mentioned on page
no. 58. The teacher told the students to bring the germinated seeds after two
days in class. After two days, the teacher collected the activity sheets and
showed them two small movie clips on seed germination (CD, Folder -Lesson
5, File- bean sprout germination and File- Time lapse radish seeds sprouting,
top and roots growing). The teacher discussed with them regarding the steps of
experimentation and conditions required for germination of seed. The teacher
developed the schematic chart of the conditions required for seed germination
as mentioned in figure 5.3.
35 mins.

57
Figure 5.2 Seed Germination Experiment
(Source of Figure 5.2: Science and Technology, Standard V, Gujarat State Board of School Textbooks, Gandhinagar)

58
Activity Sheet for Activity 3
Student’s Name: Date:
Draw the figure of experiment showing the conditions for seed germination assigning proper names.
Write your observation in the given table.
Position of
Seeds
Is air available
to seed?
Is water
available to
seed?
Is heat
available to
seed?
Is seed
germinated?
At the end of
scale,
completely
drenched with
water
At the middle
part of the scale
At the top end
of the scale
Conclusion: From above experiment, write in your own words the conditions required for seed germination.

59
Figure 5.3 Procedure for the Experiment to Study the Germination of Seed
Take beaker filled
with water Take some seeds Take cotton
Seeds at the lower
end do not
Seeds at the middle
points
Seeds at the Upper
end

60
Sr.
No.
Instructional
Objective
Description
of Activity
Classroom Interaction Time
Required
4. Students will
conclude the
conditions
required for
germination
of onion or
potato in their
own words.
Students will
draw the
picture of
germinated
onion or
potato.
Activity 4
(Logical-
mathematical,
Naturalist, Bodily-
kinesthetic,
Visual-spatial)
Demonstration of
condition required
for germination for
onion.
Visual-spatial
Drawing the
picture of
germinated onion,
potato, and sweet
potato
Process skill:
Communication
The teacher showed students the germinated onion. The teacher
explained the procedure for germination of onion as under.
Take a little water in a glass and place onion with toothpicks in such a
way that some of the part of the onion will immerse in water. Observe
it after some days. The teacher asked the students to observe the
germinated onion and instructed to note down the important points in
their notebooks. The students observed the demonstration and noted
down important points in their notebooks.
The teacher asked them to describe the entire procedure for the
germination of onion in their own words. The students replied
accordingly. The teacher instructed them to do the activity at their
home by their parents’ permission to use onion or potato.
The teacher asked them to draw the picture of the germinated onion in
their notebooks and instructed them to prepare a chart of it. The
students drew the picture of germinated onion in their notebooks.
20 mins.

61
Sr.
No.
Instructional
Objective
Description of
Activity
Classroom Interaction Time
Required
5. Students will
name the factors
responsible for
seed dispersal.
Students will
explain the
factors that cause
the dispersal of
seed.
Activity 5a (Visual
spatial and
Naturalist)
PowerPoint
Presentation of seed
dispersal (CD,
Folder – Lesson 5,
File- Presentation
for seed dispersal)
and
two movie clips on
seed dispersal
(CD, Folder-
Lesson 5, File-
Burdock Seed
Dispersal,
File- Seed
Dispersal2)
Activity 5b
(Bodily-
Kinesthetic) Seed
dispersal – A game
Process skill:
Communication
The teacher showed the students the PowerPoint Presentation of
seed dispersal (CD, Folder – Lesson 5, File- Presentation for seed
dispersal) in which the content of slides describes the concept of
seed dispersal. The slides also contain the pictures of meswak
tree, bombax, calotropis, lotus, takmaria, rajko, cocklebur
(gaderu) and gokhru. The teacher also showed them two small
movie clips on seed dispersal (CD, Folder- Lesson 5, File-
Burdock Seed Dispersal, File- Seed Dispersal2). The movie clip
shows the journey of seed from one place to other by animals, air,
and water. The teacher asked questions mentioned as under.
• What is the role of air and water in seed dispersal?
• How do the insects disperse seeds?
• How seeds are carried by animals?
• How seeds can be carried by birds and insects?
The teacher asked the students to note down their causes for seed
dispersal in their notebooks.
The teacher revised the content of seed dispersal by game. The
teacher said aloud the names of seeds like lotus, rajko, seeds of
bombax and meswak tree, cocklebur, gokhru, takmaria, and
calotropis one by one. The teacher instructed the students that
they have to show the sign of drinking if the seed is dispersed by
water. If the seed is dispersed by insects, they will have to make
humming sound. If the seed is dispersed by wind, students will
have to show the action of blowing it out. If the seed is dispersed
by birds, they will have to show the sign of flying. If the seed is
dispersed by animals or found in excreta of animals, they will
have to say aloud the names of animals.
30 mins.
7-8 mins.

62
Sr.
No.
Instructional
Objective
Description of
Activity
Classroom Interaction Time
Required
6. Students will
appreciate the
factors responsible
for seed dispersal by
writing reasons in
one or two lines.
Activity 6 (Visual
–spatial, Intra
personal,
Naturalist and
Linguistic)
Reflecting on
factors
responsible for
seed dispersal
with human life
Process skill:
Communication
The teacher told the students to close their eyes for
awhile and instructed them to recall and visualize the
conditions required for seed dispersal. The teacher told
them to complete the incomplete statements by providing
scientific reasons in the given activity sheet mentioned
on page no 63.
10 mins.

63
Activity Sheet for Activity 6
Student’s Name: Date:
Read the following sentences carefully. Complete them meaningfully. Write proper reasons with examples.
1. I should appreciate the role played by water and wind as ………………
2. I must appreciate birds, insects and animals because they help in ………………
Recapitulation:
Multiple Intelligences: Logical-mathematical and visual-spatial
Process skill: Communication
The teacher asked the students to summarize the lesson into points step by step. The teacher guided them to represent what they learnt into chart.
The students summarized the lesson orally and developed the concept chart for the Lesson 5 Seed and Its Germination.
References for Movie Clips
1. Bean sprout germination. Retrieved February 25, 2008 from http://www.youtube.com/watch?v=JbyImpvrO74 (CD, Folder – Lesson 5,
File - bean sprout germination)
2. Time lapse radish seeds sprouting, top and roots growing. Retrieved 25 February, 2008 from
http://www.youtube.com/watch?v=d26AhcKeEbE (CD, Folder – Lesson 5, File- Time lapse radish seeds sprouting, top and roots
growing)
3. Burdock seed dispersal. Retrieved December 28, 2008 from http://www.youtube.com/watch?v=bMXHkEeR4_U (CD, Folder – Lesson 5,
File-Burdock Seed Dispersal)
4. Seed dispersal. Retrieved October 28, 2008 from http://www.youtube.com/watch?v=zbQ1jWl3AOM (CD, Folder – Lesson 5, File- Seed
Dispersal2)

64
Lesson 6 Water and Its Importance
General Objectives: (1) Students will know various sources of water. (2) Students will understand water cycle and its importance in human life.
(3) Students will appreciate the uses and importance of water in life.
Introduction
The teacher introduced the lesson by telling that you have learnt that there are three basic necessities of life such as air, water, and food. Water is
available from nature and we cannot imagine our life without water. In monsoon, water falls in rain form which is stored and used by men. We,
human beings make use of water widely in various activities. We cannot live without water. We get water from river. You might be surprised
that after some years, many people will not get pure water to drink. Therefore, water is valuable to us and we should not waste water. Today, we
will learn together about water. Here, in this lesson, we will learn about usefulness of water, various sources of water and water cycle. We will
also learn the reasons how ground water is formed.

65
Sr.
No.
Instructional
Objective
Description of
Activity
Classroom Interaction Time
Required
1. Students will list
down the day- to -
day usage of water
in human life.
Activity 1
(Visual-spatial)
Pictorial
Presentation of
usage of water
Process skill:
Communication
The teacher discussed with the students about various uses of water. The
teacher listed down uses of water on black board. The teacher asked the
students to prepare pictorial chart for usage of water in their daily lives.
15 mins.
2. Students will display
the data of usage of
water in a table
systematically.
Students will
appreciate the uses
of water in day to-
day life. (By
counting quantity of
water in tins or
buckets)
Activity 2
(Logical-
mathematical
and
Interpersonal)
Counting the
need of water in
daily life
Process skill:
Communication
The teacher asked students to occupy their seats in group. The teacher
provided the activity sheets in groups and instructed them to write their
uses of water per day expressed in number of tins or bucket in the activity
sheets after the discussion among the group members. The teacher took
care that one student in each group acted as a group leader to monitor the
discussion, and the other one as a reporter to note down the data in the
given activity sheet. The students discussed in groups and wrote the data
for usage of water in activity sheets.
The teacher discussed the other uses of water in life such as water was
extensively used in building homes. Apart from that, water was used by
industry to produce goods and various chemicals, and foodstuff. The
teacher asked students to explain importance of water and the students
discussed accordingly.
15 – 20
mins.
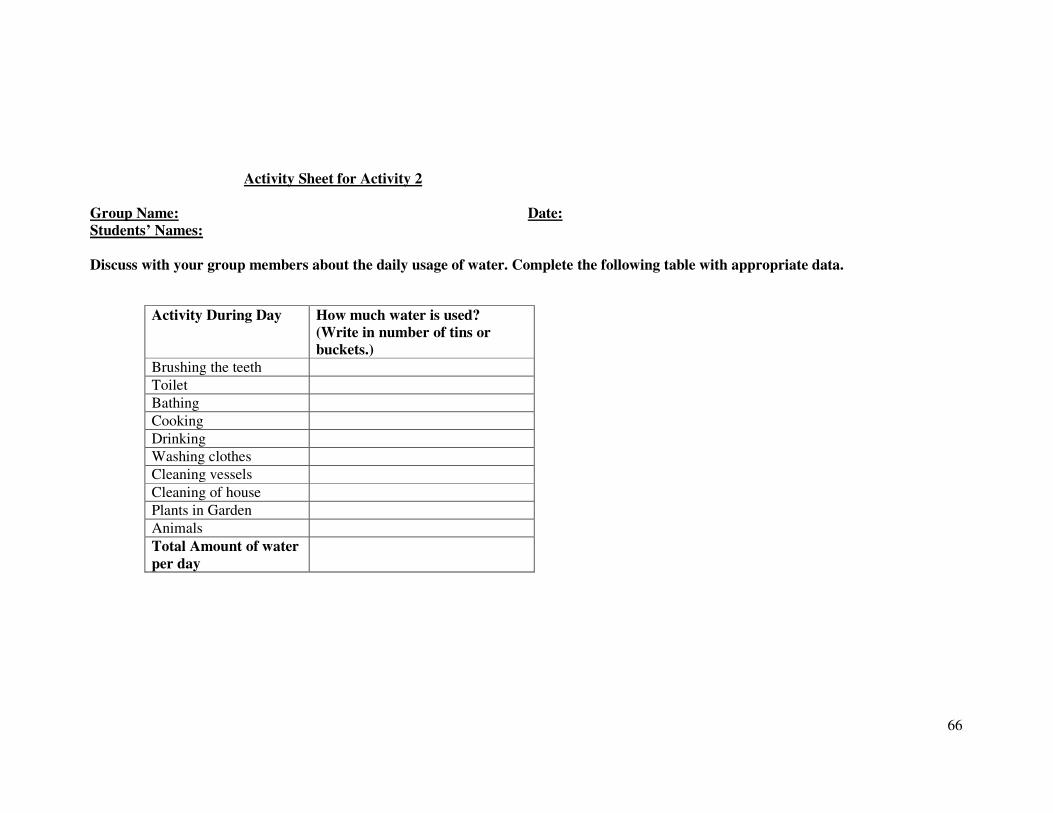
66
Activity Sheet for Activity 2
Group Name: Date:
Students’ Names:
Discuss with your group members about the daily usage of water. Complete the following table with appropriate data.
Activity During Day How much water is used?
(Write in number of tins or
buckets.)
Brushing the teeth
Toilet
Bathing
Cooking
Drinking
Washing clothes
Cleaning vessels
Cleaning of house
Plants in Garden
Animals
Total Amount of water
per day

67
Sr.
No.
Instructional
Objective
Description
of Activity
Classroom Interaction Time
Required
3. Students will
write names of
various sources
of water.
Activity 3 (Visual-
spatial)
PowerPoint
Presentation of
Different Water
Sources
(CD, Folder –
Lesson 6, File-
Sources of water)
Process skill:
Communication
The teacher showed the students the PowerPoint Presentation on various sources of water
like well, river, lake, hand pump and ocean (CD, Folder – Lesson 6, File- Sources of water)
and explained that these are known as sources of water as they provide us water, and we
use water in our daily activities. The teacher asked the students to summarize briefly of
what they saw and asked them to give the names of various rivers of Gujarat state.
10 mins.
4. Students will
draw the
picture of cloud
formation with
appropriate
labels.
Students will
explain the
process of
cloud
formation.
Activity 4 (Visual-
spatial and
Logical-
mathematical)
Cloud Formation
in Jar
Process skill:
Observation
Prior to demonstration, the teacher instructed the students to observe carefully. The teacher
demonstrated the cloud formation using the jar, matchsticks and ice cubes as under.
The teacher poured the boiling water in the transparent glass jar. The teacher lighted the
matchstick and immediately threw in the glass jar. The teacher showed the students the ice
cubes. The teacher wrapped the ice cubes in cotton cloth and immediately covered the
mouth of the jar with it. The teacher asked the students to observe the activity carefully.
The teacher asked them to relate the observation that they made with actual process of
cloud formation in nature also. The teacher distributed the activity sheet which is
mentioned on page no. 68 and instructed them to report their observation and draw the
diagram of formation of clouds in the jar. Thereafter, the teacher asked questions as under.
• What did you see in the jar?
• How did cloud form?
• How did the warm water affect the cloud formation?
• How ice cubes helped the formation of cloud?
• Describe the process of cloud formation in your own words.
20 mins.

68
Activity Sheet for Activity 4-Cloud Formation
Student’s Name: Date:
Draw the diagram showing clouds formed in a jar with proper labels.
Write down your observation of what you have observed when clouds form.
Sr.
No.
Instructional
Objective
Description of
Activity
Classroom Interaction Time
Required
5. Students will
compare the
analogy of
evaporation in
plastic bag
with the
evaporation of
seawater.
Students will
infer
evaporation is
required for
cloud
formation.
Activity 5 (Linguistic and
Logical-
mathematical)
Concept of
Evaporation as
a first step in
cloud
formation
Process skill:
Inference
The teacher told that we learnt how the clouds were formed in jar but question
arisen that what was the first step in formation of clouds. So, let’s try to explain
the first step of cloud formation. Here, the teacher instructed the students to write
their possible reasons for what happened first during cloud formation. The
students interacted in group or worked alone. They wrote down what happened in
the first step of cloud formation in their notebooks and answered accordingly.
The teacher showed them the closed transparent plastic bag containing water. This
plastic bag was kept in sunlight for 6-8 hours. The teacher asked the students to
observe this plastic bag and asked what did they observe inside the inner surface
of plastic bag? Why did we see moisture gathered on inner surface of the plastic
bag?
The teacher also probed what they saw when water was boiled in kettle or heating
tea in vessel. The teacher moved in the class, checked the students’ notebooks, and
encouraged them to think what happened at the first stage in cloud formation. The
teacher instructed them to keep the closed transparent plastic bag containing water
in the sunlight for two or more hours and observe at home.
5-7 mins.

69
Sr.
No.
Instructional
Objective
Description of
Activity
Classroom Interaction Time
Required
6. Students will
explain water
cycle.
Students will
label the
diagram of water
cycle
appropriately.
Activity 6
(Visual spatial,
Logical-
mathematical
and Musical)
Two Movie
clips for water
cycle
(CD, Folder –
Lesson 6, File -
Cool Water
Cycle Song,
File- Water
Cycle Song)
Process skill:
Communication
The teacher instructed the students to watch both the movie clips carefully. (CD,
Folder – Lesson 6, File -Cool Water Cycle Song, File- Water Cycle Song)
The teacher instructed the students to hear the song played in the movie clip
carefully to catch the words and encouraged them to sing the same song with
clapping.
The teacher explained that the heat energy of the sun evaporated water. The
evaporated water vapour went up, cooled down, and combined together to form
bigger molecules. This process was known as condensation and made bigger
cloud from the small clouds. These clouds moved from one direction to the other
by the force of wind and they fell in the form of water. Thereafter the, teacher
wrote the definitions of evaporation and condensation on the blackboard and
explained both the terms with appropriate drawing on blackboard mentioned as
under in figure 6.1. The students wrote the important points in their notebooks.
The teacher encouraged the students to prepare the water cycle chart at home.
The teacher gave the students the activity sheet wherein they had to label the
diagram of water cycle. The activity sheet for activity 6 is mentioned on page
no. 71.
20 mins.

70
The blackboard work for activity 6 is mentioned as under in figure 6.1.
Figure 6.1 Steps of Water Cycle

71
Activity Sheet for Activity 6-Water Cycle
Student’s Name: Date:
Label the water cycle diagram.
.
(Source of the above figure: Label water cycle diagram. Retrieved March 2, 2009, from
http://www.enchantedlearning.com/geology/label/watercycle/)

72
Sr.
No.
Instructional
Objective
Description
of
Activity
Classroom Interaction Time
Required
7. Students will
explain the
creation of
well and
stream of
water.
Activity 7
(Logical-
mathematical)
Brainstorming
+ Practical
activity
(Bodily-
kinesthetic and
Interpersonal)
A game of water
maze
(Visual-spatial)
Process skill:
Communication
The teacher asked below mentioned questions.
• In which season does rain fall?
• Where does the rainwater go?
The teacher drew the mountain showing the rainy water collected at the base
of mountain. The teacher explained this collected water, when gets the place to
come out, it starts flowing. This is known as stream of water. The teacher
explained the formation of stream of water with drawing on the blackboard
which is mentioned in the figure 6.2. The teacher showed them the
demonstration of ground water formation in a cup by pouring water in a beaker
filled with gravels and sands. The teacher told students to observe how water
moved from gravels and sands and initiated the discussion by asking following
question.
• Where did the water go in the glass filled with gravels and soil?
The teacher explained that rainy water was absorbed by soil in the same way
as you saw just now.
45 mins

73
Sr.
No.
Instructional
Objective
Description
of
Activity
Classroom Interaction Time
Required
7. Students will
explain the
creation of
well and
stream of
water.
Activity 7
(Logical-
mathematical)
Brainstorming
+ Practical
activity
(Bodily-
kinesthetic and
Interpersonal)
A game of Water
maze
(Visual-spatial)
Process skill:
Communication
The teacher demonstrated the formation of well with the help of the students.
The teacher formed a group of the students and instructed one student in a
group to add water in the tub filled with soil. After a few minutes, the teacher
asked another student to wear plastic gloves and dig soil to make pit in the
centre of the tub. The teacher asked the questions as under.
• What did you observe after digging?
• Why did we get water while digging soil?
At last, the teacher gave them the activity sheets wherein they had to find out
the path of water among sand particles and gravels using pencil or sketch pen
at homes. The activity sheet is mentioned on page no. 75.
45 mins

74
Figure 6.2 Stream of Water
(Source of Figure 6.2: Science and Technology, Standard V, Gujarat State Board of School Textbooks, Gandhinagar)
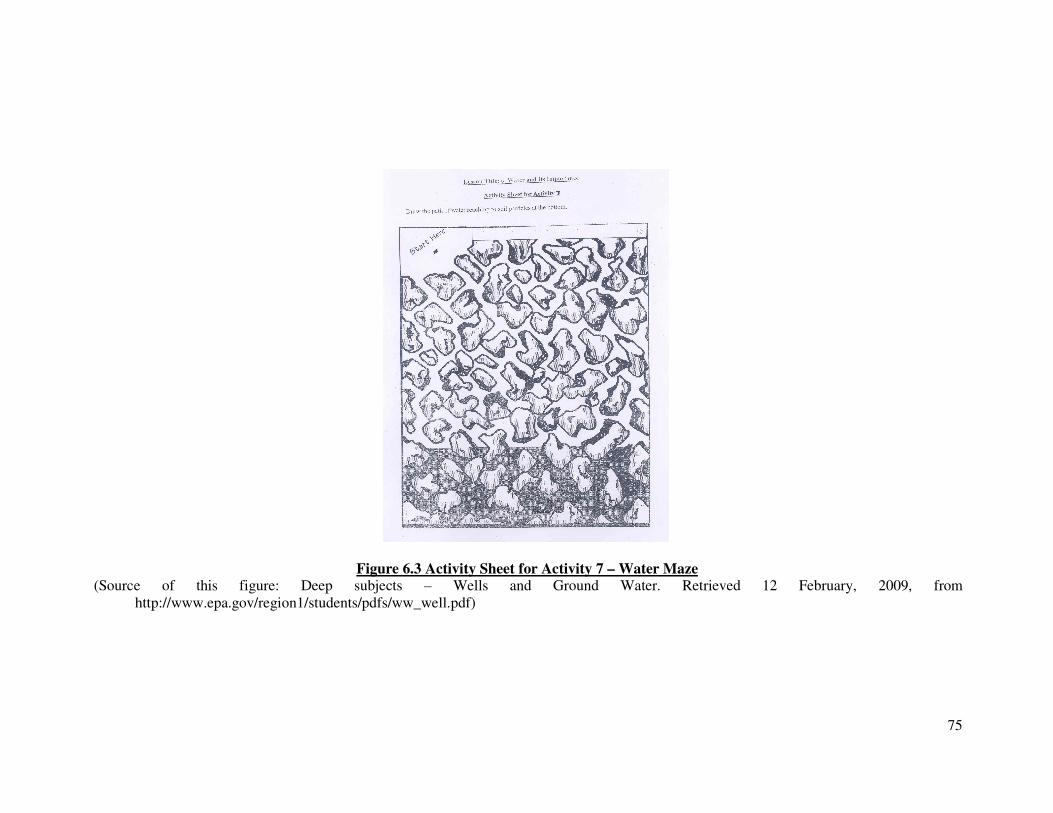
75
Figure 6.3 Activity Sheet for Activity 7 – Water Maze (Source of this figure: Deep subjects – Wells and Ground Water. Retrieved 12 February, 2009, from
http://www.epa.gov/region1/students/pdfs/ww_well.pdf)

76
Sr.
No.
Instructional
Objective
Description of
Activity
Classroom Interaction Time
Required
8. Students will explain the
importance of water in
life.
Students will write a
paragraph on ‘My life
without water.’
Activity 8
(Linguistic,
Logical-
mathematical,
Visual-spatial
and
Intrapersonal)
Writing
paragraph on
‘My life
without water.’
Process skill:
Communication
The teacher discussed the importance of water with respect to
following mentioned points.
--Need of water in physiological process of body like digestion,
excretion, and circulation of blood.
--Sea and river as transportation of heavy goods.
--Paper industry.
--Seed dispersal by water.
The teacher instructed the students to close their eyes and visualize
the scenario of plants, animals and human life in the absence of
water.
Thereafter, the teacher provided an opportunity to share what they
visualized the scenario without water. The teacher explained water is
the amazing gift of God which is used to cook food, to wash clothes,
utensils, and for bathing. The teacher discussed that water makes our
physiological process possible to live. After that, the teacher gave
the activity sheets to the students to write a small paragraph on ‘My
life without water.’
20 mins.
Activity Sheet for Activity 8
Student’s Name: Date: Write a short paragraph on ‘My life without water’ in 7-8 lines.
Recapitulation: Teacher read aloud the below mentioned hint mentioned in table 6.1 and told students to reply in one word.

77
Table 6.1 Questions
(Source of these Questions: Water cycle. find it quiz. Retrieved March 2, 2009, from
http://www.enchantedlearning.com/classroom/quiz/watercycle.shtml)
The Word
Starts With
this Letter
Hint
W A substance that is very important to us. We need it to live, and it
covers over two thirds of the surface of the Earth.
O A large body of water on the surface of the earth.
E A process in which liquid water turns into water vapor (a gas).
C A fluffy-looking object in the sky that contains tiny water droplets
or ice particles. It is formed when water vapor condenses.
R The type of precipitation is water that falls from clouds in a liquid
state.
S The type of precipitation is water that falls from clouds in a fluffy,
frozen state.
R A large flow of water that usually empties into a sea.
W The process in which water circulates from the oceans to the clouds
to the land to the rivers, and then accumulates back into the oceans.

78
The teacher will assign any project to students or a student as per his or her interest and ability.
Project 1 - Making of chart of water cycle Multiple intelligences: Bodily-kinesthetic, Logical-mathematical and Visual-spatial
Instructional Objective: Students will create the chart of water cycle.
The teacher also developed the schematic diagram of chart of water bracelet on blackboard. On each bracelet, the teacher wrote the sequence of
water cycle. The teacher encouraged the students to prepare the chart in their notebooks at homes using sketch pens and colours. The teacher
instructed students to prepare either water cycle bracelet or chart of water cycle. The figure 6.4 shows only the bracelet without mentioning the
steps of water cycle. The teacher guided the students for making chart of water cycle.
Figure 6.4 Bracelet for Writing the Steps of Water Cycle

79
Project 2 - Making of posters describing the importance of water Multiple intelligences: Logical-mathematical and Visual-spatial.
Instructional Objective: Students will create the posters describing importance of water.
Process skill: Communication.
The teacher showed one ideal specimen of poster on water. The teacher also showed them PowerPoint Presentation of posters showing water
conservation. (CD, Folder – Lesson 6, File -WATER IS PRECIOUS-posters) The teacher facilitated the group discussion on what types of
posters should be made and directed the students to work in a group.
Project 3 - Making of Roof Top Rain water Harvesting Model through Recharge Pit for Urban Area
Multiple intelligences: Logical-mathematical and Bodily-kinesthetic.
Instructional Objective: Students will create roof top rain water harvesting model through recharge pit for urban area.
Process skill: Communication.
The teacher discussed the scarcity of water and invited students’ suggestions for its conservation. Thereafter, the teacher introduced the concept
of ‘Roof top rain water harvesting through recharge pit for urban area’ which is mentioned in figure 6.5.
(http://cgwb.gov.in/documents/RWH_GUIDE.pdf). The teacher explained that ‘Roof top rain water harvesting through recharge pit for urban
area’ is suitable for buildings having a roof area of 100 sq.m.. The teacher explained the shape and size of recharge pit such as it is constructed 1
to 2 m. wide and 2 to 3 m. deep which are back filled with boulders (5-20 cm), gravels (5-10mm), and coarse sand (1.5- 2mm) in graded form.
The teacher further illustrated with the drawing of the recharge pit on the blackboard showing boulders at the bottom, gravels in between and
coarse sand at the top. It was also explained that mesh should be provided at the roof to prevent leaves or any other solid waste / debris from
entering the pit. Need of a desilting /collection chamber at the ground to arrest the flow of finer particles to the recharge pit was also discussed.
The teacher showed them the ideal model for roof top rain water harvesting through recharge pit for urban area and motivated them to create the
same model at their homes.

80
Figure 6.5 Roof Top Rain Water Harvesting Model through Recharge Pit for Urban Area
(Source of this activity & figure 6.5: Ministry of water resources, Central ground water board, Faridabad (2003). Rain water harvesting
techniques to augment ground water. Retrieved March 2, 2009, from http://cgwb.gov.in/documents/RWH_GUIDE.pdf)

81
References for Movie Clip
1. Cool water cycle song. Retrieved December 15, 2008 from http://www.youtube.com/watch?v=okZBiy_I (CD, Folder – Lesson 6, File -
Cool Water Cycle Song)
2. Water cycle song by Peter Weatherall. Retrieved on February 12, 2009 from http://www.youtube.com/watch?v=462heG_TjiE (CD,
Folder – Lesson 6, File- Water Cycle Song)

82
Lesson 7 Observation of Living World
General Objectives: (1) Students will know the utility of plant kingdom and animal kingdom in human life. (2) Students will develop
understanding of diversity found in living world from their shape, size, colour, food habits and habitat. (3) Students will appreciate the uses of
plants and diversity among them. (4) Students will develop love and compassion for animals.
Introduction: PowerPoint Presentation of various herbivores and carnivores, various plants and flowers.
The teacher showed the students the PowerPoint Presentation (PPT) for observation of living world (CD, Folder – Lesson 7, File- Presentation
for observation of living world). This PPT includes the pictures of various animals and birds. The students watched the PowerPoint Presentation
carefully. The teacher asked the questions as under.
• Are all the animals same?
• In what ways, do the animals differ from each other?
The teacher showed them different leaves and instructed them to notice the size, shape, smoothness and colour of the different types of leaves.
The students observed, touched the different leaves and discussed about their colour, sizes and some specific features of the leaves among their
friends sitting nearer to them. The teacher asked questions as under.
• Are all the trees same?
• In what way, do the trees differ from each other?
After getting responses of the students, the teacher told them that various animals, plants, flowers and trees differ from each other as we do differ
from each other by colour, height and weight. Today, we will together learn the lesson 7 Observation of Living World. In this lesson, we will
learn different types of plants, and differences among animals in food habits, habitat, size and colour. We will also learn how animals and plants
are useful to us.

83
Sr.
No.
Instructional
Objective
Description
of Activity
Classroom Interaction Time
Required
1. Students will write the
diversity of animals and
birds based on their daily
observations.
Activity 1
(Naturalist,
Interpersonal
and Logical-
mathematical)
Discussion in
pair
Process skill:
Observation
The teacher discussed with the students about variations in
animals and birds with respect to their food, colour, size, and
habitat. The teacher showed the realia of the nest of tailorbird
and model of sparrow’s nest for comparison. The teacher
explained the differences in the legs of sparrow and flamingo.
The teacher also explained the differences in food habits of
sparrow and peacock. The teacher also explained that the wood
packer uses beak to make hole into trunks and branches of trees
while tailor bird stitches leaves and small wooden sticks
together to make beautiful nest. The teacher gave them the
activity sheets and guided them how to work in pair. The teacher
instructed them to write their responses in the activity sheet 1
after discussing in pair which is mentioned on next page.
15-20
mins.

84
Activity Sheet for Activity 1
Student A: Date:
Student B:
Write the characteristics of animals / bird in the table given below.
Sr.
No.
Animal /
Bird
Habitat Food
Habits
Colour Other Features
1.
Tailor Bird
2.
Sparrow
3.
Fox
4.
Shark
5.
Camel
6.
Cow
7.
Lion
8.
Lizard
9.
Rat
10.
Ant
11.
Bat
12.
Dog

85
Sr.
No.
Instructional
Objective
Description of
Activity
Classroom Interaction Time
Required
2. Students will
classify plants
into herb, shrub,
and tree.
Students will
explain the
variation of
different plants
in terms of their
height, colour of
leaf and stem in
their own words.
Activity 2
(Naturalist,
Logical-
mathematical &
Musical)
Observation of
plant and
measuring its
height
Process skill:
Classification
(Continued on
next page)
The teacher explained the concept of herb, shrub and trees.
The teacher drew the diagrammatic chart on blackboard for
classification of plants into herb, shrub, and trees as shown in
figure 7.1. The students drew the same in their notebooks.
The teacher provided various potted plants having stem of
different colour and thickness such as rose, basil, vinca,
hibiscus and lemon. Moreover, the teacher provided string
and measure tape to measure the length of the plants. The
students measured the length of the plants in group. The
teacher gave the activity sheet to the students to record their
observations which is mentioned on page no 88. The students
wrote their observations in the activity sheet giving scientific
reasons for conclusion.
The teacher motivated the students to compose the song on
classification of plants in their words which is mentioned as
under.
Song Composed by the Students
A Song on Classification of Plants
“Three types of plants.
First is herb, second is shrub
And third is tree.
Shorter in height are herbs.
Taller than herbs are shrubs
And tall are trees.”
The teacher instructed the students to sing the composed song
with claps.
20 mins.

86
Small Herb
Medium Shrub
Long Tree
Figure 7.1 Schematic Diagram of Classification of Plants
Classify
The
Plants
HOW? By its
height
Measure
the height
P
R
O
B
L
E
M

87
Sr.
No.
Instructional
Objective
Description of
Activity
Classroom Interaction Time
Required
2. Students will
explain the
differences in
plants of the desert
area, pond, hot
humid area and
aquatic plants.
Activity 2
(Naturalist and
Logical-
mathematical)
Observation of
plants
The teacher showed them the specimens of aquatic plants
such as Pistia, Lemna, Cerratophyllum, and Lotus and
asked them to observe the given specimens of the plants.
The teacher also provided them leaves of various plants to
observe. The students observed the various leaves of plants.
The teacher discussed the differences in various plant
specimens that they observed. The teacher discussed the
differences among coconut tree and thorny plants also. The
teacher asked question: What is the difference between
desert plants and aquatic plants? The students replied
accordingly and noted down the differences in the desert
plants and aquatic plants in their note books.
15 mins.

88
Activity Sheet for Activity 2
Student’s Name: Date:
Observe the plants and write proper details in the table given below.
Sr.
No.
Name of the
Plant
Herb,
Shrub,
Tree
Height in
inches
Colour
of
Stem
Thickness
of Stem
Colour
of
Leaves
Size of leaves
compare to leaves
of rose plants
1. Rose
2. Basil
3 Vinca
4. Hibiscus
5. Lemon
6. Aasopalav
Write 5-6 scientific reasons to complete the following sentence meaningfully.
All plants are not same because…………..

89
Sr
No.
Instructional
Objective
Description of
Activity
Classroom Interaction Time
Required
3. Students will draw
picture of leaves
showing minute
veins based on
their thorough
observation.
Students will
differentiate the
leaves of a
particular plant
from other plants’
leaves based on
shape, colour and
size.
Activity 3
(Naturalist and
Visual-spatial)
Drawing the
picture of
leaves
Process skill:
Communication
The teacher showed the students various leaves of plants that
were different in shape, size and colour. The teacher asked
them to select a leave to draw and colour the picture of the
same leave in their notebooks.
The teacher asked the students to tell the differences in
various leaves they observed. Afterwards, the teacher
explained them that different plants’ leaves differ in colour,
shape and size of the leaves. For better clarity, the teacher
discussed the differences in leaves, flowers and stem of vinca
and hibiscus.
30 mins.
4. Students will
create the
colourful print of
leaves.
Activity 4
(Bodily-
kinesthetic and
Visual-spatial)
Creating
colourful print
of leave using
water colours
Process skill:
Communication
The teacher showed them an ideal specimen of colourful print
of leaves. The teacher took the help of the students to show
the entire procedure of creating colourful print of the leaves
using water colours. The teacher distributed chart paper and
leaves to the students to do the activity at home. The
activities was carried out to help students to make their
learning concrete that different plants’ leaves vary in shape,
colour and size.
15 mins.

90
Sr.
No.
Instructional
Objective
Description of
Activity
Classroom Interaction Time
Required
5. Students will
create images
of various
animals using
thumb
impression and
painting.
Activity 5 (Bodily-
kinesthetic and
Visual-spatial)
Drawing and
colouring of
animals’ pictures
using thumb
impression and
painting method.
Process skill:
Communication
The teacher asked students which animal they liked the most. The
teacher showed them a specimen of picture of tortoise, cat and dog
prepared by thumb impression. The teacher called the students to
prepare water colour-mixture. The teacher explained them the
procedure to create images of the animals using the prepared water-
colour mixture.
The students observed the teacher’s act carefully and created the
picture of the animal that they liked using thumb impression at
home. The students gave their views on the pictures prepared by
others. Thus, they appreciated each other’s pictures. The activities
was carried out to develop communication skill among the students
considering the shapes of the animals and also to arouse their
interest to learn in detail about the characteristics of the animals.
20 mins.

91
Sr.
No.
Instructional
Objective
Description of
Activity
Classroom Interaction Time
Required
6. Students will
make a list of
plants with
their uses.
Students will
give reasons to
conserve
plants.
Activity 6 Visual-
spatial and Logical-
mathematical
Listing of plants
and their uses
including medicinal
values
Process skill:
Communication
The teacher instructed students to write down about various plants
that they know. The students listed down the names of plants. The
teacher gave the additional information of some plants used in
medicine. The teacher showed some herbs like liquorice, pushkar
mul, leaves of neem, basil, tylophora asthmatica, ardusi, brambhi
which are used as ayurvedic medicines. The students in a group
observed the specimens of medicinal plants. The teacher did the
blackboard work for plants having medicinal values and uses of
plants as shown below in figure 7.2 and 7.3 using coloured chalks.
The students wrote down the uses of plants in their notebooks. The
teacher initiated the discussion using below noted questions.
• Name the plants of medicinal value.
• How are plants useful to us?
• Why should we conserve the plants?
Students replied teacher’s query.
15 mins.

92
Figure 7.2 Schematic Chart for Medicinal Plants
Figure 7.3 Schematic Chart for Uses of Plants
Making
paper from
pulp of plants
To decorate
homes with
flowers
Used in
medicines, &
It cleans the
air, gives rain.
Gives
cereals,
pulses, fruits
for food
Gum, lakh
are made
from stem of
trees.
Making
baskets,
pencils,
sweep stick
Making
furniture-
chair, table
Uses of
Plants
Neem
Turmeric
Powder
Ginger
Jethimadh
Garmalo
Adhatoda
Vasica
Basil
Plants as
medicines

93
Sr.
No.
Instructional
Objective
Description of
Activity
Classroom Interaction Time
Required
7. Students will
explain the
utility of
white ant
(termite),
earthworm,
and honeybee
for human
beings.
Activity 7
(Naturalist,
Visual-spatial
and Musical)
Demonstration
of earthworm
PPT
presentation for
insects
including honey
bee, white ant
and earthworm
(CD, Folder-
Lesson 7, File-
INSECTS1)
Movie clip of
dancing honey
bee
(CD, Folder-
Lesson 7, File-
dance of honey
bee)
Process skill:
Communication
The teacher showed them earthworms moving in the lump of soils kept in a
plastic dish and instructed them to draw earthworm after thorough
observation of it. The students observed it and they drew the picture of
earthworm in their notebooks. The teacher asked the questions as under.
• Which insect have you seen just now?
• What is its colour?
• Why is it called friend of human / farmers?
The teacher showed them PowerPoint presentation of honeybee, white ant
and earthworm (CD, Folder- Lesson 7, File- INSECTS1) and explained their
uses.
The teacher showed them the movie clip of dancing honeybee (CD, Folder-
Lesson 7, File- dance of honey bee). The teacher instructed the students to
hear the music carefully. The teacher asked them the question as under.
• Which musical instruments have been used to create the music that
you have just heard in the movie clip?
The teacher encouraged the students to compose song on honeybee. The
teacher motivated the students to clap with rhythm and sing their composed
song on honey bee. The student’s composed song is mentioned as under.
Song Composed by the Students
A Song on Honeybee
“Honey Bee, Honey bee. (2)
You are wonderful. (2)
You make sweet tasty honey. (2)
I like your dance”. (2)
Thereafter, the teacher asked them to write the uses of earthworm, white ant,
and honeybee.
25 mins.

94
Sr.
No.
Instructional
Objective
Description of
Activity
Classroom Interaction Time
Required
8. Students will
write the uses
of animals.
Students will
give reasons
to conserve
animals.
Students will
give reasons
in their own
words to ban
the
exploitation
of animals
for
entertainment
purpose.
Activity 8
(Naturalist,
Logical-
mathematical and
Intra-personal
Brainstorming
(Visual-spatial)
Movie clip for
cruelty to animals
(CD, Folder-
Lesson 7, File-
Circus Animal
Cruelty Abused for
Entertainment)
(Musical) Movie
clip of Animals
singing songs
(CD, Folder-
Lesson 7, File-
Animals singing)
Process skill:
Communication
The teacher applied brainstorming technique to know what the
students think about the uses of animals. The teacher asked questions
to the students and instructed to prepare the list of animals. Then, the
teacher asked them about the usefulness of animals to mankind in
details. The teacher wrote the uses of animals on blackboard based on
the students’ responses.
Thereafter, the teacher showed them the movie clip of animals
working in a circus (CD, Folder- Lesson 7, File- Circus Animal
Cruelty Abused for Entertainment) and instructed them to watch and
hear carefully. The teacher asked them which sentence they heard
often in the movie clip.
The teacher told them to close their eyes and linked the same
situation to them by placing themselves as animals working in a
circus. The teacher asked them: Is it appropriate to beat animals to
get entertainment? The teacher also asked how far it is appropriate to
kill animals. The teacher told the students to hear the clip of singing
animals carefully (CD, Folder- Lesson 7, File- Animals singing) and
asked: Which sentence did you hear most of the time?
30 mins.

95
Recapitulation: Multiple intelligences: Musical, Naturalist and Logical-mathematical
Process skill: Communication
The teacher instructed the students to listen the movie clip of herbivores, carnivores and omnivores carefully (CD, Folder- Lesson 7, File-
herbivores, carnivores, omnivores2). After that, the teacher initiated the discussion by asking the noted questions as below.
• Which sentence do you hear often in the song?
• Tell the names of animals that you have seen in the movie clip.
• How are animals useful to us?
• What are the types of plants? Explain them.
• How each living differs from other?
• How are plants useful to us?
• How are earthworm and honey bees useful to us?
Project-Making a Manual for Medicinal Plants Multiple intelligences: Musical, Naturalist and Logical-mathematical
Process skill: Communication
The teacher guided students to prepare a manual for medicinal plants and instructed them about the format of manual for medicinal plants. The
format of manual for medicinal plants is mentioned as under.
The Format of Manual for Medicinal Plants
Name of Medicine:
Colour of leaves:
Which part of the plant is used in medicine?
Uses of Plants:
Picture:

96
References for Movie Clips
1. Dancing bee. Retrieved February 24, 2009 from http://www.youtube.com/watch?v=34bU2brNwT4 (CD, Folder- Lesson 7, File - dance
of honey bee)
2. Circus animal cruelty: Abused for entertainment. Retrieved September 26, 2009 from http://www.youtube.com/watch?v=6Y6WKI8eKI4
Movie clip for cruelty to animals (CD, Folder- Lesson 7, File- Circus Animal Cruelty Abused for Entertainment)
3. Animals singing. Retrieved December 28, 2008 from http://www.youtube.com/watch?v=nVM5xXbUOtY Movie clip of Animals
singing songs (CD, Folder- Lesson 7, File- Animals singing)
4. Herbivores, carnivores, omnivores2. Retrieved December 28, 2008 from http://www.youtube.com/watch?v=7bWprkylAYU(CD, Folder-
Lesson 7, File- herbivores, carnivores, omnivores2)

97
Lesson 9 Food and Health
General Objectives: (1) Students will know the necessity and advantages of food. (2) Students will develop the understanding that intake of
food should not be based on liking. (3) Students will develop the insight to prepare balanced diet.
Introduction
The teacher explained that everyone requires pure air, water and food to survive. Without these three essential components, no one can sustain
life. If we will not eat or if we are not getting proper food, we will become weak. Moreover, we will be easily caught into diseases. The teacher
further told the students that they have also learnt in the third standard that how food is digested. So, let us, revise it once again by watching
small movie clip. The teacher showed the small movie clip (CD, Folder – Lesson 9, File - The Digestive System animation) on the digestive
system that shows how food is digested. Afterwards, the teacher explained how food is digested in stomach to give energy. The teacher told we
will learn about advantages of food and the wrong beliefs about food. We will also learn how to prepare balanced diet.

98
Activity Sheet for Activity 1
Group Name: Date:
Students’ Names:
Complete the following incomplete sentences with proper reasons. 1. Food provides…………..
2. Man will feel good and healthy if…………..
3. Man will not fall ill if…
4. We should eat food because….
5. Body becomes weak if…
Sr.
No.
Instructional
Objective
Description of
Activity
Classroom Interaction Time
Required
1. Students will relate
the necessity of
food with health.
Activity 1
(Interpersonal and
Linguistic) Group
discussion on
necessity of food
Process skill:
Communication
The teacher initiated the discussion by asking the advantages of
taking food. The teacher noted down some of the points discussed by
the students on blackboard. The teacher instructed the students to sit
in group and distributed the activity sheets group wise. Then, the
teacher instructed them to ask the questions for the advantages of
food to group members. The teacher took round in the class and
monitored the situation. The teacher told each group to complete the
sentences by giving chance to all group members to write answers in
the activity sheet.
20 mins.

99
Sr.
No.
Instructional
Objective
Description of
Activity
Classroom Interaction Time
Required
2. Students will
find out the
hidden names
of food from
given word
block.
Activity 2
(Linguistic
and Interpersonal)
Word Block
Game
Process skill:
Communication
The teacher told the students that they might have seen and even tried to
solve the crosswords in newspaper or in children’s supplementary of
newspaper or magazines. Now, today we will experience a new game. In
this game, you will find a rectangle in which there are numbers of tiny
squares. Each square has a letter of alphabet. You have to see vertically or
horizontally to find a word for food that we take such as ‘peas.’ After
finding such word, you have to encircle it. The teacher drew the sketch of
word block and explained on blackboard for further clarity. The teacher
instructed the students to occupy seats as per their groups and distributed
the group activity sheets to them as it was a group activity. The teacher
instructed that they have to find words in two-three minutes only.
10 mins.

100
Activity Sheet for Activity 2
(Word Block Speed Game)
Group Name:
Student’s Name: Date:
Find out the names of various nutrients / food items from either up or down ways.
F R S E H M A N T I G E N U T
R C B A N A N A U B R A T G M
U T A G A R P E A E A G C N A
S B J U F P U S R A P W W C N
M I A C A K L U R U F G H A E
R N R J P J S N A T O U E M A
B M A I Z D E M P Y X A A N T
A G L M C A S H E W N U T R S
N A E A R V L I O N U A R W A
F I G N E C U N B R T L I A R
I O G R E E N G R A M M I L K
R L S Q U B S D I I R O S N I
U Y R W T A T I C S I U I U N
T E F O N G H G E I H N N T G
O R C O W P E A H N S D X S R

101
Sr.
No.
Instructional
Objective
Description of
Activity
Classroom Interaction Time
Required
3. Students will
define the term
‘nutrient’.
Students will
explain the need
of nutrients in
food.
Students will
relate cause and
effect relationship
between food and
health in fish-
bone structure.
Activity 3 (Visual-
spatial and Logical)
a. PowerPoint
Presentation of food
and Health for
explanation of
balanced food and
necessity of
including all
nutrients in food.
(CD, Folder –
Lesson 9, File - food
activity 2)
b. Indicating minor
and major causes
(types of food) in
fishbone structure
which affect health.
Process skill:
Inference
The teacher explained the definition of nutrients and how they help us in
fighting diseases. The teacher showed them the PowerPoint Presentation
of food and health covering nutrients and its need (CD, Folder – Lesson
9, File - food activity 2). It had the diagrammatic presentation of cereals,
pulses, dry fruit with the examples, and picture of various food items
like wheat, rice, beans, and almond into pyramidal shape. The
PowerPoint Presentation also contained the slide of the patient who is
not taking all types of food items. The teacher explained every slide of
this PowerPoint Presentation.
The teacher drew the diagram of fish on blackboard. Thereafter, the
teacher told that they have seen charts but today, they will see a new
chart. The chart is known as fishbone structure because of its shape.
After that, the teacher asked the students the necessity of good food.
The teacher asked them: What will be the effect of food if necessary
nutrients are not present in our food? Why? What is the effect of food
over our health?
Then, the teacher asked students to identify the major causes and minor
causes (Food which is required to take up in small and in more quantity)
that are required to have good health. The teacher instructed the students
to fill up the minor and major causes in the fishbone structure in the
activity sheet 3. The students did the work individually.
30-35
mins.

102
Activity Sheet for Activity 3
Student’s Name: Date: The back side of this page shows chart for food and health. This chart’s type is the fishbone structure because it looks like shape of fish. Observe
it carefully. Think which type of food makes body good and healthy. Write such causes in given four blank blocks. And write the names of food
and edible items nearer to each block.

103
Causes
………………… Juwar …………
…………………... ……………..……
……………………. …………………..
………………….. ………………….
…………………. ………………….
………………... …………………
Write the
Effect of
Food on
Body
Cereals
Causes

104
Sr.
No.
Instructional
Objective
Description of
Activity
Classroom Interaction Time
Required
4. Students will
prescribe
balanced diet
by forming
groups.
Activity 4 (Bodily-
kinesthetic)
Grouping of students
to show the balanced
diet
Process skill:
Communication
The teacher distributed flashcards to each student wherein names of
various food items were written. The students carried the hanging flash
cards like names of cereals (Wheat, rice, bajara, maize), pulses(tuar,
green gram, gram, udad, beans, pea, cowpea), green vegetables (different
names of green vegetables), dry fruits (cashew nut, raisen, almond,
walnut, fig.), sweets, panipuri, noodles and food items sold at lorry.
Then, they grouped them in ‘cereals’, ‘green vegetables’, ‘pulses’ and
‘dry fruits’ when music was played. One student was selected on the
basis of chit method and was asked to prepare the balanced diet. It means
that s/he has to select the students with the hanging flash card that makes
diet meaningful but not on his / her likes or dislikes towards particular
student or food. The teacher instructed them to form a group showing the
balanced diet in one minute only.
15 mins.

105
Sr.
No.
Instructional
Objective
Description of
Activity
Classroom Interaction
Time
Required
5. Students will suggest
bad food habit based on
hypothetical situation.
Students will develop
the chart of the
balanced diet.
Activity 5
(Logical-
mathematical)
Hypothetical
situation
Process skill:
Communication
The teacher gave the students the below described hypothetical
situation to ponder awhile and asked questions noted.
Hypothetical situation:
Your younger sister Shraddha likes to eat sugar very much. She
takes sweet balls whenever she goes to party. She eats sweets too
much. She does not like to take milk. She eats only some of the
vegetables.
Questions:
• Do you find the food habit of your sister as good? If not,
give reasons for it.
• How will you correct your sister’s food habit?
• Which diet menu will you prescribe for your younger
sister?
The teacher wrote the main points on blackboard and instructed
them to write in their notebooks. The teacher instructed students to
prepare pictorial chart of balanced diet in pyramid form. The
students sketched the prescribed menu chart in their note books.
They made the same chart at home on chart paper.
20 mins.
6. Students will criticize
their own food habits.
Students will write a
paragraph mentioning
which food should be
taken with reasons.
Activity 6
(Intrapersonal)
Self-Checklist for
Diet
Process skill:
Communication
The teacher distributed the self-checklists for diet to each student
and instructed them to put tick mark whichever they found
applicable and true for themselves only. The students read the self-
checklist and put tick mark against each statement and wrote the
small paragraph on ‘Food that I should take.’ The activity sheet for
this activity is mentioned on next page.
20 mins.
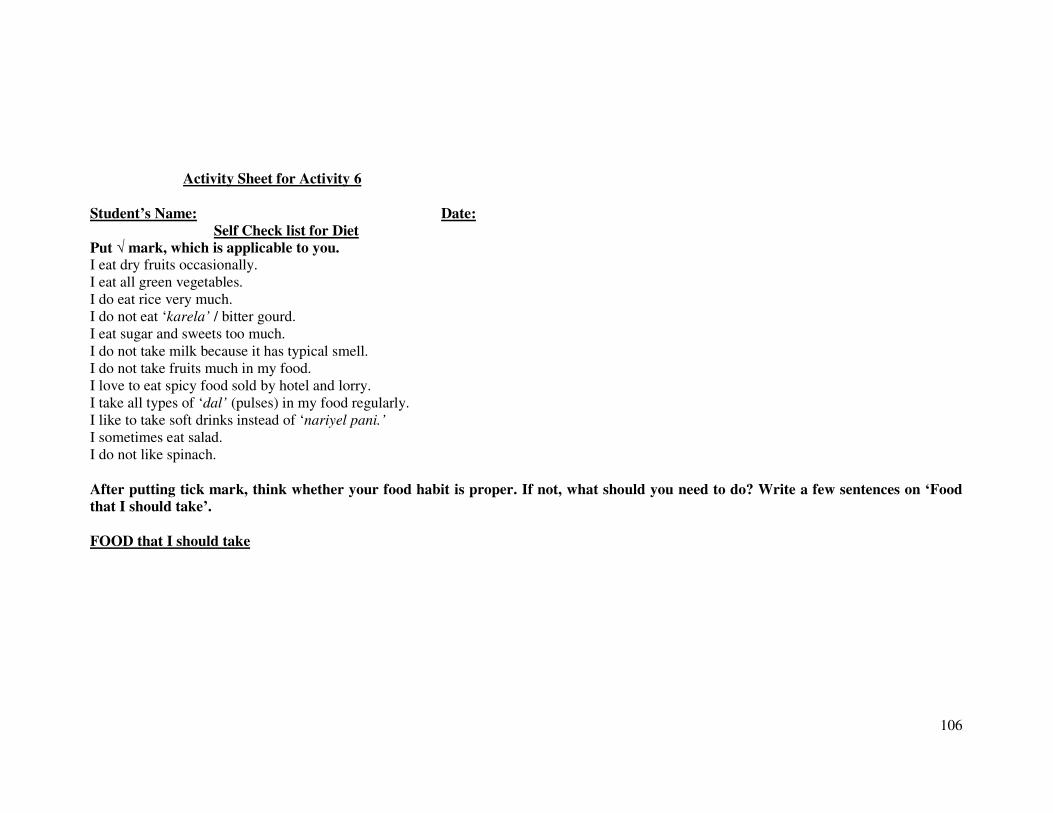
106
Activity Sheet for Activity 6
Student’s Name: Date:
Self Check list for Diet
Put √ mark, which is applicable to you. I eat dry fruits occasionally.
I eat all green vegetables.
I do eat rice very much.
I do not eat ‘karela’ / bitter gourd.
I eat sugar and sweets too much.
I do not take milk because it has typical smell.
I do not take fruits much in my food.
I love to eat spicy food sold by hotel and lorry.
I take all types of ‘dal’ (pulses) in my food regularly.
I like to take soft drinks instead of ‘nariyel pani.’
I sometimes eat salad.
I do not like spinach.
After putting tick mark, think whether your food habit is proper. If not, what should you need to do? Write a few sentences on ‘Food
that I should take’.
FOOD that I should take

107
Activity Sheet for Activity 7
Student’s Name: Date:
Interview questions
Ask the following questions to any elder person of your family and write their answers under each question. 1. What type of food should be given to the child of 8 to 10 years age group? Why?
2. Why child should not be allowed to take junk food?
3. Why we should not eat food from outsides? (Lorry)
4. Should we avoid excess quantity of sugar, sweets, and soft drinks? Why?
Sr.
No.
Instructional
Objective
Description of
Activity
Classroom Interaction Time
Required
7. Students will
indicate food for
their age.
Students will
explain the reasons
why junk food,
sugar, sweets, soft
drinks and food
from ‘lorry’ should
be avoided.
Activity 7
(Interpersonal) To
prepare the food
menu by taking
interview of the
parents.
Process skill:
Communication
The teacher told the students that we see the interview taken by
reporter on television. The reporter asks the question and s/he either
writes or records the answers. In the same way, you have to play the
role of reporter in which you will have to discuss with your parents
about good food habits of their children and food menu. The teacher
distributed them the activity sheet and asked them to do the activity
at their homes.
20 mins.

108
Project Activity Study of nutrients’ value on various packaged food, Biscuits and ‘Bourn Vita’
Instructional Objective Students will be able to explain which food is better based on the nutrients and their nutritional value.
Multiple intelligences: Logical-mathematical and intrapersonal
Process skill: inference
The teacher asked the students to collect the leaflets of packaged food and ‘Bourn Vita’ showing the nutrients’ value. The teacher instructed
them to study the various food packages that they are using at their homes. The teacher told them to do this project at home. After 4-5 days, the
teacher collected the project sheets and discussed which food item should be included in their diet and asked the reasons for the same.

109
Project Sheet
Student’s Name: Date:
Collect the any three packets of Bourn vita / Horlicks, biscuit, soft drinks, potato chips, kurkure, noodles. Read the nutrients’ values like
fat, carbohydrates, vitamins from the food packet, and complete the following table by writing nutritional values.
Observation:
Sr.
No.
Food Item Nutritional Values
Fat Carbohydrates Protein Vitamins Minerals Energy in
K.cal
1.
(100 gms)
2.
(100 gms)
3.
(100 gms)
If you find other nutritional information for food item from its packet, write here.
Inference:
1. Arrange the food items in ascending order of energy that they give.
2. Write the name of food item in blank.
It is clear from the above table, packaged food………………….. has a higher nutrient value. It also provides nutrients
like……………………………………………………...……………………………………………………………………………………………
…………..………………………………………………………………………….....
Conclusion: Therefore, packaged food like……………………..can be taken when required, by looking at their calorific value and expiry date.

110
Recapitulation Multiple intelligences: Logical-mathematical and visual-spatial
Process skill: Communication
Preparing pictorial representation of the various food items in pyramid chart
The teacher drew the picture of triangle on blackboard. The teacher told the students to place their daily food menu in it. The students drew the
picture of triangle /pyramid and mentioned appropriate food items in horizontal blank spaces of triangle /pyramid to make the food menu. The
teacher observed and selected the best food menu keeping into mind the requirement of food for children and provided feedback accordingly.
The teacher explained why particular food menu is the best. The teacher explained that the base of triangle or pyramid is broader and it becomes
narrow when going up. It means that we should write those items in horizontal blank spaces in pyramid’s / triangle’s base which we should often
include in our daily food menu. And, accordingly one should mention the food items from broader horizontal blank spaces of the pyramid /
triangle to reach its uppermost part. References for Movie Clip
1. The digestive system animation. Retrieved January 18, 2009 from http://www.youtube.com/watch?v=q3986Yfl5cU (CD, Folder –
Lesson 9, File -The Digestive System animation)

111
Lesson 11 Air
General Objectives: (1) Students will know that air occupies space and it is everywhere. (2) Students will appreciate the uses of air.
Introduction
The teacher told students they have learnt different types of substances with examples in last academic year. Therefore, the teacher asked
following mentioned questions.
• How many types of substance are there? What are they?
• Give the example of solid substances.
• Give the example of liquid substances.
• Why our lungs expand when we breathe in?
• What is inside the balloon?
• What do you see when ‘agarbatti’ is lighted?
The teacher demonstrated following activities to students to show the presence of air.
(1) The teacher showed the students the bottle filled with water. The teacher removed the cork keeping the bottle in inverted position to
remove some water from it. The teacher closed the cork of the bottle and pointed to the upper part of the bottle where there was no water
and asked: What was here in the upper side of bottle? The students gave their answers. Then, the teacher explained that the upper part of
the bottle had air so we saw bubbles when we removed some water from the bottle. The bubbles showed the presence of air.
(2) Thereafter, the teacher showed the transparent box of plastic to the students and told this box had one hole on the upper side and more than
one hole at the bottom of it. The teacher told them to fill water in the box so that water could remain in it. The teacher instructed a student
to lift his finger from the hole at the top of the box so water can flow from downwards through the holes at the bottom of the box. The
teacher involved the students in groups to do the activity in the class. The teacher asked them why water does not fall when we keep finger
at the hole of the top of the box. The teacher asked further why water falls down from the holes at the bottom end of the transparent box
when we lift the finger from the hole at the top of the box. After getting answers from the students, the teacher explained that air goes
inside, exerts pressure on water so water come out from the ends and we can have fountain. This also shows that air is everywhere. Today,
we will learn together about Lesson 11 Air and its uses.

112
Sr.
No.
Instructional
Objective
Description of
Activity
Classroom Interaction Time
Required
1. Students will find
out the uses of wind
(by reading the
paragraph given)
and write
accordingly.
Students will
mention the damage
caused by wind in
their own words.
Activity 1
(Linguistic)
Read the
following
paragraph
carefully and
answer the
questions asked.
Process skill:
Communication
The teacher distributed the activity sheet to each student
and instructed them to write the answers in the given
activity sheets by reading the paragraph carefully. The
activity sheet is mentioned as under. The students read
the paragraph carefully and wrote the answers for the
given activity. The teacher collected the activity sheets of
the students and discussed with them the uses of wind
and its devastating effect on man’s properties.
10 mins
Activity Sheet of Activity 1
Student’s Name: Date:
Read the following paragraph carefully and answer the questions asked.
Man cannot see me or touch me. I am magic thing. I am not supernatural being or ghost. I am the air. When I move with force, I am generally
known as ‘Wind. I have great power to blow anything that comes in my way. I make kite fly in the sky. I rotate the wings of ‘farakadi’. I make
the flag of temple flutter. I am helpful to man by making man’s clothes and hair dry. I make windmill moving and thus man produces energy.
But I sometimes damage the man’s properties like buildings, bridges and trees when I blow with greater force.

113
Questions: (1) Describe in your own words- wind.
(2) Write the uses of wind.
(3) Will the wind affect the human life? How?
Sr.
No.
Instructional
Objective
Description
of Activity
Classroom Interaction Time
Required
2. Students will give
reasons why
crushed paper kept
inside the glass
remained dry while
immersing glass
into a bucket filled
with water.
Activity 2
(Logical-
mathematical)
Paper does
not get wet.
Process skill:
Prediction
The teacher demonstrated the activity of immersing the inverted glass
having crushed paper inside in the bucket filled with water. Prior to this, the
teacher showed the glass to the students and ensured that the glass is dry
from inside. The teacher instructed them to observe the activity and to note
down the observation in the given activity sheet. The activity sheet 2 is
mentioned on next page. The students observed the demonstration by the
teacher. The teacher provided them the opportunity to do the same activity
in the class and encouraged them to repeat the same activity at their homes
after seeking the parents’ permission. The students wrote their observations
in the activity sheet. After collecting the activity sheets, the teacher asked
the questions: 1. Was the glass wet before immersing it in bucket filled with
water? 2. What do you predict? Will crushed paper kept inside the glass
become wet? 3. Why does the crushed paper inside the glass not become
wet? The students read their observations when the teacher asked the
questions.
20 mins

114
Activity Sheet of Activity 2
Student’s Name: Date:
Read the following questions carefully and write answers in the space provided.
1. Was the glass wet before immersing it in bucket filled with water?
2. What do you predict? Will crushed paper kept inside the glass become wet?
3. Why does the crushed paper inside the glass not become wet?

115
Activity Sheet for Activity 3
Student’s Name: Date:
Read the following questions carefully and write answers in the space provided. 1. What did you see while immersing the tilted glass in the bucket filled with water?
2. From where do the bubbles come out?
3. Why do bubbles come out?
Sr.
No.
Instructional
Objective
Description
of Activity
Classroom Interaction Time
Required
3. Students will
explain the
reasons
responsible for
the production
of bubbles
while
immersing a
tilted glass into
a bucket filled
with water.
Activity 3
(Logical-
mathematical)
Air bubble
comes out.
Process skill:
Inference
The teacher demonstrated the activity of immersing the tilted glass in the
bucket filled with water. The teacher told the students to observe the
activity. The students observed the demonstration made by the teacher.
The teacher also provided opportunity to all the students to do the same
activity in the class and instructed students to note down their
observations in the activity sheet. The students wrote their observation in
activity sheets. The activity sheet is mentioned as under. The teacher
asked questions: (1) What did you see while immersing tilted glass in
bucket filled with water? (2) From where do the bubbles come out?
(3) Why do bubbles come out? The students read their observations when
the teacher asked the questions.
The teacher also demonstrated pouring water in various shaped vessel of
glass material and asked: (1) What did they see while adding water in the
vessel? (2) Why did the bubbles come out?
20 mins

116
Sr.
No.
Instructional
Objective
Description
of Activity
Classroom Interaction Time
Required
4. Students will
explain that
air occupies
space.
Activity 4
(Logical-
mathematical,
Interpersonal
and Musical)
Air occupies
space.
Process skill:
Inference
This was a textbook activity. The teacher instructed students to sit in groups
and distributed matchbox with balloons and strings. The teacher asked each
group to count the number of balloons kept inside the balloons. The teacher
instructed to blow only one balloon in each group and fasten it with string.
The teacher asked below questions.
• Can you keep the blown balloon in the matchbox? Why?
• What was inside the balloon?
• What can be said about the property of air based on this activity?
The teacher motivated the students to compose the song based on the above
activity and instructed them to sing the same song with claps. The song
composed by the student is mentioned as under.
Song Composed by the Students
A Song on Air occupies space
“Balloons Balloons Balloons
You are big big and big.
Small space is not enough for you.
We need more place to keep you.
So, we can say, air occupies space”.
15 – 20
mins

117
Recapitulation: Multiple intelligences: Linguistic and Musical
Process skill: Communication
The teacher wrote the below mentioned columns ‘A’ and ‘B’ on blackboard and asked the students to make meaningful sentences using the
words mentioned in both the columns ‘A’ and ‘B’.
Column A Column B
Air Space
Crushed Paper Present
Blown Balloons Inverted glass
Wind
Clothes
Bubbles
Wet
The students constructed meaningful sentences on ‘air’ using the words from the above mentioned columns ‘A’ and ‘B’.
The teacher also encouraged the students to sing below mentioned song.
Song on Air
“Everywhere (3)
We find air everywhere
Air spreads everywhere
Everywhere (3)
Air is shapeless
You can’t hold air,
Only you can experience it”.

118
Lesson 12 Light and Its Properties
General Objectives: (1) Students will understand the concept of sources of light. (2) Students will know the usefulness of light in human life.
(3) Students will discover the property of light.
Introduction: The lesson will be introduced with the following activity.
A textbook story (Story of Akbar-Birbal) with the discussion of which substance among the white paper, white glass, chalk, and milk is brightest
/ whitest was narrated by the teacher using the calendar chart. The calendar chart contained the different pictures of King Akbar, Birbal and other
court men discussing about the brightest substance among the different white substances.
Story-Points: Akbar asked Birbal- which is the brightest / whitest among white things - Court men told milk- Birbal once kept glass of milk at night in Akbar’s
Room - Milk was spilled by the King’s kick- Birbal replied light is needed to see.
The teacher asked the questions as under.
• What court men and King Akbar were discussing?
• Which thing was the brightest as per court men’s belief?
• What did Birbal do?
• Which liquid was spilled by King Akbar?
• What is the colour of milk?
• Which is the brightest substance according to Birbal?
The teacher told the students that King Akbar could not see the glass of milk due to darkness and it was spilled. So, we can say from this story
that light is necessary to see any object. Rays of light reach to retina and which are decoded by brain so we can interpret the things we see. The
students listened the story carefully. They took part in the discussion session about who is the brightest and whitest among white paper, white
glass, chalk, and milk.

119
Sr.
No.
Instructional
Objective
Description of
Activity
Classroom Interaction Time
Required
1. Students will
conclude
light is
necessary to
see the
object.
Activity 1 (Visual-
spatial and Logical-
mathematical)
Looking into box
through hole to find
out objects kept inside
the box.
Situation 1: Closed
Box
Situation 2: Box was
opened to allow light
pass in the box.
Process skill:
Inference
The teacher showed the box having hole on its top. This box contained
keys, white chalk, different coloured chalks, ruler, sharpener, rubber
band, pencil, key-chain, chain, coin and rubber in it.
The teacher provided opportunities to all the students to see through a
hole and asked the question: What have you seen inside the box? Then,
the teacher called one student to open the side door of the box. The
teacher provided opportunity to all the students to see into the box
again. The teacher asked questions as under.
• How many objects can you see? What are they?
• Why cannot you see the objects kept in the box through the hole
when box is closed?
The teacher instructed the students to write their observation in their
notebooks. The teacher recorded students’ answers and observations on
blackboard while asking them questions.
25 mins.

120
Sr.
No.
Instructional
Objective
Description
of Activity
Classroom Interaction Time
Required
2. Students will
write down
the names of
various
sources of
light from the
letters given.
Students will
classify the
sources of
light into
manmade and
natural
sources of
light.
Activity 2
(Linguistic
and Logical-
mathematical)
Word Game
Process skill:
Classification
The teacher explained the concept of sources of light. The teacher explained
sources of light along with their classification into manmade and natural
sources of light. The teacher also explained why moon and other planets are
not the sources of light. The teacher wrote the definition of sources of light and
its types on blackboard. The teacher distributed the activity sheet to the
students wherein the letters of alphabet were randomly written. The activity
sheet is mentioned on the page no.121. The teacher instructed them to frame
the names of various sources of light and to classify them as natural and
manmade sources of light. The students followed the teacher’s instruction and
wrote the names of various sources of light in the activity sheet.
10 mins.

121
Activity Sheet for Activity 2
Student Name: Date: The letters of alphabet are given below. Using these letters, make the names of sources of light. Write the names of sources of light in the table.
Letters: L S W M N J T H P Q E R B U O A C I K D F X G Y T
Classify the above sources of light either as natural or artificial.
Natural Sources of Light
Manmade / Artificial sources of Light
Sr.
No.
Instructional
Objective
Description of
Activity
Classroom Interaction Time
Required
3. Students will
give reasons (in
their own words)
for electric bulb
as manmade and
an artificial
source of light.
Activity 3
(Linguistic) A
Brief description
of Thomas Alva
Edison’s trials to
make electric
bulb
Process skill:
Communication
The teacher gave the students the brief description of Thomas Alva
Edison’s invention of electric bulb to arouse interest among students.
The teacher listed some of the inventions made by scientist Thomas Alva
Edison and told he invented electric bulb by several trials. The teacher
asked them questions related to electric bulb’s discovery such as: (1)
who invented electric bulb? (2) Mention the story of electric bulb in your
own words. (3) Why is electric bulb not a natural source of light? The
teacher asked them to write a small paragraph on the contribution of
Thomas Alva Edison in making electric bulb in their own words.
10 -12
mins
No Sources of Light
1
2
3
4
5
6
122
Sr.
No.
Instructional
Objective
Description of
Activity
Classroom Interaction Time
Required
4. Students will
write down
5-7 sentences
on the ‘Uses
of Light.’
Activity 4
(Visual-spatial
and Linguistic)
Mind Imagery:
Writing a short
paragraph on
‘Uses of Light’
Process skill:
Communication
The teacher told the students to close their eyes and instructed them
to imagine a situation where there is no sun, no moon, no star, no
candle, no lantern, and no tubelight. The teacher told them to do the
same exercise at least for 3-4 minutes. The teacher asked them
following mentioned questions.
• Describe the imagination that you have seen about life
without light.
• How is light useful to us?
• Why is light necessary in our day to-day life?
• Give examples from daily life where the light is used.
The teacher explained the uses of light in daily life and wrote it on
blackboard as under.
Uses of Light in Daily Life: - For safety in industry and traffic
- For decoration and entertainment like birthday party, and
festivals
- For advertising - neon boards, sign boards.
Afterwards, the teacher distributed the activity sheet to write a
paragraph on ‘Uses of Light” which is mentioned as under.
10 Mins.
Activity Sheet for Activity 4
Student’s Name: Date:
Write 5-7 sentences on ‘Uses of Light’

123
Sr.
No.
Instructional
Objective
Description
of Activity
Classroom Interaction Time
Required
5.
Students will
arrange the
three
cardboards to
see the light
through the
holes of three
cardboards.
Students will
conclude that
light travels
in a straight
path.
Activity 5
(Logical-
mathematical,
Bodily-
kinesthetic
and
Interpersonal)
Experiment
to study the
path of light
Process skill:
Inference
With the help of the students, the teacher demonstrated the experiment to
show that light travels in a straight line. The teacher showed them the three
cardboards. Each cardboard had one hole in its centre. The teacher provided
various situations to the students to see what happened while placing one
cardboard away from the rest two while watching light of the burning candle /
torch through the holes of the cardboards. Then, the teacher placed any one /
two cardboards away from the straight line path and asked students to
observe. The teacher asked them questions as below.
• What do you see on the table?
• How many cardboards are there?
• Can you see light while keeping a cardboard away from the straight
path? Why?
• Can you see light while keeping two cardboards away from the
straight path? Why?
• What should we do to see light through all the three cardboards?
The students did the above activity in groups. The teacher distributed the
activity sheet to the students and instructed them to note down their own
observations in the activity sheet. The activity sheet is mentioned on page no.
124. The teacher wrote the observations on blackboard after collecting the
activity sheets from the students. The teacher instructed them to write the
observations in their science notebook also.
30 mins.

124
Activity Sheet for Activity 5
(Experiment of watching light through three cardboards)
Student’s Name: Date: Materials required for the Experiment of Light.
Observation: Write your observation in given table.
Sr.
No.
Position of Cardboards I can see the flame of candle
or light emitted from the
torch. (Write ‘Yes’ or ‘No’.)
1. Cardboards are arranged in such a way that
holes are in a straight line.
2. Only one cardboard is kept slightly away from
the straight path.
3. The two cardboards are kept slightly away from
the straight path.
Write the answer in one sentence. From the above experiment, what can you say about the path of light?
Draw the path of light.

125
Sr.
No.
Instructional
Objective
Description
of Activity
Classroom Interaction Time
Required
6.
Students will
conclude that
light travels in
a straight
path.
Activity 6
(Logical-
mathematical,
Interpersonal
and Musical)
Looking the
source of
light -
burning
candle or
torch through
the straight
pipe and after
bending the
pipe
Process skill:
Inference
This was a group activity. For this activity, the teacher instructed the students to
observe and discuss among them about their observation and what could be said
about the property of light. The teacher gave them one plastic tube to see through
with its both the ends opened (not closed). Teacher ensured that all the group
members will have chance to do the activity. The teacher asked the students to
hold the straight pipe pointing towards the flame of the candle/torch. Then, the
teacher told them to see the flame of the candle/light of the torch and asked them
to share their observations in their groups.
In another situation, the teacher told them to bend the plastic pipe a little and
asked them to see the flame. Sometimes, the teacher also used the torch instead of
burning candle. Then, teacher ensured that all the students in group will get chance
to see the flame of the burning candle after bending the pipe a little. The teacher
encouraged them to share their observation in their groups by asking questions
such as: (1) What did they see? (2) Why could not they see the flame of candle
when pipe was little bent?
Thereafter, the teacher asked questions to entire class mentioned as under.
• In first condition (when pipe was not bent), can you see the flame?
• In second condition (when pipe was bent), can you see the flame?
• What will you say about the path of light?
• Does light travel in zigzag way?
• Does light travel in a straight line?
The students took part in discussion and gave answers. The teacher asked them to
compose a song on the property of light and encouraged them to sing it with claps.
The song is mentioned on next page.
40-45
mins.
126
Sr.
No.
Instructional
Objective
Description
of Activity
Classroom Interaction Time
Required
6. Students will
conclude that
light travels in
a straight
path.
Activity 6
(Logical-
mathematical
Interpersonal
and Musical)
Looking to
the source of
Light -
burning
candle or
torch through
the straight
pipe and
after bending
the pipe
Process skill:
Inference
A Song on Property of Light
“Light travels
Light travels
Light travels in straight path
Because I saw the light
When the cardboards’ holes are matched”.

127
Sr.
No.
Instructional
Objective
Description
of Activity
Classroom Interaction Time
Required
7. Students will
decorate the
‘Diva’ in a
group.
Activity 7
(Bodily-
Kinesthetic,
Visual-spatial,
and
Interpersonal)
Decoration of
‘Diva.’
The teacher formed various groups of students. Each group comprised of five
students. The teacher announced the aim of the activity and showed them the
ideal specimen of a decorated ‘diva’ and asked them to observe it. The teacher
took round in the class and guided them how to decorate the ‘diva’. The teacher
distributed the necessary things like ‘diva’, glue and other materials for its
decoration. The students themselves decided the colour and design for the ‘diva’
after taking consent of the group members. They decorated the ‘diva’ in groups.
The teacher took care that all the students in each group will have equal chance
of participation with the help of the group leaders. Then, the teacher collected
their decorated ‘diva’ and provided feedback to the students. The teacher lighted
the decorated ‘diva’ and asked them: What does candle give when it is lighted?
Where do we use ‘diva’ generally? The teacher also discussed the importance of
‘diva’ in ‘Diwali’ festival, the festival of light and its religious importance.
50 Mins.
Recapitulation: Preparing star from chart paper and summarizing major concepts in it
Multiple intelligences: Visual-spatial, Linguistic and Logical-mathematical
Process skill: Communication
The teacher asked students to draw the picture of star in their notebooks and instructed them to write what they have learnt from lesson ‘Light
and Its Properties’ in the five parts of the stars. After that, the teacher told them to read what they have written and corrected their mistakes if
any. The teacher wrote their responses on blackboard and asked them to add the missing points. Thereafter, the teacher asked them to a prepare
star from chart paper and write points that they have learnt in the Lesson-Light and Its Properties using sketch pens and coloured pencils. The
students did the activity at their homes.

128
Lesson 14 Measurement of Length
General Objectives: (1) Students will know various changes in measurement of length with respect to time. (2) Students will understand the
importance of measurement of length in daily life. (3) Students will understand the procedure of using the standard measures to measure length
and width. (4) Students will appreciate the uses of the standard measurement of length.
Introduction PowerPoint Presentation of tall buildings and tall trees (CD, Folder – Lesson 14, file- measurement of length intro)
The teacher showed the PowerPoint Presentation of sky scrapper buildings and tall tress (CD, Folder – Lesson 14, file- measurement of length
intro) to make them understand the need of the standard unit of measurement. The students watched the PowerPoint Presentation and replied the
teacher’s below noted questions accordingly.
• Among different pictures of tall buildings and tall trees which do you find the tallest?
• How can you arrive at particular judgment?
The teacher explained that we require measurement to judge which tree is the tallest or the shortest or to decide the tallest student in the class.
We make use of rulers and meter tape to measure the length, height and width of the objects. Today, we will learn how the measurement of
length and width of the objects was carried out earlier. We will also learn the standard units of measurement of length.

129
Activity Sheet for Activity 1
Group Name: Date:
Name of Students:
Using span and finger, measure the length of the textbook of science and technology. Use the same measure for width of desk of your class
room. Write figures in the given table.
Table Measurement using Span and Finger
Students’ Names Length of Science and Technology
Textbook using span and finger
Width of Desk using span
and finger
A
B
C
Sr.
No.
Instructional
Objective
Description
of
Activity
Classroom Interaction Time
Required
1. Students will
explain that
span and finger
are not the
standard
measures of
length.
Activity 1
(Bodily-
kinesthetic,
Logical-
mathematical
and Inter-
personal)
Process skill:
Inference
The teacher formed the groups and defined the roles such as group leader,
discussants, and reporter and distributed the activity sheets to the students. The
teacher instructed them to measure the length of their Science and Technology
textbook and the width of their desks using their span and finger. The students
followed the teacher’s instruction carefully and reported their measurements in
given activity sheet by working in groups. The teacher asked the measurements
reported by each group and asked why the measurements vary from other
groups. The teacher instructed the group leaders to make sure that the reason
for variation in measurements should be mentioned in the conclusion given in
the activity sheet. The activity sheet for activity 1 is mentioned as under.
20 mins.

130
Conclusion: Complete the following sentence giving scientific reasons.
1. The length of Science and Technology textbook measured by students using span and finger is different because…
2. The width of desk measured by students using span and finger is different because…
Sr.
No.
Instructional
Objective
Description of
Activity
Classroom Interaction Time
Required
2. Students will
draw the scale of
measurement
with compass-
ruler showing
measurements in
inches or
centimeters.
Students will give
the names of units
of measurement
of length.
Activity 2 (Logical-
mathematical and
Visual-spatial):
Historical Story for
Units of
Measurements
using PowerPoint
Presentation
(CD, Folder –
Lesson 14, file-
Measurement of
length story)
Brief Explanation
for drawing scale in
centimeters
Details of units of
Measurement
Process skill:
Communication
The teacher explained the historical story of different units of
measurement of length using PowerPoint Presentation (CD, Folder –
Lesson 14, file- Measurement of length story).
(Source for pictures: Retrieved March 26, 2009.
http://www.immetrology.com/history_of_measurement.aspx)
The teacher also explained the students when to use particular units of
measurement such as centimeters and meters. The teacher told them to
draw the picture of scale with the measurements in inches/centimeters
in their notebooks. The students followed the teacher’s instruction
carefully and drew in their notebooks. The teacher asked students
various units used for measurement of length. The students replied
and wrote the units of measurement of length in their notebooks.
20 mins.
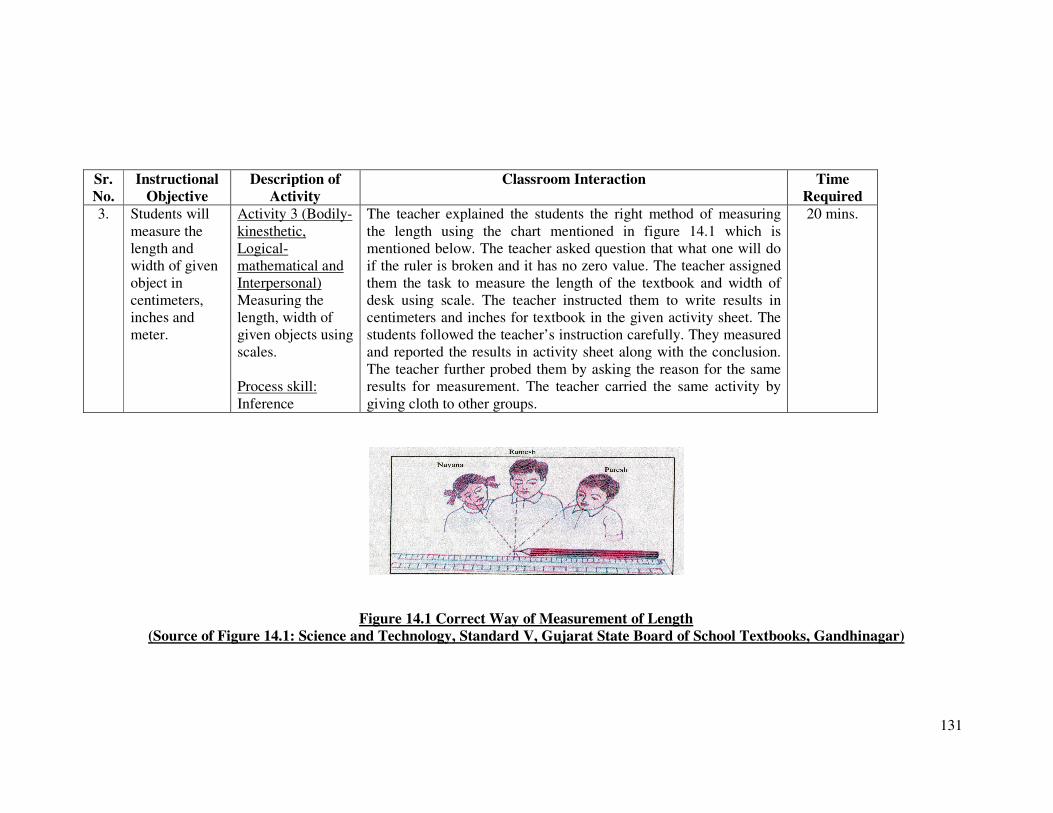
131
Sr.
No.
Instructional
Objective
Description of
Activity
Classroom Interaction Time
Required
3. Students will
measure the
length and
width of given
object in
centimeters,
inches and
meter.
Activity 3 (Bodily-
kinesthetic,
Logical-
mathematical and
Interpersonal)
Measuring the
length, width of
given objects using
scales.
Process skill:
Inference
The teacher explained the students the right method of measuring
the length using the chart mentioned in figure 14.1 which is
mentioned below. The teacher asked question that what one will do
if the ruler is broken and it has no zero value. The teacher assigned
them the task to measure the length of the textbook and width of
desk using scale. The teacher instructed them to write results in
centimeters and inches for textbook in the given activity sheet. The
students followed the teacher’s instruction carefully. They measured
and reported the results in activity sheet along with the conclusion.
The teacher further probed them by asking the reason for the same
results for measurement. The teacher carried the same activity by
giving cloth to other groups.
20 mins.
Figure 14.1 Correct Way of Measurement of Length
(Source of Figure 14.1: Science and Technology, Standard V, Gujarat State Board of School Textbooks, Gandhinagar)

132
Activity Sheet for Activity 3
Group Name: Date:
Measure the length of the textbook of science and technology using scale. Use the same measure for width of desk of your class room.
Write figures in the given table.
Table: Measurement using Scale
Students’ Names Length of Science and
Technology Textbook
using scale
Width of Desk using scale
A cms. inches. cms. inches.
B cms. inches. cms. inches.
C cms. inches. cms. inches.
Conclusion:
Complete the following sentence giving scientific reasons.
1. The length of Science and Technology Textbook in centimeters and inches using ruler is same because ….
2. The width of desk in centimeters and inches using ruler is same because ….

133
Activity Sheet for Activity 3
Group Name: Date:
Measure the length of cloth using meter tape. Write figures in the given table.
Table: Measurement using Meter tape in inches
Students’ Names Length of Cloth (Using
meter tape)
Width of Cloth (Using
meter tape)
A
B
C
Conclusion:
Complete the following sentence giving scientific reasons.
1. The length of cloth is same because ….
2. The width of cloth is same because ….
Recapitulation:
Multiple Intelligences: Logical-mathematical and linguistic
Process skill: Communication
The teacher asked the students to summarize about what they have learnt in the Lesson 14 Measurement of Length in sequence of the content
taught. The students summarized what they have learnt in the class in sentences.

134
Lesson 16 Energy
General Objectives: (1) Students will know the sources of energy. (2) Students will understand the concept of energy. (3) Students will know
the inevitability of energy in human life. (4) Students will appreciate the importance of sources of energy in life. (5) Students will promote the
parsimonious usage of energy in society.
Introduction: Questioning Session
The teacher asked, “From where do we get energy to do work?” After getting the students’ responses, the teacher called one student to displace
the heavy bunch of books and instructed other students to observe the activity carefully. The teacher explained that the energy is required to do
the work such as to displace the books, to drive bicycle, to run, to jump and in other daily activities. The teacher asked following mentioned
questions to initiate the discussion to know their prior knowledge about energy.
• Why do we get tired after running or playing?
• What will happen if we switch on the battery of electric light for two or more hours?
• What keeps fan and train moving?
• Tell other uses of electricity in daily life.
• What happen if electricity is unavailable to us?
The students answered the questions accordingly. The teacher explained that energy is necessary for man to sustain life. Food gives us energy
and this energy is used to beat the heart continuously, to digest the food and for breathing. The teacher explained that energy is the main driving
force of economy because it is required to run machinery in industry to produce goods. So, today we will learn about different sources of energy
and how the sun continues the flow of energy. We will also learn about sources of energy needed to be used and the reasons for the same.

135
Activity Sheet for Activity 1
Student’s Name: Date:
Write the source of energy of below mentioned living / non-living in the table given.
No. Living / Non-living Sources of Energy
1. Truck
2. Bike
3. Donkey
4. Lion
5. Sparrow
6. Frog
7. Snake
8. Cat
9. Rickshaw
10. Electric Train
Sr.
No.
Instructional
Objective
Description of
Activity
Classroom Interaction Time
Required
1. Students will
list down
various
sources of
energy.
Activity 1
(Logical-
mathematical)
Sources of
Energy
Process skill:
Communication
The teacher gave each student the activity sheet and asked to
write the sources of energy. After collecting the activity
sheets, the teacher discussed the sources of energy for living
and non-living things mentioned in the activity sheet 1 to
know their responses. The teacher introduced the concept of
energy by explaining the simple definition of energy that it
is the ability to do work by writing on blackboard. The
students wrote the definition of energy in their notebooks.
10 Mins.

136
Sr.
No.
Instructional
Objective
Description of
Activity
Classroom Interaction Time
Required
2. Students will
conclude the
sun as the
fundamental
source of
energy which
continues the
flow of
energy.
Activity 2
(Visual-spatial
and Logical-
mathematical)
Movie Clip:
Photo-synthesis
by plants –
Song
(CD, Folder –
Lesson 16, File
–Photosynthesis
song)
Process skill:
Inference
The teacher showed the movie clip of photosynthesis by
plants. (CD, Folder – Lesson 16, File - Photosynthesis song)
The students watched the movie clip of Photosynthesis by
plants carefully. The teacher showed the students the chart of
flow of energy and explained how energy cycle / flow of
energy is continued simultaneously. The teacher asked the
following questions to lead the students to draw the conclusion
that sun is the fundamental source of energy.
• What do herbivores eat?
• What is the food of carnivores?
• What is the photosynthesis process?
• How do plants prepare food?
• How can we say that sun is the fundamental source of
energy?
The students gave the answers accordingly. The teacher made
necessary sequence by the diagrammatic representation
regarding the flow of energy with the help of the students
shown as under.
Sun � Plants � Prepares food � Herbivore eats plants �
Carnivore kills herbivore for food.
The students developed the sequence chart in their notebooks
showing the sun as the primary source of energy that continues
the flow of energy.
15 Mins.

137
Sr.
No.
Instructional
Objective
Description of
Activity
Classroom Interaction Time
Required
3. Students will
explain the
sun as the
fundamental
and
inexhaustible
source of
energy.
Activity 3 Visual -
spatial and
Logical-
mathematical) Sun
as a primary
source of Energy
using movie clip
from Teacher tube
(CD, Folder –
Lesson 16, File-
solar energy)
Process skill:
Communication
The teacher showed the movie clip of the sun as the source
of energy (CD, Folder – Lesson 16, File- solar energy).
Here, the teacher explained why sun is the fundamental
source of energy. The students watched the movie clip
carefully.
The teacher gave basic information for solar heater. The
teacher showed them the model of solar cooker and
explained how sun is used for energy and how food is
cooked. The teacher asked why the sun is known as the
fundamental source of energy. Students answered
accordingly.
10 mins.

138
Sr.
No.
Instructional
Objective
Description of
Activity
Classroom Interaction Time
Required
4. Students will
name various
sources of
energy other
than the sun.
Students will
classify
sources of
energy into
exhaustible
and
inexhaustible.
Students will
explain
various
sources of
energy.
Activity 4
(Visual-spatial)
PowerPoint
Presentation of
Energy sources
(includes natural
and inexhaustible
sources of
Energy)
(CD, Folder -
Lesson 16 – File -
energy sources)
Process skill:
Classification
The teacher explained the terms ‘exhaustible’ and
‘inexhaustible’. The teacher showed them PowerPoint
Presentation (CD, Folder - Lesson 16 – File - energy sources)
mentioning the information regarding types of sources of
energy, and their pros, and cons in brief. After that, the
teacher asked the questions as under.
• What are the two major types of sources of energy?
• Give the examples of exhaustible sources of energy?
• Name the inexhaustible sources of energy.
• What is the difference between exhaustible and
inexhaustible sources of energy?
Thereafter, teacher listed down sources of energy such as
petrol, kerosene, CNG, LPG, wind, sun and flow of water on
blackboard.
20-25 mins.

139
Sr.
No.
Instructional
Objective
Description of
Activity
Classroom Interaction Time
Required
5. Students will
explain the
uses of wind
and flow of
water to
generate
energy.
Students will
prepare the
model of
windmill
using waste
material.
Activity 5
(Logical-
mathematical &
Bodily-
kinesthetic)
Another natural
sources of
energy- wind and
flowing water.
The teacher showed students the hand-made model of
windmill which was prepared by chart paper and pins and
explained its functioning in brief. The teacher linked this
activity with the preparation of windmill from paper with a
focus on making best out of the west material at low cost. The
teacher explained students to prepare the same at their home
by providing required guidance. Thereafter, the teacher
discussed how energy is produced by flow of water in brief.
Teacher asked the questions as under.
• What is windmill? How does it work?
• Why dams are made?
• Which dame is built on the river Tapi?
• Why ‘Ukai’ and ‘Kakarapar’ dams are built on river
‘Tapi’?
10 Mins.

140
Sr.
No.
Instructional
Objective
Description of
Activity
Classroom Interaction Time
Required
6. Students will
give reasons
for judicious
use of sources
of energy.
Activity 6a
(Logical-
mathematical and
Intrapersonal)
Writing points
under the picture
of balance by the
teacher on
blackboard.
The pie chart of
countries
providing crude oil
in PowerPoint
Presentation
(CD, Folder-
Lesson 16, File -
My country India
needs energy)
Process skill:
Communication
The teacher distributed the activity sheet wherein the energy
consumption data was given. The teacher drew (on blackboard) the
graph-India’s Natural Gas Production and Consumption 1990-2007
(fig 16.1, page no. 141) and explained how to interpret it. The teacher
explained that the energy consumption for natural gas is higher than
its production. So, we should not use such energy sources blindly,
but, we have to move towards the search and use of other sources of
energy. The teacher explained in brief that India faces the scarcity of
energy showing the pie chart of countries providing crude oil in
PowerPoint Presentation (CD, Folder- Lesson 16, File -My country
India needs energy). The teacher also explained that petrol, kerosene,
and diesel are made from crude oil. So, we have to keep control on
usage of crude oil.
The teacher asked questions as under.
• What is required to run machinery?
• From where do we get the petroleum?
• What will happen if petroleum is not available?
• Name the countries which provide petroleum to India?
Then, teacher drew the picture of balance and discussed the
advantages and disadvantages of inexhaustible and exhaustible
sources of energy. The teacher helped them to write the advantages
and disadvantages of natural sources of energy / inexhaustible
sources of energy in one column and exhaustible sources of energy
in another column of balance-chart shown in figure 16.2 on page no.
141. The teacher gave the activity sheet 6a and asked them to
interpret the graph of India’s oil production and consumption and to
write the answers accordingly which is mentioned on the page no
.142.
25 Mins.

141
Figure 16.1 India’s Natural Gas Production and Consumption 1990-2007
(Source of Figure 16.1: India's Gas Production & Consumption (1990-2007). Retrieved April 21, 2009, from
http://www.eia.doe.gov/emeu/cabs/India/Full.html)
Figure 16.2 Picture of Balance to Write Pros and Cons of Sources of Energy
Sources of Energy
Inexhaustible
Source of
energy
----------------
----------------
----------------
Exhaustible
Source of
energy
----------------
----------------
----------------

142
Activity Sheet for Activity 6a
Student’s Name: Date:
Study the below shown graph carefully. Write the answer under each question in one sentence.
Questions:
1. What could be the approximate production of oil by India in the year 2008?
2. What could be the approximate consumption of oil by India in the year 2008?
(Source of Above Graph: India's Oil Production & Consumption (1990-2009). Retrieved April 21, 2009, from
http://www.wrsc.org/attach_image/indias-oil-production-consumption-1990-2009)

143
Activity 6b
Complete the following statements to make it meaningful by writing scientific reasons in one or two sentences. 1. I should make thoughtful use of energy sources like……………………………………
2. I should not waste energy sources because my country India has………………………
3. I will tell my younger brother / sister not to use energy unnecessarily because…………...
4. I will not use petrol, kerosene unnecessarily because………………………………………
Sr.
No.
Instructional
Objective
Description of
Activity
Classroom Interaction Time
Required
6. Students will
give reasons
for judicious
use of energy
sources.
Activity 6b
(Logical-
mathematical and
Intrapersonal)
Completion of the
incomplete
sentence to make it
meaningful with
connection to
activity 6a
Process skill:
Communication
The teacher distributed the activity sheet 6b to the students
and discussed the necessity of thoughtful usage of
exhaustible sources of energy. The teacher instructed the
students to think and write the reasons to complete the
incomplete sentences meaningfully. The activity sheet 6b is
mentioned on the page no. 143.
15 Mins.

144
Recapitulation: Multiple Intelligences: Visual-spatial and Logical-mathematical
Process skill: Communication and Classification
The teacher showed various charts regarding sources of energy wherein no explanation was written. The students had to observe the charts and
in groups. They answered what they learnt from these charts. The teacher asked them to summarize about what they saw from the charts in their
own words. The teacher asked the following questions.
• Why do you think sun is a primary source of energy?
• Do you think trees get energy from sun? How?
• How can we boil water naturally? (Without the aid of gas-stove)
The teacher gave them the task to categorize the following mentioned energy sources into fundamental, exhaustible and inexhaustible sources of
energy in their notebooks. The students classified the sources of energy in their notebooks.
Sources of Energy
Sun, Petrol, Kerosene, Diesel, Wind, Natural Gas, Coal, Flowing water
Fundamental Source of Energy: __________________________________________________
Exhaustible Source of Energy : __________________________________________________
Inexhaustible Source of Energy: __________________________________________________
References for Movie Clips
1. The Photosynthesis song. Retrieved March 25, 2009 from http://www.youtube.com/watch?v=C1_uez5WX1o (CD, Folder – Lesson 16,
File -Photosynthesis song)
2. Solar energy video. Retrieved December 12, 2008 from
http://teachertube.com/viewVideo.php?video_id=10416&title=Solar_Energy_Video (CD, Folder – Lesson 16, File- solar energy)

145
GENERAL INPUT FOR INSTRUCTIONAL STRATEGY BASED ON THE
THEORY OF MULTIPLE INTELLIGENCES
The teacher used below mentioned activities before introducing the lesson or to
provide break of two-three minutes while implementing instructional strategy for
teaching science at standard V based on the theory of Multiple Intelligences (MI).
I. Intrapersonal intelligence
1. Quiet Time (Bellanca (1997))
The teacher instructed students to think on the area which demands improvement and
hard-working. The teacher asked them to decide short-term goals to achieve. This
activity was carried out in relation with daily log writing to modify their behaviour in
science class.
Alternatively, the teacher instructed students to close their eyes and revise what they
have learnt in last period. It was used before introducing a new topic or in a new
period to link students’ previous knowledge with new knowledge.
The teacher, thereafter, asked question to students to summarize what they have learnt
in last class and the teacher made list on the blackboard using colour chalks to
highlight main points. The students closed their eyes, thought, and replied
accordingly.
2. Daily Reflection Log (Bellanca (1997))
The teacher introduced the concept of daily log book to the students and explained its
utility and discussed the following mentioned statements and encouraged them to
complete them with proper words /phrases to make them meaningful. The teacher
asked them to write below mentioned incomplete statements in their notebooks and
instructed them to select a few incomplete statements to complete them based on their
personal reflection.
• Today I learnt….
• Today, I should not do….

146
• My mistakes are…
• Today I should do more efforts to learn…
• I will work…
• In this class, I want to learn….
• In this class, I intend to improve….
• In this class, I hope to…
• My goal for this class is…
• Today (this week) in this class, I learned…
• Today (this week), in this class, I improved by…. …
• In this class, I am pleased that I….
• A difficulty I am having this class is…
• I wish that this class….
This activity was carried out to help students to know their mistakes and motivate
them to bring systematization and discipline in their behaviour. The students were
instructed to maintain their daily logs regularly.
II. Interpersonal intelligence
1. To enhance the personal and group efficiency - High Jump (Bellanca (1997))
This activity was used for identifying the personal and group standards periodically.
After framing groups in science class, teacher showed the picture of high jumper and
asked students to explain what the jumper has to do when the bar is raised or lowered.
The teacher explained how the bar stands for a standard. The teacher explained when
standard is raised, it is harder for more people to meet it, and if it is lowered, it is
easier for more people to meet it. Then, the teacher asked students to suggest their fair
standards for home work, projects. The students answered the raised query and
worked in a group to set up standards of personal and group performance.
2. Discussion with Peers or Group
The students were allowed to discuss with their peers about what they learnt in last
science class. They were guided to ask relevant questions on the content of science.

147
The other student in a pair replied and it was taken care that each student in pair will
get opportunity to ask questions and to respond the raised query.
In group discussion, the students were instructed to raise the queries about the content
taught in last science class, their difficulties in learning science, doing activity and
writing activity sheets. The students were also asked to discuss their progress in doing
particular activity at home and what they learnt from the same.
3. Group Name (Bellanca (1997))
The teacher formed the groups and asked students to decide a group name for their
group. The teacher discussed the characteristics of particular animal and probed to
know why they selected particular animal’s name as their group’s name. It was
ensured by the teacher that all the students in a particular group had consensus for
their group name.
III. Bodily-kinesthetic intelligence
1. Quick Energizers (Campbell, Campbell and Dickinson (2004))
Following mentioned bodily-kinesthetic exercises were used as quick energizers for
the students in the science class.
a. Breathing - in and out exercise
This was carried out before introducing the lesson and to provide break of two-three
minutes to the students during classroom interaction. The students were asked to take
deep breath inside and to control it till they can do. The students were instructed to
repeat this small exercise.
b. Exercises
The students were instructed to stretch their hands up and down and to the front sides
and sideways. The students were also instructed to move their wrist in circular
motion. Such exercise was carried out to give them break during classroom
interaction and before introducing the topic of science. Along with this exercise, the
students were also asked to do knee rotations, neck rolls and shoulder rolls.

148
IV. Visual-spatial intelligence
1. Visualization – Thinking in images (Armstrong (2000))
The teacher instructed the students to close their eyes and think about what they learnt
in last class of science. The teacher instructed the students to think in images.
2. Colour Cues (Armstrong (2000))
In another exercise, the teacher also asked them to select a colour that they prefer or
they like as a peaceful colour. The teacher instructed them to visualize that colour and
asked them to meditate what they learnt. This was carried out to help students to
create their inside world with the colour and help them to tackle the stress they
generally face especially while working with activity, problem or new idea.
The teacher made effective use of coloured chalks while teaching. For instance, the
teacher used green coloured chalks to draw schematic diagram of living, yellow
coloured chalk for drawing sun in water cycle. The teacher also used coloured chalk
to highlight the main points.
V. Musical intelligence
The students were asked to recall the song that they composed and sang in the last
science class. The students were encouraged to sing the songs with clapping and
appropriate bodily actions. Thus, the content was revised in short time.