Embed Size (px)
Citation preview
November 2019 (01445)
Instructional Guide to Intensive In-Community (IIC) and
Behavioral Assistant (BA) Treatment Plans
1
Instructional Guide to IIC and BA Treatment Plans
Table of Contents
I. Introduction ......................................................................................................................................................................... 2
II. Accessing CYBER .................................................................................................................................................................. 3
III. Locating a Youth ................................................................................................................................................................. 4
IV. Creating a New Treatment Plan ......................................................................................................................................... 4
V. The Accordions of the Treatment Plans ............................................................................................................................. 5
Treatment Plan Type Selection Accordion ...................................................................................................................... 5
Copy Treatment Plan Accordion ..................................................................................................................................... 5
Demographics Accordion ................................................................................................................................................ 6
Youth Vision/Family Vision Accordion ............................................................................................................................ 7
Matrix Accordion ............................................................................................................................................................. 7
Diagnosis Accordion ........................................................................................................................................................ 8
Medications Accordion ................................................................................................................................................... 9
Support Attendees Accordion ....................................................................................................................................... 11
Notepad Accordion ....................................................................................................................................................... 13
Family Crisis Plan Accordion ......................................................................................................................................... 14
IIC or BA Treatment Plan Accordion ............................................................................................................................. 16
VI. Using the Matrix Accordion ............................................................................................................................................. 17
Matrix Dynamic Associate Button ................................................................................................................................. 21
Associating on the Matrix tab ....................................................................................................................................... 22
Entering Data vs. Editing Data....................................................................................................................................... 24
The Needs Tab ............................................................................................................................................................... 25
The Strengths Tab ......................................................................................................................................................... 32
Tab - BA Plan only ......................................................................................................................................................... 34
The Strategies Tab ......................................................................................................................................................... 35
The Techniques Tab ...................................................................................................................................................... 39
The Responsible Person(s) Tab ..................................................................................................................................... 41
The Desired Outcomes/Goals Tab ................................................................................................................................ 42
The Barriers Tab ............................................................................................................................................................ 44
VII. Submitting or Transferring a Treatment Plan for Internal Review ................................................................................. 45
VIII. Printing the Treatment Plans ......................................................................................................................................... 47
IX. References ....................................................................................................................................................................................... 47
2
I. Introduction The Intensive In-Community (IIC) and Behavioral Assistant (BA) Treatment Plans, completed for documentation of IIC/BA
treatment planning and to document planning for Social Emotional Learning (SEL) services, are submitted electronically
in CYBER.
Both plan types include the Treatment Matrix that allows users to input clinical information such as a youth’s Needs and
Strengths, as well as Strategies, Techniques and Barriers to treatment in an associated format. The Matrix itself is
presented in a tree structure instead of the accordion structure that is found in the rest of the plan. This format allows
the user to see all of the associated information at once. For example, the user will be able to view the Desired
Outcomes/Goals that are associated with a specific Need, as well as the Strengths, Strategies and Techniques associated
with the same Need without having to open other areas of the plan.
IIC and BA Plans are a part of the automatic-approval process in CYBER. Once submitted, the plan is automatically
approved because there are no service requests present.
Note: If the IIC/BA providers are providing SEL services, an IIC/BA treatment plan must be submitted prior to CMO
requesting authorization. CMO will have an alert identifying the absence of an IIC Treatment Plan when making the
initial request for SEL services on a CMO plan; an alert will also be triggered if the CMO is requesting continued stay in
SEL and the IIC and BA Treatment Plans have not been submitted in advance of the service request.
3
II. Accessing CYBER
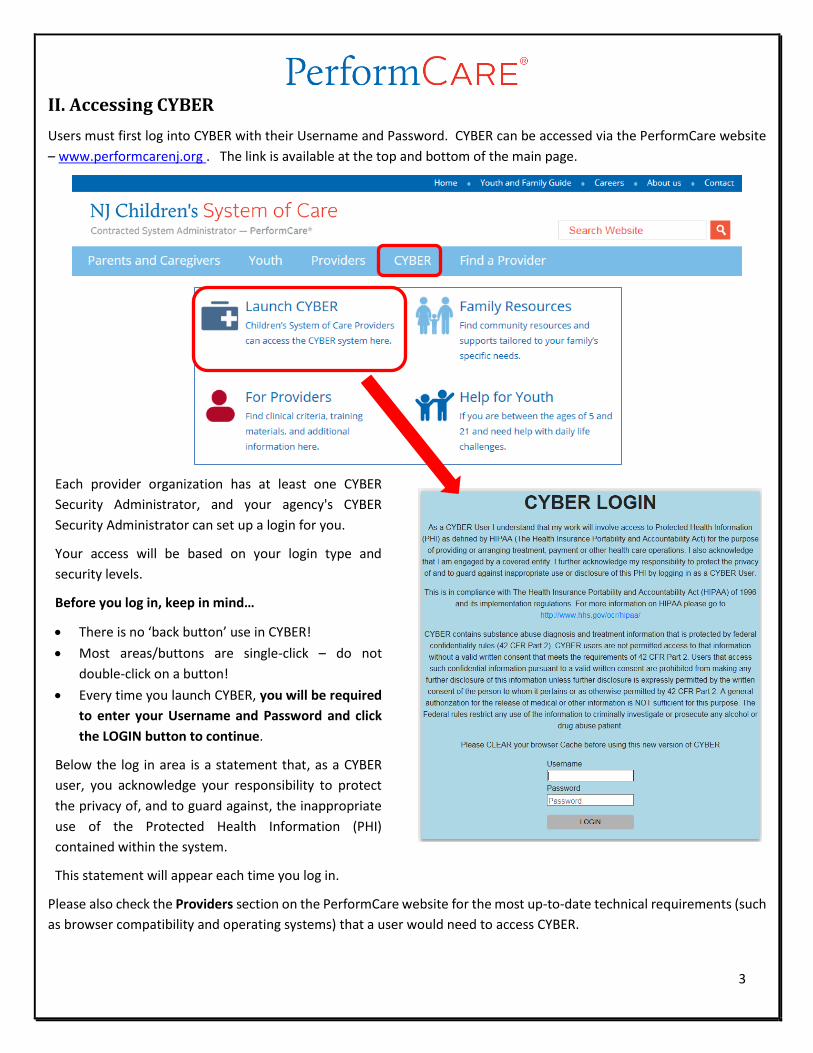
Users must first log into CYBER with their Username and Password. CYBER can be accessed via the PerformCare website
– www.performcarenj.org . The link is available at the top and bottom of the main page.
Each provider organization has at least one CYBER
Security Administrator, and your agency's CYBER
Security Administrator can set up a login for you.
Your access will be based on your login type and
security levels.
Before you log in, keep in mind…
There is no ‘back button’ use in CYBER!
Most areas/buttons are single-click – do not
double-click on a button!
Every time you launch CYBER, you will be required
to enter your Username and Password and click
the LOGIN button to continue.
Below the log in area is a statement that, as a CYBER
user, you acknowledge your responsibility to protect
the privacy of, and to guard against, the inappropriate
use of the Protected Health Information (PHI)
contained within the system.
This statement will appear each time you log in.
Please also check the Providers section on the PerformCare website for the most up-to-date technical requirements (such
as browser compatibility and operating systems) that a user would need to access CYBER.
4
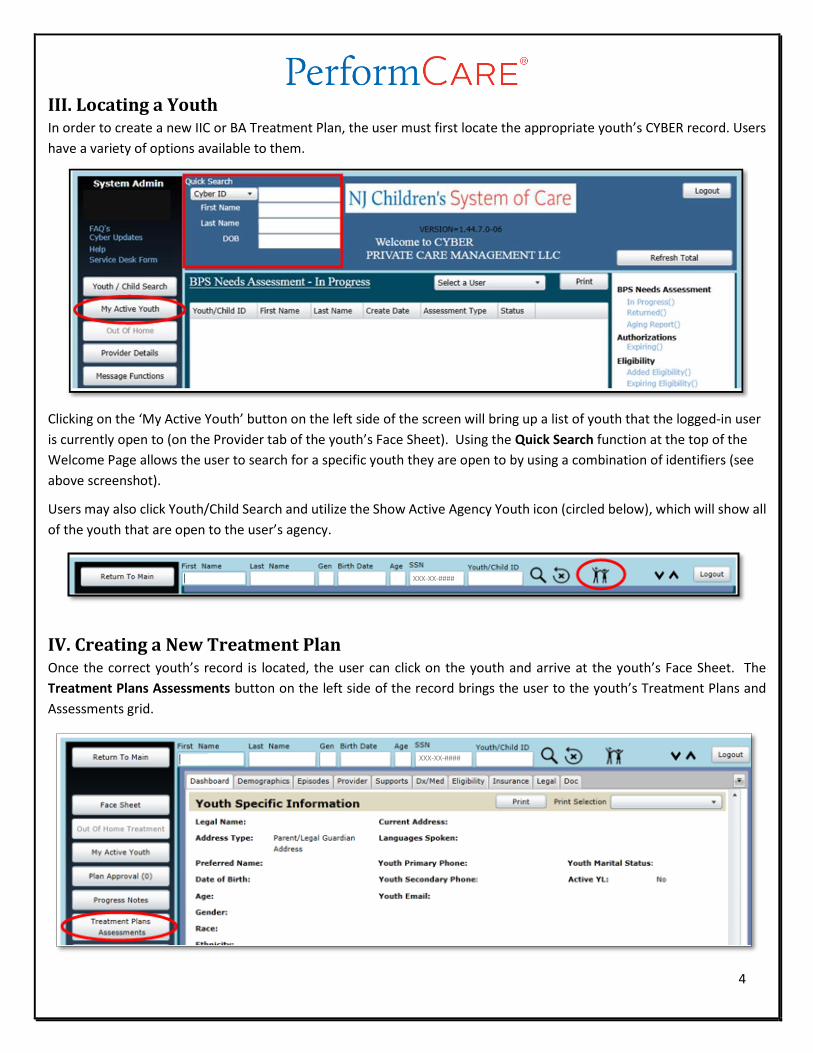
III. Locating a Youth In order to create a new IIC or BA Treatment Plan, the user must first locate the appropriate youth’s CYBER record. Users
have a variety of options available to them.
Clicking on the ‘My Active Youth’ button on the left side of the screen will bring up a list of youth that the logged-in user
is currently open to (on the Provider tab of the youth’s Face Sheet). Using the Quick Search function at the top of the
Welcome Page allows the user to search for a specific youth they are open to by using a combination of identifiers (see
above screenshot).
Users may also click Youth/Child Search and utilize the Show Active Agency Youth icon (circled below), which will show all
of the youth that are open to the user’s agency.
IV. Creating a New Treatment Plan Once the correct youth’s record is located, the user can click on the youth and arrive at the youth’s Face Sheet. The
Treatment Plans Assessments button on the left side of the record brings the user to the youth’s Treatment Plans and
Assessments grid.
XXX-XX-####
XXX-XX-####
5
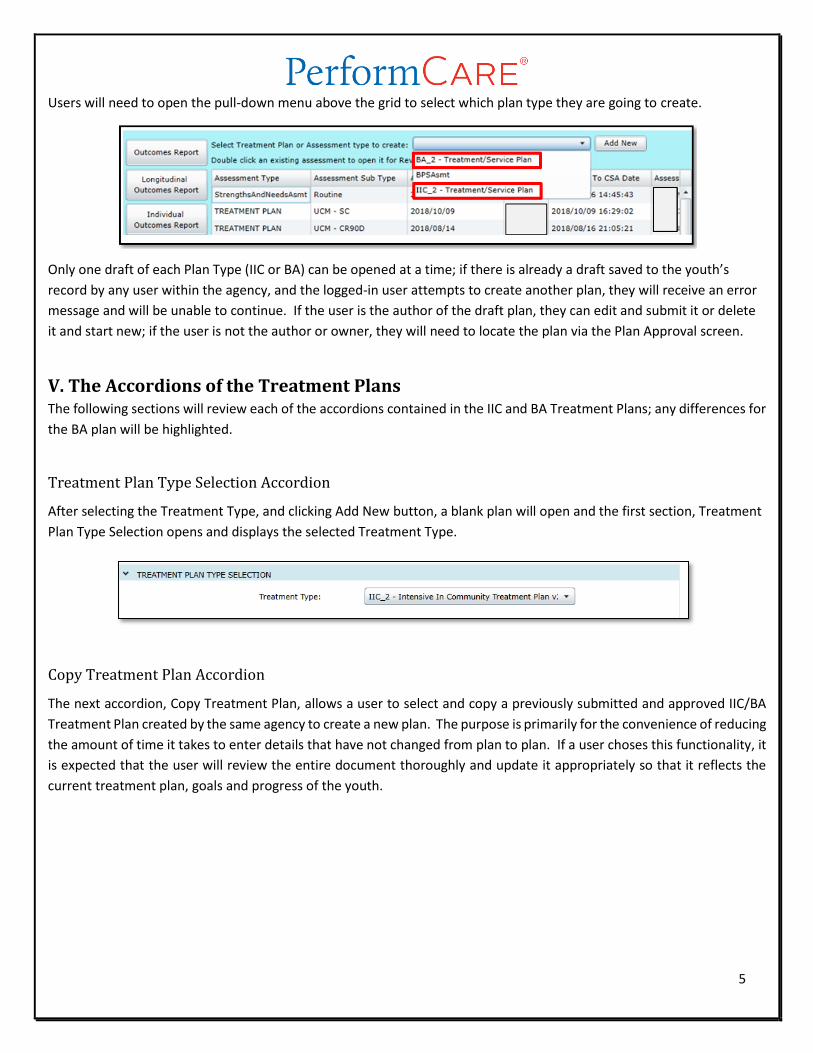
Users will need to open the pull-down menu above the grid to select which plan type they are going to create.
Only one draft of each Plan Type (IIC or BA) can be opened at a time; if there is already a draft saved to the youth’s
record by any user within the agency, and the logged-in user attempts to create another plan, they will receive an error
message and will be unable to continue. If the user is the author of the draft plan, they can edit and submit it or delete
it and start new; if the user is not the author or owner, they will need to locate the plan via the Plan Approval screen.
V. The Accordions of the Treatment Plans The following sections will review each of the accordions contained in the IIC and BA Treatment Plans; any differences for
the BA plan will be highlighted.
Treatment Plan Type Selection Accordion
After selecting the Treatment Type, and clicking Add New button, a blank plan will open and the first section, Treatment
Plan Type Selection opens and displays the selected Treatment Type.
Copy Treatment Plan Accordion
The next accordion, Copy Treatment Plan, allows a user to select and copy a previously submitted and approved IIC/BA
Treatment Plan created by the same agency to create a new plan. The purpose is primarily for the convenience of reducing
the amount of time it takes to enter details that have not changed from plan to plan. If a user choses this functionality, it
is expected that the user will review the entire document thoroughly and update it appropriately so that it reflects the
current treatment plan, goals and progress of the youth.
6
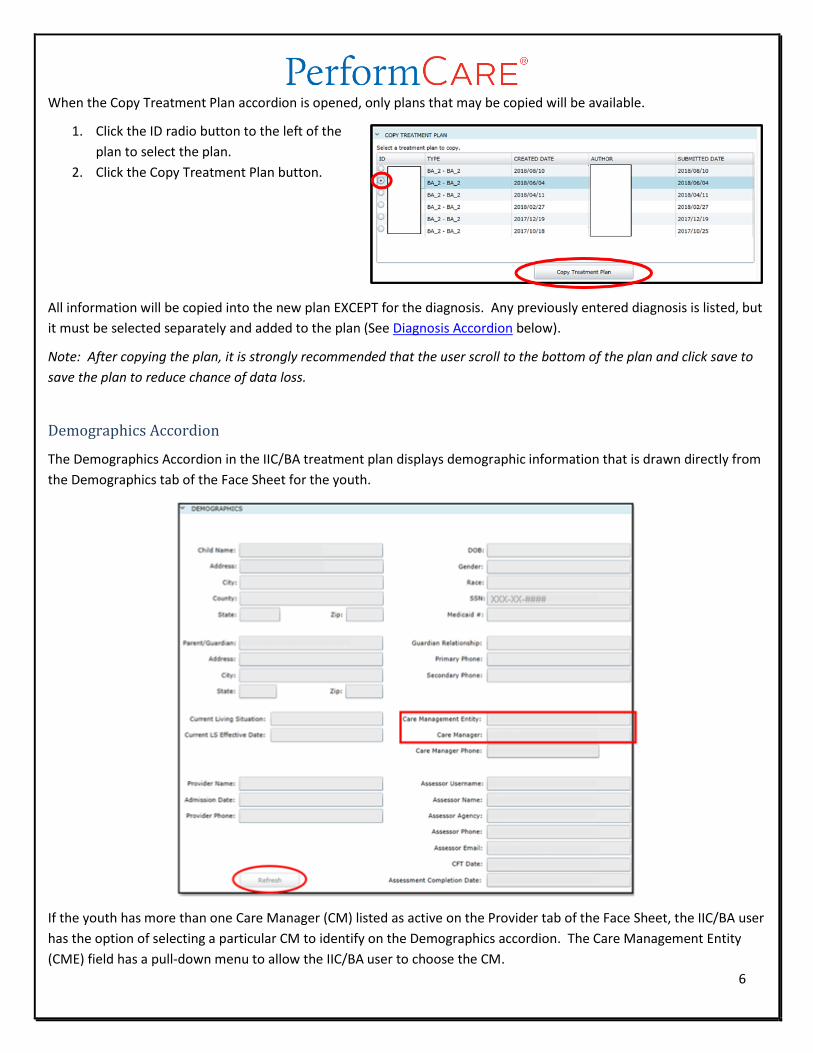
When the Copy Treatment Plan accordion is opened, only plans that may be copied will be available.
1. Click the ID radio button to the left of the
plan to select the plan.
2. Click the Copy Treatment Plan button.
All information will be copied into the new plan EXCEPT for the diagnosis. Any previously entered diagnosis is listed, but
it must be selected separately and added to the plan (See Diagnosis Accordion below).
Note: After copying the plan, it is strongly recommended that the user scroll to the bottom of the plan and click save to
save the plan to reduce chance of data loss.
Demographics Accordion
The Demographics Accordion in the IIC/BA treatment plan displays demographic information that is drawn directly from
the Demographics tab of the Face Sheet for the youth.
If the youth has more than one Care Manager (CM) listed as active on the Provider tab of the Face Sheet, the IIC/BA user
has the option of selecting a particular CM to identify on the Demographics accordion. The Care Management Entity
(CME) field has a pull-down menu to allow the IIC/BA user to choose the CM.
7
Note: If there is only one open CM on the youth’s Provider Tab Face Sheet, the field will default to that CM’s information
and a selection will not be necessary.
The ‘Refresh’ button located at the bottom of the Demographics accordion can be used prior to submitting the plan to
update the demographics accordion. This button becomes active the first time the user saves the plan. If any of the
demographic information on the youth’s Face Sheet changes and the information in the plan needs to be updated, the
user can click on the ‘Refresh’ button to pull in the most recent information from the Face Sheet.
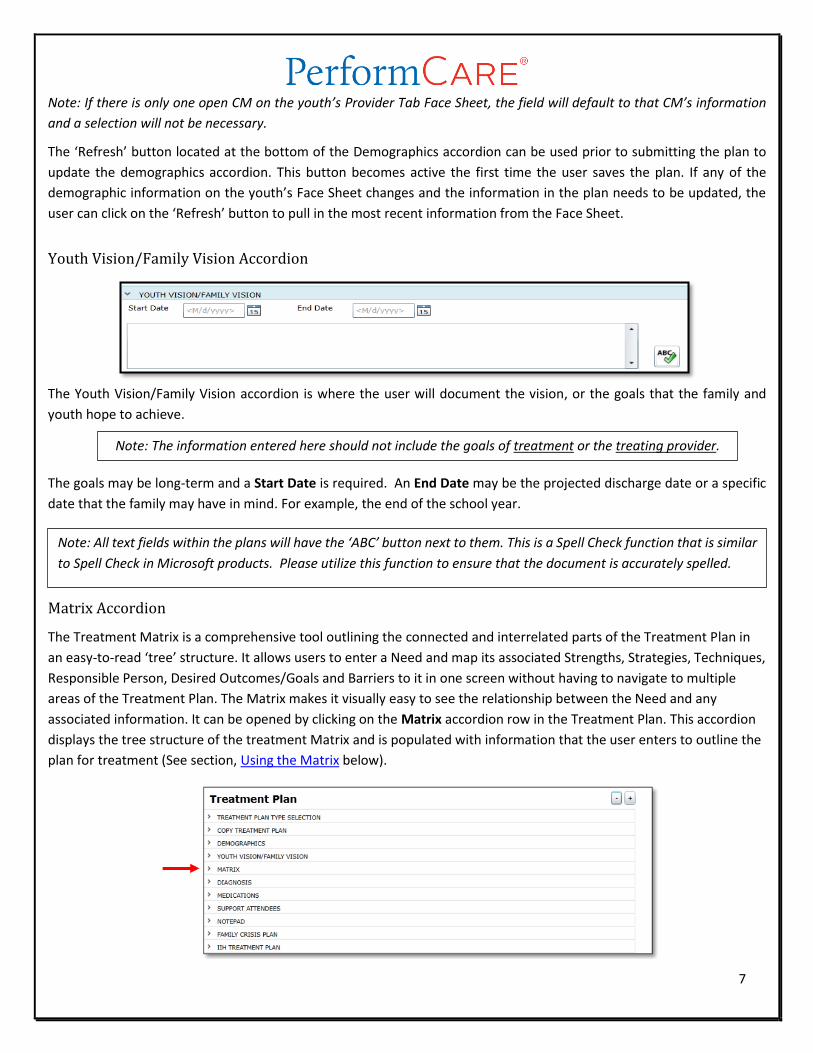
Youth Vision/Family Vision Accordion
The Youth Vision/Family Vision accordion is where the user will document the vision, or the goals that the family and
youth hope to achieve.
The goals may be long-term and a Start Date is required. An End Date may be the projected discharge date or a specific
date that the family may have in mind. For example, the end of the school year.
Matrix Accordion
The Treatment Matrix is a comprehensive tool outlining the connected and interrelated parts of the Treatment Plan in
an easy-to-read ‘tree’ structure. It allows users to enter a Need and map its associated Strengths, Strategies, Techniques,
Responsible Person, Desired Outcomes/Goals and Barriers to it in one screen without having to navigate to multiple
areas of the Treatment Plan. The Matrix makes it visually easy to see the relationship between the Need and any
associated information. It can be opened by clicking on the Matrix accordion row in the Treatment Plan. This accordion
displays the tree structure of the treatment Matrix and is populated with information that the user enters to outline the
plan for treatment (See section, Using the Matrix below).
Note: The information entered here should not include the goals of treatment or the treating provider.
Note: All text fields within the plans will have the ‘ABC’ button next to them. This is a Spell Check function that is similar
to Spell Check in Microsoft products. Please utilize this function to ensure that the document is accurately spelled.
8
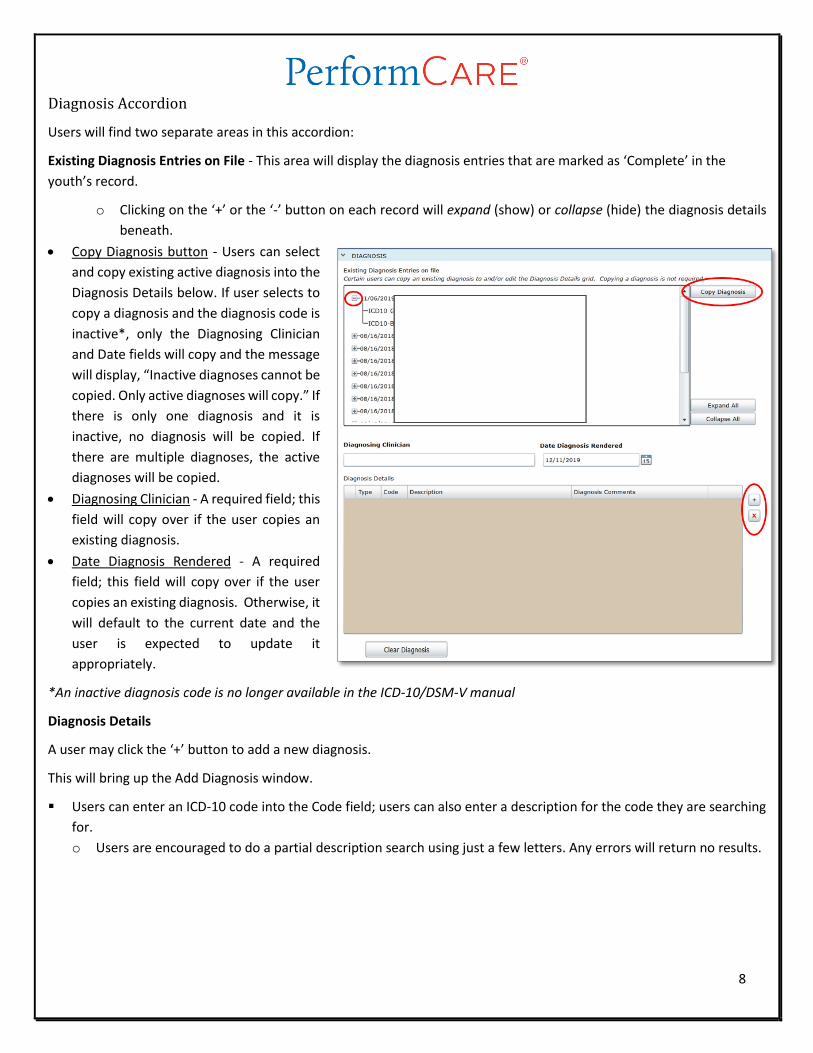
Diagnosis Accordion
Users will find two separate areas in this accordion:
Existing Diagnosis Entries on File - This area will display the diagnosis entries that are marked as ‘Complete’ in the
youth’s record.
o Clicking on the ‘+’ or the ‘-’ button on each record will expand (show) or collapse (hide) the diagnosis details
beneath.
Copy Diagnosis button - Users can select
and copy existing active diagnosis into the
Diagnosis Details below. If user selects to
copy a diagnosis and the diagnosis code is
inactive*, only the Diagnosing Clinician
and Date fields will copy and the message
will display, “Inactive diagnoses cannot be
copied. Only active diagnoses will copy.” If
there is only one diagnosis and it is
inactive, no diagnosis will be copied. If
there are multiple diagnoses, the active
diagnoses will be copied.
Diagnosing Clinician - A required field; this
field will copy over if the user copies an
existing diagnosis.
Date Diagnosis Rendered - A required
field; this field will copy over if the user
copies an existing diagnosis. Otherwise, it
will default to the current date and the
user is expected to update it
appropriately.
*An inactive diagnosis code is no longer available in the ICD-10/DSM-V manual
Diagnosis Details
A user may click the ‘+’ button to add a new diagnosis.
This will bring up the Add Diagnosis window.
Users can enter an ICD-10 code into the Code field; users can also enter a description for the code they are searching
for.
o Users are encouraged to do a partial description search using just a few letters. Any errors will return no results.
9
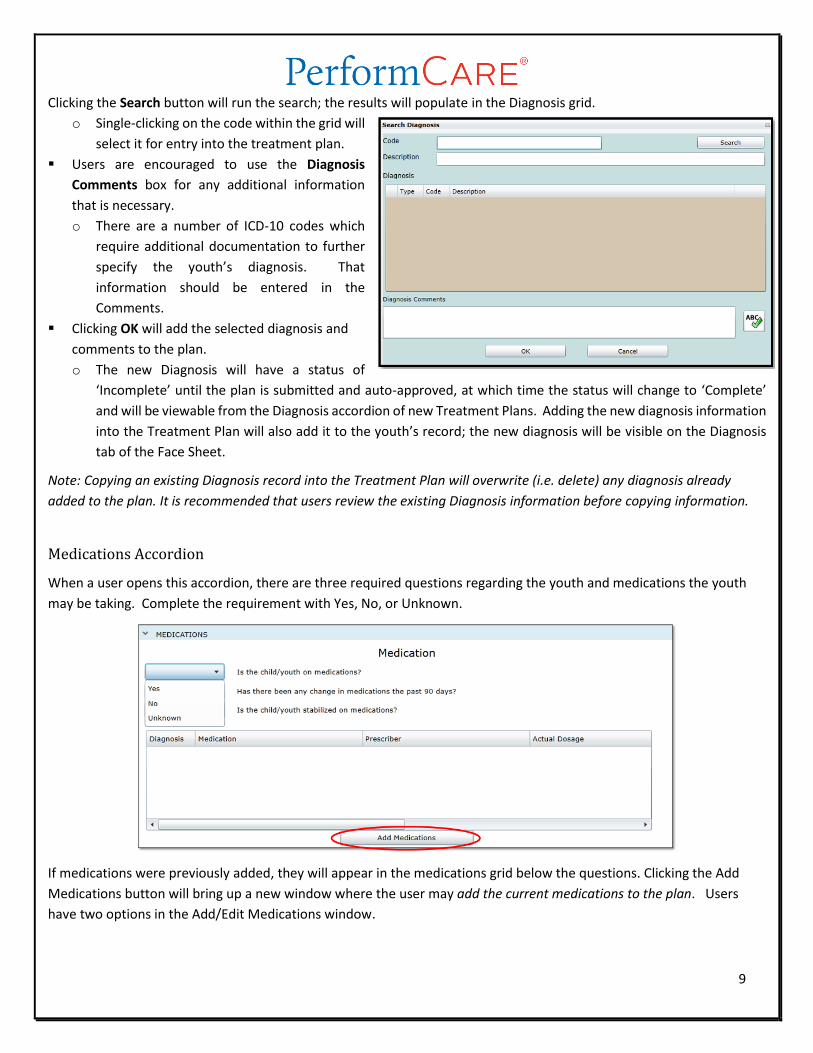
Clicking the Search button will run the search; the results will populate in the Diagnosis grid.
o Single-clicking on the code within the grid will
select it for entry into the treatment plan.
Users are encouraged to use the Diagnosis
Comments box for any additional information
that is necessary.
o There are a number of ICD-10 codes which
require additional documentation to further
specify the youth’s diagnosis. That
information should be entered in the
Comments.
Clicking OK will add the selected diagnosis and
comments to the plan.
o The new Diagnosis will have a status of
‘Incomplete’ until the plan is submitted and auto-approved, at which time the status will change to ‘Complete’
and will be viewable from the Diagnosis accordion of new Treatment Plans. Adding the new diagnosis information
into the Treatment Plan will also add it to the youth’s record; the new diagnosis will be visible on the Diagnosis
tab of the Face Sheet.
Note: Copying an existing Diagnosis record into the Treatment Plan will overwrite (i.e. delete) any diagnosis already
added to the plan. It is recommended that users review the existing Diagnosis information before copying information.
Medications Accordion
When a user opens this accordion, there are three required questions regarding the youth and medications the youth
may be taking. Complete the requirement with Yes, No, or Unknown.
If medications were previously added, they will appear in the medications grid below the questions. Clicking the Add
Medications button will bring up a new window where the user may add the current medications to the plan. Users
have two options in the Add/Edit Medications window.
10
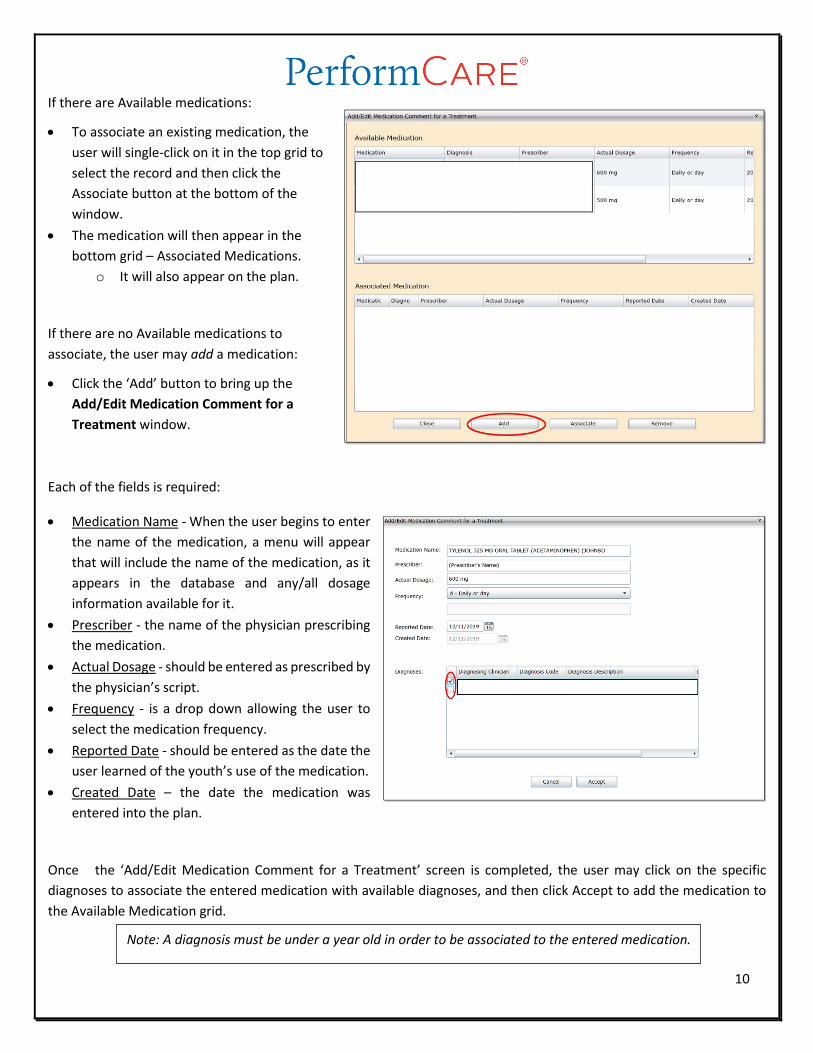
If there are Available medications:
To associate an existing medication, the
user will single-click on it in the top grid to
select the record and then click the
Associate button at the bottom of the
window.
The medication will then appear in the
bottom grid – Associated Medications.
o It will also appear on the plan.
If there are no Available medications to
associate, the user may add a medication:
Click the ‘Add’ button to bring up the
Add/Edit Medication Comment for a
Treatment window.
Each of the fields is required:
Medication Name - When the user begins to enter
the name of the medication, a menu will appear
that will include the name of the medication, as it
appears in the database and any/all dosage
information available for it.
Prescriber - the name of the physician prescribing
the medication.
Actual Dosage - should be entered as prescribed by
the physician’s script.
Frequency - is a drop down allowing the user to
select the medication frequency.
Reported Date - should be entered as the date the
user learned of the youth’s use of the medication.
Created Date – the date the medication was
entered into the plan.
Once the ‘Add/Edit Medication Comment for a Treatment’ screen is completed, the user may click on the specific
diagnoses to associate the entered medication with available diagnoses, and then click Accept to add the medication to
the Available Medication grid.
Note: A diagnosis must be under a year old in order to be associated to the entered medication.
11
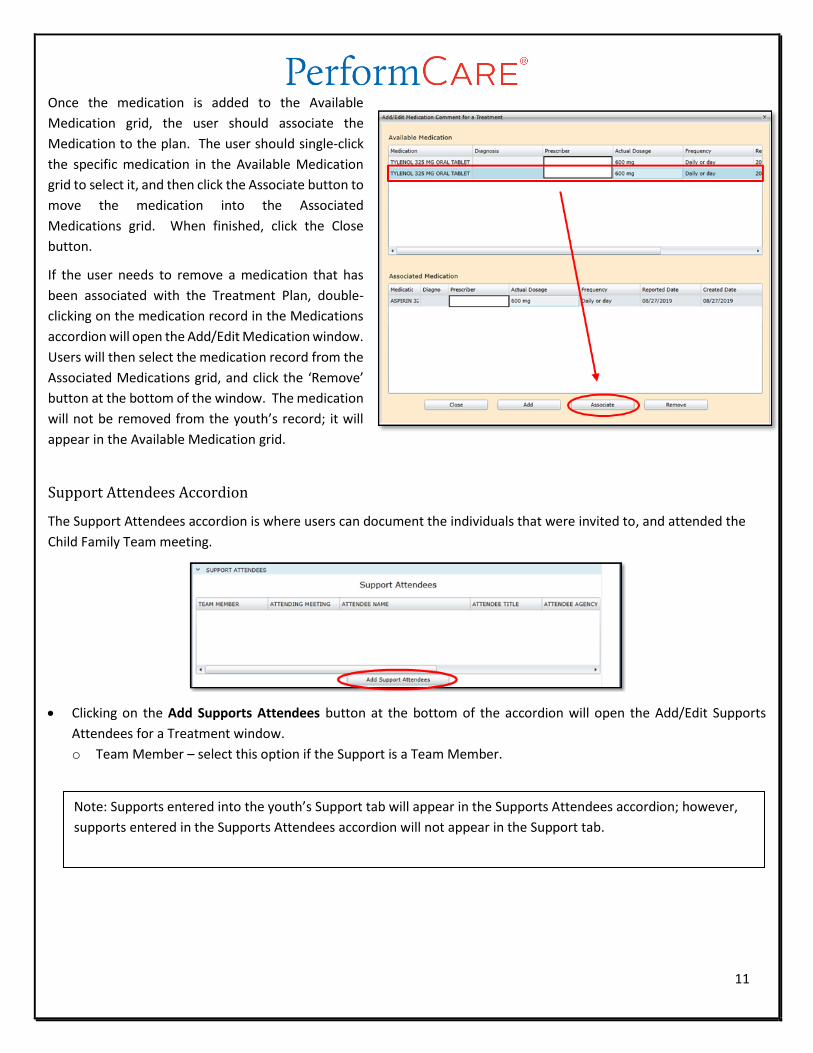
Once the medication is added to the Available
Medication grid, the user should associate the
Medication to the plan. The user should single-click
the specific medication in the Available Medication
grid to select it, and then click the Associate button to
move the medication into the Associated
Medications grid. When finished, click the Close
button.
If the user needs to remove a medication that has
been associated with the Treatment Plan, double-
clicking on the medication record in the Medications
accordion will open the Add/Edit Medication window.
Users will then select the medication record from the
Associated Medications grid, and click the ‘Remove’
button at the bottom of the window. The medication
will not be removed from the youth’s record; it will
appear in the Available Medication grid.
Support Attendees Accordion
The Support Attendees accordion is where users can document the individuals that were invited to, and attended the
Child Family Team meeting.
Clicking on the Add Supports Attendees button at the bottom of the accordion will open the Add/Edit Supports
Attendees for a Treatment window.
o Team Member – select this option if the Support is a Team Member.
Note: Supports entered into the youth’s Support tab will appear in the Supports Attendees accordion; however,
supports entered in the Supports Attendees accordion will not appear in the Support tab.
12
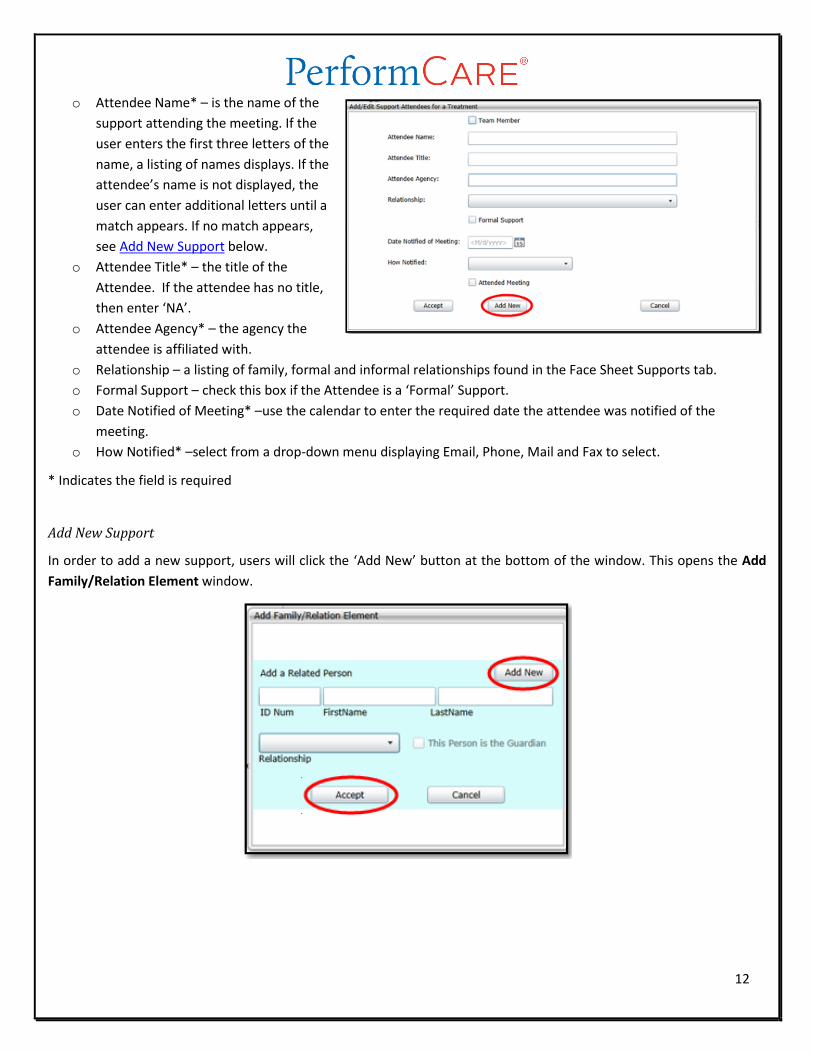
o Attendee Name* – is the name of the
support attending the meeting. If the
user enters the first three letters of the
name, a listing of names displays. If the
attendee’s name is not displayed, the
user can enter additional letters until a
match appears. If no match appears,
see Add New Support below.
o Attendee Title* – the title of the
Attendee. If the attendee has no title,
then enter ‘NA’.
o Attendee Agency* – the agency the
attendee is affiliated with.
o Relationship – a listing of family, formal and informal relationships found in the Face Sheet Supports tab.
o Formal Support – check this box if the Attendee is a ‘Formal’ Support.
o Date Notified of Meeting* –use the calendar to enter the required date the attendee was notified of the
meeting.
o How Notified* –select from a drop-down menu displaying Email, Phone, Mail and Fax to select.
* Indicates the field is required
Add New Support
In order to add a new support, users will click the ‘Add New’ button at the bottom of the window. This opens the Add
Family/Relation Element window.

13
1. Clicking the ‘Add New’ button opens the Add New Person to the Database window where the user can add
a new person to the Treatment Plan. The minimum information required is:
Enter First and Last Names
Enter at least one phone number
Select at least one classification (check box)
2. Click ‘Accept’. When the user clicks ‘Accept’ they are
returned to the Add Family/Relation Element window
again. The ID Number, First Name, and Last Name fields
will automatically populate based on the previous
screen’s entries.
3. Enter the required Relationship from the drop-down list
4. Select the optional check box, ‘This Person is the
Guardian’.
5. Clicking the ‘Accept’ button on the Add New
Family/Relation window returns the user to the Add/Edit
Support Attendees for a Treatment window. When the
user clicks the ‘Accept’ button, the new person entered is added to the
database.
Once the user is finished entering the attendees in the Add/Edit Supports Attendees
window, the added support information will be included in the Treatment Plan.
Notepad Accordion
The Notepad is available for making notations about the youth or plan that does not fall into other accordions.
Clicking the ‘Add Note’ button allows the user to create a note and add it to the Notepad in the plan. Once it is created
and saved to the plan, it cannot be edited or deleted. This functionality may be useful if users within the same agency
are transferring the plan amongst themselves for review or additional work; a manager or supervisor can enter notes
here about changes that are needed, or return the plan to the author who would then review this area for comments.
Note: This information is not added to the Supports tab of the youth’s Face Sheet.

14
The Date Entered is automatically populated by the system with the current date. The ‘ABC’ button is a Spell check
function. Please utilize this function to ensure that your information is accurately spelled for any reader reviewing the
plan. Click the ‘Accept’ button to add the note to the Notepad grid.
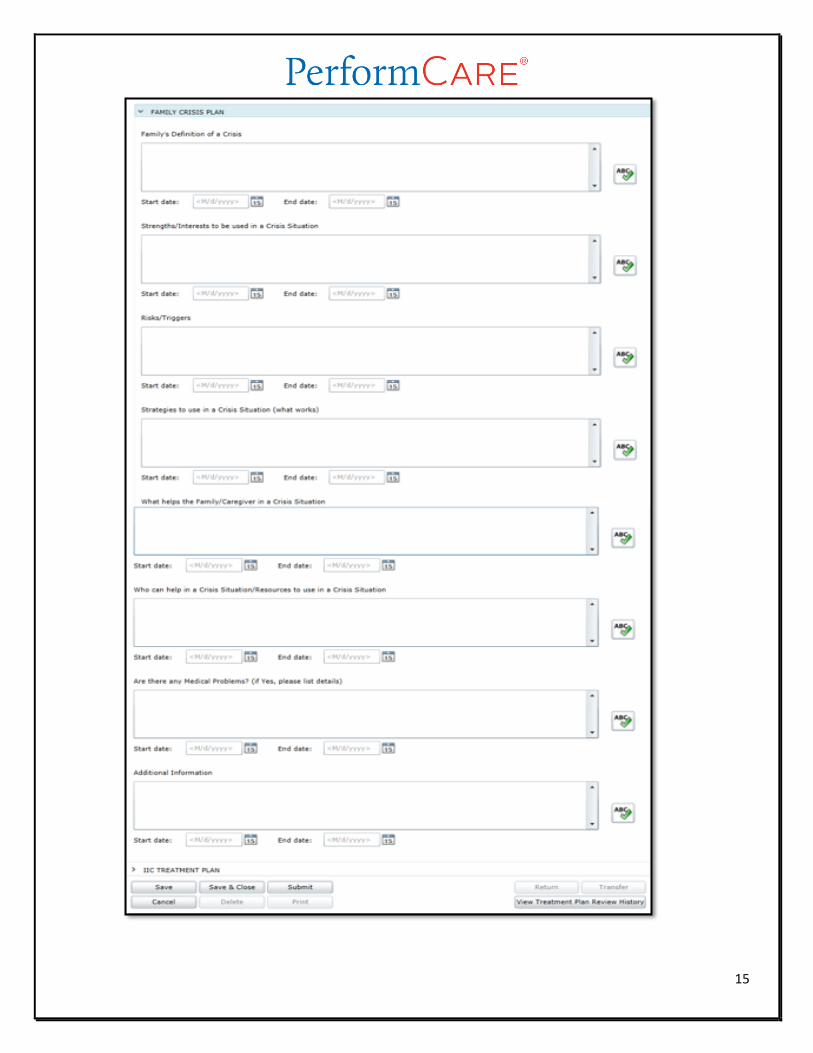
Family Crisis Plan Accordion
The Family Crisis Plan accordion is used to document how the family can and will handle a crisis situation (including risks
and triggers for crisis, what helps the caregiver during a crisis, and who can help in a crisis situation).
Start dates should be entered for each section.
Start dates are noted as the date that the section was identified (for example, the date that the family
determined what they define a ‘crisis’ to be, the date on which they will start to implement a plan for handling a
crisis, etc.).
End dates are optional and may be entered once a plan has been fully executed.
15
16
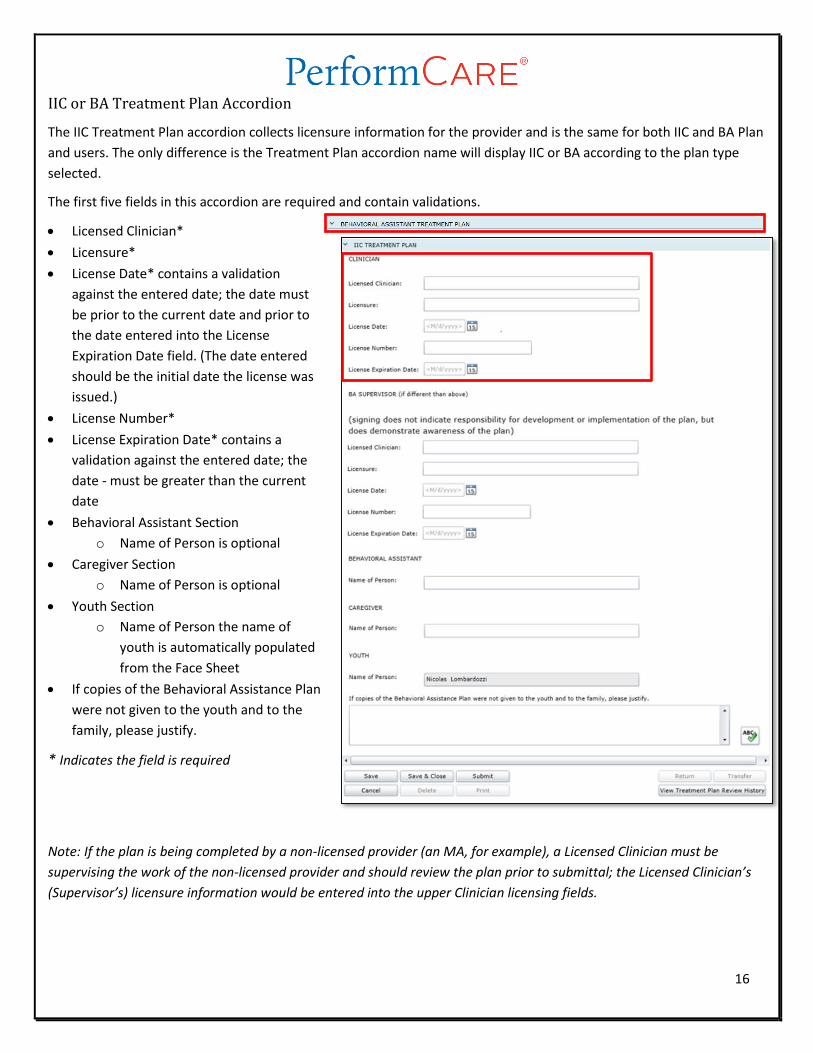
IIC or BA Treatment Plan Accordion
The IIC Treatment Plan accordion collects licensure information for the provider and is the same for both IIC and BA Plan
and users. The only difference is the Treatment Plan accordion name will display IIC or BA according to the plan type
selected.
The first five fields in this accordion are required and contain validations.
Licensed Clinician*
Licensure*
License Date* contains a validation
against the entered date; the date must
be prior to the current date and prior to
the date entered into the License
Expiration Date field. (The date entered
should be the initial date the license was
issued.)
License Number*
License Expiration Date* contains a
validation against the entered date; the
date - must be greater than the current
date
Behavioral Assistant Section
o Name of Person is optional
Caregiver Section
o Name of Person is optional
Youth Section
o Name of Person the name of
youth is automatically populated
from the Face Sheet
If copies of the Behavioral Assistance Plan
were not given to the youth and to the
family, please justify.
* Indicates the field is required
Note: If the plan is being completed by a non-licensed provider (an MA, for example), a Licensed Clinician must be
supervising the work of the non-licensed provider and should review the plan prior to submittal; the Licensed Clinician’s
(Supervisor’s) licensure information would be entered into the upper Clinician licensing fields.
17
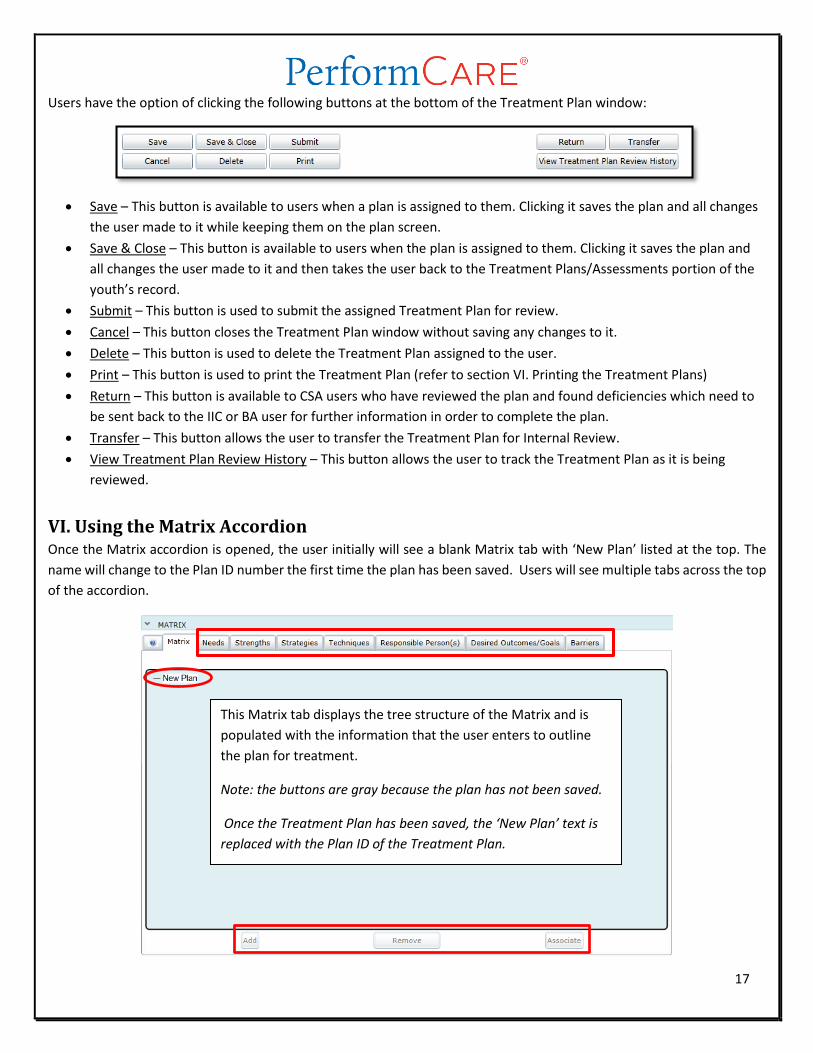
Users have the option of clicking the following buttons at the bottom of the Treatment Plan window:
Save – This button is available to users when a plan is assigned to them. Clicking it saves the plan and all changes
the user made to it while keeping them on the plan screen.
Save & Close – This button is available to users when the plan is assigned to them. Clicking it saves the plan and
all changes the user made to it and then takes the user back to the Treatment Plans/Assessments portion of the
youth’s record.
Submit – This button is used to submit the assigned Treatment Plan for review.
Cancel – This button closes the Treatment Plan window without saving any changes to it.
Delete – This button is used to delete the Treatment Plan assigned to the user.
Print – This button is used to print the Treatment Plan (refer to section VI. Printing the Treatment Plans)
Return – This button is available to CSA users who have reviewed the plan and found deficiencies which need to
be sent back to the IIC or BA user for further information in order to complete the plan.
Transfer – This button allows the user to transfer the Treatment Plan for Internal Review.
View Treatment Plan Review History – This button allows the user to track the Treatment Plan as it is being
reviewed.
VI. Using the Matrix Accordion Once the Matrix accordion is opened, the user initially will see a blank Matrix tab with ‘New Plan’ listed at the top. The
name will change to the Plan ID number the first time the plan has been saved. Users will see multiple tabs across the top
of the accordion.
This Matrix tab displays the tree structure of the Matrix and is
populated with the information that the user enters to outline
the plan for treatment.
Note: the buttons are gray because the plan has not been saved.
Once the Treatment Plan has been saved, the ‘New Plan’ text is
replaced with the Plan ID of the Treatment Plan.
18
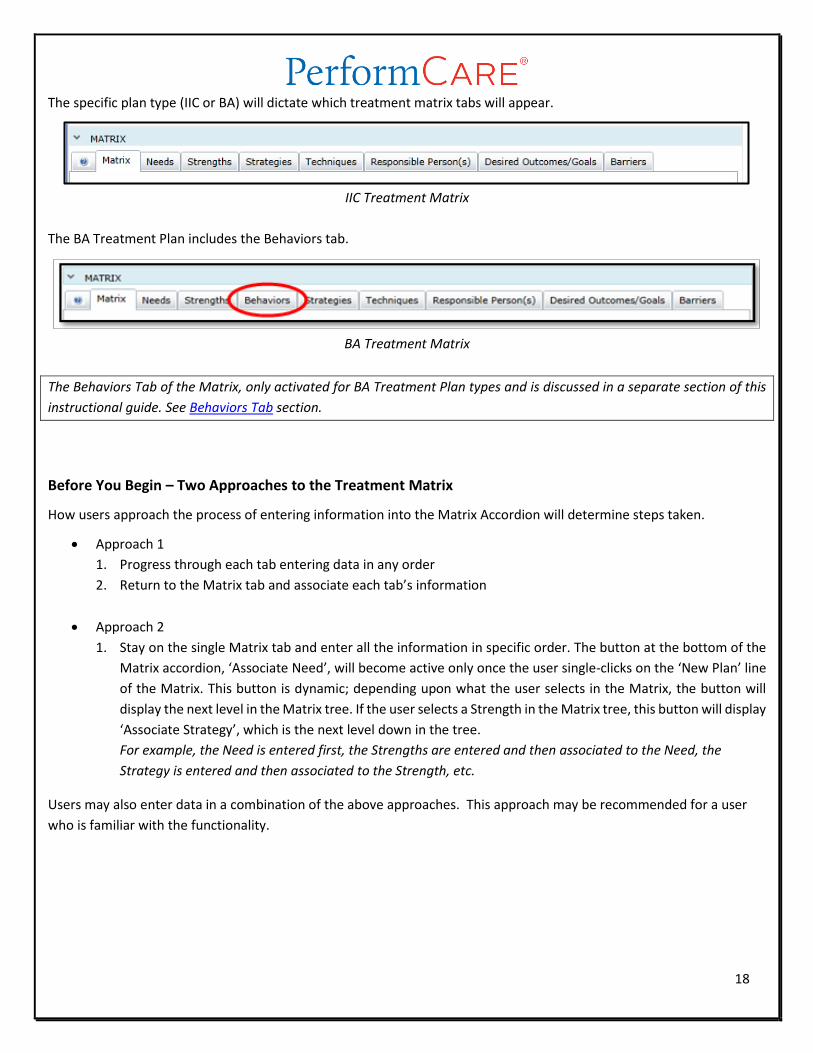
The specific plan type (IIC or BA) will dictate which treatment matrix tabs will appear.
IIC Treatment Matrix
The BA Treatment Plan includes the Behaviors tab.
BA Treatment Matrix
The Behaviors Tab of the Matrix, only activated for BA Treatment Plan types and is discussed in a separate section of this
instructional guide. See Behaviors Tab section.
Before You Begin – Two Approaches to the Treatment Matrix
How users approach the process of entering information into the Matrix Accordion will determine steps taken.
Approach 1
1. Progress through each tab entering data in any order
2. Return to the Matrix tab and associate each tab’s information
Approach 2
1. Stay on the single Matrix tab and enter all the information in specific order. The button at the bottom of the
Matrix accordion, ‘Associate Need’, will become active only once the user single-clicks on the ‘New Plan’ line
of the Matrix. This button is dynamic; depending upon what the user selects in the Matrix, the button will
display the next level in the Matrix tree. If the user selects a Strength in the Matrix tree, this button will display
‘Associate Strategy’, which is the next level down in the tree.
For example, the Need is entered first, the Strengths are entered and then associated to the Need, the
Strategy is entered and then associated to the Strength, etc.
Users may also enter data in a combination of the above approaches. This approach may be recommended for a user
who is familiar with the functionality.
19
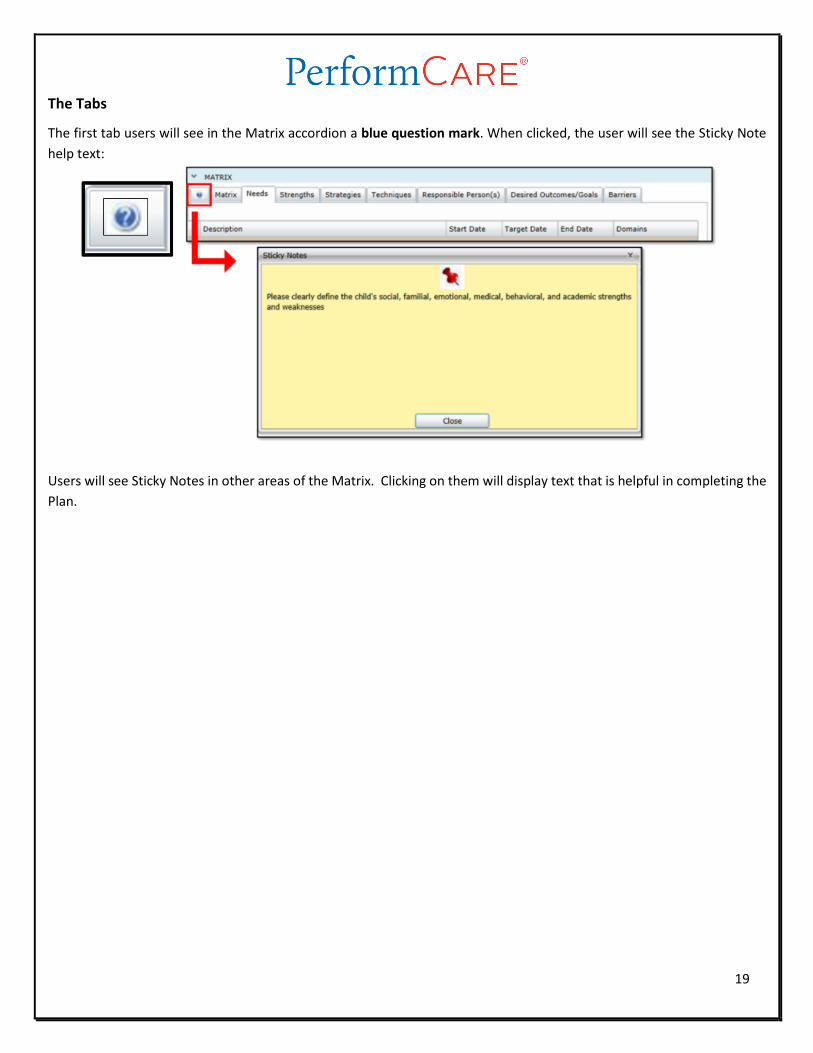
The Tabs
The first tab users will see in the Matrix accordion a blue question mark. When clicked, the user will see the Sticky Note
help text:
Users will see Sticky Notes in other areas of the Matrix. Clicking on them will display text that is helpful in completing the
Plan.
20
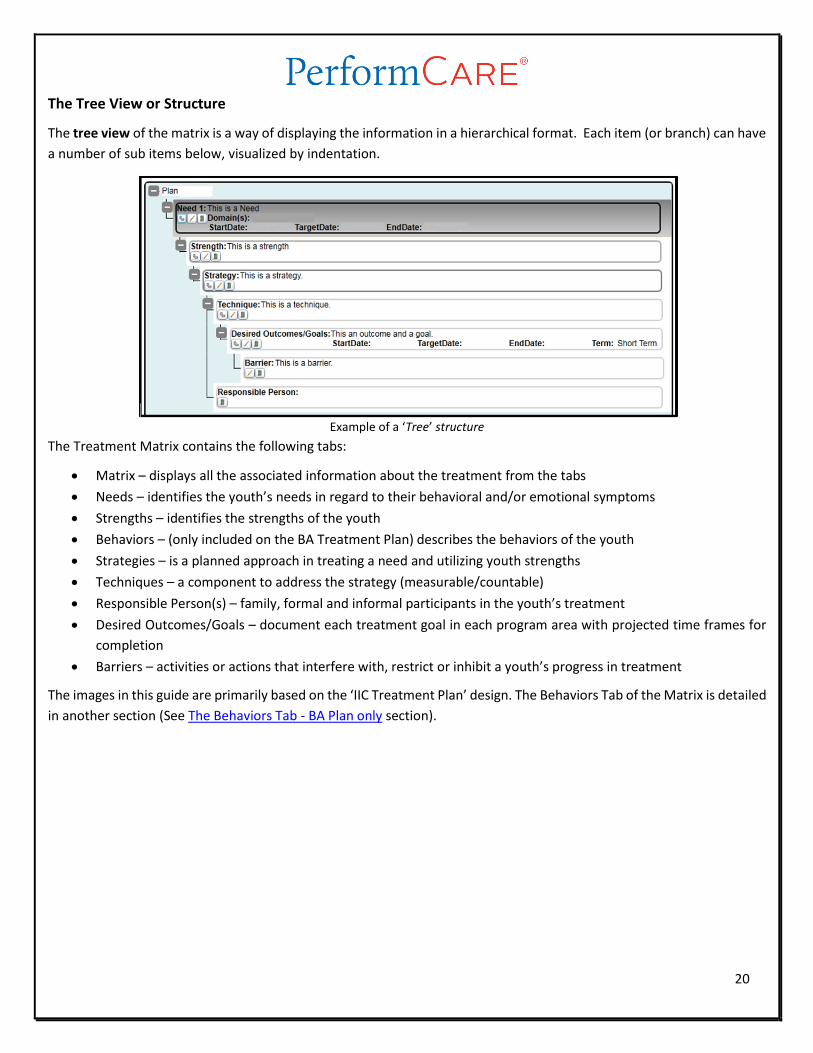
The Tree View or Structure
The tree view of the matrix is a way of displaying the information in a hierarchical format. Each item (or branch) can have
a number of sub items below, visualized by indentation.
Example of a ‘Tree’ structure
The Treatment Matrix contains the following tabs:
Matrix – displays all the associated information about the treatment from the tabs
Needs – identifies the youth’s needs in regard to their behavioral and/or emotional symptoms
Strengths – identifies the strengths of the youth
Behaviors – (only included on the BA Treatment Plan) describes the behaviors of the youth
Strategies – is a planned approach in treating a need and utilizing youth strengths
Techniques – a component to address the strategy (measurable/countable)
Responsible Person(s) – family, formal and informal participants in the youth’s treatment
Desired Outcomes/Goals – document each treatment goal in each program area with projected time frames for
completion
Barriers – activities or actions that interfere with, restrict or inhibit a youth’s progress in treatment
The images in this guide are primarily based on the ‘IIC Treatment Plan’ design. The Behaviors Tab of the Matrix is detailed
in another section (See The Behaviors Tab - BA Plan only section).

21
Matrix Dynamic Associate Button
The dynamic ‘Associate’ button changes each time you add a new level to the matrix.
The Matrix Associate button is dynamic. This means it changes with each new level added to the plan.
1. For instance, a user can start by adding a Need and associating it to the plan. When the user clicks the Need in
the Matrix tab the Associate button changes to Associate Strength.
2. Then the user can add a Strength and associate it to a Need. When the user clicks the Strength in the Matrix
tab, the associate button changes to Associate Strategy.
3. The user can add a Strategy and associate it to a Strength. When the user clicks the Strategy in the Matrix tab
the Associate button changes to Associate Technique/Responsible Person.
4. Next, the user can add a Technique and a Responsible Person and associate it to the Strategy. When the user
clicks the Technique/Responsible Person in the Matrix tab the Associate button changes to Associate Desired
Outcomes/Goals.
5. Finally, the user can add a Barrier and associate it to the Technique. When the user clicks the Desired
Outcomes/Goals in the Matrix tab the Associate button changes to Associate Barriers.

22
Associating on the Matrix tab
When the user selects a level to associate to the next level, an Associate/Available window opens divided into two
panes.
Upper Matrix Associate Window Example
At the top of the Associate window is the level of the Matrix that the user has selected.
If the user wants to edit the level here, they can click on the Pencil icon next to the item in the upper windowpane and it
will open the Add/Edit screen.
Lower Matrix Associate Window Example
The bottom of the Associate window displays all the available entries in the next level that can be associated to the
previous level. Each entry can be associated to more than one level.
The user can click on the ‘Associate’ button next to each entry in the lower windowpane to associate. As each entry is
associated, it moves from the bottom window to the top window.
Note: The label on the bottom half of the Associate window is a dynamic title that will change according to the matrix level.
The buttons at the bottom of the window are as follows:
Close – the user must use this button to close the Associate window and return the user to the Matrix tab
Add New – opens the Add/Edit screen for that level of the Matrix that the user is working on.
Remove – removes the selected, associated entry from the Matrix; Note: if there are items below the selected item, they
will be removed from the branch of the Matrix as well
Associate – (gray when no levels are selected) this is a dynamic button that will change depending on which level is
selected in the upper Associate window
23
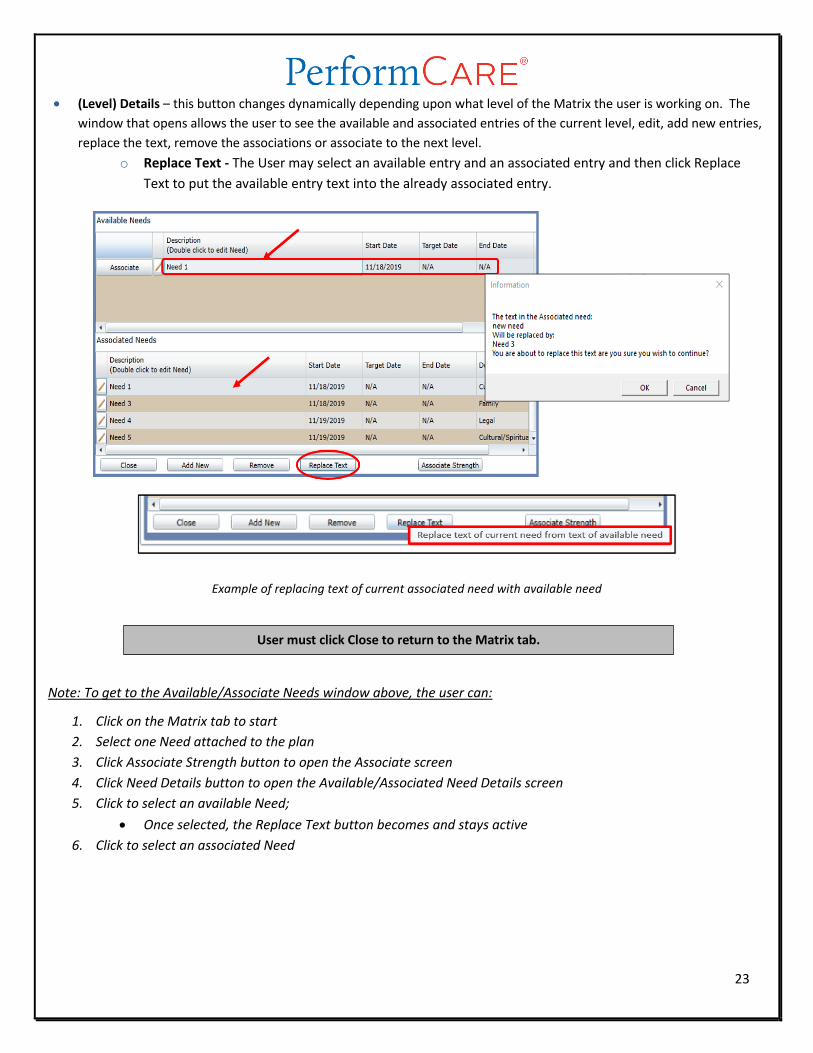
(Level) Details – this button changes dynamically depending upon what level of the Matrix the user is working on. The
window that opens allows the user to see the available and associated entries of the current level, edit, add new entries,
replace the text, remove the associations or associate to the next level.
o Replace Text - The User may select an available entry and an associated entry and then click Replace
Text to put the available entry text into the already associated entry.
Example of replacing text of current associated need with available need
Note: To get to the Available/Associate Needs window above, the user can:
1. Click on the Matrix tab to start
2. Select one Need attached to the plan
3. Click Associate Strength button to open the Associate screen
4. Click Need Details button to open the Available/Associated Need Details screen
5. Click to select an available Need;
Once selected, the Replace Text button becomes and stays active
6. Click to select an associated Need
User must click Close to return to the Matrix tab.
24
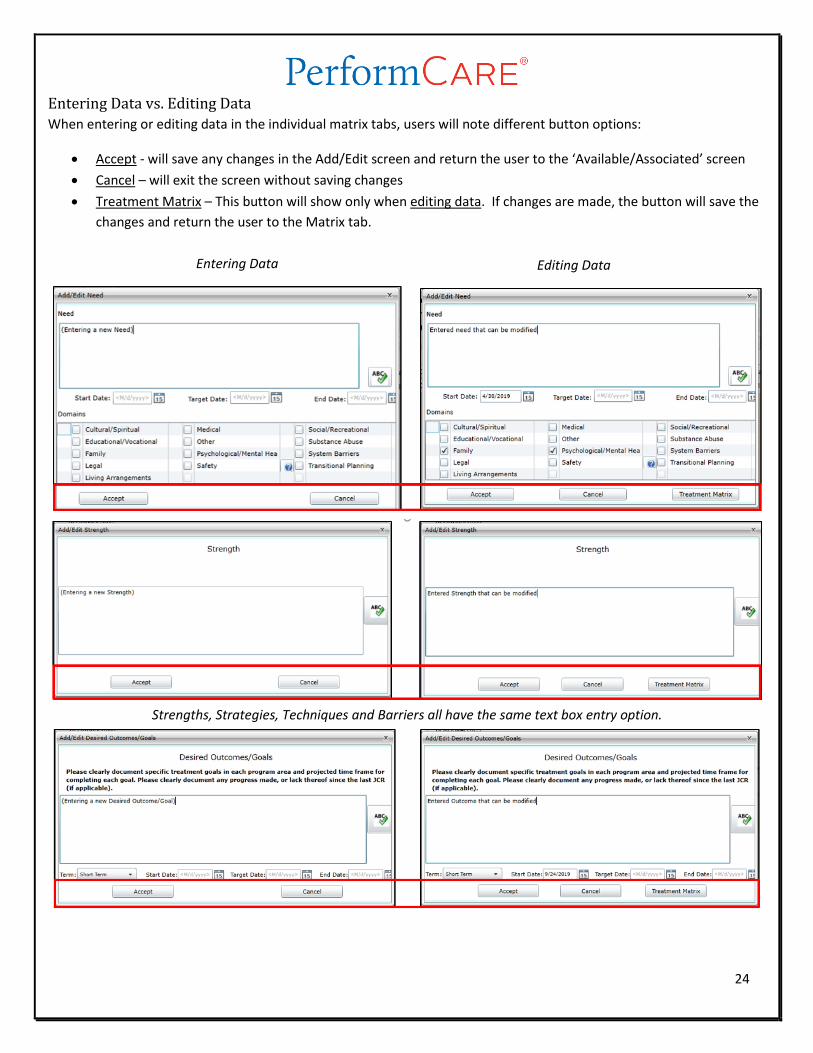
Entering Data vs. Editing Data
When entering or editing data in the individual matrix tabs, users will note different button options:
Accept - will save any changes in the Add/Edit screen and return the user to the ‘Available/Associated’ screen
Cancel – will exit the screen without saving changes
Treatment Matrix – This button will show only when editing data. If changes are made, the button will save the
changes and return the user to the Matrix tab.
Strengths, Strategies, Techniques and Barriers all have the same text box entry option.
Entering Data Editing Data
25
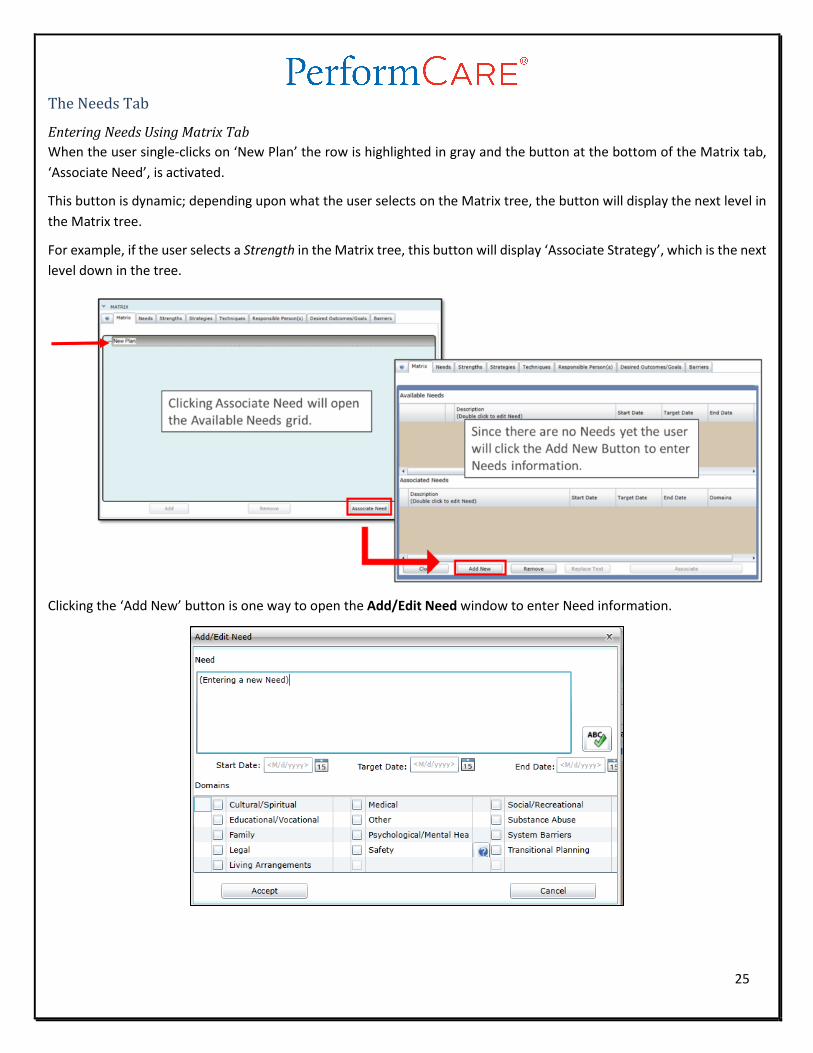
The Needs Tab
Entering Needs Using Matrix Tab
When the user single-clicks on ‘New Plan’ the row is highlighted in gray and the button at the bottom of the Matrix tab,
‘Associate Need’, is activated.
This button is dynamic; depending upon what the user selects on the Matrix tree, the button will display the next level in
the Matrix tree.
For example, if the user selects a Strength in the Matrix tree, this button will display ‘Associate Strategy’, which is the next
level down in the tree.
Clicking the ‘Add New’ button is one way to open the Add/Edit Need window to enter Need information.
26
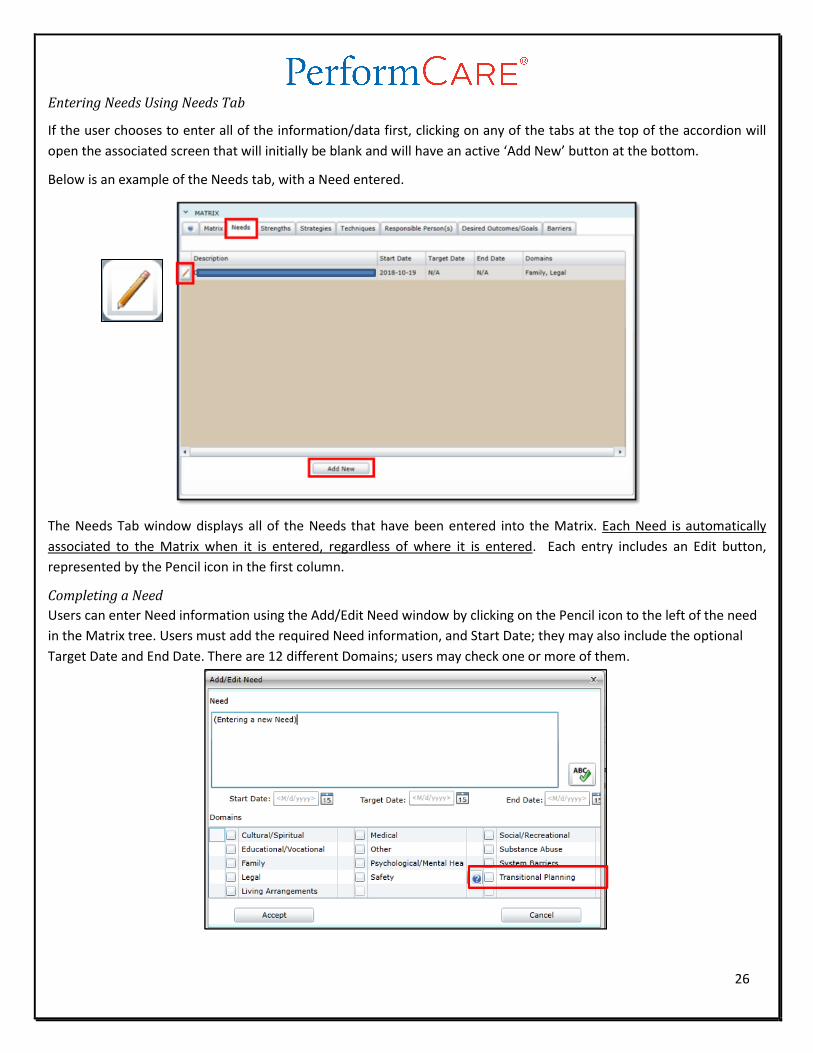
Entering Needs Using Needs Tab
If the user chooses to enter all of the information/data first, clicking on any of the tabs at the top of the accordion will
open the associated screen that will initially be blank and will have an active ‘Add New’ button at the bottom.
Below is an example of the Needs tab, with a Need entered.
The Needs Tab window displays all of the Needs that have been entered into the Matrix. Each Need is automatically
associated to the Matrix when it is entered, regardless of where it is entered. Each entry includes an Edit button,
represented by the Pencil icon in the first column.
Completing a Need
Users can enter Need information using the Add/Edit Need window by clicking on the Pencil icon to the left of the need
in the Matrix tree. Users must add the required Need information, and Start Date; they may also include the optional
Target Date and End Date. There are 12 different Domains; users may check one or more of them.
27
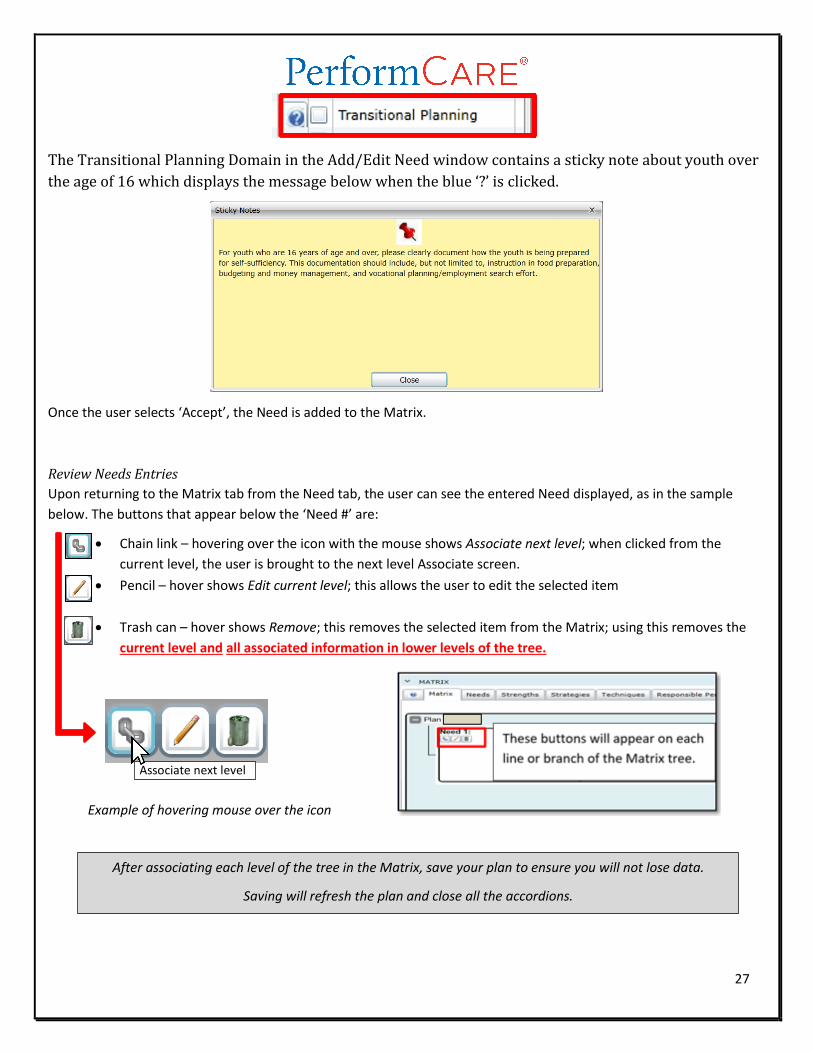
The Transitional Planning Domain in the Add/Edit Need window contains a sticky note about youth over
the age of 16 which displays the message below when the blue ‘?’ is clicked.
Once the user selects ‘Accept’, the Need is added to the Matrix.
Review Needs Entries
Upon returning to the Matrix tab from the Need tab, the user can see the entered Need displayed, as in the sample
below. The buttons that appear below the ‘Need #’ are:
Chain link – hovering over the icon with the mouse shows Associate next level; when clicked from the
current level, the user is brought to the next level Associate screen.
Pencil – hover shows Edit current level; this allows the user to edit the selected item
Trash can – hover shows Remove; this removes the selected item from the Matrix; using this removes the
current level and all associated information in lower levels of the tree.
After associating each level of the tree in the Matrix, save your plan to ensure you will not lose data.
Saving will refresh the plan and close all the accordions.
Associate next level
Example of hovering mouse over the icon
28
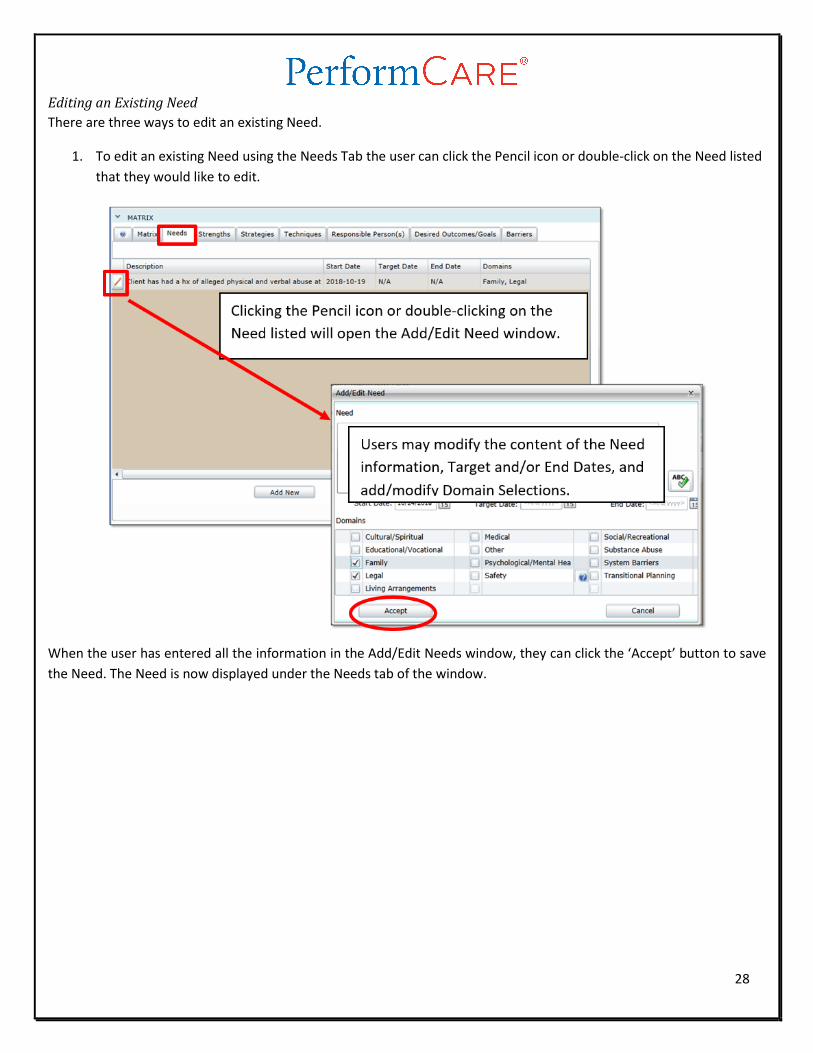
Editing an Existing Need
There are three ways to edit an existing Need.
1. To edit an existing Need using the Needs Tab the user can click the Pencil icon or double-click on the Need listed
that they would like to edit.
When the user has entered all the information in the Add/Edit Needs window, they can click the ‘Accept’ button to save
the Need. The Need is now displayed under the Needs tab of the window.

29
2. A user may edit an existing Need from the Matrix tab by clicking the Pencil Icon next to the listed
Need opens the Add/Edit Need window. In addition, from the Matrix tab users may simply double-click on the
listed Need to open the Add/Edit Need window.
Add Need screen
30
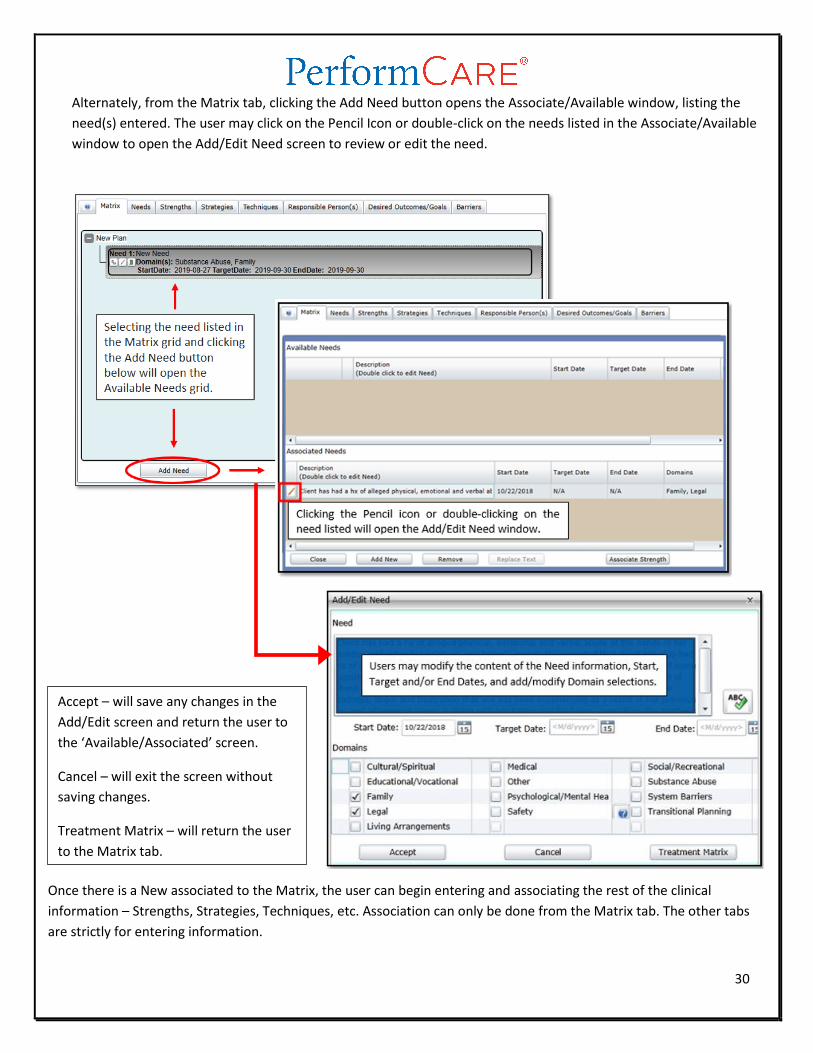
Alternately, from the Matrix tab, clicking the Add Need button opens the Associate/Available window, listing the
need(s) entered. The user may click on the Pencil Icon or double-click on the needs listed in the Associate/Available
window to open the Add/Edit Need screen to review or edit the need.
Once there is a New associated to the Matrix, the user can begin entering and associating the rest of the clinical
information – Strengths, Strategies, Techniques, etc. Association can only be done from the Matrix tab. The other tabs
are strictly for entering information.
Accept – will save any changes in the
Add/Edit screen and return the user to
the ‘Available/Associated’ screen.
Cancel – will exit the screen without
saving changes.
Treatment Matrix – will return the user
to the Matrix tab.
31
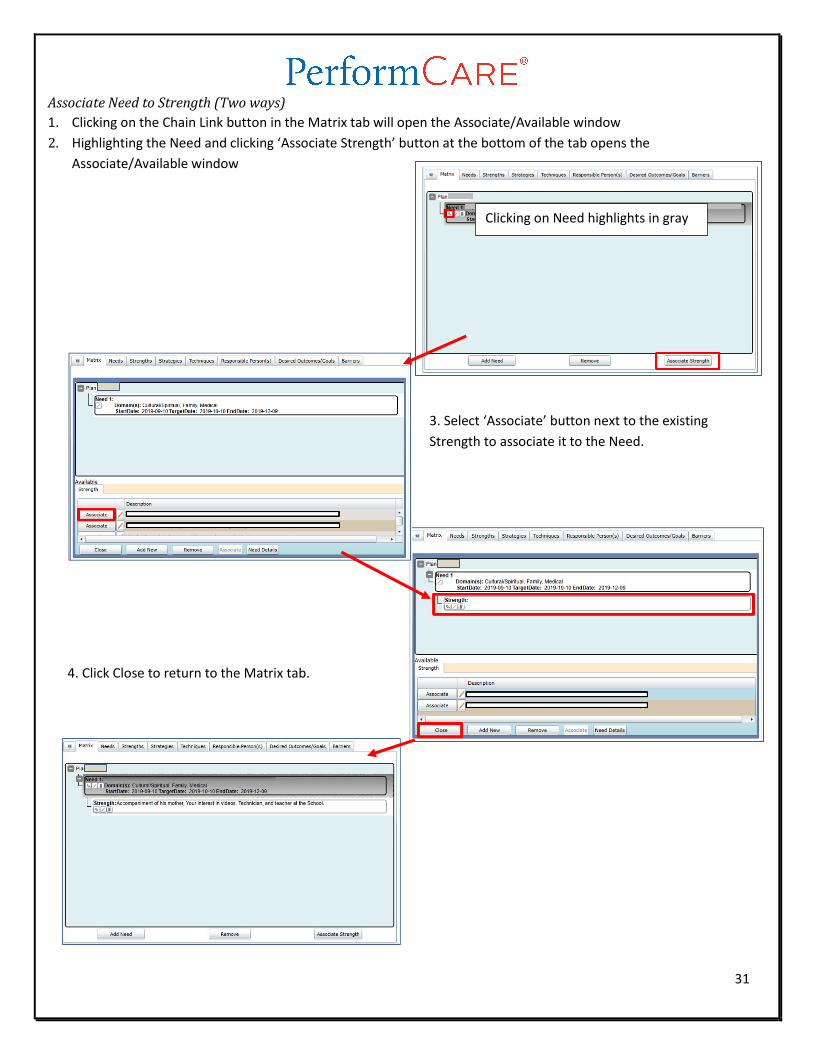
Associate Need to Strength (Two ways)
1. Clicking on the Chain Link button in the Matrix tab will open the Associate/Available window
2. Highlighting the Need and clicking ‘Associate Strength’ button at the bottom of the tab opens the
Associate/Available window
Clicking on Need highlights in gray
3. Select ‘Associate’ button next to the existing
Strength to associate it to the Need.
4. Click Close to return to the Matrix tab.
32
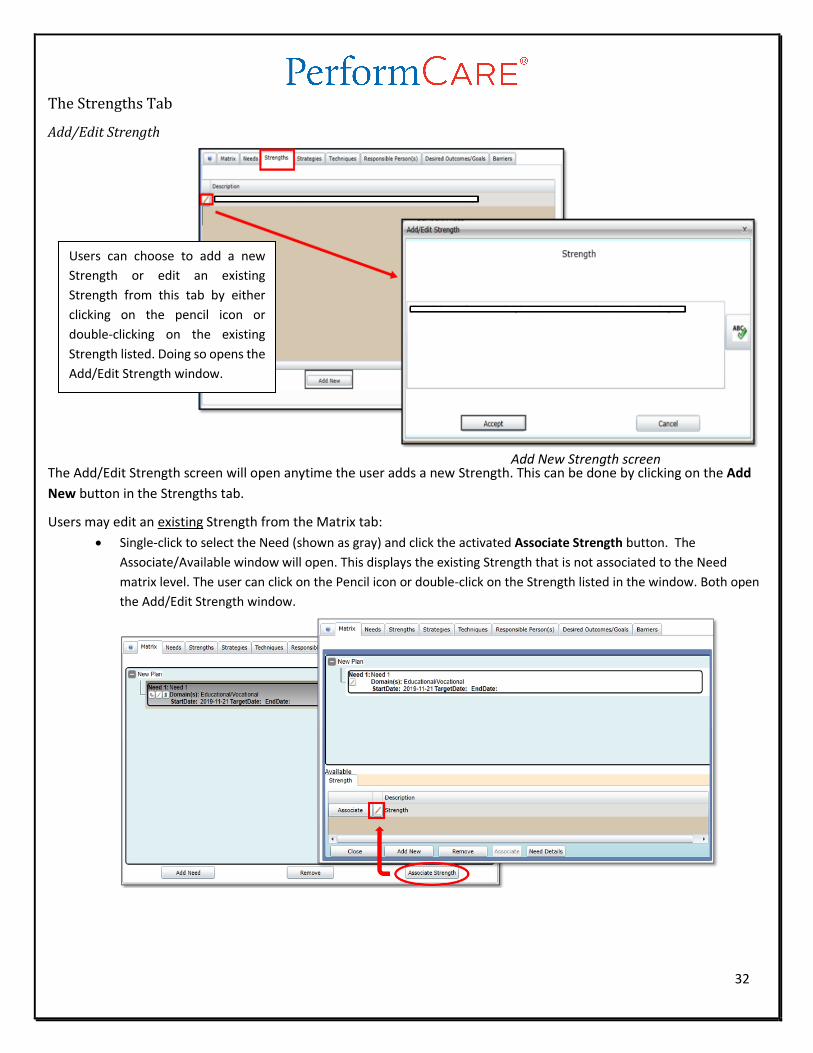
The Strengths Tab
Add/Edit Strength
The Add/Edit Strength screen will open anytime the user adds a new Strength. This can be done by clicking on the Add
New button in the Strengths tab.
Users may edit an existing Strength from the Matrix tab:
Single-click to select the Need (shown as gray) and click the activated Associate Strength button. The
Associate/Available window will open. This displays the existing Strength that is not associated to the Need
matrix level. The user can click on the Pencil icon or double-click on the Strength listed in the window. Both open
the Add/Edit Strength window.
Add New Strength screen
Users can choose to add a new
Strength or edit an existing
Strength from this tab by either
clicking on the pencil icon or
double-clicking on the existing
Strength listed. Doing so opens the
Add/Edit Strength window.
..

33
Associate Strengths
On the Matrix tab, to associate to the next level (Strength) the user can click on the chain-link button in the Need
(option 1). Alternatively, the user can single-click the Need (highlighted in gray) that activates the ‘Associate Strength’
button in the lower-right hand corner of the window (option 2).
Both options open the Associate/Available window listing the available Strength at the bottom. Clicking the ‘Associate’
button associates the Strength to the Need. Click Close to complete the association.
For Advanced users: If you have completed entering all your individual plan tabs, another way to add and associate
parts of the matrix at the same time is to single-click an existing Need in the Matrix tab that you want to associate a
Strength to. This activates the bottom row of buttons based on the selection. Clicking the Add Need button opens the
window, listing the Available Needs and Associated Needs. If the user single-clicks an Associated Need, the ‘Associate
Strength’ button becomes active allowing the user to add a new Strength. Additionally, the user can edit any existing
branches in the lower Matrix Details window associating an existing Strength. Remember to click Close when done.
Option 1 Option 2
34
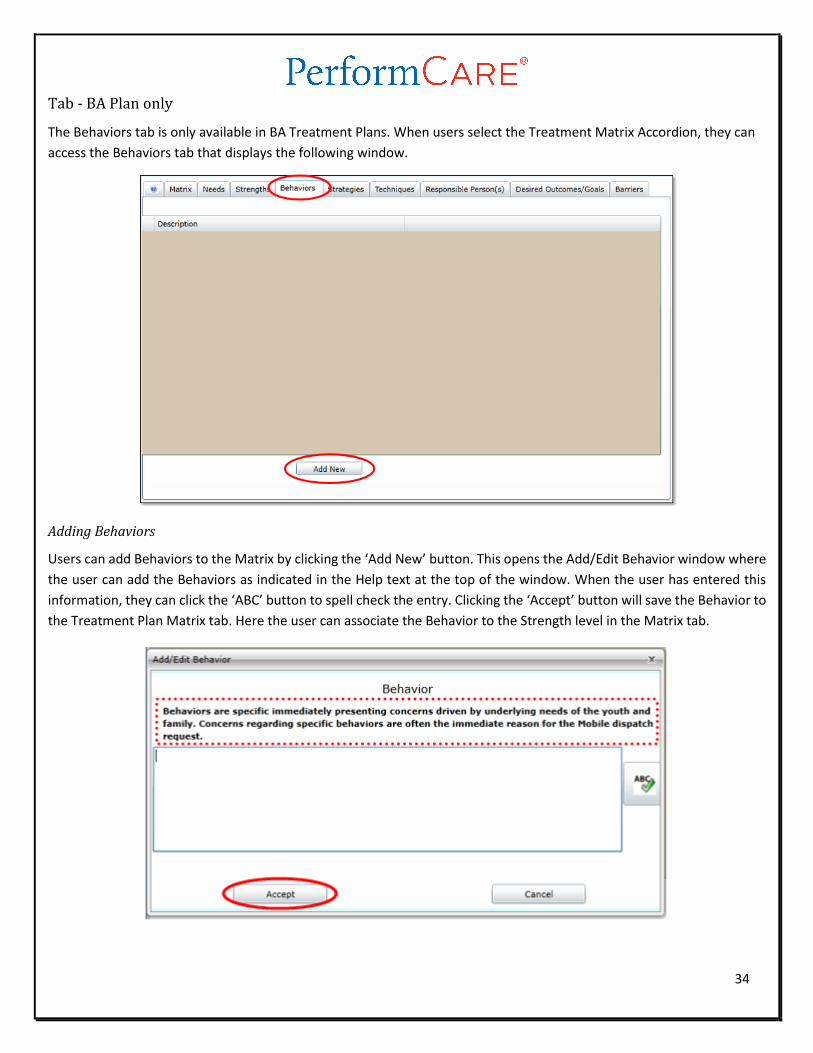
Tab - BA Plan only
The Behaviors tab is only available in BA Treatment Plans. When users select the Treatment Matrix Accordion, they can
access the Behaviors tab that displays the following window.
Adding Behaviors
Users can add Behaviors to the Matrix by clicking the ‘Add New’ button. This opens the Add/Edit Behavior window where
the user can add the Behaviors as indicated in the Help text at the top of the window. When the user has entered this
information, they can click the ‘ABC’ button to spell check the entry. Clicking the ‘Accept’ button will save the Behavior to
the Treatment Plan Matrix tab. Here the user can associate the Behavior to the Strength level in the Matrix tab.
35
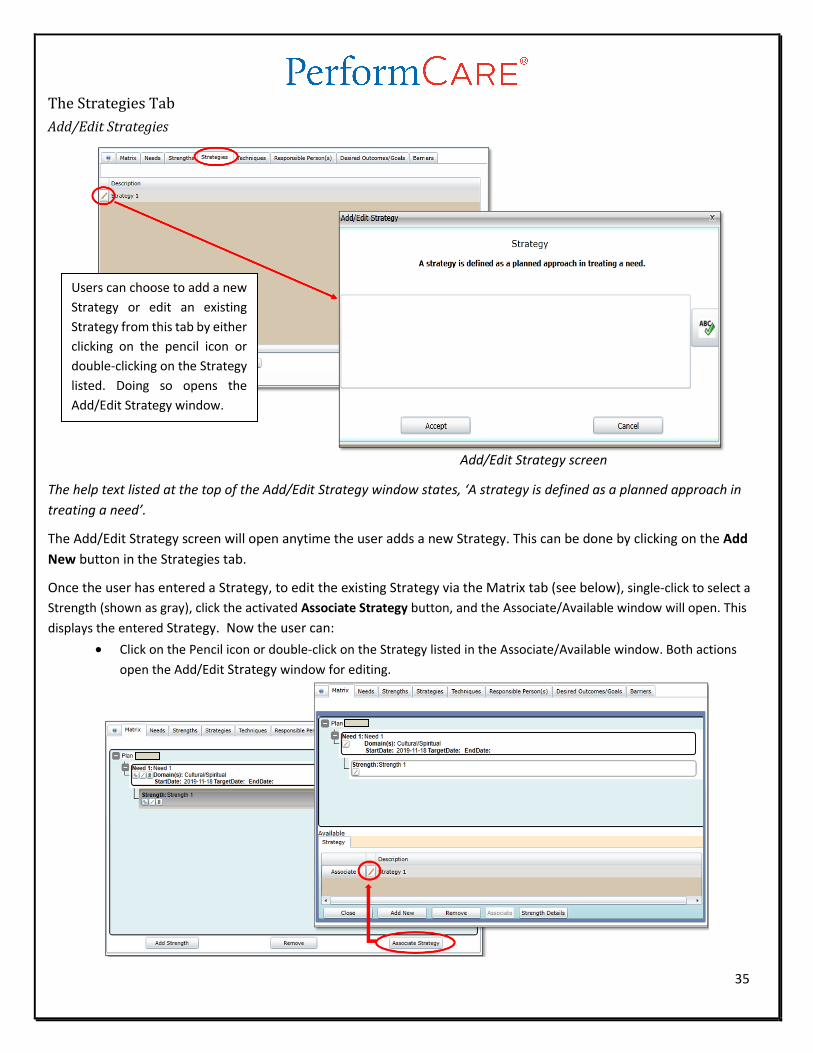
The Strategies Tab
Add/Edit Strategies
The help text listed at the top of the Add/Edit Strategy window states, ‘A strategy is defined as a planned approach in
treating a need’.
The Add/Edit Strategy screen will open anytime the user adds a new Strategy. This can be done by clicking on the Add
New button in the Strategies tab.
Once the user has entered a Strategy, to edit the existing Strategy via the Matrix tab (see below), single-click to select a
Strength (shown as gray), click the activated Associate Strategy button, and the Associate/Available window will open. This
displays the entered Strategy. Now the user can:
Click on the Pencil icon or double-click on the Strategy listed in the Associate/Available window. Both actions
open the Add/Edit Strategy window for editing.
Add/Edit Strategy screen
Users can choose to add a new
Strategy or edit an existing
Strategy from this tab by either
clicking on the pencil icon or
double-clicking on the Strategy
listed. Doing so opens the
Add/Edit Strategy window.
36
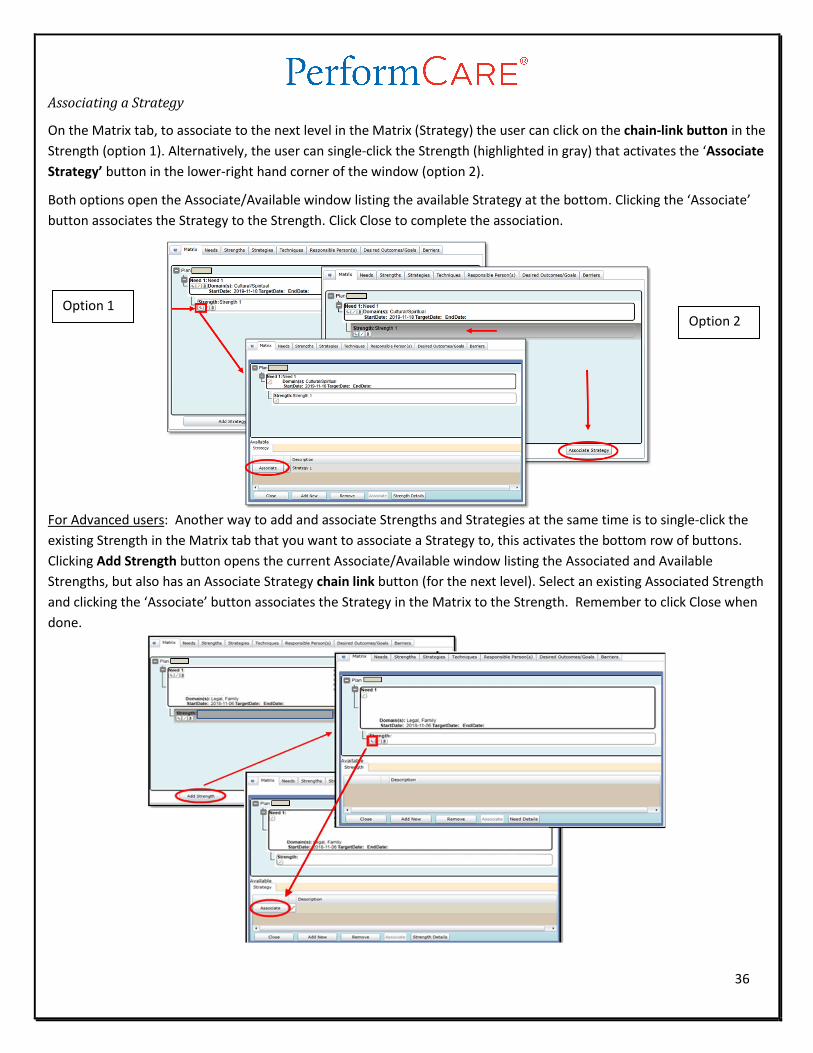
Associating a Strategy
On the Matrix tab, to associate to the next level in the Matrix (Strategy) the user can click on the chain-link button in the
Strength (option 1). Alternatively, the user can single-click the Strength (highlighted in gray) that activates the ‘Associate
Strategy’ button in the lower-right hand corner of the window (option 2).
Both options open the Associate/Available window listing the available Strategy at the bottom. Clicking the ‘Associate’
button associates the Strategy to the Strength. Click Close to complete the association.
For Advanced users: Another way to add and associate Strengths and Strategies at the same time is to single-click the
existing Strength in the Matrix tab that you want to associate a Strategy to, this activates the bottom row of buttons.
Clicking Add Strength button opens the current Associate/Available window listing the Associated and Available
Strengths, but also has an Associate Strategy chain link button (for the next level). Select an existing Associated Strength
and clicking the ‘Associate’ button associates the Strategy in the Matrix to the Strength. Remember to click Close when
done.
Option 1 Option 2
37
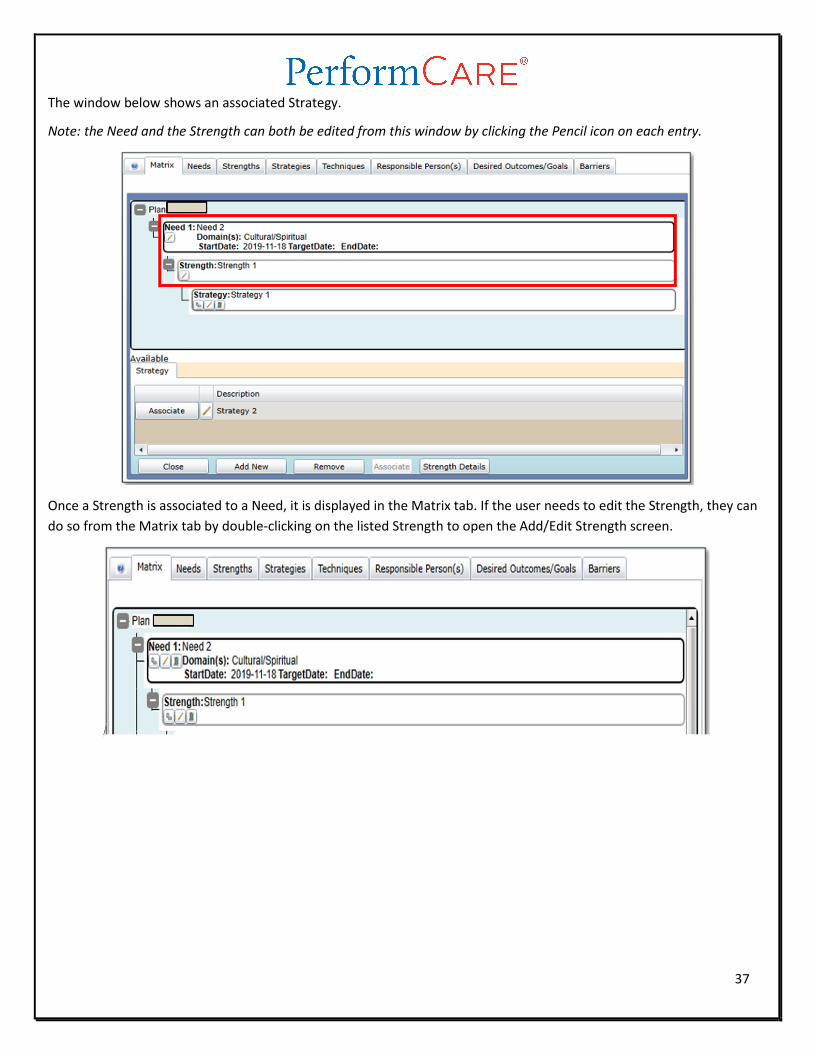
The window below shows an associated Strategy.
Note: the Need and the Strength can both be edited from this window by clicking the Pencil icon on each entry.
Once a Strength is associated to a Need, it is displayed in the Matrix tab. If the user needs to edit the Strength, they can
do so from the Matrix tab by double-clicking on the listed Strength to open the Add/Edit Strength screen.
38
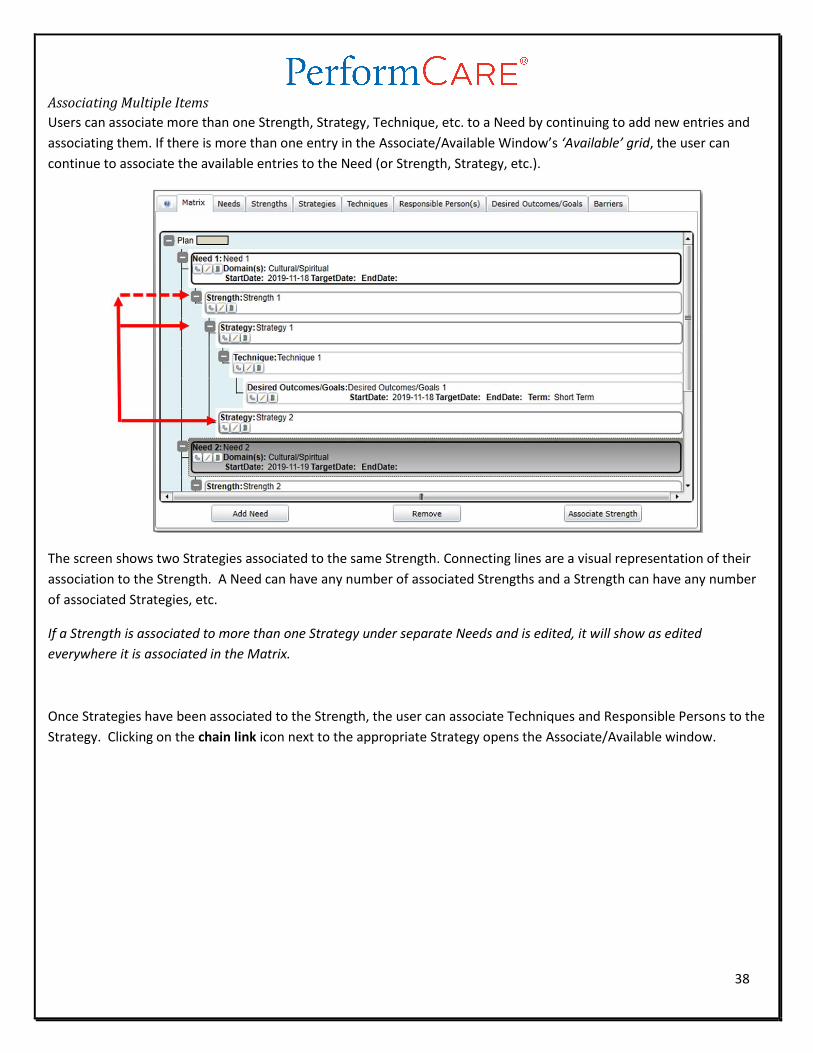
Associating Multiple Items
Users can associate more than one Strength, Strategy, Technique, etc. to a Need by continuing to add new entries and
associating them. If there is more than one entry in the Associate/Available Window’s ‘Available’ grid, the user can
continue to associate the available entries to the Need (or Strength, Strategy, etc.).
The screen shows two Strategies associated to the same Strength. Connecting lines are a visual representation of their
association to the Strength. A Need can have any number of associated Strengths and a Strength can have any number
of associated Strategies, etc.
If a Strength is associated to more than one Strategy under separate Needs and is edited, it will show as edited
everywhere it is associated in the Matrix.
Once Strategies have been associated to the Strength, the user can associate Techniques and Responsible Persons to the
Strategy. Clicking on the chain link icon next to the appropriate Strategy opens the Associate/Available window.
39
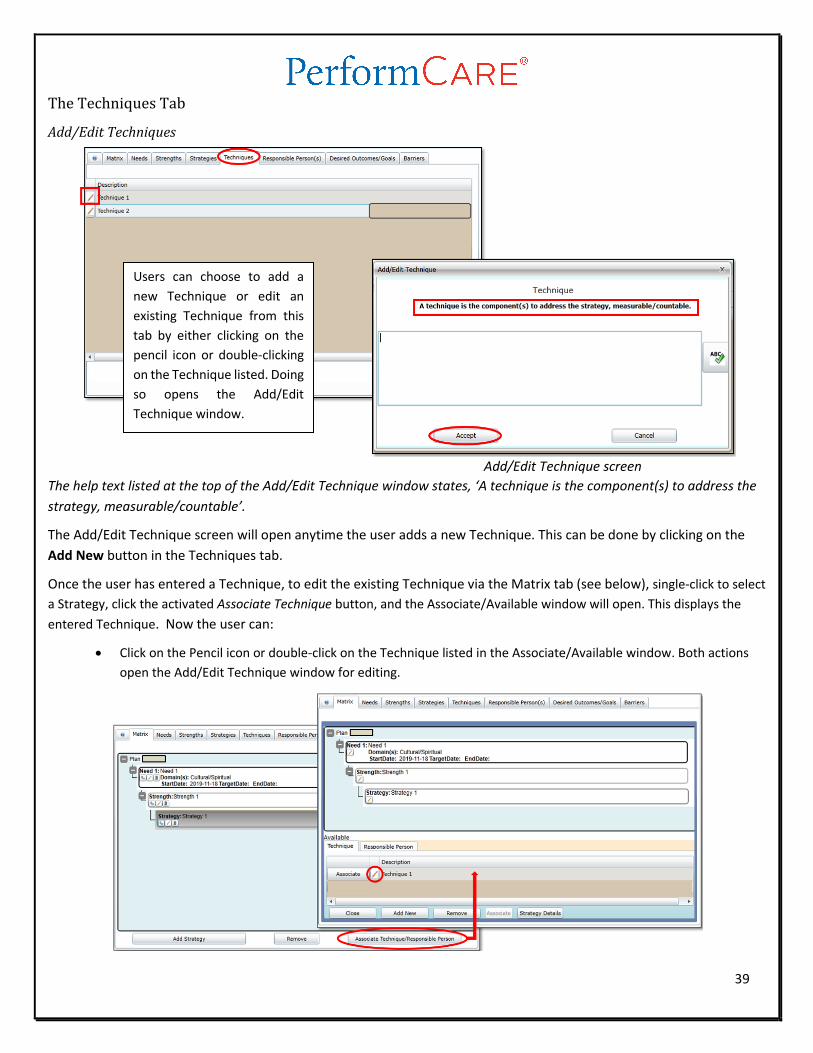
The Techniques Tab
Add/Edit Techniques
The help text listed at the top of the Add/Edit Technique window states, ‘A technique is the component(s) to address the
strategy, measurable/countable’.
The Add/Edit Technique screen will open anytime the user adds a new Technique. This can be done by clicking on the
Add New button in the Techniques tab.
Once the user has entered a Technique, to edit the existing Technique via the Matrix tab (see below), single-click to select
a Strategy, click the activated Associate Technique button, and the Associate/Available window will open. This displays the
entered Technique. Now the user can:
Click on the Pencil icon or double-click on the Technique listed in the Associate/Available window. Both actions
open the Add/Edit Technique window for editing.
Add/Edit Technique screen
Users can choose to add a
new Technique or edit an
existing Technique from this
tab by either clicking on the
pencil icon or double-clicking
on the Technique listed. Doing
so opens the Add/Edit
Technique window.
40
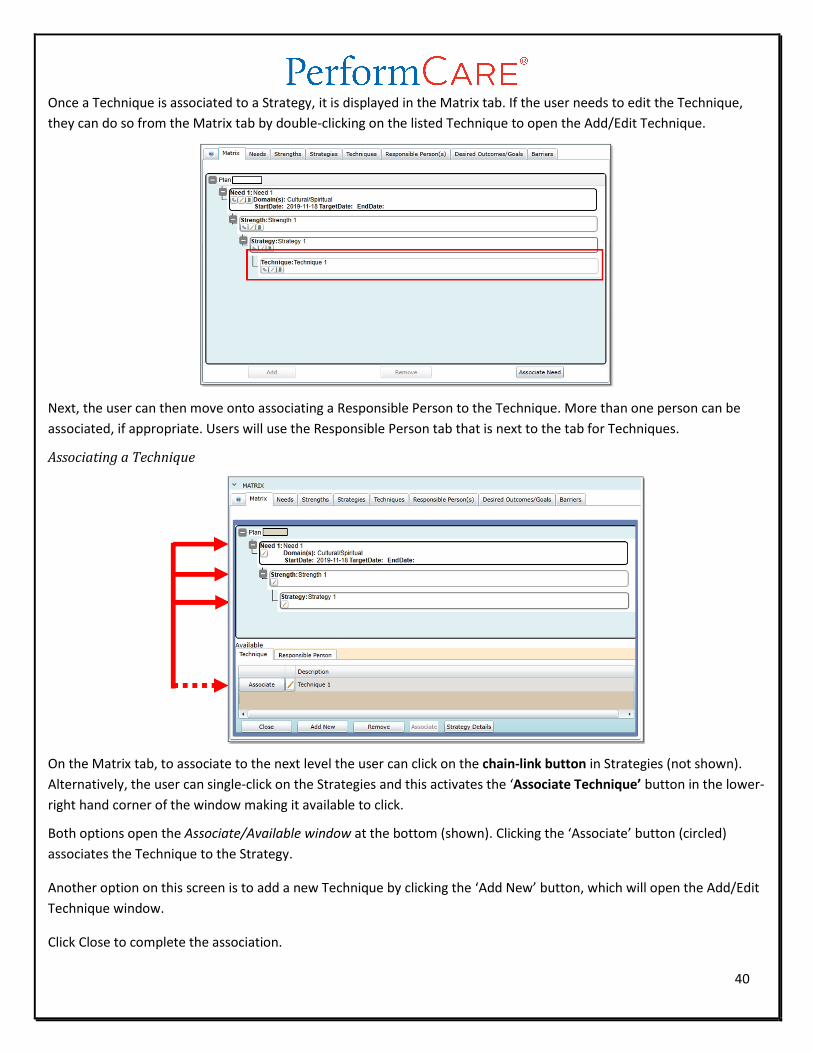
Once a Technique is associated to a Strategy, it is displayed in the Matrix tab. If the user needs to edit the Technique,
they can do so from the Matrix tab by double-clicking on the listed Technique to open the Add/Edit Technique.
Next, the user can then move onto associating a Responsible Person to the Technique. More than one person can be
associated, if appropriate. Users will use the Responsible Person tab that is next to the tab for Techniques.
Associating a Technique
On the Matrix tab, to associate to the next level the user can click on the chain-link button in Strategies (not shown).
Alternatively, the user can single-click on the Strategies and this activates the ‘Associate Technique’ button in the lower-
right hand corner of the window making it available to click.
Both options open the Associate/Available window at the bottom (shown). Clicking the ‘Associate’ button (circled)
associates the Technique to the Strategy.
Another option on this screen is to add a new Technique by clicking the ‘Add New’ button, which will open the Add/Edit
Technique window.
Click Close to complete the association.
41
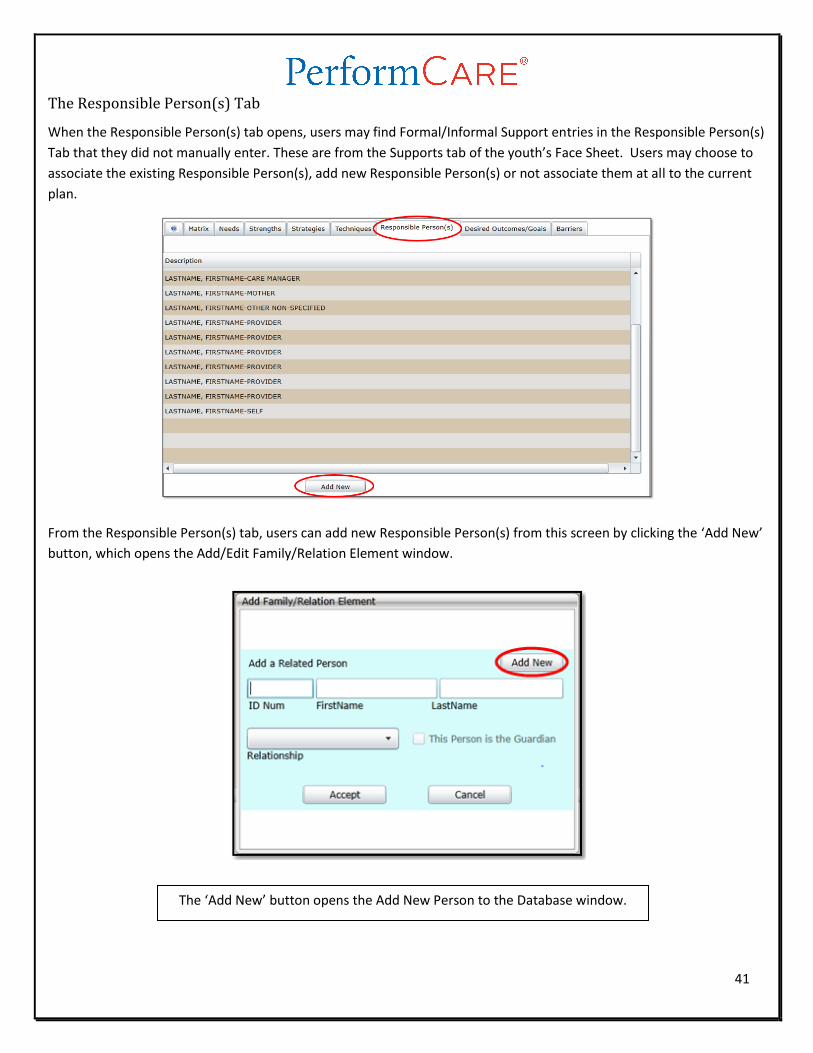
The Responsible Person(s) Tab
When the Responsible Person(s) tab opens, users may find Formal/Informal Support entries in the Responsible Person(s)
Tab that they did not manually enter. These are from the Supports tab of the youth’s Face Sheet. Users may choose to
associate the existing Responsible Person(s), add new Responsible Person(s) or not associate them at all to the current
plan.
From the Responsible Person(s) tab, users can add new Responsible Person(s) from this screen by clicking the ‘Add New’
button, which opens the Add/Edit Family/Relation Element window.
The ‘Add New’ button opens the Add New Person to the Database window.
42
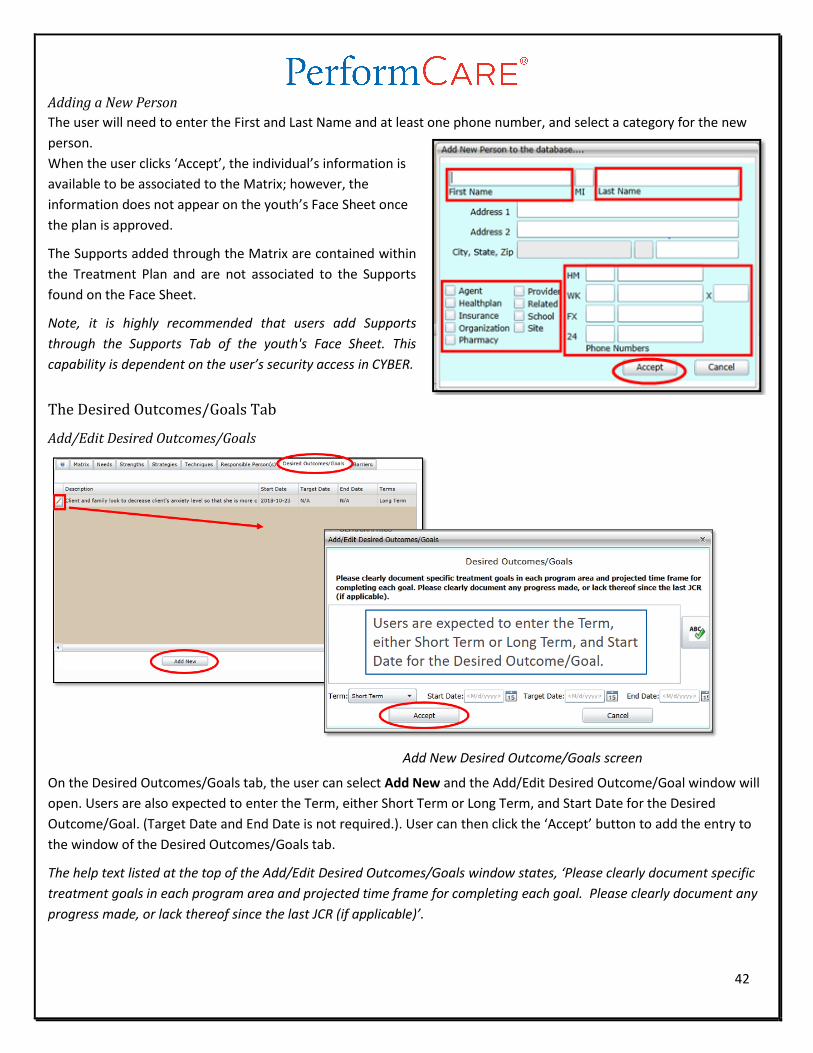
Adding a New Person
The user will need to enter the First and Last Name and at least one phone number, and select a category for the new
person.
When the user clicks ‘Accept’, the individual’s information is
available to be associated to the Matrix; however, the
information does not appear on the youth’s Face Sheet once
the plan is approved.
The Supports added through the Matrix are contained within
the Treatment Plan and are not associated to the Supports
found on the Face Sheet.
Note, it is highly recommended that users add Supports
through the Supports Tab of the youth's Face Sheet. This
capability is dependent on the user’s security access in CYBER.
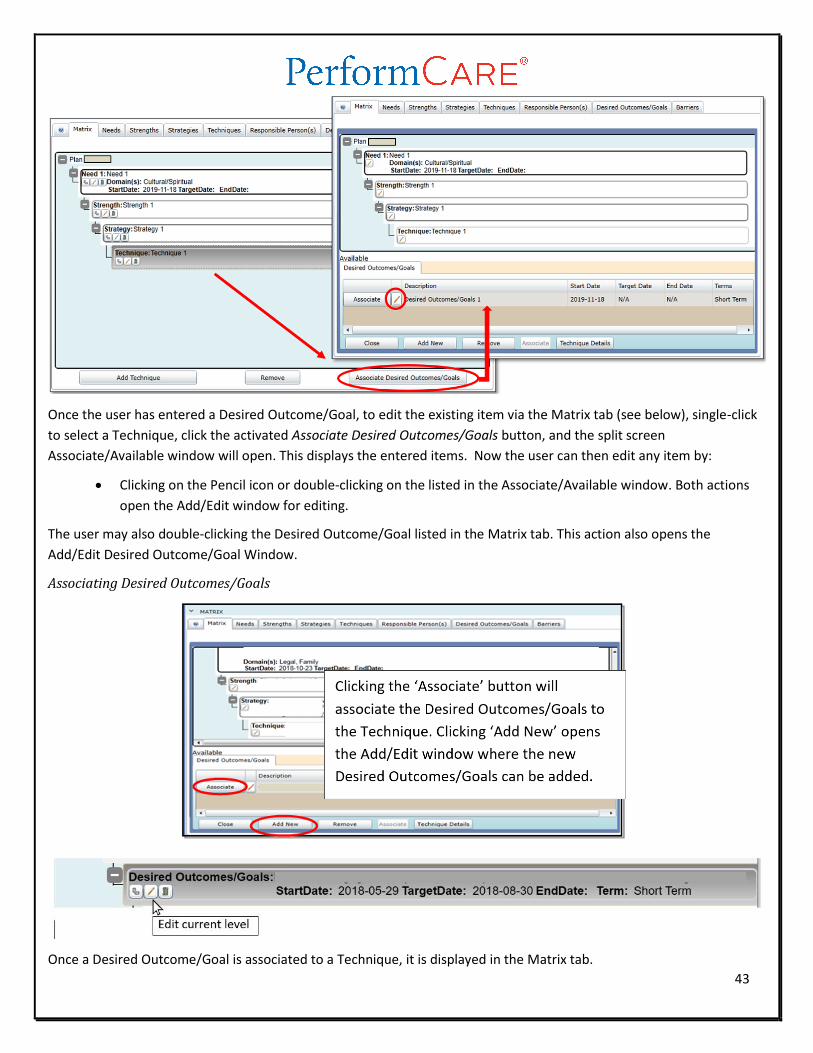
The Desired Outcomes/Goals Tab
Add/Edit Desired Outcomes/Goals
On the Desired Outcomes/Goals tab, the user can select Add New and the Add/Edit Desired Outcome/Goal window will
open. Users are also expected to enter the Term, either Short Term or Long Term, and Start Date for the Desired
Outcome/Goal. (Target Date and End Date is not required.). User can then click the ‘Accept’ button to add the entry to
the window of the Desired Outcomes/Goals tab.
The help text listed at the top of the Add/Edit Desired Outcomes/Goals window states, ‘Please clearly document specific
treatment goals in each program area and projected time frame for completing each goal. Please clearly document any
progress made, or lack thereof since the last JCR (if applicable)’.
Add New Desired Outcome/Goals screen
43
Once the user has entered a Desired Outcome/Goal, to edit the existing item via the Matrix tab (see below), single-click
to select a Technique, click the activated Associate Desired Outcomes/Goals button, and the split screen
Associate/Available window will open. This displays the entered items. Now the user can then edit any item by:
Clicking on the Pencil icon or double-clicking on the listed in the Associate/Available window. Both actions
open the Add/Edit window for editing.
The user may also double-clicking the Desired Outcome/Goal listed in the Matrix tab. This action also opens the
Add/Edit Desired Outcome/Goal Window.
Associating Desired Outcomes/Goals
Once a Desired Outcome/Goal is associated to a Technique, it is displayed in the Matrix tab.
44
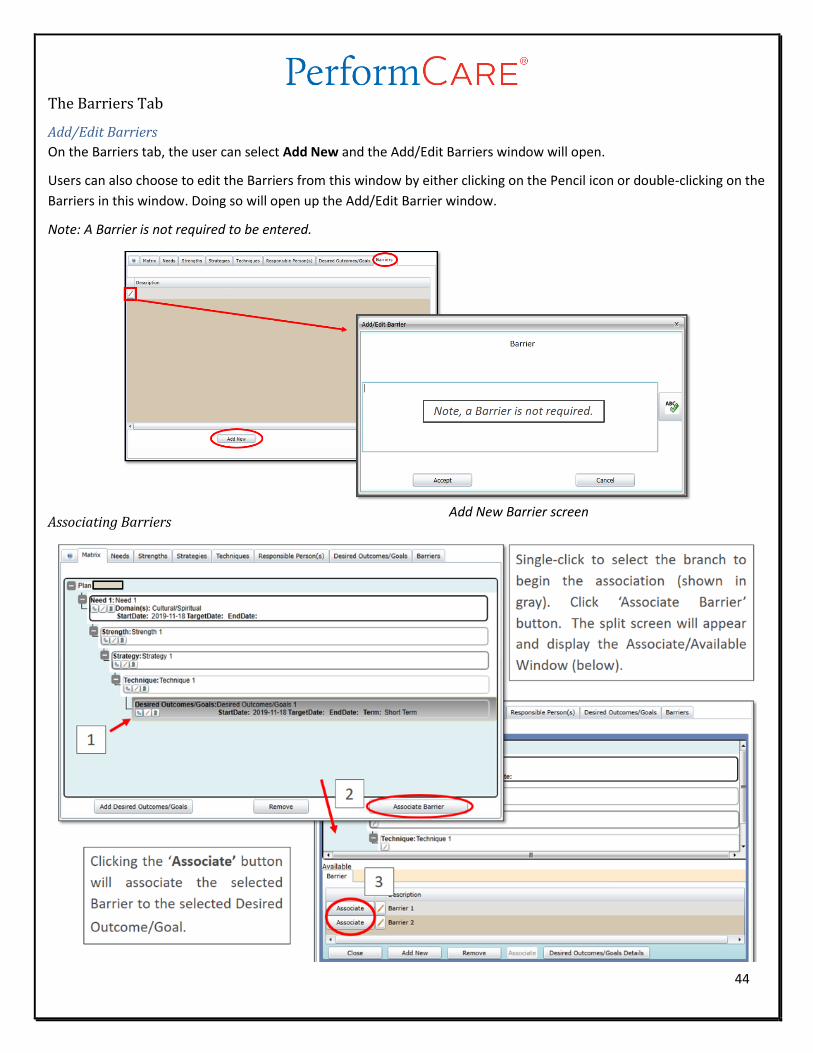
The Barriers Tab
Add/Edit Barriers
On the Barriers tab, the user can select Add New and the Add/Edit Barriers window will open.
Users can also choose to edit the Barriers from this window by either clicking on the Pencil icon or double-clicking on the
Barriers in this window. Doing so will open up the Add/Edit Barrier window.
Note: A Barrier is not required to be entered.
Associating Barriers
Add New Barrier screen
45
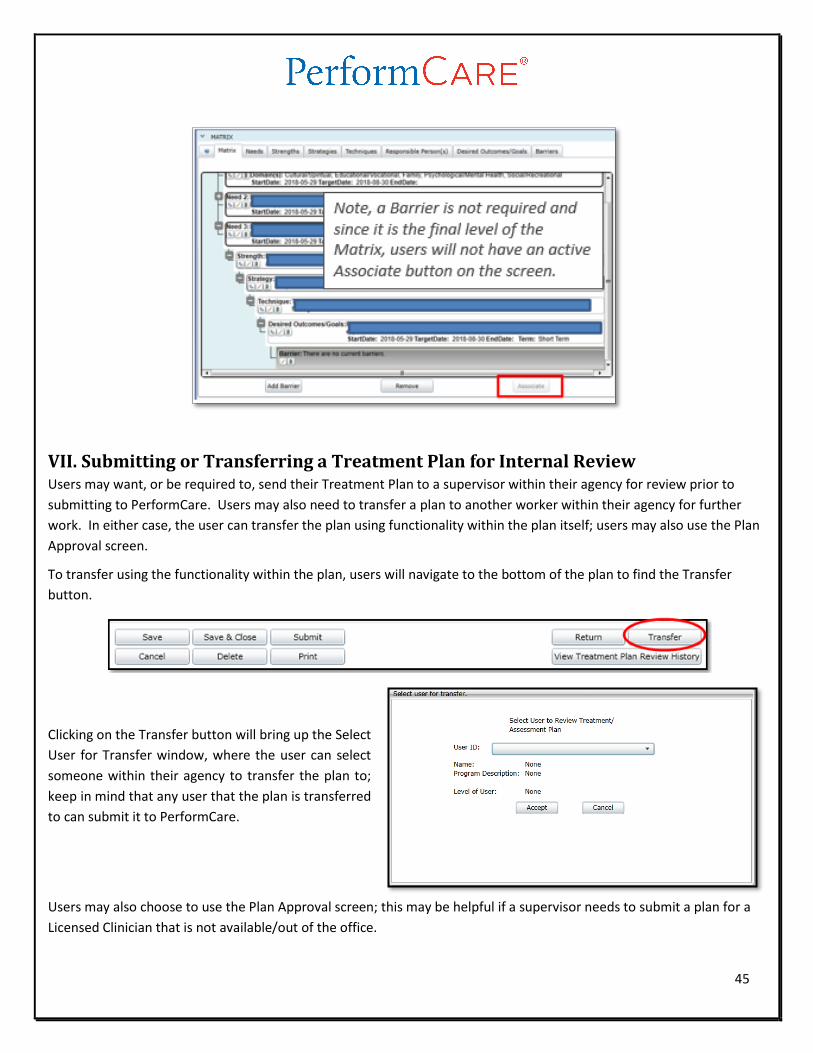
VII. Submitting or Transferring a Treatment Plan for Internal Review Users may want, or be required to, send their Treatment Plan to a supervisor within their agency for review prior to
submitting to PerformCare. Users may also need to transfer a plan to another worker within their agency for further
work. In either case, the user can transfer the plan using functionality within the plan itself; users may also use the Plan
Approval screen.
To transfer using the functionality within the plan, users will navigate to the bottom of the plan to find the Transfer
button.
Clicking on the Transfer button will bring up the Select
User for Transfer window, where the user can select
someone within their agency to transfer the plan to;
keep in mind that any user that the plan is transferred
to can submit it to PerformCare.
Users may also choose to use the Plan Approval screen; this may be helpful if a supervisor needs to submit a plan for a
Licensed Clinician that is not available/out of the office.
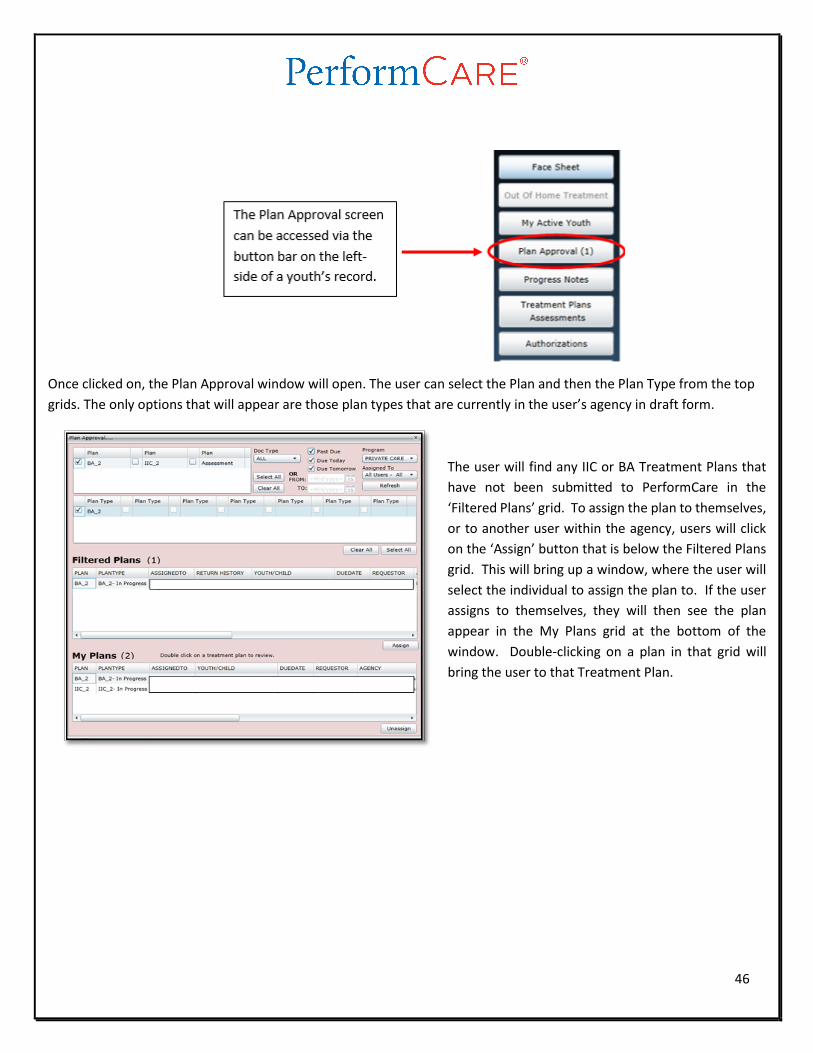
46
Once clicked on, the Plan Approval window will open. The user can select the Plan and then the Plan Type from the top
grids. The only options that will appear are those plan types that are currently in the user’s agency in draft form.
The user will find any IIC or BA Treatment Plans that
have not been submitted to PerformCare in the
‘Filtered Plans’ grid. To assign the plan to themselves,
or to another user within the agency, users will click
on the ‘Assign’ button that is below the Filtered Plans
grid. This will bring up a window, where the user will
select the individual to assign the plan to. If the user
assigns to themselves, they will then see the plan
appear in the My Plans grid at the bottom of the
window. Double-clicking on a plan in that grid will
bring the user to that Treatment Plan.
47
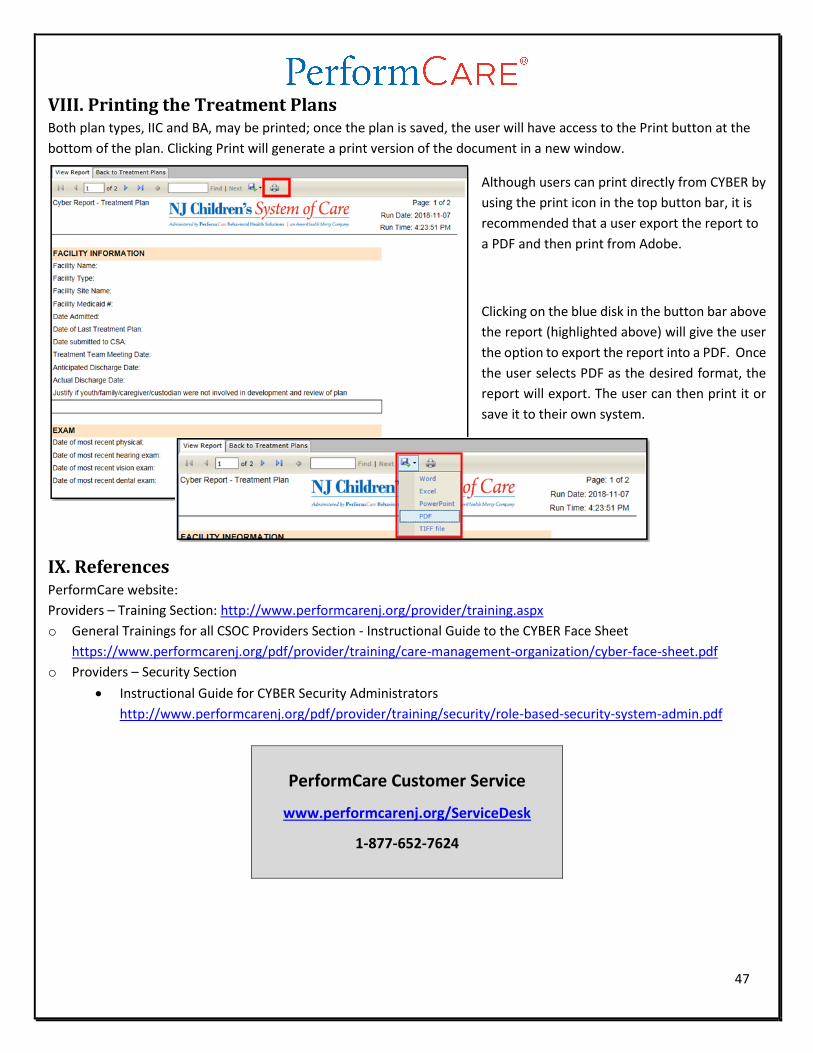
VIII. Printing the Treatment Plans Both plan types, IIC and BA, may be printed; once the plan is saved, the user will have access to the Print button at the
bottom of the plan. Clicking Print will generate a print version of the document in a new window.
Although users can print directly from CYBER by
using the print icon in the top button bar, it is
recommended that a user export the report to
a PDF and then print from Adobe.
Clicking on the blue disk in the button bar above
the report (highlighted above) will give the user
the option to export the report into a PDF. Once
the user selects PDF as the desired format, the
report will export. The user can then print it or
save it to their own system.
IX. References PerformCare website:
Providers – Training Section: http://www.performcarenj.org/provider/training.aspx
o General Trainings for all CSOC Providers Section - Instructional Guide to the CYBER Face Sheet
https://www.performcarenj.org/pdf/provider/training/care-management-organization/cyber-face-sheet.pdf
o Providers – Security Section
Instructional Guide for CYBER Security Administrators
http://www.performcarenj.org/pdf/provider/training/security/role-based-security-system-admin.pdf
PerformCare Customer Service
www.performcarenj.org/ServiceDesk
1-877-652-7624