Embed Size (px)
Citation preview
ESPA
ÑO
LEN
GLI
SHES
PAÑ
OL
ENG
LISH
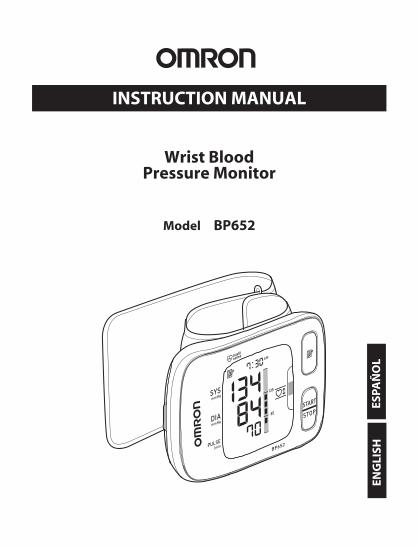
INSTRUCTION MANUAL
Model BP652
Wrist Blood Pressure Monitor
2
Before using the monitor Introduction........................................................................................................3 Safety information .............................................................................................4 Intended use ................................................................................................4 Operating the device ...................................................................................4 Care and maintenance.................................................................................5
Operating instructions BBefore taking a measurement..........................................................................6 Know your unit ..................................................................................................7 Unit display........................................................................................................8 Display symbols.................................................................................................9 Heartbeat symbol .......................................................................................9 Average value symbol ................................................................................9 Irregular heartbeat symbol ..........................................................................9 Movement error symbol .............................................................................9 Battery installation...........................................................................................11 Battery replacement ..................................................................................12 Setting the date and time..................................................................................13 Applying the arm cuff......................................................................................15 Applying the cuff on the left wrist............................................................15 Applying the cuff on the right wrist .........................................................16 Taking a measurement .....................................................................................17 Using the memory function .............................................................................22 Averaging function ...................................................................................22 To display your readings ..........................................................................22 To delete all readings stored in the memory.............................................23 Care and maintenance......................................................................................24 Error indicators ................................................................................................25 Troubleshooting tips ........................................................................................26 FCC statement..................................................................................................27 Limited warranty..............................................................................................28 Specifications...................................................................................................29 Guidance and manufacturer’s declaration .......................................................31
TABLE OF CONTENTS
3
INTRODUCTION
The monitor is compact and easy-to-use at home, at work, and during travel. Perfect for people who frequently monitor their own blood pressure.Your new digital blood pressure monitor uses the oscillometric method of blood pressure measurement. This means the monitor detects your blood’s movement through your brachial artery and converts the movements into a digital reading. An oscillometric monitor does not need a stethoscope so the monitor is simple to use.Clinical research has proven a direct relationship between blood pressure in the wrist and blood pressure in the arm. Changes in wrist blood pressure reflect changes in arm blood pressure because the arteries in the wrist and the arm are close to each other. Frequently measuring the blood pressure in your wrist will provide your physician with an accurate indication of changes in your blood pressure.The BP652 comes with the following components:• Monitor • Storage Case • 2 “AAA” Alkaline Batteries• Instruction Manual • Quick Start Guide
Please read this instruction manual thoroughly before using the unit. Please keep for future reference. For specific information about your own blood pressure, CONSULT YOUR PHYSICIAN.
Fill in for future reference.
DATE PURCHASED: __________________
SERIAL NUMBER: ____________________
• Staple your purchase receipt here• Register your product on-line at www.register-omron.com
SAVE THESE INSTRUCTIONS
Thank you for purchasing the OMRON BP652 Wrist Blood Pressure Monitor.
4
SAFETY INFORMATIONINTENDED USEThe device is a digital monitor intended for use in measuring blood pressure and pulse rate in adult patient population with wrist circumference ranging from 5 1/4 inches to 8 1/2 inches (13.5 cm to 21.5 cm). The device detects the appearance of irregular heartbeats during measurement and gives a warning signal with readings.
OPERATING THE DEVICEConsult your physician for specific information about your blood pressure. Self-diagnosis and treatment using readings may be dangerous. Follow the instructions of your physician or licensed healthcare provider.DO NOT adjust medication based on readings from this blood pressure monitor. Take medication as prescribed by your physician. Only a physician is qualified to diagnose and treat High Blood Pressure.The monitor is not intended to be a diagnostic device.Consult your physician before using the device for any of the following conditions: common arrhythmias such as atrial or ventricular premature beats or atrial fibrillation, arterial sclerosis, poor perfusion, diabetes, age, pregnancy, pre-eclampsia, renal diseases.Note that PATIENT motion, trembling, shivering may affect the reading.If battery fluid should get in your eyes, immediately rinse with plenty of clean water. Consult a physician immediately.Keep the batteries out of reach of young children.Do not use the device on the injured wrist or the wrist under medical treatment.Consult your physician before using the device on the arm with an arterio-venous (A-V) shunt.Do not use the device with other medical electrical (ME) equipment simultaneously.
SAFETY SYMBOLS USED IN THIS INSTRUCTION MANUAL
WARNINGIndicates a potentially hazardous situation which, if not avoided, could result in death or serious injury.
CAUTIONIndicates a potentially hazardous situation which, if not avoided, may result in minor or moderate injury to the user or patient or damage to the equipment or other property.
Do not use the device in the area the HF surgical equipment, MRI, or CT scanner exists, or in the oxygen rich environment.Consult your physician before using the device for any of the following conditions:• If you have had a mastectomy.• Do not take measurements more than necessary. It may cause bruising due to
blood flow interference.• People with severe blood flow problems or blood disorders as cuff inflation can
cause bruising.If you have a condition that may compromise circulation, you may get an inaccurate reading with this device. Consult your physician before using this device.Read all of the information in the instruction manual and any other literature in the box before operating the unit.Do not use this device on infants or persons who cannot express their intentions.Operate the device only as intended. Do not use the device for any other purpose.Dispose of the device, components and optional accessories according to applicable local regulations. Unlawful disposal may cause environmental pollution.Do not use a mobile phone near the device. It may result in an operational failure.Use only Omron authorized parts and accessories. Parts and accessories not approved for use with the device may damage the unit.Use only 1.5V Alkaline batteries with this device. Do not use other types of batteries. This may damage the device.Do not use in a location with moisture, or a location where water may splash on the unit. This may damage the device.
CARE AND MAINTENANCEDo not subject the monitor to strong shocks, such as dropping the unit on the floor.Do not submerge the device or any of the components in water.Store the device and the components in a clean, safe location.Changes or modification not approved by the manufacturer will void the user warranty. Do not disassemble or attempt to repair the unit or components.Do not use the device outside the specified environment. It may cause an inaccurate reading.
5
SAFETY INFORMATIONINTENDED USEThe device is a digital monitor intended for use in measuring blood pressure and pulse rate in adult patient population with wrist circumference ranging from 5 1/4 inches to 8 1/2 inches (13.5 cm to 21.5 cm). The device detects the appearance of irregular heartbeats during measurement and gives a warning signal with readings.
OPERATING THE DEVICEConsult your physician for specific information about your blood pressure. Self-diagnosis and treatment using readings may be dangerous. Follow the instructions of your physician or licensed healthcare provider.DO NOT adjust medication based on readings from this blood pressure monitor. Take medication as prescribed by your physician. Only a physician is qualified to diagnose and treat High Blood Pressure.The monitor is not intended to be a diagnostic device.Consult your physician before using the device for any of the following conditions: common arrhythmias such as atrial or ventricular premature beats or atrial fibrillation, arterial sclerosis, poor perfusion, diabetes, age, pregnancy, pre-eclampsia, renal diseases.Note that PATIENT motion, trembling, shivering may affect the reading.If battery fluid should get in your eyes, immediately rinse with plenty of clean water. Consult a physician immediately.Keep the batteries out of reach of young children.Do not use the device on the injured wrist or the wrist under medical treatment.Consult your physician before using the device on the arm with an arterio-venous (A-V) shunt.Do not use the device with other medical electrical (ME) equipment simultaneously.
Do not use the device in the area the HF surgical equipment, MRI, or CT scanner exists, or in the oxygen rich environment.Consult your physician before using the device for any of the following conditions:• If you have had a mastectomy.• Do not take measurements more than necessary. It may cause bruising due to
blood flow interference.• People with severe blood flow problems or blood disorders as cuff inflation can
cause bruising.If you have a condition that may compromise circulation, you may get an inaccurate reading with this device. Consult your physician before using this device.Read all of the information in the instruction manual and any other literature in the box before operating the unit.Do not use this device on infants or persons who cannot express their intentions.Operate the device only as intended. Do not use the device for any other purpose.Dispose of the device, components and optional accessories according to applicable local regulations. Unlawful disposal may cause environmental pollution.Do not use a mobile phone near the device. It may result in an operational failure.Use only Omron authorized parts and accessories. Parts and accessories not approved for use with the device may damage the unit.Use only 1.5V Alkaline batteries with this device. Do not use other types of batteries. This may damage the device.Do not use in a location with moisture, or a location where water may splash on the unit. This may damage the device.
CARE AND MAINTENANCEDo not subject the monitor to strong shocks, such as dropping the unit on the floor.Do not submerge the device or any of the components in water.Store the device and the components in a clean, safe location.Changes or modification not approved by the manufacturer will void the user warranty. Do not disassemble or attempt to repair the unit or components.Do not use the device outside the specified environment. It may cause an inaccurate reading.
6
BEFORE TAKING A MEASUREMENTTo ensure a reliable reading, follow these recommendations:1. Avoid eating, drinking alcohol, smoking, exercising, and bathing for 30 minutes
before taking a measurement. Rest for at least 5 minutes before taking the measurement.
2. Stress raises blood pressure. Avoid taking measurements during stressful times.3. The cuff can be applied to your left or right wrist.4. Measurements should be taken in a quiet place.5. Position the unit at heart level throughout the measurement.6. Remain still and do not talk during the measurement.7. Keep a record of your blood pressure and pulse readings for your physician. A
single measurement does not provide an accurate indication of your true blood pressure. You need to take and record several readings over a period of time. Try to measure your blood pressure at the same time each day for consistency.
7
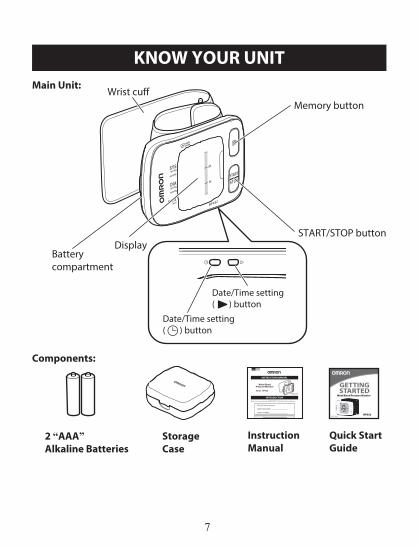
2 “AAA” Alkaline Batteries
StorageCase
Instruction Manual
KNOW YOUR UNITMain Unit:
Components:
Quick Start Guide
DisplayBattery compartment
Memory button
START/STOP button
Date/Time setting ( ) button
Date/Time setting ( ) button
Wrist cu�
INTRODUCTIONThank you for purchasing the OMRON BP652 Wrist Blood Pressure Monitor.
The monitor is compact and easy-to-use at home, at work, and during travel. Perfect for people who frequently monitor their own blood pressure.Your new digital blood pressure monitor uses the oscillometric method of blood pressure measurement. This means the monitor detects your blood’s movement through your brachial artery and converts the movements into a digital reading. An oscillometric monitor does not need a stethoscope so the monitor is simple to use.Clinical research has proven a direct relationship between blood pressure in the wrist and blood pressure in the arm. Changes in wrist blood pressure reflect changes in arm blood pressure because the arteries in the wrist and the arm are close to each other. Frequently measuring the blood pressure in your wrist will provide your physician with an accurate indication of changes in your blood pressure.The BP652 comes with the following components:• Monitor • Storage Case • 2 “AAA” Alkaline Batteries• Instruction Manual printed in English and Spanish • Quick Start Guide
Please read this instruction manual thoroughly before using the unit. Please keep for future reference. For specific information about your own blood pressure, CONSULT YOUR PHYSICIAN.
Fill in for future reference.
DATE PURCHASED: __________________
SERIAL NUMBER: ____________________
• Staple your purchase receipt here• Register your product on-line at www.register-omron.com
INSTRUCTION MANUAL
Model BP652
1883330-6A
Wrist Blood Pressure Monitor
ESEN
Wrist Blood Pressure Monitor
GETTINGSTARTED
BP6525337790-9A
8
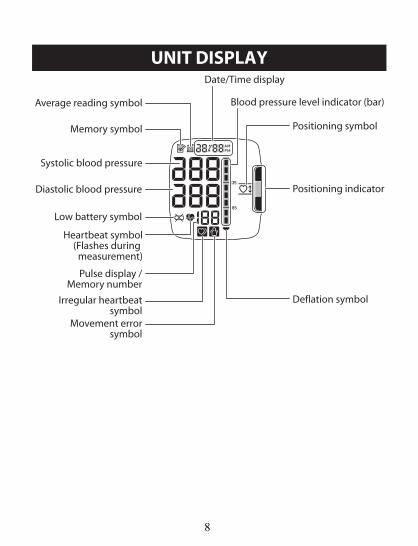
UNIT DISPLAY
Average reading symbol
Memory symbol
Heartbeat symbol(Flashes during
measurement)
Blood pressure level indicator (bar)
Systolic blood pressure
Date/Time display
Positioning symbol
Diastolic blood pressure
Low battery symbol
Pulse display / Memory number
Deflation symbolIrregular heartbeat symbol
Movement error symbol
Positioning indicator
9
Normal Heartbeat
Irregular HeartbeatShort Long
Blood pressure
Pulse
Pulse
Blood pressure
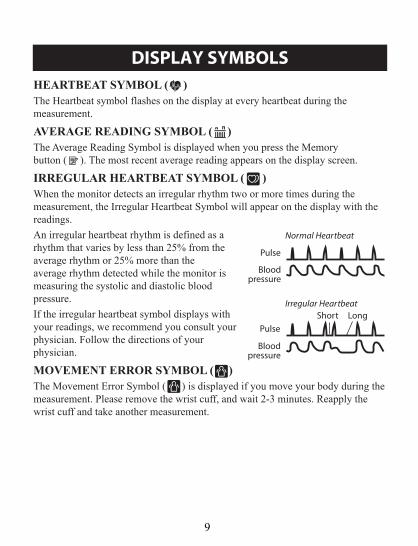
DISPLAY SYMBOLSHEARTBEAT SYMBOL ( )The Heartbeat symbol flashes on the display at every heartbeat during the measurement.
AVERAGE READING SYMBOL ( )The Average Reading Symbol is displayed when you press the Memory button ( ). The most recent average reading appears on the display screen.
IRREGULAR HEARTBEAT SYMBOL ( )When the monitor detects an irregular rhythm two or more times during the measurement, the Irregular Heartbeat Symbol will appear on the display with the readings.An irregular heartbeat rhythm is defined as a rhythm that varies by less than 25% from the average rhythm or 25% more than the average rhythm detected while the monitor is measuring the systolic and diastolic blood pressure.If the irregular heartbeat symbol displays with your readings, we recommend you consult your physician. Follow the directions of your physician.
MOVEMENT ERROR SYMBOL ( )The Movement Error Symbol ( ) is displayed if you move your body during the measurement. Please remove the wrist cuff, and wait 2-3 minutes. Reapply the wrist cuff and take another measurement.
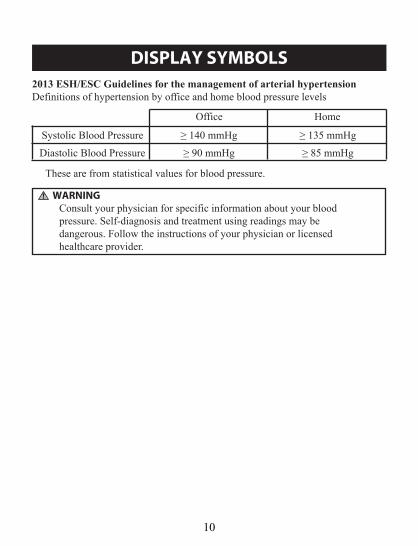
2013 ESH/ESC Guidelines for the management of arterial hypertensionDefinitions of hypertension by office and home blood pressure levels
These are from statistical values for blood pressure.
10
DISPLAY SYMBOLSHEARTBEAT SYMBOL ( )The Heartbeat symbol flashes on the display at every heartbeat during the measurement.
AVERAGE READING SYMBOL ( )The Average Reading Symbol is displayed when you press the Memory button ( ). The most recent average reading appears on the display screen.
IRREGULAR HEARTBEAT SYMBOL ( )When the monitor detects an irregular rhythm two or more times during the measurement, the Irregular Heartbeat Symbol will appear on the display with the readings.An irregular heartbeat rhythm is defined as a rhythm that varies by less than 25% from the average rhythm or 25% more than the average rhythm detected while the monitor is measuring the systolic and diastolic blood pressure.If the irregular heartbeat symbol displays with your readings, we recommend you consult your physician. Follow the directions of your physician.
MOVEMENT ERROR SYMBOL ( )The Movement Error Symbol ( ) is displayed if you move your body during the measurement. Please remove the wrist cuff, and wait 2-3 minutes. Reapply the wrist cuff and take another measurement.
Systolic Blood Pressure
Office Home
≥ 135 mmHg
Diastolic Blood Pressure ≥ 85 mmHg
≥ 140 mmHg
≥ 90 mmHg
WARNINGConsult your physician for specific information about your blood pressure. Self-diagnosis and treatment using readings may be dangerous. Follow the instructions of your physician or licensed healthcare provider.
2013 ESH/ESC Guidelines for the management of arterial hypertensionDefinitions of hypertension by office and home blood pressure levels
These are from statistical values for blood pressure.
11
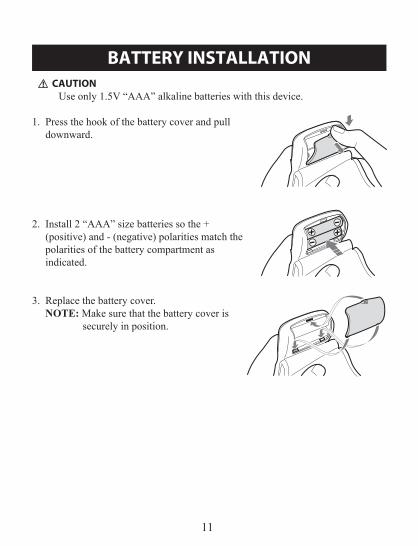
CAUTIONUse only 1.5V “AAA” alkaline batteries with this device.
1. Press the hook of the battery cover and pull downward.
2. Install 2 “AAA” size batteries so the + (positive) and - (negative) polarities match the polarities of the battery compartment as indicated.
3. Replace the battery cover.NOTE: Make sure that the battery cover is
securely in position.
BATTERY INSTALLATION
12
BATTERY REPLACEMENT
Low battery symbolWhen the Low battery symbol appears on the display, turn the monitor off and remove all the batteries. Replace with 2 new batteries at the same time.
NOTES: • Turn the unit off before replacing the batteries. If the batteries are removed while the unit is still on, the date and time will be reset to that of the previous use. The readings are not deleted.
• When the batteries are replaced, you may need to reset the date and time. Refer to “Setting the Date and Time”.
• The batteries included with the device may have a shorter life.CAUTION
Dispose of the device, components and optional accessories according to applicable local regulations. Unlawful disposal may cause environmental pollution.
BATTERY INSTALLATION
WARNINGKeep the batteries out of reach of young children.
WARNINGIf battery fluid should get in your eyes, immediately rinse with plenty of clean water. Consult a physician immediately.
13
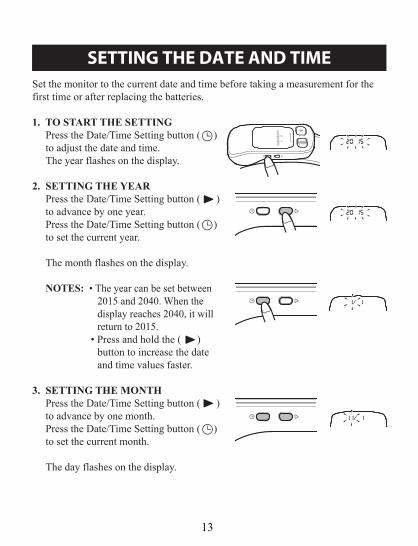
SETTING THE DATE AND TIMESet the monitor to the current date and time before taking a measurement for the first time or after replacing the batteries.
1. TO START THE SETTINGPress the Date/Time Setting button ( ) to adjust the date and time.The year flashes on the display.
2. SETTING THE YEARPress the Date/Time Setting button ( ) to advance by one year.Press the Date/Time Setting button ( ) to set the current year.
The month flashes on the display.
NOTES: • The year can be set between 2015 and 2040. When the display reaches 2040, it will return to 2015.
• Press and hold the ( ) button to increase the date and time values faster.
3. SETTING THE MONTHPress the Date/Time Setting button ( ) to advance by one month.Press the Date/Time Setting button ( ) to set the current month.
The day flashes on the display.
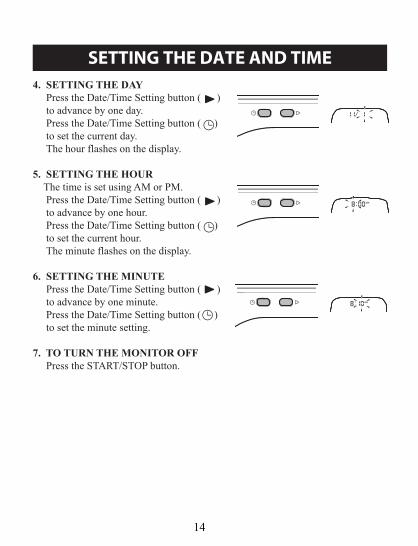
4. SETTING THE DAYPress the Date/Time Setting button ( ) to advance by one day.Press the Date/Time Setting button ( ) to set the current day.The hour flashes on the display.
5. SETTING THE HOURThe time is set using AM or PM.Press the Date/Time Setting button ( ) to advance by one hour.Press the Date/Time Setting button ( ) to set the current hour.The minute flashes on the display.
6. SETTING THE MINUTEPress the Date/Time Setting button ( ) to advance by one minute.Press the Date/Time Setting button ( ) to set the minute setting.
7. TO TURN THE MONITOR OFFPress the START/STOP button.
14
SETTING THE DATE AND TIMESet the monitor to the current date and time before taking a measurement for the first time or after replacing the batteries.
1. TO START THE SETTINGPress the Date/Time Setting button ( ) to adjust the date and time.The year flashes on the display.
2. SETTING THE YEARPress the Date/Time Setting button ( ) to advance by one year.Press the Date/Time Setting button ( ) to set the current year.
The month flashes on the display.
NOTES: • The year can be set between 2015 and 2040. When the display reaches 2040, it will return to 2015.
• Press and hold the ( ) button to increase the date and time values faster.
3. SETTING THE MONTHPress the Date/Time Setting button ( ) to advance by one month.Press the Date/Time Setting button ( ) to set the current month.
The day flashes on the display.
4. SETTING THE DAYPress the Date/Time Setting button ( ) to advance by one day.Press the Date/Time Setting button ( ) to set the current day.The hour flashes on the display.
5. SETTING THE HOURThe time is set using AM or PM.Press the Date/Time Setting button ( ) to advance by one hour.Press the Date/Time Setting button ( ) to set the current hour.The minute flashes on the display.
6. SETTING THE MINUTEPress the Date/Time Setting button ( ) to advance by one minute.Press the Date/Time Setting button ( ) to set the minute setting.
7. TO TURN THE MONITOR OFFPress the START/STOP button.

15
APPLYING THE WRIST CUFF
CAUTIONRead all of the information in the instruction manual and any otherliterature in the box before operating the unit.
CAUTIONThis device is intended for use in measuring blood pressure andpulse rate in the adult population. Do not use this device on infantsor persons who cannot express their intentions.
APPLYING THE CUFF ON THE LEFT WRIST1. Roll up sleeve. Make sure your sleeve is not rolled up
too tightly on your arm. This may constrict the flow of blood in your arm.
2. Put your arm through the cuff loop. Your palm should face upward.
3. Position the cuff leaving a clearance of approximately 1/2 to 1 inch (1-2 cm) between the cuff and the bottom of your palm.
16
APPLYING THE WRIST CUFF
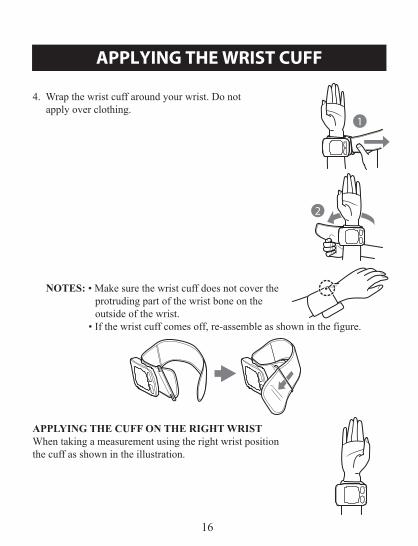
4. Wrap the wrist cuff around your wrist. Do not apply over clothing.
NOTES: • Make sure the wrist cuff does not cover the protruding part of the wrist bone on the outside of the wrist.
• If the wrist cuff comes off, re-assemble as shown in the figure.
APPLYING THE CUFF ON THE RIGHT WRISTWhen taking a measurement using the right wrist position the cuff as shown in the illustration.
17
TAKING A MEASUREMENT
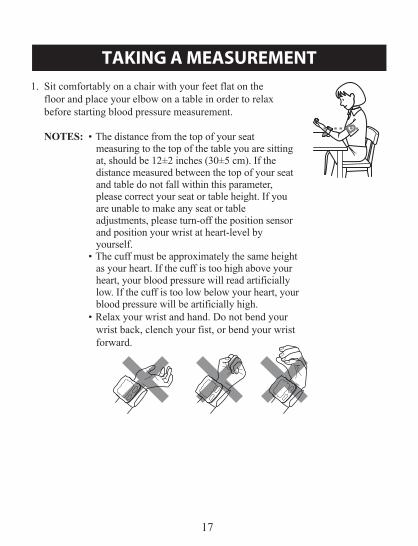
1. Sit comfortably on a chair with your feet flat on the floor and place your elbow on a table in order to relax before starting blood pressure measurement.
NOTES: • The distance from the top of your seat measuring to the top of the table you are sitting at, should be 12±2 inches (30±5 cm). If the distance measured between the top of your seat and table do not fall within this parameter, please correct your seat or table height. If you are unable to make any seat or table adjustments, please turn-off the position sensor and position your wrist at heart-level by yourself.
• The cuff must be approximately the same height as your heart. If the cuff is too high above your heart, your blood pressure will read artificially low. If the cuff is too low below your heart, your blood pressure will be artificially high.
• Relax your wrist and hand. Do not bend your wrist back, clench your fist, or bend your wrist forward.
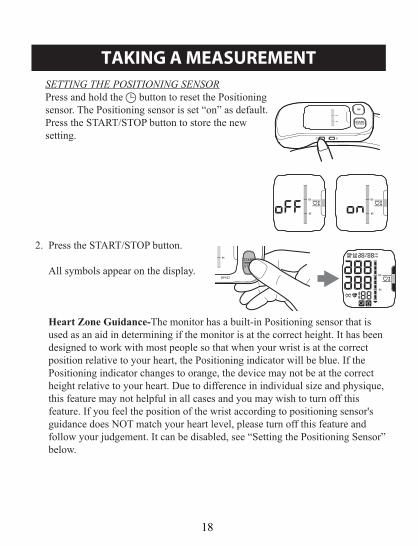
2. Press the START/STOP button.
All symbols appear on the display.
Heart Zone Guidance-The monitor has a built-in Positioning sensor that is used as an aid in determining if the monitor is at the correct height. It has been designed to work with most people so that when your wrist is at the correct position relative to your heart, the Positioning indicator will be blue. If the Positioning indicator changes to orange, the device may not be at the correct height relative to your heart. Due to difference in individual size and physique, this feature may not helpful in all cases and you may wish to turn off this feature. If you feel the position of the wrist according to positioning sensor's guidance does NOT match your heart level, please turn off this feature and follow your judgement. It can be disabled, see “Setting the Positioning Sensor” below.
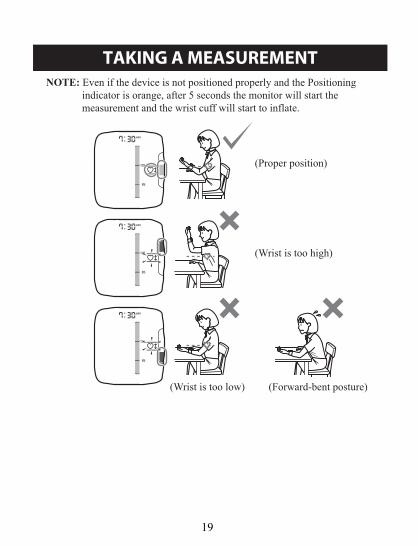
NOTE: Even if the device is not positioned properly and the Positioning indicator is orange, after 5 seconds the monitor will start the measurement and the wrist cuff will start to inflate.
18
TAKING A MEASUREMENT
1. Sit comfortably on a chair with your feet flat on the floor and place your elbow on a table in order to relax before starting blood pressure measurement.
NOTES: • The distance from the top of your seat measuring to the top of the table you are sitting at, should be 12±2 inches (30±5 cm). If the distance measured between the top of your seat and table do not fall within this parameter, please correct your seat or table height. If you are unable to make any seat or table adjustments, please turn-off the position sensor and position your wrist at heart-level by yourself.
• The cuff must be approximately the same height as your heart. If the cuff is too high above your heart, your blood pressure will read artificially low. If the cuff is too low below your heart, your blood pressure will be artificially high.
• Relax your wrist and hand. Do not bend your wrist back, clench your fist, or bend your wrist forward.
2. Press the START/STOP button.
All symbols appear on the display.
Heart Zone Guidance-The monitor has a built-in Positioning sensor that is used as an aid in determining if the monitor is at the correct height. It has been designed to work with most people so that when your wrist is at the correct position relative to your heart, the Positioning indicator will be blue. If the Positioning indicator changes to orange, the device may not be at the correct height relative to your heart. Due to difference in individual size and physique, this feature may not helpful in all cases and you may wish to turn off this feature. If you feel the position of the wrist according to positioning sensor's guidance does NOT match your heart level, please turn off this feature and follow your judgement. It can be disabled, see “Setting the Positioning Sensor” below.
SETTING THE POSITIONING SENSORPress and hold the button to reset the Positioning sensor. The Positioning sensor is set “on” as default.Press the START/STOP button to store the new setting.
NOTE: Even if the device is not positioned properly and the Positioning indicator is orange, after 5 seconds the monitor will start the measurement and the wrist cuff will start to inflate.
19
TAKING A MEASUREMENT
1. Sit comfortably on a chair with your feet flat on the floor and place your elbow on a table in order to relax before starting blood pressure measurement.
NOTES: • The distance from the top of your seat measuring to the top of the table you are sitting at, should be 12±2 inches (30±5 cm). If the distance measured between the top of your seat and table do not fall within this parameter, please correct your seat or table height. If you are unable to make any seat or table adjustments, please turn-off the position sensor and position your wrist at heart-level by yourself.
• The cuff must be approximately the same height as your heart. If the cuff is too high above your heart, your blood pressure will read artificially low. If the cuff is too low below your heart, your blood pressure will be artificially high.
• Relax your wrist and hand. Do not bend your wrist back, clench your fist, or bend your wrist forward.
2. Press the START/STOP button.
All symbols appear on the display.
Heart Zone Guidance-The monitor has a built-in Positioning sensor that is used as an aid in determining if the monitor is at the correct height. It has been designed to work with most people so that when your wrist is at the correct position relative to your heart, the Positioning indicator will be blue. If the Positioning indicator changes to orange, the device may not be at the correct height relative to your heart. Due to difference in individual size and physique, this feature may not helpful in all cases and you may wish to turn off this feature. If you feel the position of the wrist according to positioning sensor's guidance does NOT match your heart level, please turn off this feature and follow your judgement. It can be disabled, see “Setting the Positioning Sensor” below.
(Proper position)
(Wrist is too high)
(Wrist is too low) (Forward-bent posture)
NOTE: Even if the device is not positioned properly and the Positioning indicator is orange, after 5 seconds the monitor will start the measurement and the wrist cuff will start to inflate.
20
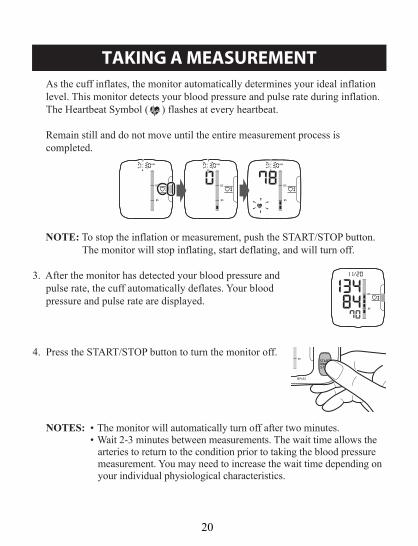
TAKING A MEASUREMENTAs the cuff inflates, the monitor automatically determines your ideal inflation level. This monitor detects your blood pressure and pulse rate during inflation.The Heartbeat Symbol ( ) flashes at every heartbeat.
Remain still and do not move until the entire measurement process is completed.
NOTE: To stop the inflation or measurement, push the START/STOP button. The monitor will stop inflating, start deflating, and will turn off.
3. After the monitor has detected your blood pressure and pulse rate, the cuff automatically deflates. Your blood pressure and pulse rate are displayed.
4. Press the START/STOP button to turn the monitor off.
NOTES: • The monitor will automatically turn off after two minutes. • Wait 2-3 minutes between measurements. The wait time allows the
arteries to return to the condition prior to taking the blood pressure measurement. You may need to increase the wait time depending on your individual physiological characteristics.
21
WARNINGThe monitor is not intended to be a diagnostic device.
WARNINGConsult your physician for specific information about your blood pressure. Self-diagnosis and treatment using readings may be dangerous. Follow the instructions of your physician or licensed healthcare provider.
WARNINGDO NOT adjust medication based on readings from this blood pressure monitor. Take medication as prescribed by your physician. Only a physician is qualified to diagnose and treat High Blood Pressure.
TAKING A MEASUREMENT
22
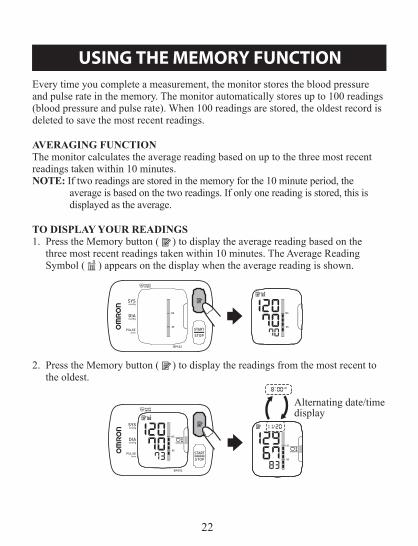
USING THE MEMORY FUNCTIONEvery time you complete a measurement, the monitor stores the blood pressure and pulse rate in the memory. The monitor automatically stores up to 100 readings (blood pressure and pulse rate). When 100 readings are stored, the oldest record is deleted to save the most recent readings.
AVERAGING FUNCTIONThe monitor calculates the average reading based on up to the three most recent readings taken within 10 minutes.NOTE: If two readings are stored in the memory for the 10 minute period, the
average is based on the two readings. If only one reading is stored, this is displayed as the average.
TO DISPLAY YOUR READINGS1. Press the Memory button ( ) to display the average reading based on the
three most recent readings taken within 10 minutes. The Average Reading Symbol ( ) appears on the display when the average reading is shown.
2. Press the Memory button ( ) to display the readings from the most recent to the oldest.
Alternating date/time display
NOTES: • The Memory number appears for a second before the pulse rate is displayed. The newest set is number “1”.
• If the Positioning indicator is set to “on” before the measurement, the Positioning indicator is displayed with the readings.
• The date and time are alternately displayed with the readings. • Press the Memory button ( ) repeatedly to display the next
readings. • Press and hold the Memory button ( ) to display the readings
faster.
3. Press the START/STOP button to turn the monitor off.
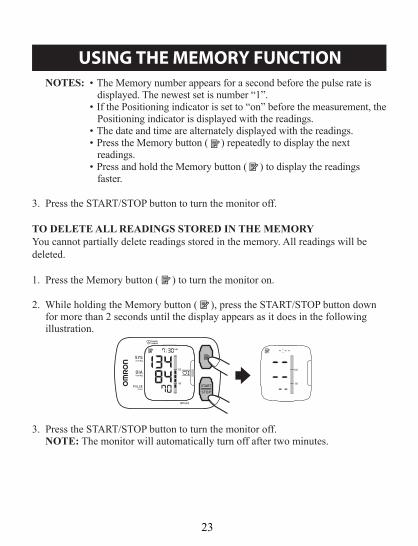
TO DELETE ALL READINGS STORED IN THE MEMORYYou cannot partially delete readings stored in the memory. All readings will be deleted.
1. Press the Memory button ( ) to turn the monitor on.
2. While holding the Memory button ( ), press the START/STOP button down for more than 2 seconds until the display appears as it does in the following illustration.
3. Press the START/STOP button to turn the monitor off.NOTE: The monitor will automatically turn off after two minutes.
23
USING THE MEMORY FUNCTIONEvery time you complete a measurement, the monitor stores the blood pressure and pulse rate in the memory. The monitor automatically stores up to 100 readings (blood pressure and pulse rate). When 100 readings are stored, the oldest record is deleted to save the most recent readings.
AVERAGING FUNCTIONThe monitor calculates the average reading based on up to the three most recent readings taken within 10 minutes.NOTE: If two readings are stored in the memory for the 10 minute period, the
average is based on the two readings. If only one reading is stored, this is displayed as the average.
TO DISPLAY YOUR READINGS1. Press the Memory button ( ) to display the average reading based on the
three most recent readings taken within 10 minutes. The Average Reading Symbol ( ) appears on the display when the average reading is shown.
2. Press the Memory button ( ) to display the readings from the most recent to the oldest.
NOTES: • The Memory number appears for a second before the pulse rate is displayed. The newest set is number “1”.
• If the Positioning indicator is set to “on” before the measurement, the Positioning indicator is displayed with the readings.
• The date and time are alternately displayed with the readings. • Press the Memory button ( ) repeatedly to display the next
readings. • Press and hold the Memory button ( ) to display the readings
faster.
3. Press the START/STOP button to turn the monitor off.
TO DELETE ALL READINGS STORED IN THE MEMORYYou cannot partially delete readings stored in the memory. All readings will be deleted.
1. Press the Memory button ( ) to turn the monitor on.
2. While holding the Memory button ( ), press the START/STOP button down for more than 2 seconds until the display appears as it does in the following illustration.
3. Press the START/STOP button to turn the monitor off.NOTE: The monitor will automatically turn off after two minutes.
24
CARE AND MAINTENANCETo keep your digital blood pressure monitor in the best condition and protect the unit from damage, follow the directions listed below:Do not forcefully bend the cuff. Do not fold tightly.Clean the monitor with a soft dry cloth.Do not use any abrasive or volatile cleaners.Wipe clean on the surface of the cuff with a soft, moistened cloth with adilution of neutral detergent.Do not allow any liquids inside the cuff. If a liquid gets in the cuff, drythe inside well.
CAUTIONDo not submerge the device or any of the components in water. Do not subject the monitor to extreme hot or cold temperatures, humidity or direct sunlight.
CAUTIONStore the device and the components in a clean, safe location.
CAUTIONDo not subject the monitor to strong shocks, such as dropping the unit on the floor.
Remove the batteries if the unit will not be used for three months or longer. Always replace all the batteries with new ones at the same time.
Use the unit in a manner consistent with the instructions provided in this manual.
CAUTIONUse only OMRON authorized parts and accessories. Parts and accessories not approved for use with the device may damage the unit.
CAUTIONChanges or modification not approved by the manufacturer will void the user warranty. Do not disassemble or attempt to repair the unit or components.
25
ERROR INDICATORS
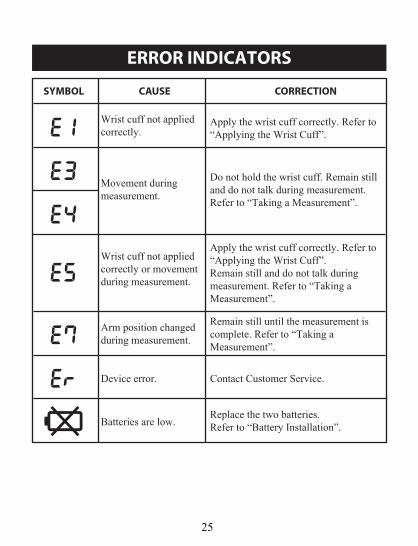
SYMBOL CAUSE CORRECTION
Wrist cuff not applied correctly.
Apply the wrist cuff correctly. Refer to“Applying the Wrist Cuff”.
Replace the two batteries.Refer to “Battery Installation”.
Do not hold the wrist cuff. Remain stilland do not talk during measurement.Refer to “Taking a Measurement”.
Remain still until the measurement iscomplete. Refer to “Taking aMeasurement”.
Contact Customer Service.
Apply the wrist cuff correctly. Refer to“Applying the Wrist Cuff”.Remain still and do not talk duringmeasurement. Refer to “Taking aMeasurement”.
Movement during measurement.
Wrist cuff not applied correctly or movement during measurement.
Arm position changed during measurement.
Device error.
Batteries are low.
26
TROUBLESHOOTING TIPS
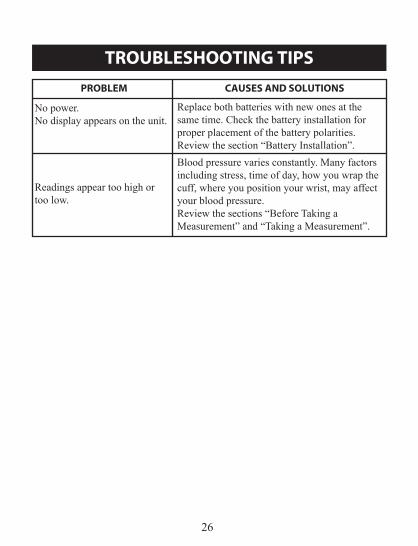
PROBLEM
No power.No display appears on the unit.
Readings appear too high or too low.
CAUSES AND SOLUTIONS
Replace both batteries with new ones at the same time. Check the battery installation for proper placement of the battery polarities.Review the section “Battery Installation”.Blood pressure varies constantly. Many factors including stress, time of day, how you wrap the cuff, where you position your wrist, may affect your blood pressure. Review the sections “Before Taking a Measurement” and “Taking a Measurement”.
27
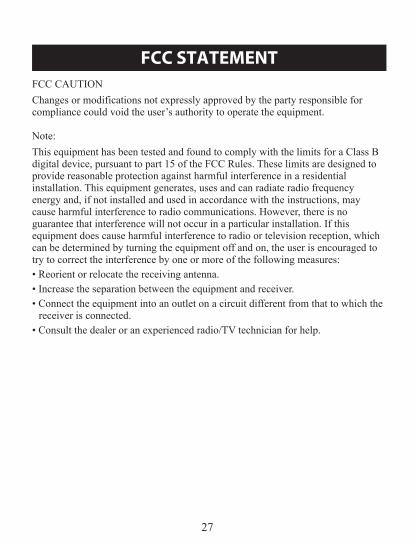
FCC CAUTIONChanges or modifications not expressly approved by the party responsible for compliance could void the user’s authority to operate the equipment.
Note:This equipment has been tested and found to comply with the limits for a Class B digital device, pursuant to part 15 of the FCC Rules. These limits are designed to provide reasonable protection against harmful interference in a residential installation. This equipment generates, uses and can radiate radio frequency energy and, if not installed and used in accordance with the instructions, may cause harmful interference to radio communications. However, there is no guarantee that interference will not occur in a particular installation. If this equipment does cause harmful interference to radio or television reception, which can be determined by turning the equipment off and on, the user is encouraged to try to correct the interference by one or more of the following measures:• Reorient or relocate the receiving antenna.• Increase the separation between the equipment and receiver.• Connect the equipment into an outlet on a circuit different from that to which the
receiver is connected.• Consult the dealer or an experienced radio/TV technician for help.
FCC STATEMENT

28
LIMITED WARRANTYYour BP652N Wrist Blood Pressure Monitor, excluding the batteries, is warranted to be free from defects in materials and workmanship appearing within 5 years from the date of purchase, when used in accordance with the instructions provided with the monitor. The above warranty extends only to the original retail purchaser.We will, at our option, replace without charge any monitor covered by the above warranty. Replacement is our only responsibility and your only remedy under the above warranty.To obtain warranty service contact Customer Service by calling 1-800-634-4350 for the address of the inspection center and the return shipping and handling fee.Enclose the Proof of Purchase. Include a letter, with your name, address, phone number, and description of the specific problem. Pack the product carefully to prevent damage in transit. Because of possible loss in transit, we recommend insuring the product with return receipt requested.THE FOREGOING IS THE SOLE WARRANTY PROVIDED BY OMRON IN CONNECTION WITH THIS PRODUCT, AND OMRON HEREBY DISCLAIMS ANY OTHER WARRANTIES, EXPRESS OR IMPLIED, INCLUDING IMPLIED WARRANTIES OF MERCHANTABILITY AND FITNESS FOR A PARTICULAR PURPOSE. IMPLIED WARRANTIES AND OTHER TERMS THAT MAY BE IMPOSED BY LAW, IF ANY, ARE LIMITED IN DURATION TO THE PERIOD OF THE ABOVE EXPRESS WARRANTY.
OMRON SHALL NOT BE LIABLE FOR LOSS OF USE OR ANY OTHER SPECIAL, INCIDENTAL, CONSEQUENTIAL OR INDIRECT COSTS, EXPENSES OR DAMAGES.
This warranty provides you with specific legal rights, and you may have other rights which vary from state to state. Some states do not allow limitations on how long an implied warranty lasts, so the above limitation may not apply to you. Some states do not allow the exclusion or limitation of incidental or consequential damages, so the above limitation or exclusion may not apply to you.
FOR CUSTOMER SERVICEVisit our web site at: www.omronhealthcare.comCall toll free: 1-800-634-4350

29
SPECIFICATIONSModel:
Display:
Measurement Range:
Accuracy:
Inflation:
Deflation:
Measurement Method:
Power Source:
Battery Life:
Operating Temperature /Humidity:
Storage Temperature /Humidity/Air Pressure:
Main Unit Weight:
Main Unit Dimensions:
Measurable circumference of wrist:
Memory:
Contents:
Applied part:
Protection againstelectric shock:
BP652N HEM-6300-ZLCD Digital DisplayPressure: 0 to 299 mmHg, Pulse: 40 to 180 beats/min.Pressure: ±3mmHg or 2% of readingPulse: ±5% of readingAutomatic by electric pumpAutomatic rapid deflationOscillometric method2 “AAA” alkaline batteries 1.5VApproximately 300 uses with 2 new alkaline batteries50ºF to 104ºF (10ºC to 40ºC) /15 to 85% RH
-4ºF to 140ºF (-20ºC to 60ºC) /10 to 95% RH700-1060 hPaApproximately 2 7/8 oz. (80g)not including batteriesApproximately 3 1/2''(w) × 2 3/8''(l) × 1/2''(d)(89 mm × 61 mm × 13 mm) (not including the wrist cuff)Approximately 5 1/4" to 8 1/2" (13.5 to 21.5 cm)
Up to 100 readingsMain Unit, Storage Case, 2 “AAA” Alkaline Batteries, Instruction Manual, and Quick Start Guide
Internally powered ME equipment

30
SPECIFICATIONSNOTES: • These specifications are subject to change without notice. • In the clinical validation study, the 5th phase was used on 85 subjects for determination of diastolic blood pressure. • This device has not been validated for use in pregnancy.
31
GUIDANCE AND MANUFACTURER’S DECLARATIONOMRON Wrist Blood Pressure Monitor (BPM) Information for accompanying documents in the scope of IEC60601-1-2:2007
Important information regarding Electro Magnetic Compatibility (EMC)With the increased number of electronic devices such as PC’s and mobile (cellular) telephones, medical devices in use may be susceptible to electromagnetic interference from other devices. Electromagnetic interference may result in incorrect operation of the medical device and create a potentially unsafe situation. Medical devices should also not interfere with other devices.
In order to regulate the requirements for EMC (Electro Magnetic Compatibil-ity) with the aim to prevent unsafe product situations, the IEC60601-1-2 standard has been implemented. This standard defines the levels of immunity to electromagnetic interferences as well as maximum levels of electromagnetic emissions for medical devices.
Medical devices manufactured by OMRON Healthcare conform to this IEC60601-1-2:2007 standard for both immunity and emissions.Nevertheless, special precautions need to be observed:• The use of accessories and cables other than those specified by OMRON, with the exception of cables sold by OMRON as replacement parts for internal components, may result in increased emission or decreased immunity of the device.• The medical devices should not be used adjacent to or stacked with other equipment. In case adjacent or stacked use is necessary, the medical device should be observed to verify normal operation in the configuration in which it will be used.• Refer to further guidance below regarding the EMC environment in which the device should be used.• The MEDICAL ELECTRICAL EQUIPMENT BPM needs special precautions regarding EMC and needs to be installed and put into service according to the EMC information provided in this documentations.
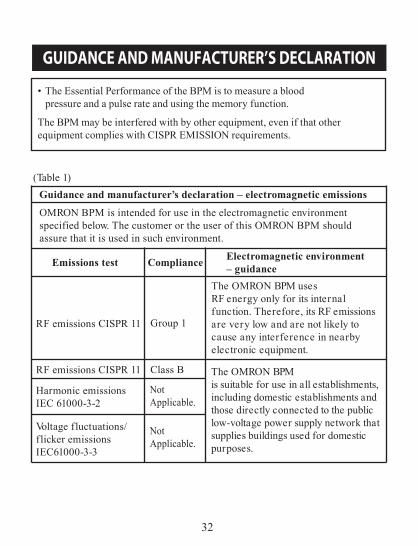
• The Essential Performance of the BPM is to measure a blood pressure and a pulse rate and using the memory function.
The BPM may be interfered with by other equipment, even if that other equipment complies with CISPR EMISSION requirements.
32
GUIDANCE AND MANUFACTURER’S DECLARATION
(Table 1)Guidance and manufacturer’s declaration – electromagnetic emissions
Emissions test
Harmonic emissions IEC 61000-3-2
Voltage fluctuations/flicker emissionsIEC61000-3-3
Important information regarding Electro Magnetic Compatibility (EMC)With the increased number of electronic devices such as PC’s and mobile (cellular) telephones, medical devices in use may be susceptible to electromagnetic interference from other devices. Electromagnetic interference may result in incorrect operation of the medical device and create a potentially unsafe situation. Medical devices should also not interfere with other devices.
In order to regulate the requirements for EMC (Electro Magnetic Compatibil-ity) with the aim to prevent unsafe product situations, the IEC60601-1-2 standard has been implemented. This standard defines the levels of immunity to electromagnetic interferences as well as maximum levels of electromagnetic emissions for medical devices.
Medical devices manufactured by OMRON Healthcare conform to this IEC60601-1-2:2007 standard for both immunity and emissions.Nevertheless, special precautions need to be observed:• The use of accessories and cables other than those specified by OMRON, with the exception of cables sold by OMRON as replacement parts for internal components, may result in increased emission or decreased immunity of the device.• The medical devices should not be used adjacent to or stacked with other equipment. In case adjacent or stacked use is necessary, the medical device should be observed to verify normal operation in the configuration in which it will be used.• Refer to further guidance below regarding the EMC environment in which the device should be used.• The MEDICAL ELECTRICAL EQUIPMENT BPM needs special precautions regarding EMC and needs to be installed and put into service according to the EMC information provided in this documentations.
OMRON BPM is intended for use in the electromagnetic environment specified below. The customer or the user of this OMRON BPM should assure that it is used in such environment.
Electromagnetic environment – guidance
Group 1
Class BRF emissions CISPR 11
RF emissions CISPR 11
The OMRON BPM uses RF energy only for its internal function. Therefore, its RF emissions are very low and are not likely to cause any interference in nearby electronic equipment.
The OMRON BPM is suitable for use in all establishments, including domestic establishments and those directly connected to the public low-voltage power supply network that supplies buildings used for domestic purposes.
Compliance
NotApplicable.
NotApplicable.
• The Essential Performance of the BPM is to measure a blood pressure and a pulse rate and using the memory function.
The BPM may be interfered with by other equipment, even if that other equipment complies with CISPR EMISSION requirements.

33
GUIDANCE AND MANUFACTURER’S DECLARATION(Table 2)
Guidance and manufacturer’s declaration – electromagnetic immunity
Immunity test IEC 60601Test level
Compliancelevel
Electromagnetic environment – guidance
OMRON BPM is intended for use in the electromagnetic environment specified below. The customer or the user of this OMRON BPM should assure that it is used in such environment.
Electrostaticdischarge (ESD)IEC 61000-4-2
Electrical fasttransient/burstIEC 61000-4-4
Surge IEC 61000-4-5
Floor should be wood, concrete, or ceramic tile. If f loors are covered with synthetic material, the relative humidity should be at least 30 %.
Not Applicable.
Not Applicable.
±6 kV contact±8 kV air
±2 kV for powersupply lines
±1 kV forinput/outputlines
NotApplicable.
±1 kVline(s) to line(s)
±2 kVline(s) to earth
NotApplicable.
±6 kV contact±8 kV air
34
GUIDANCE AND MANUFACTURER’S DECLARATION
Immunity test IEC 60601Test level
Compliancelevel
Electromagnetic environment – guidance
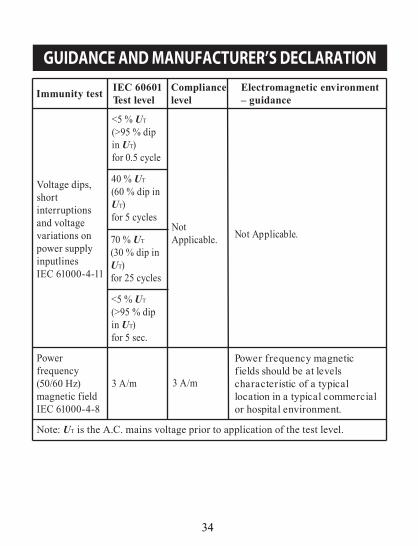
Voltage dips, short interruptions and voltage variations on power supply inputlines IEC 61000-4-11
Power frequency(50/60 Hz)magnetic fieldIEC 61000-4-8
Power frequency magnetic fields should be at levels characteristic of a typical location in a typical commercial or hospital environment.
Not Applicable.
<5 % UT
(>95 % dip in UT)for 0.5 cycle
40 % UT
(60 % dip in UT)for 5 cycles
70 % UT
(30 % dip in UT)for 25 cycles
NotApplicable.
<5 % UT
(>95 % dip in UT)for 5 sec.
3 A/m 3 A/m
Note: UT is the A.C. mains voltage prior to application of the test level.
35
GUIDANCE AND MANUFACTURER’S DECLARATION
Immunity test IEC 60601Test level
Compliancelevel
Electromagnetic environment – guidance
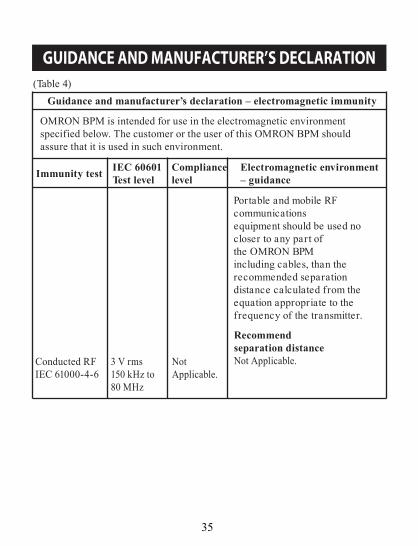
(Table 4)Guidance and manufacturer’s declaration – electromagnetic immunity
OMRON BPM is intended for use in the electromagnetic environment specified below. The customer or the user of this OMRON BPM should assure that it is used in such environment.
Conducted RFIEC 61000-4-6
Portable and mobile RF communicationsequipment should be used no closer to any part ofthe OMRON BPM including cables, than the recommended separation distance calculated from the equation appropriate to the frequency of the transmitter.
3 V rms150 kHz to80 MHz
Not Applicable.
Recommend separation distanceNot Applicable.
36
GUIDANCE AND MANUFACTURER’S DECLARATION
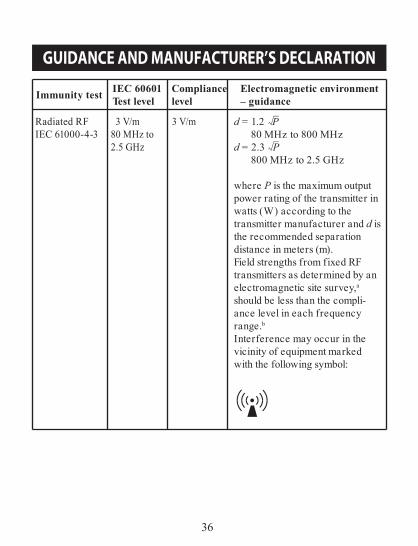
Radiated RFIEC 61000-4-3
3 V/m80 MHz to2.5 GHz
3 V/m d = 1.2 P 80 MHz to 800 MHzd = 2.3 P 800 MHz to 2.5 GHz
where P is the maximum output power rating of the transmitter in watts (W) according to thetransmitter manufacturer and d is the recommended separation distance in meters (m).Field strengths from fixed RF transmitters as determined by an electromagnetic site survey,a
should be less than the compli-ance level in each frequency range.bInterference may occur in the vicinity of equipment marked with the following symbol:
Immunity test IEC 60601Test level
Compliancelevel
Electromagnetic environment – guidance
37
GUIDANCE AND MANUFACTURER’S DECLARATION
Note1: At 80 MHz and 800 MHz, the higher frequency range applies.Note2: These guidelines may not apply in all situations. Electromagnetic propagation is affected by absorption and reflection from structures, objects, and people.
a Field strengths from fixed transmitters, such as base stations for radio (cellular/ cordless) telephones and land mobile radio, AM and FM radio broadcast, and TV broadcast cannot be predicted theoretically with accuracy. To assess the electromagnetic environment due to fixed RF transmitters, an electromagnetic site survey should be considered. If the measured field strength in the location in which the OMRON BPM is used exceeds the applicable RF compliance level above, the OMRON BPM should be observed to verify normal operation. If abnormal performance is observed, additional measures may be necessary, such as reorienting or relocating the OMRON BPM.b Over the frequency range 150 kHz to 80 MHz, field strengths should be less than 3 V/m.
38
2
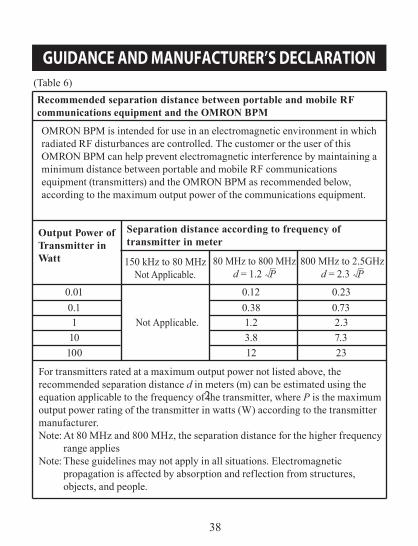
GUIDANCE AND MANUFACTURER’S DECLARATION(Table 6)Recommended separation distance between portable and mobile RF communications equipment and the OMRON BPM
Separation distance according to frequency of transmitter in meter
Not Applicable.
0.120.381.23.812
0.230.732.37.323
0.010.1110100
Output Power ofTransmitter in Watt
OMRON BPM is intended for use in an electromagnetic environment in which radiated RF disturbances are controlled. The customer or the user of this OMRON BPM can help prevent electromagnetic interference by maintaining a minimum distance between portable and mobile RF communications equipment (transmitters) and the OMRON BPM as recommended below, according to the maximum output power of the communications equipment.
150 kHz to 80 MHzNot Applicable.
For transmitters rated at a maximum output power not listed above, the recommended separation distance d in meters (m) can be estimated using the equation applicable to the frequency of the transmitter, where P is the maximum output power rating of the transmitter in watts (W) according to the transmitter manufacturer.Note: At 80 MHz and 800 MHz, the separation distance for the higher frequency range appliesNote: These guidelines may not apply in all situations. Electromagnetic propagation is affected by absorption and reflection from structures, objects, and people.
800 MHz to 2.5GHzd = 2.3 P
80 MHz to 800 MHzd = 1.2 P

39
Manufactured for :OMRON HEALTHCARE Co., Ltd.Distributed by :OMRON HEALTHCARE, INC.1925 West Field CourtLake Forest, IL 60045 U.S.A.
www.omronhealthcare.com© 2014 OMRON HEALTHCARE, INC.
Made in China 9701555-9A


![Welcome [] › wp › wp-content › ...best protection is awareness. ... Codes are also used if you delete the security certificate or “cookie” that we’ve stored on your computer,](https://img.pdfslide.us/doc/110x75/5f0daccf7e708231d43b86d5/welcome-a-wp-a-wp-content-a-best-protection-is-awareness-codes.jpg)