Embed Size (px)
Citation preview
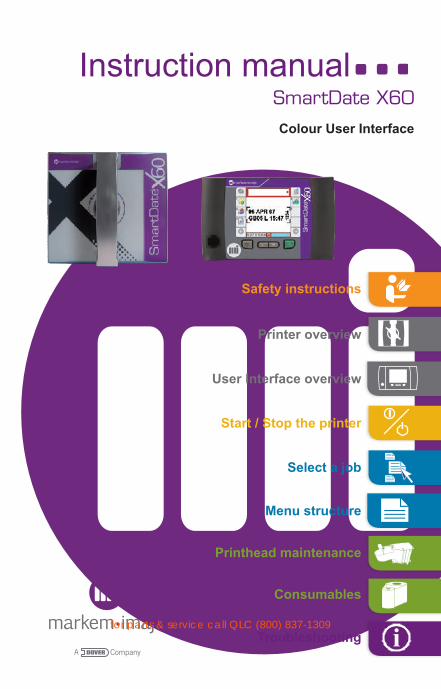
the team to trustSmartDate X60
Instruction manual
Colour User Interface
Safety instructions
Printer overview
User Interface overview
Start / Stop the printer
Select a job
Menu structure
Printhead maintenance
Consumables
Troubleshootingfor parts & service call QLC (800) 837-1309
Instruction manual
Safety instructions
2
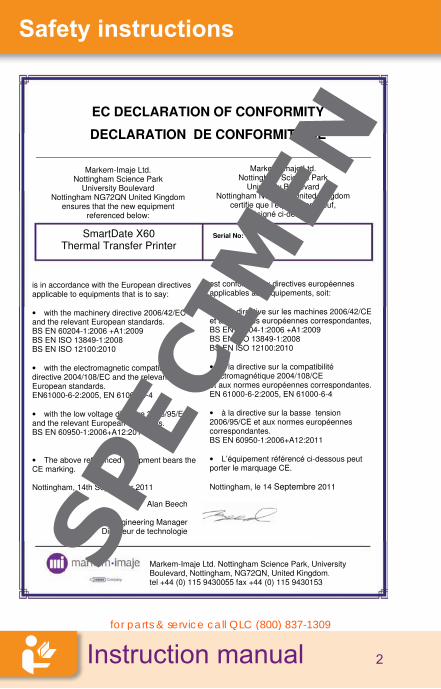
Markem-Imaje Ltd. Nottingham Science Park
University Boulevard Nottingham NG72QN United Kingdom
ensures that the new equipment referenced below:
Markem-Imaje Ltd. Nottingham Science Park
University Boulevard Nottingham NG72QN United Kingdom
certifie que l’équipement neuf, désigné ci-dessous:
Serial No:
is in accordance with the European directives applicable to equipments that is to say:
• with the machinery directive 2006/42/EC and the relevant European standards. BS EN 60204-1:2006 +A1:2009 BS EN ISO 13849-1:2008 BS EN ISO 12100:2010
• with the electromagnetic compatibility directive 2004/108/EC and the relevant European standards. EN61000-6-2:2005, EN 61000-6-4
• with the low voltage directive 2006/95/EC and the relevant European standards. BS EN 60950-1:2006+A12:2011
• The above referenced equipment bears the CE marking. Nottingham, 14th September 2011
Alan Beech
Engineering Manager Directeur de technologie
Markem-Imaje Ltd. Nottingham Science Park, University Boulevard, Nottingham, NG72QN, United Kingdom.
tel +44 (0) 115 9430055 fax +44 (0) 115 9430153
EC DECLARATION OF CONFORMITY
DECLARATION DE CONFORMITE CE
SmartDate X60 Thermal Transfer Printer
10059020-AB
est conforme aux directives européennes applicables aux équipements, soit:
• à la directive sur les machines 2006/42/CE et aux normes européennes correspondantes, BS EN 60204-1:2006 +A1:2009 BS EN ISO 13849-1:2008 BS EN ISO 12100:2010
• à la directive sur la compatibilité électromagnétique 2004/108/CE et aux normes européennes correspondantes. EN 61000-6-2:2005, EN 61000-6-4
• à la directive sur la basse tension 2006/95/CE et aux normes européennes correspondantes. BS EN 60950-1:2006+A12:2011
• L’équipement référencé ci-dessous peut porter le marquage CE.
Nottingham, le 14 Septembre 2011
SPECIMEN
for parts & service call QLC (800) 837-1309
Instruction manual
Safety instructions
3
Before using this printer, please read and fully comply with these instructions, the material safety data sheet (MSDS) for consumables used, and safety labels affixed to the printer. Servicing must be performed only by qualified people who are appropriately trained.
■ LiabilityMarkem-Imaje shall not be liable for any damage or injury resulting from any failure to follow these safety instructions, as well as good manufacturing practices and safety standards that are generally applicable in the industry, when installing, using or servicing Markem-Imaje equipment. Any user who modifies or repairs Markem-Imaje equipment, uses consumables, spare parts or accessories other than those supplied by Markem-Imaje, or fails to comply with Markem-Imaje specifications shall have sole responsibility for the consequences thereof. Markem-Imaje shall not be liable for any malfunction or damage caused by any modification of the equipment or use of the equipment for any purposes other than those for which it is designed. The user shall be solely responsible to take any precautions required by any use to which the user puts the Markem-Imaje equipment.
Markem-Imaje consumables (inks, ribbons, cleaning products and other consumables), spare parts and accessories are designed for use with Markem-Imaje equipment. Use of consumables, spare parts or accessories, that are not produced or recommended by Markem-Imaje for use with the specific Markem-Imaje equipment may harm the equipment and cause performance failures.
for parts & service call QLC (800) 837-1309

Instruction manual
Safety instructions
4
Because Markem-Imaje equipment is tested with Markem-Imaje consumables and spare parts for conformity with certain regulations and safety standards, use of non-Markem-Imaje consumables and spare parts also may be inconsistent with testing conditions and affect compliance of the equipment with certain standards. The user shall bear all risks associated with use of unsuitable consumables and spare parts.
Markem-Imaje cannot guarantee the safety and / or suitability of non-Markem-Imaje print ribbon. The NTRL certification may be compromised if non Markem-Imaje ribbon is used.If non-Markem-Imaje ribbon is used, it is recommended that anti static properties be considered.
This equipment is certified in accordance with the requirements for CE marking.
■ HandlingWhen removing the printer from the host machine, care should be taken to first ensure that the body of the printer is at a temperature that can be comfortably handled. It is important to note that the small area of the perimeter of the printer main plate which is exposed between the front and rear covers is likely to be the warmest zone, and warrants particular attention.Safety shoes should be worn when installing or removing the Controller or Printer body from packaging machinery. These units are heavy and there is a danger of injury if dropped.To avoid injury by dropping the printer cassette when changingribbon, please ensure that the cassette is placed on a bench andthat safety shoes are worn.
Printer weight: 7.82 kgController weight: 4 kg
for parts & service call QLC (800) 837-1309

Instruction manual
Safety instructions
5
■ Health / Hygiene / EnvironmentSolvent-resistant gloves and safety goggles are recommended during cleaning operations.Please read the Isopropanol Safety Data Information prior to using Isopropanol with any Markem-Imaje product.
Noise levels:
Test Standard BS EN ISO 3746:1996
SmartDate X60 Intermittent Mode 199 ppm with a 10 mm Image (700 mm/s) <70 dB (A)
SmartDate X60 Continuous Mode 299 ppm with a 10 mm Image (160 mm bag) (800 mm/s) 70 dB (A)
Operating environment of:32o F to 104o F(0o C to 40o C)
■ Installation RequirementsThe printer must be placed such that all its surfaces are easily accessible and the control interfaces are fully visible.Ensure that these services and control signals are available:Power - 100 - 230V AC (+/- 10%) 50 - 60 Hz Compressed Air - 6 Bar (max.), dry and uncontaminated.A Print Go Signal - This can be either a volt free contact which closes when printing is required, or a 24 V DC signal from a PNP sensor (positive edge triggered).Sufficient space for installation and operation. SmartDate X60 configured as a continuous printer also requires an encoder to monitor the substrate speed.
for parts & service call QLC (800) 837-1309

Instruction manual
Safety instructions
6
■ Installation First time Installations will normally be carried out by qualified Markem.Imaje service technicians.For experienced customers who have existing SmartDate units and wish to carry out installation themselves, please first check with Markem.Imaje to ensure that this is advisable.
■ Use Do not touch the printer while it is running in intermittent mode to avoid the risk of pinching.The printer is designed for thermal transfer printing. Any other use of the printer is prohibited, and any consequences shall be under the entire responsibility of the user.
■ ServicingDISCONNECT the printer from the mains before any operations requiring components to be removed or exchanged. Use appropriate tools for any work on the electrical and pnuematic circuits.DO NOT operate the machine with any covers removed. All covers must be in place using the appropriate number of fasteners. It is essential that electrical and non-electrical connector dust covers (provided with the machine) are fitted to all unused connectors to protect against dust and dirt and possible static damage to internal components.DISCONNECT the air supply before undertaking work on the printer.Do not adjust the regulator pressure above 6 Bar under any circumstances. Doing so could make the SmartDate X60 unsafe.
for parts & service call QLC (800) 837-1309
Instruction manual
Safety instructions
BatteriesThere is a non-replaceable lithium battery mounted on the control board assembly. Under no circumstances should this be replaced (it should last for several years). In the event of failure, please return the whole control board assembly to Markem-Imaje for repair.
■ Recycling
Disposal of used batteries and accumulators (applicable in EU countries and other European countries with selective waste collection systems).Disposal of used electric and electronic appliances (applicable in EU countries and other European countries with selective waste collection systems).
These symbols indicate that once these electric and electronic appliances have reached the end of their life, they cannot be treated as simple household waste. The same applies for any batteries and accumulators within the appliances. By making sure that these items are disposed of in an appropriate manner, you are playing an active role in preventing potential negative consequences to the environment and to human health that might result from improper disposal. Recycling materials also helps to save natural resources.By giving your spent electric appliances to a company authorised to recycle them, you can be certain that all built-in parts will be dealt with correctly.For all other scenarios and for how to safely remove the batteries, accumulators and other materials from your appliance, please refer to the user manual or contact your Markem-Imaje representative.
7
for parts & service call QLC (800) 837-1309
Instruction manual
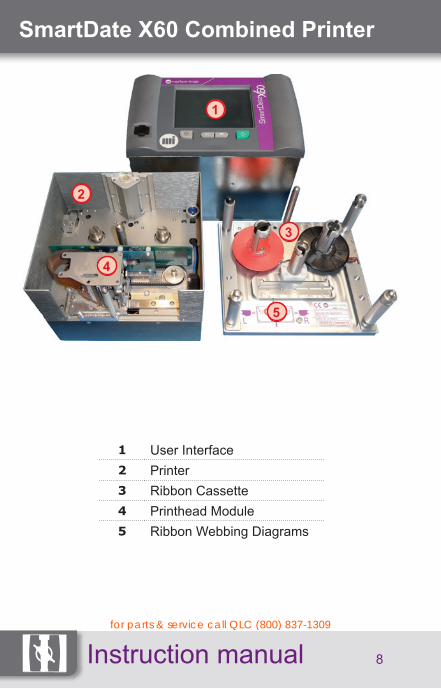
SmartDate X60 Combined Printer
1
2
3
4
5
8
1 User Interface2 Printer3 Ribbon Cassette4 Printhead Module5 Ribbon Webbing Diagrams
for parts & service call QLC (800) 837-1309

Instruction manual
SmartDate X60 Shuttle Printer
1
2
3
4
5
9
1 User Interface2 Printer3 Ribbon Cassette4 Printhead Module5 Ribbon Webbing Diagrams
for parts & service call QLC (800) 837-1309

Instruction manual
Interface overview
1 2 3 4
10
Button Function1 Stop producing2 Registration3 Select job4 Start producing
for parts & service call QLC (800) 837-1309

Instruction manual
Description of icons
11
Home This option will return you to the Home screen.
Print preview This option allows you to preview the selected job.
Folder OK This indicates that there are no faults or warnings active.
Folder warning
This indicates that there is one or more warnings active.
Folder fault This indicates that there is one or more Fault messages active.
Menus This option allows you to access the menu options.
Select job This option allows you to select a job to be printed.
Counts This option allows you to view the various printer counts.
Print adjust This option allows you to configure the basic print settings.
Settings This option allows access to the printer settings menus.
Diagnostics This option allows access to the various diagnostics functions.
Information or Statistics
This option allows you to view the selected Image field information or statistical details.
Files This option allows you to manage the various Database files.
Service This option allows access to the Service menu.This is password protected.
Version Information
This option allows you to view specific information about the printer.
for parts & service call QLC (800) 837-1309

Instruction manual
Start the printer
12
Default jobReady 0
Default jobProducing 0
for parts & service call QLC (800) 837-1309
Instruction manual
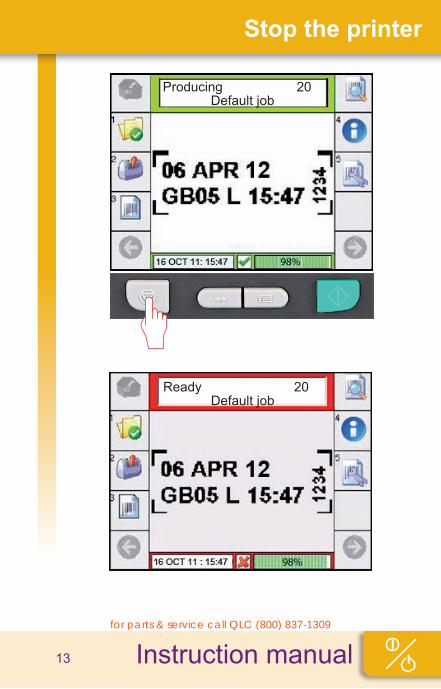
Stop the printer
13
Default jobReady 20
Default jobProducing 20
for parts & service call QLC (800) 837-1309

Instruction manual
Select a Job - Local Database
14
Job 2Job 1
Job 3
Select jobHome
Job 1Home
Field 1Field 1 [1/4]
for parts & service call QLC (800) 837-1309

Instruction manual
Select a Job - Local Database
15
ABCD
12345ABCD
20/10/10L12
Confirm JobJob 1
for parts & service call QLC (800) 837-1309

Instruction manual
Select a Job - Remote Database
16
Select Job from HostHome
Please enter the Job name
Job 1
for parts & service call QLC (800) 837-1309

Instruction manual
Select a Job - Remote Database
17
Job 1Home
Field 1Field 1 [1/4]
12345ABCD
20/10/10L12
Confirm JobJob 1
for parts & service call QLC (800) 837-1309
Instruction manual
Menu structure
18
Home screen
Status
Select job
Print adjust
Menus
Information
Settings
Statistics
Version Information
Diagnostics
Service
Counts
Health
Printhead Information
Supplies
Job History
Darkness
Registration
Offset
Rotation
Test print
Files
for parts & service call QLC (800) 837-1309

Instruction manual
Menu structure
19
Settings
Statistics
Version Information
Diagnostics
Service
Files
Machine settings
Adjust RTC
Display settings
Custom Codes
Enable security
Flex IO map
Diagnostics
Digital I/O control
Manual control
Select printhead test pattern
Speed profile graph
Copy files
Delete files
Save settings
File statistics
Clear job database
Copy logs to USB
Load settings
Installation setup
Service login
Setup wizards
Language
for parts & service call QLC (800) 837-1309

Instruction manual
Printhead maintenance
20
Print line (corner edge)
for parts & service call QLC (800) 837-1309

Instruction manual
Printhead maintenance
21
The printhead should be cleaned at regular intervals. These depend on machine use, operating environment, and choice of thermal ribbon.Turn off the power to the controller and remove the ribbon cassette. Allow the printhead to cool to normal room temperature before proceeding in order to prevent the possibility of thermal shock damage.Use a cotton swab or a soft cloth soaked in Isopropanol solvent to remove any residue from the printhead. Take care not to use excessive amounts of solvent. The print line is located on the bevelled edge of the printhead.
for parts & service call QLC (800) 837-1309

Changing the Ribbon
Instruction manual 22
When removing the cassette, if the latch does not turn, please call an Engineer. Do not use force or tools.
Use the plate below the waste ribbon to lift it off the ribbon rewind reel. If the ribbon is still difficult to remove, please call an Engineer.Do not use force or tools.
Always use an Empty Ribbon Core.Do not wrap the ribbon directly around the Ribbon Rewind Reel.
for parts & service call QLC (800) 837-1309
Ribbon Web Paths
Instruction manual23
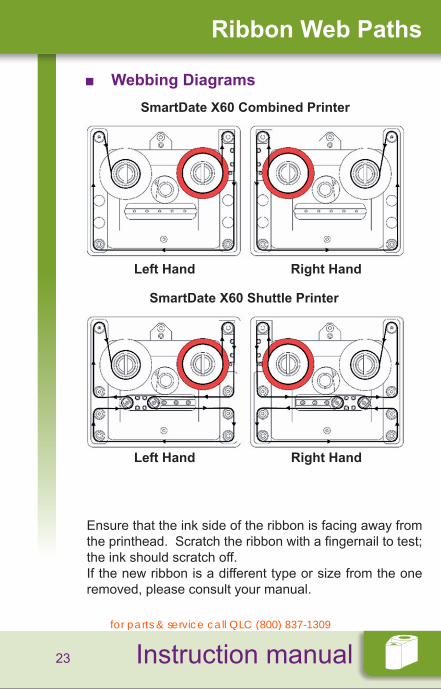
■ Webbing Diagrams
Ensure that the ink side of the ribbon is facing away from the printhead. Scratch the ribbon with a fingernail to test; the ink should scratch off.If the new ribbon is a different type or size from the one removed, please consult your manual.
SmartDate X60 Combined Printer
Left Hand Right Hand
SmartDate X60 Shuttle Printer
Left Hand Right Hand
for parts & service call QLC (800) 837-1309
Instruction manual
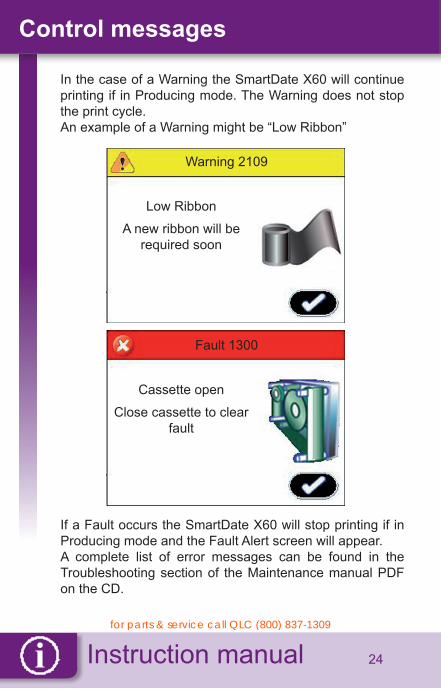
Control messages
24
If a Fault occurs the SmartDate X60 will stop printing if in Producing mode and the Fault Alert screen will appear.A complete list of error messages can be found in the Troubleshooting section of the Maintenance manual PDF on the CD.
In the case of a Warning the SmartDate X60 will continue printing if in Producing mode. The Warning does not stop the print cycle.An example of a Warning might be “Low Ribbon”
Warning 2109
Low Ribbon
A new ribbon will be required soon
Fault 1300
Cassette open
Close cassette to clear fault
for parts & service call QLC (800) 837-1309

Instruction manual
Troubleshooting - Information
25
S/N :Serial number :
Ribbon type:
LOW RIBBONThe Ribbon has almost run out.
CASSETTE OPENCheck cassette is firmly in place with latch closed.Ensure handle is in the CLOSED position.
CASSETTE LOAD ERROREnsure the shuttle or printhead is in the HOME position.
CALIBRATION FAILEDCheck ribbon for breaks or slackness
RIBBON BREAK DETECTIf ribbon is broken, reweb ribbon
for parts & service call QLC (800) 837-1309
Notes
Instruction manual 26
for parts & service call QLC (800) 837-1309
Notes
Instruction manual27
For Marking & Coding Equipment.Photographs and drawings are not binding in detail. Original instructions. This document was originally writ-ten in English. The English text of this document shall alone be authentic and shall prevail in the event of a dispute. Markem-Imaje reserves the right to modify the specifications of its products without prior notice. Any reproduction, even partial, of this document is prohibited.
© 2011 Markem-Imaje All Rights Reserved. English version
for parts & service call QLC (800) 837-1309
the team to trust
10055724
en 12/2011-AB
www.markem-imaje.com
Markem-Imaje LimitedNottingham Science ParkUniversity BoulevardNottingham NG7 2QNtel +44 (0) 115 9430055fax +44 (0) 115 9430153
for parts & service call QLC (800) 837-1309