Embed Size (px)
Citation preview

Franckh-Kosmos Verlags-GmbH & Co. KG, Pfizerstr. 5-7, 70184 Stuttgart, Germany | +49 (0) 711 2191-0 | www.kosmos.de Thames & Kosmos, 301 Friendship St., Providence, RI, 02903, USA | 1-800-587-2872 | www.thamesandkosmos.com Thames & Kosmos UK Ltd, Goudhurst, Kent, TN17 2QZ , United Kingdom | 01580 212000 | www.thamesandkosmos.co.uk
INSTRUCTION MANUAL
Dear Parents,
This knitting loom and the braiding star will make it possible to perform all sorts of fun hobby projects at different levels of difficulty — from simple friendship bracelets all the way to a loop scarf.
Please save this manual, since it contains important information about specific techniques and suggestions for all kinds of knitting and braiding projects. What you won’t find here, however, are detailed instructions describing exactly how a finished item will look. Instead, we want to inspire your child to express his or her own creativity on the basis of the skills acquired through this kit. There is no right or wrong here, no crooked or straight, just the joy of discovery and creation.
This kit contains all the materials needed for completing lots of different knitting and braiding designs, so your child can start right away with his or her own projects.
In addition, the manual offers suggestions for using or recycling other materials from around the house. This way, your child will get a feel for how to create new things out of used ones, and learn that not everything has to be purchased from a store.
Please offer your help when your child is ready to cast off the knitted item. Be sure that the woolen string is tied securely at the end and take a look at the home-made accessories before the items are worn the first time. With all needle-and-thread handicrafts, you should check to be sure that all seams, buttons, and so on are tight and secure.
We wish you and your child lots of knitting and braiding fun!
WARNING.Not suitable for children under 3 years of age. There is a risk of choking due to small parts that may be swallowed or inhaled. There is a risk of strangulation if long cords (yarn, embroidery thread) become wrapped around the neck.
Save the packaging and instructions. They contain important information.
SAFETY INFORMATION
1
KIT CONTENTS
Dear Knitting and Braiding Fans,
This kit will let you create a whole bunch of cool things. You will learn how to knit caps, sleeves, and scarves, or braid simple friendship bracelets and other decorative items. We will also show you how to use the knitting loom to make the world around you a prettier and more colorful place. Can you really do all that with just two little gadgets like the knitting loom and the braiding star? Read the following pages to find out!
1
4
3
2
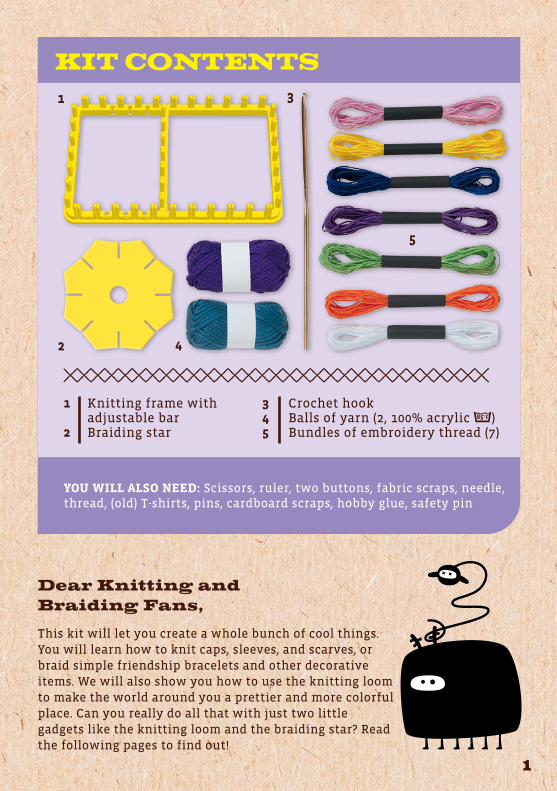
YOU WILL ALSO NEED: Scissors, ruler, two buttons, fabric scraps, needle, thread, (old) T-shirts, pins, cardboard scraps, hobby glue, safety pin
Knitting frame with adjustable barBraiding star
1
2
Crochet hook Balls of yarn (2, 100% acrylic 85°F ) Bundles of embroidery thread (7)
3 4 5
5
2
Before you learn how to use the knitting loom and braiding star, take a moment to ponder all the different kinds of knitted and braided items you will be able to make with them. You can use the knitting loom to create various sorts of rectangles and tubes made out of yarn, and the braiding star to create super-colorful arm- or wristbands out of embroidery thread.
Of course, you can use the knitted and braided items “as is” — as armbands, as loop scarves, or shoelaces. Or, you can use them to create other things such as fun stuffed animals.
But how would you feel about making the world around you a prettier place with your yarn and thread creations? This kind of street art, known as “graffiti knitting, “urban knitting,” or “yarn bombing,” has been showing up
Knit your world!
in more and more cities around the world during the last few years. By wrapping lampposts, bicycle stands, bridge railings, and other gray and gloomy objects with soft, cuddly, and colorful wrappings, the world becomes a little brighter. You can also “sew up” everyday objects such as flower pots!
NOWLET'S GO!
So keep your eyes open as you walk through your city, home, or room, and think about ways to make your world a little brighter and more colorful. Draw your ideas on the opposite page! Let your imagination run free.
Find out first who owns the object that you’d like to knit up, and ask for permission. Don’t worry: Most people like colorful knit art!
IMPORTANT!
3
NOWOff you go
! Draw your
knitting and braiding
ideas on this page!

4
LEaRNiNGTO KNIT
1 Your knitting loom is the yellow frame with all the little prongs. You will be using it along with yarn and the crochet hook to make all your knitted creations.
If you knit the frame along one, two, or three sides, what you will get is a knitted rectangle in varying widths.
2 If you knit the frame all the way around, what you will get is a tube that grows longer and longer.
How the knitting loom works
1
2
To change the color, simply cut the yarn and tie a new piece to the end.
TIP!
5
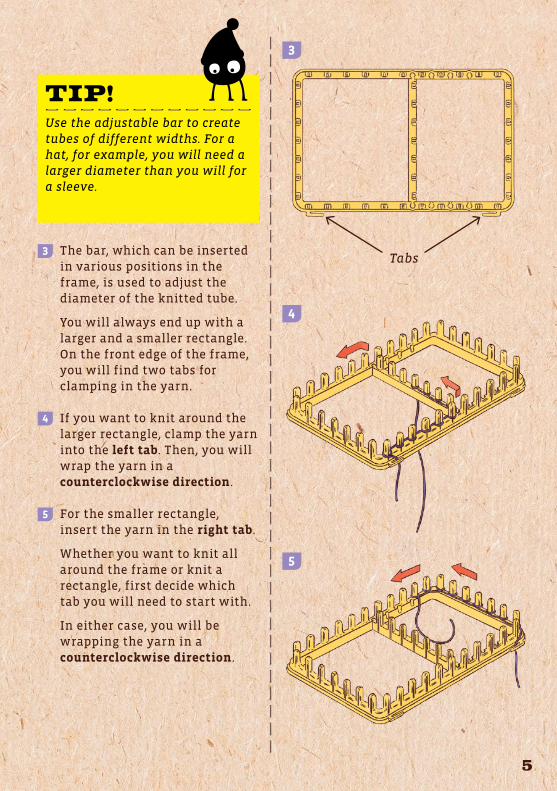
3 The bar, which can be inserted in various positions in the frame, is used to adjust the diameter of the knitted tube.
You will always end up with a larger and a smaller rectangle. On the front edge of the frame, you will find two tabs for clamping in the yarn.
4 If you want to knit around the larger rectangle, clamp the yarn into the left tab. Then, you will wrap the yarn in a counterclockwise direction.
5 For the smaller rectangle, insert the yarn in the right tab.
Whether you want to knit all around the frame or knit a rectangle, first decide which tab you will need to start with.
In either case, you will be wrapping the yarn in a counterclockwise direction.
3
4
5
Tabs
Use the adjustable bar to create tubes of different widths. For a hat, for example, you will need a larger diameter than you will for a sleeve.
TIP!
6
You will need:
Knitting loom, balls of yarn, ruler, scissors
Here’s how:
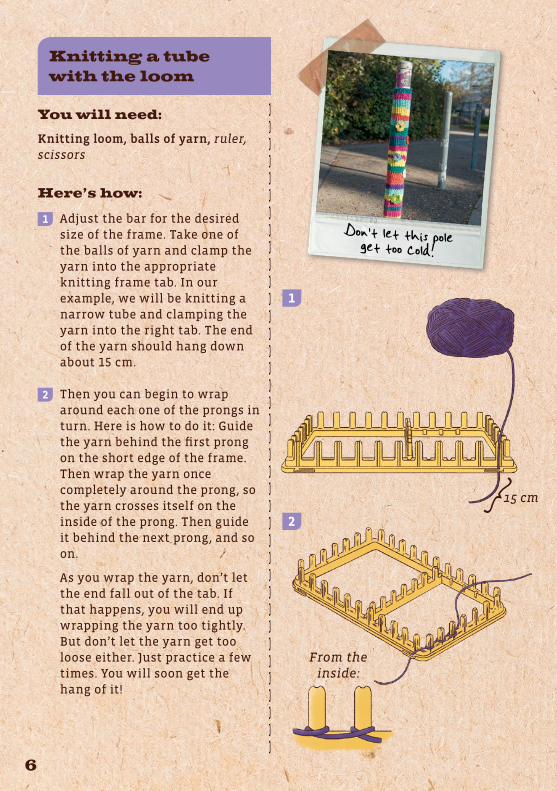
1 Adjust the bar for the desired size of the frame. Take one of the balls of yarn and clamp the yarn into the appropriate knitting frame tab. In our example, we will be knitting a narrow tube and clamping the yarn into the right tab. The end of the yarn should hang down about 15 cm.
2 Then you can begin to wrap around each one of the prongs in turn. Here is how to do it: Guide the yarn behind the first prong on the short edge of the frame. Then wrap the yarn once completely around the prong, so the yarn crosses itself on the inside of the prong. Then guide it behind the next prong, and so on.
As you wrap the yarn, don’t let the end fall out of the tab. If that happens, you will end up wrapping the yarn too tightly. But don’t let the yarn get too loose either. Just practice a few times. You will soon get the hang of it!
Knitting a tube with the loom
1
2
From the inside:
15 cm
Don’t let this pole get too cold!
7
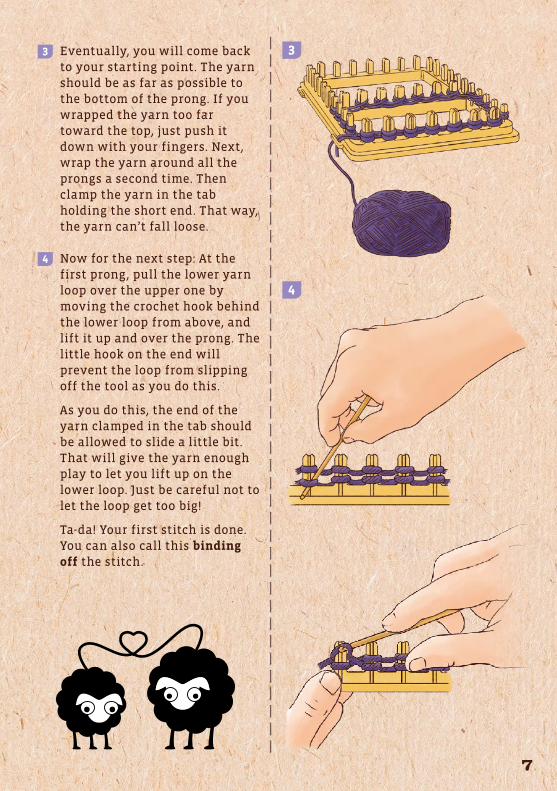
3 Eventually, you will come back to your starting point. The yarn should be as far as possible to the bottom of the prong. If you wrapped the yarn too far toward the top, just push it down with your fingers. Next, wrap the yarn around all the prongs a second time. Then clamp the yarn in the tab holding the short end. That way, the yarn can’t fall loose.
4 Now for the next step: At the first prong, pull the lower yarn loop over the upper one by moving the crochet hook behind the lower loop from above, and lift it up and over the prong. The little hook on the end will prevent the loop from slipping off the tool as you do this.
As you do this, the end of the yarn clamped in the tab should be allowed to slide a little bit. That will give the yarn enough play to let you lift up on the lower loop. Just be careful not to let the loop get too big!
Ta-da! Your first stitch is done. You can also call this binding off the stitch.
3
4
8
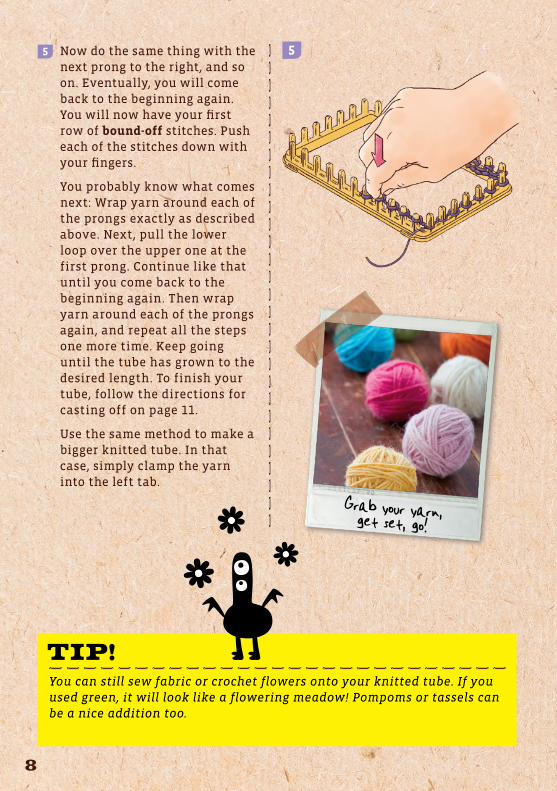
5 Now do the same thing with the next prong to the right, and so on. Eventually, you will come back to the beginning again. You will now have your first row of bound-off stitches. Push each of the stitches down with your fingers.
You probably know what comes next: Wrap yarn around each of the prongs exactly as described above. Next, pull the lower loop over the upper one at the first prong. Continue like that until you come back to the beginning again. Then wrap yarn around each of the prongs again, and repeat all the steps one more time. Keep going until the tube has grown to the desired length. To finish your tube, follow the directions for casting off on page 11.
Use the same method to make a bigger knitted tube. In that case, simply clamp the yarn into the left tab.
Grab your yarn, get set, go!
5
You can still sew fabric or crochet flowers onto your knitted tube. If you used green, it will look like a flowering meadow! Pompoms or tassels can be a nice addition too.
TIP!
9
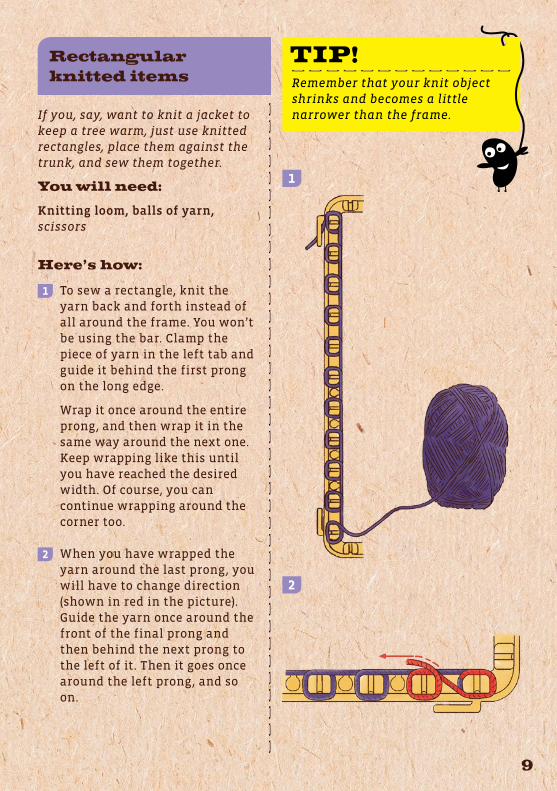
Remember that your knit object shrinks and becomes a little narrower than the frame.
TIP!
1
If you, say, want to knit a jacket to keep a tree warm, just use knitted rectangles, place them against the trunk, and sew them together.
You will need:
Knitting loom, balls of yarn, scissors
Here’s how:
1 To sew a rectangle, knit the yarn back and forth instead of all around the frame. You won’t be using the bar. Clamp the piece of yarn in the left tab and guide it behind the first prong on the long edge.
Wrap it once around the entire prong, and then wrap it in the same way around the next one. Keep wrapping like this until you have reached the desired width. Of course, you can continue wrapping around the corner too.
2 When you have wrapped the yarn around the last prong, you will have to change direction (shown in red in the picture). Guide the yarn once around the front of the final prong and then behind the next prong to the left of it. Then it goes once around the left prong, and so on.
Rectangular knitted items
2
10
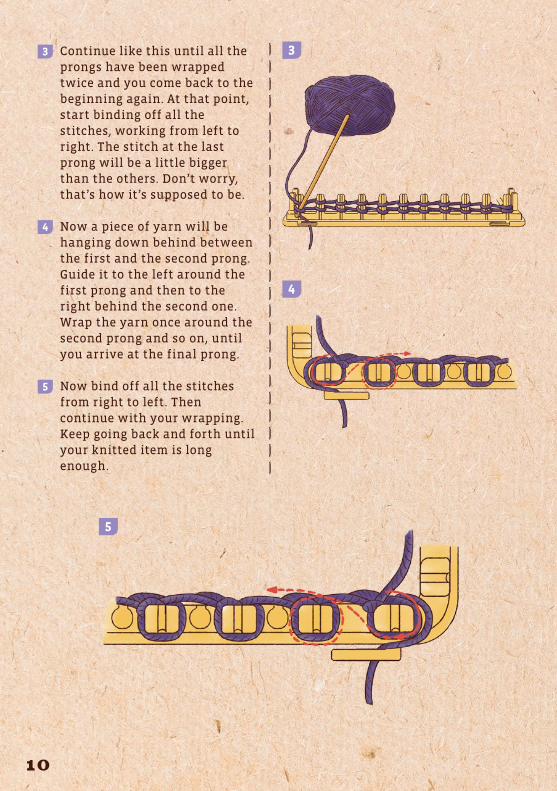
3 Continue like this until all the prongs have been wrapped twice and you come back to the beginning again. At that point, start binding off all the stitches, working from left to right. The stitch at the last prong will be a little bigger than the others. Don’t worry, that’s how it’s supposed to be.
4 Now a piece of yarn will be hanging down behind between the first and the second prong. Guide it to the left around the first prong and then to the right behind the second one. Wrap the yarn once around the second prong and so on, until you arrive at the final prong.
5 Now bind off all the stitches from right to left. Then continue with your wrapping. Keep going back and forth until your knitted item is long enough.
3
4
5
11
1
2
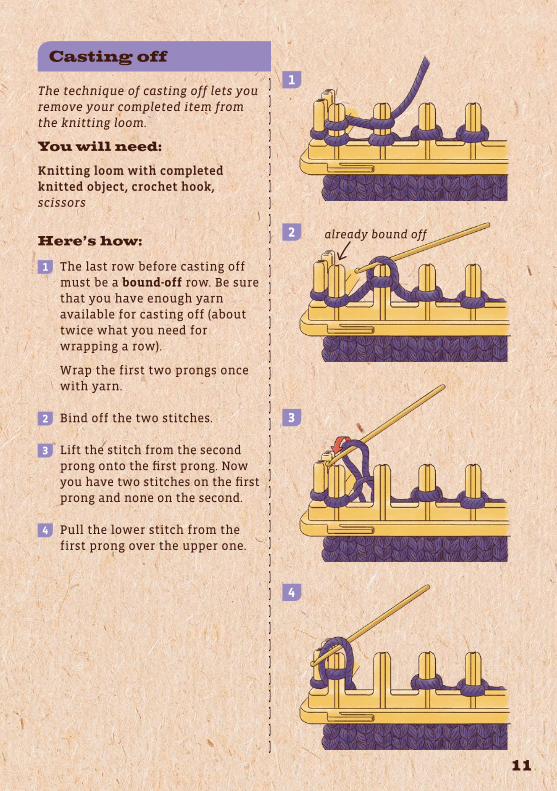
The technique of casting off lets you remove your completed item from the knitting loom.
You will need:
Knitting loom with completed knitted object, crochet hook, scissors
Here’s how:
1 The last row before casting off must be a bound-off row. Be sure that you have enough yarn available for casting off (about twice what you need for wrapping a row).
Wrap the first two prongs once with yarn.
2 Bind off the two stitches.
3 Lift the stitch from the second prong onto the first prong. Now you have two stitches on the first prong and none on the second.
4 Pull the lower stitch from the first prong over the upper one.
Casting off
3
4
already bound off
12
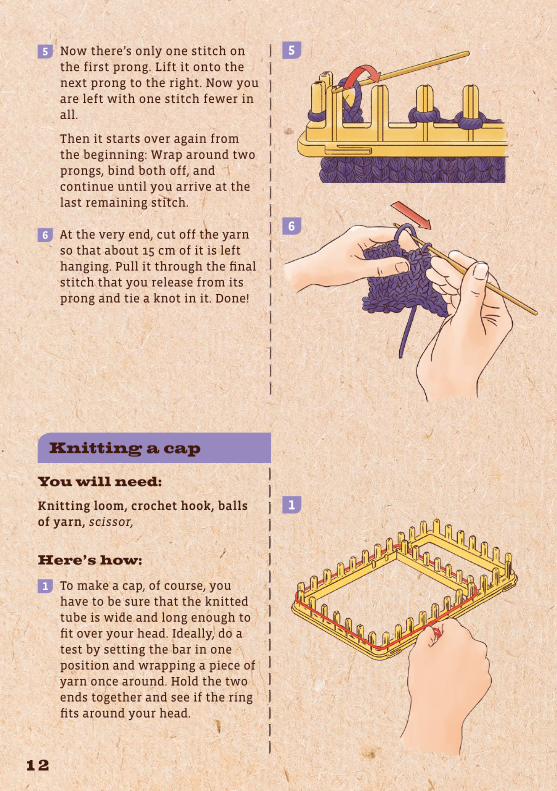
5 Now there’s only one stitch on the first prong. Lift it onto the next prong to the right. Now you are left with one stitch fewer in all.
Then it starts over again from the beginning: Wrap around two prongs, bind both off, and continue until you arrive at the last remaining stitch.
6 At the very end, cut off the yarn so that about 15 cm of it is left hanging. Pull it through the final stitch that you release from its prong and tie a knot in it. Done!
5
You will need:
Knitting loom, crochet hook, balls of yarn, scissor,
Here’s how:
1 To make a cap, of course, you have to be sure that the knitted tube is wide and long enough to fit over your head. Ideally, do a test by setting the bar in one position and wrapping a piece of yarn once around. Hold the two ends together and see if the ring fits around your head.
Knitting a cap
1
6
13
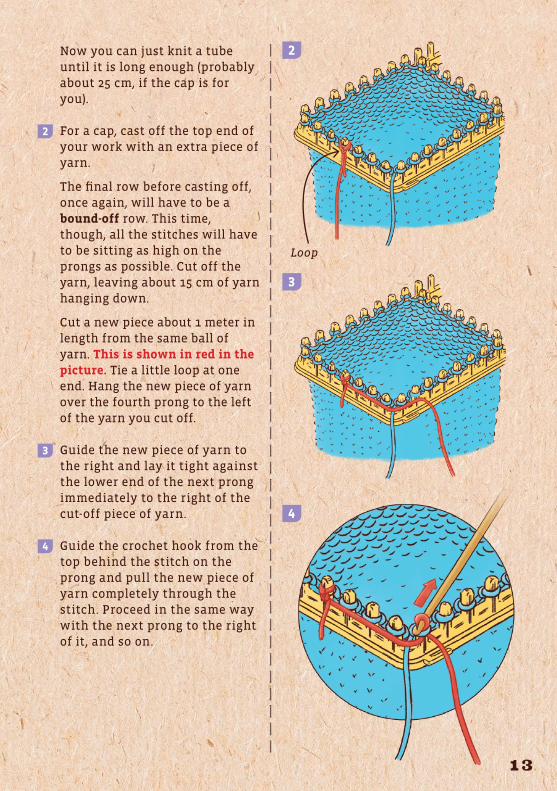
Now you can just knit a tube until it is long enough (probably about 25 cm, if the cap is for you).
2 For a cap, cast off the top end of your work with an extra piece of yarn.
The final row before casting off, once again, will have to be a bound-off row. This time, though, all the stitches will have to be sitting as high on the prongs as possible. Cut off the yarn, leaving about 15 cm of yarn hanging down.
Cut a new piece about 1 meter in length from the same ball of yarn. This is shown in red in the picture. Tie a little loop at one end. Hang the new piece of yarn over the fourth prong to the left of the yarn you cut off.
3 Guide the new piece of yarn to the right and lay it tight against the lower end of the next prong immediately to the right of the cut-off piece of yarn.
4 Guide the crochet hook from the top behind the stitch on the prong and pull the new piece of yarn completely through the stitch. Proceed in the same way with the next prong to the right of it, and so on.
2
3
4
Loop
14
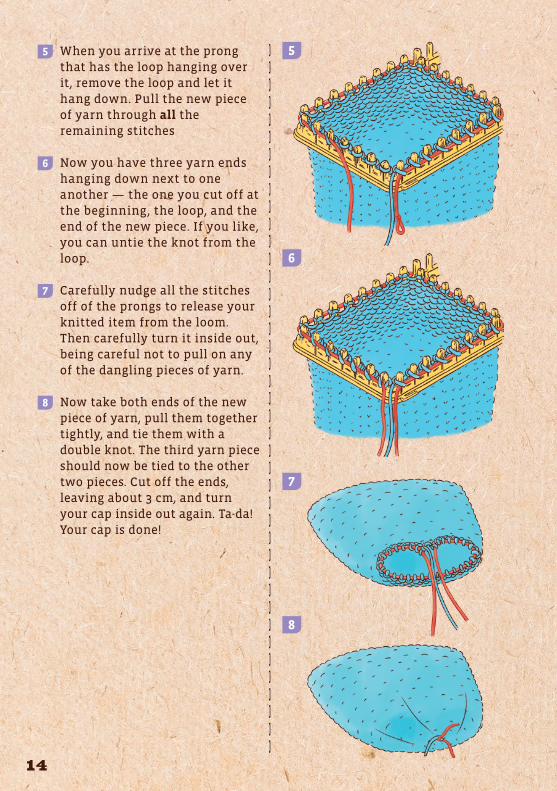
5 When you arrive at the prong that has the loop hanging over it, remove the loop and let it hang down. Pull the new piece of yarn through all the remaining stitches
6 Now you have three yarn ends hanging down next to one another — the one you cut off at the beginning, the loop, and the end of the new piece. If you like, you can untie the knot from the loop.
7 Carefully nudge all the stitches off of the prongs to release your knitted item from the loom. Then carefully turn it inside out, being careful not to pull on any of the dangling pieces of yarn.
8 Now take both ends of the new piece of yarn, pull them together tightly, and tie them with a double knot. The third yarn piece should now be tied to the other two pieces. Cut off the ends, leaving about 3 cm, and turn your cap inside out again. Ta-da! Your cap is done!
6
7
8
5
15
1
2
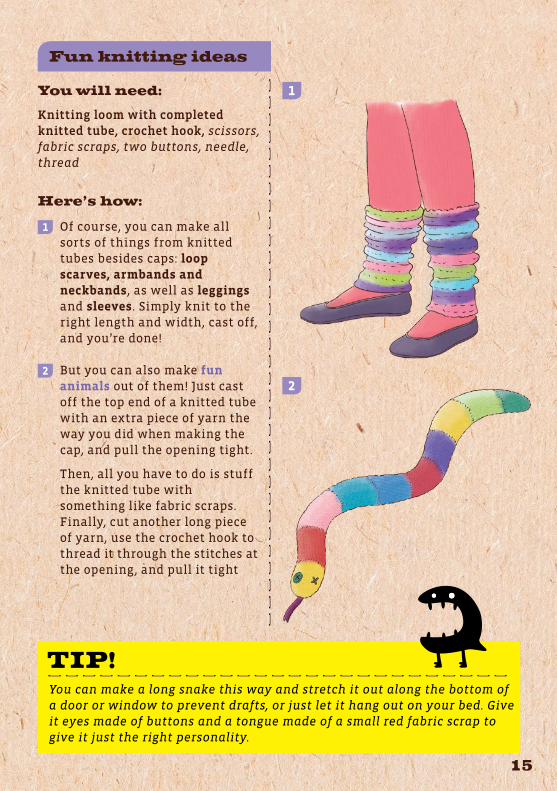
You can make a long snake this way and stretch it out along the bottom of a door or window to prevent drafts, or just let it hang out on your bed. Give it eyes made of buttons and a tongue made of a small red fabric scrap to give it just the right personality.
TIP!
You will need:
Knitting loom with completed knitted tube, crochet hook, scissors, fabric scraps, two buttons, needle, thread
Here’s how:
1 Of course, you can make all sorts of things from knitted tubes besides caps: loop scarves, armbands and neckbands, as well as leggings and sleeves. Simply knit to the right length and width, cast off, and you’re done!
2 But you can also make fun animals out of them! Just cast off the top end of a knitted tube with an extra piece of yarn the way you did when making the cap, and pull the opening tight.
Then, all you have to do is stuff the knitted tube with something like fabric scraps. Finally, cut another long piece of yarn, use the crochet hook to thread it through the stitches at the opening, and pull it tight
Fun knitting ideas
16
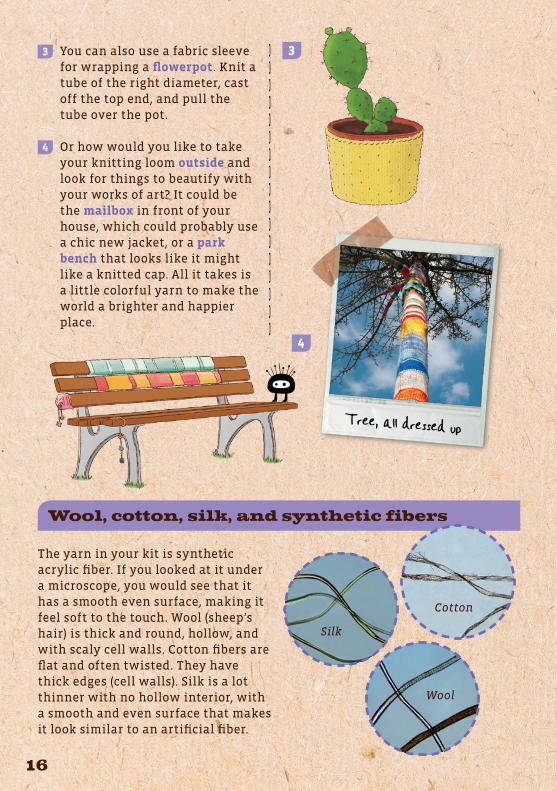
3 You can also use a fabric sleeve for wrapping a flowerpot. Knit a tube of the right diameter, cast off the top end, and pull the tube over the pot.
4 Or how would you like to take your knitting loom outside and look for things to beautify with your works of art? It could be the mailbox in front of your house, which could probably use a chic new jacket, or a park bench that looks like it might like a knitted cap. All it takes is a little colorful yarn to make the world a brighter and happier place.
3
4
Tree, all dressed up
Wool, cotton, silk, and synthetic fibers
The yarn in your kit is synthetic acrylic fiber. If you looked at it under a microscope, you would see that it has a smooth even surface, making it feel soft to the touch. Wool (sheep’s hair) is thick and round, hollow, and with scaly cell walls. Cotton fibers are flat and often twisted. They have thick edges (cell walls). Silk is a lot thinner with no hollow interior, with a smooth and even surface that makes it look similar to an artificial fiber.
Cotton
Wool
Silk

17
1
2
It doesn’t always have to be balls of yarn! Did you know that you can also make yarn from old T-shirts? Be sure to ask your parents first!
You will need:
Old T-shirts, scissors, needle, thread
Here’s how::
1 Grab a shirt you don’t need anymore, and start by cutting off the top portion where the sleeves are. Then make a small cut into the bottom hem, proceed to cut a spiral strip about ½ to 2 cm in width, and continue all the way up to the top.
2 If the fabric is stretchable, you will be able to pull the strip longer. If you need a lot of T-shirt yarn, the best thing is to sew several strips together and then roll them up into a ball. Then you can use your super-special yarn in your knitting loom!
Make new things out of old You can even make yarn out of
plastic bags. Just make sure that the plastic isn’t too stiff. Cut off the handles and bottoms of the bags and proceed just like with the T-shirt yarn.
TIP!
18
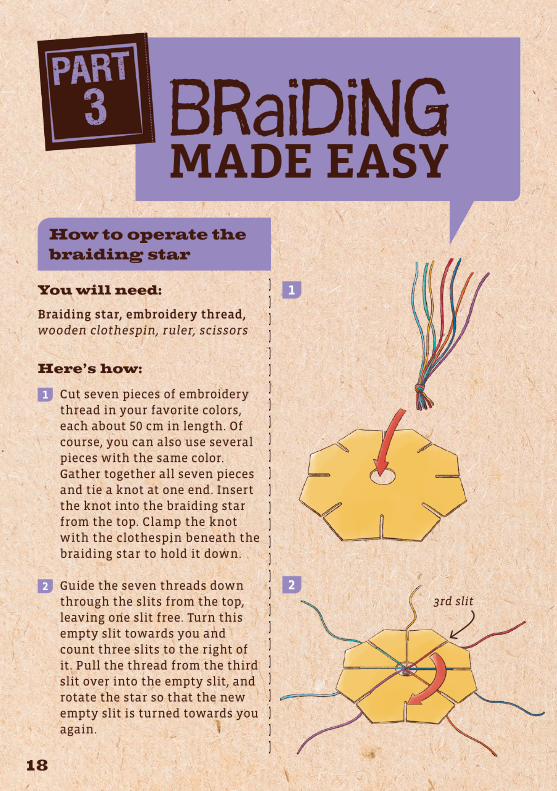
MADE EASYBRaiDiNG
How to operate the braiding star
1
2
You will need:
Braiding star, embroidery thread, wooden clothespin, ruler, scissors
Here’s how:
1 Cut seven pieces of embroidery thread in your favorite colors, each about 50 cm in length. Of course, you can also use several pieces with the same color. Gather together all seven pieces and tie a knot at one end. Insert the knot into the braiding star from the top. Clamp the knot with the clothespin beneath the braiding star to hold it down.
2 Guide the seven threads down through the slits from the top, leaving one slit free. Turn this empty slit towards you and count three slits to the right of it. Pull the thread from the third slit over into the empty slit, and rotate the star so that the new empty slit is turned towards you again.
3rd slit
19
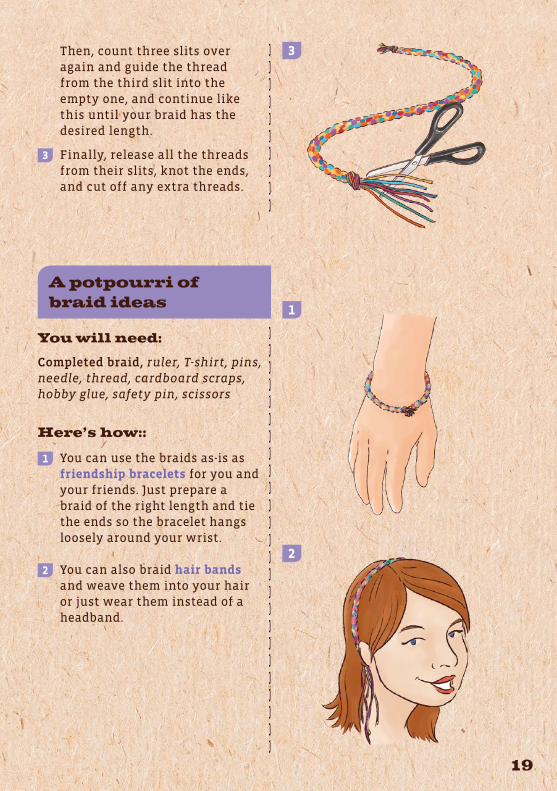
MADE EASYBRaiDiNG
You will need:
Completed braid, ruler, T-shirt, pins, needle, thread, cardboard scraps, hobby glue, safety pin, scissors
Here’s how::
1 You can use the braids as-is as friendship bracelets for you and your friends. Just prepare a braid of the right length and tie the ends so the bracelet hangs loosely around your wrist.
2 You can also braid hair bands and weave them into your hair or just wear them instead of a headband.
A potpourri ofbraid ideas 1
2
Then, count three slits over again and guide the thread from the third slit into the empty one, and continue like this until your braid has the desired length.
3 Finally, release all the threads from their slits, knot the ends, and cut off any extra threads.
3

3 Or how about using braids as fun and colorful shoelaces? For that, you will need to braid two fairly long bands. Start by removing the shoelaces from your shoes to see how long they need to be. You will need a little more thread than the length of the shoelaces.
4 You can also use the completed braids to make letters or pictures by sewing them onto a T-shirt. Ask your parents what you are allowed to use! Start by arranging your braid on the T-shirt fabric in the desired shape.
If you find a design you like, secure the braid in place with pins and sew it on with needle and thread. Just to be safe, you should only wash the finished T-shirt by hand.
5 To make brooches, look for a piece of sturdy cardboard (take a look in the recycling bin) and cut it into the desired shape.
Glue a braid onto the front side of each cardboard cutout, starting from the inside and proceeding out in a spiral until the entire surface is covered. Press the braid firmly onto the cardboard so the glue holds well.
Finally, insert a safety pin through the back.
3
You can also arrange the braids on sturdy paper or cardboard and secure them in place with hobby glue. Use this technique to make a cool sign for your door or a personalized birthday card.
TIP!
5
20
4

Kosmos Quality and Safety
More than one hundred years of expertise in publishing science experiment kits stand behind every product that bears the Kosmos name. Kosmos experiment kits are designed by an experienced team of specialists and tested with the utmost care during development and production. With regard to product safety, these experiment kits follow European and US safety standards, as well as our own refined proprietary safety guidelines. By working closely with our manufacturing partners and safety testing labs, we are able to control all stages of production. While the majority of our products are made in Germany, all of our products, regardless of origin, follow the same rigid quality standards.

1st Edition 2014 © 2014 Franckh-Kosmos Verlags-GmbH & Co. KG
This work, including all its parts, is copyright protected. Any use outside the specific limits of the copyright law without the consent of the publisher is prohibited and punishable by law. This applies specifically to reproductions, translations, microfilming, and storage and processing in electronic systems and networks. We do not guarantee that all material in this work is free from copyright or other protection.
Idea and concept: Andrea Kern Project management and editing: Kristin Albert Text: Sonja Eismann, Berlin Technical product development: Elena Ryvkin
Manual layout: Michaela Kienle, Fine Tuning, Dürmentingen Manual illustrations and photos: artenot, p. 1 bottom right (square creature), 15 bottom right, 20 top right, back cover bottom right; Jenn Huls, p. 3 (background); Anna-Mari West, p. 8 center right (all previous © shutterstock.com); artenot, front cover center left, p. 1 bottom right (creature on string), 2 center right, 3 top center, bottom right, 4 bottom left, 5 top center, 8 bottom center, 9 top right, 16 bottom right, 17 top right (© shutterstock.com, edited by Michaela Kienle); Michael Flaig, Pro-Studios, Stuttgart, front cover center, p. 1 top center; Michaela Kienle, front cover center right, p. 7 bottom left; Matthias Kaiser, Stuttgart, p. 6 top right; Isabel B. Meyer, p. 16 center right (© fotolia.com); M. Bachofer, Stuttgart, p. 16 bottom; Bianca Meier, Hamburg (all experiment illustrations)
Packaging design concept: Peter Schmidt Group GmbH, Hamburg Packaging layout: Michaela Kienle, Fine Tuning, Dürmentingen Packaging illustrations and photos: Gemenacom (Polaroid frame); Seregam (tape, both © shutterstock.com); artenot (creature with paintbrush, © shutterstock.com, edited); artenot (creature on string, © shutterstock.com, edited by Michaela Kienle); Michaela Kienle (sheep); Michael Flaig, Pro-Studios, Stuttgart (title image, materials); Matthias Kaiser, Stuttgart (Polaroids)
The publisher has made every effort to locate the holders of image rights for all of the photos used. If in any individual cases any holders of image rights have not been acknowledged, they are asked to provide evidence to the publisher of their image rights so that they may be paid an image fee in line with the industry standard.
1st English Edition © 2014 Thames & Kosmos, LLC, Providence, RI, USA Thames & Kosmos® is a registered trademark of Thames & Kosmos, LLC.
Editing: Ted McGuire; Additional Graphics and Layout: Dan Freitas, Ashley Greenleaf
Distributed in North America by Thames & Kosmos, LLC. Providence, RI 02903 Phone: 800-587-2872; Email: [email protected]
We reserve the right to make technical changes.
Printed in Germany / Imprimé en Allemagne


![Untitled-6 [] pc - audiotechni… · equipment review po a-i sine , kosmos , cryo kosmos mono block kosmos , 0 acoustic signature -e kijzma reference zyx riooo cryo chord cpa4000](https://img.pdfslide.us/doc/110x75/5f7cd721281690038a33f72c/untitled-6-pc-audiotechni-equipment-review-po-a-i-sine-kosmos-cryo-kosmos.jpg)