Embed Size (px)
Citation preview

peterson
AutoStrobe™ 590 Strobe Tuner
Instruction ManualRevised 5-99 for Software Revision 1.20
byMichael Skubic
© 1998-99-2003 Peterson Electro-Musical Products, Inc.11601 S. Mayfield Avenue, Alsip IL 60803-2476Phone: 1-708-388-3311 FAX: 1-708-388-3341
[email protected]://www.petersontuners.com


TABLE OF CONTENTS
PAGE
THE ORGANIZATION OF THIS MANUAL. . . . . . . . . . . . . . . . . . . . . . . . . . . . . . . . . . . . . . . . . . . . . . . . . . . . . 1
THE AutoStrobe 590—AT A GLANCE. . . . . . . . . . . . . . . . . . . . . . . . . . . . . . . . . . . . . . . . . . . . . . . . . . . . . . . . 1
1. INTRODUCTION. . . . . . . . . . . . . . . . . . . . . . . . . . . . . . . . . . . . . . . . . . . . . . . . . . . . . . . . . . . . . . . . . . . . 1
2. BEFORE TURNING IT ON: READ THIS SECTION!. . . . . . . . . . . . . . . . . . . . . . . . . . . . . . . . . . . . . . . . 1
THE AutoStrobe 590—IN DEPTH.. . . . . . . . . . . . . . . . . . . . . . . . . . . . . . . . . . . . . . . . . . . . . . . . . . . . . . . . . . . 5
1. SUMMARY OF FEATURES AND FRONT PANEL CONTROLS.. . . . . . . . . . . . . . . . . . . . . . . . . . . . . . 5
2. AUTOMATIC AND MANUAL NOTE SELECTION ON THE AutoStrobe 590. . . . . . . . . . . . . . . . . . . . . 7
3. SETUP MENUS—CHOOSING POWER-UP DEFAULTS / TEMPERAMENTS. . . . . . . . . . . . . . . . . . . 8a) DESCRIPTION AND INITIAL ACCESS. . . . . . . . . . . . . . . . . . . . . . . . . . . . . . . . . . . . . . . . . . . . . . . 8b) VIEWING AND MODIFYING PARAMETER DEFAULTS. . . . . . . . . . . . . . . . . . . . . . . . . . . . . . . . . 9c) VIEWING AND ALTERING TEMPERAMENT FILES. . . . . . . . . . . . . . . . . . . . . . . . . . . . . . . . . . . 11
4. TUNING INSTRUMENTS THAT PLAY IN OTHER THAN THE KEY OF "C". . . . . . . . . . . . . . . . . . . . 23
5. ENHANCED RESOLUTION OF INTONATION MEASUREMENTS. . . . . . . . . . . . . . . . . . . . . . . . . . . 24
6. CHECKING INTONATION WITH THE AutoStrobe 590.. . . . . . . . . . . . . . . . . . . . . . . . . . . . . . . . . . . . 24
7. USING THE PETERSON AutoStrobe 590 AS A METRONOME.. . . . . . . . . . . . . . . . . . . . . . . . . . . . . 25
GLOSSARY. . . . . . . . . . . . . . . . . . . . . . . . . . . . . . . . . . . . . . . . . . . . . . . . . . . . . . . . . . . . . . . . . . . . . . . . . . . . 28
APPENDIX A:WHY USE A "REAL" STROBE TUNER?. . . . . . . . . . . . . . . . . . . . . . . . . . . . . . . . . . . . . . . . . . . . . . . . . . 29
APPENDIX B:WHY BE CONCERNED ABOUT UNEQUAL TEMPERAMENTS?. . . . . . . . . . . . . . . . . . . . . . . . . . . . . . 30
INDEX. . . . . . . . . . . . . . . . . . . . . . . . . . . . . . . . . . . . . . . . . . . . . . . . . . . . . . . . . . . . . . . . . . . . . . . . . . . . . . . . 31

THE ORGANIZATION OF THIS MANUAL
Congratulations on your purchase of the peterson AutoStrobe™ 590 strobe tuner. For your convenience, thismanual is organized into three major sections. The first, "The AutoStrobe 590—At A Glance", comprises just three shortpages of "must read" information that everyone should read before attempting to turn the Model 590 on and use it.
The next section, "The AutoStrobe 590—In Depth", provides detailed information about all controls and features availablein this device, how they are used, accessed, viewed, and manipulated.
The last section includes a glossary of terms used in this manual, two appendices with supporting background about someof the exclusive capabilities of your AutoStrobe 590, and an index of terms for easy access to specific areas of the manualby subject. Terms found in the glossary first appear in the main sections of this manual with a superscripted "�" for"glossary".
THE AutoStrobe 590—AT A GLANCE
1. INTRODUCTION
The peterson AutoStrobe™ 590 combines the best from over 40 years of strobe tuner technology with our latestadvances in automatic note detection, image stability/clarity, and alternate temperament capabilities. We've integrated theclassic eight-octave strobe disc tuning system with precision digital microprocessor and motor control technologies to providea versatile tuner with unsurpassed accuracy and features. In addition, when not being used as an instrument tuner, theModel 590 functions as a programmable audio/visual metronome. This instrument is designed for simple "user-friendly"operation with little need to "press buttons" once the initial desired settings have been entered. It is the best choice for musiceducators, musicians, manufacturers, and for any application where an accurate and versatile tuner is required.
2. BEFORE TURNING IT ON: READ THIS SECTION!
OK, OK! We know you're all aflutter with anticipation, but it's really important (you can always tell by all the bold anditalics stuff!) to take care of a few details to avoid unintentionally wreaking some havoc. The following short sub-sectionswill guide you through turning the AutoStrobe 590 on and using the basic features without damage to the unit or to your ears!
IMPORTANT PRECAUTION: The Model 590 is designed to be used with 95-105V, 110-120V, 210-230, or 230-250V,50/60 Hz AC power sources. IT IS VERY IMPORTANT FOR THE VOLTAGE SELECTOR CARD LOCATED IN THEFUSE CASE AT THE BACK OF THE TUNER TO BE SET FOR THE PROPER VOLTAGE BEFORE PLUGGINGIN THE LINE CORD........... FAILURE TO DO SO MAY RESULT IN SEVERE DAMAGE TO THEINSTRUMENT!
Checking the AC Voltage Selection1) First remove the power-line cord from the unit.2) Slide the small, clear, plastic safety door of the power entry/fuse module completely to the left so as to expose the fuse
chamber.3) A small fiberglass wafer or Voltage Selection Card is inserted horizontally just below the fuse and fuse-pull lever in this
chamber. The currently selected voltage setting (100, 120, 220, or 240) will be plainly visible in large, dark numeralson this card. If the current selection matches the power-line voltage in your area, you do not need to change the selection. Simply slide the plastic window back to the right and plug the tuner line cord into the power entry receptacle at the left. You can even skip ahead over the next section—just remember that if you ever need to accommodate different powerline voltages, this next sub-section will guide you through it.
Page 1

Changing the AC Voltage SelectionIf the visible indication on the Voltage Selection Card does NOT match the power-line voltage in your area:
4) Pull the "Fuse Pull" lever out and to the left until the fuse is released on one end.5) Completely remove the fuse from the unit.6) Make sure the "Fuse Pull" lever is in the absolute far left position, completely clear of the Voltage Selection Card.7) Insert the tip of a needle-nose pliers, scissors, or other suitable item through the small hole at the edge of the selection
card. (NOTE: if you believe that you will need to switch this card often, you might consider acquiring a specialextraction tool available from Peterson.)
8) Gently but firmly pry the card straight back and out of the fuse chamber by using the upper lip of the power entry/fusemodule as a leverage point and pushing on the upper part of the tool you've selected.
9) Flip or rotate the card so the proper voltage indication will be visible when the card is re-inserted (top, left).10) Re-insert card by pushing firmly with fingers.11) Reconfirm that the proper voltage selection is now the one that is visible on the card.12) Push the "Fuse Pull" lever about halfway to the right and reinstall fuse (left end first).13) Slide safety door back to the right.14) Plug the tuner line cord into the power entry receptacle at the left.
Changing the Handle PositionOn all hand-held versions of AutoSt robe t uners , aconvenient handle is i n c l u d e d w h i c h c a nfunction as an angled stand for optimal viewing.
Repositioning the Tuner Handle
To change the position of the handle, locate the two spring-loaded, circular, silver plates on each end of the handle wherethe handle is attached to the tuner. Simultaneously pressing these plates in toward the tuner will free the handle to rotate inany position around the tuner. While pressing these plates, simply swing the handle into the desired position and release theplates. Moving the handle slightly will allow it to lock io the nearest latch position (approximately every 30° of rotation).
Basic Operation: A Quick TutorialWe will first give a summary of how to use the AutoStrobe 590 for basic tuning using the equal-tempered� scale andA=440 Hz as the pitch reference. We follow later with detailed instructions on how to use the other features available onthe tuner.
The Model 590 has both audio-sensitive input (a built-in microphone which is active whenever the EXTERNAL INPUT jackis empty) and audio output (a 3.5 mm jack for external headphones, a 1/4" EXTERNAL SPEAKER jack, and a built-inspeaker which is active whenever the headphone and EXTERNAL SPEAKER jacks are empty). The audio output allowsthe Model 590 to function as a precision audio tuner or audio metronome. This output consists of an amplified version ofthe audio input as well as a steady tone which reflects the exact "standard" frequency that the strobe tuner is currently using
Page 2

The initial screen during the power up phase is depicted here. Linethree shows the software revision number and line four the serialnumber of the particular tuner.
The first line indicates that the tuner is set for instrumentsreferenced to the Key of C. Line two indicates that the standardfor A is 440 Hz, the current note setting is "C", and that the globalpitch offset is set at 0 cents
� deviation. Line three shows that the
tuner is currently set to automatically detect the nearest standardpitch present in the audio input and use it as the current notereference for tuning. The items on line four always indicate thecurrent function, if any, of the four Function buttons (labeled 1through 4) directly beneath the LCD display. This is explained ingreater detail later in this manual.
as the reference pitch (as indicated by the OCTAVE knob at the top left of the front panel as well as the current temperament,key, semi-tone scale note, "Concert A" pitch reference, and current global cents� (¢) deviation indicated on the tuner's LCDdisplay screen). The balance and overall volume of these audio outputs are controlled by the dual knobs (bottom ring andtop cap, respectively) at the left side of the front panel directly below the "OCTAVE" control knob.
NOTE: When the headphone jack is unused and a microphone—either built-in or external—is active, the balance control(bottom ring knob of the VOL—BAL control) should ALWAYS be in the fully clockwise (internal tone only) position. Otherwise an undesirable (you know the sound!) audio feedback condition can occur. When using a non-acoustic instrument(an electric guitar or a band instrument fitted with the new "silent mute" technology, for example), turning the BALancecontrol counter-clockwise allows the Model 590 to function as a "practice amp". (High input levels will produce a distortionsound familiar to electric guitarists and can be used to good effect!)
In addition, the volume control allows for very loud output (to be easily heard across a noisy room). It is good practice toensure the volume (outer cap knob) is turned low (counter-clockwise) before switching the Model 590 on since it willbegin producing its internally-generated audio tone soon after power-up.
The manual OCTAVE control mentioned above allows the standard-pitch, audio output tone to sound in any one of fiveoctave ranges. This permits the user to independently adjust the output tone relative to the sound to be tuned for the mostpleasing or functionally clear combination. All of the above manual front panel controls—VOLume, BALance, andOCTAVE—also affect the sound of metronome "blips" when the Model 590 is configured to operate as a metronome.
After you have checked the back of the Model 590 as detailed above to verify that the voltage selector switch is set to thecorrect position of 100, 120, 220, or 240 Volts AC, connect the line cord to an AC outlet receptacle, push the power switchat the right of the strobe disc to the "up" position and follow these easy steps to use the tuner.
PETERSON
MODEL 590 TUNERREVISION X.XX
SERIAL # T590 XXXXX
NOTE: We advise that you write down the serial number shown on this initial screen and keep it with your records for futurereference in case anything should happen to your unit that would prevent this screen from appearing.
At the conclusion of the power-up tests, the strobe wheel will begin rotating and will flicker slightly due to random noise inthe room. The display panel will then change to the normal RUN screen as shown below:
KEY= C A=440 C 00 ¢ AUTOSETUP MODE MET
1 2 3 4
Page 3

The built-in microphone will pick up an instrument from across a relatively quiet room. However, if you are working in anoisy environment it may be helpful to use an external microphone (inserted in the EXTERNAL INPUT jack on the frontpanel) to be more selective and point the microphone directly at the instrument you wish to tune.
Your AutoStrobe 590 tuner can function in either of two ways: MANual mode or AUTOmatic mode. Unless you chooseto change the default, the tuner will power up in the AUTO mode. In this condition, any strong audio tone input to the built-in microphone (or EXTERNAL INPUT jack) will be internally analyzed—usually in well under a second—and the standard-pitched semitone nearest in frequency to that of the input sound will appear on the LCD screen. The motor for the strobedisc will automatically adjust in speed so that you can view the tuning of this input sound relative to this nearest standardpitch. (The internally-generated audio tone is automatically adjusted as well.) Although it is rotating very rapidly, one ormore circular bands on the disc will appear to be moving very slowly or will appear to be standing still. The lowest bandexhibiting this effect indicates which octave the audio input signal occupies. If the rotation appears to be to the left (counter-clockwise), your input sound is flat compared to this nearest standard-pitched semitone. If the rotation appears to be to theright (clockwise), the input sound is sharp compared to the standard. If the image appears to be standing still, the input isperfectly in tune with the standard. Furthermore, the slower the disc appears to be rotating, the closer the input sound is tothe standard. This makes for a very simple and natural visual feedback when bringing an input sound into tune.
To tune to a different note, simply cease the current audio input and sound a different pitch. If the new input is closer to adifferent standard-pitched semitone, the tuner will re-analyze the input, indicate this new pitch on the LCD screen, and, onceagain, automatically adjust the motor so that the disc will properly indicate the relative tuning of this new input to the neareststandard-pitched semitone.
NOTE: It is expected that the automatic note selection may not respond well at either extreme of pitch. The unit’s circuitryis less sensitive at these extremes, and sounds of short duration or with strong, non-harmonic overtones can interfere withthe note detection. Automated note selection at pitch extremes is best optimized by using an external microphone (at theEXTERNAL INPUT jack on the front panel) and placing it near the sound source. Alternatively, of course, MANual modenote selection may be chosen to avoid the difficulty entirely.
NOTE: The automatic note detection feature is based on reference tuning of A=440 Hz and Global Cent Offset (whichappears on the second line of the RUN screen) set to 0 cents. Any deviation from these tuning references will limit propernote sensing to less than the usual ±50 cents range. For most applications, deviations in the range of A430 to A450 or,separately, up to about ±40 cents Global Cent Offset will yield reasonable results for automatic note selection. Of course,there are no limitations over the full range of offsets available in the tuner when using MANual note selection.
HINT: When tuning a stringed instrument like a guitar or bass, image clarity and automatic note selection are usuallyimproved by plucking away from the bridge with a fingertip (as opposed to a fingernail or pick) using medium force. Thisminimizes the harmonic (overtone) content of the tone while maximizing the fundamental frequency that is to be tuned.
Page 4

THE AutoStrobe 590—IN DEPTH
1. SUMMARY OF FEATURES AND FRONT PANEL CONTROLS
We will begin with a brief description of the front panel controls, indicators, and basic features of the Model 590. This willprovide you with a quick reference guide to the front panel of the tuner. Detailed information about each feature is explainedin the succeeding sections of this manual.
FRONT PANEL
1. STABLE, ACCURATE, DIGITALLY-CONTROLLED STROBE — The back-illuminated, eight-octave band strobedisc is spun by a digitally-controlled motor. The rotation speeds are derived from a quartz crystal reference for theultimate in accuracy and stability. Hence, no warm-up period is required, and the instrument will maintain its 1/10 of1 cent� accuracy with no need for re-calibration…EVER! The International Standard Pitch of A=440 Hz (cycles persecond) is the factory default but can be raised or lowered in 1 Hz increments from A = 350 Hz to A = 550 Hz. TheModel 590 can be customized to power-up with an altered Concert A pitch as one of the storable SETUP parametersavailable to the user. The unparalleled accuracy of this system also allows the Model 590 to reliably distinguish thenuances of multiple temperaments�, both standard and customizable, beyond the conventional equal-tempered scale.
2. POWER SWITCH — The down or OFF position disengages the line voltage; the up or ON position permits the unitto power up.
3. SELF-CONTAINED MICROPHONE & EXTERNAL PATCH THROUGH INPUT — The Model 590 is equippedwith a built-in condenser microphone for simple use with acoustic inputs. The intonation of notes sounded into thismicrophone will be immediately visible on the strobe tuning disc when automatic note detection is enabled (which is thefactory-default power-up condition). Immediately to the right of the internal microphone is a 1/4" jack for an externalinput such as an external microphone, guitar-type pick-up, or any low or line-level audio signal in electrical form. (Anappropriate external microphone is available from peterson as part #: 170172.) The internal microphone isautomatically disconnected whenever a 1/4" connector is inserted into this "EXTERNAL INPUT" jack. To the right ofthe "EXTERNAL INPUT" jack is a 1/4" THRU jack. This passively conducts the input signal—internal mic or externalinput, whichever is currently active—back out to additional audio devices allowing the 590 tuner to be permanently
Page 5

placed within your "audio chain" for your convenience. (NOTE: On the rack-mount version R590, these two jacks areduplicated at the rear of the tuner to allow for rear-only patching that is typical in rack systems.)
4. EIGHTY-CHARACTER LCD MENU SCREEN — Simplicity and ease of operation are enhanced by the intuitiveand user-friendly menu screen displays which address all the functional features of the tuner.
5. FOUR MENU-DRIVEN FUNCTION BUTTONS — The action of each of these four push buttons is defined bywhatever specific description is currently displayed immediately above them on the bottom line of the LCD screen. These software-defined buttons permit great flexibility and simple user interaction with the Model 590.
6. TWELVE MANUAL NOTE-SELECTION BUTTONS — These 12 push buttons permit traditional manual selectionof the scale note to which the audio input is to be tuned. The Model 590 also permits (by default) an "AUTO" or"hands-off" tuning mode where the standard scale note closest in pitch to the incoming audio signal is automaticallyselected by the unit.
7. ENTER — This push button is used to select specific values of scale note cent deviations when editing customizedtemperament files used in specialized tuning applications. It is also used to make some of the user selections under thetemperament programming menus of the tuner. Under the normal RUN screen, ENTER is used in conjunction with theUP ARROW/DOWN ARROW buttons to access enhanced resolution of the global cent offset parameter displayed onthat screen.
8. KEY — This push button is used to allow the Model 590 to reference scale notes in the same key base as the instrumentto be tuned. Note names are internally transposed from "Concert Standard" notes allowing the user to see and accessnotes in the transposition with which he is most comfortable. For example, if a clarinetist enters a KEY of B= and playsthe "C" position of a B= clarinet, the strobe disc will indicate the "in tune" standing pattern when the LCD displayindicates note "C" even though the pitch being played is Concert B=. Each press of the KEY button will advance thecurrent key of the tuner one step within the sequence: C, B=, F, E=, and back to C. (Please note that all buttons whichaffect motor speed are disabled while the motor is accelerating to a new speed.)
9. UP ARROW / DOWN ARROW — These two push buttons increment or decrement various parameters on the LCDscreen depending upon which screen is currently active. While the RUN screen is active, they control the global centoffset parameter displayed on the second line of the LCD. (Individual note cent offsets are separately programmableunder Temperament File menus.) While controlling either global cent offset in the RUN screen or individual noteoffsets under the File menus, pressing both the UP and DOWN arrow buttons simultaneously will provide an immediate“reset value to 0” operation. When either button is depressed and held to continuously increment or decrement thesecent values, advancement will proceed, after one initial step, at 5 times the currently set resolution. These new featureshelp to speed manipulation of the cents parameter.
Each time the ENTER button is pressed simultaneously with either arrow button, the resolution of the global cent offsetparameter is advanced one step within the sequence: 1, 0.5, 0.1, and back to 1 cent resolution. Under some TemperamentFile menus, the arrow buttons advance a cursor to select characters when naming files.
10. DISPLAY +2 / -1 — This push button alters the strobe motor speeds so as to cause audio input in a given octave to beread on higher or lower bands on the strobe disc. While this effectively expands the range of tuning to an unprecedented11 octaves, it is most often used to push the standing strobe pattern for very high or low-pitched instruments toward themore easily-read middle strobe disc bands. However, with our latest innovations in automatic strobe clarity, this willoften be unnecessary. Each press of this button will advance the current display mode one step within the sequence:normal, +2, -1, and back to normal. For a given input pitch, the "+2" mode shifts the lowest strobe disc band exhibitinga standing pattern two positions higher than would appear in the "normal" display. This would be most useful with verylow-pitched notes. For a given input, the "-1" mode shifts the lowest strobe disc band exhibiting a standing pattern oneposition lower than would appear in the "normal" display. This would be most useful with very high-pitched notes. (Please note that all buttons which affect motor speed are disabled while the motor is accelerating to a new speed.)
Page 6

11. METRONOME ON/OFF — This push button controls functioning of the built-in metronome when operation as a tuneris not required. When the RUN screen is active, this button mimics the operation of the "4" function button by switchingto the METRONOME screen on the LCD and preparing for metronome operation. Once the METRONOME screenis activated by either of these methods, the METRONOME ON/OFF button toggles actual metronome cycling on andoff. This button is connected in parallel with the 1/4-inch jack at the rear of the tuner labeled "METRONOMESWITCH". Any momentary-close contact device such as a footswitch may be used in place of or in addition to theMETRONOME ON/OFF button at any time. (The front-panel button will continue to operate with a device plugged intothis rear jack unless the device is held in the closed position—make sure that the device operates in a momentary-closefashion. A proper footswitch is available from peterson as part #: 140070.)
12. VOLume - BALance DUAL CONTROL — The AutoStrobe 590 contains a Metronome/Tone audio output section. The output sound emanates from the 3" internal speaker unless a) the 1/4" EXTERNAL SPEAKER jack at the rear ofthe unit is connected—normally to an 8 or 16 ohm speaker—or b) the 3.5 mm front panel jack is connected—normallyto headphones or an audio line-level input. When used as a tuner, a tone rich in harmonics is generated which reflectsexactly the frequency selected by the user as determined by the current temperament, key, scale note, global cent offset,and Concert A frequency. When used as a metronome, the Model 590 produces audible "blips" to indicate timing ofmusical beats. In either case, the top cap knob of this dual control affects the sound volume or amplitude of the audiosignal being produced. The ring knob beneath it controls the balance of internally generated sound (tone or metronome)to amplified input sound (from the built-in mic or external input, whichever is currently active). Turned fully counter-clockwise: only amplified input is present in the output audio; turned fully clockwise: only internally generated soundis audible.
13. OCTAVE CONTROL — This manual switch places the internally generated audio tone or metronome blip (whicheveris currently active) at one of five octave ranges to optimize clarity.
14. HEADPHONE JACK — This is a standard 3.5 mm-sized headphone jack for private listening of internally-generatedtone and external sound as controlled by the VOLume, BALance, and OCTAVE front panel controls. Insertion into thisjack cuts off both the internal speaker and any signal to the EXTERNAL SPEAKER jack at the rear of the unit.
2. AUTOMATIC AND MANUAL NOTE SELECTION ON THE AutoStrobe 590
Your AutoStrobe 590 tuner can function in either of two ways: MANual mode or AUTOmatic mode. Unless you chooseto change the default, the tuner will power up in the AUTO mode. In this condition, any strong audio tone input to the built-in microphone (or EXTERNAL INPUT jack) will be internally analyzed—usually in well under a second—and the standard-pitched semitone nearest in frequency to that of the input sound will appear on the LCD screen. The motor for the strobedisc will automatically adjust in speed so that you can view the tuning of this input sound relative to this nearest standardpitch. (The internally-generated audio tone is automatically adjusted as well.) Although it is rotating very rapidly, one ormore circular bands on the disc will appear to be moving very slowly or will appear to be standing still. The lowest bandexhibiting this effect indicates which octave the audio input signal occupies. If the rotation appears to be to the left (counter-clockwise), your input sound is flat compared to this nearest standard-pitched semitone. If the rotation appears to be to theright (clockwise), the input sound is sharp compared to the standard. If the image appears to be standing still, the input isperfectly in tune with the standard. Furthermore, the slower the disc appears to be rotating, the closer the input sound is tothe standard. This makes for a very simple and natural visual feedback when bringing an input sound into tune.
To tune to a different note, simply cease the current audio input and sound a different pitch. If the new input is closer to adifferent standard-pitched semitone, the tuner will re-analyze the input, indicate this new pitch on the LCD screen, and, onceagain, automatically adjust the motor so that the disc will properly indicate the relative tuning of this new input to the neareststandard-pitched semitone.
The AutoStrobe 590 can also be placed in MANual mode by pressing the "2" button while the label above it in the LCDscreen indicates "MODE" (that is, when the normal RUN screen is active). Directly above this MODE label on the LCD,
Page 7

+ 7 ÷
+ 7 ÷
an indication of the currently active note-select mode—AUTO or MAN—appears. Pressing the "2" button will toggle thisnote select mode and the LCD indication will be updated.
KEY= C A=440 C 00 ¢ AUTOSETUP MODE MET
1 2 3 4
2
KEY= C A=440 C 00 ¢ MANSETUP MODE MET
1 2 3 4
Accessing Manual Note Select Mode
KEY= C A=440 C 00 ¢ MANSETUP MODE MET
1 2 3 4
2
KEY= C A=440 C 00 ¢ AUTOSETUP MODE MET
1 2 3 4
Accessing Auto Note Select Mode
While the MAN MODE is indicated, the selection of note will not be affected by the incoming audio signal and must beselected by pressing one of the note buttons below the strobe disc. This feature is useful when extraneous audio tones arepresent in the environment (making automatic selection difficult) or when one purposely wishes to measure tuning of variousharmonics (partials) present in the audio input.
NOTE: The automatic note detection feature is based on reference tuning of A=440 Hz and Global Cent Offset (whichappears on the second line of the RUN screen) set to 0 cents. Any deviation from these tuning references will limit propernote sensing to less than the usual ±50 cents range. For most applications, deviations in the range of A430 to A450 or,separately, up to about ±40 cents Global Cent Offset will yield reasonable results for automatic note selection. Of course,there are no limitations over the full range of offsets available in the tuner when using MANual note selection.
3. SETUP MENUS—CHOOSING POWER-UP DEFAULTS / TEMPERAMENTS
a) DESCRIPTION AND INITIAL ACCESSThe AutoStrobe 590 allows the user to customize the power-up condition of several important parameters which a given usermight otherwise have to set each time the unit is turned on. This capability is found under the SETUP menu. In addition,temperaments may be created, edited, activated, and stored or deleted from non-volatile memory in a separate branch underthis menu.
The SETUP menu is activated from the normal RUN screen by pressing the "1" button:
Page 8

+ 7 ÷
DOWN
UP
OFF
ON
Increment
Decrement
DOWN
UP
KEY= C A=440 C 00 ¢ AUTOSETUP MODE MET
1 2 3 4
1
SETUP MENU PLEASE SELECT MODE
OPTN FILE RUN DIAG
1 2 3 4
Accessing the Setup Screen
b) VIEWING AND MODIFYING PARAMETER DEFAULTSThe "OPTN" or Option selection provides further menu screens, each of which is dedicated to viewing and/or altering a givenSETUP parameter. The SETUP parameters, their valid ranges, and the buttons used to alter them are summarized below:
SCREEN PARAMETER SETTING VALID RANGE: BUTTONS:
RUN (beforeentering SETUP)
Strobe Disc BandDISPLAY +2 / -1
+2, -1, Normal, ...Factory Default: Normal
DISPLAY+2—-1
1st SETUPparameter screen
Concert A Pitch ReferenceRecalibration
350 Hz to 550 Hz in 1 Hzincrements
Factory Default: A=440
3
4
2nd SETUPparameter screen
Musical KEY SettingC, B=, F, E=, ...
Factory Default: KEY=CKEY
3rd SETUPparameter screen
Auto-Note Selection ModeSetting
OFF, ONFactory Default: ON
3
4
4th SETUPparameter screen
MetronomeBEATS/MINute Rate
40 TO 240Factory Default: 120
89
4th SETUPparameter screen
MetronomeBEATS/MEASure Length
1 TO 8Factory Default: 4
2
3
Each press of the "1" button (labeled "NEXT") will sequence through screens for each of these parameters except for theStrobe DISPLAY +2/-1 parameter which does not have a SETUP screen. Except for the Concert A pitch referencerecalibration, these parameters can be altered more directly from the RUN screen. However, altering the power-up state ofthese parameters can only be effected under SETUP.
L
L
L
L
L
L
LL
L
L
Page 9

+ 7 ÷
+ 7 ÷
+ 7 ÷
As each SETUP screen is accessed, the value of each parameter shown is the CURRENT state of the parameter as last alteredby any method: directly under the RUN or METRONOME screens, a previous access to the SETUP screens, or, if neitherof these occurred, the last power-up default settings. Conversely, any change to these parameters under a SETUP screen willbe reflected immediately upon exiting SETUP whether the changes were stored or not.
Continuing in order from the SETUP screen, the screen for recalibrating the Concert A pitch reference is accessed bypressing the "1" button (labeled OPTN):
SETUP MENU PLEASE SELECT MODE
OPTN FILE RUN DIAG
1 2 3 4
1
RECALIBRATE TUNER? NOW A= XXX
NEXT RUN DOWN UP
1 2 3 4
Accessing the Concert A Recalibration Screen
As with all the SETUP parameter screens, an immediate escape to the normal RUN screen is an option if viewing or changinga particular parameter is all that is desired. Hitting the appropriate value-altering buttons—in this case, buttons "3" and"4"—will cause an immediate update of the LCD screen. Hitting the "1" button (NEXT) will activate the next parameterscreen:
RECALIBRATE TUNER? NOW A= XXX
NEXT RUN DOWN UP
1 2 3 4
1
KEY SETTING KEY IS NOW : X
NEXT RUN
1 2 3 4
Accessing the Key Setting Screen
The KEY screen uses the front panel KEY button to alter the KEY setting just as it will under the RUN screen.
KEY SETTING KEY IS NOW : X
NEXT RUN
1 2 3 4
1
AUTO–NOTE SETTING MODE IS NOW : XXX
NEXT RUN OFF ON
1 2 3 4
Accessing the Auto-Note Setting Screen
Page 10

+ 7 ÷
+ 7 ÷
Button #1 returns to the Setup menu.Button #2 saves new values and returns to the SETUP menu.Button #3 returns to RUN screen and uses new values (new values are not put into startup memory with #3).
AUTO–NOTE SETTING MODE IS NOW : XXX
NEXT RUN OFF ON
1 2 3 4
1
METRONOME SETTINGS BEATS/MIN=XXX X=BEATS/MEAS NEXT DOWN UP RUN
1 2 3 4
Accessing the Metronome Setting Screen
The Metronome SETUP screen is unique in that two parameters are accessible on one screen. The front panel UPARROW/DOWN ARROW buttons are used to modify the BEATS/MIN parameter; the "2" and "3" Function buttons modifythe BEATS/MEAS parameter.
Finally, hitting the "1" button (NEXT) under the Metronome SETUP screen activates the System Memory Store screen:
METRONOME SETTINGS BEATS/MIN=XXX X=BEATS/MEASNEXT DOWN UP RUN
1 2 3 4
1
STORE VALUES IN SYSTEM MEMORY?
NO YES RUN
1 2 3 4
Accessing the Memory Storage Screen
STORE VALUES IN SYSTEM MEMORY?
NO YES RUN
1 2 3 4
Pressing the "1" button (NO) at this time will cause no changes in stored memory and revert back to the SETUP menu screen. Pressing the "3" button (RUN) at this time will cause no changes in stored memory and revert back to the normal RUN screen.
Pressing the "2" button (YES) at this time will save the SETUP parameters in the state in which they were last placed andreturn the screen to the SETUP menu. The power-up condition of the Model 590 will now reflect these latest parametersettings until new values are once again stored under SETUP.
c) VIEWING AND ALTERING TEMPERAMENT FILESTemperament refers to the specific frequency (pitch) intervals placed between notes in a musical scale. With 12 notes peroctave (the most prevalent case but, by no means, the only case), there are an infinite number of ways to set the audiofrequencies of these notes relative to one another. Through the centuries, many have wrestled with the challenge of creatingthe most pleasing, yet universally flexible, temperament of these 12 intervals. It turns out that it is mathematically impossible
Page 11

to achieve both completely, that is, if by "pleasing", one means smooth beat-free intervals, and, if by "flexible", one meanssatisfactory harmony in all possible key signatures.
The AutoStrobe 590 always powers up with Equal Temperament and all offsets applied to notes when defining (editing)custom temperaments are relative to it. In other words, if one creates a temperament in which the C# note is 5.2 cents sharpfrom the pitch for C# in an equal-tempered scale, a setting of +05.2¢ would be entered. Since the overall frequency standard(both internationally and for the Model 590) is "Concert A", it is suggested that custom temperaments be created with the"A" scale note maintained at 00.0¢ offset and then adjusting the other scale notes appropriately. In this way, the "A=xxx"setting under the SETUP menu will still be physically accurate.
The Model 590 comes with 8 non-erasable, unmodifiable temperaments including standard equal temperament. They varyconsiderably in the "pleasing versus flexible" compromise that all temperaments must address. Those familiar with publishedtemperaments will recognize most of these eight temperaments as both historically and musically useful:
T590 NAME FULL NAME DESCRIPTION
EQUA EQUAL All semi-tone intervals are identical: 12/2 or .6% above previousnote. All keys signatures are equally playable.
PYTH PYTHAGOREAN Perfect 4ths and 5ths; 3rds are poor. Avoid G< major and minorkeys. F<, C< major and E=, B= minor diatonic keys are very good.
JUMA JUST (MAJOR) Perfect triads in 12 keys: C, G, A, E, E=, F major and A, E, F<, C<,C, G minor. Avoid all other keys.
P5TH POWER FIFTHS Tempered for clean 5ths when playing electric guitar with distortion.
MEAN QUARTER COMMAMEAN-TONE
Perfect/excellent triads in 16 keys. Avoid D=, G=, A=, B major andB=, E=, F, G< minor keys.
WRK3 WERCKMEISTER—III Well-tempered; strong differentiation of key color. Avoid D=, G=,A=, B major and B=, E=, F minor keys.
KRN3 KIRNBERGER—III Similar to WRK3 but also avoid E=, E major and C, C<, G< minorkeys.
YONG YOUNG Mild differentiation of key color. Avoid D=, E=, G=, A= major andB=, C, E=, F minor keys.
Although they cannot be edited directly, one may always copy any one of these permanent temperaments into a customtemperament which can then be viewed or edited further on a note-by-note basis. The Model 590 permits up to 64 user-programmable temperaments which can be created in this way or "from scratch".
The FILE (temperament) menus are accessed under the SETUP screen. Thus, the first step when starting from the normalRUN screen is to press the “1” button to enter SETUP:
Page 12

+ 7 ÷
+ 7 ÷
KEY= C A=440 C 00 ¢ AUTOSETUP MODE
1 2 3 4
1
SETUP MENU PLEASE SELECT MODE
OPTN FILE RUN DIAG
1 2 3 4
Accessing the Setup Screen
The next step—accessing the FILE menus—is accomplished by pressing the “2” button (now labeled: FILE):
SETUP MENU PLEASE SELECT MODE
OPTN FILE RUN DIAG
1 2 3 4
2
TEMPERAMENT MENU PLEASE SELECT MODESTART COPY–EDIT –DEL RUN STOP
1 2 3 4
Accessing the File Menu Screen
Under this TEMPERAMENT MENU screen, all temperament-related activities are accessible through the four Functionbuttons below the LCD display and are summarized in the following table:
TEMPERAMENT ACTIVITY ACCESSED THROUGH: FUNCTIONBUTTON:
Select and activate a pre-existingtemperament
START–EDIT
1
Create(edit), name, and activate a newtemperament
START–EDIT
1
Copy an existing temperament, edit thecopy (if desired), name, and activatethe new temperament.
COPY–DEL
2
Delete a non-factory temperament COPY–DEL
2
Return to the RUN screen with nochange
RUN 3
Deactivate(STOP) the current non-equal temperament and revert to equaltemperament
STOP 4
The following flowcharts plot the various steps required to accomplish these temperament activities. The four exampleshighlight only the sequence of button presses typically necessary for just one of these activities, that is to say, with nomistakes or back-tracking.
L
L
L
L
L
L
Page 13

The following key will assist in understanding the "shorthand" of these flowcharts:
1. To the right (or sometimes above) each front panel function button—"1" through "4"—depicted on the flowchart is theexact label for that button as shown on the LCD display at the current step in the programming.
2. With the exception of the top two LCD screen drawings in each flowchart, the word descriptions at various steps do notnecessarily appear on the LCD screens but are meant only to explain the action at these steps.
3. The appearance of the "L" icon indicates that the user must press one of the buttons depicted horizontally to the right
of it in order to execute a choice in the current step of the programming and advance to the next step.
4. A diamond (") box indicates that the next step in the programming depends upon specific choices made up to that point. For example, under the "Creating A New Temperament" flowchart, a box labeled "4 characters?" is encountered. If theuser has entered four characters for the temperament name at this point, the next step will follow the "YES" pathdownward in the chart (at which point the LCD display re-labels the function buttons as indicated). If, at any given time,this diamond box is encountered when less than four characters have been chosen (as is normally the case for at leastthe first three times the box is encountered), the "NO" path is followed. In this example, that means that the functionbuttons continue to allow positioning of the cursor under various characters and/or selecting (or removing) a characterfrom the current temperament name under construction.
NOTE: When deleting temperaments, the motor for the rotating strobe disc will always be turned off. The motorwill begin again upon returning to the RUN screen when temperament activity is concluded.
Page 14
+ 7 ÷
+ 7 ÷
A comprehensive flowchart at the end of this instruction manual shows ALL possible paths through the temperament menusand provides a good reference once the fundamental concept of the these menus is understood. You may note that at almostevery point, there is a button function (like BACK or REDO) which jumps to a logical earlier step of the current activity ora button function (like RUN or CNCL—short for "cancel") which jumps out of the current activity with no changes made.
Let’s run through one of the examples in detail. To create a new temperament file from scratch, follow the steps alreadyoutlined above to enter the FILE menu. This takes us to the second screen shown on the flowcharts. For this example, wewill be following along on the second temperament example flowchart entitled: EXAMPLE—CREATING A NEWTEMPERAMENT. We see from that flowchart that the next step is to press “1” which is, at this point, labeled START-EDIT:
TEMPERAMENT MENU PLEASE SELECT MODESTART COPY–EDIT –DEL RUN STOP
1 2 3 4
1
SELECT TEMPERAMENT EQUA PYTH JUMA P5TH MEAN WRK3 KRN3 YONG NEW CNCL START
1 2 3 4
Accessing the Temperament Select Screen
At this point we are given the choice of selecting from among the preset Temperament Files in the tuner or selecting moreoptions with the Function buttons below the screen. In this example, we intend to create a new temperament, and, thus, wepress the “1” button labeled “NEW”:
SELECT TEMPERAMENT EQUA PYTH JUMA P5TH MEAN WRK3 KRN3 YONG NEW CNCL START
1 2 3 4
1
PICK NAME = ABCDEFGHI JKLMNOPQRSTUVWXYZ0123456789 TMPR=_ _ _ _< — — — — > BKSP CNCL
1 2 3 4
Accessing the PICK NAME Screen
Notice upon entering the PICK NAME screen that the cursor (underline) is positioned under the “A” in the selection string. While this screen is active, hitting the front panel ENTER button will cause whatever character is underlined to be addedto the TEMPERAMENT FILE name shown on the third screen line (after “TMPR=”). The underlines here are simply place-holders that are replaced by selected characters. To select a different character to enter into the name, the “1” or “2” buttonswill retreat or advance, respectively, the current cursor position (i.e., the character selection underline) as indicated by theback-arrow and forward-arrow over these buttons on the screen..
NOTE: Hitting the “1” button while the cursor is on “A” will cause the cursor to “wrap around” to the last selectioncharacter—the “blank” after “9” on the third screen line—to reduce the time it would take to scroll from a character at thebeginning of the selections to one near the end. Similarly, hitting the “2” (advance or — — >) button while the current cursorselection is this last “blank” character will cause the cursor position to “wrap around” to the top (or “A”).
Since we are beginning on the very first selection character, “A”, we would now press the “2” button to move the cursorforward under the “B” (in anticipation of naming our Temperament File: “BG 1”, i.e., “B”, “G”, “blank”, “1”).
Page 19

+ 7 ÷
+ 7 ÷
+ 7 ÷
PICK NAME = ABCDEFGHI JKLMNOPQRSTUVWXYZ0123456789 TMPR=_ _ _ _< — — — — > BKSP CNCL
1 2 3 4
2
PICK NAME = ABCDEFGHI JKLMNOPQRSTUVWXYZ0123456789 TMPR=_ _ _ _< — — — — > BKSP CNCL
1 2 3 4
Selecting a Character To Enter Into the New Temperament File Name
The cursor underline is now under the “B” in the selection string, but no character has been added to the temperament filename. To do this we must press the ENTER button on the front panel. (Note our position in the flowchart.)
PICK NAME = ABCDEFGHI JKLMNOPQRSTUVWXYZ0123456789 TMPR=_ _ _ _< — — — — > BKSP CNCL
1 2 3 4
ENTER
PICK NAME = ABCDEFGHI JKLMNOPQRSTUVWXYZ0123456789 TMPR=B _ _ _< — — — — > BKSP CNCL
1 2 3 4
Entering a Selected Character Into the New Temperament File Name
Notice that a “B” character has now been entered into the first of the four Temperament File name positions. Also note thatwe remain on the PICK NAME screen at this time. All file names must have exactly 4 characters (although any number ofthe four may be the “blank” character), and the tuner will remain on this selection screen until we have selected a characterfor all four positions in the name field area (or, alternatively, if we opt to cancel (CNCL) the whole operation with button“4”).
In order to advance the cursor to fall under the “G” (in anticipation of our next character selection), we could press the “2”button five times in quick succession. Alternatively, if the “2” button is held in the pressed position, the cursor will advanceautomatically one character at a time and several times a second. (This same hold feature is present on the “1” button whenreversing the cursor.) This is typically how we would advance the cursor any time we would need to move the cursor bymore than two or three characters.
PICK NAME = ABCDEFGHI JKLMNOPQRSTUVWXYZ0123456789 TMPR=B _ _ _< — — — — > BKSP CNCL
1 2 3 4
2
(Press and hold)
PICK NAME = ABCDEFGHI JKLMNOPQRSTUVWXYZ0123456789 TMPR=B _ _ _< — — — — > BKSP CNCL
1 2 3 4
Selecting the Second Character To Enter Into the New Temperament File Name
Once again, we must press the ENTER button to actually add our selection to the Temperament File name:
Page 20

+ 7 ÷
+ 7 ÷
+ 7 ÷
PICK NAME = ABCDEFGHI JKLMNOPQRSTUVWXYZ0123456789 TMPR=B _ _ _< — — — — > BKSP CNCL
1 2 3 4
ENTER
PICK NAME = ABCDEFGHI JKLMNOPQRSTUVWXYZ0123456789 TMPR=B G _ _< — — — — > BKSP CNCL
1 2 3 4
Entering the Second Character Into the New Temperament File Name
For the third character, a “blank” in our example of “BG 1”, we could either continue to advance through the letters andnumbers in the selection string to arrive at the “blank” character or we could make use of the wrap-around feature and reversethe cursor through “A” to the “blank”. This requires traversing only seven characters, so let us proceed with the shortcut:
PICK NAME = ABCDEFGHI JKLMNOPQRSTUVWXYZ0123456789 TMPR=B G_ _< — — — — > BKSP CNCL
1 2 3 4
1
(Press and hold)
PICK NAME = ABCDEFGHI JKLMNOPQRSTUVWXYZ0123456789 TMPR=B G_ _< — — — — > BKSP CNCL
1 2 3 4
Selecting the Third Character To Enter Into the New Temperament File Name
And, once again, entering:
PICK NAME = ABCDEFGHI JKLMNOPQRSTUVWXYZ0123456789 TMPR=B G _ _< — — — — > BKSP CNCL
1 2 3 4
ENTER
PICK NAME = ABCDEFGHI JKLMNOPQRSTUVWXYZ0123456789 TMPR=B G _< — — — — > BKSP CNCL
1 2 3 4
Entering the Third Character Into the New Temperament File Name
Notice the place-holding underline in the third position of the name is now completely blank. For our final character, we seethat it will be faster to retreat the cursor back to the “1” character than to wrap-around forward through “A” and beyond:
Page 21

+ 7 ÷
+ 7 ÷
+ 7 ÷
PICK NAME = ABCDEFGHI JKLMNOPQRSTUVWXYZ0123456789 TMPR=B G _< — — — — > BKSP CNCL
1 2 3 4
1
(Press and hold)
PICK NAME = ABCDEFGHI JKLMNOPQRSTUVWXYZ0123456789 TMPR=B G _< — — — — > BKSP CNCL
1 2 3 4
Selecting the Final Character To Enter Into the New Temperament File Name
And, finally:
PICK NAME = ABCDEFGHI JKLMNOPQRSTUVWXYZ0123456789 TMPR=B G _< — — — — > BKSP CNCL
1 2 3 4
ENTER
THE NAME CHOSEN FOR TEMPERAMENT IS: BG 1
REDO OK CNCL
1 2 3 4
Entering the Final Character Into the New Temperament File Name
You may briefly see the PICK NAME screen updated with the final name character, but this new “verify” screen will appearas soon as you release the ENTER button at this point. On the flowchart, we have now exited the loop defined by the“4 characters?” decision box; in other words, since we have now entered four characters into our temperament file name wenow exit through the path labeled “YES” (in answer to the “4 characters?” question). Note that, at any time up to this point,if we had mistakenly entered an incorrect character, we could have hit the “3” button (BKSP) to backspace through the lastcharacter entered into the name at the time. Backspacing and entering characters can be repeated indefinitely until the fourthname character is entered and this final verify screen is activated. We still have an opportunity to start completely fromscratch in naming our temperament file by hitting the “1” (REDO) button at this point. We may also cancel the entiretemperament creation process and return to the RUN screen with no permanent changes by pressing the “3” (CNCL) button.
Typically, however, being confident and consummate professionals, we will press “2” to OK our selection:
THE NAME CHOSEN FOR TEMPERAMENT IS: BG 1
REDO OK CNCL
1 2 3 4
2
TMPR = BG 1 KEY= C NOTE= C 00. 0 ¢
DONE NEXT
1 2 3 4
Verify Temperament File Name and Begin Note Editing
NOTE: If you had chosen either a name that you have already used and stored in the unit or a name used as one of the factorydefaults, a different screen will be activated which indicates the problem and permits you to return to the TEMPERAMENTMENU screen with no changes. You must then decide which course of action you wish to take: proceed with creating atemperament file with a different name or delete the previously created user file and then create your new temperament file
Page 22

using this original name.
We are assuming that we have chosen a valid name for our file and have, consequently, followed the “NO” path from the“Name already exists?” decision box on the flowchart. Thus, we have now entered the “Edit Notes” phase of ourtemperament file creation. From this one screen, we can now define the note offsets for all 12 scale notes. Note that thisscreen shows you which temperament file you are editing as well as which scale note you are editing. Also note that a“KEY=C” indication is shown on the top line.
NOTE: Regardless of what key signature was current before entering the edit process for temperaments , the key alwaysreverts to “C” for the purposes of defining note offsets. Once the editing process is complete and you return to the RUNscreen, you may enter any of the alternate keys with the usual results. However, if you applied an offset of 1.1 cents to “D”,for example, this offset will always apply to “Concert D” regardless of the new KEY you have selected.
The “cents” indication on the second line of this screen is always indicates the individual offset currently selected for thedisplayed note. Had we been editing a previously defined temperament file, this first screen may have shown a non-zeronumber here. Because we are creating a new temperament file this and all the remaining 11 notes will be initialized to00.0 cents.
NOTE: Regardless of the resolution previously chosen under the RUN screen, temperament file editing is always carriedout in the highest (0.1 cent) resolution of the tuner.
As you can see from the flowchart, changing the cent value for the current note offset is accomplished with the UP ARROWand DOWN ARROW buttons next to the screen. Once we set the desired offset for the displayed note, we may either hitbutton “4” (NEXT) or the ENTER button. Either one temporarily saves our offset selection and automatically points thedisplay to the next note in the sequence. At any time short of defining all 12 notes, we may exit and permanently save thefile by hitting button “3” (DONE) and then the ENTER button. This will save our temperament file with all the note offsetswe had entered to that point. Any notes that we declined to define in an editing session will be saved with the initial zerovalues (or previously defined offset values if we were editing a pre-existing file). Thus, had we been merely editing a pre-existing temperament file, we may have wished to only “tweak” several values and not redefine the whole file.
Once a temperament is activated, its name will appear at the upper right-hand corner of the RUN screen:
KEY= C TMPR= PYTHA=440 C 00 ¢ AUTOSETUP MODE MET
1 2 3 4
4. TUNING INSTRUMENTS THAT PLAY IN OTHER THAN THE KEY OF "C"
The Model 590 solves one of the biggest difficulties for wind players and other non-"C" instrument musicians when usinga precision tuner. Mental transposition of your note into the key of "C" is no longer required. The tuner can be easily shiftedto show the correctly transposed note names for tones played on C, B=, F, and E= instruments.
When the Model 590 is displaying the normal RUN screen, simply press the button labeled "KEY". Multiple presses of thisbutton will cycle the tuner through the musical instrument tuning keys of C, B=, F, and E=. You may press the KEY buttonas many times as you wish and the tuner will sequence through the keys of C, B=, F, E=, C, etc. The pitch referenced by thetuner will change as the speed of the strobe disc is internally transposed for the new tuning key. (Note that any button, suchas KEY, which causes a change in strobe disc speed will be temporarily disabled while the motor is accelerating to its
Page 23
+ 7 ÷
destination speed.) When in Auto-Note mode, sound your note and the scale note displayed on the LCD screen will reflectthe transposition from "concert pitch" that corresponds with the currently selected KEY parameter shown in upper left handcorner of the RUN screen.
KEY= C A=440 C 00 ¢ AUTOSETUP MODE MET
1 2 3 4
KEY
KEY= Bb A=440 C 00 ¢ AUTOSETUP MODE MET
1 2 3 4
Choosing Alternate KEY Transpositions
5. ENHANCED RESOLUTION OF INTONATION MEASUREMENTS
As you continue to practice your intonation with the Model 590, you will find that your pitch accuracy continually improves. As you find yourself playing more and more closely to perfect intonation, you may wish to adjust the tuner more preciselyto your pitch. The Model 590 has tuning accuracy to within 0.1 cents. The tuner may be adjusted to your note within thatsame accuracy. The tuner always powers up with a displayed resolution of 1 cent. This is shown as "00 ¢". When operatingunder the RUN screen, the tuner can be set for enhanced resolution of either 0.5 cents or 0.1 cents. Press and hold theENTER button, then press either the UP ARROW or DOWN ARROW button and the resolution will be changed to 0.5 cents. To further enhance the resolution to 0.1 cent increments, first release the ENTER button, then press and hold itagain while you press either the UP ARROW or DOWN ARROW button. The LCD screen always presents enhancedresolution of 0.5 cents and 0.1 cents by showing "xx.x ¢", that is, three digits with a decimal point in the number.
When the tuner is set for enhanced resolution, the UP ARROW and DOWN ARROW buttons increment/decrement thetuning adjustments of the tuner in steps of 0.5 cents or 0.1 cents. This permits intonation measurements with an accuracyof 1/200 or 1/1000 semitone.
The resolution of the tuner may be returned to 1 cent resolution by again using the UP ARROW or DOWN ARROW buttonsin conjunction with the ENTER button (press and hold the ENTER button and then press either UP ARROW or DOWNARROW). The tuner resolution cycles through a selection sequence of 1 cent, 0.5 cent, 0.1 cent, 1 cent, etc. Note that thetuner requires you to release the ENTER button between each step of this resolution selection cycle. Then press and holdit again to go to the next resolution selection.
Note: Upon returning to the RUN screen from FILE (temperament) menus, 0.1 cent resolution remains active.
Other possible uses of the enhanced resolution of 0.5 cents, or 0.1 cent could be for exact measurements of precise partialtone frequencies during the manufacture of percussive musical instruments (for example - bells, chimes, gongs, etc.), or forspecific scientific research into the timbral� structure of complex sounds and vibrations in the musical and audible frequencyspectrum. Yet another use is to allow the tuner to more precisely match a currently sharp or flat instrument (such as a pianoor organ) so that the tuner can then be used to tune other instruments in the ensemble.
6. CHECKING INTONATION WITH THE AutoStrobe 590
When you wish to check your playing intonation, the tuner can assist in a very simple manner. You will need a partner toadjust the tuner to the note(s) you are checking.
Page 24

When checking and adjusting your own intonation, it is probably better to use an external microphone. Turn your back tothe tuner while playing your note so you don't see the indications on the tuning disc while your partner is making theadjustments. That way you will be less likely to slowly change your intonation at the same time your partner is adjusting thetuner to the note you are playing.
a. Connect an external microphone to the EXTERNAL INPUT connector of the tuner. Set this microphone on a standso that you can face away from the tuner.
b. Adjust the tuner to the tuning key of your instrument as detailed above. If necessary, raise or lower the standardtuning reference pitch of the tuner (Concert A setting under the SETUP menu).
c. You are now ready to begin. For the remainder of this section we will assume that your instrument is tuned in "C"to a pitch of A = 440 Hz. The normal RUN screen of the tuner will be displayed:
KEY= C A=440 C 00 ¢ AUTOSETUP MODE MET
1 2 3 4
d. Play your note into the microphone, while your partner watches the strobe window. While you are sounding yournote, your partner will press the UP ARROW and/or DOWN ARROW buttons until the dark markings on the tuningwheel appear to be stationary. When these markings are stationary, the tuner is in tune with the note you are playing.
e. The display will show the correctness of your intonation by indicating how many cents sharp or flat your partneradjusted the tuner to match the note as you actually played it. This is presented at the "+" (sharp) or "-" (flat)"xx.x ¢" (cents) location of the display screen.
f. Musical tuning is measured by a unit called cents, representing a 1/100 division of a semitone. There are 1200 centsin each octave, and exactly 100 cents between each half-step note in equal temperament tuning. The Model 590 isadjustable in a range of ±1/2 semitone (+50.0 cents sharp to -50.0 cents flat) from being perfectly in tune (00.0 cents)at the selected temperament and scale note.
Page 25

+ 7 ÷
+
7 ÷
7. USING THE PETERSON AutoStrobe 590 AS A METRONOME
The Model 590, when not needed as a tuning instrument, can function as a fully programmable audio/visual metronome. There are two methods to initiate its use. The bottom line of the LCD screen ALWAYS indicates the current functions (ifany) of the four Function buttons (labeled "1" through "4") directly beneath. When the normal RUN screen (shown belowat the left) is active, button "4" is labeled "MET" for metronome. Pressing this button once, will cause the Model 590 tocease operating as a strobe tuner and prepare for metronome operation by a) replacing the RUN LCD screen with theMETRONOME screen, and b) spinning the strobe motor at a new unchanging speed which is explained below.
KEY= C A=440 C 00 ¢ MANSETUP MODE MET
1 2 3 4
4
METRONOME OFF BEATS/MIN=XXXX=BEATS/MEASDOWN UP TUNER
1 2 3 4
Accessing Metronome Screen - Method 1
(Note that, at this point, the metronome has not actually been turned on; no audio or visual metronome beats have beguncycling.) The second method available for initiating the Metronome screen is to press the "Metronome On/Off" button belowthe "1" button on the front panel ONCE while the RUN screen is active.
KEY= C A=440 C 00 ¢ AUTOSETUP MODE MET
1 2 3 4
METRONOME OFF BEATS/MIN=XXXX=BEATS/MEASDOWN UP TUNER
1 2 3 4
Accessing Metronome Screen - Method 2
This Metronome On/Off button is connected in parallel with the "METRONOME SWITCH" 1/4-inch jack at the rear of theunit. Any momentary-close contact device such as a footswitch may be used in place of or in addition to this button at anytime. (The front-panel button will continue to operate with a device plugged into this rear jack unless the device is held inthe closed position—make sure that the device operates in a momentary-close fashion. A proper footswitch is available frompeterson as part #140070.)
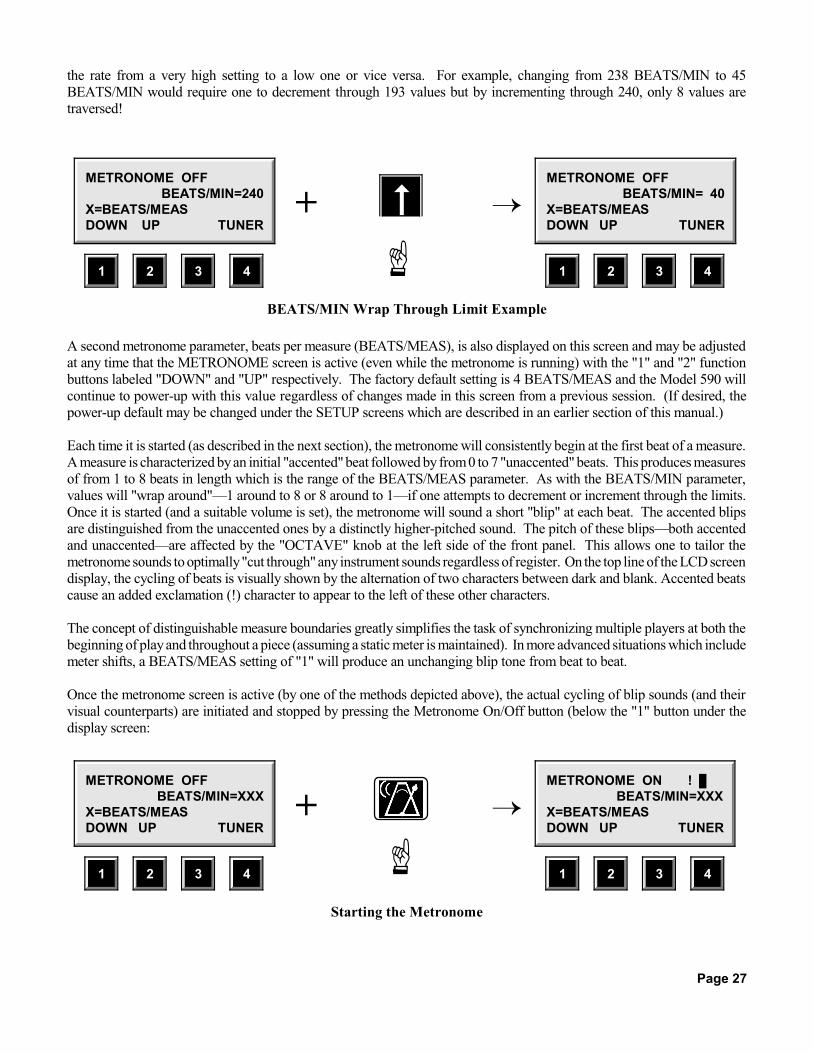
Once the METRONOME screen is active, you may initiate several operations: metronome rate changes, measure lengthchanges, and metronome on/off. The current rate for the metronome, expressed in beats/minute (BEATS/MIN), is alwaysdisplayed on the second line of this screen and is always adjustable (even when the metronome is running) with the "uparrow" and "down arrow" buttons to the right of the LCD screen. The factory default setting is 120 beats/minute and theModel 590 will continue to power-up with this value regardless of changes made in this screen from a previous session. (Ifdesired, the power-up default may be changed under the SETUP screens which are described in an earlier section of thismanual.) The range of values for metronome rate is 40 to 240 BEATS/MIN. Incrementing or decrementing above and belowthese limits causes the parameter to "wrap around" to the opposite limit. This effectively reduces the time required to change
Page 26
+
7 ÷
+ 7 ÷
the rate from a very high setting to a low one or vice versa. For example, changing from 238 BEATS/MIN to 45BEATS/MIN would require one to decrement through 193 values but by incrementing through 240, only 8 values aretraversed!
METRONOME OFF BEATS/MIN=240X=BEATS/MEASDOWN UP TUNER
1 2 3 4
!
METRONOME OFF BEATS/MIN= 40X=BEATS/MEASDOWN UP TUNER
1 2 3 4
BEATS/MIN Wrap Through Limit Example
A second metronome parameter, beats per measure (BEATS/MEAS), is also displayed on this screen and may be adjustedat any time that the METRONOME screen is active (even while the metronome is running) with the "1" and "2" functionbuttons labeled "DOWN" and "UP" respectively. The factory default setting is 4 BEATS/MEAS and the Model 590 willcontinue to power-up with this value regardless of changes made in this screen from a previous session. (If desired, thepower-up default may be changed under the SETUP screens which are described in an earlier section of this manual.)
Each time it is started (as described in the next section), the metronome will consistently begin at the first beat of a measure. A measure is characterized by an initial "accented" beat followed by from 0 to 7 "unaccented" beats. This produces measuresof from 1 to 8 beats in length which is the range of the BEATS/MEAS parameter. As with the BEATS/MIN parameter,values will "wrap around"—1 around to 8 or 8 around to 1—if one attempts to decrement or increment through the limits. Once it is started (and a suitable volume is set), the metronome will sound a short "blip" at each beat. The accented blipsare distinguished from the unaccented ones by a distinctly higher-pitched sound. The pitch of these blips—both accentedand unaccented—are affected by the "OCTAVE" knob at the left side of the front panel. This allows one to tailor themetronome sounds to optimally "cut through" any instrument sounds regardless of register. On the top line of the LCD screendisplay, the cycling of beats is visually shown by the alternation of two characters between dark and blank. Accented beatscause an added exclamation (!) character to appear to the left of these other characters.
The concept of distinguishable measure boundaries greatly simplifies the task of synchronizing multiple players at both thebeginning of play and throughout a piece (assuming a static meter is maintained). In more advanced situations which includemeter shifts, a BEATS/MEAS setting of "1" will produce an unchanging blip tone from beat to beat.
Once the metronome screen is active (by one of the methods depicted above), the actual cycling of blip sounds (and theirvisual counterparts) are initiated and stopped by pressing the Metronome On/Off button (below the "1" button under thedisplay screen:
METRONOME OFF BEATS/MIN=XXXX=BEATS/MEASDOWN UP TUNER
1 2 3 4
METRONOME ON ! $ BEATS/MIN=XXXX=BEATS/MEASDOWN UP TUNER
1 2 3 4
Starting the Metronome
Page 27

As described above in activating the metronome screen, a footswitch jack labeled "METRONOME SWITCH" at the rearof the unit is connected in parallel with the Metronome On/Off button. Thus, any momentary-close contact device such asa footswitch may be used in place of or in conjunction with this front-panel button at any time. (The front-panel button willcontinue to operate with a device plugged into this rear jack unless the device is held in the closed position—make sure thatthe device operates in a momentary-close fashion. A proper footswitch is available from peterson as part #: 140070.)
GLOSSARY
cent - an audio frequency interval which is defined by the division of an equally-tempered semitone interval into 100 equal-ratio steps. Each cent is 1200/2 times the previous one in frequency, making it about 0.058% higher in frequency than theprevious one.
equal-tempered -type of note scaling within a musical octave in which a perfect 2:1 octave frequency ratio is divided intoequal-ratio scale notes. In a twelve-tone scale, each note's frequency is 12/2 times the previous one making each scale noteabout 6% higher in frequency than the previous one.
equal temperament - a musical scale in which the scale notes are at equal ratios from one to the next. In a twelve-tone/octave scale, this ratio is 12/2 making each scale note about 6% higher in frequency than the previous one. This scalingchoice provides for identical musical intervals regardless of the root note used for the key signature. In exchange for thisflexibility, all intervals have varying degrees of built-in dissonance associated with them.
temperament - frequency scaling of the notes within a musical octave.
timbre - the "character" or quality of a sound, distinct from pitch and volume, which distinguishes one sound from another. All natural sounds may be thought of as containing various simple-tone (sinusoidal) frequencies in varying strengths. It isthe relative strength and frequency of these over-tones or "partials" and the manner in which these parameters change overthe course of the sound that makes a note from a piano, for example, distinguishable from that of a trumpet.
Page 28

APPENDIX A:WHY USE A "REAL" STROBE TUNER?
There are many cheap "strobe pattern" tuners on the market which attempt to emulate the look of the image produced by anauthentic rotating strobe disc. This is usually done with an array of LEDs (Light Emitting Diodes) which are simply turnedON or OFF in sequence so as to "appear" that the light image is drifting left or right.
While such schemes may satisfy an economic niche, they miss out on the almost magical (and supremely functional) aspectsof a true strobe effect. All of these emulation schemes necessarily have one thing in common: a digital decision must bemade to interpret when to indicate an "in tune" signal (either by lighting a special green LED or otherwise creating a non-sequencing pattern on the LEDs). This creates several problems.
The most glaring of these is the "dead band" problem. The circuitry to form an "In tune?/Out of tune?" decision can, indeed,be very simple and cheap but, by its very nature, it implies that some amount of "out-of-tuneness" must be tolerated whenmaking an "in tune" indication. This is because a frequency that is EXACTLY in tune is an infinitely narrow point. If acircuit could be made to react to only this point (which is impossible by the way), getting that treasured "Green LED" to turnon would be even more of a frustration than it already is on such tuners. In fact, given the normal pitch fluctuations in a realinstrument, the light would simply never be ON (or at best be turned on for such short periods that you would never see it). As the manufacturers of such tuners widen the band of "out of tuneness" around that ideal frequency—the deviation fromperfect tuning that they decide is "in tune enough" for you—a more stable indication is made. Note that this is at the expenseof your ever knowing how close or far from perfect tuning you are up to the limit of this "dead band". Such devices typicallygive up at about ±1 cent� deviation and usually allow several times this degree of inaccuracy before the "in tune" signalreverts to an "out-of-tune" indication. Of course, the really bad news is: the total worse case error is double that. (You couldtune your instrument near the sharp end of the dead band, another player might land near the flat end.)
How bad is this level of detuning? Pretty bad! Over the centuries, many have wrestled with the concepts of intonation andtemperament—the art of setting appropriate pitch intervals for the various musical notes. As it happens, there is no onetemperament that allows for truly in-tune musical intervals over multiple key signatures. The level of concern in these cases:as small as 1 or 2 cents! For example, music in modern western culture is overwhelmingly based upon equal temperament�. We have grown accustomed to some of the inherent inaccuracies of this temperament, yet it does present problems. Forinstance, one of the milder imperfections is the production of intervals of fifths which are between 1 and 2 cents flat from"perfect" non-beating intervals (...and you don't even want to know how bad the thirds are!) In many cases, this is quiteacceptable. However, with harmonically rich instruments—a brass section or an electronically distorted guitar, forexample—even this level of detuning can be disturbing. (Good brass players actually adjust the intonation of the notes theyplay to minimize this problem. This is why "a good section is hard to find!") In the case of the guitar where such on-the-flyadjustments are impossible, adding another couple of cents inaccuracy because of tuning device limitations can yieldpositively raucous results. In the orchestral case, the added imprecision could spread the instruments out to the point thateven accomplished players would have difficulty "lipping" the notes accurately. Of course, with their limited precision, thepseudo-strobe tuners have no hope of properly distinguishing between temperaments. The best that they can do is center onequal-tempered notes (with their particular shortcomings) and lop on a "dead band" for good measure.
The magic of a true strobe lies in the responsiveness and "smoothness" of the effect from "flat" to "perfectly in tune" to"sharp". Physically, no change of state occurs in the tuner—no discrete decision takes place. Your eye simply interprets theeffect of the spinning pattern in relation to the blinking illumination behind it. Thus, the response to the user as the inputpitch is adjusted is literally at the speed of light! This is a perfect visual analogy to the effect of hearing two sound sources"beat" against each other when they are out of tune. Moreover, your ability to discern movement in the strobe image(indicating an out-of-tune audio source) is actually more sensitive than that of hearing audio beats and much more sensitive(about 10 to 20 times more!) than "pseudo-strobe" tuners. This level of precision in your Model 590 tuner not only allowsunprecedented accuracy in tuning to "standard" pitches, but permits one to utilize the subtler shades of alteredtemperaments—both pre-programmed and user-programmable—discussed in the SETUP section of this manual.
Page 29

APPENDIX B:WHY BE CONCERNED ABOUT UNEQUAL TEMPERAMENTS?
Temperament refers to the specific frequency (pitch) intervals placed between notes in a musical scale. With 12 notes peroctave (the most prevalent case but, by no means, the only case), there are an infinite number of ways to set the audiofrequencies of these notes relative to one another. Through the centuries, many have wrestled with the challenge of creatingthe most pleasing, yet universally flexible, temperament of these 12 intervals. It turns out that it is mathematically impossibleto achieve both completely, that is, if by "pleasing", one means smooth beat-free intervals, and, if by "flexible", one meanssatisfactory harmony in all possible key signatures.
Since compromise is the only option, it should come as no surprise that there exists about as many different well-definedtemperaments as there are people who have attempted to create them. The fact is: both of these goals—pleasing andflexible—are moving targets. The requirements of harmonicity and key signature flexibility have changed greatly over thecenturies in general and vary just as greatly from person to person. For example, a piece in the 18th-century baroque stylemight never modulate from a single key signature (or perhaps just to the very similar "5th" key). A temperament which isfunctional in just a handful of keys might be (and was) satisfactory. In 20th-century western music, all keys and scale notesare fair game, sometimes even within a single piece. Moreover, through the years, people have become more accepting of complex and "closer" simultaneously sounded harmonic intervals. Harmonies that would have been considered unbearablydissonant 150 years ago are now considered "colorful"—even beautiful—by many today. With such complex harmony andeffects like parallel harmonic movement, it is generally better to have harmonic relationships that are moderately imperfect,but equally imperfect over all key signatures. Thus, Equal Temperament� has generally won out in modern music. You maynever have considered before that it is the adherence to this temperament that allows one to unthinkingly transpose a musicalpiece to any key on a piano with no ill effects.
So, why worry about altered temperaments if equal temperament is so pervasive? The reasons are many and varied. Becauseequal temperament lands so squarely in favor of flexibility, some of the intervals are, well, not very pleasing. For example,major thirds are about 14 cents sharp from the "perfect" non-beating interval...and how often do you play a piece of musicwith no major thirds anywhere? In some music, on some instruments, this is bearable. (We certainly have had a lot ofopportunity to get used to it!) But play a major third interval using a brass or reed sound (with no chorusing or other effects)on a standard equally-tempered synthesizer, and you will understand something about why people still want to hear "live"horn sections. No matter how good the actual timbre� of the synthesized sound is, there is something very "unhorn-like"and disturbing about that simple harmony. Good brass and reed players constantly, and sometimes unconsciously, "lip" thenotes they play to minimize intervalic beating with notes played by others in their section.
Players of other types of instruments are not so lucky. There can be no adjusting of strings on-the-fly while playing a frettedstring instrument like a guitar; there is no "lipping" possible while playing several hundred pipes in a pipe organ. If one isplaying a program which includes classical period pieces, he will simply never achieve on an equally-tempered instrumentthe beautiful effect that the composer had envisioned when composing the piece for a Just or Mean-Tone temperedinstrument. Similarly, because of their unique use of certain musical intervals, instruments like the steel slide guitar canbenefit by purposely tuning to un-equal temperaments.
Sometimes unequal temperament can be used to help correct inherent deficiencies in certain types of instruments. Frettedinstruments like the guitar are designed to be equally-tempered but it turns out that slightly altered tunings of the open stringsand harmonics relative to the fretted notes can improve the overall sound of the instrument. This is because real strings donot act quite the same as the theoretical models that must be assumed when designing musical instruments around them.
Similarly, makers of musical instruments (such as the steel drum, bells, xylophone, etc.) which have very inharmonic timbrescan benefit from a tuner with altered temperament capabilities by using the note offsets to mimic the desired "harmonics"(or, more accurately, partial frequencies) inherent in a given sounded tone. The programmable nature of temperaments inthe Model 590 means less work compared to constantly "dialing in" different harmonic offsets.
Page 30

INDEX
PAGEAC Voltage.. . . . . . . . . . . . . . . . . . . . . . . . . . . . . . . . . . . . . . . . . . . . . . . . . . . . . . . . . . . . . . . . . . . . . . . . . . . . . 1Accuracy
Tuning. . . . . . . . . . . . . . . . . . . . . . . . . . . . . . . . . . . . . . . . . . . . . . . . . . . . . . . . . . . . . . . . . . . . . . . . . . . . . . 5Auto-Note Selection.. . . . . . . . . . . . . . . . . . . . . . . . . . . . . . . . . . . . . . . . . . . . . . . . . . . . . . . . . . . . . . . . . 4, 7, 9
Offset Limitations.. . . . . . . . . . . . . . . . . . . . . . . . . . . . . . . . . . . . . . . . . . . . . . . . . . . . . . . . . . . . . . . . . . 4, 8AUTOmatic.. . . . . . . . . . . . . . . . . . . . . . . . . . . . . . . . . . . . . . . . . . . . . . . . . . . . . . . . . . . . . . . . . . . . . . . . . . 4, 7BALANCE. . . . . . . . . . . . . . . . . . . . . . . . . . . . . . . . . . . . . . . . . . . . . . . . . . . . . . . . . . . . . . . . . . . . . . . . . . . 3, 7Buttons. . . . . . . . . . . . . . . . . . . . . . . . . . . . . . . . . . . . . . . . . . . . . . . . . . . . . . . . . . . . . . . . . . . . . . . . . . . . . . . . . 6Concert A. . . . . . . . . . . . . . . . . . . . . . . . . . . . . . . . . . . . . . . . . . . . . . . . . . . . . . . . . . . . . . . . . . . . . . . . . . . 5, 10Controls
BALANCE. . . . . . . . . . . . . . . . . . . . . . . . . . . . . . . . . . . . . . . . . . . . . . . . . . . . . . . . . . . . . . . . . . . . . . . . 3, 7Front Panel. . . . . . . . . . . . . . . . . . . . . . . . . . . . . . . . . . . . . . . . . . . . . . . . . . . . . . . . . . . . . . . . . . . . . . . . . . 5OCTAVE. . . . . . . . . . . . . . . . . . . . . . . . . . . . . . . . . . . . . . . . . . . . . . . . . . . . . . . . . . . . . . . . . . . . . . . . . 2, 7VOLUME. . . . . . . . . . . . . . . . . . . . . . . . . . . . . . . . . . . . . . . . . . . . . . . . . . . . . . . . . . . . . . . . . . . . . . . . . 3, 7
Default Settings. . . . . . . . . . . . . . . . . . . . . . . . . . . . . . . . . . . . . . . . . . . . . . . . . . . . . . . . . . . . . . . . . . . . . . . . . . 9DISPLAY +2/-1.. . . . . . . . . . . . . . . . . . . . . . . . . . . . . . . . . . . . . . . . . . . . . . . . . . . . . . . . . . . . . . . . . . . . . . . 6, 9EXTERNAL INPUT. . . . . . . . . . . . . . . . . . . . . . . . . . . . . . . . . . . . . . . . . . . . . . . . . . . . . . . . . . . . . . . . . . 2, 4, 5EXTERNAL SPEAKER. . . . . . . . . . . . . . . . . . . . . . . . . . . . . . . . . . . . . . . . . . . . . . . . . . . . . . . . . . . . . . . . . . . . 2Factory Defaults.. . . . . . . . . . . . . . . . . . . . . . . . . . . . . . . . . . . . . . . . . . . . . . . . . . . . . . . . . . . . . . . . . . . . . . . . . 9Footswitch. . . . . . . . . . . . . . . . . . . . . . . . . . . . . . . . . . . . . . . . . . . . . . . . . . . . . . . . . . . . . . . . . . . . . . . 7, 26, 27Frequency Calibration. . . . . . . . . . . . . . . . . . . . . . . . . . . . . . . . . . . . . . . . . . . . . . . . . . . . . . . . . . . . . . . . . . . . 10Handle Positioning.. . . . . . . . . . . . . . . . . . . . . . . . . . . . . . . . . . . . . . . . . . . . . . . . . . . . . . . . . . . . . . . . . . . . . . . 2Headphones.. . . . . . . . . . . . . . . . . . . . . . . . . . . . . . . . . . . . . . . . . . . . . . . . . . . . . . . . . . . . . . . . . . . . . . . . . 2, 7Intonation Training. . . . . . . . . . . . . . . . . . . . . . . . . . . . . . . . . . . . . . . . . . . . . . . . . . . . . . . . . . . . . . . . . . . . . . . 24KEY. . . . . . . . . . . . . . . . . . . . . . . . . . . . . . . . . . . . . . . . . . . . . . . . . . . . . . . . . . . . . . . . . . . . . . . . . . . . . 6, 9, 23LCD Screen. . . . . . . . . . . . . . . . . . . . . . . . . . . . . . . . . . . . . . . . . . . . . . . . . . . . . . . . . . . . . . . . . . . . . . . . . . . . . 6
Initial.. . . . . . . . . . . . . . . . . . . . . . . . . . . . . . . . . . . . . . . . . . . . . . . . . . . . . . . . . . . . . . . . . . . . . . . . . . . . . . . 3RUN. . . . . . . . . . . . . . . . . . . . . . . . . . . . . . . . . . . . . . . . . . . . . . . . . . . . . . . . . . . . . . . . . . . . . . . . . . . . . . . . 3
MANual. . . . . . . . . . . . . . . . . . . . . . . . . . . . . . . . . . . . . . . . . . . . . . . . . . . . . . . . . . . . . . . . . . . . . . . . . . . . . 4, 7Menu
FILE. . . . . . . . . . . . . . . . . . . . . . . . . . . . . . . . . . . . . . . . . . . . . . . . . . . . . . . . . . . . . . . . . . . . . . . . . . . . . . . 12SETUP.. . . . . . . . . . . . . . . . . . . . . . . . . . . . . . . . . . . . . . . . . . . . . . . . . . . . . . . . . . . . . . . . . . . . . . . . . . . . . 8Temperament. . . . . . . . . . . . . . . . . . . . . . . . . . . . . . . . . . . . . . . . . . . . . . . . . . . . . . . . . . . . . . . . . . . . . . . 12
METRONOME. . . . . . . . . . . . . . . . . . . . . . . . . . . . . . . . . . . . . . . . . . . . . . . . . . . . . . . . . . . . . . . . . . . . . . . . . . 25Beats/Measure.. . . . . . . . . . . . . . . . . . . . . . . . . . . . . . . . . . . . . . . . . . . . . . . . . . . . . . . . . . . . . . . . . . . . . . 27Beats/Minute. . . . . . . . . . . . . . . . . . . . . . . . . . . . . . . . . . . . . . . . . . . . . . . . . . . . . . . . . . . . . . . . . . . . . . . . 26On/Off. . . . . . . . . . . . . . . . . . . . . . . . . . . . . . . . . . . . . . . . . . . . . . . . . . . . . . . . . . . . . . . . . . . . . . . . . . . . . 27Rate. . . . . . . . . . . . . . . . . . . . . . . . . . . . . . . . . . . . . . . . . . . . . . . . . . . . . . . . . . . . . . . . . . . . . . . . . . . . . . . 26
METRONOME Settings. . . . . . . . . . . . . . . . . . . . . . . . . . . . . . . . . . . . . . . . . . . . . . . . . . . . . . . . . . . . . . . . 9, 25METRONOME SWITCH. . . . . . . . . . . . . . . . . . . . . . . . . . . . . . . . . . . . . . . . . . . . . . . . . . . . . . . . . . . . 7, 26, 27Microphone
Built-in. . . . . . . . . . . . . . . . . . . . . . . . . . . . . . . . . . . . . . . . . . . . . . . . . . . . . . . . . . . . . . . . . . . . . . . . . . . 2, 4External. . . . . . . . . . . . . . . . . . . . . . . . . . . . . . . . . . . . . . . . . . . . . . . . . . . . . . . . . . . . . . . . . . . . . . . . . . 4, 5
MODEAutomatic.. . . . . . . . . . . . . . . . . . . . . . . . . . . . . . . . . . . . . . . . . . . . . . . . . . . . . . . . . . . . . . . . . . . . . . . . 4, 7Mmanual. . . . . . . . . . . . . . . . . . . . . . . . . . . . . . . . . . . . . . . . . . . . . . . . . . . . . . . . . . . . . . . . . . . . . . . . . 4, 7
Note Selection. . . . . . . . . . . . . . . . . . . . . . . . . . . . . . . . . . . . . . . . . . . . . . . . . . . . . . . . . . . . . . . . . . . . . . . . 4, 7OCTAVE. . . . . . . . . . . . . . . . . . . . . . . . . . . . . . . . . . . . . . . . . . . . . . . . . . . . . . . . . . . . . . . . . . . . . . . . . . . . 2, 7Pitch Calibration.. . . . . . . . . . . . . . . . . . . . . . . . . . . . . . . . . . . . . . . . . . . . . . . . . . . . . . . . . . . . . . . . . . . . . . . . 10Pitch Reference. . . . . . . . . . . . . . . . . . . . . . . . . . . . . . . . . . . . . . . . . . . . . . . . . . . . . . . . . . . . . . . . . . . . . . 5, 10
Factory Default. . . . . . . . . . . . . . . . . . . . . . . . . . . . . . . . . . . . . . . . . . . . . . . . . . . . . . . . . . . . . . . . . . . . 5, 9
Page 31

Power-up Settings. . . . . . . . . . . . . . . . . . . . . . . . . . . . . . . . . . . . . . . . . . . . . . . . . . . . . . . . . . . . . . . . . . . . . . . . 9
PAGEResolution
Tuning. . . . . . . . . . . . . . . . . . . . . . . . . . . . . . . . . . . . . . . . . . . . . . . . . . . . . . . . . . . . . . . . . . . . . . . . . . . . . 24Sscreen. . . . . . . . . . . . . . . . . . . . . . . . . . . . . . . . . . . . . . . . . . . . . . . . . . . . . . . . . . . . . . . . . . . . . . . . . . . . . . . . 6
FILE. . . . . . . . . . . . . . . . . . . . . . . . . . . . . . . . . . . . . . . . . . . . . . . . . . . . . . . . . . . . . . . . . . . . . . . . . . . . . . . 12Initial.. . . . . . . . . . . . . . . . . . . . . . . . . . . . . . . . . . . . . . . . . . . . . . . . . . . . . . . . . . . . . . . . . . . . . . . . . . . . . . . 3RUN. . . . . . . . . . . . . . . . . . . . . . . . . . . . . . . . . . . . . . . . . . . . . . . . . . . . . . . . . . . . . . . . . . . . . . . . . . . . . . . . 3Temperament. . . . . . . . . . . . . . . . . . . . . . . . . . . . . . . . . . . . . . . . . . . . . . . . . . . . . . . . . . . . . . . . . . . . . . . 12
Serial Number. . . . . . . . . . . . . . . . . . . . . . . . . . . . . . . . . . . . . . . . . . . . . . . . . . . . . . . . . . . . . . . . . . . . . . . . . . . 3SETUP. . . . . . . . . . . . . . . . . . . . . . . . . . . . . . . . . . . . . . . . . . . . . . . . . . . . . . . . . . . . . . . . . . . . . . . . . . . . . . . . . 8Strobe.. . . . . . . . . . . . . . . . . . . . . . . . . . . . . . . . . . . . . . . . . . . . . . . . . . . . . . . . . . . . . . . . . . . . . . . . . . . . . . . . 29
Accuracy. . . . . . . . . . . . . . . . . . . . . . . . . . . . . . . . . . . . . . . . . . . . . . . . . . . . . . . . . . . . . . . . . . . . . . . . . . . 29Tuning. . . . . . . . . . . . . . . . . . . . . . . . . . . . . . . . . . . . . . . . . . . . . . . . . . . . . . . . . . . . . . . . . . . . . . . . . . 5, 29
Temperaments.. . . . . . . . . . . . . . . . . . . . . . . . . . . . . . . . . . . . . . . . . . . . . . . . . . . . . . . . . . . . . . . . . . . . . . 8, 11Creation Example. . . . . . . . . . . . . . . . . . . . . . . . . . . . . . . . . . . . . . . . . . . . . . . . . . . . . . . . . . . . . . . . . . . . 19Factory Default. . . . . . . . . . . . . . . . . . . . . . . . . . . . . . . . . . . . . . . . . . . . . . . . . . . . . . . . . . . . . . . . . . . . . . 12Unequal. . . . . . . . . . . . . . . . . . . . . . . . . . . . . . . . . . . . . . . . . . . . . . . . . . . . . . . . . . . . . . . . . . . . . . . . . . . . 30
Voltage Selection Card. . . . . . . . . . . . . . . . . . . . . . . . . . . . . . . . . . . . . . . . . . . . . . . . . . . . . . . . . . . . . . . . . . . . 1VOLUME. . . . . . . . . . . . . . . . . . . . . . . . . . . . . . . . . . . . . . . . . . . . . . . . . . . . . . . . . . . . . . . . . . . . . . . . . . . . 3, 7
AutoStrobe™ is a trademark of Peterson Electro-Musical Products, Inc.
All contents © Copyright 1998-1999 by Peterson Electro-Musical Products, Inc. No part or parts may be copiedor reproduced without the expressed written consent of Peterson Electro-Musical Products, Inc.
Page 32