Embed Size (px)
Citation preview
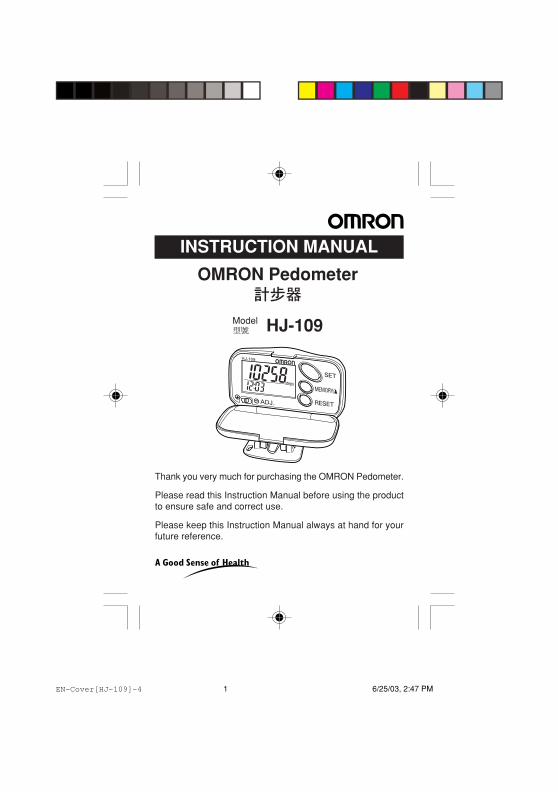
INSTRUCTION MANUAL
OMRON Pedometer��
Model HJ-109
Thank you very much for purchasing the OMRON Pedometer.
Please read this Instruction Manual before using the productto ensure safe and correct use.
Please keep this Instruction Manual always at hand for yourfuture reference.
��
EN-Cover[HJ-109]-4 6/25/03, 2:47 PM1
2 Before Using The Unit
CONTENTS
Before Using the UnitSafety Information ....................................................... 3Features of the Pedometer HJ-109 ............................. 4Name of Parts ............................................................. 5About the Pedometer .................................................. 6
How to Use the UnitHow to Attach the Pedometer ..................................... 8How to Set Time, Weight, and Stride Distance ........... 9How to Start .............................................................. 12How to Adjust the Sensitivity ..................................... 13To View the Results .................................................. 14Memory Function ...................................................... 15Replacement of Battery ............................................ 16
TroubleshootingHow to Care and Store the Unit ................................. 17When Problem Occurs .............................................. 18Specifications ............................................................ 19
CONTENTS
EN-02-19[HJ109]-8 7/1/03, 4:18 PM2
Before Using The Unit 3
Before Using the UnitSafety InformationPlease read this section carefully before using this unit
WarningKeep the unit out of reach of young children. If a childswallows battery, cover, or screw, consult a doctorimmediately.
Caution• Do not disassemble, repair, or modify the unit.
It may cause damage, or accident.• Do not throw the battery into fire. It may cause
explosion.
General Advice• Avoid exposing the unit to strong shock.• Do not force open the main unit.• Do not press too hard or twist the clip.• The main unit is not waterproof. Do not wash it or
touch it with wet hands.
EN-02-19[HJ109]-7 6/30/03, 2:27 PM3
4 Before Using The Unit
Features of the Pedometer HJ-109
❑ “Aerobic step” function helps to enhanceyour health.The pedometer can measure continuous walkingfor more than 10 minutes in terms of number ofaerobic steps, which should be effective to burnbody fat.
❑ Calculates the amount of fat burnt, thisinformation is useful for your diet planning.
❑ Displays walking distance whereby, you canset a target before walking.
❑ Memory function that can show the data ofpast seven days.
❑ Dual display function that can show both thetime and the number of steps simultaneously.
❑ Compact and simple to use features.
EN-02-19[HJ109]-7 6/30/03, 2:27 PM4
Before Using The Unit 5
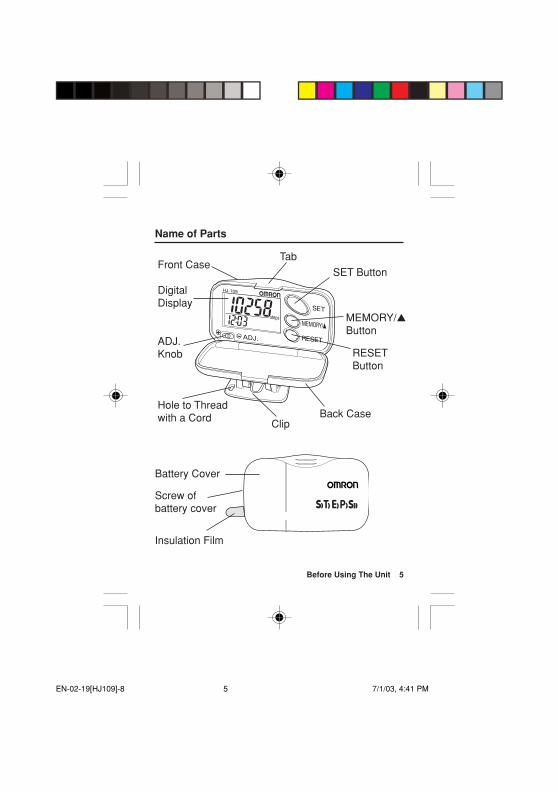
Name of Parts
Front Case
DigitalDisplay
ADJ.Knob
Hole to Threadwith a Cord Back Case
Clip
Tab
SET Button
MEMORY/▲Button
RESETButton
T E) ) ) )) )
Battery Cover
Insulation Film
Screw ofbattery cover
EN-02-19[HJ109]-8 7/1/03, 4:41 PM5
6 Before Using The Unit
About the Pedometer
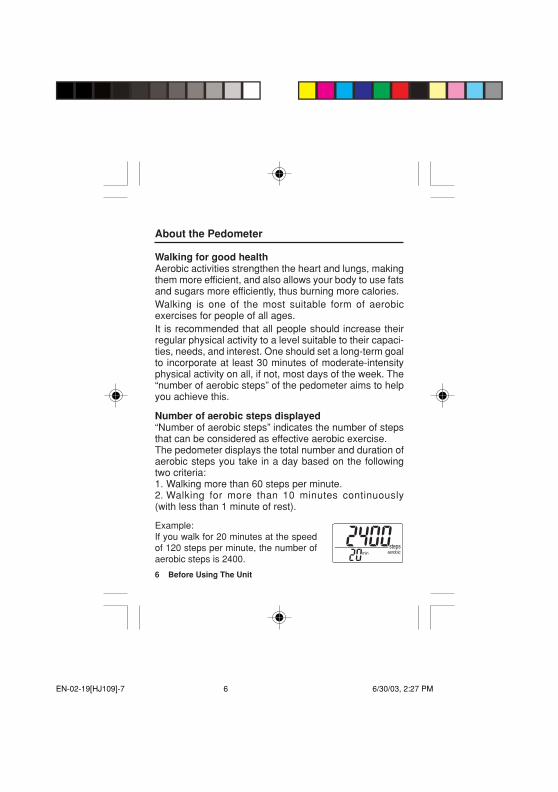
Walking for good healthAerobic activities strengthen the heart and lungs, makingthem more efficient, and also allows your body to use fatsand sugars more efficiently, thus burning more calories.Walking is one of the most suitable form of aerobicexercises for people of all ages.It is recommended that all people should increase theirregular physical activity to a level suitable to their capaci-ties, needs, and interest. One should set a long-term goalto incorporate at least 30 minutes of moderate-intensityphysical activity on all, if not, most days of the week. The“number of aerobic steps” of the pedometer aims to helpyou achieve this.
Number of aerobic steps displayed“Number of aerobic steps” indicates the number of stepsthat can be considered as effective aerobic exercise.The pedometer displays the total number and duration ofaerobic steps you take in a day based on the followingtwo criteria:1. Walking more than 60 steps per minute.2. Walking for more than 10 minutes continuously(with less than 1 minute of rest).
Example:If you walk for 20 minutes at the speedof 120 steps per minute, the number ofaerobic steps is 2400.
EN-02-19[HJ109]-7 6/30/03, 2:27 PM6
Before Using The Unit 7
About the Pedometer
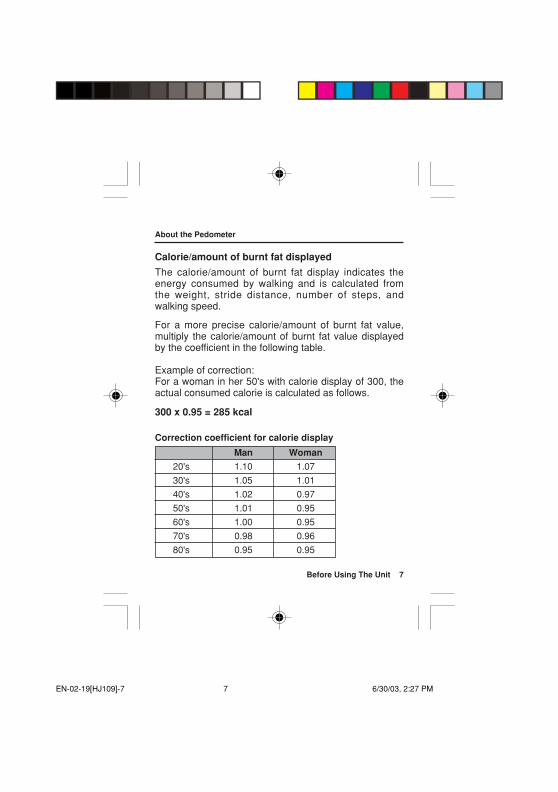
Calorie/amount of burnt fat displayed
The calorie/amount of burnt fat display indicates theenergy consumed by walking and is calculated fromthe weight, stride distance, number of steps, andwalking speed.
For a more precise calorie/amount of burnt fat value,multiply the calorie/amount of burnt fat value displayedby the coefficient in the following table.
Example of correction:For a woman in her 50's with calorie display of 300, theactual consumed calorie is calculated as follows.
300 x 0.95 = 285 kcal
Correction coefficient for calorie display
Man Woman
20's 1.10 1.07
30's 1.05 1.01
40's 1.02 0.97
50's 1.01 0.95
60's 1.00 0.95
70's 0.98 0.96
80's 0.95 0.95
EN-02-19[HJ109]-7 6/30/03, 2:27 PM7

8 Before Using The UnitHow To Use The Unit
• Attach the unit to your belt or to thetop of your shorts or pants.
• The unit must be horizontal to theground in order for it to functioncorrectly.
• The case should be closed duringuse, and opened only to see thereadings. (The unit will not countsteps if the case is open.)
• To prevent the unit from dropping,we recommend that you use a cordto tie it to your belt.
Your Pedometer may not be able to display the stepcount correctly when:
• Walking at an inconsistent or irregular pace, as incrowded places.
• Walking or jogging in sandals, clogs, slippers etc.• Engaging in intense sports or exercises with varying
up and down movement, e.g. climbing the stairs.
T E) ))
)))
How To Use the UnitHow to Attach the Pedometer
EN-02-19[HJ109]-8 7/1/03, 4:18 PM8
Before Using The Unit 9
How to Set Time, Weight, and Stride Distance
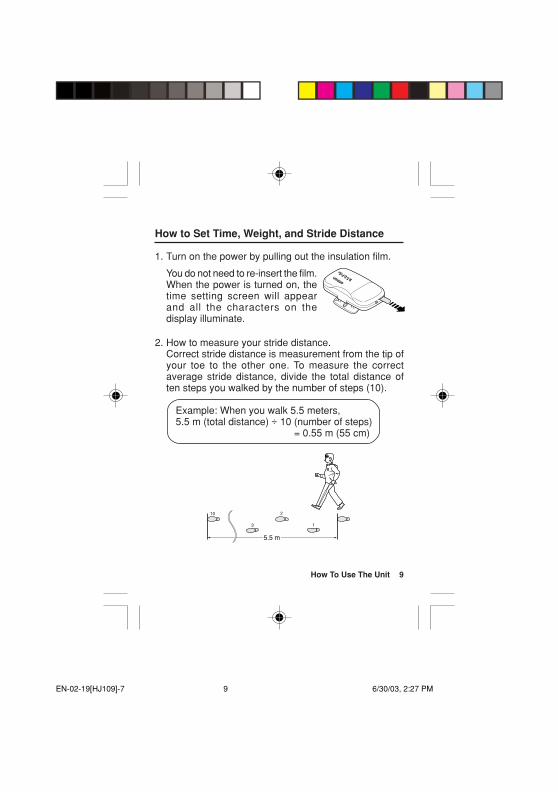
1. Turn on the power by pulling out the insulation film.
You do not need to re-insert the film.When the power is turned on, thetime setting screen will appearand all the characters on thedisplay illuminate.
2. How to measure your stride distance.Correct stride distance is measurement from the tip ofyour toe to the other one. To measure the correctaverage stride distance, divide the total distance often steps you walked by the number of steps (10).
Example: When you walk 5.5 meters,5.5 m (total distance) ÷ 10 (number of steps)
= 0.55 m (55 cm)
210
1
5.5 m
3
TE))
))
))
How To Use The Unit
EN-02-19[HJ109]-7 6/30/03, 2:27 PM9
10 Before Using The Unit
How to Set Time, Weight, and Stride Distance
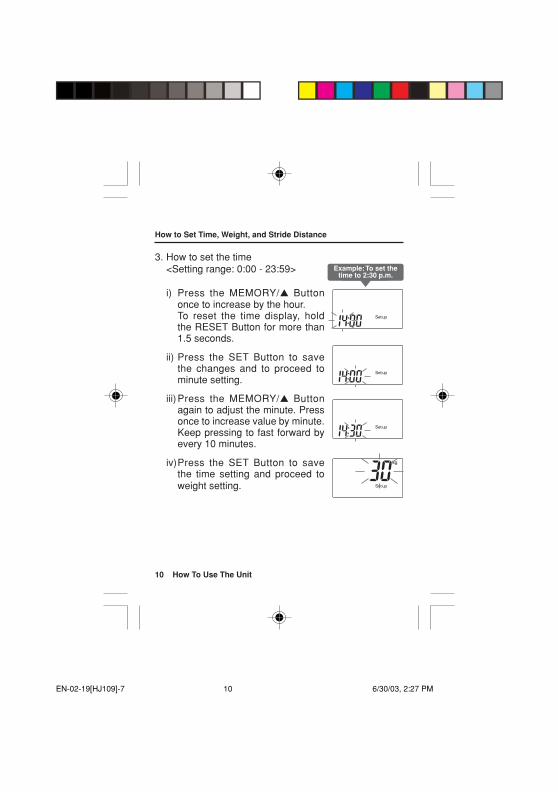
Example:To set thetime to 2:30 p.m.
3. How to set the time<Setting range: 0:00 - 23:59>
i) Press the MEMORY/▲ Buttononce to increase by the hour.To reset the time display, holdthe RESET Button for more than1.5 seconds.
ii) Press the SET Button to savethe changes and to proceed tominute setting.
iii)Press the MEMORY/▲ Buttonagain to adjust the minute. Pressonce to increase value by minute.Keep pressing to fast forward byevery 10 minutes.
iv)Press the SET Button to savethe time setting and proceed toweight setting.
How To Use The Unit
EN-02-19[HJ109]-7 6/30/03, 2:27 PM10
Before Using The Unit 11
How to Set Time, Weight, and Stride Distance
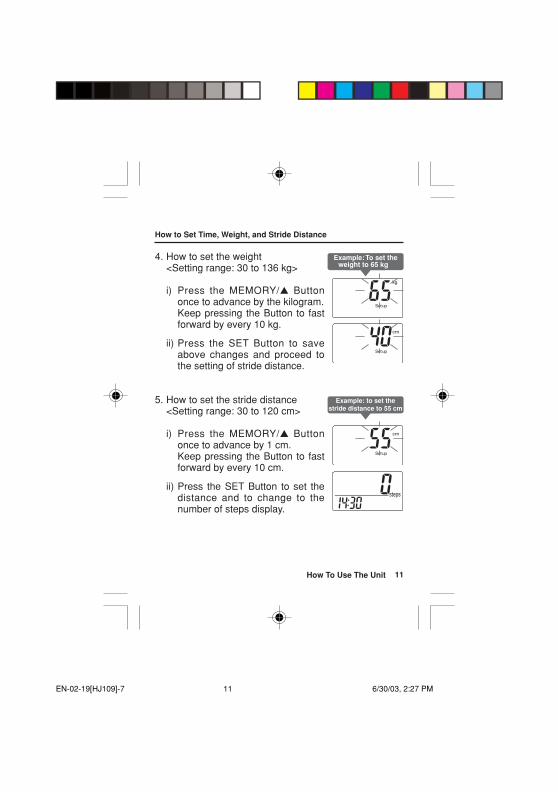
Example:To set theweight to 65 kg
Example: to set thestride distance to 55 cm
4. How to set the weight<Setting range: 30 to 136 kg>
i) Press the MEMORY/▲ Buttononce to advance by the kilogram.Keep pressing the Button to fastforward by every 10 kg.
ii) Press the SET Button to saveabove changes and proceed tothe setting of stride distance.
5. How to set the stride distance<Setting range: 30 to 120 cm>
i) Press the MEMORY/▲ Buttononce to advance by 1 cm.Keep pressing the Button to fastforward by every 10 cm.
ii) Press the SET Button to set thedistance and to change to thenumber of steps display.
How To Use The Unit
EN-02-19[HJ109]-7 6/30/03, 2:27 PM11

12 Before Using The Unit
How to Start
1. When all the settings are completed, your pedometeris ready for step count mode.
2. Reset the data on the display,including the number of steps,number of aerobic steps, calories,and distance to zero (0), bypressing the RESET Button formore than 1.5 seconds.
3. Close the front case and clip yourpedometer to your belt or thewaist band of your pants Securely.(Refer to “How To Attach ThePedometer”).
4. Walk 100 steps to check whetherthe pedometer counts your numberof steps correctly.If there’s any discrepancy betweenthe number of steps you take andthe number shown, adjust thesensitivity accordingly. (Refer toPage 13.)
How To Use The Unit
EN-02-19[HJ109]-7 6/30/03, 2:27 PM12

Before Using The Unit 13
This unit is adjusted to +/– 5% accuracy (+/– 5 stepsagainst 100 steps) measured by standard walking on aflat surface in the correct posture.
• Attach your digital pedometerproperly and walk 100 steps.
• If the step count displayed is 5steps or more than actual, shift theADJ. Knob slightly to the negative(d) side.
• If the step count displayed is 5steps or less than actual, shift theADJ. Knob slightly to the positive(e) side.
Repeat the 100 steps test again andadjust the ADJ. Knob accordingly tillyou reach the +/– 5 steps countaccuracy against your actual strides.
NOTE:Readjust the sensitivity if you change your pace of jogging,walking or competitive walking etc.
How to Adjust the Sensitivity
Move the knob to thenegative (–) side.
Move the knob to thepositive (+) side.
How To Use The Unit
EN-02-19[HJ109]-7 6/30/03, 2:27 PM13
14 Before Using The Unit
To View the Results
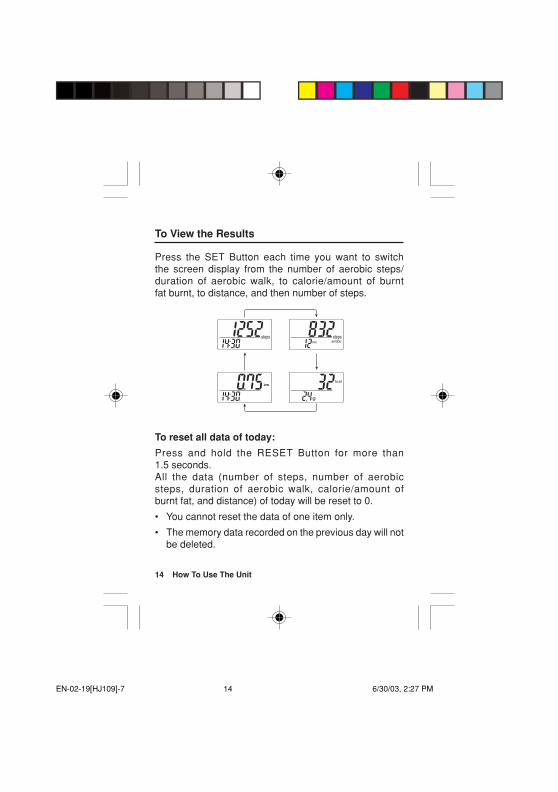
Press the SET Button each time you want to switchthe screen display from the number of aerobic steps/duration of aerobic walk, to calorie/amount of burntfat burnt, to distance, and then number of steps.
To reset all data of today:
Press and hold the RESET Button for more than1.5 seconds.All the data (number of steps, number of aerobicsteps, duration of aerobic walk, calorie/amount ofburnt fat, and distance) of today will be reset to 0.
• You cannot reset the data of one item only.
• The memory data recorded on the previous day will notbe deleted.
How To Use The Unit
EN-02-19[HJ109]-7 6/30/03, 2:27 PM14
Before Using The Unit 15
Memory Function
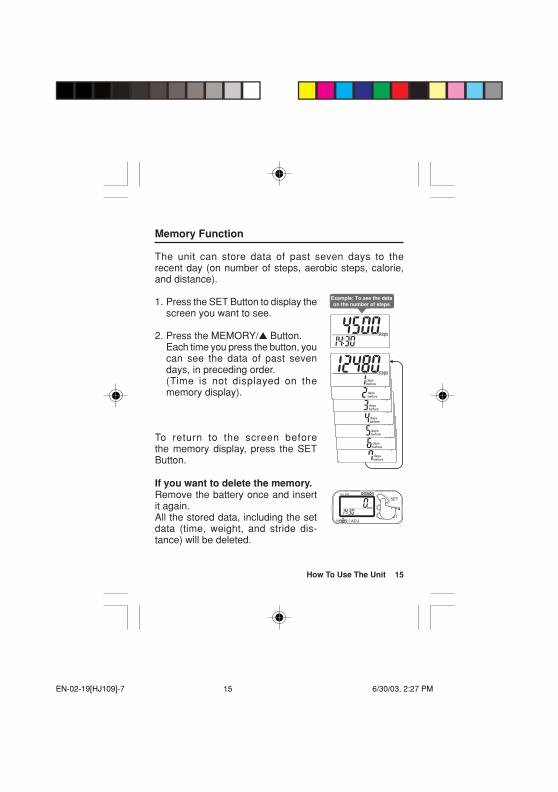
The unit can store data of past seven days to therecent day (on number of steps, aerobic steps, calorie,and distance).
1. Press the SET Button to display thescreen you want to see.
2. Press the MEMORY/▲ Button.Each time you press the button, youcan see the data of past sevendays, in preceding order.(Time is not displayed on thememory display).
To return to the screen beforethe memory display, press the SETButton.
If you want to delete the memory.Remove the battery once and insertit again.All the stored data, including the setdata (time, weight, and stride dis-tance) will be deleted.
Example: To see the dataon the number of steps
How To Use The Unit
EN-02-19[HJ109]-7 6/30/03, 2:27 PM15
16 Before Using The Unit
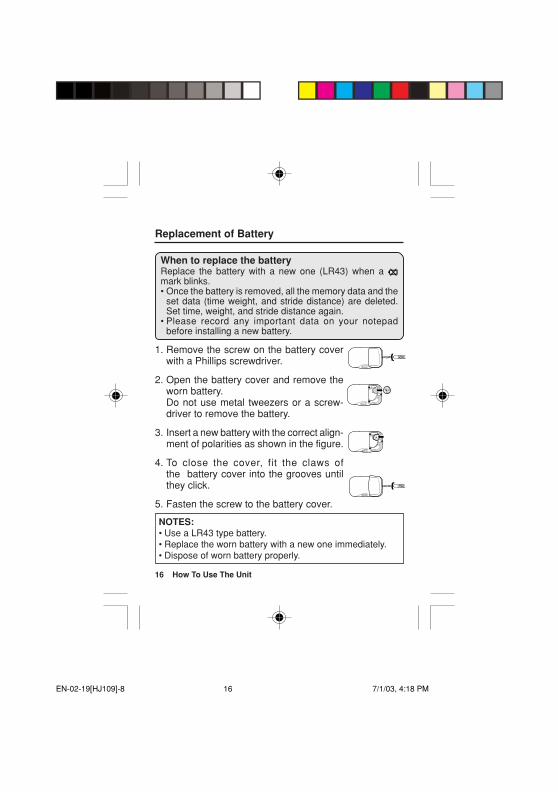
1. Remove the screw on the battery coverwith a Phillips screwdriver.
2. Open the battery cover and remove theworn battery.Do not use metal tweezers or a screw-driver to remove the battery.
3. Insert a new battery with the correct align-ment of polarities as shown in the figure.
4. To close the cover, fit the claws ofthe battery cover into the grooves untilthey click.
5. Fasten the screw to the battery cover.
NOTES:• Use a LR43 type battery.• Replace the worn battery with a new one immediately.• Dispose of worn battery properly.
When to replace the batteryReplace the battery with a new one (LR43) when a mark blinks.• Once the battery is removed, all the memory data and the
set data (time weight, and stride distance) are deleted.Set time, weight, and stride distance again.
• Please record any important data on your notepadbefore installing a new battery.
Replacement of Battery
How To Use The Unit
EN-02-19[HJ109]-8 7/1/03, 4:18 PM16
Before Using The Unit 17Troubleshooting
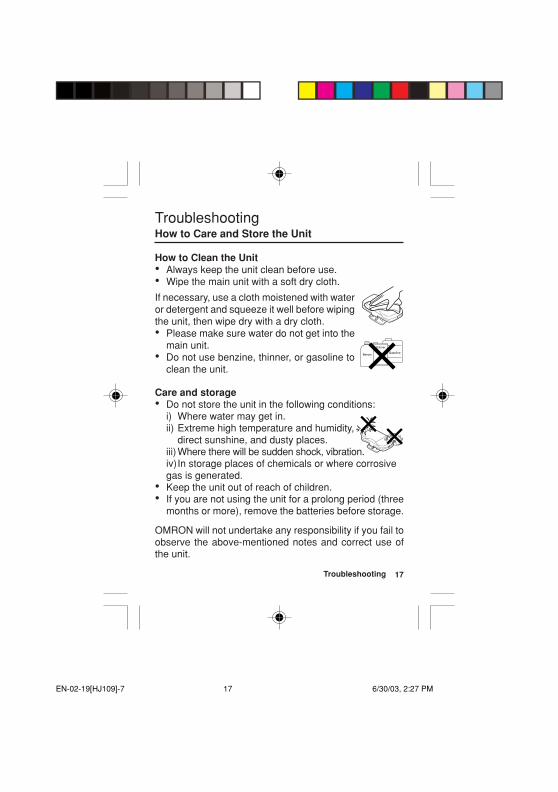
How to Clean the Unit• Always keep the unit clean before use.• Wipe the main unit with a soft dry cloth.
If necessary, use a cloth moistened with wateror detergent and squeeze it well before wipingthe unit, then wipe dry with a dry cloth.• Please make sure water do not get into the
main unit.• Do not use benzine, thinner, or gasoline to
clean the unit.
Care and storage• Do not store the unit in the following conditions:
i) Where water may get in.ii) Extreme high temperature and humidity,
direct sunshine, and dusty places.iii)Where there will be sudden shock, vibration.iv)In storage places of chemicals or where corrosivegas is generated.
• Keep the unit out of reach of children.• If you are not using the unit for a prolong period (three
months or more), remove the batteries before storage.
OMRON will not undertake any responsibility if you fail toobserve the above-mentioned notes and correct use ofthe unit.
Benzin
Thinner
Gasoline
TroubleshootingHow to Care and Store the Unit
EN-02-19[HJ109]-7 6/30/03, 2:27 PM17
18 Before Using The UnitTroubleshooting
When Problem Occurs
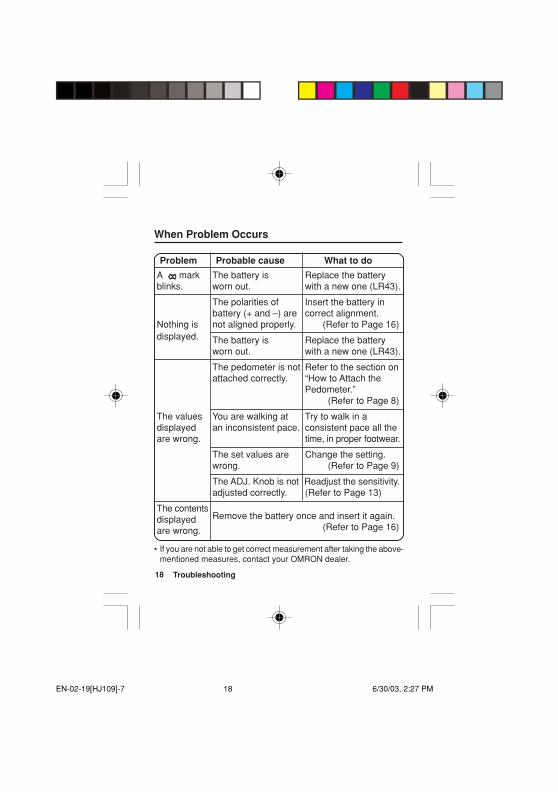
Problem Probable cause What to do
A mark The battery is Replace the batteryblinks. worn out. with a new one (LR43).
The polarities of Insert the battery inbattery (+ and –) are correct alignment.
Nothing is not aligned properly. (Refer to Page 16)displayed. The battery is Replace the battery
worn out. with a new one (LR43).
The pedometer is not Refer to the section onattached correctly. “How to Attach the
Pedometer.”(Refer to Page 8)
The values You are walking at Try to walk in adisplayed an inconsistent pace. consistent pace all theare wrong. time, in proper footwear.
The set values are Change the setting.wrong. (Refer to Page 9)
The ADJ. Knob is not Readjust the sensitivity.adjusted correctly. (Refer to Page 13)
The contentsRemove the battery once and insert it again.displayed
(Refer to Page 16)are wrong.
• If you are not able to get correct measurement after taking the above-mentioned measures, contact your OMRON dealer.
EN-02-19[HJ109]-7 6/30/03, 2:27 PM18
Before Using The Unit 19
Specifications
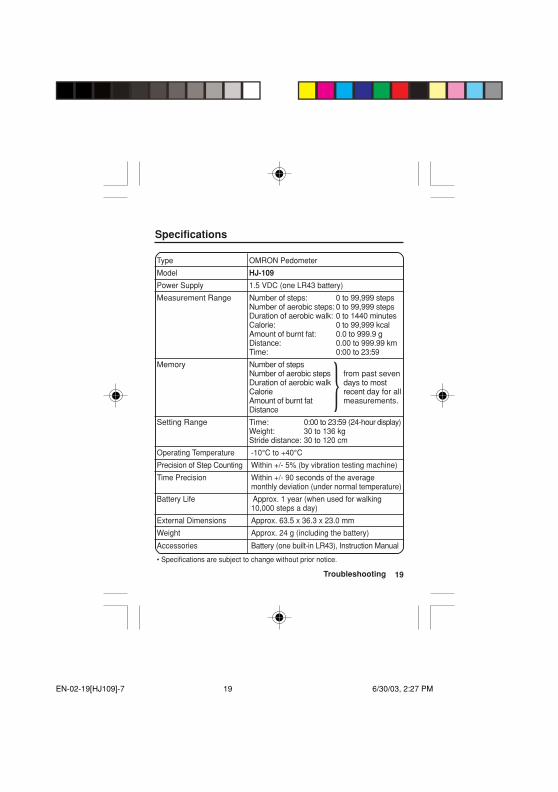
Type OMRON Pedometer
Model HJ-109
Power Supply 1.5 VDC (one LR43 battery)
Measurement Range Number of steps: 0 to 99,999 stepsNumber of aerobic steps: 0 to 99,999 stepsDuration of aerobic walk: 0 to 1440 minutesCalorie: 0 to 99,999 kcalAmount of burnt fat: 0.0 to 999.9 gDistance: 0.00 to 999.99 kmTime: 0:00 to 23:59
Memory Number of stepsNumber of aerobic steps from past sevenDuration of aerobic walk days to mostCalorie recent day for allAmount of burnt fat measurements.Distance
Setting Range Time: 0:00 to 23:59 (24-hour display)Weight: 30 to 136 kgStride distance: 30 to 120 cm
Operating Temperature -10°C to +40°CPrecision of Step Counting Within +/- 5% (by vibration testing machine)
Time Precision Within +/- 90 seconds of the averagemonthly deviation (under normal temperature)
Battery Life Approx. 1 year (when used for walking10,000 steps a day)
External Dimensions Approx. 63.5 x 36.3 x 23.0 mm
Weight Approx. 24 g (including the battery)
Accessories Battery (one built-in LR43), Instruction Manual
• Specifications are subject to change without prior notice.
Troubleshooting
EN-02-19[HJ109]-7 6/30/03, 2:27 PM19