Embed Size (px)
Citation preview
Phone: 1-360-734-3482 • On-Line Technical Support: [email protected]
COPYRIGHT © XXXXX, 200X BY WOODSTOCK INTERNATIONAL, INC.WARNING: NO PORTION OF THIS MANUAL MAY BE REPRODUCED IN ANY SHAPE OR FORM WITHOUT
THE WRITTEN APPROVAL OF WOODSTOCK INTERNATIONAL, INC. Printed in XXXXXX
INSTRUCTION MANUAL
ALUMA-CLASSIC™ FENCEW1716 & W1720
Phone: 1-360-734-3482 • On-Line Technical Support: [email protected]
COPYRIGHT © APRIL, 2004 BY WOODSTOCK INTERNATIONAL, INC. REVISED FEBRUARY, 2015 (BL)WARNING: NO PORTION OF THIS MANUAL MAY BE REPRODUCED IN ANY SHAPE OR FORM WITHOUT
THE WRITTEN APPROVAL OF WOODSTOCK INTERNATIONAL, INC. Printed in Taiwan

INTRODUCTION� 2About Your New Aluma-Classic™ Fence 2Woodstock Service and Support 2Get To Know Your Fence 3Unpacking 3Fence Controls 3
ASSEMBLY� 4Inventory 4W1716 Installation 5W1720 Installation 6
ADJUSTMENTS� 9Fence Parallelism 9Scale Installation & Adjustment 10
PARTS� 11
ASSEM
BLYO
PERATIO
NS
MA
INTEN
AN
CEPA
RTSA
DJU
STMEN
TSSA
FETYIN
TROD
UCTIO
N
USE�THE�QUICK�GUIDE�PAGE�LABELS�TO�SEARCH�OUT�INFORMATION�FAST!
Contents
INTR
OD
UCT
ION
-2-
Your new SHOP FOX® Model W1716/W1720 Aluma-Classic™ Fence is specially designed to provide many years of trouble-free service. Close attention to engineering detail, ruggedly built parts, and a rigid quality control program assure safe and reliable operation.
The Aluma-Classic™ Fence features an extruded aluminum and steel construction, utilizing a sturdy T-shape design that fits most table saws easily. The Model W1716/W1720 also features a single cam lock-ing lever, magnified cursor lens and standard 57" rails. The Model W1720 is exactly the same as the Model W1716 except it features 79" extruded aluminum rails for wide panel cutting up to 50" right of the blade.
For more features and details, refer to the Specifications sub-section in this manual.
Woodstock International, Inc. is committed to customer satisfaction in providing this manual. It is our intent to include all the information necessary for safety, ease of assembly, practical use and durabil-ity of this product.
We stand behind our machines! In the event that a defect is found, parts are missing or questions arise about your machine, please contact Woodstock International Service and Support at 1-360-734-3482 or send e-mail to: [email protected]. Our knowledgeable staff will help you troubleshoot prob-lems, order parts or arrange warranty returns.
If you need the latest edition of this manual, you can download it from http://www.shopfox.biz. If you still have questions after reading the latest manual, or if you have comments please contact us at:
Woodstock�International,�Inc.Attn:�Technical�Support�Department
P.O.�Box�2309Bellingham,�WA�98227
Woodstock�Service�and�Support
About�Your�New�Aluma-Classic™�Fence
INTRODUCTION
-3-
INTRO
DU
CTION
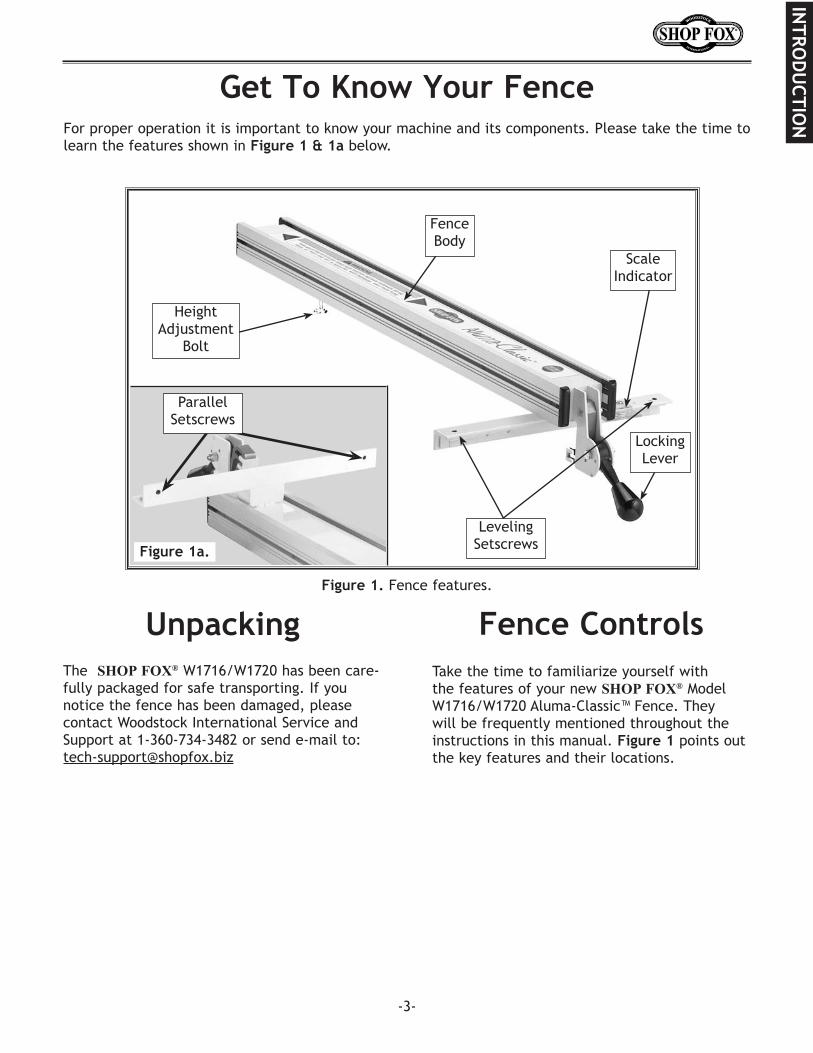
Fence�ControlsTake the time to familiarize yourself with the features of your new SHOP FOX® Model W1716/W1720 Aluma-Classic™ Fence. They will be frequently mentioned throughout the instructions in this manual.�Figure�1�points out the key features and their locations.
Figure�1.�Fence features.
Get�To�Know�Your�FenceFor proper operation it is important to know your machine and its components. Please take the time to learn the features shown in Figure�1�&�1a below.
The �SHOP FOX® W1716/W1720 has been care-fully packaged for safe transporting. If you notice the fence has been damaged, please contact Woodstock International Service and Support at 1-360-734-3482 or send e-mail to: [email protected]
Unpacking
Height Adjustment
Bolt
FenceBody
Scale Indicator
LockingLever
LevelingSetscrews
ParallelSetscrews
Figure�1a.
ASS
EMBL
Y
-4-
READ�and�understand�this�entire� instruction� man-ual� before� performing�any�operations�with�your�machine.� Serious� per-sonal� injury� may� occur�if� safety� and�operational�information�is�not�under-stood�and�followed.
The following is a description of the main components shipped with the SHOP FOX® Model W1716/W1720 Aluma-Classic™ Fence. You should lay the components out to easily identify them.
If any parts are missing, find the part num-ber in the back of this manual and contact Woodstock International, Inc. at 360-734-3482 or at: [email protected]
Model�W1716:� � � � • Aluma-Classic™ Fence 1 • Fence Handle Knob 1 • Fence Scale Assembly 1 • 57" Front Rail 1 • 57" Front Rail Bracket 1 • 48" Rear Rail 1 • 30" Scale 1 • W1716 Hardware Bag 1
Model�W1720: • Aluma-Classic™ Fence 1 • 79" Front Fence Rails 1 • 79" Rear Fence Rails 1 • Rail End Caps 4 • Phillips Head Tap Screw #8 x 3⁄8" 4 • Legs 2 • Feet 2 • 50" Scale 1 • W1720 Hardware Bag 1
�
UNPLUG-power� cord�before�you�do�any�assem-bly� or� adjustment� tasks!�Otherwise,� serious� per-sonal�injury�to�you�or�oth-ers�may�occur!
InventoryASSEMBLY
ASSEM
BLY
-5-
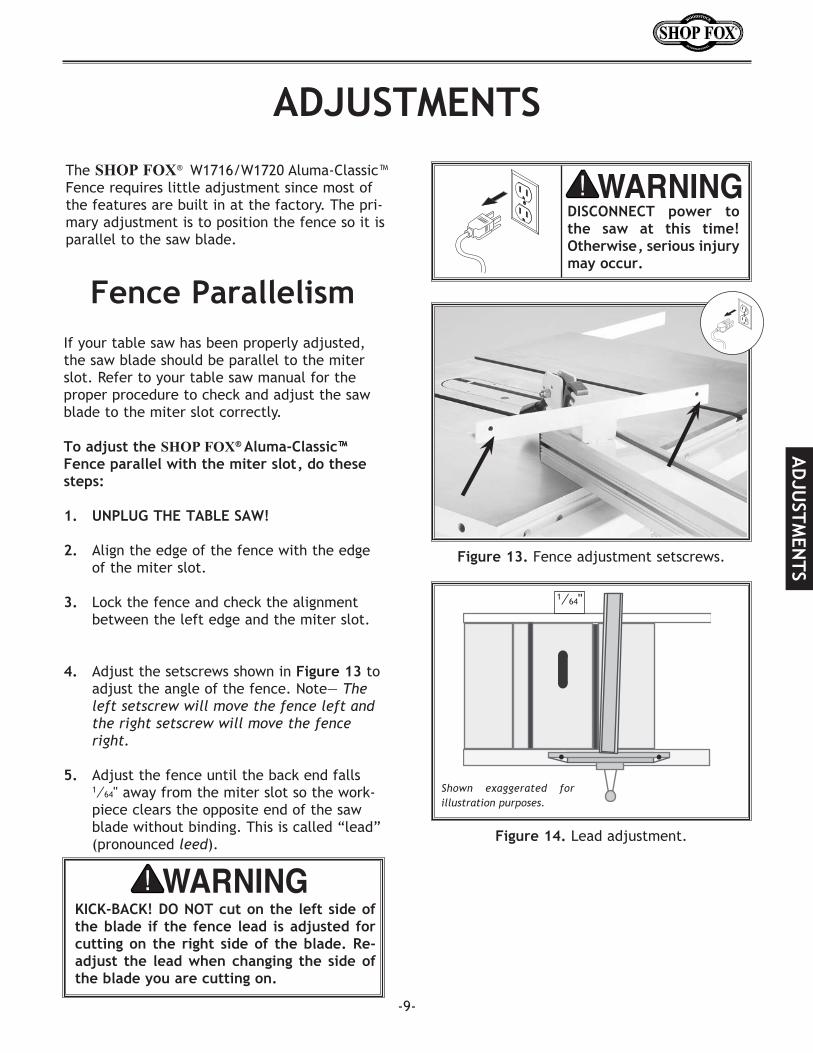
Figure�2. Rear fence rail bracket.
Figure�4. Installing fence tubing.
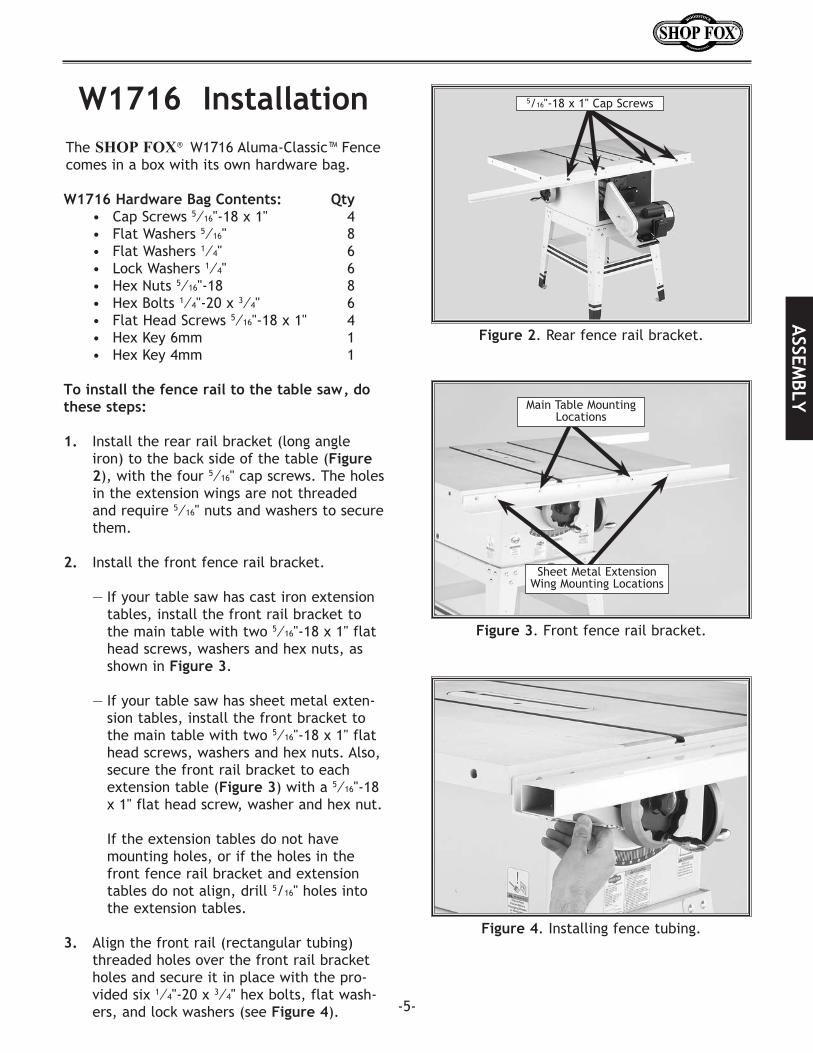
W1716��InstallationThe SHOP FOX® W1716 Aluma-Classic™ Fence comes in a box with its own hardware bag.
W1716�Hardware�Bag�Contents:� Qty • Cap Screws 5⁄16"-18 x 1" 4 • Flat Washers 5⁄16" 8 • Flat Washers 1⁄4" 6 • Lock Washers 1⁄4" 6 • Hex Nuts 5⁄16"-18 8 • Hex Bolts 1⁄4"-20 x 3⁄4" 6 • Flat Head Screws 5⁄16"-18 x 1" 4 • Hex Key 6mm 1 • Hex Key 4mm 1
To�install�the�fence�rail�to�the�table�saw,�do�these�steps:
1. Install the rear rail bracket (long angle iron) to the back side of the table (Figure�2), with the four 5⁄16" cap screws. The holes in the extension wings are not threaded and require 5⁄16" nuts and washers to secure them.
2. Install the front fence rail bracket.
— If your table saw has cast iron extension tables, install the front rail bracket to the main table with two 5⁄16"-18 x 1" flat head screws, washers and hex nuts, as shown in Figure�3.
— If your table saw has sheet metal exten-sion tables, install the front bracket to the main table with two 5⁄16"-18 x 1" flat head screws, washers and hex nuts. Also, secure the front rail bracket to each extension table (Figure�3) with a 5⁄16"-18 x 1" flat head screw, washer and hex nut.
If the extension tables do not have mounting holes, or if the holes in the front fence rail bracket and extension tables do not align, drill 5/16" holes into the extension tables.
3. Align the front rail (rectangular tubing) threaded holes over the front rail bracket holes and secure it in place with the pro-vided six 1⁄4"-20 x 3⁄4" hex bolts, flat wash-ers, and lock washers (see Figure�4).
Figure�3. Front fence rail bracket.
Main Table Mounting Locations
Sheet Metal Extension Wing Mounting Locations
5/16"-18 x 1" Cap Screws
ASS
EMBL
Y
-6-
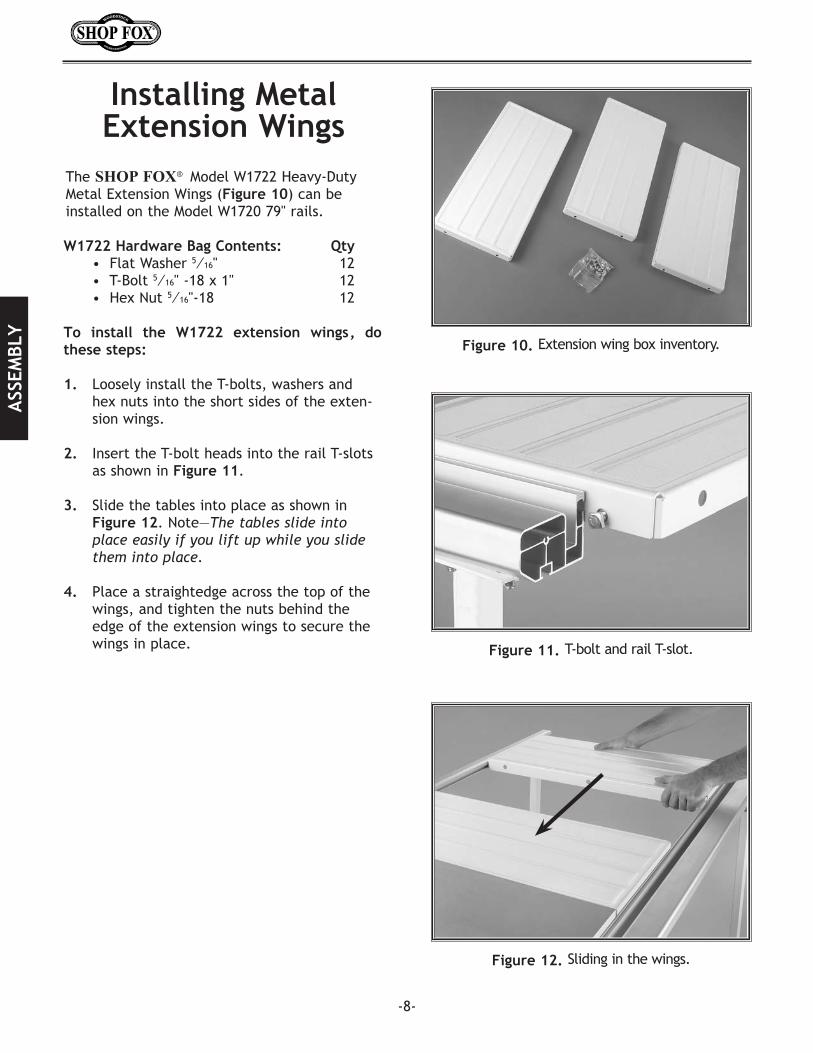
Figure�7.�Extension rail inventory.
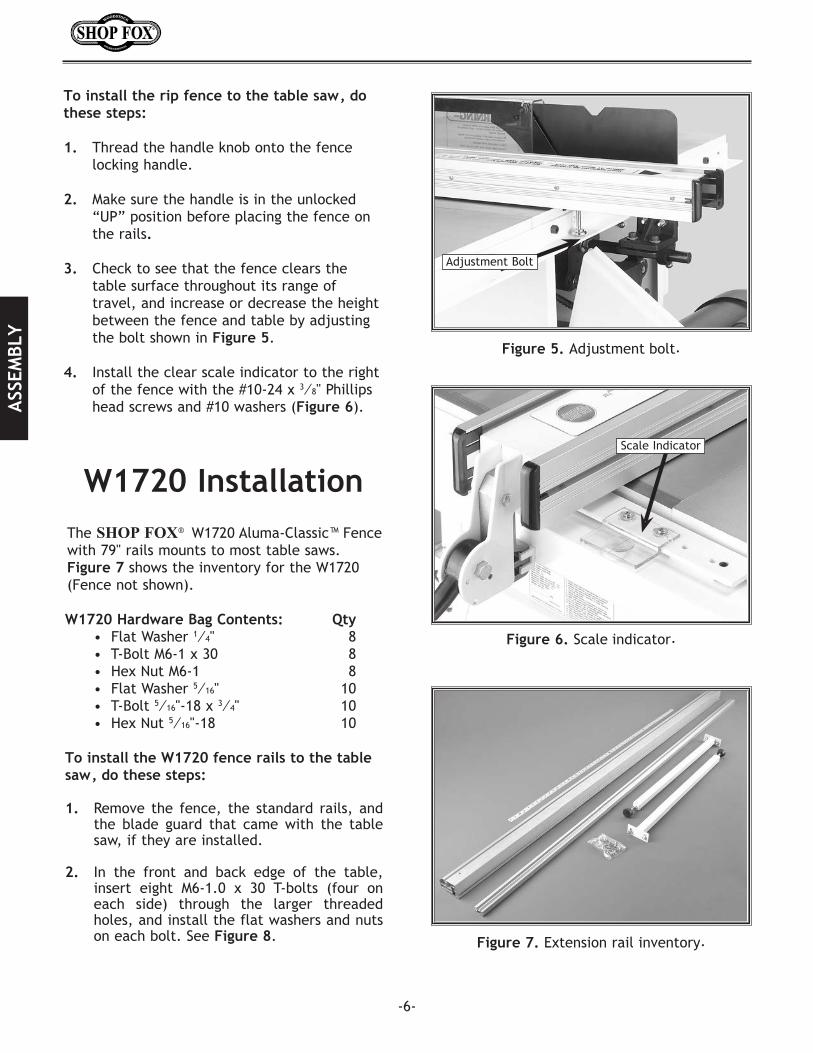
Figure�5.�Adjustment bolt.
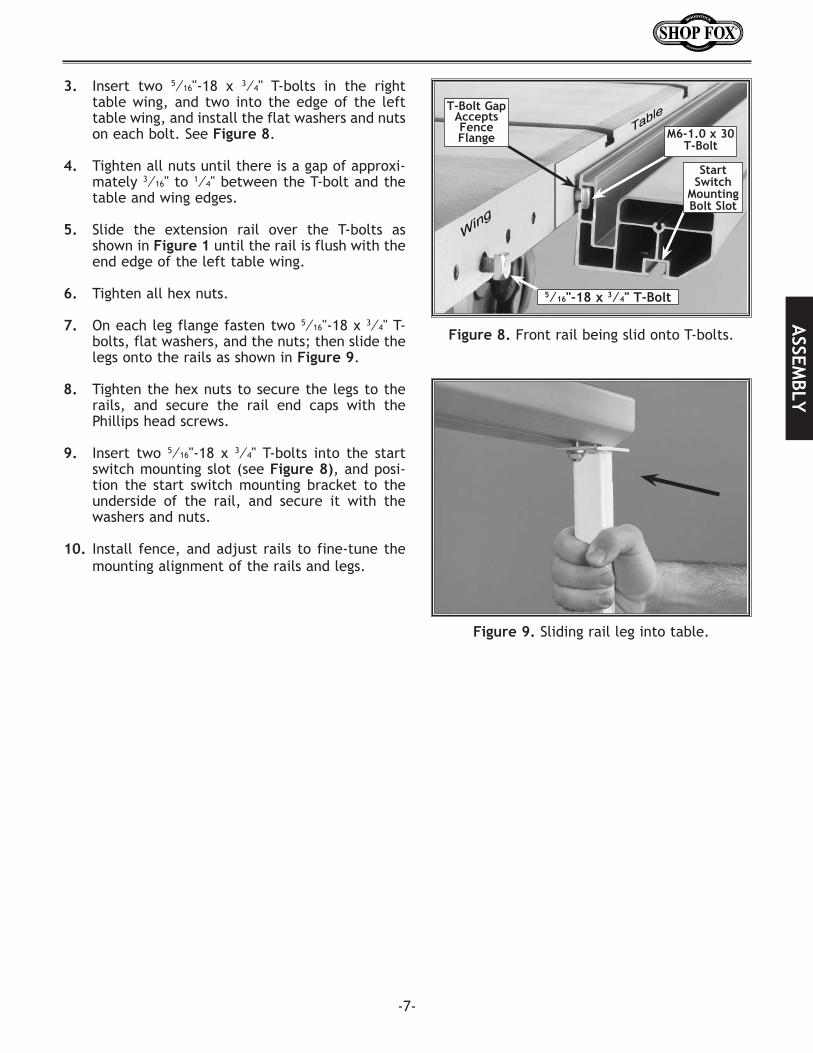
Figure�6.�Scale indicator.
To�install�the�rip�fence�to�the�table�saw,�do�these�steps:
1. Thread the handle knob onto the fence locking handle.
2. Make sure the handle is in the unlocked “UP” position before placing the fence on the rails.
3.� Check to see that the fence clears the table surface throughout its range of travel, and increase or decrease the height between the fence and table by adjusting the bolt shown in Figure�5.
4. Install the clear scale indicator to the right of the fence with the #10-24 x 3⁄8" Phillips head screws and #10 washers (Figure�6).
W1720�InstallationThe SHOP FOX® W1720 Aluma-Classic™ Fence with 79" rails mounts to most table saws. Figure�7 shows the inventory for the W1720 (Fence not shown).
W1720�Hardware�Bag�Contents:� Qty� • Flat Washer 1⁄4" 8 • T-Bolt M6-1 x 30 8 • Hex Nut M6-1 8 • Flat Washer 5⁄16" 10 • T-Bolt 5⁄16"-18 x 3⁄4" 10 • Hex Nut 5⁄16"-18 10
To�install�the�W1720�fence�rails�to�the�table�saw,�do�these�steps:
1. Remove the fence, the standard rails, and the blade guard that came with the table saw, if they are installed.
2. In the front and back edge of the table, insert eight M6-1.0 x 30 T-bolts (four on each side) through the larger threaded holes, and install the flat washers and nuts on each bolt. See Figure�8.
Adjustment Bolt
Scale Indicator
-7-
Figure�9.�Sliding rail leg into table.
3. Insert two 5⁄16"-18 x 3⁄4" T-bolts in the right table wing, and two into the edge of the left table wing, and install the flat washers and nuts on each bolt. See Figure�8.
4. Tighten all nuts until there is a gap of approxi-mately 3⁄16" to 1⁄4" between the T-bolt and the table and wing edges.
5. Slide the extension rail over the T-bolts as shown in Figure�1 until the rail is flush with the end edge of the left table wing.
6.�� Tighten all hex nuts.
7.�� On each leg flange fasten two 5⁄16"-18 x 3⁄4" T-bolts, flat washers, and the nuts; then slide the legs onto the rails as shown in Figure�9.
8.�� Tighten the hex nuts to secure the legs to the rails, and secure the rail end caps with the Phillips head screws.�
9.�� Insert two 5⁄16"-18 x 3⁄4" T-bolts into the start switch mounting slot (see Figure�8), and posi-tion the start switch mounting bracket to the underside of the rail, and secure it with the washers and nuts.
10.��Install fence, and adjust rails to fine-tune the mounting alignment of the rails and legs.
Figure�8. Front rail being slid onto T-bolts.
T-Bolt�Gap�Accepts�Fence�Flange M6-1.0�x�30
T-Bolt
5⁄16"-18�x�3⁄4"�T-Bolt
Start�Switch�
Mounting�Bolt�Slot
ASSEM
BLY
ASS
EMBL
Y
-8-
Installing�Metal�Extension�Wings
The SHOP FOX® Model W1722 Heavy-Duty Metal Extension Wings (Figure�10) can be installed on the Model W1720 79" rails.
W1722�Hardware�Bag�Contents:� Qty� • Flat Washer 5⁄16" 12 • T-Bolt 5⁄16" -18 x 1" 12 • Hex Nut 5⁄16"-18 12
To� install� the� W1722� extension� wings,� do�these�steps:
1.� Loosely install the T-bolts, washers and hex nuts into the short sides of the exten-sion wings.
2. Insert the T-bolt heads into the rail T-slots as shown in Figure�11.
3. Slide the tables into place as shown in Figure�12. Note—The tables slide into place easily if you lift up while you slide them into place.
4. Place a straightedge across the top of the wings, and tighten the nuts behind the edge of the extension wings to secure the wings in place. Figure�11.�T-bolt and rail T-slot.
Figure�12.�Sliding in the wings.
Figure�10.�Extension wing box inventory.
AD
JUSTM
ENTS
-9-
The SHOP FOX® W1716/W1720 Aluma-Classic™ Fence requires little adjustment since most of the features are built in at the factory. The pri-mary adjustment is to position the fence so it is parallel to the saw blade.
If your table saw has been properly adjusted, the saw blade should be parallel to the miter slot. Refer to your table saw manual for the proper procedure to check and adjust the saw blade to the miter slot correctly.
To�adjust�the�SHOP FOX®�Aluma-Classic™�Fence�parallel�with�the�miter�slot,�do�these�steps:
1.� UNPLUG�THE�TABLE�SAW!
2. Align the edge of the fence with the edge of the miter slot.
3. Lock the fence and check the alignment between the left edge and the miter slot.
4. Adjust the setscrews shown in Figure�13 to adjust the angle of the fence. Note— The left setscrew will move the fence left and the right setscrew will move the fence right.
5. Adjust the fence until the back end falls 1⁄64" away from the miter slot so the work-piece clears the opposite end of the saw blade without binding. This is called “lead” (pronounced leed).
Figure�13.�Fence adjustment setscrews.
Figure�14.�Lead adjustment.
DISCONNECT� power� to�the� saw� at� this� time!�Otherwise,�serious�injury�may�occur.
Fence�Parallelism
ADJUSTMENTS
1⁄64"
Shown exaggerated for illustration purposes.
KICK-BACK!�DO�NOT�cut�on�the�left�side�of�the�blade� if� the� fence� lead� is�adjusted� for�cutting�on� the� right� side�of� the�blade.�Re-adjust� the� lead�when�changing� the� side�of�the�blade�you�are�cutting�on.
AD
JUST
MEN
TS
-10-
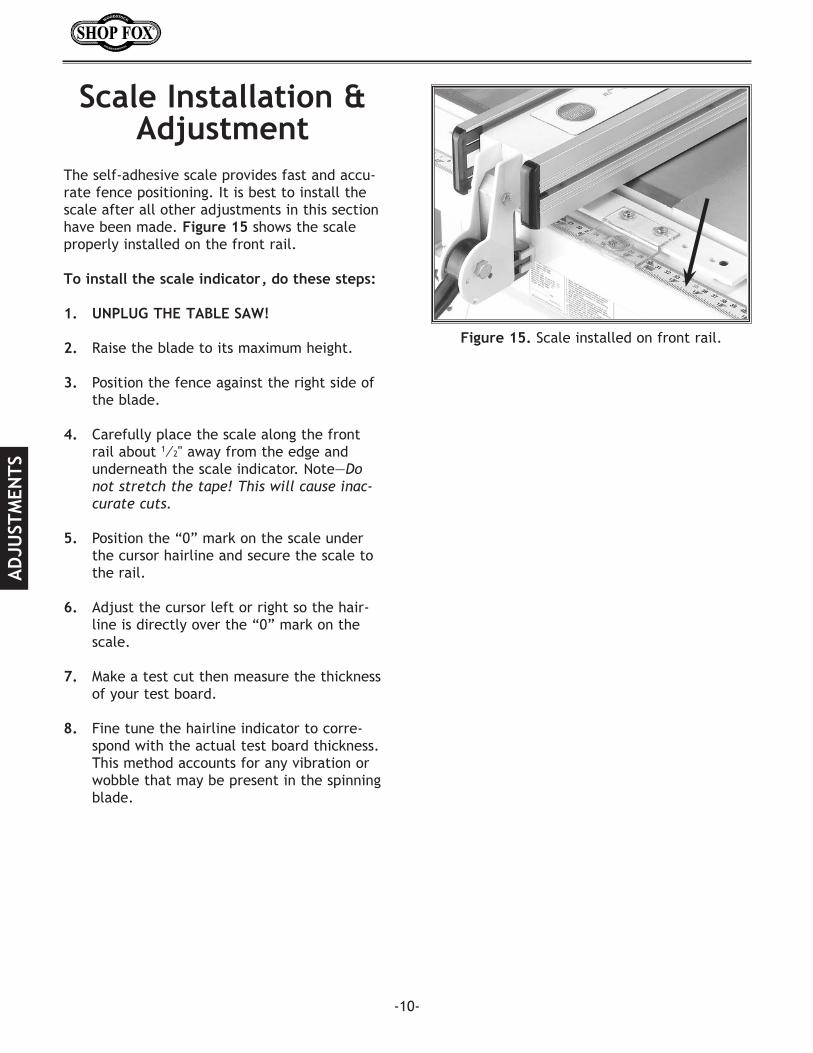
The self-adhesive scale provides fast and accu-rate fence positioning. It is best to install the scale after all other adjustments in this section have been made. Figure�15 shows the scale properly installed on the front rail.
To�install�the�scale�indicator,�do�these�steps:�
1.� UNPLUG�THE�TABLE�SAW!
2. Raise the blade to its maximum height.
3. Position the fence against the right side of the blade.
4. Carefully place the scale along the front rail about 1⁄2" away from the edge and underneath the scale indicator. Note—Do not stretch the tape! This will cause inac-curate cuts.
5. Position the “0” mark on the scale under the cursor hairline and secure the scale to the rail.
6. Adjust the cursor left or right so the hair-line is directly over the “0” mark on the scale.
7. Make a test cut then measure the thickness of your test board.
8. Fine tune the hairline indicator to corre-spond with the actual test board thickness. This method accounts for any vibration or wobble that may be present in the spinning blade.
Scale�Installation�&�Adjustment
Figure�15.�Scale installed on front rail.
PARTS
-11-
5
4
1
5
3
23
6
223
5
5
17
1612
25
1537 20 21
37
8
14
26
35
43
36
32
333423
2930
2938
9
39
19
187
24
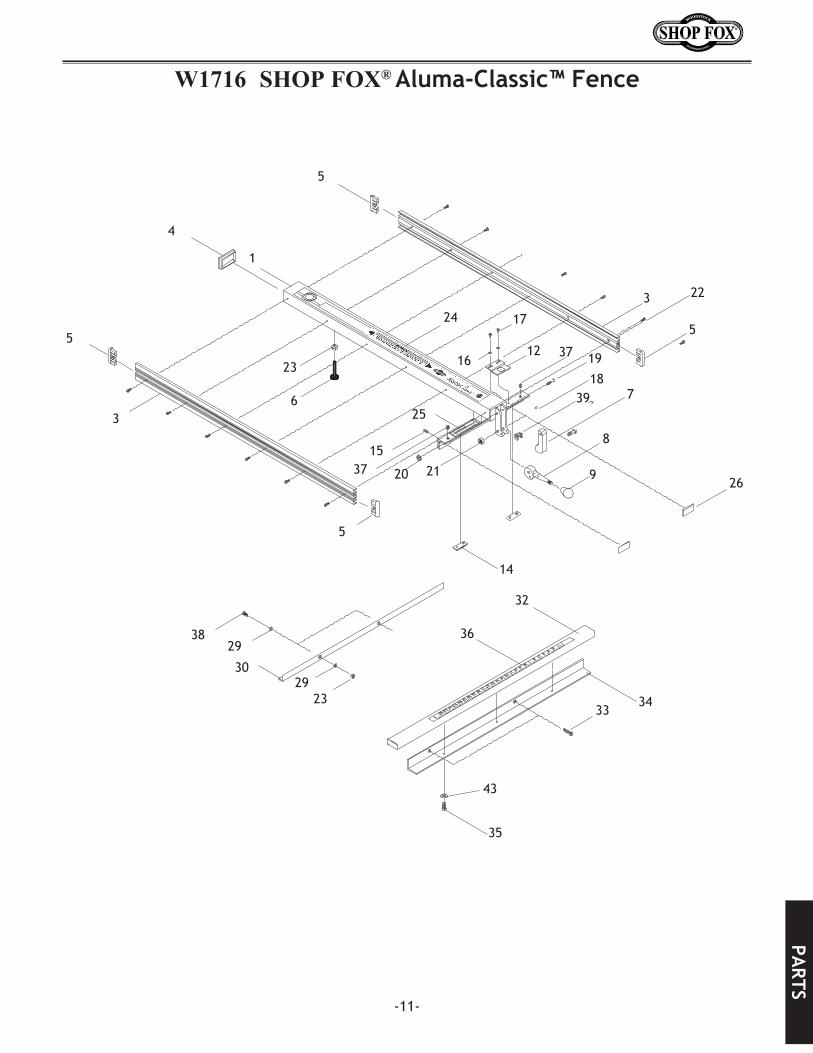
W1716 SHOP FOX® Aluma-Classic™�Fence�
1 X1716001 FENCE BODY ASSEMBLY3 X1716003 FENCE SIDEBOARD4 X1716004 FENCE PLUG5 X1716005 FENCE SIDEBOARD CAP6 X1716006 ADJUSTMENT BOLT 5⁄16"-18 7 X1716007 CLAMP8 X1716008 HANDLE9 X1716009 FEMALE KNOB 12 X1716012 CLEAR INDICATOR 14 X1716014 SLIDER 19 X 50 X 2T15 X1716015 SETSCREW 5⁄16"-18 X 1⁄4"16 X1716016 FLAT WASHER #1017 X1716017 PHLP HD SCR 10-24 X 3⁄8"18 X1716018 HEX BOLT 3⁄8"-16 X 13⁄4"19 X1716019 HEX BOLT 1⁄4"-20 X 13⁄4"20 X1716020 LOCK NUT 1⁄4"-2021 X1716021 LOCK NUT 3⁄8"-1622 X1716022 PHLP HD SCR 8-32 X 3⁄8"23 X1716023 HEX NUT 5⁄16"-1824 X1716024 ALUMA-CLASSIC™ LABEL25 X1716025 WARNING LABEL (SHORT)26 X1716026 SLIDER 19 X 50 X 1.2T29 X1716027 FLAT WASHER 5⁄16"30 X1716030 REAR RAIL32 X1716032 FRONT RAIL33 X1716033 FLAT HD SCR 5⁄16"-18 X 1 34 X1716033 FRONT RAIL BRACKET35 X1716035 HEX BOLT 1⁄4"-20 X 3⁄4"36 X1716036 SCALE 30"37 X1716037 SETSCREW 5⁄16"-18 X 1⁄4"38 X1716038 CAP SCREW 5⁄16"-18 X 139 X1716039 CLAMP PLUG43 X1716043 LOCK WASHER 1⁄4"
PART
S
-12-
REF� PART�#� DESCRIPTION
W1716 SHOP FOX® Aluma-Classic™�Fence
PARTS
5
4
1
5
3
23
6
22 3
5
5
17
16 12
25
15
37 20 21
37
8
14
26 9
39
19 18
7
24
131
114 141
113 123
121
111 140
123 113
141
127
102
103 134
131
131 134
115
131 141 113
124
126
122
118
141
113
124
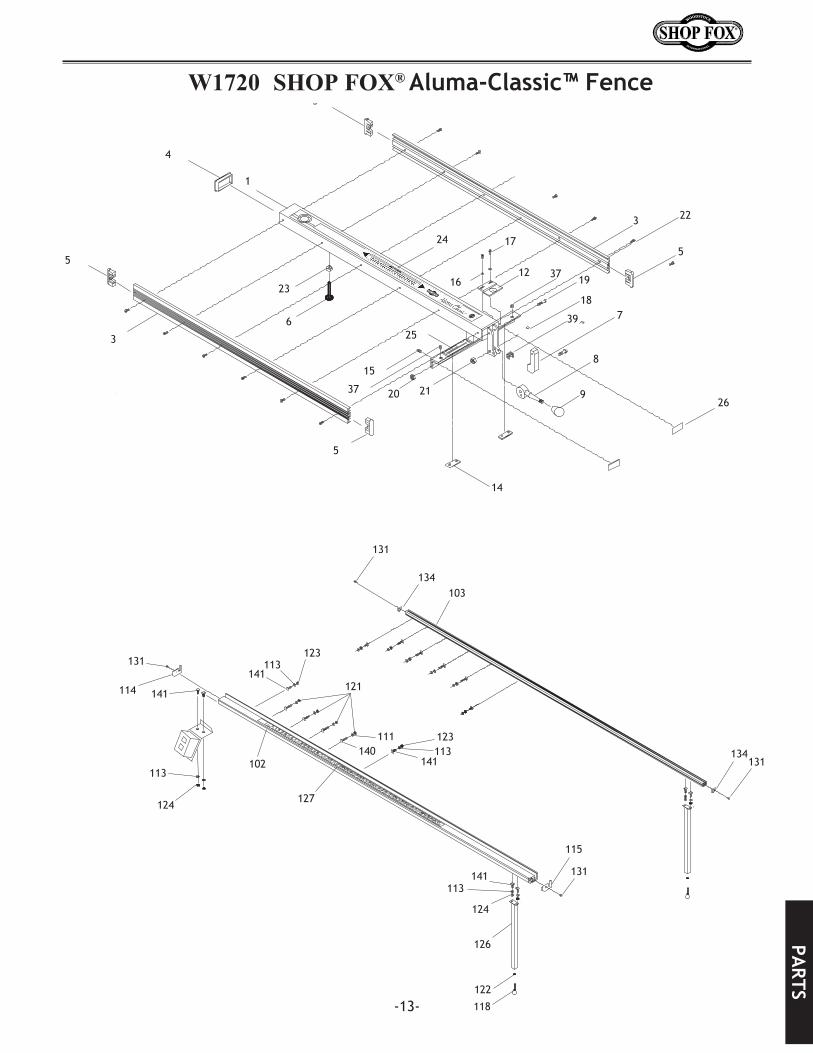
W1720 SHOP FOX® Aluma-Classic™�Fence�
-13-
PART
S
-14-
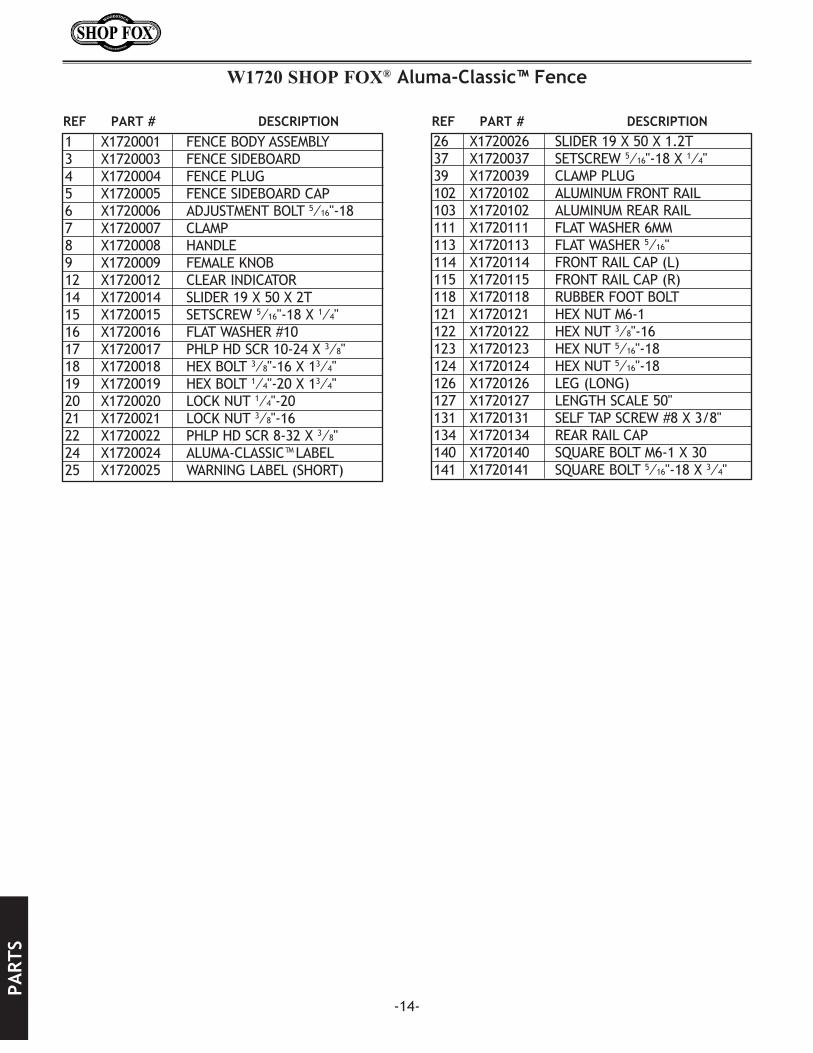
REF� PART�#� DESCRIPTION1 X1720001 FENCE BODY ASSEMBLY3 X1720003 FENCE SIDEBOARD4 X1720004 FENCE PLUG5 X1720005 FENCE SIDEBOARD CAP6 X1720006 ADJUSTMENT BOLT 5⁄16"-18 7 X1720007 CLAMP8 X1720008 HANDLE9 X1720009 FEMALE KNOB 12 X1720012 CLEAR INDICATOR 14 X1720014 SLIDER 19 X 50 X 2T15 X1720015 SETSCREW 5⁄16"-18 X 1⁄4"16 X1720016 FLAT WASHER #1017 X1720017 PHLP HD SCR 10-24 X 3⁄8"18 X1720018 HEX BOLT 3⁄8"-16 X 13⁄4"19 X1720019 HEX BOLT 1⁄4"-20 X 13⁄4"20 X1720020 LOCK NUT 1⁄4"-2021 X1720021 LOCK NUT 3⁄8"-1622 X1720022 PHLP HD SCR 8-32 X 3⁄8"24 X1720024 ALUMA-CLASSIC™ LABEL25 X1720025 WARNING LABEL (SHORT)
W1720 SHOP FOX® Aluma-Classic™�Fence
REF� PART�#� DESCRIPTION26 X1720026 SLIDER 19 X 50 X 1.2T37 X1720037 SETSCREW 5⁄16"-18 X 1⁄4"39 X1720039 CLAMP PLUG102 X1720102 ALUMINUM FRONT RAIL103 X1720102 ALUMINUM REAR RAIL111 X1720111 FLAT WASHER 6MM113 X1720113 FLAT WASHER 5⁄16"114 X1720114 FRONT RAIL CAP (L)115 X1720115 FRONT RAIL CAP (R)118 X1720118 RUBBER FOOT BOLT121 X1720121 HEX NUT M6-1122 X1720122 HEX NUT 3⁄8"-16123 X1720123 HEX NUT 5⁄16"-18124 X1720124 HEX NUT 5⁄16"-18126 X1720126 LEG (LONG)127 X1720127 LENGTH SCALE 50"131 X1720131 SELF TAP SCREW #8 X 3/8"134 X1720134 REAR RAIL CAP140 X1720140 SQUARE BOLT M6-1 X 30141 X1720141 SQUARE BOLT 5⁄16"-18 X 3⁄4"
tape along edges--please do not staple
Fold along dotted lIne
Fold along dotted lIne
Woodstock international inc. p.o. box 2309 bellingham, Wa 98227-2309
placestampHere