Embed Size (px)
Citation preview
1
Instruction Manual for
Bar Fridge / Beer Cabinet / Heated Glass Alfresco Range
MODELS: CTW55-SS, CTW56-SS, CTW57-SS + CTW328-SS
Thank for choosing this quality product, please read this manual carefully before using it, it is important to know your bar fridge as glass door units are completely different to whitegoods domestic types.
2
IMPORTANT
REGISTER YOUR UNIT ONLINE FOR WARRANTY
PURPOSES
You will need 1. Serial Number (Located at rear of unit) 2. Model Numbers are CTW55-SS (1Door), CTW56-SS (2Door), CTW57-SS (Solid 2 Door), CTW328-SS (3Door) 3. Installation details, we just need to know ‘where’ you are placing unit and the environment it is in
3
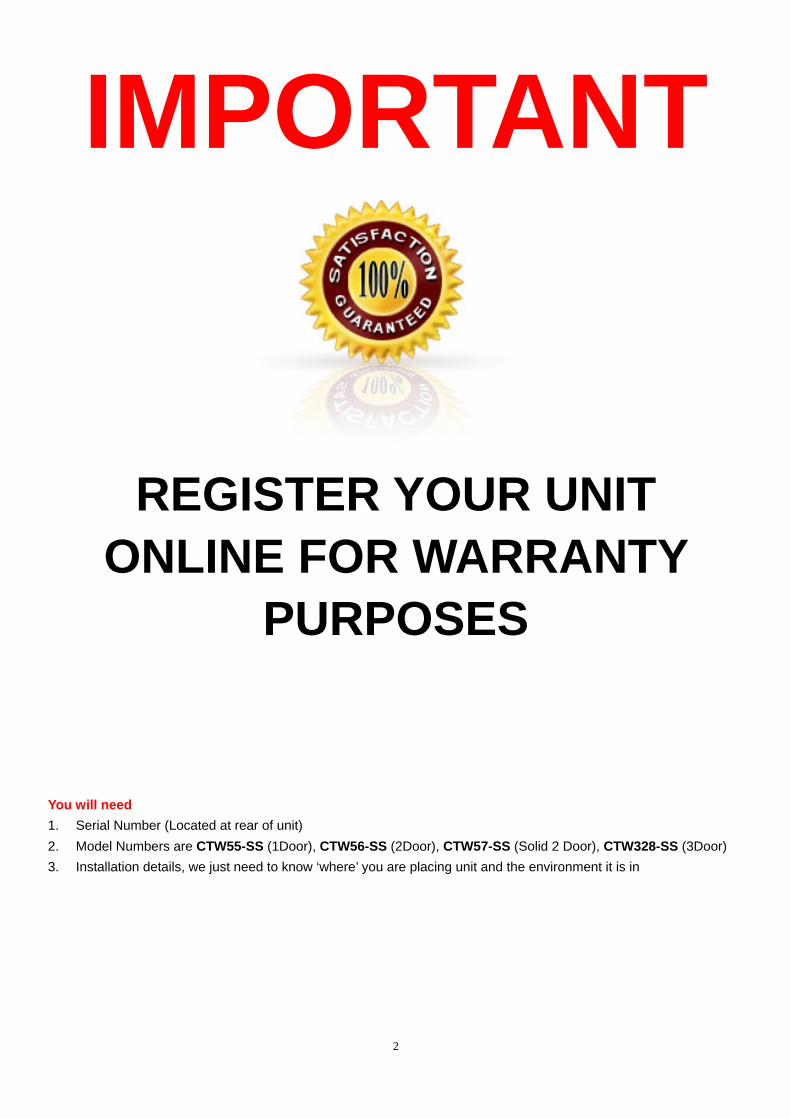
1- YOUR BAR FRIDGE
4
2-IMPORTANT SAFETY INSTRUCTIONS
WARNING To reduce the risk of fire, electrical shock, or injury when using your appliance, follow these basic precautions:
Read all instructions before using the bar fridge Do not attempt to touch any working or electrical parts during operation, apart from main control panel.
Never allow children to operate, play with, or crawl inside the appliance. Never clean appliance parts with flammable fluids. Don’t clean S/Steel parts with any citrus style cleaners, special SS cleaner or hot water is best Do not store or use gasoline or any other flammable vapors in the vicinity or any other appliance. The fumes
can create a fire hazard or explosion. -Save these instructions-
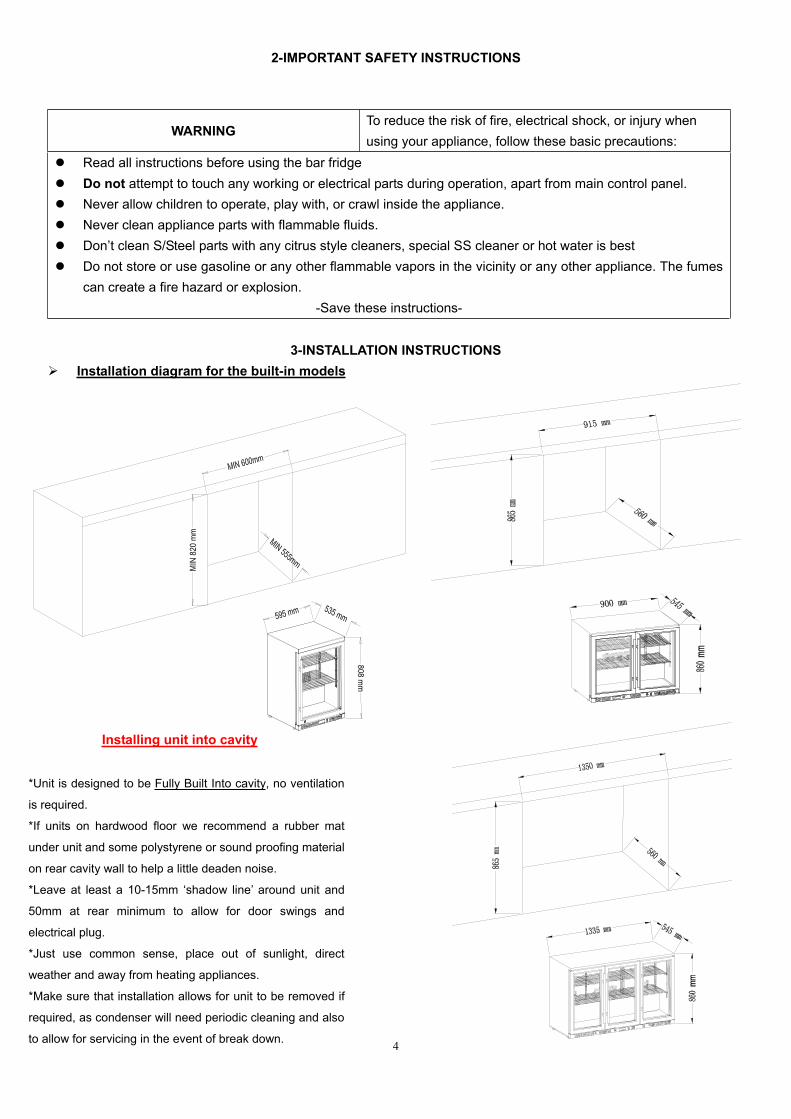
3-INSTALLATION INSTRUCTIONS Installation diagram for the built-in models
Installing unit into cavity
*Unit is designed to be Fully Built Into cavity, no ventilation
is required.
*If units on hardwood floor we recommend a rubber mat
under unit and some polystyrene or sound proofing material
on rear cavity wall to help a little deaden noise.
*Leave at least a 10-15mm ‘shadow line’ around unit and
50mm at rear minimum to allow for door swings and
electrical plug.
*Just use common sense, place out of sunlight, direct
weather and away from heating appliances.
*Make sure that installation allows for unit to be removed if
required, as condenser will need periodic cleaning and also
to allow for servicing in the event of break down.
5
Before Using Your Bar Fridge
Remove the exterior and interior packing. Before connecting the Bar Fridge to the power source, let it stand upright for approximately 2 hours. This will
reduce the possibility of a malfunction in the cooling system from handling during transportation. Clean the interior surface with lukewarm water using a soft cloth.
Installation of Your Bar Fridge
This appliance is designed for free standing installation or 100% built-in (fully recessed). Place your Bar Fridge on a floor that is strong enough to support it when it is fully loaded. To level your fridge
adjust the front leveling legs at the bottom of the fridge. Locate the Fridge away from direct sunlight and sources of heat (stove, heater, radiator, etc.) Direct sunlight
will affect running times greatly and increase electrical consumption. Extreme cold or hot ambient temperatures may also cause the unit not to perform properly.
Avoid locating the unit in moist areas. Plug the fridge into an exclusive, properly installed-grounded wall outlet. Do not under any circumstances cut
or remove the third (ground) prong from the power cord. Any questions concerning about power and/or grounding should be directed toward a certified electrician or an authorized products service center.
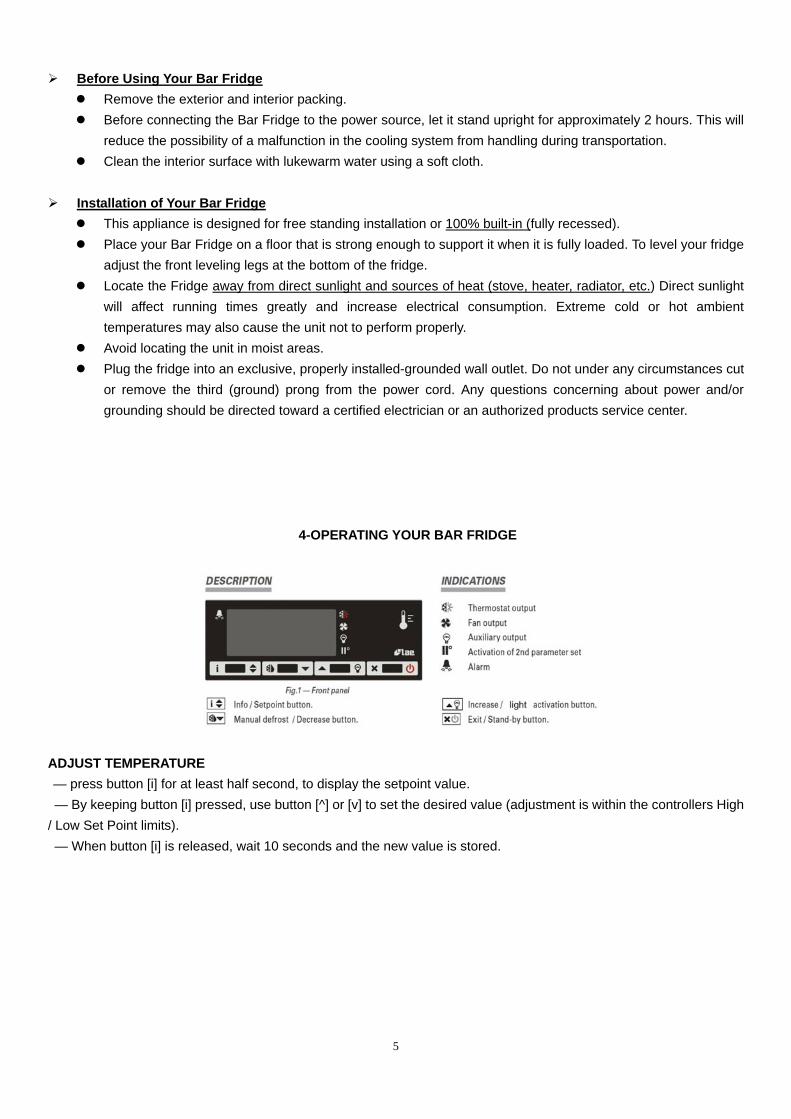
4-OPERATING YOUR BAR FRIDGE
ADJUST TEMPERATURE — press button [i] for at least half second, to display the setpoint value. — By keeping button [i] pressed, use button [^] or [v] to set the desired value (adjustment is within the controllers High / Low Set Point limits). — When button [i] is released, wait 10 seconds and the new value is stored.
6
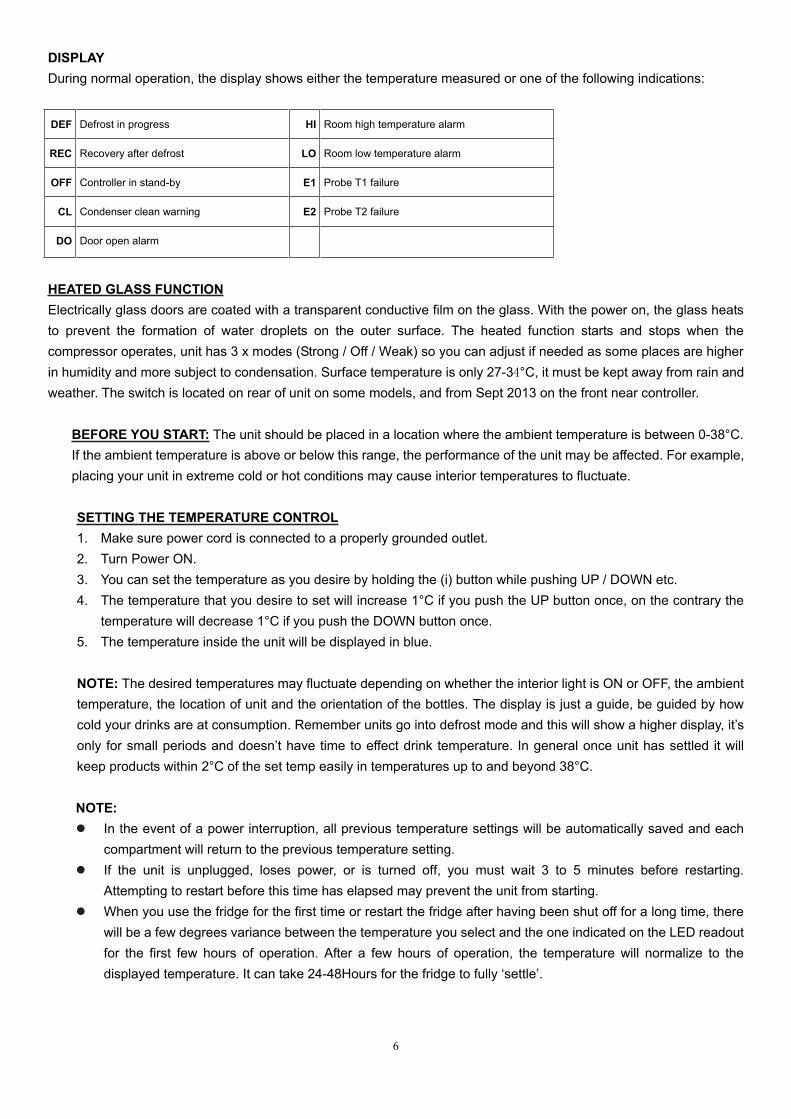
DISPLAY During normal operation, the display shows either the temperature measured or one of the following indications:
DEF Defrost in progress HI Room high temperature alarm
REC Recovery after defrost LO Room low temperature alarm
OFF Controller in stand-by E1 Probe T1 failure
CL Condenser clean warning E2 Probe T2 failure
DO Door open alarm
HEATED GLASS FUNCTIONElectrically glass doors are coated with a transparent conductive film on the glass. With the power on, the glass heats to prevent the formation of water droplets on the outer surface. The heated function starts and stops when the compressor operates, unit has 3 x modes (Strong / Off / Weak) so you can adjust if needed as some places are higher in humidity and more subject to condensation. Surface temperature is only 27-34°C, it must be kept away from rain and weather. The switch is located on rear of unit on some models, and from Sept 2013 on the front near controller.
BEFORE YOU START: The unit should be placed in a location where the ambient temperature is between 0-38°C. If the ambient temperature is above or below this range, the performance of the unit may be affected. For example, placing your unit in extreme cold or hot conditions may cause interior temperatures to fluctuate.
SETTING THE TEMPERATURE CONTROL1. Make sure power cord is connected to a properly grounded outlet. 2. Turn Power ON. 3. You can set the temperature as you desire by holding the (i) button while pushing UP / DOWN etc. 4. The temperature that you desire to set will increase 1°C if you push the UP button once, on the contrary the
temperature will decrease 1°C if you push the DOWN button once. 5. The temperature inside the unit will be displayed in blue.
NOTE: The desired temperatures may fluctuate depending on whether the interior light is ON or OFF, the ambient temperature, the location of unit and the orientation of the bottles. The display is just a guide, be guided by how cold your drinks are at consumption. Remember units go into defrost mode and this will show a higher display, it’s only for small periods and doesn’t have time to effect drink temperature. In general once unit has settled it will keep products within 2°C of the set temp easily in temperatures up to and beyond 38°C.
NOTE: In the event of a power interruption, all previous temperature settings will be automatically saved and each
compartment will return to the previous temperature setting. If the unit is unplugged, loses power, or is turned off, you must wait 3 to 5 minutes before restarting.
Attempting to restart before this time has elapsed may prevent the unit from starting. When you use the fridge for the first time or restart the fridge after having been shut off for a long time, there
will be a few degrees variance between the temperature you select and the one indicated on the LED readout for the first few hours of operation. After a few hours of operation, the temperature will normalize to the displayed temperature. It can take 24-48Hours for the fridge to fully ‘settle’.

7
DOOR LOCK This unit comes with locks on all doors for preventative security. The keys are located inside the plastic bag that contains the User Manual. To unlock the door, insert the key
into the lock and turn counterclockwise. To lock the door, simply reverse the operation making sure the metal pin is engaged completely. Then remove
the key and place it is a secure place for safekeeping, one near fridge and one inside in safe location.
5-LAYOUT AND STORAGE Your cabinet was designed to store a maximum number of bottles in total security. We recommend that you observe the tips below to optimize loading. -Spread your bottles out as evenly as possible over the shelves, so that weight is not concentrated in one point, Also make sure your bottles do not touch the back of the cabinet wall, or the step at bottom. -Make sure that bottles are not all grouped together at the top or bottom of the cabinet. -A fridge that is full and has nice allowance for air movement will work more efficiently. -Never try to adjust shelf with bottles still on it. PLEASE NOTE Before modifying your cabinet’s original configuration in any way, be sure to ask your dealer for advice.
How to use your shelving ● You can put the beer bottles on the shelving any way you like, lay down or upright.
Max Weight per shelf: 25kgs To adjust shelving, clips can be moved, place ‘top’ part of clip in first then force bottom part up. If clips seem loose, remove and ‘expand the width of opening on clip, this will allow it to fit better.
8
6-CARE AND MAINTENANCE
Cleaning Your Bar Fridge Turn off the power, unplug the appliance, and remove all items including shelves and rack. Wash the inside stainless with hot water only and fully dry the unit interior. Wash the shelves with a mild detergent solution. Wring excess water out of the sponge or cloth when cleaning area of the controls, or any electrical parts. Wash the outside cabinet with hot water and wipe with clean dry cloth. After installation, we recommend that owners apply a thin layer of Olive Oil with a clean rag, to all exposed
Stainless Steel areas. This should then be polished in and buffed off with another clean rag to a non-oily finish. This process will aid protection against dirt and other corrosive contaminants, by providing a temporary food-safe shield. The Olive Oil layer also makes later polishing and removal of fingerprints easier. This process should be repeated frequently every 3-4 months. ALL stainless steel can rust, it is a myth that stainless steel doesn’t rust. .
Power Failure Most power failures are corrected within a few hours and should not affect the temperature of your appliance if you
minimize the number of times the door is opened. If the power is going to be off for a longer period of time, you need to take the proper steps to protect your contents.
Vacation time Short vocations: Leave the Bar Fridge operating during vacations of less than three weeks. Long vocations: If the appliance will not be used for several months, remove all items and turn off the appliance.
Clean and dry the interior thoroughly. To prevent door and mold growth, leave the door open slightly: blocking it open if necessary.
Moving Your Bar Fridge Remove all items. Securely tape down all loose items (shelves) inside your appliance. Turn the adjustable leg up to the base to avoid damage. Tape the door shut, using tape thatwill remove easy without leaving sticky material. Be sure the appliance stays secure in the upright position during transportation. Also protect outside of appliance
with a blanket, or similar item.
Energy saving Tips The Bar Fridge should be located in the coolest area of the room, away from heat producing appliances, and out of
the direct sunlight. Ventilation at rear also helps a lot with energy usage, so create a positive air flow where possible, although with this range they are designed to be fully built in.
When you are not using fridge during weekdays etc. it is recommended to set the temp at a higher level, so set at 8oC during periods of non usage, this will not only mean less run time, it also still keeps drinks at a temp that won’t be spoiled. It saves energy also which these days is a growing concern for most households.
Keep the fridge stocked, an empty fridge will run longer, believe it or not.
9
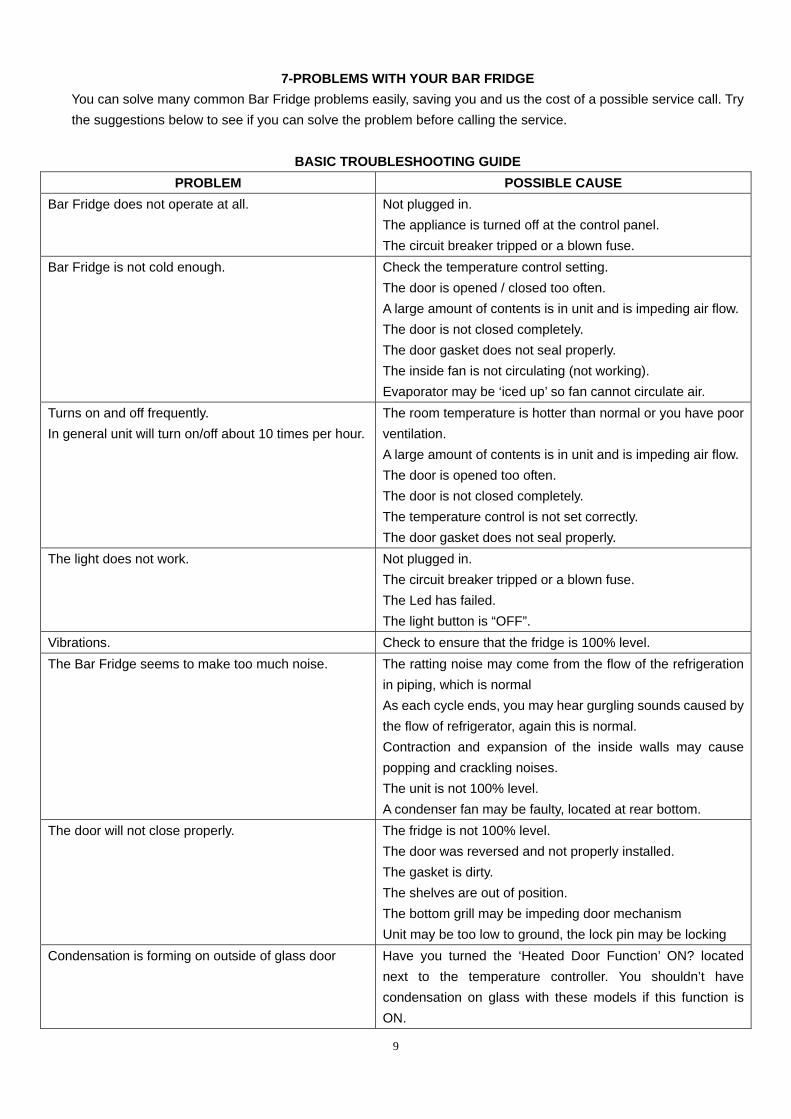
7-PROBLEMS WITH YOUR BAR FRIDGE
You can solve many common Bar Fridge problems easily, saving you and us the cost of a possible service call. Try the suggestions below to see if you can solve the problem before calling the service.
BASIC TROUBLESHOOTING GUIDE PROBLEM POSSIBLE CAUSE
Bar Fridge does not operate at all. Not plugged in. The appliance is turned off at the control panel. The circuit breaker tripped or a blown fuse.
Bar Fridge is not cold enough. Check the temperature control setting. The door is opened / closed too often. A large amount of contents is in unit and is impeding air flow.The door is not closed completely. The door gasket does not seal properly. The inside fan is not circulating (not working). Evaporator may be ‘iced up’ so fan cannot circulate air.
Turns on and off frequently. In general unit will turn on/off about 10 times per hour.
The room temperature is hotter than normal or you have poor ventilation. A large amount of contents is in unit and is impeding air flow.The door is opened too often. The door is not closed completely. The temperature control is not set correctly. The door gasket does not seal properly.
The light does not work. Not plugged in. The circuit breaker tripped or a blown fuse. The Led has failed. The light button is “OFF”.
Vibrations. Check to ensure that the fridge is 100% level. The Bar Fridge seems to make too much noise. The ratting noise may come from the flow of the refrigeration
in piping, which is normal As each cycle ends, you may hear gurgling sounds caused by the flow of refrigerator, again this is normal. Contraction and expansion of the inside walls may cause popping and crackling noises. The unit is not 100% level. A condenser fan may be faulty, located at rear bottom.
The door will not close properly. The fridge is not 100% level. The door was reversed and not properly installed. The gasket is dirty. The shelves are out of position. The bottom grill may be impeding door mechanism Unit may be too low to ground, the lock pin may be locking
Condensation is forming on outside of glass door Have you turned the ‘Heated Door Function’ ON? located next to the temperature controller. You shouldn’t have condensation on glass with these models if this function is ON.
01
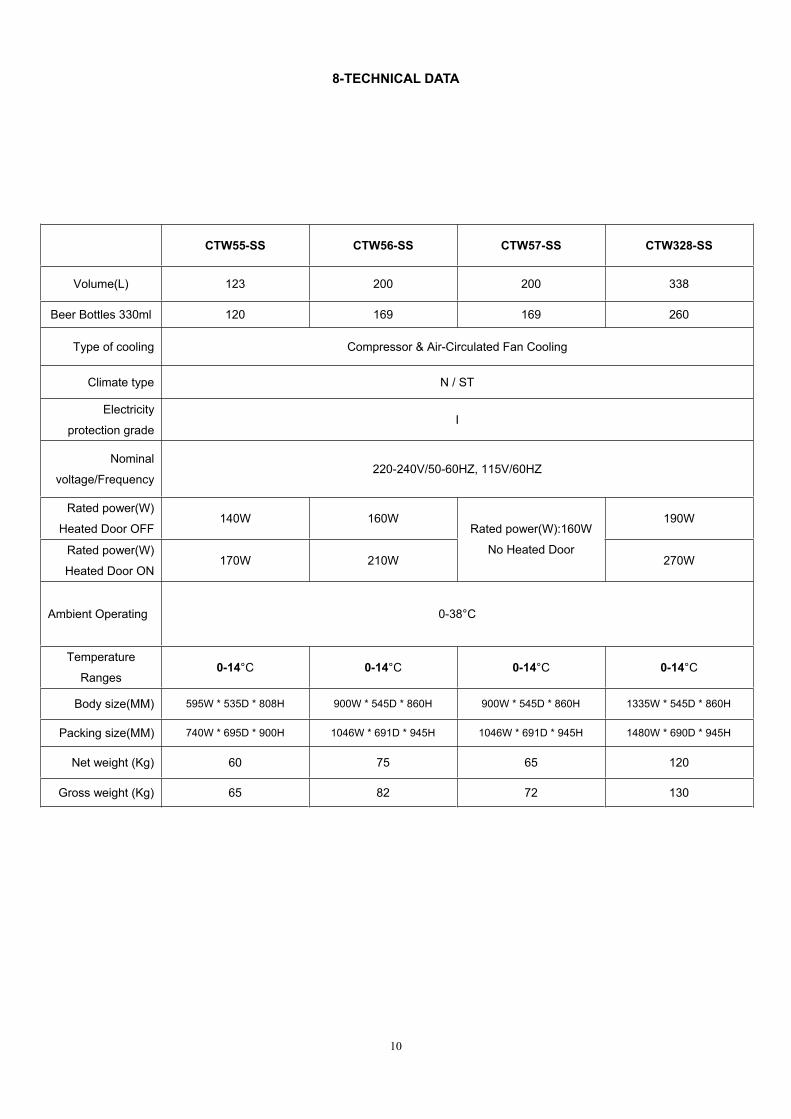
8-TECHNICAL DATA
CTW55-SS CTW56-SS CTW57-SS CTW328-SS
833 002 002 321 )L(emuloV
062 961 961 021 lm033 selttoB reeB
gnilooC naF detalucriC-riA & rosserpmoC gnilooc fo epyT
TS / N epyt etamilC
Electricity
protection grade I
Nominal
voltage/Frequency 220-240V/50-60HZ, 115V/60HZ
Rated power(W)
Heated Door OFF W091 W061 W041
Rated power(W)
Heated Door ON 170W 210W
Rated power(W):160W
No Heated Door 270W
C°83-0 gnitarepO tneibmA
Temperature
Ranges 0-14°C 0-14°C 0-14°C 0-14°C
Body size(MM) 595W * 535D * 808H 900W * 545D * 860H 900W * 545D * 860H 1335W * 545D * 860H
Packing size(MM) 740W * 695D * 900H 1046W * 691D * 945H 1046W * 691D * 945H 1480W * 690D * 945H
021 56 57 06 )gK( thgiew teN
031 27 28 56 )gK( thgiew ssorG

11
9. WARRANTY All refrigerated compressor driven products purchased from Bar Fridges Australia (BFA) are covered by;
1. 24 Month Australia Wide Parts and Labour Warranty from the date of purchase for domestic applications, apart from scratch n dent and
stock specials where each warranty is stipulated separately on the listing.
2. 12 Months Australia Wide Parts and Labor Warranty from date of purchase on commercial applications.
3. All non compressor items carry12 Months Australia Wide Parts and Labour Warranty.
BFA will pay all costs to repair, replace or refund (at our sole discretion) any faulty unit or part thereof, if the fault is deemed to be a defect in operation,
material, or workmanship, BFA is geared towards fairness in all cases.
Warranty Does Not Include;
• Any expenses resulting from service calls for either products or faults that are not specifically covered by this warranty, (including units
which are found to be operating normally). Any call out fees will then be bourne by the client (at our discretion).
• Any expenses resulting from service calls for both fault diagnosis and repair after the above warranty terms have expired. BFA will always
assist after warranty periods, just as they would within warranty periods.
• Any client wishing to return a unit after purchase with no legitimate reason. It is understood that the client has read our listing and knows all
of the specifications in regards to size, noise levels and the environment suited for the fridge. The cost to return is fully bourne by the client
as well as the initial cost of the delivery plus re-stocking fees.
• Any expenses resulting from defects to the unit caused by any person, other than BFA or its authorized service agents, including;
a) Incorrect installation ie; no ventilation or exposure to the elements
b) Abuse, misuse or alteration
c) Neglect or failure to let unit settle after relocation or transport
d) Damage from movement
e) Act of god
• Any indirect, incidental or consequential damages, except as provided for by the Trade Practices Act and Similar State and Territory Laws.
• Units used in ‘moveable’ vehicles (Cars, Vans, Buses etc.) will not be covered under any warranty at all
• Fridges that do not come under our standard warranted lines. These will be clearly advertised with the warranty information directly
pertaining to that product, and the purchase invoice will state the warranty.
• Flouro/Led lights, ballast, rusted parts (even Stainless Steel), screws, nuts and any plastic parts, basic wear and tear.
• Labor if technician has to travel outside of the Australian mainland.
• Compensation/Claim in any form if client hasn’t read the listing correctly in regard to the fridge power draw and any noise levels, BFA has
extensive product details, so the consumer is obligated to make an informed decision.
How to Obtain Service:
For assistance, contact BFA on 1300 376849 with the fridge model, serial number, date of purchase and a description of the problem, or register
online at www.bar-fridges-australia.com.au. There is no guaranteed time limit for repairs to be carried out but all warranty issues are regarded as
‘urgent’, and every effort will be made to have the problem rectified immediately. In some cases to speed the process up where a job is a minor repair,
parts may be sent direct to the client and authorization will be given to make the repair themselves and the warranty not being voided. This is popular
in situations like fan replacements when the client is an actual tradesman.
Proof of Purchase:
It remains the customer’s responsibility to establish proof of purchase for warranty purposes. Always retain your sales receipt as we need the
invoice number to verify your purchase date.
Authorised Service Agents:
Service is provided by BFA and it’s authorized service network of refrigeration mechanics Australia Wide. We cover all area’s though, some remote
areas can mean longer wait times. We don’t allow for service outside normal working hours, otherwise call out fees are applicable. ALL call outs have
to be arranged and performed by approved BFA service technicians. Clients cannot arrange their own technicians.
Replacement Parts:
Parts will always be available at very reasonable prices after the warranty period is finished, unless a stock item becomes obsolete. In 99% of cases
we carry parts as it is very important to BFA to keep clients happy after the warranty period has expired
12
Distributors for Singapore & Malaysia Eldric Marketing Pte Ltd
5 Pereira Road #02-01 Asiawide Industrial Building
Singapore 368025 www.eldric.sg Email [email protected]
![Beer Fridge: a Personal Journey€¦ · Beer Fridge: a Personal Journey 5 [12 ] At about 4 Amps the TEC performs best, the temperature at the bottom of the fridge is lowest. Currents](https://img.pdfslide.us/doc/110x75/5fb7d0a0ef2c1a36865d8d6a/beer-fridge-a-personal-journey-beer-fridge-a-personal-journey-5-12-at-about.jpg)