Embed Size (px)
Citation preview

I N S T R U C T I O N M A N U A L
www.oakworks.com · 717.235.6807
Cabana Lounger

© 2010 Oakworks® , Inc.
Manual Part # MMMNST0021 Edition 1, English June 2010
All rights are reserved. No part of this document may be photocopied, reproduced or translated to another language without prior written consent of Oakworks®, Inc.
Oakworks® is a registered trademark of Oakworks®, Inc.
Notice
The information contained in this document is subject to change without notice and should not be construed as a commitment by Oakworks®, Inc.
Oakworks®, Inc. assumes no responsibility for any errors that may appear in this document nor does it make expressed or implied warranty of any kind with regard to this material, including, but not limited to, the implied warranties of merchantability and fitness for a particular purpose.
Oakworks®, Inc. shall not be liable for incidental or consequential damages in connection with or arising out of the furnishing, performance, or use of this document and the program material which it describes.

TABLE OF CONTENTS
Section I:
Product Description & Photo ...................................................pg 1
Product Specs ..............................................................................pg 2
Section II:
Assembly .......................................................................... pg 3-4
Section III: Directions for Use
To change Lounger Height.......................................................pg 5
Backrest operation .....................................................................pg 5
Optional Bench Backrest operation ......................................pg 6
Optional QuickLock face rest operation ..............................pg 7
Section IV: Care & Cleaning ..........................................................pg 8
Section V: Warranty ..................................................................... pg 8
Contact Information ................................................................... back cover
i
TAB
LE O
F C
ON
TEN
TS
TABLE OF CONTENTS

PRODUCT DESCRIPTION
1
PR
OD
UC
T D
ESC
RIP
TIO
N
The Cabana Lounger by Oakworks combines the art of leisure with refi ned functionality. Designed to be located outside in a covered location, the lounger is convertible from bench with or without backrest, to chaise with backrest, to full size adjustable height massage table. Perfect choice for pool side massages and relaxation. Great for spa guest suites too!
CONVERTS INTO ADJUSTABLE HEIGHT MASSAGE TABLE
The Cabana Lounger should not be used in any other manner than that described within this manual. Use of any unnecessary force or unauthorized procedures could result in injury to practitioner, client or equipment.
Converts quickly from bench, to lounger, to adjustable height massage table. The Cabana Lounger is built with solid mahogany construction, Duratouch Marine grade upholstery and 3” super comfortable foam designed for seating or massage. The optional cabana bench backrest folds out of the way for massage and face rest outlets are available at the end of the table.
LOUNGER DETAILS
Cabana Bench BackrestFace Rest Acceptability Leg Height Adustability

PRODUCT DESCRIPTION
PR
OD
UC
T D
ESC
RIP
TIO
N
TABLE SPECS*:
• Maximum working load: 550 lb.(249 kg)
• Height *: 20” - 32” (51 cm - 81 cm)
• Width: 31” (79 cm)
• Length: 73” (185 kg)
• Weight: 95 lbs. (43 kg)
• Shipping Weight: 125 lbs. (57 kg)
• Top: Backrest
• Padding: 3” (8 cm) Aero·Cel™ System
• Upholstery: DuraTouch™
• Frame: Mahogany
*Measurements are determined from floor to top of seat pad using standard padding; these measurements can be affected by natural material variations in padding
**Published weight may differ due to options chosen, natural material variations and padding density
2
STAINLESS STEELPROTECTION
OPTIONAL CABANA BENCH BACKREST EASILY FOLDS OUT OF THE WAY
ADJUSTABLE BACKREST
DURATOUCHUPHOLSTERY
SOLID MAHOGANY CONSTRUCTION
ADJUSTABLE HEIGHT RANGE
CONSTRUCTION
ADJUSTABLE BACKREST STANDARD
3” CUSTOM PADDING SYSTEM
MODEL # CBMH CBMHBR

ASSEMBLY
ASS
EM
BLY
3
PARTS INCLUDED:
2 - Plastic Caps 4 - Acorn Nuts 8 - Hex Nuts
1 - Table
4 - Legs (2 of each)
Locate the pack of legs & hardware and set aside.
step 1
Remove packing material.
step 2
Obtain one leg. Line up leg bolt with one metal corner bracket. Check that the small pull pin on the leg is pointing to the inside of the table. (see picture)
step 3
Place a split lock washer and hex nut on each bolt. Hand tighten, making sure that the leg fits securely into the corner of the skirt.
step 4
8 - Split Lock Washer
TOOLS REQUIRED: 1/2” open end or box end wrench
9/16” open end or box end wrench
small pull pin
INST
ALL
ATI
ON
4
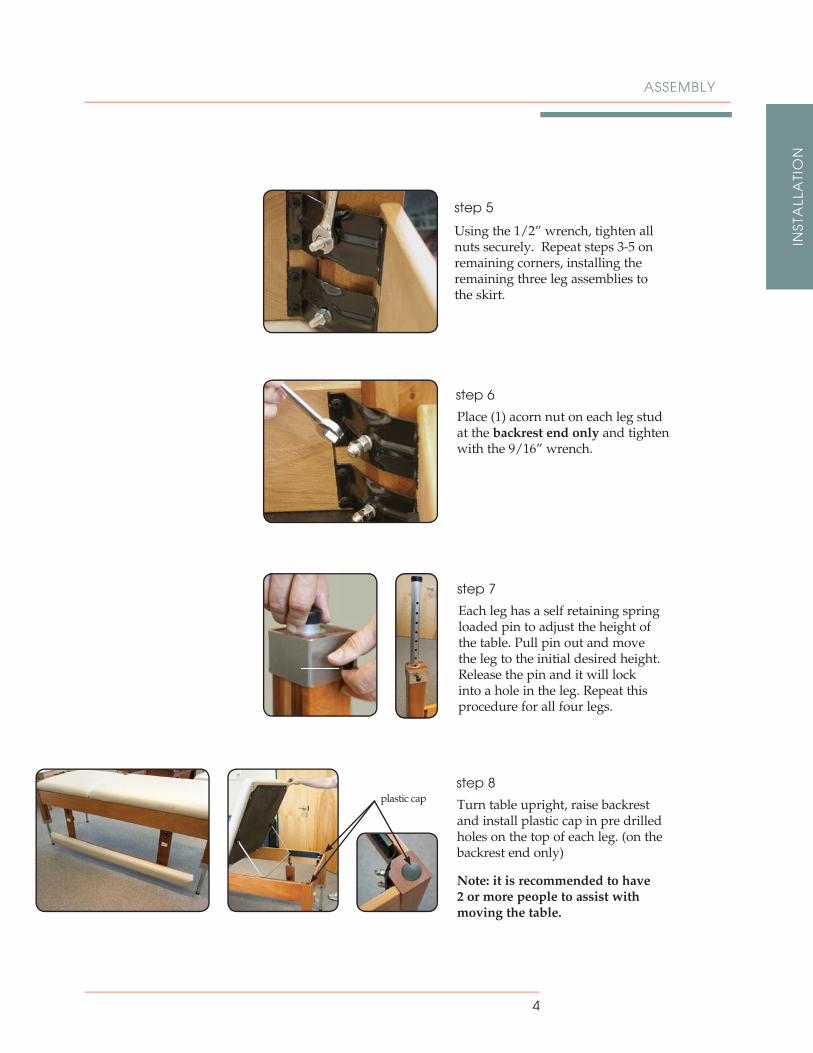
Using the 1/2” wrench, tighten all nuts securely. Repeat steps 3-5 on remaining corners, installing the remaining three leg assemblies to the skirt.
step 5
Place (1) acorn nut on each leg stud at the backrest end only and tighten with the 9/16” wrench.
step 6
ASSEMBLY
Each leg has a self retaining spring loaded pin to adjust the height of the table. Pull pin out and move the leg to the initial desired height. Release the pin and it will lock into a hole in the leg. Repeat this procedure for all four legs.
step 7
Turn table upright, raise backrest and install plastic cap in pre drilled holes on the top of each leg. (on the backrest end only)
Note: it is recommended to have 2 or more people to assist with moving the table.
step 8plastic cap
DIR
EC
TIO
NS
FOR
USE
DIRECTIONS FOR USE
5
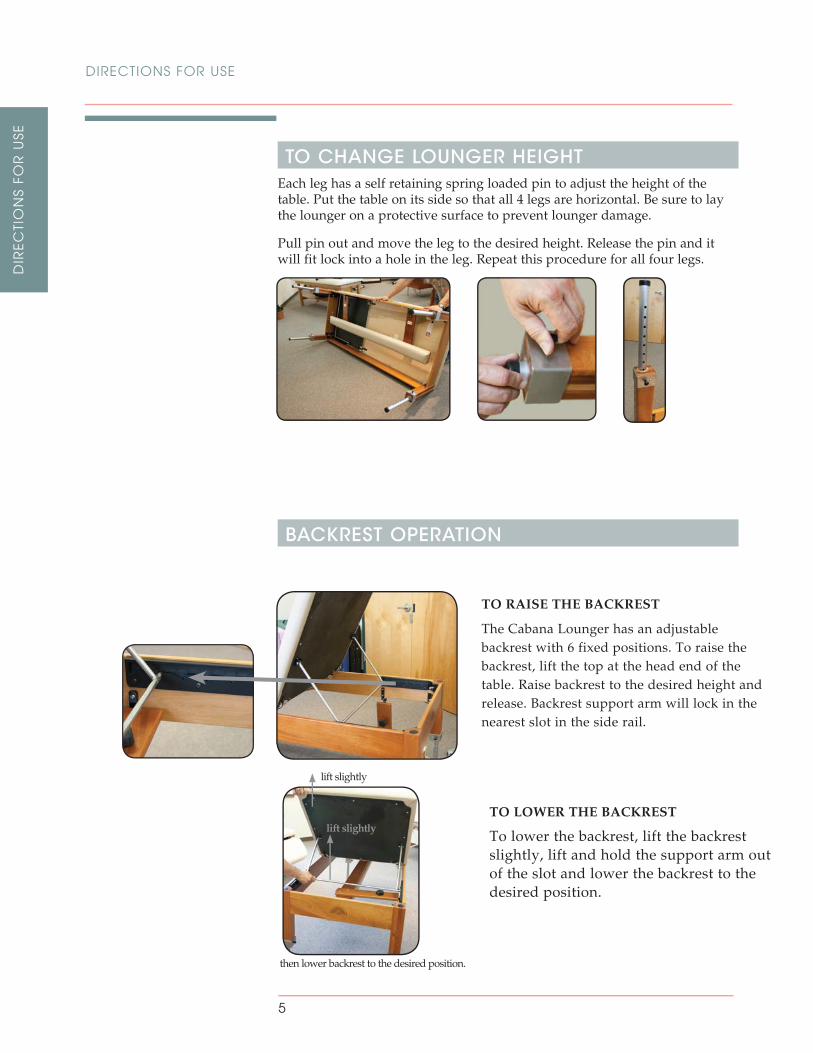
TO CHANGE LOUNGER HEIGHT
Each leg has a self retaining spring loaded pin to adjust the height of the table. Put the table on its side so that all 4 legs are horizontal. Be sure to lay the lounger on a protective surface to prevent lounger damage.
Pull pin out and move the leg to the desired height. Release the pin and it will fit lock into a hole in the leg. Repeat this procedure for all four legs.
BACKREST OPERATION
TO RAISE THE BACKREST
The Cabana Lounger has an adjustable backrest with 6 fixed positions. To raise the backrest, lift the top at the head end of the table. Raise backrest to the desired height and release. Backrest support arm will lock in the nearest slot in the side rail.
lift slightly
lift slightly
then lower backrest to the desired position.
TO LOWER THE BACKREST
To lower the backrest, lift the backrest slightly, lift and hold the support arm out of the slot and lower the backrest to the desired position.
DIR
EC
TIO
NS
FOR
USE
6
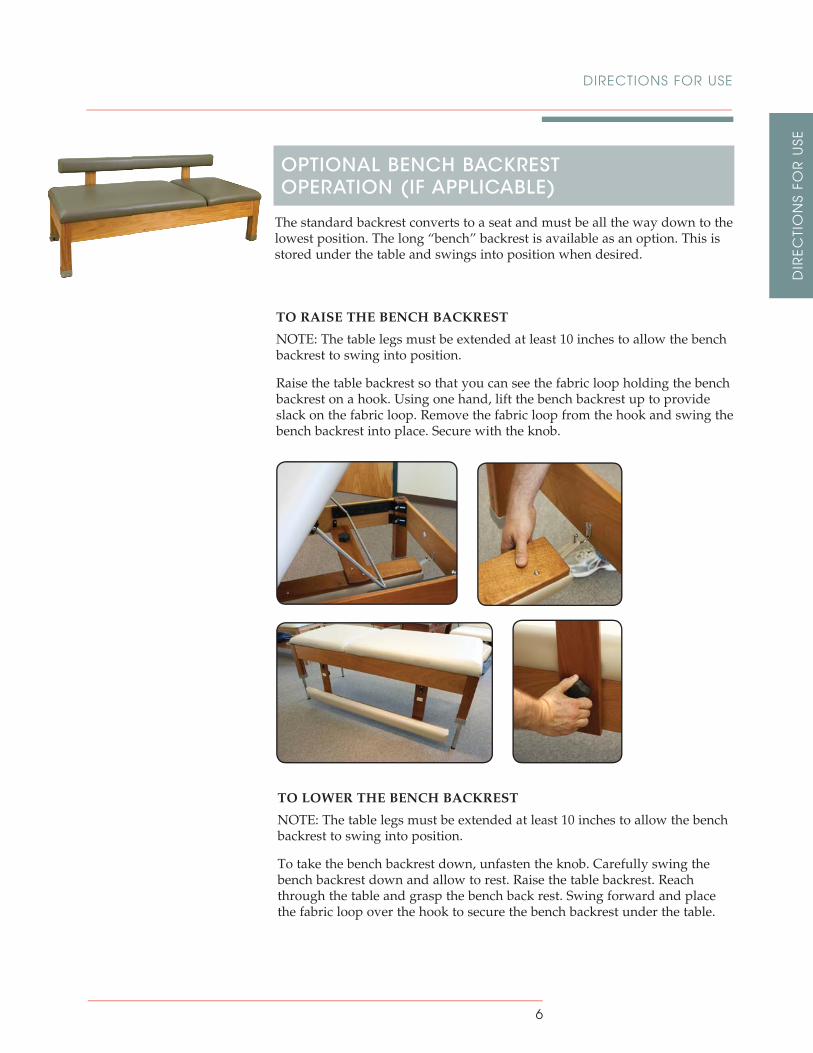
OPTIONAL BENCH BACKREST OPERATION (IF APPLICABLE)
TO RAISE THE BENCH BACKREST
NOTE: The table legs must be extended at least 10 inches to allow the bench backrest to swing into position.
Raise the table backrest so that you can see the fabric loop holding the bench backrest on a hook. Using one hand, lift the bench backrest up to provide slack on the fabric loop. Remove the fabric loop from the hook and swing the bench backrest into place. Secure with the knob.
TO LOWER THE BENCH BACKREST
NOTE: The table legs must be extended at least 10 inches to allow the bench backrest to swing into position.
To take the bench backrest down, unfasten the knob. Carefully swing the bench backrest down and allow to rest. Raise the table backrest. Reach through the table and grasp the bench back rest. Swing forward and place the fabric loop over the hook to secure the bench backrest under the table.
The standard backrest converts to a seat and must be all the way down to the lowest position. The long “bench” backrest is available as an option. This is stored under the table and swings into position when desired.
DIRECTIONS FOR USE
OPTIONAL ACCESSORY
OP
TIO
NA
L A
CC
ESS
OR
Y
7
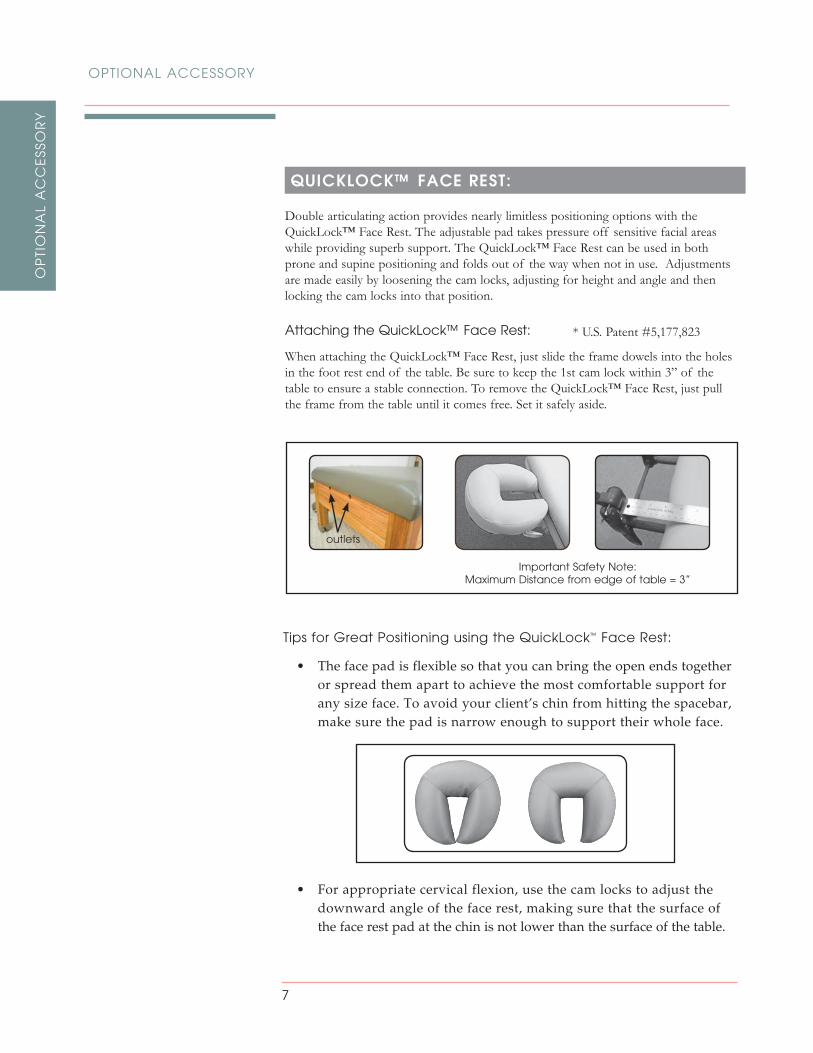
Double articulating action provides nearly limitless positioning options with the QuickLock™ Face Rest. The adjustable pad takes pressure off sensitive facial areas while providing superb support. The QuickLock™ Face Rest can be used in both prone and supine positioning and folds out of the way when not in use. Adjustments are made easily by loosening the cam locks, adjusting for height and angle and then locking the cam locks into that position.
Attaching the QuickLock™ Face Rest:
When attaching the QuickLock™ Face Rest, just slide the frame dowels into the holes in the foot rest end of the table. Be sure to keep the 1st cam lock within 3” of the table to ensure a stable connection. To remove the QuickLock™ Face Rest, just pull the frame from the table until it comes free. Set it safely aside.
QUICKLOCK™ FACE REST & HEAD REST
* U.S. Patent #5,177,823
QUICKLOCK™ FACE REST:
Important Safety Note: Maximum Distance from edge of table = 3”
outlets
Tips for Great Positioning using the QuickLock™ Face Rest:
• The face pad is flexible so that you can bring the open ends together or spread them apart to achieve the most comfortable support for any size face. To avoid your client’s chin from hitting the spacebar, make sure the pad is narrow enough to support their whole face.
• For appropriate cervical flexion, use the cam locks to adjust the downward angle of the face rest, making sure that the surface of the face rest pad at the chin is not lower than the surface of the table.

HOW TO CARE FOR YOUR UPHOLSTERY:
In order to maintain the quality and ensure the life of the table, here are some preventative steps that can be taken to protect the upholstery.
• Clean your upholstery fabric every day. We recommend cleaning your upholstery fabric with a mild detergent to protect it against oil stains and dirt which will cause cracking and permanent stains over time. Household products you can use include a 4:1 diluted solution of 409® cleaner, Fantastik® or any non-abrasive with a non-alcohol content. Products with a high alcohol content, when used over time, will dry and eventually crack your upholstery fabric. Note: Damage caused by these cleansers will not be covered under the warranty.
• Avoid extremes in temperature. Very cold temperatures can make your fabric prone to cracking. Very high temperatures can cause the fabric to stretch permanently.
• Avoid exposing your products to direct sunlight for extended periods of time. This can lead to fading and cracking of the fabric.
Cushions may be replaced for a charge, but you can lengthen the life of the upholstery fabric on your lounge by following these quick and easy suggestions.
GENERAL CARE OF TABLE
• Use only a mild solution of 4:1 diluted non-alcohol cleaner such as 409®, Fantastik® or some other non-abrasive cleaner to wipe down the metal and wooden surfaces. Apply with a damp (not wet) lint-free cloth.
• The wooden cabinetry of the table can be polished with any polish approved for wooden surfaces. Spray, or pour, the polish onto a soft cloth and be careful not to get it onto other surfaces.
CA
RE
, C
LEA
NIN
G &
WA
RR
AN
TY
CARE, CLEANING & WARRANTY
For full warranty details, please visit www.oakworks.com
All warranties are limited to factory-provided replacement parts, factory repair or replacement, at the discretion of OAKWORKS®.
All warranties exclude damage caused by improper set-up, accident, abuse, misuse, neglect, use for other than intended purpose or reasonable wear such as tears in the upholstery.
All warranties are invalidated by non-factory modifications and unauthorized repairs, which will immediately terminate all liability by OAKWORKS® for the product or damages caused by its use.
The buyer and its customers shall be responsible for proper set-up and use of the products as well as any supervision required for safety. In no event shall OAKWORKS® be liable for any special, indirect, consequential, incidental, exemplary or punitive damages or costs. Use of non-approved cleaning solutions voids the guarantee on all fabrics.
The warranties set forth herein are the sole and exclusive warranties provided by OAKWORKS®. There are no other warranties, representations or guarantees provided by OAKWORKS® either expressed or implied, including warranties of merchantability and fitness for a particular purpose.
Warranty valid with proof of purchase.
8
WARRANTY STATEMENT
Manual Part # MMMNST0021rev. 60710 Edition 1, English June2010
Printed in U.S.A.
CONTACT INFORMATION:
Oakworks® Inc.
923 East Wellspring Road New Freedom, PA 17349
Toll Free (USA only): 800.558.8850 Phone: 717-235-6807
FAX: 717-235-6798
www.oakworks.com