Embed Size (px)
Citation preview
Instruction Manual
Register your product atwww.babystyledirect.co.uk
3
CONTENTS
Important Safety Information 4-5Fitting and Removing of Front Wheels 6Fitting and Removing of Rear Wheels 6Locking and Unlocking the Front Swivel Wheels 7Opening the Chassis with the Seat Unit Fitted 7-8Folding the Chassis with the Seat Unit Fitted 9-10Folding the Chassis with the Seat Unit / Carrycot / Car Seat Removed 10Adjusting the Handle Height 11Using the Parking Brake 11Fitting / Removing the Bumper Bar 11Fitting the Seat Unit 12Removing the Seat Unit 12Adjusting the Seat Unit Backrest 12Adjusting the Leg Rest 13Hood / Sun Canopy 13-15Adjusting the Hood / Canopy / Harness Shoulder Height 15Using the Restraint System 15-16Fitting the Stroller Rain Cover 17Assembling the Carrycot 17Fitting the Carrycot Apron 17Fitting the Carrycot to the Chassis 18Removing the Carrycot 19Adjusting the Carrycot Hood 19Rocking / Stablising the Carrycot when not attached to the Chassis 19Fitting the Carrycot Rain Cover 20Fitting the Footmuff 20Fitting the Oyster Carapace Infant Car Seat using the Multi Adaptors 20-21 Removing the Oyster Carapace Infant Car Seat from 21the Chassis when fitted with the Multi AdaptorsCare and Maintenance 23Your Warranty Policy 24-25Notes 26-27
PAGE
4
IMPORTANT – Read these instructions before use
and keep for future reference.
Important Safety Information.
This vehicle is intended for children from birth to a maximum of 22kg.
Age and weight usage: Pram body/carrycot 0 to 9Kg, Car seat 0 to 13kg (follow
manufacturers guidelines), Seat unit 0 to 22kg, Ride on board/platform max 20kg.
The seat unit, carrycot or car seat is suitable for one child only to the maximum
weight stated above.
It is important that any person intending to use this stroller understands the
instructions.
WARNING: Never leave your child unattended.
WARNING: Ensure that all locking devices are engaged before use.
WARNING: To avoid injury ensure that the child is kept away when unfolding and folding this product.
WARNING: Do not let the child play with this product.
WARNING: Always use the restraint system (safety harness).
WARNING: Check the pram body, seat unit or car seat attachment devices are correctly engaged before use.
WARNING: This product is not suitable for running or skating.
WARNING: The maximum weight for the shopping basket is 3kg.
WARNING: Never lift/carry the chassis while occupied. Your child’s safety may be at risk.
5
WARNING: Do not use the vehicle on steps, stairs or escalators; as it may be dangerous to your child.
WARNING: Always descend/mount kerbs on the back wheels, do not tip the stroller forward.
WARNING: Any load attached to the handle and/or the back of the backrest and/or the sides of the vehicle will affect the stability of the vehicle.
WARNING: Incorrect assembly, folding or use of this vehicle may cause damage and affect the safety of the stroller.
WARNING: Pram body/carrycot: This product is suitable for a child who cannot sit up unaided, roll over and cannot push itself up on its hands and knees. Maximum weight of the child for the carrycot must not exceed 9kg.
WARNING: Always use the seat in the most reclined position for new bornbabies to approx. 6 months.
WARNING: Always use the crotch strap in combination with the waist belt.
WARNING: Never leave the stroller without first engaging the parking device. Avoid uphill or downhill parking.
WARNING: No additional mattress should be added to the carrycot; only use the mattress provided.
WARNING: Never use the parasol attached to the stroller if there is wind.
WARNING: Do not use accessories that are not approved by the manufacturer.
WARNING: Do not use replacement parts other than those supplied by the manufacturer or supplier.
6
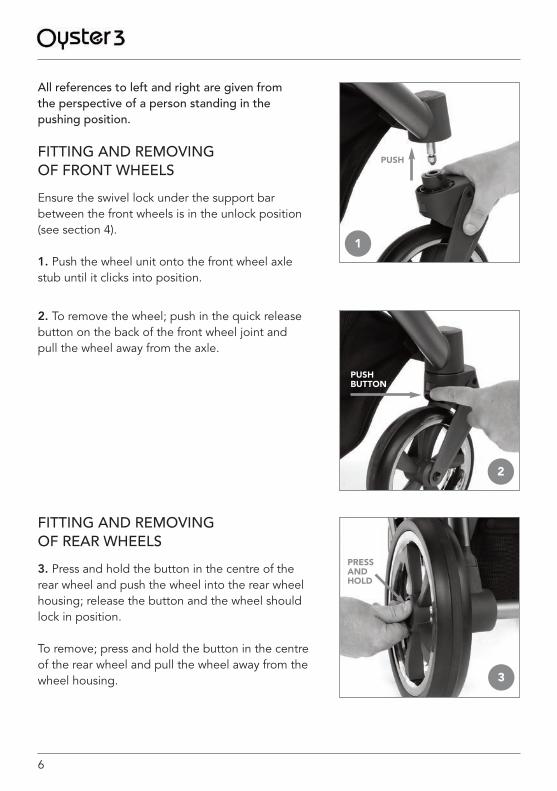
All references to left and right are given from the perspective of a person standing in thepushing position.
FITTING AND REMOVING OF FRONT WHEELS
Ensure the swivel lock under the support barbetween the front wheels is in the unlock position(see section 4).
1. Push the wheel unit onto the front wheel axlestub until it clicks into position.
2. To remove the wheel; push in the quick releasebutton on the back of the front wheel joint andpull the wheel away from the axle.
FITTING AND REMOVING OF REAR WHEELS
3. Press and hold the button in the centre of therear wheel and push the wheel into the rear wheelhousing; release the button and the wheel shouldlock in position.
To remove; press and hold the button in the centreof the rear wheel and pull the wheel away from thewheel housing.
1
2
3
PRESSANDHOLD
PUSH BUTTON
PUSH
7
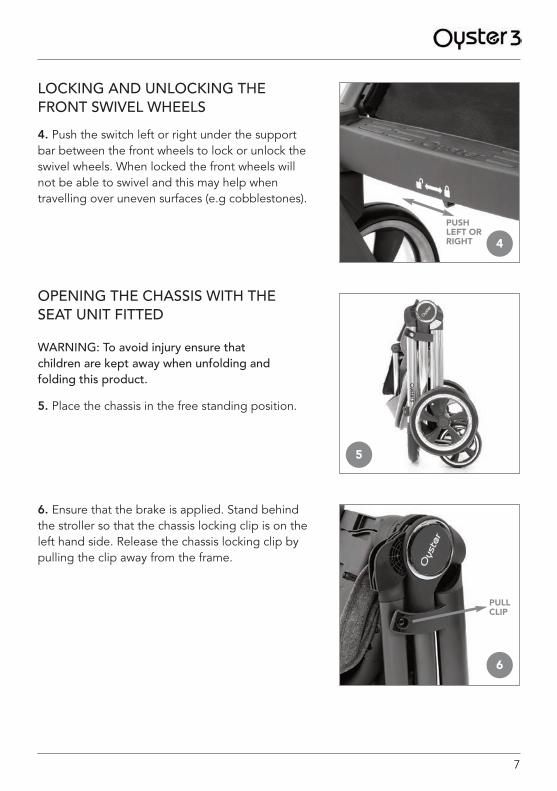
LOCKING AND UNLOCKING THEFRONT SWIVEL WHEELS
4. Push the switch left or right under the supportbar between the front wheels to lock or unlock theswivel wheels. When locked the front wheels willnot be able to swivel and this may help whentravelling over uneven surfaces (e.g cobblestones).
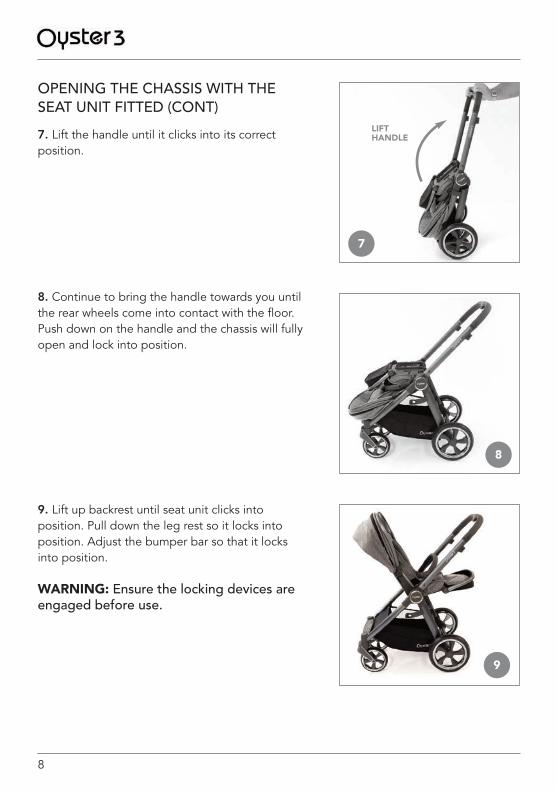
OPENING THE CHASSIS WITH THESEAT UNIT FITTED
WARNING: To avoid injury ensure that children are kept away when unfolding andfolding this product.
5. Place the chassis in the free standing position.
6. Ensure that the brake is applied. Stand behindthe stroller so that the chassis locking clip is on theleft hand side. Release the chassis locking clip bypulling the clip away from the frame.
4
6
5
PUSHLEFT ORRIGHT
PULLCLIP
8
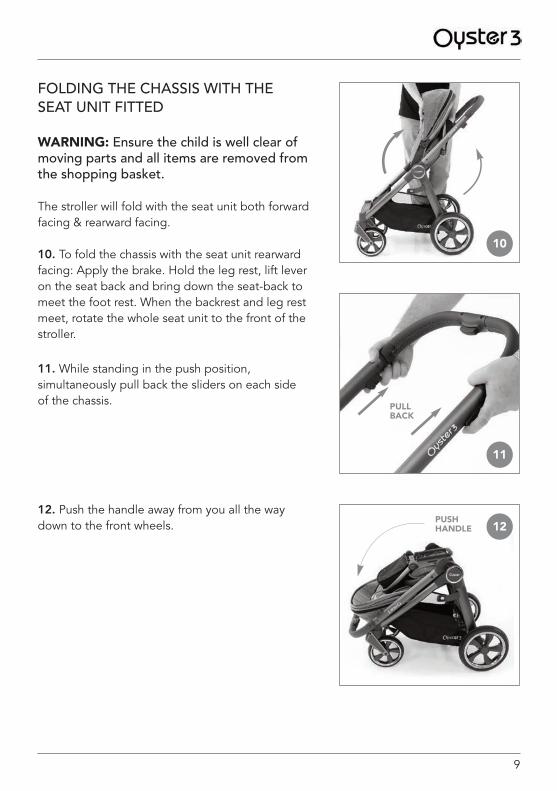
OPENING THE CHASSIS WITH THESEAT UNIT FITTED (CONT)
7. Lift the handle until it clicks into its correctposition.
8. Continue to bring the handle towards you untilthe rear wheels come into contact with the floor.Push down on the handle and the chassis will fullyopen and lock into position.
9. Lift up backrest until seat unit clicks intoposition. Pull down the leg rest so it locks intoposition. Adjust the bumper bar so that it locksinto position.
WARNING: Ensure the locking devices areengaged before use.
8
7
9
LIFTHANDLE
9
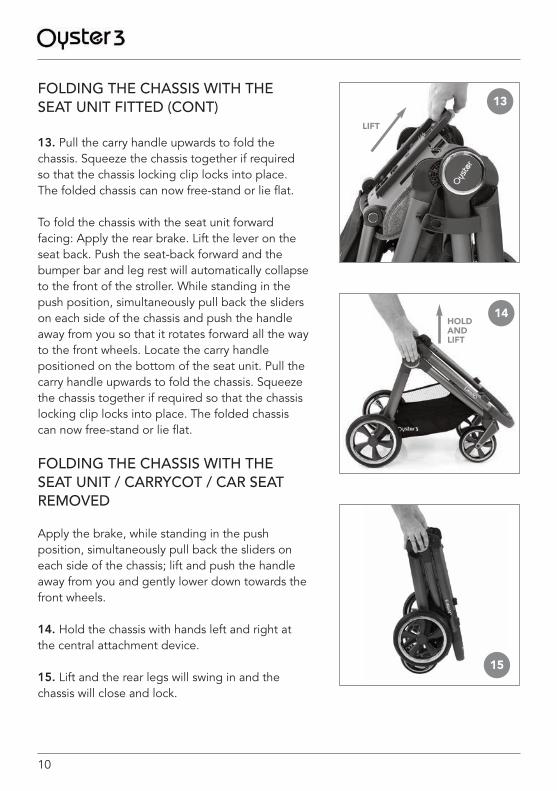
FOLDING THE CHASSIS WITH THESEAT UNIT FITTED
WARNING: Ensure the child is well clear ofmoving parts and all items are removed fromthe shopping basket.
The stroller will fold with the seat unit both forwardfacing & rearward facing.
10. To fold the chassis with the seat unit rearwardfacing: Apply the brake. Hold the leg rest, lift leveron the seat back and bring down the seat-back tomeet the foot rest. When the backrest and leg restmeet, rotate the whole seat unit to the front of thestroller.
11. While standing in the push position,simultaneously pull back the sliders on each sideof the chassis.
12. Push the handle away from you all the waydown to the front wheels.
10
11
12PUSHHANDLE
PULLBACK
10
FOLDING THE CHASSIS WITH THESEAT UNIT FITTED (CONT)
13. Pull the carry handle upwards to fold thechassis. Squeeze the chassis together if requiredso that the chassis locking clip locks into place.The folded chassis can now free-stand or lie flat.
To fold the chassis with the seat unit forwardfacing: Apply the rear brake. Lift the lever on theseat back. Push the seat-back forward and thebumper bar and leg rest will automatically collapseto the front of the stroller. While standing in thepush position, simultaneously pull back the sliderson each side of the chassis and push the handleaway from you so that it rotates forward all the wayto the front wheels. Locate the carry handlepositioned on the bottom of the seat unit. Pull thecarry handle upwards to fold the chassis. Squeezethe chassis together if required so that the chassislocking clip locks into place. The folded chassiscan now free-stand or lie flat.
FOLDING THE CHASSIS WITH THESEAT UNIT / CARRYCOT / CAR SEATREMOVED
Apply the brake, while standing in the pushposition, simultaneously pull back the sliders oneach side of the chassis; lift and push the handleaway from you and gently lower down towards thefront wheels.
14. Hold the chassis with hands left and right atthe central attachment device.
15. Lift and the rear legs will swing in and thechassis will close and lock.
13
14
15
LIFT
HOLDANDLIFT
11
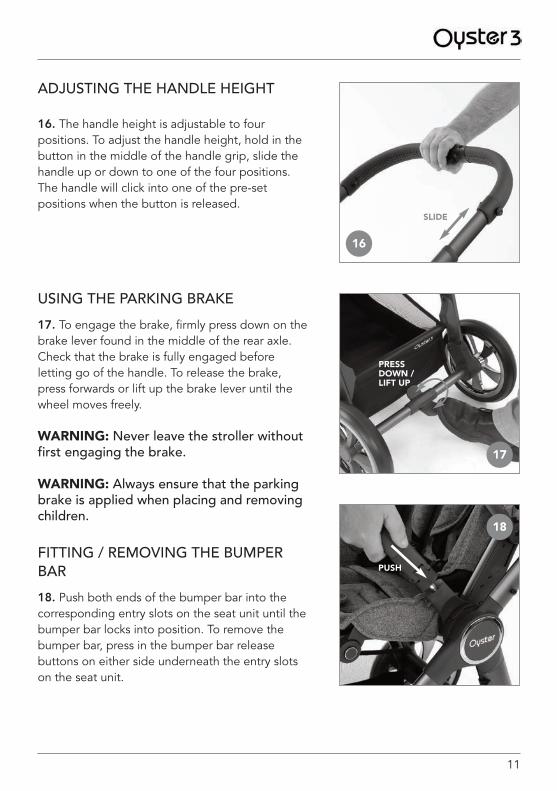
ADJUSTING THE HANDLE HEIGHT
16. The handle height is adjustable to fourpositions. To adjust the handle height, hold in thebutton in the middle of the handle grip, slide thehandle up or down to one of the four positions.The handle will click into one of the pre-setpositions when the button is released.
USING THE PARKING BRAKE
17. To engage the brake, firmly press down on thebrake lever found in the middle of the rear axle.Check that the brake is fully engaged beforeletting go of the handle. To release the brake,press forwards or lift up the brake lever until thewheel moves freely.
WARNING: Never leave the stroller withoutfirst engaging the brake.
WARNING: Always ensure that the parkingbrake is applied when placing and removingchildren.
FITTING / REMOVING THE BUMPERBAR
18. Push both ends of the bumper bar into thecorresponding entry slots on the seat unit until thebumper bar locks into position. To remove thebumper bar, press in the bumper bar releasebuttons on either side underneath the entry slotson the seat unit.
17
18
16
SLIDE
PUSH
PRESSDOWN /LIFT UP
12
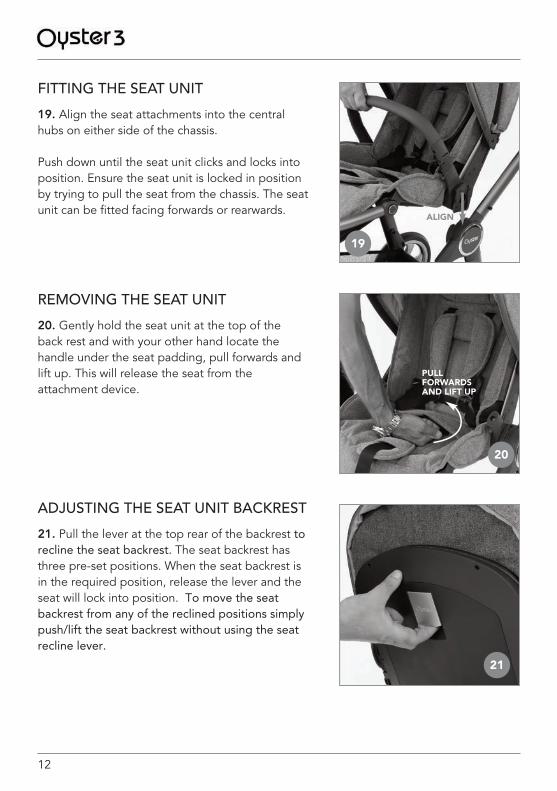
FITTING THE SEAT UNIT
19. Align the seat attachments into the central hubs on either side of the chassis.
Push down until the seat unit clicks and locks into position. Ensure the seat unit is locked in position by trying to pull the seat from the chassis. The seat unit can be fitted facing forwards or rearwards.
REMOVING THE SEAT UNIT
20. Gently hold the seat unit at the top of the back rest and with your other hand locate the handle under the seat padding, pull forwards and lift up. This will release the seat from the attachment device.
ADJUSTING THE SEAT UNIT BACKREST
21. Pull the lever at the top rear of the backrest to recline the seat backrest. The seat backrest has three pre-set positions. When the seat backrest is in the required position, release the lever and the seat will lock into position. To move the seat backrest from any of the reclined positions simply push/lift the seat backrest without using the seat recline lever.
19
20
21
ALIGN
PULLFORWARDSAND LIFT UP

13
ADJUSTING THE LEG REST
22. To lower the leg rest press in the buttons onboth sides at the top of the leg rest and pushdown. To raise the leg rest into higher positions,lift the leg rest and it will automatically click intothe next position.
23. The leg rest also has a pop up feature to raisethe calf support. Push up from beneath the calfsupport until it pops into position.
There is a small zipped pocket under the footrest.
HOOD/SUN CANOPY
24. The seat unit has a multi-function hood thathelps to protect your child from the elements. Thehood is extendable, factor 50+ protected and hasa peekaboo ventilation window as well as a flip outsun visor.
22
PRESS
23
PUSH
24
14
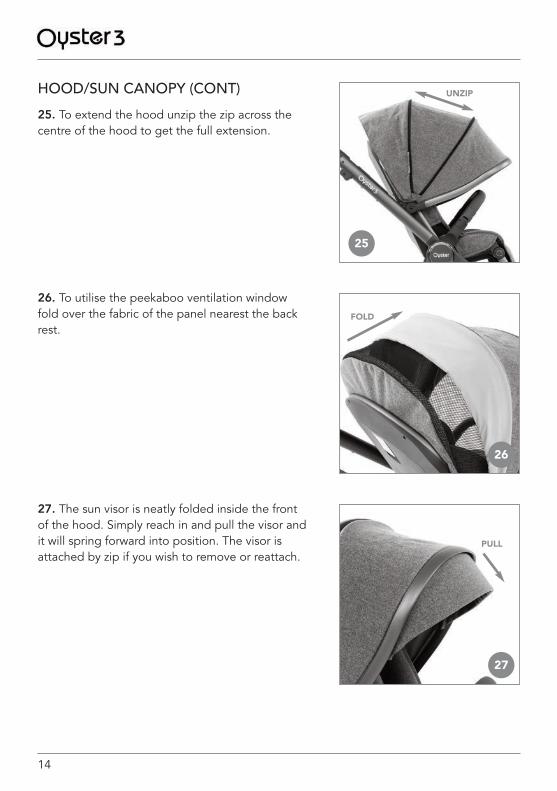
HOOD/SUN CANOPY (CONT)
25. To extend the hood unzip the zip across thecentre of the hood to get the full extension.
26. To utilise the peekaboo ventilation windowfold over the fabric of the panel nearest the backrest.
27. The sun visor is neatly folded inside the frontof the hood. Simply reach in and pull the visor andit will spring forward into position. The visor isattached by zip if you wish to remove or reattach.
25
UNZIP
26
FOLD
27
PULL
15
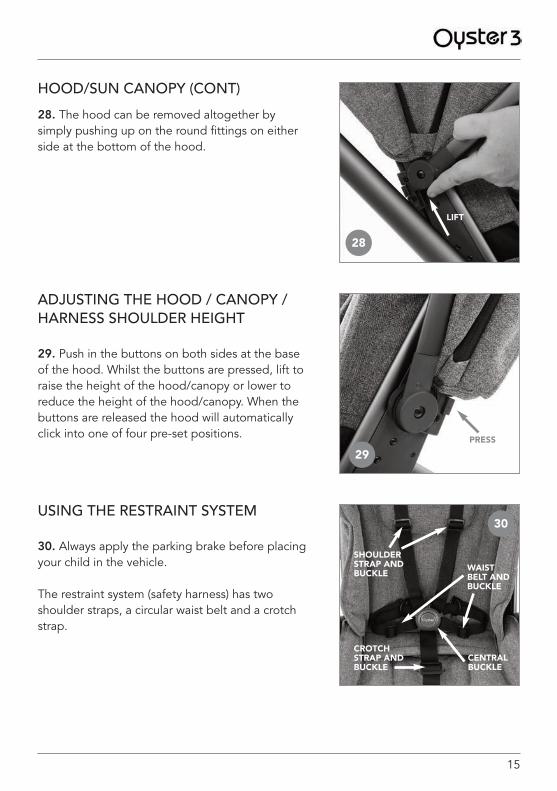
HOOD/SUN CANOPY (CONT)
28. The hood can be removed altogether bysimply pushing up on the round fittings on eitherside at the bottom of the hood.
28
LIFT
ADJUSTING THE HOOD / CANOPY /HARNESS SHOULDER HEIGHT
29. Push in the buttons on both sides at the baseof the hood. Whilst the buttons are pressed, lift toraise the height of the hood/canopy or lower toreduce the height of the hood/canopy. When thebuttons are released the hood will automaticallyclick into one of four pre-set positions.
29PRESS
USING THE RESTRAINT SYSTEM
30. Always apply the parking brake before placingyour child in the vehicle.
The restraint system (safety harness) has twoshoulder straps, a circular waist belt and a crotchstrap.
30
CENTRALBUCKLE
CROTCHSTRAP ANDBUCKLE
WAISTBELT ANDBUCKLE
SHOULDERSTRAP ANDBUCKLE

16
31
32. Push firmly into the central buckle. Repeat,fitting the right connector from the shoulder strapwith the right connector from the waist belt andagain firmly push into the central buckle.
The harness can be adjusted to suit your child bysliding the adjusters along the shoulder straps andwaist belt. To release the safety harness, push thebutton in the centre of the buckle. The crotchstrap can be adjusted to suit your child. There aretwo button holes in the seat base. Thread thebuckle through the hole in the plastic seat basethen through the opening in the seat covers andreposition, passing back through first the seatcover and then through the opening in the plasticseat base.
WARNING: Ensure the buckle andconnectors are fully engaged before use.
WARNING: Always use the crotch strap incombination with the waist belt.
ALWAYS USE THE SAFETY HARNESS
32
USING THE RESTRAINT SYSTEM(CONT)
31. Place the two shoulder straps over the child’sshoulder and the waist belt around the waist. Thecrotch strap should be placed between the child’slegs. To secure: fit together the left connector fromthe shoulder strap with the left connector from thewaist belt.
17
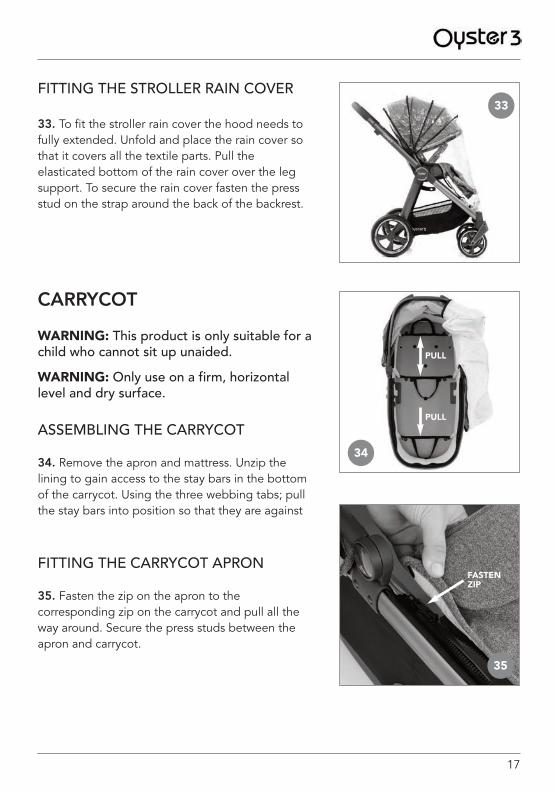
33FITTING THE STROLLER RAIN COVER
33. To fit the stroller rain cover the hood needs tofully extended. Unfold and place the rain cover sothat it covers all the textile parts. Pull theelasticated bottom of the rain cover over the legsupport. To secure the rain cover fasten the pressstud on the strap around the back of the backrest.
35
FITTING THE CARRYCOT APRON
35. Fasten the zip on the apron to thecorresponding zip on the carrycot and pull all theway around. Secure the press studs between theapron and carrycot.
34
CARRYCOT
WARNING: This product is only suitable for achild who cannot sit up unaided.
WARNING: Only use on a firm, horizontallevel and dry surface.
ASSEMBLING THE CARRYCOT
34. Remove the apron and mattress. Unzip thelining to gain access to the stay bars in the bottomof the carrycot. Using the three webbing tabs; pullthe stay bars into position so that they are against
PULL
PULL
FASTENZIP
18
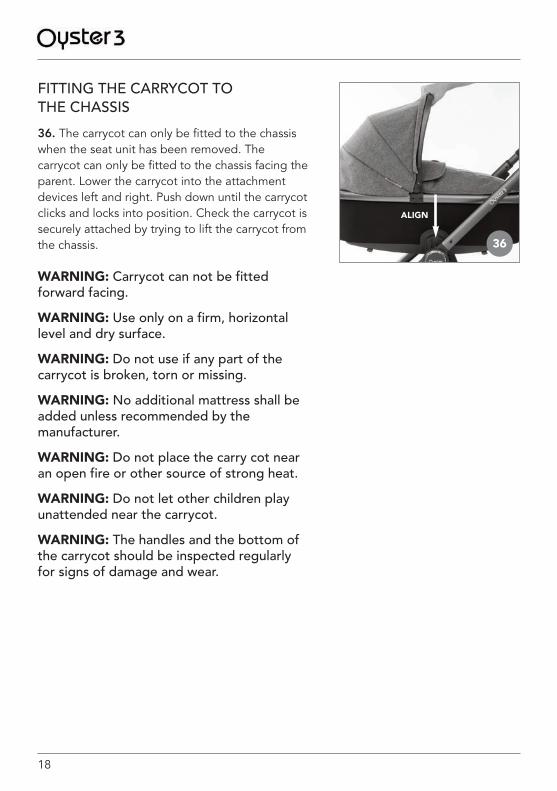
FITTING THE CARRYCOT TO THE CHASSIS
36. The carrycot can only be fitted to the chassiswhen the seat unit has been removed. Thecarrycot can only be fitted to the chassis facing theparent. Lower the carrycot into the attachmentdevices left and right. Push down until the carrycotclicks and locks into position. Check the carrycot issecurely attached by trying to lift the carrycot fromthe chassis.
WARNING: Carrycot can not be fittedforward facing.
WARNING: Use only on a firm, horizontallevel and dry surface.
WARNING: Do not use if any part of thecarrycot is broken, torn or missing.
WARNING: No additional mattress shall beadded unless recommended by themanufacturer.
WARNING: Do not place the carry cot nearan open fire or other source of strong heat.
WARNING: Do not let other children playunattended near the carrycot.
WARNING: The handles and the bottom ofthe carrycot should be inspected regularlyfor signs of damage and wear.
36
ALIGN
19
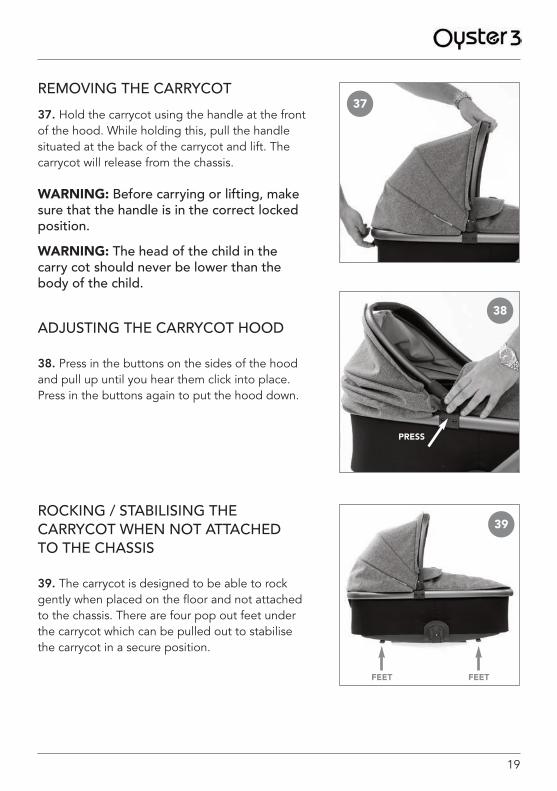
REMOVING THE CARRYCOT
37. Hold the carrycot using the handle at the frontof the hood. While holding this, pull the handlesituated at the back of the carrycot and lift. Thecarrycot will release from the chassis.
WARNING: Before carrying or lifting, makesure that the handle is in the correct lockedposition.
WARNING: The head of the child in thecarry cot should never be lower than thebody of the child.
37
ROCKING / STABILISING THECARRYCOT WHEN NOT ATTACHED TO THE CHASSIS
39. The carrycot is designed to be able to rockgently when placed on the floor and not attachedto the chassis. There are four pop out feet underthe carrycot which can be pulled out to stabilisethe carrycot in a secure position.
39
FEET FEET
ADJUSTING THE CARRYCOT HOOD
38. Press in the buttons on the sides of the hoodand pull up until you hear them click into place.Press in the buttons again to put the hood down.
38
PRESS
20
40
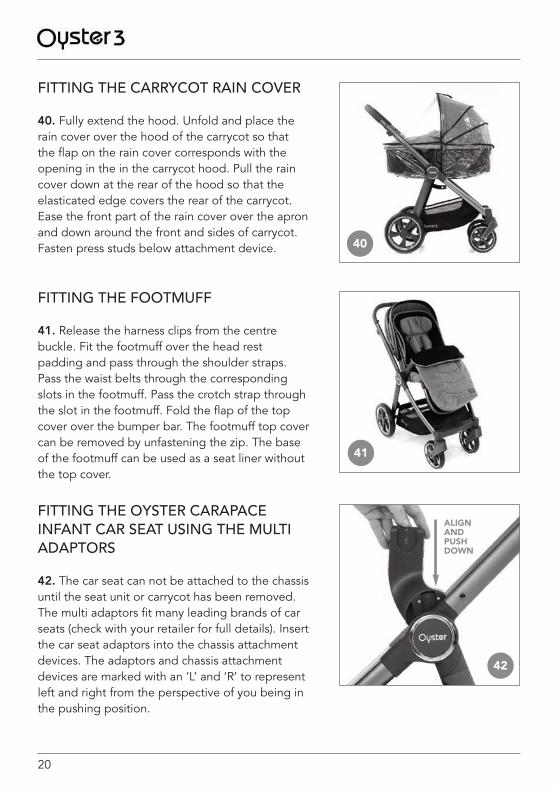
FITTING THE CARRYCOT RAIN COVER
40. Fully extend the hood. Unfold and place therain cover over the hood of the carrycot so thatthe flap on the rain cover corresponds with theopening in the in the carrycot hood. Pull the raincover down at the rear of the hood so that theelasticated edge covers the rear of the carrycot.Ease the front part of the rain cover over the apronand down around the front and sides of carrycot.Fasten press studs below attachment device.
42
ALIGNANDPUSHDOWN
FITTING THE OYSTER CARAPACEINFANT CAR SEAT USING THE MULTIADAPTORS
42. The car seat can not be attached to the chassisuntil the seat unit or carrycot has been removed.The multi adaptors fit many leading brands of carseats (check with your retailer for full details). Insertthe car seat adaptors into the chassis attachmentdevices. The adaptors and chassis attachmentdevices are marked with an ‘L’ and ‘R’ to representleft and right from the perspective of you being inthe pushing position.
41
FITTING THE FOOTMUFF
41. Release the harness clips from the centrebuckle. Fit the footmuff over the head restpadding and pass through the shoulder straps.Pass the waist belts through the correspondingslots in the footmuff. Pass the crotch strap throughthe slot in the footmuff. Fold the flap of the topcover over the bumper bar. The footmuff top covercan be removed by unfastening the zip. The baseof the footmuff can be used as a seat liner withoutthe top cover.
21
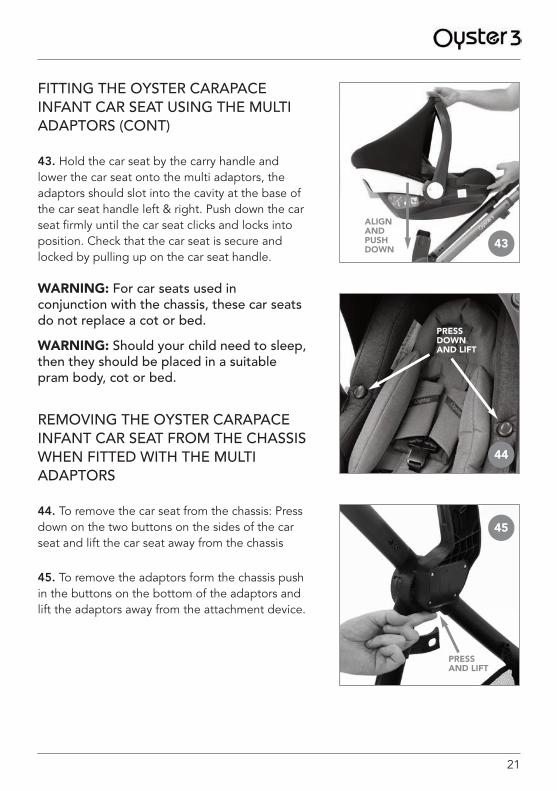
FITTING THE OYSTER CARAPACEINFANT CAR SEAT USING THE MULTIADAPTORS (CONT)
43. Hold the car seat by the carry handle andlower the car seat onto the multi adaptors, theadaptors should slot into the cavity at the base ofthe car seat handle left & right. Push down the carseat firmly until the car seat clicks and locks intoposition. Check that the car seat is secure andlocked by pulling up on the car seat handle.
WARNING: For car seats used inconjunction with the chassis, these car seatsdo not replace a cot or bed.
WARNING: Should your child need to sleep,then they should be placed in a suitablepram body, cot or bed.
REMOVING THE OYSTER CARAPACEINFANT CAR SEAT FROM THE CHASSISWHEN FITTED WITH THE MULTIADAPTORS
44. To remove the car seat from the chassis: Pressdown on the two buttons on the sides of the carseat and lift the car seat away from the chassis
45. To remove the adaptors form the chassis pushin the buttons on the bottom of the adaptors andlift the adaptors away from the attachment device.
43
44
45
ALIGNANDPUSHDOWN
PRESSDOWNAND LIFT
PRESS AND LIFT
22
23
CARE AND MAINTENANCE
• Regularly check screws, rivets, bolts and fastenings to ensure they are locked tight andsecure. Replace any parts in an inferior condition. When using this product during thewinter, by the sea or off road it is important to clean using fresh water and drythoroughly. Salt water and salt and grit from the roads will corrode metal parts unlessremoved.
• Check on a regular basis that all chassis locking devices are working correctly.
• If any part of the product is damaged, contact your local BabyStyle retailer immediatelywithout using the pushchair.
• Do not expose the product to excessive sunlight for periods of time, even normalexposure to sunlight may cause change to the colour of the fabrics.
• Take care not to tear fabrics when transporting the stroller.
• Light oil or silicone spray can be used to lubricate moving parts. Periodically remove therear wheels; clean, lubricate and replace.
• Ensure all zips are either fully open or closed to prevent damage.
• Always use the rain cover in inclement weather.
• Do not place items on top of the hood/canopy, it could damage the fabrics or renderthe product unsafe.
• Any load attached to the handle and/or on the back of the backrest and/or on the sidesof the stroller will affect the stability of the stroller.
• Tyres can leave marks on some surfaces such as vinyl flooring or carpet.
• Fabrics should only be cleaned in accordance to the care labels.
• Do not place fabrics in a washing machine, hand wash or sponge clean only using milddetergent and warm water (30°C)
24
WARRANTY POLICY
KEEP YOUR ORIGINAL RECEIPT OF PURCHASE SAFE WITH YOURWARRANTY INFORMATIONIt will be required should you unfortunately find a defect. The receipt must show the dateof purchase clearly. In the first instance you must contact the original place of purchase.Exchanging or returning the product cannot be requested. Repairs to any part of thisproduct do not extend the warranty period. Do not return your product direct to themanufacturer.
SERVICING OF YOUR OYSTER 3 STROLLERWe recommend that this product is regularly maintained and is serviced by a BabyStyleauthorised dealer at least every 12 months. Only replacement parts supplied orrecommended by the manufacturer/distributor shall be used.
DISCLAIMER Whilst we believe the information set out in this instruction manual to be correct andreliable at the time of print, we do not accept responsibility for its accuracy and we shallnot be liable for its interpretation and its use. We reserve the right to change, modify, addor delete product specifications at any time without prior notice.
YOUR WARRANTY POLICYAt BabyStyle, we guarantee your product has been manufactured in accordance with allcurrent European safety standards which are applicable to this product, and that thisproduct is free from any defects in workmanship and material at the time of purchase.During the production process this product has gone through rigorous quality checks.Despite our efforts, if this product does show a manufacturing or material defect within the24 months warranty period for the chassis and seat frames and 6 months for the carrycot,seat fabrics and PVC rain cover, we will comply to the warranty terms and conditionsproviding the product has been used for normal use as described within the instructionmanual and it has been serviced and maintained correctly as described in the instructionmanual, for further information please contact the place of purchase. Please retain youroriginal receipt of purchase safely.
25
WARRANTY TERMS
• Chassis and seat frames: 24 consecutive months.
• Seat fabrics, carrycot, accessories and PVC rain cover: 6 consecutive months.
• The warranty only applies to the original purchaser and is non-transferable.
The warranty will be invalidated in the following circumstances:
• The product has not been used for its purpose other than described within theinstruction manual.
• If the product is returned for repair through a dealer not authorised by us.
• If the original receipt of purchase cannot be provided.
• If the defect is as a result of improper use or incorrect maintenance, negligence orimpact damage.
• If the parts show normal wear and tear that may be expected from daily use of theproduct (wheels, rotating or moving parts etc).
The warranty of this product becomes valid from the date of purchase as stated on theoriginal receipt of purchase. This does not affect your statutory rights.

26
NOTES

27

36 Charles Street, Sileby, Leicestershire LE12 7RJ.
T: 01509 816444E: [email protected]
©BabyStyle UK Ltd 2018 AJB1400/20122018v2