Embed Size (px)
Citation preview

PrepExpressTM Slicer/Shredder/Spiralizer SSL-100
For your safety and continued enjoyment of this product, always read the instruction book carefully before using.
INSTRUCTION AND RECIPEBOOKLET

2
IMPORTANT UNPACKINGINSTRUCTIONSThis package contains a Cuisinart® PrepExpress™ 5-cup Slicer/Shredder/Spiralizer and the accessories for it:
5-cup Work Bowl, Cleaning Brush, 2 Feed Tubes and Pushers, 4 Cutting Cones, Base and Instruction/Recipe Book.
CAUTION:
THE CUTTING CONES HAVE VERY SHARP EDGES.
To avoid injury when unpacking the parts, please follow these instructions.
1. Place the box on a low table or floor next to the kitchen counter where you’ll use the appliance. Be sure the box is right side up, then open the box.
2. Remove the Instruction Book and the Angled Feed Tube and Pusher.
3. Remove cardboard packing materials and pulp molds, and lift the unit out of the box. Remove from plastic bag.
4. Remove the 5-cup Work Bowl from the base of the unit, then carefully remove the four Cutting Cones from the plastic bags in the bowl. Be careful not to touch sharp blades of Cutting Cones.
5. Place the Work Bowl back onto the base and refer to the Instruction Book for operating directions.
6. Return cardboard, pulp molds and all plastic bags to the box in case shipping is necessary in the future.
We recommend that you visit our website, www.cuisinart.com, for a fast, efficient way to complete your product registration.
Instruction Book
Angled Feed Tube
Pulp Mold
Housing/Base
Work Bowl &
Cutting Cones
Cleaning Brush

3
CONTENTSImportant Unpacking Instructions. . . . . . . 2
Important Safeguards . . . . . . . . . . . . . . . . 3
Features and Benefits . . . . . . . . . . . . . . . . .5
Accessories . . . . . . . . . . . . . . . . . . . . . . . . .6
Operating Instructions . . . . . . . . . . . . . . . . .7
Spiralizing. . . . . . . . . . . . . . . . . . . . . . . . . . .7
Slicing and Shredding . . . . . . . . . . . . . . . .8
Cleaning, Storage and Maintenance . . . . .9
Tips & Hints . . . . . . . . . . . . . . . . . . . . . . . . 9
Warranty. . . . . . . . . . . . . . . . . . . . . . . . . . . 9
Recipes . . . . . . . . . . . . . . . . . . . . . . . . 11–24
IMPORTANT SAFEGUARDSWhen using electrical appliances, basic safety precautions should always be followed, including:
Getting Ready
1. Read all instructions.
2. Cutting Cones are sharp. Handle them carefully. Inspect blade prior to use for damage. Do not use blade if damaged.
3. Always unplug from outlet when not in use, before putting on or taking off parts, before removing food and before cleaning. To unplug, grasp plug and pull from electrical outlet. Never pull cord.
4. Do not use outdoors.
5. Do not let cord hang over edge of table or counter, or touch hot surfaces, including the stove.
6. Do not operate any appliance with a damaged cord or plug, or after appliance malfunctions, or has been dropped or damaged in any way. Return appliance to the nearest authorized service facility for examination, repair or electrical or mechanical adjustment.
7. This appliance comes with a resettable protection device to prevent damage to the motor in the the case of extreme overload. Should unit shut off unexpectedly, unplug it and let it cool for at least 15 minutes before continuing.
Operation
1. Keep hands and other utensils away from Cutting Cones while processing food to prevent the possibility of severe personal injury or damage to the PrepExpress™.
2. Avoid coming into contact with moving parts. Never push food down Feed Tube by hand. Always use Pusher.
3. Make sure motor has completely stopped before removing Feed Tube. (If machine does not stop within 4 seconds after you remove the cover assembly, call 1-800-726-0190 for assistance. Do not use the machine.)
4. Store Cutting Cones as you would sharp knives. Keep out of reach of children.
5. Be sure the Feed Tube is securely locked in place before operating the PrepExpress™.
6. Never try to override or tamper with Feed Tube interlock mechanism.
Cleaning
1. To protect against risk of electrical shock, do not put appliance in water or other liquids.
General
1. This appliance should not be used by or near children or individuals with certain disabilities.
2. Do not operate this, or any other motor-driven appliance while under the influence of alcohol or other substances that affect your reaction time or perception.
3. The Cuisinart® PrepExpress™ is ETL listed for household use. Use it only for food preparation as described in the accompanying recipe and instruction book. Do not use this appliance for anything but its intended use.
4. The use of attachments not recommended or sold by Cuisinart may cause fire, electrical shock or personal injury, or damage to your unit.
5. Do not operate your appliance in an appliance garage or under a wall cabinet. When storing in an appliance garage, always unplug the unit from the electrical outlet. Not doing so could create a risk of fire, especially if the appli-ance touches the walls of the garage or the door touches the unit as it closes.
6. Unplug from outlet when not in use, before putting on or taking off parts, and before cleaning.

WARNINGRISK OF FIRE OR ELECTRIC SHOCK
DO NOT OPEN
WARNING: TO REDUCE THE RISK OF FIRE OR ELECTRIC SHOCK,
DO NOT REMOVE COVER (OR BACK)
NO USER-SERVICEABLE PARTS INSIDE
REPAIR SHOULD BE DONE BY AUTHORIZED SERVICE PERSONNEL ONLY
4
SAVE THESE INSTRUCTIONSFOR HOUSEHOLD USE ONLYNOTES ON THE CORD PLUGThis appliance has a polarized plug (one blade is wider than the other). To reduce the risk of electric shock, this plug will fit in a polarized outlet only one way. If the plug does not fit fully into the outlet, reverse the plug. If it still does not fit, contact a qualified electrician. Do not modify the plug in any way.
NOTES ON THE CORD1. A short power-supply cord (or
detachable power-supply cord) is provided to reduce the risk resulting from becoming entangled in or tripping over a longer cord.
2. Longer, detachable power-supply cords or extension cords are available and may be used if care is exercised in their use.
3. If a long, detachable power-supply cord or extension cord is used:
a. The marked electrical rating of the detachable power-supply cord or extension cord should be at least as great as the electrical rating of the appliance.
b. If the appliance is of the grounded type, the extension cord should be a grounding-type 3-wire cord.
c. The longer cord should be arranged so that it will not drape over the countertop or tabletop where it can be pulled on by children or tripped over.
WARNING: RISK OF FIRE OR ELECTRIC SHOCK The lightning flash with arrowhead
symbol within an equilateral triangle
is intended to alert the user to the
presence of uninsulated, dangerous
voltage within the product’s enclosure
that may be of sufficient magnitude
to constitute a risk of fire or electric
shock to persons.
The exclamation point within an
equilateral triangle is intended
to alert the user to the presence
of important operating and
maintenance (servicing) instructions
in the literature accompanying
appliance.

5
FEATURES AND BENEFITS
1. Motor Unit
With On/Off control switch.
ON (I) OFF (O)
2. 5-Cup Work Bowl
3. 4 Cutting Cones
a. 2.5mm Slice/Ribbon (Green)
b. 3.0mm Crinkle Slice/Ribbon (Blue)
c. 3.0mm Thin Shred/Spaghetti
(Maroon)
d. 9mm Wide Shred/Spaghetti (Black)
4. Cutting Cone Holder
5. Straight Feed Tube
For spiralizing.
5a. Straight Feed Tube Pusher
6. Angled Feed Tube
For slicing and shredding.
6a. Angled Feed Tube Pusher
7. Cleaning Brush
5.
4.
2.
3b. 3d.
1.
3a. 3c.
7.
6.
6a.
5a.

6
ACCESSORIES
CUTTING CONES
Slicer/Shredder Spiralizer
3.0mm Thin Shred/Spaghetti (Maroon)
9mm Wide Shred/Spaghetti (Black)
2.5mm Slice/Ribbon (Green)
3.0mm Crinkle Slice/Ribbon (Blue)
SELECT
RESULTS

7
OPERATING INSTRUCTIONS
Spiralizing (Use Straight Feed Tube and Pusher)
1a. Plug unit into outlet. The control switch located on the side of the unit must be in the OFF position before starting. Make sure Cutting Cone Holder is properly positioned in unit. Follow step 1b. to properly insert desired Cutting Cone into the Cutting Cone Holder.
1b. Each Cutting Cone has a thumb recess and an arrow on handle. The arrow must be aligned with one of the 6 notches on the Cutting Cone Holder. (See 6 notch positions in figure to right.)
2. Place Straight Feed Tube on unit and turn clockwise until it clicks to lock into place.
3. Trim the edges of the fruit or vegetable to form a flat surface the width of the Feed Tube. Firmly press the flat end of the item onto the prongs of the Pusher and insert it into the Feed Tube, or place food item directly into the Feed Tube.
4. Be sure Pusher is pressed securely into fruit or vegetable in Feed Tube. Turn control switch located on the side of the unit to ON. Push down with even force to process; processed item will drop into the 5-cup Work Bowl. When processing is complete, turn control switch to OFF.
Results:Based on desired Cutting Cone used:
• 2.5mm Slice/Ribbon (Green):
• 3.0mm Crinkle Slice/Ribbon (Blue):
• 3.0mm Thin Shred/Spaghetti (Maroon):
• 9mm Wide Shred/Spaghetti (Black):

8
Slicing and Shredding (Use Angled Feed Tube and Pusher)
1a. Plug unit into outlet. The control switch located on the side of the unit must be in the OFF position before starting. Make sure Cutting Cone Holder is properly positioned in unit. Follow step 1b. to properly insert desired Cutting Cone into the Cutting Cone Holder.
1b. Each Cutting Cone has a thumb recess and an arrow on handle. The arrow must be aligned with one of the 6 notches on the Cutting Cone Holder. (See 6 notch positions in figure on right.)
2. Place Angled Feed Tube on unit and turn clockwise until it clicks to lock into place. Feed Tube should be facing you.
3. Trim the edges of the fruit or vegetable to form a flat surface the width of the Feed Tube. Place food item directly into the Feed Tube.
4. Turn control switch located on side of the unit to ON. Push down with even force to process; items will drop into the 5-Cup Work Bowl. When processing is complete, turn control switch to OFF.
Results:Based on desired Cutting Cone used:
• 2.5mm Slice/Ribbon (Green):
• 3.0mm Crinkle Slice/Ribbon (Blue):
• 3.0mm Thin Shred/Spaghetti (Maroon) :
• 9mm Wide Shred/Spaghetti (Black):

9
CLEANING, STORAGE AND MAINTENANCE• Unplug the power cord before cleaning.
Do not put power cord, plug or motor unit in water or other liquids.
• Disassemble all the accessories such as Feed Tubes, Cutting Cones and Cutting Cone Holder.
• Rinse under running water and remove food scraps with Cleaning Brush.
• Wipe the outside surface of the motor unit with a damp cloth, then dry thoroughly.
• All removable parts are top rack dishwasher safe.
• Clean all accessories after each use.
CAUTION:
• Ensure that the motor unit is unplugged when disassembling.
• The blades are sharp; please handlecarefully when cleaning.
NOTE: Never immerse the motor unit in water for cleaning.
Maintenance: Any other servicing should be performed by an authorized service representative.
TIPS & HINTS • Choose vegetables and fruits that are firm
and not overripe.
• Ingredients do not need to be cut to fit the height of the Feed Tube. Some ingredients, however, may need to be trimmed to fit the width of the Feed Tube.
• Sometimes, if ingredients are too wide to fit through the Straight Feed Tube for spiralizing, they can first be placed directly into the Cutting Cone before assembling the Feed Tube. If ingredient is still too wide to fit the Feed Tube, the sides may be pared down.
• Before spiralizing, slightly trim tops and bottoms of ingredients to form a flat surface. This will help secure the food to the Pusher.
• Make sure Pusher is firmly inserted into the desired ingredient before spiralizing.
• Put the narrowest end of the food into the
Feed Tube first.
• Round items that fit the Straight Feed Tube spiralize best.
• Use consistent pressure when spiralizing/slicing/shredding to achieve the most even cuts.
• Switching between spiralizing and slicing and shredding is easy—simply switch the Feed Tube.
• When continuously processing ingredients, remove the remaining scrap from the Cutting Cone before processing the next ingredient.
• If the machine runs for a long time (around 60 minutes) and shuts off, the unit may have overheated. Your machine has an overload protection device. It will shut down to protect the motor. Turn off and unplug the unit, and let it rest for a few minutes. The machine will be recovered for use.
LIMITED 3 YEAR WARRANTY (U.S. AND CANADA ONLY)This warranty is available to consumers only. You are a consumer if you own a Cuisinart® PrepExpress™ that was purchased at retail for personal, family or household use. Except as otherwise required under applicable law, this warranty is not available to retailers or other commercial purchasers or owners.
We warrant that your Cuisinart® PrepExpress™ will be free of defects in materials and workmanship under normal home use for 3 years from the date of original purchase.
We recommend that you visit our website, www.cuisinart.com for a fast, efficient way to complete your product registration. However, product registration does not eliminate the need for the consumer to maintain the original proof of purchase in order to obtain the warranty benefits. In the event that you do not have proof of purchase receipt, the purchase date for purposes of this warranty will be the date of manufacture.
If your Cuisinart® PrepExpress™ should prove to be defective within the warranty period, we will repair it, or if we think necessary, replace it. To obtain warranty service, simply call our toll-free number 1-800-726-0190 for additional information from our Consumer Service Representatives, or send the defective product to Consumer Service at Cuisinart, 7475 North Glen Harbor Blvd., Glendale, AZ 85307.

10
To facilitate the speed and accuracy of your return, please enclose $10.00 for shipping and handling of the product.
Please pay by check or money order made payable to Cuisinart (California residents need only supply proof of purchase and should call 1-800-726-0190 for shipping instructions).
NOTE: For added protection and secure handling of any Cuisinart product that is being returned, we recommend you use a traceable, insured delivery service. Cuisinart cannot be held responsible for in-transit damage or for packages that are not delivered to us. Lost and/or damaged products are not covered under warranty. Please be sure to include your return address, daytime phone number, description of the product defect, product model number (located on bottom of product), original date of purchase and any other information pertinent to the product’s return.
Your Cuisinart® PrepExpress™ has been manufactured to the strictest specifications and has been designed for use only in 120 volt outlets and only with authorized accessories and replacement parts. This warranty expressly excludes any defects or damages caused by attempted use of this unit with a converter, as well as use with accessories, replacement parts or repair service other than those authorized by Cuisinart. This warranty does not cover any damage caused by accident, misuse, shipment or other than ordinary household use. This warranty excludes all incidental or consequential damages. Some states do not allow the exclusion or limitation of these damages, so these exclusions may not apply to you. This warranty gives you specific legal rights, and you may also have other rights, which vary from state to state.
CALIFORNIA RESIDENTS ONLY
California law provides that for In-Warranty Service, California residents have the option of returning a nonconforming product (A) to the store where it was purchased or (B) to another retail store that sells Cuisinart products of the same type.
The retail store shall then, at its discretion, either repair the product, refer the consumer to an independent repair facility, replace the product, or refund the purchase price less the amount directly attributable to the consumer’s prior usage of the product. If the above options do not result in the appropriate relief to the consumer, the consumer may then take the product to an independent repair facility if service or repair can be economically accomplished. Cuisinart and not the consumer will be responsible for the reasonable cost of such
service, repair, replacement, or refund for nonconforming products under warranty.
California residents may also, according to their preference, return nonconforming products directly to Cuisinart for repair, or if necessary, replacement, by calling our Consumer Service Center toll-free at 1-800-726-0190.
Cuisinart will be responsible for the cost of the repair, replacement, and shipping and handling for such products under warranty.
BEFORE RETURNING YOUR CUISINART PRODUCT
If you are experiencing problems with your Cuisinart product, we suggest that you call our Consumer Service Center at 1-800-726-0190 before returning the product to be serviced. If servicing is needed, a Representative can confirm whether the product is under warranty and direct you to the nearest service location.
Important: If the nonconforming product is to be serviced by someone other than Cuisinart’s Authorized Service Center, please remind the servicer to call our Consumer Service Center at 1-800-726-0190 to ensure that the problem is properly diagnosed, the product is serviced with the correct parts, and the product is still under warranty.
G IB-14725-ESP
©2017 Cuisinart150 Milford Road
East Windsor, NJ 08520Printed in China
17CE024878
Trademarks or service marks referred to herein are the
trademarks or service marks of their respective owners.

11
RECIPE TIPS AND HINTS • The Cuisinart® PrepExpress™ allows you to prepare ingredients quickly and easily, whether
you’re cooking for one person or for a party. Plus, cleanup is a breeze. Just rinse the accessories when you’re done and run them through the dishwasher.
• Most vegetables and some fruits can be prepped with the Cuisinart® PrepExpress™. Recommended foods that can be used with all Cutting Cones include zucchini, summer squash, cucumbers, carrots, potatoes, sweet potatoes, beets, radishes, daikon and small apples.
• Larger items, such as butternut squash, may also be processed by trimming the sides or quartering to fit desired Feed Tube. (Keep in mind that round items spiralize best.)
• Some softer items may be sliced, such as firm plum tomatoes, avocados and mangoes.
• Prepped foods can be enjoyed raw, pickled, sautéed, fried, roasted or mixed into recipes. They can be used as toppings, served as a side or main dish, or even as a garnish.
• Other fun uses for the Cuisinart® PrepExpress™ include:
• Making rose-like garnishes using radishes and the Slice/Ribbon Cone.
• Making cauliflower rice using cauliflower florets and the Thin Shred/Spaghetti Cone.
• Making pickled ginger for sushi using peeled, fresh ginger and the Slice/Ribbon Cone.
• Making homemade pickles using cucumbers and the Slice/Ribbon Cone or Crinkle/Ribbon Cone.
• For easy serving, use kitchen shears to cut spiralized food.
RECIPESTo help your Cuisinart® PrepExpress™ feel right at home in your kitchen, we’ve assembled a variety of delicious recipes to get you started, from quick and easy to more complex gourmet dishes.
Carrot and Parsnip Pancakes .......................................................................................................................................... 12Garlic Dill Pickles .............................................................................................................................................................. 13Potato Chips ..................................................................................................................................................................... 14Summer Rolls .................................................................................................................................................................... 15Zucchini Bruschetta .......................................................................................................................................................... 16Mixed Beet Salad with Goat Cheese ............................................................................................................................ 17Daikon "Noodle" Soup ................................................................................................................................................... 18Baked Zucchini Rosettes ................................................................................................................................................. 19Brown Rice Bowl with Avocado and Salmon ................................................................................................................ 20"Pasta" Primavera ............................................................................................................................................................ 21"Spaghetti" with Diced Tomatoes and Wild Salmon .................................................................................................. 22Sweet Potato Fettucine with Wild Mushrooms and Swiss Chard .............................................................................. 23Apple Tartlets ................................................................................................................................................................... 24
12
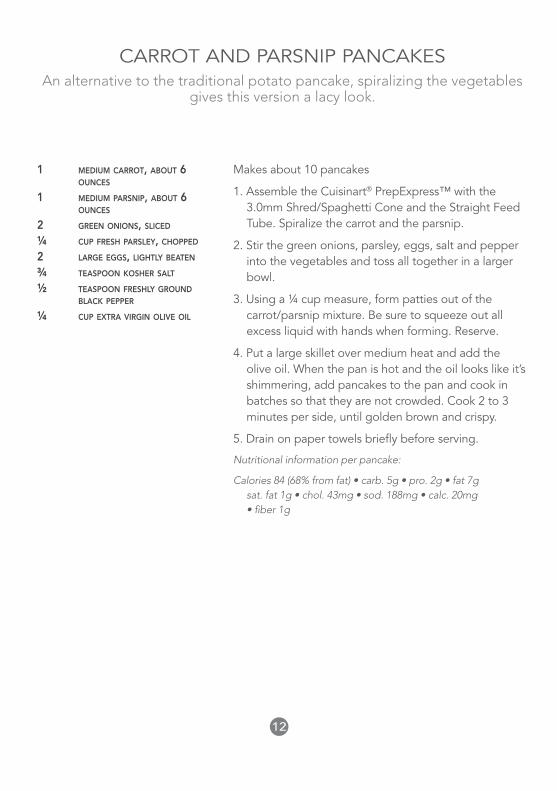
CARROT AND PARSNIP PANCAKES An alternative to the traditional potato pancake, spiralizing the vegetables
gives this version a lacy look.
Makes about 10 pancakes
1. Assemble the Cuisinart® PrepExpress™ with the 3.0mm Shred/Spaghetti Cone and the Straight Feed Tube. Spiralize the carrot and the parsnip.
2. Stir the green onions, parsley, eggs, salt and pepper into the vegetables and toss all together in a larger bowl.
3. Using a ¼ cup measure, form patties out of the carrot/parsnip mixture. Be sure to squeeze out all excess liquid with hands when forming. Reserve.
4. Put a large skillet over medium heat and add the olive oil. When the pan is hot and the oil looks like it’s shimmering, add pancakes to the pan and cook in batches so that they are not crowded. Cook 2 to 3 minutes per side, until golden brown and crispy.
5. Drain on paper towels briefl y before serving.
Nutritional information per pancake:
Calories 84 (68% from fat) • carb. 5g • pro. 2g • fat 7g sat. fat 1g • chol. 43mg • sod. 188mg • calc. 20mg • fi ber 1g
1 MEDIUM CARROT, ABOUT 6 OUNCES
1 MEDIUM PARSNIP, ABOUT 6 OUNCES
2 GREEN ONIONS, SLICED
¼ CUP FRESH PARSLEY, CHOPPED
2 LARGE EGGS, LIGHTLY BEATEN
¾ TEASPOON KOSHER SALT
½ TEASPOON FRESHLY GROUND BLACK PEPPER
¼ CUP EXTRA VIRGIN OLIVE OIL

13
GARLIC DILL PICKLESThe amount of sugar in this recipe may be adjusted to your liking—add
more for a sweeter fl avor and less for a sharper one.
Makes about 100 pickle slices
1. Assemble the Cuisinart® PrepExpress™ with the Slice/Ribbon or Crinkle/Ribbon Cone and Angled Feed Tube. Slice the cucumber. Add the dill and garlic to the cucumber. Toss and then transfer to a quart container or medium mixing bowl. Reserve.
2. Combine the remaining ingredients in a small saucepan. Bring to a boil and then immediately pour the liquid over the cucumber mixture, making sure all the cucumber slices are submerged.
3. Cool to room temperature, cover and then refrigerate overnight. Pickles will deepen in fl avor the longer they marinate.
Nutritional information per serving (10 pickles):
Calories 10 (12% from fat) • carb. 2g • pro. 0g • fat 0g sat. fat 0g • chol. 23mg • sod. 239mg • calc. 16mg • fi ber 0g
1 SEEDLESS ENGLISH CUCUMBER, ABOUT 12 OUNCES, TRIMMED
1 SMALL BUNCH DILL, ABOUT 1 OUNCE
3 GARLIC CLOVES, SMASHED
1¼ CUPS WATER
¾ CUP WHITE VINEGAR
1 TEASPOON KOSHER SALT
1 TEASPOON WHOLE CORIANDER SEEDS
½ TEASPOON DILL SEEDS
½ TEASPOON MUSTARD SEEDS
½ TO 1 TEASPOON GRANULATED SUGAR

14
POTATO CHIPS The Cuisinart® PrepExpress™ slices vegetables into thin and even slices,
perfect for crispy chips that can be seasoned with any of your favorite herbs and spices.
Makes about 4 cups
1. Assemble the Cuisinart® PrepExpress™ with the Slice/Ribbon or Crinkle/Ribbon Cone and the Angled Feed Tube. Slice the potatoes.
2. Fill a medium, heavy-bottomed saucepan halfway with vegetable or canola oil. Heat the oil over medium heat until it reaches 350°F. Fry the potato slices in small batches until they are lightly golden, about 3 to 4 minutes. Use a metal skimmer or heatproof, long slotted spoon to strain the chips out of the hot oil and transfer to a paper towel-lined plate. Sprinkle with a small pinch of the salt.
3. Return the oil to 350°F and repeat with remaining potato slices.
Nutritional information per serving (½ cup):
Calories 219 (71% from fat) • carb. 15g • pro. 1g • fat 18g sat. fat 3g • chol. 0mg • sod. 26mg • calc. 15mg • fi ber 2g
1 MEDIUM POTATO, SCRUBBED, NOT PEELED
1 MEDIUM SWEET POTATO; SCRUBBED, NOT PEELED
VEGETABLE/CANOLA OIL, FOR FRYING
½ TEASPOON KOSHER SALT (OR USE YOUR FAVORITE SEASONING SALT SUCH AS TRUFFLE SALT)

15
SUMMER ROLLSDaikon, also known as Chinese radish or winter radish,
makes an excellent and nutritious substitute in these rolls, which are traditionally stuffed with rice noodles.
Makes ¾ cup sauce, 24 summer rolls
1. Put all of the Peanut Dipping Sauce ingredients into the small bowl of a Cuisinart® Food Processor or Chopper. Process until completely smooth and homogenous. Transfer to a small serving bowl, cover and refrigerate until ready to use.
2. Assemble the Cuisinart® PrepExpress™ with the 3.0mm Shred/Spaghetti Cone and Straight Feed Tube. Spiralize the daikon. Remove and reserve.
3. Replace the Shred/Spaghetti Cone and Straight Feed Tube with the Slice/Ribbon Cone and Angled Feed Tube. Slice the cucumber; remove and reserve. Repeat with the mango and avocados, stopping to clean the Cutting Cone as necessary.
4. Replace the Slice/Ribbon Cone with the 3.0mm Shred/Spaghetti Cone. Shred the carrot. Reserve.
5. Assemble the summer rolls by dipping one of the rice paper rounds into a bowl of warm water. When the rice paper becomes soft and malleable, remove from water, let excess drip off and transfer to a fl at plate. Smooth edges to fl atten into a circle.
6. Pile a heaping tablespoon of spiralized daikon into the center of the rice paper. In even layers, top with 2 cucumber slices, 3 mint leaves, 2 avocado slices, 3 mango slices, a pinch of carrot, 4 cilantro leaves, a squeeze of lime and a very small pinch of the salt.
7. Fold the bottom of the rice paper over the fi lling, then fold the right edge inward, and then the left, and roll up from the bottom to seal. Repeat with remaining rice papers.
8. Serve with the Peanut Dipping Sauce.
Nutritional information per serving (1 summer roll): Calories 49 (32% from fat) • carb. 8g • pro. 1g • fat 2g • sat. fat 0g chol. 0mg • sod. 76mg • calc. 18mg • fi ber 2g
Nutritional information per serving (½ tablespoon peanut dipping sauce): Calories 28 (30% from fat) • carb. 5g • pro. 1g • fat 1g • sat. fat 0g • chol. 0mg • sod. 136mg • calc. 28mg • fi ber 0g
PEANUT DIPPING SAUCE
½ CUP HOISIN SAUCE 3 TABLESPOONS CREAMY PEANUT
BUTTER 1 TABLESPOON WATER 1 TEASPOON SOY SAUCE, REDUCED
SODIUM
1 VERY SMALL GARLIC CLOVE 1 ½-INCH PIECE FRESH GINGER,
PEELED
½ TO 1 TEASPOON HOT CHILI SAUCE
½ TEASPOON FRESH LIME JUICE
SUMMER ROLLS
1 LARGE DAIKON (12 OUNCES), PEELED
½ LARGE SEEDLESS CUCUMBER, TRIMMED
1 FIRM MANGO, PITTED AND CUT TO FIT ANGLED FEED TUBE
2 FIRM AVOCADOS, HALVED, PITTED AND FLESH SCOOPED OUT
1 LARGE CARROT, PEELED
24 RICE PAPER ROUNDS
WARM WATER, FOR ASSEMBLING
10 SPRIGS FRESH MINT
10 SPRIGS FRESH CILANTRO
1 LIME
½ TEASPOON KOSHER SALT

16
ZUCCHINI BRUSCHETTAA fun summer appetizer when zucchini are abundant.
Makes 12 bruschetta
1. Preheat toaster oven to 375°F. Rub one side of each slice of bread with the garlic and then brush with the tablespoon of olive oil. Bake in oven for about 5 minutes, until golden and crispy.
2. Mix the ricotta together with the Parmesan, ¼ teaspoon of salt, ¼ teaspoon of pepper and 1 teaspoon of mint. Reserve.
3. Assemble the Cuisinart® PrepExpress™ with the 9mm Shred/Spaghetti Cone and the Angled Feed Tube. Shred the zucchini and toss together with the lemon juice, remaining salt, pepper and mint.
4. Assemble the bruschetta by topping each with 1 tablespoon of the ricotta mixture and then 1 teaspoon of the shredded zucchini.
Nutritional information per bruschetta:
Calories 156 (33% from fat) • carb. 19g • pro. 7g • fat 6g sat. fat 3g • chol. 12mg • sod. 309mg • calc. 87mg • fi ber 1g
12 SLICES (½ INCH THICK) FRENCH BREAD
1 GARLIC CLOVE, SMASHED
1 TABLESPOON PLUS 2 TEASPOONS EXTRA VIRGIN OLIVE OIL, DIVIDED
1 CUP WHOLE-MILK RICOTTA, STRAINED
2 TABLESPOONS GRATED PARMESAN
½ TEASPOON KOSHER SALT, DIVIDED
½ TEASPOON FRESHLY GROUND BLACK PEPPER, DIVIDED
1½ TEASPOONS FRESH MINT, THINLY SLICED, DIVIDED
1 SMALL ZUCCHINI, ABOUT 3 OUNCES
1 TEASPOON FRESH LEMON JUICE

17
MIXED BEET SALAD WITH GOAT CHEESEBeet salads are most commonly roasted, but here we keep them raw. You
get the same sweet fl avor, but in a fraction of the time.
Makes 4 servings (about 2 cups)
1. Assemble the Cuisinart® PrepExpress™ with the 3.0mm Shred/Spaghetti Cone and Straight Feed Tube. Spiralize the beets. Transfer to a shallow serving bowl.
2. Add the olive oil, lemon juice, salt and pepper. Toss to combine. Top with the goat cheese and basil. Serve immediately.
Nutritional information per serving (½ cup):
Calories 82 (64% from fat) • carb. 6g • pro. 2g • fat 6g sat. fat 1g • chol. 2mg • sod. 203mg • calc. 15mg • fi ber 2g
2 SMALL GOLDEN BEETS, SCRUBBED
2 SMALL RED BEETS, SCRUBBED
1½ TABLESPOONS EXTRA VIRGIN OLIVE OIL
2 TEASPOONS FRESH LEMON JUICE
¼ TEASPOON KOSHER SALT
PINCH FRESHLY GROUND BLACK PEPPER
1 TABLESPOON CRUMBLED GOAT CHEESE
2 LARGE BASIL LEAVES, THINLY SLICED (CHIFFONADE)

18
DAIKON “NOODLE” SOUPA simple play on an Asian noodle soup – don’t forget your chopsticks for the
“noodles”!
Makes 4 servings
1. Put the chicken broth and water into a small stockpot and place on the stove.
2. Assemble the Cuisinart® PrepExpress™ with the Slice/Ribbon Cone and Angled Feed Tube. Slice the ginger and jalapeño. Replace the Slice/Ribbon Cone with the Crinkle/Ribbon Cone. Slice the carrot.
3. Place sliced vegetables into the stockpot with the garlic, ½ cup cilantro and fi sh sauce. Bring to a boil and then reduce to a simmer for about 20 minutes.
4. While soup is simmering, replace the Crinkle/Ribbon Cone with the 3.0mm Shred/Spaghetti Cone and Straight Feed Tube and spiralize the daikon.
5. Divide the daikon noodles (cutting strands with kitchen shears to separate where necessary) among four soup bowls. Put ¼ cup of chicken in each bowl with 1 tablespoon of green onion.
6. Pour broth and soup vegetables evenly among each bowl. Top each with a tablespoon of cilantro and a squeeze of lime. Serve immediately.
Nutritional information per serving:
Calories 141 (22% from fat) • carb. 11g • pro. 16g • fat 3g sat. fat 1g • chol. 63mg • sod. 576mg • calc. 59mg • fi ber 4g
4 CUPS CHICKEN BROTH 2 CUPS WATER
1 3-INCH PIECE FRESH GINGER, PEELED
1 SMALL JALAPEÑO
1 LARGE CARROT, PEELED 1 GARLIC CLOVE, CRUSHED
¾ CUP CILANTRO SPRIGS, DIVIDED
1 TABLESPOON FISH SAUCE
1 POUND DAIKON, PEELED
1 CUP COOKED, THINLY SLICED CHICKEN BREAST, ABOUT 1 BREAST
¼ CUP THINLY SLICED GREEN ONION, ABOUT 1 GREEN ONION
½ LIME, QUARTERED

19
BAKED ZUCCHINI ROSETTESThe PrepExpress™ lives up to its name with this breeze of a dish.
There is no need to carve out time to boil pasta or roll fi nicky noodles; just use the Spiralizer for the zucchini, scoop the cheese and you’re on your
way to getting a photo-worthy dinner on the table.
Makes 8 servings
1. Coat a 13x9-inch baking dish with the olive oil. Reserve.
2. Preheat oven to 450°F with the rack in the upper third position.
3. Assemble the Cuisinart® PrepExpress™ with the Slice/Ribbon or Crinkle/Ribbon Cone and Straight Feed Tube. Spiralize the zucchini, stopping to clean the Cutting Cone as necessary and to remove the prepared zucchini from the work bowl as it gets full.
4. Once all zucchini are processed, cut each spiral so they each have 4 to 5 layers; there should be 3 to 4 pieces per zucchini. Put each piece (they should look like rosettes) into the prepared baking pan – they should fi t tightly.
5. Remove the Slice/Ribbon Cone and replace it with the 3.0mm Shred/Spaghetti Cone. Shred the Pecorino. Remove half and reserve. Add the remaining ingredients, except for the sauce, to the prep bowl with the Pecorino and stir to combine. Evenly divide the cheese mixture on top of each zucchini rosette. Top with ½ cup of the marinara sauce and then sprinkle with the reserved Pecorino.
6. Bake for 15 to 20 minutes, or until the cheese is melted and just browned.
7. Serve immediately with additional warm marinara sauce.
Nutritional information per serving:
Calories 155 (59% from fat) • carb. 6g • pro. 10g • fat 10g sat. fat 6g • chol. 32mg • sod. 214mg • calc. 131mg fi ber 1g
2 TEASPOONS OLIVE OIL 4 MEDIUM ZUCCHINI, TRIMMED
1½ OUNCES PECORINO ROMANO 1 POUND (ABOUT 2 CUPS)
WHOLE-MILK RICOTTA
1 TABLESPOON PACKED FRESH BASIL, THINLY SLICED (CHIFFONADE)
½ TEASPOON GRATED LEMON ZEST
¼ TEASPOON FRESHLY GROUND BLACK PEPPER
PINCH KOSHER SALT
½ CUP MARINARA SAUCE, PLUS ADDITIONAL FOR SERVING (WARMED)

20
BROWN RICE BOWL WITH AVOCADO AND SALMON
While your rice is cooking, you will have plenty of time to prepare the vegetables and salmon for this quick and healthy meal that is high in protein and
good-for-you fats. Do not feel like you need to stay in the boundaries of the suggested vegetables - there are so many items that would work nicely. If you have
leftover chicken on hand, that works well as a substitute for the salmon.
Makes 1 serving
1. Rub the inside of a small bowl with the halved lime and the chili paste. Reserve the lime half for serving.
2. Assemble the Cuisinart® PrepExpress™ with the Slice/Ribbon Cone and Angled Feed Tube. Slice the radish, carrot, cucumber and avocado, stopping to clean the Cutting Cone as necessary.
3. Put the rice into the prepared bowl. Top with the sliced vegetables and salmon. Drizzle the sesame oil evenly over the food and then squeeze the reserved lime half over as well. Garnish with the sesame seeds and herbs. Serve immediately.
Nutritional information:
Calories 643 (29% from fat) • carb. 88g • pro. 27g • fat 21g sat. fat 3g • chol. 47g • sod. 77mg • calc. 84mg • fi ber 10g
½ LIME
¼ TEASPOON KOREAN CHILI PASTE
1 SMALL RADISH (THE WATERMELON VARIETY MAKES FOR A BEAUTIFUL PRESENTATION IF YOU CAN FIND IT; IF NOT, THE CLASSIC RED RADISH WORKS WELL, OR EVEN DAIKON)
½ MEDIUM CARROT, PEELED
1 1- TO 2-INCH PIECE SEEDLESS CUCUMBER
½ SMALL, FIRM AVOCADO
1 CUP COOKED, SHORT-GRAIN BROWN RICE, WARM
1 3- TO 4-OUNCE SALMON FILLET, COOKED TO DESIRED DONENESS
½ TEASPOON SESAME OIL SESAME SEEDS, WHITE OR BLACK
OR A COMBINATION OF BOTH
FRESH BASIL, THINLY SLICED (CHIFFONADE)
FRESH CILANTRO LEAVES, ROUGHLY CHOPPED

21
“PASTA” PRIMAVERA Zucchini stands in for pasta in this bright, veggie-loaded dish.
Makes 5 cups
1. Assemble the Cuisinart® PrepExpress™ with the Slice/Ribbon Cone and Angled Feed Tube. Slice the leek. Reserve. Replace the Slice/Ribbon Cone with the 9mm Shred/Spaghetti Cone and shred the zucchini. Replace the 9mm Shred/Spaghetti Cone with the 3.0mm Shred/Spaghetti Cone and shred the carrot. Reserve the shredded zucchini and carrot together. Shred the Parmesan. Reserve.
2. In a large skillet, heat the butter over medium-high heat. Once butter melts and starts to foam, add the sliced leek. Reduce heat to medium and cook, stirring constantly, to soften, about 5 minutes. Add shredded zucchini, carrot, Parmesan, peas, salt and pepper. Stir and warm until the cheese is melted, about 5 minutes. Remove from heat and add the mint and lemon juice.
3. Taste and adjust seasoning as desired. Serve immediately.
Nutritional information per serving (1 cup):
Calories 149 (55% from fat) • carb. 9g • pro. 9g • fat 10g sat. fat 7g • chol. 29mg • sod. 546mg • calc. 249mg fi ber 3g
½ SMALL LEEK, LIGHT GREEN AND WHITE PARTS ONLY, SLICED LENGTHWISE WITH ROOT END INTACT
3 MEDIUM ZUCCHINI, ABOUT 1½ POUNDS, TRIMMED
1 MEDIUM CARROT, TRIMMED
3 OUNCES PARMESAN 2 TABLESPOONS UNSALTED BUTTER 1 CUP FROZEN PEAS
½ TEASPOON KOSHER SALT
¼ TEASPOON FRESHLY GROUND BLACK PEPPER
2 TABLESPOONS MINT LEAVES, TORN 2 TEASPOONS FRESH LEMON JUICE

22
“SPAGHETTI” WITH DICED TOMATOES AND WILD SALMON
This satisfying one-pan meal is nutritious and packed with fresh Mediterranean fl avor.
Makes 2 to 3 servings
1. Assemble the Cuisinart® PrepExpress™ with the 3.0mm Shred/Spaghetti Cone and Straight Feed Tube. Spiralize the zucchini. Reserve.
2. In a large sauté pan, heat the olive oil over medium-high heat. Once hot, add the salmon, skin side down. Sprinkle with salt and pepper and sear, about 2 minutes. Add the olives and capers. Cook for 1 minute. Carefully add the diced tomatoes with the liquid, cover, and reduce heat to low. Gently simmer until cooked, about 10 minutes.
3. Once salmon is ready, transfer to a serving plate.
4. Continue cooking sauce, uncovered, until most of the liquid has evaporated. Add the spiralized zucchini zoodles and toss to just warm through.
5. Taste and adjust seasoning as desired. Zucchini will release liquid during cooking; serve sauce and (zoodles) with a slotted spoon.
Nutritional information per serving (based on 3 servings):
Calories 268 (56% from fat) • carb. 12g • pro. 18g • fat 17g sat. fat 2g • chol. 42mg • sod. 924mg • calc. 52mg • fi ber 3g
2 MEDIUM ZUCCHINI, 1 POUND, TRIMMED
1 TABLESPOON EXTRA VIRGIN OLIVE OIL
½ POUND WILD SALMON ¼ TEASPOON KOSHER SALT
PINCH FRESHLY GROUND BLACK PEPPER
½ CUP PITTED KALAMATA OLIVES, ROUGHLY CHOPPED
1 TABLESPOON CAPERS, DRAINED AND RINSED
1 CAN (14 OUNCES) DICED TOMATOES
23
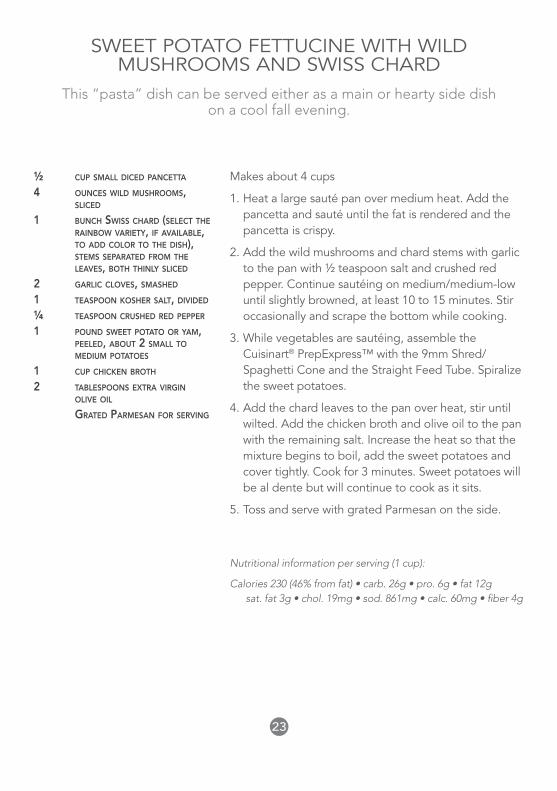
SWEET POTATO FETTUCINE WITH WILD MUSHROOMS AND SWISS CHARD
This “pasta” dish can be served either as a main or hearty side dish on a cool fall evening.
Makes about 4 cups
1. Heat a large sauté pan over medium heat. Add the pancetta and sauté until the fat is rendered and the pancetta is crispy.
2. Add the wild mushrooms and chard stems with garlic to the pan with ½ teaspoon salt and crushed red pepper. Continue sautéing on medium/medium-low until slightly browned, at least 10 to 15 minutes. Stir occasionally and scrape the bottom while cooking.
3. While vegetables are sautéing, assemble the Cuisinart® PrepExpress™ with the 9mm Shred/Spaghetti Cone and the Straight Feed Tube. Spiralize the sweet potatoes.
4. Add the chard leaves to the pan over heat, stir until wilted. Add the chicken broth and olive oil to the pan with the remaining salt. Increase the heat so that the mixture begins to boil, add the sweet potatoes and cover tightly. Cook for 3 minutes. Sweet potatoes will be al dente but will continue to cook as it sits.
5. Toss and serve with grated Parmesan on the side.
Nutritional information per serving (1 cup):
Calories 230 (46% from fat) • carb. 26g • pro. 6g • fat 12g sat. fat 3g • chol. 19mg • sod. 861mg • calc. 60mg • fi ber 4g
½ CUP SMALL DICED PANCETTA 4 OUNCES WILD MUSHROOMS,
SLICED
1 BUNCH SWISS CHARD (SELECT THE RAINBOW VARIETY, IF AVAILABLE, TO ADD COLOR TO THE DISH), STEMS SEPARATED FROM THE LEAVES, BOTH THINLY SLICED
2 GARLIC CLOVES, SMASHED
1 TEASPOON KOSHER SALT, DIVIDED
¼ TEASPOON CRUSHED RED PEPPER
1 POUND SWEET POTATO OR YAM, PEELED, ABOUT 2 SMALL TO MEDIUM POTATOES
1 CUP CHICKEN BROTH
2 TABLESPOONS EXTRA VIRGIN OLIVE OIL
GRATED PARMESAN FOR SERVING

24
APPLE TARTLETS
Makes 4 servings
1. Preheat oven to 425°F with the rack in the middle position. Line a baking sheet with parchment paper; reserve.
2. Using a 4-inch round cutter, cut four rounds out of the puff pastry. Transfer to the prepared baking sheet. Using a paring knife, score a small border around each piece of dough, making a ¼-inch border. Using the tines of a fork, evenly prick the dough all over without cutting through. Reserve in refrigerator until ready to use.
3. Assemble the Cuisinart® PrepExpress™ with the Slice/Ribbon Cone and Straight Feed Tube. Spiralize the apples, stopping to clean the Cutting Cone between apples and to remove the processed apple from the Work Bowl before processing the second. Cut each apple horizontally so that each apple forms two rosettes.
4. Remove puff pastry from refrigerator and place the apples on the prepared baking sheet next to the dough rounds. Evenly sprinkle the cinnamon sugar over each apple rosette.
5. Bake the dough and the apples for 15 minutes. Once the 15 minutes have expired, carefully remove from oven, press down the center of each dough round and, using a heatproof utensil (an offset spatula works best), place the cooked apple in the center of each partially baked pastry. Return to oven and allow to cook until the apples are soft and nicely browned, another 10 to 15 minutes.
6. While tartlets are baking, warm the jam slightly until just runny.
7. Remove tartlets from the oven and carefully brush each with the warm jam. Serve with vanilla ice cream or whipped cream.
Nutritional information per tartlet:
Calories 92 (23% from fat) • carb. 18g • pro. 1g • fat 3g sat. fat 1g • chol. 0mg • sod. 45mg • calc. 5mg • fi ber 1g
1 SHEET PUFF PASTRY, ROLLED SLIGHTLY TO SMOOTH ANY CREASES
2 SMALL APPLES
1 TABLESPOON CINNAMON SUGAR (EITHER STORE BOUGHT, OR 1 TABLESPOON SUGAR MIXED WITH ¼ TEASPOON CINNAMON)
APRICOT JAM, FOR FINISHING
VANILLA ICE CREAM OR SWEET-ENED WHIPPED CREAM, FOR SERVING
These simple tartlets are a beautiful alternative to the process of making a full apple pie. No pie cutters needed – just serve individually with a topping
of vanilla ice cream or whipped cream.


24
TARTALETAS DE MANZANA
Rinde 4 porciones
1. Poner la rejilla del horno en el centro del mismo y precalentar el horno a 425 °F (220 °C). Forrar una placa para horno con papel sulfurizado; reservar.
2. Usando un cortador de galletas redondo de 4 pulgadas (10 cm), cortar cuatro fondos de tartaleta. Disponerlos sobre la placa preparada. Usando un cuchillo mondador, cortar (sin perforar la masa) un círculo en el interior de cada fondo de tartaleta para formar una orilla de ¼ de pulgada (5 mm). Pinchar uniformemente (sin perforar la masa) cada fondo de tartaleta con un tenedor. Refrigerar hasta el momento de usar.
3. Ensamblar el aparato, usando el cono para rodajas/espiral ancho y la boca de alimentación recta. Cortar las manzanas en espiral, limpiando el cono y vaciando el bol después de procesar la primera manzana. Cortar las manzanas horizontalmente de manera que cada una rinda dos “rositas”.
4. Sacar la placa para horno del refrigerador y colocar las manzanas en la misma, al lado de los fondos de tartaleta. Rociar las manzanas uniformemente con azúcar de canela.
5. Hornear los fondos de tartaleta y las manzanas por 15 minutos. Después de este tiempo, retirarlos la placa del horno, presionar el centro de cada fondo de tartaleta con un utensilio a prueba de calor (p. ej. una espátula angulada) y colocar una mitad de manzana en el centro de cada fondo de tartaleta. Regresar al horno y hornear por 10–15 minutos adicionales, hasta que las manzanas estén suaves y bien doradas.
6. Mientras las tartaletas se están cocinando, calentar ligeramente la mermelada de albaricoque hasta que esté líquida.
7. Sacar las tartaletas del horno y cepillar cuidadosamente cada una con la mermelada tibia. Servir con helado de vainilla o crema batida.
Información nutricional por tartaleta:
Calorías 92 (23 % de grasa) • Carbohidratos 18 g • Proteínas 1 g • Grasa 3 g • Grasa saturada 1 g • Colesterol 0 mg Sodio 45 mg • Calcio 5 mg • Fibra 1 g
1 HOJA DE MASA DE HOJALDRE DESCONGELADA, ENROLLADA SIN APRETAR PARA SUAVIZAR LOS PLIEGUES
2 MANZANAS PEQUEÑAS
1 CUCHARADA DE AZÚCAR DE CANELA (COMPRADO O HECHO EN CASA MEZCLANDO 1 CUCHARADA DE AZÚCAR GRANULADA Y ¼ DE CUCHARADITA DE CANELA EN POLVO)
MERMELADA DE ALBARICOQUE PARA GLASEAR
HELADO DE VAINILLA O CREMA BATIDA DULCE PARA SERVIR
Estas tartaletas sencillas son una hermosa alternativa a una tarta de manzana. ¡Y no tiene que cortarlas! Simplemente sirva las tartaletas
individuales con helado de vainilla o crema batida.

23
“FETUCHINI” DE BATATA CON SETAS SILVESTRES Y ALCEGA
Pruebe esta “pasta” como plato principal o sustancioso acompañamiento, en una noche fresca de otoño.
Rinde aproximadamente 4 tazas
1. Poner una salteadora grande a calentar a fuego medio. Agregar la “pancetta” y saltear hasta que la grasa se haya derretido y que la “pancetta” esté crujiente.
2. Agregar las setas silvestres, los tallos de acelga, el ajo, ½ cucharadita de la sal y las hojuelas de pimiento rojo. Seguir salteando a fuego medio/medio-lento durante por lo menos 10–15 minutos, hasta dorarse ligeramente. Revolver de vez en cuando, raspando el fondo.
3. Mientras los vegetales se están cocinando, ensamblar el aparato, usando el cono para rallado grueso de 9 mm/espiral “espagueti” grueso y la boca de alimentación recta. Cortar las batatas en espiral.
4. Agregar las hojas de acelga a la salteadora y revolver hasta que se marchiten. Agregar el caldo de pollo, el aceite de oliva y la sal restante. Subir el fuego. Cuando la mezcla empiece a hervir, agregar las batatas y cubrir con una tapa ajustada. Cocinar por 3 minutos. Las batatas estarán al dente pero continuarán cocinándose después de retirar la salteadora del fuego.
5. Revolver y servir con queso Parmesano al lado.
Información nutricional por porción de 1 taza:
Calorías 230 (46 % de grasa) • Carbohidratos 26 g • Proteínas 6 g • Grasa 12 g • Grasa saturada 3 g • Colesterol 19 mg Sodio 861 mg • Calcio 60 mg • Fibra 4 g
½ TAZA (60 G) DE “PANCETTA” (TOCINO ITALIANO), EN CUBITOS
4 ONZAS (115 G) DE SETAS SILVESTRES, EN RODAJAS
1 RACIMO DE ALCEGA (LA VARIEDAD “ARCOÍRIS”, SI ESTÁ DISPONIBLE, AÑADIRÁ COLOR AL PLATO), LAS HOJAS SEPARADAS DE LOS TALLOS Y AMBOS FINAMENTE REBANADOS
2 DIENTES DE AJO, MACHACADOS
1 CUCHARADITA DE SAL KOSHER
¼ CUCHARADITA DE HOJUELAS DE PIMIENTO ROJO
1 LIBRA (455 G) DE CAMOTE/BATATA/ÑAME, PELADOS
1 TAZA (235 ML) DE CALDO DE POLLO
2 CUCHARADAS DE ACEITE DE OLIVA VIRGEN EXTRA
QUESO PARMESANO RALLADO PARA SERVIR

22
“ESPAGUETI” CON TOMATES PICADO Y SALMÓN SALVAJE
Esta sustanciosa comida de un solo plato es nutritiva y repleta de sabores mediterráneos.
Rinde 2–3 porciones
1. Ensamblar el aparato, usando el cono para rallado delgado de 3 mm/espiral “espagueti” delgado y la boca de alimentación recta. Cortar el calabacín en espiral. Reservar.
2. Colocar el aceite de oliva en una salteadora grande y calentar a fuego medio-alto. Cuando el aceite esté caliente, agregar el salmón, el lado con piel apuntando hacia abajo. Sazonar con sal y pimienta, y sellar por aproximadamente 2 minutos. Agregar las aceitunas y las alcaparras. Cocinar por 1 minuto. Agregar cuidadosamente los tomates picados con su jugo; tapar y reducir el fuego. Cocinar a fuego bajo por aproximadamente 10 minutos.
3. Cuando el salmón esté listo, colocarlo sobre un plato para servir.
4. Seguir cocinando la salsa, sin tapar, hasta que la mayoría del líquido se haya evaporado. Agregar los “fideos” de calabacín y revolver hasta que estén calientes.
5. Probar y ajustar la sazón al gusto. El calabacín echará líquido durante la cocción; usar una cuchara calada para servir la salsa y los “fideos”.
Información nutricional por porción (basada en 3 porciones):
Calorías 268 (56 % de grasa) • Carbohidratos 12 g • Proteínas 18 g • Grasa 17 g • Grasa saturada 2 g • Colesterol 42 mg Sodio 924 mg • Calcio 52 mg • Fibra 3 g
2 CALABACINES (“ZUCCHINI”) MEDIANOS
1 CUCHARADA DE ACEITE DE OLIVA VIRGEN EXTRA
½ LIBRA (225 G) DE SALMÓN SALVAJE
¼ CUCHARADITA DE SAL KOSHER
1 PIZCA DE PIMIENTA NEGRA RECIÉN MOLIDA
½ TAZA (100 G) DE ACEITUNAS NEGRAS “KALAMATA” DESHUESADAS, PICADAS GRUESO
1 CUCHARADA DE ALCAPARRAS, ESCURRIDAS Y ENJUAGADAS
1 LATA DE 14 ONZAS (395 G) DE TOMATES COCIDOS PICADOS

21
“PASTA” PRIMAVERA Usamos calabacín en vez de pasta en este colorido plato lleno de
vegetales.
Rinde 5 tazas
1. Ensamblar el aparato, usando el cono para rodajas/espiral ancho y la boca de alimentación inclinada. Rebanar el puerro. Reservar. Quitar el cono para rodajas/espiral ancho e instalar el cono para rallado grueso de 9 mm/espiral “espagueti” grueso; triturar los calabacines. Quitar el cono para rallado grueso de 9 mm/espiral “espagueti” grueso e instalar el cono para rallado grueso de 3 mm/espiral “espagueti” grueso; rallar la zanahoria. Reservar el calabacín y la zanahoria juntos. Triturar el queso Parmesano. Reservar.
2. Calentar la mantequilla a fuego medio-alto, en un sartén grande. Cuando la mantequilla esté derretida y empiece a burbujear, agregar el puerro rebanado. Reducir el fuego y cocinar a fuego medio por aproximadamente 5 minutos, revolviendo frecuentemente, hasta que se suavice. Agregue el calabacín rallado, la zanahoria rallada, el queso Parmesano triturado, la sal y la pimienta. Calentar, revolviendo, por aproximadamente 5 minutos, hasta que el queso esté derretido. Retirar del fuego y agregar la menta y el jugo de limón.
3. Probar y ajustar la sazón al gusto. Servir inmediatamente.
Información nutricional por porción de 1 taza :
Calorías 149 (55 % de grasa) • Carbohidratos 9 g • Proteínas 9 g • Grasa 10 g • Grasa saturada 7 g • Colesterol 29 mg Sodio 546 mg • Calcio 249 mg • Fibra 3 g
½ PUERRO PEQUEÑO (PARTE BLANCA Y VERDE CLARO SOLAMENTE), PARTIDO LONGITUDINALMENTE A LA MITAD PERO DEJANDO LA RAÍZ INTACTA
3 CALABACINES (“ZUCCHINI”) MEDIANOS
1 ZANAHORIA MEDIANA
3 ONZAS (85 G) DE QUESO PARMESANO
2 CUCHARADAS (30 G) DE MANTEQUILLA SIN SAL
1 TAZA (140 G) DE ARVEJAS CONGELADAS
½ CUCHARADITA DE SAL KOSHER
¼ CUCHARADITA DE PIMIENTA NEGRA RECIÉN MOLIDA
2 CUCHARADAS DE HOJAS DE MENTA FRESCA REBANADA
2 CUCHARADITAS DE JUGO DE LIMÓN FRESCO

20
BOL DE ARROZ INTEGRAL CON AGUACATE Y SALMÓN
Mientras el arroz se está cocinando, tiene tiempo de sobra para preparar los vegetales y el salmón para esta rápida y saludable comida alta en proteína y grasas saludables. No dude en experimentar con otros vegetales si desea. ¡Esta receta es
deliciosa con una variedad de vegetales! También puede sustituir el salmón con sobras de pollo.
Rinde 1 porción
1. Restregar el interior de un bol pequeño con la mitad de la lima y la pasta de chile. Reservar la otra mitad de la lima para servir.
2. Ensamblar el aparato, usando el cono para rodajas/espiral ancho y la boca de alimentación inclinada. Rebanar el rábano, la zanahoria, el pepino y el aguacate, limpiando el cono entre cada ingrediente si es necesario.
3. Poner el arroz en el bol. Cubrir con los vegetales rebanados y el salmón. Rociar uniformemente con aceite de sésamo/ajonjolí y jugo de lima. Decorar con semillas de sésamo/ajonjolí y hierbas. Servir inmediatamente.
Información nutricional:
Calorías 643 (29 % de grasa) • Carbohidratos 88 g • Proteínas 27 g • Grasa 21 g • Grasa saturada 3 g • Colesterol 47 g Sodio 77 mg • Calcio 84 mg • Fibra 10 g
½ LIMA/LIMÓN VERDE
¼ CUCHARADITA DE PASTA DE CHILE COREANA
1 RÁBANO PEQUEÑO (EL RÁBANO SANDÍA DA LUGAR A UNA HERMOSA PRESENTACIÓN, PERO SI NO ESTÁ DISPONIBLE, UN RÁBANO ROJO CLÁSICO O INCLUSO DAIKON, SON PERFECTOS)
½ ZANAHORIA MEDIANA, PELADA
1 TROZO DE 1–2 PULGADAS (2.5–5 CM) DE PEPINO SIN SEMILLAS
½ AGUACATE FIRME PEQUEÑO
1 TAZA (195 G) DE ARROZ INTEGRAL DE GRANO CORTO COCINADO, TIBIO
1 FILETE DE 3–4 ONZAS (85–115 G) DE SALMÓN, COCINADO AL PUNTO DESEADO
½ CUCHARADITA DE ACEITE DE SÉSAMO/AJONJOLÍ
SEMILLAS DE SÉSAMO/AJONJOLÍ (BLANCO, NEGRO O UNA MEZCLA)
ALBAHACA FRESCA, FINAMENTE REBANADA
HOJAS DE CILANTRO FRESCO, PICADAS GRUESO

19
“NIDOS” DE CALABACÍN AL HORNOLa rebanadora/trituradora/espiralizadora PrepExpress™ está a la altura de su nombre en este plato rápido. No tendrá que pasar tiempo cocinando pasta
ni enrollando fideos; simplemente corte el calabacín en espiral, agregue queso y alístese para una cena digna de ser fotografiada.
Rinde 8 porciones
1. Engrasar una bandeja de 13 x 9 pulgadas (33 cm x 22 cm) con el aceite de oliva. Reservar.
2. Poner la rejilla del horno en el tercio superior del mismo y precalentar el horno a 450 °F (230 °C).
3. Ensamblar el aparato, usando el cono para rodajas/espiral ancho o el cono para rodajas onduladas/espiral ancho ondulado, y la boca de alimentación recta. Cortar el calabacín en espiral, parando para limpiar el cono si es necesario y vaciando el bol cuando esté lleno.
4. Después procesar el calabacín, cortar cada espiral para formar “nidos” de 4–5 capas (cada calabacín debería rendir 3–4 “nidos”). Disponer los “nidos” en la bandeja, apretujándolos.
5. Quitar el cono para rodajas/espiral ancho e instalar el cono para rallado delgado de 3 mm/espiral “espagueti” delgado. Triturar el queso Pecorino. Sacar y reservar la mitad. Agregar los ingredientes restantes, excepto la salsa marinara al bol y revolver para mezclar. Dividir la mezcla de queso uniformemente entre los “nidos”. Cubrir con ½ taza (120 ml) de salsa marinara y el queso Pecorino reservado.
6. Hornear por 15–20 minutos, o hasta que el queso esté completamente derretido y ligeramente dorado.
7. Servir inmediatamente, con salsa marinara tibia.
Información nutricional por porción:
Calorías 155 (59 % de grasa) • Carbohidratos 6 g • Proteínas 10 g • Grasa 10 g • Grasa saturada 6 g • Colesterol 32 mg Sodio 214 mg • Calcio 131 mg • Fibra 1 g
2 CUCHARADITAS (10 ML) DE ACEITE DE OLIVA
4 CALABACINES (“ZUCCHINI”) MEDIANOS, CORTADOS
1½ ONZA (40 G) DE QUESO PECORINO ROMANO
1 LIBRA (455 G) DE QUESO RICOTTA DE LECHE ENTERA
1 CUCHARADA LLENA DE ALBAHACA FRESCA, FINAMENTE REBANADA
½ CUCHARADITA DE RALLADURA DE LIMÓN
¼ CUCHARADITA DE PIMIENTA NEGRA RECIÉN MOLIDA
1 PIZCA DE SAL KOSHER
½ TAZA (120 ML) DE SALSA MARINARA + UN POCO MÁS PARA SERVIR (TIBIA)

18
SOPA DE “FIDEOS” DE DAIKONUna alternativa simple a la sopa de fideos asiática. ¡No olvide sus palillos
chinos para comer los “fideos”!
Rinde 4 porciones
1. Colocar el caldo de pollo y el agua en una olla pequeña y poner a calentar.
2. Ensamblar el aparato, usando el cono para rodajas/espiral ancho y la boca de alimentación inclinada. Rebanar el jengibre y el jalapeño. Quitar el cono para rodajas/espiral ancho e instalar el cono para rodajas onduladas/espiral ancho ondulado. Rebanar la zanahoria.
3. Colocar los vegetales rebanados en la olla y agregar el ajo, ½ taza (30 g) del cilantro y la salsa de pescado. Calentar hasta que empiece a hervir, y luego reducir el fuego y cocinar a fuego lento por 20 minutos aproximadamente.
4. Mientras la sopa se está cocinando, quitar el cono para rodajas onduladas/espiral ancho ondulado e instalar el cono para rallado delgado de 3 mm/espiral “espagueti” delgado y la boca de alimentación recta. Cortar el daikon en espiral.
5. Dividir los “fideos” de daikon entre cuatro boles, cortándolo con tijeras de cocina. Añadir en cada bol ¼ del pollo y 1 cucharada de cebolletas.
6. Dividir la sopa de vegetales entre los boles. Agregar 1 cucharada de cilantro y un chorro de jugo de lima. Servir inmediatamente.
Información nutricional por porción:
Calorías 141 (22 % de grasa) • Carbohidratos 11 g • Proteínas 16 g • Grasa 3 g • Grasa saturada 1 g • Colesterol 63 mg Sodio 576 mg • Calcio 59 mg • Fibra 4 g
4 TAZAS (945 ML) DE CALDO DE POLLO
2 TAZAS (475 ML) DE AGUA
1 TROZO DE 3 PULGADAS (7.5 CM) DE JENGIBRE FRESCO, PELADO
1 JALAPEÑO PEQUEÑO
1 ZANAHORIA GRANDE, PELADA 1 DIENTE DE AJO, MACHACADO
¾ TAZA (45 G) DE CILANTRO, CON TALLOS
1 CUCHARADA DE SALSA DE PESCADO
1 LIBRA (455 G) DE DAIKON, PELADO
1 PECHUGA DE POLLO COCINADA, FINAMENTE REBANADA
¼ CEBOLLETA (“GREEN ONION”), FINAMENTE REBANADA
½ LIMA/LIMÓN VERDE, EN CUARTOS

17
ENSALADA DE REMOLACHA MIXTA CON QUESO DE CABRA
Muchas ensaladas llevan remolacha asada, pero en esta receta, usamos remolacha cruda. Tiene el mismo sabor dulce, pero la preparación dura una
fracción del tiempo.
Rinde 4 porciones (2 tazas)
1. Ensamblar el aparato, usando el cono para rallado delgado de 3 mm/espiral “espagueti” delgado y la boca de alimentación recta. Cortar las remolachas en espiral. Colocar en un bol para servir poco profundo.
2. Agregar el aceite de oliva, el jugo de limón, la sal y la pimienta. Revolver para mezclar. Cubrir con el queso de cabra y la albahaca. Servir inmediatamente.
Información nutricional por porción de ½ taza:
Calorías 82 (64 % de grasa) • Carbohidratos 6 g • Proteínas 2 g • Grasa 6 g • Grasa saturada 1 g • Colesterol 2 mg Sodio 203 mg • Calcio 15 mg • Fibra 2 g
2 REMOLACHAS DORADAS PEQUEÑAS, RESTREGADAS
2 REMOLACHAS ROJAS PEQUEÑAS, RESTREGADAS
1½ CUCHARADA DE ACEITE DE OLIVA VIRGEN EXTRA
2 CUCHARADITAS DE JUGO DE LIMÓN FRESCO
¼ CUCHARADITA DE SAL KOSHER
1 PIZCA DE PIMIENTA NEGRA RECIÉN MOLIDA
1 CUCHARADA DE QUESO DE CABRA DESMENUZADO
2 HOJAS GRANDES DE ALBAHACA FRESCA, FINAMENTE REBANADAS

16
“BRUSCHETTAS” DE CALABACÍNEste aperitivo divertido es perfecto en verano, cuando los calabacines
están de temporada.
Rinde 12 “bruschettas”
1. Precalentar el horno a 375 °F (190 °C). Restregar un lado de cada rebanada de pan con ajo y cepillar con una cucharada del aceite de oliva. Hornear por aproximadamente 5 minutos, hasta dorarse.
2. Colocar el queso Ricotta, el queso Parmesano, ¼ de cucharadita de la sal, ¼ de cucharadita de la pimienta y 1 cucharadita de la menta en un bol; revolver. Reservar.
3. Ensamblar el aparato, usando el cono para rallado grueso de 9 mm/espiral “espagueti” grueso, y la boca de alimentación inclinada. Rallar el calabacín y agregar el jugo de limón y la sal/pimienta/menta restantes; revolver.
4. Armar las “bruschettas”, colocando sobre cada rebanada de pan 1 cucharada de la mezcla de queso y luego 1 cucharada de calabacín rallado.
Información nutricional por “bruschetta”:
Calorías 156 (33 % de grasa) • Carbohidratos 19 g • Proteínas 7 g • Grasa 6 g • Grasa saturada 3 g • Colesterol 12 mg Sodio 309 mg • Calcio 87 mg • Fibra 1 g
12 REBANADAS GRUESAS DE PAN FRANCÉS
1 DIENTE DE AJO, MACHACADO
1 CUCHARADA + 2 CUCHARADITAS DE ACEITE DE OLIVA VIRGEN EXTRA
1 TAZA (235 ML) DE QUESO RICOTTA DE LECHE ENTERA, ESCURRIDO
2 CUCHARADAS DE QUESO PARMESANO RALLADO
½ CUCHARADITA DE SAL KOSHER
½ CUCHARADITA DE PIMIENTA NEGRA RECIÉN MOLIDA
1½ CUCHARADITA DE MENTA FRESCA FINAMENTE REBANADA
1 CALABACÍN (“ZUCCHINI”) PEQUEÑO
1 CUCHARADITA DE JUGO DE LIMÓN FRESCO

15
ROLLITOS DE VERANOEl daikon, también conocido como “rábano chino” o “rábano de invierno”
es una alternativa nutritiva a los fideos de arroz usados tradicionalmente para rellenar estos rollitos.
Rinde ¾ de taza y 24 rollitos
1. Colocar todos los ingredientes de la salsa de maní en el bol de una procesadora de alimentos o de una picadora Cuisinart®. Procesar hasta obtener una mezcla suave y homogénea. Poner en un bol pequeño, cubrir y refrigerar hasta el momento de usar.
2. Ensamblar el aparato, usando el cono para rallado delgado de 3 mm/espiral “espagueti” delgado y la boca de alimentación recta. Cortar el daikon en espiral. Reservar.
3. Quitar el cono para rallado delgado de 3 mm/espiral “espagueti” delgado y la boca de alimentación recta e instalar el cono para rodajas/espiral ancho y la boca de alimentación inclinada. Rebanar el pepino; reservar. Repetir con el mango y el aguacate, limpiando el cono entre cada ingrediente si es necesario.
4. Quitar el cono para rodajas/espiral ancho e instalar el cono para rallado delgado de 3 mm/espiral “espagueti” delgado. Rallar la zanahoria. Reservar.
5. Para armar los rollitos: llenar un bol grande con agua tibia. Colocar una hoja de papel de arroz en el agua. Cuando el papel de arroz esté suave y dúctil, retirarlo del agua, dejando que el exceso de agua se escurra, y colocarlo sobre un plato plano. Suavizar las orillas para que le círculo esté plano.
6. Colocar una cucharada llena de daikon en el centro del papel de arroz. Agregar 2 rodajas de pepino, 3 hojas de menta, 2 rebanadas de aguacate, 3 rebanadas de mango, una pizca de zanahoria rallada, 4 hojas de cilantro, un chorro de jugo de lima y una pizca muy pequeña de sal.
7. Doblar la parte de abajo del papel de arroz por encima del relleno, luego el lado derecho, el lado izquierdo, y enrollar hacia arriba para sellar. Repetir con el resto del papel de arroz y del relleno.
8. Servir con la salsa de maní.
Información nutricional por porción (1 rollito): Calorías 49 (32 % de grasa) • Carbohidratos 8 g • Proteínas 1 g • Grasa 2 g Grasa saturada 0 g • Colesterol 0 mg • Sodio 76 mg Calcio 18 mg • Fibra 2 g
Información nutricional por porción (½ cucharada de salsa): Calorías 28 (30 % de grasa) • Carbohidratos 5 g • Proteínas 1 g • Grasa 1 g Grasa saturada 0 g • Colesterol 0 mg Sodio 136 mg • Calcio 28 mg Fibra 0 g
SALSA PARA MOJAR DE MANÍ
½ TAZA (120 ML) DE SALSA HOISIN 3 CUCHARADAS (45 G) DE
MANTEQUILLA DE MANÍ CREMOSA
1 CUCHARADA (15 ML) DE AGUA 1 CUCHARADITA (5 ML) DE SALSA DE
SOYA BAJA EN SODIO
1 DIENTE DE AJO MUY PEQUEÑO 1 TROZO DE ½ PULGADA (1.5 CM)
DE JENGIBRE, PELADO
½–1 CUCHARADITA DE SALSA DE CHILE PICANTE
½ CUCHARADITA DE JUGO DE LIMA/LIMÓN VERDE FRESCO
ROLLITOS DE VERANO
1 DAIKON (RÁBANO BLANCO) GRANDE, PELADO
½ PEPINO SIN SEMILLAS GRANDE
1 MANGO GRANDE, DESHUESADO Y CORTADO PARA CABER EN LA BOCA DE ALIMENTACIÓN INCLINADA
2 AGUACATES FIRMES 1 ZANAHORIA GRANDE, PELADA
24 HOJAS REDONDAS DE PAPEL DE ARROZ COMESTIBLE
AGUA TIBIA PARA ARMAR LOS ROLLOS
10 RAMITAS DE MENTA FRESCA
10 RAMITAS DE CILANTRO FRESCO
1 LIMA/LIMÓN VERDE
½ CUCHARADITA DE SAL KOSHER

14
CHIPS DE PAPA La rebanadora/trituradora/espiralizadora Cuisinart® PrepExpress™ permite obtener rodajas delgadas y regulares, perfectas para hacer chips crujientes
que luego puede sazonar con sus hierbas o especias favoritas.
Rinde aproximadamente 4 tazas
1. Ensamblar el aparato, usando el cono para rodajas/espiral ancho o el cono para rodajas onduladas/espiral ancho ondulado, y la boca de alimentación inclinada. Rebanar las papas.
2. Llenar una cacerola mediana de fondo pesado hasta la mitad con aceite vegetal o aceite de colza. Calentar el aceite hasta que alcance 350 °F (180 °C). Colocar una pequeña cantidad de papas en el aceite y freír por 3–4 minutos, hasta que estén ligeramente doradas. Sacar los chips del aceite, usando una espumadera o una cuchara calada larga, y colocarlos sobre un plato forrado con papel absorbente. Rociar con una pizca pequeña de sal.
3. Calentar el aceite otra vez hasta que alcance 350 °F (180 °C) y repetir con el resto de las papas.
Información nutricional por porción de ½ taza:
Calorías 219 (71 % de grasa) • Carbohidratos 15 g • Proteínas 1 g • Grasa 18 g • Grasa saturada 3 g • Colesterol 0 mg Sodio 26 mg • Calcio 15 mg • Fibra 2 g
1 PAPA MEDIANA, RESTREGADA (NO PELADA)
1 CAMOTE/BATATA/ÑAME MEDIANO, RESTREGADO (NO PELADO)
ACEITE VEGETAL/DE COLZA PARA FREÍR
½ CUCHARADITA DE SAL KOSHER (TAMBIÉN PUEDE USAR SU SAL FAVORITA, TAL COMO SAL DE TRUFA)

13
PEPINOS ENCURTIDOS CON AJO Y ENELDOPuede ajustar la cantidad de azúcar en esta receta al gusto. Cuanto menos
azúcar, más intenso el sabor.
Rinde aproximadamente 100 rodajas encurtidas
1. Ensamblar el aparato, usando el cono para rodajas/espiral ancho o el cono para rodajas onduladas/espiral ancho ondulado, y la boca de alimentación inclinada. Rebanar el pepino. Agregar el eneldo y el ajo. Revolver y colocar la mezcla en un recipiente de 1 L o un tazón mediano. Reservar.
2. Colocar los ingredientes restantes en una cacerola pequeña. Calentar a fuego medio-alto. Cuando la mezcla empiece a hervir, echarla inmediatamente sobre los pepinos, cerciorándose de que todos los pepinos están sumergidos.
3. Dejar enfriar a temperatura ambiente, y luego cubrir y refrigerar por una noche. El sabor de los pepinos se intensificará a medida que se marinen.
Información nutricional por porción (10 rodajas):
Calorías 10 (12 % de grasa) • Carbohidratos 2 g • Proteínas 0 g • Grasa 0 g • Grasa saturada 0 g • Colesterol 23 mg Sodio 239 mg • Calcio 16 mg • Fibra 0 g
1 PEPINO INGLÉS (VERDE, LARGO Y SIN SEMILLAS) DE APROXIMADAMENTE 12 ONZAS (350 G)
1 ONZA (30 G) DE ENELDO
3 DIENTES DE AJO, MACHACADOS
1¼ TAZA (295 ML) DE AGUA
¾ TAZA (175 ML) DE VINAGRE BLANCO
1 CUCHARADITA DE SAL KOSHER
1 CUCHARADITA DE SEMILLAS DE CILANTRO
½ CUCHARADITA DE SEMILLAS DE ENELDO
½ CUCHARADITA DE SEMILLAS DE MOSTAZA
½–1 CUCHARADITA DE AZÚCAR GRANULADA

12
PANQUEQUES DE ZANAHORIA Y CHIRIVÍA Una alternativa a los panqueques de papa tradicionales, usando vegetales
cortados en espiral para una hermosa presentación.
Rinde aproximadamente 10 panqueques
1. Ensamblar el aparato, usando el cono para rallado delgado de 3 mm/espiral “espagueti” delgado y la boca de alimentación recta. Cortar la zanahoria y la chirivía en espiral.
2. Colocar los vegetales, las cebolletas, el perejil, los huevos, la sal y la pimienta en un tazón grande y revolver.
3. Formar “tortitas” de ¼ de taza de la mezcla, cerciorándose de exprimir la mezcla con las manos para eliminar el exceso de líquido. Reservar.
4. Poner el aceite de oliva a calentar a fuego medio, en un sartén grande. Cuando el aceite esté caliente, colocar varios panqueques en el sartén, sin permitir que se toquen. Cocinar por 2–3 minutos por lado, hasta que estén dorados y crujientes.
5. Colocar por unos segundos sobre papel absorbente para eliminar el exceso de aceite y servir.
Información nutricional por panqueque:
Calorías 84 (68 % de grasa) • Carbohidratos 5 g • Proteínas 2 g • Grasa 7 g • Grasa saturada 1 g • Colesterol 43 mg Sodio 188 mg • Calcio 20 mg • Fibra 1 g
1 ZANAHORIA MEDIANA
1 CHIRIVÍA MEDIANA
2 CEBOLLETAS (“GREEN ONIONS”), REBANADAS
¼ TAZA (15 G) DE PEREJIL FRESCO, PICADO
2 HUEVOS GRANDES, LIGERAMENTE BATIDOS
¾ CUCHARADITA DE SAL KOSHER
½ CUCHARADITA DE PIMIENTA NEGRA RECIÉN MOLIDA
¼ TAZA (60 ML) DE ACEITE DE OLIVA VIRGEN EXTRA

11
CONSEJOS ACERCA DE LAS RECETAS • La rebanadora/trituradora/espiralizadora Cuisinart
® PrepExpress
™ permite preparar los
ingredientes rápido y fácilmente, ya sea que esté cocinando para una persona o una fiesta. Además, la limpieza es una brisa. Simplemente enjuague los accesorios después de usarlos y colóquelos en el lavavajillas.
• La mayoría de los vegetales y algunas frutas pueden ser procesados con la rebanadora/trituradora/espiralizadora Cuisinart
® PrepExpress
™. La mayoría de los conos procesadores
pueden procesar calabacines, calabacines amarillos, pepinos, zanahorias, papas, camote/batatas, remolachas, rábanos, daikon (rábano blanco) y pequeñas manzanas.
• Para procesar alimentos más grandes, tales como calabazas moscadas, deberá cortar los lados de los alimentos o cortar estos en cuartos, de manera que quepan en la boca de alimentación. Tenga presente que los alimentos redondos producen espirales más hermosos.
• Los alimentos suaves tales como los tomates, los aguacates y los mangos pueden ser rebanados.
• Los alimentos procesados pueden comerse crudos, encurtidos, salteados, fritos, asados o formar parte de recetas. Los puede servir como acompañamiento, plato principal e incluso usarlos como cobertura o decoración.
• Por ejemplo, puede preparar:
• Decoraciones en forma de rosa usando rábanos y el cono para rebanar/cortar en espiral ancho.
• “Arroz” de coliflor usando cogollos de coliflor y el cono para rallar delgado/cortar en espiral “espagueti” delgado.
• Jengibre encurtido para sushi usando jengibre fresco pelado y el cono para rebanar/cortar en espiral ancho.
• Pepino encurtido casero usando pepinos y el cono para rebanar/cortar en espiral ancho o el cono para cortar en rodajas onduladas/espiral ancho ondulado.
• Para servir fácilmente los alimentos cortados en espiral, corte los espirales con tijeras de cocina.
RECETASA continuación encontrará una variedad de deliciosas recetas, desde platos sencillos y rápidos hasta recetas “gourmet” que deleitarán y sorprenderán a toda su familia.
Panqueques de zanahoria y chirivía .........................................................................................................................12Pepinos encurtidos con ajo y eneldo .......................................................................................................................13Chips de papas ...........................................................................................................................................................14Rollitos de verano ......................................................................................................................................................15“Bruschettas” de calabacín .......................................................................................................................................16Ensalada de remolacha mixta con queso de cabra ................................................................................................17Sopa de “fideos” de daikon .....................................................................................................................................18“Nidos” de calabacín al horno .................................................................................................................................19Bol de arroz integral con aguacate y salmón ..........................................................................................................20“Pasta” Primavera ......................................................................................................................................................21“Espagueti” con tomates picado y salmón salvaje ................................................................................................22“Fetuchini” de batata con setas silvestres y alcega ...............................................................................................23Tartaletas de manzana ...............................................................................................................................................24

10
del recibo de compra, el período de garantía será calculado a partir de la fecha de fabricación.
Si este aparato presentara algún defecto de materiales o fabricación durante el período de garantía, lo reparemos o reemplazaremos (a nuestra opción). Para obtener servicio bajo esta garantía, llame a nuestra línea directa gratuita al 1800-726-0190 o regrese el aparato defectuoso a: Cuisinart, Service Department, 7475 North Glen Harbor Blvd., Glendale, AZ 85307.
Regrese el producto defectuoso, junto con su recibo de compra y un cheque o giro postal de US$10.00 para cubrir los gastos de manejo y envío.
Los residentes de California solo necesitan dar una prueba de compra y deben llamar al 1-800-726-0190 para recibir instrucciones de envío.
NOTA: para mayor seguridad, le aconsejamos que mande su paquete por un método de entrega con seguro y seguimiento. Cuisinart no será responsable por los daños ocurridos durante el transporte o por los paquetes mandados a una dirección equivocada. Los productos perdidos y/o dañados durante el envío no serán cubiertos bajo esta garantía. Recuerde incluir su nombre, dirección y teléfono, la descripción del problema, así como cualquier información pertinente.
Este aparato satisface las más altas exigencias de fabricación y ha sido diseñado para uso sobre corriente de 120 V, usando accesorios y piezas de repuesto autorizados solamente. Esta garantía excluye expresamente los daños causados por accesorios, piezas o reparaciones no autorizados por Cuisinart, así como los daños causados por el uso de un convertidor de voltaje. Esta garantía no cubre el uso institucional o comercial del producto, y no es válida en caso de daños causados por mal uso, negligencia o accidente. Esta garantía excluye expresamente todos los daños incidentales o consecuentes. Algunos Estados no permiten la exclusión o limitación de daños incidentales o consecuentes, de modo que las limitaciones mencionadas pueden no regir para usted. Esta garantía le otorga derechos legales específicos y usted puede tener otros derechos que varían de un Estado a otro.
RESIDENTES DE CALIFORNIA
La ley del estado de California ofrece dos opciones bajo el período de garantía. Los residentes del estado de California pueden (A) regresar el producto defectuoso a la tienda donde lo compraron o (B) a
otra tienda que venda productos Cuisinart® de este
tipo.
La tienda, a su opción, reparará el producto, referirá al consumidor a un centro de servicio
independiente, cambiará el producto o reembolsará al consumidor por el precio original del producto, menos la cantidad imputable al uso del producto por el consumidor hasta que este se dañe. Si estas dos opciones no satisfacen al consumidor, podrá llevar el aparato a un centro de servicio independiente, siempre que se pueda ajustar o reparar el aparato de manera económica. Cuisinart será responsable por los gastos de servicio, reparación, reemplazo o reembolso de los productos defectuosos durante el período de garantía.
Los residentes de California también pueden, si lo desean, mandar el aparato defectuoso directamente a Cuisinart para que lo reparen o lo cambien. Para esto, se debe llamar a nuestro servicio posventa al -800-726-0190.
Cuisinart será responsable por los gastos de reparación, reemplazo, manejo y envío de los productos defectuosos durante el período de garantía.
ANTES DE HACER REPARAR SU APARATO
Si su aparato tiene algún problema, le recomendamos que llame a nuestro servicio posventa al 1-800-726-0190 antes de regresar el aparato a Cuisinart. Un representante le confirmará si su producto sigue bajo garantía y le indicará la dirección del centro de servicio más cercano.
Importante: si debe llevar el producto defectuoso a un centro de servicio no autorizado, por favor informe al personal del centro de servicio que deberían llamar al servicio posventa de Cuisinart al 1-800-726-0190 a fin de diagnosticar el problema correctamente, usar las piezas correctas para repararlo y asegurarse de que el producto esté bajo garantía.
G IB-14725-ESP
©2017 Cuisinart150 Milford Road
East Windsor, NJ 08520Impreso en China
17CE024878 Todas las marcas registradas, comerciales o de servicio
mencionadas en este documento pertenecen a sus titulares
respectivos.

9
LIMPIEZA, MANTENIMIENTO Y ALMACENAJE• Desconecte el aparato antes de limpiarlo.
No sumerja el cable, la clavija o la unidad principal en agua ni en ningún otro líquido.
• Desensamble todos los accesorios (bocas de alimentación, conos procesadores y portacono).
• Enjuáguelos en agua corriente, quitando los residuos de alimento con el cepillo de limpieza.
• Todas las piezas removibles son aptas para lavavajillas.
• Limpie todos los accesorios después de cada uso.
PRECAUCIÓN:
• cerciórese de que el cable está desconectado antes de desensamblar los accesorios.
• Los filos de los conos son muy afilados; manipule los conos con cuidado durante la limpieza.
• Limpie el exterior del bloque-motor con un paño ligeramente humedecido y seque bien.
NOTA: nunca sumerja el bloque-motor en agua.
Mantenimiento: cualquier otro servicio debe ser realizado por un técnico autorizado.
CONSEJOS • Elija vegetales y frutas firmes, que no sean
muy maduros.
• No es necesario cortar los ingredientes en lo alto. Sin embargo, puede que sea necesario cortar algunos ingredientes en lo ancho.
• Si un ingrediente es demasiado ancho para caber en la boca de alimentación recta, puede introducirlo directamente en el cono procesador antes de colocar la boca de alimentación sobre la unidad. Si el ingrediente aún no cabe en la boca de alimentación, corte ligeramente los lados.
• Antes de cortar en espiral, corte las extremidades superior e inferior del ingrediente para formar una superficie plana; esto ayudará a sujetar el alimento al empujador.
• Cerciórese de que el empujador está firmemente insertado en el alimento antes de empezar a cortar en espiral.
• Introduzca primero la extremidad más delgada del alimento en la boca de alimentación.
• Los alimentos redondos que quepan en la boca de alimentación recta producen los mejores espirales.
• Empuje el empujador ejerciendo una presión regular; esto producirá resultados más uniformes.
• Para cortar en espiral después de rebanar/triturar o viceversa, simplemente sustituya la boca de alimentación.
• Cuando procese varios alimentos en forma continua, quite los residuos de alimentos del cono procesador antes de procesar el alimento siguiente.
• Este aparato está equipado con un dispositivo de protección térmica que apaga automáticamente el motor en caso de sobrecalentamiento, lo que puede pasar si usa la unidad continuamente por un tiempo prolongado (aproximadamente 60 minutos). Si esto ocurriera, apague el aparato y permita que el motor se enfríe por unos minutos. Después de este tiempo, debería funcionar normalmente.
GARANTÍA LIMITADA DE 3 AÑOS(VÁLIDA EN LOS EE.UU. Y EN CANADÁ SOLAMENTE)Esta garantía es para los consumidores solamente. Usted es un consumidor si ha comprado su aparato Cuisinart
® en una tienda, para uso personal o
casero. A excepción de los estados donde la ley lo permita, esta garantía no es para los detallistas, los demás comerciantes ni los dueños.
Cuisinart garantiza este aparato contra todo defecto de materiales o fabricación durante 3 años después de la fecha de compra original, siempre que el aparato haya sido utilizado para uso doméstico y según las instrucciones.
Le aconsejamos que llene el formulario de registro
disponible en www.cuisinart.com a fin de facilitar la verificación de la fecha de compra original. Sin embargo, no es necesario registrar el producto para recibir servicio bajo esta garantía. En ausencia

8
Cómo rebanar o triturar (usando la boca de alimentación
inclinada)
1a. Conecte el cable a una toma de corriente. Cerciórese de que el botón de encendido/apagado ubicado en el costado del aparato está en la posición “OFF” antes de encender el aparato. Cerciórese de que el portacono está debidamente instalado. Siga el paso 1b. a continuación para instalar el cono procesador deseado en el portacono.
1b. Cada cono procesador cuenta con una cavidad para el pulgar y un asa. La flecha del asa debe estar alineada con una de las 6 muescas sobre el portacono (véase la ilustración a la derecha).
2. Coloque la boca de alimentación inclinada sobre la base y gire en sentido horario para sujetar. La boca de alimentación debería encontrarse frente a su cuerpo.
3. Corte las extremidades de la fruta o del vegetal de tal manera que formen una superficie plana. Coloque la fruta o el vegetal directamente en la boca de alimentación.
4. Encienda la unidad, poniendo el botón de encendido/apagado en “ON”. Empuje el empujador, ejerciendo presión regular; el alimento procesado se caerá en el bol. Después de terminar, apague la unidad, poniendo el botón de encendido/apagado en “OFF”.
Resultados:(dependiendo del cono procesador usado)
• Cono para rodajas de 2.5 mm/Espiral ancho
(verde)
• Cono para rodajas onduladas de 3 mm/Espiral
ancho ondulado (azul)
• Cono para rallado delgado de 3 mm/Espiral
“espagueti” delgado (rojo oscuro)
• Cono para rallado grueso de 9 mm/Espiral
“espagueti” grueso (negro)

7
INSTRUCCIONES DE OPERACIÓN
Cómo cortar en espiral (usando la boca de
alimentación recta)
1a. Conecte el cable a una toma de corriente. Cerciórese de que el botón de encendido/apagado ubicado en el costado del aparato está en la posición “OFF” antes de encender el aparato. Cerciórese de que el portacono está debidamente instalado. Siga el paso 1b. a continuación para instalar el cono procesador deseado en el portacono.
1b. Cada cono procesador cuenta con una cavidad para el pulgar y un asa con una flecha. La flecha del asa debe estar alineada con una de las 6 muescas sobre el portacono (véase la ilustración a la derecha).
2. Coloque la boca de alimentación recta sobre la base y gire en sentido horario para sujetar.
3. Corte las extremidades de la fruta o del vegetal de tal manera que formen una superficie plana. Presione la extremidad plana del alimento contra los “dientes” del empujador e introduzca este en la boca de alimentación, o introduzca el alimento directamente en la boca de alimentación.
4. Cerciórese de que el empujador está presionando la fruta o el vegetal de manera segura. Encienda la unidad, poniendo el botón de encendido/apagado en “ON”. Empuje el empujador, ejerciendo presión regular; el alimento procesado se caerá en el bol. Después de terminar, apague la unidad, poniendo el botón de encendido/apagado en “OFF”.
Resultados:
(dependiendo del cono procesador usado)
• Cono para rodajas de 2.5 mm/Espiral ancho
(verde)
• Cono para rodajas onduladas de 3 mm/
Espiral ancho ondulado (azul)
• Cono para rallado delgado de 3 mm/Espiral
“espagueti” delgado (rojo oscuro)
• Cono para rallado grueso de 9 mm/Espiral
“espagueti” grueso (negro)

6
ACCESORIOS
CONOS PROCESADORESBoca de alimentación inclinada
para rebanar/triturarBoca de alimentación recta
para cortar en espiral
Rallado delgado de 3 mm/Espiral “espagueti” delgado (rojo oscuro)
Rallado grueso de 9 mm/Espiral “espagueti” grueso (negro)
Rodajas de 2.5 mm/Espiral ancho (verde)
Rodajas onduladas de 3 mm/Espiral ancho ondulado (azul)
ELIJA ENTRE
RESULTADOS

5
PIEZAS Y CARACTERÍSTICAS
1. Bloque-motor/Base
con botón de encendido/apagado
2. Bol de 5 tazas (1.2 L)
3. 4 conos procesadores
a. Rodajas de 2.5 mm/Espiral ancho (verde)
b. Rodajas onduladas de 3 mm/Espiral ancho
ondulado (azul)
c. Rallado delgado de 3 mm/Espiral
“espagueti” delgado (rojo oscuro)
d. Rallado grueso de 9 mm/Espiral
“espagueti” grueso (negro)
4. Portacono
5. Boca de alimentación recta
Para cortar en espiral.
5a. Empujador de la boca de alimentración recta
6. Boca de alimentación inclinada
Para rebanar y triturar.
6a. Empujador de la boca de alimentracion
inclinada
7. Cepillo de limpieza
5.
4.
2.
3b.3d.
1.
3a.3c.
7.
6.
5a.
6a.

ADVERTENCIARIESGO DE INCENDIO O DESCARGA
ELÉCTRICA NO LO ABRA
ADVERTENCIA: PARA REDUCIR EL RIESGO DE DESCARGA ELÉCTRICA,
NO DESARME EL CUERPO DEL APARATO.ESTE APARATO NO CONTIENE
NINGUNA PIEZA QUE PUEDA SER REPARADA/CAMBIADA POR EL
USUARIO.LAS REPARACIONES DEBEN SER EFECTUADAS POR TÉCNICOS
AUTORIZADOS SOLAMENTE.
4
GUARDE ESTAS INSTRUCCIONESPARA USO DOMÉSTICO SOLAMENTENOTAS ACERCA DEL ENCHUFEEl cable de este aparato está dotado de una clavija polarizada (una pata es más ancha que la otra). Como medida de seguridad, se podrá enchufar de una sola manera en la toma de corriente polarizada. Si no entrara en la toma de corriente, inviértala. Si aún no entrara completamente, comuníquese con un electricista. No intente modificarla.
NOTAS ACERCA DEL CABLE1. El cable provisto con este aparato es
corto o removible, para reducir el peligro de que alguien se enganche o tropiece con un cable más largo.
2. Se podrá usar una extensión eléctrica, siempre que respete las precauciones siguientes.
3. Si utiliza un cable removible largo o una extensión:
a. La clasificación nominal de la extensión debe ser por lo menos igual a la del aparato.
b. Si el cable del aparato está dotado de un enchufe con puesta a tierra, la extensión también debe serlo.
c. El cable más largo o la extensión deben ser acomodados de manera que no cuelguen de la encimera/mesa, donde pueden ser jalados por niños o pueden causar tropiezos.
ADVERTENCIA: RIESGO DE INCENDIO O DESCARGA ELÉCTRICA El símbolo representado por un
relámpago con punta de flecha
dentro de un triángulo equilátero
tiene como fin alertar al usuario de la
presencia de voltajes peligrosos no
aislados en el interior del aparato,
los cuales pueden ser de suficiente
magnitud para constituir un riesgo
de incendio o descarga eléctrica.
El signo de exclamación dentro de
un triángulo equilátero tiene como fin
alertar al usuario de la presencia de
instrucciones importantes de
operación y mantenimiento (servicio)
en la documentación que acompaña
al equipo.

3
ÍNDICEInstrucciones de desembalaje. . . . . . . . . . . . . 2
Medidas de seguridad importantes. . . . . . . . . 3
Piezas y características . . . . . . . . . . . . . . . . . . 5
Accesorios . . . . . . . . . . . . . . . . . . . . . . . . . . . . 6
Instrucciones de operación . . . . . . . . . . . . . . . 7
Cómo cortar en espiral . . . . . . . . . . . . . . . . . . 7
Cómo rebanar/triturar. . . . . . . . . . . . . . . . . . . . 8
Limpieza, mantenimiento y almacenaje. . . . . . 9
Consejos útiles. . . . . . . . . . . . . . . . . . . . . . . . . 9
Garantía . . . . . . . . . . . . . . . . . . . . . . . . . . . . . . 9
Recetas . . . . . . . . . . . . . . . . . . . . . . . . . . 11–24
MEDIDAS DE SEGURIDAD IMPORTANTES Al usar aparatos eléctricos, siempre debe tomar precauciones básicas de seguridad, incluso las siguientes:
Preparación
1. Lea todas las instrucciones.
2. Los conos procesadores son muy afilados; manipúlelos con sumo cuidado.Inspeccione la hoja antes del uso para comprobar que no está dañada. En caso de daño, no use el accesorio.
3. Desconecte el aparato cuando no está en uso, antes de instalar/sacar piezas, antes de vaciar el bol y antes de limpiarlo. Para desconectar el cable de la toma de corriente, agárrelo por la clavija; nunca jale el cable.
4. No lo utilice en exteriores.
5. No permita que el cable cuelgue del borde de la encimera o de la mesa, ni que haga contacto con superficies calientes.
6. No utilice este aparato si el cable o la clavija estuviesen dañados, después de que hubiese funcionado mal o que se hubiese caído o si estuviese dañado; regréselo a un centro de servicio autorizado para su revisión, reparación o ajuste.
7. Este aparato está equipado con un dispositivo de protección térmica que apaga el motor en caso de sobrecalentamiento. Si esto ocurriera, desenchufe el aparato y permita que se enfríe por 15 minutos o más antes de continuar.
Operación
1. Para reducir el riesgo de herida seria o de daño al aparato, mantenga las manos y los utensilios
alejados de los conos procesadores durante el funcionamiento.
2. Evite el contacto con las piezas móviles. Nunca introduzca la mano/los dedos en la boca de alimentación; siempre use el empujador.
3. Espere hasta que el motor se haya detenido completamente antes de sacar la boca de alimentación. Si el motor no se detiene dentro de 4 segundos después de sacar la boca de alimentación, desconecte el aparato y llame al 1-800-726-0190 para asistencia. No utilice el aparato.
4. Guarde los conos procesadores como lo hiciera cuchillos afilados. Manténgalos fuera del alcance de los niños.
5. Asegúrese de que la boca de alimentación esté debidamente puesta y de que el empujador esté completamente engranado antes de poner el aparato en marcha.
6. No intente forzar el mecanismo de enclavamiento/bloqueo de seguridad de la boca de alimentación.
Limpieza
1. Para reducir el riesgo de descarga eléctrica, no coloque el aparato en agua ni en ningún otro líquido.
Generalidades
1. Este aparato no debe ser usado por o cerca de niños o personas con ciertas discapacidades.
2. No utilice este aparato bajo el efecto del alcohol u otra sustancia que afecte su tiempo de reacción o su percepción.
3. La rebanadora/trituradora/espiralizadora Cuisinart
® PrepExpress
™ cuenta con la
certificación “ETL” para uso doméstico. Utilícela únicamente con el propósito para el cual fue diseñada, según se describe en este manual de instrucciones. No utilice el aparato para ningún fin que no sea el indicado.
4. El uso de accesorios no recomendados o vendidos por Cuisinart puede provocar un incendio, un choque eléctrico o una herida, o dañar el aparato.
5. No haga funcionar el aparato debajo o dentro de un armario/gabinete. Siempre desconecte el aparato antes de guardarlo en un armario/gabinete. Dejar el aparato conectado presenta un riesgo de incendio, especialmente si este toca las paredes o la puerta del armario/gabinete cuando cierra.
6. Desconecte el aparato cuando no está en uso, antes de instalar/sacar piezas y antes de limpiarlo.
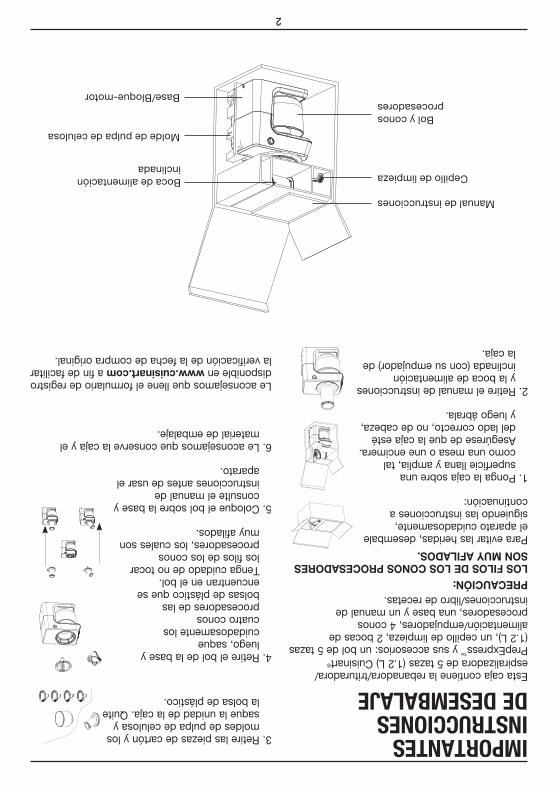
2
IMPORTANTES INSTRUCCIONESDE DESEMBALAJEEsta caja contiene la rebanadora/trituradora/espiralizadora de 5 tazas (1.2 L) Cuisinart
®
PrepExpress™
y sus accesorios: un bol de 5 tazas (1.2 L), un cepillo de limpieza, 2 bocas de alimentación/empujadores, 4 conos procesadores, una base y un manual de instrucciones/libro de recetas.
PRECAUCIÓN:
LOS FILOS DE LOS CONOS PROCESADORES SON MUY AFILADOS.
Para evitar las heridas, desembale el aparato cuidadosamente, siguiendo las instrucciones a continuación:
1. Ponga la caja sobre una superficie llana y amplia, tal como una mesa o une encimera. Asegúrese de que la caja esté del lado correcto, no de cabeza, y luego ábrala.
2. Retire el manual de instrucciones y la boca de alimentación inclinada (con su empujador) de la caja.
3. Retire las piezas de cartón y los moldes de pulpa de celulosa y saque la unidad de la caja. Quite la bolsa de plástico.
4. Retire el bol de la base y luego, saque cuidadosamente los cuatro conos procesadores de las bolsas de plástico que se encuentran en el bol. Tenga cuidado de no tocar los filos de los conos procesadores, los cuales son muy afilados.
5. Coloque el bol sobre la base y consulte el manual de instrucciones antes de usar el aparato.
6. Le aconsejamos que conserve la caja y el material de embalaje.
Le aconsejamos que llene el formulario de registro disponible en www.cuisinart.com a fin de facilitar la verificación de la fecha de compra original.
Manual de instrucciones
Boca de alimentación
inclinada
Molde de pulpa de celulosa
Base/Bloque-motor
Bol y conos
procesadores
Cepillo de limpieza

Rebanadora/Trituradora/Espiralizadora PrepExpress™
SSL-100
Para su seguridad y para disfrutar plenamente de este producto, siempre lea cuidadosamente las
instrucciones antes de usarlo.
MANUAL DE
INSTRUCCIONES
Y LIBRO DE
RECETAS

Version No: SSL100 IB-14725-ESPOpen Size: 148x210MM Number of Page:52PP Saddle Stitiched
Materal: 105gsm gloss artpaper for whole book Coating: Gloss varnishing in cover
Front Cover: 4C(CMYK)+1C(BK)
PDF version: SSL100 IB-14725-ESP(0.0) Hugo Code: XBD 0083 IB-1-1 Operator:LKF
Hugo Diecut: IRP:BBJ Hot Stamping:
Remark: Quality Request(1) Spot UV: Embossing:
Front Inside: 1C(BK)+1C(BK) Date: 07-Jan-2017 Co-ordlinator:Astor You/Linda Ouyang
Hugo Description