Embed Size (px)
Citation preview
Instant Moisture Meter for Grains, Seeds, Coffee and other small products PM-650
Operating Manual

CONTENTS
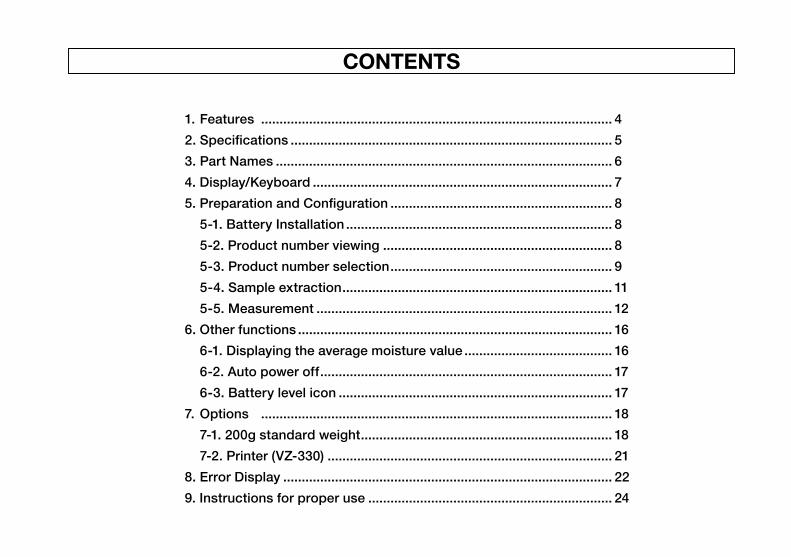
1. Features ............................................................................................... 42.Specifications ....................................................................................... 53. Part Names ........................................................................................... 64.Display/Keyboard ................................................................................. 75.PreparationandConfiguration ............................................................ 8 5-1.BatteryInstallation ........................................................................ 8 5-2.Productnumberviewing .............................................................. 8 5-3.Productnumberselection ............................................................ 9 5-4.Sampleextraction ......................................................................... 11 5-5.Measurement ................................................................................ 126.Otherfunctions ..................................................................................... 16 6-1.Displayingtheaveragemoisturevalue ........................................ 16 6-2.Autopoweroff ............................................................................... 17 6-3.Batterylevelicon .......................................................................... 177.Options ............................................................................................... 18 7-1.200gstandardweight .................................................................... 18 7-2.Printer(VZ-330) ............................................................................. 218.ErrorDisplay ......................................................................................... 229.Instructionsforproperuse .................................................................. 24
4
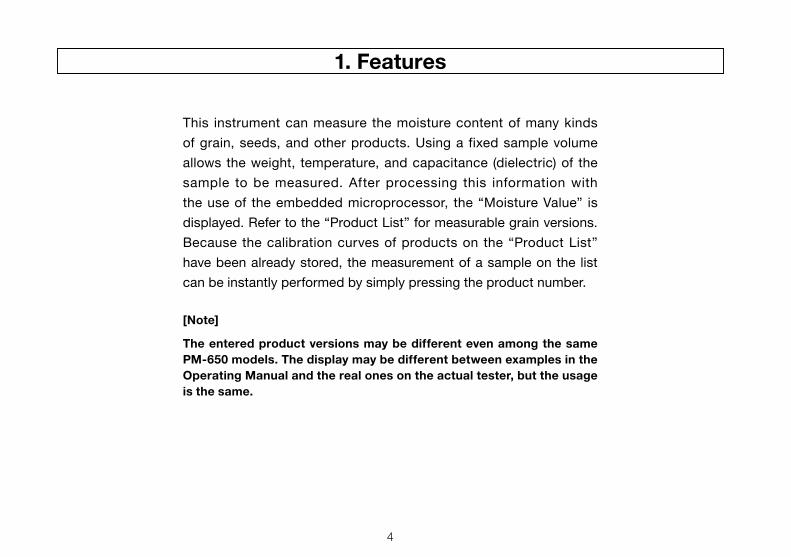
This instrument can measure the moisture content of many kinds of grain, seeds, and other products. Using a fixed sample volume allows the weight, temperature, and capacitance (dielectric) of the sample to be measured. After processing this information with the use of the embedded microprocessor, the “Moisture Value” is displayed. Refer to the “Product List” for measurable grain versions. Because the calibration curves of products on the “Product List” have been already stored, the measurement of a sample on the list can be instantly performed by simply pressing the product number.
1. Features
[Note]
The entered product versions may be different even among the same PM-650 models. The display may be different between examples in the Operating Manual and the real ones on the actual tester, but the usage is the same.
5
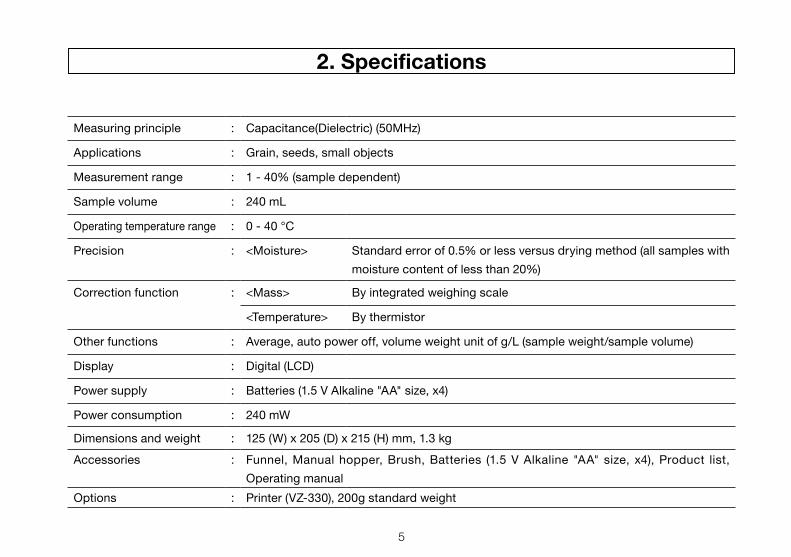
2. Specifications
Measuring principle : Capacitance(Dielectric) (50MHz)
Applications : Grain, seeds, small objects
Measurement range : 1 - 40% (sample dependent)
Sample volume : 240 mL
Operating temperature range : 0 - 40 °C
Precision : <Moisture> Standard error of 0.5% or less versus drying method (all samples with moisture content of less than 20%)
Correction function : <Mass> By integrated weighing scale
<Temperature> By thermistor
Other functions : Average, auto power off, volume weight unit of g/L (sample weight/sample volume)
Display : Digital (LCD)
Power supply : Batteries (1.5 V Alkaline "AA" size, x4)
Power consumption : 240 mW
Dimensions and weight : 125 (W) x 205 (D) x 215 (H) mm, 1.3 kg
Accessories : Funnel, Manual hopper, Brush, Batteries (1.5 V Alkaline "AA" size, x4), Product list, Operating manual
Options : Printer (VZ-330), 200g standard weight
6
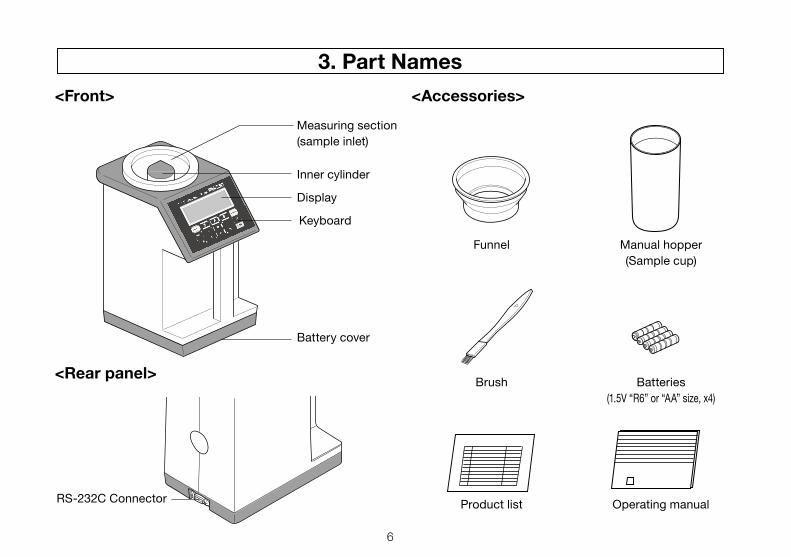
3. Part Names<Accessories>
<Rear panel>
<Front>Measuring section(sample inlet)
Battery cover
Keyboard
Display
Inner cylinder
Funnel Manual hopper (Sample cup)
Product list Operating manual
Brush Batteries (1.5V “R6” or “AA” size, x4)
RS-232C Connector
7
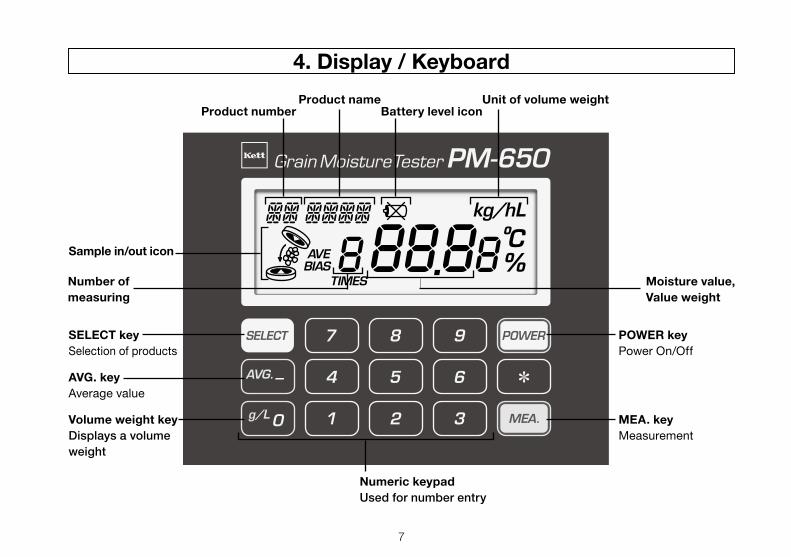
4. Display / Keyboard
MEA. keyMeasurement
POWER keyPower On/Off
Moisture value, Value weight
Battery level iconProduct name
Product number
Sample in/out icon
Number of measuring
Unit of volume weight
SELECT keySelection of products
AVG. keyAverage value
Volume weight keyDisplaysavolumeweight
Numeric keypadUsedfornumberentry
8
5. Preparation and Configuration• This instrument isequippedwithan integratedweighingscale.Foroptimal results, this instrumentshould
be placed on a horizontal surface and used in locations where the wind is not strong and the instrument isn’t subject to vibration.
• Donothittheinstrumentduringoperationanddonotleavetheinstrumentupsidedown.• Althoughthis instrumentperformsautomatic temperaturecorrection, foroptimalmeasurement, leave this
instrument at ambient temperature for 2 hours or more before use.• Thetemperaturesensorembeddedinthemainunitmeasurestheambienttemperaturearoundthemeasuring
unit and automatically performs temperature correction. If the temperature difference between the main unit and a sample is ±10 °C or more, a measurement error may be generated and, therefore, the displayed measured value blinks (warning indication) (see “8. Error Display” on page 22and23).
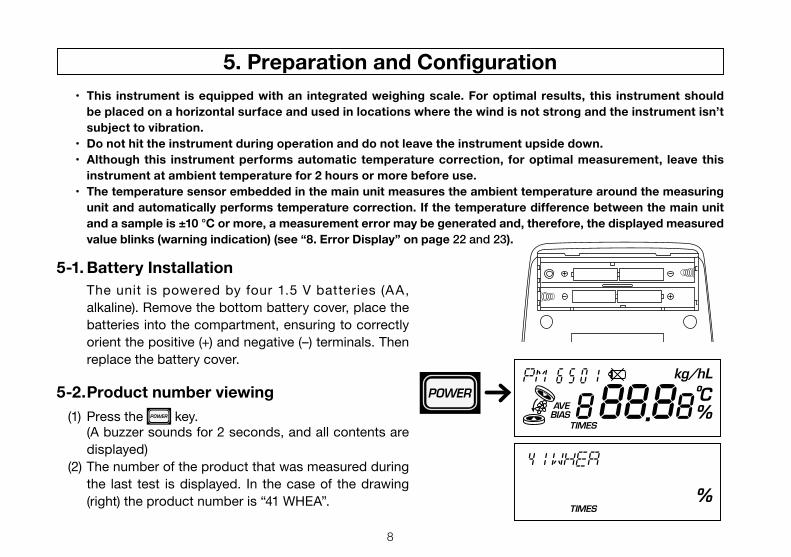
5-1. Battery Installation The unit is powered by four 1.5 V batteries (AA,
alkaline). Remove the bottom battery cover, place the batteries into the compartment, ensuring to correctly orient the positive (+) and negative (–) terminals. Then replace the battery cover.
5-2. Product number viewing(1) Press the key. (A buzzer sounds for 2 seconds, and all contents are
displayed)(2) The number of the product that was measured during
the last test is displayed. In the case of the drawing (right) the product number is “41 WHEA”.
9
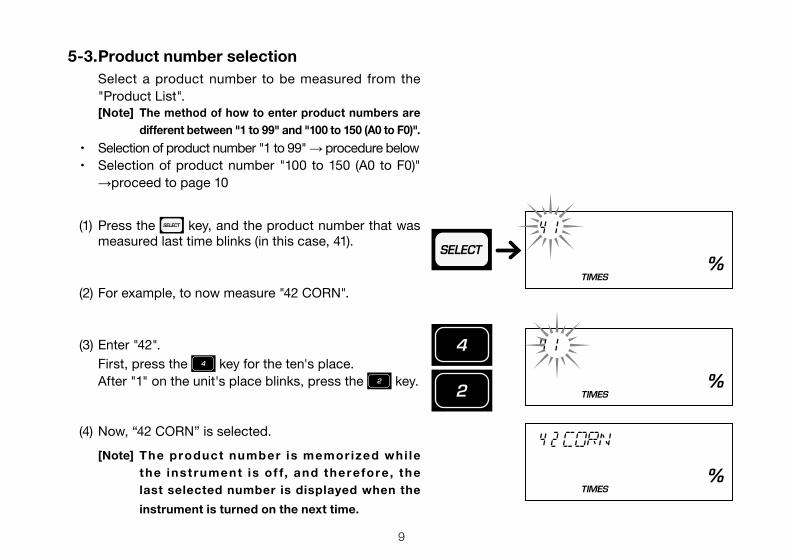
5-3. Product number selection Select a product number to be measured from the
"Product List".[Note] The method of how to enter product numbers are
different between "1 to 99" and "100 to 150 (A0 to F0)".・ Selection of product number "1 to 99" → procedure below・ Selection of product number "100 to 150 (A0 to F0)"
→proceed to page 10
(1) Press the key, and the product number that was measured last time blinks (in this case, 41).
(2) For example, to now measure "42 CORN".
(3) Enter "42". First, press the key for the ten's place. After "1" on the unit's place blinks, press the key.
(4) Now, “42 CORN” is selected.[Note] The product number is memor ized whi le
the ins t rument is of f , and therefore, the last selected number is displayed when the instrument is turned on the next time.
10
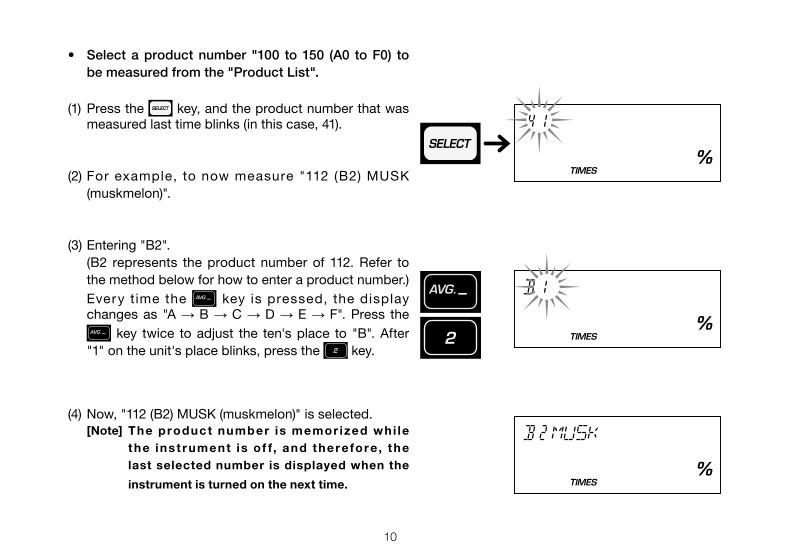
• Selectaproductnumber "100 to150 (A0 toF0) tobemeasuredfromthe"ProductList".
(1) Press the key, and the product number that was measured last time blinks (in this case, 41).
(2) For example, to now measure "112 (B2) MUSK (muskmelon)".
(3) Entering "B2". (B2 represents the product number of 112. Refer to
the method below for how to enter a product number.) Every time the key is pressed, the display
changes as "A → B → C → D → E → F". Press the key twice to adjust the ten's place to "B". After
"1" on the unit's place blinks, press the key.
(4) Now, "112 (B2) MUSK (muskmelon)" is selected.[Note] The product number is memor ized whi le
the ins t rument is of f , and therefore, the last selected number is displayed when the instrument is turned on the next time.
11
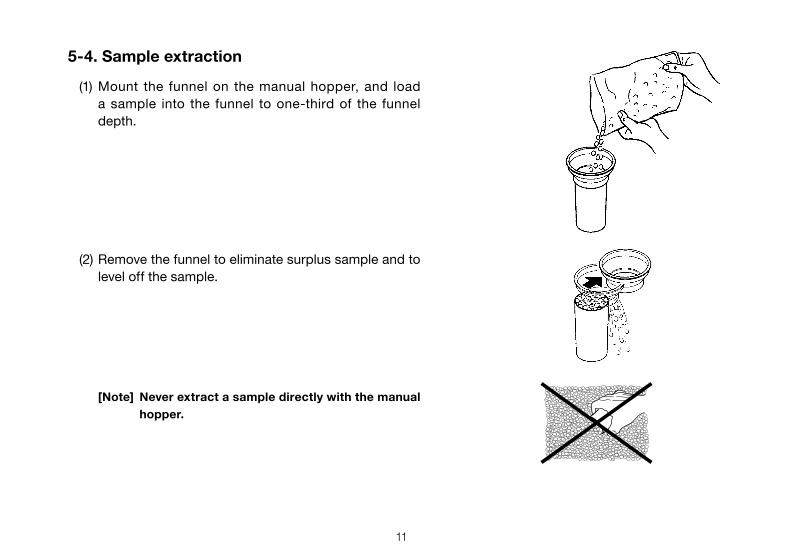
5-4. Sample extraction
(1) Mount the funnel on the manual hopper, and load a sample into the funnel to one-third of the funnel depth.
(2) Remove the funnel to eliminate surplus sample and to level off the sample.
[Note] Never extract a sample directly with the manual hopper.
12
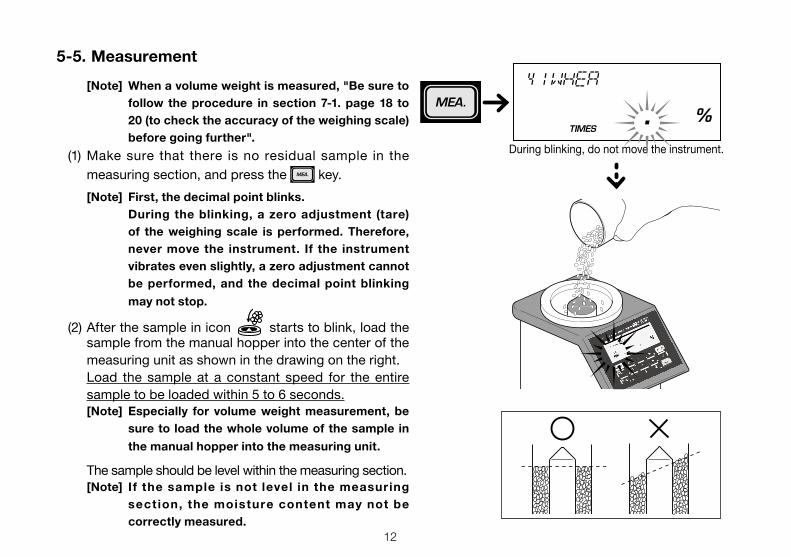
5-5. Measurement[Note] When a volume weight is measured, "Be sure to
follow the procedure in section 7-1. page 18 to 20 (to check the accuracy of the weighing scale) before going further".
(1) Make sure that there is no residual sample in the measuring section, and press the key.[Note] First, the decimal point blinks. During the blinking, a zero adjustment (tare)
of the weighing scale is performed. Therefore, never move the instrument. If the instrument vibrates even slightly, a zero adjustment cannot be performed, and the decimal point blinking may not stop.
(2) After the sample in icon starts to blink, load the sample from the manual hopper into the center of the measuring unit as shown in the drawing on the right.
Load the sample at a constant speed for the entire sample to be loaded within 5 to 6 seconds.[Note] Especially for volume weight measurement, be
sure to load the whole volume of the sample in the manual hopper into the measuring unit.
The sample should be level within the measuring section.[Note] If the sample is not level in the measuring
sect ion, the moisture content may not be correctly measured.
During blinking, do not move the instrument.

13
(3) After the decimal point blinks for approx. 5 seconds, the measuring count and moisture content are displayed.
Display example : 41 WHEA 1TIMES 13.5% (Product number : 41 WHEAT, 1st measurement, moisture content 13.5%) The measuring count is displayed from 1 to 9. The 10th measuring count is displayed as 1.
When the key is pressed after the moisture content is displayed, the volume weight is displayed with its unit. Once the key is pressed, the unit cannot return to the moisture content display.
Display example : 41 WHEA 1TIMES 786g/L (Product number : 41 WHEAT, 1st measurement, volume weight 786 g/L)
<Display example>
14
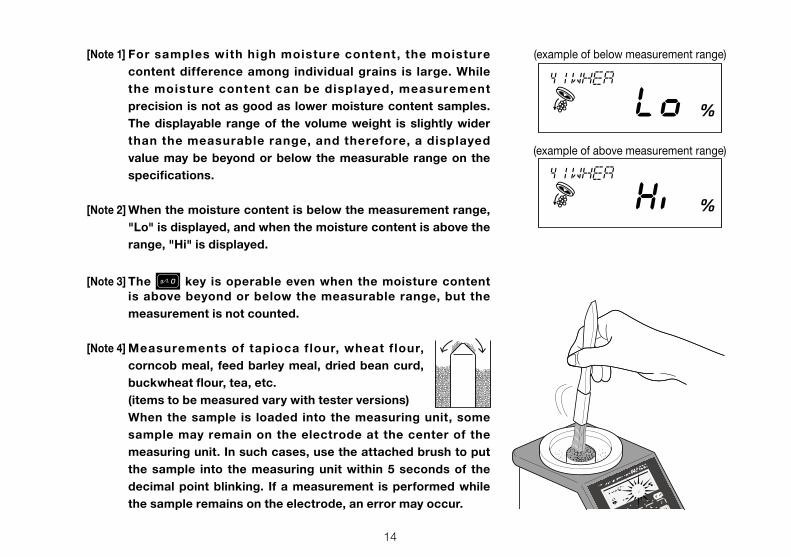
(example of below measurement range)
(example of above measurement range)
[Note 1] For samples with high moisture content , the moisture content difference among individual grains is large. While the moisture content can be displayed, measurement precision is not as good as lower moisture content samples. The displayable range of the volume weight is slightly wider than the measurable range, and therefore, a displayed value may be beyond or below the measurable range on the specifications.
[Note 2] When the moisture content is below the measurement range, "Lo" is displayed, and when the moisture content is above the range, "Hi" is displayed.
[Note 3] The key is operable even when the moisture content is above beyond or below the measurable range, but the measurement is not counted.
[Note 4] Measurements of tapioca f lour, wheat f lour, corncob meal, feed barley meal, dried bean curd, buckwheat flour, tea, etc.
(items to be measured vary with tester versions) When the sample is loaded into the measuring unit, some
sample may remain on the electrode at the center of the measuring unit. In such cases, use the attached brush to put the sample into the measuring unit within 5 seconds of the decimal point blinking. If a measurement is performed while the sample remains on the electrode, an error may occur.
15
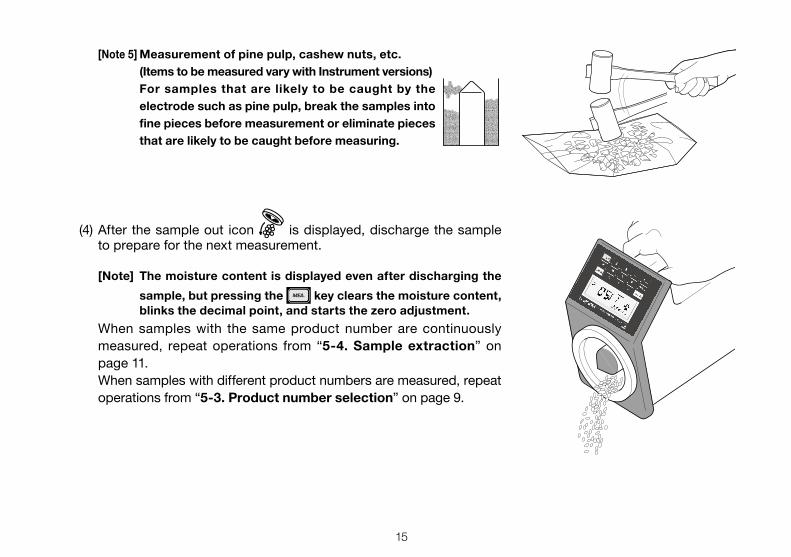
[Note 5] Measurement of pine pulp, cashew nuts, etc. (Items to be measured vary with Instrument versions) For samples that are likely to be caught by the
electrode such as pine pulp, break the samples into fine pieces before measurement or eliminate pieces that are likely to be caught before measuring.
(4) After the sample out icon is displayed, discharge the sample to prepare for the next measurement.
[Note] The moisture content is displayed even after discharging the sample, but pressing the key clears the moisture content, blinks the decimal point, and starts the zero adjustment.
When samples with the same product number are continuously measured, repeat operations from “5-4. Sample extraction” on page 11.
When samples with different product numbers are measured, repeat operations from “5-3. Product number selection” on page 9.
16
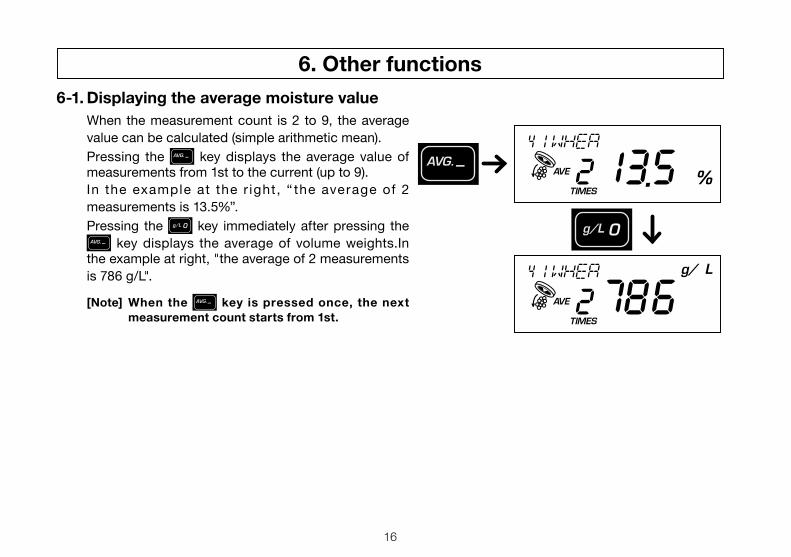
6-1. Displaying the average moisture value When the measurement count is 2 to 9, the average
value can be calculated (simple arithmetic mean). Pressing the key displays the average value of
measurements from 1st to the current (up to 9). In the example at the r ight, “ the average of 2
measurements is 13.5%”. Pressing the key immediately after pressing the
key displays the average of volume weights.In the example at right, "the average of 2 measurements is 786 g/L".
[Note] When the key is pressed once, the next measurement count starts from 1st.
6. Other functions
17
6-2. Auto power off If no measurement or operation is performed for 3
minutes with the power on, the power is automatically turned off to avoid battery drain.
A buzzer sounds and the displayed contents disappear.
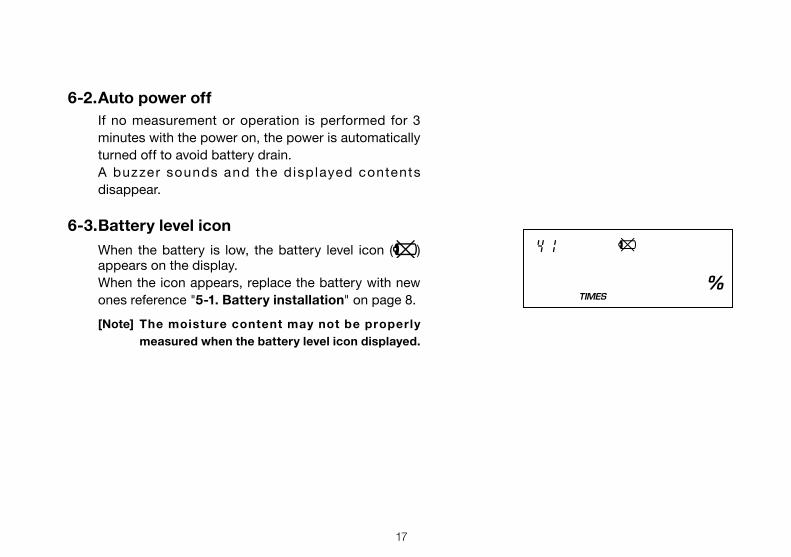
6-3. Battery level icon When the battery is low, the battery level icon ( )
appears on the display. When the icon appears, replace the battery with new
ones reference "5-1. Battery installation" on page 8.[Note] The moisture content may not be properly
measured when the battery level icon displayed.
18
7. Options
Mainunit
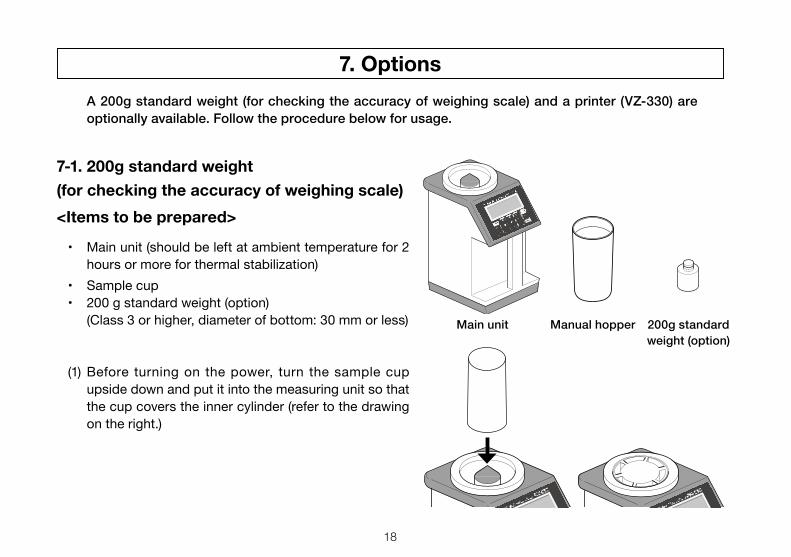
7-1. 200g standard weight (for checking the accuracy of weighing scale)
A200gstandardweight(forcheckingtheaccuracyofweighingscale)andaprinter(VZ-330)areoptionallyavailable.Followtheprocedurebelowforusage.
200gstandardweight(option)
Manualhopper
<Items to be prepared>
• Mainunit(shouldbeleftatambienttemperaturefor2hours or more for thermal stabilization)
• Samplecup• 200gstandardweight(option) (Class 3 or higher, diameter of bottom: 30 mm or less)
(1) Before turning on the power, turn the sample cup upside down and put it into the measuring unit so that the cup covers the inner cylinder (refer to the drawing on the right.)
19
Simultaneouspressingduringbeep
<Accuracycheckingmodeofweighingscale>
+Beep
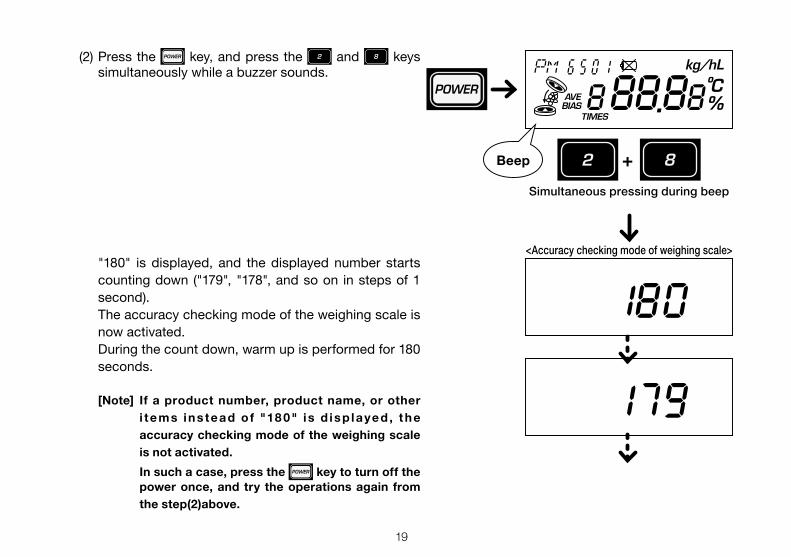
(2) Press the key, and press the and keys simultaneously while a buzzer sounds.
"180" is displayed, and the displayed number starts counting down ("179", "178", and so on in steps of 1 second).
The accuracy checking mode of the weighing scale is now activated.
During the count down, warm up is performed for 180 seconds.
[Note] If a product number, product name, or other i tems ins tead o f "18 0" i s d isp layed , t he accuracy checking mode of the weighing scale is not activated.
In such a case, press the key to turn off the power once, and try the operations again from the step(2)above.
20
Normalfrom199.0to201.0
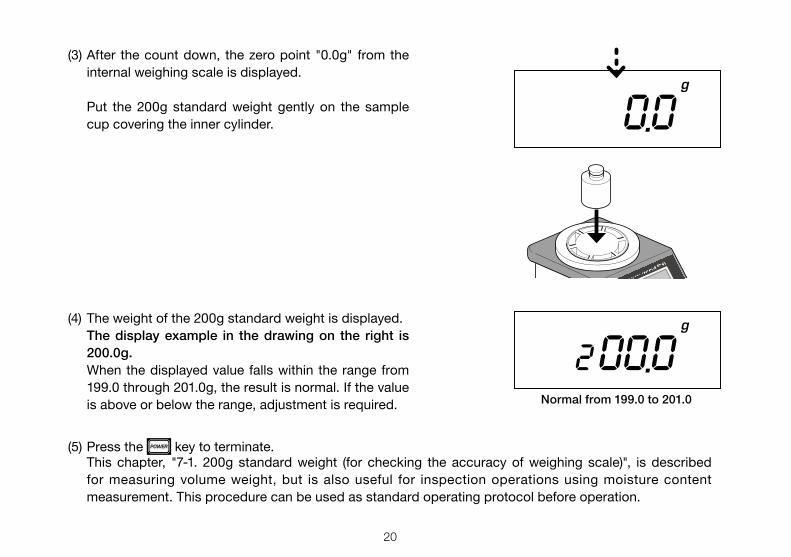
(3) After the count down, the zero point "0.0g" from the internal weighing scale is displayed.
Put the 200g standard weight gently on the sample cup covering the inner cylinder.
(4) The weight of the 200g standard weight is displayed. Thedisplayexample in thedrawingon the right is
200.0g. When the displayed value falls within the range from
199.0 through 201.0g, the result is normal. If the value is above or below the range, adjustment is required.
(5) Press the key to terminate. This chapter, "7-1. 200g standard weight (for checking the accuracy of weighing scale)", is described
for measuring volume weight, but is also useful for inspection operations using moisture content measurement. This procedure can be used as standard operating protocol before operation.
21
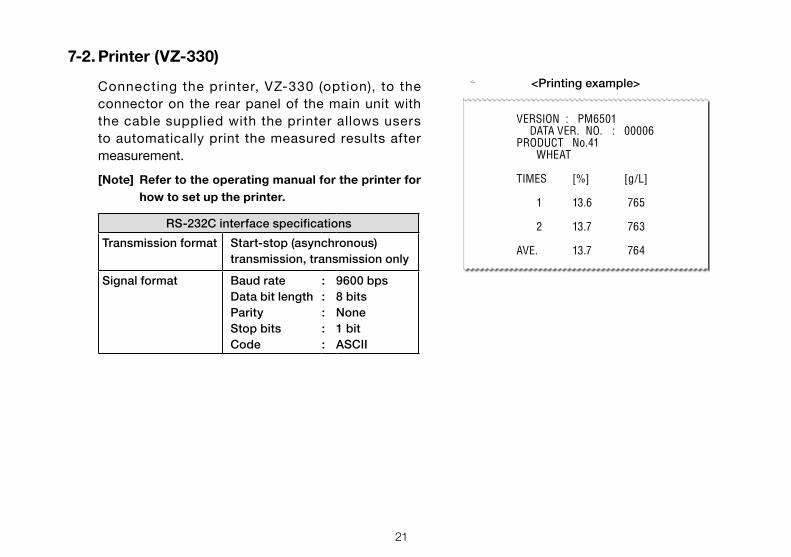
7-2. Printer (VZ-330)
Connecting the printer, VZ-330 (option), to the connector on the rear panel of the main unit with the cable supplied with the printer allows users to automatically print the measured results after measurement.[Note] Refer to the operating manual for the printer for
how to set up the printer.
RS-232CinterfacespecificationsTransmissionformat Start-stop(asynchronous)
transmission,transmissiononly
Signalformat BaudrateDatabitlengthParityStopbitsCode
:::::
9600 bps8 bitsNone1 bitASCII
<Printingexample>
VERSION : PM6501 DATA VER. NO. : 00006PRODUCT No.41 WHEAT
TIMES [%] [g/L]
1 13.6 765
2 13.7 763
AVE. 13.7 764
22
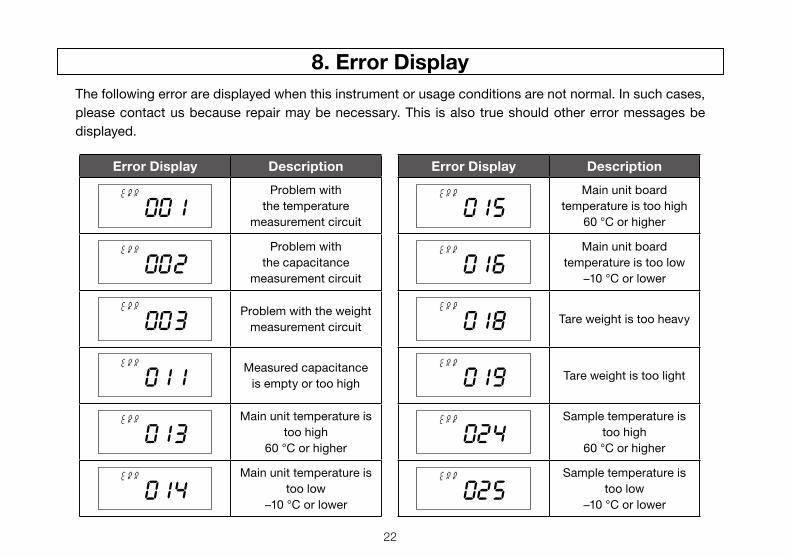
The following error are displayed when this instrument or usage conditions are not normal. In such cases, please contact us because repair may be necessary. This is also true should other error messages be displayed.
8. Error Display
Error Display DescriptionMain unit board
temperature is too high60 °C or higher
Main unit board temperature is too low
−10°Corlower
Tare weight is too heavy
Tare weight is too light
Sample temperature is too high
60 °C or higher
Sample temperature is too low
−10°Corlower
Error Display DescriptionProblem with
the temperature measurement circuit
Problem with the capacitance
measurement circuit
Problem with the weight measurement circuit
Measured capacitance is empty or too high
Main unit temperature is too high
60 °C or higher
Main unit temperature is too low
−10°Corlower
23
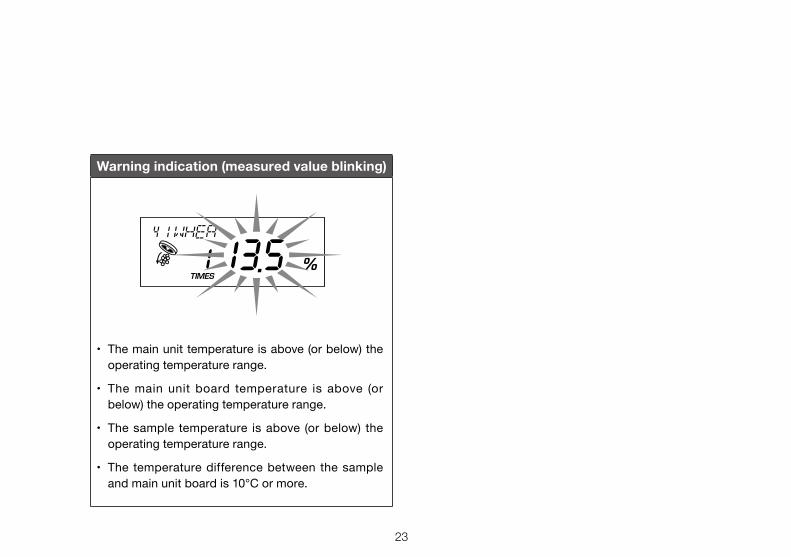
Warning indication (measured value blinking)
• Themainunittemperatureisabove(orbelow)theoperating temperature range.
• Themainunit board temperature is above (orbelow) the operating temperature range.
• Thesample temperature isabove (orbelow) theoperating temperature range.
• The temperaturedifferencebetweenthesampleand main unit board is 10°C or more.
24
(1) This tester is a precision instrument equipped with an integrated weighing scale. To avoid instrument failure, do not hit the instrument or drop it.
(2) Do not directly touch the metal part of the measuring unit with your hand. Failure to observe this may generate static electricity which may lead to breakdown.
(3) The protrusion inside the measuring unit is the temperature sensor and, therefore, be careful not to break it.
(4) When the inner portion of the measuring unit becomes dirty, use a soft damp cloth to wipe inside. Never wash this tester in water.
(5) When this tester is not used for a long period of time, remove the batteries.
(6) If a displayed measured value is not normal or is questionable, stop using this tester immediately and contact us.
9. Instructions for proper use


1310·HI·0101·PDF
Caution● It isstrictlyprohibitedtotransferpartorallof thismanualwithout
permission.● Thecontentsofthismanualaresubjecttochangewithoutnotice.● Theappearances,screens,etc.of theproductandaccessories
displayedonthismanualmaydifferfromtheactualones,however,operationsandfunctionsarenotaffected.
● Alleffortshavebeenmadetoensurethecontentsofthismanualareaccurate.However, ifyounoticeanypart tobeunclear, incorrect,omitted,orthelikeinthismanual,pleasecontactus.
● Beawarethatwearenotliablefortheeffectsresultingfromopera-tionsaccordingtothismanualregardlessoftheitemsabove.