Embed Size (px)
Citation preview

Installing the Service Connector on yourpremises for tiering to AWS S3Cloud TieringBen CammettJune 08, 2020
This PDF was generated from https://docs.netapp.com/us-en/cloud-tiering/task_installing_service_connector.htmlon June 08, 2020. Always check docs.netapp.com for the latest.

Table of ContentsInstalling the Service Connector on your premises for tiering to AWS S3 . . . . . . . . . . . . . . . . . . . . . . . . . . . . 1
Understanding the relationship between the Service Connector and Cloud Manager . . . . . . . . . . . . . . . 1
Verifying host requirements . . . . . . . . . . . . . . . . . . . . . . . . . . . . . . . . . . . . . . . . . . . . . . . . . . . . . . . . . . . . . . . . . . 1
Preparing your networking . . . . . . . . . . . . . . . . . . . . . . . . . . . . . . . . . . . . . . . . . . . . . . . . . . . . . . . . . . . . . . . . . . . 2
Providing permissions to an AWS account . . . . . . . . . . . . . . . . . . . . . . . . . . . . . . . . . . . . . . . . . . . . . . . . . . . . . 3
Installing the Service Connector on an on-premises Linux host . . . . . . . . . . . . . . . . . . . . . . . . . . . . . . . . . . 5
Adding the AWS account to Cloud Manager . . . . . . . . . . . . . . . . . . . . . . . . . . . . . . . . . . . . . . . . . . . . . . . . . . . . 7

Installing the Service Connector on yourpremises for tiering to AWS S3If you want to tier cold data to AWS S3, you can deploy the Service Connectoreither on your premises or in an AWS VPC. This page describes how to install theon-premises Service Connector.
To deploy the Service Connector in AWS, follow the prompts in Cloud Tiering when discovering yourfirst cluster.
Understanding the relationship between the ServiceConnector and Cloud ManagerTo install the Service Connector, you need to download and install NetApp Cloud Manager software.You need to do this because the Service Connector is part of Cloud Manager.
Verifying host requirementsThe Service Connector is supported on a Linux host that meets the following requirements.
Supported operating systems
• CentOS 7.2
• CentOS 7.3
• CentOS 7.4
• CentOS 7.5
• CentOS 7.6
• CentOS 7.7
• Red Hat Enterprise Linux 7.2
• Red Hat Enterprise Linux 7.3
• Red Hat Enterprise Linux 7.4
• Red Hat Enterprise Linux 7.5
• Red Hat Enterprise Linux 7.6
• Red Hat Enterprise Linux 7.7
The Red Hat Enterprise Linux system must be registered with Red Hat SubscriptionManagement. If it is not registered, the system cannot access repositories to update required 3rdparty software during installation.
The Service Connector software is supported on English-language versions of these operatingsystems.
Hypervisor
A bare metal or hosted hypervisor that is certified to run CentOS or Red Hat Enterprise LinuxRed Hat Solution: Which hypervisors are certified to run Red Hat Enterprise Linux?
CPU
2.27 GHz or higher with two cores
RAM
4 GB
Free disk space in /opt
100 GB
Ports
The following ports must be available:
• 80 for HTTP access
• 443 for HTTPS access
• 3306 for the database
• 8080 for the API proxy
If other services are using these ports, the installation fails.
There is a potential conflict with port 3306. If another instance of MySQL isrunning on the host, it uses port 3306 by default. You must change the port thatthe existing MySQL instance uses.
You can change the default HTTP and HTTPS ports when you install the Service Connector. Youcannot change the default port for the MySQL database. If you change the HTTP and HTTPSports, you must ensure that users can access the web console from a remote host:
◦ Modify the security group to allow inbound connections through the ports.
◦ Specify the port when you enter the URL to the web console.
Preparing your networkingThe Service Connector needs a connection to your ONTAP clusters, to AWS S3, and to the Cloud Tieringservice.
Steps

1. Set up an on-premises location for the Service Connector that enables the following connections:
◦ An outbound internet connection to the Cloud Tiering service over port 443 (HTTPS)
◦ An HTTPS connection over port 443 to S3
◦ An HTTPS connection over port 443 to your ONTAP clusters
2. Ensure that outbound internet access is allowed to those endpoints:
◦ http://dev.mysql.com/get/mysql-community-release-el7-5.noarch.rpm
◦ https://dl.fedoraproject.org/pub/epel/epel-release-latest-7.noarch.rpm
◦ https://s3.amazonaws.com/aws-cli/awscli-bundle.zip
The installer accesses these URLs during the installation process.
Providing permissions to an AWS accountAfter you install the Service Connector, you need to provide access keys for an AWS account. Thataccount needs specific permissions so the Service Connector can set up data tiering to AWS S3 on yourbehalf.
Cloud Tiering tiers data to an S3 bucket that resides in this AWS account.
Steps
1. From the AWS IAM console, create an IAM policy by copying and pasting the permissions below.
For step-by-step instructions, refer to AWS Documentation: Creating IAM Policies.

{ "Version": "2012-10-17", "Statement": [ { "Effect": "Allow", "Action": [ "sts:DecodeAuthorizationMessage", "s3:ListBucket", "ec2:DescribeRegions", "cloudformation:CreateStack", "cloudformation:DeleteStack", "cloudformation:DescribeStacks", "cloudformation:DescribeStackEvents", "cloudformation:ValidateTemplate" ], "Resource": "*" }, { "Sid": "fabricPoolPolicy", "Effect": "Allow", "Action": [ "s3:DeleteBucket", "s3:GetLifecycleConfiguration", "s3:PutLifecycleConfiguration", "s3:CreateBucket", "s3:GetBucketTagging", "s3:PutBucketTagging" ], "Resource": "arn:aws:s3:::fabric-pool*" } ]}
2. Attach the policy to an IAM role or an IAM user.
For step-by-step instructions, refer to the following:
◦ AWS Documentation: Creating IAM Roles
◦ AWS Documentation: Adding and Removing IAM Policies
Result
The account now has the required permissions. You need to provide access keys for the AWS accountafter you install the Service Connector.
Installing the Service Connector on an on-premisesLinux hostAfter you verify system and network requirements, download and install the software on a supportedLinux host.
About this task
• Root privileges are not required for installation.
• The Service Connector installs the AWS command line tools (awscli) to enable recovery proceduresfrom NetApp support.
If you receive a message that installing the awscli failed, you can safely ignore the message. TheService Connector can operate successfully without the tools.
• The installer that is available on the NetApp Support Site might be an earlier version. Afterinstallation, the software automatically updates itself if a new version is available.
Steps
1. Download the installation script for Cloud Manager 3.8.4 or later from the NetApp Support Site, andthen copy it to the Linux host.
Why do I need to install Cloud Manager?
2. Assign permissions to execute the script.
Example
chmod +x OnCommandCloudManager-V3.8.4.sh
3. Run the installation script:
./OnCommandCloudManager-V3.8.4.sh [silent] [proxy=ipaddress] [proxyport=port][proxyuser=user_name] [proxypwd=password]
silent runs the installation without prompting you for information.
proxy is required if the host is behind a proxy server.
proxyport is the port for the proxy server.
proxyuser is the user name for the proxy server, if basic authentication is required.
proxypwd is the password for the user name that you specified.
4. Unless you specified the silent parameter, type Y to continue the script, and then enter the HTTPand HTTPS ports when prompted.

If you change the HTTP and HTTPS ports, you must ensure that users can access the Cloud Managerweb console from a remote host:
◦ Modify the security group to allow inbound connections through the ports.
◦ Specify the port when you enter the URL to the web console.
The Service Connector is now installed. At the end of the installation, the Cloud Manager service(occm) restarts twice if you specified a proxy server.
5. Open a web browser and enter the following URL:
https://ipaddress:port
ipaddress can be localhost, a private IP address, or a public IP address, depending on theconfiguration of the host.
port is required if you changed the default HTTP (80) or HTTPS (443) ports. For example, if theHTTPS port was changed to 8443, you would enter https://ipaddress:8443
6. Sign up at NetApp Cloud Central or log in.
7. After you log in, set up Cloud Manager:
a. Specify the Cloud Central account to associate with this Cloud Manager system. This should bethe same account that you specified when you ran the pre-installation script.
Learn about Cloud Central accounts.
b. Enter a name for the system.
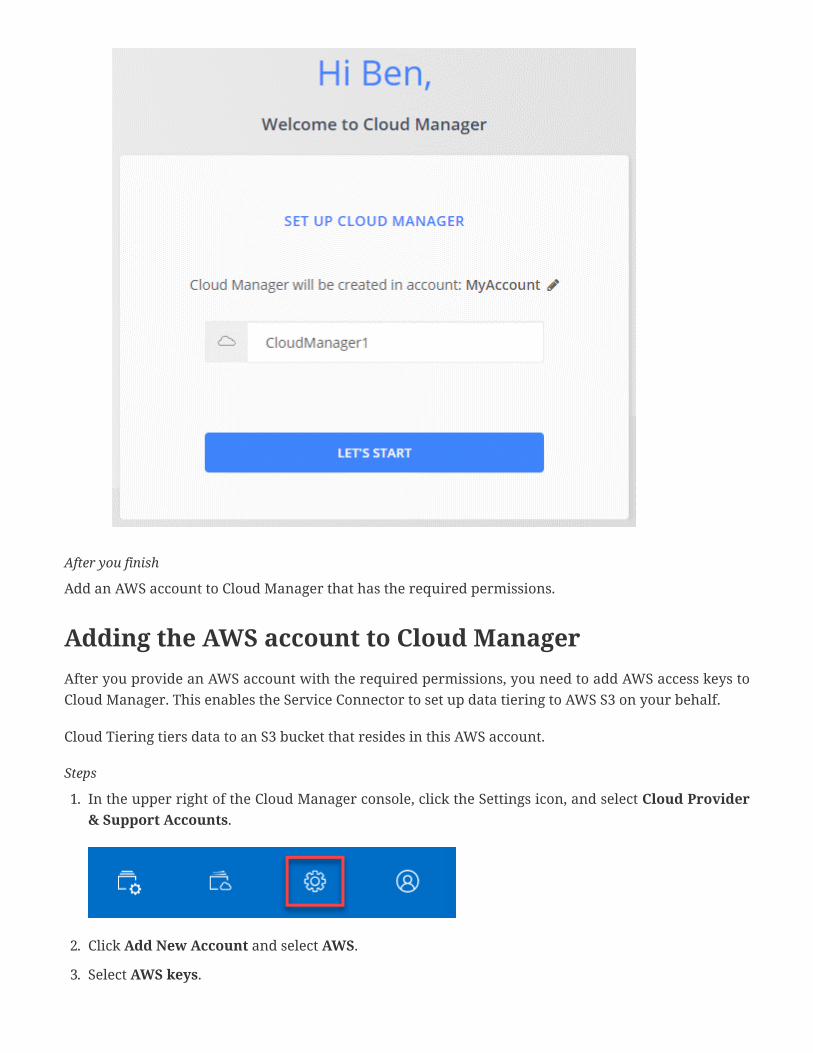
After you finish
Add an AWS account to Cloud Manager that has the required permissions.
Adding the AWS account to Cloud ManagerAfter you provide an AWS account with the required permissions, you need to add AWS access keys toCloud Manager. This enables the Service Connector to set up data tiering to AWS S3 on your behalf.
Cloud Tiering tiers data to an S3 bucket that resides in this AWS account.
Steps
1. In the upper right of the Cloud Manager console, click the Settings icon, and select Cloud Provider& Support Accounts.
2. Click Add New Account and select AWS.
3. Select AWS keys.

4. Confirm that the policy requirements have been met and then click Create Account.
Result
The Service Connector is now installed with the permissions that it needs to tier cold data from yourONTAP systems to AWS S3. You should now see the Service Connector when you set up tiering to a newcluster.

Copyright Information
Copyright © 2020 NetApp, Inc. All rights reserved. Printed in the U.S. No part of this documentcovered by copyright may be reproduced in any form or by any means-graphic, electronic, ormechanical, including photocopying, recording, taping, or storage in an electronic retrieval system-without prior written permission of the copyright owner.
Software derived from copyrighted NetApp material is subject to the following license and disclaimer:
THIS SOFTWARE IS PROVIDED BY NETAPP “AS IS” AND WITHOUT ANY EXPRESS OR IMPLIEDWARRANTIES, INCLUDING, BUT NOT LIMITED TO, THE IMPLIED WARRANTIES OFMERCHANTABILITY AND FITNESS FOR A PARTICULAR PURPOSE, WHICH ARE HEREBYDISCLAIMED. IN NO EVENT SHALL NETAPP BE LIABLE FOR ANY DIRECT, INDIRECT,INCIDENTAL, SPECIAL, EXEMPLARY, OR CONSEQUENTIAL DAMAGES (INCLUDING, BUT NOTLIMITED TO, PROCUREMENT OF SUBSTITUTE GOODS OR SERVICES; LOSS OF USE, DATA, ORPROFITS; OR BUSINESS INTERRUPTION) HOWEVER CAUSED AND ON ANY THEORY OFLIABILITY, WHETHER IN CONTRACT, STRICT LIABILITY, OR TORT (INCLUDING NEGLIGENCE OROTHERWISE) ARISING IN ANY WAY OUT OF THE USE OF THIS SOFTWARE, EVEN IF ADVISED OFTHE POSSIBILITY OF SUCH DAMAGE.
NetApp reserves the right to change any products described herein at any time, and without notice.NetApp assumes no responsibility or liability arising from the use of products described herein,except as expressly agreed to in writing by NetApp. The use or purchase of this product does notconvey a license under any patent rights, trademark rights, or any other intellectual propertyrights of NetApp.
The product described in this manual may be protected by one or more U.S. patents,foreign patents, or pending applications.
RESTRICTED RIGHTS LEGEND: Use, duplication, or disclosure by the government is subject torestrictions as set forth in subparagraph (c)(1)(ii) of the Rights in Technical Data andComputer Software clause at DFARS 252.277-7103 (October 1988) and FAR 52-227-19 (June 1987).
Trademark Information
NETAPP, the NETAPP logo, and the marks listed at http://www.netapp.com/TM are trademarks ofNetApp, Inc. Other company and product names may be trademarks of their respective owners.