Embed Size (px)
Citation preview

One Blue Hill Plaza, 16
th Floor, PO Box 1546
Pearl River, NY 10965
1-800-PC-AMERICA, 1-800-722-6374
(Voice) 845-920-0800 (Fax) 845-920-0880
1 | P a g e
Installing the EPSON U2xx Series
Printer using Ethernet Connection
Using APD_402E Driver

2 | P a g e
Using an Ethernet cable (RJ45) through a router or switch this option requires the
purchase of a Router or switch and network cable.
Before you begin, make sure your EPSON TM-
U220 printer is plugged in and properly
connected to your router/switch via network
cable and that the paper roll is properly
seated.
You can connect your TM-U220 printer to your
PC through either a router or a switch via cat-
5e cable (see image below).

3 | P a g e
Before you begin configuring the Ethernet properties for the Epson printer please download the
utility from:
http://download2.pcamerica.com/drivers/Epson_Utility_for_Ethernet_Printers.zip
Configure the Ethernet Epson Kitchen Printer
Follow the installation steps which will install the Epson
TMNet WinConfig Version 3.00.
1. Select Next.
2. Select I accept the terms of the license agreement.
3. Select Next.

4 | P a g e
4. Select Next.
5. Select Next.
6. Select Install.

5 | P a g e
7. Select Finish.
8. Select Start, point to Programs, point to EPSON TMNet
WinConfig; then select EPSON TMNet WinConfig Ver
3.00.
Select the printer where you want to set the IP address, and
then select the Configuration button. (You might wait for 10
seconds or more to view the UB-E02 over the network on
your screen.)
9. Select the TCP/IP tab.
10. Select Manual for IP Address Setting.
11. Select Set using PING.
12. Assign the IP address, the Subnet mask, and the Default
gateway.
Ask your administrator for the IP address and the
Default gateway to be set.
13. Select OK.

6 | P a g e
14. Select Yes.
15. Enter the password set in the print server; then select
OK. If the password is not set, just select OK without
entering the password.
The update is complete when the message “Configuration is
successfully done” appears.
16. Select OK.
7 | P a g e
Before you begin, make sure your EPSON printer is plugged in, and that the receipt paper roll is
properly seated.
Note: Depending on the printer you have purchased will determine the interface type.
Make sure the printer is turned off for the driver installation.
Before you begin please download and extract the installation files from:
http://download2.pcamerica.com/drivers/APD_402E.zip
The Install files are also located on the CD in the directory:
Drivers\EPSON Printer Drivers
1. Run the install file (APD_402E.exe).
2. Select Next to begin the installer. 3. Select I accept the terms in the license agreement
and select Next.

8 | P a g e
4. Select Standard and then select Next.
5. If no printers are listed select Add.
6. Select the correct printer that you have under Select
Driver: (e.g. EPSON TM-U220 Receipt).
7. Optionally you can give a name to the printer other
than the one that is there by default (e.g. Kitchen or
Pizza).
8. Select the correct type of port under Port Type: (e.g. if
the printer connects via a parallel port select Create
an Ethernet port).
9. Optionally you can set the receipt printer as the
default printer in windows.
10. Select Next.

9 | P a g e
11. At the next screen you will be prompted to enter a IP
address: here you will enter the IP address of the
printer (default: 192.168.192.168).
12. Select Next.
13. The printer that you have configured should now
show under Printer Configuration.
14. Select Next.
15. Review the files to be installed and select Next.
The files will automatically install on your computer.

10 | P a g e
16. Select Yes, I want to restart my computer now.
17. Select Finish.

11 | P a g e
Once your computer has restarted and you’re back at the Windows Desktop, you’re ready to set up the properties for your printer. You can now turn the printer back on.
1. Select Start | Control Panel | Printers and Faxes. 2. Right-click on the EPSON TM-U220 Receipt printer
and select Properties. 3. Select the Ports tab. 4. Select the port your EPSON TM-U220 Receipt printer
is connected to (e.g. ESDPRT001) and select Apply.
Note: If the printer is already selected and the Apply button is disabled, just continue to the next step.
Now you can print a test page to ensure that your printer is set up correctly. 1. Select the General tab. 2. Select Print Test Page. Note: If your test page fails to print, see the Printer Troubleshooting section below.

12 | P a g e
Next, you’ll adjust how the receipt paper is cut. From the same Printer Properties window, General tab: 1. Select Printing Preferences. 2. Select the Document Settings tab. 3. At the bottom of the window select Paper
Conservation. Then select Top & Bottom.
4. Select Paper Source. 5. At the bottom of the window select
Document[NoFeed,NoCut]. 6. Select OK two times to finish configuring the printer.
13 | P a g e
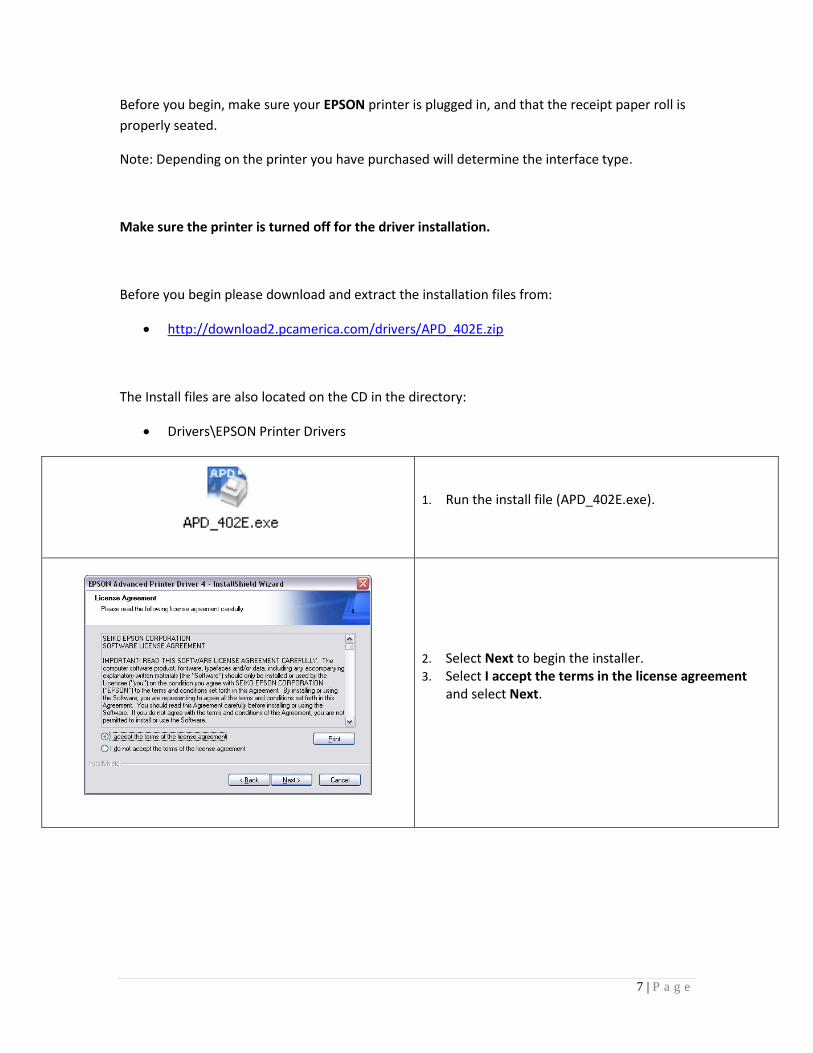
Now you’re ready to set up your printer in RPE/CRE.
1. Start the RPE/CRE program.
2. Select the Options/Manager and enter your password (where applicable), then select [4] Setup | [L] Friendly Printer
Setup and re-enter your password if necessary.
3. Select the Add Printer button. Enter Kitchen for your new printer name and Select Enter.
4. Select Kitchen in the Select Friendly Printer list on the left.
5. Select EPSON TM-U220 Receipt in the Select local Windows printer list on the right.
6. Select Epson TM-U220 Impact Receipt Printer as the Printer Type.
7. Check Print orders using two colors (Epson only).
8. Optionally select Disable Printer at this Station (if applicable).
9. Check Cut Receipt at this Station.
10. Optionally select Print Master/Subordinate Receipts (See: Printing Master/Subordinate Receipts).
11. Select Save & Exit.

14 | P a g e
Sending Items to the EPSON TM-U220 Kitchen Printer
You’ll use the Printers setting for your Inventory Items to indicate which should be sent directly from your CRE/RPE
application to the Kitchen Printer.
1. Start the RPE/CRE program.
2. Select the Options/Manager and enter your
password (where applicable).
3. Select [5] Administrative then [A] Inventory
Maintenance.
4. Locate an Item you want sent to the Kitchen
Printer and select the Printers tab.
5. Select Add Printer and select the Kitchen
button to select the kitchen printer that we just
added.
6. Select Save Changes.
Repeat steps 4-6 above for each Inventory Item
you want sent to the Kitchen Printer when ordered.
Examples of items you would probably not want
sent to the Kitchen Printer include beverages and
desserts, but items prepared in the kitchen should
be individually directed to the Kitchen Printer.

15 | P a g e
Sending Orders to the Kitchen Receipt Printer
After configuring your inventory to go to the kitchen printer we can test that everything was
configured correctly by doing the following:
1. Start the RPE/CRE program.
2. Login to start taking transactions.
3. After adding items to the invoice with a kitchen
printer associated, select SEND.
4. If prompted, enter an On-hold ID.
5. Select Enter.
If all settings were configured correctly the kitchen printer will print the order information for
the kitchen staff to prepare.

16 | P a g e
Printing Master/Subordinate Receipts
If the Option Print Master/Subordinate Receipts was checked in Friendly Printer Setup, the
kitchen printer will print a "Master Ticket" and also print "Subordinate Tickets" for each item
that needs to be prepared. All of these tickets will print after selecting SEND on the invoice
screen of RPE:
An example Master Ticket.
The Subordinate Receipts are referencing from this
example.
A Subordinate Ticket for the first item.
A Subordinate Ticket for the second item.
Note: Three copies of this ticket will print as the master
ticket for this order shows that there were three orders
of this item.
A Subordinate Ticket for the third item.

17 | P a g e
Preventing Items from Being Sent to the Kitchen
1. Start the RPE/CRE program.
2. Select the Options/Manager and enter your password (where applicable).
3. Select Administrator then Inventory Maintenance.
4. Select the Optional Info tab.
5. Select the Additional Info tab.
6. The option Never Print in Kitchen can be checked
for any item to prevent it from being printed on the
kitchen printout. (This is typically used for Combo
Meals)
For more information on Combo Meals please see
the following link:
http://faq.pcamerica.com/file-lockers/pdf-
locker/Combo_Meals.pdf
7. Select Save then select Exit.

18 | P a g e
Additional Options
1. Start the RPE/CRE program.
2. Select the Options/Manager and enter your password (where applicable).
3. Select Setup then Setup Screen.
4. Under the Receipt tab the following options are available:
Under Kitchen Receipt Font Size Select the font size to
print on all kitchen printers. (Station Specific)
This option will print whether or not the invoice has
been paid for on the kitchen receipt. (System-Wide)
Under the Restaurant Features: Functionality tab the following options are available:
ORDER IDENTIFIER (Station Specific)
None — Disabled. Prompt Table Number – Prompts for a numeric
table number with a touch-screen numeric keypad (such as for a tabletop number given to a customer to put on their table for order delivery).
Customer Name – Prompts for the customer’s name with a touch-screen keyboard
IDENTIFIER IS PRINTED ON KITCHEN RECEIPT or, DISPLAYED ON KITCHEN VIDEO SYSTEM.

19 | P a g e
If checked, the second description line in Inventory
Maintenance will be sent to kitchen printers. (System-
Wide)
If checked, the server will be prompted for the name of
the customer. This name will be displayed on the
kitchen printout. (Station Specific)
Under the Restaurant Features: Delivery tab the following options are available:
If checked, the customer info that is checked (under:
Print Customer Info) on Page 2 of the Receipt tab of the
Setup Screen will be included on kitchen printouts.
20 | P a g e
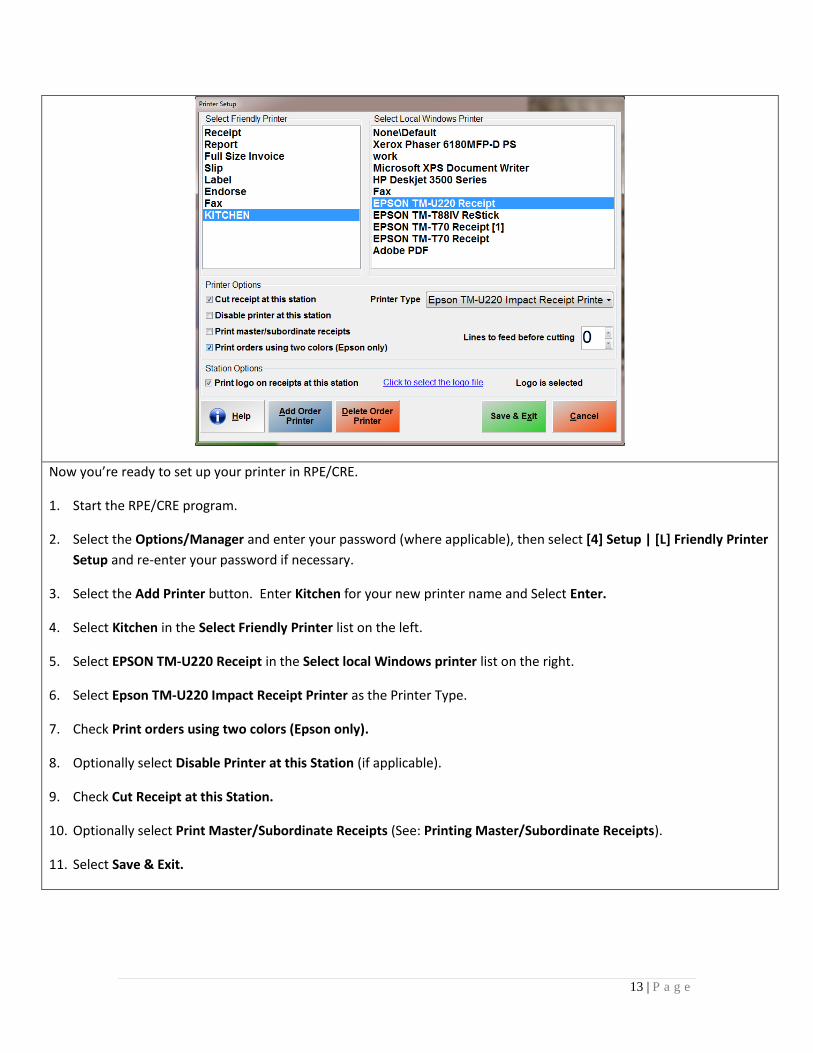
EPSON Receipt Printer Troubleshooting
If your test page fails to print, you most likely have one or more conflicting ports configured. Please follow the steps
below.
1. Select Start | Control Panel | Printers and
Faxes.
2. Right-click on the EPSON Kitchen Printer and
select Properties.
Note: If you have more than one of the same
kitchen printer listed (e.g. EPSON TM-U220 Receipt
and EPSON TM-U220 Receipt(1), delete all except
the unnumbered listing. Right-click on the
duplicate printer name(s) and select Delete.
3. Select the Ports tab.
Check the first corresponding port for the printer
that you have (e.g. ESDPRT001, 192.168.192.168).
4. Select the General tab.
Select Print Test Page if the test page prints
correctly, you can return to the CRE/RPE software
and configure the printer there.
If the test page still does not print correctly, return
to the Ports tab and continue from Step 4 above
with the next unchecked corresponding printer
port.