Embed Size (px)
Citation preview
Working with 3D PCB OrCAD / Allegro PCB Editor
Nordcad Systems A/S / Nordcad AS 2018 - R2
[email protected] / [email protected] +45 96 31 56 99 / +47 21 55 28 28
Page 1 of 15
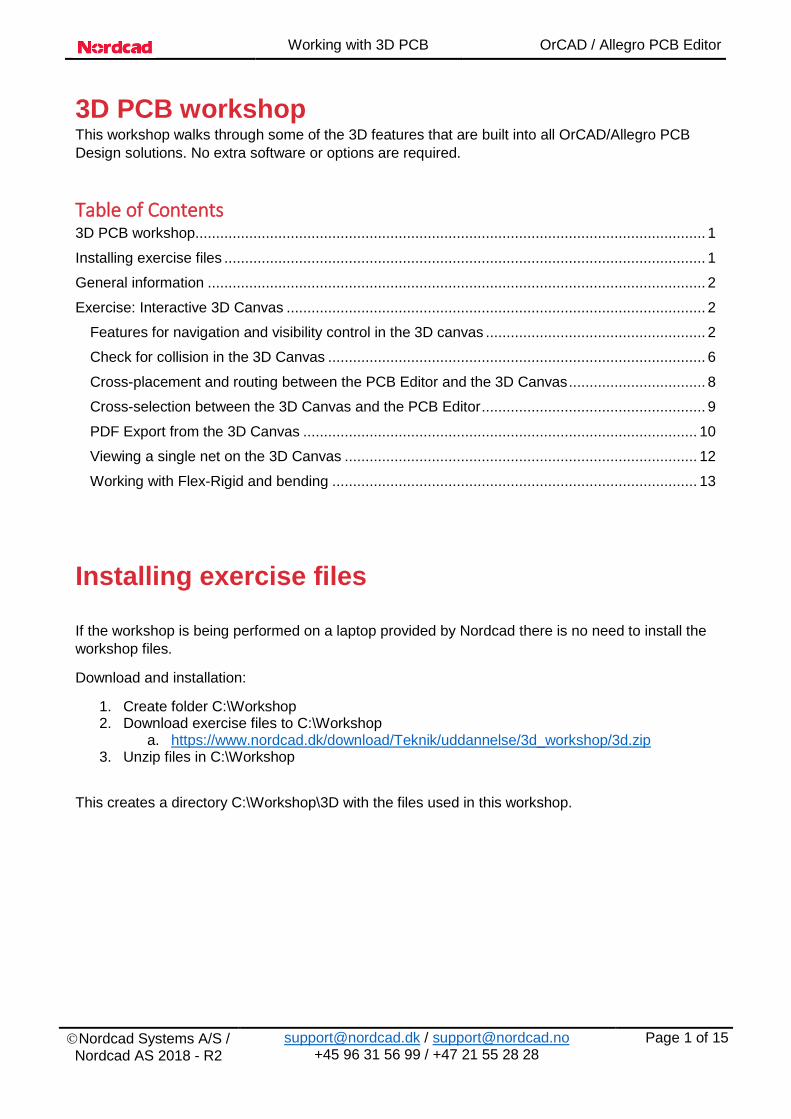
3D PCB workshop This workshop walks through some of the 3D features that are built into all OrCAD/Allegro PCB
Design solutions. No extra software or options are required.
Table of Contents 3D PCB workshop ........................................................................................................................... 1
Installing exercise files .................................................................................................................... 1
General information ........................................................................................................................ 2
Exercise: Interactive 3D Canvas ..................................................................................................... 2
Features for navigation and visibility control in the 3D canvas ..................................................... 2
Check for collision in the 3D Canvas ........................................................................................... 6
Cross-placement and routing between the PCB Editor and the 3D Canvas ................................. 8
Cross-selection between the 3D Canvas and the PCB Editor ...................................................... 9
PDF Export from the 3D Canvas ............................................................................................... 10
Viewing a single net on the 3D Canvas ..................................................................................... 12
Working with Flex-Rigid and bending ........................................................................................ 13
Installing exercise files
If the workshop is being performed on a laptop provided by Nordcad there is no need to install the
workshop files.
Download and installation:
1. Create folder C:\Workshop 2. Download exercise files to C:\Workshop
a. https://www.nordcad.dk/download/Teknik/uddannelse/3d_workshop/3d.zip 3. Unzip files in C:\Workshop
This creates a directory C:\Workshop\3D with the files used in this workshop.
Working with 3D PCB OrCAD / Allegro PCB Editor
Nordcad Systems A/S / Nordcad AS 2018 - R2
[email protected] / [email protected] +45 96 31 56 99 / +47 21 55 28 28
Page 2 of 15
General information Notice that the performance of working with 3D Canvas depends on the PC hardware. If you’re
using a Nordcad laptop for the exercises the HW is not state of the art or anything special, so you
should see much better performance back at your office.
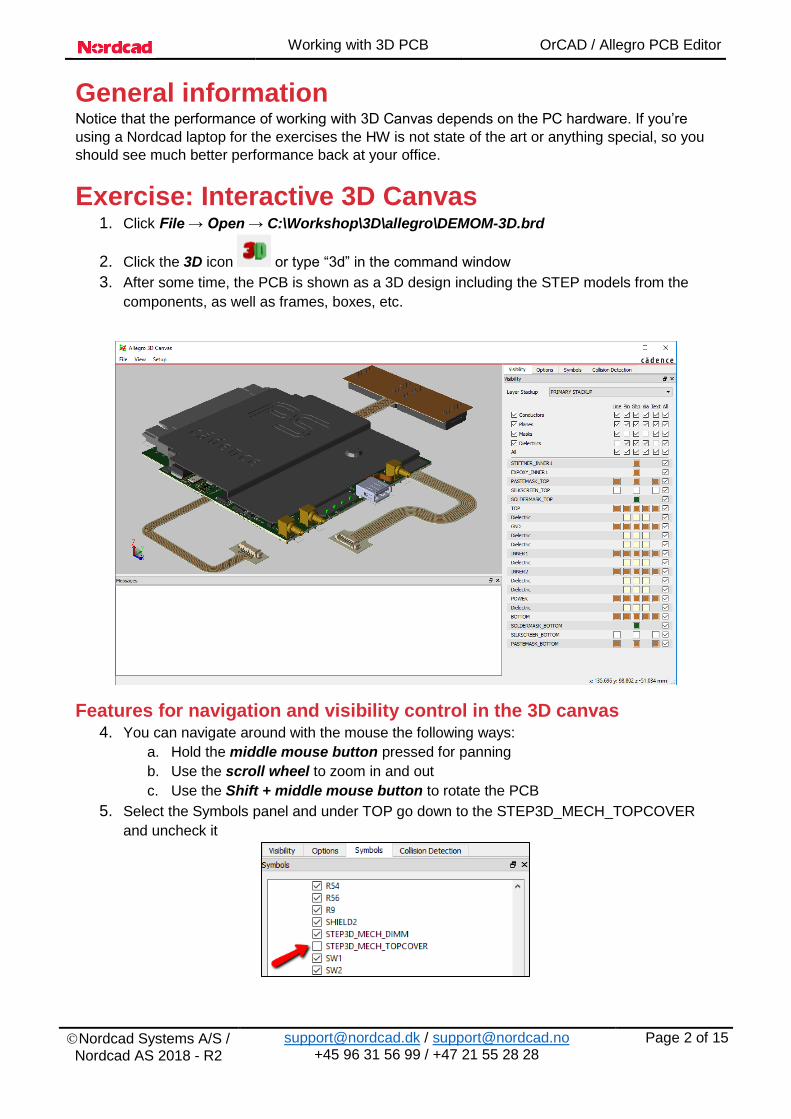
Exercise: Interactive 3D Canvas 1. Click File → Open → C:\Workshop\3D\allegro\DEMOM-3D.brd
2. Click the 3D icon or type “3d” in the command window
3. After some time, the PCB is shown as a 3D design including the STEP models from the
components, as well as frames, boxes, etc.
Features for navigation and visibility control in the 3D canvas 4. You can navigate around with the mouse the following ways:
a. Hold the middle mouse button pressed for panning
b. Use the scroll wheel to zoom in and out
c. Use the Shift + middle mouse button to rotate the PCB
5. Select the Symbols panel and under TOP go down to the STEP3D_MECH_TOPCOVER
and uncheck it
Working with 3D PCB OrCAD / Allegro PCB Editor
Nordcad Systems A/S / Nordcad AS 2018 - R2
[email protected] / [email protected] +45 96 31 56 99 / +47 21 55 28 28
Page 3 of 15
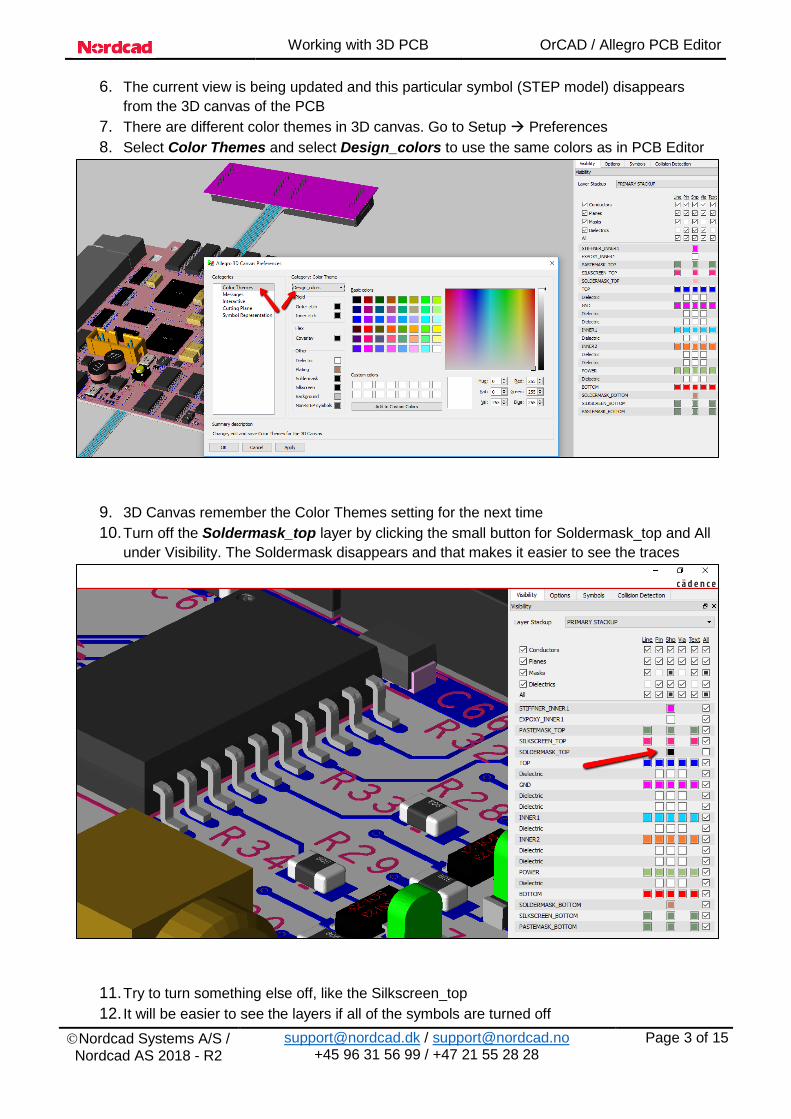
6. The current view is being updated and this particular symbol (STEP model) disappears
from the 3D canvas of the PCB
7. There are different color themes in 3D canvas. Go to Setup Preferences
8. Select Color Themes and select Design_colors to use the same colors as in PCB Editor
9. 3D Canvas remember the Color Themes setting for the next time
10. Turn off the Soldermask_top layer by clicking the small button for Soldermask_top and All
under Visibility. The Soldermask disappears and that makes it easier to see the traces
11. Try to turn something else off, like the Silkscreen_top
12. It will be easier to see the layers if all of the symbols are turned off
Working with 3D PCB OrCAD / Allegro PCB Editor
Nordcad Systems A/S / Nordcad AS 2018 - R2
[email protected] / [email protected] +45 96 31 56 99 / +47 21 55 28 28
Page 4 of 15
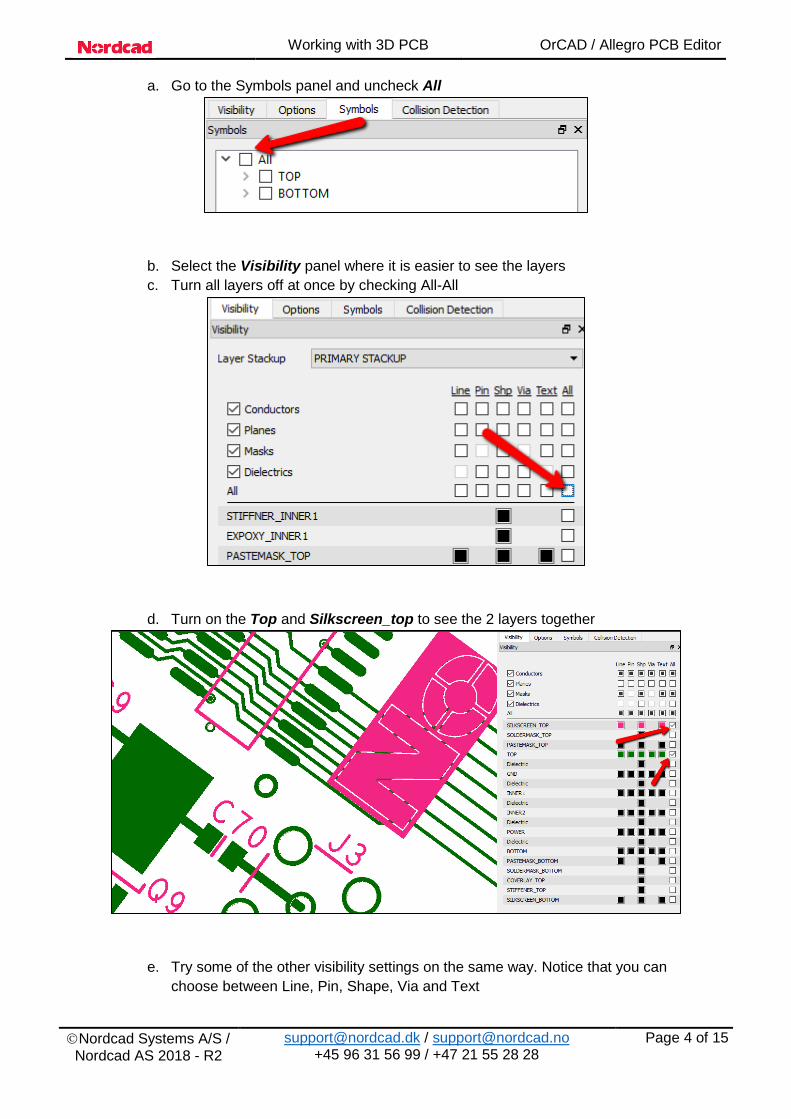
a. Go to the Symbols panel and uncheck All
b. Select the Visibility panel where it is easier to see the layers
c. Turn all layers off at once by checking All-All
d. Turn on the Top and Silkscreen_top to see the 2 layers together
e. Try some of the other visibility settings on the same way. Notice that you can
choose between Line, Pin, Shape, Via and Text

Working with 3D PCB OrCAD / Allegro PCB Editor
Nordcad Systems A/S / Nordcad AS 2018 - R2
[email protected] / [email protected] +45 96 31 56 99 / +47 21 55 28 28
Page 5 of 15
13. Click View → Camera to choose different views
14. Click Setup → Preferences to change the background color. The 3D canvas will
remember this setting next time
a. Select a color
b. Then click the Background color icon to assign the selected color
15. Change the background color back to white if you wish
16. Close the 3D Canvas
Working with 3D PCB OrCAD / Allegro PCB Editor
Nordcad Systems A/S / Nordcad AS 2018 - R2
[email protected] / [email protected] +45 96 31 56 99 / +47 21 55 28 28
Page 6 of 15
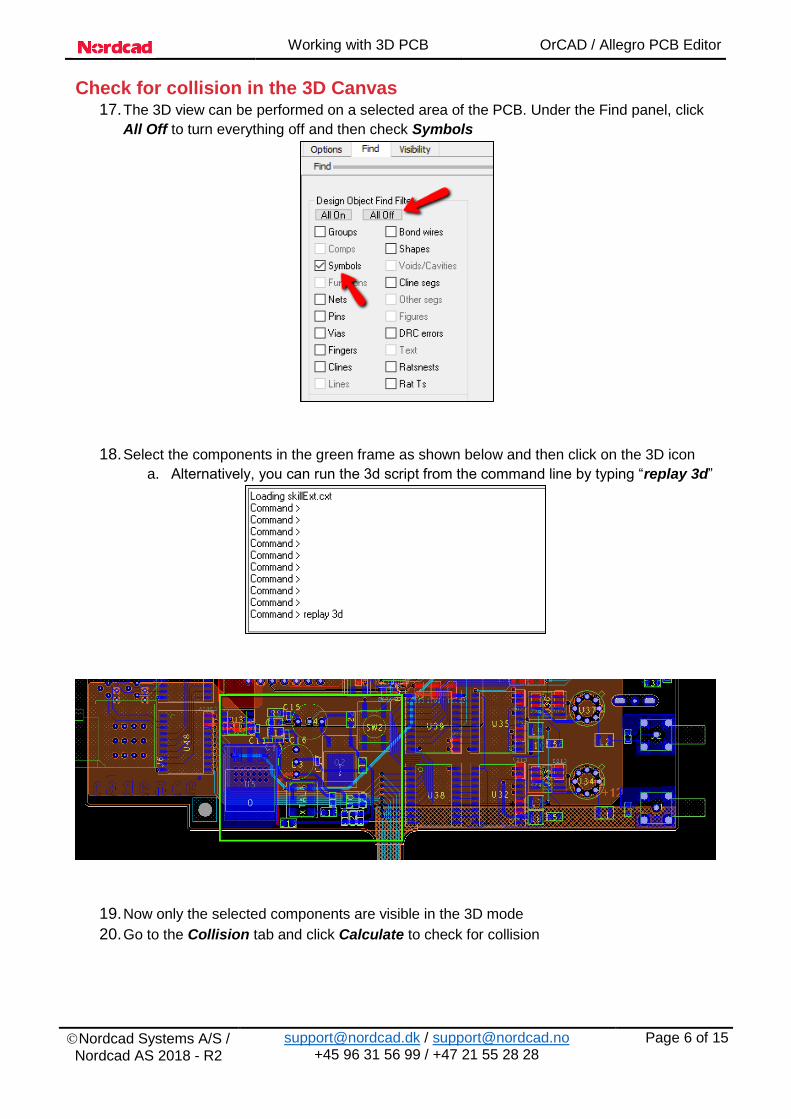
Check for collision in the 3D Canvas 17. The 3D view can be performed on a selected area of the PCB. Under the Find panel, click
All Off to turn everything off and then check Symbols
18. Select the components in the green frame as shown below and then click on the 3D icon
a. Alternatively, you can run the 3d script from the command line by typing “replay 3d”
19. Now only the selected components are visible in the 3D mode
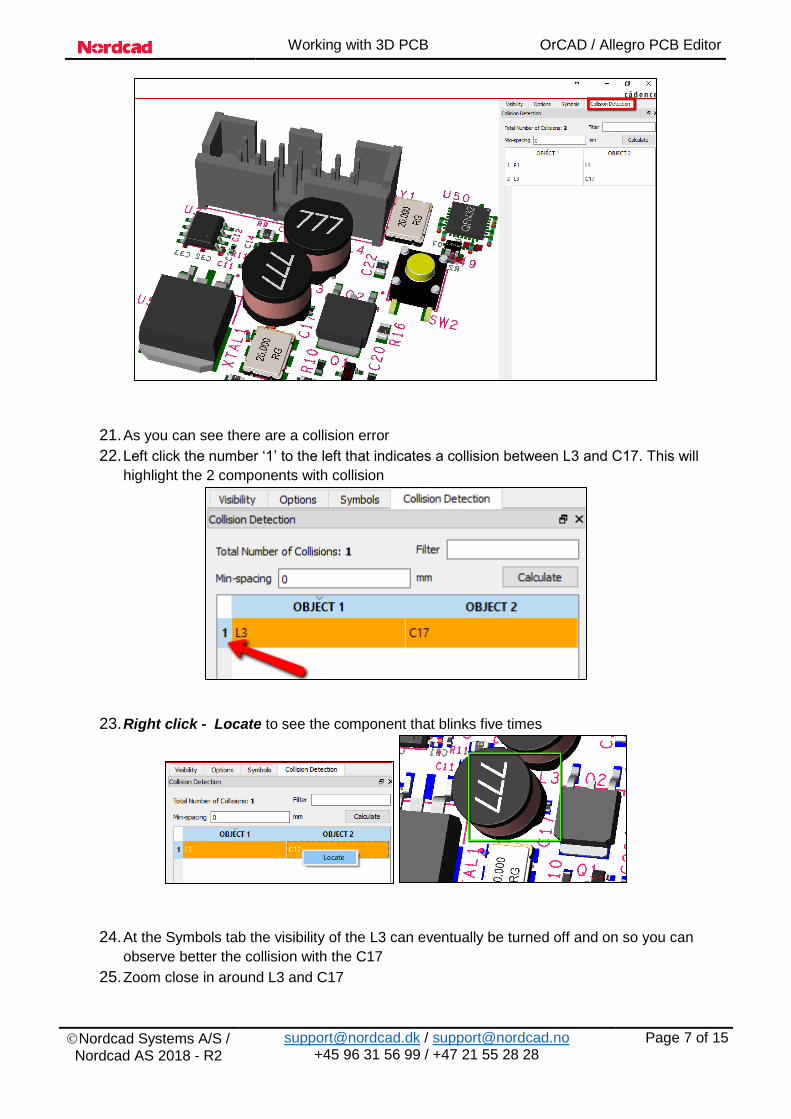
20. Go to the Collision tab and click Calculate to check for collision
Working with 3D PCB OrCAD / Allegro PCB Editor
Nordcad Systems A/S / Nordcad AS 2018 - R2
[email protected] / [email protected] +45 96 31 56 99 / +47 21 55 28 28
Page 7 of 15
21. As you can see there are a collision error
22. Left click the number ‘1’ to the left that indicates a collision between L3 and C17. This will
highlight the 2 components with collision
23. Right click - Locate to see the component that blinks five times
24. At the Symbols tab the visibility of the L3 can eventually be turned off and on so you can
observe better the collision with the C17
25. Zoom close in around L3 and C17
Working with 3D PCB OrCAD / Allegro PCB Editor
Nordcad Systems A/S / Nordcad AS 2018 - R2
[email protected] / [email protected] +45 96 31 56 99 / +47 21 55 28 28
Page 8 of 15
Cross-placement and routing between the PCB Editor and the 3D
Canvas 26. Place side by side the 3D Canvas and the PCB Editor to work easily with both views
a. It can be done by pressing the Windows key and the right/left arrow
+
27. The objects can be selected with a simple click on the 3D canvas like in the PCB Editor.
The object becomes highlighted in the PCB Editor as well
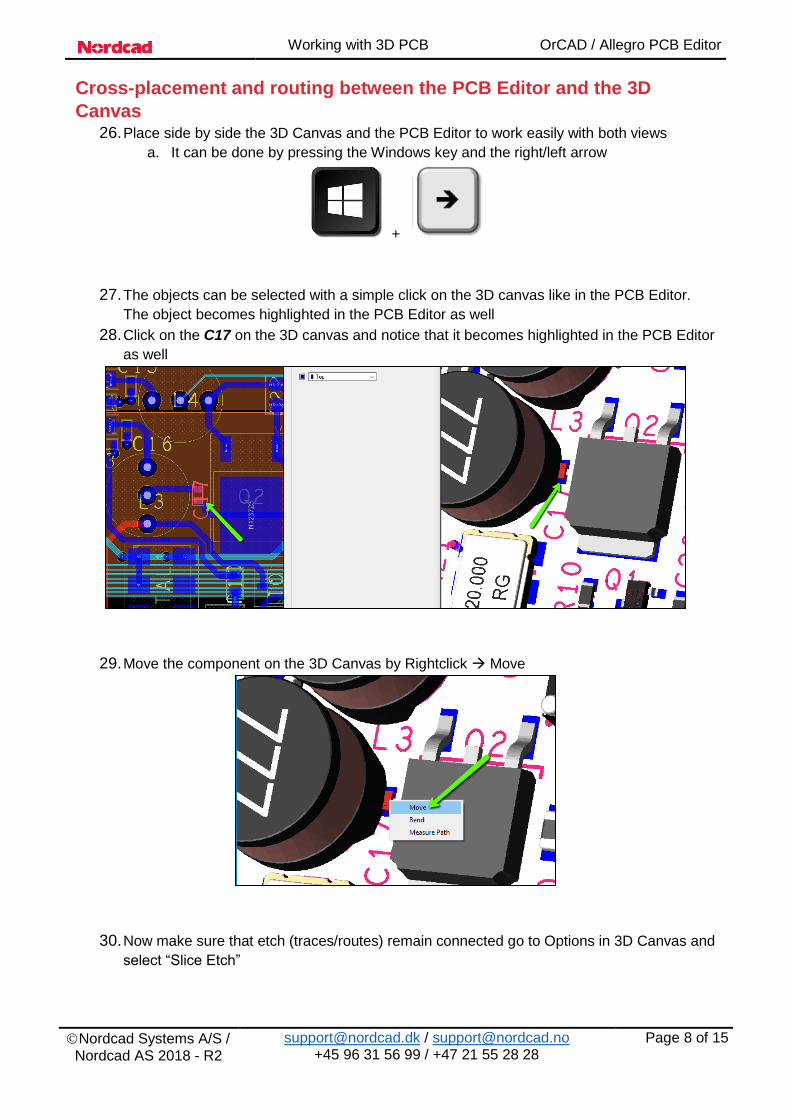
28. Click on the C17 on the 3D canvas and notice that it becomes highlighted in the PCB Editor
as well
29. Move the component on the 3D Canvas by Rightclick Move
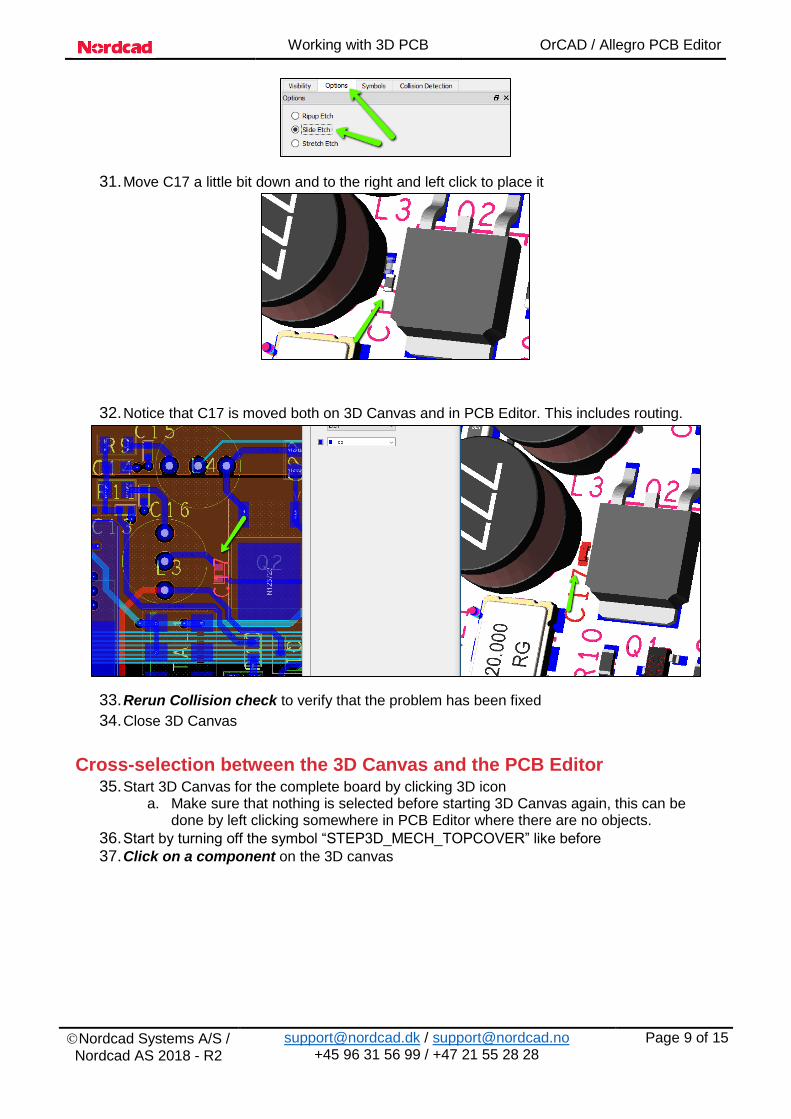
30. Now make sure that etch (traces/routes) remain connected go to Options in 3D Canvas and
select “Slice Etch”
Working with 3D PCB OrCAD / Allegro PCB Editor
Nordcad Systems A/S / Nordcad AS 2018 - R2
[email protected] / [email protected] +45 96 31 56 99 / +47 21 55 28 28
Page 9 of 15
31. Move C17 a little bit down and to the right and left click to place it
32. Notice that C17 is moved both on 3D Canvas and in PCB Editor. This includes routing.
33. Rerun Collision check to verify that the problem has been fixed
34. Close 3D Canvas
Cross-selection between the 3D Canvas and the PCB Editor 35. Start 3D Canvas for the complete board by clicking 3D icon
a. Make sure that nothing is selected before starting 3D Canvas again, this can be done by left clicking somewhere in PCB Editor where there are no objects.
36. Start by turning off the symbol “STEP3D_MECH_TOPCOVER” like before
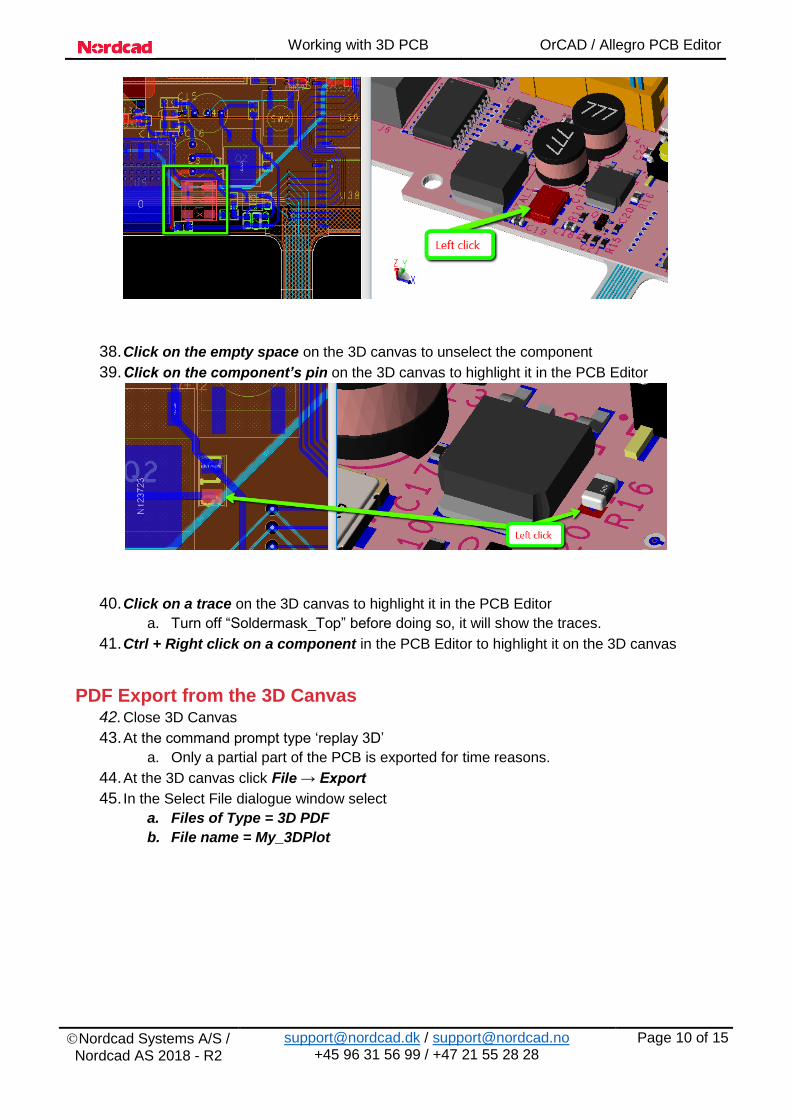
37. Click on a component on the 3D canvas
Working with 3D PCB OrCAD / Allegro PCB Editor
Nordcad Systems A/S / Nordcad AS 2018 - R2
[email protected] / [email protected] +45 96 31 56 99 / +47 21 55 28 28
Page 10 of 15
38. Click on the empty space on the 3D canvas to unselect the component
39. Click on the component’s pin on the 3D canvas to highlight it in the PCB Editor
40. Click on a trace on the 3D canvas to highlight it in the PCB Editor
a. Turn off “Soldermask_Top” before doing so, it will show the traces.
41. Ctrl + Right click on a component in the PCB Editor to highlight it on the 3D canvas
PDF Export from the 3D Canvas 42. Close 3D Canvas
43. At the command prompt type ‘replay 3D’
a. Only a partial part of the PCB is exported for time reasons.
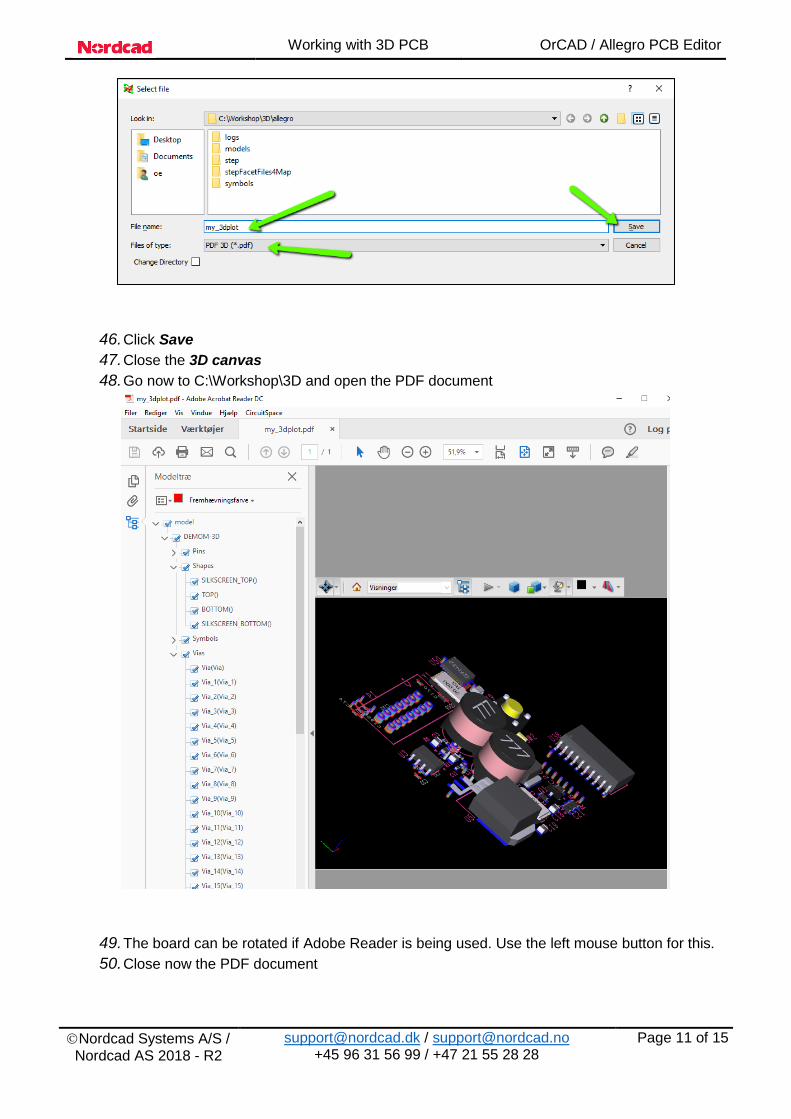
44. At the 3D canvas click File → Export
45. In the Select File dialogue window select
a. Files of Type = 3D PDF
b. File name = My_3DPlot
Working with 3D PCB OrCAD / Allegro PCB Editor
Nordcad Systems A/S / Nordcad AS 2018 - R2
[email protected] / [email protected] +45 96 31 56 99 / +47 21 55 28 28
Page 11 of 15
46. Click Save
47. Close the 3D canvas
48. Go now to C:\Workshop\3D and open the PDF document
49. The board can be rotated if Adobe Reader is being used. Use the left mouse button for this.
50. Close now the PDF document
Working with 3D PCB OrCAD / Allegro PCB Editor
Nordcad Systems A/S / Nordcad AS 2018 - R2
[email protected] / [email protected] +45 96 31 56 99 / +47 21 55 28 28
Page 12 of 15
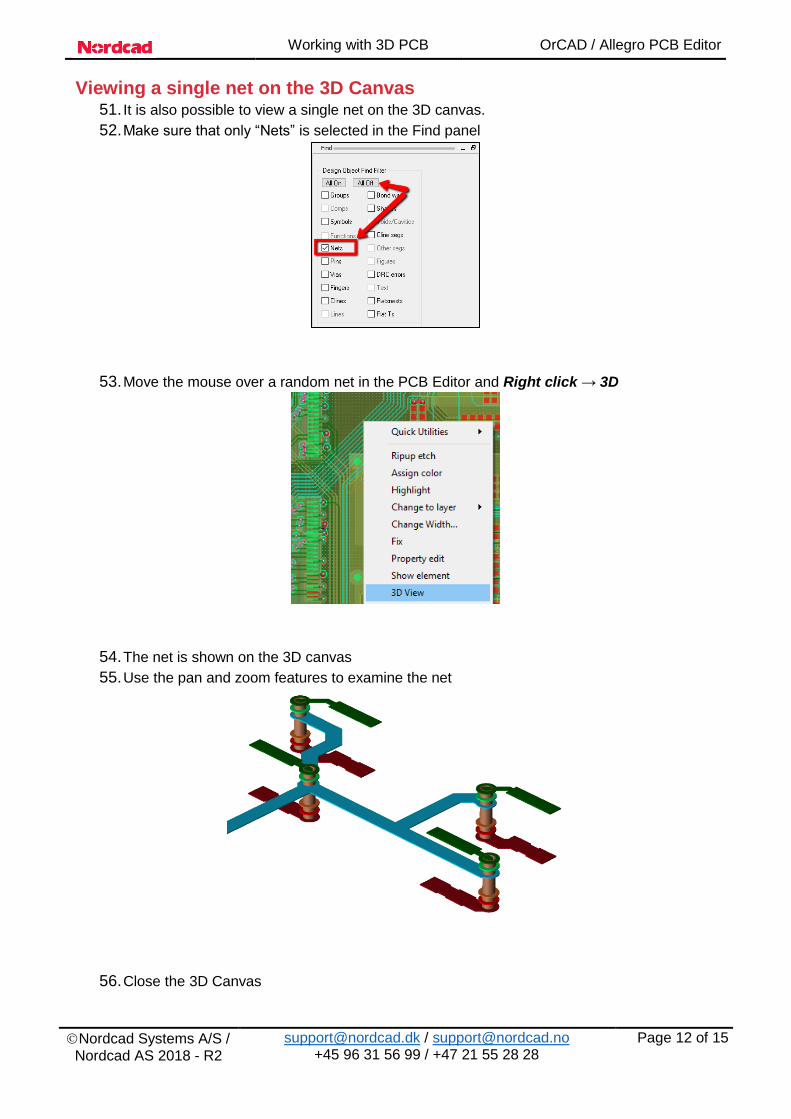
Viewing a single net on the 3D Canvas 51. It is also possible to view a single net on the 3D canvas.
52. Make sure that only “Nets” is selected in the Find panel
53. Move the mouse over a random net in the PCB Editor and Right click → 3D
54. The net is shown on the 3D canvas
55. Use the pan and zoom features to examine the net
56. Close the 3D Canvas
Working with 3D PCB OrCAD / Allegro PCB Editor
Nordcad Systems A/S / Nordcad AS 2018 - R2
[email protected] / [email protected] +45 96 31 56 99 / +47 21 55 28 28
Page 13 of 15
Working with Flex-Rigid and bending 57. Start 3D Canvas for the complete PCB
58. Notice that the board has 3 flex sections/zones
59. If bending is defined in PCB Editor this can be shown in 3D Canvas a. Bending can be defined directly in PCB Editor or transferred through IDX from
MCAD
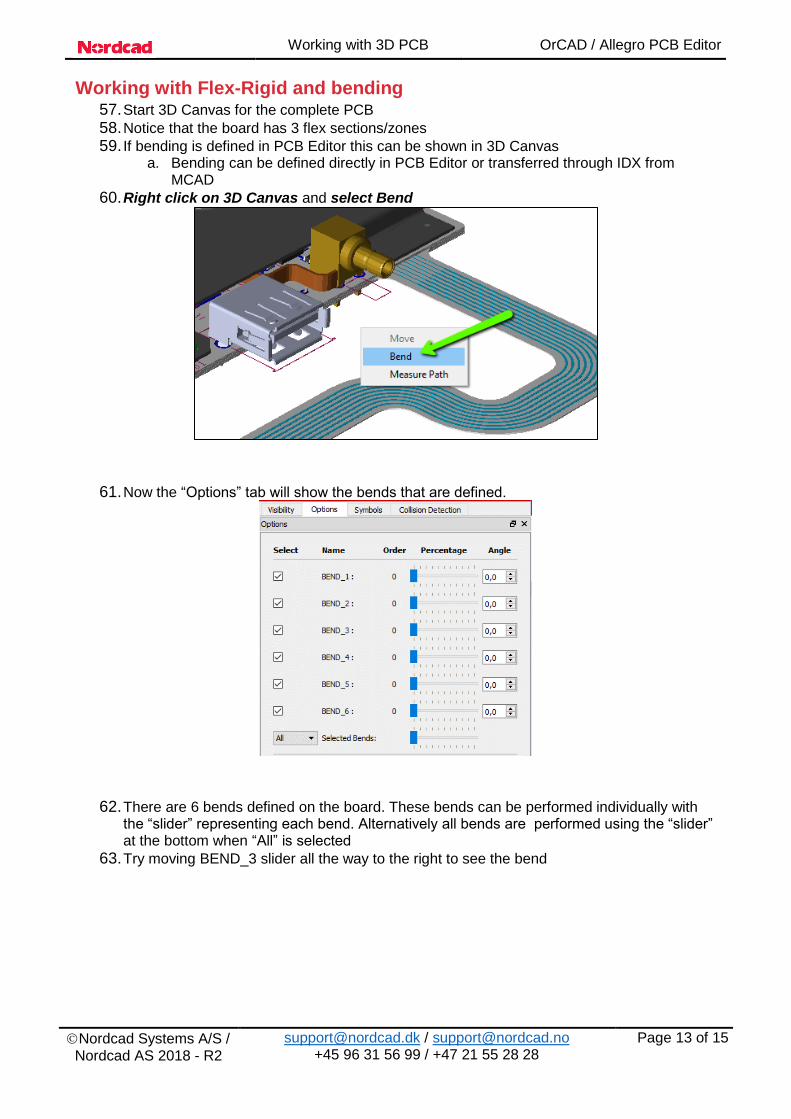
60. Right click on 3D Canvas and select Bend
61. Now the “Options” tab will show the bends that are defined.
62. There are 6 bends defined on the board. These bends can be performed individually with the “slider” representing each bend. Alternatively all bends are performed using the “slider” at the bottom when “All” is selected
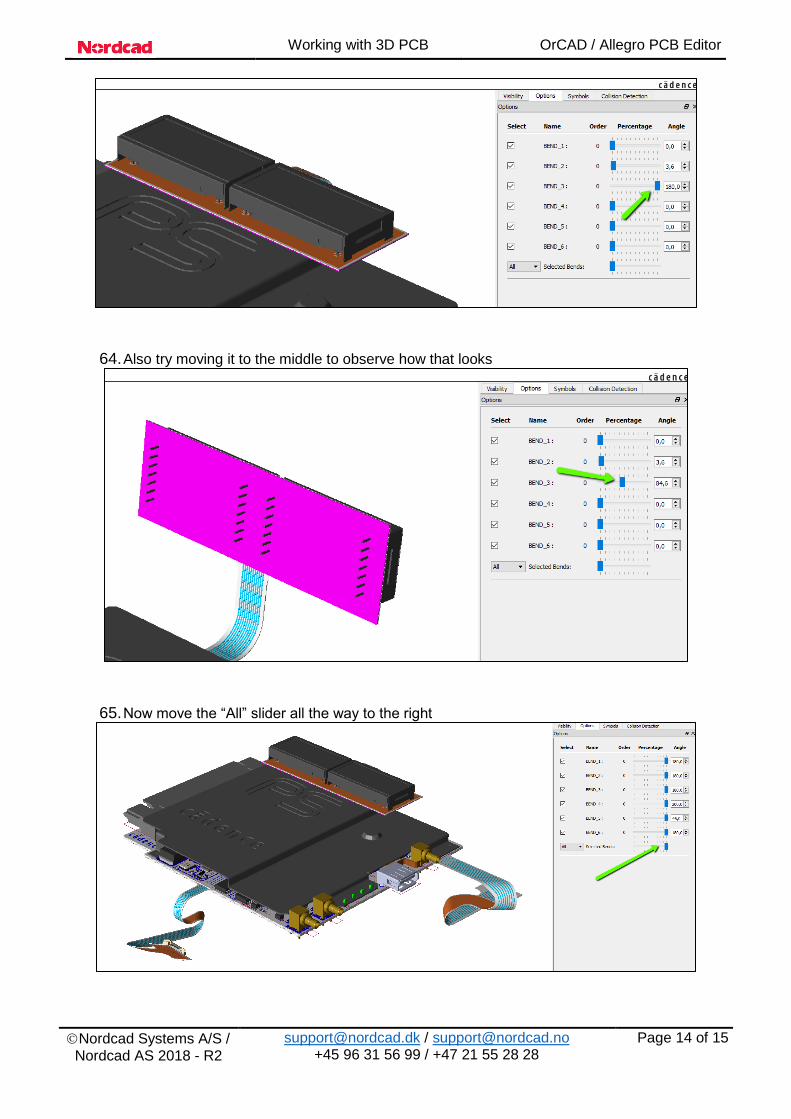
63. Try moving BEND_3 slider all the way to the right to see the bend
Working with 3D PCB OrCAD / Allegro PCB Editor
Nordcad Systems A/S / Nordcad AS 2018 - R2
[email protected] / [email protected] +45 96 31 56 99 / +47 21 55 28 28
Page 14 of 15
64. Also try moving it to the middle to observe how that looks
65. Now move the “All” slider all the way to the right
Working with 3D PCB OrCAD / Allegro PCB Editor
Nordcad Systems A/S / Nordcad AS 2018 - R2
[email protected] / [email protected] +45 96 31 56 99 / +47 21 55 28 28
Page 15 of 15
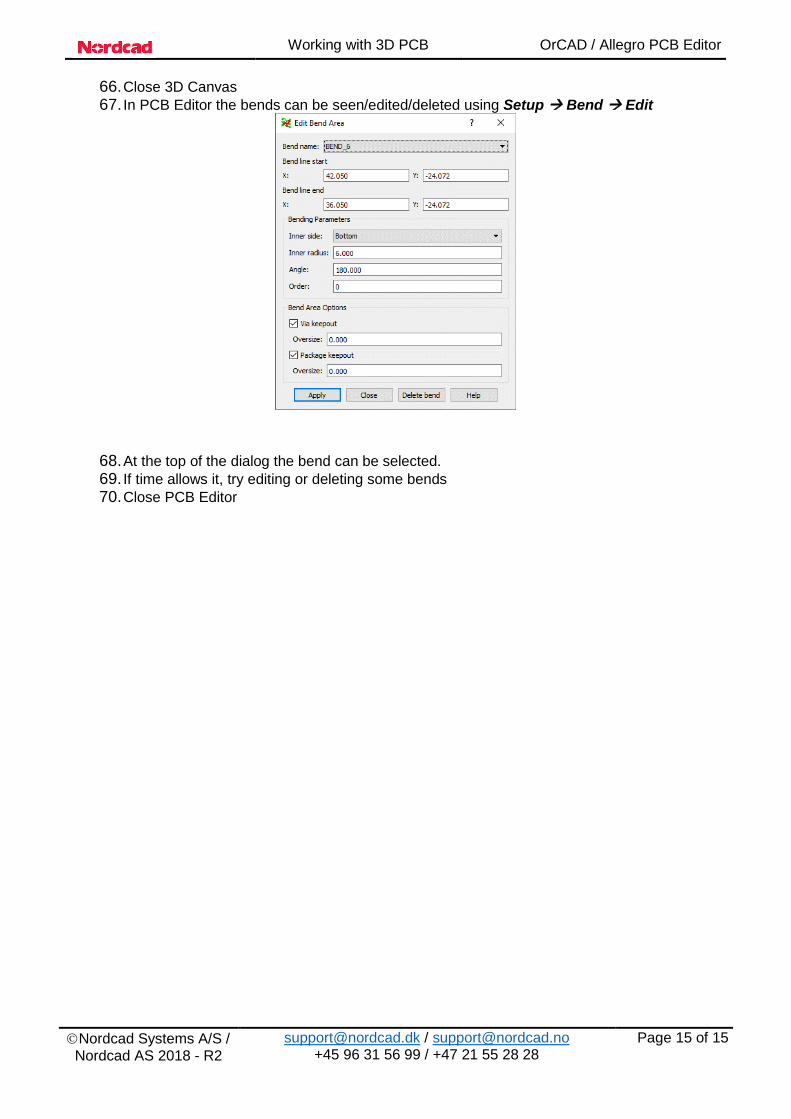
66. Close 3D Canvas
67. In PCB Editor the bends can be seen/edited/deleted using Setup Bend Edit
68. At the top of the dialog the bend can be selected.
69. If time allows it, try editing or deleting some bends
70. Close PCB Editor