Embed Size (px)
Citation preview

INSTALLING AND USING A "MONOPRICE" USB TABLET
INTO A "WINDOWS" COMPUTER
HIGH-LEVEL EXECUTIVE SUMMARY "Monoprice" USB tablets are bundled with a CD containing hardware drivers and "Tablet Software". Here is our advice about installing and using this inexpensive USB tablet in a "Windows XP", Windows Vista", or "Windows 7" computer.
WHY USE A "MONOPRICE" USB TABLET? For the rest of us (at approximately one-third the price of a comparably-sized Wacom "Intuos" tablet), Monoprice.com sells a line of inexpensive USB tablets that are described at http://www.monoprice.com/products/subdepartment.asp?c_id=108&cp_id=10841 A blow-by-blow comparison between "Monoprice" tablets and "Wacom Intuos" tablets can be found at http://aztcs.org/meeting_notes/winhardsig/tablets/tablet-comparison.pdf

WHAT IS ON THE CD THAT ARRIVES WITH A "MONOPRICE" USB TABLET? The CD that is packaged with your "Monoprice" USB tablet contains: hardware drivers for the tablet and five(5) "Tablet Software" application programs: According on page 5 of "TabletSoftware_English.pdf" on the bundled CD that arrived with Bill Brownlee's "Monoprice" 12x9-in. tablet:
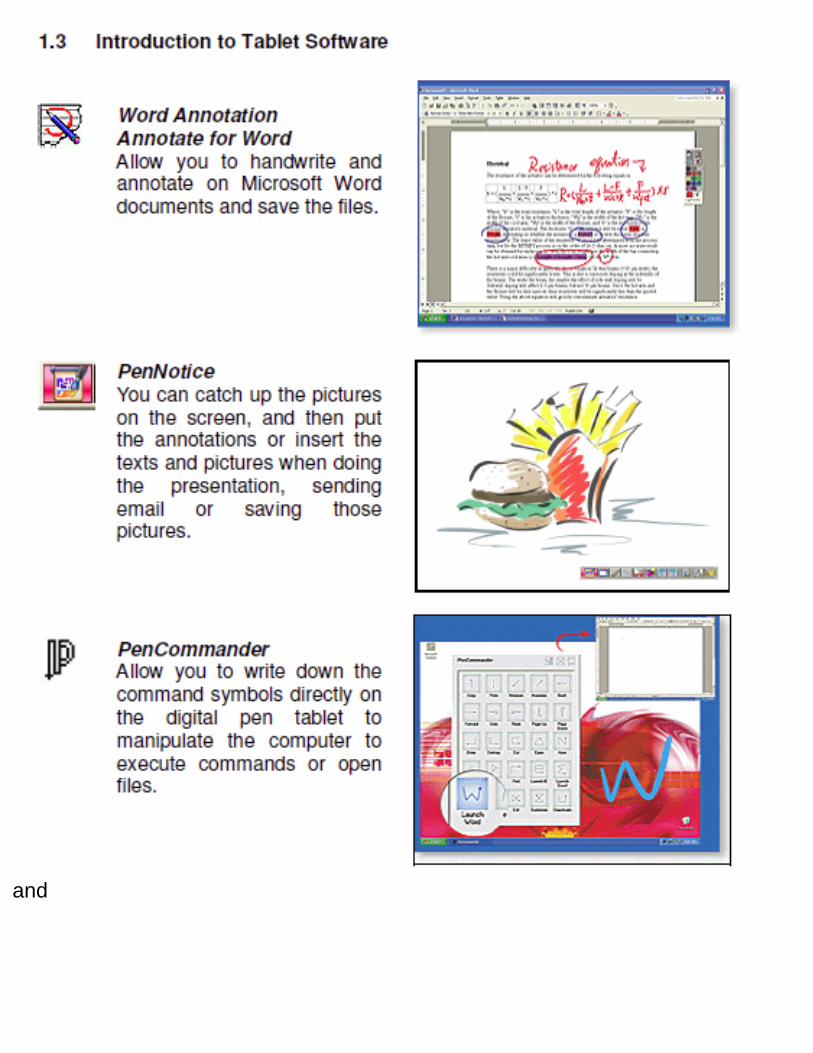
and


MONOPRICE'S "TABLET SOFTWARE" COMPATIBILITY CLAIMS According on page 5 of "TabletSoftware_English.pdf" on the bundled CD that arrived with Bill Brownlee's "Monoprice" 12x9-in. tablet:

RESULTS OF TESTING OF MONOPRICE'S "TABLET SOFTWARE" APPLICATIONS
We tested the some of the Monoprice "Tablet Software" applications on "Wndows 7", "Windows Vista", and "Windows XP" computers: "Word Annotation Annotate for Word" only works for "Microsoft Word 2003". It does not work for "Microsoft Word 2007" and "Microsoft Word 2010". We did not test with "Microsoft Word 2000". (During the installation of "Tablet Software", "Word Annotation Annotate for Word" will not install unless it detects the presence of "Microsoft Word 2003" or "Microsoft Word 2000".) "Pen Commander" worked in "Windows XP". It did no install into "Windows Vista" and "Windows 7". "Pen Signer" works in "Microsoft Word 2002", "Microsoft Word 2007", and "Microsoft Word 2011". "Pen Signer" works in "Microsoft Excel 2003", "Microsoft Excel 2007", and "Microsoft Excel 2011". "Pen Signer" works in "PowerPoint 2003" and "PowerPoint 2011". "Pen Signer" did not work in "PowerPoint 2007". We did not test "Pen Mail" since we do not use a "standalone e-mail software program" (such as "Outlook", "Thunderbird", or "Eudora"). "Pen Notice" works well in "Windows XP" and "Windows 7". "Pen Notice" skipped when we used it to write onto the "Desktop" of a "Windows Vista" computer that had 4 Gigabytes of RAM. We did not test "Pen Notice" with "Windows 2000". "Pen Notice" does not work well on computers that have less that 3 Megabytes of RAM: it "skipped" as we were writing on RAM-challenged computers. Since "Pen Notice" draws on top of the entire Windows "Desktop", it works well with all "Windows" applications programs.

"MONOPRICE" INSTALLATION BASICS The installation process for installing a "Monoprice" tablet into a "Windows.." computer consists of four "big steps": Big Step 1: Remove hardware drivers and software applications for any other USB tablets that you have ever attached to the "Windows.." computer. Big Step 2: Install the AAA battery into the pen of the "Monoprice" tablet. Big Step 3: Install Monoprice's proprietary "hardware drivers". Big Step 4: Attach the USB cable of the "Monoprice" tablet to an available USB port and perform an initial test of the tablet. (Optional) Big Step 5: Install the "Tablet Software" programs that are on the CD that is "bundled" with the "Monoprice" tablet.

BIG STEP 1: REMOVE HARDWARE DRIVERS AND APPLICATIONS FOR ANY OTHER USB TABLETS THAT YOU HAVE EVER ATTACHED TO YOUR "WINDOWS.." COMPUTER Remove hardware drivers and software applications for any other USB tablets that you have ever attached to your "Windows.." computer. The various brands of USB tablets do not get along with each other so please make sure that you only have one brand of USB tablet attached to your "Windows.." computer at any single point in time. The hardware driver for the "Monoprice" tablet does not get along with the hardware drivers of the tablets of other brands of USB tablets. Use "Revo Unstaller Free", "PC Decrapifier", "Add or Remove Programs"("Windows XP"), or "Programs and Features"(Windows Vista" and "Windows 7") to remove driver and application software that is for another other brand of USB tablet, prior to installing the hardware driver for a "Monoprice" tablet.

BIG STEP 2: INSTALL THE AAA BATTERY INTO THE PEN OF THE "MONOPRICE" TABLET
The documentation that is provided by "Monoprice" fails to explain the correct orientation for the AAA battery that goes into the pen. For instructions on installing this battery, please see http://aztcs.org/meeting_notes/winhardsig/tablets/Monoprice/pen-battery.pdf

BIG STEP 3: INSTALL MONOPRICE'S PROPRIETARY "HARDWARE DRIVERS": When installing a "Monoprice" USB tablet into a "Windows.." computer, you have a choice between installing the "hardware driver" on the bundled CD or the more current hardware driver that is downloadable from the uc-logic.com Web site.

BIG STEP 3 (LESS DESIRABLE CD OPTION) WHEN INSTALLING HARDWARE DRIVERS FOR THE TABLET, USE THE DRIVERS THAT ARE ON THE BUNDLED CD ONLY IF YOU HAVE NO ACCESS TO THE INTERNET:
If you have access to the Internet, skip this section and move to the next section where you will download more a current hardware driver from a Web site on the Internet. The "Monoprice" USB tablet arrives with a CD that contains all installation programs. You insert this CD into your computer and either the "Setup.exe" file on the CD automatically runs or you can double-click on it to start it up. Then, the following screen is displayed in your "Windows.." computer:

The top "Driver Setup" button has "Support Dual Screen" as a description. The bottom "Driver Setup" button has "Support XP 64Bit" as a description. If you click on the top "Driver Setup" button, you will install the drivers located at <Driver letter of the CD>:\Driver\ If you click on the bottom "Driver Setup" button, you will install the drivers located at <Driver letter of the CD>:\Driver1\ The PDF documentation file inside <Driver letter of the CD>:\Driver1\ makes no mention of dual monitor screens for any operating system so we surmise that you have to use the top "Driver Setup" button if you have multiple monitors in any version of "Windows.."

BIG STEP 3 (MORE DESIRABLE INTERNET DOWNLOAD OPTION) WHEN INSTALLING THE TABLET, USE THE MORE RECENT DRIVERS AT "uc-logic.com" (INSTEAD OF THE DRIVERS ON THE BUNDLED CD) (IF YOU HAVE ACCESS TO THE INTERNET)
More up-to-date hardware drivers are available at the manufacturer's Web site at http://www.uc-logic.com/en/index.php?ParentMenuID=4 so you probably should use them instead, according to http://forums.macrumors.com/showthread.php?t=1079937 However, the CD also contains some amazing "Windows" software applications which are not available at the manufacturer's Web site: You can use the "Tablet Software" on the bundled CD to do freehand drawing onto documents, presentations, spreadsheets, graphics programs, and (tempoararily) onto the Windows "Desktop". You have to install hardware drivers for the Monoprice tablet BEFORE installing the "Tablet Software" applications on the bundled CD.

The Web page at http://www.uc-logic.com/en/index.php?ParentMenuID=4 looks like this:

For the various "Windows XP/Vista/7" computers that we tested the "Monoprice" tablet on, we had great success with the most recent driver that has a date of 2011.11-14:
Use the older driver only if you are running the extremely rare 64-bit version of "Windows XP".

BIG STEP 4: ATTACH THE USB CABLE OF THE "MONOPRICE" TABLET AND PERFORM AN INITIAL TEST OF THE TABLET: AFTER you complete "Step 3", attach the USB cable of the "Monoprice" tablet to any available USB 2 or USB 3 port. If you touch the tip of the pen to the drawing surface of the "Monoprice" tablet and make a drawing motion, the mouse cursor of your "Windows.." computer should move in a manner that corresponds to your drawing motions. If you attempt to draw on the tablet and nothing happens, you can follow the troubleshooting steps at http://aztcs.org/meeting_notes/winhardsig/tablets/Monoprice/troubleshooting-Monoprice.pdf to resolve the problem

SOFTWARE PROGRAMS AND SUPPORT FOR THE "MONOPRICE" USB TABLET: The "Windows.." operating system treats the Monoprice "USB" tablet like two mice. For example, "Devices and Printers" in "Windows 7.." shows the "Monoprice" as two devices: a "HID-compliant mouse" and a "USB Input Device":

In order to get the tablet to act as an ink pen, a brush, a highlighter, paint bucket, or as an eraser, you have to either use the "Tablet Software" programs that are provided on the bundled "Monoprice" CD or use the "tablet support" that is available in many software programs. For example, in "Microsoft Office 2010" programs, you can use the "Ink Tools" tab to activate various drawing tools for your "Monoprice" tablet.

OPTIONAL BIG STEP 5: INSTALL "TABLET SOFTWARE" PROGRAMS USING THE INSTALLATION CD OF THE "MONOPRICE" TABLET

The "Monoprice" USB tablet arrives with a bundled CD: You insert this CD into your computer and either the "Setup.exe" file on the CD automatically runs or you can double-click on it to start it up. Then, the following screen is displayed in your "Windows.." computer:

The "Tablet Software Setup" button installs various tablet-based software application programs into a "Windows" computer.

If you click on the "Tablet Software Setup" button, you get a selection box as follows:


"PenMail.." provides you with a screen for writing a message. The you click on a button that opens your "standalone client e-mail software application program" (such as "Outlook", "Thunderbird", or "Eudora") and attaches your handwritten message to a new e-mail message. You then use your "standalone client e-mail software application program to send off your e-mail message. Unless you are absolutely sure that you want to use "PenMail", remove the checkmark from it:

Then click on the "OK" button. Click on the "OK" button.


USING THE PEN ON THE "MONOPRICE" TABLET The top button of the two buttons ("Button 2") on the side of the pen simulates a right-click of a mouse. Tap and hold also acts a right click in "Windows Vista" and "Windows 7". "Tap and hold" does not work in "Windows XP". Single click of the pen to select in all versions of "Windows". Double-click of the pen acts as a double-click of the mouse in all versions of "Windows".
STORING THE PEN According on page 4 of "Quick Start Guide_English.pdf" on the bundled CD that arrived with Bill Brownlee's "Monoprice" 12x9-in. tablet:

USING "INK TOOLS" IN "MICROSOFT WORD 2010", "MICROSOFT EXCEL 2010", OR "MICROSOFT POWERPOINT 2010" "Microsoft Office 2010" has great "support" for USB tablets. If the "hardware driver" of your "Monoprice" tablet is installed and working correctly, the "Ribbon Bar" of "Microsoft Office 2010" programs will display an "Ink Tools" tab when the you touch the pen of the "Monoprice" tablet to the drawing surface of the tablet. See http://office.microsoft.com/en-us/excel-help/use-ink-on-a-tablet-pc-HA101841468.aspx for details on how to use "Ink Tools" in "Microsoft Word 2010", "Microsoft Excel 20" or "Microsoft PowerPoint 2010". From inside "Microsoft Word 2010", when you touch the pen of the "Monoprice" tablet to the drawing surface of the tablet. the "Ink Tools" tab looks like this:

If you then use your tablet pen or the mouse to click on "Pens" in the "Ink Tools" tab, it will then look like this:
In addition to a "Pen", you also have a "Highlighter", an "Eraser", and a "Select Objects" tool.

If you use the pen to tap twice on the color selector, the color palette, it looks like this:

If you use the pen to tap twice on the line width selector, it looks like this:

USING THE "PENNOTICE" PROGRAM IN MONOPRICE'S "TABLET SOFTWARE" TO (TEMPORARILY) DRAW ANYWHERE ON THE COMPUTER MONITOR SCREEN You can use the "PenNotice" program that is part of Monoprice's "Tablet Software" suite of bundled applications programs to perform temporary freehand drawing anywhere on your computer monitor. This amazing program requires a computer with at least 3 Gigabytes of RAM. If you try using it on a computer with only 1 Gigabytes of RAM, the pen will "skip" with the drawing filling in 10 to 15 seconds after you draw it! Click on the Windows "Start" buttom:

The Windows "Start menu" will be displayed:
Click on "All Programs".
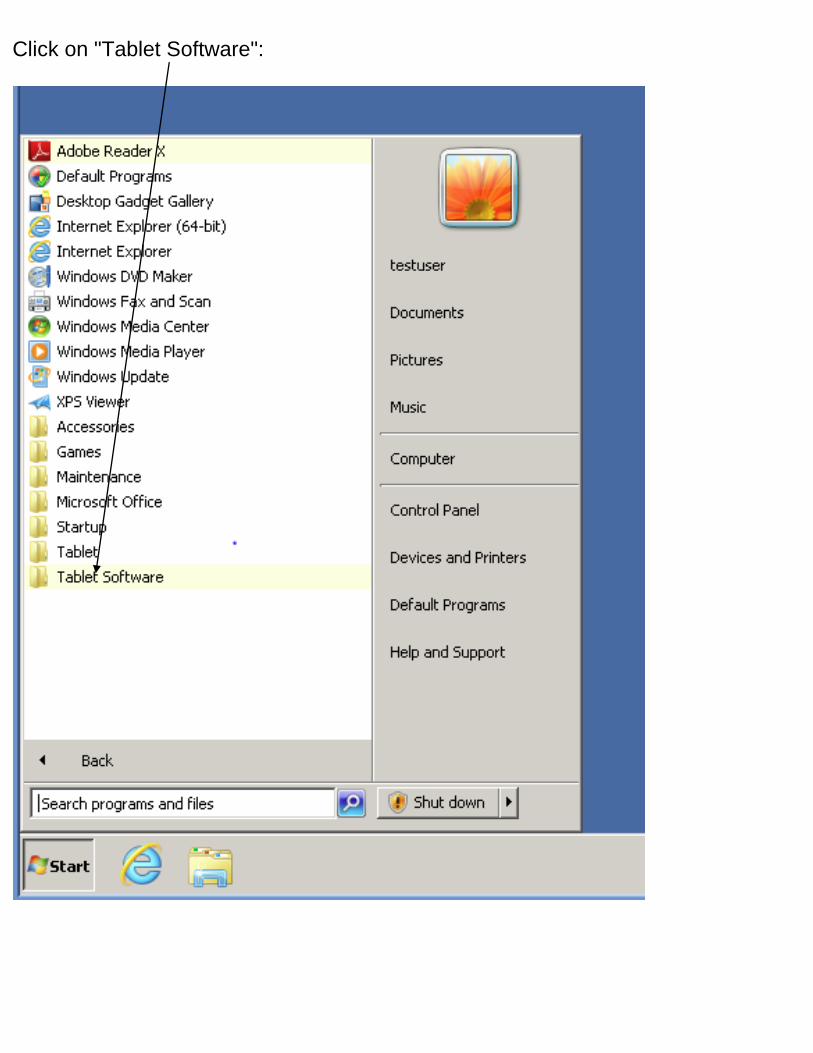
Click on "Tablet Software":

Click on "PenNotice":

The "PenNotice" toolbar will be displayed:
Click on the mouse icon.

Click on the "Annotate Mode" icon.

Use the pen of the tablet to draw anywhere you want on the monitor of the computer.

There are two ways for you to erase the drawing: Both ways are provided by the "Options" icon so click on it:

Method 1: You can click on the "Clear All" icon which looks like a waste basket.
Method 2: You can click on the "Close" icon which will close the "PenNotice" software program and remove the "drawing".

USING THE "PENSIGNER" PROGRAM IN MONOPRICE'S "TABLET SOFTWARE" TO DRAW INTO DOCUMENT FILES Click on the Windows "Start" buttom:

The "Start menu will be displayed:
Click on "All Programs".

Click on "Tablet Software":

Click on "PenSigner":

Click on "Yes":

The "PenSigner" toolbar will be displayed:

Open the document that you wish to draw into:

Use the pen of the tablet to tap on the Pencil button on the left or the Brush button on the right:

The "PenSigner" toolbar will expand downward:
Use the pen of the tablet to tap on the desired color.

Use the pen of the tablet to adjust the "Line Width" slider.

Use the pen of the tablet to draw into the document:

Use the pen to tap on the "Undo" and "Clear" buttons, as required:

Use the pen to tap on "OK" button in order to lock in the drawing. Otherwise, the drawing will disappear when you attempt to save the document file with whatever software program it opened with.

Use the "Save" button of whatever software program you opened the document with to save the document: