Embed Size (px)
DESCRIPTION
Installing and Configuring the SmoothStepper
Citation preview
Soigeneris
Installing and Configuring the
SmoothStepper V1.5
Jeffrey T. Birt
Page 2
304 Fox Creek Road
Rolla, MO 65401 US
573-647-9294
[email protected] A quick guide to installing and updating the SmoothStepper
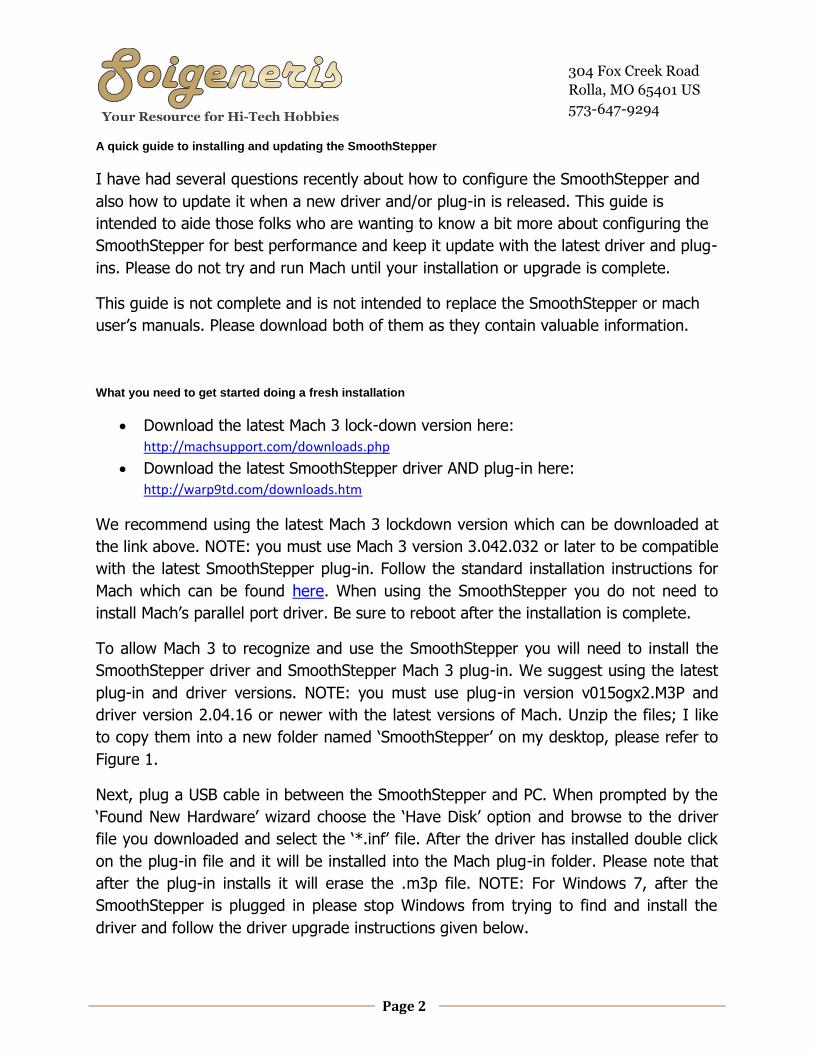
I have had several questions recently about how to configure the SmoothStepper and
also how to update it when a new driver and/or plug-in is released. This guide is
intended to aide those folks who are wanting to know a bit more about configuring the
SmoothStepper for best performance and keep it update with the latest driver and plug-
ins. Please do not try and run Mach until your installation or upgrade is complete.
This guide is not complete and is not intended to replace the SmoothStepper or mach
user’s manuals. Please download both of them as they contain valuable information.
What you need to get started doing a fresh installation
Download the latest Mach 3 lock-down version here:
http://machsupport.com/downloads.php
Download the latest SmoothStepper driver AND plug-in here:
http://warp9td.com/downloads.htm
We recommend using the latest Mach 3 lockdown version which can be downloaded at
the link above. NOTE: you must use Mach 3 version 3.042.032 or later to be compatible
with the latest SmoothStepper plug-in. Follow the standard installation instructions for
Mach which can be found here. When using the SmoothStepper you do not need to
install Mach’s parallel port driver. Be sure to reboot after the installation is complete.
To allow Mach 3 to recognize and use the SmoothStepper you will need to install the
SmoothStepper driver and SmoothStepper Mach 3 plug-in. We suggest using the latest
plug-in and driver versions. NOTE: you must use plug-in version v015ogx2.M3P and
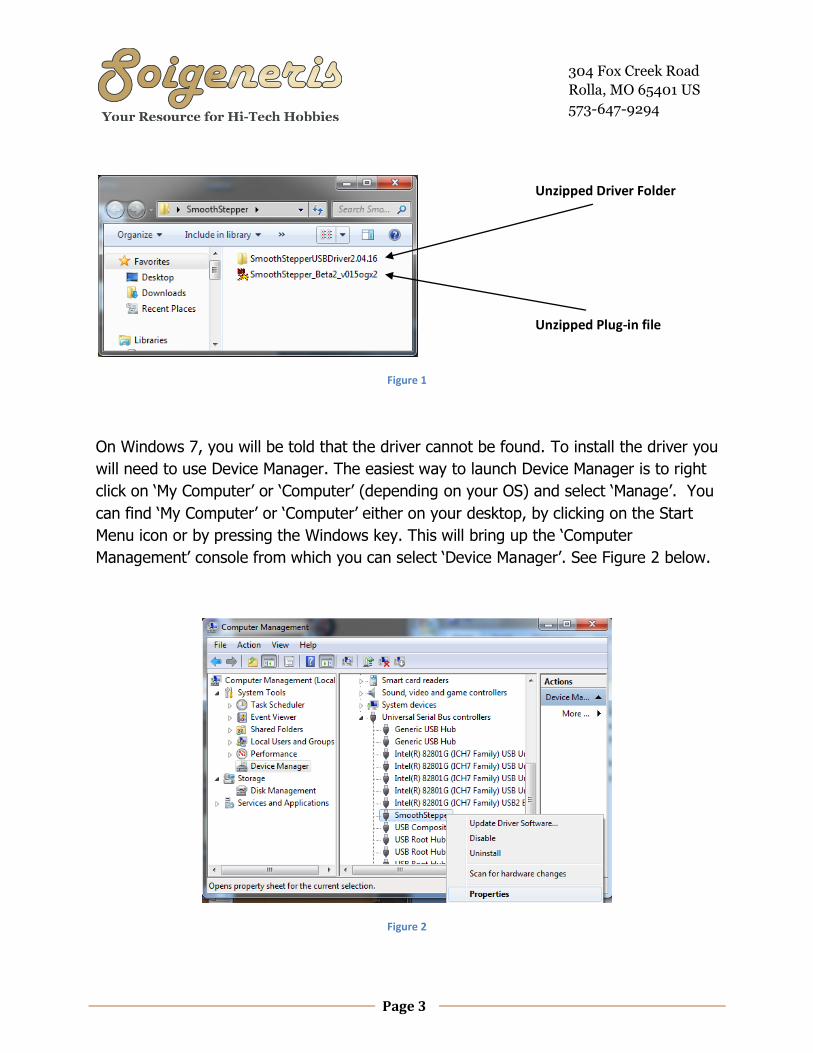
driver version 2.04.16 or newer with the latest versions of Mach. Unzip the files; I like
to copy them into a new folder named ‘SmoothStepper’ on my desktop, please refer to
Figure 1.
Next, plug a USB cable in between the SmoothStepper and PC. When prompted by the
‘Found New Hardware’ wizard choose the ‘Have Disk’ option and browse to the driver
file you downloaded and select the ‘*.inf’ file. After the driver has installed double click
on the plug-in file and it will be installed into the Mach plug-in folder. Please note that
after the plug-in installs it will erase the .m3p file. NOTE: For Windows 7, after the
SmoothStepper is plugged in please stop Windows from trying to find and install the
driver and follow the driver upgrade instructions given below.
Page 3
304 Fox Creek Road
Rolla, MO 65401 US
573-647-9294
Figure 1
On Windows 7, you will be told that the driver cannot be found. To install the driver you
will need to use Device Manager. The easiest way to launch Device Manager is to right
click on ‘My Computer’ or ‘Computer’ (depending on your OS) and select ‘Manage’. You
can find ‘My Computer’ or ‘Computer’ either on your desktop, by clicking on the Start
Menu icon or by pressing the Windows key. This will bring up the ‘Computer
Management’ console from which you can select ‘Device Manager’. See Figure 2 below.
Figure 2
Unzipped Driver Folder
Unzipped Plug-in file

Page 4
304 Fox Creek Road
Rolla, MO 65401 US
573-647-9294
[email protected] Expand the USB section in Device Manager and then right click on the ‘SmoothStepper’
entry and select ‘Properties’ as shown above. The ’SmoothStepper Properties’ window
will popup, from this window select the ‘Driver tab and then the ‘Update Driver’ button
as shown in Figure 3.
Figure 3
We want to choose the ‘manual’ option for updating the driver by selecting the ‘Browse
my computer…’ option. Navigate to SmoothStepperUSBDriver2.08.24 folder and select
the ‘*.inf’ file and then Click OK. See Figure 4 below.
Finally, click the ‘Next’ button to install the updated driver. If you get a screen that says
‘This driver cannot be verified…’ go ahead and select OK to continue.
Figure 4
Page 5
304 Fox Creek Road
Rolla, MO 65401 US
573-647-9294
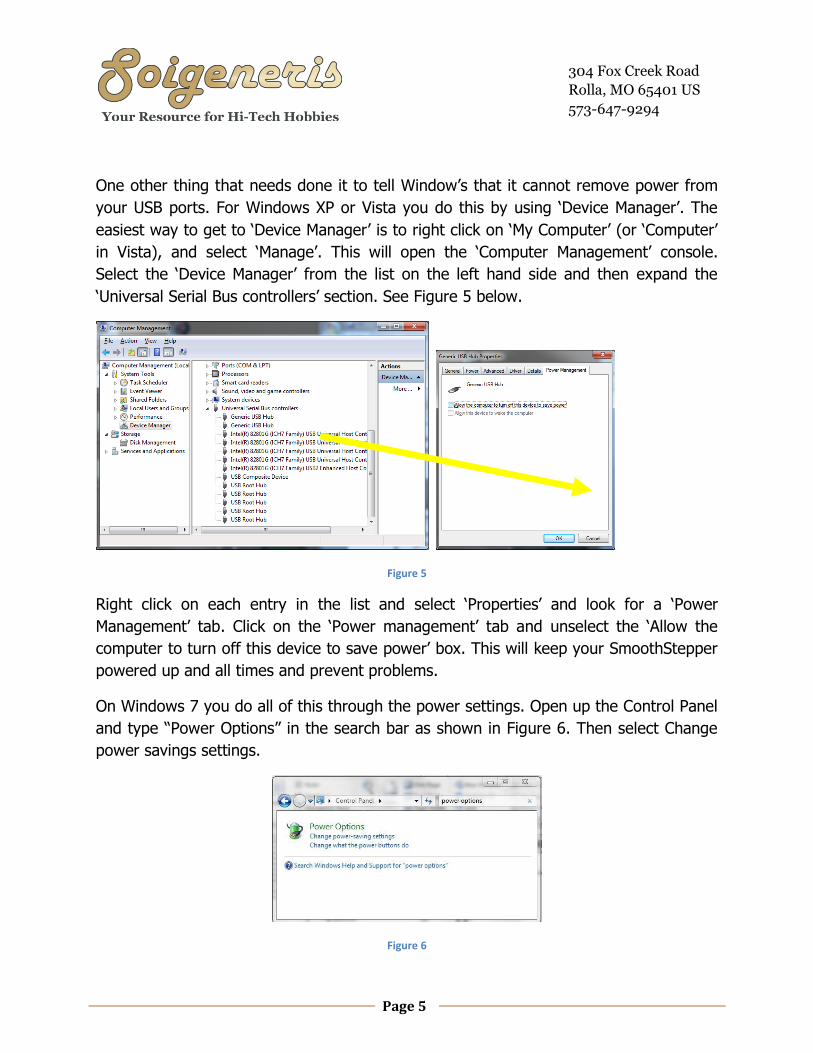
One other thing that needs done it to tell Window’s that it cannot remove power from
your USB ports. For Windows XP or Vista you do this by using ‘Device Manager’. The
easiest way to get to ‘Device Manager’ is to right click on ‘My Computer’ (or ‘Computer’
in Vista), and select ‘Manage’. This will open the ‘Computer Management’ console.
Select the ‘Device Manager’ from the list on the left hand side and then expand the
‘Universal Serial Bus controllers’ section. See Figure 5 below.
Figure 5
Right click on each entry in the list and select ‘Properties’ and look for a ‘Power
Management’ tab. Click on the ‘Power management’ tab and unselect the ‘Allow the
computer to turn off this device to save power’ box. This will keep your SmoothStepper
powered up and all times and prevent problems.
On Windows 7 you do all of this through the power settings. Open up the Control Panel
and type “Power Options” in the search bar as shown in Figure 6. Then select Change
power savings settings.
Figure 6
Page 6
304 Fox Creek Road
Rolla, MO 65401 US
573-647-9294
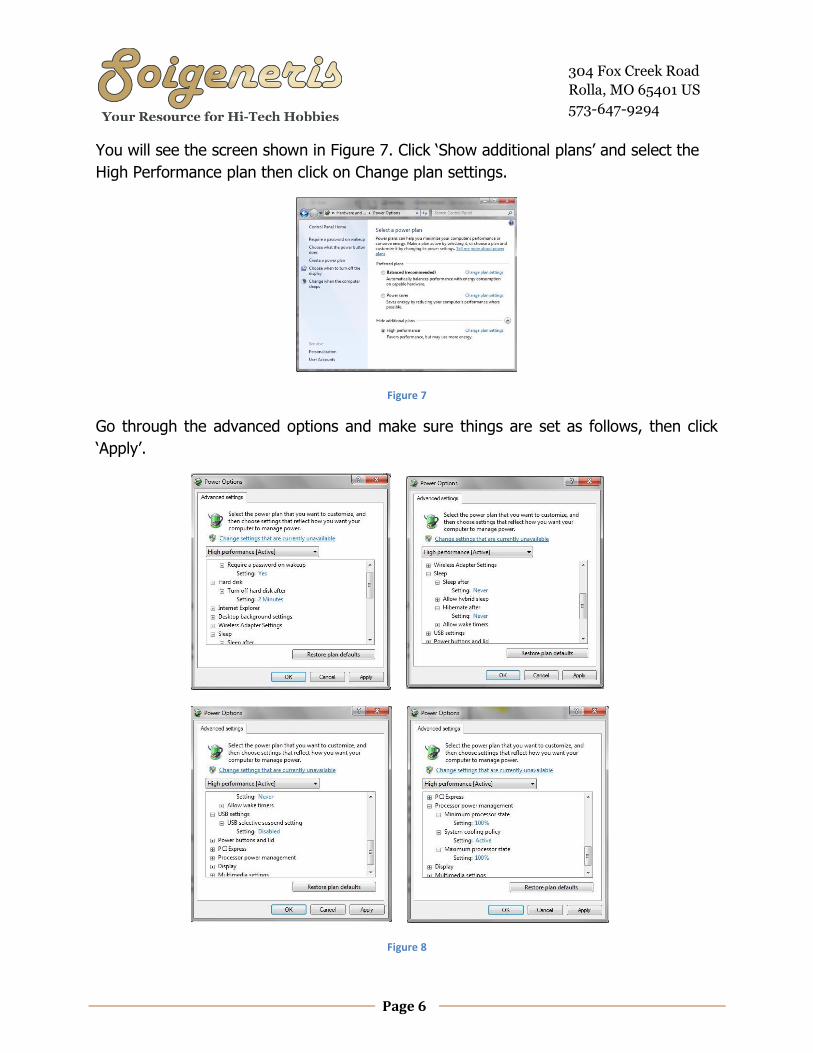
[email protected] You will see the screen shown in Figure 7. Click ‘Show additional plans’ and select the
High Performance plan then click on Change plan settings.
Figure 7
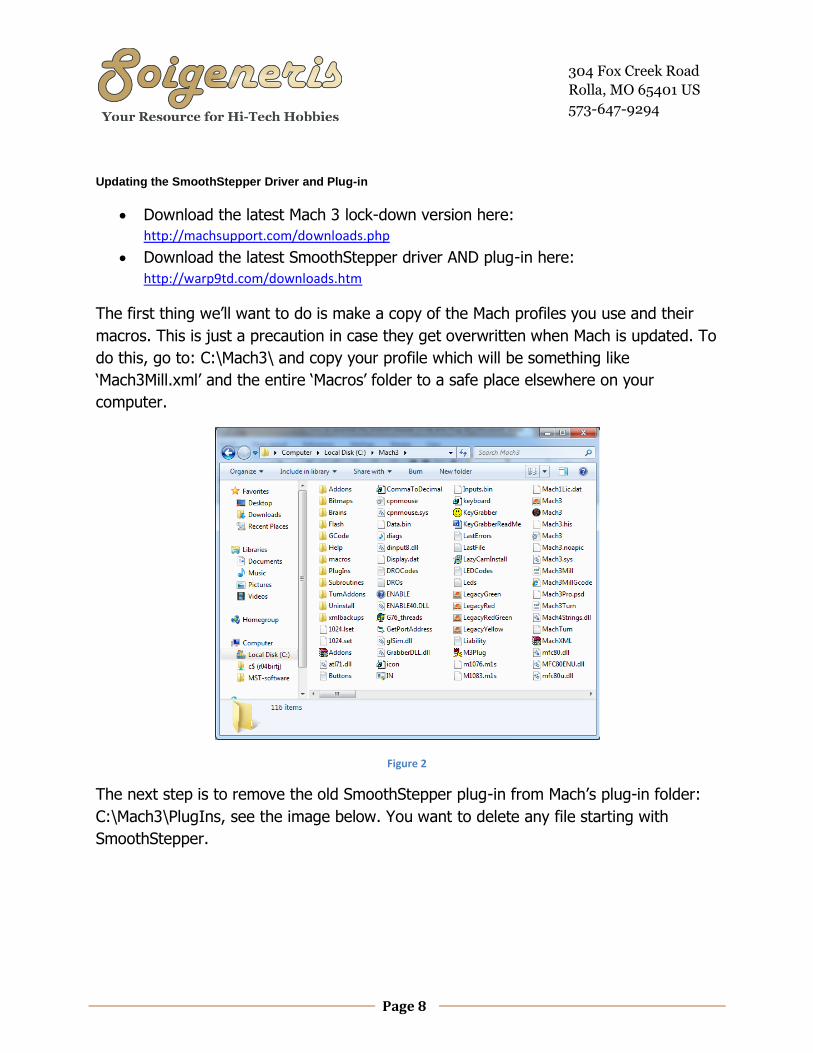
Go through the advanced options and make sure things are set as follows, then click
‘Apply’.
Figure 8

Page 7
304 Fox Creek Road
Rolla, MO 65401 US
573-647-9294
[email protected] To use the SmoothStepper with Mach 3 you need tell Mach to use it as the motion
control device. Since Mach saves all your settings in ‘Profiles’ you need to create or
modify a profile. If you are retrofitting an existing machine you can use Mach Loader to
clone your existing profile. If you don’t have an existing profile you can use Mach loader
to create a new one.
Start Mach up with your new profile and then click on the ‘Function Cfg’s’ menu and
select ‘Reset Dev Sel…’. Now shut down Mach and restart using your new profile. When
Mach starts it will ask you to choose a motion control device, select the SmoothStepper.
The only other thing to watch out for is that the SS plug-in is likely to complain about
the spindle step/direction signals not being set to a valid port in Ports and Pins (you can
keep them disabled if you are not using a S/D spindle but they just have to have a valid
port assigned.)
Page 8
304 Fox Creek Road
Rolla, MO 65401 US
573-647-9294
Updating the SmoothStepper Driver and Plug-in
Download the latest Mach 3 lock-down version here:
http://machsupport.com/downloads.php
Download the latest SmoothStepper driver AND plug-in here:
http://warp9td.com/downloads.htm
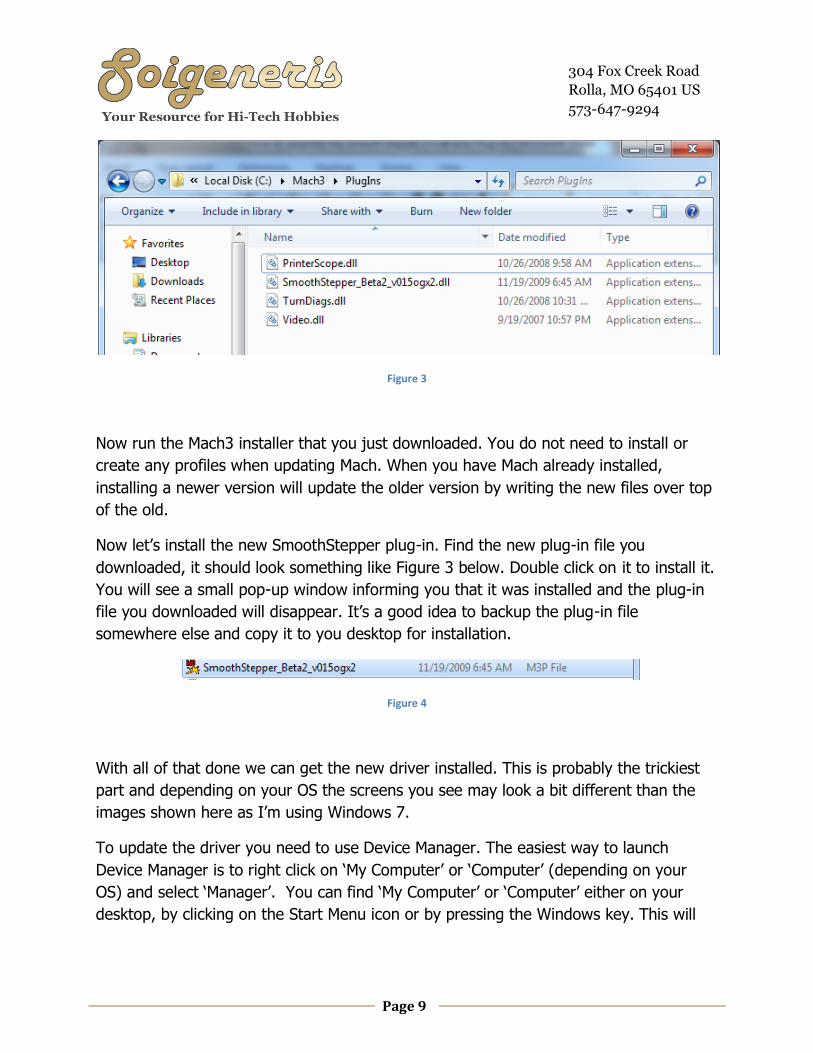
The first thing we’ll want to do is make a copy of the Mach profiles you use and their
macros. This is just a precaution in case they get overwritten when Mach is updated. To
do this, go to: C:\Mach3\ and copy your profile which will be something like
‘Mach3Mill.xml’ and the entire ‘Macros’ folder to a safe place elsewhere on your
computer.
Figure 2
The next step is to remove the old SmoothStepper plug-in from Mach’s plug-in folder:
C:\Mach3\PlugIns, see the image below. You want to delete any file starting with
SmoothStepper.
Page 9
304 Fox Creek Road
Rolla, MO 65401 US
573-647-9294
Figure 3
Now run the Mach3 installer that you just downloaded. You do not need to install or
create any profiles when updating Mach. When you have Mach already installed,
installing a newer version will update the older version by writing the new files over top
of the old.
Now let’s install the new SmoothStepper plug-in. Find the new plug-in file you
downloaded, it should look something like Figure 3 below. Double click on it to install it.
You will see a small pop-up window informing you that it was installed and the plug-in
file you downloaded will disappear. It’s a good idea to backup the plug-in file
somewhere else and copy it to you desktop for installation.
Figure 4
With all of that done we can get the new driver installed. This is probably the trickiest
part and depending on your OS the screens you see may look a bit different than the
images shown here as I’m using Windows 7.
To update the driver you need to use Device Manager. The easiest way to launch
Device Manager is to right click on ‘My Computer’ or ‘Computer’ (depending on your
OS) and select ‘Manager’. You can find ‘My Computer’ or ‘Computer’ either on your
desktop, by clicking on the Start Menu icon or by pressing the Windows key. This will
Page 10
304 Fox Creek Road
Rolla, MO 65401 US
573-647-9294
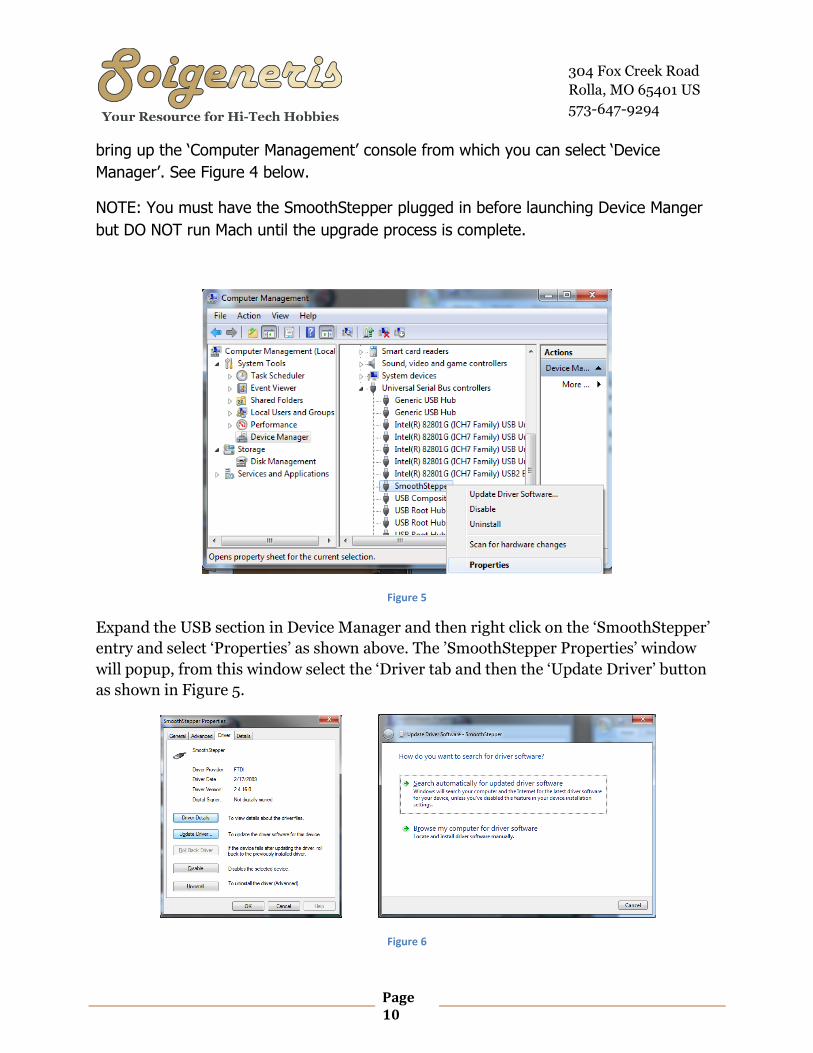
[email protected] bring up the ‘Computer Management’ console from which you can select ‘Device
Manager’. See Figure 4 below.
NOTE: You must have the SmoothStepper plugged in before launching Device Manger
but DO NOT run Mach until the upgrade process is complete.
Figure 5
Expand the USB section in Device Manager and then right click on the ‘SmoothStepper’
entry and select ‘Properties’ as shown above. The ’SmoothStepper Properties’ window
will popup, from this window select the ‘Driver tab and then the ‘Update Driver’ button
as shown in Figure 5.
Figure 6
Page 11
304 Fox Creek Road
Rolla, MO 65401 US
573-647-9294
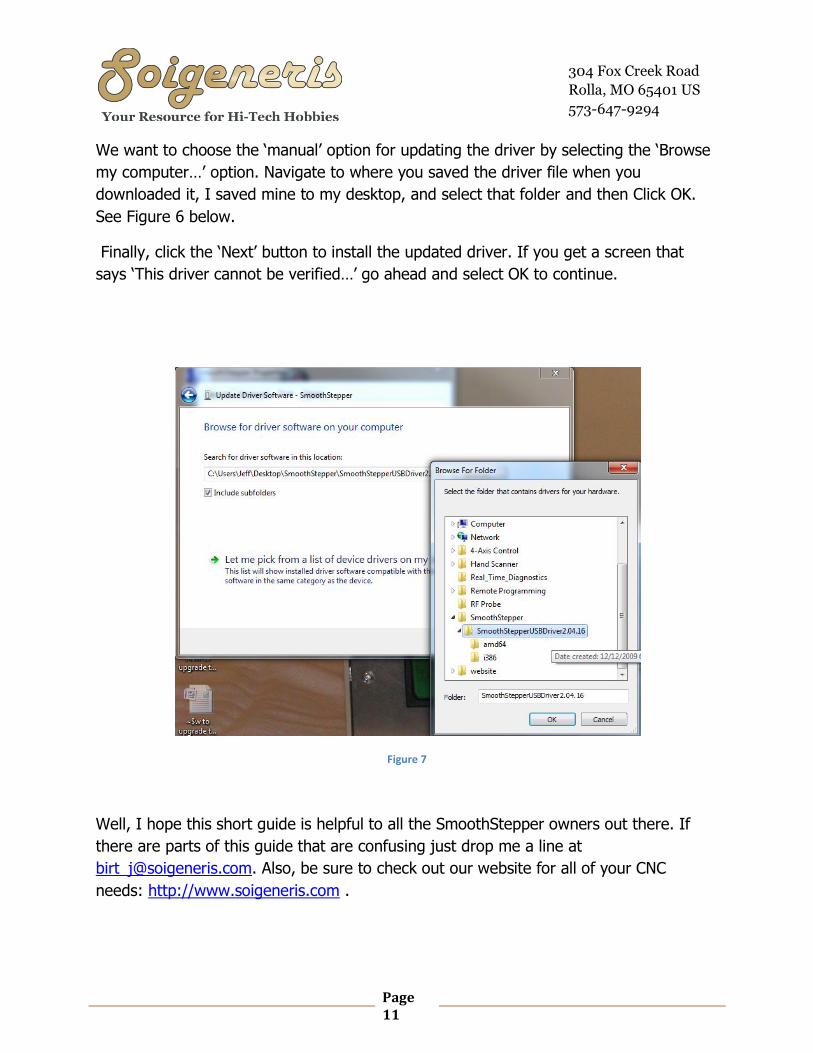
[email protected] We want to choose the ‘manual’ option for updating the driver by selecting the ‘Browse
my computer…’ option. Navigate to where you saved the driver file when you
downloaded it, I saved mine to my desktop, and select that folder and then Click OK.
See Figure 6 below.
Finally, click the ‘Next’ button to install the updated driver. If you get a screen that
says ‘This driver cannot be verified…’ go ahead and select OK to continue.
Figure 7
Well, I hope this short guide is helpful to all the SmoothStepper owners out there. If
there are parts of this guide that are confusing just drop me a line at
[email protected]. Also, be sure to check out our website for all of your CNC
needs: http://www.soigeneris.com .
Page 12
304 Fox Creek Road
Rolla, MO 65401 US
573-647-9294
[email protected] Configuration Tips
The SmoothStepper or any other motion control device that works with Mach DOES
NOT interpret or manipulate the G-code, Mach ALWAYS does that. Mach's planner
interprets the G-Code and breaks every movement down into the itty-bitty movements
that needs to take place between each clock cycle; by clock cycle I am referring to the
'kernel' rate on the parallel port drive and the 'Controller Frequency' and 'Max Step
Frequency' in the SmoothStepper configuration. In the SmoothStepper you can think of
the 'Max Step Frequency' as sort of a kernel frequency that you can assign per axis.
Just like with the parallel port driver, the steps/unit and max velocity determine the
frequency needed.
In either case let’s say you are starting from 0,0,0 and have a 'G0 X0.1234'; Mach will
break that distance down into the small bits that need to be moved to each clock cycle
(accounting for acceleration, deceleration and velocity, steps/unit). If your using the
LPT driver then this clock is the kernel frequency, for the SmoothStepper is a
combination of the 'Controller Frequency' and 'Max Step Frequency', as mentioned
above. In some case breaking down a movement into all of these little steps leads to
very minute rounding errors in the axis DRO. Since Mach runs a sort of cumulative axis
DRO this is not an actual error as if it could not break a move down into an even
number for display purposes the next move will be calculated properly, so any single
step will be taken up on the next move. A crude analogy would be typing '1/3' into a
calculator. You'll get 0.33333333...which we would just say is '0.3333'.
If the SmoothStepper has its 'Max Step Frequency' set too high for an axis it will limit
the output resolution for that axis. You can get an idea of what this frequency should
be set to by knowing your steps/unit and max velocity.
Steps/Unit * Units/Min = Steps/Min
Steps/Min / 60 = Steps/Second (or Max Step Frequency)
This Steps/Second is the needed step frequency for that Axis, you should set the
SmoothStepper’s 'Max Step Frequency' to the lowest value that is equal to or greater
than your Steps/Second. Once you get all your axis' 'Max Step Frequency' set, adjust
the 'Controller Frequency' to the lowest value that proved Smooth movement, the note
on the SmoothStepper configuration page says higher settings will limit resolution.
Page 13
304 Fox Creek Road
Rolla, MO 65401 US
573-647-9294
[email protected] SmoothStepper Spindle Set Up
Go to Config->Ports&Pins->Motor Outputs tab
Enable the spindle
Assign port and pin values to match your system
Go to Config->Ports&Pins->Spindle setup tab
Check the box that says ‘Use Spindle Motor Output’
If your spindle uses an Output to trigger a relay this needs to set up.
The other settings do not apply to the SmoothStepper
Go to Config->Motor Tuning->Spindle Axis (press Save when done)
For a PWM spindle:
Set "Steps Per" to 1000 (can adjust later for acceleration)
Set "Velocity" to 60 (Effects some Mach calculations, no effect on SS)
Set "Accel" to 1 (The accel is calculated as "Steps Per" * "Accel", so just adjust
"Steps Per" to get the accel results that work well)
For Step & Direction:
Set "Steps Per" to the maximum step frequency. This is the frequency that will
produce the maximum speed of the spindle motor.
Set "Velocity" to 60. This is a magic number that allows you to enter the max
step frequency for "Steps Per".
Set "Accel" to whatever value gives you the acceleration you want.
Go to Config -> Spindle Pulleys
Select a pulley
Choose min and max RPM, and a ratio so that spindle feedback calculates the
correct RPM for display
Page 14
304 Fox Creek Road
Rolla, MO 65401 US
573-647-9294
[email protected] SmoothStepper Config (Under PlugIn Control)
For PWM:
Check the box for PWM
Select a base frequency for PWM (in Hz)
For Step & Direction:
Check the box for Step & Direction
Select a step pulse width. Make sure the frequency that was selected in Motor
Tuning is not too fast for this pulse width. Otherwise the signal will never
transition. For example, for a max step frequency of 25 kHz, the maximum pulse
width is 40 microseconds. At 25 kHz, the waveform would be 100% duty cycle if
the pulse width is 40 us.
Page 15
304 Fox Creek Road
Rolla, MO 65401 US
573-647-9294
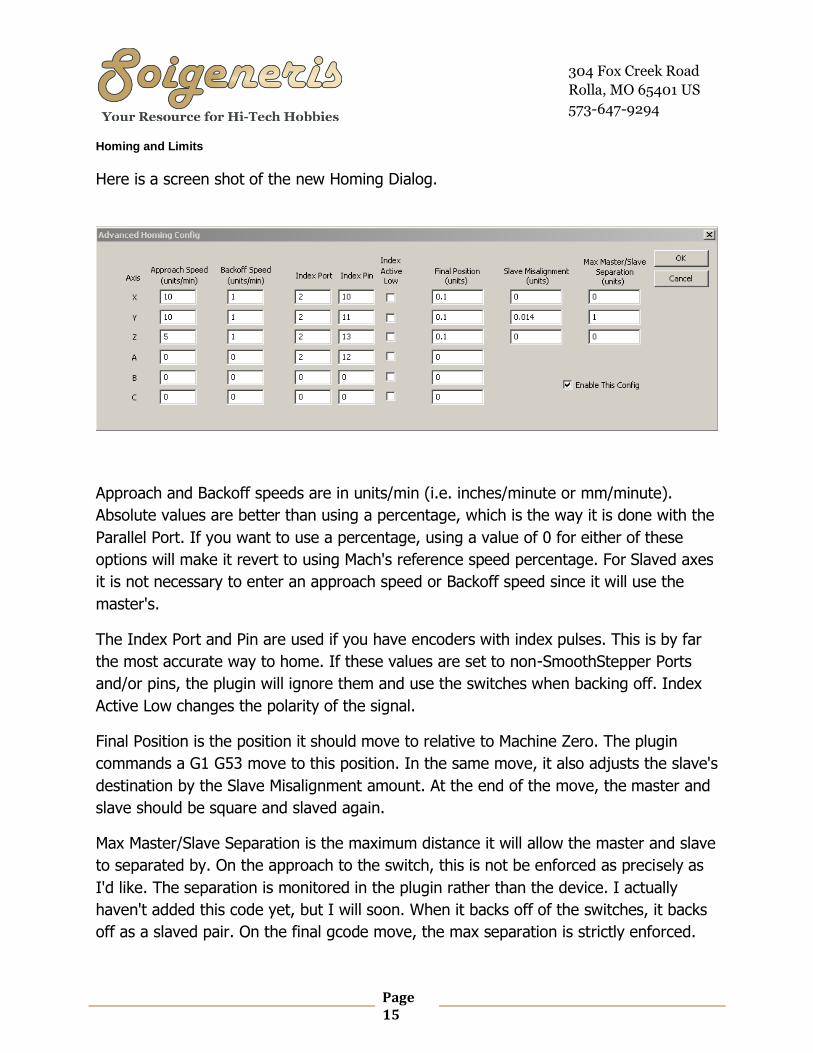
[email protected] Homing and Limits
Here is a screen shot of the new Homing Dialog.
Approach and Backoff speeds are in units/min (i.e. inches/minute or mm/minute).
Absolute values are better than using a percentage, which is the way it is done with the
Parallel Port. If you want to use a percentage, using a value of 0 for either of these
options will make it revert to using Mach's reference speed percentage. For Slaved axes
it is not necessary to enter an approach speed or Backoff speed since it will use the
master's.
The Index Port and Pin are used if you have encoders with index pulses. This is by far
the most accurate way to home. If these values are set to non-SmoothStepper Ports
and/or pins, the plugin will ignore them and use the switches when backing off. Index
Active Low changes the polarity of the signal.
Final Position is the position it should move to relative to Machine Zero. The plugin
commands a G1 G53 move to this position. In the same move, it also adjusts the slave's
destination by the Slave Misalignment amount. At the end of the move, the master and
slave should be square and slaved again.
Max Master/Slave Separation is the maximum distance it will allow the master and slave
to separated by. On the approach to the switch, this is not be enforced as precisely as
I'd like. The separation is monitored in the plugin rather than the device. I actually
haven't added this code yet, but I will soon. When it backs off of the switches, it backs
off as a slaved pair. On the final gcode move, the max separation is strictly enforced.


![[1]Oracle® Fusion Middleware Installing and Configuring ... · Installing and Configuring Oracle Enterprise Data Quality 12c ... Oracle Fusion Middleware Installing and Configuring](https://img.pdfslide.us/doc/110x75/5b8396637f8b9a47588d872b/1oracle-fusion-middleware-installing-and-configuring-installing-and.jpg)