Embed Size (px)
Citation preview
Installing an Oracle 10g RAC database on Solaris 10 64-bit with an iSCSI SAN
Introduction: This document is meant as a walk through for those looking to setup an Oracle 10gR2 RAC database on a Sun Solaris 10 system using an iSCSI interface to a SAN storage. Note: This document should be used in conjunction with the following documents:
1. Oracle Clusterware Installation and Real Application Clusters Installation Guide: 10gR2 (10.2)for Solaris Operating System (September 2006: part no. B14205-07)
2. Oracle Database Installation Guide for Solaris Operating System (SPARC 64-bit) part no. B15690
Software used:
1. Oracle 10g (10.2.0.1) 2. Sun Solaris 10
Hardware Used:
1. Sun T1000 Servers. 2. Equallogic PeerStorage Array 3. Riverstone Gigabit switches
Overview:
1. Setup iSCSI. 2. Create RAW device files for CRS 3. Prepare servers for Oracle CRS installation 4. Install Oracle CRS 5. Install Oracle ASM 6. Install Oracle 10g
The installation of the Oracle software can be on the server hard drives or placed on a volume on the SAN. To install the Oracle software onto the SAN, Cluster software will have to be used. Since I do not have a reliable cluster software I am going to do separate installations of the Oracle software on each server. I will then create raw partitions on the SAN. The Oracle Cluster Ready Service (CRS) will access the raw partitions directly. The raw partitions for the database will be controlled by Oracle’s ASM. If the Oracle software is going to be placed on the SAN then a regular file system can be used instead of raw partitions.
Setup iSCSI: Step 1: Verify that the iSCSI packages are installed # pkginfo SUNWiscsiu SUNWiscsir Step 2: Configure the array Create and add volume(s) for the Sun server(s). Include the proper access controls (IP Address, iSCSI name, etc.) when creating the volumes. On the Sun server: Display Initiator information # iscsiadm list initiator-node Use the initiator node information as the initiator name for creating volume access
1
Installing an Oracle 10g RAC database on Solaris 10 64-bit with an iSCSI SAN
On the Equallogic iSCSI array: EQ> create volume volume1 size 2048 Volume is in MB. For gigabytes add GB. ex. 50GB Volume select volume_name access create initiator initiator_name or Volume select volume_name access create ipaddress ip_address EQ> volume select volume1 access create initiator iqn.2000-05.com.sun.a2sd-4000.sn00044 To determine the target name: EQ> volume select volume_name show The target name will be listed as ISCSI name: ex. iqn.2001-05.com.equallogic:6…. Note: It is best if there are no unsecured access volumes on the array. The Sun servers will see all volumes configured with their specific access (IP address, iSCSI name, etc.) as well as all unsecured volumes. Step 3a: Configure Target discovery using ip address
# iscsiadm add discovery-address 10.0.0.1:3260 Repeat above for all volumes
Step 3a.1: Enable Target discovery
# iscsiadm modify discovery --sendtargets enable Other commands:
Disable Target Discovery
# iscsiadm modify discovery --sendtargets disable
Remove Target discovery
# iscsiadm remove discovery-address 10.0.0.1:3260 Step 3b: Configure Target discovery using target name. # iscsiadm add static-config iqn.2001-05.com.equallogic:6…. , ip_address Repeat above for all volumes # iscsiadm modify discovery --static enable Other commands: Disable Target Discovery
2
Installing an Oracle 10g RAC database on Solaris 10 64-bit with an iSCSI SAN
# iscsiadm modify discovery --static disable Remove Target discovery # iscsiadm remove static-config iqn.2001-05.com.equallogic:6…. Step 5: Create the iSCSI device links for the local system # devfsadm -i iscsi Step 6. Check for iSCSI devices # iscsiadm list target –S
Basic iSCSI Monitoring Display Initiator information # iscsiadm list initiator-node Display Target information # iscsiadm list target –S # iscsiadm list discovery-address –v 10.0.0.3 # iscsiadm list target-param -v iqn.2001-05.com.equallogic:6….
Create Raw Device Files for CRS Step 1: Create partitions Use the format utility: # format AVAILABLE DISK SELECTIONS: 0. c0t1d0 <SUN72G cyl 14087 alt 2 hd 24 sec 424> /pci@8,600000/SUNW,qlc@4/fp@0,0/ssd@w500000e010685cf1,0 1. c0t2d0 <SUN72G cyl 14087 alt 2 hd 24 sec 424> /pci@8,600000/SUNW,qlc@4/fp@0,0/ssd@w500000e0106e3ba1,0 2. c2t0d0 <EQLOGIC-100E-00-2.2 cyl 546 alt 2 hd 16 sec 63> /iscsi/[email protected]%3A6-8a0900-deca50901-805ff036ff445ca2-volume2FFFF,0 3. c2t4d0 <EQLOGIC-100E-00-2.2 cyl 546 alt 2 hd 16 sec 63> /iscsi/[email protected]%3A6-8a0900-dcca50901-971ff036ff145ca2-volume1FFFF,0
3
Installing an Oracle 10g RAC database on Solaris 10 64-bit with an iSCSI SAN
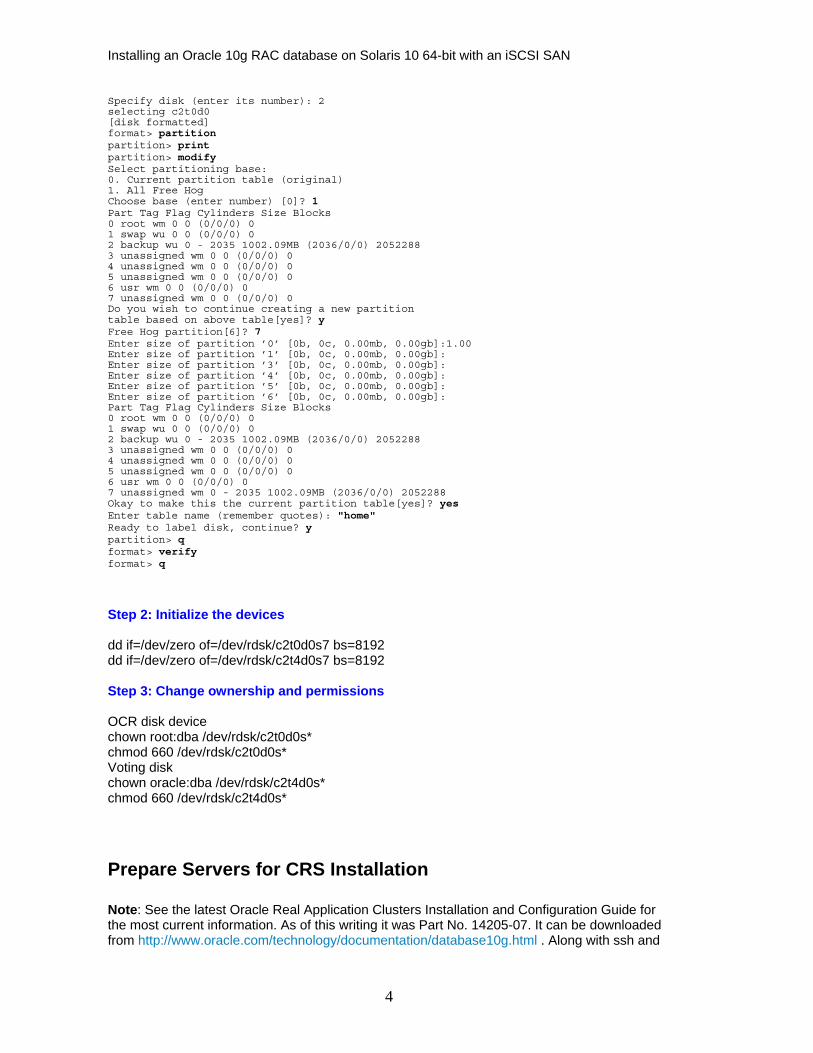
Specify disk (enter its number): 2 selecting c2t0d0 [disk formatted] format> partition partition> print partition> modify Select partitioning base: 0. Current partition table (original) 1. All Free Hog Choose base (enter number) [0]? 1 Part Tag Flag Cylinders Size Blocks 0 root wm 0 0 (0/0/0) 0 1 swap wu 0 0 (0/0/0) 0 2 backup wu 0 - 2035 1002.09MB (2036/0/0) 2052288 3 unassigned wm 0 0 (0/0/0) 0 4 unassigned wm 0 0 (0/0/0) 0 5 unassigned wm 0 0 (0/0/0) 0 6 usr wm 0 0 (0/0/0) 0 7 unassigned wm 0 0 (0/0/0) 0 Do you wish to continue creating a new partition table based on above table[yes]? y Free Hog partition[6]? 7 Enter size of partition ’0’ [0b, 0c, 0.00mb, 0.00gb]:1.00 Enter size of partition ’1’ [0b, 0c, 0.00mb, 0.00gb]: Enter size of partition ’3’ [0b, 0c, 0.00mb, 0.00gb]: Enter size of partition ’4’ [0b, 0c, 0.00mb, 0.00gb]: Enter size of partition ’5’ [0b, 0c, 0.00mb, 0.00gb]: Enter size of partition ’6’ [0b, 0c, 0.00mb, 0.00gb]: Part Tag Flag Cylinders Size Blocks 0 root wm 0 0 (0/0/0) 0 1 swap wu 0 0 (0/0/0) 0 2 backup wu 0 - 2035 1002.09MB (2036/0/0) 2052288 3 unassigned wm 0 0 (0/0/0) 0 4 unassigned wm 0 0 (0/0/0) 0 5 unassigned wm 0 0 (0/0/0) 0 6 usr wm 0 0 (0/0/0) 0 7 unassigned wm 0 - 2035 1002.09MB (2036/0/0) 2052288 Okay to make this the current partition table[yes]? yes Enter table name (remember quotes): "home" Ready to label disk, continue? y partition> q format> verify format> q
Step 2: Initialize the devices dd if=/dev/zero of=/dev/rdsk/c2t0d0s7 bs=8192 dd if=/dev/zero of=/dev/rdsk/c2t4d0s7 bs=8192 Step 3: Change ownership and permissions OCR disk device chown root:dba /dev/rdsk/c2t0d0s* chmod 660 /dev/rdsk/c2t0d0s* Voting disk chown oracle:dba /dev/rdsk/c2t4d0s* chmod 660 /dev/rdsk/c2t4d0s*
Prepare Servers for CRS Installation Note: See the latest Oracle Real Application Clusters Installation and Configuration Guide for the most current information. As of this writing it was Part No. 14205-07. It can be downloaded from http://www.oracle.com/technology/documentation/database10g.html . Along with ssh and
4
Installing an Oracle 10g RAC database on Solaris 10 64-bit with an iSCSI SAN
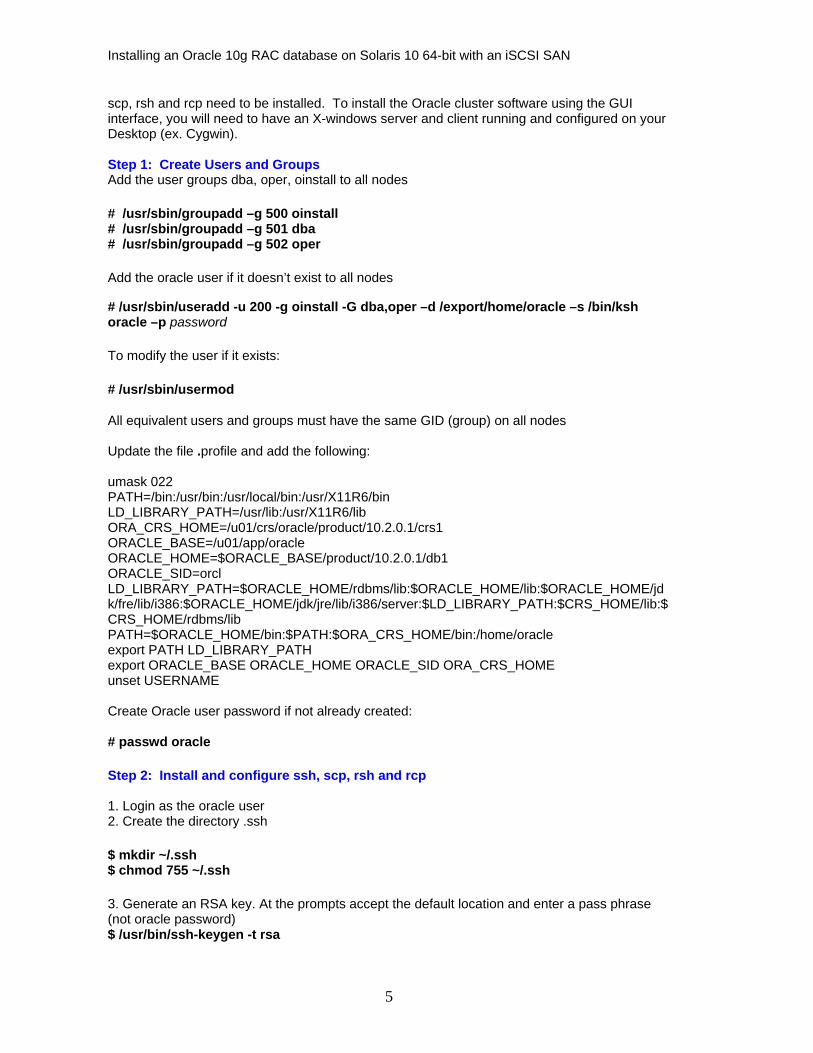
scp, rsh and rcp need to be installed. To install the Oracle cluster software using the GUI interface, you will need to have an X-windows server and client running and configured on your Desktop (ex. Cygwin). Step 1: Create Users and Groups Add the user groups dba, oper, oinstall to all nodes # /usr/sbin/groupadd –g 500 oinstall # /usr/sbin/groupadd –g 501 dba # /usr/sbin/groupadd –g 502 oper Add the oracle user if it doesn’t exist to all nodes # /usr/sbin/useradd -u 200 -g oinstall -G dba,oper –d /export/home/oracle –s /bin/ksh oracle –p password To modify the user if it exists: # /usr/sbin/usermod All equivalent users and groups must have the same GID (group) on all nodes Update the file .profile and add the following: umask 022 PATH=/bin:/usr/bin:/usr/local/bin:/usr/X11R6/bin LD_LIBRARY_PATH=/usr/lib:/usr/X11R6/lib ORA_CRS_HOME=/u01/crs/oracle/product/10.2.0.1/crs1 ORACLE_BASE=/u01/app/oracle ORACLE_HOME=$ORACLE_BASE/product/10.2.0.1/db1 ORACLE_SID=orcl LD_LIBRARY_PATH=$ORACLE_HOME/rdbms/lib:$ORACLE_HOME/lib:$ORACLE_HOME/jdk/fre/lib/i386:$ORACLE_HOME/jdk/jre/lib/i386/server:$LD_LIBRARY_PATH:$CRS_HOME/lib:$CRS_HOME/rdbms/lib PATH=$ORACLE_HOME/bin:$PATH:$ORA_CRS_HOME/bin:/home/oracle export PATH LD_LIBRARY_PATH export ORACLE_BASE ORACLE_HOME ORACLE_SID ORA_CRS_HOME unset USERNAME Create Oracle user password if not already created: # passwd oracle Step 2: Install and configure ssh, scp, rsh and rcp 1. Login as the oracle user 2. Create the directory .ssh $ mkdir ~/.ssh $ chmod 755 ~/.ssh 3. Generate an RSA key. At the prompts accept the default location and enter a pass phrase (not oracle password) $ /usr/bin/ssh-keygen -t rsa
5
Installing an Oracle 10g RAC database on Solaris 10 64-bit with an iSCSI SAN
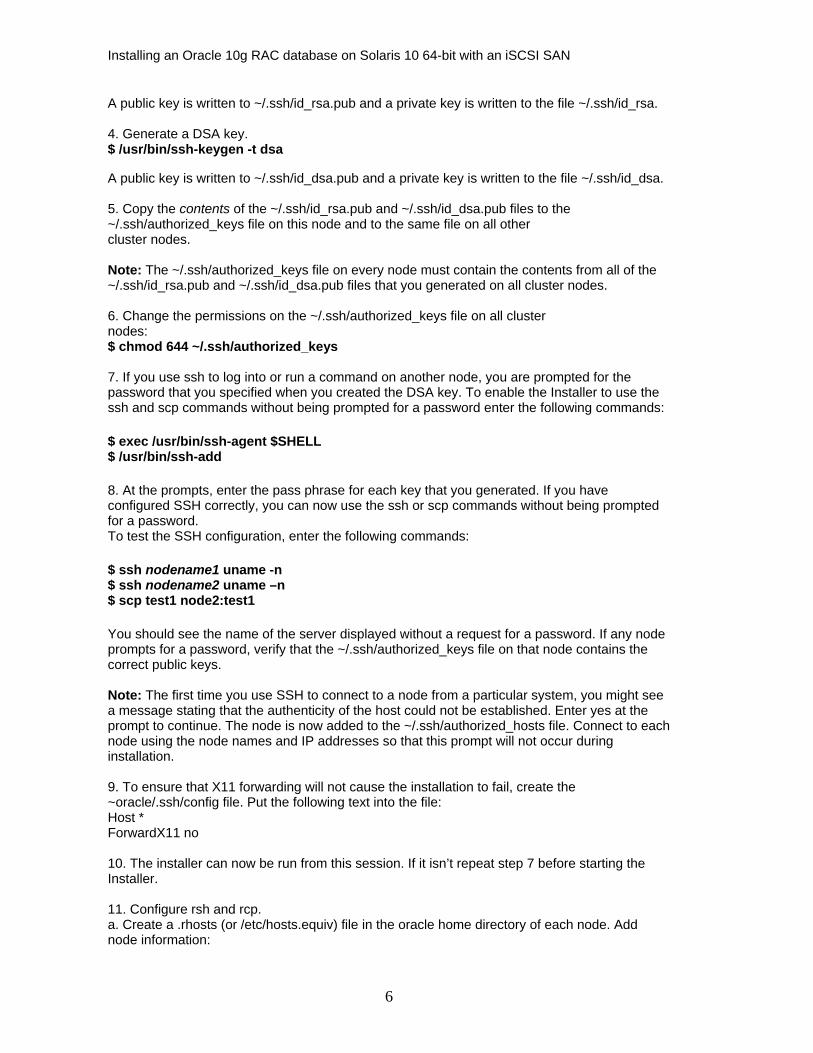
A public key is written to ~/.ssh/id_rsa.pub and a private key is written to the file ~/.ssh/id_rsa. 4. Generate a DSA key. $ /usr/bin/ssh-keygen -t dsa A public key is written to ~/.ssh/id_dsa.pub and a private key is written to the file ~/.ssh/id_dsa. 5. Copy the contents of the ~/.ssh/id_rsa.pub and ~/.ssh/id_dsa.pub files to the ~/.ssh/authorized_keys file on this node and to the same file on all other cluster nodes. Note: The ~/.ssh/authorized_keys file on every node must contain the contents from all of the ~/.ssh/id_rsa.pub and ~/.ssh/id_dsa.pub files that you generated on all cluster nodes. 6. Change the permissions on the ~/.ssh/authorized_keys file on all cluster nodes: $ chmod 644 ~/.ssh/authorized_keys 7. If you use ssh to log into or run a command on another node, you are prompted for the password that you specified when you created the DSA key. To enable the Installer to use the ssh and scp commands without being prompted for a password enter the following commands: $ exec /usr/bin/ssh-agent $SHELL $ /usr/bin/ssh-add 8. At the prompts, enter the pass phrase for each key that you generated. If you have configured SSH correctly, you can now use the ssh or scp commands without being prompted for a password. To test the SSH configuration, enter the following commands: $ ssh nodename1 uname -n $ ssh nodename2 uname –n $ scp test1 node2:test1 You should see the name of the server displayed without a request for a password. If any node prompts for a password, verify that the ~/.ssh/authorized_keys file on that node contains the correct public keys. Note: The first time you use SSH to connect to a node from a particular system, you might see a message stating that the authenticity of the host could not be established. Enter yes at the prompt to continue. The node is now added to the ~/.ssh/authorized_hosts file. Connect to each node using the node names and IP addresses so that this prompt will not occur during installation. 9. To ensure that X11 forwarding will not cause the installation to fail, create the ~oracle/.ssh/config file. Put the following text into the file: Host * ForwardX11 no 10. The installer can now be run from this session. If it isn’t repeat step 7 before starting the Installer. 11. Configure rsh and rcp. a. Create a .rhosts (or /etc/hosts.equiv) file in the oracle home directory of each node. Add node information:
6
Installing an Oracle 10g RAC database on Solaris 10 64-bit with an iSCSI SAN
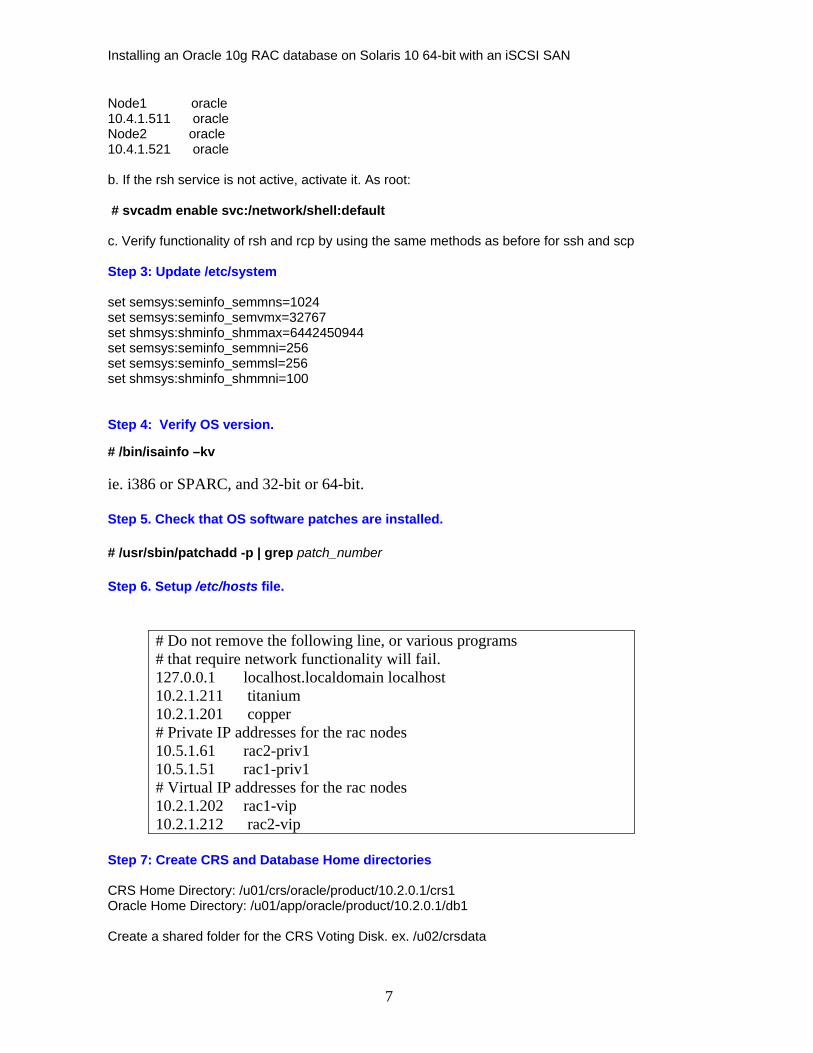
Node1 oracle 10.4.1.511 oracle Node2 oracle 10.4.1.521 oracle b. If the rsh service is not active, activate it. As root: # svcadm enable svc:/network/shell:default c. Verify functionality of rsh and rcp by using the same methods as before for ssh and scp Step 3: Update /etc/system set semsys:seminfo_semmns=1024 set semsys:seminfo_semvmx=32767 set shmsys:shminfo_shmmax=6442450944 set semsys:seminfo_semmni=256 set semsys:seminfo_semmsl=256 set shmsys:shminfo_shmmni=100 Step 4: Verify OS version. # /bin/isainfo –kv ie. i386 or SPARC, and 32-bit or 64-bit. Step 5. Check that OS software patches are installed. # /usr/sbin/patchadd -p | grep patch_number Step 6. Setup /etc/hosts file.
# Do not remove the following line, or various programs # that require network functionality will fail. 127.0.0.1 localhost.localdomain localhost 10.2.1.211 titanium 10.2.1.201 copper # Private IP addresses for the rac nodes 10.5.1.61 rac2-priv1 10.5.1.51 rac1-priv1 # Virtual IP addresses for the rac nodes 10.2.1.202 rac1-vip 10.2.1.212 rac2-vip
Step 7: Create CRS and Database Home directories CRS Home Directory: /u01/crs/oracle/product/10.2.0.1/crs1 Oracle Home Directory: /u01/app/oracle/product/10.2.0.1/db1 Create a shared folder for the CRS Voting Disk. ex. /u02/crsdata
7
Installing an Oracle 10g RAC database on Solaris 10 64-bit with an iSCSI SAN
Create a shared folder for the Oracle database data. ex. /u03/oradata A folder can also be created for archive logs or flash-back files. ex. /u04/archive Step 8: Verify servers meet hardware and software requirements: check the Guide. Run the cluvfy (cluster verification utility) utility, which will perform various system checks that will confirm that your system is configured for Oracle Clusterware and Oracle RAC. $ ./runcluvfy.sh stage -pre crsinst -n node1,node2 -verbose To check for required OS packages listed in Guide. # pkginfo –i SUNWarc SUNWbtool SUNWhea SUNWlibm SUNWlibms
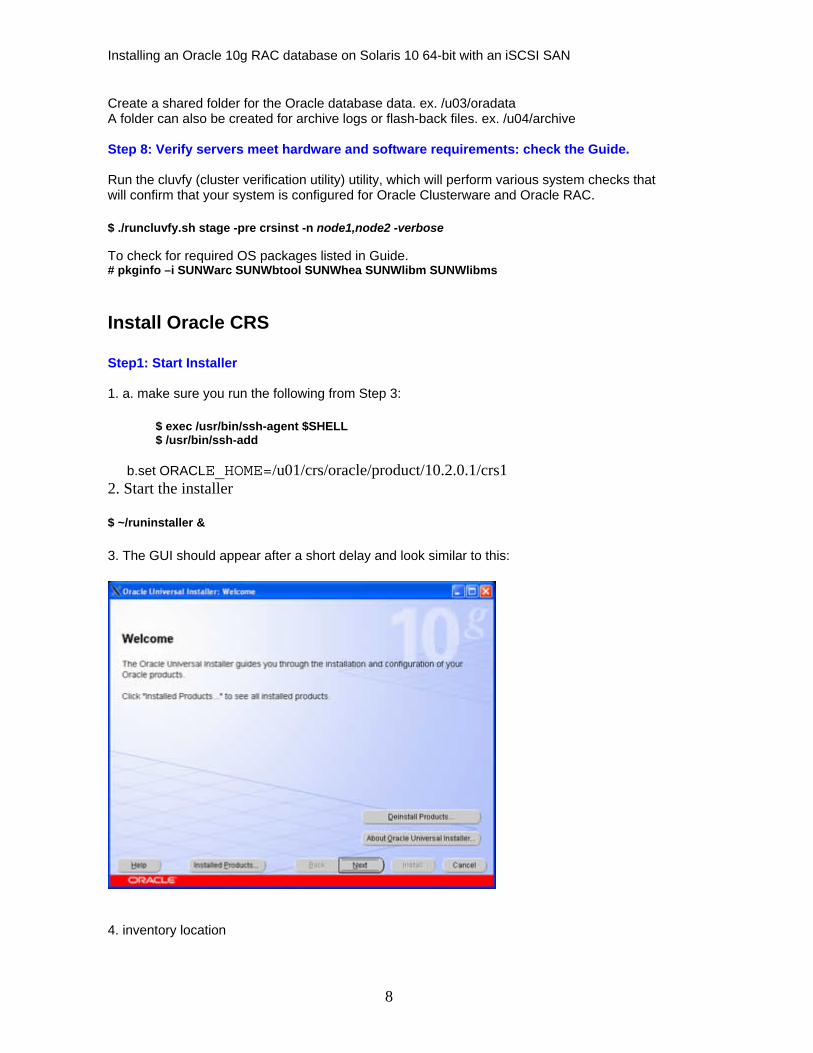
Install Oracle CRS Step1: Start Installer 1. a. make sure you run the following from Step 3:
$ exec /usr/bin/ssh-agent $SHELL $ /usr/bin/ssh-add
b.set ORACLE_HOME=/u01/crs/oracle/product/10.2.0.1/crs1 2. Start the installer $ ~/runinstaller & 3. The GUI should appear after a short delay and look similar to this:
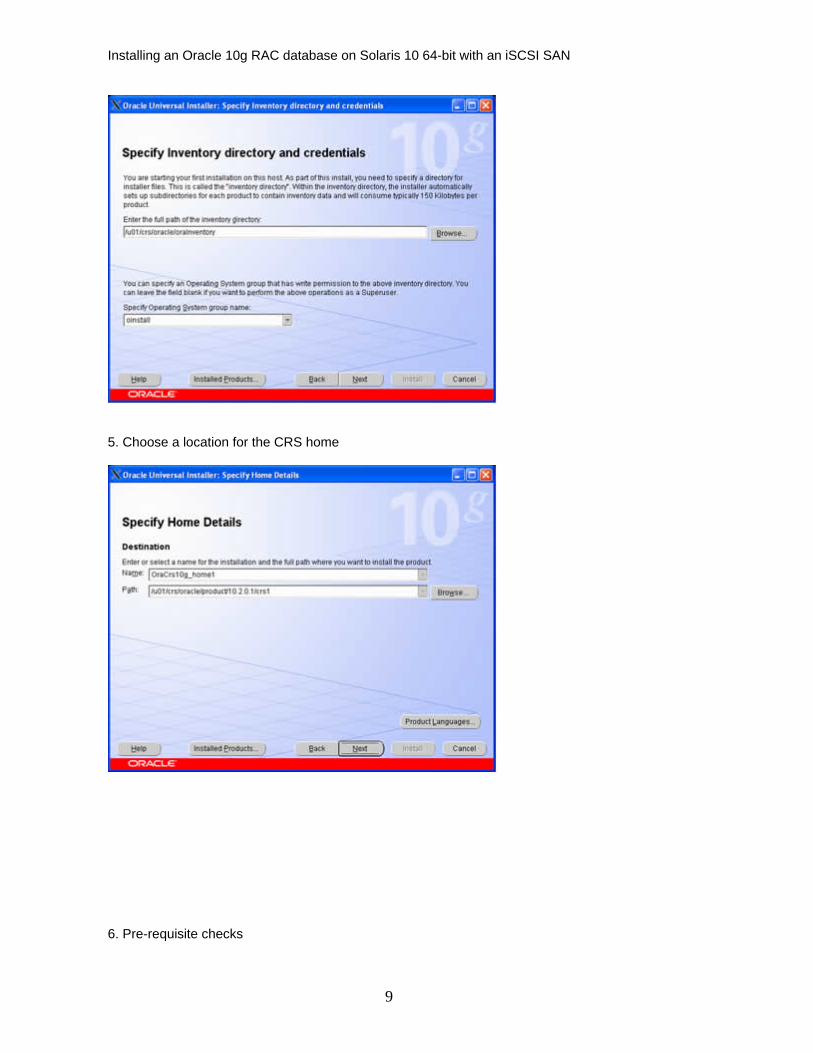
4. inventory location
8
Installing an Oracle 10g RAC database on Solaris 10 64-bit with an iSCSI SAN
5. Choose a location for the CRS home
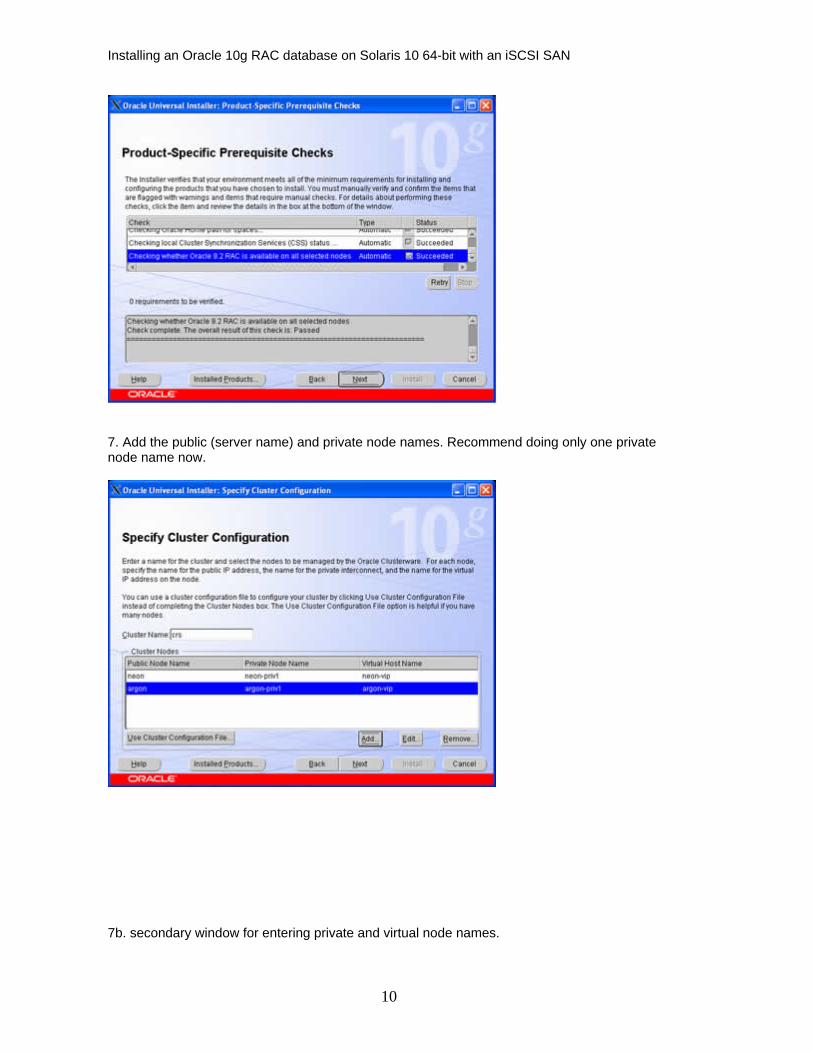
6. Pre-requisite checks
9
Installing an Oracle 10g RAC database on Solaris 10 64-bit with an iSCSI SAN
7. Add the public (server name) and private node names. Recommend doing only one private node name now.
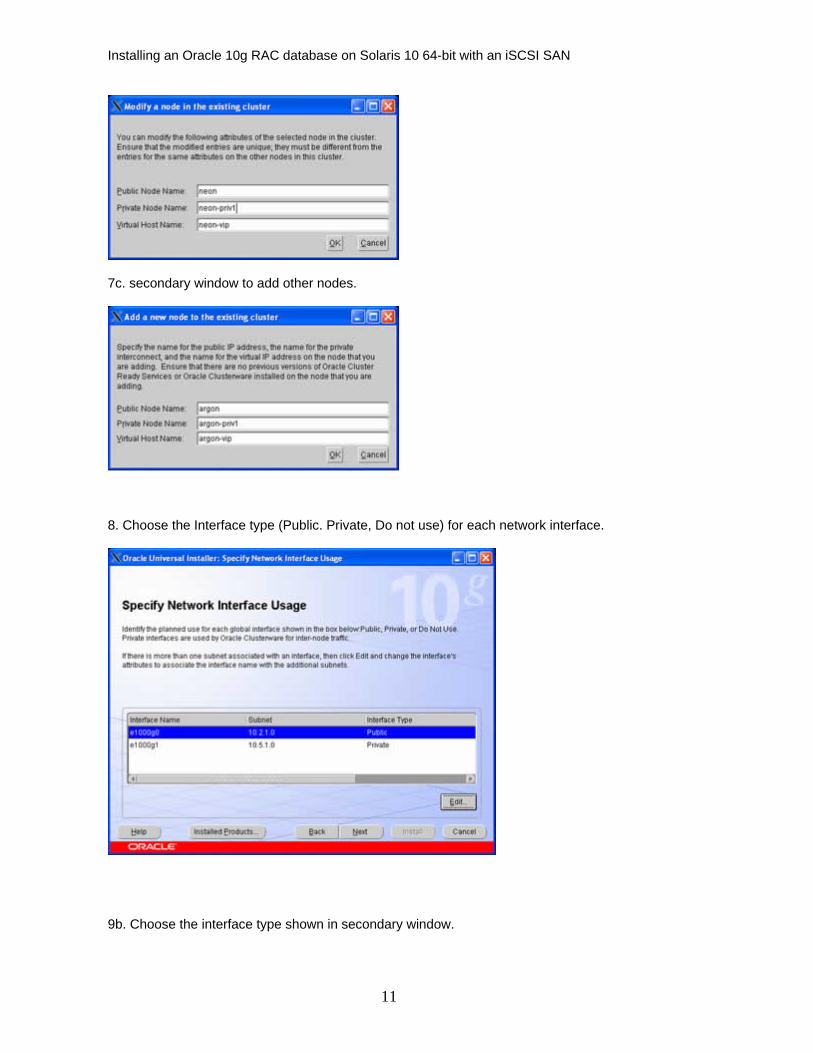
7b. secondary window for entering private and virtual node names.
10
Installing an Oracle 10g RAC database on Solaris 10 64-bit with an iSCSI SAN
7c. secondary window to add other nodes.
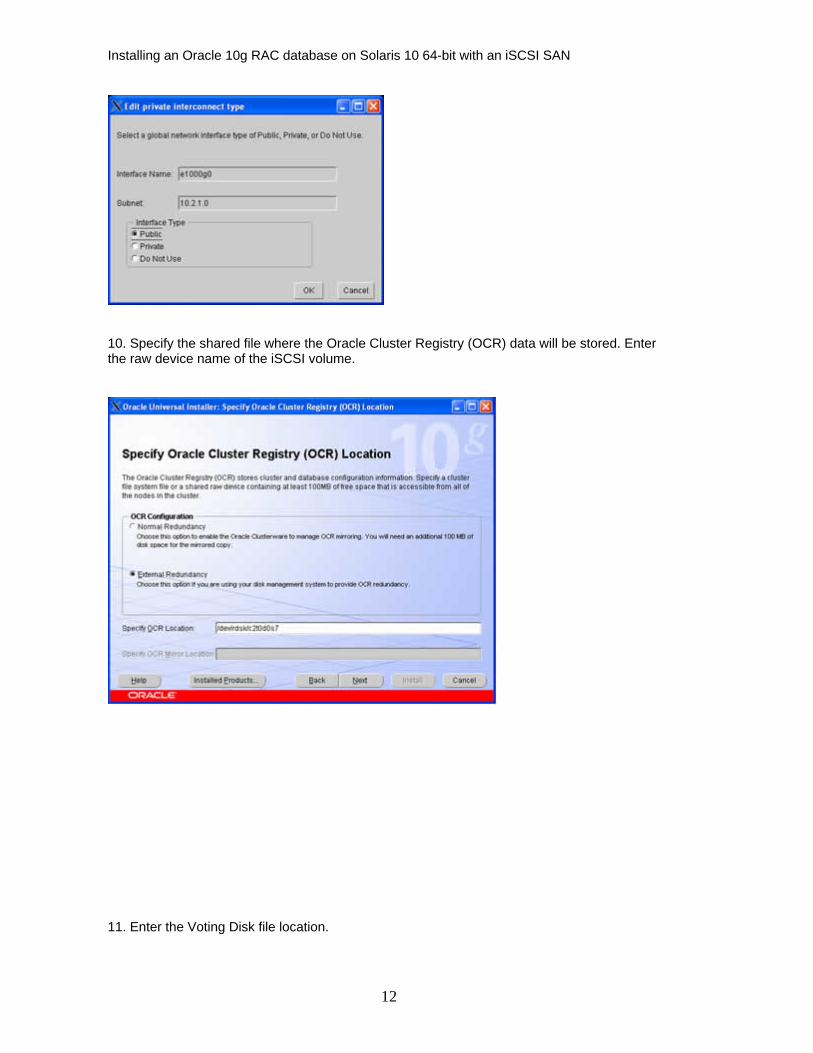
8. Choose the Interface type (Public. Private, Do not use) for each network interface.
9b. Choose the interface type shown in secondary window.
11
Installing an Oracle 10g RAC database on Solaris 10 64-bit with an iSCSI SAN
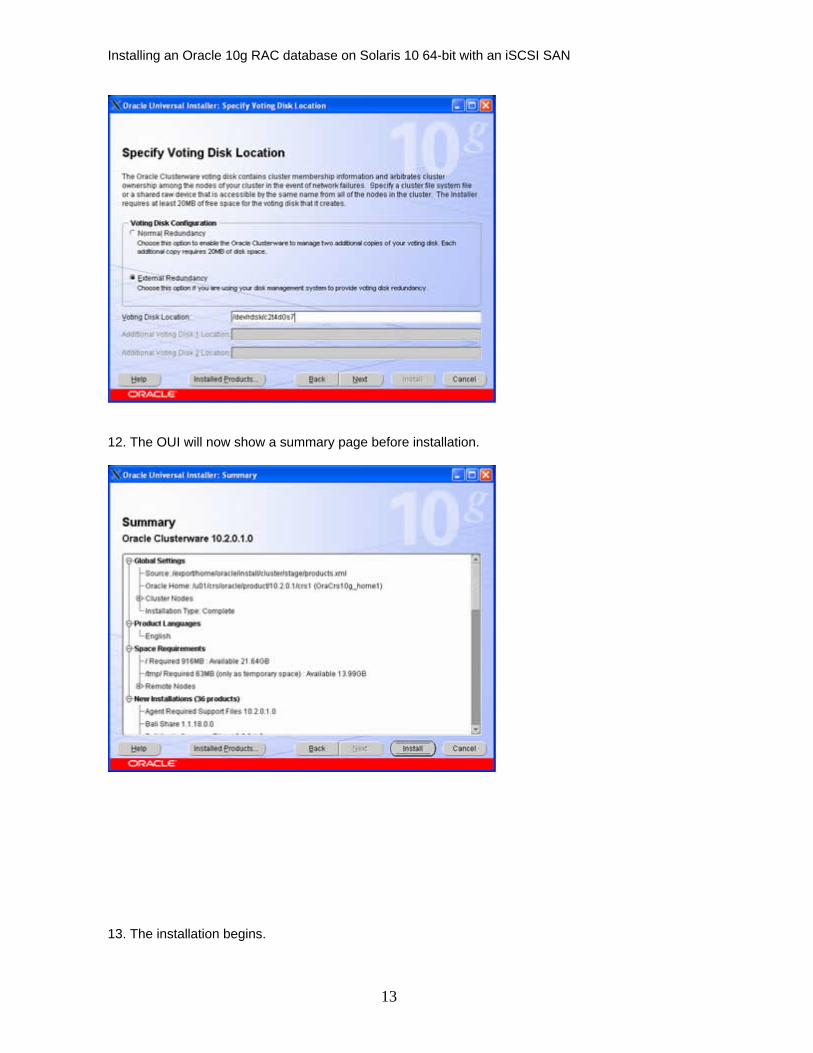
10. Specify the shared file where the Oracle Cluster Registry (OCR) data will be stored. Enter the raw device name of the iSCSI volume.
11. Enter the Voting Disk file location.
12
Installing an Oracle 10g RAC database on Solaris 10 64-bit with an iSCSI SAN
12. The OUI will now show a summary page before installation.
13. The installation begins.
13
Installing an Oracle 10g RAC database on Solaris 10 64-bit with an iSCSI SAN
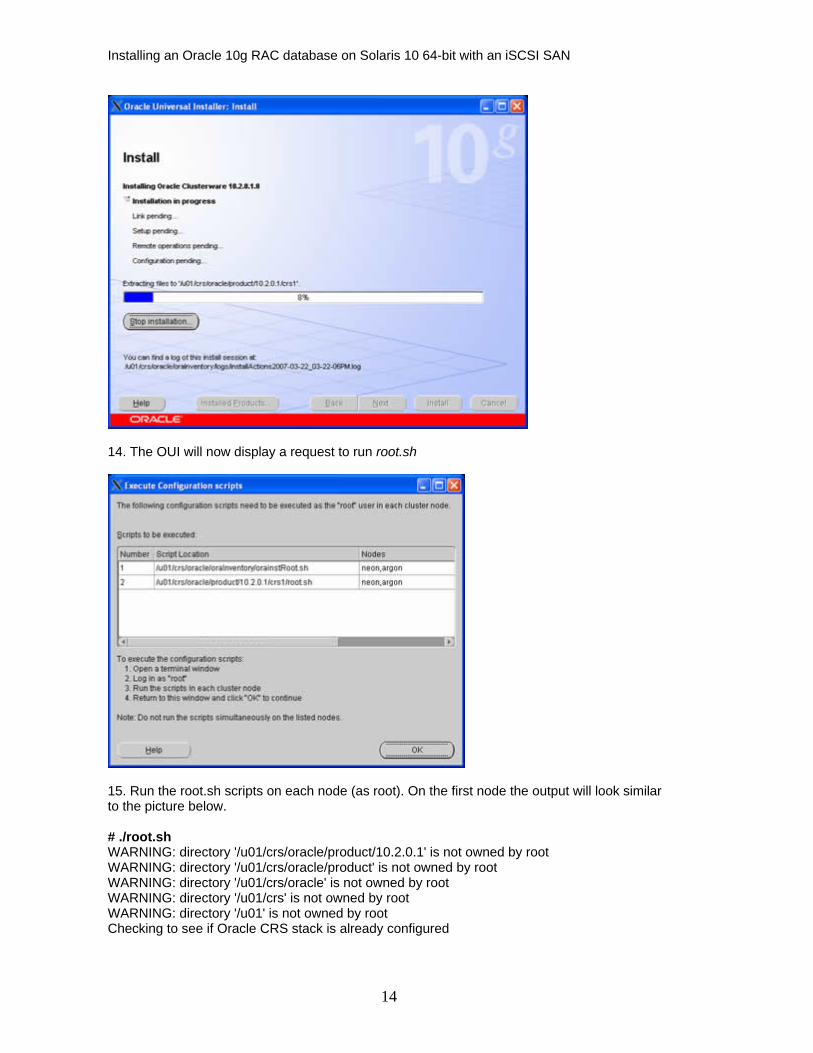
14. The OUI will now display a request to run root.sh
15. Run the root.sh scripts on each node (as root). On the first node the output will look similar to the picture below. # ./root.sh WARNING: directory '/u01/crs/oracle/product/10.2.0.1' is not owned by root WARNING: directory '/u01/crs/oracle/product' is not owned by root WARNING: directory '/u01/crs/oracle' is not owned by root WARNING: directory '/u01/crs' is not owned by root WARNING: directory '/u01' is not owned by root Checking to see if Oracle CRS stack is already configured
14
Installing an Oracle 10g RAC database on Solaris 10 64-bit with an iSCSI SAN
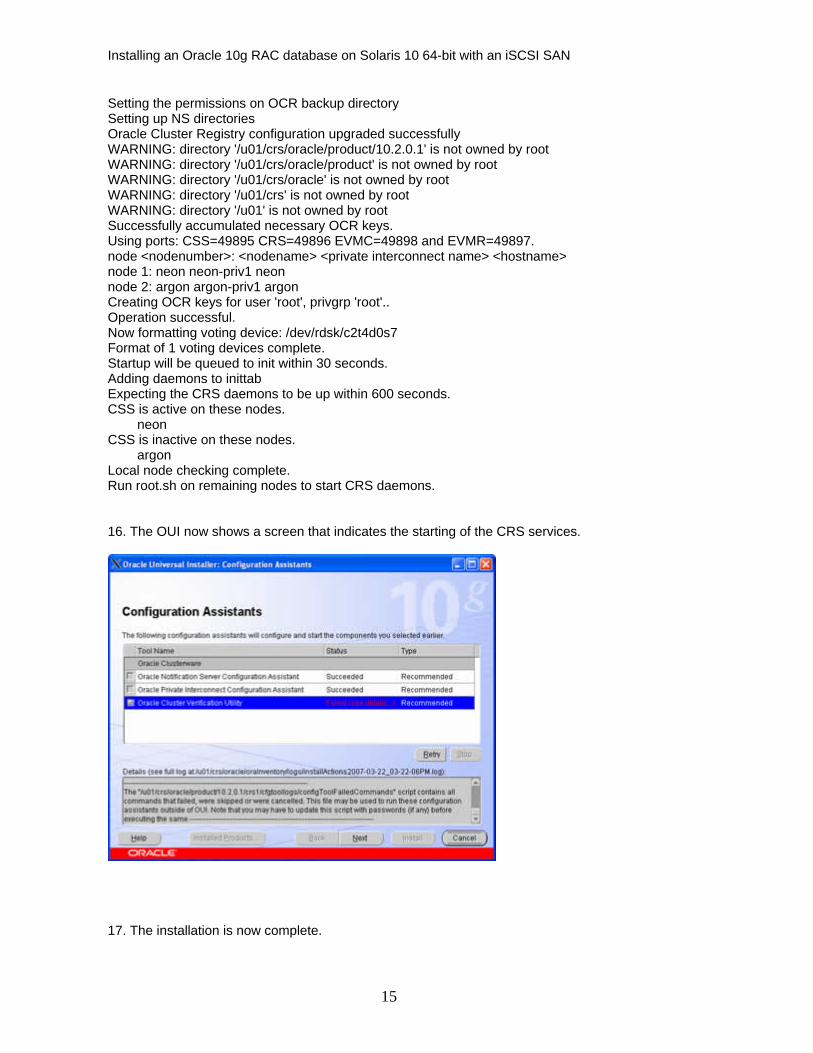
Setting the permissions on OCR backup directory Setting up NS directories Oracle Cluster Registry configuration upgraded successfully WARNING: directory '/u01/crs/oracle/product/10.2.0.1' is not owned by root WARNING: directory '/u01/crs/oracle/product' is not owned by root WARNING: directory '/u01/crs/oracle' is not owned by root WARNING: directory '/u01/crs' is not owned by root WARNING: directory '/u01' is not owned by root Successfully accumulated necessary OCR keys. Using ports: CSS=49895 CRS=49896 EVMC=49898 and EVMR=49897. node <nodenumber>: <nodename> <private interconnect name> <hostname> node 1: neon neon-priv1 neon node 2: argon argon-priv1 argon Creating OCR keys for user 'root', privgrp 'root'.. Operation successful. Now formatting voting device: /dev/rdsk/c2t4d0s7 Format of 1 voting devices complete. Startup will be queued to init within 30 seconds. Adding daemons to inittab Expecting the CRS daemons to be up within 600 seconds. CSS is active on these nodes. neon CSS is inactive on these nodes. argon Local node checking complete. Run root.sh on remaining nodes to start CRS daemons. 16. The OUI now shows a screen that indicates the starting of the CRS services.
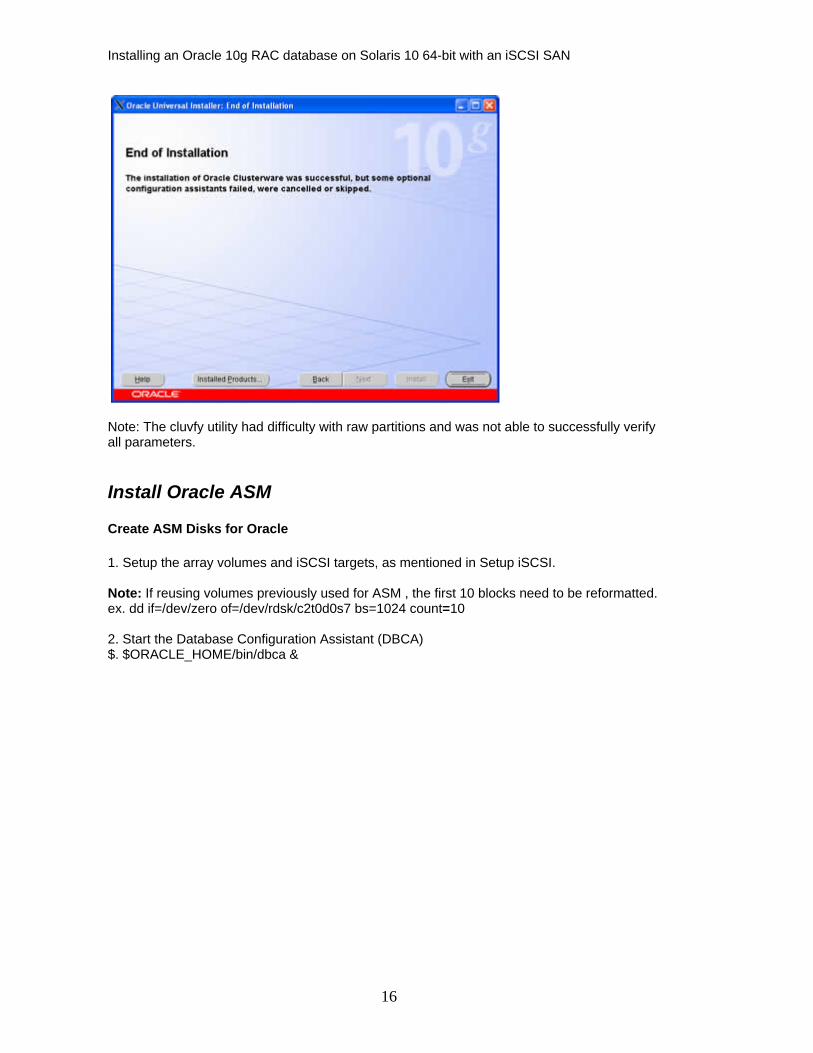
17. The installation is now complete.
15
Installing an Oracle 10g RAC database on Solaris 10 64-bit with an iSCSI SAN
Note: The cluvfy utility had difficulty with raw partitions and was not able to successfully verify all parameters.
Install Oracle ASM
Create ASM Disks for Oracle
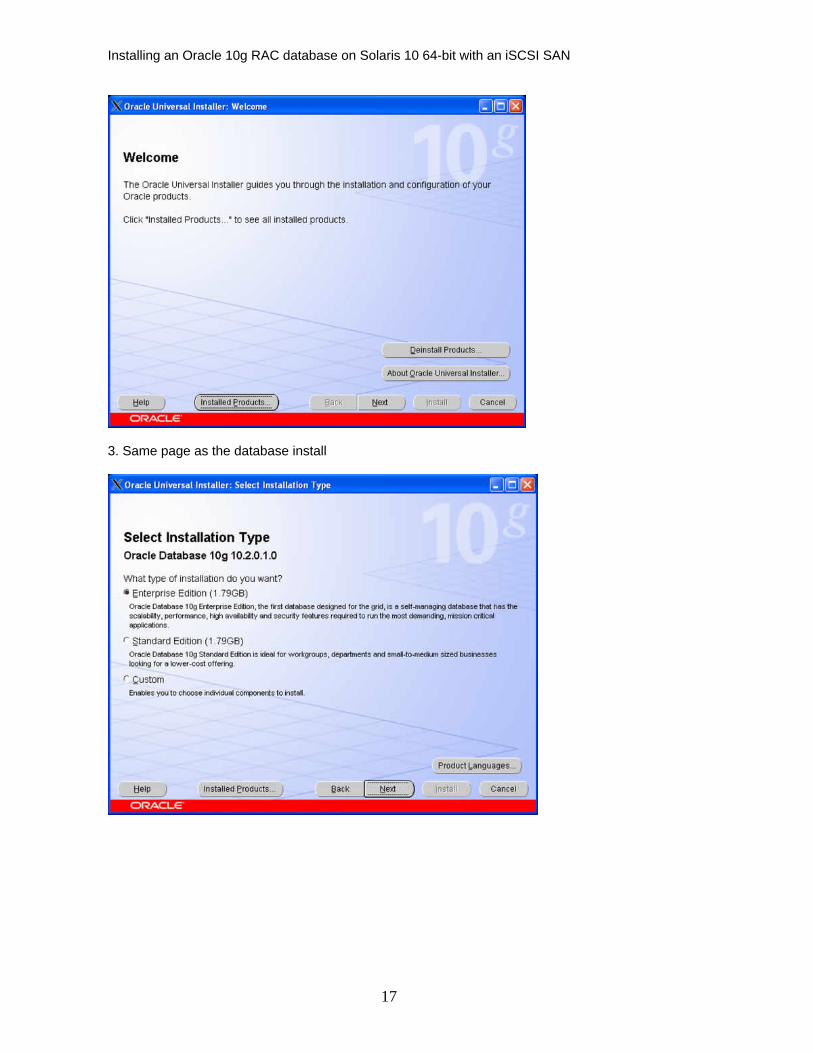
1. Setup the array volumes and iSCSI targets, as mentioned in Setup iSCSI. Note: If reusing volumes previously used for ASM , the first 10 blocks need to be reformatted. ex. dd if=/dev/zero of=/dev/rdsk/c2t0d0s7 bs=1024 count=10 2. Start the Database Configuration Assistant (DBCA) $. $ORACLE_HOME/bin/dbca &
16
Installing an Oracle 10g RAC database on Solaris 10 64-bit with an iSCSI SAN
3. Same page as the database install
17
Installing an Oracle 10g RAC database on Solaris 10 64-bit with an iSCSI SAN
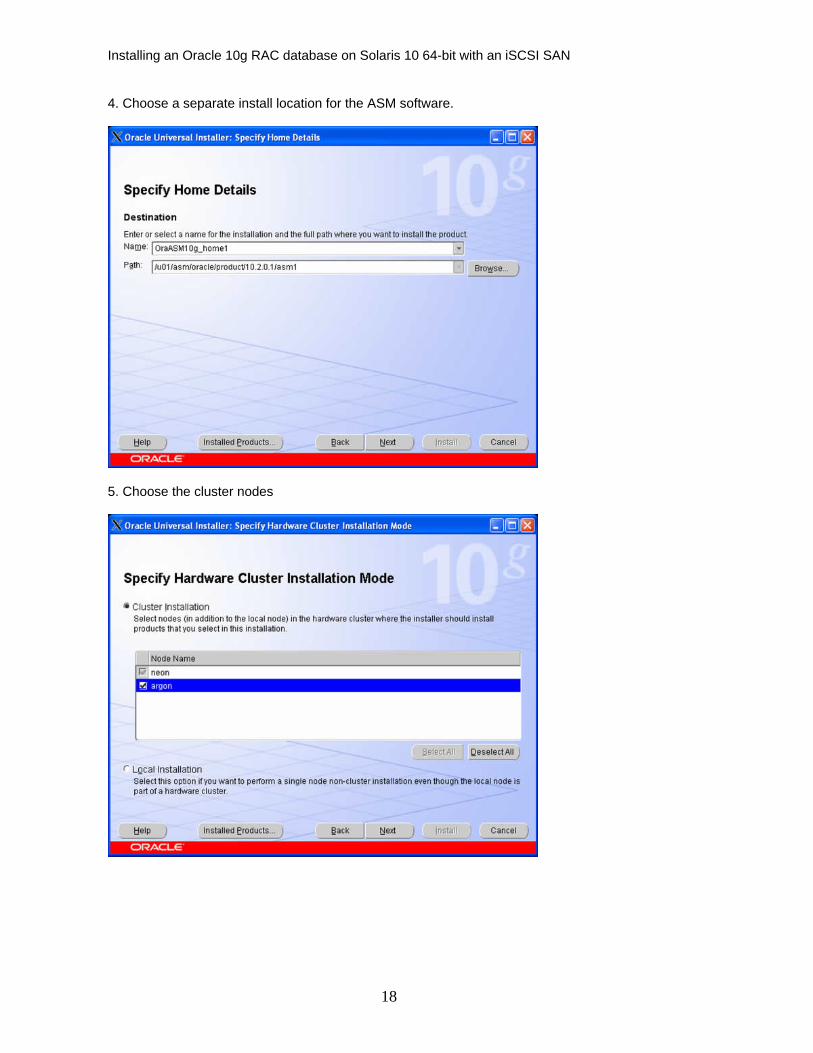
4. Choose a separate install location for the ASM software.
5. Choose the cluster nodes
18
Installing an Oracle 10g RAC database on Solaris 10 64-bit with an iSCSI SAN
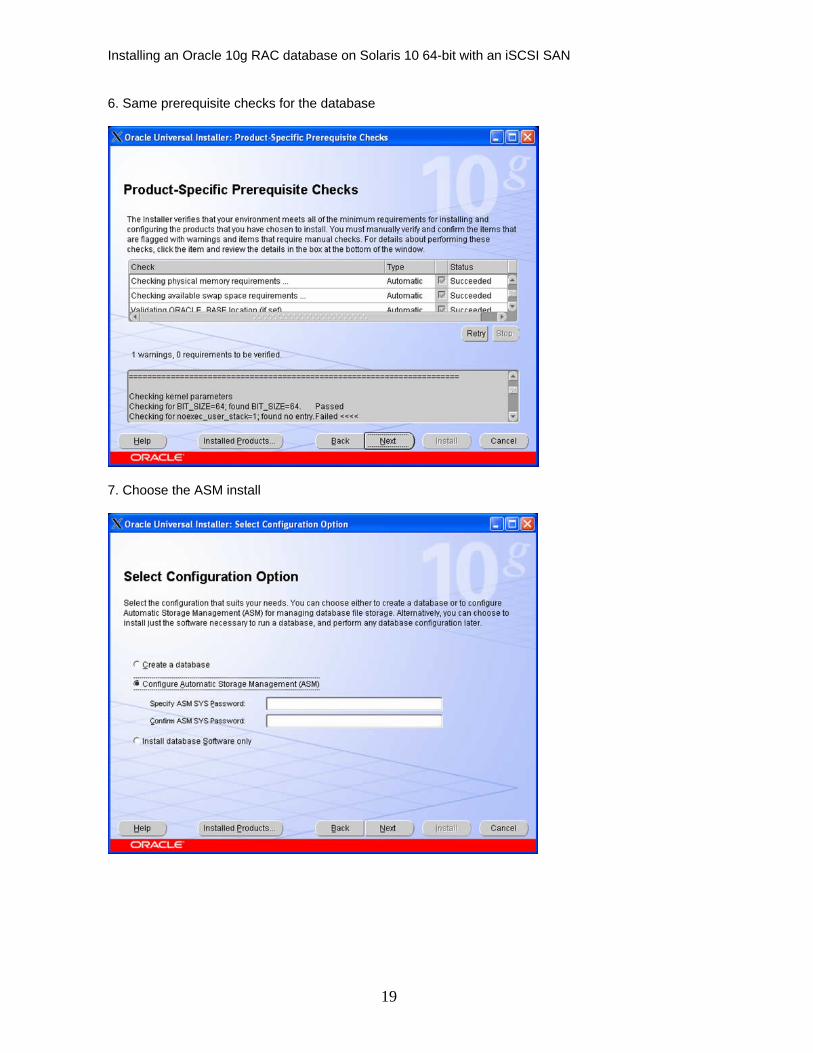
6. Same prerequisite checks for the database
7. Choose the ASM install
19

Installing an Oracle 10g RAC database on Solaris 10 64-bit with an iSCSI SAN
8. Available unused raw disks will be shown. Choose the ones to be included.
9. Install summary page
20
Installing an Oracle 10g RAC database on Solaris 10 64-bit with an iSCSI SAN
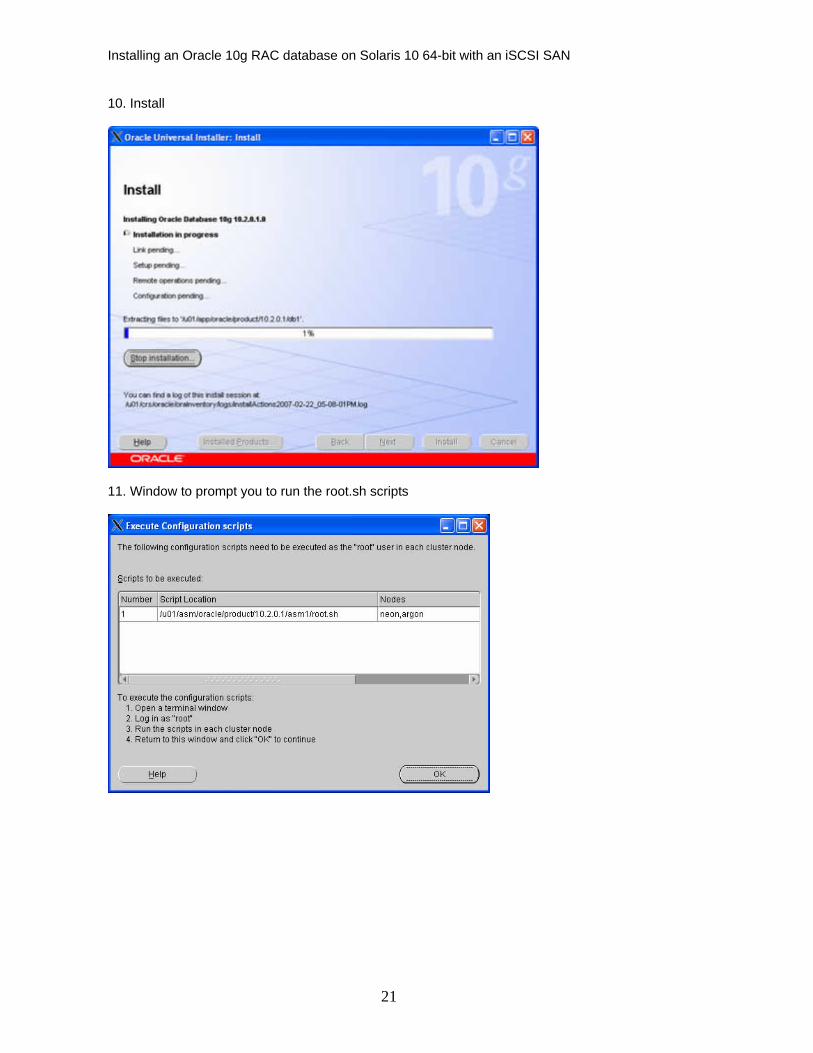
10. Install
11. Window to prompt you to run the root.sh scripts
21
Installing an Oracle 10g RAC database on Solaris 10 64-bit with an iSCSI SAN
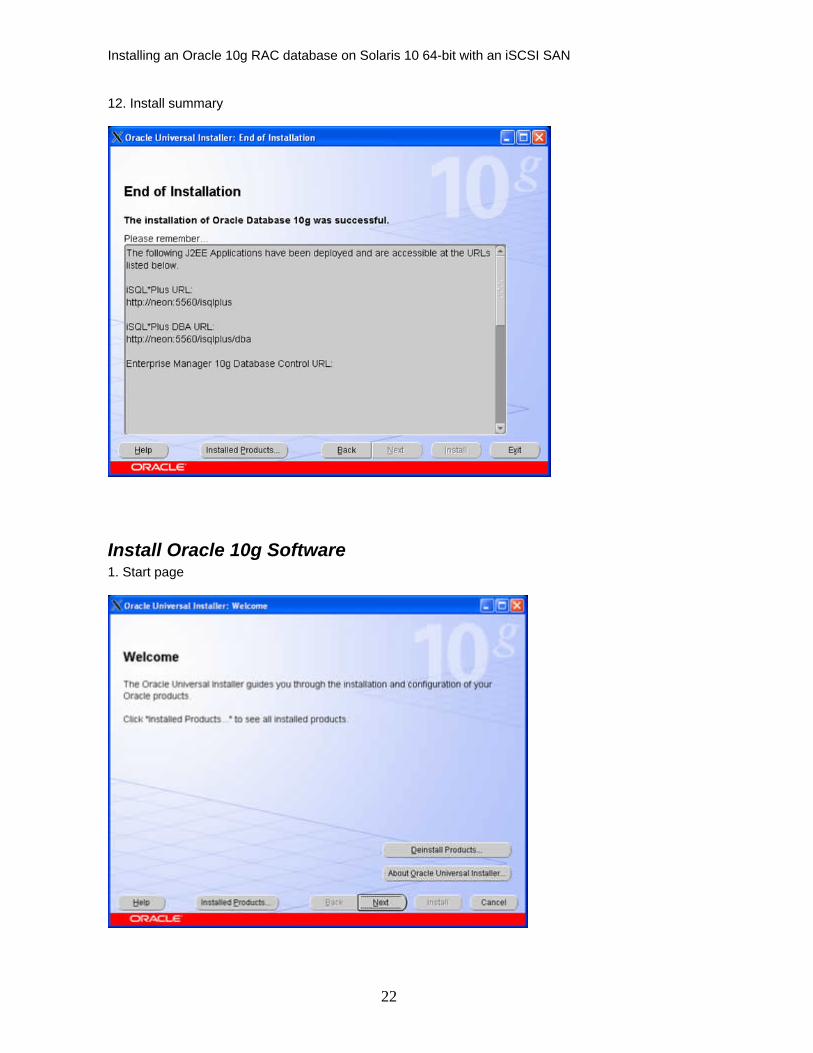
12. Install summary
Install Oracle 10g Software 1. Start page
22
Installing an Oracle 10g RAC database on Solaris 10 64-bit with an iSCSI SAN
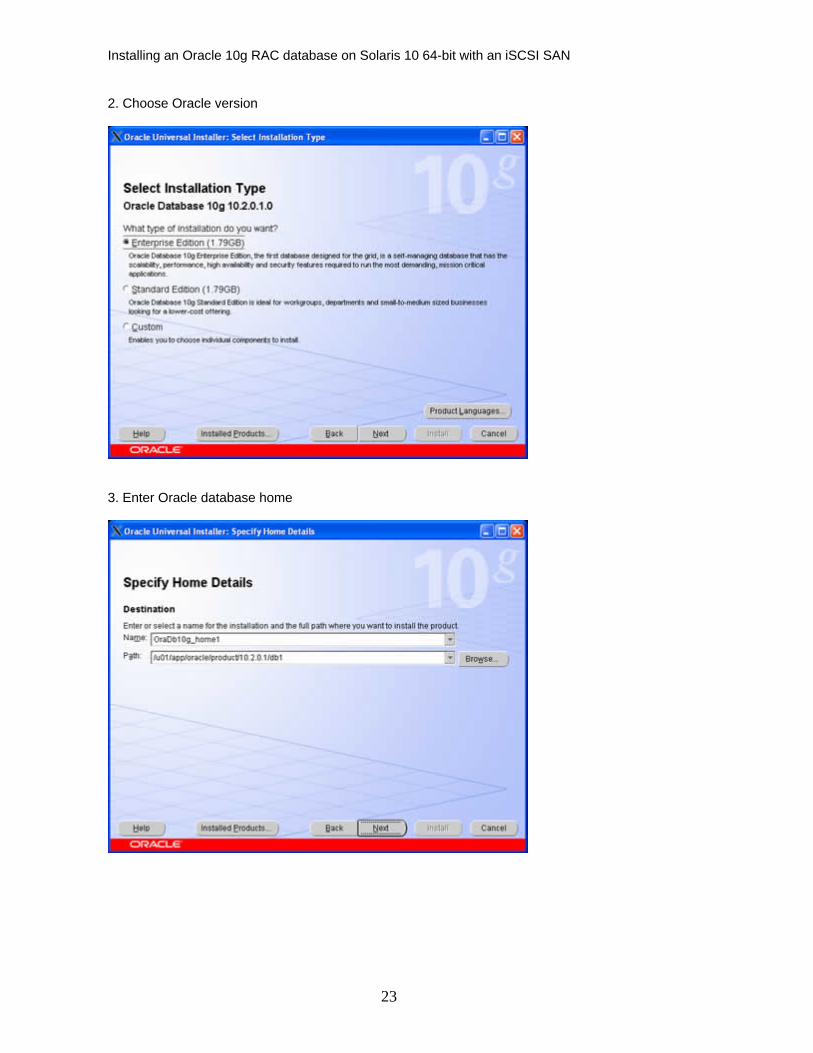
2. Choose Oracle version
3. Enter Oracle database home
23
Installing an Oracle 10g RAC database on Solaris 10 64-bit with an iSCSI SAN
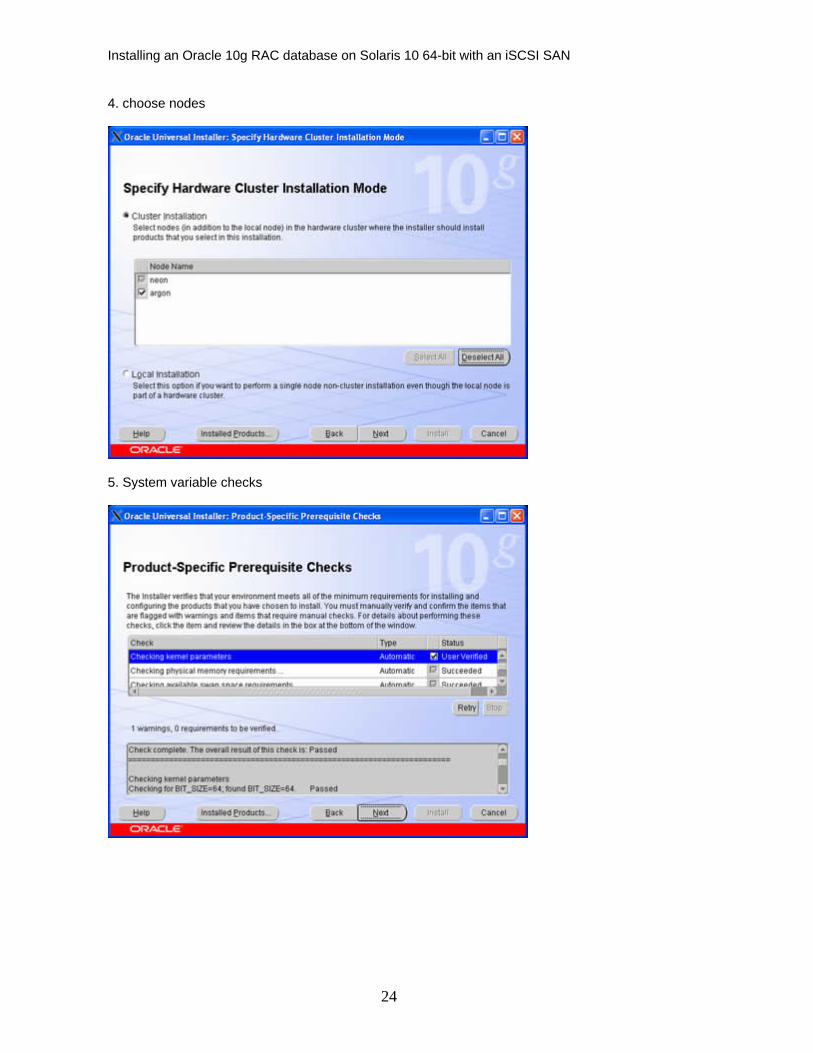
4. choose nodes
5. System variable checks
24

Installing an Oracle 10g RAC database on Solaris 10 64-bit with an iSCSI SAN
6. Choose type of install
7. Summary page of install components.
25
Installing an Oracle 10g RAC database on Solaris 10 64-bit with an iSCSI SAN
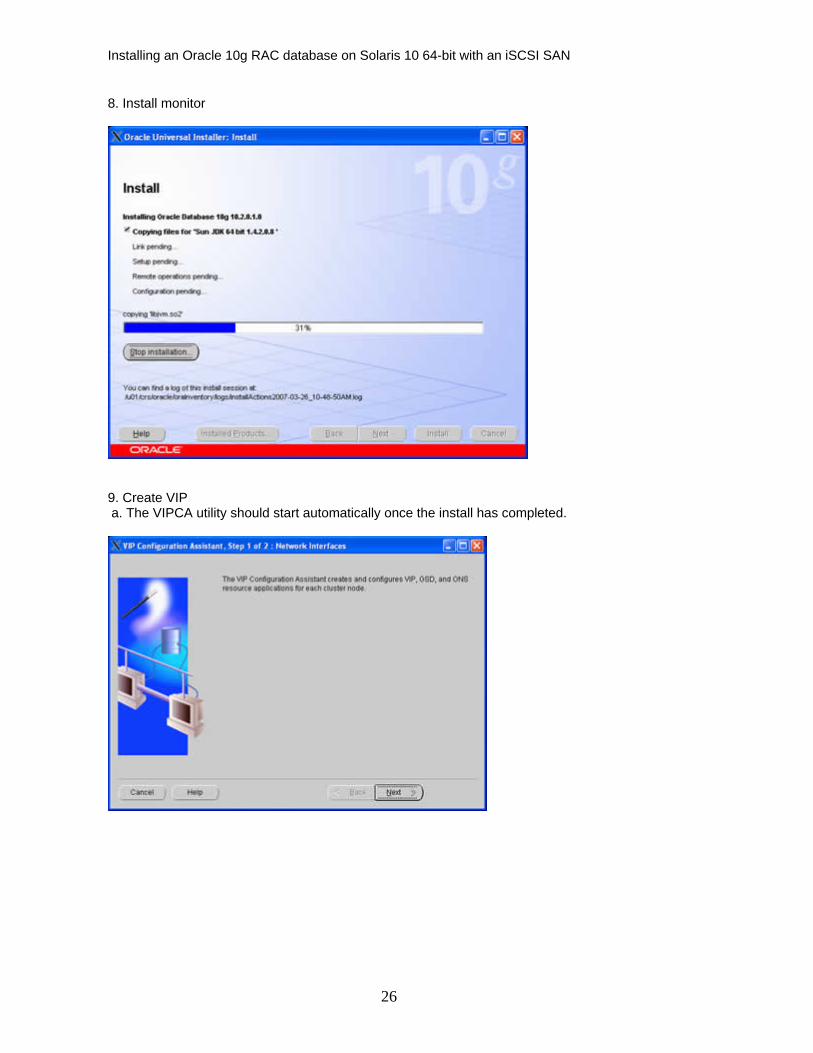
8. Install monitor
9. Create VIP a. The VIPCA utility should start automatically once the install has completed.
26

Installing an Oracle 10g RAC database on Solaris 10 64-bit with an iSCSI SAN
b. The network interfaces will be shown.
c. Enter the desired virtual IP addresses
27
Installing an Oracle 10g RAC database on Solaris 10 64-bit with an iSCSI SAN
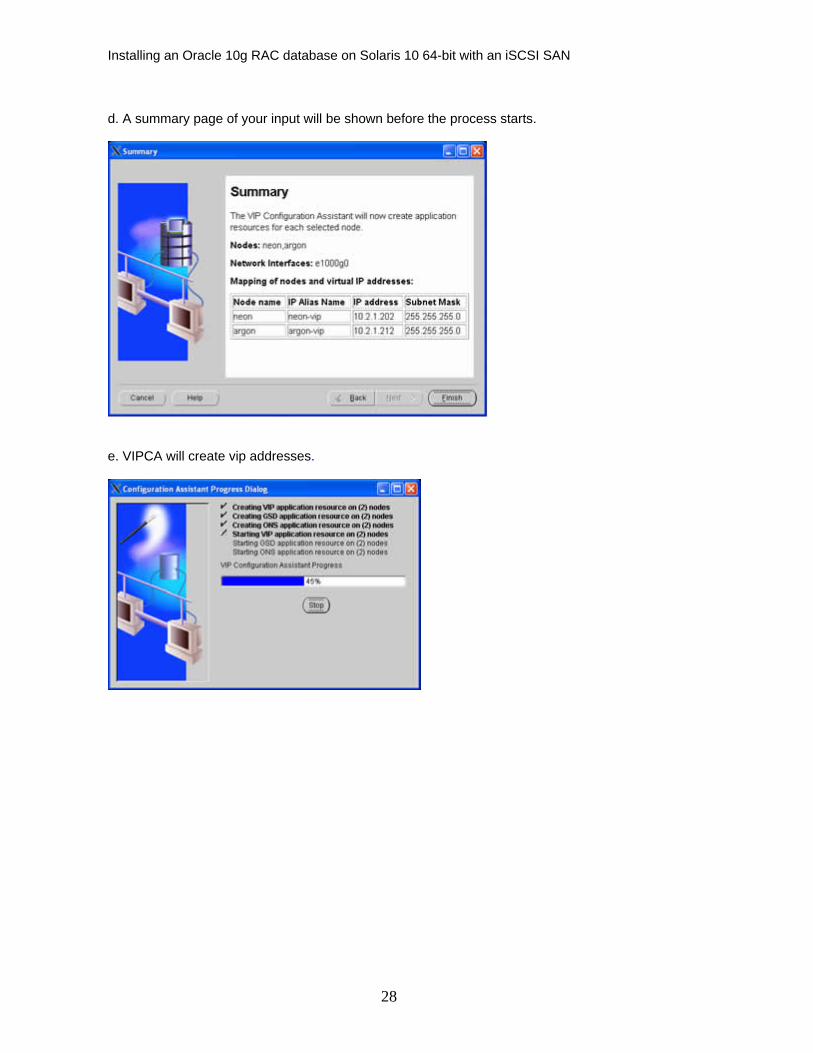
d. A summary page of your input will be shown before the process starts.
e. VIPCA will create vip addresses.
28
Installing an Oracle 10g RAC database on Solaris 10 64-bit with an iSCSI SAN
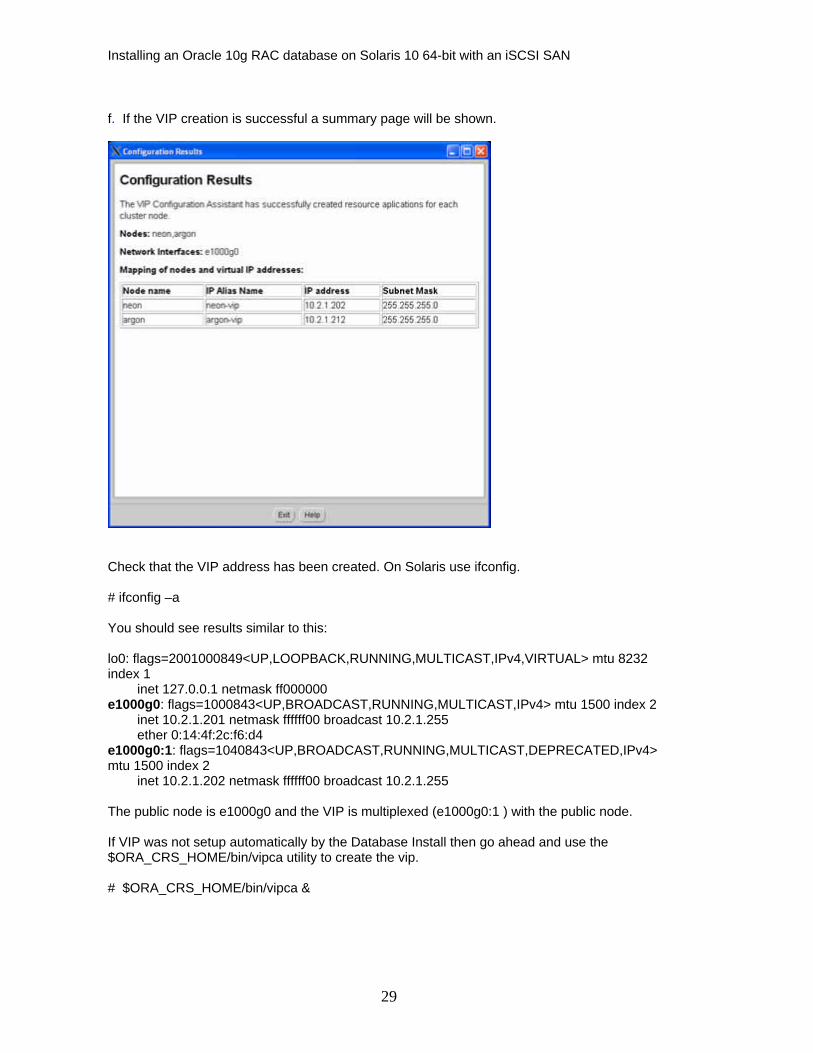
f. If the VIP creation is successful a summary page will be shown.
Check that the VIP address has been created. On Solaris use ifconfig. # ifconfig –a You should see results similar to this: lo0: flags=2001000849<UP,LOOPBACK,RUNNING,MULTICAST,IPv4,VIRTUAL> mtu 8232 index 1 inet 127.0.0.1 netmask ff000000 e1000g0: flags=1000843<UP,BROADCAST,RUNNING,MULTICAST,IPv4> mtu 1500 index 2 inet 10.2.1.201 netmask ffffff00 broadcast 10.2.1.255 ether 0:14:4f:2c:f6:d4 e1000g0:1: flags=1040843<UP,BROADCAST,RUNNING,MULTICAST,DEPRECATED,IPv4> mtu 1500 index 2 inet 10.2.1.202 netmask ffffff00 broadcast 10.2.1.255 The public node is e1000g0 and the VIP is multiplexed (e1000g0:1 ) with the public node. If VIP was not setup automatically by the Database Install then go ahead and use the $ORA_CRS_HOME/bin/vipca utility to create the vip. # $ORA_CRS_HOME/bin/vipca &
29
Installing an Oracle 10g RAC database on Solaris 10 64-bit with an iSCSI SAN
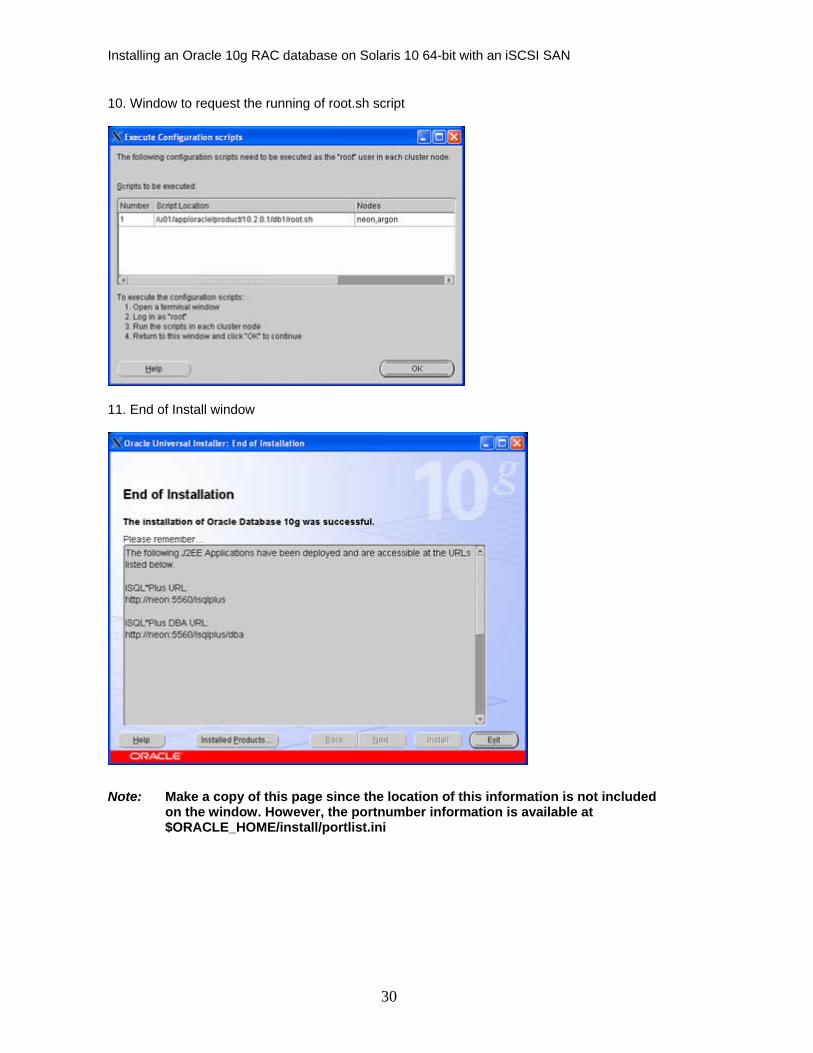
10. Window to request the running of root.sh script
11. End of Install window
Note: Make a copy of this page since the location of this information is not included on the window. However, the portnumber information is available at $ORACLE_HOME/install/portlist.ini
30