Embed Size (px)
Citation preview

4001613-03
Manufactured by / forMILES INDUSTRIES LTD.
British Columbia, Canadawww.valorfireplaces.com
Installation & Operating Instructions
Electric Coal Effect FireplaceDEC1
INSTALLER: Leave this manual with the appliance.CONSUMER: Retain this manual for future reference.
Please read this manual BEFORE installing and operating this appliance.
© 2008 Miles Industries Ltd.

2
CONGRATULATIONS!
We know that there are a lot of other brands that you could have purchased, and we appreciate that you have chosen a Valor product. Be assured that you have not only selected a superior heater, but also superior service.Your dedicated dealer will maintain the performance and efficiency of your electric heater. All dealers are certified experts and will be happy to answer any questions you may have, so please don’t hesitate to call them as your satisfaction is our number one priority.
Sincerely, Miles Industries Ltd.
Please read and carefully follow all of the instructions found in this manual. Please pay special attention to the safety instructions. The instructions included here will assure that you have many years of dependable and enjoyable service from your electric heater.
Should you encounter an operational problem, call your dealer immediately. Do not try to repair the unit as you may cause an injury or damage the heater.
3
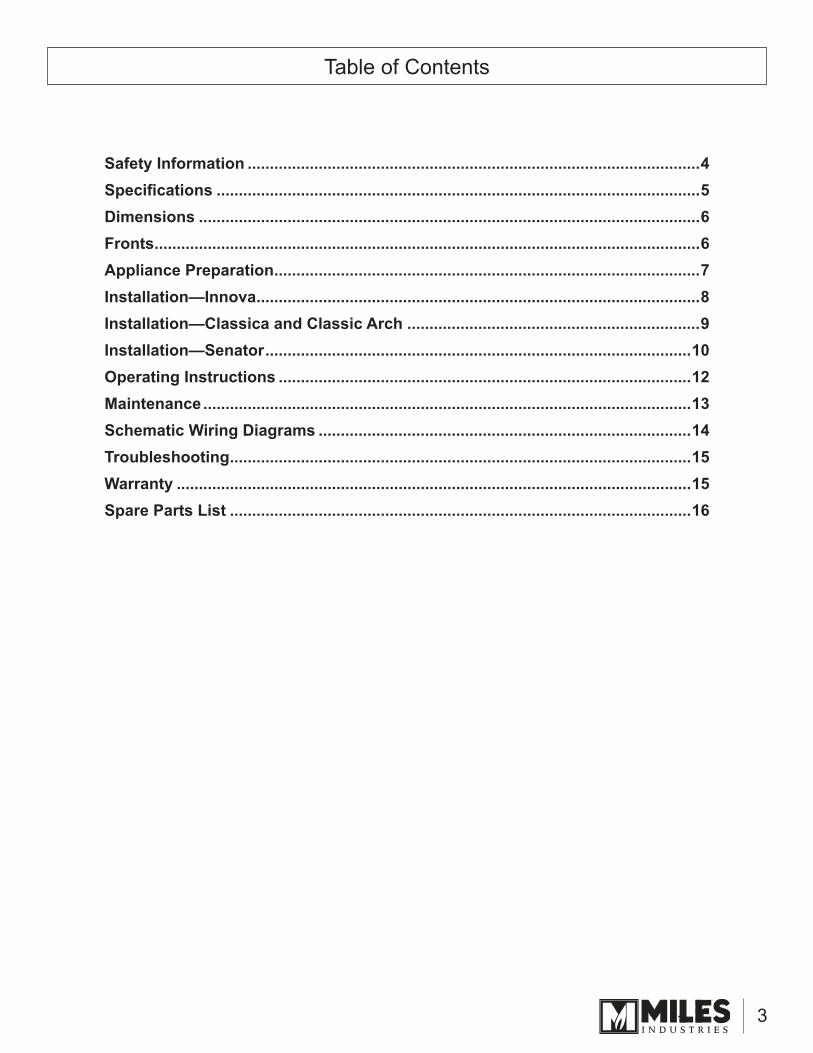
Table of Contents
Safety Information ......................................................................................................4Specifications .............................................................................................................5Dimensions .................................................................................................................6Fronts ...........................................................................................................................6Appliance Preparation ................................................................................................7Installation—Innova ....................................................................................................8Installation—Classica and Classic Arch ..................................................................9Installation—Senator ................................................................................................10Operating Instructions .............................................................................................12Maintenance ..............................................................................................................13Schematic Wiring Diagrams ....................................................................................14Troubleshooting ........................................................................................................15Warranty ....................................................................................................................15Spare Parts List ........................................................................................................16

4
Safety Information
WARNING: IF THE INFORMATION IN THIS MANUAL IS NOT FOLLOWED EXACTLY, AN ELECTRICAL SHOCK OR FIRE MAY RESULT CAUSING PROPERTY DAMAGE, PERSONAL INJURY OR LOSS OF LIFE.
IMPORTANT INSTRUCTION
When using electrical appliance, basic precautions should always be followed to reduce the risk of fire, electric shock, and injury to persons, including the following:
Read all instructions before using this heater.This heater is hot when in use. To avoid burns, do not let bare skin touch hot surface. If provided, use handles when moving this heater. Keep combustible materials, such as furniture, pillows, bedding, papers, clothes, and curtains at least 3 feet (0.9 m) from the front of the heater and keep them away from the sides and rear.Extreme caution is necessary when any heater is used by or near children or invalids and whenever the heater is left operating and unattended.Always unplug heater when not in use.Do not operate any heater with a damaged cord or plug or after the heater malfunctions, has been dropped or damaged in any manner. Return heater to authorized service facility for examination, electrical or mechanical adjustment, or repair.Do not use outdoors.This heater is not intended for use in bathrooms, laundry areas and similar indoor locations. Never locate heater where it may fall into a bathtub or other water container.Do not run cord under carpeting. Do not cover cord with throw rugs, runners, or the like. Arrange cord away from traffic area and where it will not be tripped over.To disconnect heater, turn controls to off, then remove plug from outlet.Connect to properly grounded outlets only.Do not insert or allow foreign objects to enter any ventilation or exhaust opening as this may cause an electric shock or fire, or damage the heater.To prevent a possible fire, do not block air intakes or exhaust in any manner. Do not use on soft surfaces, like a bed, where openings may become blocked.A heater has hot and arcing or sparking parts inside. Do not use it in areas where gasoline, paint, or flammable liquids are used or stored.Use this heater only as described in this manual. Any other use not recommended by the manufacturer may cause fire, electric shock, or injury to persons.Avoid the use of an extension cord because the extension cord may overheat and cause a risk of fire. However, if you have to use an extension cord, the cord shall be No. 14 AWG minimum size and rated not less than 1875 watts.“SAVE THESE INSTRUCTIONS”
1)2)
3)
4)5)
6)7)
8)
9)10)11)
12)
13)
14)
15)
16)
FAILURE TO FOLLOW THESE INSTRUCTIONS MAY RESULT IN A POSSIBLE ELECTRIC SHOCK, FIRE HAZARD AND/OR INJURY OR PROPERTY DAMAGE AND WILL VOID THE WARRANTY.

�
SpecificationsSpecifications
Power Supply: 120 V; 15-amp grounded, circuitPower Cord Length: 6’ (183 cm)Frequency: 60 HzHeater Power: 1325 WNet Weight: 25 lb. / 11.3 kg (engine only)
Note: A dedicated power supply circuit is recommended for the unit but not required. Additional electrical appliances on the same circuit may exceed the current (amperage) rating for that circuit. If, after the installation of your unit, the circuit breaker trips or the fuse fails on a repeated basis, then a dedicated circuit will likely be required. Any new wiring must be done in compliance with local and national codes and other applicable regulations in order to reduce the risk of fire, electric shock or other injuries. Therefore, it is strongly recommended that you hire a licensed electrician to complete any such work.
GroundingThis heater is for use on 120 volts. Its power cord has a three-prong plug with a grounding pin. It must be plugged in a three-prong permanently grounded outlet. The grounding pin cannot be cut off to fit in a two-prong outlet.If possible, avoid the use of an extension cord because the extension cord may overheat and cause a risk of fire. However, if you have to use an extension cord, the cord shall be no. 14 Awg minimum size and rated not less than 1875 watts, 15 amps. The extension cord must be a three-wire cord with grounding type plug and cord connection.
•••••
Safety InformationThis Electric Fireplace is designed for residential applications to be framed in as a zero clearance fireplace.This appliance has been tested in accordance with UL 2021 and CSA C22.2 No. 46-M1988 standards for fixed and location dedicated electric room heaters.Installation must conform to local codes. In the absence of local codes, electrical wiring and grounding must comply with the National Electrical Code ANSI/ NFPA 70 - latest edition. In Canada, the current CSA C22-1 Canadian Electrical Code - latest edition.IMPORTANT: Before starting your fireplace installation, read this installation and operation manual very carefully to ensure you understand it completely and entirely.
Any repairs to this fireplace should be performed by a qualified service technician only.
Under no circumstances should this fireplace be modified. Parts having to be removed for servicing must be replaced prior to operating the fireplace again.
Lamp should be replaced only with halogen lamp type GY 6.35 Rated 12 V, �0 W.
It is important, when buying replacement light bulb, to ensure that the filament is in the correct orientation to the location pins

6
FrontsHere are the fronts available for installation on the Dimension fireplace.
INNOVAWall mounted; partially or
fully recessed
CLASSICAHearth mounted with surround or mantel;
wall surface mounted or partially recessed
SENATORHearth mounted; wall surface mounted or partially recessed
CLASSIC ARCHHearth mounted with surround or mantel;
wall surface mounted or partially recessed
Top View
Front View Side View
15–1/4” (39 cm)
18” (46 cm)6–3/8”(16 cm)
23–1/2”(60 cm)
21–3/4”(55 cm)
DimensionsDimensions of Heater

7
Appliance Preparation
Checking the light bulbWhen handling the light bulb, avoid touching the glass with bare fingers as this will reduce the life of the bulb.Before continuing with the installation of the heater, it is important to check that the light bulb has not become loose in transit. The bulb is located into a cradle on the rear of the access panel. Open the access panel by unscrewing the locking screw in an anticlockwise direction. Ensure that the bulb is located firmly in its holder—see figure 2.It is important that the bulb be horizontal and not angled in any way—see figure 3. When closing the access panel, be careful not to trap wiring between the access panel and heater body. Screw the locking screw in a clockwise direction to secure the access panel.
Fitting the batteries to the Remote Control HandsetThe remote control handset uses 2 x 1.5 V. AAA type batteries. For longer battery life, use only alkaline batteries. To install the batteries, slide the cover down on the rear of the handset and remove—see figure 4. The polarity of the batteries is marked on the inside of the battery compartment. If the heater does not respond to the remote control handset commands, it is likely that the batteries are faulty or require replacement.
Testing the UnitPrior to installation of the unit, test it to make sure it operates properly. Plug the unit’s power supply cord into a conveniently located 120-volt grounded outlet. Caution: The unit’s power supply cord must be connected to a properly grounded and protected 120-volt outlet. Always use ground fault protection where required by the electrical code. Warning: Do not operate the unit if it is damaged or has malfunctioned. If you suspect the unit is damaged, contact your Valor dealer.Refer to the Operating Instructions section further on in this manual for more information on the various controls and features of the unit.
Ensure that thelight bulb is firmlyin the holder
Figure 2
Figure 4
Figure 3
Please read this section thoroughly before positioning the heater.
Tools RequiredDepending of the front chosen for the installation you may need the following tools:
Phillips / cross head screwdriver with a number 2 size tip.Power drill and appropriate size drill bit.Hardware appropriate for fitting to wall/mantel/surround.
General notes to read before fitting your heaterThere should be at least 2” (5 cm) clearance between the top of the front and anything such as a shelf, fireplace surround or mantel, etc. This will allow the front to be lifted off or removed during servicing. To check the shelf clearance, gently place the front against the surface to which it is to be fixed and measure the distance from the top of the front.If fitting the heater onto a reflective or shiny surface such as a hearth, we recommend that this surface does not extend further than 12” (30 cm) from the fixing plane (wall). Reflective or shiny surfaces that project further than 12” (30 cm) may reflect an image of the internal light bulb.
Fitting the cable clampIf the mains cable is to be routed to the left hand side of the heater, there is a cable clamp supplied with the heater to hold the cable in place. This prevents the cable being trapped under the heater during installation. Fit the cable clamp—see figure 1.
•••
Figure 1

8
The Innova front is designed to be used on the Dimension heater when mounted to the wall either fully recessed or partially recessed.
Note: When mounting to decorative surfaces such as wall paper, care should be taken not to drag the heater down the wall as this may damage the decorative surface.
Fully Recessed InstallationMake the cavity into the wall.Place the heater in the cavity. Ensure the heater is true and square when aligning to cavity.Drill the wall if necessary at the four fixing points—see figure 5.Secure the heater with screws.
Partially Recessed Installation using the Spacer FrameThe Innova front is supplied with a separate spacer frame for use in installations where the space in the wall is not deep enough to take the full depth of the heater. The minimum depth required is 3-1/2” (9 cm).For your safety, the frame and heater must be securely fixed to the wall.The rear of the spacer has two screw location slots in the top flange. These should be to the rear when fitting.
Make the cavity into the wall.Position the spacer frame against the wall. Ensure that the spacer frame is central to the wall opening.The top rear flange of the spacer frame has two fixing points—see figure 6. Drill the wall at the two fixing points.Secure the spacer frame to the heater using four no. 8 x 3/8 screws supplied—see figure 7.Align the heater with spacer attached to the two drilled fixing points and secure to the wall with two screws.
Front InstallationRemove the front from its packaging.There are two magnets on the lower rear of the front. They should rest against the outer edge of the two raised sections. Ensure that they are located correctly before fitting the front.Hold the front firmly and lift into place. Keeping the magnets away from the body of the heater, locate the front hanging brackets into those on top of the heater—see figure 8. Lower the front into place and swing the bottom of the front towards the heater to engage the magnets.
1.2.
3.4.
1.2.
3.
4.
�.
1.2.
3.
Installation—Innova
Figure 5
Figure 6
Figure 7
Screw fixing points
22-1/2”(57 cm)
15-1/2”(39 cm)3-1/2” (9 cm)
partially recessed6-1/2” (17 cm)fully recessed
8-1/2” (22 cm)from floor surfacerecommended
Cavity minimum dimensions
Figure 8
Magnetlocations

9
Installation—Classica and Classic ArchThe Classica and Classic Arch fronts are designed to be used on the Dimension heater when installed fully recessed in a mantel or into the wall at hearth or floor level. Note: When mounting to decorative surfaces such as wall paper, care should be taken not to drag the heater down the wall as this may damage the decorative surface.If fitting the heater onto a reflective or shiny surface such as a hearth, we recommend that this surface does not extend further than 12” (30 cm) from the fixing plane (wall). Reflective or shiny surfaces that project further than 12” (30 cm) may reflect an image of the internal light bulb.
Mantel ClearancesMinimum depth: 6-1/2” (17 cm)Opening dimensions: 15-1/2” W x 22-1/2” H (39 cm W x 57 cm H)
Heater InstallationInstall the mantel on the wall or, if heater to be recessed, make the cavity into the wall.Place the heater in the mantel opening or cavity. Ensure the heater is true and square when aligning to opening or cavity.Drill the mantel or wall if necessary at the four fixing points—see figure 9.Secure the heater with screws.
Classica Front InstallationRemove the front from its packaging.Before fitting the front, the hood baffle must be installed on the heater. Remove the upper grill panel from the heater—see figure 10.Install the hood and its baffle provided with the front on the heater—see figure 11.On the rear face of the front below the opening, install the infill panel provided with the front—see figure 12.There are two magnets on the lower rear of the front. They should rest on the two raised sections. Ensure that they are located correctly before fitting the front.Hold the front firmly and lift into place. Keeping the magnets away from the body of the heater, locate the front hanging brackets into those on top of the heater—see figure 13. Lower the front into place and swing the bottom of the front towards the heater to engage the magnets.
1.
2.
3.4.
1.2.
3.
4.
�.
6.
Figure 9
22-1/2”(57 cm)
15-1/2”(39 cm)6-1/2” (17 cm)fully recessed
Cavity minimum dimensions
Figure 13Figure 11 Figure 12
Figure 10
Magnetlocations

10
Installation—Classica and Classic ArchClassic Arch Installation
Remove the arch from its packaging.Before fitting the arch, the hood and its baffle must be installed on the heater. Remove the upper grill panel from the heater—see figure 14.Install the hood baffle and the arch hood provided on the heater with screws provided—see figure 15.On the rear face of the arch, below the opening, install the infill panel provided with the front—see figure 16.There are two magnets on the lower rear of the arch fitted on the two raised sections. Hold the front firmly and lift into place. Keeping the magnets away from the body of the heater, locate the front hanging brackets into those on top of the heater—see figure 17. Lower the front into place and swing the bottom of the front towards the heater to engage the magnets.
1.2.
3.
4.
�.
Figure 15 Figure 16 Figure 17
Figure 14
Magnetlocations
The Senator front is designed to be used on the Dimension heater when suface mounted or partially inserted into the wall at hearth or floor level.
IMPORTANT: With the Senator front, the engine must use a riser supplied with the front. Consider the height of the riser and the hearth (if any) when marking the wall for unit position—surface mounted or partially recessed.
Note: When mounting to decorative surfaces such as wall paper, care should be taken not to drag the heater down the wall as this may damage the decorative surface.If fitting the heater onto a reflective or shiny surface such as a hearth, we recommend that this surface does not extend further than 12” (30 cm) from the fixing plane (wall). Reflective or shiny surfaces that project further than 12” (30 cm) may reflect an image of the internal light bulb.
Installation—Senator
22-1/2”(57 cm)
15-1/2”(39 cm)3-1/2” (9 cm)
partially recessed
Cavity minimum dimensions

11
Heater InstallationSurface MountedThe Senator front is supplied with a riser and a spacer frame for use in surface mounted installations. For your safety, the frame and heater must be securely fixed to the wall.
At the base of the heater, release the two screws on each side—see figure 18. Insert the riser’s side flanges under the screws and tighten the screws.Fit the side mounting brackets to the heater with two screws per side—see figure 18.Position the spacer frame against the wall. Ensure that the spacer frame is central to the heater position and at the right height to accommodate the heater with riser on the floor finish or hearth.Secure the spacer frame to the wall with four screws—see figure 19.Secure the heater to the spacer frame using four screws through the side mounting brackets—see figure 20.
Partially Recessed
Make the cavity into the wall for the heater.At the base of the heater, release the two screws on each side—see figure 18. Insert the riser’s side flanges under the screws and tighten the screws.Fit the side mounting brackets to the heater with two screws per side—see figure 18.Place the heater in the mantel opening or cavity. Ensure the heater is true and square when aligning to opening or cavity.Secure the heater to the wall using four screws through the side mounting brackets.
Senator Front InstallationRemove the front from its packaging.Install the air duct to the heater with screws provided—see figure 20a.Hook the cast front onto the side mounting brackets on each side of the heater—see figure 21.Place the cast top onto the cast front.Hook the ashpan door to the cast front.
1.
2.3.
4.�.
1.2.
3.4.
�.
1.
2.
3.
4.
�.
Installation—Senator
Figure 18 Figure 19 Figure 20
Figure 21Figure 20a

12
Never cover the heater or obstruct the opening at the base of the heater; this could cause overheating and consequent risk of fire.
Remote Control OperationON/OFF ButtonTo activate the remote handset, it is necessary to press the red ON/OFF button. The status lamp on the heater will turn green—see figure 22.Pressing this button at anytime while the DIMENSION effect and heater are in operation will turn the DIMENSION effect and heater off.
EFFECT ButtonThis turns the DIMENSION effect on and turns the status lamp amber. Press the button again to turn the DIMENSION effect off.
HEAT+ ButtonThis turns the DIMENSION effect and heater on. Both the status lamp and temperature lamp turn red. The heater is now on high setting. Pressing and holding the button will adjust the temperature setting and temperature lamp as below:
Manual Control OperationThe manual control is there as a backup. If the remote control has been damaged, lost, or the batteries life has expired, the manual control will enable the DIMENSION effect and heater to be operated.The control is located at the bottom left hand corner or the heater.
Press the button onceThis turns the DIMENSION effect on and turns the status lamp amber.
Press the button a second timeThis turns the DIMENSION effect and heater on. Both the status lamp and temperature lamp turn red. The heater is now on high setting.Pressing and holding the button will adjust the temperature range and temperature as indicated above.
Press the button a third timeThis turns the heater DIMENSION effect off.
Operating Instructions
Temperature lamp color Temperature settingGreen LowAmber MediumRed High
Temperature Lamp
ON/OFF
EFFECT
HEAT +
Figure 22

13
MaintenanceImportant SafetyBefore undertaking maintenance or replacing the light bulb, always disconnect the heater from the electricity supply by removing the 3-pin plug and allowing the heater to cool.
CleaningThe heater and plastic parts need only to be wiped clean with a dry soft cloth; do not use polishes or abrasive materials. This is especially important when cleaning the effects screen.
Replacing the light bulbThe light bulb access cover is on the rear of the heater. Access can be gained as indicated below.
Remove the front by lifting it clear of the heater.If the heater is secured with screws, remove the screws.Remove the heater.At the rear top of the heater, there is a hinged access panel. Unscrew and remove the locking screw—see figure 23.The light bulb is located into a cradle on the rear of the access panel. Open the access panel and remove the bulb. Do this by gently gripping the bulb and pulling it clear off the ceramic connector—see figure 23.Replace the light bulb with a 50W 12V GY 6.35 type halogen bulb ONLY. Close the access panel. When handling the light bulb, avoid touching the glass with bare fingers as this will reduce the life of the bulb. Be careful not to trap wiring between the access panel and heater body. It is important, when buying replacement light bulb, to ensure that the filament is in the correct orientation to the location pins—see figure 24.Secure the heater back in place—see appropriate Installation section in this manual.
••••
•
•
•
Figure 23Figure 24

14
Schematic Wiring Diagrams
L N
Handset
Fuse position if required
Thermistor
Daughterboard
Remote control mother board
Transformer
Heater motor
Thermal trip
Heating element
Effects motor
12V �0W Lamp
Blue
Blue
Blue
Blue
Blue
Blu
e
Brown
Brown
Red
Bro
wn
Heating motor
Heater
Mains terminal
Effects motor
Electronic Transformer
Thermal trip
Circuit board
Lamp
Brown
Brown
Blue
Blue
Blue
Blu
e
Blu
e
Red
Black
BlackBlack
Bla
ck
Bla
ck
Black
Black
Red
Blue
Black
Blue
Black
Black
Red

1�
TroubleshootingRemote control does not workThe batteries in the remote control handset probably need replacing—see Maintenance section in this manual. The heater can be operated manually as indicated in the Operating Instructions section.
Heater on but no light or low lightThis is possibly a failure of the light bulb. Replace the light bulb as indicated in the Maintenance section. The bulb fitted to this heater is a halogen type 50 Watt 12 Volt GY 6.35. A replacement bulb is supplied with the heater. Due to the indeterminate life span and ease or replacement, the light bulbs are specifically excluded from the warranty.When handling the bulb, avoid touching the glass with bare fingers as this will reduce the life of the bulb.Caution: Ensure the bulb is cool before attempting to remove it from the heater.
Heater on but no light or no heatThe first thing to do is check the wall socket. To do this, plug in a known working appliance. If the appliance you have plugged in does not work, there is a good chance that the problem lies with the circuit breaker. Note: A dedicated power supply circuit is recommended for the unit but not required. Additional electrical appliances on the same circuit may exceed the current (amperage) rating for that circuit. If, after the installation of your unit, the circuit breaker trips on a repeated basis, then a dedicated circuit will likely be required.
Heater is on but no heatCheck the temperature lamp setting. It may be that you want the room warmer and need to increase the temperature setting.
Alternatively, a cut out device is fitted to the heater to prevent damage due to overheating. If it operates due to an obstruction in the airflow, the heater must be turned off and allowed to cool for 15 minutes and the obstruction removed before restarting.
Other problem than mentioned aboveIf you have a problem different than those mentioned above, contact your local Valor dealer for help.
Temperature lamp color Temperature settingGreen LowAmber MediumRed High
WarrantyThis electric fireplace was inspected, tested and carefully packaged to minimize the chance of damage during shipment. If a part (excluding light bulbs*) within one (1) year from the date of purchase proves to be defective in material or fabrication under normal use, the part will be repaired or replaced. The Company’s obligation under the warranty is to replace or repair defective parts or to refund the purchase price. Any expenses or damage resulting from the installation, removal or transportation of the product will be the responsibility of the owner and are not covered by this warranty. Defects must be reported to the authorized dealer where the product was purchased. The owner assumes all other risks arising out from the use or misuse of the product. The warranty will be void if the product damage or failure is deemed by the Company to be caused by accident, alteration, misuse, abuse, incorrect installation or removal, or connection to an incorrect power source by the owner. The Company neither assumes, nor authorizes any person or entity to assume for it any obligation or liability associated with its products.
*Light bulbs are not covered under this warranty.

16
Spare Parts ListDescription Engine Classica Innova Classic Arch Senator
Motherboard/Thermister 5129855/1848Daughterboard 5121767
Transformer 5129852Lamp 5129309
Lampholder 5129713Effects Fan 5129853Heater Fan 5129856
Element 5129857Effects Panel Assembly 5120290
Mirror Assembly �130218Remote Handset 5121963Hardware Pack 841
Air duct assembly 5129404 5129976 5131895AZHood 5122750PP 5129912
Ashpan Door Knob 5121746 5129934 4001590Cast Infill Panel 5121748 5129926Hanging Bracket 5121721 5121993 5121721Spacer Frame 5129279PP 4001658AZ
Nickel Plated Finial 4001589Casting Hooks 4001593AHHeater Riser 4001597AH
Side Mounting Brackets 4001594AH
Spacer Frame
Arch Hood
Classica Hood
Arch Air Duct
Classica Air Duct
Cast Infill Panel
Spacer FrameRiser
Mounting Brackets
Casting Hooks
Air Duct
Senator Spares