Embed Size (px)
Citation preview
1
INSTALLATION INSTRUCTIONS: VERTICAL WALL BED HARDWARE KIT WITH FRAME
*Our more compact model for shipping.
Rockler Woodworking and Hardware 4365 Willow Drive, Medina, MN 55340
MODEL CODES:54877 (Single vertical wall bed)55991 (Double vertical wall bed)54386 (Queen vertical wall bed)
1-800-279-4441

2
A Left and right of the frame x2 x2 x2
B Upper and lower half frame supports x4 x4 x4
C Middle frame supports x2 x2 x2
D Long center frame support x1 x1 x1
E Upper and lower frame supports x2 x2 x2
F Flat bars x2 x2 x2
G Pistons (non locking) x2 x2 x2
H Mattress Supports x1 x2 x2
I Mounting plates (left and right) x2 x2 x2
J Saddle locking plates x2 x2 x2
K Brackets to attach wall bed to wall x2 x2 x2
L Door brackets x6 x12 x12
M Legs (left and right) x2 x2 x2
N Tube (for attaching legs) x1 x1 x1
O Slats x40 x40 x42
P Slat caps x40 x40 x42
Q Double slat caps x20 x20 x21
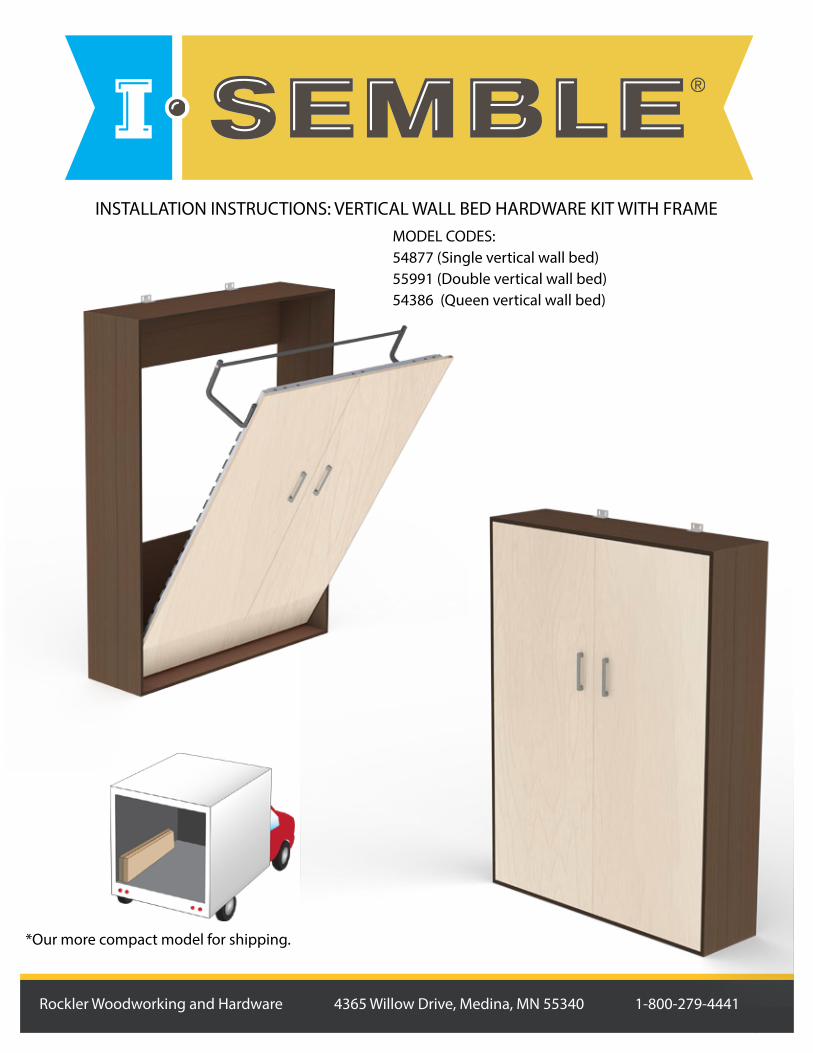
HARDWARE
3
R Wrench x1 x1 x1
S1 Allen Key #4 x1 x1 x1
S2 Allen Key #5 x1 x1 x1
T Threaded inserts x16 x16 x16
U M8 x 16mm Screws x16 x16 x16
V #10 x 55mm Screws (Step 12) x26 x26 x26
W #8 x 15mm Screws (Steps 11-12) x32 x52 x52
X #10 x 15mm Screws x4 x4 x4
Y #10 x 30mm Screws x4 x4 x4
Z M5 x 15mm Screws x2 x2 x2
AA M6 x 30mm Bolts x4 x4 x4
BB M8x 50mm Bolts x34 x34 x34
CC Washers x8 x8 x8
DD Nylon Washers (for pivoting legs) x4 x4 x4
EE M5 Nuts (for saddle locks) x2 x2 x2
FF M8 Locking nuts x40 x40 x40
GG Temporary stoppers x2 x2 x2
4
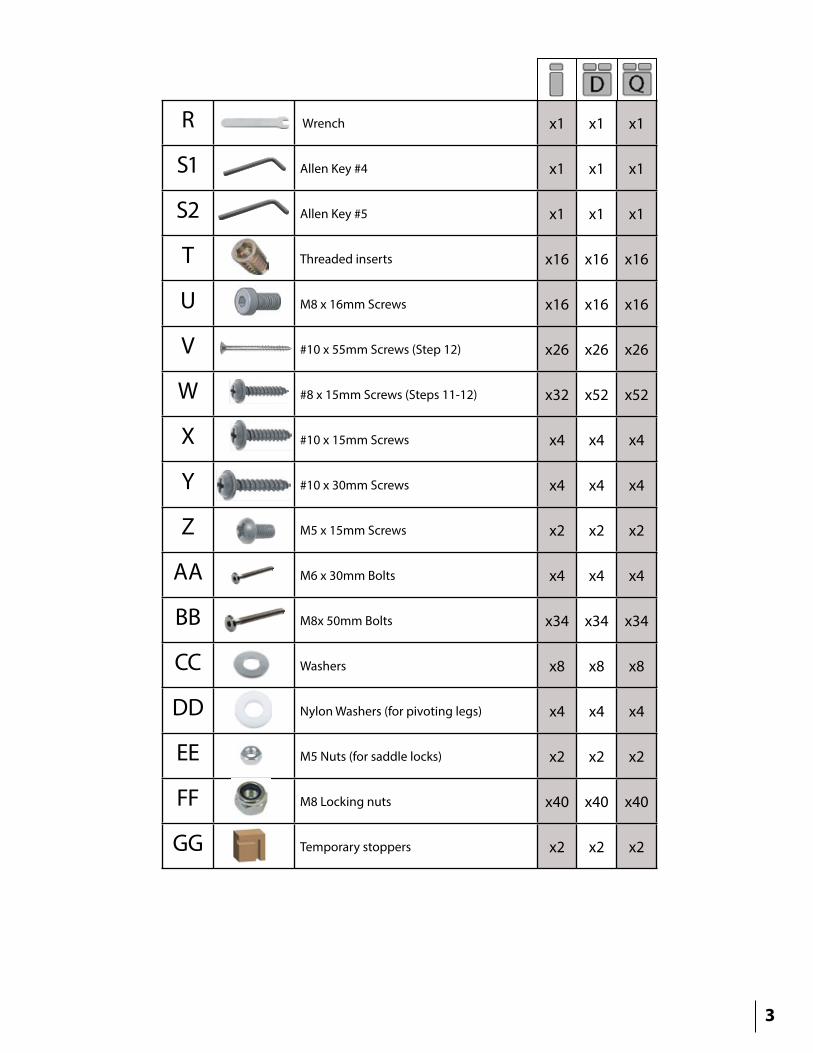
*All measurements are for 19mm (3/4'') board
ESingle
E EDouble
E EQueen
A= ExteriorB-C-D-E = Inset
SINGLE WALL BED
# QtyA 2B 2C 1D 1E 1F 1
DOUBLE WALL BED
# QtyA 2B 2C 1D 1E 2F 1
QUEEN WALL BED
# QtyA 2B 2C 1D 1E 2F 1
* Suggested dimensions
31 9/163
in3/43/43/43/43/45/8
in83 1/263 5/1663 5/1663 5/1681 3/4
18
in16161326
3/43/43/43/45/8
76 3/418
in1616
in78 1/257 1/4
## ########### #########
41 1/83
in3/43/43/43/43/45/8
in78 1/241 3/841 3/841 3/8
78 1/283 1/2
in## ########### #########
ThicknessLengthWidth
in41 3/857 1/463 5/16
in14 1/214 1/214 1/2
in77
## ########### #########
in
Queen
Outside MeasurementsWidth Depth Height
SingleDouble
42 7/858 3/464 13/16
in## ########### ########### #########
in78 1/2
Panneaux
19mm
VERTICAL WALL BED Conversion Table
DIMENSIONS
3/4'' Panels
Queen
Inside MeasurementsWidth Depth Height
SingleDouble
Width Length Thickness
Length ThicknessWidth
1326
28 1/23
57 1/457 1/476 3/4
18
in3/4
A A
B
B
D
C
A A
B
C
B
D
E
F
Overall Cabinet Dimensions
* Suggested dimensions
Cabinet Parts Dimension Guide
5
3 18 "
6 1516 "
13
7 8"
17
3 4"
9 716 "
11
7 16"
61 8
" 7
3 4"
21 2
" 2
1 2"
11
7 16"
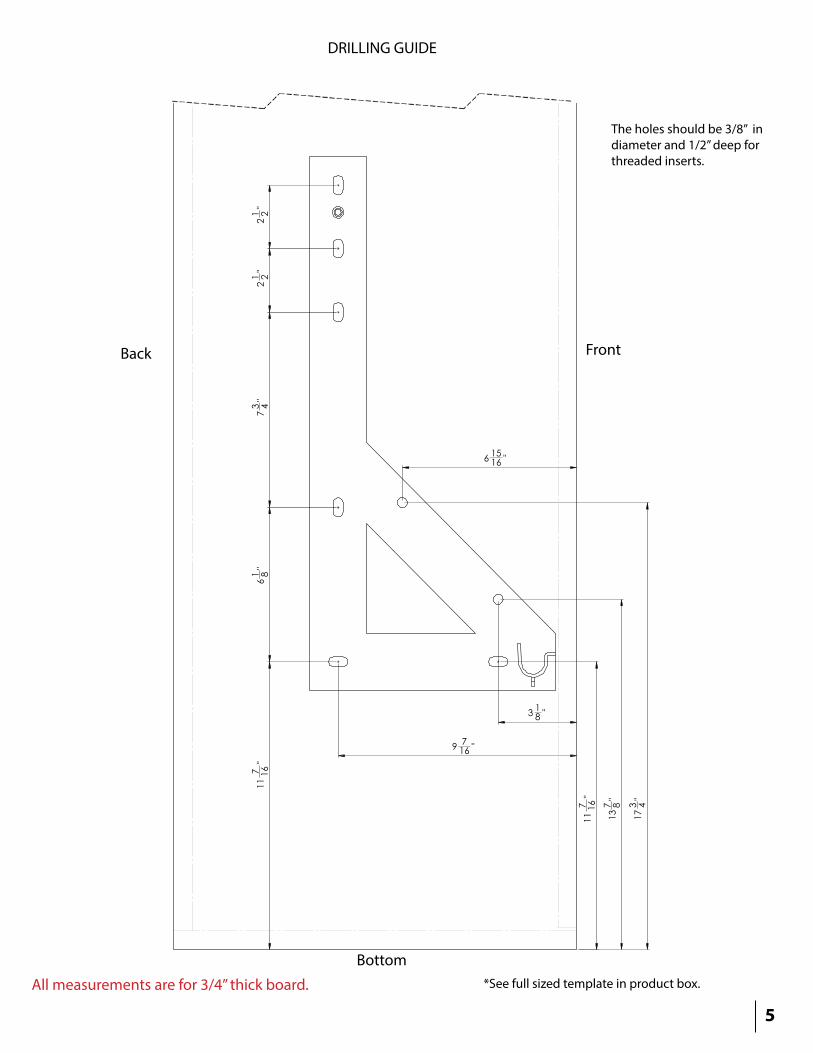
DRILLING GUIDE
FrontBack
Bottom
All measurements are for 3/4’’ thick board.
The holes should be 3/8” in diameter and 1/2” deep for threaded inserts.
*See full sized template in product box.
6
Right side
Front
Front
Left side
Bottom
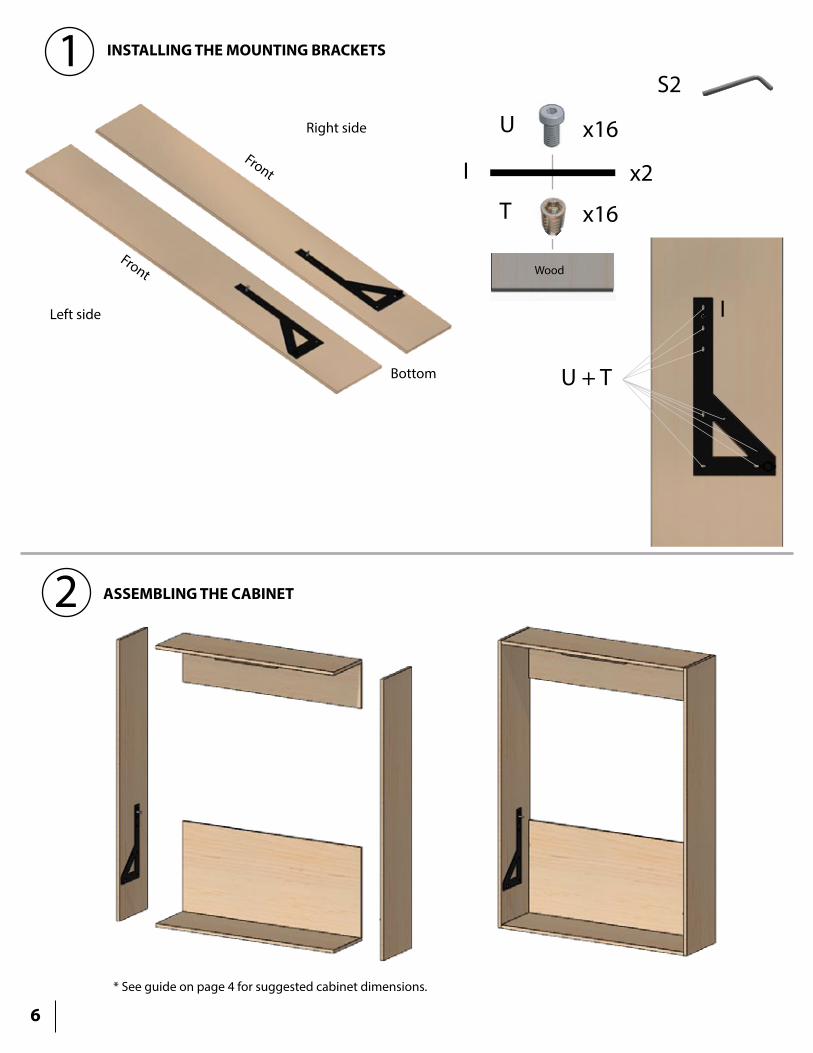
INSTALLING THE MOUNTING BRACKETS1
U + T
U
I
T
I
Wood
ASSEMBLING THE CABINET2
* See guide on page 4 for suggested cabinet dimensions.
x16
x16
x2
S2
7
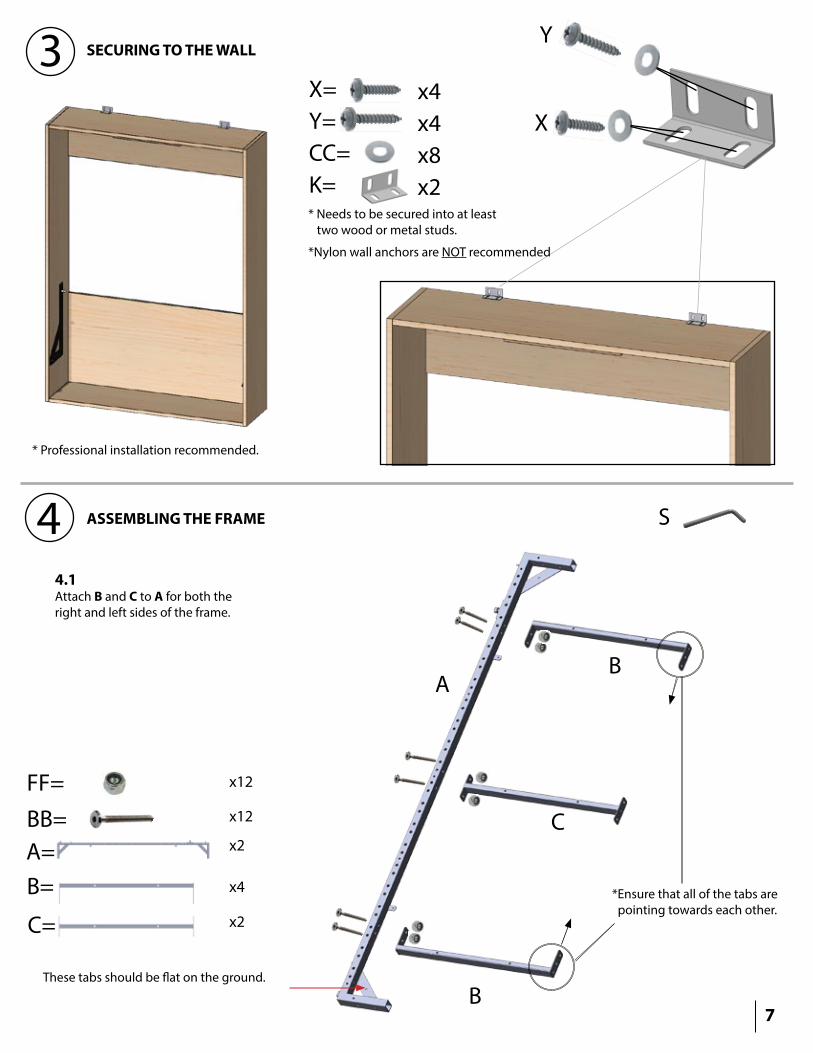
ASSEMBLING THE FRAME4
3 SECURING TO THE WALL
* Professional installation recommended.
* Needs to be secured into at least two wood or metal studs.
4.1Attach B and C to A for both the right and left sides of the frame.
B
B
C
A
FF=
BB=
X=Y=CC=K=
x4x4x8x2
A=B=
C=
x4
x2
*Ensure that all of the tabs are pointing towards each other.
These tabs should be flat on the ground.
S
x12
x12
x2
*Nylon wall anchors are NOT recommended
X
Y
8
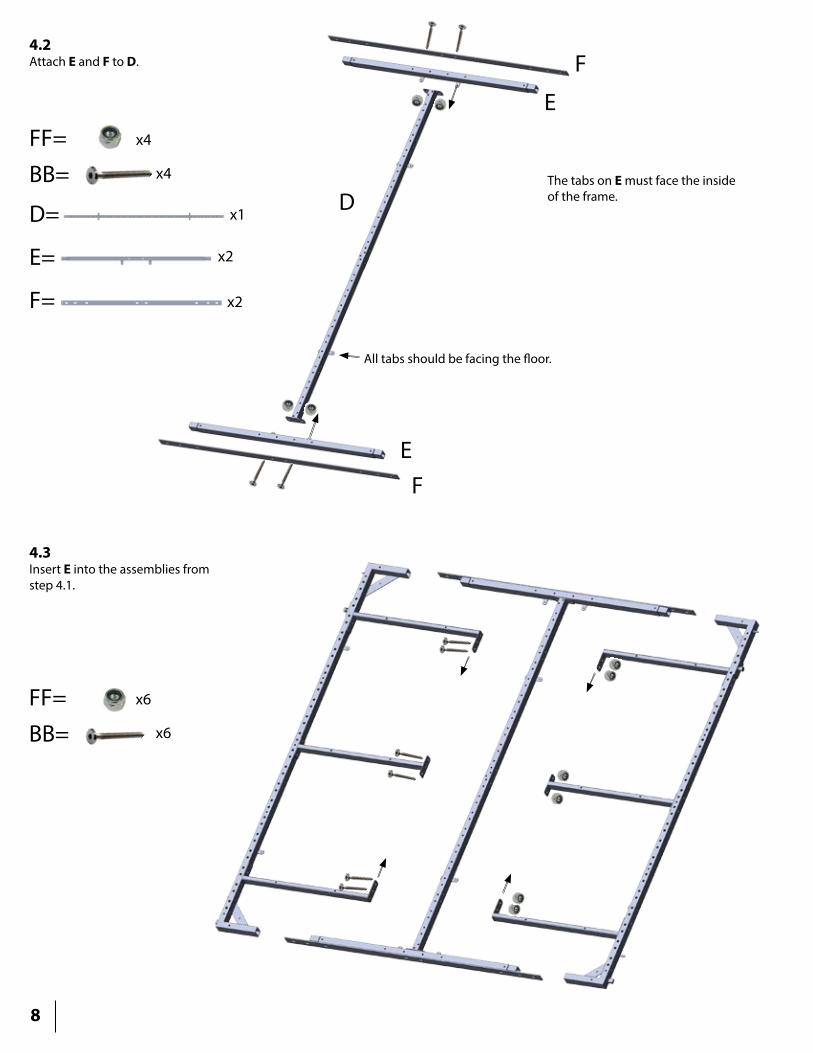
4.2Attach E and F to D.
E
E
D
4.3Insert E into the assemblies from step 4.1.
F
F
FF= x4
BB= x4
FF= x6
BB= x6
D=
E=
F=
All tabs should be facing the floor.
x1
x2
x2
The tabs on E must face the inside of the frame.
9
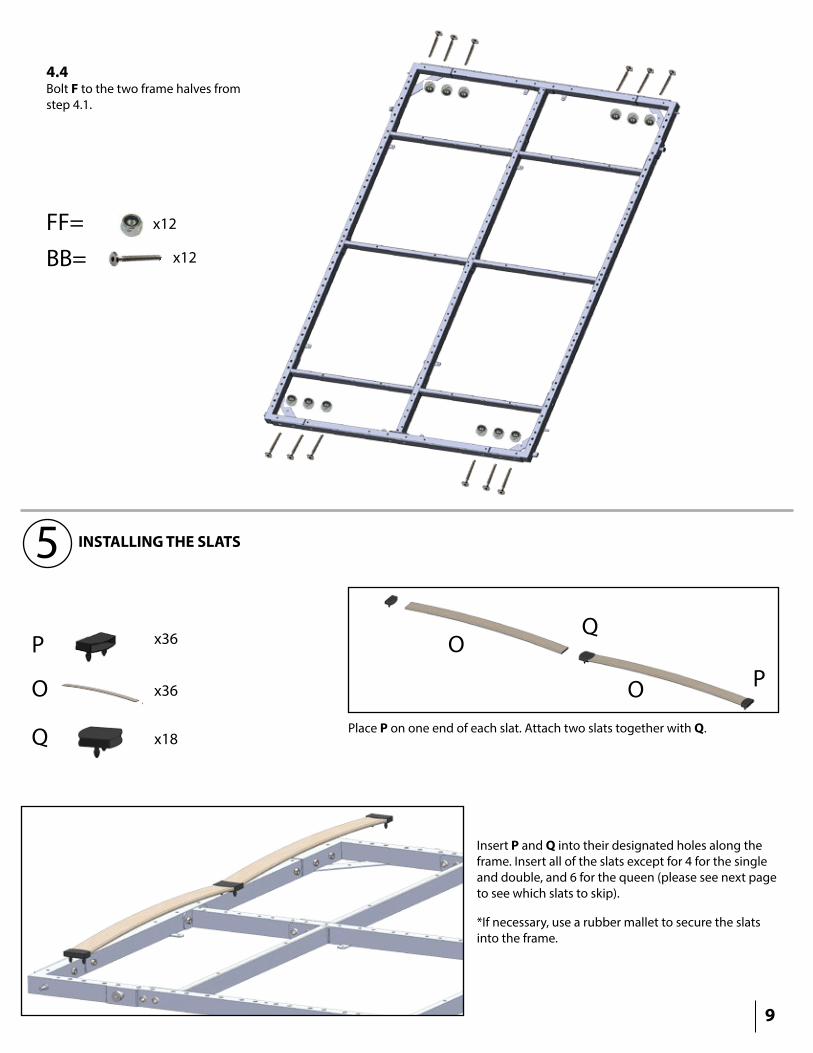
4.4Bolt F to the two frame halves from step 4.1.
FF= x12
BB= x12
5 INSTALLING THE SLATS
P
O P
QO
O
Q Place P on one end of each slat. Attach two slats together with Q.
Insert P and Q into their designated holes along the frame. Insert all of the slats except for 4 for the single and double, and 6 for the queen (please see next page to see which slats to skip).
x36
x36
x18
*If necessary, use a rubber mallet to secure the slats into the frame.

10
6 ATTACHING THE PISTONS TO THE FRAME
FF= x2
Secure the longer metal ends of the pistons to the frame.
G= x2
FF
This end
1 2 3 4 5 6 7 8 9 10 11 12 13 14 15 16 17 18 19 20
Start from this side.
For each bed size, do not insert slats in row #8, or the slats in the last row. For the queen size, please do not insert slats in row #11 as well.
Example below works for both single and double.
#8
Last
Pivot point
Pivot point
Please do not insert slats in row 11 for the queen
11
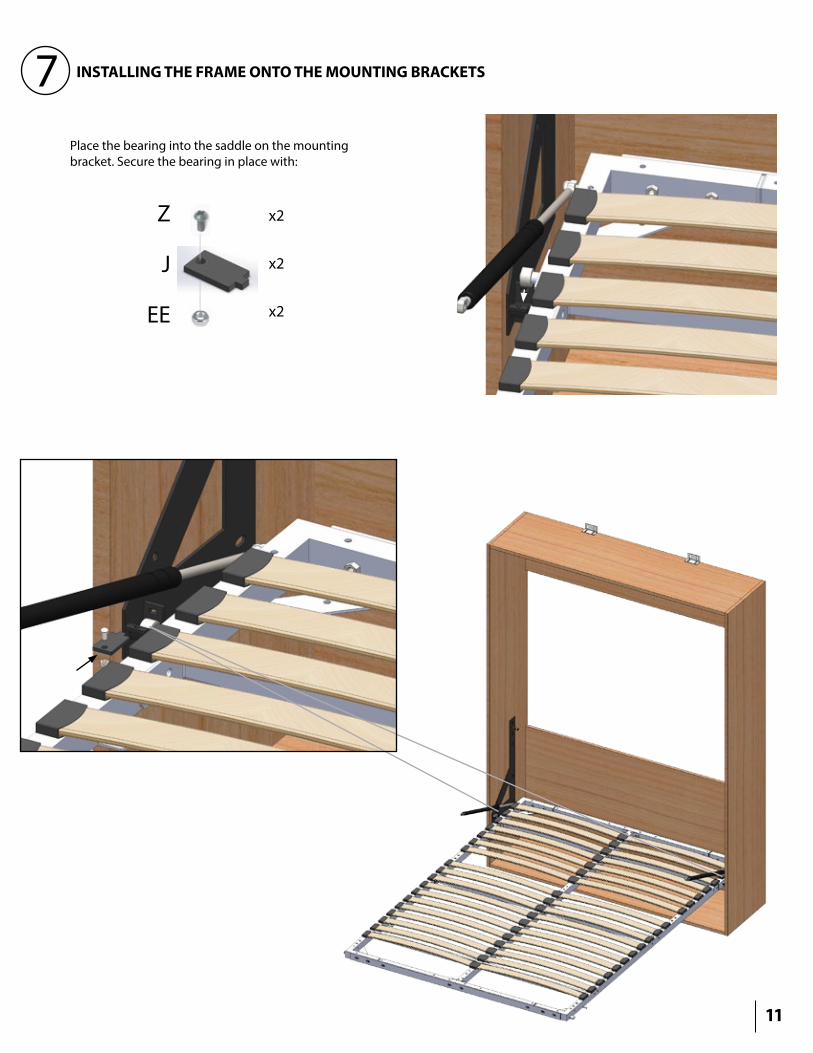
Place the bearing into the saddle on the mounting bracket. Secure the bearing in place with:
INSTALLING THE FRAME ONTO THE MOUNTING BRACKETS
Z
J
EE
x2
x2
x2
7
12
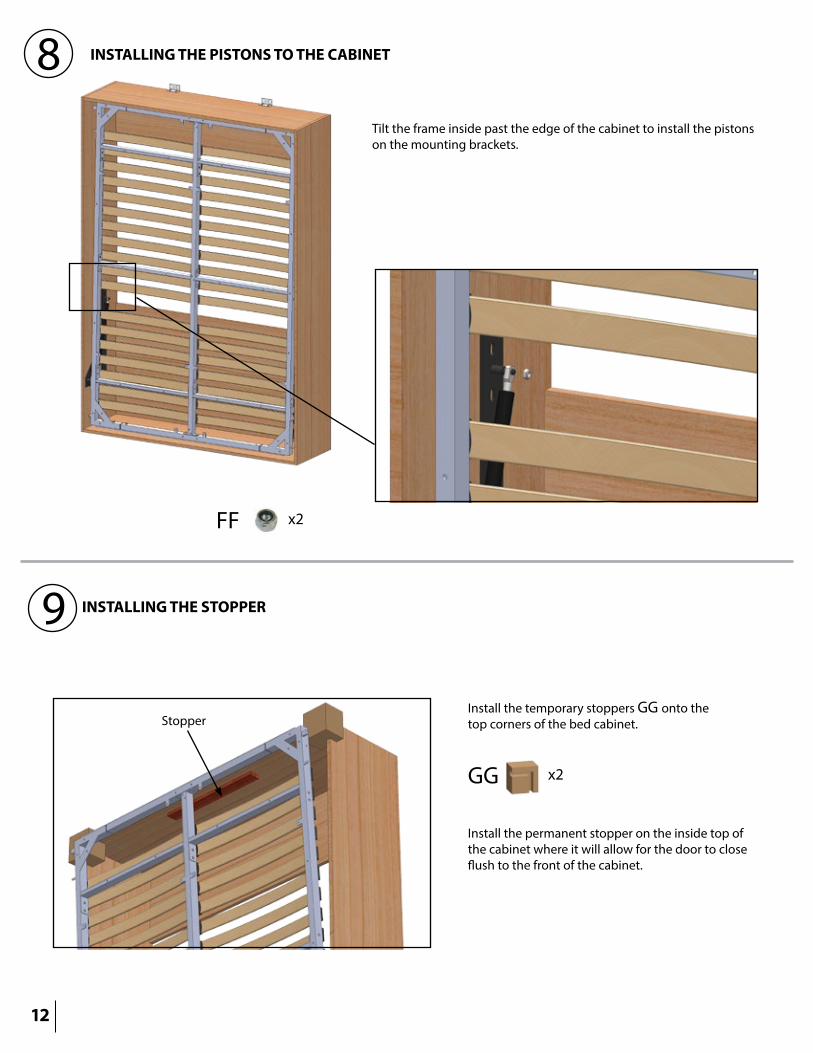
Tilt the frame inside past the edge of the cabinet to install the pistons on the mounting brackets.
INSTALLING THE PISTONS TO THE CABINET
FF x2
8
INSTALLING THE STOPPER
Install the permanent stopper on the inside top of the cabinet where it will allow for the door to close flush to the front of the cabinet.
9
StopperInstall the temporary stoppers GG onto the top corners of the bed cabinet.
GG x2
13
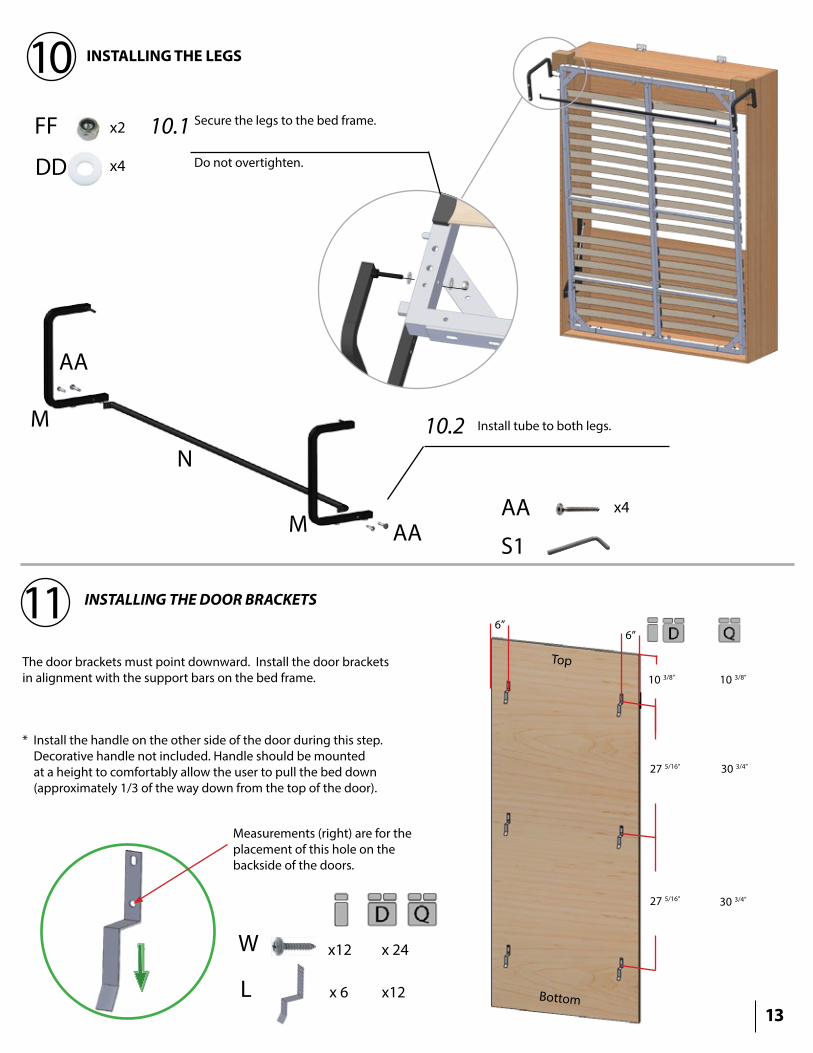
INSTALLING THE LEGS
FF
DD
N
M
x2
x4 Do not overtighten.
Install tube to both legs.M
10.1
10.2
AA
S1
x4
10
INSTALLING THE DOOR BRACKETS
L x12
The door brackets must point downward. Install the door brackets in alignment with the support bars on the bed frame.
AA
Top
Bottom
AA
W x 24
11
* Install the handle on the other side of the door during this step. Decorative handle not included. Handle should be mounted at a height to comfortably allow the user to pull the bed down (approximately 1/3 of the way down from the top of the door).
x 6
x12
10 3/8”
27 5/16”
27 5/16”
10 3/8”
30 3/4”
30 3/4”
6”6”
Measurements (right) are for the placement of this hole on the backside of the doors.
Secure the legs to the bed frame.
14
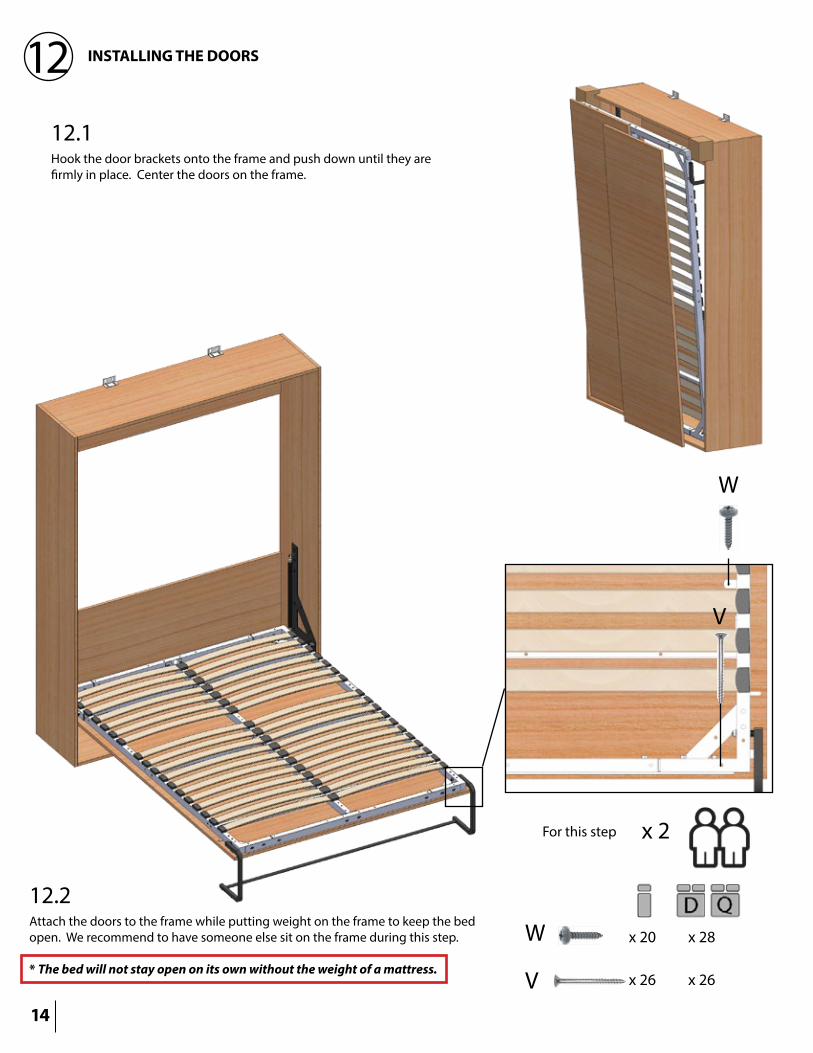
INSTALLING THE DOORS
Hook the door brackets onto the frame and push down until they are firmly in place. Center the doors on the frame.
Attach the doors to the frame while putting weight on the frame to keep the bed open. We recommend to have someone else sit on the frame during this step.
* The bed will not stay open on its own without the weight of a mattress.
V
W
V
W x 20
x 26
12.1
12.2
For this step x 2
12
x 28
x 26

15
INSTALLING THE MATTRESS SUPPORTS
Insert the mattress supports into the designated holes on the bed frame.
H
13
H x 2
INSTALLING THE REMAINING SLATS
14
P
O
x4
x4
x2
P
QO
OQ
Insert P and Q into their designated holes along the frame. Insert all of the remaining slats.
x 1
x6
x6
x3
16
.
.
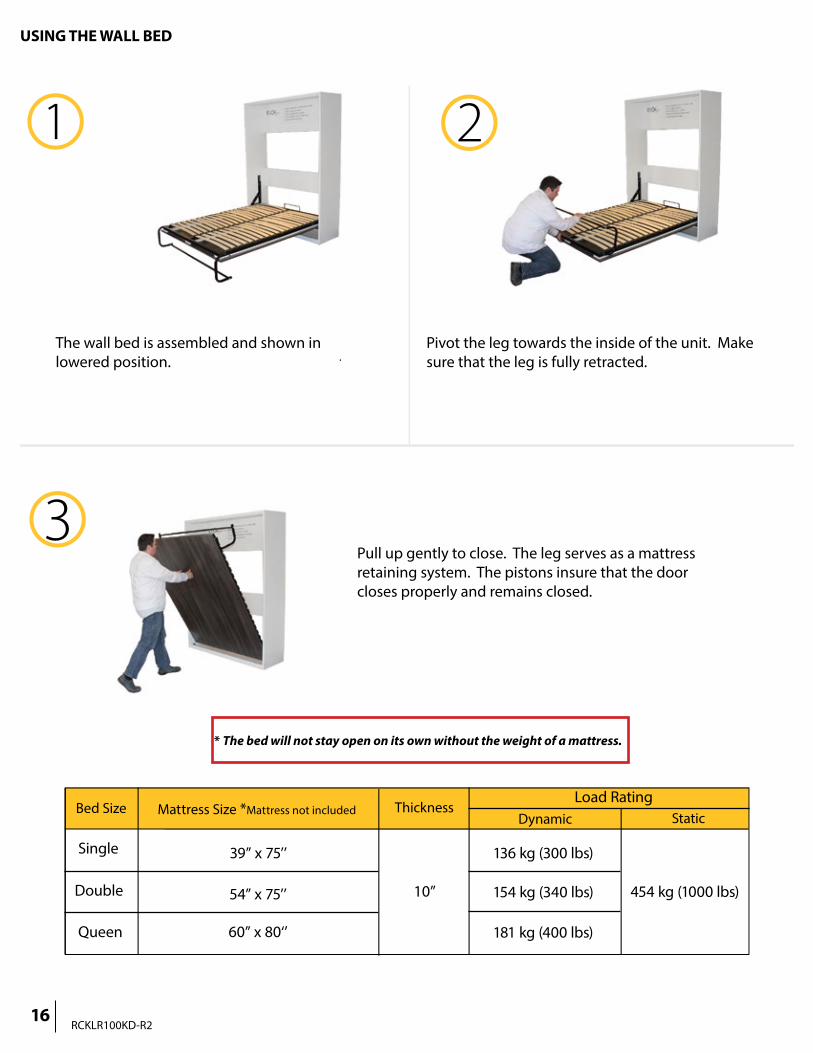
The wall bed is assembled and shown in lowered position.
Pivot the leg towards the inside of the unit. Make sure that the leg is fully retracted.
Pull up gently to close. The leg serves as a mattress retaining system. The pistons insure that the door closes properly and remains closed.
USING THE WALL BED
Double
Queen
39” x 75’’
54” x 75’’
60” x 80‘’
454 kg (1000 lbs)
136 kg (300 lbs)
154 kg (340 lbs)
181 kg (400 lbs)
Bed Size Mattress Size *Mattress not includedLoad Rating
Dynamic Static
Single
* The bed will not stay open on its own without the weight of a mattress.
Thickness
10”
RCKLR100KD-R2