Embed Size (px)
Citation preview

i
Installation Instructions forthe SAS® System underUNIX® Environments,
Release 6.12 (TS050 and above)Table of Contents
Chapter 1, Introduction ........................................................................................................ 1Using This Book........................................................................................................ 1Related Publications................................................................................................. 1The SAS Manager Application ............................................................................... 2
Chapter 2, Installing the SAS System on AIX.................................................................. 5Extracting SAS Manager from the Tape or CD-ROM.......................................... 5Performing a Default Installation of the SAS System or AdditionalProducts..................................................................................................................... 8
Chapter 3, Installing the SAS System on HP-UX .......................................................... 11
Extracting SAS Manager from the Tape or CD-ROM........................................ 11Performing a Default Installation of the SAS System or AdditionalProducts................................................................................................................... 14
Chapter 4, Installing the SAS System on Solaris........................................................... 17
Extracting SAS Manager from the Tape or CD-ROM........................................ 17Performing a Default Installation of the SAS System or AdditionalProducts................................................................................................................... 20
Chapter 5, Making the SAS System Available to Users ............................................... 23Configuring the SAS System................................................................................. 23Invoking SAS Software.......................................................................................... 24Running the SAS System with the X Window System...................................... 25
The XKeysymDB file................................................................................ 25Updating the XKeysymDB file................................................. 26Using the XKeysymDB File ...................................................... 26
Running the SAS System on Asynchronous Devices ........................................ 27
Chapter 6, The Directory Structure of the SAS System................................................ 29
Appendix A, Configuration Information for the SAS System on Solaris................. 31Performing a Dual Installation ............................................................................. 33
Appendix B, SAS/ACCESS Interface Installation ......................................................... 35When to Install a SAS/ACCESS Product............................................................ 35Overview of Installing a SAS/ACCESS Product ............................................... 36Installing SAS/ACCESS Interface to SYBASE and SQL Server Software ...... 37
Installing on Solaris 2 and SYBASE Open Client Release 10.0 or later37Installing on any Combination of Operating System and SYBASERelease Other Than Solaris 2 and SYBASE Release 10.0 or later ....... 38
Installing SAS/ACCESS Interface to INGRES Software ................................... 40Installing SAS/ACCESS Interface to ODBC Software on HP-UX ................... 41

ii
Installing SAS/ACCESS Interface to ORACLE Software ................................. 42Installing SAS/ACCESS Interface to INFORMIX Software.............................. 45Installing the SAS/ACCESS Interface to DB2 for UNIX Systems Software ... 47Output of a Sample SAS/ACCESS Interface Installation ................................. 48
Appendix C, Post-Installation Setup for SAS/ASSIST Software ............................... 53Profile Changes and Enhancements..................................................................... 54Converting User Profiles from a Previous Release ............................................ 54Converting Existing Master and Group Profiles ................................................ 57
Appendix D, Post-Installation Setup for SAS/CONNECT Software......................... 59Storing and Locating SAS/CONNECT Script Files ........................................... 59System Configuration for the TELNET and TCP Access Methods.................. 60System Configuration for the APPC Communications Access Method.......... 60System Configuration for the APPC Communications Access Method underHP-UX...................................................................................................................... 60
Software Requirements ........................................................................... 60SAS System Configuration...................................................................... 61
System Options .......................................................................... 61Environment Variables.............................................................. 62Macro Variables ......................................................................... 63
HP-UX Configuration and Management .............................................. 63SNAplusLink.............................................................................. 63SNAplusAPI ............................................................................... 64Management ............................................................................... 64
Sample Configuration.............................................................................. 64SAS Specifics............................................................................... 68
References ................................................................................................. 69System Configuration for the APPC Communications Access Method underSolaris....................................................................................................................... 69
Software Requirements ........................................................................... 69SAS System Configuration...................................................................... 69
System Options .......................................................................... 69Environment Variables.............................................................. 70Macro Variables ......................................................................... 71
Solaris 2.x/Sun Link Configuration and Management ....................... 71SAS Specifics............................................................................... 77
References ................................................................................................. 77System Configuration for the APPC Communications Access Method underAIX............................................................................................................................ 78
Software Requirements ........................................................................... 78SAS System Configuration...................................................................... 78
System Options .......................................................................... 78Environment Variables.............................................................. 79Macro Variables ......................................................................... 80
SNA Server/6000 Configuration............................................................ 80SAS Specifics............................................................................... 83
References ................................................................................................. 84
Appendix E, Post-Installation Instructions for SAS/CPE Software or IT ServiceVision Software.................................................................................................................... 85
iii
Appendix F, Configuration Instructions for SAS/SHARE Software ......................... 87Set SAS System Option to Specify the TCP/IP Access Method....................... 87
Configuration for the TCP/IP Communications Method................... 87System Configuration for the APPC Communications Access Method ......... 87
Appendix G, Using Syncsort with the SAS System for UNIX Environments ......... 89Making Syncsort Available ................................................................................... 89Using Syncsort in a SAS Session........................................................................... 91
Appendix H, Invoking SAS/TUTOR Software.............................................................. 93
Appendix I, Using SETINIT to Extend............................................................................ 95Creating the SETINIT.SAS File............................................................................. 95For More Information ............................................................................................ 96
Appendix J, Performing a Custom Installation of the SAS System ........................... 97The Custom Installation Menu............................................................. 101
Choose Licensing files ............................................................. 101Choose SAS Notes ................................................................... 101Choose International Support ................................................ 101Choose Products ...................................................................... 102Choose Samples ....................................................................... 102Choose Maps ............................................................................ 103Clear All Selections.................................................................. 103Preview Selections ................................................................... 104Install Current Selections........................................................ 104Go Back ..................................................................................... 104
Appendix K, Post-Installation Setup for the SQL Query Window.......................... 105
Appendix L, Selecting the Default Language for NLS Installations ....................... 107Introduction .......................................................................................................... 107Performing a Quick Install .................................................................................. 107Installing NLS Products Using a Custom Install.............................................. 107Japanese Installations........................................................................................... 109Other Non-English Installations......................................................................... 110Using Help in an NLS Environment.................................................................. 111
Appendix M, Installing SAS Desktop........................................................................... 113
Government Notice ........................................................................................................... 115

1
Chapter 1, Introduction
This document provides installation instructions for the SAS System, Release 6.12, forUNIX environments. The following systems are included in these instructions (thehardware platform is indicated in parentheses):
❏ AIX® (IBM RISC System/6000™)❏ HP-UX (Hewlett Packard 9000 Precision Architecture)❏ SunOS, Solaris 1 and Solaris 2 (Sun SPARC).
Note: For information specific to Solaris, see Appendix A, "ConfigurationInformation for the SAS System under Solaris," before you start theinstallation.
Alert Notes are provided on your media and with your product package. Thesenotes contain any corrections or additions to this document. You should read theAlert Notes before installing the SAS System. For more information on Alert Notesand other documentation included on your media, see "The SAS ManagerApplication" later in this chapter.
If you have licensed IT Service Vision software, refer to the Installation Instructions forIT Service Vision included with this software shipment before following any of theinstructions in this document. The IT Service Vision installation instructions willguide you in installing the necessary components of the SAS System.
Using This Book
All system-dependent instructions are marked with a computer icon in theleft margin. Be sure to follow those instructions when they apply to your system.
Related Publications
The following is a list of related publications that contain information you may finduseful:
❏ SAS Companion for UNIX Environments: Language, Version 6, First Edition
❏ SAS Companion for UNIX Environments: User Interfaces, Version 6, First Edition
❏ SAS Consultant’s Guide: Supporting the SAS System, First Edition
2 Installation Instructions for the SAS System under UNIX Environments, Release 6.12
SAS Institute provides many publications about products in the SAS System and howto use them on specific hosts. For a complete list of SAS publications, you shouldrefer to the current Publications Catalog. The catalog is produced twice a year. Youcan order a free copy of the catalog by writing to the following address:
SAS Institute, Inc.Book Sales DepartmentSAS Campus Dr.Cary, NC 27513
The SAS Manager Application
The SAS Manager application is supplied with Base SAS software to help you installand maintain the SAS System in your environment. The SAS Manager primary menucontains the following options, which are briefly described:
❏ Load Software From Media
installs everything included on the installation media. The configuration filesare built and installation test streams are executed automatically. This optionis recommended for any installation of the SAS System and maintenance.
❏ Invoke Custom Installation and Utilities
contains menu items that enable you to customize your installation byselecting products and manually configuring the SAS System. Selecting thismenu item also allows you to invoke the installation test streams. Use thisoption only when you need to customize your installation.
From this menu you have the following options:
❏ Invoke Custom Installation Facility
enables you to select products to be installed and to manuallyconfigure the SAS System.
❏ Invoke Product Specific Configuration
enables you to perform post-installation configuration for productsthat require additional setup. The instructions for each productrequiring post-installation configuration are provided in acorresponding appendix in this document.
❏ Invoke SAS Installation Utilities
provides tools for configuring and verifying the SAS System. Thisfacility allows you to perform the following tasks:
❏ create SAS configuration and autoexec files
❏ apply special Technical Support fixes
Installation Instructions for the SAS System under UNIX Environments, Release 6.12 3
❏ patch the SAS executable with the current installationdirectory (SASROOT)
❏ apply SAS SETINIT information
❏ run the SAS System installation test streams
❏ uncompress map data sets.
❏ Invoke SAS Maintenance Utilities
provides tools for promoting, staging, and deleting maintenance.Tools are also provided to manage catalogs.
Note: This option is not applicable to this release of the SASSystem.
❏ Exit SAS Installation Manager
exits the SAS Manager application.
❏ $SASROOT/doc
contains text and PostScript versions of Alert Notes, System Requirements,and installation instructions. See the README file for information on how tobrowse and print these files.

5
Chapter 2, Installing the SAS® System on AIX
®
This chapter provides instructions for installing the SAS System on AIX. Follow thesteps outlined in this chapter, and then proceed to Chapter 5, "Making the SASSystem Available to Users."
Extracting SAS Manager from the Tape or CD-ROM
You must extract the SAS Manager application from your distribution media beforeproceeding with the installation. This section explains how to extract the SASManager to begin the installation of the SAS System in the UNIX environment. Youcan install the SAS System in any location on the system with sufficient space. Theinstallation requires that all SAS files exist in a directory named sas612, which iscreated for you and contains all files associated with the SAS System. SASROOT isthe pathname for the location of the SAS files.
It is not necessary to have root privileges to install the SAS System. If the software isnot installed as root, the SAS system administrator should install the softwareusing either the administrator’s userid or a userid created for the SAS System, such asSAS. To complete future installs, the system administrator requires read and writeprivileges on the SASROOT directory and its contents.
If you are installing the SAS System on an IBM RS/6000 system with an8 mm tape, you must change the block size parameters on the 8 mm tape drive asdescribed below:
To determine the status of the block size, issue the following command if your tapedrive is local:
lsattr -l rmt0 -E
To determine the status of the block size, issue the following command if your tapedrive is remote:
rsh hostname -l username /etc/lsattr -l rmt0 -E
6 Installation Instructions for the SAS System under UNIX Environments, Release 6.12
Record the block size information that is displayed. If the block size is not set to 0,you must change it for the installation. If you are using a local tape drive, issue thefollowing command:
chdev -l rmt0 -a block_size=0
Note: You must have root privilege to issue this command.
If you are using a remote tape drive, issue the following command:
rsh hostname -l username /etc/chdev -l rmt0 -a block_size=0
You can also use the smit command to change these parameters. For moreinformation about the smit command, refer to your system documentation.
Note: You can restore the original system parameters after you have completed theinstallation. Instructions for restoring the parameters are given at the end ofthe installation instructions provided in the section, "Performing a DefaultInstallation of the SAS System," and in Appendix J, "Performing a CustomInstallation of the SAS System."
The following steps show you how to extract the SAS Manager application. Generaland system-specific instructions are provided. You should follow the generalinstructions, as well as the instructions, if any, for your system. Your local systemsadministrator should be able to provide you with assistance with your hardwareconfiguration and site.
Notes: These instructions use /usr/local/sas612 as the pathname for theSASROOT directory. This pathname is an example. Substitute yourinstallation directory, ending with sas612 for this name in the instructions.
These instructions use /dev/rmt0.1 as the name for a non-rewinding tapedevice. If you are installing from tape, verify the name of your tape devicewith your system administrator and substitute the correct name everywhere/dev/rmt0.1 appears in the instructions.
These instructions assume a CD-ROM is mounted at /cdrom. If you areinstalling from CD-ROM and it is mounted in another location, substitute thecorrect location everywhere /cdrom appears in the instructions.
Complete the following steps:
1. Insert the media into the appropriate drive. Make sure the tape is rewound.Instructions for rewinding tape media are provided under, "For Local TapeMedia," in this section.
For Local Tape Media:
Note: Tape media include 8 mm and 4 mm/DDS (DAT). Make sure thatyour device is a non-rewinding tape device.
Installation Instructions for the SAS System under UNIX Environments, Release 6.12 7
If you are using a local tape drive (a drive attached to the computer on whichyou are installing), issue the following command:
tctl -f /dev/rmt0.1 rewind
For CD-ROM:
Note: This release of the SAS System supports ISO-9660 CD-ROM andRockridge extensions where available.
To mount the CD-ROM, use the following command:
mount -r -v cdrfs /dev/cd0 /cdrom
Notes:
❏ Refer to your system documentation for the correct devicename.
❏ Mounting and unmounting a CD-ROM device requires rootprivileges. The remainder of the install process does not.After mounting the CD, you can return to the standardprivilege set.
For Remote Tape Media:
If you are using a remote tape drive (a drive connected to a machine on yournetwork other than the machine on which you are installing), issue thefollowing command where hostname is the name of the host with the tapedrive, and username is the name that you need to remote-login to the hostspecified by hostname. You can omit -l username if it is the same asyour current user name.
rsh hostname -l username tctl -f /dev/rmt0.1 rewind
Note: To utilize the tape drive on a remote machine, the current user on thecurrent machine must have remote access to the userid on the remotemachine. This is typically accomplished by using a .rhosts file inthe remote user’s home directory. Please see your systemsadministrator or system documentation for further details.
2. Change to the directory where you want the SAS System installed by issuinga command similar to the following:
cd /usr/local
8 Installation Instructions for the SAS System under UNIX Environments, Release 6.12
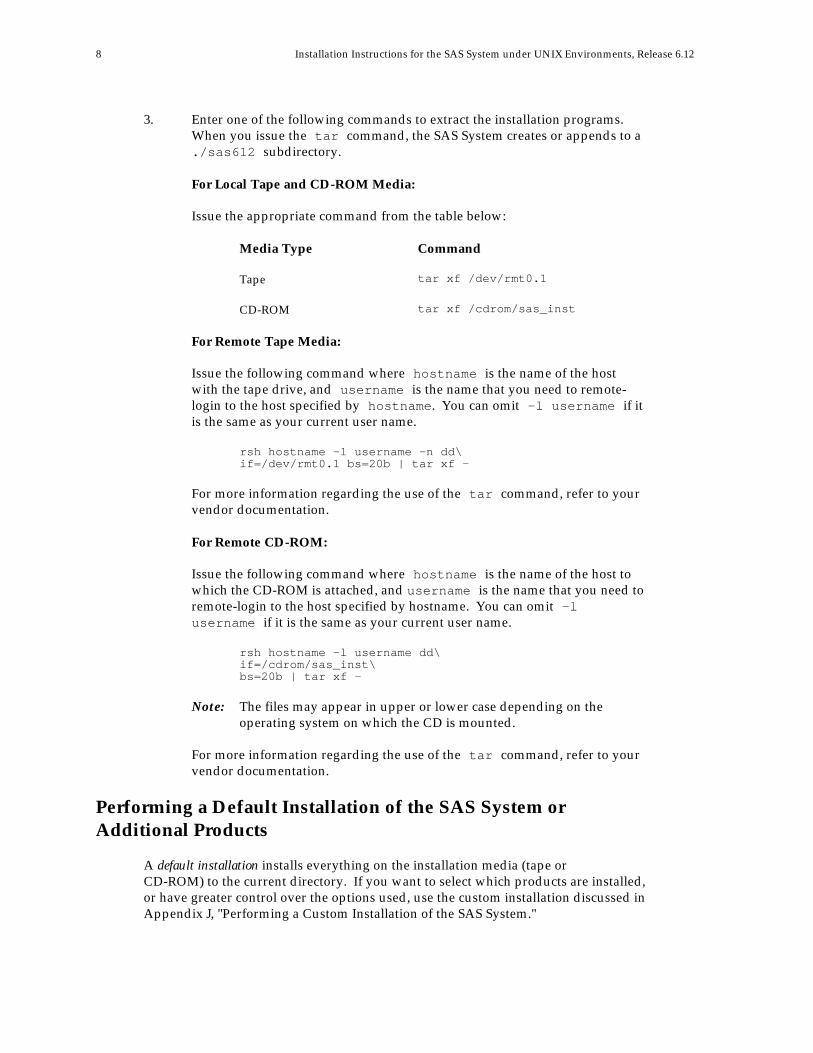
3. Enter one of the following commands to extract the installation programs.When you issue the tar command, the SAS System creates or appends to a./sas612 subdirectory.
For Local Tape and CD-ROM Media:
Issue the appropriate command from the table below:
Media Type Command
Tape tar xf /dev/rmt0.1
CD-ROM tar xf /cdrom/sas_inst
For Remote Tape Media:
Issue the following command where hostname is the name of the hostwith the tape drive, and username is the name that you need to remote-login to the host specified by hostname. You can omit -l username if itis the same as your current user name.
rsh hostname -l username -n dd\if=/dev/rmt0.1 bs=20b | tar xf -
For more information regarding the use of the tar command, refer to yourvendor documentation.
For Remote CD-ROM:
Issue the following command where hostname is the name of the host towhich the CD-ROM is attached, and username is the name that you need toremote-login to the host specified by hostname. You can omit -lusername if it is the same as your current user name.
rsh hostname -l username dd\if=/cdrom/sas_inst\bs=20b | tar xf -
Note: The files may appear in upper or lower case depending on theoperating system on which the CD is mounted.
For more information regarding the use of the tar command, refer to yourvendor documentation.
Performing a Default Installation of the SAS System orAdditional Products
A default installation installs everything on the installation media (tape orCD-ROM) to the current directory. If you want to select which products are installed,or have greater control over the options used, use the custom installation discussed inAppendix J, "Performing a Custom Installation of the SAS System."
Installation Instructions for the SAS System under UNIX Environments, Release 6.12 9
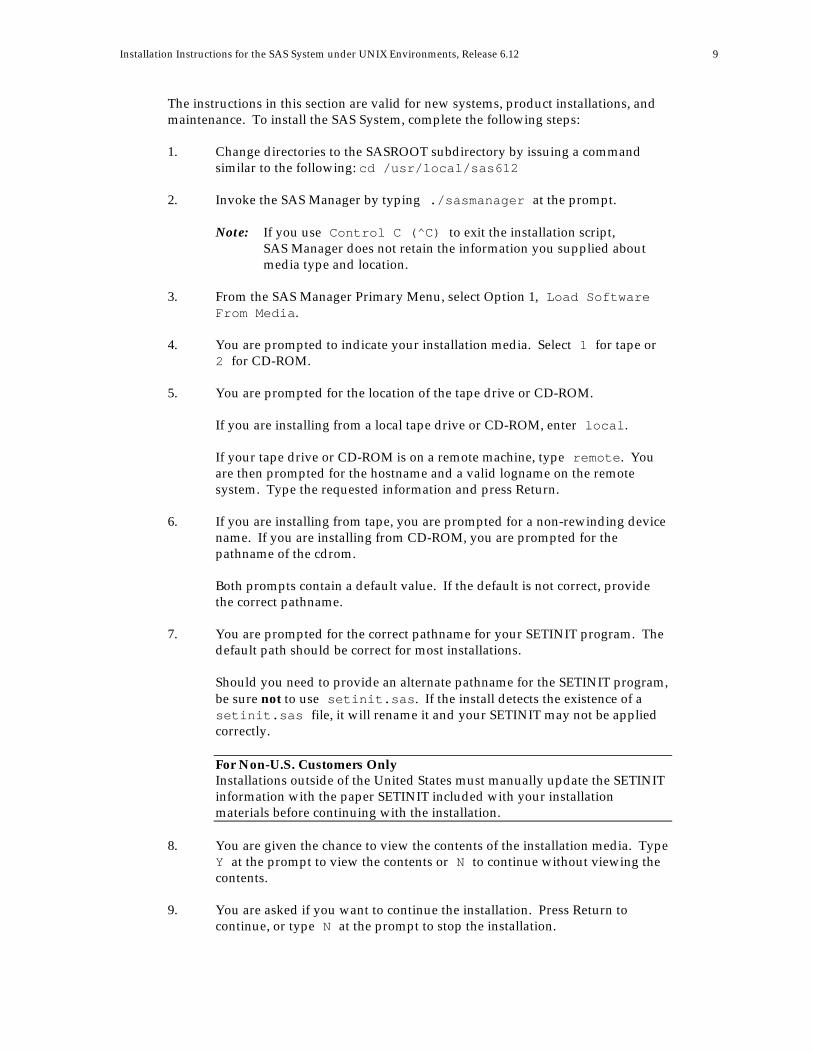
The instructions in this section are valid for new systems, product installations, andmaintenance. To install the SAS System, complete the following steps:
1. Change directories to the SASROOT subdirectory by issuing a commandsimilar to the following: cd /usr/local/sas612
2. Invoke the SAS Manager by typing ./sasmanager at the prompt.
Note: If you use Control C (^C) to exit the installation script,SAS Manager does not retain the information you supplied aboutmedia type and location.
3. From the SAS Manager Primary Menu, select Option 1, Load SoftwareFrom Media.
4. You are prompted to indicate your installation media. Select 1 for tape or2 for CD-ROM.
5. You are prompted for the location of the tape drive or CD-ROM.
If you are installing from a local tape drive or CD-ROM, enter local.
If your tape drive or CD-ROM is on a remote machine, type remote. Youare then prompted for the hostname and a valid logname on the remotesystem. Type the requested information and press Return.
6. If you are installing from tape, you are prompted for a non-rewinding devicename. If you are installing from CD-ROM, you are prompted for thepathname of the cdrom.
Both prompts contain a default value. If the default is not correct, providethe correct pathname.
7. You are prompted for the correct pathname for your SETINIT program. Thedefault path should be correct for most installations.
Should you need to provide an alternate pathname for the SETINIT program,be sure not to use setinit.sas. If the install detects the existence of asetinit.sas file, it will rename it and your SETINIT may not be appliedcorrectly.
For Non-U.S. Customers OnlyInstallations outside of the United States must manually update the SETINITinformation with the paper SETINIT included with your installationmaterials before continuing with the installation.
8. You are given the chance to view the contents of the installation media. TypeY at the prompt to view the contents or N to continue without viewing thecontents.
9. You are asked if you want to continue the installation. Press Return tocontinue, or type N at the prompt to stop the installation.
10 Installation Instructions for the SAS System under UNIX Environments, Release 6.12
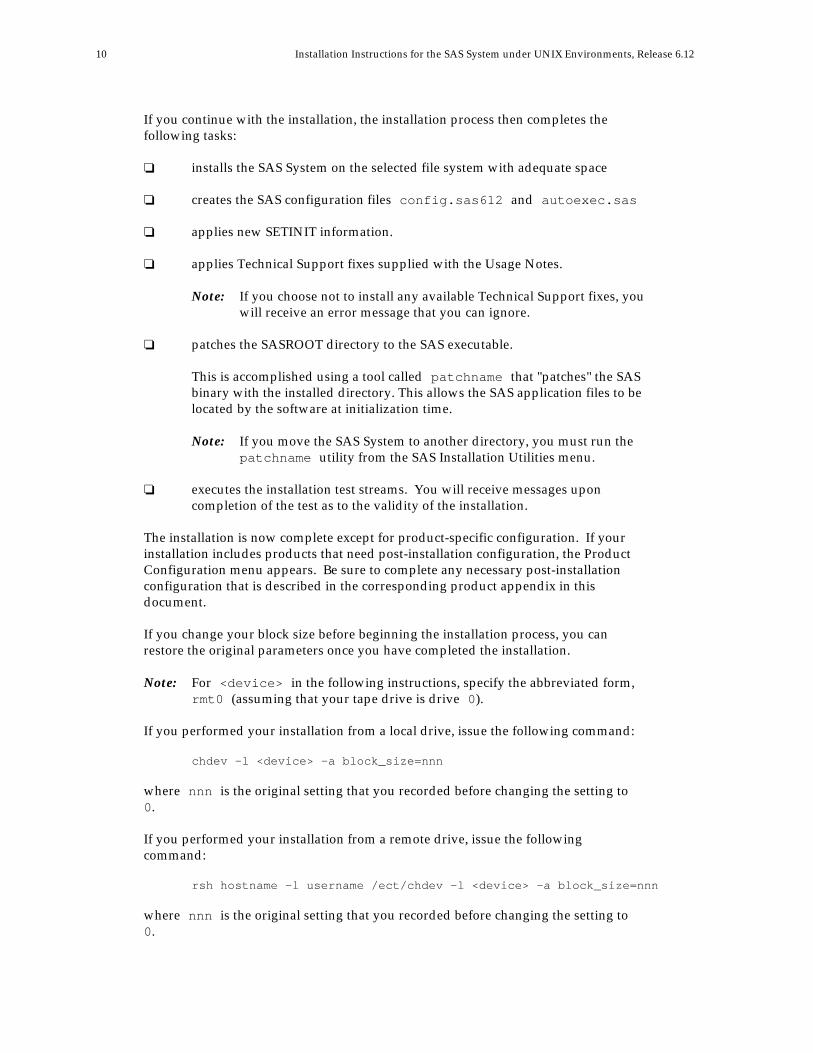
If you continue with the installation, the installation process then completes thefollowing tasks:
❏ installs the SAS System on the selected file system with adequate space
❏ creates the SAS configuration files config.sas612 and autoexec.sas
❏ applies new SETINIT information.
❏ applies Technical Support fixes supplied with the Usage Notes.
Note: If you choose not to install any available Technical Support fixes, youwill receive an error message that you can ignore.
❏ patches the SASROOT directory to the SAS executable.
This is accomplished using a tool called patchname that "patches" the SASbinary with the installed directory. This allows the SAS application files to belocated by the software at initialization time.
Note: If you move the SAS System to another directory, you must run thepatchname utility from the SAS Installation Utilities menu.
❏ executes the installation test streams. You will receive messages uponcompletion of the test as to the validity of the installation.
The installation is now complete except for product-specific configuration. If yourinstallation includes products that need post-installation configuration, the ProductConfiguration menu appears. Be sure to complete any necessary post-installationconfiguration that is described in the corresponding product appendix in thisdocument.
If you change your block size before beginning the installation process, you canrestore the original parameters once you have completed the installation.
Note: For <device> in the following instructions, specify the abbreviated form,rmt0 (assuming that your tape drive is drive 0).
If you performed your installation from a local drive, issue the following command:
chdev -l <device> -a block_size=nnn
where nnn is the original setting that you recorded before changing the setting to0.
If you performed your installation from a remote drive, issue the followingcommand:
rsh hostname -l username /ect/chdev -l <device> -a block_size=nnn
where nnn is the original setting that you recorded before changing the setting to0.
11
Chapter 3, Installing the SAS®
System on HP-UX®
This chapter provides instructions for installing the SAS System on HP-UX. Followthe steps outlined in this chapter, and then proceed to Chapter 5, "Making the SASSystem Available to Users."
Extracting SAS Manager from the Tape or CD-ROM
You must extract the SAS Manager application from your distribution media beforeproceeding with the installation. This section explains how to extract the SASManager to begin the installation of the SAS System in the UNIX environment. Youcan install the SAS System in any location on the system with sufficient space. Theinstallation requires that all SAS files exist in a directory named sas612, which iscreated for you and contains all files associated with the SAS System. SASROOT isthe pathname for the location of the SAS files.
It is not necessary to have root privileges to install the SAS System. If the software isnot installed as root, the SAS system administrator should install the softwareusing either the administrator’s userid or a userid created for the SAS System, such asSAS. To complete future installs, the system administrator requires read and writeprivileges on the SASROOT directory and its contents.
Install the SAS System on a file system supporting 255-character file names. You willhave difficulty installing the SAS System on a file system that supports only 14-character file names.
The following steps show you how to extract the SAS Manager application. Generaland system-specific instructions are provided. You should follow the generalinstructions, as well as the instructions, if any, for your system. Your local systemsadministrator should be able to provide you with assistance with your hardwareconfiguration and site.
Notes: These instructions use /usr/local/sas612 as the pathname for theSASROOT directory. This pathname is an example. Substitute yourinstallation directory, ending with sas612 for this name in the instructions.
These instructions use /dev/rmt/4mn as the name for a non-rewindingtape device. If you are installing from tape, verify the name of your tapedevice with your system administrator and substitute the correct nameeverywhere /dev/rmt/4mn appears in the instructions.
These instructions assume a CD-ROM is mounted at /cdrom. If you areinstalling from CD-ROM and it is mounted in another location, substitute thecorrect location everywhere /cdrom appears in the instructions.
12 Installation Instructions for the SAS System under UNIX Environments, Release 6.12
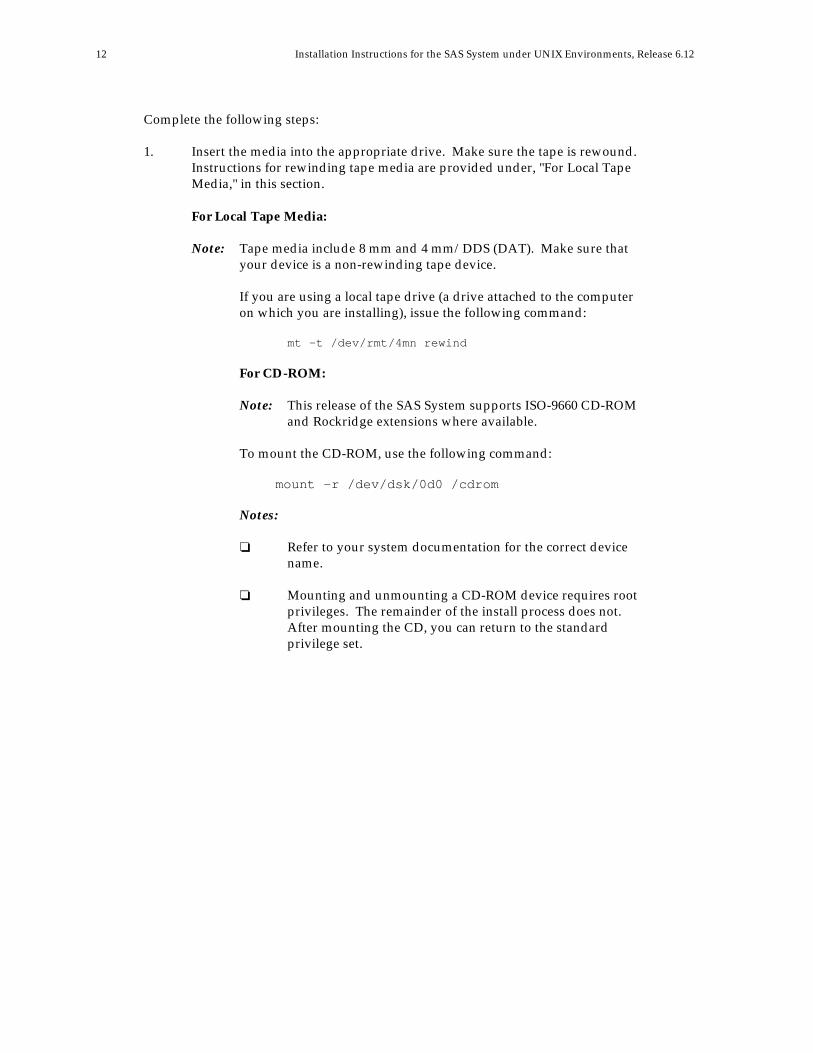
Complete the following steps:
1. Insert the media into the appropriate drive. Make sure the tape is rewound.Instructions for rewinding tape media are provided under, "For Local TapeMedia," in this section.
For Local Tape Media:
Note: Tape media include 8 mm and 4 mm/DDS (DAT). Make sure thatyour device is a non-rewinding tape device.
If you are using a local tape drive (a drive attached to the computeron which you are installing), issue the following command:
mt -t /dev/rmt/4mn rewind
For CD-ROM:
Note: This release of the SAS System supports ISO-9660 CD-ROMand Rockridge extensions where available.
To mount the CD-ROM, use the following command:
mount -r /dev/dsk/0d0 /cdrom
Notes:
❏ Refer to your system documentation for the correct devicename.
❏ Mounting and unmounting a CD-ROM device requires rootprivileges. The remainder of the install process does not.After mounting the CD, you can return to the standardprivilege set.
Installation Instructions for the SAS System under UNIX Environments, Release 6.12 13
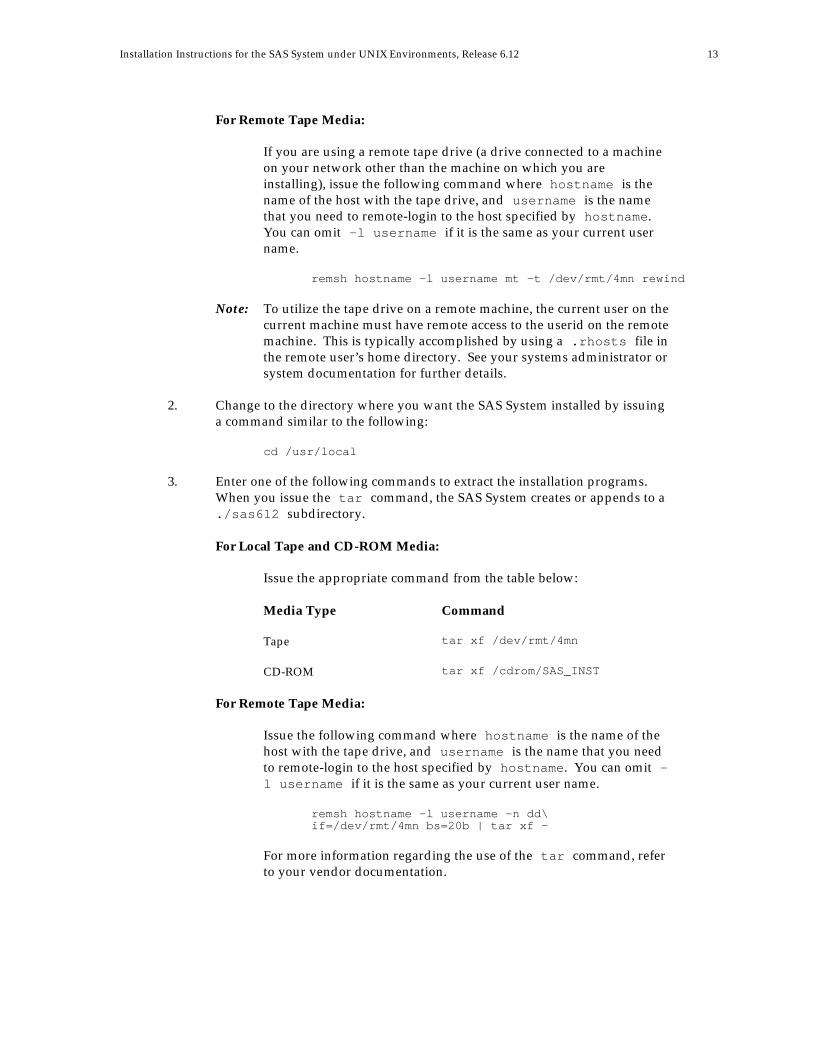
For Remote Tape Media:
If you are using a remote tape drive (a drive connected to a machineon your network other than the machine on which you areinstalling), issue the following command where hostname is thename of the host with the tape drive, and username is the namethat you need to remote-login to the host specified by hostname.You can omit -l username if it is the same as your current username.
remsh hostname -l username mt -t /dev/rmt/4mn rewind
Note: To utilize the tape drive on a remote machine, the current user on thecurrent machine must have remote access to the userid on the remotemachine. This is typically accomplished by using a .rhosts file inthe remote user’s home directory. See your systems administrator orsystem documentation for further details.
2. Change to the directory where you want the SAS System installed by issuinga command similar to the following:
cd /usr/local
3. Enter one of the following commands to extract the installation programs.When you issue the tar command, the SAS System creates or appends to a./sas612 subdirectory.
For Local Tape and CD-ROM Media:
Issue the appropriate command from the table below:
Media Type Command
Tape tar xf /dev/rmt/4mn
CD-ROM tar xf /cdrom/SAS_INST
For Remote Tape Media:
Issue the following command where hostname is the name of thehost with the tape drive, and username is the name that you needto remote-login to the host specified by hostname. You can omit -l username if it is the same as your current user name.
remsh hostname -l username -n dd\if=/dev/rmt/4mn bs=20b | tar xf -
For more information regarding the use of the tar command, referto your vendor documentation.
14 Installation Instructions for the SAS System under UNIX Environments, Release 6.12
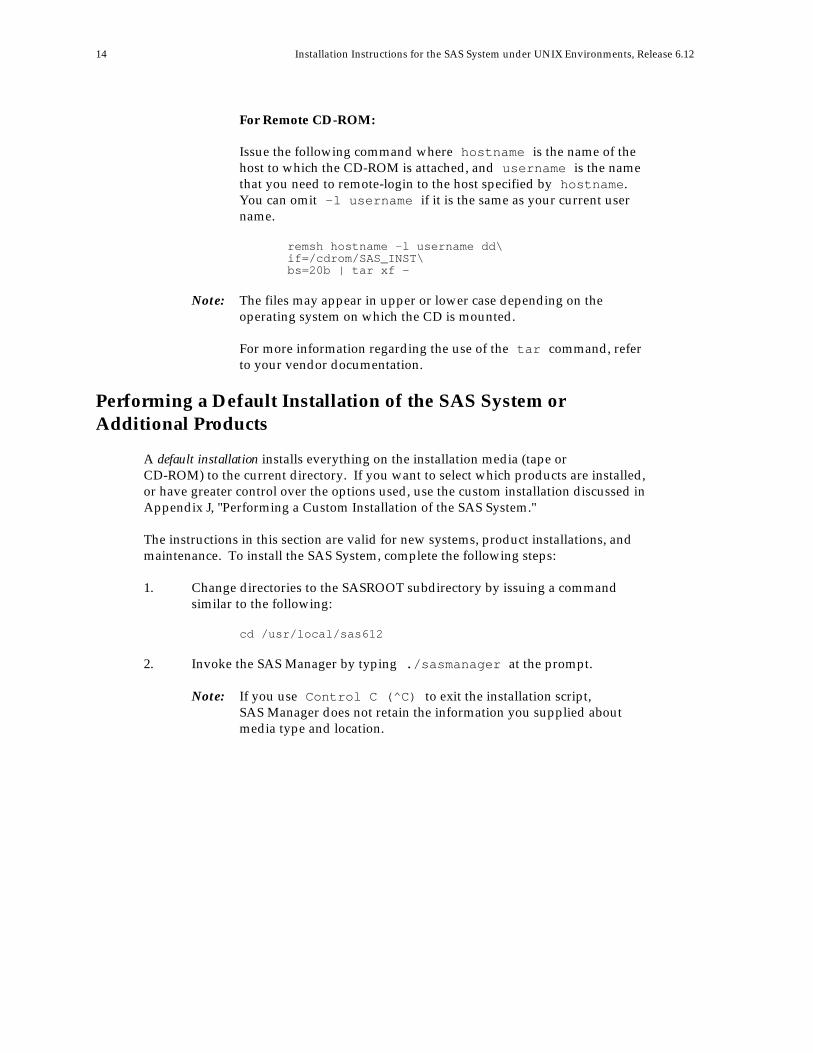
For Remote CD-ROM:
Issue the following command where hostname is the name of thehost to which the CD-ROM is attached, and username is the namethat you need to remote-login to the host specified by hostname.You can omit -l username if it is the same as your current username.
remsh hostname -l username dd\if=/cdrom/SAS_INST\bs=20b | tar xf -
Note: The files may appear in upper or lower case depending on theoperating system on which the CD is mounted.
For more information regarding the use of the tar command, referto your vendor documentation.
Performing a Default Installation of the SAS System orAdditional Products
A default installation installs everything on the installation media (tape orCD-ROM) to the current directory. If you want to select which products are installed,or have greater control over the options used, use the custom installation discussed inAppendix J, "Performing a Custom Installation of the SAS System."
The instructions in this section are valid for new systems, product installations, andmaintenance. To install the SAS System, complete the following steps:
1. Change directories to the SASROOT subdirectory by issuing a commandsimilar to the following:
cd /usr/local/sas612
2. Invoke the SAS Manager by typing ./sasmanager at the prompt.
Note: If you use Control C (^C) to exit the installation script,SAS Manager does not retain the information you supplied aboutmedia type and location.
Installation Instructions for the SAS System under UNIX Environments, Release 6.12 15
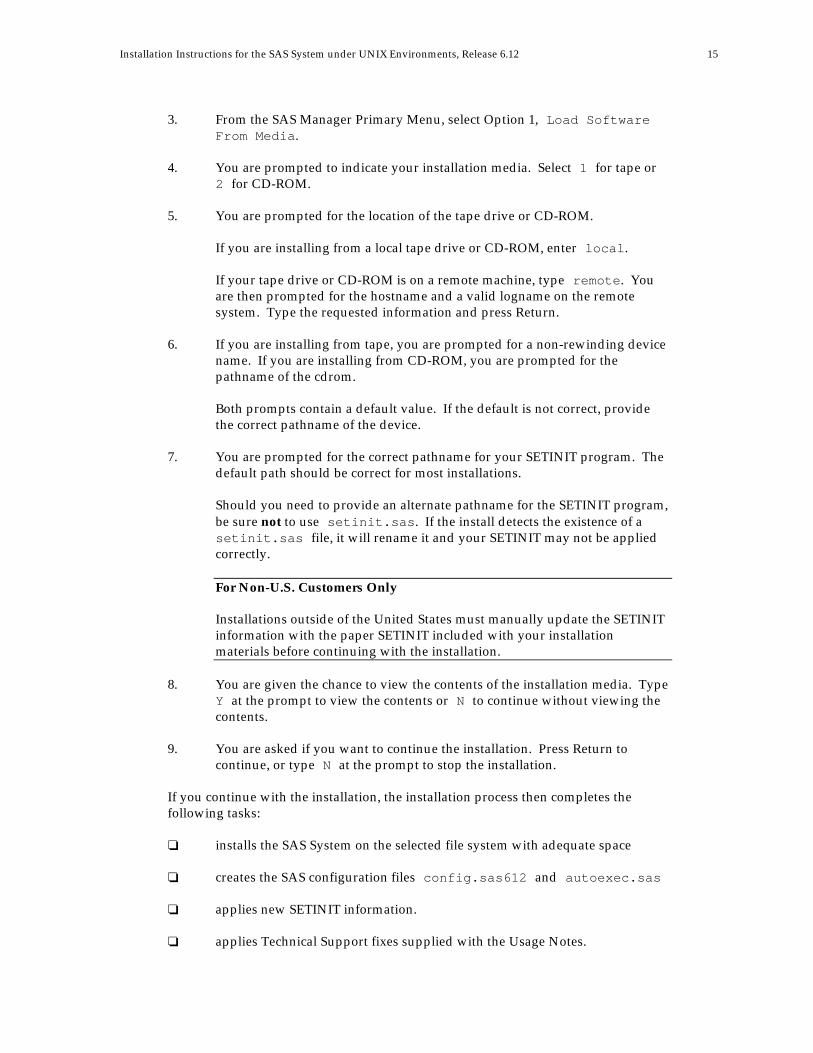
3. From the SAS Manager Primary Menu, select Option 1, Load SoftwareFrom Media.
4. You are prompted to indicate your installation media. Select 1 for tape or2 for CD-ROM.
5. You are prompted for the location of the tape drive or CD-ROM.
If you are installing from a local tape drive or CD-ROM, enter local.
If your tape drive or CD-ROM is on a remote machine, type remote. Youare then prompted for the hostname and a valid logname on the remotesystem. Type the requested information and press Return.
6. If you are installing from tape, you are prompted for a non-rewinding devicename. If you are installing from CD-ROM, you are prompted for thepathname of the cdrom.
Both prompts contain a default value. If the default is not correct, providethe correct pathname of the device.
7. You are prompted for the correct pathname for your SETINIT program. Thedefault path should be correct for most installations.
Should you need to provide an alternate pathname for the SETINIT program,be sure not to use setinit.sas. If the install detects the existence of asetinit.sas file, it will rename it and your SETINIT may not be appliedcorrectly.
For Non-U.S. Customers Only
Installations outside of the United States must manually update the SETINITinformation with the paper SETINIT included with your installationmaterials before continuing with the installation.
8. You are given the chance to view the contents of the installation media. TypeY at the prompt to view the contents or N to continue without viewing thecontents.
9. You are asked if you want to continue the installation. Press Return tocontinue, or type N at the prompt to stop the installation.
If you continue with the installation, the installation process then completes thefollowing tasks:
❏ installs the SAS System on the selected file system with adequate space
❏ creates the SAS configuration files config.sas612 and autoexec.sas
❏ applies new SETINIT information.
❏ applies Technical Support fixes supplied with the Usage Notes.
16 Installation Instructions for the SAS System under UNIX Environments, Release 6.12
Note: If you choose not to install any available Technical Support fixes, youwill receive an error message that you can ignore.
❏ patches the SASROOT directory to the SAS executable.
This is accomplished using a tool called patchname that "patches" the SASbinary with the installed directory. This allows the SAS application files to belocated by the software at initialization time.
Note: If you move the SAS System to another directory, you must run thepatchname utility from the SAS Installation Utilities menu.
❏ executes the installation test streams. You will receive messages uponcompletion of the test as to the validity of the installation.
The installation is now complete except for product-specific configuration. If yourinstallation includes products that need post-installation configuration, the ProductConfiguration menu appears. Be sure to complete any necessary post-installationconfiguration that is described in the corresponding product appendix in thisdocument.
17
Chapter 4, Installing the SAS®
System on Solaris®
This chapter provides instructions for installing the SAS System on Solaris. Followthe steps outlined in this chapter, and then proceed to Chapter 5, "Making the SASSystem Available to Users."
Extracting SAS Manager from the Tape or CD-ROM
You must extract the SAS Manager application from your distribution media beforeproceeding with the installation. This section explains how to extract the SASManager to begin the installation of the SAS System in the UNIX environment. Youcan install the SAS System in any location on the system with sufficient space. Theinstallation requires that all SAS files exist in a directory named sas612, which iscreated for you and contains all files associated with the SAS System. SASROOT isthe pathname for the location of the SAS files.
It is not necessary to have root privileges to install the SAS System. If the software isnot installed as root, the SAS system administrator should install the softwareusing either the administrator’s userid or a userid created for the SAS System, such asSAS. To complete future installs, the system administrator requires read and writeprivileges on the SASROOT directory and its contents.
The following steps show you how to extract the SAS Manager application. Generaland system-specific instructions are provided. You should follow the generalinstructions, as well as the instructions for your system. Your local systemsadministrator should be able to provide you with assistance with your hardwareconfiguration and site.
Notes: These instructions use /usr/local/sas612 as the pathname for theSASROOT directory. This pathname is an example. Substitute yourinstallation directory, ending with sas612 for this name in the instructions.
These instructions use /dev/nrst0 or /dev/rmt/0mn as the name for anon-rewinding tape device. If you are installing from tape, verify the nameof your tape device with your system administrator and substitute the correctname everywhere /dev/nrst0 or /dev/rmt/0mn appears in theinstructions.
These instructions assume a CD-ROM is mounted at /cdrom. If you areinstalling from CD-ROM and it is mounted in another location, substitute thecorrect location everywhere /cdrom appears in the instructions.
18 Installation Instructions for the SAS System under UNIX Environments, Release 6.12
Complete the following steps:
1. Insert the media into the appropriate drive. Make sure the tape is rewound.Instructions for rewinding tape media are provided under, "For Local TapeMedia," in this section.
For Local Tape Media:
Note: Tape media include QIC 150, 8 mm and 4 mm/DDS (DAT). Makesure that your device is a non-rewinding tape device.
If you are using a local tape drive (a drive attached to the computeron which you are installing), issue one of the following commandsbased on your operating platform:
OS Version RewindCommand
Device End ofCommand
SunOS 4.1.x (Solaris 1) mt -f /dev/nrst0 rewind
SunOS 5.x (Solaris 2) mt -f /dev/rmt/0mn rewind
For CD-ROM:
Note: This release of the SAS System supports ISO-9660 CD-ROMand Rockridge extensions where available.
To mount the CD-ROM, use one of the following commands:
OS Version Command
SunOSSolaris 1 mount -r -t hsfs /dev/sr0 /cdrom
SunOSSolaris 2 mount -r -F hsfs /dev/sr0 /cdrom
Notes:
❏ Refer to your system documentation for the correct devicename.
❏ Mounting and unmounting a CD-ROM device requires rootprivileges. The remainder of the install process does not.After mounting the CD, you can return to the standardprivilege set.
Installation Instructions for the SAS System under UNIX Environments, Release 6.12 19
For Remote Tape Media:
If you are using a remote tape drive (a drive connected to a machineon your network other than the machine on which you areinstalling), issue the following command where hostname is thename of the host with the tape drive, and username is the namethat you need to remote-login to the host specified by hostname.You can omit -l username if it is the same as your current username.
rsh hostname -l username mt -f /dev/rmt/0mn rewind
Note: To utilize the tape drive on a remote machine, the current user on thecurrent machine must have remote access to the userid on the remotemachine. This is typically accomplished by using a .rhosts file inthe remote user’s home directory. See your systems administrator orsystem documentation for further details.
2. Change to the directory where you want the SAS System installed by issuinga command similar to the following:
cd /usr/local
3. Enter one of the following commands to extract the installation programs.When you issue the tar command, the SAS System creates or appends to a./sas612 subdirectory.
For Local Tape and CD-ROM Media:
Issue the appropriate command from the table below:
Media Type Command
SunOSSolaris 1 (Tape)
tar xf /dev/nrst0
SunOSSolaris 2 (Tape)
tar xf /dev/rmt/0mn
SunOS/Solaris 1 and 2(CD-ROM)
tar xf /cdrom/sas_inst
For Remote Tape Media:
Issue the following command where hostname is the name of thehost with the tape drive, and username is the name that you needto remote-login to the host specified by hostname. You can omit -l username if it is the same as your current user name.
rsh hostname -l username -n dd\if=/dev/rmt/0mn bs=20b | tar xf -
20 Installation Instructions for the SAS System under UNIX Environments, Release 6.12
For more information regarding the use of the tar command, referto your vendor documentation.
For Remote CD-ROM:
Issue the following command where hostname is the name of thehost to which the CD-ROM is attached, and username is the namethat you need to remote-login to the host specified by hostname.You can omit -l username if it is the same as your current username.
rsh hostname -l username dd\if=/cdrom/SAS_INST\bs=20b | tar xf -
Note: The files may appear in upper or lower case depending on theoperating system on which the CD is mounted.
For more information regarding the use of the tar command, referto your vendor documentation.
Performing a Default Installation of the SAS System orAdditional Products
A default installation installs everything on the installation media (tape orCD-ROM) to the current directory. If you want to select which products are installed,or have greater control over the options used, use the custom installation discussed inthe next section, "Performing a Custom Installation of the SAS System."
Note: If you are installing on a Solaris 2 machine and want to perform a dualinstallation, you must first follow the instructions provided in Appendix J,"Performing a Custom Installation of the SAS System," and then follow thesteps in Appendix A, "Configuration Information for the SAS System onSolaris." If you are installing on Solaris 1, a default installation will allow forthe dual configuration.
The instructions in this section are valid for new systems, product installations, andmaintenance. To install the SAS System, complete the following steps:
1. Change directories to the SASROOT subdirectory by issuing a commandsimilar to the following:
cd /usr/local/sas612
2. Invoke the SAS Manager by typing ./sasmanager at the prompt.
Note: If you use Control C (^C) to exit the installation script,SAS Manager does not retain the information you supplied aboutmedia type and location.
3. From the SAS Manager Primary Menu, select Option 1, Load SoftwareFrom Media.
Installation Instructions for the SAS System under UNIX Environments, Release 6.12 21
4. You are prompted to indicate your installation media. Select 1 for tape or2 for CD-ROM.
5. You are prompted for the location of the tape drive or CD-ROM.
If you are installing from a local tape drive or CD-ROM, enter local.
If your tape drive or CD-ROM is on a remote machine, type remote. Youare then prompted for the hostname and a valid logname on the remotesystem. Type the requested information and press Return.
6. If you are installing from tape, you are prompted for a non-rewinding devicename. If you are installing from CD-ROM, you are prompted for thepathname of the cdrom.
Both prompts contain a default value. If the default is not correct, providethe correct pathname of the device.
7. You are prompted for the correct pathname for your SETINIT program. Thedefault path should be correct for most installations.
Should you need to provide an alternate pathname for the SETINIT program,be sure not to use setinit.sas. If the install detects the existence of asetinit.sas file, it will rename it and your SETINIT may not be appliedcorrectly.
For Non-U.S. Customers Only
Installations outside of the United States must manually update the SETINITinformation with the paper SETINIT included with your installationmaterials before continuing with the installation.
8. You are given the chance to view the contents of the installation media. TypeY at the prompt to view the contents or N to continue without viewing thecontents.
9. You are asked if you want to continue the installation. Press Return tocontinue, or type N at the prompt to stop the installation.
If you continue with the installation, the installation process then completes thefollowing tasks:
❏ installs the SAS System on the selected file system with adequate space
❏ creates the SAS configuration files config.sas612 and autoexec.sas
❏ applies new SETINIT information.
❏ applies Technical Support fixes supplied with the Usage Notes.
Note: If you choose not to install any available Technical Support fixes, youwill receive an error message that you can ignore.

22 Installation Instructions for the SAS System under UNIX Environments, Release 6.12
❏ patches the SASROOT directory to the SAS executable.
This is accomplished using a tool called patchname that "patches" the SASbinary with the installed directory. This allows the SAS application files to belocated by the software at initialization time.
Note: If you move the SAS System to another directory, you must run thepatchname utility from the SAS Installation Utilities menu.
❏ executes the installation test streams. You will receive messages uponcompletion of the test as to the validity of the installation.
The installation is now complete except for product-specific configuration. If yourinstallation includes products that need post-installation configuration, the ProductConfiguration menu appears. Be sure to complete any necessary post-installationconfiguration that is described in the corresponding product appendix in thisdocument.
For Solaris 2 Only
If you are installing on a Solaris 2 system, the Solaris 2 support files areautomatically put into place for you, overwriting the Solaris 1 files. If youwant a dual installation of both Solaris 1 and Solaris 2, you must perform acustom installation.
23
Chapter 5, Making the SAS® System Available to
Users
Once you have installed the SAS System, you need to make it available to your users.You can use either of the following two methods to accomplish this task:
❏ Edit each user’s shell startup scripts so that the SASROOT directory isincluded in the search path.
Note: Commands used to set your path environment variable may varyfrom these examples.
For example, change the following line in .profile for Bourne Shell users:
PATH=/bin:/usr/bin:/usr/local/bin:.
to read:
PATH=/bin:/usr/bin:/usr/local/bin:/usr/local/sas612:.
❏ Make a link to the SAS command (sas) to a directory that is already in thesearch path by issuing a command similar to the following:
ln -s /usr/local/sas612/sas /usr/bin/sas
Configuring the SAS System
Now that you have installed the SAS System, you should perform the configurationtasks described in this section. These include:
❏ the Support Application❏ the man pages❏ the maps data sets.
In addition, you can modify your default configuration file.
The Support Application is a menu-driven interface for the SAS Notes and samplelibraries. Refer to SAS Consultant’s Guide: Supporting the SAS System, First Edition formore information on the support application.
To invoke the application, run the script file support found in the/usr/local/sas612/sas_notes subdirectory, or include the programusage.sas into the program editor of the SAS Display Manager and submit thestatements. The program usage.sas is found in the/usr/local/sas612/sas_notes subdirectory.

24 Installation Instructions for the SAS System under UNIX Environments, Release 6.12
Release 6.12 includes manual pages (referred to as "man pages") that should be installed.Refer to your system documentation on how to install new man pages. The man pagesare in the directory /usr/local/sas612/utilities/man.
The maps provided on the distribution tape have been compressed to reduce theamount of disk space required to install them. All compressed map data sets have a.Z extension. If you want to use the maps, you must first decompress them. Thiscan be accomplished through the SAS Manager in the SAS Installation Utilities menu.
You may want to modify the default config.sas612 file found in/usr/local/sas612. However, you can run the SAS System using the defaultconfiguration file. Refer to SAS Companion for UNIX Environments: Language, Version6, First Edition for information on how to customize the config.sas612 file foryour site’s needs.
Invoking SAS Software
To invoke the SAS System, change directories to your home directory or to thedirectory from which you want to invoke the SAS System, and enter the followingcommand:
/usr/local/sas612/sas
If your system administrator has made the SAS System available, you can just typesas.
For Solaris 2 Only
If you have installed both Solaris 1 and Solaris 2 in the dual mode, seeAppendix A, "Configuration Information for the SAS System under Solaris"for more information about installation. The invocation line under Solaris 2is as follows:
/usr/local/sas612/sas.sol2 -config config.sas612.sol2
Installation Instructions for the SAS System under UNIX Environments, Release 6.12 25
Running the SAS System with the X Window System
Release 6.12 includes a user interface based on the X Window system. On mostsystems, the SAS System functions correctly and completely without altering the filesthat manage the interface. However, if you want to customize the interface, thesefiles allow you to do that.
The directory /usr/local/sas/X11/bitmaps contains the files for the variousbitmaps used with the SAS System. Most sites will probably not need these. Bitmapsare used as icons in various SAS System products. These bitmaps are compiled intothe SAS System when it is built.
Some sites, however, may prefer to load the files for these bitmaps at run-timeinstead of using the built-in bitmaps. This can be done by setting theSAS.loadSASIcons X resource to True.
The OSF/Motif Interface to Release 6.12 of the SAS System makes an attempt torecognize the type of X server on which the interface is displayed so that the properkey definitions can be established. Many X servers can be recognized by the vendorstring supplied with the server. You can examine this string with the xdpyinfoclient.
Many of the files in /usr/local/sas612/X11/resource_files contain thedefinitions used for the various X servers. You do not need to do anything with thesefiles. However, users who want to customize the keys for an X server may find thesefiles useful as a starting point.
The file /usr/local/sas612/X11/resource_files/Resource_Defaultsdocuments the default values given to the SAS application resources that do not varyfor different servers. Again, this file does not need to be installed, but is provided as areference for those wanting to do their own customization of these interfaces.
For more information on the OSF/Motif Interface, refer to Chapter 3, "Using theOSF/Motif Interface to the SAS System," in SAS Companion for UNIX Environments:User Interfaces.
The XKeysymDB file
Some sites will need to update the XKeysymDB file when they install Release 6.12 ofthe SAS System. This section explains what this file is, who needs to update it, andhow to update it.
The XKeysymDB file is a database of X keysym names, and is used by theOSF/Motif Interface to the SAS System, and many other X clients. Your site willalready have a version of this file. However, it may not contain all of the vendor-defined keysym names that are used with the OSF/Motif Interface to the SAS System.The SAS version of the XKeysymDB file includes the keysyms defined by thevarious X server vendors, as well as the virtual keysyms used by OSF/Motif.
26 Installation Instructions for the SAS System under UNIX Environments, Release 6.12
Sites running the Solaris operating system can find this file in$OPENWINHOME/lib/XKeysymDB. If OpenWindows has been installed in thedefault location, this path is /usr/openwin/lib/XKeysymDB. Sites not runningSolaris can find this file in /usr/lib/X11/XKeysymDB.
Updating the XKeysymDB file
You need to install the Release 6.12 version of this file if you see warnings containingthe phrase unknown keysym when you execute this release of the SAS System.
All Solaris sites with the OpenWindows environment need to install the XKeysymDBfile. The version supplied by Sun does not include the OSF virtual keysyms, andmany warnings are generated if the XKeysymDB file is not updated.
Other sites need to update the XKeysymDB file if the SAS System is executed on asystem from one vendor, and displayed using an X server from a different vendor.For example, if you run Release 6.12 on an AIX system and display it on an HPworkstation, you need the new XKeysymDB file to get the keysyms that are specificto the HP X server.
Using the XKeysymDB File
You can use the SAS System Release 6.12 version of the XKeysymDB file in either ofthe following ways:
❏ to replace the existing XKeysymDB file. (You must have root permission toperform this task.) The following explains the commands necessary toperform this task. When you enter the commands, replace the symbols$SASROOT and $LIBDIR with the directory names used on your system.
The $SASROOT symbol indicates the directory where Release 6.12 of theSAS System is installed.
The $LIBDIR symbol indicates the directory containing the XKeysymDBfile. For Solaris systems, the directory should be /usr/openwin/lib. Formost other systems, it is /usr/lib/X11.
Once you have determined the values for these symbols, enter the followingcommands:
cd $LIBDIRmv XKeysymDB XKeysymDB.oldcp $SASROOT/X11/resource_files/XKeysymDB .
If the new XKeysymDB file was installed correctly, you should no longer seeany messages about unknown keysyms when you run Release 6.12 of theSAS System.
❏ to define the XKEYSYMDB environment variable to point to this version ofthe file. X clients, including the SAS System, can then use this one instead ofthe system version.
Installation Instructions for the SAS System under UNIX Environments, Release 6.12 27
For example, if you have the SAS System, Release 6.12 installed in/usr/local/sas612, and you are using the C-Shell, you can define theenvironment variable with the following command:
setenv XKEYSYMDB /usr/local/sas612/X11/resource_files/XKeysymDB
If you are using the Bourne or Korn shells, you can issue the followingcommand:
XKEYSYMDB=/usr/local/sas612/X11/resource_files/XKeysymDBexport XKEYSYMDB
Running the SAS System on Asynchronous Devices
Changes have been made to the files associated with running on ASCII terminals toaccommodate the new products in Release 6.12 of the SAS System. There are alsomany changes in the terminfo addendum source files and terminfo tools in thisrelease. These new files should be used by those sites running Release 6.12 of the SASSystem. These changes support new products available with Release 6.12 and addsupport for new terminals. The modifications to the addendum source files and toolsinclude the addition of declarations of control keys for the keys window, and a newrequired capability called ’deviceid’ which is used to identify the main terminal namein compiled addendum files using an alias. (For example, 4105 instead of tek4105 -uses deviceid=tek4105.) For more information on the changes to the terminfoaddendum source files, refer to Chapter 3, "Using the OSF/Motif Interface to the SASSystem," in SAS Companion for UNIX Environments: User Interfaces.
Notes:
❏ IBM 3151 terminals:
When using an IBM 3151 terminal, make sure control C ( ^C ) is not used ina stty setting. The IBM 3151 emits a ^C as the last byte of each functionkey sequence. The operating system will use the ^C if it is used in a sttysetting. For instance, if intr is set as ^C, SAS will be interrupted whenyou press a function key.
❏ Wyse 50 terminals:
When using a Wyse 50 terminal, do not use control A ( ^A ) in a sttysetting because it is used by the terminal as the first byte of all function keysequence emitted. Using ^A in a stty setting may cause the function keysto be ignored.
❏ Frame and SAS/INSIGHT software:
Neither of these is supported on an ASCII terminal. These are onlysupported on UNIX devices supporting full windowing systems ( XWindows, and so on).

28 Installation Instructions for the SAS System under UNIX Environments, Release 6.12
❏ Gwindow support:
Gwindow support is offered on the following devices: Tek4105, Tek4205,VT286, VT330, and VT340.
29
Chapter 6, The Directory Structure of the SAS®
System
The following subdirectories are created when the SAS System is installed:
Note: The $SASROOT symbol indicates the directory where Release 6.12 of theSAS System is installed.
$SASROOT/doccontains text and PostScript versions of Alert Notes, System Requirements,and installation instructions. See the README file for information on how tobrowse and print these files.
$SASROOT/.installcontains configuration information about the current SAS installation. Do notremove or change the contents of this directory, as doing so will result inincorrect behavior for future sessions of the Installation Manager program,and inhibit SAS Institute Technical Support’s ability to diagnose anyproblems that may arise.
$SASROOT/sasexecontains the executable SAS software files for all of your products.
$SASROOT/sashelpcontains the SAS help files and catalogs.
$SASROOT/sasmsgcontains the SAS message files.
$SASROOT/saspgmcontains miscellaneous files for several products.
$SASROOT/sasautoscontains the SAS macro files.
$SASROOT/X11contains bitmaps, X resource files, and SAS native help files.
$SASROOT/terminfocontains terminfo files for running the SAS System on ASCII based terminals.
$SASROOT/mapscontains the map data sets if you have SAS/GRAPH software.
$SASROOT/misccontains miscellaneous files such as product-specific online documentation,and scripts for use with SAS/CONNECT and SAS/GRAPH drivers.
30 Installation Instructions for the SAS System under UNIX Environments, Release 6.12
$SASROOT/samplescontains the Sample Library programs.
$SASROOT/sastestcontains the installation test stream programs.
$SASROOT/utilitiescontains three subdirectories: bin contains useful tools such as thepatchname command, cleanwork, untic, unticadd, and so on; mancontains the SAS man pages that you can make available on your system; andsrc contains source code examples for SAS/SHARE authenticationroutines.
$SASROOT/sas_notescontains the Technical Support application as well as usage note information.
$SASROOT/solaris2contains files specific to Solaris 2. All files in other directories andsubdirectories are shared and are identical between the two versions of theSPARC system.
31
Appendix A, Configuration Information for theSAS
® System on Solaris
The information in this appendix applies to Solaris-based machines only (SunOS orSPARC). Throughout this appendix, SunOS 4.1 and SunOS 5.x are referred to asSolaris 1 and Solaris 2 respectively.
The distribution media containing Base SAS software also includes a product calledSolaris 2 Support. This product contains files that have been modified to support theSAS System on Solaris 2. (Only a small number of the files SAS Institute ships needto be changed to support Solaris 2.) If you are installing the SAS System to run on aSolaris-based platform, you have the following installation options:
❏ You can install on a Solaris 1-based system.
If you perform a default installation on a Solaris 1-based system, the Solaris 2files are loaded, but not configured. From this installation, you can run theSAS System under Solaris 1 only.
❏ You can install on a Solaris 2-based system.
If you perform a default installation on a Solaris 2-based system, the Solaris 2files are loaded and the installation program overwrites the Solaris 1 files,leaving an installation that runs under Solaris 2 only.
If you performed a customized installation on Solaris 2 for both productionand maintenance releases, you must invoke the Solaris 2 Specific Installationmenu as described later in this section.
❏ You can perform a dual installation on a Solaris platform.
You can set up the SAS System so that both Solaris 1 and Solaris 2 aresupported from a single server. (The server could be running eitheroperating system.) This is called a dual install. It is more complicated to setup and manage than two single installations; however, the disk savings makeit a valid option at sites running both versions of Solaris.
Note: To perform a dual installation on a Solaris 2 machine, you must usethe Custom Installation menu.
32 Installation Instructions for the SAS System under UNIX Environments, Release 6.12
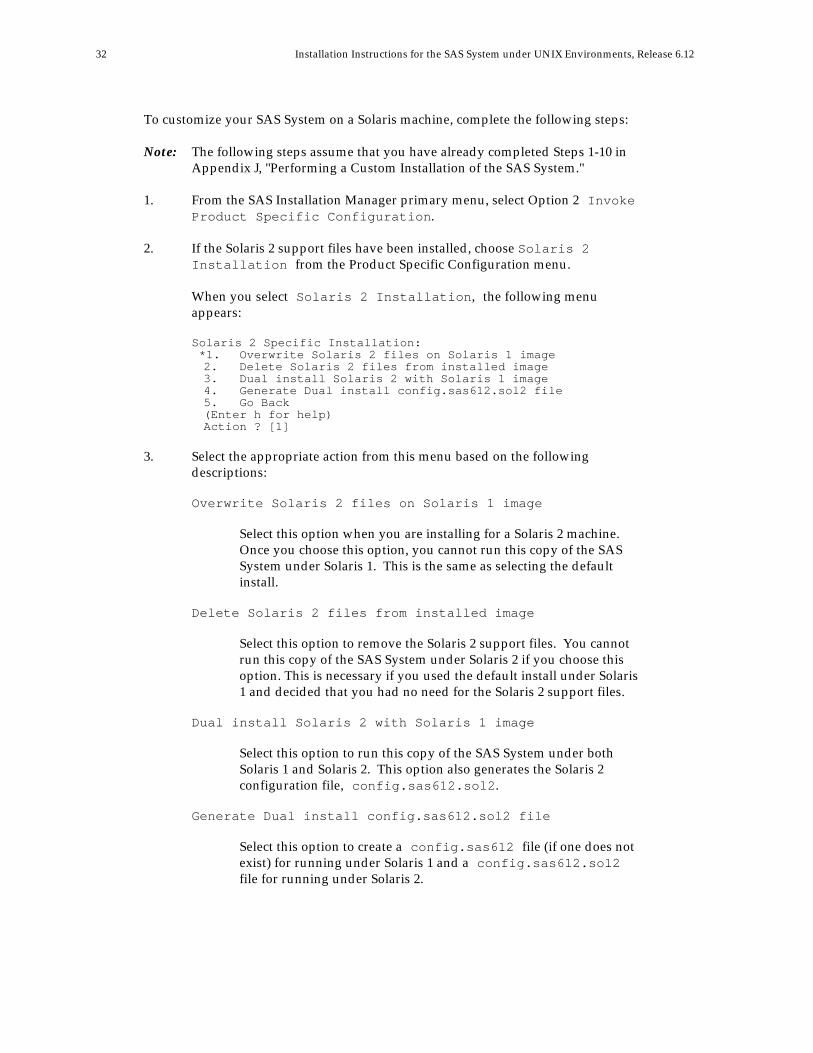
To customize your SAS System on a Solaris machine, complete the following steps:
Note: The following steps assume that you have already completed Steps 1-10 inAppendix J, "Performing a Custom Installation of the SAS System."
1. From the SAS Installation Manager primary menu, select Option 2 InvokeProduct Specific Configuration.
2. If the Solaris 2 support files have been installed, choose Solaris 2Installation from the Product Specific Configuration menu.
When you select Solaris 2 Installation, the following menuappears:
Solaris 2 Specific Installation: *1. Overwrite Solaris 2 files on Solaris 1 image2. Delete Solaris 2 files from installed image3. Dual install Solaris 2 with Solaris 1 image4. Generate Dual install config.sas612.sol2 file5. Go Back(Enter h for help)Action ? [1]
3. Select the appropriate action from this menu based on the followingdescriptions:
Overwrite Solaris 2 files on Solaris 1 image
Select this option when you are installing for a Solaris 2 machine.Once you choose this option, you cannot run this copy of the SASSystem under Solaris 1. This is the same as selecting the defaultinstall.
Delete Solaris 2 files from installed image
Select this option to remove the Solaris 2 support files. You cannotrun this copy of the SAS System under Solaris 2 if you choose thisoption. This is necessary if you used the default install under Solaris1 and decided that you had no need for the Solaris 2 support files.
Dual install Solaris 2 with Solaris 1 image
Select this option to run this copy of the SAS System under bothSolaris 1 and Solaris 2. This option also generates the Solaris 2configuration file, config.sas612.sol2.
Generate Dual install config.sas612.sol2 file
Select this option to create a config.sas612 file (if one does notexist) for running under Solaris 1 and a config.sas612.sol2file for running under Solaris 2.
Installation Instructions for the SAS System under UNIX Environments, Release 6.12 33
Go Back
Select this option to return to the Product Specific Configurationmenu.
Performing a Dual Installation
A dual installation implies that other machines will be accessing the SAS binariesover a network file system such as NFS or AFS, so it is important to have consistentpathnames on all machines. The SAS binary is modified onsite to include its installeddirectory. In a dual installation, the Solaris 2 SAS binary is not patched with thisinformation, you must do this manually.
This is accomplished through the use of the patchname command located inSASROOT/utilities/bin. From the SASROOT directory, this can be accomplishedwith the command:
./utilities/bin/patchname sas.sol12 <the_SASROOT_pathname>
For example, if SAS is installed in /usr/local/sas612 the command would be:
./utilities/bin/patchname sas.sol12 /usr/local/sas612
You may have to patch the Solaris 1 SAS binary as well, if your network file systemsetup is different on some clients. Not having the SAS binary correctly patched is themost common problem in setting up a dual install.
The dual installation also requires that Solaris 2 users use a separate config file,config.sas612.sol2. Remember that in order to invoke the SAS System on a Solaris 2machine, you must use the -config option. For more information on this option, referto Chapter 6 in SAS Companion for UNIX Environments: Language.
Warning: While it is easy for a savvy UNIX user or administrator toreconfigure the dual installation directory structures, location ofconfig files, file naming conventions and the like, doing so will resultin making it impossible for SAS Institute add-on products or patchesto be applied automatically. In situations where you are compelledto make such changes to the SAS structure on disk, it is highlyrecommended for supportability reasons that you perform twodistinct installations of the SAS System, one for Solaris 2 and theother for SunOS 4.1.x.

35
Appendix B, SAS/ACCESS® Interface Installation
For each SAS/ACCESS interface that you want to use at your site, you must executean installation process specific to your Data Base Management System (DBMS). Theinstallation process creates an image by performing a link using object files andlibraries provided by the SAS/ACCESS interface and by your DBMS. Beforeexecuting the installation procedure, read this appendix so you can provide thecorrect information during the installation.
Notes: Refer to the System Requirements document provided in your installationpackage to determine if the combination of your operating system and theversion of your DBMS is supported by the SAS/ACCESS interface you areinstalling.
Throughout this appendix, SunOS 4.x and SunOS 5.x are referred to asSolaris 1 and Solaris 2 respectively.
When to Install a SAS/ACCESS Product
If you are installing your SAS/ACCESS interface for the first time, you must alwaysexecute the SAS/ACCESS installation. There are two exceptions to this:
❏ You are running Solaris 2, installing SAS/ACCESS to SYBASE and SQLServer, and using SYBASE Open Client Release 10.0 or later
❏ You are installing SAS/ACCESS to DB2 for UNIX Systems on AIX.
For more information about these operating system and DBMS version combinations,refer to "Installing SAS/ACCESS Interface to SYBASE," or "Installing SAS/ACCESSto DB2 for UNIX Systems" later in this appendix.
If you have previously installed your SAS/ACCESS interface, there are two situationsunder which you may need to reinstall the software.
❏ If you have installed a new version of your DBMS, you may need to executethe SAS/ACCESS installation again to ensure that the interface uses the newversion of your DBMS libraries. However, if you have upgraded to a newrelease of your DBMS and are not experiencing problems with yourSAS/ACCESS interface, you do not need to reinstall the software.
❏ If you are installing a maintenance version of the SAS System for UNIXenvironments, you may have to reinstall your SAS/ACCESS interface toensure that you receive any maintenance bug fixes. Refer to the Alert Notesin your SAS System installation package, and read any that are for yourparticular SAS/ACCESS interface. If you must reinstall, there will be anAlert Note describing this.
36 Installation Instructions for the SAS System under UNIX Environments, Release 6.12
Overview of Installing a SAS/ACCESS Product
Installing SAS/ACCESS software is a menu-driven process. To invoke theSAS/ACCESS installation main menu, complete the following steps:
1. Select Invoke Custom Installation and Utilities from theSAS installation main menu.
2. Select Invoke Product Specific Configuration from theSAS System Custom Installation and Utilities menu.
3. Select SAS/ACCESS Installation from the Product SpecificConfiguration menu.
You may also see the following two menus during your SAS/ACCESS installation:
❏ The Select Destination Media menu appears if you have not alreadyencountered this menu elsewhere in the SAS System installation process. Formore information about this menu, refer to Appendix J, "Performing aCustom Installation of the SAS System."
❏ The Select Production/Staged Maintenance Level menu lets you installSAS/ACCESS interfaces at either the 6.12 production level, or the 6.12 stagedmaintenance level. This menu appears only when it is appropriate. Thismenu does not appear for promoted maintenance. For more informationabout staged and promoted maintenance, refer to "Maintenance Overview,"in Chapter 2, "The SAS Manager Application."
Every menu allows you to go back to the previous menu and to get help from theonline Help system. The selections you make, and the information displayed arelogged to the general SAS installation log file.
The installation program determines the operating system at your site. If it is unableto determine it, you are prompted to select the operating system for your site.
Installation Instructions for the SAS System under UNIX Environments, Release 6.12 37
The SAS/ACCESS Interface Selection menu is the main installation menu. It displaysthe names of available SAS/ACCESS interfaces, from which you select the one thatyou want to install. Before beginning the installation process, you should know thefollowing information about the DBMS you selected:
❏ the version of the DBMS installed on your system, which is required due toincompatibilities between DBMS versions. If you choose a version of theDBMS other than the one you have installed, the installation will fail or theSAS/ACCESS interface will give unpredictable results.
❏ the DBMS root directory, which is required so that the installation procedurecan find the DBMS libraries that are required for linking the SAS/ACCESSproduct.
After you select the interface you want to install, the next menu lists the variousDBMS versions supported on your operating system. You must select theappropriate one for your site. You are then prompted for the DBMS root directory. Ifavailable, a default value obtained from a DBMS-specific environment variable isprovided.
After you provide the requested information, the SAS/ACCESS interface is linkedwith the on-site DBMS libraries. If the link is successful, the new image is tested. Forthe test to run successfully, the environment variables required by the DBMS must beset to the proper values.
Installing SAS/ACCESS Interface to SYBASE and SQL ServerSoftware
Read the following section if you are installing SAS/ACCESS to SYBASE and SQLServer on a Solaris 2 system using SYBASE Open Client Release 10.0 or later. Readthe second section if you are running a different operating system or release ofSYBASE.
Installing on Solaris 2 and SYBASE Open Client Release10.0 or later
You can install the SAS/ACCESS Interface to SYBASE and SQL Server as a newinstallation if this is the first time you have installed it on your system, or as anupgraded installation.
38 Installation Instructions for the SAS System under UNIX Environments, Release 6.12
If you are performing a new installation and you are using SYBASE Open ClientRelease 10.0 or later with the SAS/ACCESS interface to SYBASE and SQL Server, youdo not have to execute the installation facility for the interface. However, because theSYBASE executable uses shared object libraries, you must add the location of theSYBASE shared libraries to your system’s LD_LIBRARY_PATH environmentvariable before executing the SAS/ACCESS Interface to SYBASE and SQL Server.These libraries are located in $SYBASE/lib, where the SYBASE variable isdefined as the root directory of the SYBASE installation. Execute the following C-shell command to add this path to your LD_LIBRARY_PATH variable:
setenv LD_LIBRARY_PATH $LD_LIBRARY_PATH:$SYBASE/lib
For Bourne Shell, execute the following:
LD_LIBRARY_PATH=$SYBASE/lib:$LD_LIBRARY_PATHEXPORT LD_LIBRARY_PATH
If you have previously installed the SAS/ACCESS Interface to SYBASE and SQLServer using a release of SYBASE Open Client prior to Release 10.0, and you areupgrading the interface to use SYBASE Open Client 10.0 or later, you do not need toperform an installation. Instead, if you are performing a product installation or apromoted installation, you can upgrade by submitting the following copy command:
cp $SASROOT/sasexe/dbi/sassyb10 $SASROOT/sasexe/dbi/sassyb
Otherwise, if you are performing a staged maintenance installation, you can upgradeby submitting the following copy command:
cp $SASROOT/maint/sasexe/dbi/sassyb10 \ $SASROOT/maint/sasexe/dbi/sassyb
In addition, you must update your LD_LIBRARY_PATH variable as describedabove.
Installing on any Combination of Operating System andSYBASE Release Other Than Solaris 2 and SYBASERelease 10.0 or later
Complete the following steps to install SAS/ACCESS Interface to SYBASE and SQLServer:
1. Select SAS/ACCESS interface to SYBASE from the SAS/ACCESSinterface selection menu.
2. Select a release of SYBASE Open Client DB-Library.
The menu displayed can vary depending on the operating system on whichyou are installing the software. Choose the SYBASE Open Client release youhave installed. Refer to the System Requirements document in yourinstallation package for information about which versions of SYBASE aresupported.
Installation Instructions for the SAS System under UNIX Environments, Release 6.12 39
3. Enter the SYBASE root directory.
After you select a release of SYBASE, you are prompted for the SYBASE rootdirectory. A default value is displayed with the value of the environmentvariable SYBASE. If SYBASE is not assigned a value, no default isdisplayed and you are required to type in the path to the SYBASE rootdirectory.
4. Review your selections and enter Y (Yes) or N (No).
All the SYBASE related selections that you have made are displayed,allowing you to review your selections before linking.
❏ Enter N at the continue prompt if you selected a wrong release orsupplied the wrong SYBASE root directory. You are returned to theSAS/ACCESS interface selection menu so that you can make yourselections again.
❏ Enter Y at the continue prompt if you are satisfied with all yourselections. This starts the linking process. The message Please waitis displayed. On Solaris systems, ranlib executing appears priorto linking.
If the link is not successful, you are notified of the failure. The most commoncause for link failure is missing object files or libraries. In this case, the nameof the module that could not be found is displayed. If it is a missing SYBASElibrary, ensure that you specified the correct SYBASE root directory value.
5. After successful linking, the image is tested by invoking the SAS System. Ifthe test is successful, you are notified that the SAS/ACCESS Interface toSYBASE has installed successfully. You can either go back to the previousmenu or select another SAS/ACCESS interface for installation.
If the testing is not successful, you can be notified of any of the followingproblems:
❏ the SAS System fails at invocation
This can be caused by a problem with your SAS System installation.
❏ unable to invoke SYBASE
The SYBASE products required for your configuration may not beinstalled correctly or the environment for SYBASE is not setcorrectly.
❏ for Solaris 2, LD_LIBRARY_PATH is not set correctly.
❏ some other problem that is specific to your site.
If you are having problems, look at the SAS log file of the test program formore information. The path and name of the log file are displayed.
40 Installation Instructions for the SAS System under UNIX Environments, Release 6.12
Installing SAS/ACCESS Interface to INGRES Software
To successfully install the SAS/ACCESS Interface to INGRES, you must have accessto INGRES either through a server or client installation. Refer to the SystemRequirements document provided in your installation package to find the exactreleases supported by SAS/ACCESS under the different operating systems.
Complete the following steps to install the SAS/ACCESS Interface to INGRES:
1. Select SAS/ACCESS interface to INGRES from the SAS/ACCESSinterface menu.
2. Select a version of INGRES.
The SAS/ACCESS Interface to INGRES is capable of supporting INGRESVersion 6 and CA-OpenIngres 1.1/06. Due to incompatibilities betweenreleases, you are asked to be specific about which release you are running.
3. Enter the INGRES root directory.
A default value is displayed. This value is the value of the environmentvariable II_SYSTEM. If II_SYSTEM is not assigned a value, no default isdisplayed, and you are required to type in the path to the INGRES rootdirectory. The installation application sets II_SYSTEM to the path that youspecify.
4. Review your selections and enter Y (Yes) or N (No).
All the INGRES related selections that you have made are displayed,allowing you to review your selections before linking.
❏ Enter N at the continue prompt if you specified the wrong INGRESroot directory. You are returned to the SAS/ACCESS interface selectionmenu so that you can make your selections again.
❏ Enter Y at the continue prompt if you are satisfied with all yourselections. This starts the linking process. The message Please waitis displayed. On Solaris systems, ranlib executing appears priorto the linking.
If the link is not successful, you are notified about the failure. The mostcommon cause for link failure is missing object files or libraries. In this case,the name of the module that could not be found is displayed. If it is amissing INGRES library, make sure that you specified the correct INGRESroot directory value.
Installation Instructions for the SAS System under UNIX Environments, Release 6.12 41
5. After successful linking, the image is tested by invoking the SAS System. Ifthe test is successful, you are notified that the SAS/ACCESS Interface toINGRES has installed successfully. You can either go back to the previousmenu or select another SAS/ACCESS interface to install.
If the testing is not successful, you can be notified of any of the followingproblems:
❏ the SAS System fails at invocation
This can be caused by a problem with your SAS System installation.
❏ unable to invoke INGRES
The INGRES products required for your configuration may not beinstalled correctly, or the environment for INGRES is not setcorrectly.
❏ some other problem that is specific to your site.
If you are having problems, look at the SAS log file of the testprogram for more information. The path and name of the log file aredisplayed.
Installing SAS/ACCESS Interface to ODBC Software on HP-UX
Before you can use the SAS/ACCESS Interface to ODBC on HP-UX, the followingproducts are required:
❏ Base SAS software❏ SAS/ACCESS Interface to ODBC software❏ ODBC Driver for your database❏ Client software for your database connection.
An ODBC driver for the data source from which you want to access data is alsorequired. These drivers are often available from the DBMS vendor and other thirdparty ODBC driver developers. The driver you choose may require additional DBMSsoftware in order to access the data.
You may have to edit the .odbc.ini file in your home directory with a text editor toconfigure data sources. Some ODBC driver vendors may allow systemadministrators to maintain a centralized copy by setting the environment variable.
The ODBC drivers are ODBC API-compliant dynamic link libraries, referred to inUNIX as shared objects. You must include the full path to the dynamic link librariesin the SHLIB_PATH so that ODBC drivers can be loaded dynamically at run time.
For more information about SAS/ACCESS Interface to ODBC software, refer to SASTechnical Report P-262, SAS/ACCESS Interface to ODBC: SQL Procedure Pass ThroughFacility. For more information about ODBC, refer to Microsoft ODBC 2.0 Programmer’sReference and SDK Guide, or consult your ODBC driver vendor.
42 Installation Instructions for the SAS System under UNIX Environments, Release 6.12
Installing SAS/ACCESS Interface to ORACLE Software
Refer to the System Requirements document provided in your installation package tofind the exact releases supported by SAS/ACCESS software under the differentoperating systems.
Note: To run the SAS/ACCESS Interface to ORACLE at your site, you must definethe environment variable SASORA to be V7 for an ORACLE Version 7client install. If you do not set Version 8 variables correctly, errors arereturned from the SAS System. For example, the following C shell commandmust be executed when you want to use the SAS/ACCESS Interface toORACLE to access an ORACLE7 server:
setenv SASORA V7setenv TWO_TASK oracle_alias
For Bourne shell, execute the following command:
SASORA=V7export SASORATWO_TASK=oracle_aliasexport TWO_TASK
Note: The ORACLE environment variable TWO_TASK must also be set to a validORACLE alias name (i.e., oracle_alias) defined in the tnsnames.ora file.
Installation Instructions for the SAS System under UNIX Environments, Release 6.12 43
For Non-U.S. Customers Only
Complete the following steps if you are running ORACLE PRO*C 1.3 for HP-UX 9.x. (This configuration is not available in the U.S.)
1. Create a backup of the object file distributed with the SAS/ACCESSInterface to ORACLE that supports ORACLE PRO*C 1.4 as shown inthe example below.
For Promoted Maintenance:
cp $SASROOT/saspgm/dbi/obj/orasqlv6036.o\$SASROOT/saspgm/dbi/obj/orasqlv6036.o.bak
For Staged Maintenance:
cp $SASROOT/maint/saspgm/dbi/obj/orasqlv6036.o\$SASROOT/maint/saspgm/dbi/obj/orasqlv6036.o.bak
2. Replace the PRO*C 1.4 object with the PRO*C 1.3 object as shown inthe example below.
For Promoted Maintenance:
cp $SASROOT/saspgm/dbi/obj/orasqlv13.o\$SASROOT/saspgm/dbi/obj/orasqlv6036.o
For Staged Maintenance:
cp $SASROOT/maint/saspgm/dbi/obj/orasqlv13.o\$SASROOT/maint/saspgm/dbi/obj/orasqlv6036.o
3. Follow the installation procedure outlined in the following section.Select 6.0.36.5 or later to link this product on HP-UX.
44 Installation Instructions for the SAS System under UNIX Environments, Release 6.12
Complete the following steps to install the SAS/ACCESS Interface to ORACLE:
1. Select SAS/ACCESS interface to ORACLE from the SAS/ACCESSinterface menu.
2. Select a version of ORACLE.
The SAS/ACCESS Interface to ORACLE is capable of supporting ORACLEVersion 6 and ORACLE Version 7 installations. Due to incompatibilitiesbetween releases, you are asked to be specific about which release you arerunning. Refer to the Systems Requirement document in your installationpackage to find out which releases of ORACLE are supported.
3. Select whether you want to use the pre-linked image shipped with Release6.12 of the SAS System and enter Y (Yes) or N (No).
❏ Enter N at the continue prompt if you do not want to use the pre-linked image shipped with Release 6.12 of the SAS System and thencontinue to Step 4.
❏ Enter Y at the continue prompt if you want to use the pre-linkedimage shipped with Release 6.12 of the SAS System. You will receivea message that the pre-linked image was copied, and then skip toStep 6.
4. Enter the ORACLE root directory.
After you select a release of ORACLE, you are prompted for the ORACLEroot directory. A default value is displayed. This value is the value of theenvironment variable ORACLE_HOME. If ORACLE_HOME is not assigned avalue, a default is not provided and you are required to type in the path tothe ORACLE root directory.
5. Review your selections and enter Y (Yes) or N (No).
All of the ORACLE related selections that you have made are displayed,allowing you to review your selections before continuing with the linking.
❏ Enter N at the continue prompt if you selected a wrong release orspecified the wrong ORACLE root directory. You are returned to theSAS/ACCESS interface selection menu so that you can make yourselections again.
❏ Enter Y at the continue prompt if you are satisfied with all yourselections. This starts the linking process. The message Please waitis displayed. On Solaris systems, ranlib executing appears priorto linking.
If the link is not successful, you are notified about the failure. The mostcommon cause for link failure is missing object files or libraries. In this case,the name of the module that could not be found is displayed. If it is a
Installation Instructions for the SAS System under UNIX Environments, Release 6.12 45
missing ORACLE library, make sure that you specified the correct ORACLEroot directory value.
6. After successful linking, or copying of the pre-linked image, the image istested by invoking the SAS System. If the test is successful, you are notifiedthat the SAS/ACCESS Interface to ORACLE has installed successfully. Youcan either go back to the previous menu or select another SAS/ACCESSinterface to install.
If the testing is not successful, you can be notified of any of the followingproblems:
❏ the SAS System fails at invocation.
This can be caused by a problem with your SAS System installation.
❏ unable to invoke ORACLE.
The ORACLE products required for your configuration may not beinstalled correctly, or the environment for ORACLE is not setcorrectly.
❏ SASORA environment variable is not set correctly.
❏ TWO_TASK environment variable is not set correctly.
❏ for Solaris 2, LD_LIBRARY_PATH is not set correctly.
❏ some other problem that is specific to your site.
If you are having problems, look at the SAS log file of the test program formore information. The path and name of the log file are displayed.
Installing SAS/ACCESS Interface to INFORMIX Software
Refer to the Systems Requirements document provided in your installation packageto find the exact releases of INFORMIX supported by SAS/ACCESS software forUNIX environments. Complete the following steps to install the SAS/ACCESSInterface to INFORMIX:
1. Select SAS/ACCESS to INFORMIX from the SAS/ACCESS interfacemenu.
2. Select a version of INFORMIX.
The SAS/ACCESS Interface to INFORMIX is capable of supporting differentversions of INFORMIX software. Due to incompatibilities between releases,you are asked to be specific about which release you are running. Refer tothe Systems Requirements document in your installation package todetermine which releases of INFORMIX are supported.
46 Installation Instructions for the SAS System under UNIX Environments, Release 6.12
3. Enter the INFORMIX root directory.
A default value may appear at the prompt. This is the value of theenvironment variable INFORMIXDIR. If INFORMIXDIR is not assigned avalue, no default is displayed and you are required to type in the path to theINFORMIX root directory. The installation application sets INFORMIXDIRto the path that you specify.
4. Review your selections and enter Y (Yes) or N (No).
All of the INFORMIX related selections that you have made are displayed,allowing you to review your selections before continuing with the linking.
❏ Enter N at the continue prompt if you specified the wrongINFORMIX root directory. You are returned to the SAS/ACCESSinterface selection menu so that you can make your selections again.
❏ Enter Y at the continue prompt if you are satisfied with all yourselections. This starts the linking process. The message Pleasewait is displayed. On Solaris systems, ranlib executingappears prior to linking.
If the link is not successful, you are notified about the failure. The mostcommon cause for link failure is missing object files or libraries. In this case,the name of the module that could not be found is displayed. If it is amissing INFORMIX library, make sure that you specified the correctINFORMIX root directory value in Step 2.
5. After successful linking, the image is tested by invoking the SAS System. Ifthe test is successful, you are notified that the SAS/ACCESS interface toINFORMIX has installed successfully. You can either go back to the previousmenu or select another SAS/ACCESS interface to install.
If the testing is not successful, any of the following can be the problem:
❏ problems invoking the SAS System.
This can be due to a problem with your SAS System installation.
❏ unable to invoke INFORMIX.
The INFORMIX products required for your configuration may not beinstalled correctly, or the environment for INFORMIX is not setcorrectly.
❏ some other problem that is specific to your site.
If you are having problems, look at the SAS log file of the testprogram for more information. The path and name of the log fileappears on your display.
Installation Instructions for the SAS System under UNIX Environments, Release 6.12 47
Installing the SAS/ACCESS Interface to DB2 for UNIX SystemsSoftware
The SAS/ACCESS Interface to DB2 for UNIX Systems is supported on the AIXoperating system.
You must bind the application package DB2.SASDB2 to your database whether ornot you decide to custom install the SAS/ACCESS Interface to DB2 for UNIXSystems. Binding an application is a DB2 procedure that is performed using the DB2Command Line Processor. Binding is not a SAS procedure but simple instructions onhow to do this are provided at the end of this section. If you have specific questionsregarding the BIND, contact your Database Administrator.
A pre-linked SAS/ACCESS Interface to DB2 image is shipped with Release 6.12 ofthe SAS System and the custom install link is not required. However, you will stillneed to set the LIBPATH environment variable as follows, as well as binding theapplication package at the end of this section.
Make sure the LIBPATH environment points to INSTHOME before you invoke theSAS System. This is required since the SAS DB2 for UNIX Systems engine executableneeds to know the path to the DB2 for UNIX Systems shared library at your site. If$INSTHOME is not already part of your LIBPATH, set the LIBPATH environmentvariable as follows:
For Bourne Shell, execute the following command:
LIBPATH=$INSTHOME/lib:$LIBPATHexport LIBPATH
For C Shell, execute the following command:
setenv LIBPATH $INSTHOME/lib:$LIBPATH
Note: INSTHOME is a DB2 for UNIX Systems environment variable that should beset to the DB2 home or root directory where the DB2 "shared" library libdb2.ais located (usually /usr/lpp/db2_02_02_0000). If $INSTHOME is notset, see your DBA for more information.
If you have chosen to perform the custom install link, complete the following steps toinstall the SAS/ACCESS Interface to DB2 for UNIX Systems:
1. Select SAS/ACCESS Interface to DB2 from the SAS/ACCESSinterface menu.
A message indicating that this is an optional install is displayed.
2. You are prompted to choose whether or not to continue with the install.Select Y to continue with the installation, or N to exit.
If you select Y, make sure you have LIBPATH set correctly as describedpreviously, and do a bind before you try to use the interface.
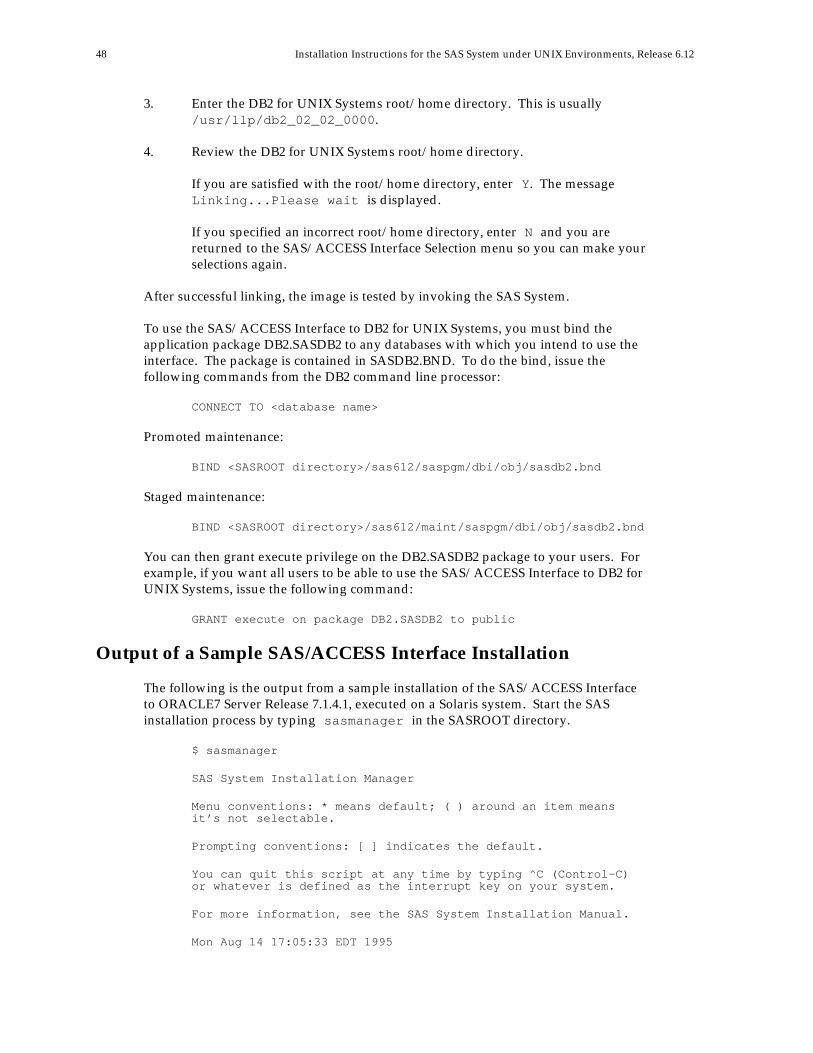
48 Installation Instructions for the SAS System under UNIX Environments, Release 6.12
3. Enter the DB2 for UNIX Systems root/home directory. This is usually/usr/llp/db2_02_02_0000.
4. Review the DB2 for UNIX Systems root/home directory.
If you are satisfied with the root/home directory, enter Y. The messageLinking...Please wait is displayed.
If you specified an incorrect root/home directory, enter N and you arereturned to the SAS/ACCESS Interface Selection menu so you can make yourselections again.
After successful linking, the image is tested by invoking the SAS System.
To use the SAS/ACCESS Interface to DB2 for UNIX Systems, you must bind theapplication package DB2.SASDB2 to any databases with which you intend to use theinterface. The package is contained in SASDB2.BND. To do the bind, issue thefollowing commands from the DB2 command line processor:
CONNECT TO <database name>
Promoted maintenance:
BIND <SASROOT directory>/sas612/saspgm/dbi/obj/sasdb2.bnd
Staged maintenance:
BIND <SASROOT directory>/sas612/maint/saspgm/dbi/obj/sasdb2.bnd
You can then grant execute privilege on the DB2.SASDB2 package to your users. Forexample, if you want all users to be able to use the SAS/ACCESS Interface to DB2 forUNIX Systems, issue the following command:
GRANT execute on package DB2.SASDB2 to public
Output of a Sample SAS/ACCESS Interface Installation
The following is the output from a sample installation of the SAS/ACCESS Interfaceto ORACLE7 Server Release 7.1.4.1, executed on a Solaris system. Start the SASinstallation process by typing sasmanager in the SASROOT directory.
$ sasmanager
SAS System Installation Manager
Menu conventions: * means default; ( ) around an item meansit’s not selectable.
Prompting conventions: [ ] indicates the default.
You can quit this script at any time by typing ^C (Control-C)or whatever is defined as the interrupt key on your system.
For more information, see the SAS System Installation Manual.
Mon Aug 14 17:05:33 EDT 1995
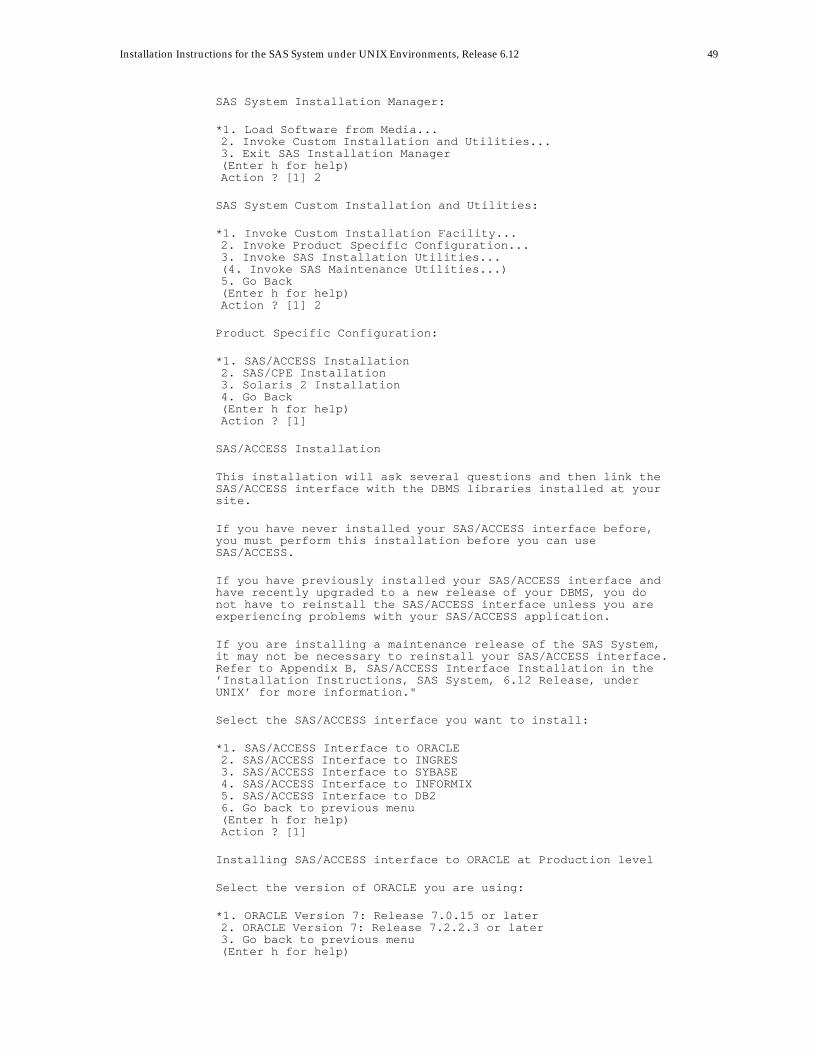
Installation Instructions for the SAS System under UNIX Environments, Release 6.12 49
SAS System Installation Manager:
*1. Load Software from Media...2. Invoke Custom Installation and Utilities...3. Exit SAS Installation Manager(Enter h for help)Action ? [1] 2
SAS System Custom Installation and Utilities:
*1. Invoke Custom Installation Facility...2. Invoke Product Specific Configuration...3. Invoke SAS Installation Utilities...(4. Invoke SAS Maintenance Utilities...)5. Go Back(Enter h for help)Action ? [1] 2
Product Specific Configuration:
*1. SAS/ACCESS Installation2. SAS/CPE Installation3. Solaris 2 Installation4. Go Back(Enter h for help)Action ? [1]
SAS/ACCESS Installation
This installation will ask several questions and then link theSAS/ACCESS interface with the DBMS libraries installed at yoursite.
If you have never installed your SAS/ACCESS interface before,you must perform this installation before you can useSAS/ACCESS.
If you have previously installed your SAS/ACCESS interface andhave recently upgraded to a new release of your DBMS, you donot have to reinstall the SAS/ACCESS interface unless you areexperiencing problems with your SAS/ACCESS application.
If you are installing a maintenance release of the SAS System,it may not be necessary to reinstall your SAS/ACCESS interface.Refer to Appendix B, SAS/ACCESS Interface Installation in the’Installation Instructions, SAS System, 6.12 Release, underUNIX’ for more information."
Select the SAS/ACCESS interface you want to install:
*1. SAS/ACCESS Interface to ORACLE2. SAS/ACCESS Interface to INGRES3. SAS/ACCESS Interface to SYBASE4. SAS/ACCESS Interface to INFORMIX5. SAS/ACCESS Interface to DB26. Go back to previous menu(Enter h for help)Action ? [1]
Installing SAS/ACCESS interface to ORACLE at Production level
Select the version of ORACLE you are using:
*1. ORACLE Version 7: Release 7.0.15 or later2. ORACLE Version 7: Release 7.2.2.3 or later3. Go back to previous menu(Enter h for help)
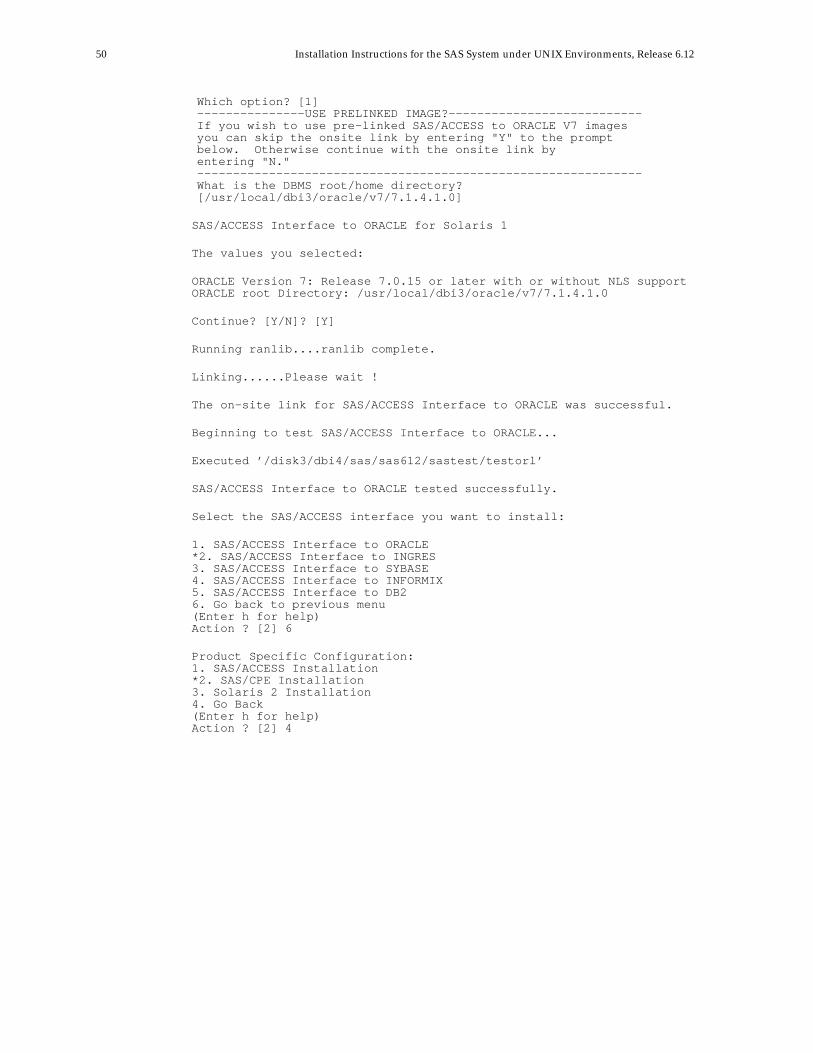
50 Installation Instructions for the SAS System under UNIX Environments, Release 6.12
Which option? [1]---------------USE PRELINKED IMAGE?---------------------------If you wish to use pre-linked SAS/ACCESS to ORACLE V7 imagesyou can skip the onsite link by entering "Y" to the promptbelow. Otherwise continue with the onsite link byentering "N."--------------------------------------------------------------What is the DBMS root/home directory?[/usr/local/dbi3/oracle/v7/7.1.4.1.0]
SAS/ACCESS Interface to ORACLE for Solaris 1
The values you selected:
ORACLE Version 7: Release 7.0.15 or later with or without NLS supportORACLE root Directory: /usr/local/dbi3/oracle/v7/7.1.4.1.0
Continue? [Y/N]? [Y]
Running ranlib....ranlib complete.
Linking......Please wait !
The on-site link for SAS/ACCESS Interface to ORACLE was successful.
Beginning to test SAS/ACCESS Interface to ORACLE...
Executed ’/disk3/dbi4/sas/sas612/sastest/testorl’
SAS/ACCESS Interface to ORACLE tested successfully.
Select the SAS/ACCESS interface you want to install:
1. SAS/ACCESS Interface to ORACLE*2. SAS/ACCESS Interface to INGRES3. SAS/ACCESS Interface to SYBASE4. SAS/ACCESS Interface to INFORMIX5. SAS/ACCESS Interface to DB26. Go back to previous menu(Enter h for help)Action ? [2] 6
Product Specific Configuration:1. SAS/ACCESS Installation*2. SAS/CPE Installation3. Solaris 2 Installation4. Go Back(Enter h for help)Action ? [2] 4
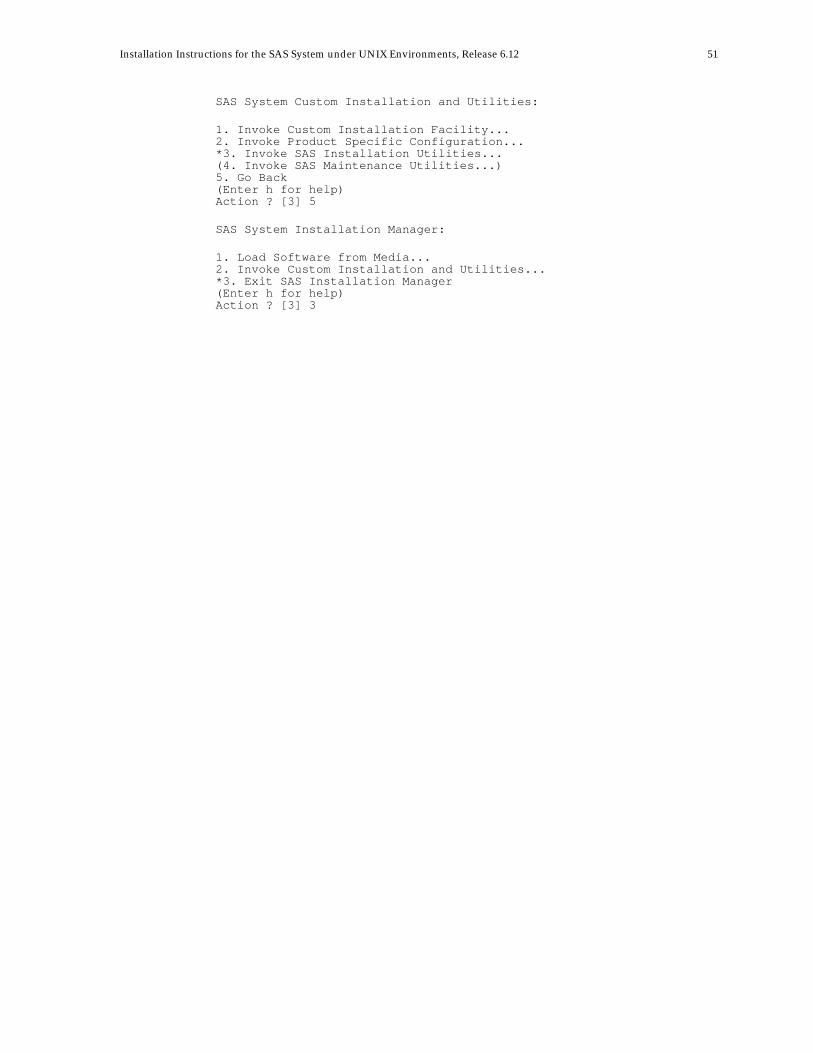
Installation Instructions for the SAS System under UNIX Environments, Release 6.12 51
SAS System Custom Installation and Utilities:
1. Invoke Custom Installation Facility...2. Invoke Product Specific Configuration...*3. Invoke SAS Installation Utilities...(4. Invoke SAS Maintenance Utilities...)5. Go Back(Enter h for help)Action ? [3] 5
SAS System Installation Manager:
1. Load Software from Media...2. Invoke Custom Installation and Utilities...*3. Exit SAS Installation Manager(Enter h for help)Action ? [3] 3

53
Appendix C, Post-Installation Setup forSAS/ASSIST
® Software
This appendix describes how to add an optional master profile to SAS/ASSISTsoftware. A master profile can be used to override the default settings as sent by SASInstitute. This allows you to provide a customized setup for SAS/ASSIST software.With the master profile you can control the profile options of all SAS/ASSIST usersfrom one central place. For information on the profile options, refer to SAS/ASSISTSoftware: Changes and Enhancements, Version 6.
Complete the following steps to add a master profile to SAS/ASSIST software:
1. Specify the location of the master profile by creating a new directory that allusers of SAS/ASSIST software will have read-access to.
All users with write-access to this directory will automatically also have writeaccess to the master profile in SAS/ASSIST software. Select a name thatconforms to the naming conventions at your installation. The name of thisnew directory must be stored in an entry in the SASHELP library. Thisrequires that you have write access to the SASHELP library.
On line 1 of the Program Editor window of the SAS Display Manager System,type the physical pathname of the master profile directory. Execute theSave command to store this in the SASHELP.QASSIST catalog. Save it assashelp.qassist.parms.source. The location of the master profile isnow known by SAS/ASSIST software.
2. Create the master profile.
The first time SAS/ASSIST software is started a master profile is created ifthe SASHELP.QASSIST.PARMS.SOURCE contains the name of an existingphysical pathname, and the person who starts SAS/ASSIST software haswrite-access to this physical pathname.
3. Customize the master profile by starting SAS/ASSIST and selecting SETUP ... Master/group...
If you have write-access to the SAS library containing the master profile youcan specify default values for your installation. These values will be used bynew users as they start SAS/ASSIST software.
Note: If you restrict values by typing R in Status, users will not beallowed to change the values you define.
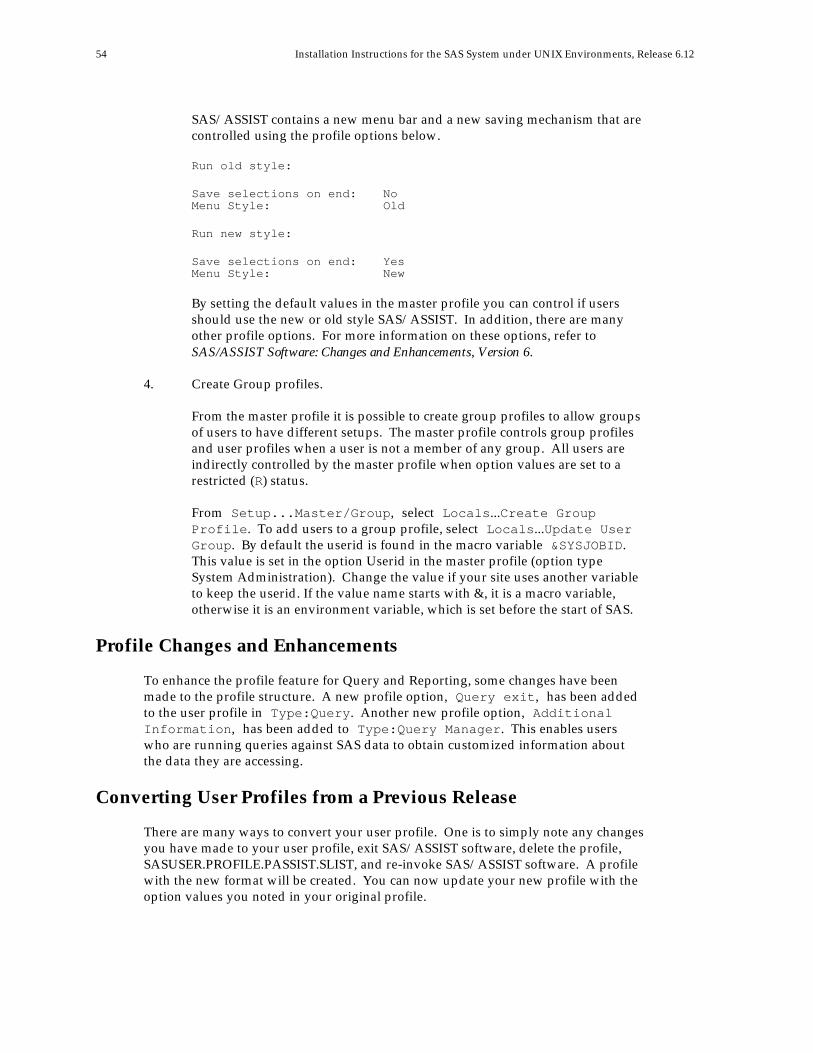
54 Installation Instructions for the SAS System under UNIX Environments, Release 6.12
SAS/ASSIST contains a new menu bar and a new saving mechanism that arecontrolled using the profile options below.
Run old style:
Save selections on end: NoMenu Style: Old
Run new style:
Save selections on end: YesMenu Style: New
By setting the default values in the master profile you can control if usersshould use the new or old style SAS/ASSIST. In addition, there are manyother profile options. For more information on these options, refer toSAS/ASSIST Software: Changes and Enhancements, Version 6.
4. Create Group profiles.
From the master profile it is possible to create group profiles to allow groupsof users to have different setups. The master profile controls group profilesand user profiles when a user is not a member of any group. All users areindirectly controlled by the master profile when option values are set to arestricted (R) status.
From Setup...Master/Group, select Locals...Create GroupProfile. To add users to a group profile, select Locals...Update UserGroup. By default the userid is found in the macro variable &SYSJOBID.This value is set in the option Userid in the master profile (option typeSystem Administration). Change the value if your site uses another variableto keep the userid. If the value name starts with &, it is a macro variable,otherwise it is an environment variable, which is set before the start of SAS.
Profile Changes and Enhancements
To enhance the profile feature for Query and Reporting, some changes have beenmade to the profile structure. A new profile option, Query exit, has been addedto the user profile in Type:Query. Another new profile option, AdditionalInformation, has been added to Type:Query Manager. This enables userswho are running queries against SAS data to obtain customized information aboutthe data they are accessing.
Converting User Profiles from a Previous Release
There are many ways to convert your user profile. One is to simply note any changesyou have made to your user profile, exit SAS/ASSIST software, delete the profile,SASUSER.PROFILE.PASSIST.SLIST, and re-invoke SAS/ASSIST software. A profilewith the new format will be created. You can now update your new profile with theoption values you noted in your original profile.
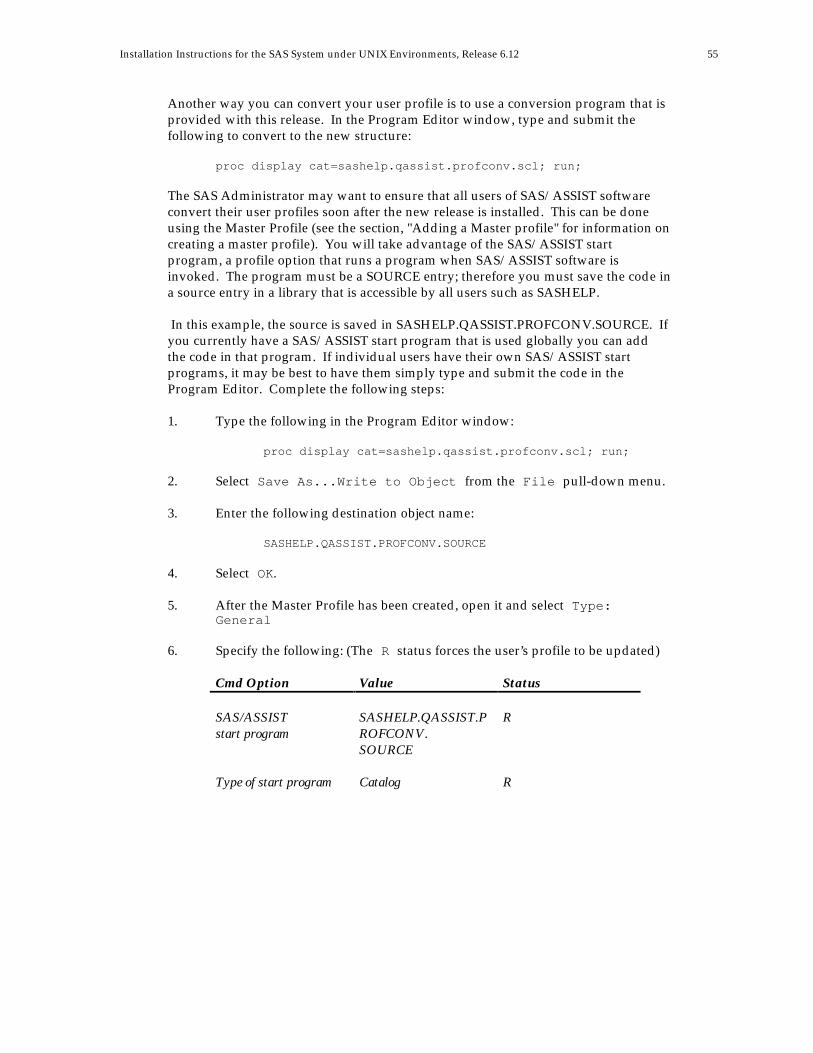
Installation Instructions for the SAS System under UNIX Environments, Release 6.12 55
Another way you can convert your user profile is to use a conversion program that isprovided with this release. In the Program Editor window, type and submit thefollowing to convert to the new structure:
proc display cat=sashelp.qassist.profconv.scl; run;
The SAS Administrator may want to ensure that all users of SAS/ASSIST softwareconvert their user profiles soon after the new release is installed. This can be doneusing the Master Profile (see the section, "Adding a Master profile" for information oncreating a master profile). You will take advantage of the SAS/ASSIST startprogram, a profile option that runs a program when SAS/ASSIST software isinvoked. The program must be a SOURCE entry; therefore you must save the code ina source entry in a library that is accessible by all users such as SASHELP.
In this example, the source is saved in SASHELP.QASSIST.PROFCONV.SOURCE. Ifyou currently have a SAS/ASSIST start program that is used globally you can addthe code in that program. If individual users have their own SAS/ASSIST startprograms, it may be best to have them simply type and submit the code in theProgram Editor. Complete the following steps:
1. Type the following in the Program Editor window:
proc display cat=sashelp.qassist.profconv.scl; run;
2. Select Save As...Write to Object from the File pull-down menu.
3. Enter the following destination object name:
SASHELP.QASSIST.PROFCONV.SOURCE
4. Select OK.
5. After the Master Profile has been created, open it and select Type:General
6. Specify the following: (The R status forces the user’s profile to be updated)
Cmd Option Value Status
SAS/ASSISTstart program
SASHELP.QASSIST.PROFCONV.SOURCE
R
Type of start program Catalog R
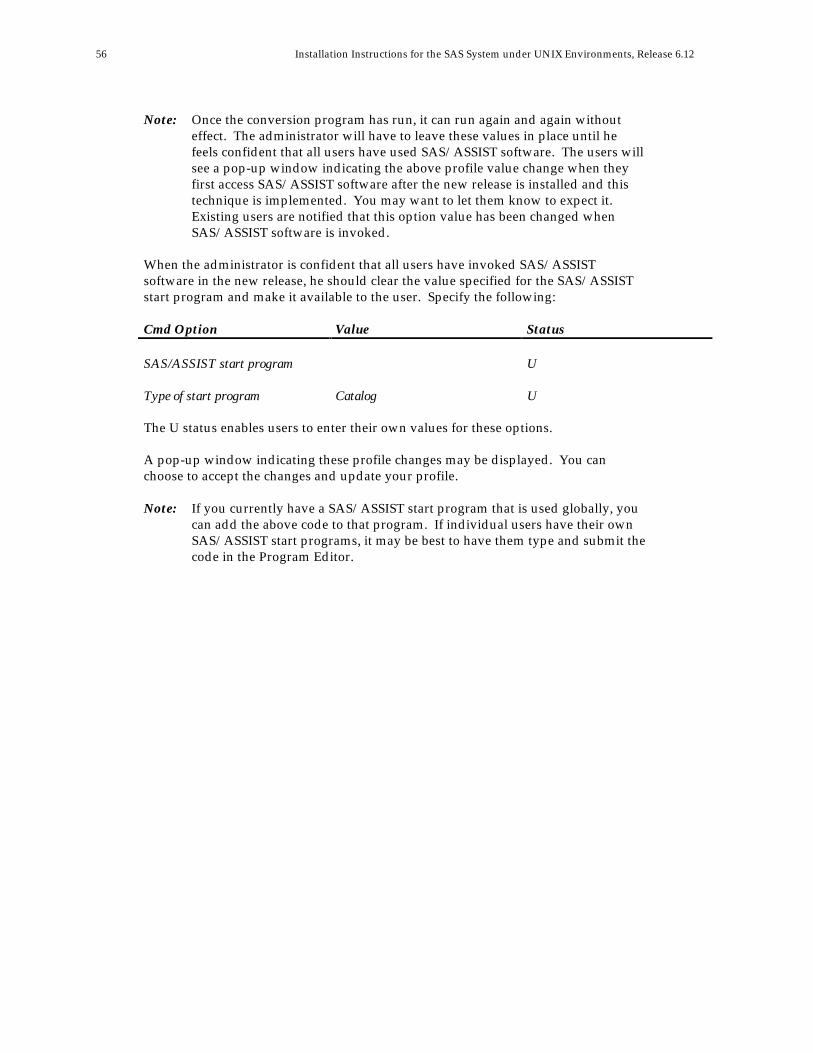
56 Installation Instructions for the SAS System under UNIX Environments, Release 6.12
Note: Once the conversion program has run, it can run again and again withouteffect. The administrator will have to leave these values in place until hefeels confident that all users have used SAS/ASSIST software. The users willsee a pop-up window indicating the above profile value change when theyfirst access SAS/ASSIST software after the new release is installed and thistechnique is implemented. You may want to let them know to expect it.Existing users are notified that this option value has been changed whenSAS/ASSIST software is invoked.
When the administrator is confident that all users have invoked SAS/ASSISTsoftware in the new release, he should clear the value specified for the SAS/ASSISTstart program and make it available to the user. Specify the following:
Cmd Option Value Status
SAS/ASSIST start program U
Type of start program Catalog U
The U status enables users to enter their own values for these options.
A pop-up window indicating these profile changes may be displayed. You canchoose to accept the changes and update your profile.
Note: If you currently have a SAS/ASSIST start program that is used globally, youcan add the above code to that program. If individual users have their ownSAS/ASSIST start programs, it may be best to have them type and submit thecode in the Program Editor.
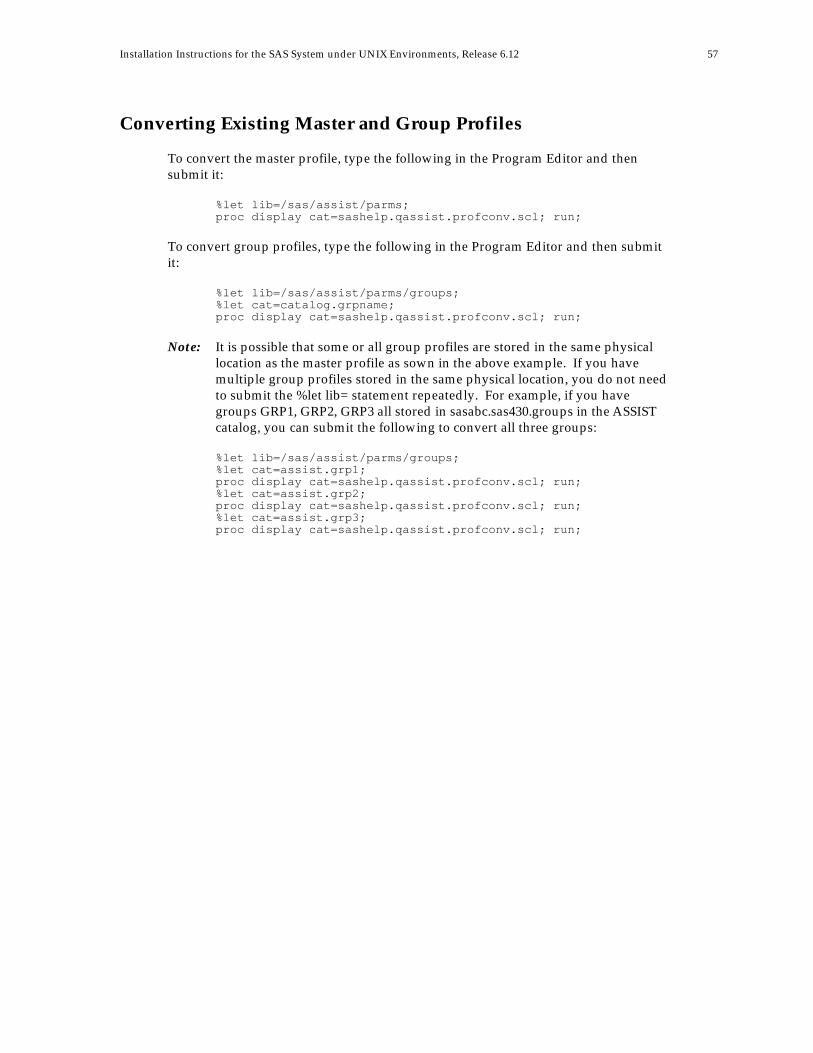
Installation Instructions for the SAS System under UNIX Environments, Release 6.12 57
Converting Existing Master and Group Profiles
To convert the master profile, type the following in the Program Editor and thensubmit it:
%let lib=/sas/assist/parms;proc display cat=sashelp.qassist.profconv.scl; run;
To convert group profiles, type the following in the Program Editor and then submitit:
%let lib=/sas/assist/parms/groups;%let cat=catalog.grpname;proc display cat=sashelp.qassist.profconv.scl; run;
Note: It is possible that some or all group profiles are stored in the same physicallocation as the master profile as sown in the above example. If you havemultiple group profiles stored in the same physical location, you do not needto submit the %let lib= statement repeatedly. For example, if you havegroups GRP1, GRP2, GRP3 all stored in sasabc.sas430.groups in the ASSISTcatalog, you can submit the following to convert all three groups:
%let lib=/sas/assist/parms/groups;%let cat=assist.grp1;proc display cat=sashelp.qassist.profconv.scl; run;%let cat=assist.grp2;proc display cat=sashelp.qassist.profconv.scl; run;%let cat=assist.grp3;proc display cat=sashelp.qassist.profconv.scl; run;

59
Appendix D, Post-Installation Setup forSAS/CONNECT
® Software
This appendix describes the use of the sample script files shipped withSAS/CONNECT software, lists supported software for access methods available forUNIX environments, and outlines configuration procedures for those access methodsthat require additional configuration.
TELNET, TCP/IP, and APPC are the access methods supported for UNIXenvironments and their derivatives. Refer to SAS/CONNECT Software: Usage andReference, Version 6, Second Edition and SAS Software: Changes and Enhancements, Release6.12 for information on the access methods supported by other systems.
Storing and Locating SAS/CONNECT Script Files
SAS/CONNECT software ships several sample script files that are used to establish aconnection to a remote SAS session. The SASSCRIPT configuration option points tothe location of the SAS/CONNECT script files. The SASSCRIPT option is used bySAS/ASSIST software and can be used by user-written SCL applications.
For UNIX environments, the script files are installed into the!SASROOT/MISC/CONNECT directory by default. The following line has beenincluded in the CONFIG.SAS file in order to define the default script file location:
-SASSCRIPT !sasroot/misc/connect
If you want to move the script files to another directory, you must edit theCONFIG.SAS file and update the SASSCRIPT option with the new directorylocation.
60 Installation Instructions for the SAS System under UNIX Environments, Release 6.12
System Configuration for the TELNET and TCP Access Methods
Using the TELNET or TCP access method, a UNIX user can connect to any supportedplatform that meets the following criteria:
❏ is on the TCP/IP network
❏ is running a release of the SAS System with the corresponding access methodsupport
❏ has SAS/CONNECT software licensed.
With the TCP access method, one of the supported TCP/IP products must beinstalled on any node, local or remote, that you want to use with SAS/CONNECTsoftware.
For the TELNET access method, a supported TCP/IP package must be installed onthe local node. The remote node does not have to run a supported TCP/IP product,but must run some TCP/IP product to make the node accessible using TELNET.
The TELNET and TCP/IP access methods supplied with SAS/CONNECT softwarerun with the TCP/IP services that are native to the UNIX operating system. Thereare no additional requirements.
System Configuration for the APPC Communications AccessMethod
The following sections provide reference information for establishing anenvironment to use SNA LU6.2 APPC (Advanced Program-to-ProgramCommunications) communications within your SAS applications under HP-UX,Solaris and AIX.
Notes: Currently, a client-side implementation is available for use witheither SAS/CONNECT or SAS/SHARE software.
The information included in these sections is included on the install media inthe !SASROOT/MISC/CONNECT and !SASROOT/MISC/SHAREdirectories. Refer to the README file in these directories for moreinformation.
System Configuration for the APPC Communications AccessMethod under HP-UX
Software Requirements
❏ 9.x version of HP-UX operating system
❏ Release 3 or later of SNAplusAPI and SNAplusLink tested with Release3/Dart 16 components. Recommended patches at Release 3/Dart 16:PHNE_4773, PHNE_5314, PHNE_5374
Installation Instructions for the SAS System under UNIX Environments, Release 6.12 61
SAS System Configuration
System Options
COMAMID=APPC
specifies that the APPC access method should be used for communicationbetween SAS/CONNECT local and remote sessions or SAS/SHARE userand server sessions. This option may be specified in the SAS command, in aSAS configuration file, or in an OPTIONS statement.
REMOTE=remote-session-id
specifies the logical unit (LU) to use in establishing a SAS/CONNECTremote session. To establish a remote session on another workstation, thevalue of this option in the local session on this workstation should be apartner lu_alias.
When the remote session is on MVS, the value of this option should be thename of the APPC/MVS scheduler LU.
When the remote session is on CMS, the value of this option should be thename of the AVS (APPC/VM VTAM Support) private gateway LU for theVM system.
When the remote session is on VSE, the value of this option should be thename of the VTAM APPL ID (ABCNAME) that has been set up for APPCLU6.2 communications.
When the remote session is on OS/2 or Windows the value of this optionshould be name of the control point LU configured on the remoteworkstation.
In all cases, the value of this option must be the same in the local and remotesessions. This option may be specified in the SAS command, in a SASConfiguration file, or in an OPTIONS statement.
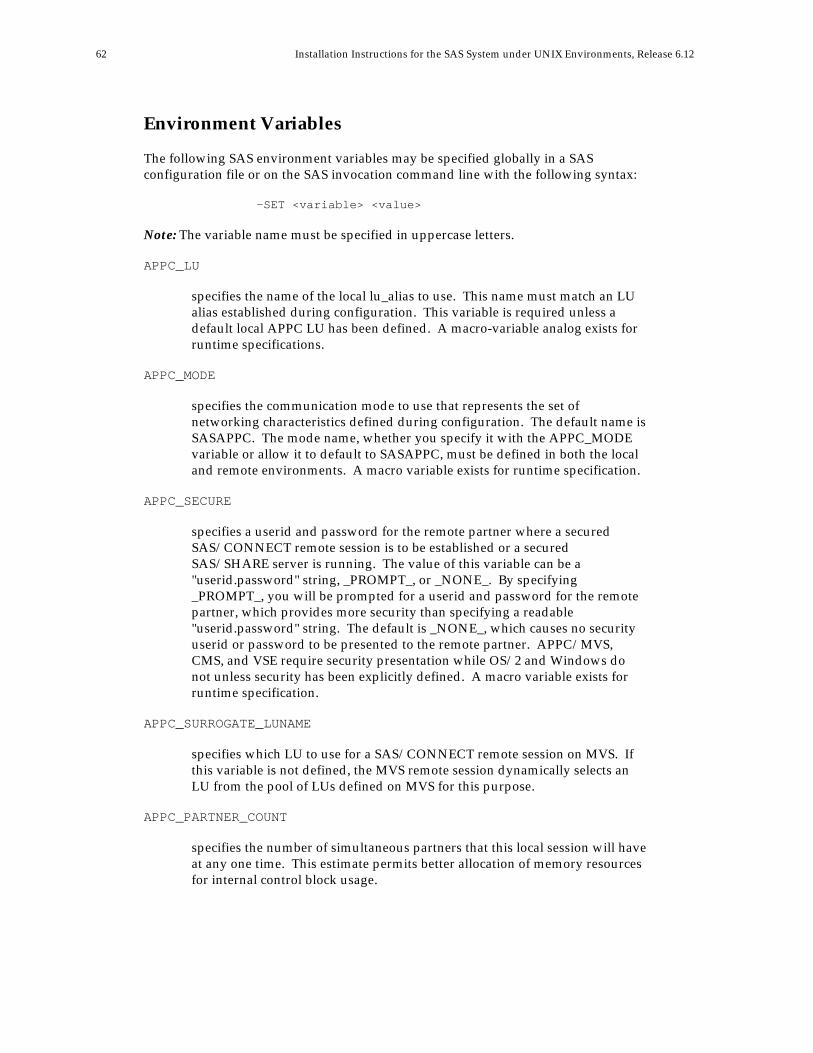
62 Installation Instructions for the SAS System under UNIX Environments, Release 6.12
Environment Variables
The following SAS environment variables may be specified globally in a SASconfiguration file or on the SAS invocation command line with the following syntax:
-SET <variable> <value>
Note: The variable name must be specified in uppercase letters.
APPC_LU
specifies the name of the local lu_alias to use. This name must match an LUalias established during configuration. This variable is required unless adefault local APPC LU has been defined. A macro-variable analog exists forruntime specifications.
APPC_MODE
specifies the communication mode to use that represents the set ofnetworking characteristics defined during configuration. The default name isSASAPPC. The mode name, whether you specify it with the APPC_MODEvariable or allow it to default to SASAPPC, must be defined in both the localand remote environments. A macro variable exists for runtime specification.
APPC_SECURE
specifies a userid and password for the remote partner where a securedSAS/CONNECT remote session is to be established or a securedSAS/SHARE server is running. The value of this variable can be a"userid.password" string, _PROMPT_, or _NONE_. By specifying_PROMPT_, you will be prompted for a userid and password for the remotepartner, which provides more security than specifying a readable"userid.password" string. The default is _NONE_, which causes no securityuserid or password to be presented to the remote partner. APPC/MVS,CMS, and VSE require security presentation while OS/2 and Windows donot unless security has been explicitly defined. A macro variable exists forruntime specification.
APPC_SURROGATE_LUNAME
specifies which LU to use for a SAS/CONNECT remote session on MVS. Ifthis variable is not defined, the MVS remote session dynamically selects anLU from the pool of LUs defined on MVS for this purpose.
APPC_PARTNER_COUNT
specifies the number of simultaneous partners that this local session will haveat any one time. This estimate permits better allocation of memory resourcesfor internal control block usage.
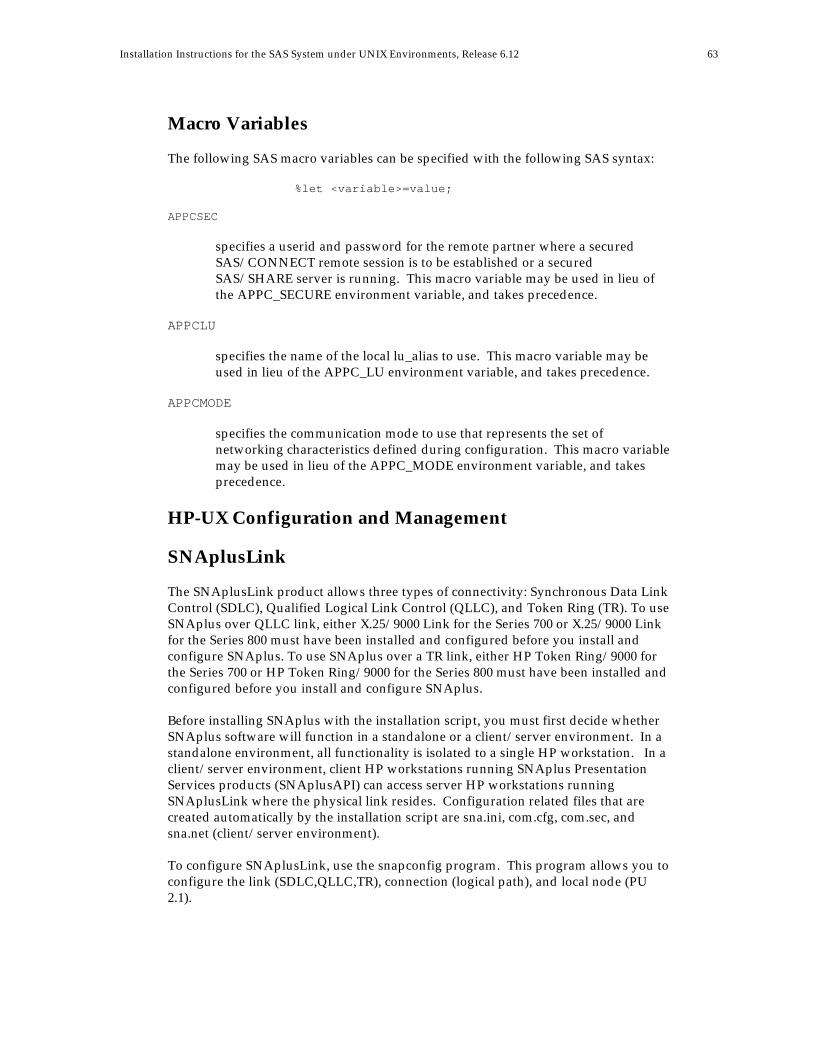
Installation Instructions for the SAS System under UNIX Environments, Release 6.12 63
Macro Variables
The following SAS macro variables can be specified with the following SAS syntax:
%let <variable>=value;
APPCSEC
specifies a userid and password for the remote partner where a securedSAS/CONNECT remote session is to be established or a securedSAS/SHARE server is running. This macro variable may be used in lieu ofthe APPC_SECURE environment variable, and takes precedence.
APPCLU
specifies the name of the local lu_alias to use. This macro variable may beused in lieu of the APPC_LU environment variable, and takes precedence.
APPCMODE
specifies the communication mode to use that represents the set ofnetworking characteristics defined during configuration. This macro variablemay be used in lieu of the APPC_MODE environment variable, and takesprecedence.
HP-UX Configuration and Management
SNAplusLink
The SNAplusLink product allows three types of connectivity: Synchronous Data LinkControl (SDLC), Qualified Logical Link Control (QLLC), and Token Ring (TR). To useSNAplus over QLLC link, either X.25/9000 Link for the Series 700 or X.25/9000 Linkfor the Series 800 must have been installed and configured before you install andconfigure SNAplus. To use SNAplus over a TR link, either HP Token Ring/9000 forthe Series 700 or HP Token Ring/9000 for the Series 800 must have been installed andconfigured before you install and configure SNAplus.
Before installing SNAplus with the installation script, you must first decide whetherSNAplus software will function in a standalone or a client/server environment. In astandalone environment, all functionality is isolated to a single HP workstation. In aclient/server environment, client HP workstations running SNAplus PresentationServices products (SNAplusAPI) can access server HP workstations runningSNAplusLink where the physical link resides. Configuration related files that arecreated automatically by the installation script are sna.ini, com.cfg, com.sec, andsna.net (client/server environment).
To configure SNAplusLink, use the snapconfig program. This program allows you toconfigure the link (SDLC,QLLC,TR), connection (logical path), and local node (PU2.1).
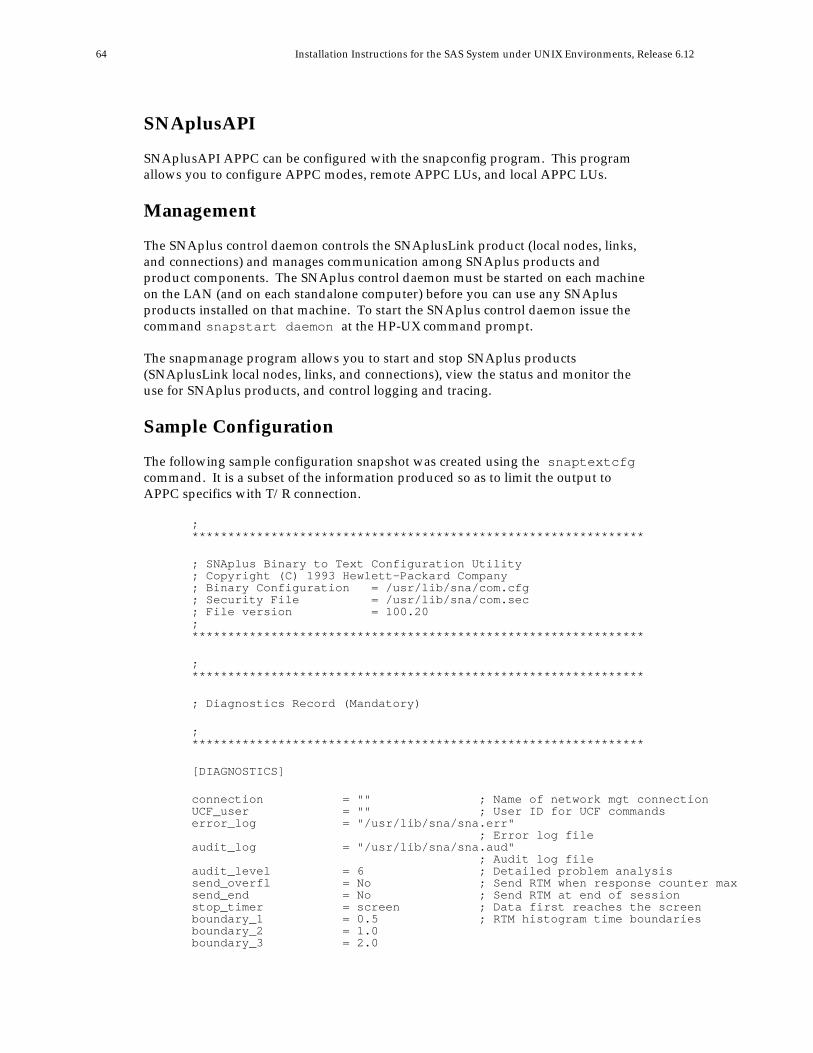
64 Installation Instructions for the SAS System under UNIX Environments, Release 6.12
SNAplusAPI
SNAplusAPI APPC can be configured with the snapconfig program. This programallows you to configure APPC modes, remote APPC LUs, and local APPC LUs.
Management
The SNAplus control daemon controls the SNAplusLink product (local nodes, links,and connections) and manages communication among SNAplus products andproduct components. The SNAplus control daemon must be started on each machineon the LAN (and on each standalone computer) before you can use any SNAplusproducts installed on that machine. To start the SNAplus control daemon issue thecommand snapstart daemon at the HP-UX command prompt.
The snapmanage program allows you to start and stop SNAplus products(SNAplusLink local nodes, links, and connections), view the status and monitor theuse for SNAplus products, and control logging and tracing.
Sample Configuration
The following sample configuration snapshot was created using the snaptextcfgcommand. It is a subset of the information produced so as to limit the output toAPPC specifics with T/R connection.
;***************************************************************
; SNAplus Binary to Text Configuration Utility; Copyright (C) 1993 Hewlett-Packard Company; Binary Configuration = /usr/lib/sna/com.cfg; Security File = /usr/lib/sna/com.sec; File version = 100.20;***************************************************************
;***************************************************************
; Diagnostics Record (Mandatory)
;***************************************************************
[DIAGNOSTICS]
connection = "" ; Name of network mgt connectionUCF_user = "" ; User ID for UCF commandserror_log = "/usr/lib/sna/sna.err" ; Error log fileaudit_log = "/usr/lib/sna/sna.aud" ; Audit log fileaudit_level = 6 ; Detailed problem analysissend_overfl = No ; Send RTM when response counter maxsend_end = No ; Send RTM at end of sessionstop_timer = screen ; Data first reaches the screenboundary_1 = 0.5 ; RTM histogram time boundariesboundary_2 = 1.0boundary_3 = 2.0
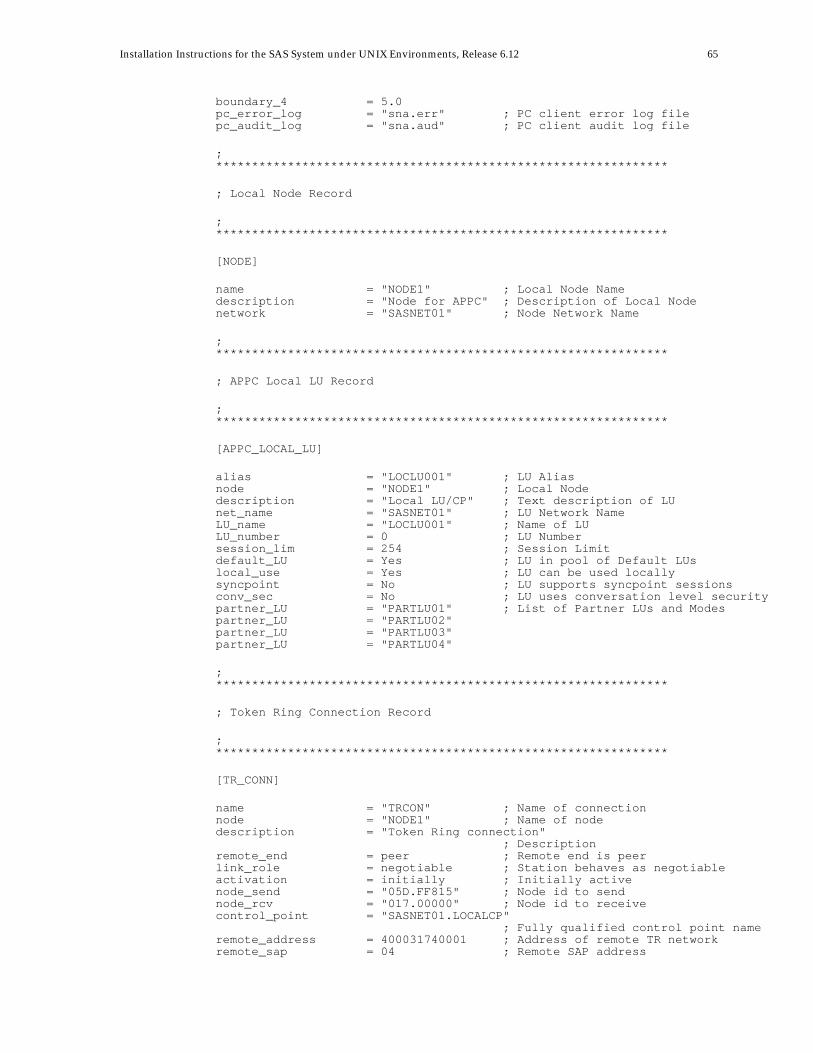
Installation Instructions for the SAS System under UNIX Environments, Release 6.12 65
boundary_4 = 5.0pc_error_log = "sna.err" ; PC client error log filepc_audit_log = "sna.aud" ; PC client audit log file
;***************************************************************
; Local Node Record
;***************************************************************
[NODE]
name = "NODE1" ; Local Node Namedescription = "Node for APPC" ; Description of Local Nodenetwork = "SASNET01" ; Node Network Name
;***************************************************************
; APPC Local LU Record
;***************************************************************
[APPC_LOCAL_LU]
alias = "LOCLU001" ; LU Aliasnode = "NODE1" ; Local Nodedescription = "Local LU/CP" ; Text description of LUnet_name = "SASNET01" ; LU Network NameLU_name = "LOCLU001" ; Name of LULU_number = 0 ; LU Numbersession_lim = 254 ; Session Limitdefault_LU = Yes ; LU in pool of Default LUslocal_use = Yes ; LU can be used locallysyncpoint = No ; LU supports syncpoint sessionsconv_sec = No ; LU uses conversation level securitypartner_LU = "PARTLU01" ; List of Partner LUs and Modespartner_LU = "PARTLU02"partner_LU = "PARTLU03"partner_LU = "PARTLU04"
;***************************************************************
; Token Ring Connection Record
;***************************************************************
[TR_CONN]
name = "TRCON" ; Name of connectionnode = "NODE1" ; Name of nodedescription = "Token Ring connection" ; Descriptionremote_end = peer ; Remote end is peerlink_role = negotiable ; Station behaves as negotiableactivation = initially ; Initially activenode_send = "05D.FF815" ; Node id to sendnode_rcv = "017.00000" ; Node id to receivecontrol_point = "SASNET01.LOCALCP" ; Fully qualified control point nameremote_address = 400031740001 ; Address of remote TR networkremote_sap = 04 ; Remote SAP address
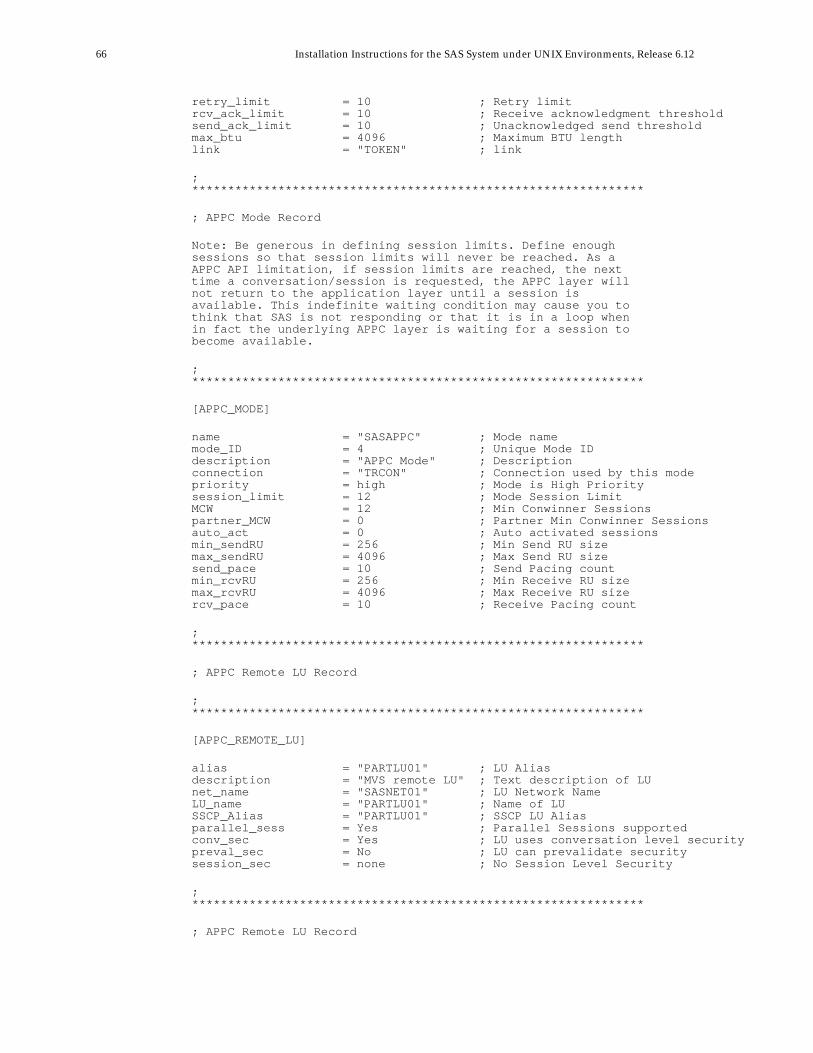
66 Installation Instructions for the SAS System under UNIX Environments, Release 6.12
retry_limit = 10 ; Retry limitrcv_ack_limit = 10 ; Receive acknowledgment thresholdsend_ack_limit = 10 ; Unacknowledged send thresholdmax_btu = 4096 ; Maximum BTU lengthlink = "TOKEN" ; link
;***************************************************************
; APPC Mode Record
Note: Be generous in defining session limits. Define enoughsessions so that session limits will never be reached. As aAPPC API limitation, if session limits are reached, the nexttime a conversation/session is requested, the APPC layer willnot return to the application layer until a session isavailable. This indefinite waiting condition may cause you tothink that SAS is not responding or that it is in a loop whenin fact the underlying APPC layer is waiting for a session tobecome available.
;***************************************************************
[APPC_MODE]
name = "SASAPPC" ; Mode namemode_ID = 4 ; Unique Mode IDdescription = "APPC Mode" ; Descriptionconnection = "TRCON" ; Connection used by this modepriority = high ; Mode is High Prioritysession_limit = 12 ; Mode Session LimitMCW = 12 ; Min Conwinner Sessionspartner_MCW = 0 ; Partner Min Conwinner Sessionsauto_act = 0 ; Auto activated sessionsmin_sendRU = 256 ; Min Send RU sizemax_sendRU = 4096 ; Max Send RU sizesend_pace = 10 ; Send Pacing countmin_rcvRU = 256 ; Min Receive RU sizemax_rcvRU = 4096 ; Max Receive RU sizercv_pace = 10 ; Receive Pacing count
;***************************************************************
; APPC Remote LU Record
;***************************************************************
[APPC_REMOTE_LU]
alias = "PARTLU01" ; LU Aliasdescription = "MVS remote LU" ; Text description of LUnet_name = "SASNET01" ; LU Network NameLU_name = "PARTLU01" ; Name of LUSSCP_Alias = "PARTLU01" ; SSCP LU Aliasparallel_sess = Yes ; Parallel Sessions supportedconv_sec = Yes ; LU uses conversation level securitypreval_sec = No ; LU can prevalidate securitysession_sec = none ; No Session Level Security
;***************************************************************
; APPC Remote LU Record
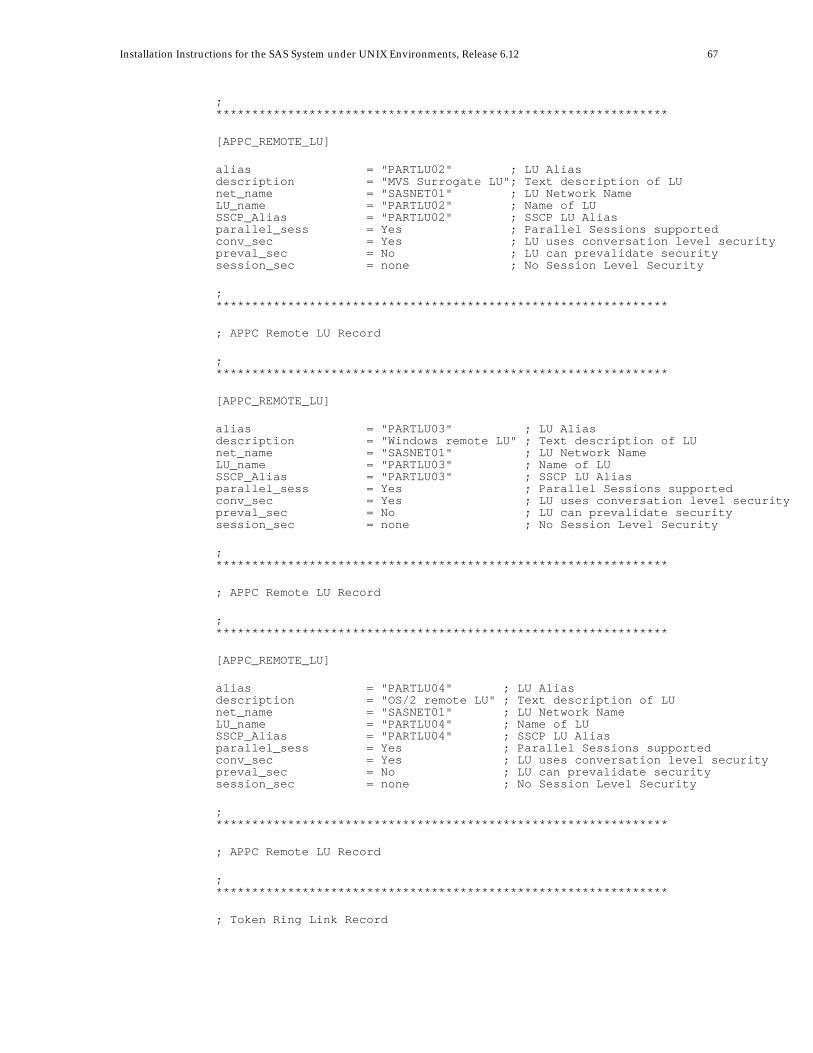
Installation Instructions for the SAS System under UNIX Environments, Release 6.12 67
;***************************************************************
[APPC_REMOTE_LU]
alias = "PARTLU02" ; LU Aliasdescription = "MVS Surrogate LU"; Text description of LUnet_name = "SASNET01" ; LU Network NameLU_name = "PARTLU02" ; Name of LUSSCP_Alias = "PARTLU02" ; SSCP LU Aliasparallel_sess = Yes ; Parallel Sessions supportedconv_sec = Yes ; LU uses conversation level securitypreval_sec = No ; LU can prevalidate securitysession_sec = none ; No Session Level Security
;***************************************************************
; APPC Remote LU Record
;***************************************************************
[APPC_REMOTE_LU]
alias = "PARTLU03" ; LU Aliasdescription = "Windows remote LU" ; Text description of LUnet_name = "SASNET01" ; LU Network NameLU_name = "PARTLU03" ; Name of LUSSCP_Alias = "PARTLU03" ; SSCP LU Aliasparallel_sess = Yes ; Parallel Sessions supportedconv_sec = Yes ; LU uses conversation level securitypreval_sec = No ; LU can prevalidate securitysession_sec = none ; No Session Level Security
;***************************************************************
; APPC Remote LU Record
;***************************************************************
[APPC_REMOTE_LU]
alias = "PARTLU04" ; LU Aliasdescription = "OS/2 remote LU" ; Text description of LUnet_name = "SASNET01" ; LU Network NameLU_name = "PARTLU04" ; Name of LUSSCP_Alias = "PARTLU04" ; SSCP LU Aliasparallel_sess = Yes ; Parallel Sessions supportedconv_sec = Yes ; LU uses conversation level securitypreval_sec = No ; LU can prevalidate securitysession_sec = none ; No Session Level Security
;***************************************************************
; APPC Remote LU Record
;***************************************************************
; Token Ring Link Record
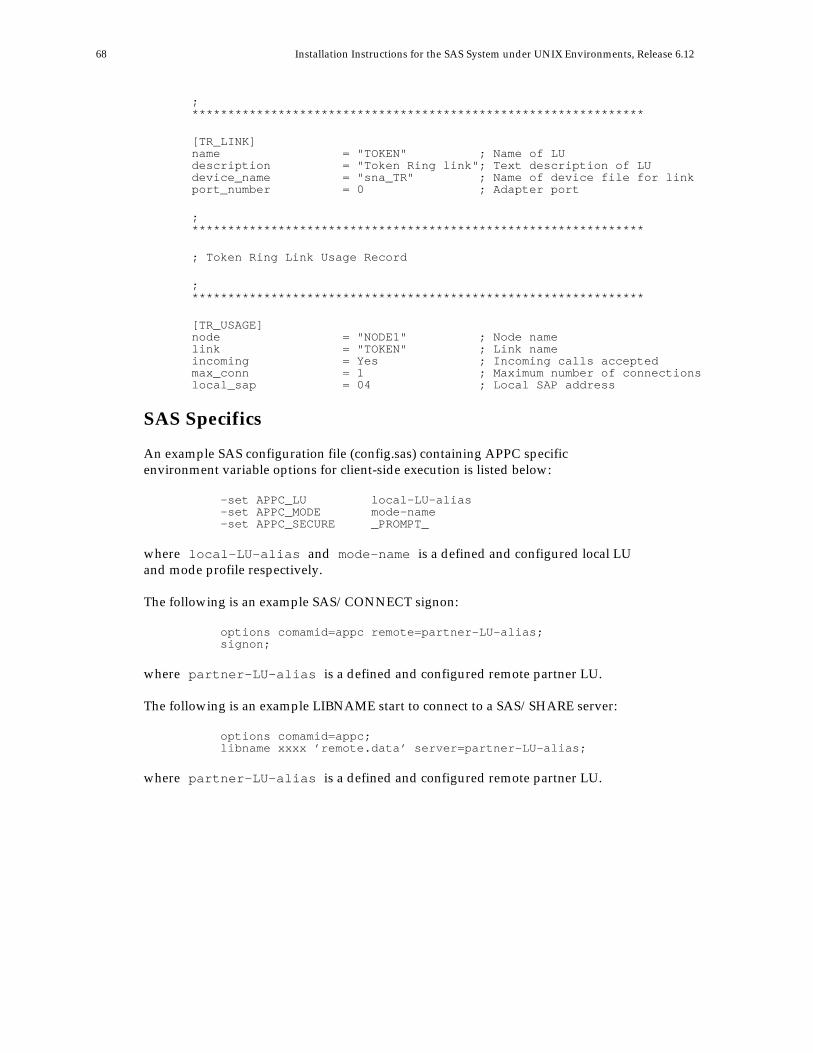
68 Installation Instructions for the SAS System under UNIX Environments, Release 6.12
;***************************************************************
[TR_LINK]name = "TOKEN" ; Name of LUdescription = "Token Ring link"; Text description of LUdevice_name = "sna_TR" ; Name of device file for linkport_number = 0 ; Adapter port
;***************************************************************
; Token Ring Link Usage Record
;***************************************************************
[TR_USAGE]node = "NODE1" ; Node namelink = "TOKEN" ; Link nameincoming = Yes ; Incoming calls acceptedmax_conn = 1 ; Maximum number of connectionslocal_sap = 04 ; Local SAP address
SAS Specifics
An example SAS configuration file (config.sas) containing APPC specificenvironment variable options for client-side execution is listed below:
-set APPC_LU local-LU-alias -set APPC_MODE mode-name -set APPC_SECURE _PROMPT_
where local-LU-alias and mode-name is a defined and configured local LUand mode profile respectively.
The following is an example SAS/CONNECT signon:
options comamid=appc remote=partner-LU-alias; signon;
where partner-LU-alias is a defined and configured remote partner LU.
The following is an example LIBNAME start to connect to a SAS/SHARE server:
options comamid=appc; libname xxxx ’remote.data’ server=partner-LU-alias;
where partner-LU-alias is a defined and configured remote partner LU.
Installation Instructions for the SAS System under UNIX Environments, Release 6.12 69
Note: If the server is running on a CMS system that is connected to your systemthrough a global VTAM gateway, you must use a two-level server namespecification as follows:
server=gateway.serverid
where gateway is defined to the CMS system and is locally defined as apartner-LU-alias.
References
❏ HP-UX SNAplus Installation Guide (J2220-61021)❏ HP-UX SNAplusLink Administrator’s Guide (J2220-61023)❏ HP-UX SNAplusAPI Administrator’s Guide (J2223-61008)❏ HP-UX SNAplus Diagnostics Guide (J2220-61022)❏ Installing and Administering X.25/9000 (36940-90018)❏ Installing and Administering Token Ring/9000 (J21625-61001)❏ IBM SNA: Technical Overview❏ IBM SNA: Formats
System Configuration for the APPC Communications AccessMethod under Solaris
Software Requirements
❏ Solaris Version 2.x
❏ SunSoft’s SunLink SNA Peer-to-Peer software Version 8.0 or later. Thefollowing patches are recommended for Version 8.0:
❏ 102146❏ 102147❏ 102229.
SAS System Configuration
System Options
COMAMID=APPC
specifies that the APPC access method should be used for communicationbetween SAS/CONNECT local and remote sessions or SAS/SHARE userand server sessions. This option can be specified in the SAS command, in aSAS configuration file, or in an OPTIONS statement.
70 Installation Instructions for the SAS System under UNIX Environments, Release 6.12
REMOTE=remote-session-id
specifies the unique session name to use in establishing a SAS/CONNECTremote session. The unique session name is defined in the MODE definitionin the configuration file. It uniquely binds a mode_name, partner LU, andlocal LU together. The SunLink APPC package does not put any namingrestrictions on the unique_session_name parameter; however, tofunction in a SAS environment, the unique_session_name parametermust be the same name as the partner LU name in order to guarantee that theremote= value is the same in both the local and remote sessions.
When the remote session is on MVS, the value of this option should be thename of the APPC/MVS scheduler LU.
When the remote session is on CMS, the value of this option should be thename of the AVS (APPC/VM VTAM Support) private gateway LU for theVM system.
When the remote session is on VSE, the value of this option should be thename of the VTAM APPL ID (ACBNAME) that has been set up for APPCLU6.2 communications.
When the remote session is on OS/2 or Windows the value of this optionshould be name of the control point LU configured on the remoteworkstation.
In all cases, the value of this option must be the same in the local and remotesessions. This option can be specified in the SAS command, in a SASConfiguration file, or in an OPTIONS statement.
Environment Variables
The following HP environment variables can be specified globally in a SASconfiguration file or on the SAS invocation command line with the following syntax:
-SET <variable> <value>
Note: The variable name must be specified in uppercase letters.
APPC_GATEWAY
specifies the name of the peer-to-peer gateway that you will attach to. Thegateway provides the SNA stack for connecting to an SNA network. If youare working in a standalone environment and your gateway is the samename as your machine name, you do not have to specify this option. Bydefault, SAS will use the gethostname() Unix function to obtain the machinename where SAS is executing and then use it as the gateway name.
During SunLink SNA Peer-to-Peer configuration, you will enter the gatewayname either in a local /etc/appcs file or in the NIS/NIS+ database. Amacro variable exists for runtime specifications.
Installation Instructions for the SAS System under UNIX Environments, Release 6.12 71
APPC_SECURE
specifies a userid and password for the remote partner where a securedSAS/CONNECT remote session is to be established or a securedSAS/SHARE server is running. The value of this variable can be auserid.password string, _PROMPT_, or _NONE_. By specifying_PROMPT_, you are prompted for a userid and password for the remotepartner, which provides more security than specifying a readableuserid.password string. The default is _NONE_, which causes nosecurity userid or password to be presented to the remote partner.APPC/MVS, CMS, and VSE require security presentation while OS/2 andWindows does not unless security has been explicitly defined. A macrovariable exists for runtime specifications.
APPC_SURROGATE_LUNAME
specifies which LU to use for a SAS/CONNECT remote session on MVS. Ifthis variable is not defined, the MVS remote session dynamically selects anLU from the pool of LUs defined on MVS for this purpose.
APPC_PARTNER_COUNT
specifies the number of simultaneous partners that this local session will haveat any one time. This estimate permits better allocation of memory resourcesfor internal control block usage.
Macro Variables
The following SAS macro variables can be specified with the following SAS syntax:
%let <variable>=value;
APPCSEC
specifies a userid and password for the remote partner where a securedSAS/CONNECT remote session is to be established or a securedSAS/SHARE server is running. This macro variable may be used in lieu ofthe APPC_SECURE environment variable, and takes precedence.
APPCGATE
specifies the name of the peer-to-peer gateway that you will attach to. Thismacro variable may be used in lieu of the APPC_GATEWAY environmentvariable, and takes precedence.
Solaris 2.x/Sun Link Configuration and Management
I. Install and configure link components such as SDLC or LLC drivers
For example, if a token ring connection is desired, you will have to install andconfigure the SunLink Token Ring Interface/SBus software.
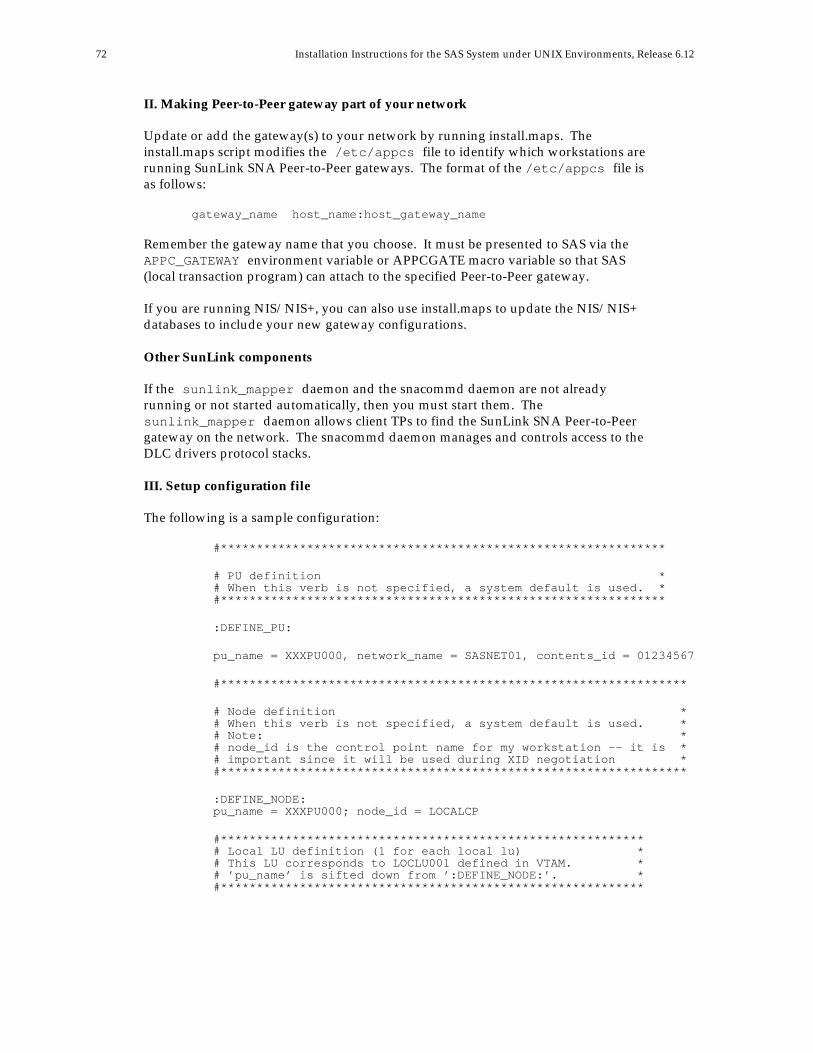
72 Installation Instructions for the SAS System under UNIX Environments, Release 6.12
II. Making Peer-to-Peer gateway part of your network
Update or add the gateway(s) to your network by running install.maps. Theinstall.maps script modifies the /etc/appcs file to identify which workstations arerunning SunLink SNA Peer-to-Peer gateways. The format of the /etc/appcs file isas follows:
gateway_name host_name:host_gateway_name
Remember the gateway name that you choose. It must be presented to SAS via theAPPC_GATEWAY environment variable or APPCGATE macro variable so that SAS(local transaction program) can attach to the specified Peer-to-Peer gateway.
If you are running NIS/NIS+, you can also use install.maps to update the NIS/NIS+databases to include your new gateway configurations.
Other SunLink components
If the sunlink_mapper daemon and the snacommd daemon are not alreadyrunning or not started automatically, then you must start them. Thesunlink_mapper daemon allows client TPs to find the SunLink SNA Peer-to-Peergateway on the network. The snacommd daemon manages and controls access to theDLC drivers protocol stacks.
III. Setup configuration file
The following is a sample configuration:
#**************************************************************
# PU definition * # When this verb is not specified, a system default is used. * #**************************************************************
:DEFINE_PU:
pu_name = XXXPU000, network_name = SASNET01, contents_id = 01234567
#*****************************************************************
# Node definition * # When this verb is not specified, a system default is used. * # Note: * # node_id is the control point name for my workstation -- it is * # important since it will be used during XID negotiation * #*****************************************************************
:DEFINE_NODE: pu_name = XXXPU000; node_id = LOCALCP
#*********************************************************** # Local LU definition (1 for each local lu) * # This LU corresponds to LOCLU001 defined in VTAM. * # ’pu_name’ is sifted down from ’:DEFINE_NODE:’. * #***********************************************************
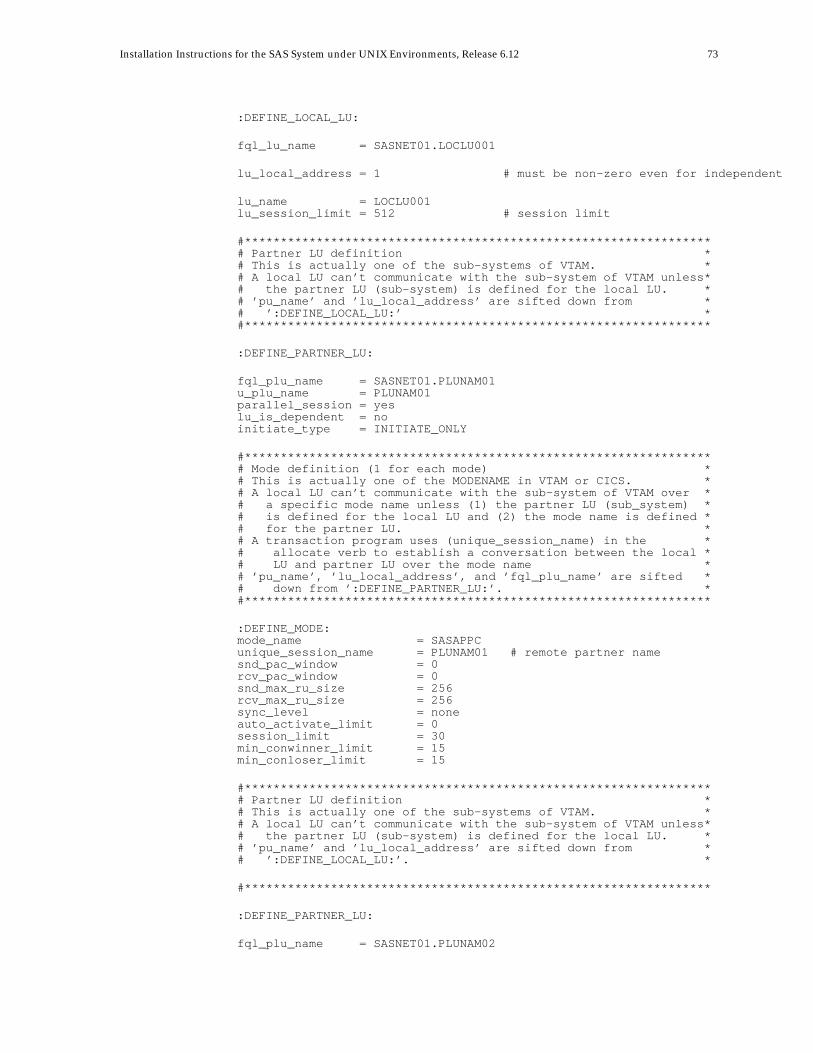
Installation Instructions for the SAS System under UNIX Environments, Release 6.12 73
:DEFINE_LOCAL_LU:
fql_lu_name = SASNET01.LOCLU001
lu_local_address = 1 # must be non-zero even for independent
lu_name = LOCLU001 lu_session_limit = 512 # session limit
#***************************************************************** # Partner LU definition * # This is actually one of the sub-systems of VTAM. * # A local LU can’t communicate with the sub-system of VTAM unless* # the partner LU (sub-system) is defined for the local LU. * # ’pu_name’ and ’lu_local_address’ are sifted down from * # ’:DEFINE_LOCAL_LU:’ * #*****************************************************************
:DEFINE_PARTNER_LU:
fql_plu_name = SASNET01.PLUNAM01 u_plu_name = PLUNAM01 parallel_session = yes lu_is_dependent = no initiate_type = INITIATE_ONLY
#***************************************************************** # Mode definition (1 for each mode) * # This is actually one of the MODENAME in VTAM or CICS. * # A local LU can’t communicate with the sub-system of VTAM over * # a specific mode name unless (1) the partner LU (sub_system) * # is defined for the local LU and (2) the mode name is defined * # for the partner LU. * # A transaction program uses (unique_session_name) in the * # allocate verb to establish a conversation between the local * # LU and partner LU over the mode name * # ’pu_name’, ’lu_local_address’, and ’fql_plu_name’ are sifted * # down from ’:DEFINE_PARTNER_LU:’. * #*****************************************************************
:DEFINE_MODE: mode_name = SASAPPC unique_session_name = PLUNAM01 # remote partner name snd_pac_window = 0 rcv_pac_window = 0 snd_max_ru_size = 256 rcv_max_ru_size = 256 sync_level = none auto_activate_limit = 0 session_limit = 30 min_conwinner_limit = 15 min_conloser_limit = 15
#***************************************************************** # Partner LU definition * # This is actually one of the sub-systems of VTAM. * # A local LU can’t communicate with the sub-system of VTAM unless* # the partner LU (sub-system) is defined for the local LU. * # ’pu_name’ and ’lu_local_address’ are sifted down from * # ’:DEFINE_LOCAL_LU:’. *
#*****************************************************************
:DEFINE_PARTNER_LU:
fql_plu_name = SASNET01.PLUNAM02
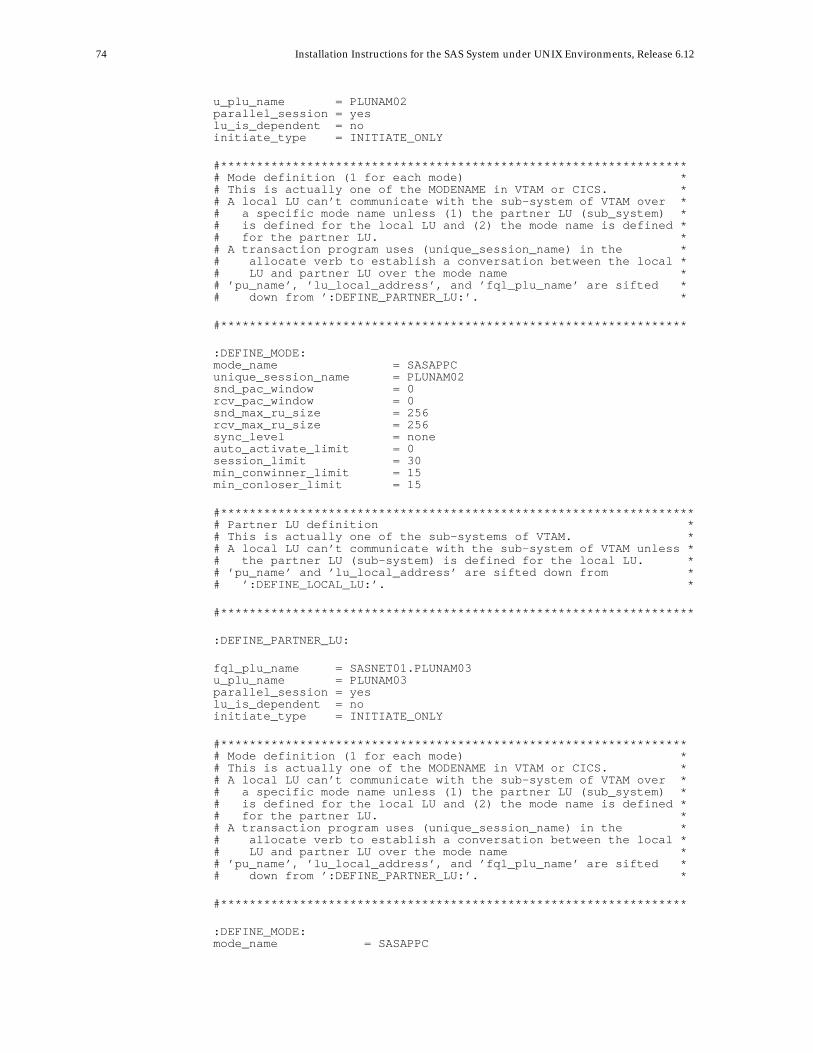
74 Installation Instructions for the SAS System under UNIX Environments, Release 6.12
u_plu_name = PLUNAM02 parallel_session = yes lu_is_dependent = no initiate_type = INITIATE_ONLY
#***************************************************************** # Mode definition (1 for each mode) * # This is actually one of the MODENAME in VTAM or CICS. * # A local LU can’t communicate with the sub-system of VTAM over * # a specific mode name unless (1) the partner LU (sub_system) * # is defined for the local LU and (2) the mode name is defined * # for the partner LU. * # A transaction program uses (unique_session_name) in the * # allocate verb to establish a conversation between the local * # LU and partner LU over the mode name * # ’pu_name’, ’lu_local_address’, and ’fql_plu_name’ are sifted * # down from ’:DEFINE_PARTNER_LU:’. *
#*****************************************************************
:DEFINE_MODE: mode_name = SASAPPC unique_session_name = PLUNAM02 snd_pac_window = 0 rcv_pac_window = 0 snd_max_ru_size = 256 rcv_max_ru_size = 256 sync_level = none auto_activate_limit = 0 session_limit = 30 min_conwinner_limit = 15 min_conloser_limit = 15
#****************************************************************** # Partner LU definition * # This is actually one of the sub-systems of VTAM. * # A local LU can’t communicate with the sub-system of VTAM unless * # the partner LU (sub-system) is defined for the local LU. * # ’pu_name’ and ’lu_local_address’ are sifted down from * # ’:DEFINE_LOCAL_LU:’. *
#******************************************************************
:DEFINE_PARTNER_LU:
fql_plu_name = SASNET01.PLUNAM03 u_plu_name = PLUNAM03 parallel_session = yes lu_is_dependent = no initiate_type = INITIATE_ONLY
#***************************************************************** # Mode definition (1 for each mode) * # This is actually one of the MODENAME in VTAM or CICS. * # A local LU can’t communicate with the sub-system of VTAM over * # a specific mode name unless (1) the partner LU (sub_system) * # is defined for the local LU and (2) the mode name is defined * # for the partner LU. * # A transaction program uses (unique_session_name) in the * # allocate verb to establish a conversation between the local * # LU and partner LU over the mode name * # ’pu_name’, ’lu_local_address’, and ’fql_plu_name’ are sifted * # down from ’:DEFINE_PARTNER_LU:’. *
#*****************************************************************
:DEFINE_MODE: mode_name = SASAPPC
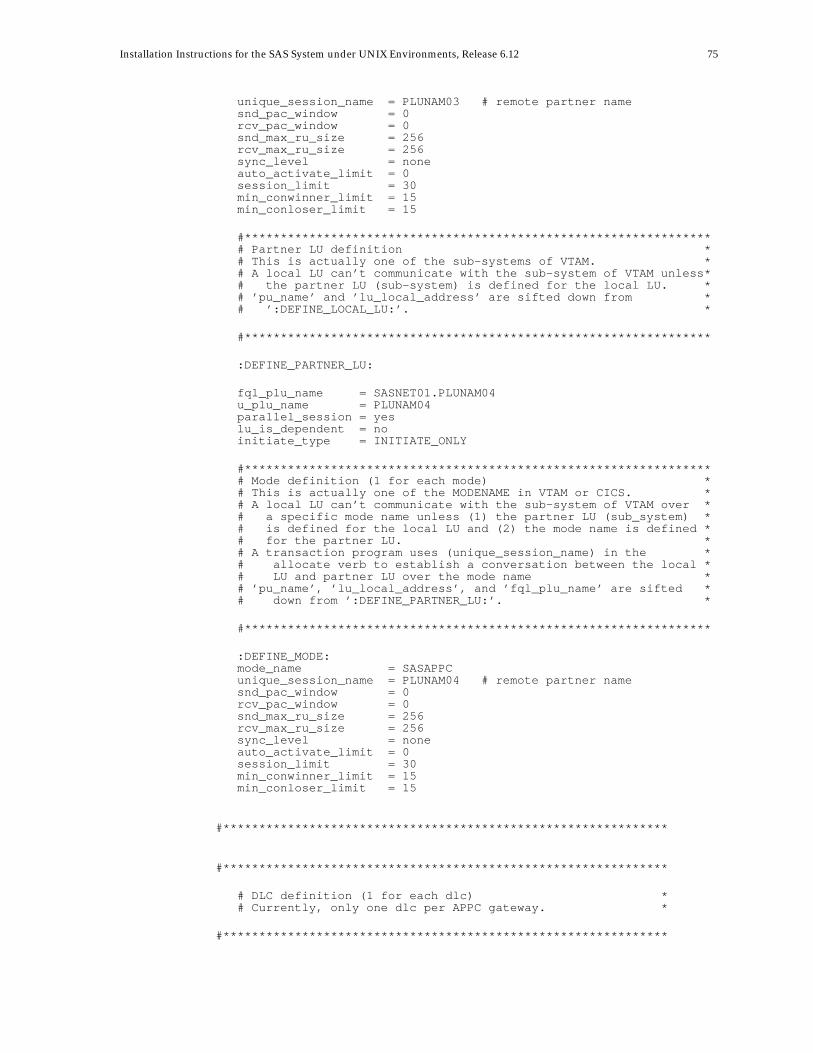
Installation Instructions for the SAS System under UNIX Environments, Release 6.12 75
unique_session_name = PLUNAM03 # remote partner name snd_pac_window = 0 rcv_pac_window = 0 snd_max_ru_size = 256 rcv_max_ru_size = 256 sync_level = none auto_activate_limit = 0 session_limit = 30 min_conwinner_limit = 15 min_conloser_limit = 15
#***************************************************************** # Partner LU definition * # This is actually one of the sub-systems of VTAM. * # A local LU can’t communicate with the sub-system of VTAM unless* # the partner LU (sub-system) is defined for the local LU. * # ’pu_name’ and ’lu_local_address’ are sifted down from * # ’:DEFINE_LOCAL_LU:’. *
#*****************************************************************
:DEFINE_PARTNER_LU:
fql_plu_name = SASNET01.PLUNAM04 u_plu_name = PLUNAM04 parallel_session = yes lu_is_dependent = no initiate_type = INITIATE_ONLY
#***************************************************************** # Mode definition (1 for each mode) * # This is actually one of the MODENAME in VTAM or CICS. * # A local LU can’t communicate with the sub-system of VTAM over * # a specific mode name unless (1) the partner LU (sub_system) * # is defined for the local LU and (2) the mode name is defined * # for the partner LU. * # A transaction program uses (unique_session_name) in the * # allocate verb to establish a conversation between the local * # LU and partner LU over the mode name * # ’pu_name’, ’lu_local_address’, and ’fql_plu_name’ are sifted * # down from ’:DEFINE_PARTNER_LU:’. *
#*****************************************************************
:DEFINE_MODE: mode_name = SASAPPC unique_session_name = PLUNAM04 # remote partner name snd_pac_window = 0 rcv_pac_window = 0 snd_max_ru_size = 256 rcv_max_ru_size = 256 sync_level = none auto_activate_limit = 0 session_limit = 30 min_conwinner_limit = 15 min_conloser_limit = 15
#**************************************************************
#**************************************************************
# DLC definition (1 for each dlc) * # Currently, only one dlc per APPC gateway. *
#**************************************************************
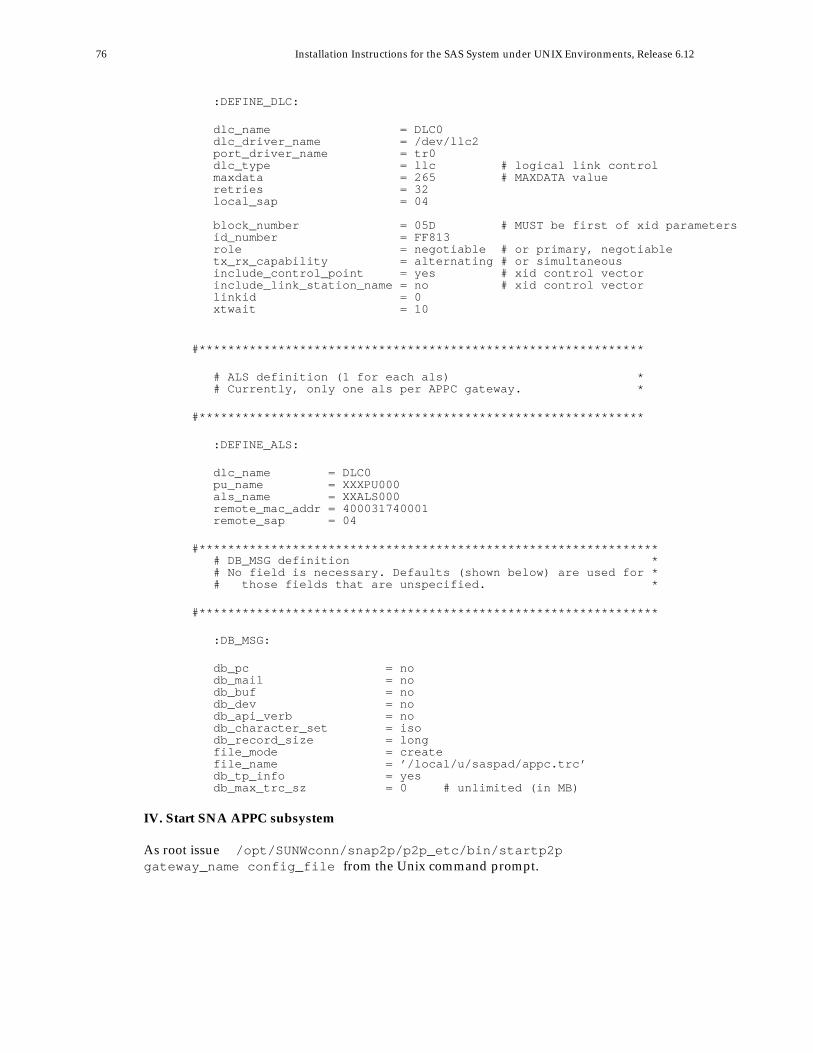
76 Installation Instructions for the SAS System under UNIX Environments, Release 6.12
:DEFINE_DLC:
dlc_name = DLC0 dlc_driver_name = /dev/llc2 port_driver_name = tr0 dlc_type = llc # logical link control maxdata = 265 # MAXDATA value retries = 32 local_sap = 04
block_number = 05D # MUST be first of xid parameters id_number = FF813 role = negotiable # or primary, negotiable tx_rx_capability = alternating # or simultaneous include_control_point = yes # xid control vector include_link_station_name = no # xid control vector linkid = 0 xtwait = 10
#**************************************************************
# ALS definition (1 for each als) * # Currently, only one als per APPC gateway. *
#**************************************************************
:DEFINE_ALS:
dlc_name = DLC0 pu_name = XXXPU000 als_name = XXALS000 remote_mac_addr = 400031740001 remote_sap = 04
#**************************************************************** # DB_MSG definition * # No field is necessary. Defaults (shown below) are used for * # those fields that are unspecified. *
#****************************************************************
:DB_MSG:
db_pc = no db_mail = no db_buf = no db_dev = no db_api_verb = no db_character_set = iso db_record_size = long file_mode = create file_name = ’/local/u/saspad/appc.trc’ db_tp_info = yes db_max_trc_sz = 0 # unlimited (in MB)
IV. Start SNA APPC subsystem
As root issue /opt/SUNWconn/snap2p/p2p_etc/bin/startp2pgateway_name config_file from the Unix command prompt.
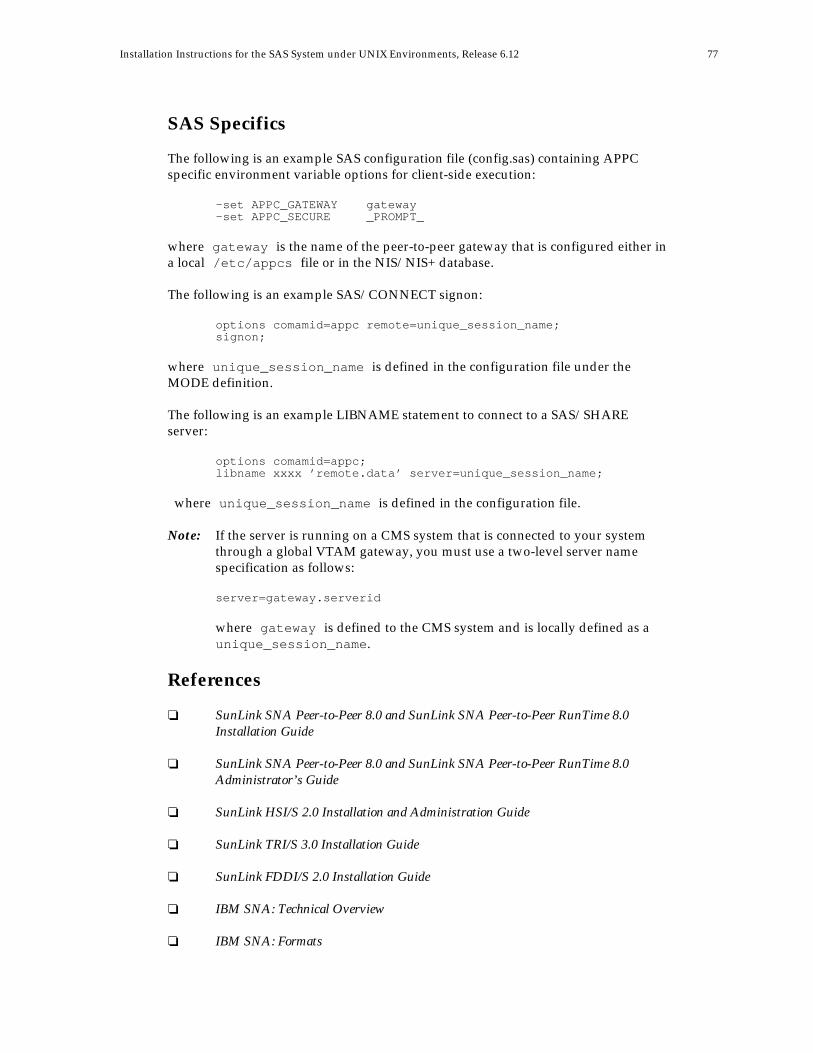
Installation Instructions for the SAS System under UNIX Environments, Release 6.12 77
SAS Specifics
The following is an example SAS configuration file (config.sas) containing APPCspecific environment variable options for client-side execution:
-set APPC_GATEWAY gateway-set APPC_SECURE _PROMPT_
where gateway is the name of the peer-to-peer gateway that is configured either ina local /etc/appcs file or in the NIS/NIS+ database.
The following is an example SAS/CONNECT signon:
options comamid=appc remote=unique_session_name;signon;
where unique_session_name is defined in the configuration file under theMODE definition.
The following is an example LIBNAME statement to connect to a SAS/SHAREserver:
options comamid=appc;libname xxxx ’remote.data’ server=unique_session_name;
where unique_session_name is defined in the configuration file.
Note: If the server is running on a CMS system that is connected to your systemthrough a global VTAM gateway, you must use a two-level server namespecification as follows:
server=gateway.serverid
where gateway is defined to the CMS system and is locally defined as aunique_session_name.
References
❏ SunLink SNA Peer-to-Peer 8.0 and SunLink SNA Peer-to-Peer RunTime 8.0Installation Guide
❏ SunLink SNA Peer-to-Peer 8.0 and SunLink SNA Peer-to-Peer RunTime 8.0Administrator’s Guide
❏ SunLink HSI/S 2.0 Installation and Administration Guide
❏ SunLink TRI/S 3.0 Installation Guide
❏ SunLink FDDI/S 2.0 Installation Guide
❏ IBM SNA: Technical Overview
❏ IBM SNA: Formats
78 Installation Instructions for the SAS System under UNIX Environments, Release 6.12
System Configuration for the APPC Communications AccessMethod under AIX
Software Requirements
❏ AIX version 3.2.5❏ AIX SNA Server/6000 version 2.1.1
SAS System Configuration
System Options
COMAMID=APPC
specifies that the APPC access method should be used for communicationbetween SAS/CONNECT local and remote sessions or SAS/SHARE userand server sessions. This option can be specified in the SAS command, in aSAS configuration file, or in an OPTIONS statement.
REMOTE=remote-session-id
specifies the logical unit (LU) to use in establishing a SAS/CONNECTremote session. To establish a remote session on another workstation, thevalue of this option in the local session on this workstation should be apartner LU name.
When the remote session is on MVS, the value of this option should be thename of the APPC/MVS scheduler LU.
When the remote session is on CMS, the value of this option should be thename of the AVS (APPC/VM VTAM Support) private gateway LU for theVM system.
When the remote session is on VSE, the value of this option should be thename of the VTAM APPL ID (ACBNAME) that has been set up for APPCLU6.2 communications.
When the remote session is on OS/2 or Windows the value of this optionshould be name of the control point LU configured on the remoteworkstation.
In all cases, the value of this option must be the same in the local and remotesessions. This option can be specified in the SAS command, in a SASConfiguration file, or in an OPTIONS statement.
Installation Instructions for the SAS System under UNIX Environments, Release 6.12 79
Environment Variables
The following SAS environment variables can be specified globally in a SASconfiguration file or on the SAS invocation command line with the following syntax:
-SET <variable> <value>
APPC_NET
specifies the network name to utilize in order to form the fully qualifiedpartner LU name in APPN environments. This name is required to exploitAPPN connections in the absence of explicitly configured partner LUprofiles. A macro-variable analog exists for runtime specification.
APPC_MODE
specifies the communication mode to use that represents the set ofnetworking characteristics defined during configuration. The default name isSASAPPC. The mode name, whether you specify it with the APPC_MODEvariable or allow it to default to SASAPPC, must be defined in both the localand remote environments. A macro-variable analog exists for runtimespecification.
APPC_SECURE
specifies a userid and password for the remote partner where a securedSAS/CONNECT remote session is to be established or a securedSAS/SHARE server is running. The value of this variable can be auserid.password string, _PROMPT_, or _NONE_. By specifying _PROMPT_,you are prompted for a userid and password for the remote partner, whichprovides more security than specifying a readable "userid.password" string.The default is _NONE_, which causes no security userid or password to bepresented to the remote partner. APPC/MVS, CMS, and VSE requiresecurity presentation while OS/2 does not unless you have established a userprofile on the OS/2 workstation with Communications Manager or with UserProfile Management. A macro-variable analog exists for runtimespecification.
APPC_SURROGATE_LUNAME
specifies which LU to use for a SAS/CONNECT remote session on MVS. Ifthis variable is not defined, the MVS remote session dynamically selects anLU from the pool of LUs defined on MVS for this purpose.
80 Installation Instructions for the SAS System under UNIX Environments, Release 6.12
Macro Variables
The following SAS macro variables can be specified with the following SAS syntax:
%let <variable>=value;
APPCNET
specifies the network name to utilize in order to form the fully qualifiedpartner LU name in APPN environments. This macro variable can be used inlieu of the APPC_NET environment variable, and takes precedence.
APPCMODE
specifies the communication mode to use that represents the set ofnetworking characteristics defined during configuration. This macro variablecan be used in lieu of the APPC_MODE environment variable, and takesprecedence.
APPCSEC
specifies a userid and password for the remote partner where a securedSAS/CONNECT remote session is to be established or a securedSAS/SHARE server is running. This macro variable can be used in lieu ofthe APPC_SECURE environment variable, and takes precedence.
SNA Server/6000 Configuration
Various configuration tasks must be completed before APPC connectivity within SAScan be utilized. If SNA APPC is utilized by other applications at your site, it may bethat the necessary tasks have already been performed. If not, the degree ofconfiguration required is dependent on the capabilities of your SNA network. Morespecifically, if your SNA network supports APPN, no partner logical unit, location,and side information profiles need be configured.
At a minimum, node, control point, data link control, link station, and mode profilesare required. The node profile is created when the SNA Server/6000 product isinstalled, and defines a set of modifiable default parameters that establish operationalcontrols. A control point definition is required to define local SNA aspects regardingPU/LU functionality, including APPN characteristics. Data link control and linkstation profiles define transport layer attributes including network interface type aswell as local control and remote link station characteristics. Mode profiles arerequired for each mode name in the set of possible presentations between allpotential remote partners. That is, any mode name to be utilized in a sessionestablishment request must be defined to both the local and remote LUs.
The profile definitions are utilized during session setup to establish flow controlparameters such as request unit sizes and pacing limits as well as to controlmaximum session limits. If your SNA network does not support APPN, partnerlogical unit, location, and side information profiles must be configured for eachpotential partner.
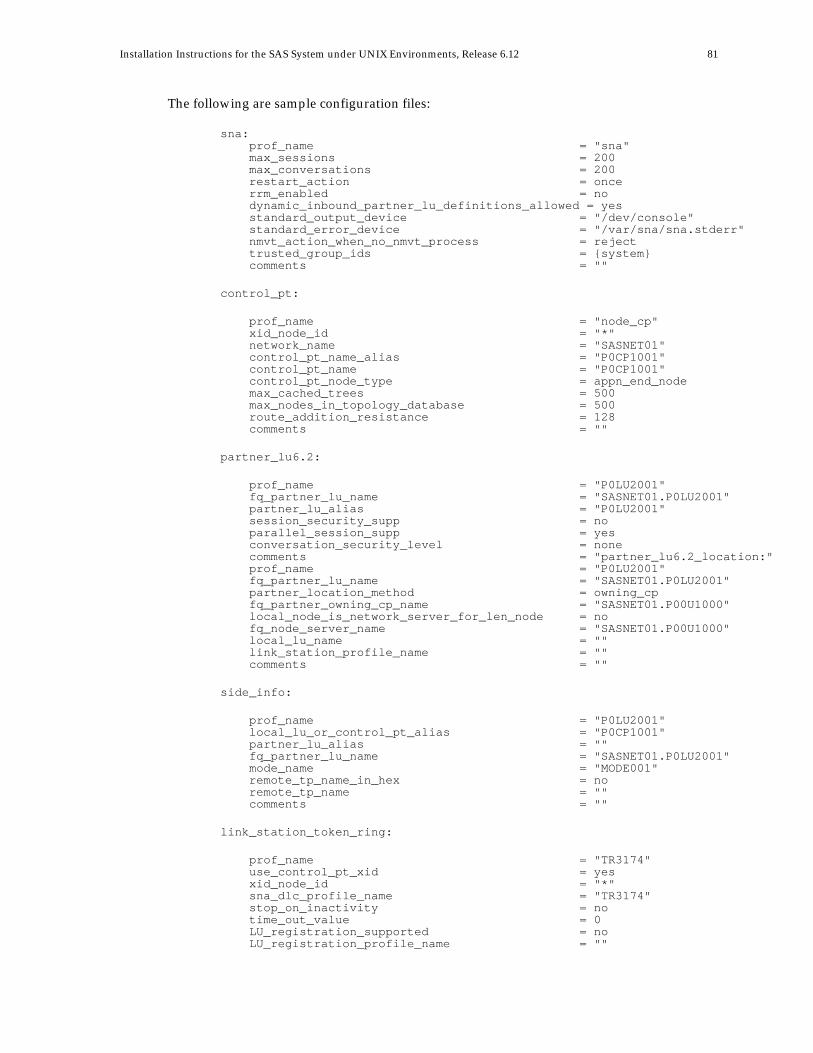
Installation Instructions for the SAS System under UNIX Environments, Release 6.12 81
The following are sample configuration files:
sna: prof_name = "sna" max_sessions = 200 max_conversations = 200 restart_action = once rrm_enabled = no dynamic_inbound_partner_lu_definitions_allowed = yes standard_output_device = "/dev/console" standard_error_device = "/var/sna/sna.stderr" nmvt_action_when_no_nmvt_process = reject trusted_group_ids = {system} comments = ""
control_pt:
prof_name = "node_cp" xid_node_id = "*" network_name = "SASNET01" control_pt_name_alias = "P0CP1001" control_pt_name = "P0CP1001" control_pt_node_type = appn_end_node max_cached_trees = 500 max_nodes_in_topology_database = 500 route_addition_resistance = 128 comments = ""
partner_lu6.2:
prof_name = "P0LU2001" fq_partner_lu_name = "SASNET01.P0LU2001" partner_lu_alias = "P0LU2001" session_security_supp = no parallel_session_supp = yes conversation_security_level = none comments = "partner_lu6.2_location:" prof_name = "P0LU2001" fq_partner_lu_name = "SASNET01.P0LU2001" partner_location_method = owning_cp fq_partner_owning_cp_name = "SASNET01.P00U1000" local_node_is_network_server_for_len_node = no fq_node_server_name = "SASNET01.P00U1000" local_lu_name = "" link_station_profile_name = "" comments = ""
side_info:
prof_name = "P0LU2001" local_lu_or_control_pt_alias = "P0CP1001" partner_lu_alias = "" fq_partner_lu_name = "SASNET01.P0LU2001" mode_name = "MODE001" remote_tp_name_in_hex = no remote_tp_name = "" comments = ""
link_station_token_ring:
prof_name = "TR3174" use_control_pt_xid = yes xid_node_id = "*" sna_dlc_profile_name = "TR3174" stop_on_inactivity = no time_out_value = 0 LU_registration_supported = no LU_registration_profile_name = ""
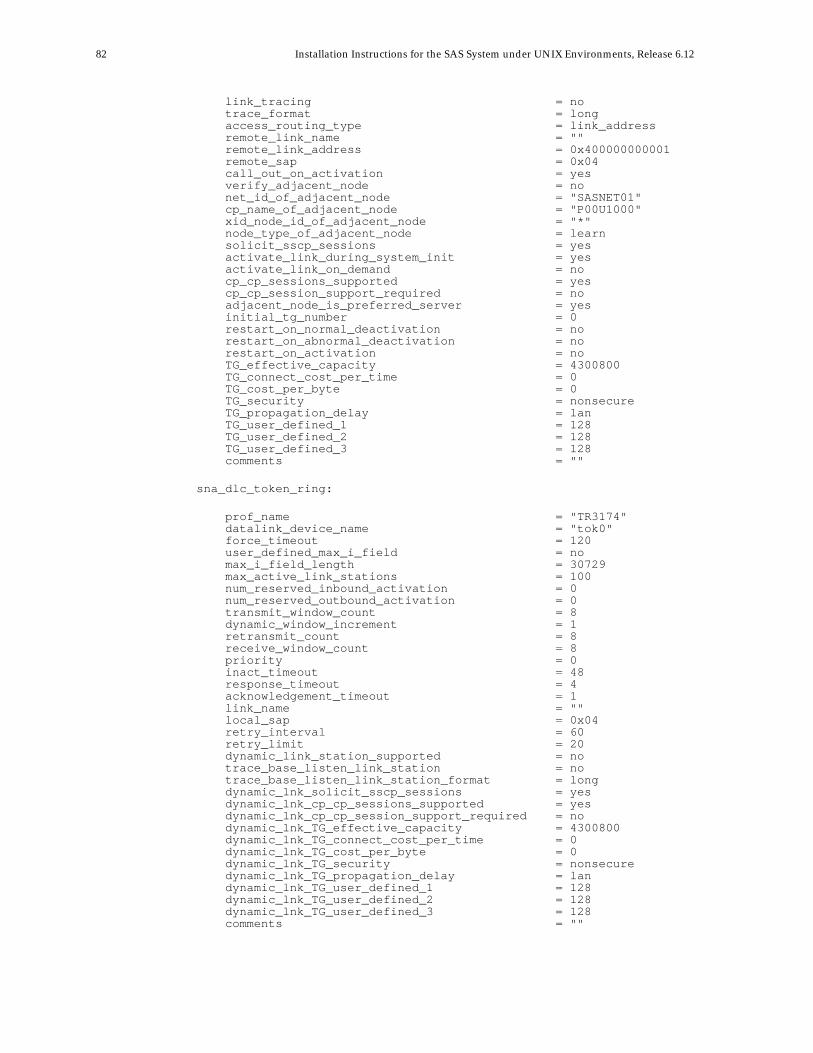
82 Installation Instructions for the SAS System under UNIX Environments, Release 6.12
link_tracing = no trace_format = long access_routing_type = link_address remote_link_name = "" remote_link_address = 0x400000000001 remote_sap = 0x04 call_out_on_activation = yes verify_adjacent_node = no net_id_of_adjacent_node = "SASNET01" cp_name_of_adjacent_node = "P00U1000" xid_node_id_of_adjacent_node = "*" node_type_of_adjacent_node = learn solicit_sscp_sessions = yes activate_link_during_system_init = yes activate_link_on_demand = no cp_cp_sessions_supported = yes cp_cp_session_support_required = no adjacent_node_is_preferred_server = yes initial_tg_number = 0 restart_on_normal_deactivation = no restart_on_abnormal_deactivation = no restart_on_activation = no TG_effective_capacity = 4300800 TG_connect_cost_per_time = 0 TG_cost_per_byte = 0 TG_security = nonsecure TG_propagation_delay = lan TG_user_defined_1 = 128 TG_user_defined_2 = 128 TG_user_defined_3 = 128 comments = ""
sna_dlc_token_ring:
prof_name = "TR3174" datalink_device_name = "tok0" force_timeout = 120 user_defined_max_i_field = no max_i_field_length = 30729 max_active_link_stations = 100 num_reserved_inbound_activation = 0 num_reserved_outbound_activation = 0 transmit_window_count = 8 dynamic_window_increment = 1 retransmit_count = 8 receive_window_count = 8 priority = 0 inact_timeout = 48 response_timeout = 4 acknowledgement_timeout = 1 link_name = "" local_sap = 0x04 retry_interval = 60 retry_limit = 20 dynamic_link_station_supported = no trace_base_listen_link_station = no trace_base_listen_link_station_format = long dynamic_lnk_solicit_sscp_sessions = yes dynamic_lnk_cp_cp_sessions_supported = yes dynamic_lnk_cp_cp_session_support_required = no dynamic_lnk_TG_effective_capacity = 4300800 dynamic_lnk_TG_connect_cost_per_time = 0 dynamic_lnk_TG_cost_per_byte = 0 dynamic_lnk_TG_security = nonsecure dynamic_lnk_TG_propagation_delay = lan dynamic_lnk_TG_user_defined_1 = 128 dynamic_lnk_TG_user_defined_2 = 128 dynamic_lnk_TG_user_defined_3 = 128 comments = ""
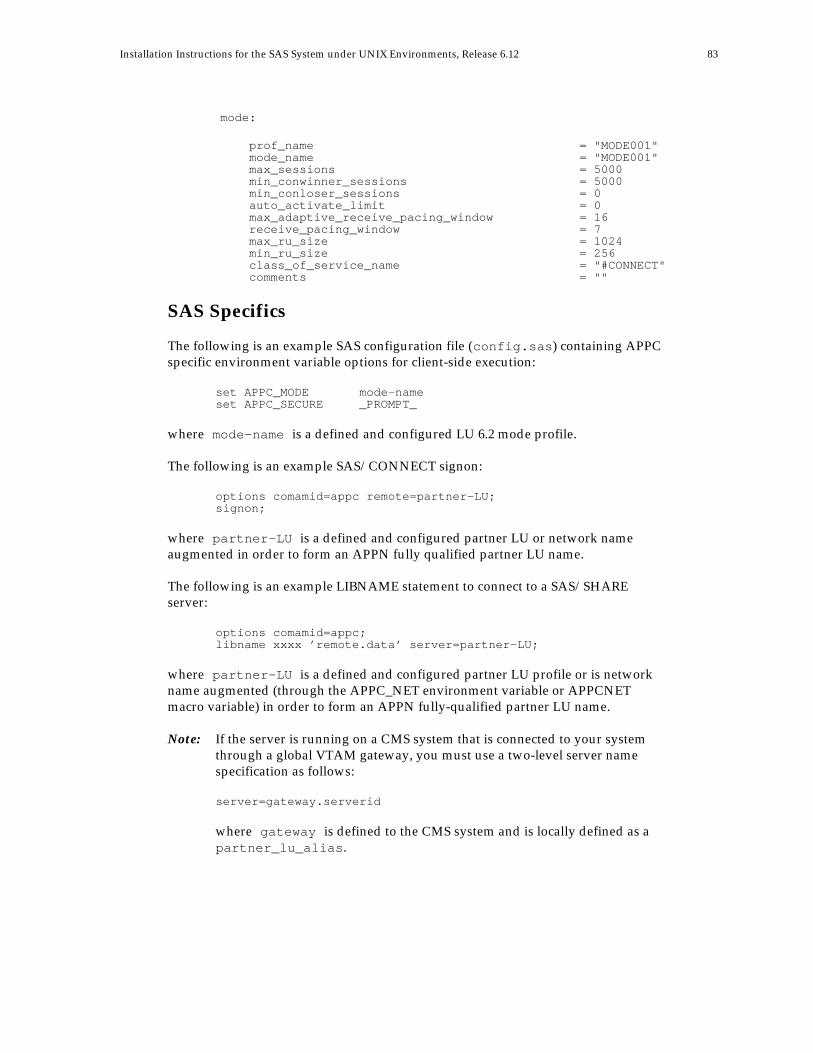
Installation Instructions for the SAS System under UNIX Environments, Release 6.12 83
mode:
prof_name = "MODE001" mode_name = "MODE001" max_sessions = 5000 min_conwinner_sessions = 5000 min_conloser_sessions = 0 auto_activate_limit = 0 max_adaptive_receive_pacing_window = 16 receive_pacing_window = 7 max_ru_size = 1024 min_ru_size = 256 class_of_service_name = "#CONNECT" comments = ""
SAS Specifics
The following is an example SAS configuration file (config.sas) containing APPCspecific environment variable options for client-side execution:
set APPC_MODE mode-nameset APPC_SECURE _PROMPT_
where mode-name is a defined and configured LU 6.2 mode profile.
The following is an example SAS/CONNECT signon:
options comamid=appc remote=partner-LU;signon;
where partner-LU is a defined and configured partner LU or network nameaugmented in order to form an APPN fully qualified partner LU name.
The following is an example LIBNAME statement to connect to a SAS/SHAREserver:
options comamid=appc;libname xxxx ’remote.data’ server=partner-LU;
where partner-LU is a defined and configured partner LU profile or is networkname augmented (through the APPC_NET environment variable or APPCNETmacro variable) in order to form an APPN fully-qualified partner LU name.
Note: If the server is running on a CMS system that is connected to your systemthrough a global VTAM gateway, you must use a two-level server namespecification as follows:
server=gateway.serverid
where gateway is defined to the CMS system and is locally defined as apartner_lu_alias.

84 Installation Instructions for the SAS System under UNIX Environments, Release 6.12
References
❏ AIX SNA Server/6000 Command Reference (SC31-7100)❏ AIX SNA Server/6000 Diagnosis Guide and Messages (SC31-7101)❏ AIX SNA Server/6000 User’s Guide (SC31-7002)❏ AIX SNA Server/6000 Transaction Program Reference (SC31-7003)❏ AIX SNA Server/6000 Configuration Reference (SC31-7014)
85
Appendix E, Post-Installation Instructions forSAS/CPE
® Software or IT Service Vision
® Software
Please refer to the Installation Instructions for IT Service Vision included in yourcustomer package for any post-installation instructions for your SAS System.

87
Appendix F, Configuration Instructions forSAS/SHARE
® Software
The information in this appendix is also included on the installation tape asSASROOT/misc/share/README.
Set SAS System Option to Specify the TCP/IP Access Method
The SAS system option COMAMID= specifies which access method SAS/SHAREsoftware should use for communication. Specify COMAMID=TCP to use the TCP/IPaccess method, which is the only access method available for use with this release ofSAS/SHARE software for UNIX environments.
Configuration for the TCP/IP Communications Method
Each SAS server that runs on a network node must be defined as a service in the file/etc/services or /etc/inet/services on that node. Each entry in this fileassociates a service name with the port number and protocol used by that service. Anentry for a SAS server has the following form:
<server name> <port number>/tcp # <comments>
The server name must be 1-8 characters in length. The first character must be a letteror underscore; the remaining seven characters can include letters, digits, underscores,the dollar ($) sign, or the at (@) sign.
An entry for a server whose name is MKTSERV might look like the following:
mktserv 5000/tcp # SAS server for Marketing and Sales
The server name is specified with the SERVER= option in the LIBNAME statement,and the OPERATE procedure in user and server administrator programs.
System Configuration for the APPC Communications AccessMethod
See "System Configuration for the APPC Communications Access Method," inAppendix D, "Post-Installation Setup for SAS/CONNECT Software," for informationon establishing an environment to use SNA LU6.2 APPC (Advanced Program-to-Program Communications) communications within your SAS applications under HP-UX, Solaris and AIX.


89
Appendix G, Using Syncsort with the SAS®
System for UNIX® Environments
Syncsort is a sort routine that may be purchased from Syncsort, Inc. You can useSyncsort as an alternate sorting algorithm to the one provided by the SAS System. Touse Syncsort with the SAS System, complete the following steps:
1. Install the Syncsort library on your system by following the instructionsprovided by Syncsort, Inc.
2. Make the Syncsort library available to the SAS System by following theinstructions in the following section, "Making Syncsort Available."
3. Submit an options statement in a SAS session to specify the Syncsort routineby following the instructions in the section "Using Syncsort in a SAS Session."
Making Syncsort Available
This section describes the machine-specific instructions for making Syncsort availableto the SAS System.
For Solaris 1 Only
Use one of the following methods to specify the full path of the Syncsort library:
❏ Specify the -sortlib option when invoking the SAS System, giving thefull pathname of the Syncsort library as shown in the following example:
sas -sortlib /usr/local/syncsort/lib/libsyncsort.so.1.0.5
❏ Submit the following option statement from the SAS System program editor:
OPTIONS SORTLIB=<syncsort library>
where <syncsort library> is the full pathname of the Syncsort libraryas shown in the following example:
OPTIONS SORTLIB="/usr/local/syncsort/lib/libsyncsort.so.1.0.5";
90 Installation Instructions for the SAS System under UNIX Environments, Release 6.12
For Solaris 2 Only
You must place the Syncsort library in one of the directories searched by default, suchas /usr/lib, or set the environment variable LD_LIBRARY_PATH to the directorycontaining the Syncsort library. Set this environment variable before invoking theSAS System, as shown in the following example:
setenv LD_LIBRARY_PATH /usr/local/syncsort/lib
Note: The above example uses C-Shell syntax, therefore the syntax will vary forBourne Shell and K-Shell users.
For HP-UX Only
The SAS System does not support the shared library that Syncsort provides for HP-UX machines. You must obtain the archive library for HP-UX from Syncsort, Inc.
Complete the following steps to make Syncsort available to the SAS System. Thesesteps need to be followed each time a new Syncsort library and archive librarybecome available.
1. Change directories to !SASROOT/saspgm/base/c/cntl. There is a filecalled syncsort.make in this directory. This file contains the followingtext:
SYNCARLIB = /usr/local/syncsort/lib/libsyncsort.asassyncs: ../obj/sassyncs.o $(SYNCARLIB)/bin/ld -o ../obj/sassyncs ../obj/sassyncs.o $(SYNCARLIB) \-HF -a archive -R80000 -N -lc -e mcn_main
2. Set SYNCARLIB to the pathname of the archive library.
Note: If this file is being created, make sure there is a TAB character in front of the/bin/ld command, rather than blanks.
3. At the system prompt, enter the command make -f syncsort.make
Once the make has completed, you should have an appendage calledsassyncs in the !SASROOT/saspgm/base/c/obj directory.
4. Add the following statement to your congig.sas612 file:
-PATH !SASROOT/saspgm/base/c/obj
Installation Instructions for the SAS System under UNIX Environments, Release 6.12 91
For AIX (RS/6000) Only
If your version of Syncsort has a structure for syncsort/lib that containslibsyncsort.a but not libsyncsort.o, then you will need to create the librarylibsyncsort.o using libsyncsort.a. Submit the following command:
ar x libsyncsort.a libsyncort.o
You must place the Syncsort library in the directory /usr/local/syncsort/libwhere it will be found by default, or set the environment variable LIBPATH to thedirectory containing the Syncsort library. Set this environment variable beforeinvoking the SAS System, as shown in the following example:
setenv LIBPATH <syncsort lib location>:/usr/lib:/lib
where <syncsort lib location> is the full pathname of the Syncsort library.
Note: The above example uses C-shell syntax, therefore the syntax will vary forBourne Shell and K-Shell users.
Using Syncsort in a SAS Session
Once Syncsort is available, use the SORTPGM=HOST or SORTPGM=BEST optionsstatements to tell the SAS System when to use the Syncsort routine.
Note: The options statements throughout this section specify the syntax to submitto the SAS System. You can also specify these options as command lineoptions and options in the config.sas file. Refer to SAS Companion forUNIX Environments: Language for more information on setting options.
Submit one of the following options statements in a SAS session:
❏ OPTIONS SORTPGM=HOST;
tells the SAS System to always use Syncsort.
92 Installation Instructions for the SAS System under UNIX Environments, Release 6.12
❏ OPTIONS SORTPGM=BEST;
tells the SAS System to choose the best sorting method in a givensituation, the SAS System sort or Syncsort.
There are two options that define how the SAS System chooses the "best" sortalgorithm. The following examples use the syntax of an options statementthat needs to be submitted to the SAS System:
❏ -sortcut <n> , where n specifies a number of observations.
OPTIONS SORTPGM=BEST SORTCUT=500;
-sortcut tells the SAS System to choose Syncsort if the number ofobservations is greater than the number you specify, and to use theSAS System sort if the number of observations is equal to or less thanthe number specified.
❏ -sortcutp <size>[kKmM], where <size> specifies a file size ineither kilobytes or megabytes.
OPTIONS SORTPGM=BEST SORTCUTP=40M;
-sortcutp tells the SAS System to choose Syncsort if the size of thedata being sorted exceeds the size you specify, and to use the SASSystem sort if the size of the data is equal to or smaller than the sizeyou specify.
If these options are not defined or these options are set to zero, the SASSystem chooses the SAS System sort routine. If you specify both options andeither condition is met, the SAS System chooses the Syncsort routine.
Syncsort creates all temporary files in the SASWORK directory. You can change thisdirectory by using the option sortdev <dir>, where <dir> is the directory inwhich you want the temporary files to be created. For example, submit the followingstatement if you want the temporary files to be created in /tmp:
OPTIONS SORTPGM=BEST SORTCUT=500 sortdev="/tmp";
The Syncsort option sortanom t prints timing and resource information after eachphase of a sort. The following is an example of this option:
OPTIONS SORTPGM=HOST SORTANOM=t;
93
Appendix H, Invoking SAS/TUTOR® Software
SAS/TUTOR software can be invoked directly from the SAS System.To access the SAS/TUTOR courses, complete the following steps:
1. Invoke the SAS System.
2. Select Online Training from the Help pull-down menu in theProgram Editor window.

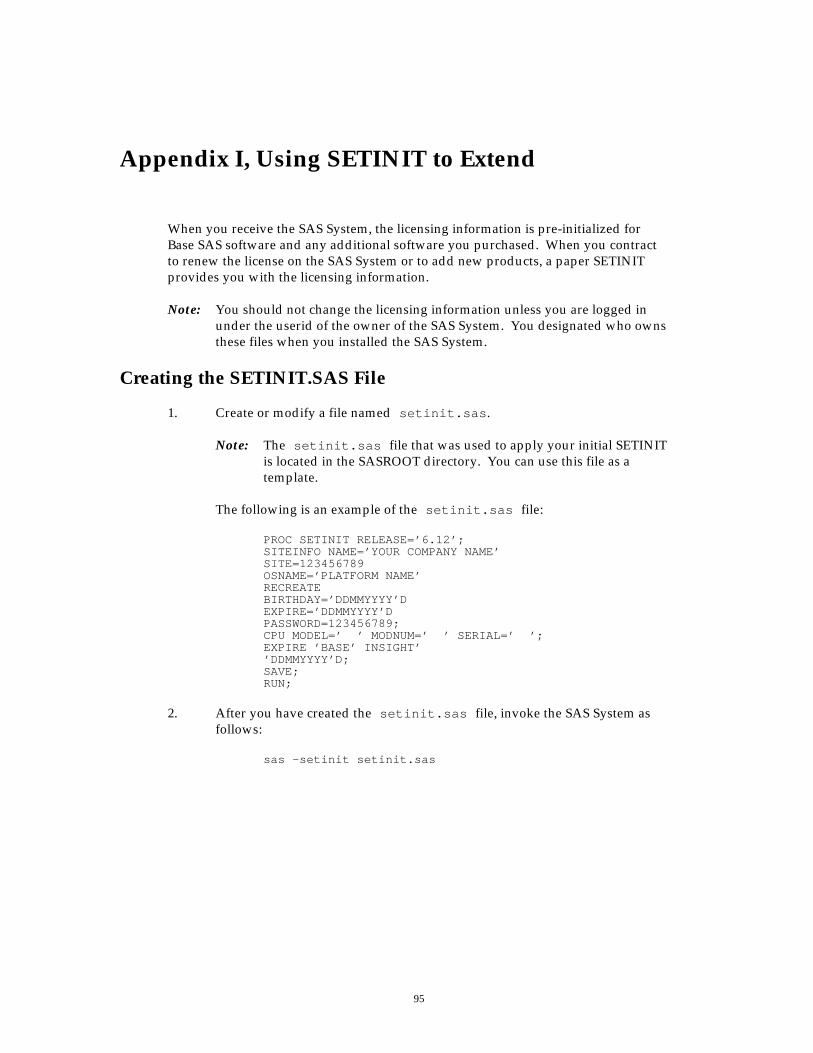
95
Appendix I, Using SETINIT to Extend
When you receive the SAS System, the licensing information is pre-initialized forBase SAS software and any additional software you purchased. When you contractto renew the license on the SAS System or to add new products, a paper SETINITprovides you with the licensing information.
Note: You should not change the licensing information unless you are logged inunder the userid of the owner of the SAS System. You designated who ownsthese files when you installed the SAS System.
Creating the SETINIT.SAS File
1. Create or modify a file named setinit.sas.
Note: The setinit.sas file that was used to apply your initial SETINITis located in the SASROOT directory. You can use this file as atemplate.
The following is an example of the setinit.sas file:
PROC SETINIT RELEASE=’6.12’;SITEINFO NAME=’YOUR COMPANY NAME’SITE=123456789OSNAME=’PLATFORM NAME’RECREATEBIRTHDAY=’DDMMYYYY’DEXPIRE=’DDMMYYYY’DPASSWORD=123456789;CPU MODEL=’ ’ MODNUM=’ ’ SERIAL=’ ’;EXPIRE ’BASE’ INSIGHT’’DDMMYYYY’D;SAVE;RUN;
2. After you have created the setinit.sas file, invoke the SAS System asfollows:
sas -setinit setinit.sas
96 Installation Instructions for the SAS System under UNIX Environments, Release 6.12
3. Check the setinit.log file for the following lines:
❏ NOTE: Siteinfo data have been updated.
indicates that the SETINIT applied correctly.
❏ NOTE: No update of the secondary setinit since eitherthe password was omitted or zero, or the SEC statementwas omitted.
indicates that the secondary SETINIT information was not updated.This is normal.
Should you need to provide an alternate pathname for the SETINIT program, be surenot to use setinit.sas. If the install detects the existence of a setinit.sasfile, it will rename it and your SETINIT may not be applied correctly.
For More Information
If you need more information about applying your SETINIT, refer to SAS Companionfor UNIX Environments: Language.
If you have questions about your SETINIT data, please call our Customer ServicesDepartment at (919) 677-8003 between 9:00 a.m. and 8:00 p.m. Eastern Standard Time.
If you encounter problems applying your SETINIT, please call our Technical SupportDivision at (919) 677-8008 between 9:00 a.m. and 8:00 p.m. Eastern Standard Time.Ask the Technical Receptionist for a UNIX consultant. Please have your site numberready when you call.
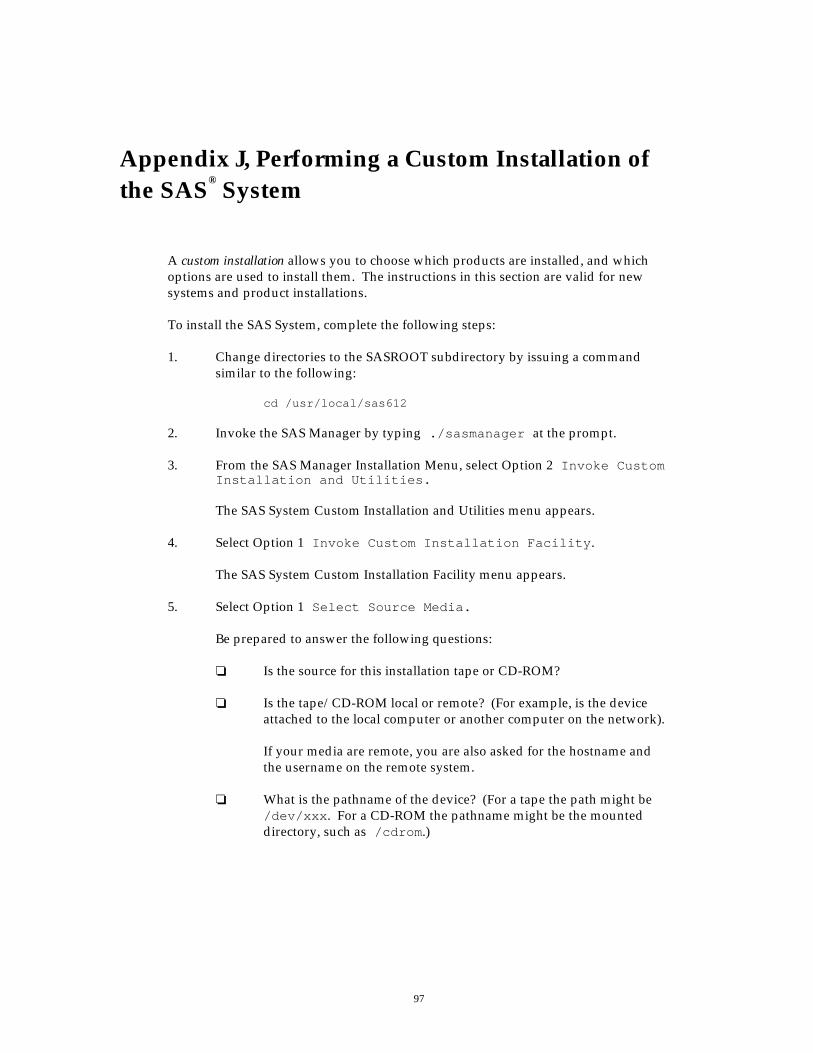
97
Appendix J, Performing a Custom Installation ofthe SAS
® System
A custom installation allows you to choose which products are installed, and whichoptions are used to install them. The instructions in this section are valid for newsystems and product installations.
To install the SAS System, complete the following steps:
1. Change directories to the SASROOT subdirectory by issuing a commandsimilar to the following:
cd /usr/local/sas612
2. Invoke the SAS Manager by typing ./sasmanager at the prompt.
3. From the SAS Manager Installation Menu, select Option 2 Invoke CustomInstallation and Utilities.
The SAS System Custom Installation and Utilities menu appears.
4. Select Option 1 Invoke Custom Installation Facility.
The SAS System Custom Installation Facility menu appears.
5. Select Option 1 Select Source Media.
Be prepared to answer the following questions:
❏ Is the source for this installation tape or CD-ROM?
❏ Is the tape/CD-ROM local or remote? (For example, is the deviceattached to the local computer or another computer on the network).
If your media are remote, you are also asked for the hostname andthe username on the remote system.
❏ What is the pathname of the device? (For a tape the path might be/dev/xxx. For a CD-ROM the pathname might be the mounteddirectory, such as /cdrom.)
98 Installation Instructions for the SAS System under UNIX Environments, Release 6.12
6. Select Option 2 Select Destination Media
You have the choice of installing the SAS System to any of the following:
❏ Disk Image
Choose this option when your destination is a disk.
❏ Distribution Disk Image
Choose this option when you want to build an image of theSAS System for distribution where each product is stored in anarchive format.
❏ Tape (includes QIC, 8 mm, and 4 mm)
Choose this option when your destination is a tape.
Be prepared to answer the following questions:
❏ Is the source for this installation tape or CD-ROM?
❏ Is the tape/CD-ROM local or remote? (Is the device attachedto the local computer or another computer on the network?)
If your media are remote, you are also asked for thehostname and the username on the remote system.
❏ What is the pathname of the device? (For a tape the pathmight be /dev/xxx. For a CD-ROM the pathname mightbe the mounted directory, such as /cdrom.)
Note: You may want to install the SAS System to more than one destinationon your system. Normally, you complete an entire installation,including product-specific customizations, before installation to adifferent destination. SAS Manager remembers the destinationbetween invocations. Therefore, when running SAS Manager to loadto a destination that is different from the previous one, you mustchoose Select Destination Media from the SAS CustomInstallation Facility to specify the new destination.
7. Select Option 3 Show Current Installation Settings to show thecurrent SASROOT directory as well as the source and destination settings.This includes remote information if either the source or destination is remote.This step is optional.
8. Select Option 4 View media contents to display the contents of thesource media. This step is optional.
Installation Instructions for the SAS System under UNIX Environments, Release 6.12 99
9. Select Option 5 Install All Products from Source toDestination to install all of the products and files, or Option 6 PerformCustom Installation to install only those files you select to install.
For new installations, you are asked to supply the correct pathname for yourSETINIT program. The default path should be correct for most installations.
If you select Option 5, you see a message saying Installing SASProducts. Selecting this option is not the same as performing a defaultinstallation because the SAS Utilities are not automatically run for you.
Alternatively, you can select Option 6 Custom installation to selectthe products you want to install. For information about each option on theCustom Installation menu, see "The Custom Installation Menu" later in thischapter.
10. After the products are installed, select the Go Back option until you returnto the SAS System Custom Installation and Utilities menu.
11. From the SAS System Custom Installation and Utilities menu, select Option 2Invoke Product Specific Configuration to display a list ofproducts that need additional setup. Choose each product by itscorresponding number and follow the directions. See the appropriateappendix for additional information on product-specific configurations.
Note: If none of the products you installed require additional setup, selectGo Back from the Product Specific Configuration menu to return tothe Custom Installation and Utilities menu.
12. From the SAS System Custom Installation and Utilities menu, select Option 3Invoke SAS Installation Utilities. After running this option, youmust perform the tasks represented by Options 1 and 3 on this menu tocomplete the installation.
❏ Option 1 creates a config.sas612 and autoexec.sas file.
❏ Option 2 applies special Technical Support fixes that are suppliedwith the SAS Notes. Select this option to unload special, highpriority fixes that are currently not available via the normalmaintenance channel. Utilize this option when you are directed todo so by SAS Institute Technical Support.
❏ Option 3 runs patchname, a utility that patches the SAS executablewith the current installation.
❏ Option 4 applies the SAS SETINIT information.
For more information about SETINIT, see Appendix I, "UsingSETINIT to Extend SAS Software Products," or refer to SASCompanion for UNIX Environments: Language, Version 6, First Edition.
100 Installation Instructions for the SAS System under UNIX Environments, Release 6.12
❏ Option 5 runs the System Integrity test to verify that the SAS Systeminstalled correctly. This step is optional, but recommended. You willreceive messages upon completion of the test as to the validity of theinstallation.
❏ Option 6 uncompresses the maps data sets. This step is optional.
❏ Option 7 returns you to the main menu.
You have completed the installation of the SAS System.
For AIX (RS/6000) Only
If you changed your block size before beginning the installation process, youcan restore the original parameters once you have completed the installation.
Note: For <device> in the following instructions, specify theabbreviated form, rmt0 (assuming that your tape drive isdrive 0).
If you performed your installation from a local drive, issue the followingcommand:
chdev -l <device> -a block_size=nnn
where nnn is the original setting that you recorded before changing thesetting to 0.
If you performed your installation from a remote drive, issue the followingcommand:
rsh hostname -l username /ect/chdev -l <device> -a block_size=nnn
where nnn is the original setting that you recorded before changing thesetting to 0.
Installation Instructions for the SAS System under UNIX Environments, Release 6.12 101
The Custom Installation Menu
This section explains each of the options on the Custom Installation menu. Thismenu appears when you select Option 6 as previously described in Step 9 in theprevious section, "Performing a Custom Installation of the SAS System."
The Custom Installation menu contains the following options:
❏ Choose Licensing files❏ Choose SAS Notes❏ Choose International Support❏ Choose Products❏ Choose Samples❏ Choose Maps❏ Clear All Selections❏ Preview Selections❏ Install Current Selections❏ Go Back
Each of these options is described in the following sections.
Choose Licensing files
Select Option 1 Licensing files to install the SAS System licensing files. Thesefiles are required to run the SAS System.
If you are installing the SAS System for the first time or installing a new product, youmust install the licensing files. Failure to do so may result in errors when running theinstallation test streams, and errors when attempting to execute the SAS System.
Note: If you are installing maintenance or usage notes, or if you are re-installing aproduct, you may not need to re-install the licensing files.
Choose SAS Notes
Select Option 2 Choose SAS Notes to install the SAS Notes. SAS Notes aresupplied by Technical Support and come with an application that allows you to viewthem. SAS Notes provide the following information:
❏ a list of known problems❏ explanations of work-arounds for known problems❏ general information for running SAS software❏ help for troubleshooting error messages.
Choose International Support
Select Option 3 Choose International Support to display the availablelanguages that you can choose to install. International support is available only forsites receiving a language other than English on their media.
102 Installation Instructions for the SAS System under UNIX Environments, Release 6.12
Choose Products
Select Option 4 Choose Products to select the products you want to install. Thefollowing menu is displayed:
Custom Selection of Products:* 1. Select All Products2. Select Individual Products3. Clear Current Product Selections4. Go Back(Enter h for help)Action ? [1]
The following is a brief explanation of each option on the menu:
Select All Products
selects all of the products on the installation media for installation.
Select Individual Products
prompts you for the number of products you want to install. Leave a blankbetween each number. You can also specify ranges of numbers such as 1-19, indicating you want to install products 1 through 19.
Clear Current Product Selections
clears all of your selections, enabling you to select different products.
Go Back
returns you to the Custom Selection Install menu.
Choose Samples
Select Option 5 Choose Samples to choose the samples that you want to install byproduct. The following menu is displayed:
Custom Selection of Samples:* 1. Select All Samples2. Select Individual Samples3. Clear Current Sample Selections4. Go Back(Enter h for help)Action ? [1]
The following is a brief explanation of each option on the menu:
Select All Samples
selects all of the samples on the installation media for installation.
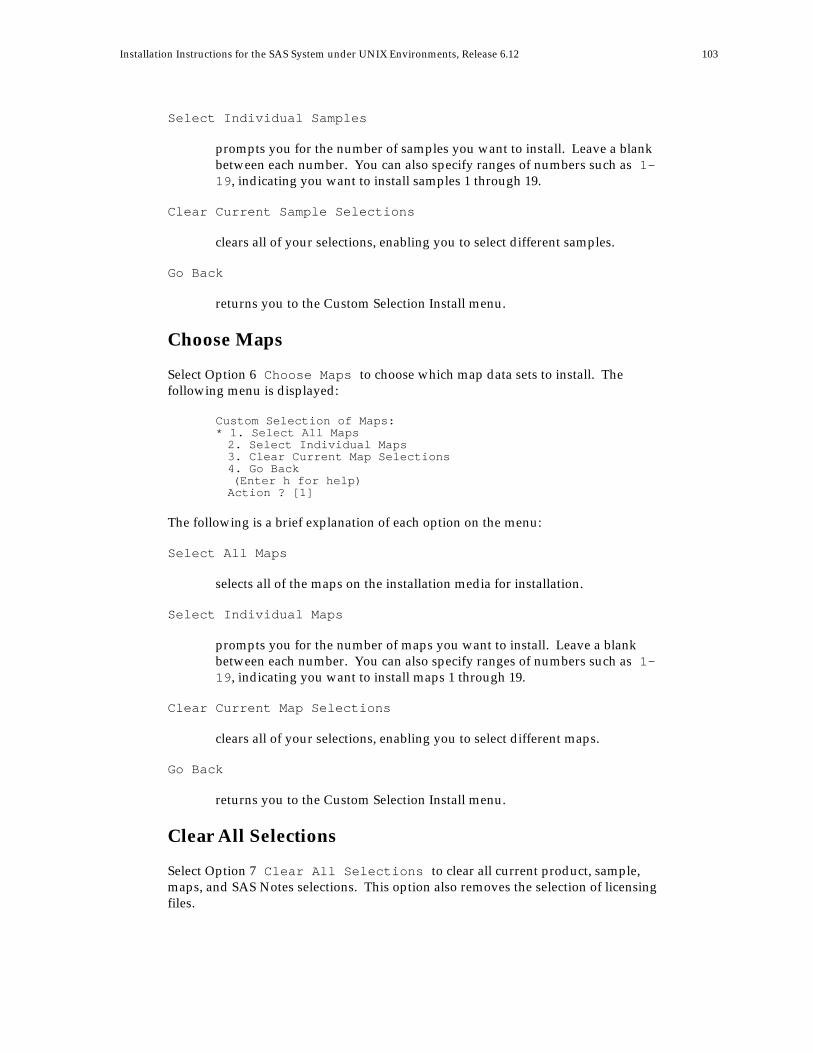
Installation Instructions for the SAS System under UNIX Environments, Release 6.12 103
Select Individual Samples
prompts you for the number of samples you want to install. Leave a blankbetween each number. You can also specify ranges of numbers such as 1-19, indicating you want to install samples 1 through 19.
Clear Current Sample Selections
clears all of your selections, enabling you to select different samples.
Go Back
returns you to the Custom Selection Install menu.
Choose Maps
Select Option 6 Choose Maps to choose which map data sets to install. Thefollowing menu is displayed:
Custom Selection of Maps:* 1. Select All Maps2. Select Individual Maps3. Clear Current Map Selections4. Go Back(Enter h for help)Action ? [1]
The following is a brief explanation of each option on the menu:
Select All Maps
selects all of the maps on the installation media for installation.
Select Individual Maps
prompts you for the number of maps you want to install. Leave a blankbetween each number. You can also specify ranges of numbers such as 1-19, indicating you want to install maps 1 through 19.
Clear Current Map Selections
clears all of your selections, enabling you to select different maps.
Go Back
returns you to the Custom Selection Install menu.
Clear All Selections
Select Option 7 Clear All Selections to clear all current product, sample,maps, and SAS Notes selections. This option also removes the selection of licensingfiles.
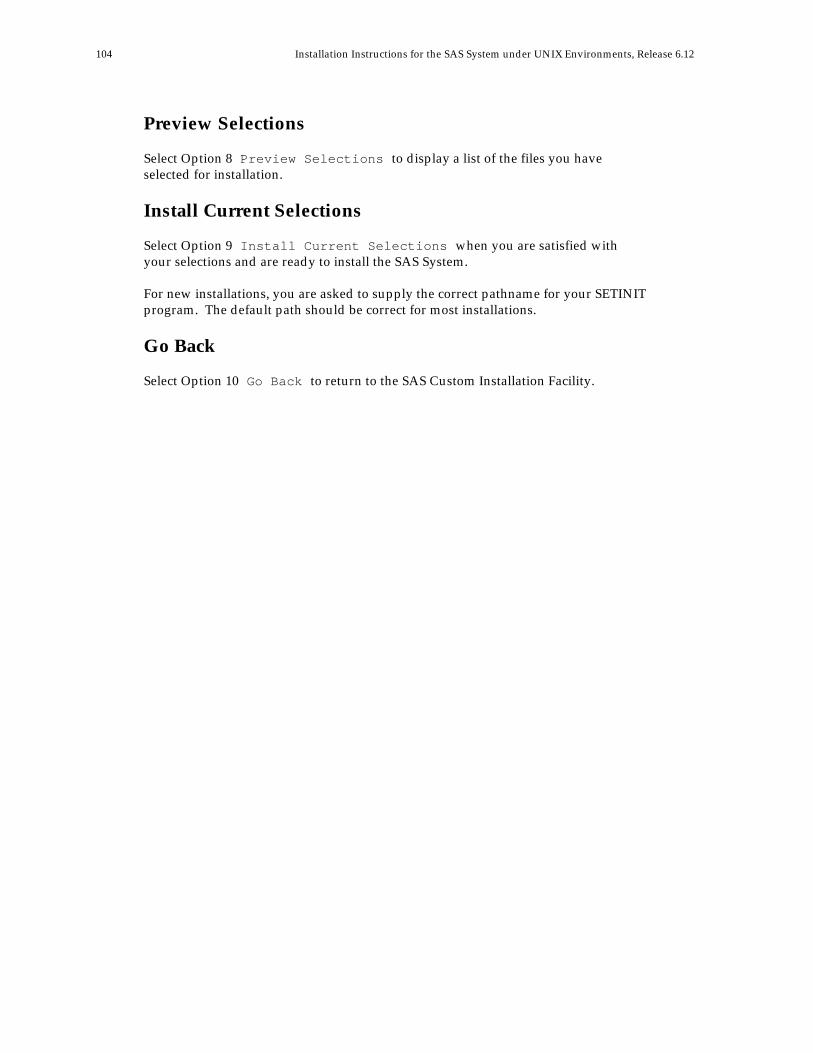
104 Installation Instructions for the SAS System under UNIX Environments, Release 6.12
Preview Selections
Select Option 8 Preview Selections to display a list of the files you haveselected for installation.
Install Current Selections
Select Option 9 Install Current Selections when you are satisfied withyour selections and are ready to install the SAS System.
For new installations, you are asked to supply the correct pathname for your SETINITprogram. The default path should be correct for most installations.
Go Back
Select Option 10 Go Back to return to the SAS Custom Installation Facility.
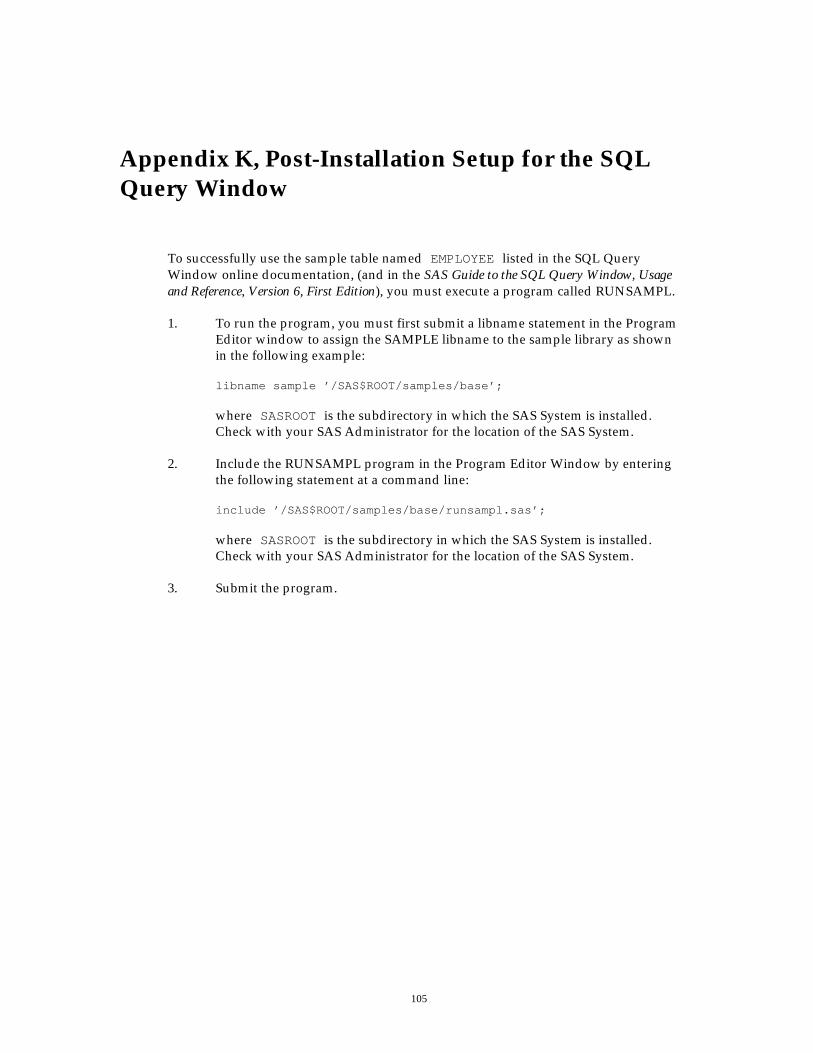
105
Appendix K, Post-Installation Setup for the SQLQuery Window
To successfully use the sample table named EMPLOYEE listed in the SQL QueryWindow online documentation, (and in the SAS Guide to the SQL Query Window, Usageand Reference, Version 6, First Edition), you must execute a program called RUNSAMPL.
1. To run the program, you must first submit a libname statement in the ProgramEditor window to assign the SAMPLE libname to the sample library as shownin the following example:
libname sample ’/SAS$ROOT/samples/base’;
where SASROOT is the subdirectory in which the SAS System is installed.Check with your SAS Administrator for the location of the SAS System.
2. Include the RUNSAMPL program in the Program Editor Window by enteringthe following statement at a command line:
include ’/SAS$ROOT/samples/base/runsampl.sas’;
where SASROOT is the subdirectory in which the SAS System is installed.Check with your SAS Administrator for the location of the SAS System.
3. Submit the program.

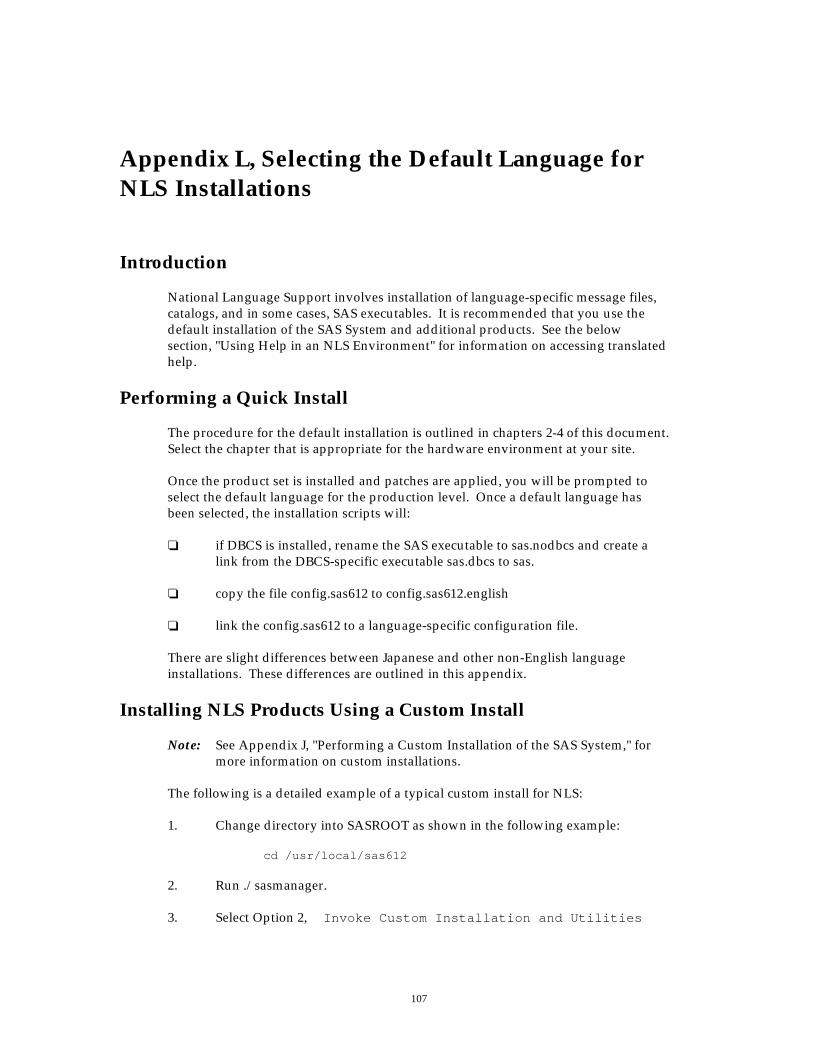
107
Appendix L, Selecting the Default Language forNLS Installations
Introduction
National Language Support involves installation of language-specific message files,catalogs, and in some cases, SAS executables. It is recommended that you use thedefault installation of the SAS System and additional products. See the belowsection, "Using Help in an NLS Environment" for information on accessing translatedhelp.
Performing a Quick Install
The procedure for the default installation is outlined in chapters 2-4 of this document.Select the chapter that is appropriate for the hardware environment at your site.
Once the product set is installed and patches are applied, you will be prompted toselect the default language for the production level. Once a default language hasbeen selected, the installation scripts will:
❏ if DBCS is installed, rename the SAS executable to sas.nodbcs and create alink from the DBCS-specific executable sas.dbcs to sas.
❏ copy the file config.sas612 to config.sas612.english
❏ link the config.sas612 to a language-specific configuration file.
There are slight differences between Japanese and other non-English languageinstallations. These differences are outlined in this appendix.
Installing NLS Products Using a Custom Install
Note: See Appendix J, "Performing a Custom Installation of the SAS System," formore information on custom installations.
The following is a detailed example of a typical custom install for NLS:
1. Change directory into SASROOT as shown in the following example:
cd /usr/local/sas612
2. Run ./sasmanager.
3. Select Option 2, Invoke Custom Installation and Utilities
108 Installation Instructions for the SAS System under UNIX Environments, Release 6.12
4. Select Option 1, Invoke Custom Installation Facility
5. Select Option 1, Select Source Media.... You are prompted with aseries of questions concerning your media. See Appendix J for moreinformation.
6. Select Option 2, Select Destination Media... and take the defaultanswers supplied by the install.
7. Select Option 6, Perform Custom Installation...
8. Select Option 1, Choose Licensing Files...
9. Select Option 2, Choose SAS Notes...
10. Select Option 3, Choose International Support... and select all ofthe languages you want to install onto your system.
Later in the install, you are asked to pick one of the languages to be thedefault. However, you can run SAS with any of the languages you choosehere at any time. Choosing Option 5, Choose All Languages onSource Media provides the most flexibility. When you are finishedselecting languages, select Go Back to return to the Custom Installationmenu.
11. Select Option 4, Choose Products... and select the products you wantto load. You can load either all or some of the products. When you arefinished selecting products, select Option 4, Go Back to return to theCustom Installation menu.
12. Select Option 5, Choose Samples.... This is similar to the ChooseProducts selection. Make your sample selections and then select GoBack to return to the Custom Installation menu.
13. Select Option 6, Choose Maps... This is also similar to the ChooseProducts selection. Make your map selections and then select Go Backto return to the Custom Installation menu.
14. Select Option 9, Install Current Selections to actually install whatyou selected in the previous steps. This will take a while. When the processis finished, all selected products are installed on to your system. Now, post-processing for installed NLS products is required.
15. Select Option 10, Go Back to return to the SAS Custom Installation Facilitymenu.
16. Select Option 7, Go Back to return to the SAS System Custom Installationand Utilities menu.
17. Select Option 3, Invoke SAS Installation Utilities...
Note: For now, Option 2 is skipped so that the config file for English iscreated before you proceed to create NLS configurations.
Installation Instructions for the SAS System under UNIX Environments, Release 6.12 109
18. Select Option 1, Create SAS config and autoexec files...
19. Select Option 2, Apply Special Tech Support Fixes (suppliedwith SAS Notes).
20. Select Option 3, Patch SAS Binary With Installed Directory
21. Select Option 4, Apply SAS Setinit Information
22. Select Option 5, Invoke SAS Installation Tests
23. If you selected any maps from the Custom Installation menu, select Option 6,Uncompress Maps Datasets
24. Select Option 7, Go Back to return to the SAS System Custom Installationand Utilities menu.
25. Select Option 2, Invoke Product Specific Configuration
26. Select National Language Support (NLS) Configuration. Youare prompted with a list of languages. Select the language you want as thedefault the next time you invoke the SAS System.
You can change your default language later by using sasmanager, returningto this menu, and selecting another language.
27. Select Option 5, Desktop Installation. Though not a part of NLS, youneed to run this option in order to use the Desktop functions. See AppendixM, "Installing SAS Desktop" for more information.
Japanese Installations
Once the patches have been applied to the SAS System and additional products, thefollowing prompt is displayed:
Choose the default language for the production level:* 1. Japanese and DBCS files 2. Japanese SJIS and DBCS files 3. DBCS without language files 4. English 5. Cancel(Enter h for help)Which option? (1)
Option 1, Japanese and DBCS files, installs Japanese files (such as localizedmessage files, localized catalogs etc.) in the primary encoding (EUC in this case) andexecutables for Double Byte Character Set (DBCS) support. Note that the specificencoding format that is used is host-dependent.
110 Installation Instructions for the SAS System under UNIX Environments, Release 6.12
Option 2, Japanese SJIS and DBCS files, installs Japanese files (such aslocalized message files, localized catalogs etc.) in an alternate encoding (SJIS in thiscase) and executables for Double Byte Character Set (DBCS) support. Note that thespecific encoding format that is used is host-dependent.
Option 3, DBCS without language files, installs only the executables forDouble Byte Character Set (DBCS) support. For this option, no language-specific filesare installed.
Option 4, English, sets up the default English environment without any language-specific files.
Option 5, Cancel, aborts the selection of a language for the production level. Inthis case, the SAS executables and configuration files remain the English version.
Other Non-English Installations
Once the patches have been applied to the SAS System and additional products, thefollowing prompt is displayed:
Choose the default language for the production level:* 1. <Language> 2. English 3. Cancel(Enter h for help)Which option? (1)
Option 1, <Language> installs the language-specific message files, catalogs, and ifapplicable, executables, and set up the SAS environment as described in theIntroduction to this appendix.
Option 2, English, sets up the default English environment without any language-specific files.
Option 3, Cancel, aborts the selection of a language for the production level. Inthis case, the SAS executable and configuration files remain the English version.
Installation Instructions for the SAS System under UNIX Environments, Release 6.12 111
Using Help in an NLS Environment
There are two methods of accessing the SAS Help system. The default method is theHELPLUS graphical user interface. The alternate method is through the character-based terminal (CBT) help system.
Note that few if any of the HELPLUS source files have been translated to non-Englishlanguages, but some of the CBT-based files have been translated.
By default, the SAS System is set up to use HELPLUS. This is indicated in theconfiguration file config.sas612.<language> by the line:
-helpenv helplus
To force the help system to the CBT-based system, change the HELPENV option to:
-helpenv sas
Remember that only some of the help files have been translated.

113
Appendix M, Installing SAS® Desktop
The distribution media containing Base SAS software also includes the product, SASDesktop. In its default form, SAS Desktop provides a new graphical interface to theSAS System. SAS Desktop is also used by SAS/EIS and SAS/WarehouseAdministrator software. SAS Desktop is automatically installed unless you areperforming a custom installation. If you are performing a custom installation, followthe instructions in this appendix.
Installing SAS Desktop creates five indexed data sets that are needed by the desktop.SAS Desktop should be installed after all other products have been installed as theobservations in the data sets can vary depending on what other SAS products areinstalled at the site.
Complete the following steps to install SAS Desktop:
Note: The following steps assume that you have already completed Steps 1-10 inAppendix J, "Performing a Custom Installation of the SAS System."
1. Select Option 3, Invoke SAS Installation Utilities... thenOption 1, Create SAS Config and Autoexec Files... and thenOption 7, Go Back from the SAS System Custom Installation and Utilitiesmenu.
2. From the SAS System Custom Installation and Utilities menu, selectOption 2 Invoke Product Specific Configuration.
3. From the Product Specific Configuration menu, select Option 5 DesktopInstallation.

115
Government Notice
If you are a government site, a file containing information specific to your site isextracted during the product installation phase of the installation procedure.Assuming you have installed the SAS System at /usr/local, the file can be located in:
/usr/local/sas612/misc/notice
Note: It is important that you read this file, and that you make other users at yoursite aware of this information. To have the government notice automaticallydisplay in the SAS log, issue the following UNIX command:
cat /usr/local/sas612/misc/notice >> /usr/local/sas612/misc/base/news
This will append the government notice file onto the existing news file. Thedefault configuration file uses the -news option to specify that this file isdisplayed in the log after each invocation of the SAS System.


![Sas 101 1.1.2011[1]](https://img.pdfslide.us/doc/110x75/546cf99baf795971298b50e9/sas-101-1120111.jpg)