Embed Size (px)
Citation preview
1
Installation Instructions for ERDAS IMAGINE 2015
Note: You will need administrative rights to install this software.
Please refer to the ERDAS IMAGINE 2015 Download instructions for details on how to download the software
from the ERDAS Intergraph website.
Step 1 – Install / Check KeyServer Client
Before you install this software, check to make sure that the KeyServer Client software is installed on the target
computer.
You can check by going to Start – All Programs – Sassafras K2 – Then select ‘KeyVerify.’ The resulting screen
should indicate a server under ‘Name’. It should also list “Valid” under Status.
If there is no Sassafras K2 folder under All Programs, or the KeyVerify does not indicate a valid install, please go
to the TIPS website (http://www.tips.osmre.gov/) under Software – Downloadable Software and download the
K2Client software appropriate to the target computer (32-bit or 64-bit). Follow the installation instructions
included on the Downloadable Software page to install the KeyServer K2Client software.
Note: A new version of KeyServer was released on October 2012; if KeyServer was installed on your
machine prior to that date, download and install the latest version from the TIPS website.
Step 2 – Remove previous ERDAS Intergraph software
Uninstall any previous versions of Foundation, ERDAS IMAGINE, LPS, ER Mapper, ERDAS-Net Licensing
and fixes and enhancements (ex: ERDAS Imagine 2014)
Restart your computer
Note: If you have Intergraph licensing version 11.11.1 you can leave in on workstation and skip step
5 and steps involving installing the license manager and entering licensing information since it has
not been updated from Erdas 2015.
Step 3 – Install ERDAS Foundation 2015
Note: You will need to unzip/uncompress all downloaded files if they are not yet uncompressed.
ERDAS Foundation is required to run any ERDAS-Intergraph software.
Navigate to the folder ERDAS-FOUNDATION
Double click Application Setup
2
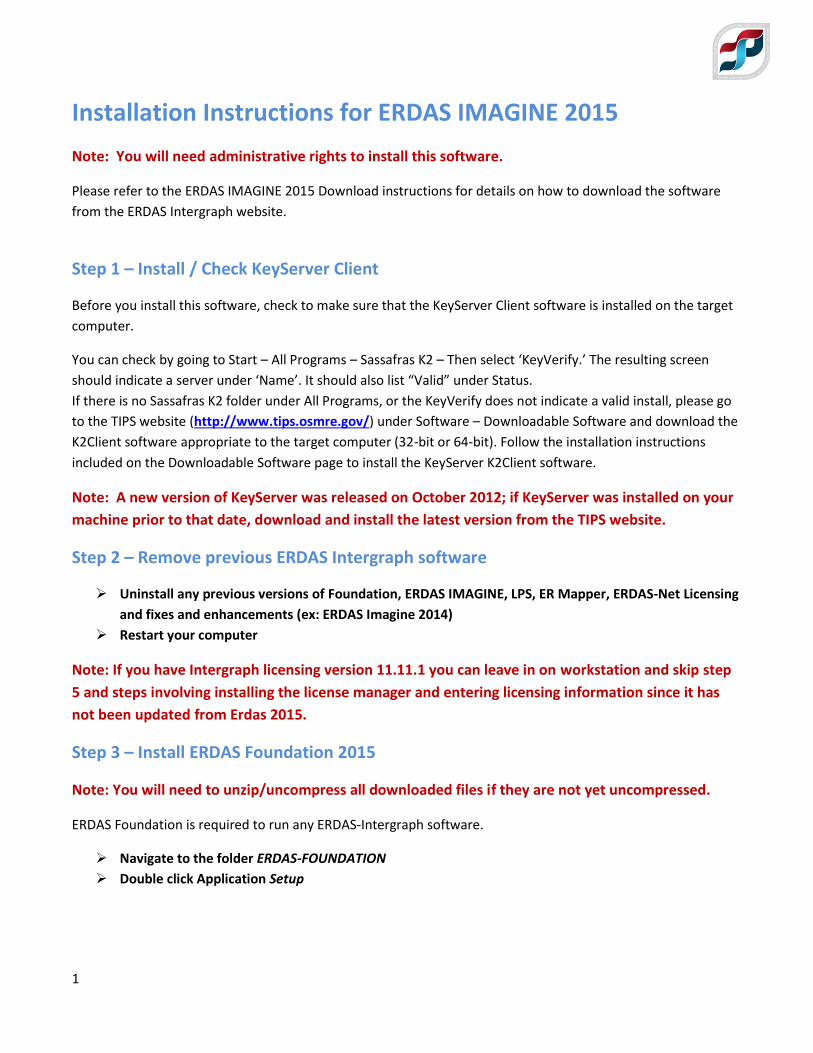
You will be prompted to install Microsoft.NET Framework 4.52 if it is not already installed on your computer. If
it is, you will not see the following two screens.
Enable the I have read and accept the license terms check box
Click Install
Click Finish after the installation is complete
3
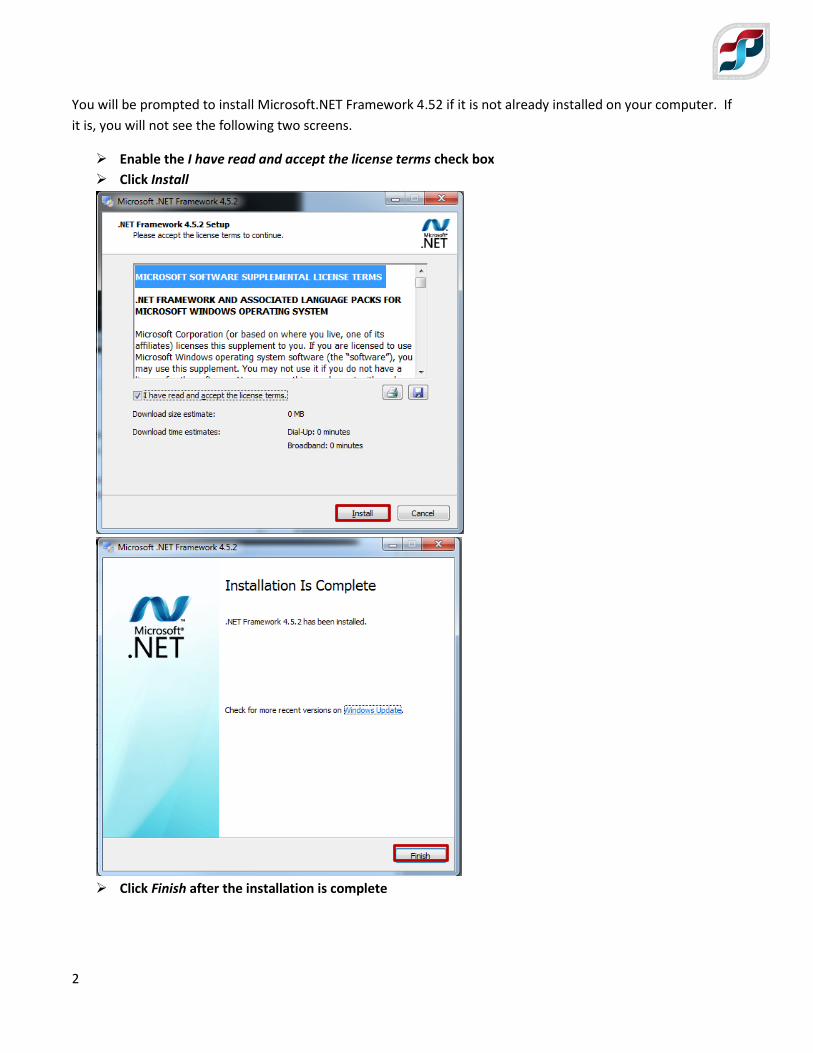
Click the box next to Supporting Software to expand
Click ERDAS Foundation 2015 to highlight
Click Install
4
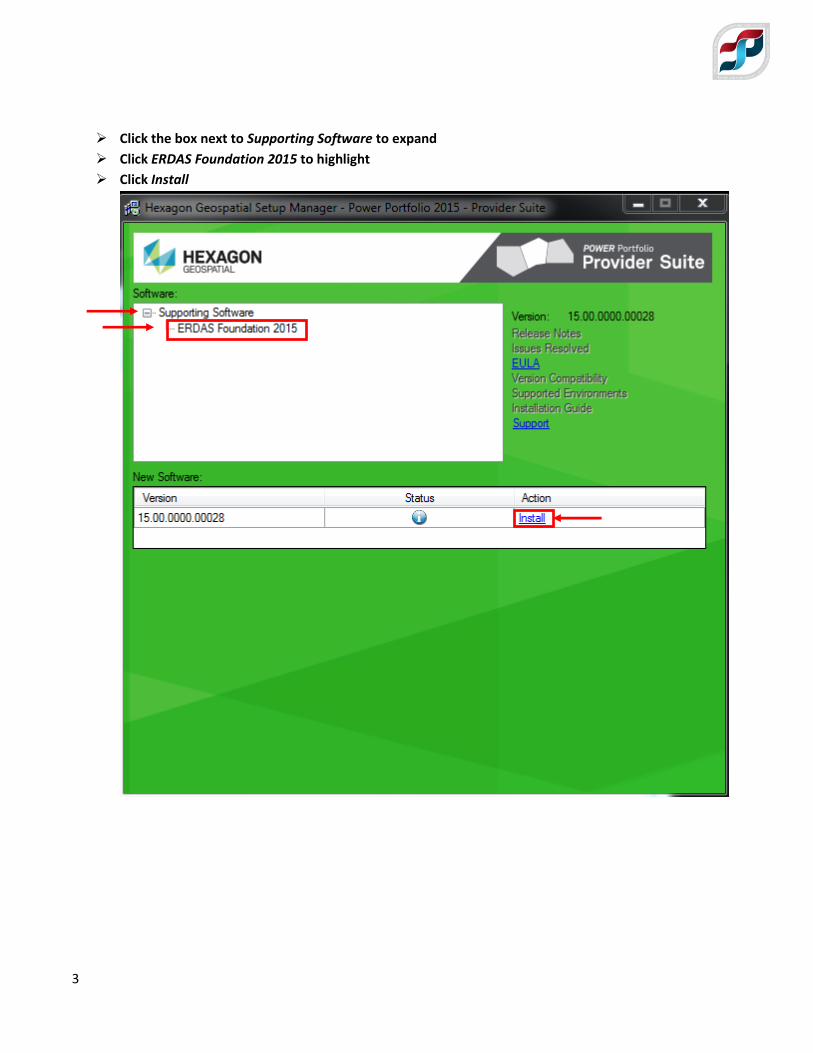
You will be prompted to install Intergraph Licensing if you did not have version 2014 installed
Click Install
5
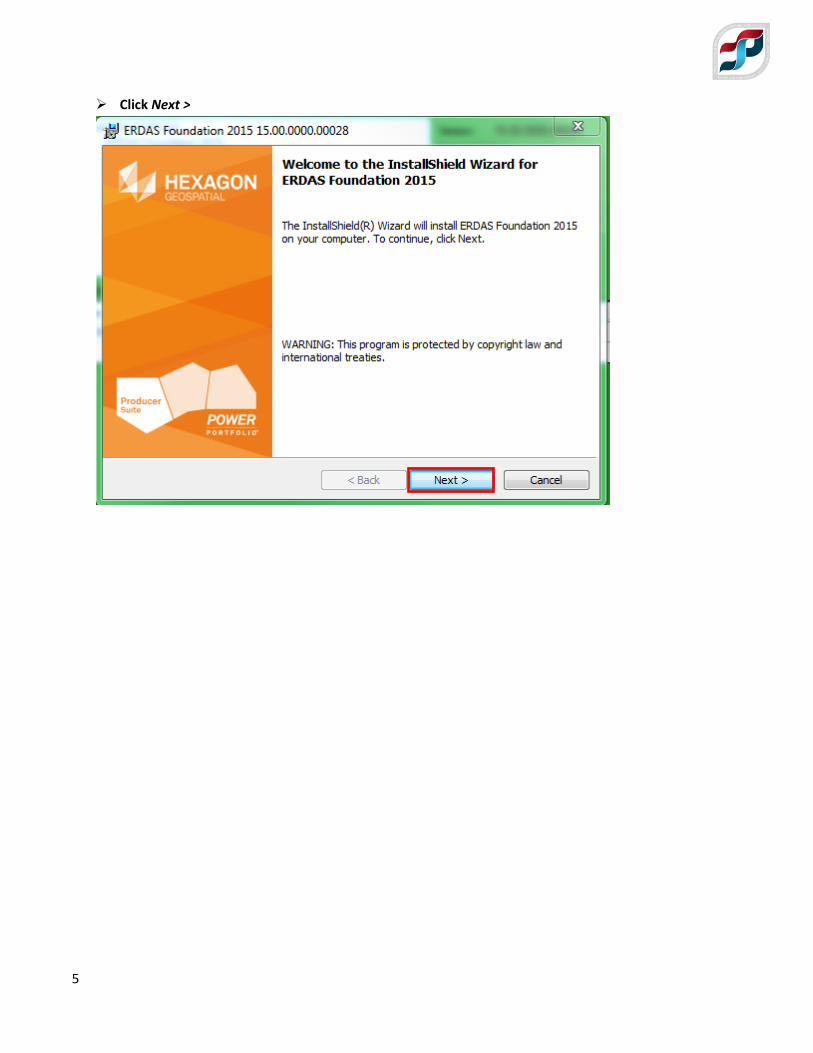
Click Next >
6
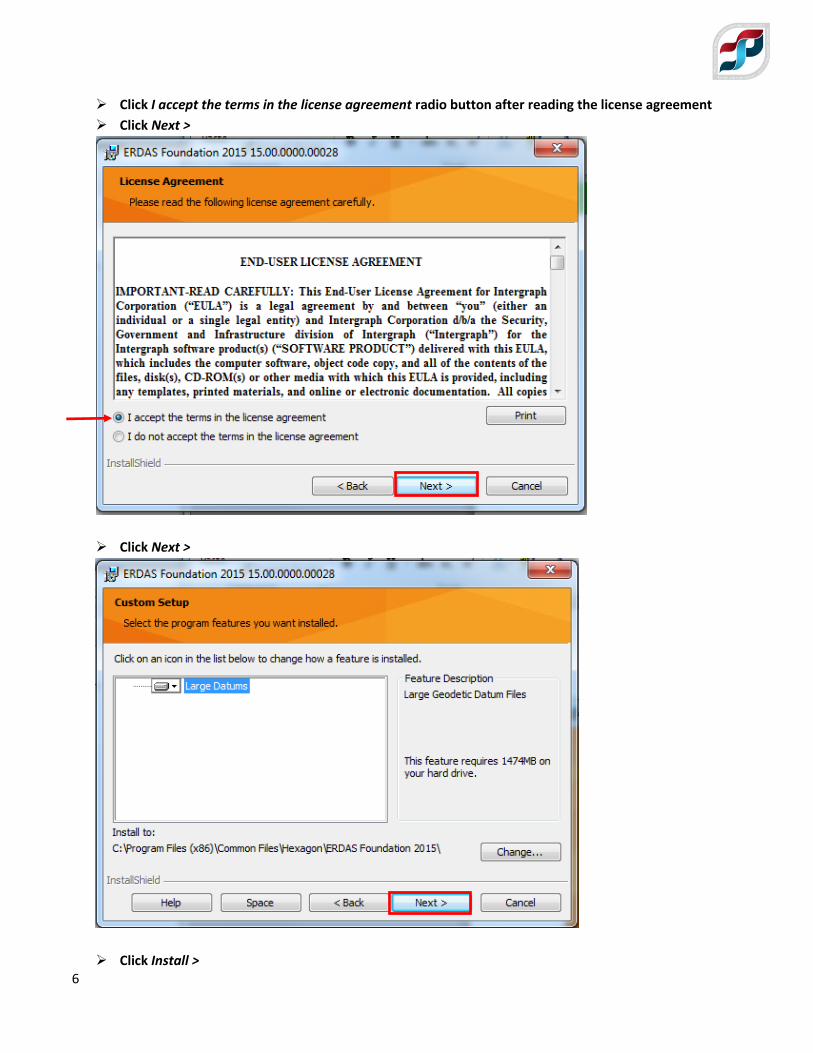
Click I accept the terms in the license agreement radio button after reading the license agreement
Click Next >
Click Next >
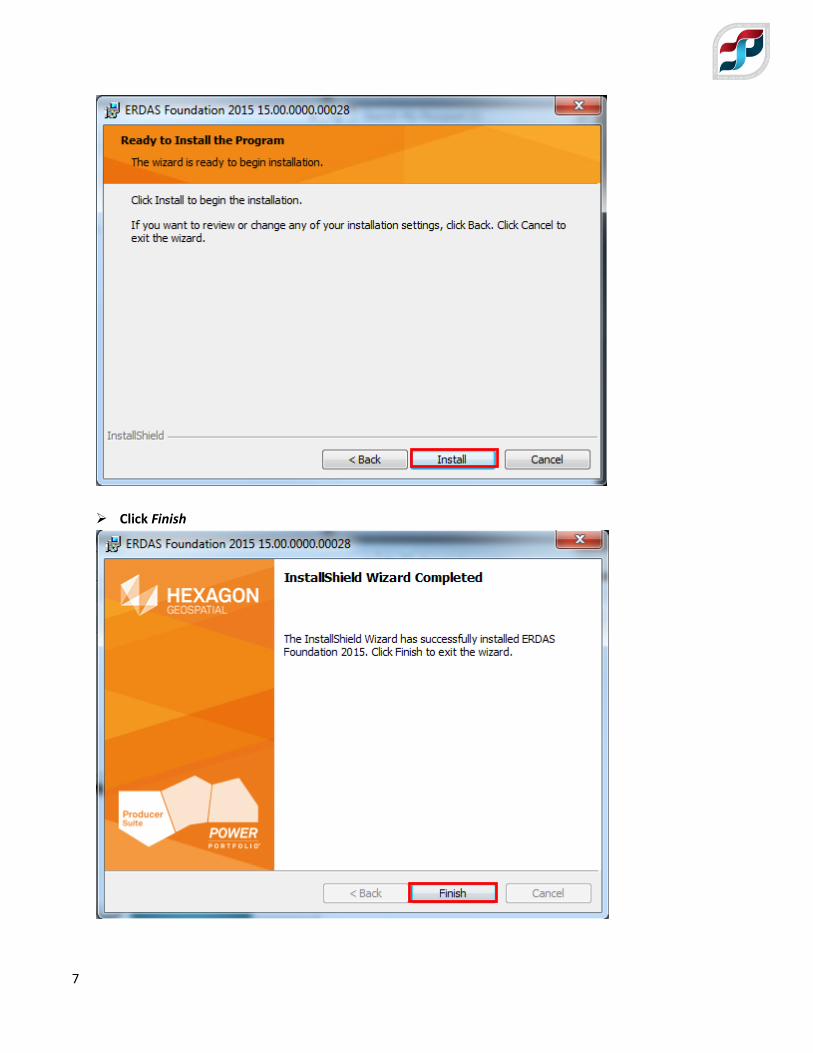
Click Install >
7
Click Finish
8
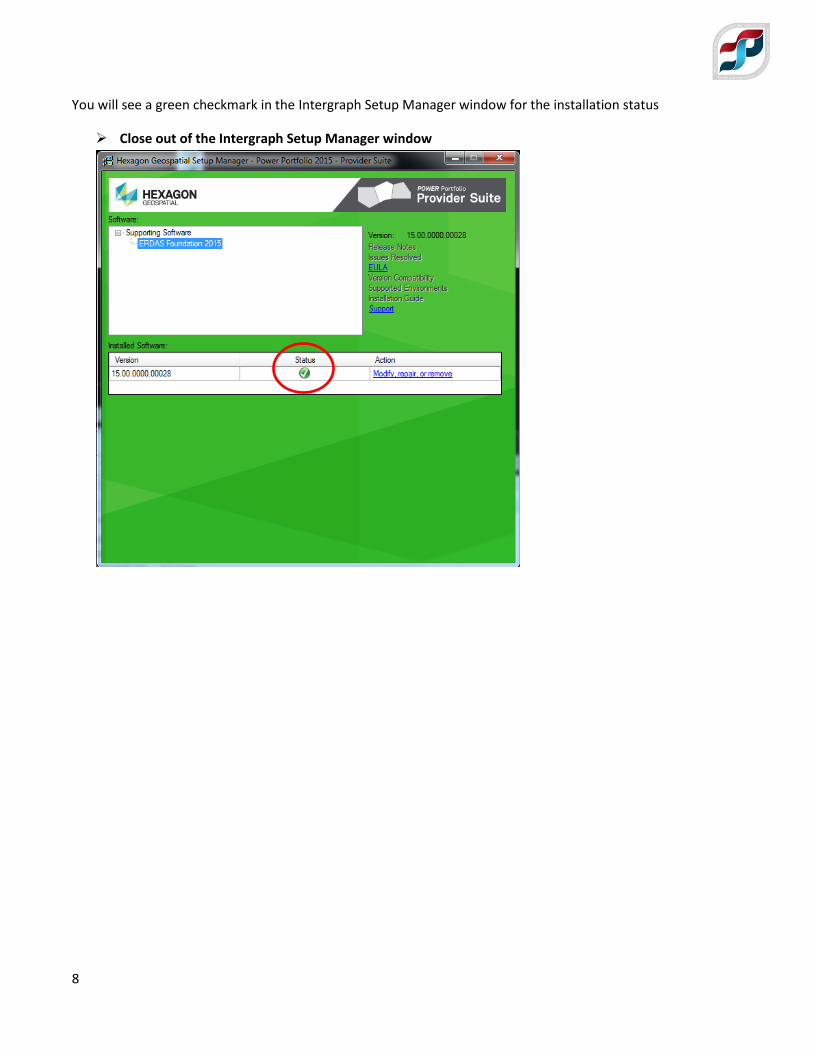
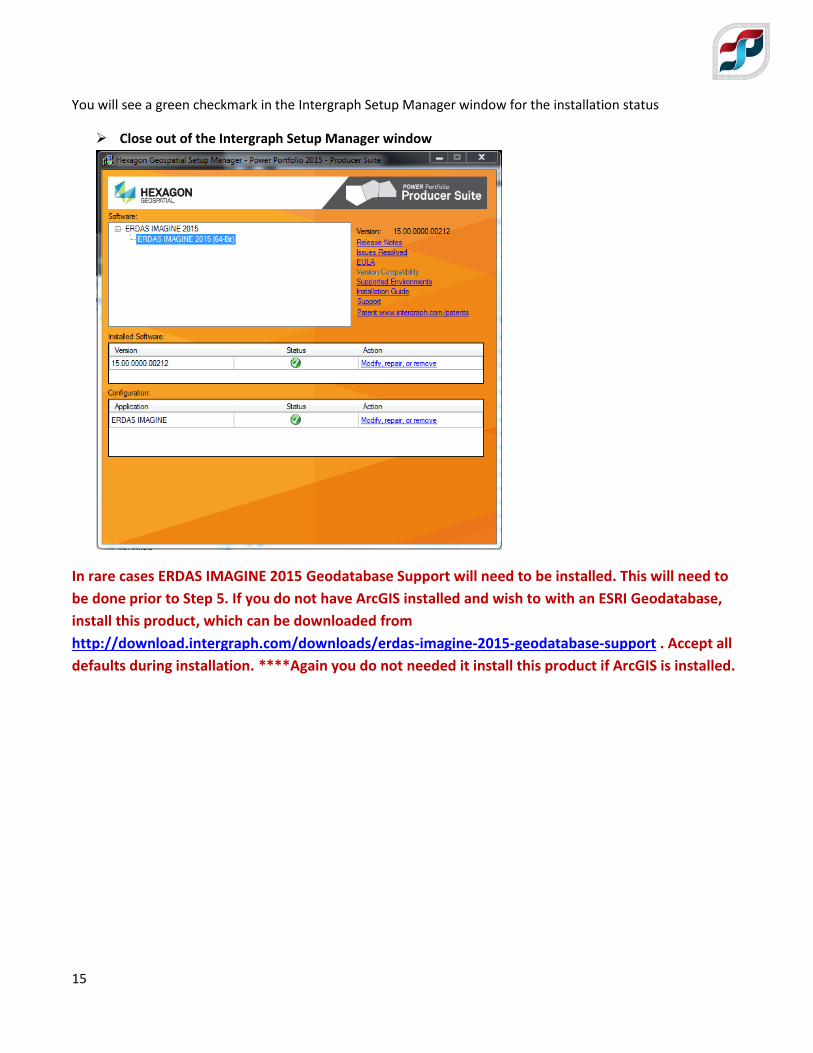
You will see a green checkmark in the Intergraph Setup Manager window for the installation status
Close out of the Intergraph Setup Manager window
9
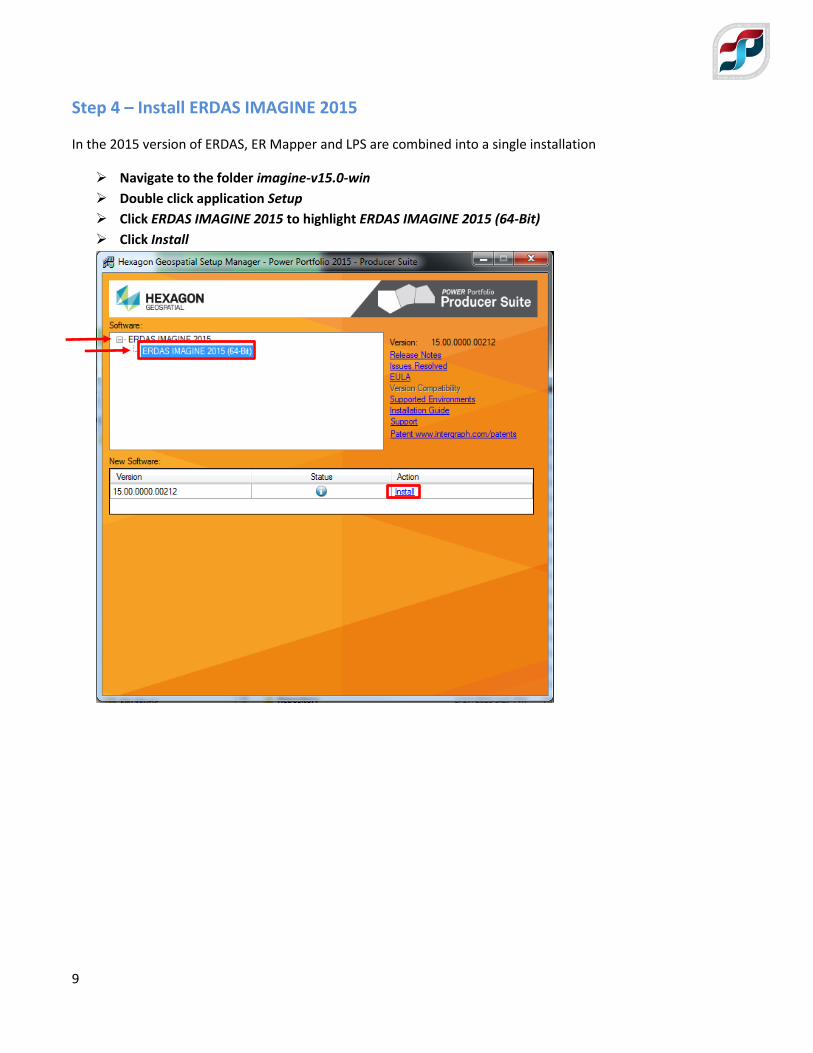
Step 4 – Install ERDAS IMAGINE 2015
In the 2015 version of ERDAS, ER Mapper and LPS are combined into a single installation
Navigate to the folder imagine-v15.0-win
Double click application Setup
Click ERDAS IMAGINE 2015 to highlight ERDAS IMAGINE 2015 (64-Bit)
Click Install
10
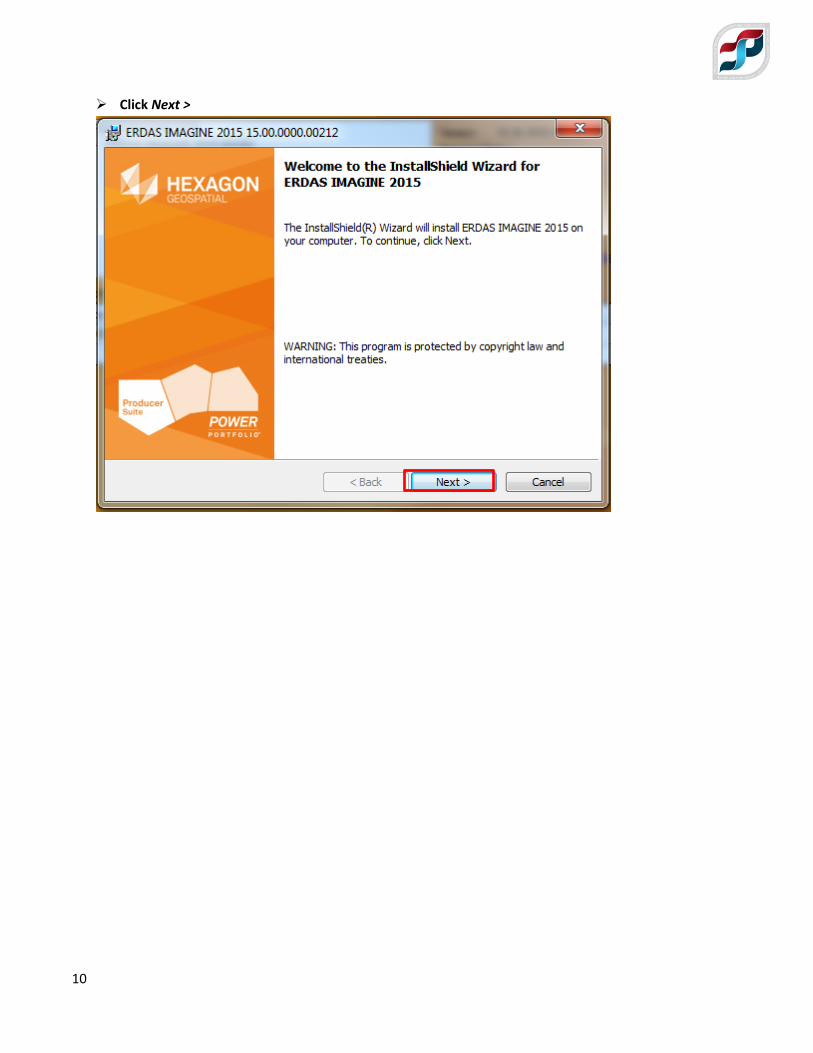
Click Next >
11
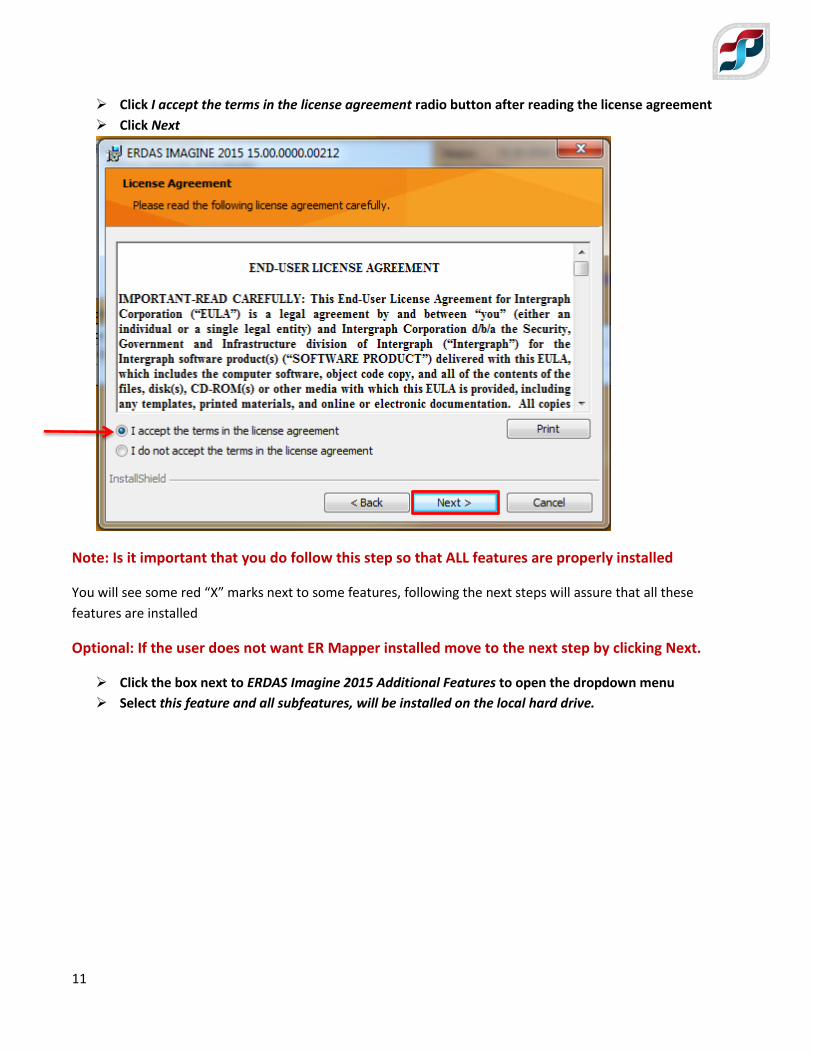
Click I accept the terms in the license agreement radio button after reading the license agreement
Click Next
Note: Is it important that you do follow this step so that ALL features are properly installed
You will see some red “X” marks next to some features, following the next steps will assure that all these
features are installed
Optional: If the user does not want ER Mapper installed move to the next step by clicking Next.
Click the box next to ERDAS Imagine 2015 Additional Features to open the dropdown menu
Select this feature and all subfeatures, will be installed on the local hard drive.
12
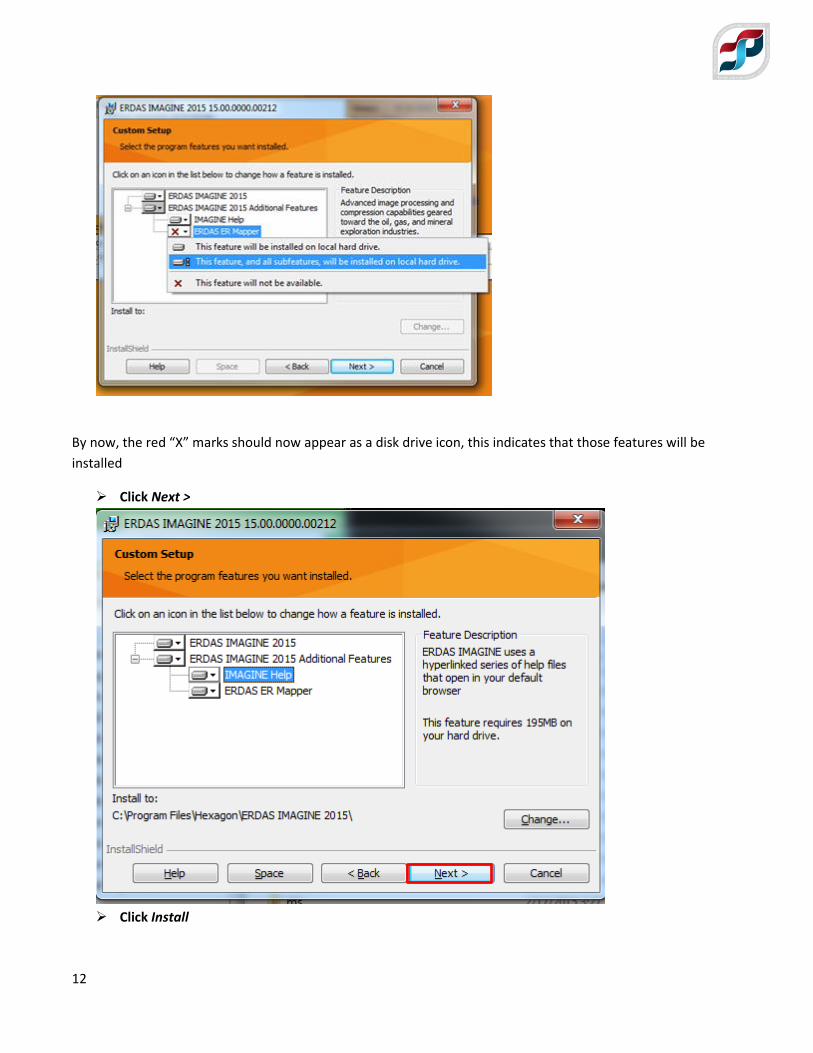
By now, the red “X” marks should now appear as a disk drive icon, this indicates that those features will be
installed
Click Next >
Click Install
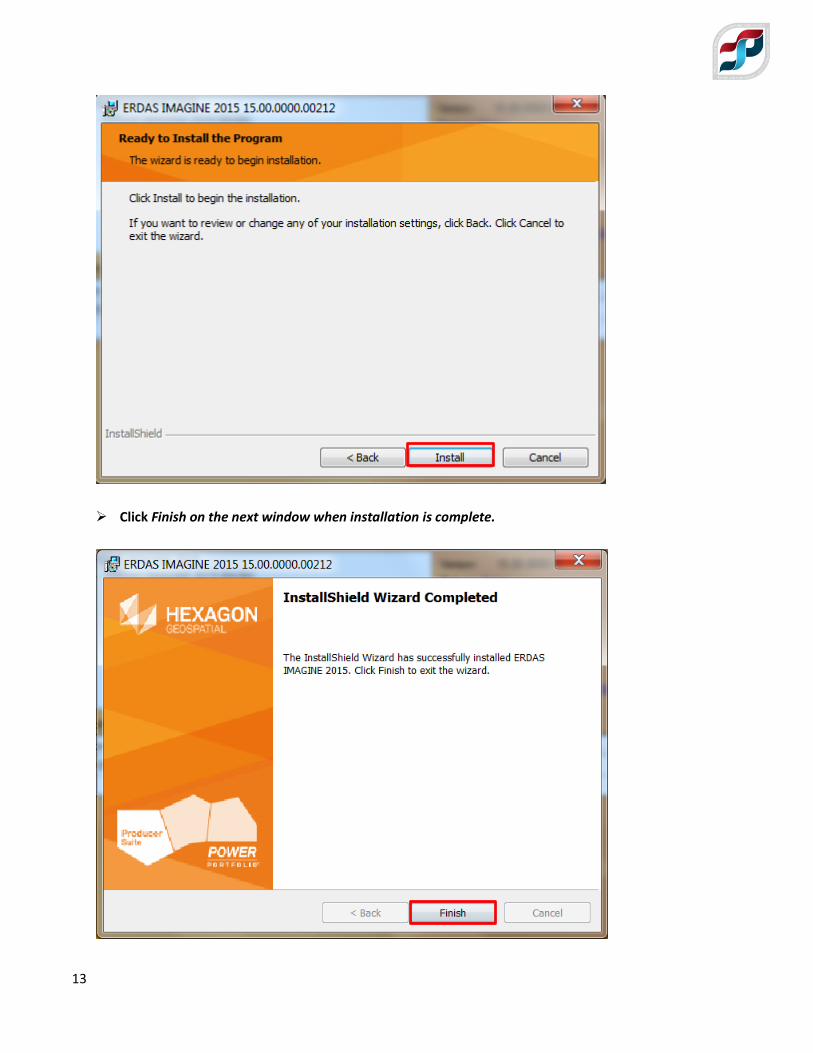
13
Click Finish on the next window when installation is complete.
14
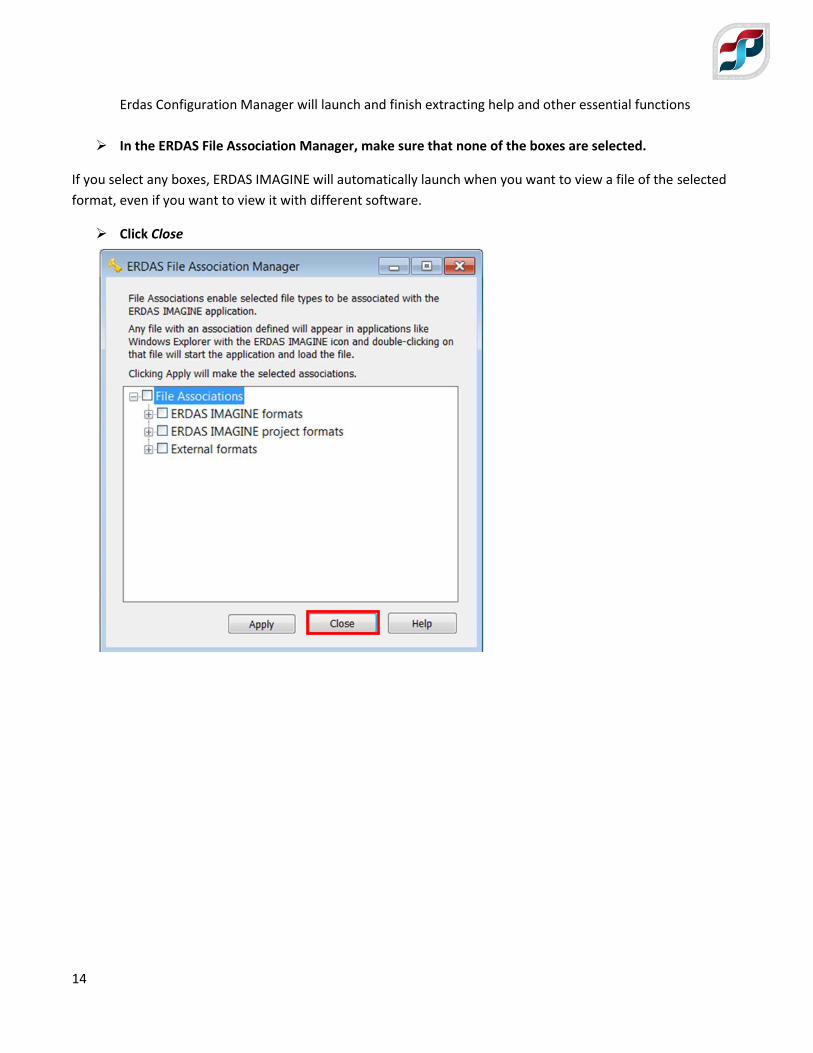
Erdas Configuration Manager will launch and finish extracting help and other essential functions
In the ERDAS File Association Manager, make sure that none of the boxes are selected.
If you select any boxes, ERDAS IMAGINE will automatically launch when you want to view a file of the selected
format, even if you want to view it with different software.
Click Close
15
You will see a green checkmark in the Intergraph Setup Manager window for the installation status
Close out of the Intergraph Setup Manager window
In rare cases ERDAS IMAGINE 2015 Geodatabase Support will need to be installed. This will need to
be done prior to Step 5. If you do not have ArcGIS installed and wish to with an ESRI Geodatabase,
install this product, which can be downloaded from
http://download.intergraph.com/downloads/erdas-imagine-2015-geodatabase-support . Accept all
defaults during installation. ****Again you do not needed it install this product if ArcGIS is installed.
16
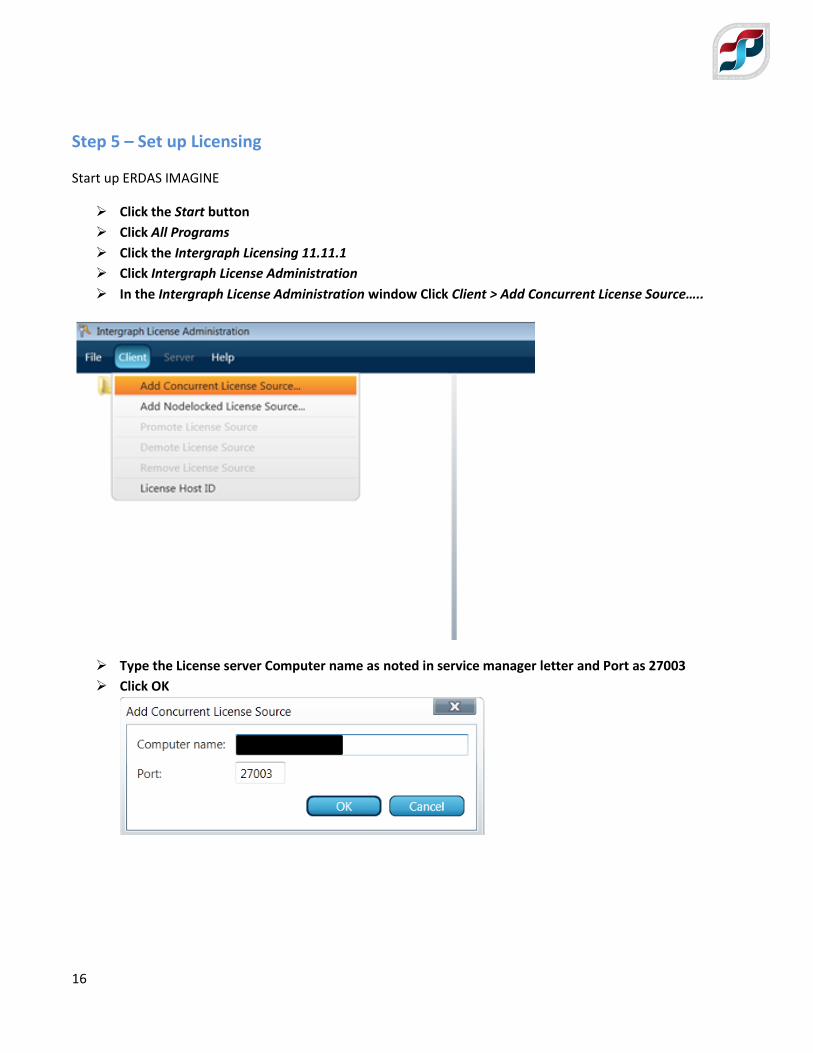
Step 5 – Set up Licensing
Start up ERDAS IMAGINE
Click the Start button
Click All Programs
Click the Intergraph Licensing 11.11.1
Click Intergraph License Administration
In the Intergraph License Administration window Click Client > Add Concurrent License Source…..
Type the License server Computer name as noted in service manager letter and Port as 27003
Click OK
17
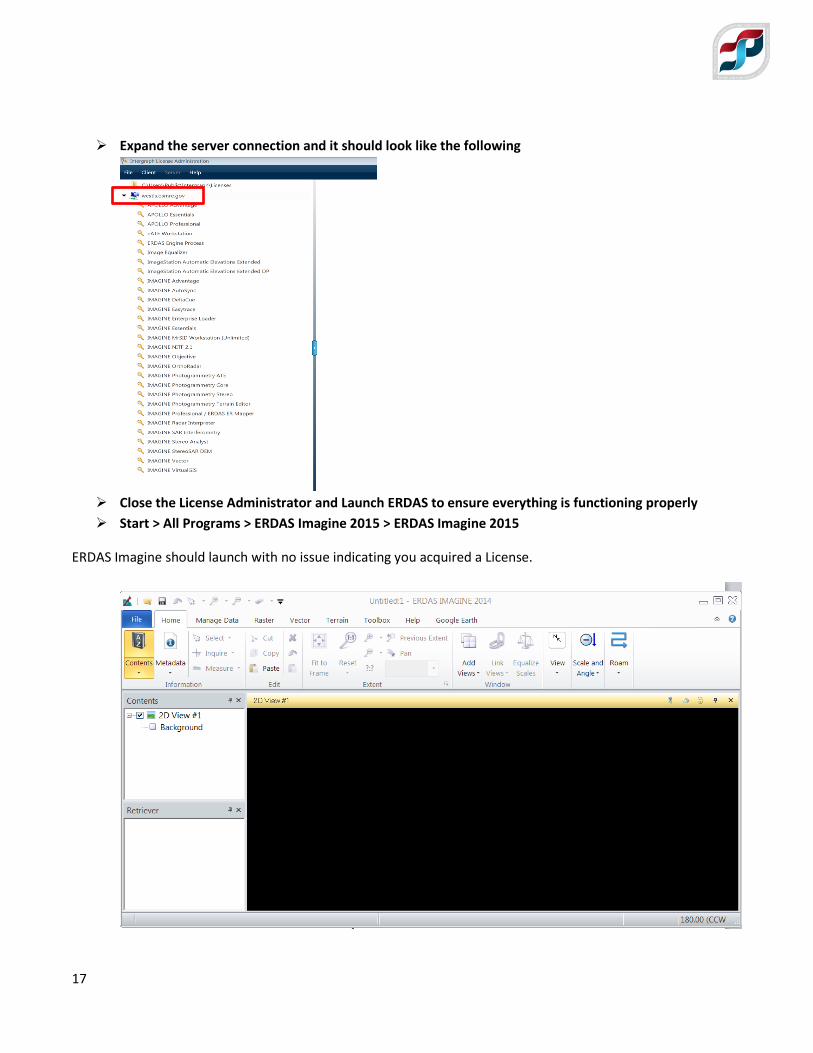
Expand the server connection and it should look like the following
Close the License Administrator and Launch ERDAS to ensure everything is functioning properly
Start > All Programs > ERDAS Imagine 2015 > ERDAS Imagine 2015
ERDAS Imagine should launch with no issue indicating you acquired a License.
18
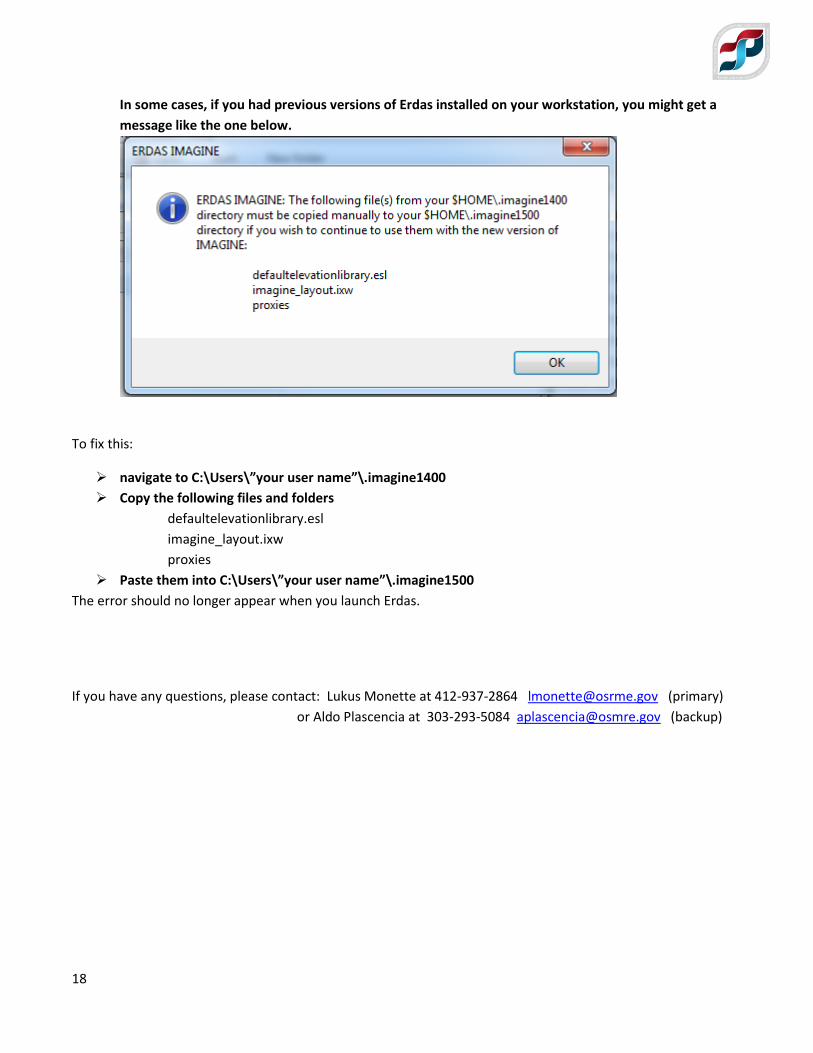
In some cases, if you had previous versions of Erdas installed on your workstation, you might get a
message like the one below.
To fix this:
navigate to C:\Users\”your user name”\.imagine1400
Copy the following files and folders
defaultelevationlibrary.esl
imagine_layout.ixw
proxies
Paste them into C:\Users\”your user name”\.imagine1500
The error should no longer appear when you launch Erdas.
If you have any questions, please contact: Lukus Monette at 412-937-2864 [email protected] (primary)
or Aldo Plascencia at 303-293-5084 [email protected] (backup)