Embed Size (px)
Citation preview
CUE DEE ”YOUR INNOVATIVE PARTNER” 1
Welcome to visit our homepage for more information and manual downloads.www.cuedee.com • [email protected]
RRU DOUBLE LIGHT POLE MOUNTMANUAL
PRODUCT NO: 7483 - REV B
INSTALLATION INSTRUCTIONRRU DOUBLE LIGHT POLE MOUNT
RRU Double Light Pole Mount for installation of twoRRU units on mast, towers or other vertical structures.
Welcome to visit our homepage for more information and manual downloads.www.cuedee.com • [email protected]
2 CUE DEE ”YOUR INNOVATIVE PARTNER”
RRU DOUBLE LIGHT POLE MOUNTMANUAL
PRODUCT NO: 7483 - REV B
CONTENTS1. PRODUCT COVERED IN THIS INSTALLATION INSTRUCTION ...................................................... 2
2. RECOMMENDED TOOLS ......................................................................................................... 2
3. PARTS INCLUDED ................................................................................................................... 3
4. PACKAGE DIMENSIONS .......................................................................................................... 3
5. ASSEMBLY OF THE MOUNT .................................................................................................... 4
6. CLAMP MOUNTING RANGE ..................................................................................................... 8
1. PRODUCT COVERED IN THISINSTALLATION INSTRUCTION
This installation instruction covers the RRU Double Light Pole Mount. The bracket is made of ano-dized aluminium and the fasteners are made of acid proof stainless steel. This instruction shows how the bracket is assembled, mounted towards the RRU units and installed on mast, towers or other vertical structures.
2. RECOMMENDED TOOLS
Torque wrench 17 mm open-ended spanner (M10)17 mm socket (M10)
CUE DEE ”YOUR INNOVATIVE PARTNER” 3
Welcome to visit our homepage for more information and manual downloads.www.cuedee.com • [email protected]
RRU DOUBLE LIGHT POLE MOUNTMANUAL
PRODUCT NO: 7483 - REV B
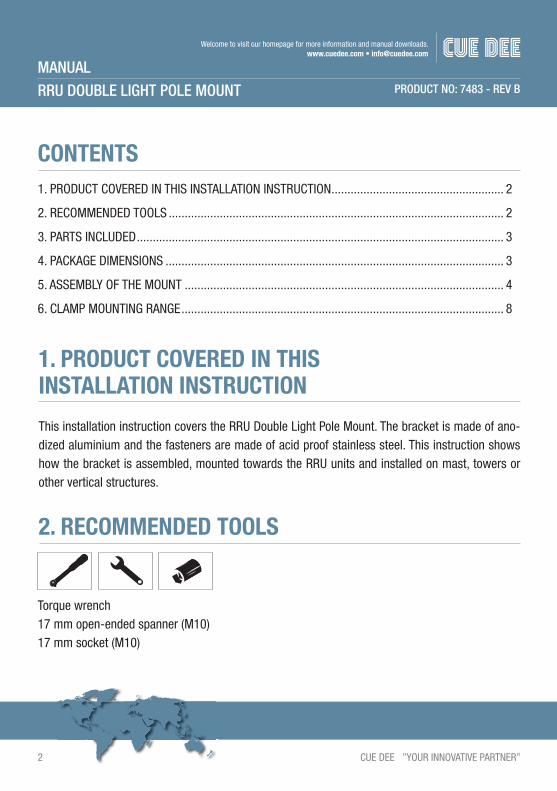
3. PARTS INCLUDED
4. PACKAGE DIMENSIONSART. NO. IDENTIFICATION SIZE (mm) WEIGHT (kg)7483 RRU Double Light Pole Mount 300 x 95 x 95 3,0
ITEM: QTY: ART. NO: DESCRIPTION: STANDARD:1 2 7358 Clamp, front2 2 7359 Clamp, back3 2 7484 Z-angle 4 4 6116 Threaded Rod M10x210 A4-70 DIN 9765 12 1308 Washer 10,5 A4 DIN 125-A6 20 1395 Nut M10 A4-80 DIN 934 7 4 1322 Bolt M10x35 A4-80 DIN 933
1
3
26 64
5 6
65 6
7 5
Welcome to visit our homepage for more information and manual downloads.www.cuedee.com • [email protected]
4 CUE DEE ”YOUR INNOVATIVE PARTNER”
RRU DOUBLE LIGHT POLE MOUNTMANUAL
PRODUCT NO: 7483 - REV B
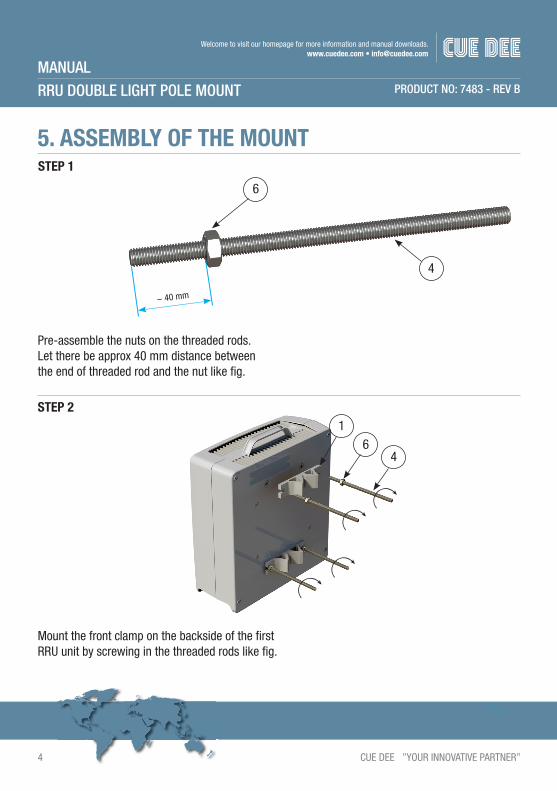
5. ASSEMBLY OF THE MOUNT
Pre-assemble the nuts on the threaded rods.Let there be approx 40 mm distance between the end of threaded rod and the nut like fig.
~ 40 mm
Mount the front clamp on the backside of the first RRU unit by screwing in the threaded rods like fig.
4
6
16
4
STEP 1
STEP 2
CUE DEE ”YOUR INNOVATIVE PARTNER” 5
Welcome to visit our homepage for more information and manual downloads.www.cuedee.com • [email protected]
RRU DOUBLE LIGHT POLE MOUNTMANUAL
PRODUCT NO: 7483 - REV B
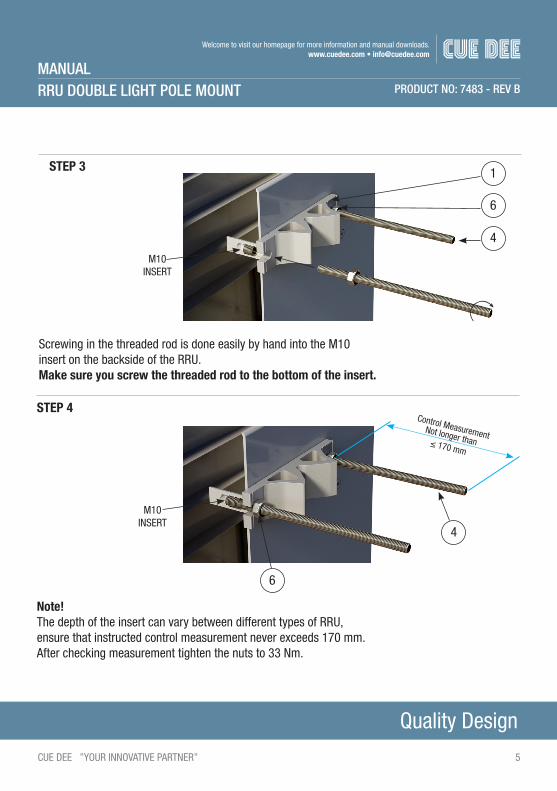
Screwing in the threaded rod is done easily by hand into the M10 insert on the backside of the RRU.Make sure you screw the threaded rod to the bottom of the insert.
STEP 3
Note!The depth of the insert can vary between different types of RRU, ensure that instructed control measurement never exceeds 170 mm. After checking measurement tighten the nuts to 33 Nm.
STEP 4
M10INSERT
6
1
4
Control MeasurementNot longer than≤ 170 mm
M10INSERT
4
6
Welcome to visit our homepage for more information and manual downloads.www.cuedee.com • [email protected]
6 CUE DEE ”YOUR INNOVATIVE PARTNER”
RRU DOUBLE LIGHT POLE MOUNTMANUAL
PRODUCT NO: 7483 - REV B
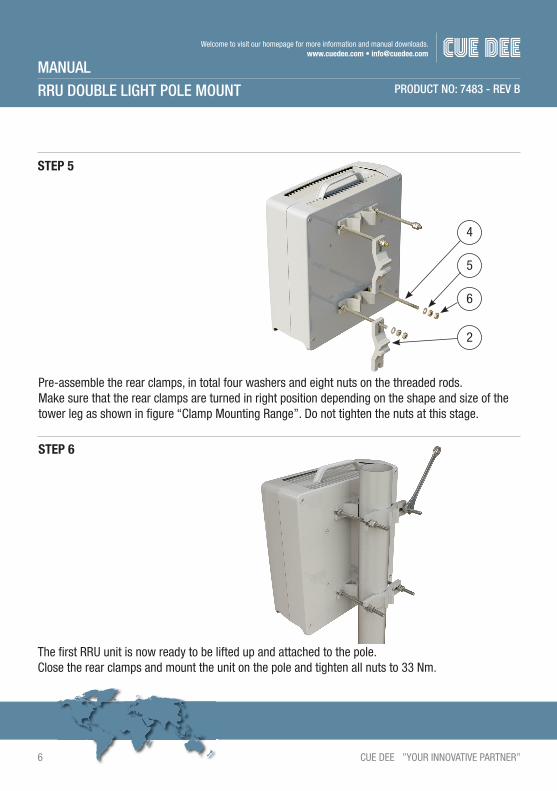
STEP 5
Pre-assemble the rear clamps, in total four washers and eight nuts on the threaded rods. Make sure that the rear clamps are turned in right position depending on the shape and size of the tower leg as shown in figure “Clamp Mounting Range”. Do not tighten the nuts at this stage.
STEP 6
4
5
6
2
The first RRU unit is now ready to be lifted up and attached to the pole. Close the rear clamps and mount the unit on the pole and tighten all nuts to 33 Nm.
CUE DEE ”YOUR INNOVATIVE PARTNER” 7
Welcome to visit our homepage for more information and manual downloads.www.cuedee.com • [email protected]
RRU DOUBLE LIGHT POLE MOUNTMANUAL
PRODUCT NO: 7483 - REV B
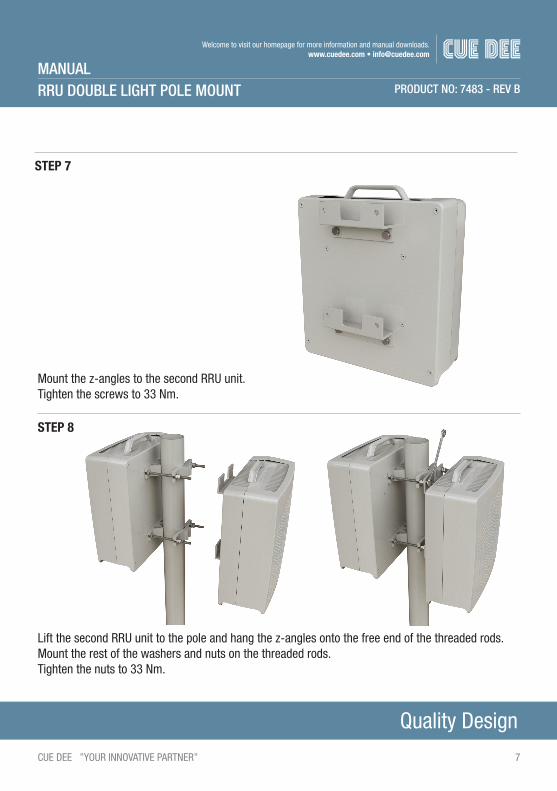
STEP 7
STEP 8
Mount the z-angles to the second RRU unit.Tighten the screws to 33 Nm.
Lift the second RRU unit to the pole and hang the z-angles onto the free end of the threaded rods.Mount the rest of the washers and nuts on the threaded rods.Tighten the nuts to 33 Nm.

Welcome to visit our homepage for more information and manual downloads.www.cuedee.com • [email protected]
8 CUE DEE ”YOUR INNOVATIVE PARTNER”
RRU DOUBLE LIGHT POLE MOUNTMANUAL
PRODUCT NO: 7483 - REV B
90˚ ANGLE PROFILES35x35-90x90 mm (1,4x1,4-3,5x3,5 inch) 3
For 90˚ angle frame legs the back clamp profile should be turned with the protruding lips towards the frame member.
60˚ ANGLE PROFILES40-100 mm (1,6-4,0 inch) 4
For 60˚ angle frame legs turn the back profile with the protruding lips away from the frame member.
ROUND TUBES Ø25-120 mm (1,0-4,7 inch) 1
For tubes Ø25-60 mm the back clamp profile should be turned with the protruding lips towards the tube. For tubes Ø60-120 mm the lips should be turned away from the tube.
SQUARE PROFILES35x35-90x90 mm (1,4x1,4-3,5x3,5 inch) 2
For square profiles 35x35 to 50x50 mm the back clamp profile should be turned with the protruding lips towards the frame member. For squares 50x50 to 90x90 mm the lips should be turned away from the frame member.
6. CLAMP MOUNTING RANGE
Ø25-60 mm Ø60-120 mm
Max Ø120 mmMin Ø25 mm 1
35x35 to 50x50 mm 50x50 to 90x90 mm
Max 90x90 mmMin 35x35 mm 2
Max 90x90 mm 3Min 35x35 mm 3
Min opening 40 mm 4 Max opening 100 mm
1) The threaded rods must be shortened for tubes Ø25-55 mm.
2) The threaded rods must be shortened for squares 35x35-50x50 mm.
3) The threaded rods must be shortened when used on 90˚ angle profiles.
4) The threaded rods must be shortened when used on 60˚ angles 40-90 mm.