Embed Size (px)
Citation preview

AlphaGuard® BIO & MT F l u I d A P P l I e d R o o F I n G S y S T e M S
INSTALLATION GUIDE

I
II
III
IV
V
VI
VII
VIII
IX
X
XI
XII
Table of Contents
GENERAL OVERVIEW
STORAGE & HANDLING
WEATHER RESTRICTIONS
PERSONAL PROTECTION EQUIPMENT
TOOLS & EQUIPMENT
PRODUCT LIST
PRIMER MATRIX
SYSTEM QUALIFICATIONS
SURFACE PREPARATION
APPLICATION & INSTALLATION
INSPECTION & REPAIRS
DETAILS
4-5
6
7
8
9
10
11
12-13
14-26
27-29
30
31-45

4
AlphaGuard Plus Roofing System
AlphaGuard Concrete Roofing System
AlphaGuard Restoration System
AlphaGuard Top Coat
AlphaGuard Reinforcement
AlphaGuard Base Coat
BURmastic Composite Ply
BURmastic Adhesive SF
Approved Coverboard
Polyisocyanurate Insulation
Steel Deck (Pictured) or Concrete
AlphaGuard Top Coat
AlphaGuard Reinforcement
AlphaGuard Base Coat
Concrete Deck
AlphaGuard Top Coat
AlphaGuard Reinforcement
AlphaGuard Base Coat
Existing Roof Membrane

5
The AlphaGuard MT System is a liquid-applied, moisture triggered, aliphatic, polyurethane elastomeric roofing membrane that provides seamless waterproofing.
The unique moisture triggered formula uses moisture from the air to begin the curing process, but does not rely on moisture for the entire curing process. This differs from moisture cured urethanes, which needs the moisture for the entire curing process and is susceptible to carbon dioxide gassing and pin holing. This makes for a more stable, uniformed cure.
This UV resistant, high solid, durable roofing system is low odor, low VOC and is field-applied with one-part liquid waterproofing layers reinforced with fabric. AlphaGuard MT can be fully bonded to a variety of substrates as a maintenance and restoration system or as a new construction system.
Fabric reinforcement is required to provide dimensional stability to the cured urethane waterproofing. Fabric reinforcement will prevent potential shrinkage, especially in high movement flashing areas.
General Overview
The AlphaGuard BIO System is a liquid-applied, bio-based, two-component, polyurethane roofing field and flashing elastomeric membrane that provides seamless waterproofing.
AlphaGuard MT AlphaGuard BIO
The development of AlphaGuard BIO is derived from unique bio-based, polyurethane technology. The high bio-content makes for a sustainable, environmentally responsible roofing product while the polyurethane technology offers long-term waterproofing performance in the toughest conditions.
The 100% solids, highly reflective, UV resistant product is a field applied two-component roofing system. The two-component technology has a catalyzed curing process which results in a faster dry times, a more uniform finished film, and negates the possiblity of blistering, gassing, pinholing, etc.
AlphaGuard BIO can be installed to a variety of substrates as a maintenance and restoration system, as a liquid flashing membrane, or as a new construction system. Fabric reinforcement is required to provide dimensional stability to the cured urethane waterproofing.
AlphaGuard BIO is a low VOC product with minimal to no odor, making it ideal for applications over occupied space causing little to no disruption to the building's occupants.

6
Storage & Handling
All AlphaGuard components will be delivered to the site in original sealed containers. Store AlphaGuard components in cool, dry spaces outside of direct sunlight in accordance with local regulations. Store away from heat, open fire, or any ignition sources. In addition, store away from strong acids or bases.
Rolls must be stored vertically to prevent contact with water and other contaminants. Optimum storage temperature is between 60ºF and 90ºF. Shelf life drops at temperatures above this range. In addition, resins risk self-polymerization when exposed to temperatures above 140ºF.
Do not smoke around Geogard Primer and keep product away from open flame, fire, or any ignition source. Geogard Primer, in particular, is flammable and harmful if inhaled, swallowed or absorbed through the skin. This can cause skin, eye, and respiratory irritation.

7
Weather Restrictions
AlphaGuard System installations cannot proceed when there is a threat of precipitation or condensation on the substrate exists. Applying AlphaGuard during or just before a precipitation event can cause the surface to become pitted or distorted.
Application of AlphaGuard MT System is permitted when the ambient temperature is between 50ºF (10ºC) and 110ºF (43ºC) and the substrate temperature is a minimum of 5ºF above the dew point. It is required that overnight temperatures be above 40ºF (4.4ºC).
Application of AlphaGuard BIO System is permitted when the ambient temperature is between 45ºF (7ºC) and 110ºF (43ºC) and the substrate temperature is a minimum of 5ºF above the dew point. It is required that overnight temperatures be above 40ºF (4.4ºC).
8
Personal Protection Equipment
Refer to the MSDS for each product for specific PPE information.
Provide the following to installers: Safety Shoes & Overalls, suitable Hand, Eye, and Ear Protection, and hard hats & appropriate fall protection. Comply with requirements of OSHA, NIOSH or governing local authority regarding barricades, retaining ropes, and other safety elements (active / passive).
Use AlphaGuard with adequate ventilation or respiratory protection as needed to keep exposure below TLV values within applications lacking sufficient natural air movements. Protect HVAC air intake ducts from infiltration into the building interior. Pre-existing eyes, skin, and respiratory issues may be aggravated by exposure, and may cause skin and respiratory sensitization.
Geogard Primer is flammable and harmful if inhaled, swallowed or absorbed through the skin. This can cause skin, eye, and respiratory irritation. Do not smoke around Geogard Primer and keep product away from open flame, fire, or any ignition source.

9
Tools & Equipment
• Blower, Broom, or Vacuum
• Chalk Line
• Disposable Rubber Gloves
• Extension Cords
• Garbage Bags
• Generator
• Hand Grinder
• Hand Sander
• Masking Tape
• Pail Heat Bands
• Paint Brushes - 4”
• Paint Roller Cages - 4” & 9”
• Paint Roller Covers - 4” & 9” - 3/8-1/2” nap
• Paint Roller Extension Handles
• Paint Trays
• Power washer (3,000 psi max)
• Rags
• Scarifier (concrete substrates)
• Scissors and/or Razor Knives
• Screwdrivers
• Shot Blaster (concrete substrates)
• Sockets / Wrenches
• Squeegees - Flat Blade & ¼” Notched
• Tap Set
• Tape measure
• Tarps and/or Sheeting
• Wet Mil Gauge
• Water Source

10
Product List
Fluid-Applied MembraneAlphaGuard MT Base CoatAlphaGuard MT Top CoatAlphaGuard BIO Base Coat Kits (Part A & B)AlphaGuard BIO Top Coat Kits (Part A & B)
Reinforcing MaterialsAlphaGuard Glass MatPermafab (Polyester Reinforcement)
PrimersAlphaGuard C-PrimeAlphaGuard M-PrimeAlphaGuard WB PrimerGeogard PrimerTremco Primer/Splice WashTremco Primer/Splice Wash LV
Base SheetsBURmastic Composite PlyBURmastic Composite Ply HTBURmastic Composite Ply PremiumBURmastic Supreme Composite Ply
MasticsSolargard Seam Sealer
Base Sheet AdhesiveBURmastic Adhesive SF
Insulation AdhesiveTremco Low Rise Foam Adhesive

11
AlphaGuard Primer Matrix
Substrates
C-Pr
ime
M-P
rime
Re-P
rime
Prim
er/S
plice
Was
h
WB
Prim
er
WoodMetal X
Concrete XBrick X
Stone XBituminous Surfaces X X
MB Cap Sheets X XEPDM X X
PVC/TPA XTPO X
Hypalon X XPlastic/PVC Pipes X
Urethane Coated Surfaces X X
Chart 1
*
*When using AlphaGuard WB Primer, a test patch must be utilized to ensure proper adhesion to the substrate.

System Qualifications
Notify warrantor of extent of work. Do not proceed with work that will diminish Owner’s protection under existing warranties unless directed by Owner.
Existing Warranties
Examine existing roofing substrates, with Installer present, for compliance with requirements and for other conditions affecting application and performance of roof coatings.
• For the record, prepare written report, endorsedby Installer, listing conditions detrimental to performance.• Verify compatibility with and suitability ofsubstrates.• Verify that substrates are visibly dry and free ofmoisture. Conduct an IR scan on applicable roof assemblies to identify moisture within the existing roof system.• Verify that roofing membrane surfaces haveadequately aged to enable proper bond with base coat.• Verify that roofing membrane is free of blisters,splits, open laps, indications of shrinkage, and puncture damage or other indications of impending roof system failure.• Application of fluid-applied membrane indicatesacceptance of surfaces and conditions.
Examination
Protect existing roofing system that is indicated not to receive fluid-applied roofing, and adjacent portions of building and building equipment.
• Comply with warranty requirements of existingroof membrane manufacturer.• Limit traffic and material storage to areas ofexisting roofing membrane that have been protected.• Maintain temporary protection and leave inplace until replacement roofing has been completed.
Shut down air intake equipment in the vicinity of the Work in coordination with the Owner. Cover air intake louvers before proceeding with coating work that could affect indoor air quality or activate smoke detectors in the duct work.
• Verify that rooftop utilities and service pipingaffected by the Work have been shut off before commencing Work.
Maintain roof drains in functioning condition to ensure roof drainage at end of each workday. Prevent debris from entering or blocking roof drains and conductors. Use roof-drain plugs specifically designed for this purpose. Remove roof-drain plugs at end of each workday, when no work is taking place, or when rain is forecast.
• Do not permit water to enter into or underexisting membrane roofing system components that are to remain.
Preparation
12

System Qualifications
Membrane Surface Preparation: • Remove aggregate ballast or pavers fromroofing membrane.• Remove blisters, ridges, buckles and othersubstrate irregularities from existing roofing membrane that would inhibit application of uniform, waterproof coating. • Repair membrane at locations whereirregularities have been removed.• Broom clean existing substrate.• Clean substrate of contaminants such as dirt,debris, oil, and grease that can affect adhesion of fluid-applied membrane by power washing at minimum 2,000 psi. Remove existing coatings if any. Allow to dry thoroughly.• Verify that existing substrate is dry beforeproceeding with application of fluid- applied roofing. Spot check substrates with an electrical capacitance moisture-detection meter.
Roof Coating Preparation
13
Roof Patching: Notify Owner each day of extent of roof tear-off proposed and obtain authorization to proceed.
• Build-up isolated low spots on existing roofingmembrane with fluid- applied manufacturer’s recommended products to alleviate ponding.• Limited Roof Tear-Off: Where indicated, removeexisting roofing membrane and other membrane roofing system components down to the deck. Fill in the tear-off areas to match existing membrane roofing system construction. • During removal operations, have sufficient andsuitable materials on-site to facilitate rapid installation of temporary protection in the event of unexpected rain.
Roof Coating Preparation
Remove or repair existing base flashings around parapets, curbs, walls, and penetrations.
• Clean substrates of contaminants such asasphalt, sheet materials, dirt, and debris.• Do not damage metal counterflashings that areto remain. Replace damaged counterflashings with counterflashings of like metal, weight/thickness and finish.• Repair flashings with like materials.• Repair gravel stops, copings and other roofrelated sheet metal and trip elements Reseal joints, replace loose or missing fasteners, and replace components where required to create a watertight condition.
Existing Flashings

14
Surface Preparation
Before beginning the project, consider the substrates that are present on your project and refer to the primer matrix (see Chart 1) to select the proper primer.
The substrate in which you will be roofing must be clean and dry. All surfaces should be cleaned with a power washer (min. 2,000 psi) and a cleaning solution that is appropriate for the substrate. Any existing roof system should have a thermal IR scan performed. This will ensure that all areas of concern will be addressed and wet insulation will be removed.
When applying AlphaGuard to a concrete substrate, always refer to the International Concrete Repair Institute (ICRI) manual for Selecting and Specifying Concrete Surface Preparation for Sealers, Coating, and Polymer Overlays no. 03732-1.
In order to use AlphaGuard over a concrete substrate, the surface must be prepared to accept the roofing system. All grease, oils, asphalt remnants, buildup and debris must be removed. The surface must be repaired prior to applying AlphaGuard. All cracks larger than ¼” must be repaired using a rapid set, self-leveling concrete repair mixture. Allow to properly set and dry before proceeding.
Areas that are raised more than ¼”, must be leveled or ground down. This will allow for a level and sound substrate for AlphaGuard. The surface must be shot blasted or scarified to achieve a CSP 3-6 profile (ICRI 03732-1). This will allow the AlphaGuard system to properly adhere to the substrate.
For new concrete substrates, allow a minimum of 28 days, and always test the moisture in the concrete before proceeding with installation of AlphaGuard.
CONCRETE DECKS
ASPHALT BUR / MB SYSTEMS
When restoring asphalt based roof systems, make all necessary repairs using Solargard Seam Sealer and Permafab. Once all repairs have been made, allow to cure for a minimum of 24 hours before applying the AlphaGuard System.
All surfaces to have AlphaGuard applied, should be power washed (min. 2,000 psi) and all debris removed from roof. Once roof is clean and dry, prime all surfaces that are to be treated. Refer to the primer matrix (see chart 1) for the appropriate primer for this substrate.
For modified bitumen and cap sheet roofs, end laps and side laps must be treated with AlphaGuard base coat or Solargard Seam Sealer at a rate of 50 linear feet/gallon.
Existing urethane coatings should power washed (min. 2,000 psi) and allowed to dry before any AlphaGuard is applied. Refer to the primer matrix (see chart 1) for the appropriate primer for this substrate. Allow primer to fully dry before applying AlphaGuard to the substrate.
EXISTING URETHANE COATINGS

Wrinkles in EPDM will telegraph through the AlphaGuard system. It is necessary to make these repairs before applying AlphaGuard.
Holes and tears in membranes must be repaired before AlphaGuard is applied.
(Fig. 2)
(Fig. 1)
SINGLE PLY SYSTEMS
The substrate must be inspected for loose flashings, popped fasteners and tearing of the membrane.
All single ply substrates must be clean and dry before any AlphaGuard is applied. The surface must be power washed (min. 2,000 psi) and cleaned with a mild detergent (wax free). Remove any walkway pads and make all necessary repairs before priming the surface. Refer to the primer matrix (see chart 1) for the appropriate primer for this substrate.
White single ply roof, cleaned and ready to be coated with AlphaGuard.
15

16
Metal substrates must be clean and primed with M-Prime.
WOOD SURFACES
AlphaGuard can be applied directly to small wooden details and walls of wood construction. If a wood deck is being utilized, insulation and /or a base sheet must be used. Consult Tremco Technical Service for the recommendations on your project.
BRICK OR STONE SURFACES
When coating or flashing brick or stone, power wash the surfaces and remove any loose mortar or protruding surfaces. Refer to the primer matrix (see chart 1) for the appropriate primer for this substrate.
METAL SURFACES
When coating a metal surface, all rusted or oxidized areas must be ground to a bright metal surface. Any painted surfaces should be tested to verify adhesion, either by a small test area or sending a small sample into our lab. Refer to the primer matrix (see chart 1) for the appropriate primer for this substrate.

17
AlphaGuard Application On Concrete Decks
Minimum deck thickness for structural concrete is 4".
Only poured-in-place concrete that provides bottom side drying is acceptable.
Structural Concrete Deck must be structurally sound, dry, and free of grease, oils, coatings, dust, curing compounds and other contaminants. Surface laitance must be removed. The surface must be scarified, shot blasted or pressure washed with high/ultra high pressure. Remove oil, grease smear and asphalt residue with trisodium phosphate or a strong detergent. For oil contaminated surfaces, use steam cleaning in conjunction with a strong emulsifying detergent. Rinse thoroughly with potable water.
Properly prepared concrete substrate
Remove defective concrete, honeycombs, cavities, joint cracks, voids and other defects by routing to sound material. Smooth precast and formed concrete surfaces must be cleaned,
roughened and made absorptive by mechanical abrasion. Surface profile should be equal to CSP 3-6 in accordance with ICRI Guideline 310.2. If it is not possible to mechanically abrade, acid etch with a 15% Hydrochloric acid solution. After etching, pressure wash or flush the surface with copious amounts of water to neutralize the surface. Care must be taken to ensure that all salts and residue from the reaction have been removed.
The pH of the surface should be checked, as per ASTM D 4262, following acid etching. Following surface preparation, apply AlphaGuard MT to the cleaned surface in a small area. An Elcometer Pull Off Adhesion tester or similar (ASTM D 4541) must be used to test the trial area for proper adhesion. Before application of the coating, use the “Visqueen test” (ASTM D 4263) to evaluate moisture level in concrete.
Allow new structural concrete to cure for a minimum of 28 days. Remove any surface hardener or curing compounds by using the recommended mechanical methods for surface preparation.
Patch all unsound or defective concrete with repair mortar acceptable to material manufacturer.
Prevent dust, vapors, gases, and odors from entering into the building during roof installation. When shutting down or blocking air intakes, provide makeup air or additional intake air from sources away from the work area. Coordinate these procedures with owner’s Representative.
Maintain roof drains in functioning condition to ensure roof drainage at end of each workday. Prevent debris from entering or blocking roof drains and conductors. Use roof-drain plugs specifically designed for this purpose. Remove roof-drain plugs at the end of each workday, when no work is taking place, or when rain is forecast. Do not permit water to enter into or under existing membrane roofing system components that are to remain.

18
ICRI Surface Profiles
Surface profiles are provided by the International Concrete Repair Institute (ICRI). Molded replicas of these profiles can be purchased from ICRI at www.ICRI.org.
CSP 1(Acid Etched)
CSP 2(Grinding)
CSP 3(Light Shot blasting)
CSP 4(Light Scarification)
CSP 5(Medium Shot blasting)
CSP 7(Heavy Abrasive Blast)
CSP 8(Scabbled)
CSP 9(Heavy Scarification)
CSP 6(Medium Scarification)

19
GENERAL INSTALLATION REQUIREMENTS
Use products with personal protection equipment. User must read container label and material safety data sheets prior to use.
Store all materials prior to application at temperatures between 60ºF and 90ºF
Use with adequate ventilation. Protect HVAC air intake ducts from infiltration into the building’s interior.
Application Temperatures:AlphaGuard BIO: 45ºF - 110ºFAlphaGuard MT: 50ºF - 110ºF* Cure times are extended below 50ºF
Prevent materials from penetrating substrate joints, entering building, or damaging roofing system components or adjacent building construction.
Painters tape shall be used to mask detail areas and metal flashings. Remove tape while AlphaGuard remains wet.
All flashings shall be installed first, before the field of the roof is covered.
After base coat and fiberglass reinforcement have been installed, and before the top coat is installed, a thorough inspection of the surface must be conducted by the manufacturer’s technical representative. The fiberglass reinforcement must be completely encapsulated by the base coat, with no pinholes or voids, at the end of each work day.
Coverage rates of base coat and top coat must be continuously verified for proper wet film thickness with a wet mil gauge.
Coverage rate of base coat may vary depending on surface conditions.
Raised or exposed fiberglass reinforcement shall be sanded smooth prior to application of top coat.
ALPHAGUARD C-PRIME INSTALLATION
Mixing: Use clean containers and mixing equipment.
Using a low speed “Jiffy” type mixer, mix the A & B components separately for approximately one minute.
Combine one part by volume Part A with one part by volume “B”. Mix the components thoroughly for three to five minutes.
Scrape the bottom and sides of the mixing container at least once. Do not mix air into the blend. Mix only enough material that can be used within the working life.
Application: The ambient and surface temperature must be between 50ºF to 90ºF (10ºC to 32.2ºC).
Apply to concrete using a short nap roller, squeegee, or brush.
Coverage rates may vary depending on concrete surface conditions.
Surface temperature, porosity and texture will determine actual material quantities. Ensure primer does not puddle and substrate has complete coverage.
AlphaGuard base coat can be applied as soon as the primer has become tack free.
ALPHAGUARD BIO MIXING INSTRUCTIONS
Using a low speed “Jiffy” type mixer, mix AlphaGuard BIO Part A for one minute.
Combine Part B with Part A in its entirety. Do not breakdown kits into smaller quantities.
Mix the components thoroughly until completely blended (typically 2 minutes). Mix only enough material that can be used within the pot life (20-25 minutes).

20
Prime all metal surfaces with M-Prime.
Install base coat to flashing surfaces according to manufacturer’s written instructions. Extend coating up vertical surfaces a minimum of 8" and out onto horizontal surfaces 4".
Back roll to achieve a minimum wet mil coating thickness as required by the manufacturer.
Install fiberglass reinforcement immediately into wet base coat. Extend reinforcement up vertical surfaces a minimum of 8" and out onto horizontal surfaces 4". Install according to manufacturers written instructions.
Lap adjacent flashing pieces of fiberglass no less than 3". Roll the surface of the fiberglass to completely embed it into the wet base coat.
The fiberglass reinforcement must be backrolled to ensure material saturates through the reinforcement.
Fiberglass must be fully encapsulated in base coat without pin holes, voids, or openings.
Tape all edges to provide a straight line for all flashing details.
FLASHING AND STRIPPING INSTALLATION
Base coat and fiberglass reinforcement must be installed on all curbs, penetrations, and drains before moving to installation in the field.
Install masking tape or similar along the top edge of flashings where base coat will terminate.
Prime all metal surfaces with AlphaGuard M-Prime prior to installing flashings.
21
ALPHAGUARD MEMBRANE APPLICATION
Base Coat Application:Install base coat directly onto primed concrete surface and spread coating evenly according to manufacturer’s written instructions. Back roll to achieve the desired minimum wet mil thickness.
Prime metal surfaces with AlphaGuard M-Prime.
Install reinforcement immediately into wet base coat. Using a wet roller, fully embed the reinforcement into the wet base coat. Roll until fully saturated. Reinforcement must be fully encapsulated in base coat and not contain pin holes, voids, or openings.
Lap adjacent rolls no less than 3”. End laps shall be no less than 6”. Lap onto flashing no less than 3”.
Top Coat Application:Apply top coat over cured base coat beginning with flashings then install top coat directly over field base coat and spread coating evenly according to manufacturer’s written instructions. Back roll to achieve a minimum thickness of 32 wet mils on both flashings and field.
Priming of the base coat with Geogard Primer may be required if top coat is not applied within 72 hours of the base coat application.
WALKWAY INSTALLATION
Non-Skid Walkway Application:1. Identify walkway areas as indicated, or asdirected by Owner.2. Apply additional application of top coat totaped walkway area at 1¼ gals / SQ (20 wet mils).3. Broadcast approximately 20-30 lbs. per 100sq.ft. of 20-40 mesh silica sand or quartz in the wet top coat material.4. Immediately back roll sand and top coat,creating an even dispersal of sand.5. Remove tape outlining walkway immediately.
* If walkway application is not applied within 72hours of the top coat application the top coat shall be primed with Geogard Primer.
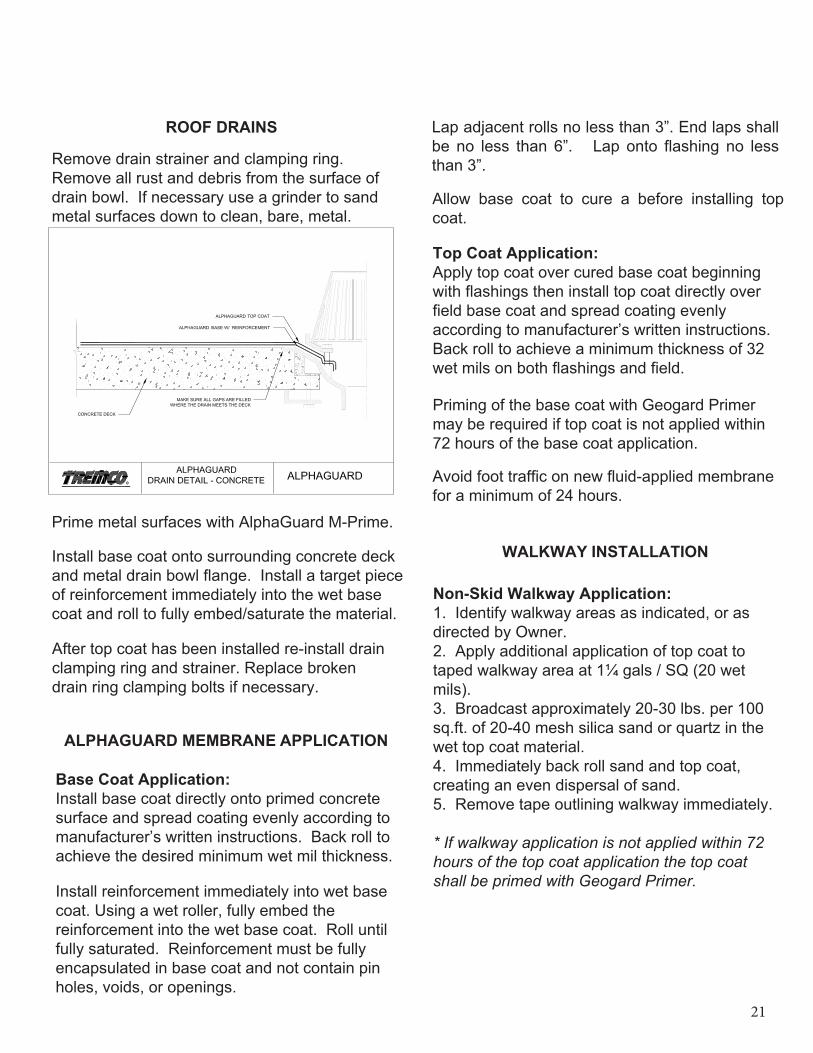
ROOF DRAINS
Remove drain strainer and clamping ring. Remove all rust and debris from the surface of drain bowl. If necessary use a grinder to sand metal surfaces down to clean, bare, metal.
Install base coat onto surrounding concrete deck and metal drain bowl flange. Install a target piece of reinforcement immediately into the wet base coat and roll to fully embed/saturate the material.
After top coat has been installed re-install drain clamping ring and strainer. Replace broken drain ring clamping bolts if necessary.
Allow base coat to cure a before installing top coat.
Avoid foot traffic on new fluid-applied membrane for a minimum of 24 hours.
22
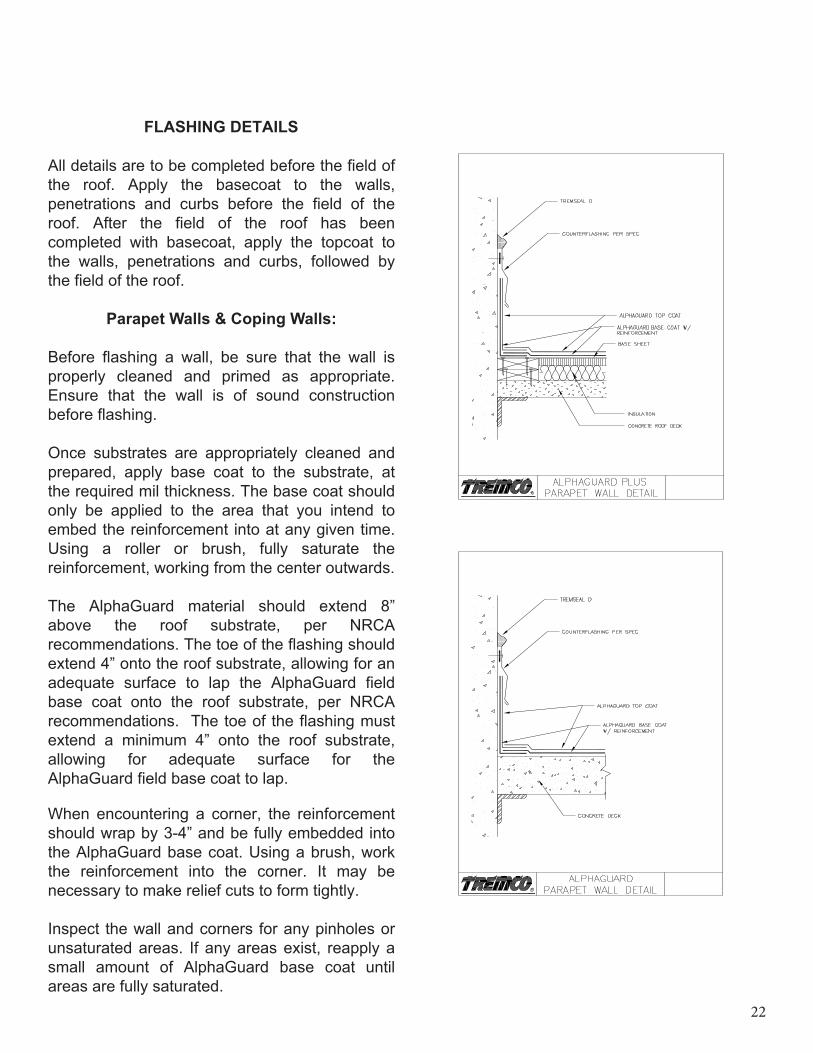
FLASHING DETAILS
All details are to be completed before the field of the roof. Apply the basecoat to the walls, penetrations and curbs before the field of the roof. After the field of the roof has been completed with basecoat, apply the topcoat to the walls, penetrations and curbs, followed by the field of the roof.
Parapet Walls & Coping Walls:
Before flashing a wall, be sure that the wall is properly cleaned and primed as appropriate. Ensure that the wall is of sound construction before flashing.
Once substrates are appropriately cleaned and prepared, apply base coat to the substrate, at the required mil thickness. The base coat should only be applied to the area that you intend to embed the reinforcement into at any given time. Using a roller or brush, fully saturate the reinforcement, working from the center outwards.
The AlphaGuard material should extend 8” above the roof substrate, per NRCA recommendations. The toe of the flashing should extend 4” onto the roof substrate, allowing for an adequate surface to lap the AlphaGuard field base coat onto the roof substrate, per NRCA recommendations. The toe of the flashing must extend a minimum 4” onto the roof substrate, allowing for adequate surface for the AlphaGuard field base coat to lap.
When encountering a corner, the reinforcement should wrap by 3-4” and be fully embedded into the AlphaGuard base coat. Using a brush, work the reinforcement into the corner. It may be necessary to make relief cuts to form tightly.
Inspect the wall and corners for any pinholes or unsaturated areas. If any areas exist, reapply a small amount of AlphaGuard base coat until areas are fully saturated.

23
Wood or Solid Curbs:
Once substrates are appropriately cleaned and prepared, apply AlphaGuard base coat to the substrate, at the required mil thickness. The base coat should only be applied to the area that you intend to embed the reinforcement into at any given time. Using a roller or brush, fully saturate the reinforcement, working from the center outwards.
The AlphaGuard material should extend 8” above the roof substrate, per NRCA recommendations. The toe of the flashing should extend 4” onto the roof substrate, allowing for an adequate surface to lap the AlphaGuard field base coat to lap.
When encountering a corner, the reinforcement should wrap by 3-4” and be fully embedded into the AlphaGuard base coat. Using a brush, work the reinforcement into the corner. It may be necessary to make relief cuts to form tightly.
Inspect the curb and corners for any pinholes or unsaturated areas. If any areas exist, reapply a small amount of AlphaGuard base coat until areas are fully saturated.
Insulated Curbs:
Before flashing an insulated curb with AlphaGuard, one ply of BURmastic Composite ply must be set in BURmastic SF over the curb wall and onto the field of the roof. Remove excess BURmastic SF at laps and allow to cure overnight.
Once the BURmastic SF has cured, AlphaGuard can be applied directly to the BURmastic Composite ply. The AlphaGuard material should extend above the BURmastic Composite ply by at least 1”. The toe of the flashing should extend 4” onto the roof substrate, allowing for an adequate surface to lap the AlphaGuard field base coat.
When encountering a corner, the reinforcement should wrap by 3-4” and be fully embedded into the AlphaGuard base coat. Using a brush, work the reinforcement into the corner. It may be necessary to make relief cuts to form tightly. Inspect the curb and corners for any pinholes or unsaturated areas. If any areas exist, reapply a small amount of AlphaGuard basecoat until areas are fully saturated.

24
Soil Stacks, Pipe Penetrations and Pitch Pockets:
All penetrations should be properly prepared by grinding metal surfaces to a bright metal, removing asphalt residue and priming with the appropriate primers (see chart 1).
Once a penetration has been properly prepared, mark them at least 8” above the roof deck. Tape along these marks to ensure you have a clean, straight line.
On round penetrations, cut pieces to sizes that are manageable and tear the bottom edge, 2-3” from the edge. This will allow the reinforcement to conform to the pipe. Apply the AlphaGuard base coat and fully embed the reinforcement. The field base coat should extend over the toe of the flashing, to the base of the pipe. Once cured, the AlphaGuard top coat can be applied, followed by the field top coat. On square penetrations, cut pieces that are manageable. Cut the pieces to go 8” above the field of the roof and 4” onto the field of the roof. Apply the AlphaGuard base coat and fully embed the reinforcement. The field base coat should extend over the toe of the flashing, to the base of the pipe. Once cured, the AlphaGuard top coat can be applied, followed by the field top coat.
Flashing pipes and stands are easy and seamless.
Penetrations on MB roof systems can be flashed with AlphaGuard as well.
Penetrations that previously needed pitch pockets are flashed with AlphaGuard. This eliminates possible points of water infiltration.
AlphaGuard as a flashing solution, is compatible with a variety of roofing systems.

25
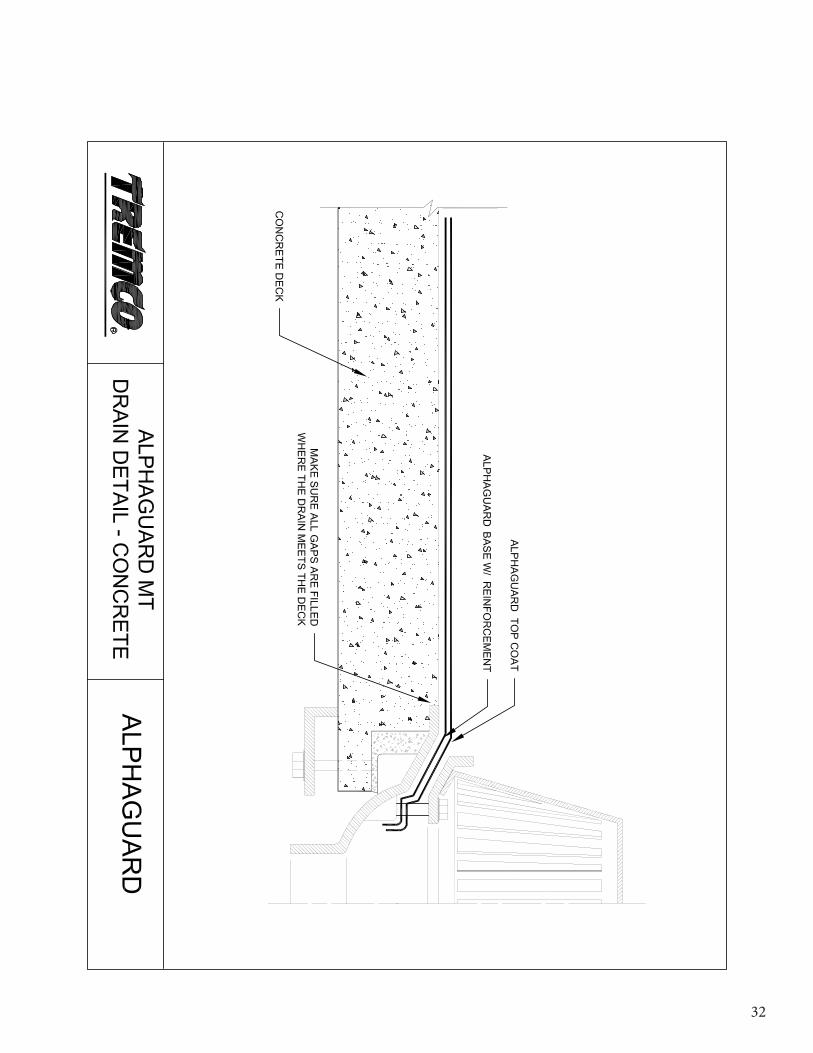
Internal Roof Drains:
Prior to applying AlphaGuard to a roof drain detail, inspect the drain bowl for cracks and holes. Grind the bowl to remove any residual roofing products or asphalt residue. The drain should have a clean, rust free surface.
For insulated roof systems, a base sheet of BURmastic Composite ply adhered in BURmastic SF should extend onto the drain bowl to the inside edge of the bowl. The transition from the insulation board to the drain bowl should be within 1/8” vertically and 1/8” horizontally. A tight fit is necessary at the areas.
For concrete decks, make sure that the gap between the deck and the drain bowl is 1/8” or less. For gaps greater than 1/8”, a urethane sealant should be used to fill the void. Once the drain is prepared properly, the field base coat and reinforcement should be extended into the drain past where the ring meets the bowl and down into the bowl, followed by the top coat. Reinstall the drain bowl and basket once the material is completely cured.
For restoration projects, make all necessary repairs to the existing drain detail. Ensure that the existing roofing material is adhered tightly to the drain bowl and abutting insulation. Once the drain is prepared properly, the field base coat and reinforcement should be extended into the drain past where the ring meets the bowl, followed by the top coat. Reinstall the drain bowl and basket once the material is completely cured.
When flashing a drain, AlphaGuard will conform to the drain bowl, eliminating areas where water can penetrate.
For concrete and insulated systems, extend AlphaGuard into the drain bowl. Ensure that the drain bowl is prepared per requirements.
Completed drain detail.
26
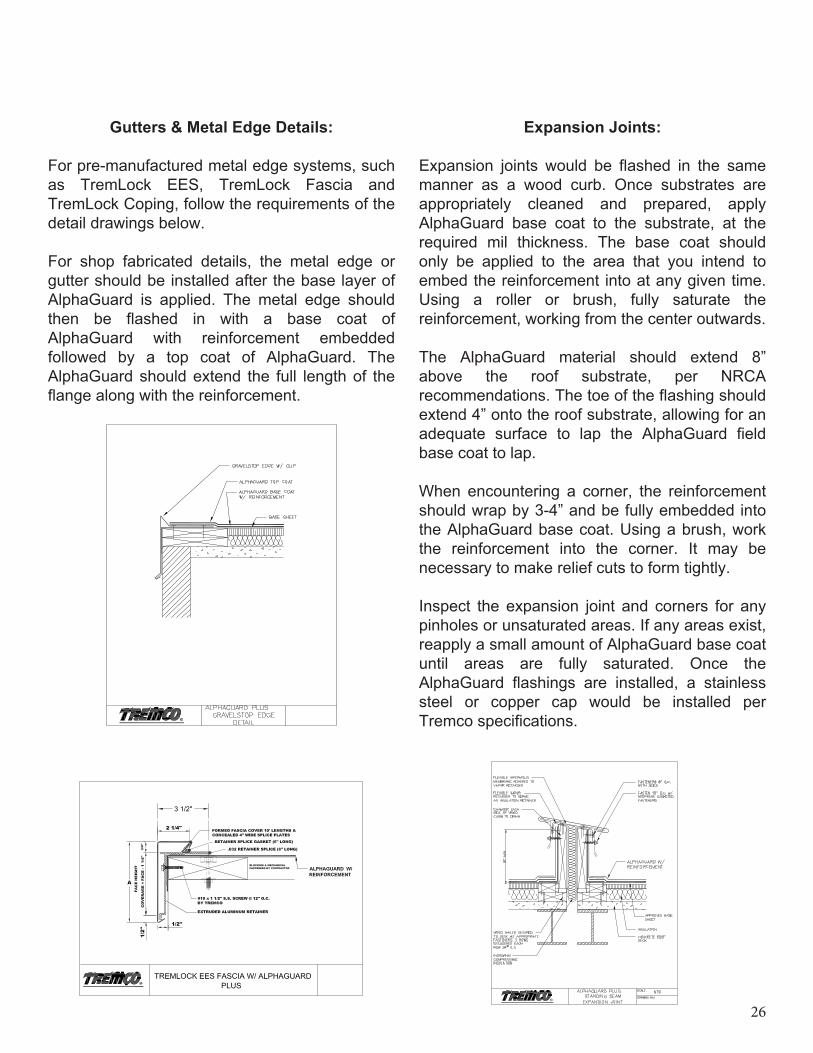
Gutters & Metal Edge Details:
For pre-manufactured metal edge systems, such as TremLock EES, TremLock Fascia and TremLock Coping, follow the requirements of the detail drawings below.
For shop fabricated details, the metal edge or gutter should be installed after the base layer of AlphaGuard is applied. The metal edge should then be flashed in with a base coat of AlphaGuard with reinforcement embedded followed by a top coat of AlphaGuard. The AlphaGuard should extend the full length of the flange along with the reinforcement.
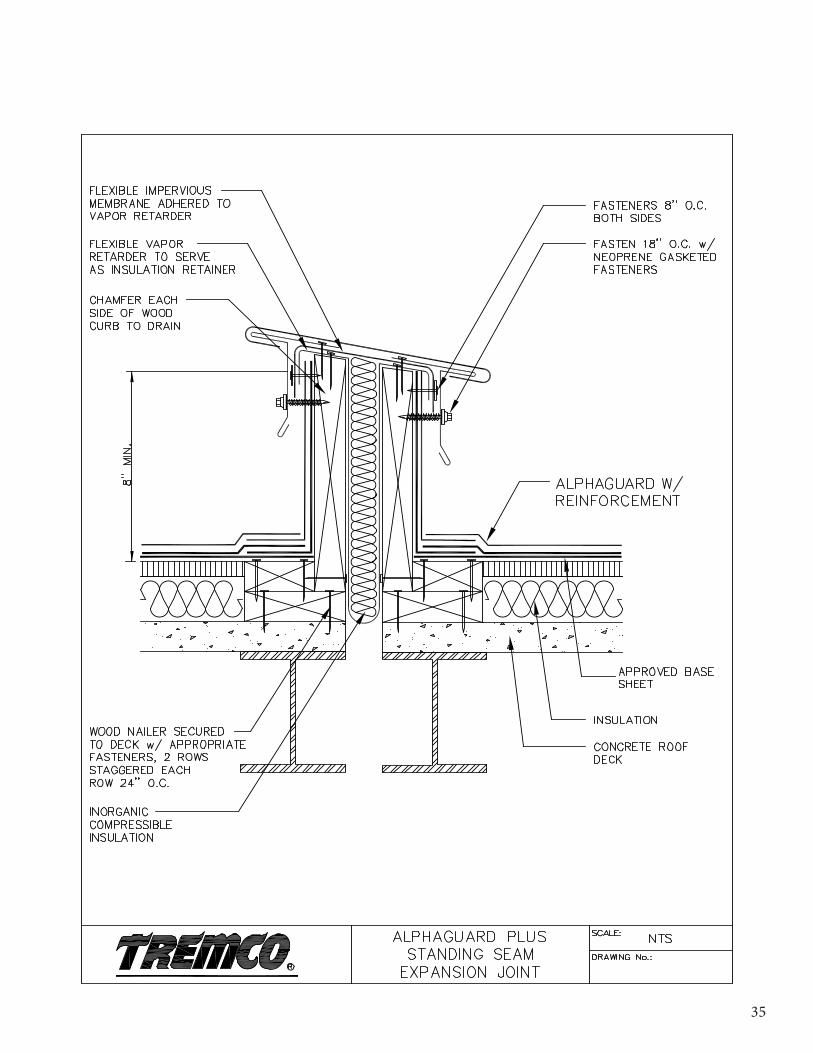
Expansion Joints:
Expansion joints would be flashed in the same manner as a wood curb. Once substrates are appropriately cleaned and prepared, apply AlphaGuard base coat to the substrate, at the required mil thickness. The base coat should only be applied to the area that you intend to embed the reinforcement into at any given time. Using a roller or brush, fully saturate the reinforcement, working from the center outwards.
The AlphaGuard material should extend 8” above the roof substrate, per NRCA recommendations. The toe of the flashing should extend 4” onto the roof substrate, allowing for an adequate surface to lap the AlphaGuard field base coat to lap.
When encountering a corner, the reinforcement should wrap by 3-4” and be fully embedded into the AlphaGuard base coat. Using a brush, work the reinforcement into the corner. It may be necessary to make relief cuts to form tightly.
Inspect the expansion joint and corners for any pinholes or unsaturated areas. If any areas exist, reapply a small amount of AlphaGuard base coat until areas are fully saturated. Once the AlphaGuard flashings are installed, a stainless steel or copper cap would be installed per Tremco specifications.

27
ALPHAGUARD APPLICATION DIRECT TO CONCRETE
Base coat and fiberglass reinforcement installation:
• Install base coat directly onto primedconcrete surface and spread coatingevenly according to Tremco’s writteninstructions.
• Back roll to achieve a minimum wet milthickness according to Tremco’swritten instructions.
• Install fiberglass reinforcementimmediately into wet base coat. Rollsurface of fiberglass tofully embed into wet basecoat. Roll until fully saturated.
• Lap adjacent rolls of glass mat no lessthan 3”. End laps shall be no less than 6”.
• Lap onto flashing no less than 3”.• Roll the surface of the fiberglass to
completely embed into the wet base coat.• Allow base coat to cure a before installing
top coat.• Fiberglass reinforcement must be fully
encapsulated in base coat and not containpin holes, voids, or openings.
Top coat installation for field of roof and flashings:
• Priming of the base coat may be requiredif top coat is not applied within 72 hours ofthe base coat application. The basecoat shall be lightly primed withmanufacturer’s recommended primer.
• Install top coat on flashings first. Extendcoating up vertical surfaces a minimum of8 “ and out onto horizontal surfaces.
• Install top coat directly over field basecoat and spread coating evenly accordingto manufacturer’s written instructions.
• Back roll to achieve a minimum wet milthickness according to manufacturer’swritten instructions.
• Avoid foot traffic on new fluid-appliedmembrane for a minimum of 24 hours.
WALKWAY INSTALLATION
Install walkways following application of top coat. Locate as indicated, or as directed by Owner.
• If walkway application is not applied within72 hours of the top coat applicationthe top coat shall be primed withmanufacturer’s recommended primer.
• Apply additional application of top coat totaped walkway area according tomanufacturer’s written instructions.
• Broadcast approximately 20-30 lbs. per100 sq. ft. of 20-40 mesh silica sandor quartz in the wet top coat material.
• Immediately back roll sand and top coat,creating an even dispersal of sand.Remove tape outlining walkwayimmediately.

28
ALPHAGUARD PLUS APPLICATION INSULATED SYSTEMS
BURmastic Roof System Installation:
• Install roof insulation.• Plan placement of SF BURmastic Roofing
System to ensure that water flows over oralong, but not against exposed edges.
• Starting at the low point of the roof,embed approved ply sheetsin a uniform, continuous application ofBURmastic Adhesive SF.
• Ply shall never touch ply.• Apply BURmastic Adhesive SF at a rate of
2 Gal/100 sf.
Base coat and fiberglass reinforcement installation:
• Install base coat directly onto approvedply sheet and spread coatingevenly according to Tremco’swritten instructions.
• Back roll to achieve a minimum wet milthickness according to Tremco’swritten instructions.
• Install fiberglass reinforcementimmediately into wet base coat. Rollsurface of fiberglass tofully embed into wet basecoat. Roll until fully saturated.
• Lap adjacent rolls of glass mat no lessthan 3”. End laps shall be no less than 6”.
• Lap onto flashing no less than 3”.• Roll the surface of the fiberglass to
completely embed into the wet base coat.• Allow base coat to cure before installing
top coat.• Fiberglass reinforcement must be fully
encapsulated in base coat and not containpin holes, voids, or openings.
Top coat installation for field of roof and flashings:
• Priming of the base coat is required if topcoat is not applied within 72 hours ofthe base coat application. The basecoat shall be lightly primed withmanufacturer’s recommended primer.
• Install top coat on flashings first. Extendcoating up vertical surfaces a minimum of8 “ and out onto horizontal surfaces.
• Install top coat directly over field basecoat and spread coating evenly accordingto manufacturer’s written instructions.
• Back roll to achieve a minimum wet milthickness according to manufacturer’swritten instructions.
• Avoid foot traffic on new fluid-appliedmembrane for a minimum of 24 hours.
WALKWAY INSTALLATION
Install walkways following application of top coat. Locate as indicated, or as directed by Owner.
• If walkway application is not applied within72 hours of the top coat applicationthe top coat shall be primed withmanufacturer’s recommended primer.
• Apply additional application of top coat totaped walkway area according tomanufacturer’s written instructions.
• Broadcast approximately 20-30 lbs. per100 sq. ft. of 20-40 mesh silica sandor quartz in the wet top coat material.
• Immediately back roll sand and top coat,creating an even dispersal of sand.Remove tape outlining walkwayimmediately.

29
ALPHAGUARD APPLICATION RESTORATION
Base coat and fiberglass reinforcement installation:
• Prime with required primer (see chart 1)and install base coat onto approvedsubstrate, spread coatingevenly according to Tremco’swritten instructions.
• Back roll to achieve a minimum wet milthickness according to Tremco’swritten instructions.
• Install fiberglass reinforcementimmediately into wet base coat. Rollsurface of fiberglass tofully embed into wet basecoat. Roll until fully saturated.
• Lap adjacent rolls of glass mat no lessthan 3”. End laps shall be no less than 6”.
• Lap onto flashing no less than 3”.• Roll the surface of the fiberglass to
completely embed into the wet base coat.• Allow base coat to cure a before installing
top coat.• Fiberglass reinforcement must be fully
encapsulated in base coat and not containpin holes, voids, or openings.
Top coat installation for field of roof and flashings:
• Priming of the base coat is required if topcoat is not applied within 72 hours ofthe base coat application. The basecoat shall be lightly primed withmanufacturer’s recommended primer.
• Install top coat on flashings first. Extendcoating up vertical surfaces a minimum of8 “ and out onto horizontal surfaces.
• Install top coat directly over field basecoat and spread coating evenly accordingto manufacturer’s written instructions.
• Back roll to achieve a minimum wet milthickness according to manufacturer’swritten instructions.
• Avoid foot traffic on new fluid-appliedmembrane for a minimum of 24 hours.
WALKWAY INSTALLATION
Install walkways following application of top coat. Locate as indicated, or as directed by Owner.
• If walkway application is not applied within72 hours of the top coat applicationthe top coat shall be primed withmanufacturer’s recommended primer.
• Apply additional application of top coat totaped walkway area according tomanufacturer’s written instructions.
• Broadcast approximately 20-30 lbs. per100 sq. ft. of 20-40 mesh silica sandor quartz in the wet top coat material.
• Immediately back roll sand and top coat,creating an even dispersal of sand.Remove tape outlining walkwayimmediately.

30
Final Inspection
Arrange for roofing system manufacturer’s technical personnel to inspect the fluid-applied membrane on completion. Prior to manufacturer’s final inspection the contractor shall examine the completed work for the following deficiencies:
Inspect completed Top Coat installation for pin holes, voids, exposed base coat, exposed reinforcement, rough fiberglass, blisters, un-adhered material or any other deficiencies that could compromise waterproofing integrity and long term performance.
Correct deficiencies as follows:
Pin holes/voids/exposed base coat or reinforcement:1. Install Geogard Primer over Top Coat at acoverage rate of 1 gal/500 sf. Allow to dry.2. Install new Top Coat at a coverage rate of 2gal/100 sf.
Repair & Maintenance
INSPECTION & REPAIR
Rough fiberglass reinforcement:1. Sand or grind fiberglass reinforcement downflush to surrounding Base Coat surface.2. Install Geogard Primer over area at acoverage rate of 1 gal/600 sf. Allow to dry.3. Install new Top Coat at a coverage rate of 2gal/100 sf.
Blisters/un-adhered Top Coat:1. Cut out and remove loose coating.2. Remove moisture if present.3. Install Geogard Primer over area at acoverage rate of 1 gal/500 sf. Allow to dry.4. Install new Top Coat at a coverage rate of 2gal/100 sf.
The fluid-applied membrane does not require additional surfacing or coatings for the duration of the warranty service life. However, the following preventive maintenance and general rooftop housekeeping procedures should be performed on a regular basis:
Inspect the fluid-applied membrane for physical damage such as punctures, splits, or tears.
Inspect flashing components and details for openings that could allow moisture entry.
Inspect rooftop for debris on the membrane and around drains. Remove debris and ensure all drain strainers are clear.
Dirt and debris that has accumulated on the roof surface can be removed to preserve the surfaces solar reflectivity. Remove dirt and debris with a solution of soap and water.
Dispose of rinse water according to local environmental regulations.
Repair & Maintenance
If inspection reveals that repairs are needed in the membrane or flashings follow these general guidelines:
Punctures/splits/tears:1. Clean surface of membrane with soap andwater. Let dry.2. Install Geogard Primer over defective area at acoverage rate of 1 gal/500 sf.3. Install Base Coat over defect at a coverage rateof 3 gal/100 sf and install reinforcement into wet material.4. Ensure that reinforcement is completelysaturated and does not contain pin holes or voids.5. Once Base Coat is dry install Top Coat at acoverage rate of 2 gal/100 sf.

31
Detail Drawings
32

33

34
35

36

37

38

39

40

41

42

43

44

45

3735 Green Road • Beachwood, OH • 44122 • 216-292-500050 Beth Nealson Drive • Toronto, ON • M4H 1M6 • 216-292-5000
6881