Embed Size (px)
Citation preview
Installation Guide CompanyCRYPT v1.4.5
[2012-03-01] Page: 1 / 29
Installation Guide CompanyCRYPT v1.4.5
© S.I.T. GmbH & Co. KG
Kaiser-Wilhelm-Str. 9 • 30159 Hanover • Germany
Telefon: +49 511 8999 710 • Telefax: +49 511 8999 712
Internet: www.companycrypt.com • eMail: [email protected]
© Copyright 2005-2012 by S.I.T. GmbH & Co. KG
Subject to change
The materials contained herein are the sole property of S.I.T.. No part of this publication may be reproduced or disseminated or transmitted in any form or by any means electronic, mechanical, photocopying, recording, or otherwise stored in any retrievable system or otherwise used in any manner whatsoever without the express permission of S.I.T..
S.I.T. provides this publication in the form „as is” and does not take any liability for this documentation. The non liability includes expressed or implicit guarantees or suitability for defined purposes. The reader or user carries full responsibility for any usage of the information provided in this documentation.
Under no condition shall S.I.T. be liable for any direct or indirect, coincidental, special or resulting damage or loss, derived from any error within or related to the provided information, even and especially when the possibility of loss or damage was stated.
Furthermore S.I.T. claims the right to change, modify, nullify or update this documentation at any given time without the obliga-tion to inform persons or organisations.
The usage of the software related to this documentation is part of and regulated by the licence agreement of S.I.T..
Trademarks
MIMEsweeper and MAILsweeper are registered trademark (TM) of the company CLEARSWIFT.
CompanyCRYPT is a registered trademark (TM) of the company S.I.T. GmbH & Co. KG.
Any other trademark, brand, product names or logo not named above but used in this documentation is to be considered a registered trademark of the registered trademark holder.

Installation Guide CompanyCRYPT v1.4.5
[2012-03-01] Page: 2 / 29
1 Content
1.1 List of content
1 Content............................................................................................................... 2 1.1 List of content...................................................................................................................... 2 1.2 Document content ............................................................................................................... 2
2 Preparing the installation ................................................................................. 3 2.1 System requirements .......................................................................................................... 3 2.2 Special requirements .......................................................................................................... 3
3 CompanyCRYPT Installation ............................................................................ 4 3.1 Choosing the right implementation sequence ................................................................. 4
3.1.1 Installation Sequence 1 – Single Server................................................................. 4 Installing the program files...................................................................................................................5
3.1.2 Installation Sequence 2 – Multiple Server (A) ........................................................ 5 Installing the program files on the Master System (PCS) ....................................................................6 Installing the program files on the Slave System (PS).........................................................................8
3.1.3 Installation Sequence 3 – Multiple Server (B) ...................................................... 10 Installing the program files on the Slave System (PS).......................................................................11 Installing the program files on the Master System (PCS) ..................................................................13
3.2 Installing the CompanyCRYPT-WebGUI ......................................................................... 16 3.2.1 Setting up the CC-WebGUI as a Virtual Directory.................................................. 16 3.2.2 Setting up Authentication........................................................................................ 19 3.2.3 Setting up Access Control ...................................................................................... 20 3.2.4 Activating SSL encryption (optional, recommended) ............................................. 22 3.2.5 Setting up the URL for Certificate Revocation List – CRL...................................... 24
4 De-installing CompanyCRYPT ....................................................................... 27 4.1 Part 1 – Deleting CompanyCRYPT services and EXE.INI entries................................. 27 4.2 Part 2 – Remove CompanyCRYPT program files (Uninstall) ........................................ 27 4.3 Part 3 – Remove CompanyCRYPT-WebGUI.................................................................... 28
1.2 Document content This document describes the necessary steps to install CompanyCRYPT® on a system with defined preliminaries. It supports you while setting up an operational CompanyCRYPT ® installation including the administrative access. The configuration of CompanyCRYPT ® and the integration into the product MIMEsweeper for SMTP’® by Clearswift® is described in a separate document named Configuration Guide.
Installation Guide CompanyCRYPT v1.4.5
[2012-03-01] Page: 3 / 29
2 Preparing the installation
2.1 System requirements Software: Windows Server 2008 Standard or Enterprise
Internet Information Server, MIMEsweeper for SMTP 5.4
The freely available Open Source products GnuPG and OpenSSL are part of the Company-CRYPT installation package.
Hardware: The same requirements as for the MIMEsweeper for SMTP apply. Beyond that: • CPU > 2 GHz recommended • 20 MB HDD space
Network: If using synchronisation between multiple CompanyCRYPT installations, a single configurable IP-port (default: 23499) has to be opened between the assigned Master system and each Slave system in both directions.
Permissions: The installation of CompanyCRYPT has to be done with ‘Local Administrator’ permissions. Please ensure, that your log-on account meets this requirement or that your account has suffi-cient permissions to install services and write access to the registry.
2.2 Special requirements If this install package comes with an additional ReadMe file, please make sure that you have read this before you start the installation. It will contain additional instruction or descriptions of additional requirements.

Installation Guide CompanyCRYPT v1.4.5
[2012-03-01] Page: 4 / 29
3 CompanyCRYPT Installation
3.1 Choosing the right implementation sequence CompanyCRYPT supports MIMEsweeper distributed environments with multiple server. CompanyCRYPT key material, data and configuration information can be synchronized across an IP connection. The synchronisation is based on a master-slave model in which the master is used to administrate the CompanyCRYPT deployment centrally.
The next pictures show different outlines of the full CompanyCRYPT implementation (installation and configuration). Depending on the type of MIMEsweeper deployment (PCS with/without PS on the same system), the CompanyCRYPT implementation sequence varies. Use the pictures below to select the implementation sequence that matches your MIMEsweeper deployment.
Note: The step CompanyCRYPT-“First Start..”, and all following steps (“Entering Licence”) as well as all steps within MI-MEsweeper are described in the CompanyCRYPT Configuration Guide.
3.1.1 Installation Sequence 1 – Single Server Follow this sequence, if all components are installed on a single server.
CompanyCRYPT
CompanyCRYPTInstallation
Activation of Web-GUI (IIS)
First start = Initialisation
CompanyCRYPT
Entering Licence
GeneralConfiguration
Generating CA and CSA key
Generating internal keys
Importingexternal keys
MIMEsweeper
Address lists
Classifications
Scenarios
KeyserverSpecial accounts
Optional Described in „CompanyCRYPT Configuration Guide“
MIMEsweeper: Primary Configuration Server (PCS)and Policy Server (PS)
Single Server
Described in this document
SMTP SMTP

Installation Guide CompanyCRYPT v1.4.5
[2012-03-01] Page: 5 / 29
Installing the program files
Step 1 Start the installation by a right-click on the file CompanyCRYPT_vXXX_setup.exe („XXX“ stands for the program version ) and select Run as administrator.
Step 2 If the window User Account Control appears confirm it with Yes.
Step 3 The welcome window will appear, click on Next.
Step 4 In the dialog box’ Software-Licence-Agreement’ select „I accept ...“ and click on Next.
Step 5 In the next dialog box the target installation directory can be selected. Either proceed with the pre-selected directory with Next or click on the button Change and select the desired directory. Confirm the change by clicking on OK then.
Step 6 Now by clicking on Install, the program installation will be started. A progress bar will be displayed.
Step 7 A successful installation will be displayed by the window ‘Completing the CompanyCRYPT Setup Wizard’. Deactivate the option Launch CompanyCRYPT. By clicking on the button Finish the process is complete.
3.1.2 Installation Sequence 2 – Multiple Server (A) Follow this sequence, if your MIMEsweeper is a Primary Configuration Server (PCS) and a Policy Server (PS) is installed and active on the same system. The setup of Master and Slave can be done independently, it is recommended to start with the Master.

Installation Guide CompanyCRYPT v1.4.5
[2012-03-01] Page: 6 / 29
Multiple Server (A)
MIMEsweeper 1: Primary Configuration Server (PCS) and Policy Server (PS)
SMTP SMTP
MIMEsweeper 2, 3, …: Policy Server (PS) only
CompanyCRYPTInstallation
Activation of Web-GUI (IIS)
First start = Initialisation
Entering Licence
ActivatingSynchronisation
Described in this document
MIMEsweeper 1CompanyCRYPT: Master
MIMEsweeper 2, 3, ..CompanyCRYPT: Slave
CompanyCRYPTInstallation
Activation of Web-GUI (IIS)
First start = Initialisation
Entering Licence
ActivatingSynchronisation
Without IIS: Using SyncManager
Continue like“Single Server”
OptionalDescribed in „CompanyCRYPT
Configuration Guide“
Installing the program files on the Master System (PCS)
Step 1 Start the installation by a right-click on the file CompanyCRYPT_vXXX_setup.exe („XXX“ stands for the program version ) and select Run as administrator.
Step 2

Installation Guide CompanyCRYPT v1.4.5
[2012-03-01] Page: 7 / 29
If the window User Account Control appears confirm it with Yes.
Step 3 The welcome window will appear, click on Next.
Step 4 In the dialog box’ Software-Licence-Agreement’ select „I accept ...“ and click on Next.
Step 5 In the next dialog box the target installation directory can be selected. Either proceed with the pre-selected directory with Next or click on the button Change and select the desired directory. Confirm the change by clicking on OK then.
Step 6 Now by clicking on Install, the program installation will be started. A progress bar will be displayed.
Step 7 A successful installation will be displayed by the window ‘Completing the CompanyCRYPT Setup Wizard’. The option Launch CompanyCRYPT should be marked. By clicking on the button Finish the SyncManager will be started.
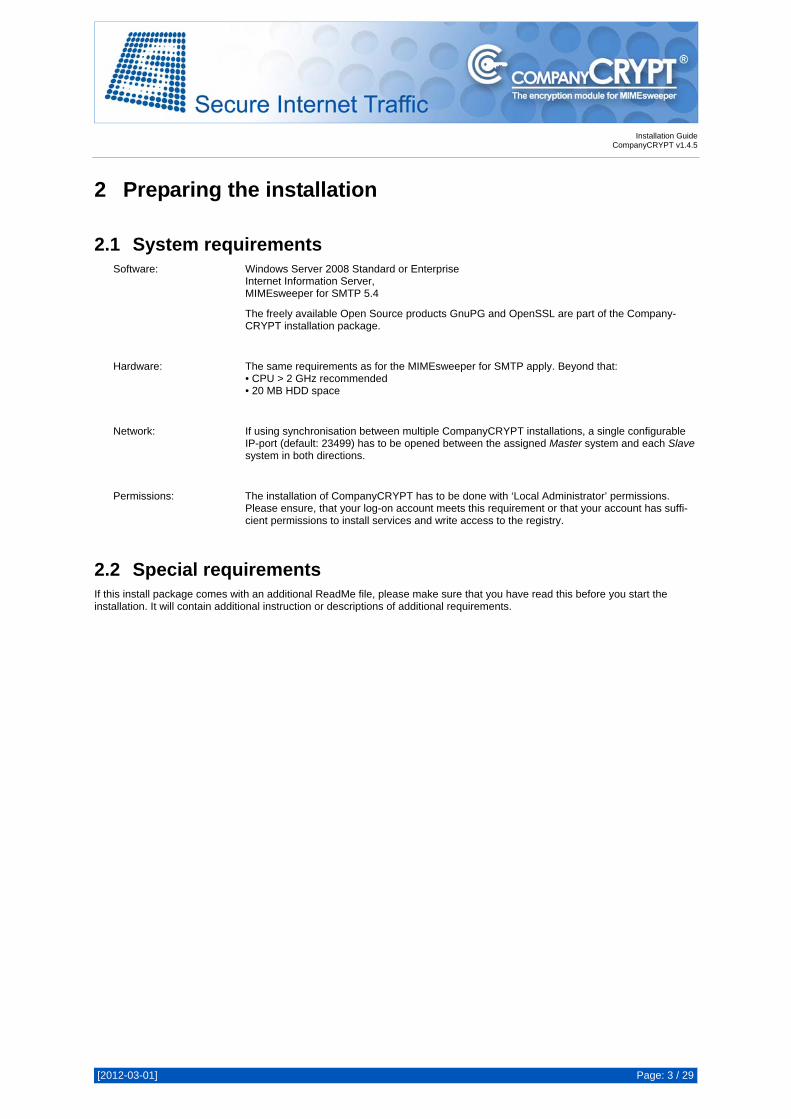
Step 8 Within the LICENCE-STATUS frame click on Add.
Step 9 Enter your licence details, click on Apply and close the window by clicking on Close. A valid licence is displayed with a green OK.
Installation Guide CompanyCRYPT v1.4.5
[2012-03-01] Page: 8 / 29
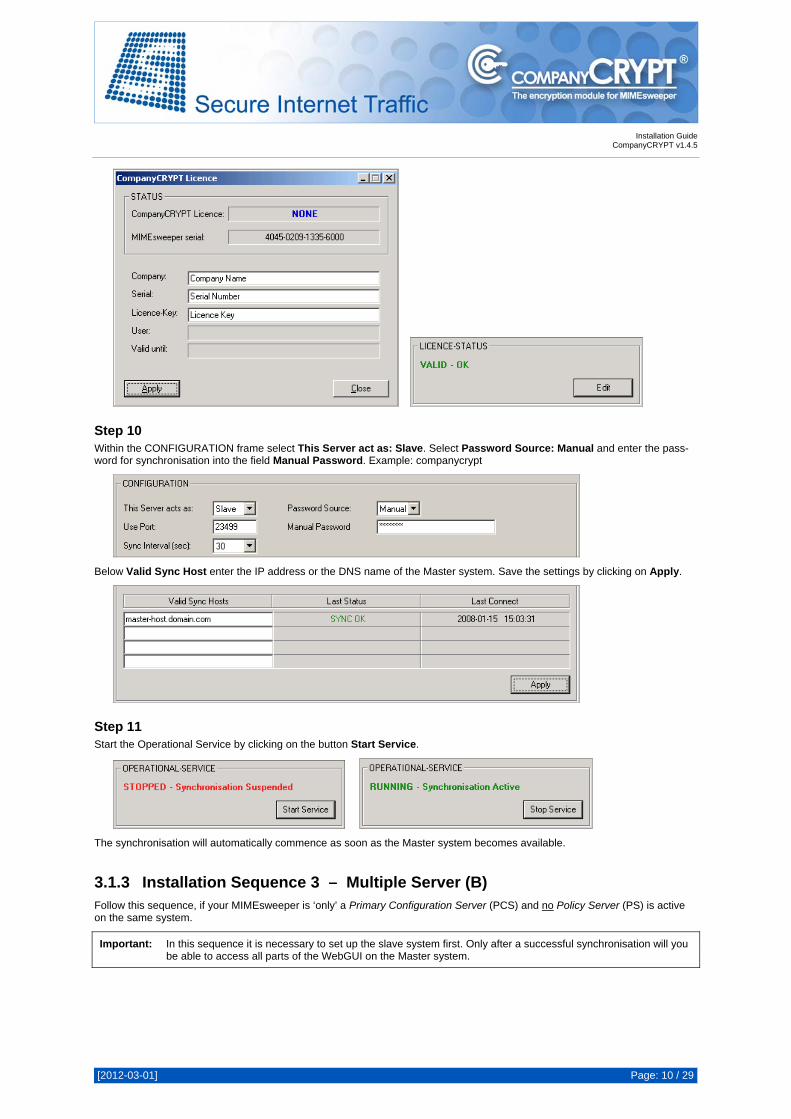
Step 10 Within the CONFIGURATION frame select This Server acts as: Master. Select Password Source: Manual and enter a pass-word for synchronisation into the field Manual Password. Example: companycrypt
Below Valid Sync Host enter the IP addresses or the DNS names of the Slave systems. Save the settings by clicking on Ap-ply.
Step 11 Start the Operational Service by clicking on the button Start Service.
The synchronisation will automatically commence as soon as the Slave systems have been configured.
Installing the program files on the Slave System (PS)
Step 1 Start the installation by a right-click on the file CompanyCRYPT_vXXX_setup.exe („XXX“ stands for the program version ) and select Run as administrator.

Installation Guide CompanyCRYPT v1.4.5
[2012-03-01] Page: 9 / 29
Step 2 If the window User Account Control appears confirm it with Yes.
Step 3 The welcome window will appear, click on Next.
Step 4 In the dialog box’ Software-Licence-Agreement’ select „I accept ...“ and click on Next.
Step 5 In the next dialog box the target installation directory can be selected. Either proceed with the pre-selected directory with Next or click on the button Change and select the desired directory. Confirm the change by clicking on OK then.
Step 6 Now by clicking on Install, the program installation will be started. A progress bar will be displayed.
Step 7 A successful installation will be displayed by the window ‘Completing the CompanyCRYPT Setup Wizard’. The option Launch CompanyCRYPT should be marked. By clicking on the button Finish the SyncManager will be started.
Step 8 Within the LICENCE-STATUS frame click on Add.
Step 9 Enter your licence details, click on Apply and close the window by clicking on Close. A valid licence is displayed with a green OK.
Installation Guide CompanyCRYPT v1.4.5
[2012-03-01] Page: 10 / 29
Step 10 Within the CONFIGURATION frame select This Server act as: Slave. Select Password Source: Manual and enter the pass-word for synchronisation into the field Manual Password. Example: companycrypt
Below Valid Sync Host enter the IP address or the DNS name of the Master system. Save the settings by clicking on Apply.
Step 11 Start the Operational Service by clicking on the button Start Service.
The synchronisation will automatically commence as soon as the Master system becomes available.
3.1.3 Installation Sequence 3 – Multiple Server (B) Follow this sequence, if your MIMEsweeper is ‘only’ a Primary Configuration Server (PCS) and no Policy Server (PS) is active on the same system.
Important: In this sequence it is necessary to set up the slave system first. Only after a successful synchronisation will you be able to access all parts of the WebGUI on the Master system.

Installation Guide CompanyCRYPT v1.4.5
[2012-03-01] Page: 11 / 29
Multiple Server (B)
MIMEsweeper 1: Primary Configuration Server (PCS) only
SMTP SMTP
MIMEsweeper 2, 3, …: Policy Server (PS) only
CompanyCRYPTInstallation
Activation of Web-GUI (IIS)
First start = Initialisation
ActivatingSynchronisation
GeneralConfiguration
Described in this document
MIMEsweeper 1CompanyCRYPT: Master
After successfulSynchronisation
MIMEsweeper 2, 3, ..CompanyCRYPT: Slave
CompanyCRYPTInstallation
Activation of Web-GUI (IIS)
First start = Initialisation
Entering Licence
ActivatingSynchronisation
Without IIS: Using SyncManager
Optional
Described in „CompanyCRYPT
Configuration Guide“
Continue like“Single Server”
Installing the program files on the Slave System (PS)
Step 1 Start the installation by a right-click on the file CompanyCRYPT_vXXX_setup.exe („XXX“ stands for the program version ) and select Run as administrator.

Installation Guide CompanyCRYPT v1.4.5
[2012-03-01] Page: 12 / 29
Step 2 If the window User Account Control appears confirm it with Yes.
Step 3 The welcome window will appear, click on Next.
Step 4 In the dialog box’ Software-Licence-Agreement’ select „I accept ...“ and click on Next.
Step 5 In the next dialog box the target installation directory can be selected. Either proceed with the pre-selected directory with Next or click on the button Change and select the desired directory. Confirm the change by clicking on OK then.
Step 6 Now by clicking on Install, the program installation will be started. A progress bar will be displayed.
Step 7 A successful installation will be displayed by the window ‘Completing the CompanyCRYPT Setup Wizard’. The option Launch CompanyCRYPT should be marked. By clicking on the button Finish the SyncManager will be started.
Step 8 Within the LICENCE-STATUS frame click on Add.
Step 9 Enter your licence details, click on Apply and close the window by clicking on Close. A valid licence is displayed with a green OK.

Installation Guide CompanyCRYPT v1.4.5
[2012-03-01] Page: 13 / 29
Step 10 Within the CONFIGURATION frame select This Server act as: Slave. Select Password Source: Manual and enter a pass-word for synchronisation into the field Manual Password. Example: companycrypt
Below Valid Sync Host enter the IP address or the DNS name of the Master system. Save the settings by clicking on Apply.
Step 11 Start the Operational Service by clicking on the button Start Service.
The synchronisation will automatically commence as soon as the Master system becomes available.
Installing the program files on the Master System (PCS)
Step 1 Start the installation by a right-click on the file CompanyCRYPT_vXXX_setup.exe („XXX“ stands for the program version ) and select Run as administrator.
Step 2

Installation Guide CompanyCRYPT v1.4.5
[2012-03-01] Page: 14 / 29
If the window User Account Control appears confirm it with Yes.
Step 3 The welcome window will appear, click on Next.
Step 4 In the dialog box’ Software-Licence-Agreement’ select „I accept ...“ and click on Next.
Step 5 In the next dialog box the target installation directory can be selected. Either proceed with the pre-selected directory with Next or click on the button Change and select the desired directory. Confirm the change by clicking on OK then.
Step 6 Now by clicking on Install, the program installation will be started. A progress bar will be displayed.
Step 7 A successful installation will be displayed by the window ‘Completing the CompanyCRYPT Setup Wizard’. The option Launch CompanyCRYPT should be marked. By clicking on the button Finish the SyncManager will be started.
Step 8 Within the LICENCE-STATUS frame click on Add.
Step 9 Enter your licence details, click on Apply and close the window by clicking on Close. A valid licence is displayed with a green OK.

Installation Guide CompanyCRYPT v1.4.5
[2012-03-01] Page: 15 / 29
Step 10 Within the CONFIGURATION frame select This Server acts as: Master. Select Password Source: Manual and enter the password for synchronisation into the field Manual Password. Example: companycrypt
Below Valid Sync Host enter the IP addresses or the DNS names of the Slave systems. Save the settings by clicking on Ap-ply.
Step 11 Start the Operational Service by clicking on the button Start Service.
Step 12 The synchronisation will automatically commence as soon as the Slave system has been configured. During the first synchroni-sation cycle the licence information will be validated.

Installation Guide CompanyCRYPT v1.4.5
[2012-03-01] Page: 16 / 29
3.2 Installing the CompanyCRYPT-WebGUI The following pages will describe the integration into a Microsoft® Internet Information Service (IIS) 7.0 under Windows Server 2008 R2. Upon integration into an older version of the IIS (or MS-Windows) the name of some paths and menu items may differ from the documented information hereafter.
Important: For the configuration of the WebGUI the Role „Web Server (IIS)“ and the Role Services „CGI“ and „URL Authorization“ must be installed on the server. Within the Server Manager you can install the needed compo-nents.
3.2.1 Setting up the CC-WebGUI as a Virtual Directory The implementation as a Virtual Directory is highly recommended. It means that when accessing the CompanyCRYPT-WebGUI, the address consists of the domain (of the hostname) and the selected directory for CompanyCRYPT. Example: mail.host.com/CCWEB
Step 1 Begin with Start Administrative Tools and start the Internet Information Services (IIS) Manager. Move to and right-click on Internet Information Services (IIS) Manager … (Local Computer) (Features View) ISAPI and CGI Restrictions and select Open Feature.

Installation Guide CompanyCRYPT v1.4.5
[2012-03-01] Page: 17 / 29
Step 2 Now click on the Action Add and add to the ISAPI or CGI path: <CompanyCRYPT-Install directory>\webfiles\HTDOCS\cgi-bin\index.exe. Enter CompanyCRYPT into the field Description. Finally activate the field Allow extension path to execute and save with OK.
Step 3 Move to Internet Information Services (IIS) Manager … (Local Computer) Sites and select Default Web Site.
Step 4 Right-click on Default Web Site and select Add Virtual Directory. Enter CCWEB as an alias or choose an individual name. Enter the Physical path according to your installation: <CC-Install directory>\Webfiles\HTDOCS. Click on Connect as.
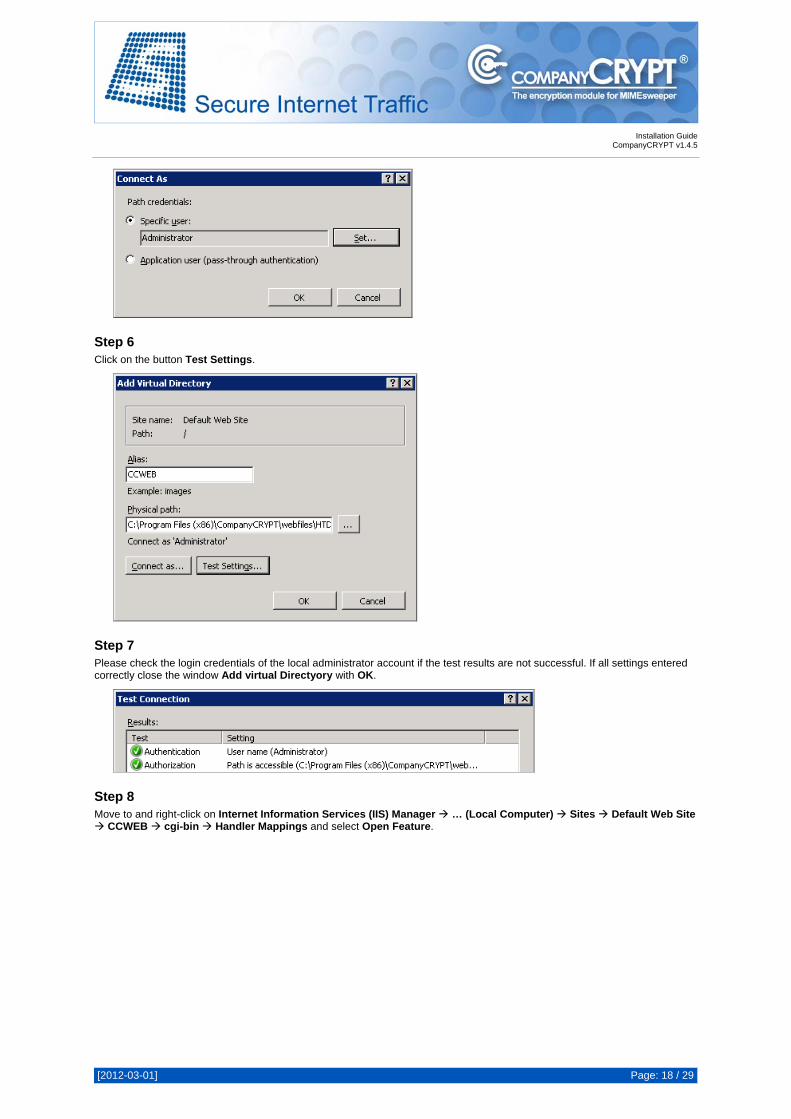
Step 5 Select Specific user and click the button Set. Enter the login credentials for the local administrator account and save the settings with Ok.
Installation Guide CompanyCRYPT v1.4.5
[2012-03-01] Page: 18 / 29
Step 6 Click on the button Test Settings.
Step 7 Please check the login credentials of the local administrator account if the test results are not successful. If all settings entered correctly close the window Add virtual Directyory with OK.
Step 8 Move to and right-click on Internet Information Services (IIS) Manager … (Local Computer) Sites Default Web Site
CCWEB cgi-bin Handler Mappings and select Open Feature.

Installation Guide CompanyCRYPT v1.4.5
[2012-03-01] Page: 19 / 29
Step 9 Now click on the Action Edit Feature Permissions. Finally activate Execute and save with OK.
3.2.2 Setting up Authentication Important: By default the IIS will grant access to hosted web sites with the anonymous/guest account. Due to the lack of
permissions, this account cannot be used to administrate CompanyCRYPT. Please use the administrators ac-count or an account with sufficient permissions to fully access the CompanyCRYPT folder and additional rights to install/start/stop services.
It is highly recommended to activating this setting by which access to the CompanyCRYPT WebGUI is only granted after suc-cessful authentication.
Step 1 Move to and right-click on Internet Information Services (IIS) Manager … (Local Computer) Sites Default Web Site
CCWEB Authentication and select Open Feature.
Step 2 Disable the Anonymous Authentication. Instead activate the Windows Authentication.

Installation Guide CompanyCRYPT v1.4.5
[2012-03-01] Page: 20 / 29
3.2.3 Setting up Access Control The implementation of access control is based on the windows user management. It is recommended to set up a dedicated user group in the system that is afterwards configured to have access to the CompanyCRYPT WebGUI.
Step 1 Set up a new user group. Depending on the existing infrastructure it may either be a local or a domain group. For better recog-nisability name this group CompanyCRYPT-Administrators. Add all desired personal accounts to make them members of that group.
Step 2 Move to and right-click on Internet Information Services (IIS) Manager … (Local Computer) Sites Default Web Site
CCWEB and select Edit Permissions.
Step 3 Make sure that besides the System account (required) only accounts and groups are listed that are entitled to manage Com-panyCRYPT. All other entries are to be removed. This accounts should be configured to have Full Control. Add the account IIS_IUSRS with the following permissions: ‘Read & execute’, ‘List folder contents’ and ‘Read’. Save the settings by clicking on OK.

Installation Guide CompanyCRYPT v1.4.5
[2012-03-01] Page: 21 / 29
Step 4 Move to and right-click on Internet Information Services (IIS) Manager … (Local Computer) Sites Default Web Site
CCWEB Authorization Rules and select Open Feature.
Step 5 Remove all Rules from the list and click on the Action Add Allow Rule. Select Specified roles or user groups and enter the group CompanyCRYPT-Administrators. Save with OK.

Installation Guide CompanyCRYPT v1.4.5
[2012-03-01] Page: 22 / 29
3.2.4 Activating SSL encryption (optional, recommended) All data and information entered via the WebGUI can be protected during transmission from your browser to the server by means of SSL encryption. The ability of using SSL has to be activated in the IIS. This can be done at any given time.
Note: Activation of SSL in the IIS requires the import of a server-certificate, usually supplied in the form of a *.p12 file. This can be generated within the IIS.
Note: If there is already a server certificate integrated into your Default Web Site this step is obsolete.
Step 1 Move to and right-click on Internet Information Services (IIS) Manager … (Local Computer) Server Certificates and select Open Feature.
Step 2 Now click on the Action Create Self-Signed Certificate. Add the Fully Qualified Domain Name of the server to the field Specify a friendly name for the certificate. Save with OK.
Important: Make sure that the name of the certificate owner exactly matches the FQDN (Fully Qualified Domain Name) of your server. Example: http://msw.company.com/ccweb Name: msw.company.com
Step 3 Move to and right-click on Internet Information Services (IIS) Manager … (Local Computer) Sites Default Web Site and select Edit Bindings.

Installation Guide CompanyCRYPT v1.4.5
[2012-03-01] Page: 23 / 29
Step 4 In the window Site Bindings click the button Add. Select https in the field Type and in the field SSL certificate choose the entry which matches the local server name. Save all setting by leaving this window with OK.
Step 5 The windows Site Bindings will show the entry for https. Close this window.
Step 6 Move to and right-click on Internet Information Services (IIS) Manager … (Local Computer) Sites Default Web Sites CCWEB SSL settings and select Open Feature.

Installation Guide CompanyCRYPT v1.4.5
[2012-03-01] Page: 24 / 29
Step 7 Activate the option Require SSL. The Client certificates settings should be set to Ignore. Save the settings with Apply.
3.2.5 Setting up the URL for Certificate Revocation List – CRL If a self-signed CA certificate is used within CompanyCRYPT for creating and signing of new certificates, then a certificate revocation list will be created automatically by CompanyCRYPT. This CRL will typically be provided via a HTTP link.
The address of the CRL consists of the domain (of the hostname) and the selected directory. Example: mail.host.com/CRL
Step 1 Begin with Start Administrative Tools and start the Internet Information Services (IIS) Manager. Move to Internet Infor-mation Services (IIS) Manager … (Local Computer) Sites and select Default Web Site.

Installation Guide CompanyCRYPT v1.4.5
[2012-03-01] Page: 25 / 29
Step 2 Right-click on Default Web Site and select Add Virtual Directory. Enter CRL as an alias or choose an individual name. Enter the Physical path according to your installation: <CC-Install directory>\smime and save with OK.
Step 3 Move to and right-click on Internet Information Services (IIS) Manager … (Local Computer) Sites Default Web Sites CRL Default Document and select Open Feature.
Step 4 Choose the Action Add and enter the name crl.crl as the Default Document. Save with OK.

Installation Guide CompanyCRYPT v1.4.5
[2012-03-01] Page: 26 / 29
Step 5 Remove all entries from the list except the file name crl.crl.
Note: All internal certificates should contain the link to your CRL. This will provide the information about the CRL to your partners for automated queries. Full URL syntax is required. Example: http://mail.host.com/CRL
Important: Note that to access the Certificate Revocation List via HTTP from the Internet your firewall rules have to be modified as well.

Installation Guide CompanyCRYPT v1.4.5
[2012-03-01] Page: 27 / 29
4 De-installing CompanyCRYPT Important Note: Before de-installing CompanyCRYPT all existing CompanyCRYPT scenarios (De- and encryption jobs) have to be deleted in the MIMEsweeper-Policy Editor.
4.1 Part 1 – Deleting CompanyCRYPT services and EXE.INI entries WebGUI (Configuration) System Service Control / MIMEsweeper
Step 1 First stop the Operational service by clicking on the Stop button. Then stop the Reprocess Service by clicking on the other Stop button.
Step 2 Delete the two services by clicking on their Uninstall buttons. In case the button is coloured grey and you read ‚Query’ the stopping process is not yet complete. Refresh the display by clicking on Query button.
Step 3 Delete the EXE.INI entries by clicking on the Remove button.
Step 4 After completing step 1 through 3 you should see the view below. You may now close the WebGUI.
4.2 Part 2 – Remove CompanyCRYPT program files (Uninstall) Start Control Panel Software Add or Remove Programs
Step 1 Move to Start Control Panel Programs Uninstall a program and select the entry CompanyCRYPT, then click on Uninstall.
Step 2 Answer the following question „Are you sure you want to uninstall CompanyCRYPT“ with Yes and all program files of Com-panyCRYPT will be removed.
Step 3 Existing key material and files that have been modified since installation will not be removed automatically by the previous Step. If there is no longer any need for these files, the complete folder CompanyCRYPT can be simply deleted.
Installation Guide CompanyCRYPT v1.4.5
[2012-03-01] Page: 28 / 29
4.3 Part 3 – Remove CompanyCRYPT-WebGUI Start Administrative Tools Internet Information Services (IIS) Manager
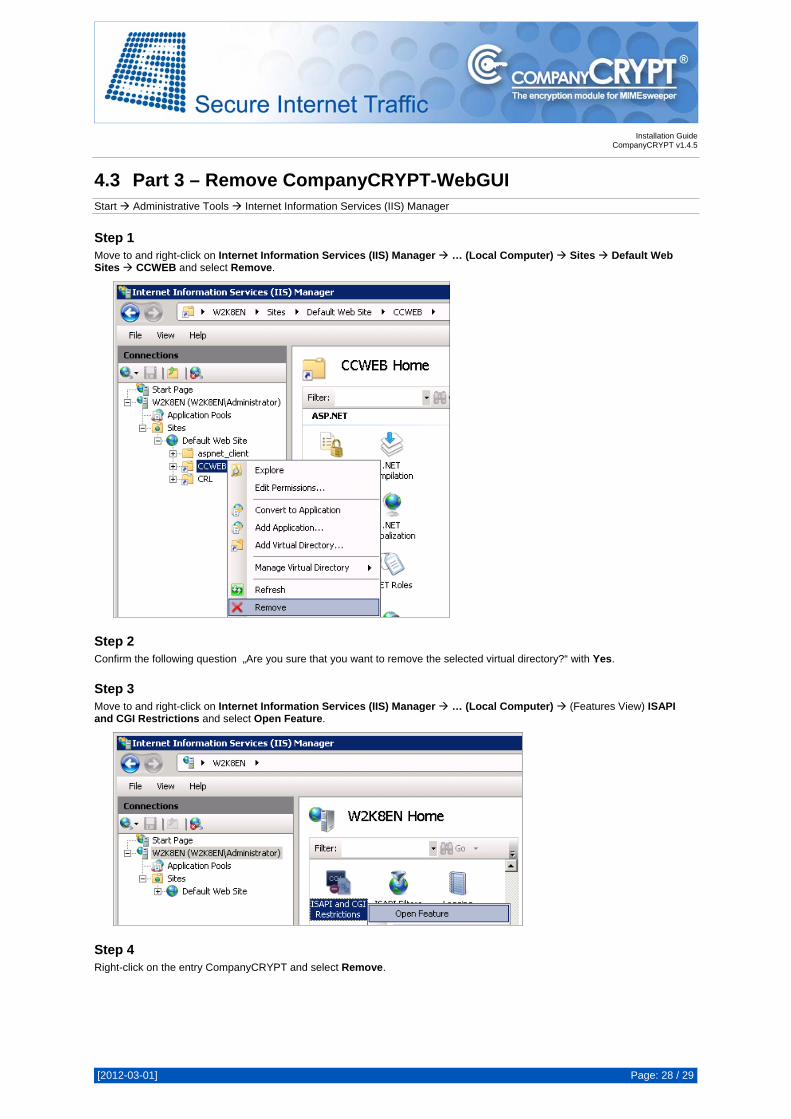
Step 1 Move to and right-click on Internet Information Services (IIS) Manager … (Local Computer) Sites Default Web Sites CCWEB and select Remove.
Step 2 Confirm the following question „Are you sure that you want to remove the selected virtual directory?“ with Yes.
Step 3 Move to and right-click on Internet Information Services (IIS) Manager … (Local Computer) (Features View) ISAPI and CGI Restrictions and select Open Feature.
Step 4 Right-click on the entry CompanyCRYPT and select Remove.

Installation Guide CompanyCRYPT v1.4.5
[2012-03-01] Page: 29 / 29
Step 5 Confirm the following question „Are you sure that you want to remove the selected restriction?“ with Yes.