Embed Size (px)
Citation preview
Oracle Retail Order BrokerInstallation Guide Release 16.0E83029-09
April 2018
ii
Oracle Retail Order Broker Installation Guide, Release 16.0
E83029-09
Copyright © 2018, Oracle and/or its affiliates. All rights reserved.
This software and related documentation are provided under a license agreement containing restrictions on use and disclosure and are protected by intellectual property laws. Except as expressly permitted in your license agreement or allowed by law, you may not use, copy, reproduce, translate, broadcast, modify, license, transmit, distribute, exhibit, perform, publish, or display any part, in any form, or by any means. Reverse engineering, disassembly, or decompilation of this software, unless required by law for interoperability, is prohibited.
The information contained herein is subject to change without notice and is not warranted to be error-free. If you find any errors, please report them to us in writing.
If this software or related documentation is delivered to the U.S. Government or anyone licensing it on behalf of the U.S. Government, then the following notice is applicable:
U.S. GOVERNMENT END USERS: Oracle programs, including any operating system, integrated software, any programs installed on the hardware, and/or documentation, delivered to U.S. Government end users are “commercial computer software” pursuant to the applicable Federal Acquisition Regulation and agency-specific supplemental regulations. As such, use, duplication, disclosure, modification, and adaptation of the programs, including any operating system, integrated software, any programs installed on the hardware, and/or documentation, shall be subject to license terms and license restrictions applicable to the programs. No other rights are granted to the U.S. Government.
This software or hardware is developed for general use in a variety of information management applications. It is not developed or intended for use in any inherently dangerous applications, including applications that may create a risk of personal injury. If you use this software or hardware in dangerous applications, then you shall be responsible to take all appropriate fail-safe, backup, redundancy, and other measures to ensure its safe use. Oracle Corporation and its affiliates disclaim any liability for any damages caused by use of this software or hardware in dangerous applications.
Oracle and Java are registered trademarks of Oracle and/or its affiliates. Other names may be trademarks of their respective owners.
Intel and Intel Xeon are trademarks or registered trademarks of Intel Corporation. All SPARC trademarks are used under license and are trademarks or registered trademarks of SPARC International, Inc. AMD, Opteron, the AMD logo, and the AMD Opteron logo are trademarks or registered trademarks of Advanced Micro Devices. UNIX is a registered trademark of The Open Group.
This software or hardware and documentation may provide access to or information on content, products, and services from third parties. Oracle Corporation and its affiliates are not responsible for and expressly disclaim all warranties of any kind with respect to third-party content, products, and services unless otherwise set forth in an applicable agreement between you and Oracle. Oracle Corporation and its affiliates will not be responsible for any loss, costs, or damages incurred due to your access to or use of third-party content, products, or services, except as set forth in an applicable agreement between you and Oracle.
iii
Oracle Retail VAR Applications
The following restrictions and provisions only apply to the programs referred to in this section and licensed to you. You acknowledge that the programs may contain third party software (VAR applications) licensed to Oracle. Depending upon your product and its version number, the VAR applications may include:
(i) the MicroStrategy Components developed and licensed by MicroStrategy Services Corporation (MicroStrategy) of McLean, Virginia to Oracle and imbedded in the MicroStrategy for Oracle Retail Data Warehouse and MicroStrategy for Oracle Retail Planning & Optimization applications.
(ii) the Wavelink component developed and licensed by Wavelink Corporation (Wavelink) of Kirkland, Washington, to Oracle and imbedded in Oracle Retail Mobile Store Inventory Management.
(iii) the software component known as Access Via™ licensed by Access Via of Seattle, Washington, and imbedded in Oracle Retail Signs and Oracle Retail Labels and Tags.
(iv) the software component known as Adobe Flex™ licensed by Adobe Systems Incorporated of San Jose, California, and imbedded in Oracle Retail Promotion Planning & Optimization application.
You acknowledge and confirm that Oracle grants you use of only the object code of the VAR Applications. Oracle will not deliver source code to the VAR Applications to you. Notwithstanding any other term or condition of the agreement and this ordering document, you shall not cause or permit alteration of any VAR Applications. For purposes of this section, “alteration” refers to all alterations, translations, upgrades, enhancements, customizations or modifications of all or any portion of the VAR Applications including all reconfigurations, reassembly or reverse assembly, re-engineering or reverse engineering and recompilations or reverse compilations of the VAR Applications or any derivatives of the VAR Applications. You acknowledge that it shall be a breach of the agreement to utilize the relationship, and/or confidential information of the VAR Applications for purposes of competitive discovery.
The VAR Applications contain trade secrets of Oracle and Oracle's licensors and Customer shall not attempt, cause, or permit the alteration, decompilation, reverse engineering, disassembly or other reduction of the VAR Applications to a human perceivable form. Oracle reserves the right to replace, with functional equivalent software, any of the VAR Applications in future releases of the applicable program.
iv
Contents
Send Us Your Comments .............................................................................................vi
Preface ..........................................................................................................................viiAudience ............................................................................................................................................ viiDocumentation Accessibility .......................................................................................................... viiCustomer Support ............................................................................................................................ viiImproved Process for Oracle Retail Documentation Corrections ............................................viiiOracle Retail Documentation on the Oracle Technology Network .........................................viiiConventions ......................................................................................................................................viii
1 Preinstallation TasksPrerequisites ..................................................................................................................................... 1-2
Implementation Capacity Planning .............................................................................................. 1-2Check Supported Database Server Requirements ...................................................................... 1-2Check Supported Application Server Requirements ................................................................. 1-2Check Supported Application Server Requirements for Store Connect or Supplier Direct Fulfillment Servers .......................................................................................................................... 1-3Check Client PC and Web Browser Requirements ..................................................................... 1-3Supported Oracle Retail Products ................................................................................................. 1-3Linux User Account Privileges to Install the Software .............................................................. 1-4WebLogic User Privileges to Configure WebLogic .................................................................... 1-4Oracle WebService Manager – Policy Manager .......................................................................... 1-4
Definitions and Concepts ............................................................................................................... 1-5Platform ............................................................................................................................................. 1-5Domain .............................................................................................................................................. 1-5Cluster ............................................................................................................................................... 1-5ADMIN_SERVER ............................................................................................................................ 1-5DOMAIN_SERVER ......................................................................................................................... 1-5WEBLOGIC_12c ............................................................................................................................... 1-5DOMAIN_FOLDER ........................................................................................................................ 1-6
2 Installation StepsBefore You Start ............................................................................................................................... 2-1
Databases ........................................................................................................................................... 2-3Create Database Containers and Pluggable Databases .............................................................. 2-3Create Table Spaces for Each Database ........................................................................................ 2-3Create the Users / Schemas and Seed Data for Each Database ................................................. 2-4
Order Broker Application .............................................................................................................. 2-7Create the Order Broker Application Admin User .................................................................... 2-7Install the Application ..................................................................................................................... 2-8Use the WebLogic Console to Configure the Application ....................................................... 2-11
Set Up Startup Arguments for Managed Servers .................................................................... 2-18Edit Config.xml .............................................................................................................................. 2-19Start Up the Servers ....................................................................................................................... 2-19
Validate the Installation ............................................................................................................... 2-20
v
Configure the Installation ............................................................................................................. 2-20 Store Connect Installation ........................................................................................................... 2-22
Validate the Store Connect Installation ...................................................................................... 2-23Supplier Direct Fulfillment (Vendor Portal) Installation ...................................................... 2-24
Validate the Vendor Portal Installation ...................................................................................... 2-25
Time Zones .................................................................................................................A-1
Installation Order ........................................................................................................B-1
Feedback vi
Send Us Your Comments
Oracle Retail Order Broker Installation Guide, Release 16.0
Oracle welcomes customers' comments and suggestions on the quality and usefulness of this document.
Your feedback is important, and helps us to best meet your needs as a user of our products. For example:
• Are the implementation steps correct and complete?
• Did you understand the context of the procedures?
• Did you find any errors in the information?
• Does the structure of the information help you with your tasks?
• Do you need different information or graphics? If so, where, and in what format?
• Are the examples correct? Do you need more examples?
If you find any errors or have any other suggestions for improvement, then please tell us your name, the name of the company who has licensed our products, the title and part number of the documentation and the chapter, section, and page number (if available).
Note: Before sending us your comments, you might like to check that you have the latest version of the document and if any concerns are already addressed. To do this, access the Online Documentation available on the Oracle Technology Network Web site. It contains the most current Documentation Library plus all documents revised or released recently.
Send your comments to us using the electronic mail address: [email protected]
Please give your name, address, electronic mail address, and telephone number (optional).
If you need assistance with Oracle software, then please contact your support representative or Oracle Support Services.
If you require training or instruction in using Oracle software, then please contact your Oracle local office and inquire about our Oracle University offerings. A list of Oracle offices is available on our Web site at http://www.oracle.com.
Preface vii
Preface
Oracle Retail Order Broker Installation Guide describes the steps required to install the application.
AudienceThis Installation Guide is for the staff responsible for installing Oracle Retail Order Broker on premise.
Note: These steps require working knowledge of Linux administration, Oracle database administration, and WebLogic administration.
Documentation AccessibilityFor information about Oracle’s commitment to accessibility, visit the Oracle Accessibility Program website at http://www.oracle.com/us/corporate/accessibility/ index.html.
Access to Oracle SupportCustomers that have purchased support have access to electronic support at My Oracle Support. For information, visit http://www.oracle.com/pls/topic/lookup?ctx=acc&id=info or visit
http://www.oracle.com/pls/topic/lookup?ctx=acc&id=trs if you are hearing impaired.
• Oracle Retail Order Broker Store Connect Online Help
• Oracle Retail Order Broker Vendor Portal Online Help
• Oracle Retail Order Broker Vendor Integration Guide
• Oracle Retail Order Broker Administration Guide
• Oracle Retail Order Broker Operations Guide
• Oracle Retail Order Broker Security Guide
See the Oracle Retail Order Broker 16.0 documentation library at the following URL:
http://www.oracle.com/technetwork/documentation/oracle-retail-100266.html
Note: This documentation library includes documents that apply to both Oracle Retail Order Broker for installation on premise, and Oracle Retail Order Broker Cloud Service.
Customer SupportTo contact Oracle Customer Support, access My Oracle Support at the following URL:
Preface viii
https://support.oracle.com
When contacting Customer Support, please provide the following:
• Product version and program/module name
• Functional and technical description of the problem (include business impact)
• Detailed step-by-step instructions to re-create
• Exact error message received
• Screen shots of each step you take
Improved Process for Oracle Retail Documentation CorrectionsTo more quickly address critical corrections to Oracle Retail documentation content, Oracle Retail documentation may be republished whenever a critical correction is needed. For critical corrections, the republication of an Oracle Retail document may at times not be attached to a numbered software release; instead, the Oracle Retail document will simply be replaced on the Oracle Technology Network Web site.
An updated version of the applicable Oracle Retail document is indicated by Oracle part number, as well as print date (month and year). An updated version uses the same part number, with a higher-numbered suffix. For example, part number E123456-02 is an updated version of a document with part number E123456-01.
If a more recent version of a document is available, that version supersedes all previous versions.
Oracle Retail Documentation on the Oracle Technology NetworkOracle Retail product documentation is available on the following web site:
http://www.oracle.com/technetwork/documentation/oracle-retail-100266.html
ConventionsThe following text conventions are used in this document:
Convention Meaning
boldface Boldface type indicates graphical user interface elements associated with an action, emphasis, or terms defined in text or the glossary.
italic Italic type indicates book titles, or placeholder variables for which you supply particular values.
monospace Monospace type indicates commands within a paragraph, URLs, code in examples, text that appears on the screen, or text that you enter.
Oracle Retail Order Broker Installation Guide 1 - 1
11Preinstallation Tasks
This chapter discusses the tasks to complete before installation and introduces basic concepts and terms.
Note: Oracle Retail assumes that the retailer has applied all required fixes for supported compatible technologies.
In this chapter:
• Prerequisites on page 2
- Implementation Capacity Planning on page 2
- Check Supported Database Server Requirements on page 2
- Check Supported Application Server Requirements on page 2
- Check Client PC and Web Browser Requirements on page 3
- Supported Oracle Retail Products on page 3
- Linux User Account Privileges to Install the Software on page 4
- WebLogic User Privileges to Configure WebLogic on page 4
- Oracle WebService Manager – Policy Manager on page 4
• Definitions and Concepts on page 5
- Platform on page 5
- Domain on page 5
- Cluster on page 5
- ADMIN_SERVER on page 5
- DOMAIN_SERVER on page 5
- WEBLOGIC_12c on page 5
- DOMAIN_FOLDER on page 6
Preinstallation Tasks
Oracle Retail Order Broker Installation Guide 1 - 2
Prerequisites
Implementation Capacity PlanningThere is significant complexity involved in the deployment of Oracle Retail applications, and capacity planning is site specific. Oracle Retail strongly suggests that before installation or implementation you engage your integrator (such as the Oracle Retail Consulting team) and hardware vendor to request a disk sizing and capacity planning effort.
Sizing estimates are based on a number of factors, including the following:
• Workload and peak concurrent users and batch transactions
• Hardware configuration and parameters
• Data scarcity
• Application features utilized
Additional considerations during this process include your high availability needs as well as your backup and recovery methods.
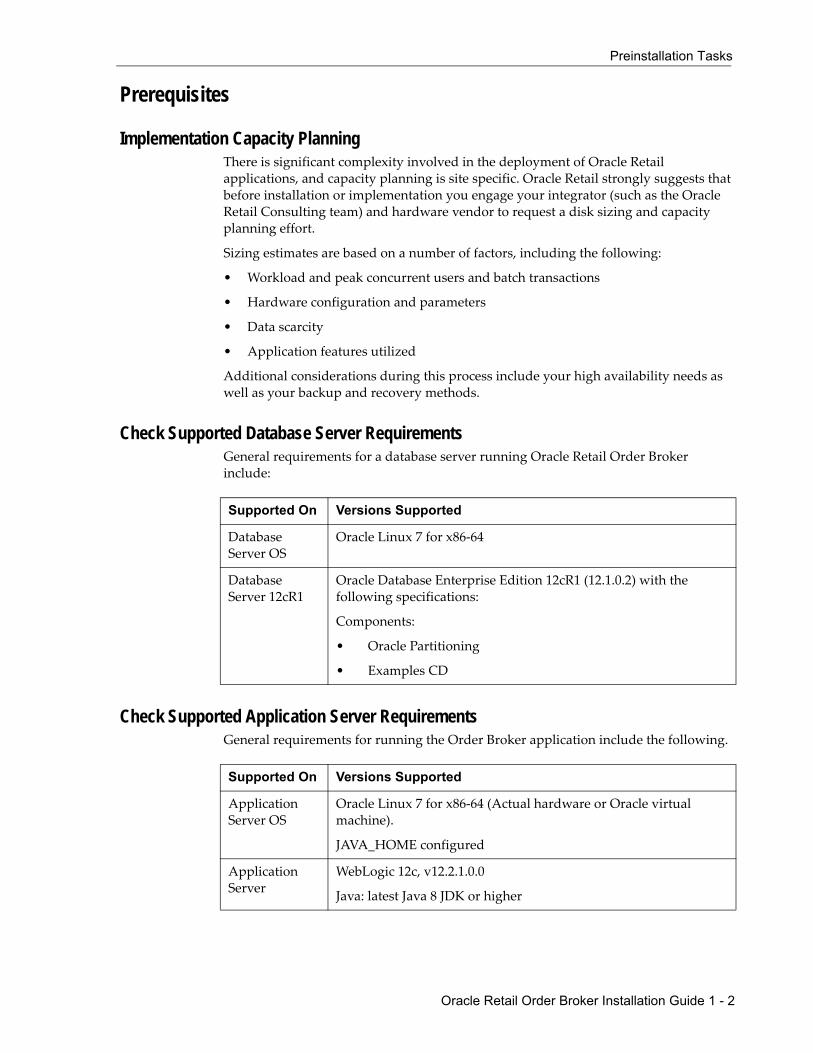
Check Supported Database Server RequirementsGeneral requirements for a database server running Oracle Retail Order Broker include:
Check Supported Application Server RequirementsGeneral requirements for running the Order Broker application include the following.
Supported On Versions Supported
Database Server OS
Oracle Linux 7 for x86-64
Database Server 12cR1
Oracle Database Enterprise Edition 12cR1 (12.1.0.2) with the following specifications:
Components:
• Oracle Partitioning
• Examples CD
Supported On Versions Supported
Application Server OS
Oracle Linux 7 for x86-64 (Actual hardware or Oracle virtual machine).
JAVA_HOME configured
Application Server
WebLogic 12c, v12.2.1.0.0
Java: latest Java 8 JDK or higher
Preinstallation Tasks
Oracle Retail Order Broker Installation Guide 1 - 3
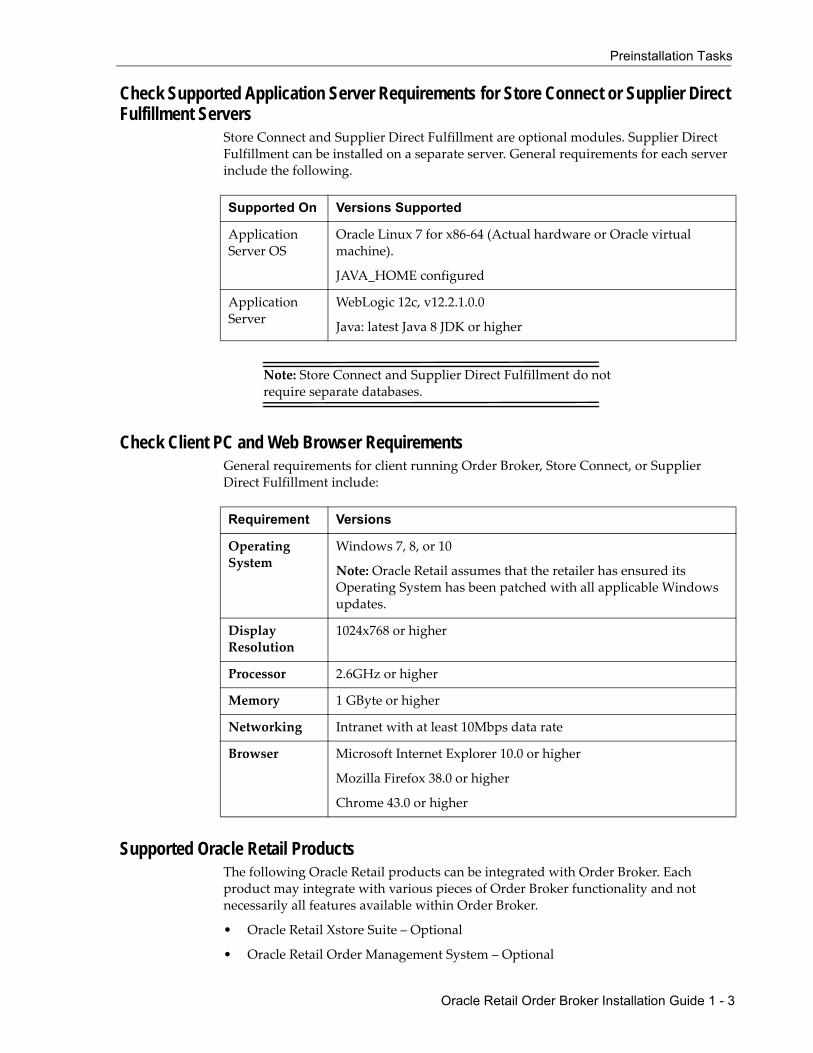
Check Supported Application Server Requirements for Store Connect or Supplier Direct Fulfillment Servers
Store Connect and Supplier Direct Fulfillment are optional modules. Supplier Direct Fulfillment can be installed on a separate server. General requirements for each server include the following.
Note: Store Connect and Supplier Direct Fulfillment do not require separate databases.
Check Client PC and Web Browser RequirementsGeneral requirements for client running Order Broker, Store Connect, or Supplier Direct Fulfillment include:
Supported Oracle Retail ProductsThe following Oracle Retail products can be integrated with Order Broker. Each product may integrate with various pieces of Order Broker functionality and not necessarily all features available within Order Broker.
• Oracle Retail Xstore Suite – Optional
• Oracle Retail Order Management System – Optional
Supported On Versions Supported
Application Server OS
Oracle Linux 7 for x86-64 (Actual hardware or Oracle virtual machine).
JAVA_HOME configured
Application Server
WebLogic 12c, v12.2.1.0.0
Java: latest Java 8 JDK or higher
Requirement Versions
Operating System
Windows 7, 8, or 10
Note: Oracle Retail assumes that the retailer has ensured its Operating System has been patched with all applicable Windows updates.
Display Resolution
1024x768 or higher
Processor 2.6GHz or higher
Memory 1 GByte or higher
Networking Intranet with at least 10Mbps data rate
Browser Microsoft Internet Explorer 10.0 or higher
Mozilla Firefox 38.0 or higher
Chrome 43.0 or higher

Preinstallation Tasks
Oracle Retail Order Broker Installation Guide 1 - 4
Order Management System 16.0 or higher supports the use of ship-for-pickup orders rather than retail pickup or ship-to-store orders.
• Oracle Retail Open Commerce Platform – Optional
The above products can be installed before or after Order Broker. However, it is helpful to know the connection details for the other products when configuring Order Broker.
Linux User Account Privileges to Install the Software A Linux user account is needed to install the software. The Linux user that is used to install the software should have write access to the Installation directories.
WebLogic User Privileges to Configure WebLogicThe user who configures the application in the WebLogic console must have read/write/execute authority in the WebLogic domain.
Oracle WebService Manager – Policy ManagerThe OWSM Policy Manager must be installed with the domain.
Preinstallation Tasks
Oracle Retail Order Broker Installation Guide 1 - 5
Definitions and Concepts
PlatformStarting with release 16.0, Order Broker uses the WebLogic 12c (version 12.2.1.0.0) platform rather than Apache Tomcat (Tomee). Apache Tomcat is no longer supported.
DomainThe Order Broker application suite will be deployed under a WebLogic Domain.
A domain is an interrelated set of WebLogic Server resources managed as a unit. A domain includes one or more administration servers and managed servers. Various clients use the administration server to configure the system. The managed server is used to run actual applications.
A domain includes one or more WebLogic Server instances, which can be clustered, non-clustered, or a combination of clustered and non-clustered instances.
ClusterThe Order Broker application suite will be deployed within a WebLogic Cluster.
The Order Broker application suite, along with configuration including Data Sources, is replicated to participating servers in the WebLogic cluster.
The Order Broker application suite only has to be deployed on a single server in the cluster as part of the installation process.
A cluster is part of a particular WebLogic Server domain.
ADMIN_SERVERThe Order Broker application suite will be deployed using WebLogic’s Administration Server. The application server can be accessed by a web browser, and requires a user ID and password to log in.
Typically, the Administration server is accessed on port 7002, for example:
http://your_weblogic_server.us.oracle.com:7002/console
Domains include a special WebLogic Server instance called the Administration Server, which is the central point from which you configure and manage all resources in the domain. Usually, you configure a domain to include additional WebLogic Server instances called Managed Servers.
DOMAIN_SERVERThe Order Broker application suite will be deployed using WebLogic’s Administration Server and run under the Domain Server. The Order Broker application suite is not deployed under the Administration Server, since other applications could be deployed with other Domains. Each server with the cluster will have a Domain Server.
WEBLOGIC_12cYou will need to know your root installation path for WebLogic in order to perform the installation process.

Preinstallation Tasks
Oracle Retail Order Broker Installation Guide 1 - 6
DOMAIN_FOLDERThis is the root folder of the domain.
Oracle Retail Order Broker Installation Guide 2 - 1
22Installation Steps
The following basic steps are required to install and set up Oracle Retail Order Broker for the first time.
Note: These steps require working knowledge of Linux administration, Oracle database administration, and WebLogic administration.
Before You StartJava JDK:
The Java 8 JDK or higher must be installed on the application server, and JAVA_HOME must be configured.
Database Connection Information:
Prior to beginning the installation process, you must source the credentials for the following database connections:
• Order Broker Database
• Proximity Database
• Order Broker Admin Database
For more information: See the Preinstallation Tasks.
Download the installation package: The installation package is available on the Oracle Software Delivery Cloud (https://edelivery.oracle.com/osdc/faces/Home.jspx). Search for Oracle Retail Order Broker on the Linux platform to find and download the installation package.
In this chapter:
• Databases on page 3
- Create Database Containers and Pluggable Databases on page 3
- Create Table Spaces for Each Database on page 3
- Create the Users / Schemas and Seed Data for Each Database on page 4
• Order Broker Application on page 7
- Create the Order Broker Application Admin User on page 7
Installation Steps
Oracle Retail Order Broker Installation Guide 2 - 2
- Install the Application on page 8
• Set Up Startup Arguments for Managed Servers on page 18
• Validate the Installation on page 20
• Store Connect Installation on page 22
- Validate the Store Connect Installation on page 23
- Configure the Installation on page 20
• Supplier Direct Fulfillment (Vendor Portal) Installation on page 24
- Validate the Vendor Portal Installation on page 25
Installation Steps
Oracle Retail Order Broker Installation Guide 2 - 3
DatabasesBefore you begin: See the Preinstallation Tasks.
Script editor: Make sure you open scripts in an editor that can read and support UTF-8 encoding, since some scripts contain double-byte data.
Important: You need to use SQL*Plus rather than Oracle SQL Developer to run each of the scripts mentioned below.
Create Database Containers and Pluggable DatabasesThe Order Broker database is made up of two databases with three user / schemas. The Order Broker Install contains a Database folder with SQL scripts for creating the database objects and data. They can be used to complete the following database setup tasks.
1. In Oracle, create one or more Container Databases. For example, you could create one for the Order Broker and Proximity schemas and one for the Order Broker Admin schema. The decision of how many Container Databases to create is up to the DBA.
2. Next, create pluggable databases that are connected to the Container Database created in step 1.
3. In Oracle, create two pluggable databases.
Important: Before creating the pluggable databases, be sure to note the user ID and password. Also, be sure to record the Target File Path.
When creating the pluggable databases, use Custom Names. The pluggable databases are:
- Order_Broker (includes the Order Broker and the Proximity schemas)
- Order_Broker_Admin
Note: The databases need to follow this naming convention, including the underscores between words.
4. After creating the pluggable databases, set the state of each database to Open.
Create Table Spaces for Each Database1. Create table spaces for the ORDER_BROKER database:
• ORDER_BROKER_DATA
• ORDER_BROKER_INDEX
• ORDER_BROKER_LOBS
• PROXIMITY_DATA
• PROXIMITY_INDEX

Installation Steps
Oracle Retail Order Broker Installation Guide 2 - 4
Run Order_Broker_tablespace.sql logged in as system.
Important: You need to use SQL*Plus rather than Oracle SQL Developer to run a sql script.
Note: The Order_Broker_tablespace.sql script needs to be updated with the appropriate data file paths.
2. Create the following tables spaces for the ORDER_BROKER_ADMIN database:
- ORDER_BROKER_ADMIN_DATA
- ORDER_BROKER_ADMIN_INDEX
Run Order_Broker_Admin_tablespace.sql logged in as system.
Important: You need to use SQL*Plus rather than Oracle SQL Developer to run a sql script.
Create the Users / Schemas and Seed Data for Each Database
Note: Do not copy and paste text directly from this PDF file. To eliminate unwanted special characters, copy and paste first into a text editor, and then copy and paste from the text editor into the specified file, after first confirming that no unwanted special characters were embedded.
For the ORDER_BROKER and ORDER_BROKER_ADMIN databases:
1. In the ORDER_BROKER database:
- Create an ORDER_BROKER user / schema
- Create an ORDER_BROKER_PROXIMITY user / schema
Open the Order_Broker_Users.sql script.
In the following line, replace the order_broker with the password generated for the order_broker user:
CREATE USER order_broker IDENTIFIED BY order_broker DEFAULT TABLESPACE order_broker_data TEMPORARY TABLESPACE TEMP;
In the following line, replace the proximity with the password generated for the proximity user:
CREATE USER proximity IDENTIFIED BY proximity DEFAULT TABLESPACE proximity_data TEMPORARY TABLESPACE TEMP;
Run Order_broker_users.sql logged in as system.
Important: You need to use SQL*Plus rather than Oracle SQL Developer to run a sql script.
Run the following command logged in as system:
grant execute on dbms_lob to order_broker;
Installation Steps
Oracle Retail Order Broker Installation Guide 2 - 5
2. In the Order_Broker_Admin database, create an ORDER_BROKER_ADMIN user / schema.
Open the Order_Broker_Admin_Users.sql script.
In the following line, replace the order_broker_admin with the password generated for the order_broker_admin user:
CREATE USER order_broker_admin IDENTIFIED BY order_broker_admin DEFAULT TABLESPACE order_broker_admin_data TEMPORARY TABLESPACE TEMP;
Run Order_broker_Admin_users.sql logged in as system.
Important: You need to use SQL*Plus rather than Oracle SQL Developer to run a sql script.
3. In the ORDER_BROKER database, logged in as the ORDER_BROKER user:
- Run the Order_Broker_schema.sql script
Important: You need to use SQL*Plus rather than Oracle SQL Developer to run a sql script.
Before running the Order_Broker_seed_data.sql script and the other scripts listed below, change the Linux path as follows:
REM INSERTING into TENANTInsert into TENANT(TENANT_ID,NAME,LICENSE_CODE,KEY_CODE,UI_TIME_OUT,TENANT_LOGO,ACCOUNT,EMAIL_INTERVAL_MINUTES,EMAIL_TEMPLATE_PATH,REPORT_RETENTION_DAYS,LOG_RETENTION_DAYS,PACKSLIP_RETENTION_DAYS,PRODUCT_IMPORT_RETENTION_DAYS,ATTRIBUTE_DATA_DIRECTORY,PRODUCT_DATA_DIRECTORY,PROXIMITY_DATA_DIRECTORY,EXPORT_DATA_DIRECTORY,CLEANUP_JOB_SCHEDULE,ESB_SERVICES_WSDL_LOCATION,USE_ORDER_BROKER,USE_VENDOR_PORTAL,USE_STORE_CONNECT,LOCK_OUT_ATTEMPTS)values (0,'Order Broker',' ',null,20,' ','locate',15,'<WEBLOGIC_12c>/<DOMAIN_FOLDER>/conf/emailtemplates',30,14,30,30,'/usr/share/OrderBroker/data/AttributeUploadData','/usr/share/OrderBroker/data/ProductUploadData','/usr/share/OrderBroker/data/ProximityUploadData','/usr/share/OrderBroker/data/ExportData','0 00 01 ? * *','',1,1,1,5);
Note: In these instructions, <WEBLOGIC_12c> should be substituted with the root Weblogic Installation path, and <DOMAIN_FOLDER> should be substituted with your domain folder.
- Run the Order_Broker_seed_data.sql script
- Run the Order_Broker_schema_v15_0_changes.sql script
- Run the Order_Broker_schema_v15_1_changes.sql script
- Run the Order_Broker_schema_v16_0_changes.sql script
Installation Steps
Oracle Retail Order Broker Installation Guide 2 - 6
Important: You need to use SQL*Plus rather than Oracle SQL Developer to run a sql script.
4. In the ORDER_BROKER database, logged in as the PROXIMITY user:
- Run the Order_Broker_Proximity_schema.sql script
- Run the Order_Broker_Proximity_seed_data.sql script
Important: You need to use SQL*Plus rather than Oracle SQL Developer to run a sql script.
5. In the ORDER_BROKER_ADMIN database, logged in as the ORDER_BROKER_ADMIN user:
- Run the Order_Broker_Admin_schema.sql script
- Run the Order_Broker_Admin_schema_v16_0_changes.sql script
Important: You need to use SQL*Plus rather than Oracle SQL Developer to run a sql script.
Installation Steps
Oracle Retail Order Broker Installation Guide 2 - 7
Order Broker ApplicationBefore you begin: See the Preinstallation Tasks.
Important: File names, folder names, and commands on the Linux server are case-sensitive. While completing the following steps, confirm that the case is correct.
Important: You should use a text editor on a Linux machine rather than on a Windows machine to update any text files, XML files, or properties files.
Create the Order Broker Application Admin User
Note: Do not copy and paste text directly from this PDF file. To eliminate unwanted special characters, copy and paste first into a text editor, and then copy and paste from the text editor into the specified file, after first confirming that no unwanted special characters were embedded.
1. For security reasons, the database doesn’t contain any default application user IDs.
2. This step creates the Admin user for the application. It only needs to be executed once per client instance.
3. Copy files from the Order Broker Installation folder Install/Order Broker/Create Admin User to a temporary directory on the app server.
4. Navigate to the Create Admin User folder.
5. Execute the following single-line command, replacing the variables with the appropriate values:
"%JAVA_HOME%/bin/java" -cp ojdbc7.jar:CreateOrderBroker.jar com.oracle.orderbroker.CreateOrderBrokerUser jdbc:oracle:thin:@%HOST_NAME% %DATABASE_USER_NAME% %DATABASE_USER_PASSWORD% %OB_ADMIN_ID% %OB_ADMIN_PASSWORD%
Where:
- %JAVA_HOME% = path to the java JDK
- %HOST_NAME% = Oracle database host name, in form //HOST:PORT/SERVICE
- %DATABASE_USER_NAME% = database user name
- %DATABASE_USER_PASSWORD% = database user password
- %OB_ADMIN_ID% = Application Admin ID to be created
- %OB_ADMIN_PASSWORD% = Application password for Admin user
Note: Any uppercase characters in the user ID will be converted to lowercase.
Installation Steps
Oracle Retail Order Broker Installation Guide 2 - 8
The command should return User successfully created. Any other message or error should be investigated.
Note: If the default user ID or password is lost, you can run the same command again to create an additional user ID. Then you can use this additional user ID to log into the application to reset the default user ID’s password.
6. Delete the temporary folder you created in step 1 from the application server when this step is complete.
Install the Application In the next steps, you will copy folders and files from the /Order Broker/WebLogic install folders.
Note: These configuration steps, with the exception of the Locate.ear deployment and Data Sources setup, must be repeated on all the servers in the cluster. The Locate.ear is installed in the Admin console of WebLogic, which distributes it to every server in the cluster.
1. Copy the Locate.ear from the Deployments folder to a staging area on the server where you run the WebLogic Admin Console. You will deploy the Locate.ear later to the cluster in WebLogic. This step is not required on all servers in the cluster. The Locate.ear is installed in the Admin Console in WebLogic, which distributes it to every server in the cluster.
Note: In these instructions, <WEBLOGIC_12c> should be substituted with the root Weblogic Installation path, and <DOMAIN_FOLDER> should be substituted with your domain folder.
2. Create a conf folder in <WEBLOGIC_12C>/<DOMAIN_FOLDER> and copy the following folders:
- emailtemplates folder in /Order Broker/Weblogic/conf to <WEBLOGIC_12c>/<DOMAIN_FOLDER>/conf
- packslips folder in /Order Broker/Weblogic/conf to <WEBLOGIC_12c>/<DOMAIN_FOLDER>/conf
- reports folder in /Order Broker/Weblogic/conf to <WEBLOGIC_12c>/<DOMAIN_FOLDER>/conf
- props folder in /Order Broker/Weblogic/conf to <WEBLOGIC_12c>/<DOMAIN_FOLDER>/conf
- security folder in /Order Broker/Weblogic/conf to <WEBLOGIC_12c>/<DOMAIN_FOLDER>/conf
Note: Give full rights to the folders for the application service profile.
3. Copy the Gurobi runtime files to the server.
Installation Steps
Oracle Retail Order Broker Installation Guide 2 - 9
- Make the following directory: /usr/share/gurobi
- Copy the following files from the /Order Broker/Gurobi directory to the /usr/share/gurobi directory:
libgurobi65.so libGurobiJni65.so
4. To enable uploads, provide full read/write/execute access to the user running the application.
5. If the <WEBLOGIC_12c>/<DOMAIN_FOLDER>/logs directory doesn't exist, create it. Also, give full rights for the application service profile to this directory.
6. Repeat steps 2 through 5 on all the servers in the cluster.
Edit Configuration Files and Set Up Data Folders
Note: In these instructions, <WEBLOGIC_12c> should be substituted with the root Weblogic Installation path, and <DOMAIN_FOLDER> should be substituted with your domain folder.
Note: Do not copy and paste text directly from this PDF file. To eliminate unwanted special characters, copy and paste first into a text editor, and then copy and paste from the text editor into the specified file, after first confirming that no unwanted special characters were embedded.
1. Using a Linux-compatible text editor, open the sp-policy.properties file you just copied to <WEBLOGIC_12c>/<DOMAIN_FOLDER>/conf/security and change the pepper-file-path setting to the new WebLogic installation path:
pepper-file-path= <WEBLOGIC_12c>/<DOMAIN_FOLDER>/conf/security/pasword_pepper. properties
2. Using a Linux-compatible text editor, change the pasword_pepper.properties file found in /server/conf/security. Set PEPPER1= AND PEPPER2= to random string values of at least 30 characters.
Example:
PEPPER1= 4fb1272c47f2ac8aeebf10d4a61c75
PEPPER2= 0fccfa6905f5f66c7d826f1a3d484ba
Important: These are example strings only. Do not use these examples.
3. Move the ehcache.xml file in /Order Broker/Weblogic/conf to <WEBLOGIC_12c>/<DOMAIN_FOLDER>/conf, and use a Linux-compatible text editor to update the following:
<cacheManagerPeerProviderFactoryclass="net.sf.ehcache.distribution.RMICacheManagerPeer ProviderFactory"
Installation Steps
Oracle Retail Order Broker Installation Guide 2 - 10
properties="peerDiscovery=automatic,multicastGroupAddress=#.#.#.#,multicastGroupPort=15, timeToLive=#"/>
Where:
- multicastGroupAddress= #.#.#.# is a unique value common all servers in the range 224.0.0.1 to 239.255.255.255
- timeToLive=0 for a single server and 1 for a multiple server installation
4. Set up application data folders:
- Create the following folder structure:
* /usr/share/OrderBroker/data
* /usr/share/OrderBroker/data/ProductUploadData
* /usr/share/OrderBroker/data/ExportData
* /usr/share/OrderBroker/data/ProximityUploadData
- Create the SDFUploadData folder under /usr/share/OrderBroker
Assign full rights to these folders.
5. Move the log4j.xml file in /Order Broker/Weblogic/conf to <WEBLOGIC_12c>/<DOMAIN_FOLDER>/conf.
Open the log4j.xml file you just copied in a Linux-compatible text editor, and change all occurrences of:
<param name="File" value="/home/u00/webadmin/config/domains/wls_1221/ADFDomain/logs
to
<param name="File" value="<WEBLOGIC_12c>/<DOMAIN_FOLDER>/logs
Note: <WEBLOGIC_12c> should be substituted with the root Weblogic Installation path, and <DOMAIN_FOLDER> should be substituted with your domain folder.
You will need to change 10 occurrences in the log4j.xml file to your WebLogic Installation path.
6. Locate the locate-config.properties file in your WebLogic installation (<WEBLOGIC_12c>/<DOMAIN_FOLDER>/conf/props directory) and open it in a Linux-compatible text editor.
- Change the line below from:
on.premise=N to:
on.premise=Y- Also in the locate-config.properties file, change the
server.timezone property to server.timezone=XYZ where XYZ is the
Installation Steps
Oracle Retail Order Broker Installation Guide 2 - 11
time zone of your application server and database server. See the Time Zones on page 1 for a listing.
Note: If this entry is not set to a valid time zone, orders are not displayed in Order Inquiry, and reports do not generate correctly.
7. Navigate to <WEBLOGIC_12c>/<DOMAIN_FOLDER>/bin/setDomainEnv.sh and open the setDomainEnv.sh file in a Linux-compatible text editor.
- Locate these arguments and move them, or add them if they don’t already exist:
USER_MEM_ARGS="-Xms768m -Xmx2048m"
These arguments should be placed before the first instance of WL_HOME.
These are the recommended max and min memory sizes to run Order Broker.
- Add these parameters at the end of this line (last line of file):
set JAVA_OPTIONS="${JAVA_OPTIONS} -Dlog4j.configuration="file:${DOMAIN_HOME}/conf/log4j.xml"
Note: All the parameters for the JAVA_OPTIONS should be on the same line.
8. Also in the setDomainEnv.sh file, adding the following entry:
PATCH_LIBPATH=/usr/share/gurobi:$PATCH_LIBPATH
It should look something like this, with the new entry inserted before the call to commEnv.sh:
# set PATCH_CLASSPATH=[myPatchClasspath] (windows)
# set PATCH_LIBPATH=[myPatchLibpath] (windows)
# set PATCH_PATH=[myPatchPath] (windows)
# PATCH_CLASSPATH=[myPatchClasspath] (unix)
# PATCH_PATH=[myPatchPath] (unix)
PATCH_LIBPATH=/usr/share/gurobi:$PATCH_LIBPATH
. ${WL_HOME}/../oracle_common/common/bin/commEnv.sh
9. Delete all the log files, if any, in the <WEBLOGIC_12c>/<DOMAIN_FOLDER>/log directory.
10. Repeat the above steps for all servers in the cluster.
Use the WebLogic Console to Configure the Application
Note: Do not copy and paste text directly from this PDF file. To eliminate unwanted special characters, copy and paste first into a text editor, and then copy and paste from the text editor into the specified file, after first confirming that no unwanted special characters were embedded.
Installation Steps
Oracle Retail Order Broker Installation Guide 2 - 12
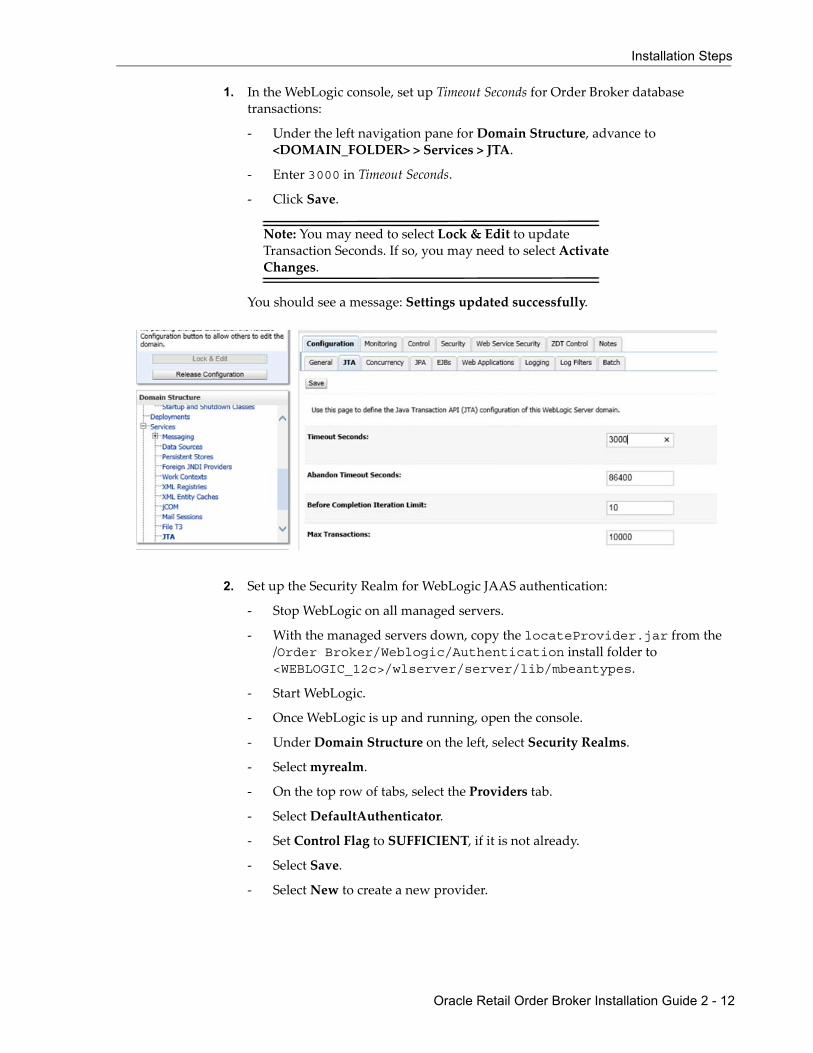
1. In the WebLogic console, set up Timeout Seconds for Order Broker database transactions:
- Under the left navigation pane for Domain Structure, advance to <DOMAIN_FOLDER> > Services > JTA.
- Enter 3000 in Timeout Seconds.
- Click Save.
Note: You may need to select Lock & Edit to update Transaction Seconds. If so, you may need to select Activate Changes.
You should see a message: Settings updated successfully.
2. Set up the Security Realm for WebLogic JAAS authentication:
- Stop WebLogic on all managed servers.
- With the managed servers down, copy the locateProvider.jar from the /Order Broker/Weblogic/Authentication install folder to <WEBLOGIC_12c>/wlserver/server/lib/mbeantypes.
- Start WebLogic.
- Once WebLogic is up and running, open the console.
- Under Domain Structure on the left, select Security Realms.
- Select myrealm.
- On the top row of tabs, select the Providers tab.
- Select DefaultAuthenticator.
- Set Control Flag to SUFFICIENT, if it is not already.
- Select Save.
- Select New to create a new provider.
Installation Steps
Oracle Retail Order Broker Installation Guide 2 - 13
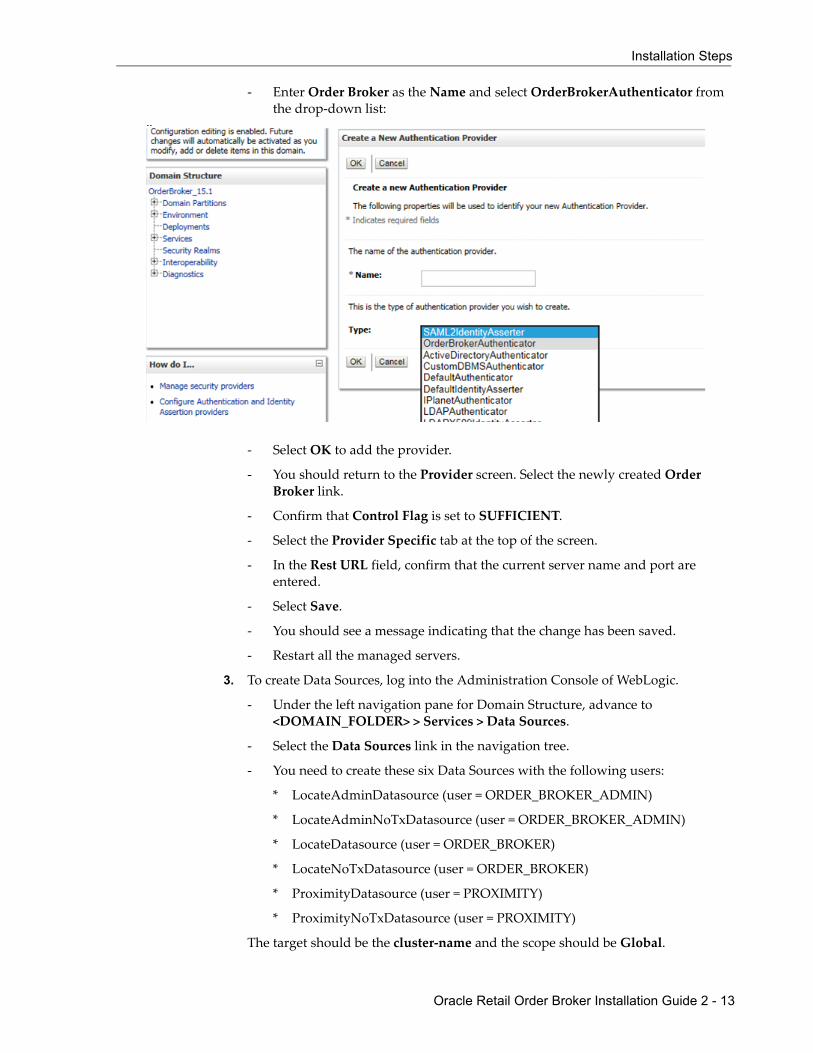
- Enter Order Broker as the Name and select OrderBrokerAuthenticator from the drop-down list:
- Select OK to add the provider.
- You should return to the Provider screen. Select the newly created Order Broker link.
- Confirm that Control Flag is set to SUFFICIENT.
- Select the Provider Specific tab at the top of the screen.
- In the Rest URL field, confirm that the current server name and port are entered.
- Select Save.
- You should see a message indicating that the change has been saved.
- Restart all the managed servers.
3. To create Data Sources, log into the Administration Console of WebLogic.
- Under the left navigation pane for Domain Structure, advance to <DOMAIN_FOLDER> > Services > Data Sources.
- Select the Data Sources link in the navigation tree.
- You need to create these six Data Sources with the following users:
* LocateAdminDatasource (user = ORDER_BROKER_ADMIN)
* LocateAdminNoTxDatasource (user = ORDER_BROKER_ADMIN)
* LocateDatasource (user = ORDER_BROKER)
* LocateNoTxDatasource (user = ORDER_BROKER)
* ProximityDatasource (user = PROXIMITY)
* ProximityNoTxDatasource (user = PROXIMITY)
The target should be the cluster-name and the scope should be Global.
Installation Steps
Oracle Retail Order Broker Installation Guide 2 - 14
Example: To map each of the required data sources:
* Select New.
Note: Selecting Lock & Edit may be required to select New.
* Select Generic Data Source under the Summary of JDBC Data Sources panel on the Configuration tab.
* Enter the Data Source name, such as LocateDatasource, into Name field. See the list above for the six Data Sources you need to create.
* Leave the Scope set to Global.
* Enter the Data source name, such as LocateDatasource, into the JNDI Name field.
* Leave the Database Type set to Oracle and select Next.
* Set the Database Driver to *Oracles’s Driver Thin for pooled instance connections; Version Any and select Next.
* Leave Options set to the defaults and select Next.
* Set the Database Name to <SERVICENAME>, for example jdbc:oracle:thin:@<HOSTNAME>:1521/<SERVICENAME>.
* Set the Host Name to <HOSTNAME>, for example jdbc:oracle:thin:@<HOSTNAME>:1521/<SERVICENAME>.
* Set the Port to the number before the forward slash, for example jdbc:oracle:thin:@<HOSTNAME>:1521/<SERVICENAME>.
* Set the Database User Name to ORDER_BROKER.
* Set Password/Confirm Password to password = ORDER_BROKER and select Next.
* Set the URL to URL: jdbc:oracle:thin:@<HOSTNAME>:1521/<SERVICENAME>.
Note: You cannot leave the default URL because Order Broker uses pluggable databases, which require the format indicated above.
Wrong: jdbc:oracle:thin:@<HOSTNAME>:1521:<SERVICENAME>Correct: jdbc:oracle:thin:@<HOSTNAME>:1521/<SERVICENAME>
* Set the Test Table Name to validationQuery = SELECT 1 from dual in SQL PINGDATABASE.
Note: Test Table Name: SELECT 1 from dual: This will be your entry from your validationQuery.
* Select Test Configuration.
* Select Finish.
The data source will now be displayed in the table.
* Select the Data Source by clicking on the Link under Name in the table.
Installation Steps
Oracle Retail Order Broker Installation Guide 2 - 15
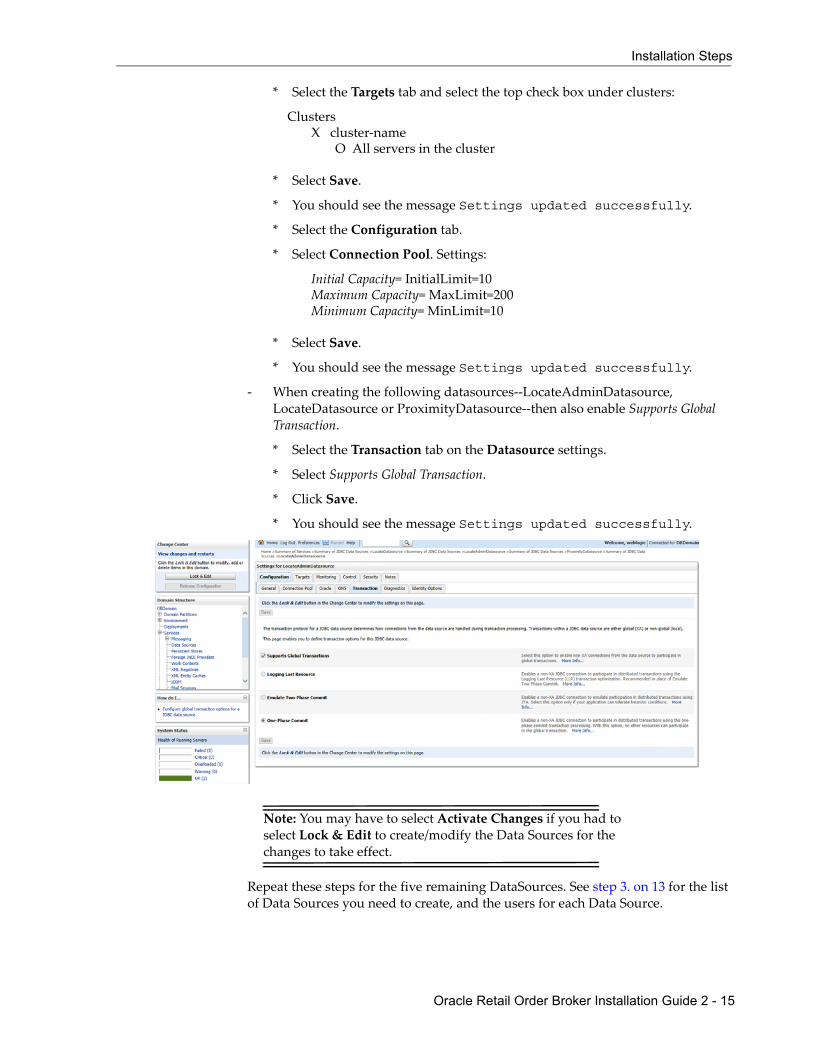
* Select the Targets tab and select the top check box under clusters:
Clusters X cluster-name
O All servers in the cluster
* Select Save.
* You should see the message Settings updated successfully.
* Select the Configuration tab.
* Select Connection Pool. Settings:
Initial Capacity= InitialLimit=10Maximum Capacity= MaxLimit=200Minimum Capacity= MinLimit=10
* Select Save.
* You should see the message Settings updated successfully.
- When creating the following datasources--LocateAdminDatasource, LocateDatasource or ProximityDatasource--then also enable Supports Global Transaction.
* Select the Transaction tab on the Datasource settings.
* Select Supports Global Transaction.
* Click Save.
* You should see the message Settings updated successfully.
Note: You may have to select Activate Changes if you had to select Lock & Edit to create/modify the Data Sources for the changes to take effect.
Repeat these steps for the five remaining DataSources. See step 3. on 13 for the list of Data Sources you need to create, and the users for each Data Source.
Installation Steps
Oracle Retail Order Broker Installation Guide 2 - 16
Note: These Data Sources will deploy to all other servers in the cluster, so you do not need to repeat these steps for the remaining servers in the cluster.
Additional step for the LocateNoTxDatasource datasource:
- Add jtaManaged=false to the connection pool properties field.
- Click Save.
- Click Activate Changes.
Deploy the Locate.ear from the Staging Area to the ClusterAs mentioned above under Install the Application on page 8, you now need to deploy the Locate.ear to the Cluster in WebLogic.
1. Log into the Administration Console of WebLogic.
2. Under the left navigation pane for Domain Structure:
- Select Deployments.
- Select Lock & Edit if needed to enable the Install button.
- Select Install.
- Under the Path, select the staging area where you placed the Locate.ear from the Deployments folder and select Next.
- The screen refreshes and displays the Locate.ear.
- Select the radio button under Current Location to select the Locate.ear and select Next.
- Leave the default: Install this deployment as an application.
- Select the cluster-name checkbox as shown and All servers in the cluster for radio button:
Clusters X cluster-name
O All servers in the cluster- Select Next.
- Select Finish.
- Select Release Configuration if you had selected Lock & Edit; otherwise, select Active Changes.
3. You must now enable the Order Broker application to deployment to start servicing all requests.
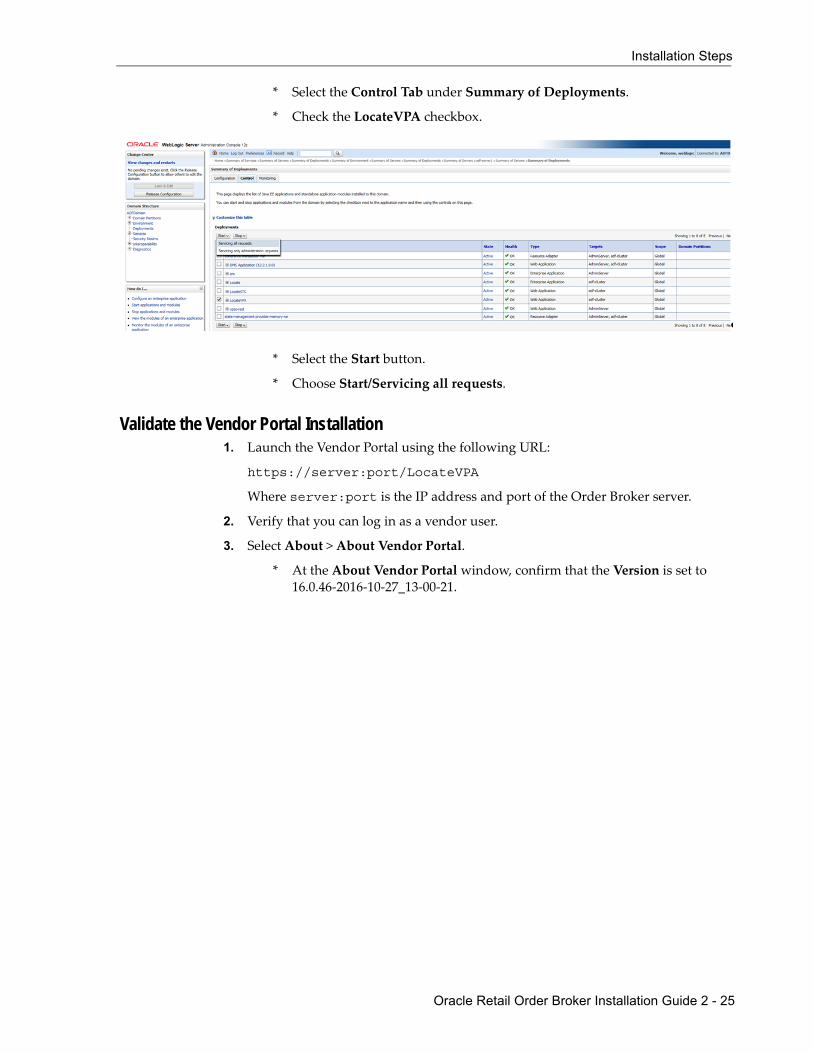
- Select the Control Tab under Summary of Deployments.
Installation Steps
Oracle Retail Order Broker Installation Guide 2 - 17
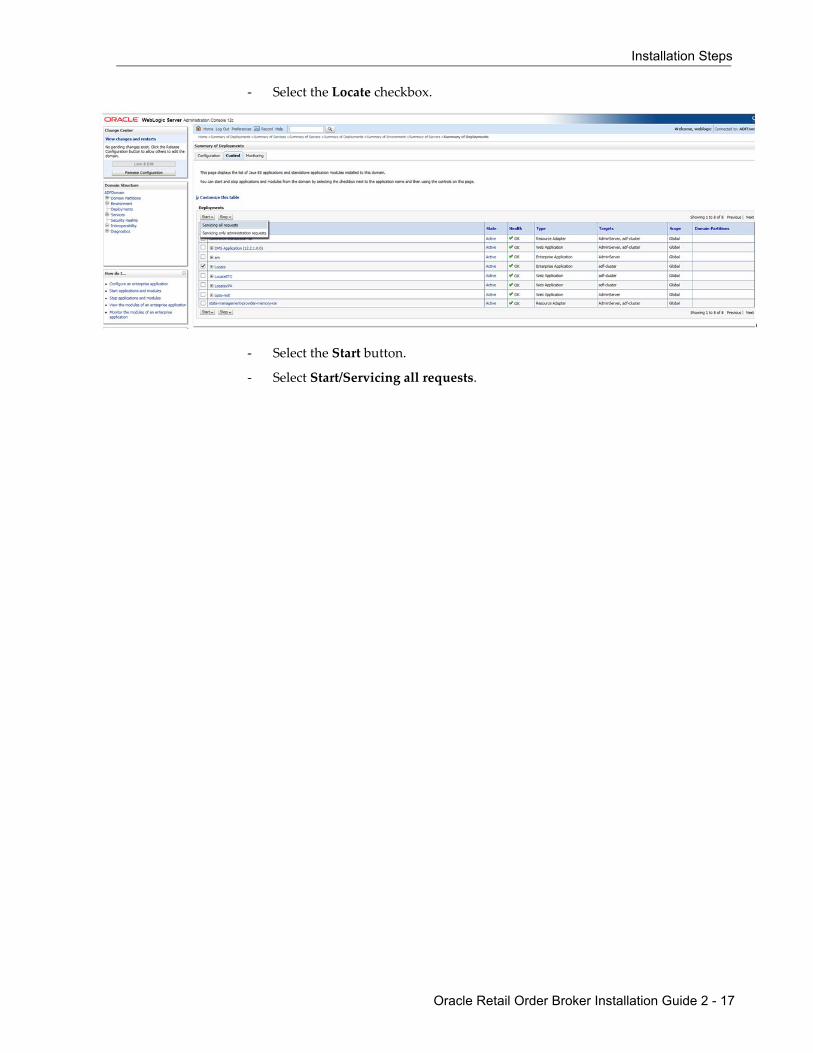
- Select the Locate checkbox.
- Select the Start button.
- Select Start/Servicing all requests.
Installation Steps
Oracle Retail Order Broker Installation Guide 2 - 18
Set Up Startup Arguments for Managed Servers
Note: Do not copy and paste text directly from this PDF file. To eliminate unwanted special characters, copy and paste first into a text editor, and then copy and paste from the text editor into the specified file, after first confirming that no unwanted special characters were embedded.
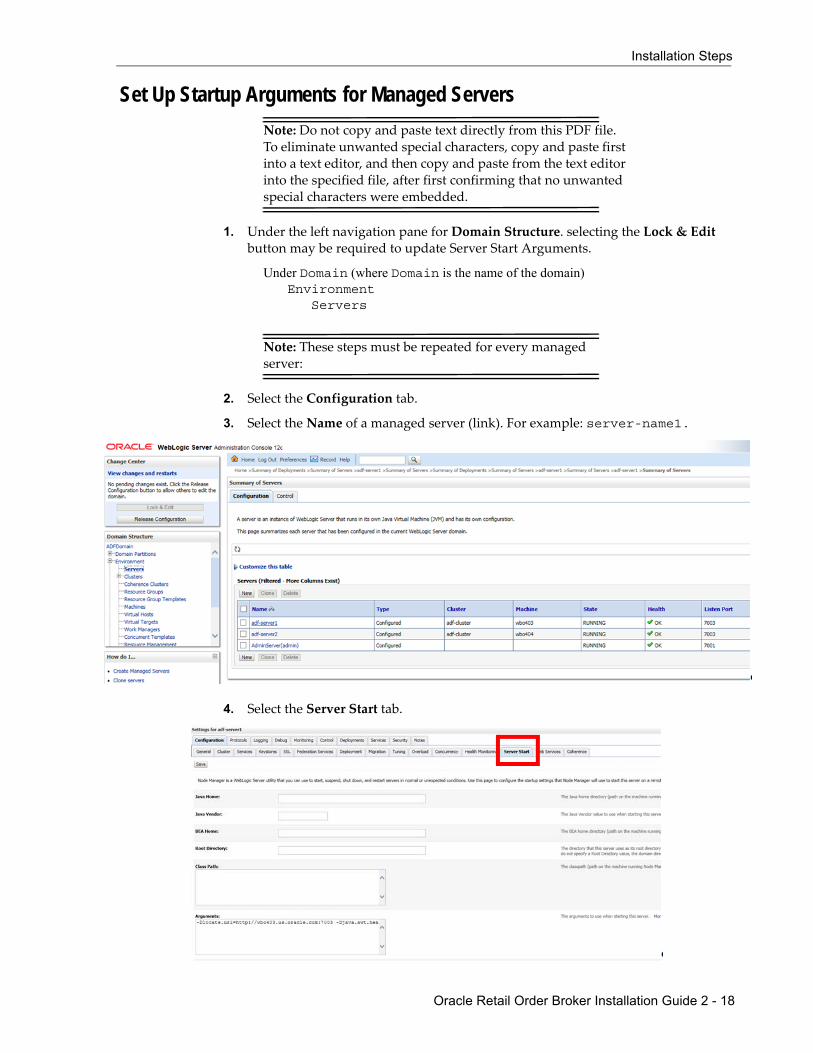
1. Under the left navigation pane for Domain Structure. selecting the Lock & Edit button may be required to update Server Start Arguments.
Under Domain (where Domain is the name of the domain)Environment
Servers
Note: These steps must be repeated for every managed server:
2. Select the Configuration tab.
3. Select the Name of a managed server (link). For example: server-name1.
4. Select the Server Start tab.
Installation Steps
Oracle Retail Order Broker Installation Guide 2 - 19
5. Enter these values in the Arguments text box:
-Dlocate.uri=http://your_weblogic_server.domain.com:<port>
-Djava.awt.headless=true
Note: All the ARGUMENTS should be on the same line.
Note: Replace your_weblogic_server.domain.com with your managed server name, and change <port> to the non-SSL port you set up for Order Broker. The port should be the port that the server is deployed to in the clustered environment, and it cannot be the SSL port.
Edit Config.xml
Note: Do not copy and paste text directly from this PDF file. To eliminate unwanted special characters, copy and paste first into a text editor, and then copy and paste from the text editor into the specified file, after first confirming that no unwanted special characters were embedded.
1. Locate the config.xml file in your WebLogic installation (<WEBLOGIC_12c> /<DOMAIN_FOLDER>/config/config.xml)
2. Open it in a Linux-compatible text editor:
Insert the bolded line below between two existing lines:
<node-manager-username>weblogic</node-manager-username><node-manager-password-encrypted>{ABC}XXXXXXXXXXXXXXXXXXXXXXXXXXXXXXXXX</node-manager-password-encrypted><enforce-valid-basic-auth-credentials>false</enforce-valid-basic-auth-credentials><use-kss-for-demo>true</use-kss-for-demo></security-configuration>
Note: Failure to complete the above steps can result in a 401 error response to a web service call.
Start Up the Servers1. Open the WebLogic console in a browser.
2. Under the Domain Structure navigate to Environment -> Servers.
3. Select the control tab.
4. Select each of the Managed servers and click the start button.
5. Check the Config.xml file still contains the bolded line added above under Edit Config.xml.
Installation Steps
Oracle Retail Order Broker Installation Guide 2 - 20
Validate the Installation1. Launch the application using the following URL:
https://server:port/LocateUI
Where server:port is the IP address and port of the Order Broker server.
2. Log in using the Admin User created under Create the Order Broker Application Admin User on page 7.
Note: If you can’t log in, confirm that property values are set with just an equal sign and no other code between the property and the setting: for example, prop=value.
3. From the Systems menu, select About Order Broker.
4. At the About Order Broker window, confirm that the levels are correct:
- Version: 16.0
- Server Level: 16.0.47-2016-11-29_16-01-56
- Database Level: 16.0.047
5. Select Cache... from the About Order Broker window and confirm that all servers are listed correctly.
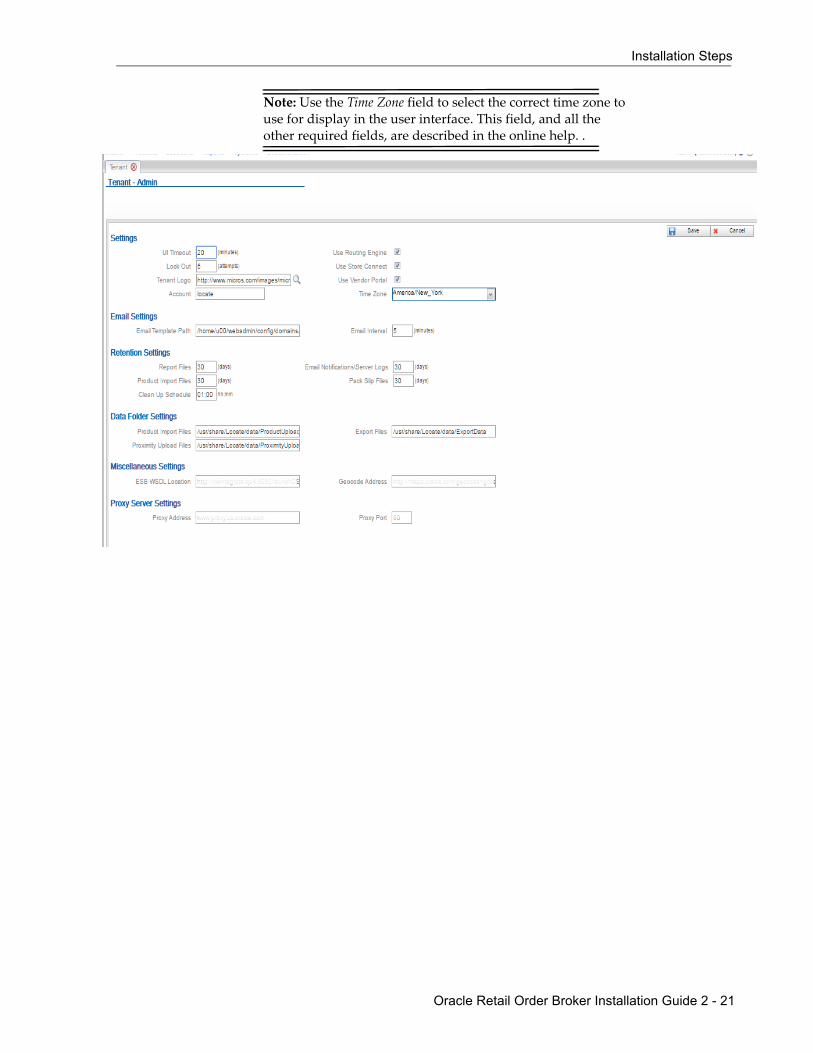
Configure the Installation1. From the menu, navigate to the Tenant Screen (System > Tenant).
2. Configure the settings based upon your requirements. See the online help or the Administration Guide for details.
Installation Steps
Oracle Retail Order Broker Installation Guide 2 - 21
Note: Use the Time Zone field to select the correct time zone to use for display in the user interface. This field, and all the other required fields, are described in the online help. .
Installation Steps
Oracle Retail Order Broker Installation Guide 2 - 22
Store Connect Installation1. Copy the LocateSTC.war from the /StoreConnect/Deployments folder to a
staging area on the same server as WebLogic to deploy later to the Cluster in WebLogic. This step is not required on all servers in the cluster.
2. Deploy the LocateSTC.war from the staging area to the cluster:
- Log into the Administration Console of WebLogic and deploy the LocateSTC.war.
- Under the left navigation pane for Domain Structure:
* Select Deployments.
* Select Lock & Edit if needed to enable the Install button.
* Select Install.
* Under the Path, select the staging area where you placed the LocateSTC.war from the Deployments folder.
* Select Next. The screen refreshes and displays LocateSTC.war.
* Select the radio button under Current Location to select the LocateSTC.war file.
* Select Next.
* Leave the default: Install this deployment as an application.
* Select the check box for your cluster as shown below and the All servers in the cluster radio button:
ClustersX cluster-name (where customer-name is the name of the cluster)
O All servers in the cluster
* Select Next.
* Select Finish.
* Select Release Configuration if you had to select Lock & Edit earlier; otherwise, select Activate Changes.
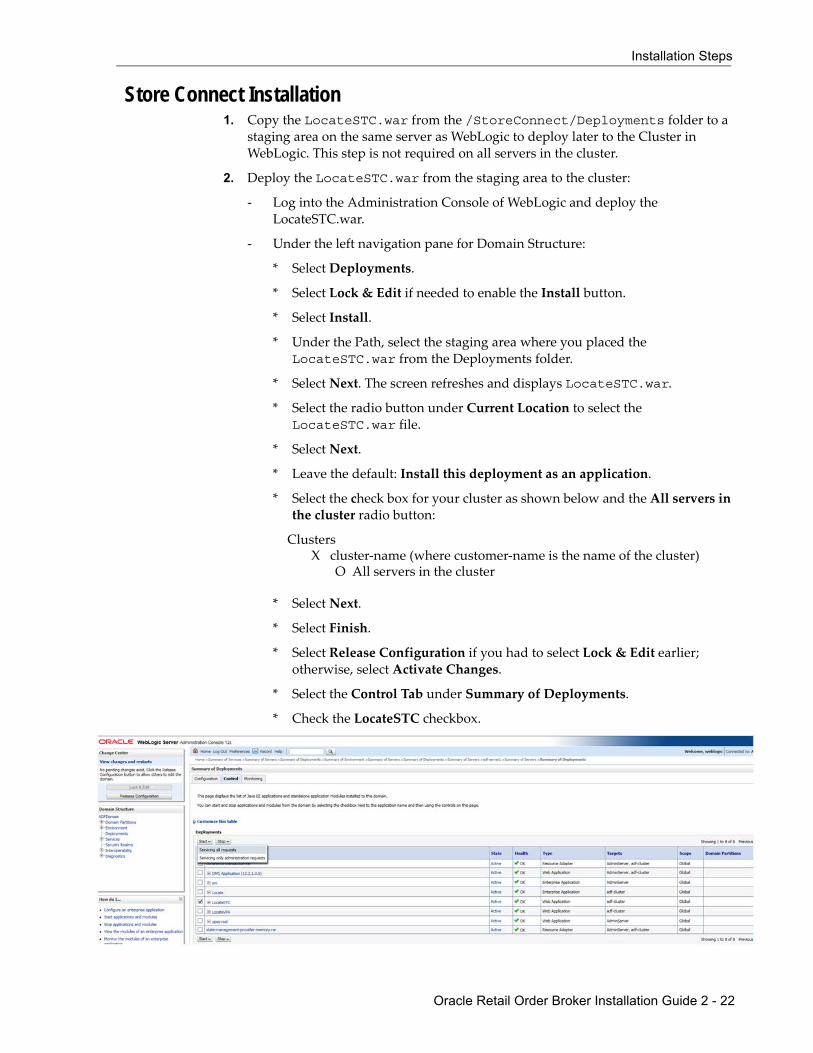
* Select the Control Tab under Summary of Deployments.
* Check the LocateSTC checkbox.
Installation Steps
Oracle Retail Order Broker Installation Guide 2 - 23
* Select the Start button.
* Select Start/Servicing all requests.
Validate the Store Connect Installation1. Launch Store Connect using the following URL:
https://server:port/LocateSTC
Where server:port is the IP address and port of the Order Broker server.
2. Verify that you can log in as a store associate user.
3. Select About Store Connect at the very bottom left of the screen.
4. At the About Store Connect window, confirm that the Version is set to 16.0.46-2016-10-27_13-00-21.
Installation Steps
Oracle Retail Order Broker Installation Guide 2 - 24
Supplier Direct Fulfillment (Vendor Portal) Installation
Note: Do not copy and paste text directly from this PDF file. To eliminate unwanted special characters, copy and paste first into a text editor, and then copy and paste from the text editor into the specified file, after first confirming that no unwanted special characters were embedded.
1. Copy the LocateVPA.war from the /Supplier Direct Fulfillment/Deployments folder to a staging area on the same server as WebLogic to deploy later to the Cluster in WebLogic. This step is not required on all servers in the cluster.
2. Use a Linux-compatible text editor to open the web.xml in the war file in the WEB-INF folder and add the following section:
<context-param> <param-name>LOCATE_UPLOAD_FOLDER</param-name> <param-value>SDFUPLOAD_DATA_PATH</param-value>
</context-param>
Where SDFUPLOAD_DATA_PATH is the data folder path set up previously, such as /usr/share/OrderBroker/SDFUploadData.
3. Deploy the LocateVPA.war from the staging area to the cluster:
- Log into the Administration Console of WebLogic and deploy LocateVPA.war.
- Under the left navigation pane for Domain Structure:
* Select Deployments.
* Select Lock & Edit to enable the Install button if needed.
* Select Install.
* Under the Path, select the staging area where you placed the LocateVPA.war from the Deployments folder.
* Select Next. The screen refreshes and displays LocateVPA.war.
* Select the radio button under Current Location to select LocateVPA.war.
* Select Next.
* Leave the default: Install this deployment as an application.
* Select the check box of the cluster as shown and All servers in the cluster radio button.
ClustersX cluster-name (where cluster-name is the name of the cluster)
O All servers in the cluster
* Select Next.
* Select Finish.
* Select Release Configuration if you selected Lock & Edit earlier; otherwise, select Activate Changes.
Installation Steps
Oracle Retail Order Broker Installation Guide 2 - 25
* Select the Control Tab under Summary of Deployments.
* Check the LocateVPA checkbox.
* Select the Start button.
* Choose Start/Servicing all requests.
Validate the Vendor Portal Installation1. Launch the Vendor Portal using the following URL:
https://server:port/LocateVPA
Where server:port is the IP address and port of the Order Broker server.
2. Verify that you can log in as a vendor user.
3. Select About > About Vendor Portal.
* At the About Vendor Portal window, confirm that the Version is set to 16.0.46-2016-10-27_13-00-21.
Oracle Retail Order Broker Installation Guide A - 1
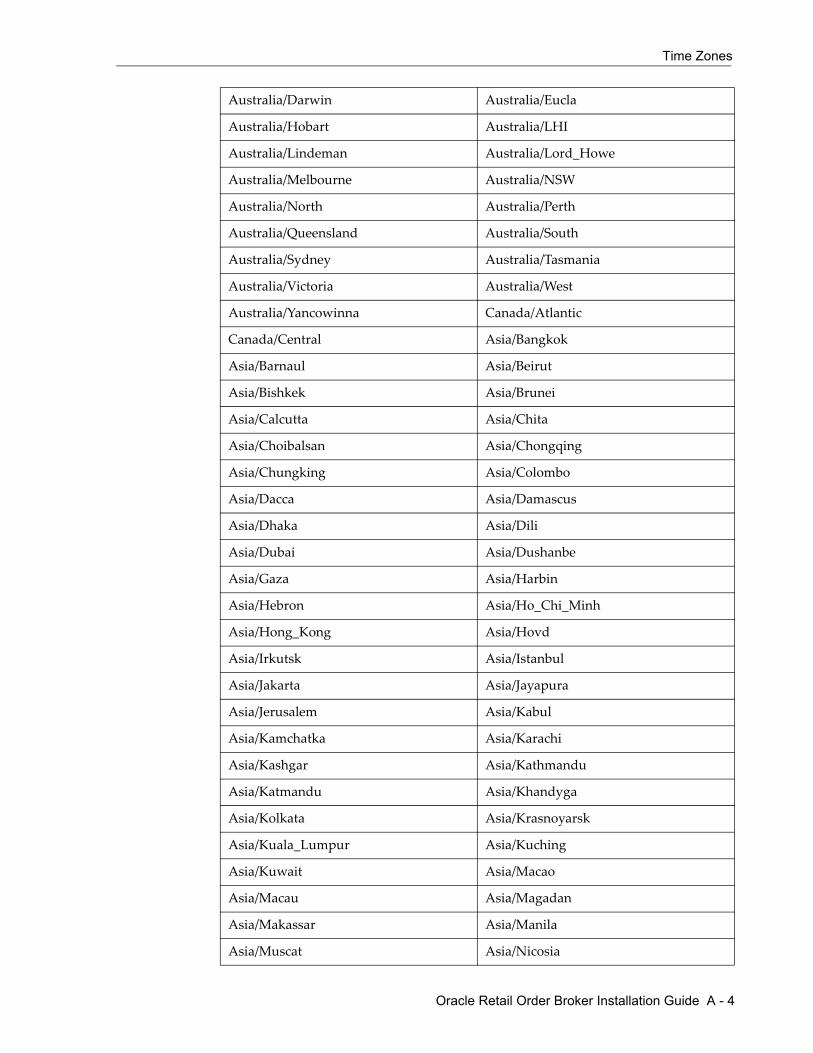
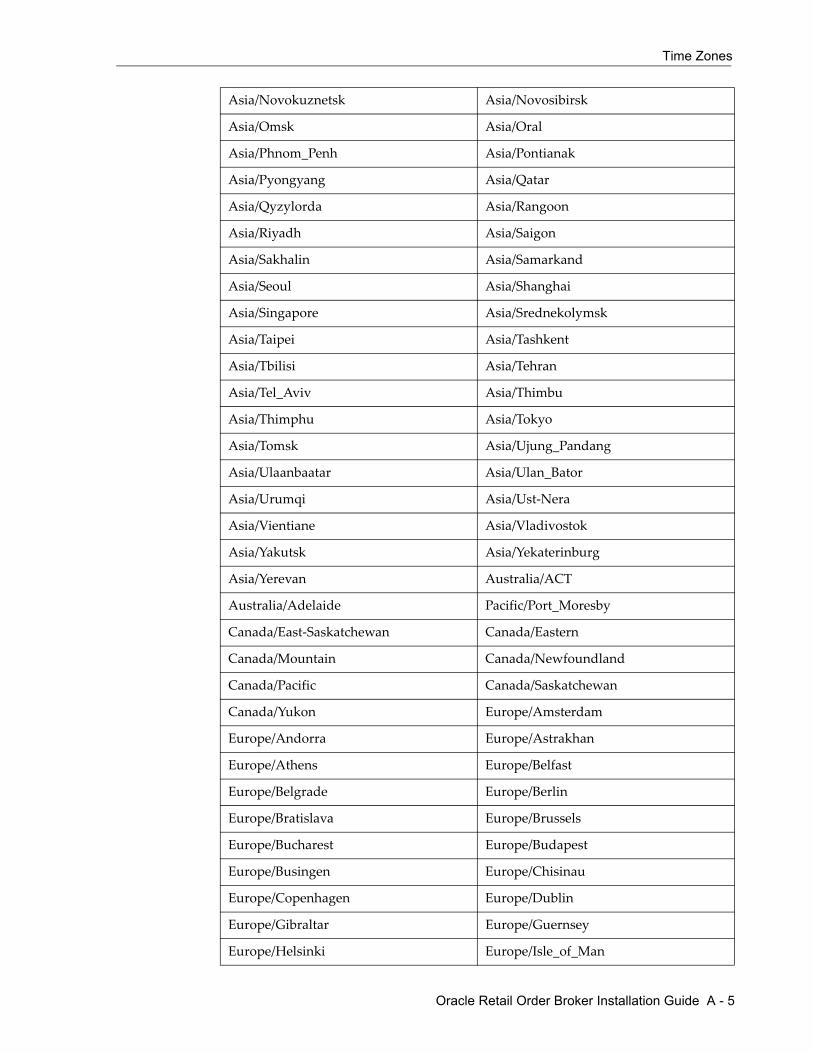
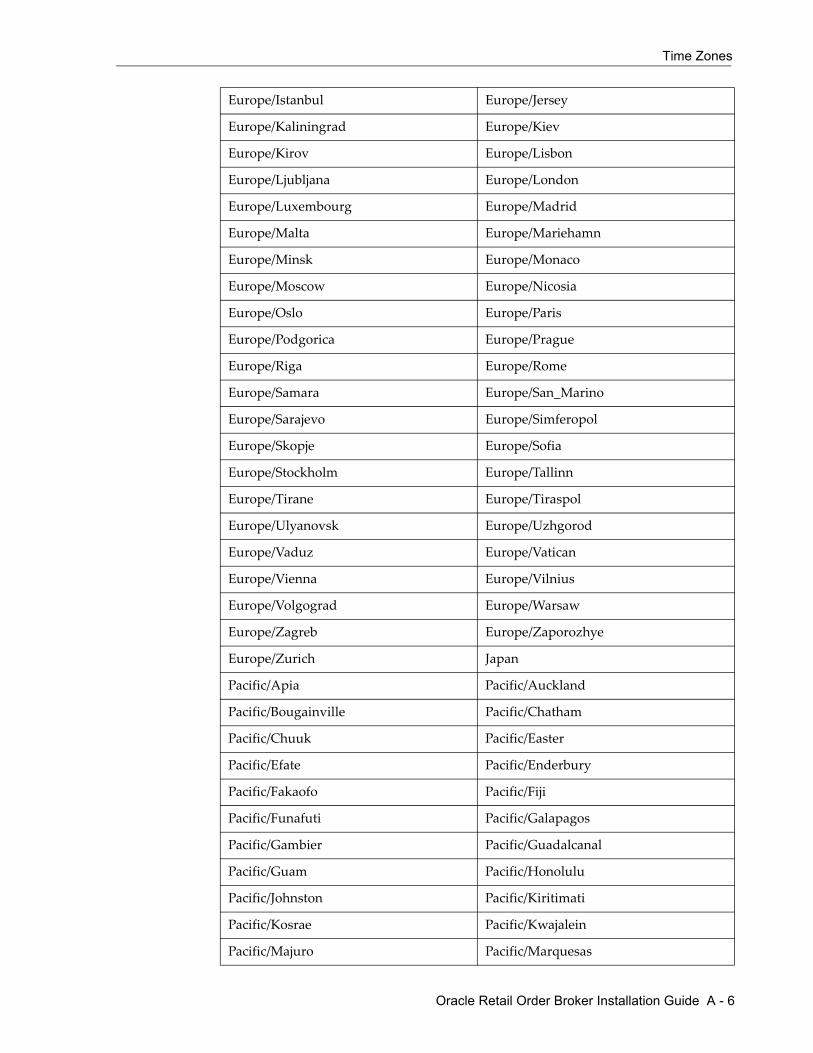
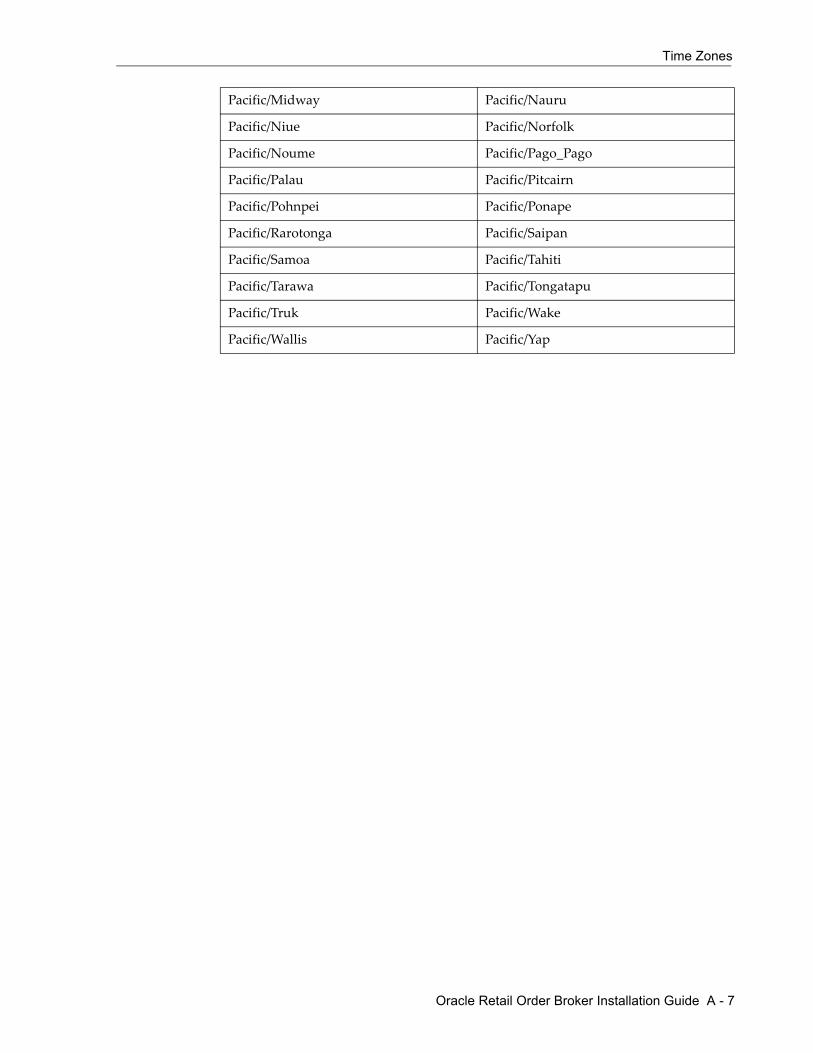
ATime Zones
Available time zones are listed below.
America/Adak America/Anchorage
America/Anguilla America/Antigua
America/Araguaina America/Argentina/Buenos_Aires
America/Argentina/Catamarca America/Argentina/ComodRivadavia
America/Argentina/Cordoba America/Argentina/Jujuy
America/Argentina/La_Rioja America/Argentina/Mendoza
America/Argentina/Rio_Gallegos America/Argentina/Salta
America/Argentina/San_Juan America/Argentina/San_Luis
America/Argentina/Tucuman America/Argentina/Ushuaia
America/Aruba America/Asuncion
America/Atikokan America/Atka
America/Bahia America/Bahia_Banderas
America/Barbados America/Belem
America/Belize America/Blanc-Sablon
America/Boa_Vista America/Bogota
America/Boise America/Buenos_Aires
America/Cambridge_Bay America/Campo_Grande
America/Cancun America/Caracas
America/Catamarca America/Cayenne
America/Cayman America/Chicago
America/Chihuahua America/Coral_Harbour
America/Cordoba America/Costa_Rica
America/Creston America/Cuiaba
America/Curacao America/Danmarkshavn
Time Zones
Oracle Retail Order Broker Installation Guide A - 2
America/Dawson America/Dawson_Creek
America/Denver America/Detroit
America/Dominica America/Edmonton
America/Eirunepe America/El_Salvador
America/Ensenada America/Fort_Nelson
America/Fort_Wayne America/Fortaleza
America/Glace_Bay America/Godthab
America/Goose_Bay America/Grand_Turk
America/Grenada America/Guadeloupe
America/Guatemala America/Guayaquil
America/Guyana America/Halifax
America/Havana America/Hermosillo
America/Indiana/Indianapolis America/Indiana/Knox
America/Indiana/Marengo America/Indiana/Petersburg
America/Indiana/Tell_City America/Indiana/Vevay
America/Indiana/Vincennes America/Indiana/Winamac
America/Indianapolis America/Inuvik
America/Iqaluit America/Jamaica
America/Juneau America/Kentucky/Louisville
America/Kentucky/Monticello America/Knox_IN
America/Kralendijk America/La_Paz
America/Lima America/Los_Angeles
America/Louisville America/Lower_Princes
America/Maceio America/Managua
America/Manaus America/Marigot
America/Martinique America/Matamoros
America/Mazatlan America/Mendoza
America/Menominee America/Merida
America/Metlakatla America/Mexico_City
America/Miquelon America/Moncton
America/Monterrey America/Montevideo
America/Montreal America/Montserrat
America/Nassau America/New_York
Time Zones
Oracle Retail Order Broker Installation Guide A - 3
America/Nipigon America/Nome
America/Noronha America/North_Dakota/Beulah
America/North_Dakota/Center America/North_Dakota/New_Salem
America/Ojinaga America/Panama
America/Pangnirtung America/Paramaribo
America/Phoenix America/Port-au-Prince
America/Port_of_Spain America/Porto_Acre
America/Porto_Velho America/Puerto_Rico
America/Rainy_River America/Rankin_Inlet
America/Recife America/Regina
America/Resolute America/Rio_Branco
America/Rosario America/Santa_Isabel
America/Santarem America/Santiago
America/Santo_Domingo America/Sao_Paulo
America/Scoresbysund America/Shiprock
America/Sitka America/St_Barthelemy
America/St_Johns America/St_Kitts
America/St_Lucia America/St_Thomas
America/St_Vincent America/Swift_Current
America/Tegucigalpa America/Thule
America/Thunder_Bay America/Tijuana
America/Toronto America/Tortola
America/Vancouver America/Virgin
America/Whitehorse America/Winnipeg
America/Yakutat America/Yellowknife
Asia/Aden Asia/Almaty
Asia/Amman Asia/Anadyr
Asia/Aqtau Asia/Aqtobe
Asia/Ashgabat Asia/Ashkhabad
Asia/Baghdad Asia/Bahrain
Asia/Baku America/Jujuy
Australia/Brisbane Australia/Broken_Hill
Australia/Canberra Australia/Currie
Time Zones
Oracle Retail Order Broker Installation Guide A - 4
Australia/Darwin Australia/Eucla
Australia/Hobart Australia/LHI
Australia/Lindeman Australia/Lord_Howe
Australia/Melbourne Australia/NSW
Australia/North Australia/Perth
Australia/Queensland Australia/South
Australia/Sydney Australia/Tasmania
Australia/Victoria Australia/West
Australia/Yancowinna Canada/Atlantic
Canada/Central Asia/Bangkok
Asia/Barnaul Asia/Beirut
Asia/Bishkek Asia/Brunei
Asia/Calcutta Asia/Chita
Asia/Choibalsan Asia/Chongqing
Asia/Chungking Asia/Colombo
Asia/Dacca Asia/Damascus
Asia/Dhaka Asia/Dili
Asia/Dubai Asia/Dushanbe
Asia/Gaza Asia/Harbin
Asia/Hebron Asia/Ho_Chi_Minh
Asia/Hong_Kong Asia/Hovd
Asia/Irkutsk Asia/Istanbul
Asia/Jakarta Asia/Jayapura
Asia/Jerusalem Asia/Kabul
Asia/Kamchatka Asia/Karachi
Asia/Kashgar Asia/Kathmandu
Asia/Katmandu Asia/Khandyga
Asia/Kolkata Asia/Krasnoyarsk
Asia/Kuala_Lumpur Asia/Kuching
Asia/Kuwait Asia/Macao
Asia/Macau Asia/Magadan
Asia/Makassar Asia/Manila
Asia/Muscat Asia/Nicosia
Time Zones
Oracle Retail Order Broker Installation Guide A - 5
Asia/Novokuznetsk Asia/Novosibirsk
Asia/Omsk Asia/Oral
Asia/Phnom_Penh Asia/Pontianak
Asia/Pyongyang Asia/Qatar
Asia/Qyzylorda Asia/Rangoon
Asia/Riyadh Asia/Saigon
Asia/Sakhalin Asia/Samarkand
Asia/Seoul Asia/Shanghai
Asia/Singapore Asia/Srednekolymsk
Asia/Taipei Asia/Tashkent
Asia/Tbilisi Asia/Tehran
Asia/Tel_Aviv Asia/Thimbu
Asia/Thimphu Asia/Tokyo
Asia/Tomsk Asia/Ujung_Pandang
Asia/Ulaanbaatar Asia/Ulan_Bator
Asia/Urumqi Asia/Ust-Nera
Asia/Vientiane Asia/Vladivostok
Asia/Yakutsk Asia/Yekaterinburg
Asia/Yerevan Australia/ACT
Australia/Adelaide Pacific/Port_Moresby
Canada/East-Saskatchewan Canada/Eastern
Canada/Mountain Canada/Newfoundland
Canada/Pacific Canada/Saskatchewan
Canada/Yukon Europe/Amsterdam
Europe/Andorra Europe/Astrakhan
Europe/Athens Europe/Belfast
Europe/Belgrade Europe/Berlin
Europe/Bratislava Europe/Brussels
Europe/Bucharest Europe/Budapest
Europe/Busingen Europe/Chisinau
Europe/Copenhagen Europe/Dublin
Europe/Gibraltar Europe/Guernsey
Europe/Helsinki Europe/Isle_of_Man
Time Zones
Oracle Retail Order Broker Installation Guide A - 6
Europe/Istanbul Europe/Jersey
Europe/Kaliningrad Europe/Kiev
Europe/Kirov Europe/Lisbon
Europe/Ljubljana Europe/London
Europe/Luxembourg Europe/Madrid
Europe/Malta Europe/Mariehamn
Europe/Minsk Europe/Monaco
Europe/Moscow Europe/Nicosia
Europe/Oslo Europe/Paris
Europe/Podgorica Europe/Prague
Europe/Riga Europe/Rome
Europe/Samara Europe/San_Marino
Europe/Sarajevo Europe/Simferopol
Europe/Skopje Europe/Sofia
Europe/Stockholm Europe/Tallinn
Europe/Tirane Europe/Tiraspol
Europe/Ulyanovsk Europe/Uzhgorod
Europe/Vaduz Europe/Vatican
Europe/Vienna Europe/Vilnius
Europe/Volgograd Europe/Warsaw
Europe/Zagreb Europe/Zaporozhye
Europe/Zurich Japan
Pacific/Apia Pacific/Auckland
Pacific/Bougainville Pacific/Chatham
Pacific/Chuuk Pacific/Easter
Pacific/Efate Pacific/Enderbury
Pacific/Fakaofo Pacific/Fiji
Pacific/Funafuti Pacific/Galapagos
Pacific/Gambier Pacific/Guadalcanal
Pacific/Guam Pacific/Honolulu
Pacific/Johnston Pacific/Kiritimati
Pacific/Kosrae Pacific/Kwajalein
Pacific/Majuro Pacific/Marquesas
Time Zones
Oracle Retail Order Broker Installation Guide A - 7
Pacific/Midway Pacific/Nauru
Pacific/Niue Pacific/Norfolk
Pacific/Noume Pacific/Pago_Pago
Pacific/Palau Pacific/Pitcairn
Pacific/Pohnpei Pacific/Ponape
Pacific/Rarotonga Pacific/Saipan
Pacific/Samoa Pacific/Tahiti
Pacific/Tarawa Pacific/Tongatapu
Pacific/Truk Pacific/Wake
Pacific/Wallis Pacific/Yap
Oracle Retail Order Broker Installation Guide B - 1
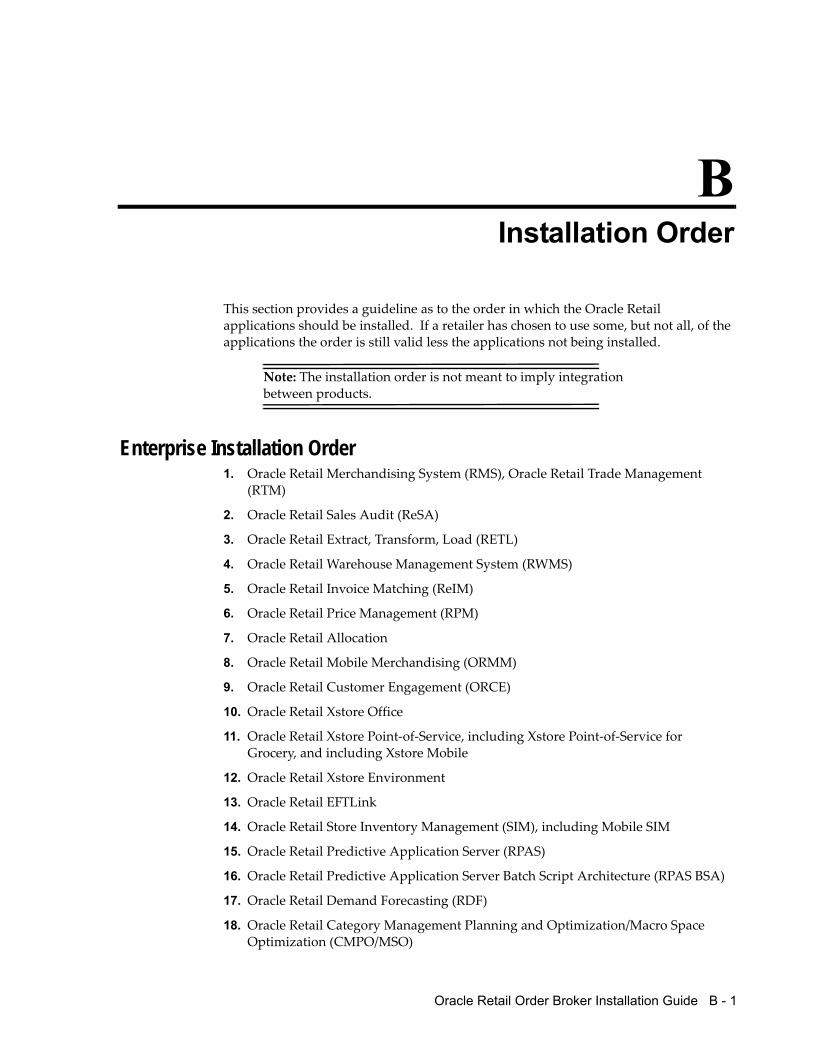
BInstallation Order
This section provides a guideline as to the order in which the Oracle Retail applications should be installed. If a retailer has chosen to use some, but not all, of the applications the order is still valid less the applications not being installed.
Note: The installation order is not meant to imply integration between products.
Enterprise Installation Order1. Oracle Retail Merchandising System (RMS), Oracle Retail Trade Management
(RTM)
2. Oracle Retail Sales Audit (ReSA)
3. Oracle Retail Extract, Transform, Load (RETL)
4. Oracle Retail Warehouse Management System (RWMS)
5. Oracle Retail Invoice Matching (ReIM)
6. Oracle Retail Price Management (RPM)
7. Oracle Retail Allocation
8. Oracle Retail Mobile Merchandising (ORMM)
9. Oracle Retail Customer Engagement (ORCE)
10. Oracle Retail Xstore Office
11. Oracle Retail Xstore Point-of-Service, including Xstore Point-of-Service for Grocery, and including Xstore Mobile
12. Oracle Retail Xstore Environment
13. Oracle Retail EFTLink
14. Oracle Retail Store Inventory Management (SIM), including Mobile SIM
15. Oracle Retail Predictive Application Server (RPAS)
16. Oracle Retail Predictive Application Server Batch Script Architecture (RPAS BSA)
17. Oracle Retail Demand Forecasting (RDF)
18. Oracle Retail Category Management Planning and Optimization/Macro Space Optimization (CMPO/MSO)
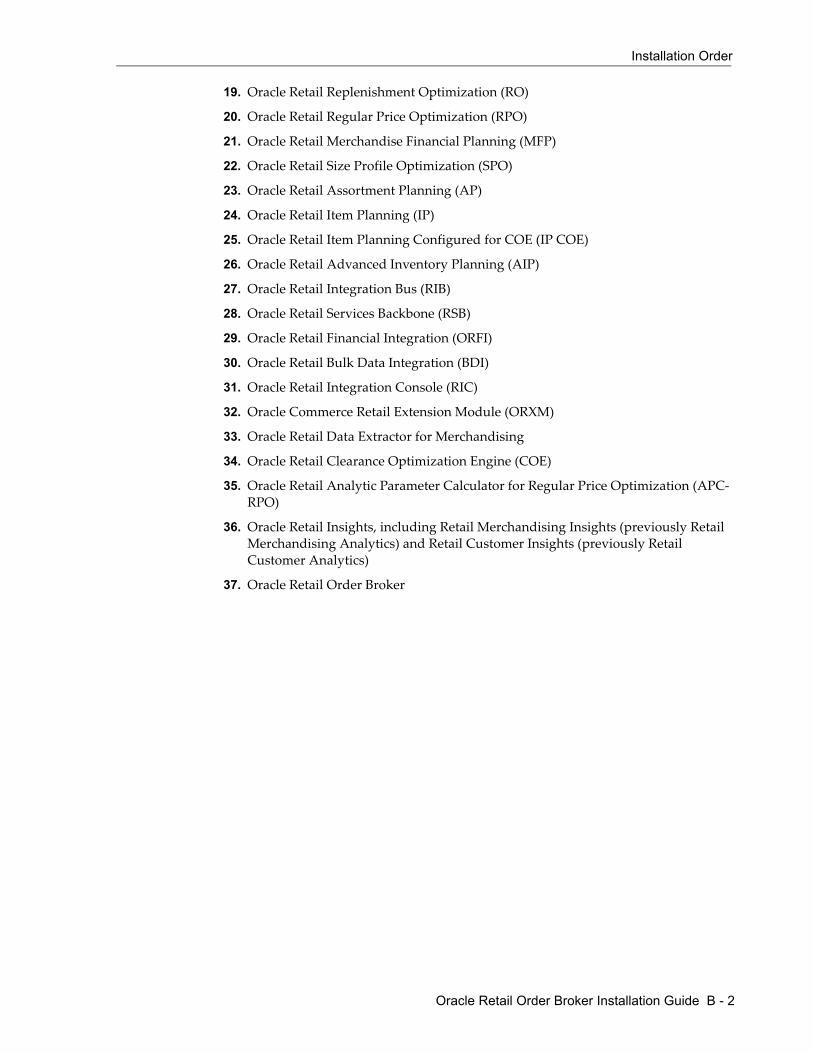
Installation Order
Oracle Retail Order Broker Installation Guide B - 2
19. Oracle Retail Replenishment Optimization (RO)
20. Oracle Retail Regular Price Optimization (RPO)
21. Oracle Retail Merchandise Financial Planning (MFP)
22. Oracle Retail Size Profile Optimization (SPO)
23. Oracle Retail Assortment Planning (AP)
24. Oracle Retail Item Planning (IP)
25. Oracle Retail Item Planning Configured for COE (IP COE)
26. Oracle Retail Advanced Inventory Planning (AIP)
27. Oracle Retail Integration Bus (RIB)
28. Oracle Retail Services Backbone (RSB)
29. Oracle Retail Financial Integration (ORFI)
30. Oracle Retail Bulk Data Integration (BDI)
31. Oracle Retail Integration Console (RIC)
32. Oracle Commerce Retail Extension Module (ORXM)
33. Oracle Retail Data Extractor for Merchandising
34. Oracle Retail Clearance Optimization Engine (COE)
35. Oracle Retail Analytic Parameter Calculator for Regular Price Optimization (APC-RPO)
36. Oracle Retail Insights, including Retail Merchandising Insights (previously Retail Merchandising Analytics) and Retail Customer Insights (previously Retail Customer Analytics)
37. Oracle Retail Order Broker


![[]Oracle® Retail Integration Cloud Services …...Warehouse and MicroStrategy for Oracle Retail Planning & Optimization applications. (ii) the Wavelink component developed and licensed](https://img.pdfslide.us/doc/110x75/5fce5367235051302d3e7779/oracle-retail-integration-cloud-services-warehouse-and-microstrategy-for.jpg)