Embed Size (px)
Citation preview

INSTALLATION GUIDE
NOTE
When attaching to vinyl siding with wallattachments and vinyl decks.
Pre-drill holes
Fill holes in plate with silicone then drive screw in
MAINTENANCE
Silicone around screws need to be checkedevery two years
Reapplied as necessary
INSTALLATION GUIDE
STANDARD PICKET RAILING
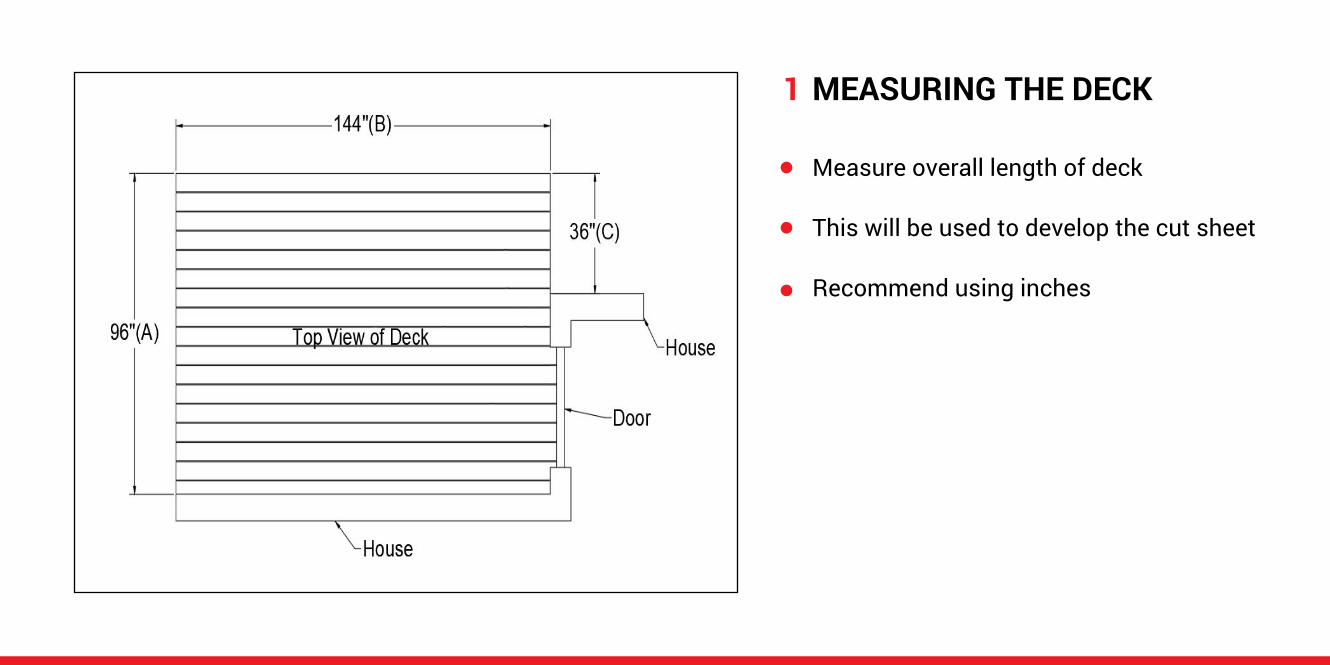
MEASURING THE DECK1
Measure overall length of deck
This will be used to develop the cut sheet
Recommend using inches

2 CHECK OVER HANG OFDECK BOARDS
Railing post to be mounted over framing,not the over hang of deck boards
Measure over hang
This will be used to develop cut sheet

3 POST LAYOUT
Know what posts go where
Posts will effect the cut sheet

4 POST DIMENSIONS
Post dimensions effects cut sheet
McLean posts are 2”x2” square posts
McLean corner posts are 4”x4” baseplate
McLean End and Line posts have 4”x6”base plate
Bottom rail is cut to the inside of eachstated post
Bottom rail cut is 3” less for every post.Plus whatever the over hang is on thedeck boards
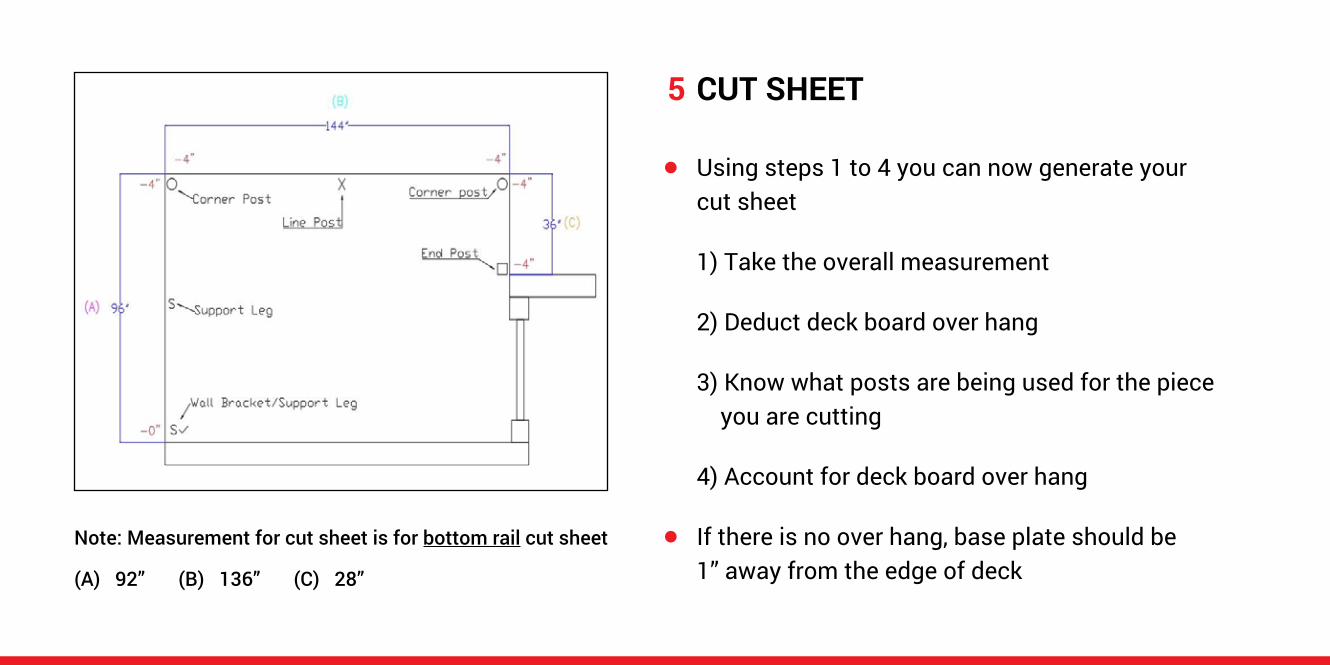
5 CUT SHEET
Using steps 1 to 4 you can now generate yourcut sheet
1) Take the overall measurement
2) Deduct deck board over hang
3) Know what posts are being used for the piece you are cutting
4) Account for deck board over hang
If there is no over hang, base plate should be1” away from the edge of deck
Note: Measurement for cut sheet is for bottom rail cut sheet
(A) 92” (B) 136” (C) 28”

PICKET SPACING6
Taking the measurements generated from the cut sheet
(A) Always start at a full picketspace 4”
Now determine (C) is 3” picket spacefrom post to picket on each sideof the rail
Divide by 2 -> divide the sum of (A+B/2=C)
Determine picket spacing (corner to corner)
Picket spacing is 4” (between each picket)
Goal is to have the same space between post and picketon each side of a single piece of rail
(B) Measure the rail from the startof a picket to the measurement fromyour cut sheet
Add (A) 4” and (B) 2” together=6

CUTTING THE BOTTOM RAIL7
Cut bottom rail first
Use number from picket spacing formula (C) 3”
Make first cut
Measure length of rail from cut sheet and make second cut
Note: Bottom rail cut cannot exceed 4” past a picket and must be no less than 1” from a picket
This process works the same forPosts - Wall Brackets - End Post - Corner Post

8 CUTTING RAIL FOR LINE POST
Count the number of pickets in said pieceof rail (21)
Find the middle picket (11) This is the picketline post will replace
Make one cut 6” from top rail (Cut #1)
Measure 3¼” from each picket on either sideof the picket being removed
Install line post
Line post has an open slot in the top to slipover the 6” picket you left in the top rail

CUTTING TOP RAIL WALL BRACKETS9
All rail being cut to go into wall brackets the toprail will be ½” less than the bottom rail
This is not the overall measurement but ½” lessfrom the picket
Bottom rail to first picket 3” (example)
Top rail cut to first 2 ½” (example)
Note:
Bottom rail is to be cut square and tight to wall
Top wall bracket to be screwed flat to surface (not rock)
Bottom rail is an exposed cut
CUTTING TOP RAIL END POST10
For all Rail being cut to go into an end post the top cut will be 3” more than the bottom rail cut
This is not the overall measurement but 3” more from the first picket
Bottom rail to first picket 3” (example)
Top rail cut to first picket 6” (example)
Note:
Never use a factory end when cutting the rail for an end post
Factory end of rail: top and bottom equal distance from first picket
End post requiers top rail to be 3” longer than the bottom rail
CUTTING TOP RAIL FOR CORNER POST11
For all rail being cut to go into corner post the top cut always be 1” less than the bottom rail cut
This is not the overall measurement but 1” more from the first picket
Bottom rail to first picket 3” (example)
Top rail cut to be 2” first picket (example)
Note:
The top rail cut will always be generated after the bottom rail has been cut and picket spacing has been determined.

INSTALLATION GUIDE
GLASS RAILING
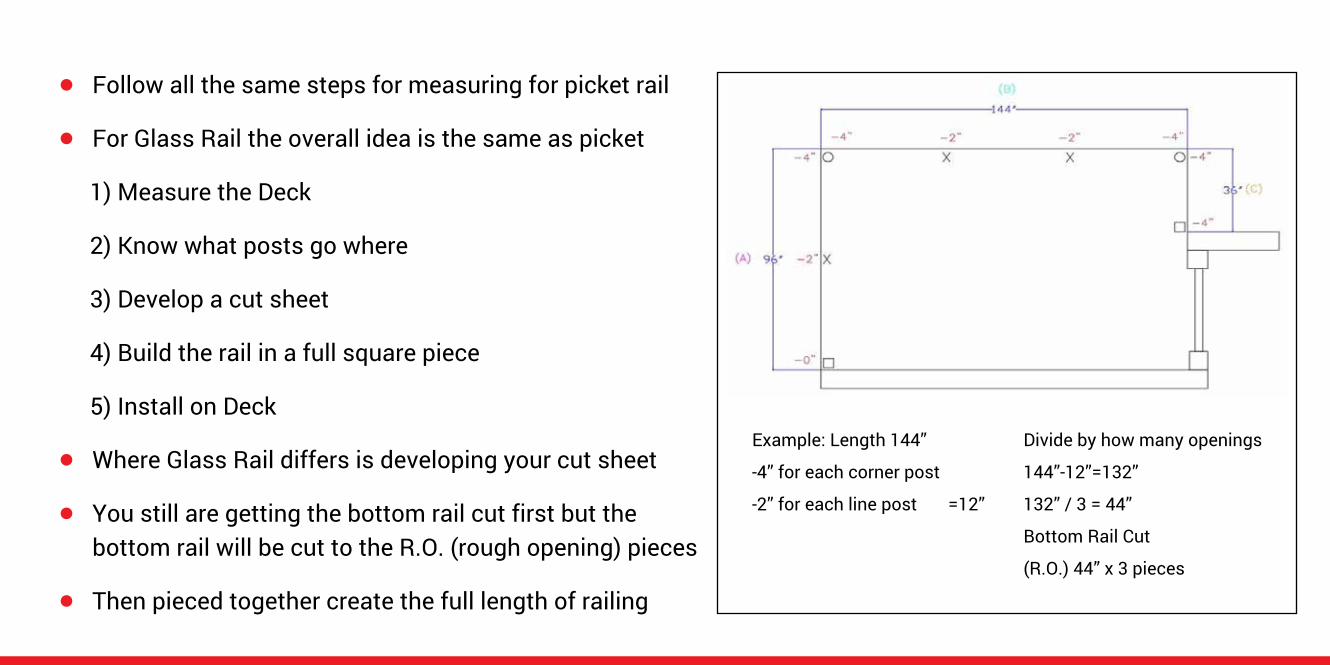
For Glass Rail the overall idea is the same as picket
Follow all the same steps for measuring for picket rail
You still are getting the bottom rail cut first but thebottom rail will be cut to the R.O. (rough opening) pieces
Then pieced together create the full length of railing
Where Glass Rail differs is developing your cut sheet
1) Measure the Deck
2) Know what posts go where
3) Develop a cut sheet
4) Build the rail in a full square piece
5) Install on DeckExample: Length 144” Divide by how many openings
144”-12”=132”
132” / 3 = 44”
Bottom Rail Cut
(R.O.) 44” x 3 pieces
-4” for each corner post
-2” for each line post =12”
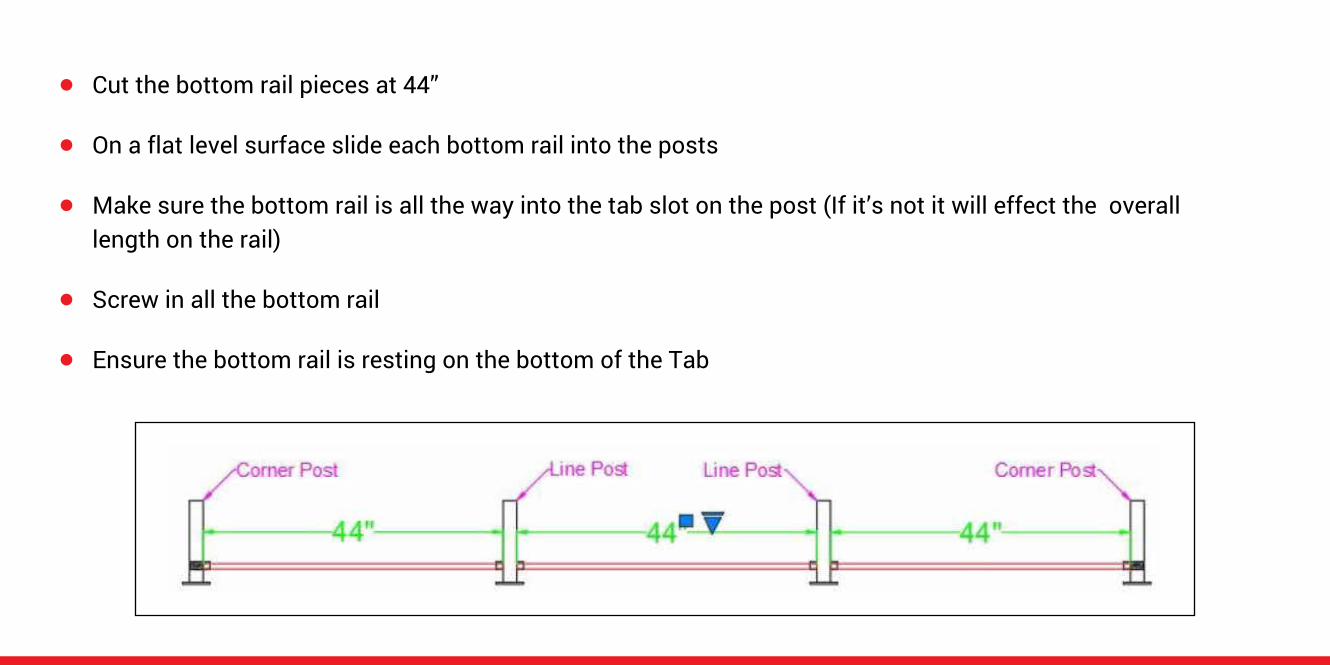
Cut the bottom rail pieces at 44”
On a flat level surface slide each bottom rail into the posts
Make sure the bottom rail is all the way into the tab slot on the post (If it’s not it will effect the overalllength on the rail)
Screw in all the bottom rail
Ensure the bottom rail is resting on the bottom of the Tab
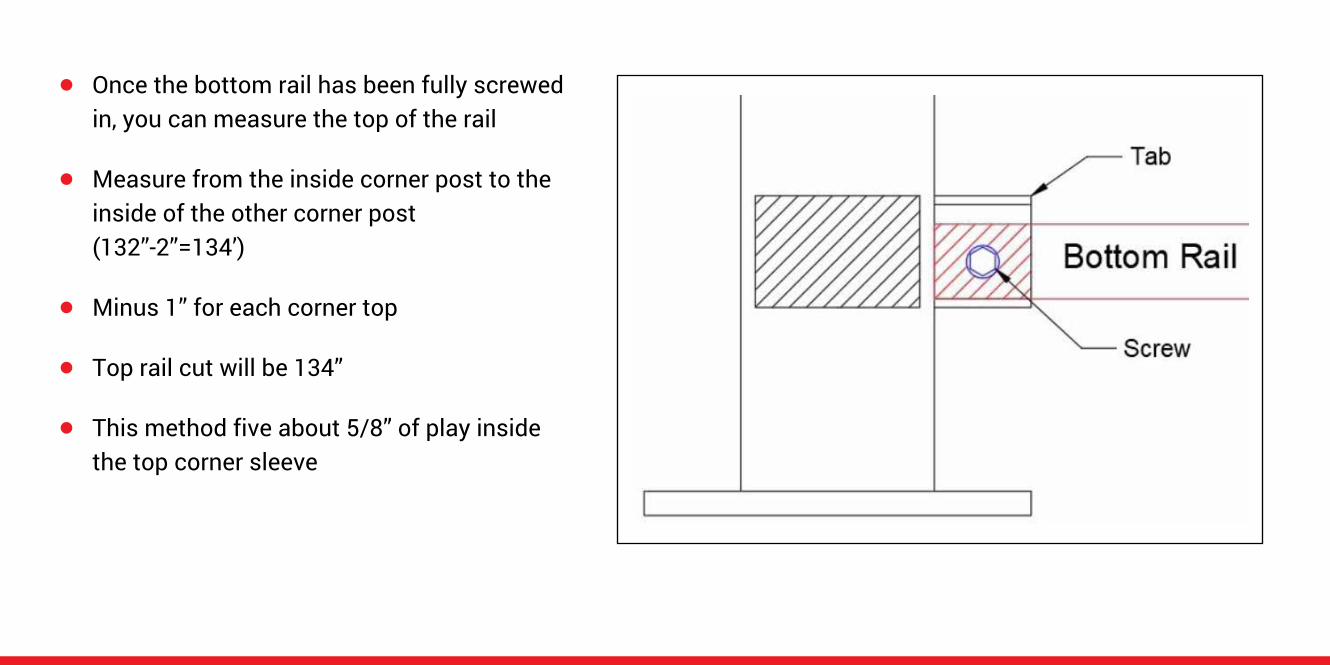
Once the bottom rail has been fully screwedin, you can measure the top of the rail
Measure from the inside corner post to theinside of the other corner post(132”-2”=134’)
Minus 1” for each corner top
Top rail cut will be 134”
This method five about 5/8” of play insidethe top corner sleeve
Note
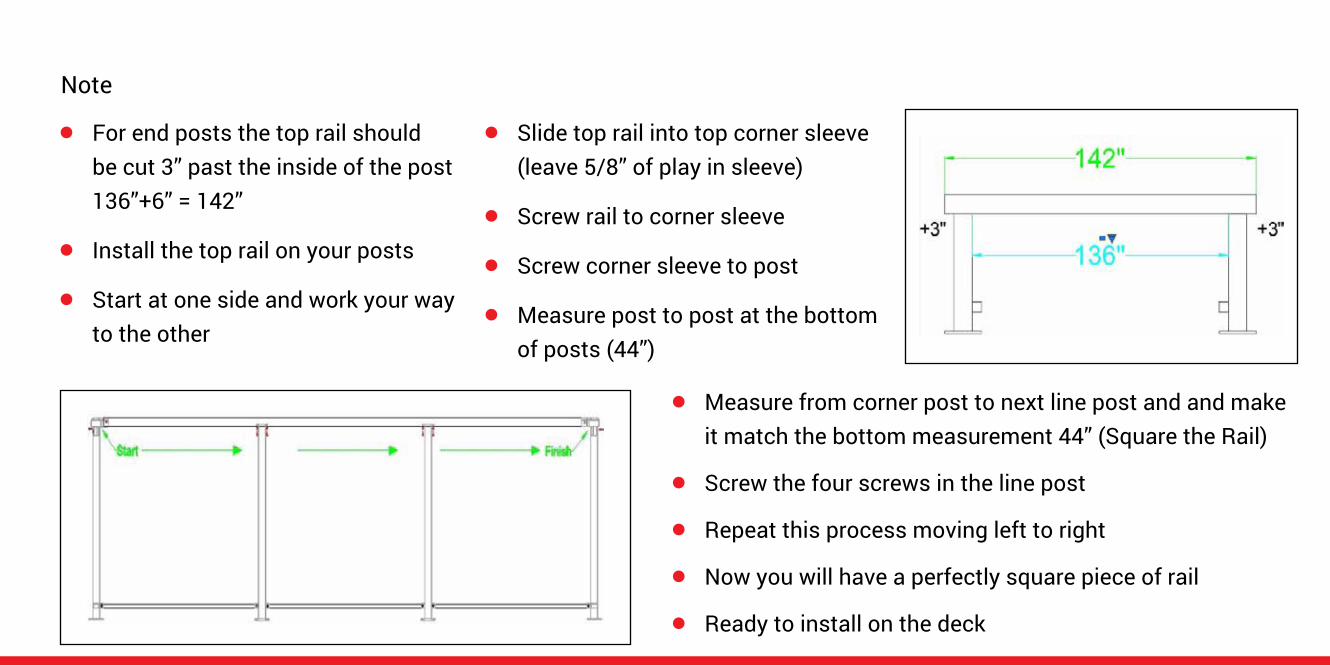
For end posts the top rail shouldbe cut 3” past the inside of the post136”+6” = 142”
Install the top rail on your posts
Start at one side and work your wayto the other
Slide top rail into top corner sleeve(leave 5/8” of play in sleeve)
Screw rail to corner sleeve
Screw corner sleeve to post
Measure post to post at the bottomof posts (44”)
Measure from corner post to next line post and and makeit match the bottom measurement 44” (Square the Rail)
Screw the four screws in the line post
Repeat this process moving left to right
Now you will have a perfectly square piece of rail
Ready to install on the deck

GLASS SIZE
Your glass panel will be 3” less in width than yourR.O. inside of post to inside of post measurement
Glass panel height is set at a consisten height of38 ¼” tall
This gives a ½ glass reveal from post to glass oneach side of the piece
To install the glass simply push the panel all theway into the top rail
Then pull down the glass to rest in the bottom channel
44” R.O. 41” Glass Size

INSTALLATION GUIDE
STAIR RAILING
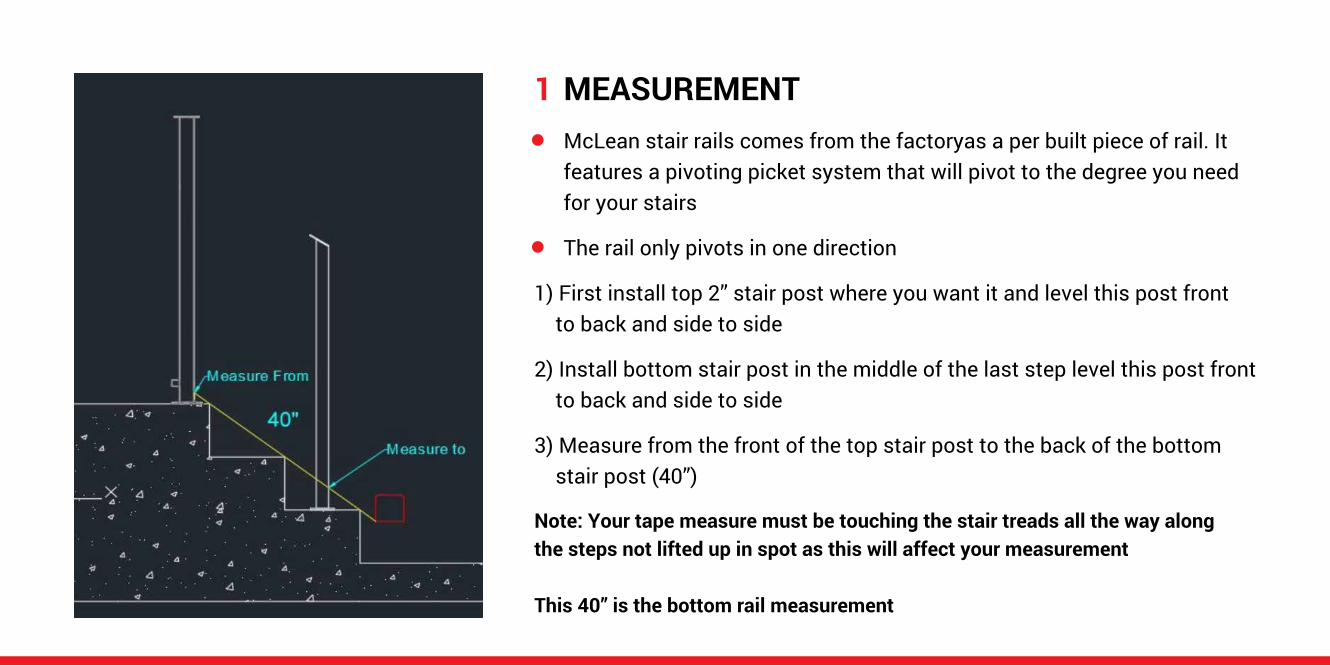
MEASUREMENT1McLean stair rails comes from the factoryas a per built piece of rail. Itfeatures a pivoting picket system that will pivot to the degree you needfor your stairs
The rail only pivots in one direction
1) First install top 2” stair post where you want it and level this post front to back and side to side
2) Install bottom stair post in the middle of the last step level this post front to back and side to side
3) Measure from the front of the top stair post to the back of the bottom stair post (40”)
Note: Your tape measure must be touching the stair treads all the way alongthe steps not lifted up in spot as this will affect your measurement
This 40” is the bottom rail measurement
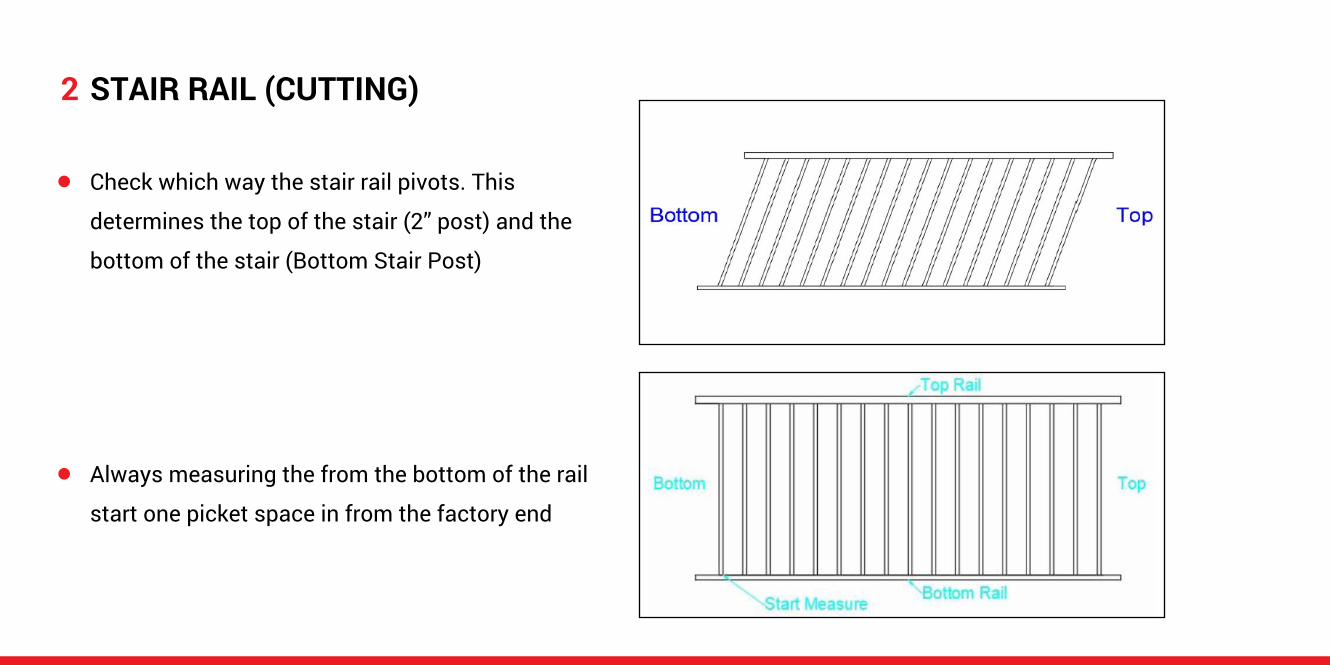
STAIR RAIL (CUTTING)2
Check which way the stair rail pivots. This
determines the top of the stair (2” post) and the
bottom of the stair (Bottom Stair Post)
Always measuring the from the bottom of the rail
start one picket space in from the factory end
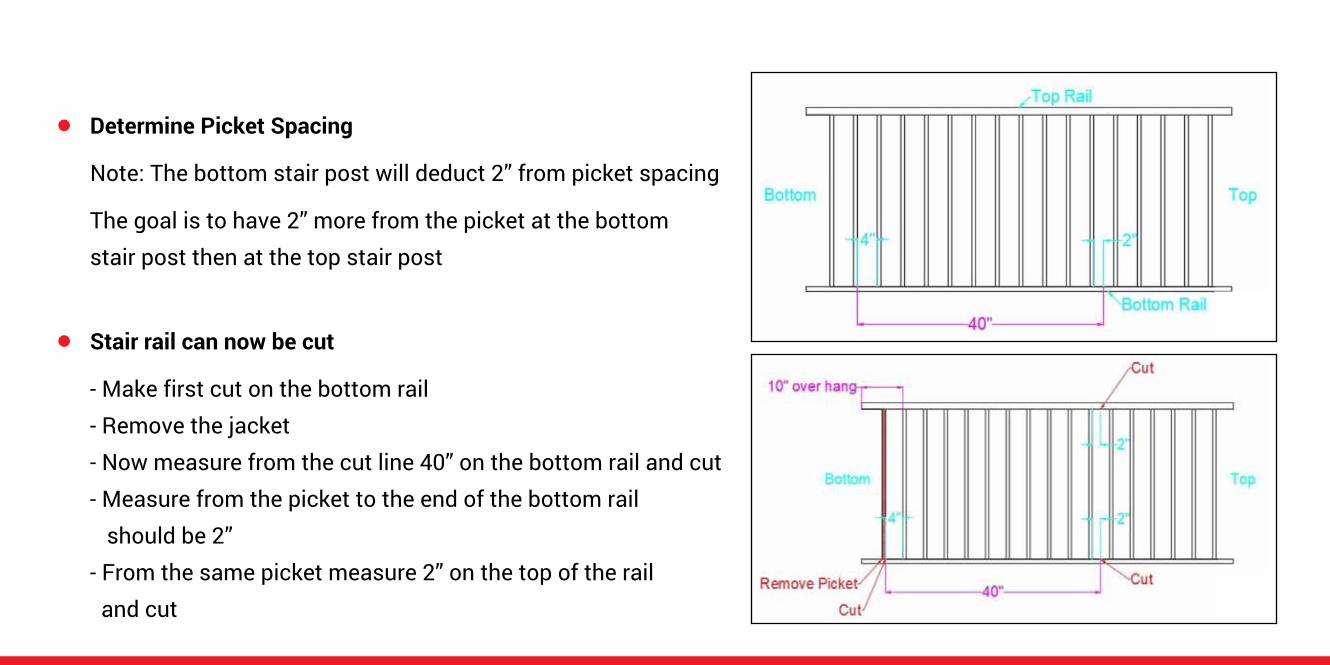
Determine Picket Spacing
Note: The bottom stair post will deduct 2” from picket spacing
The goal is to have 2” more from the picket at the bottomstair post then at the top stair post
Stair rail can now be cut
- Make first cut on the bottom rail- Remove the jacket- Now measure from the cut line 40” on the bottom rail and cut- Measure from the picket to the end of the bottom rail should be 2”- From the same picket measure 2” on the top of the rail and cut
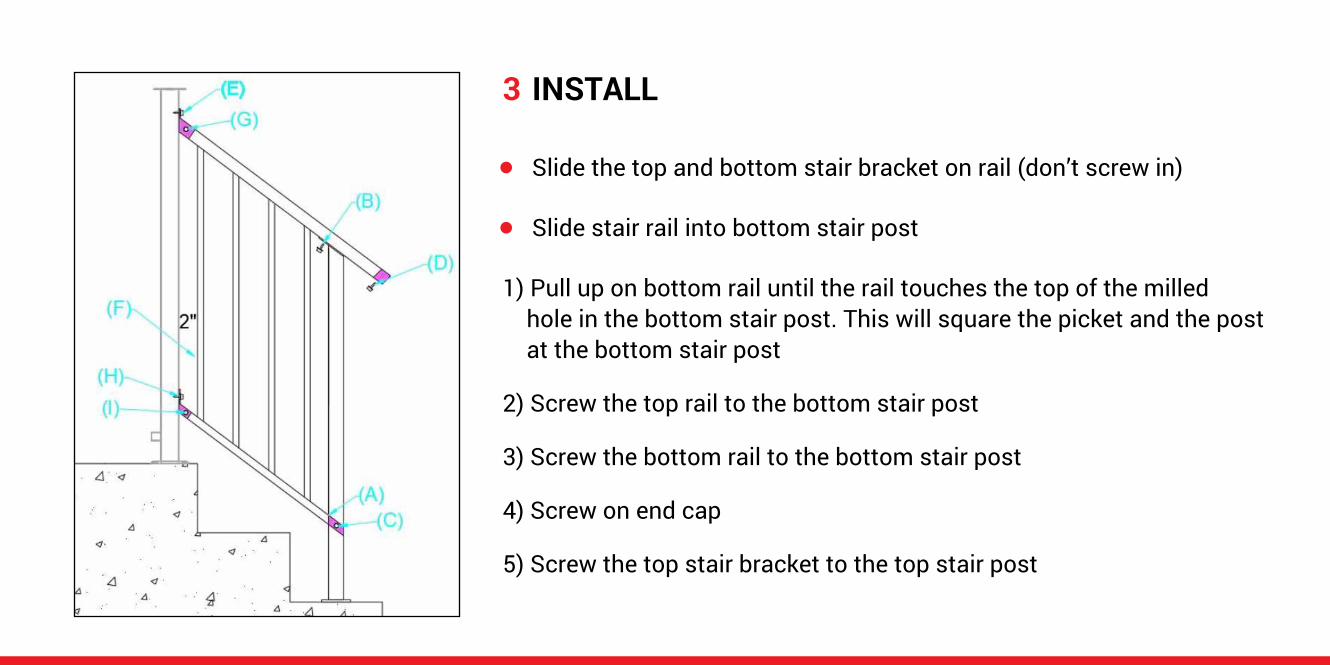
INSTALL3
Slide the top and bottom stair bracket on rail (don’t screw in)
Slide stair rail into bottom stair post
1) Pull up on bottom rail until the rail touches the top of the milled hole in the bottom stair post. This will square the picket and the post at the bottom stair post
2) Screw the top rail to the bottom stair post
3) Screw the bottom rail to the bottom stair post
4) Screw on end cap
5) Screw the top stair bracket to the top stair post
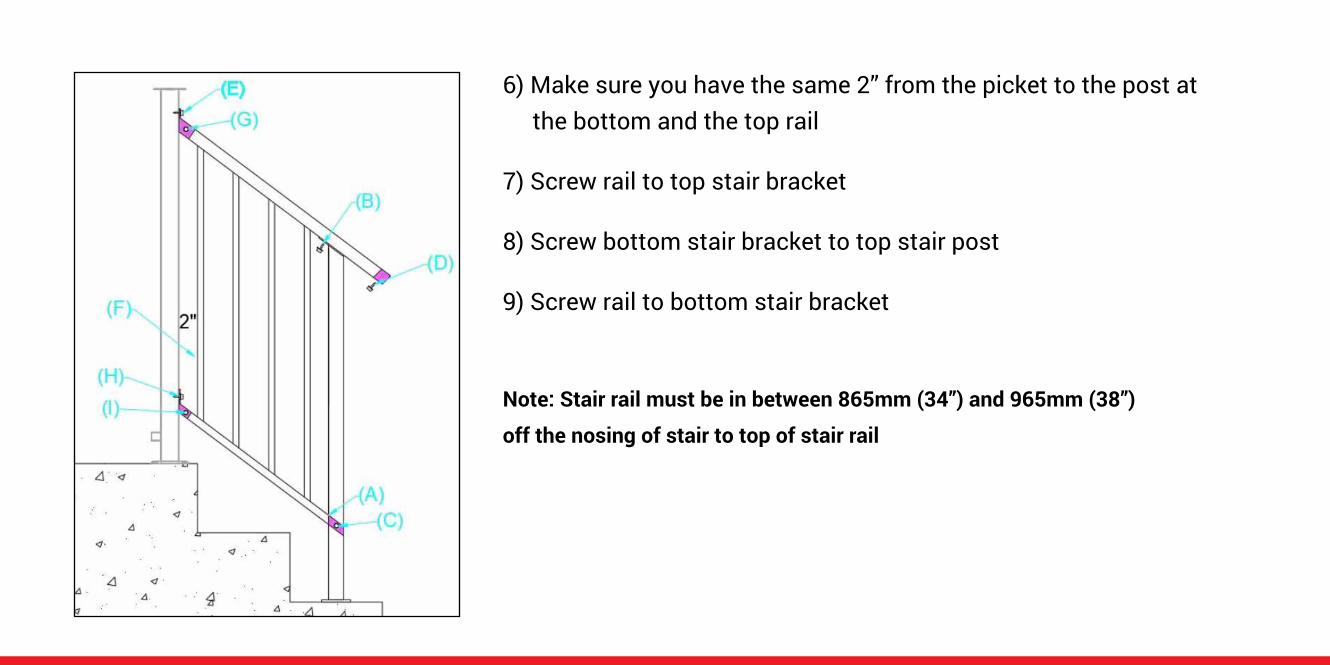
7) Screw rail to top stair bracket
8) Screw bottom stair bracket to top stair post
9) Screw rail to bottom stair bracket
Note: Stair rail must be in between 865mm (34”) and 965mm (38”)
off the nosing of stair to top of stair rail
6) Make sure you have the same 2” from the picket to the post at the bottom and the top rail