Embed Size (px)
Citation preview

Installation Guide: EO Hub and EO Genius V1.1

Installation Guide: EO Hub and EO Genius V1.1 03/10/2019 Page 1 of 25
Table of Contents 1 Introduction .................................................................................................................................... 2
2 Wiring Connections for the Genius Charging stations and the serial bus ...................................... 3
2.1 Fitting termination resistors to the RS485 Serial Bus ............................................................. 4
2.2 Earthing of the Serial Bus ........................................................................................................ 4
2.3 Connecting the Serial cable to the RJ45 connector on the hub.............................................. 4
3 Wiring Connections for the Hub ..................................................................................................... 6
3.1 Power ...................................................................................................................................... 6
3.2 EO Genius RS485 serial Comms .............................................................................................. 7
3.3 CT Clamps ................................................................................................................................ 7
3.4 Ethernet connection & Network Security Settings ................................................................. 7
3.4.1 GPRS Modems ................................................................................................................. 8
3.5 Boot Up ................................................................................................................................... 8
3.6 LEDs ......................................................................................................................................... 8
3.6.1 Start Up ........................................................................................................................... 8
3.6.2 Normal Operation ........................................................................................................... 9
4 Web setup for the EO Hub ............................................................................................................ 10
4.1 High level steps for configuring an EO Hub .......................................................................... 10
4.2 Actions before visiting the site.............................................................................................. 10
4.3 Join the wifi hotspot set up by the hub ................................................................................ 11
4.4 Log in to the hub as an administrator ................................................................................... 11
4.5 Change the default security settings and wifi hotspot ssid .................................................. 12
4.6 Login again using the new credentials .................................................................................. 14
4.7 Set up the hub mode – eoCloud or OCPP ............................................................................. 15
4.8 Configure any specific IP settings ......................................................................................... 16
4.9 Check that the charging stations are listed in the hub’s inventory ...................................... 17
4.9.1 Online ............................................................................................................................ 17
4.9.2 Offline............................................................................................................................ 17
4.10 Perform diagnostic tests ....................................................................................................... 19
4.11 Finalise Installation ............................................................................................................... 21
5 Configuring the EO Hub to communicate to a 3rd party OCPP back office server ........................ 22
6 Further Technical Support ............................................................................................................ 24
7 Revision History ............................................................................................................................ 25

Installation Guide: EO Hub and EO Genius V1.1 03/10/2019 Page 2 of 25
1 Introduction This document details the physical installation instructions for the Hub, how to connect it to the
Genius charging stations and how to configure the settings on the EO Hub.
This document is designed to complement the EO Academy training days and it is still mandatory for
Installers to attend a training day before installing a genius and hub.
The details of all EO Academy training events can be found here: www.eocharging.eventbrite.co.uk
Experience has shown that often the most difficult part of the installation is enabling the
communications between the EO Hub and the eoCloud back office portal. Therefore it is
recommended that the IT settings (section 3.4) are discussed with the client as soon as possible.

Installation Guide: EO Hub and EO Genius V1.1 03/10/2019 Page 3 of 25
2 Wiring Connections for the Genius Charging stations and the serial
bus Each Genius charging station has a short two wire serial cable protruding from it. This needs to be
connected to the other stations and the hub in a daisy chain fashion (with the hub at one end).
Figure 1 - EO Hub and EO Genius serial communication bus
Different cables have been used in the manufacture of Genius charging stations and therefore the
Comms A and Comms B could be either of the following
• Comms A – Red or Blue&White stripe
• Comms B – Black or White&Blue stripe
Serial cable needs to be run from the hub to the genius charging station in order to connect the two
together. Without full communication in place the EO Genius the charging station will perform
identically in operation to an eoBasic and will not offer any advanced functionality.
When the charging stations are daisy chained, please note the following recommendations and best
practices:
• Terminate the RS485 cable from the charging station into a breakout box
• Use Wago connectors to join the two cables together to create the serial bus.
• When post mounting, the breakout box can be placed within the post
• When wall mounting, the breakout box can be placed within the trunking
This best practice is shown in Figure 2 below.

Installation Guide: EO Hub and EO Genius V1.1 03/10/2019 Page 4 of 25
Figure 2 - Wago connectors linking up the serial bus
Although very short cable runs can be achieved using CAT5E cable, for reliable operation the
following RS485 products are recommended. Note that by using a 600V rated serial cable this allows
the installer to run serial bus cable together in the same containment as the conductors
• Belbin 9841 – LSZH 600V – Link
• Belbin 9841 – SWA LSZH – Link
2.1 Fitting termination resistors to the RS485 Serial Bus To ensure reliable communication on RS485 serial cable runs of greater than 25m, a 120 ohm 0.25W
terminating resistor should be applied at each end of the bus. The following link provides guidance
on selection of a termination resistor:
https://maximintegratedsupport.force.com/support/s/article/RS-485-Termination-Resistor-Power-
Rating
2.2 Earthing of the Serial Bus With to the current mounting mechanism of the serial cable in the genius station, this is the
recommended best practice for the earthing of the serial bus:
• Connect the shield of the serial cable to Pin 1 on the RJ45 connector at the hub (refer to
section 3.2)
• Connect all of the shields of the serial cables together at each breakout box
• DO NOT connect the shield of the cable to the earth of the charging station
2.3 Connecting the Serial cable to the RJ45 connector on the hub The serial connector on the hub is an RJ45 socket i.e. a standard Ethernet socket. The thickness of
the recommended serial cable is too thick to be connected into an RJ45 connector. To overcome
this, use the following steps:
• Take a standard Ethernet cable
• Cut a short length with the RJ45/Ethernet plug on one end.

Installation Guide: EO Hub and EO Genius V1.1 03/10/2019 Page 5 of 25
• Strip and expose the bare wires for pins 4&5 for Comms A&B and pin 1 for earth
• Connect the serial cable to the bare wires using a 3 way level connector
A typical finished connection is shown below in Figure 3
Figure 3 - Connecting the serial cable to the RJ45 socket on the hub
Installation Guide: EO Hub and EO Genius V1.1 03/10/2019 Page 6 of 25
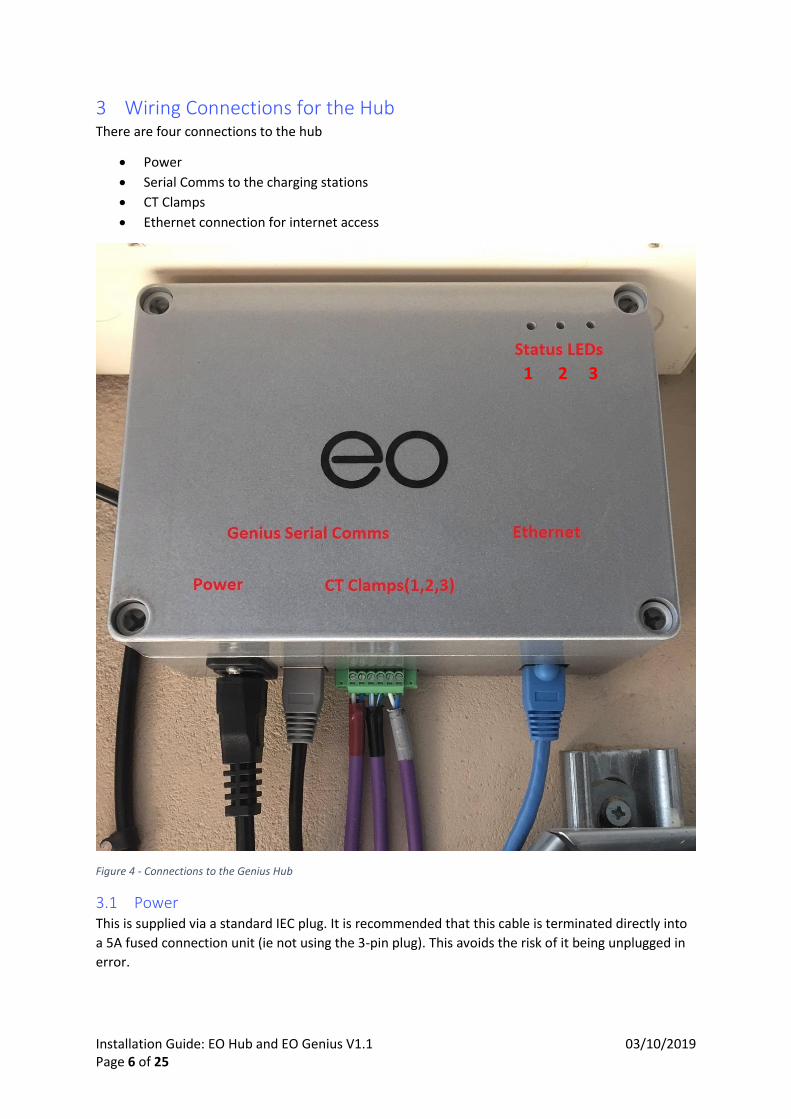
3 Wiring Connections for the Hub There are four connections to the hub
• Power
• Serial Comms to the charging stations
• CT Clamps
• Ethernet connection for internet access
Figure 4 - Connections to the Genius Hub
3.1 Power This is supplied via a standard IEC plug. It is recommended that this cable is terminated directly into
a 5A fused connection unit (ie not using the 3-pin plug). This avoids the risk of it being unplugged in
error.
1 2 3

Installation Guide: EO Hub and EO Genius V1.1 03/10/2019 Page 7 of 25
Regulations state charging equipment must have a dedicated final radial circuit, so EO Hub must not
be powered on the same radial as the charging stations. Where a dedicated EV distribution board is
fitted, we recommend a single phase supply is taken from this this same board.
3.2 EO Genius RS485 serial Comms The EO Genius charging station needs to connect to the EO Hub via an serial bus. Charging stations
are daisy chained together with the final connection to the EO Hub. The serial bus connects to the
hub via an RJ45 connection. The wiring of the EO Hub RJ45 connector for serial comms is as follows:
• Pin 1 – Earth
• Pin 2 – Unused but connected to GND
• Pin 3 – Unused but connected to GND
• Pin 4 – Comms A – Blue with white stripe
• Pin 5 – Comms B – White with blue stripe
• Pin 6 – Unused but connected to GND
• Pin 7 – Unused but connected to GND
• Pin 8 – Unused but connected to GND
3.3 CT Clamps If automatic load management is going to be used at the installation then CT clamps need to be
installed and connected to the EO Hub. Connections to the EO Hub is as follows
• Pin 1 – L1 – White
• Pin 2 – L1 – Black
• Pin 3 – L2 – White
• Pin 4 – L2 – Black
• Pin 5 – L3 – White
• Pin 6 – L3 – Black
Pin 1 is the left hand pin of the connector shown in Figure 4.
3.4 Ethernet connection & Network Security Settings For the EO Hub to communicate to the eoCloud back office Portal, an internet enabled ethernet
connection needs to be provided using an RJ45 connector.
As standard, the EO Hub IP address and DNS server address are assigned via DHCP. Once assigned, it
is best if the IP address is reserved in the DHCP table. For sites where a fixed IP address is required
please contact EO Support for advice.
For most non-domestic installations, the following firewall settings must be applied to allow the EO
Hub to connect to EO servers.
Installation Guide: EO Hub and EO Genius V1.1 03/10/2019 Page 8 of 25
Please share these details with the appropriate site IT manager to ensure setting are correctly
applied ready for completion of your installation!!!
• TCP ports 4455-4456 must to be open allow the outgoing connection
• TCP and UDP port 53 must be open for DNS and is critical
For sophisticated firewall systems, the following addresses must all be reachable
• hubsvr1.eocharging.uk Secondary eoCloud server
• hubsvr2.eocharging.uk Primary eoCloud server
• hubsvr4.eocharging.uk Test eoCloud server
• hubsvr5.eocharging.uk eoCloud server
• hubsvr6.eocharging.uk eoCloud server
• postie.ccsys.uk Email exchange server
• 8.8.8.8 Primary DNS
• 8.8.4.4 Secondary DNS
Once the settings have been configured, it’s possible to test the whether the ports are open by
navigating to:
http://porttest.eocharging.com:4455
http://porttest.eocharging.com:4456
3.4.1 GPRS Modems Rather than using a wired internet connection, it is possible to connect the EO Hub to a wireless 4G
modem. Eo can supply these pre configured but if a third party modem is used then consider the
following points to ensure that a connection is trouble free:
• Update the APN settings for the mobile network
• Turn off any VPN settings
3.5 Boot Up On power up, the EO Hub performs a boot up sequence which can take around 90sec to complete.
When a successful boot up sequence has completed, then the left hand LED and the middle LED are
solid green.
These LEDs can also provide diagnostic information for the support team.
3.6 LEDs There are three status LEDs on the EO Hub as shown in Figure 4. LED1 is on the far left, LED2 is in the
middle and LED3 is on the far right. These LEDs are either illuminated green or off. The LEDs indicate
different stages of operation with the principle stages being “Start Up” and “Normal Operation”
3.6.1 Start Up Stage LED1 LED2 LED3 Repeats Description
1
6 times Start Up
2 Solid Error state – contact EO
3 2 Flashes Connecting to primary server
4
2 Flashes Connecting to Secondary server if primary failed

Installation Guide: EO Hub and EO Genius V1.1 03/10/2019 Page 9 of 25
5
6 times Failure to Connect – Check Internet connections
6
6 times Start Up successful
7
5 times Fatal Error – Contact EO
After a successful start up, then the EO Hub shall enter into Normal Operation.
3.6.2 Normal Operation Stage LED1 LED2 LED3 Repeats Description
1
6 times Secondary Start Up
2 Solid Internet Connection Test
3 Solid Configuring Hub – this can take up to 60sec
4
LED1&2= Solid LED3 = Blinks rapidly
The EO Hub is communicating with the EO Genius charging stations. This is the normal operational state.
5 LED1,2,3 =
Solid The EO Hub is connected to the EO Cloud but no charging stations have been allocated to the EO Hub

Installation Guide: EO Hub and EO Genius V1.1 03/10/2019 Page 10 of 25
4 Web setup for the EO Hub The EO Hub can be configured using a web interface. This powerful interface will allow the installer
to:
1) Configure the hub to communicate to the eoCloud or a 3rd party OCPP server
2) Configure specific IP settings
3) Set up charging stations
4) Perform diagnostic checks on the charging stations
4.1 High level steps for configuring an EO Hub The following sequence is expected to be followed in order to set up the hub
1) Before visiting the site
a. Set up the host in the eoPortal
b. Assign the hub to the host
c. Assign the charging stations to the hub
2) On site
a. Join the wifi hotspot set up by the hub
b. Log in to the hub as an administrator
c. Change the default security settings and wifi hotspot ssid
d. Login again using the new credentials
e. Set up the hub mode – eoCloud or OCPP
f. Configure any specific IP settings
g. Check that the charging stations are listed in the hub’s inventory
h. Perform diagnostic tests:
i. Check the Internet connection to eoCloud or OCPP server
ii. Check the CT clamps are working OK
iii. Check that the hub can communicate with all of the connected EO Genius
charging stations
The details are listed below in the following sections
4.2 Actions before visiting the site Before visiting the premise it is important to set up in the eoCloud the host and allocate the chargers
to the host. This is so that the hub can be updated with the communication details of the charging
stations that are assigned to it. Then, when the hub is connected to the eoCloud, then it can start to
communicate with the attached EO Genius stations.
The installer is responsible for the following actions:
1) Set up the host
2) Assign a hub from the installer’s stock to the host
3) Assign genius charging stations from the host’s stock to the hub

Installation Guide: EO Hub and EO Genius V1.1 03/10/2019 Page 11 of 25
4) If the hub is going to be set up without an internet connection then the installer will need to
export the list of charging stations from the host
Figure 5 - Exporting charger list
5) Save the exported list of chargers into a local text file
6) Create a host Admin
7) Set up hosted drivers if applicable
All of these actions are described in the eoPortal User Guide - EO Portal User Guide
4.3 Join the wifi hotspot set up by the hub When the installer is on site, it is possible to log onto the wifi Hot spot. The default hotspot details
are:
• SSID – eoHUB-####
• Password – please contact [email protected] for the password for the specific hub.
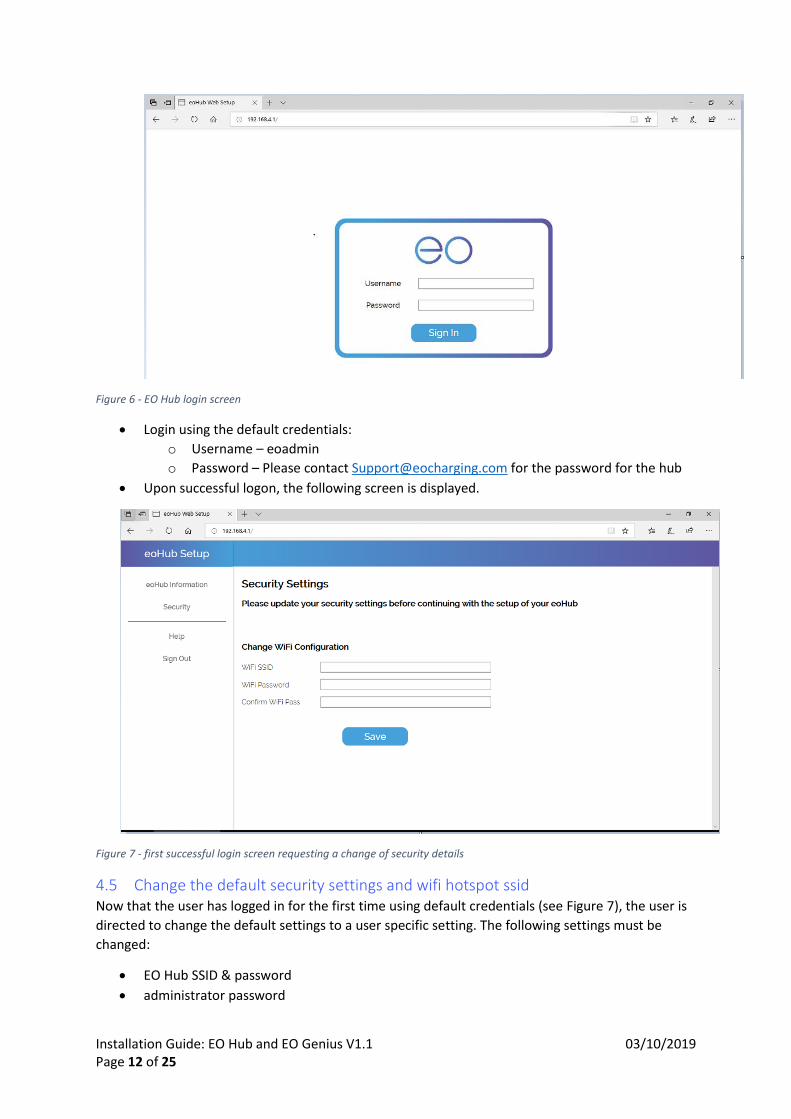
4.4 Log in to the hub as an administrator Now that the EO Hub’s hotspot has been joined, then it is now possible to login into the the EO Hub
as an administrator
• Load a web browser e.g. Edge or Chrome
• Go to http://192.168.4.1 to display the login screen
Installation Guide: EO Hub and EO Genius V1.1 03/10/2019 Page 12 of 25
Figure 6 - EO Hub login screen
• Login using the default credentials:
o Username – eoadmin
o Password – Please contact [email protected] for the password for the hub
• Upon successful logon, the following screen is displayed.
Figure 7 - first successful login screen requesting a change of security details
4.5 Change the default security settings and wifi hotspot ssid Now that the user has logged in for the first time using default credentials (see Figure 7), the user is
directed to change the default settings to a user specific setting. The following settings must be
changed:
• EO Hub SSID & password
• administrator password

Installation Guide: EO Hub and EO Genius V1.1 03/10/2019 Page 13 of 25
Figure 8 - Changing the default SSID to a user specific choice
Figure 9 - changing the eoadmin password to a user specific password
At this point the user will be informed that the hub must be rebooted in order for the changes to
occur
NOTE – please note down the new SSID, the SSID password and the administrator password. These
will be needed to log in into the hub. These should be passed to the site Administrator for safe
keeping!!

Installation Guide: EO Hub and EO Genius V1.1 03/10/2019 Page 14 of 25
Figure 10 - a hub reboot is required
A HUB REBOOT MUST BE PERFORMED AT THIS POINT
It may take up to 60sec for the hub to reboot
Figure 11 - Hub rebooting which can take 60sec
4.6 Login again using the new credentials When the hub has been rebooted then the user must rejoin the hub using the new non default
credentials.
The user must
i) Login into the hub using the new wifi hotspot SSID
ii) Login using the new password for eoadmin
When the user has successfully joined the new SSID and logged in as the administrator, the full suite
of configuration options will be available to the administrator

Installation Guide: EO Hub and EO Genius V1.1 03/10/2019 Page 15 of 25
Figure 12 - new options once security credentials have been updated
When the administrator logs in then there are two items worth highlighting that are circled in Figure
12:
1) The new hub configuration options on the left hand side
2) A warning that the hub is currently not connected to the internet. This will not be shown if
the hub is indeed connected to the internet.
The first option available is to change the security settings which is the same as section 4.5. The
subsequent options are then described in the sections below.
4.7 Set up the hub mode – eoCloud or OCPP If the system is to be setup to communicate to the eoCloud then the eoCloud option should be
enabled.

Installation Guide: EO Hub and EO Genius V1.1 03/10/2019 Page 16 of 25
Figure 13 - setting eoCloud operation
4.8 Configure any specific IP settings Sometimes, hosts want to specify specific IP settings for the EO Hub e.g. a static IP address. It is now
possible to modify these settings. Firstly select the “Enable Custom Settings” switch as shown in
Figure 13.
This will enable the following options to be made available
Figure 14 - Custom IP settings
The administrator will now be able to set the custom IP settings. Click save in order to save the
settings.

Installation Guide: EO Hub and EO Genius V1.1 03/10/2019 Page 17 of 25
4.9 Check that the charging stations are listed in the hub’s inventory Now that the IP settings have been set up the next task is to set up the charging stations. If the hub
is being set up without an internet connection, then it is possible to tell the EO Hub which charging
stations it is supposed to be communicating with.
If the hub has access to the eoCloud then the cloud will automatically send down the list of charging
stations to the EO Hub. However this depends on the installer having set up the host in the eoCloud
prior to the installation – see section 4.2
4.9.1 Online If the host has been set up in the eoCloud AND the EO Hub has internet access then the EO Hub will
automatically be populated with the correct list of charging stations. The “Manage Offline Chargers”
will be empty and the list of chargers will be displayed in the “Diagnostics” screen.
There is nothing else at this point for the installer to do.
4.9.2 Offline If the EO Hub does not have internet connection then it is still possible to add charging stations to
the EO Hub manually.
When the “Manage Offline Chargers” page is selected then the following is shown as per Figure 15.
Figure 15 - Adding offline chargers without internet connection
At this point the installer needs to add the address of the EO Genius charging stations to the EO Hub
in order to enable the hub to communicate with a charging station:

Installation Guide: EO Hub and EO Genius V1.1 03/10/2019 Page 18 of 25
This information needs to be extracted from the eoPortal by the Installer following the
instructions in 4.2 i.e. clicking on the “Export Charger List” button from the portal
Figure 16 - exporting charger list
At this point, the installer can simply add the exported list all at once OR add the station addresses
one by one.
If the installer has exported the list of addresses and serial numbers from the portal and saved them
in a text file, then this information can simply be copied and pasted into the “Add New Charger” field
in the “Manage Offline Charger” page of the EO Hub
Figure 17 - Adding charging stations to the EO Hub in offline mode
When the Add button has been clicked then the list of chargers should be displayed

Installation Guide: EO Hub and EO Genius V1.1 03/10/2019 Page 19 of 25
Figure 18 - manually added charging stations
Alternatively the installer can simply manually add the station addresses to the Offline Charger list
one by one and simply click Add.
At this point, the only task remaining is to perform the diagnostic tests
4.10 Perform diagnostic tests There are three types of Diagnostic tests available:
• Check the Connection to the internet
• Check the CT Clamps
• Check that the EO Hub can communicate to the EO Genius stations
The diagnostic tests are shown below in Figure 19.

Installation Guide: EO Hub and EO Genius V1.1 03/10/2019 Page 20 of 25
Figure 19 - Diagnostic Tests
The Network test checks the connection to the eoCloud or OCPP server
Figure 20 - Successful Network Test
The CT Test checks that the CTs are connected correctly and displays the instantaneous current
consumption
Figure 21 - Successful CT Test
The Serial Diagnostics Test checks that the EO Genius charging stations are connected correctly. It is
possible to determine the comms latency between the charging stations.

Installation Guide: EO Hub and EO Genius V1.1 03/10/2019 Page 21 of 25
Figure 22 - Successful charging station comms test
4.11 Finalise Installation When the tests have passed it is now possible to run a final system test. Click on the Finish page and
then run the system test.
Figure 23 - Successful System Test
At this point the last action is to reboot the hub as this will apply all the settings to the hub.

Installation Guide: EO Hub and EO Genius V1.1 03/10/2019 Page 22 of 25
5 Configuring the EO Hub to communicate to a 3rd party OCPP back
office server If the EO Hub is to be set up to communicate to a 3rd party OCPP back office server then the
following steps must be made:
1) Set up a host in eoCloud
2) Assign the hub to the host
3) Assign the charging stations to the hub
4) Power up the hub and check that the charging station list is downloaded to the hub by
checking the status in the portal
5) Load up the EO Hub web set up
6) Switch the EO Hub into OCPP mode on the Global Settings
Figure 24 - setting the hub up to OCPP mode

Installation Guide: EO Hub and EO Genius V1.1 03/10/2019 Page 23 of 25
7) Update the OCPP connection setting in the OCPP Settings Page
Figure 25 - setting the OCPP configuration settings
Alternatively, it is possible to configure the EO Hub directly into OCPP mode, but the installer will
need to know the addresses of the EO Genius charging stations so that these can be manually added
to the offline charger list. This list of addresses can be provided by EO.

Installation Guide: EO Hub and EO Genius V1.1 03/10/2019 Page 24 of 25
6 Further Technical Support All EO Charging technical documentation is published in the EO Resource Centre, this is found at:
https://www.eocharging.com/service-support/
The EO Support team can be reached at:
• Email: [email protected]
• Phone: +44 (0) 333 77 20383

Installation Guide: EO Hub and EO Genius V1.1 03/10/2019 Page 25 of 25
7 Revision History Version Date Changes
1.0 21st Nov 2018 First Draft
1.1 3rd Oct 2019 Updated the password details for the hubs and also the list of required servers