Embed Size (px)
Citation preview

Installation Guide

Before Lock Installation���������������������������������������������������������������������������������������������������������������������������������������������������������������������������������������� 3
Surface Mount Installation Fordoorthicknessmeasuringbetween.01"-.91"(0.2mm-23mm)���������������������������������������������������������������������������������������������������� 4 RequiredComponents�������������������������������������������������������������������������������������������������������������������������������������������������������������������������� 4 Installation��������������������������������������������������������������������������������������������������������������������������������������������������������������������������������������������� 5
Door Preparation StrikePlateInstallation RequiredComponents�������������������������������������������������������������������������������������������������������������������������������������������������������������������������� 7 Installation��������������������������������������������������������������������������������������������������������������������������������������������������������������������������������������������� 8
DoorMountingHolesDrillInstructionsandTemplate DrillInstructions������������������������������������������������������������������������������������������������������������������������������������������������������������������������������������ 9 TemplateforStandard&VerticalBody�������������������������������������������������������������������������������������������������������������������������������������������� 10
MetalDoorPreparation CompatibilityGuide���������������������������������������������������������������������������������������������������������������������������������������������������������������������������� 11 Removalof3-holeLockPlug������������������������������������������������������������������������������������������������������������������������������������������������������������ 12 RemovalofPadlockHasp������������������������������������������������������������������������������������������������������������������������������������������������������������������ 13

3
Before Lock Installation
The door must be prepared for lock installation.
StrikePlate
AngledStrikePlate SecurityStrikePlate DoubleDoorStrikePlate
DoorMountingHoles The door must have door mounting holes.
A strike plate must be installed. 1.
2.

4
Surface Mount InstallationFor door thickness measuring between .01" - .91" (0.2 mm - 23 mm)
1-FrontUnit
StandardKeypadStandardBody
StandardKeypadVerticalBody
TouchRFIDVerticalBody
TouchRFIDStandardBody
Deadbolt Deadlatch
1-RearUnit
2-SplitLockWashers
Required Components
*Not included
1*-PhillipsHeadScrewdriver(#2)2-PhillipsHeadScrews
D
C
B
A
Screw Size Length Door Thickness
Min Max
A 1" (25.400 mm) .01" (.2 mm) .16" (4 mm)
B 1 1/4" (31.750 mm) .16" (4 mm) .43" (11 mm)
C 1 1/2" (38.100 mm) .43" (11 mm) .67" (17 mm)
D 1 3/4" (44.450 mm) .67" (17 mm) .91" (23 mm)

5
REAR VIEW FRONT VIEW
1
REAR VIEW FRONT VIEW
2
With�the�rear�unit�behind�the�door,�extend�the�cable�through�the�door’s�mounting�hole�
InstallationFor illustration, a keypad front unit with a bolt rear unit is used.
REAR VIEW FRONT VIEW
3
Attach�the�cable�to�the�front�unit��A�triple�beep�indicates�successful�connection�
Hold�the�front�and�rear�units�against�the�door�and�secure�with�the�mounting�screws�

6
For keypad locks with deadbolt rear units:Press = ` to extend the bolt.Press = ` to again to retract the bolt.
For touch RFID locks with deadbolt rear units:Touch ` to extend the bolt.Touch ` again to retract the bolt.
For keypad locks with deadlatch rear units:Press = ` to retract the latch.The latch will extend automatically.
For touch RFID locks with deadlatch rear units:Touch ` to retract the latch.The latch will extend automatically.
Repeat test with the door closed.If ten rapid beeps are heard, the strike plate or door alignment may need adjustment to allow the lock to operate properly.If the door is not locked when the bolt/latch is extended, the strike plate or lock position may need adjustment.
REAR VIEW FRONT VIEW
4
Test the lock while the door is open to ensure that the bolt/latch is operating properly.
7
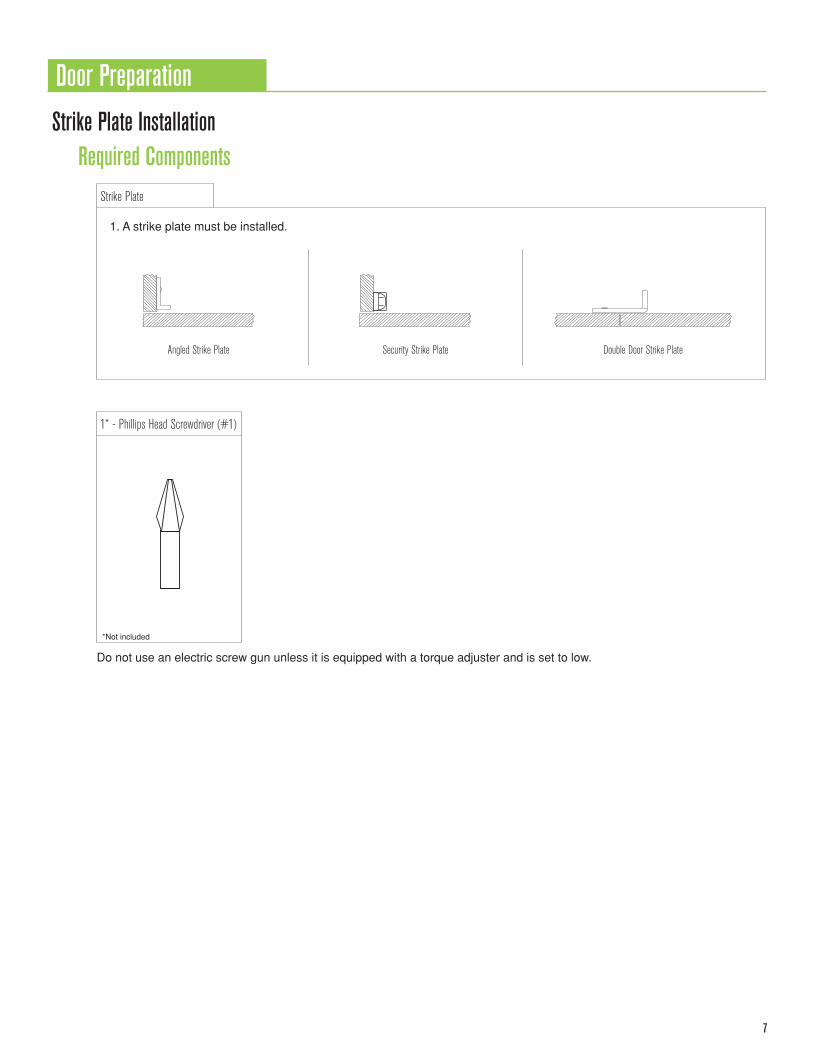
Door Preparation
Strike Plate InstallationRequired Components
Do not use an electric screw gun unless it is equipped with a torque adjuster and is set to low.
1*-PhillipsHeadScrewdriver(#1)
StrikePlate
1. A strike plate must be installed.
AngledStrikePlate SecurityStrikePlate DoubleDoorStrikePlate
*Not included

8
Installation
Position the strike plate on the door frame centering it with the center of the desired location of the door mounting holes.
Drill 0.25" (6.35 mm) pilot holes using a 1/6" drill bit.
Adjust the strike plate to the proper position (.32" (8 mm) from the door edge) then tighten the self tapping screws.
Allow .32" (8 mm) from door edge and mark the position of the adjustment slot holes.
Position the strike plate and the self tapping screws into the adjustment slot holes. Do not tighten the screws.
Position and tighten the remaining self tapping screw into the center hole.
Doo
r Fra
me
1
Doo
r Fra
me
Drill PilotHoles Here
3
Doo
r Fra
me
0.32 in
(8 mm)
Mark Here
2
Doo
r Fra
me
0.32 in
(8 mm)
5
Doo
r Fra
me
4
Doo
r Fra
me
6
9
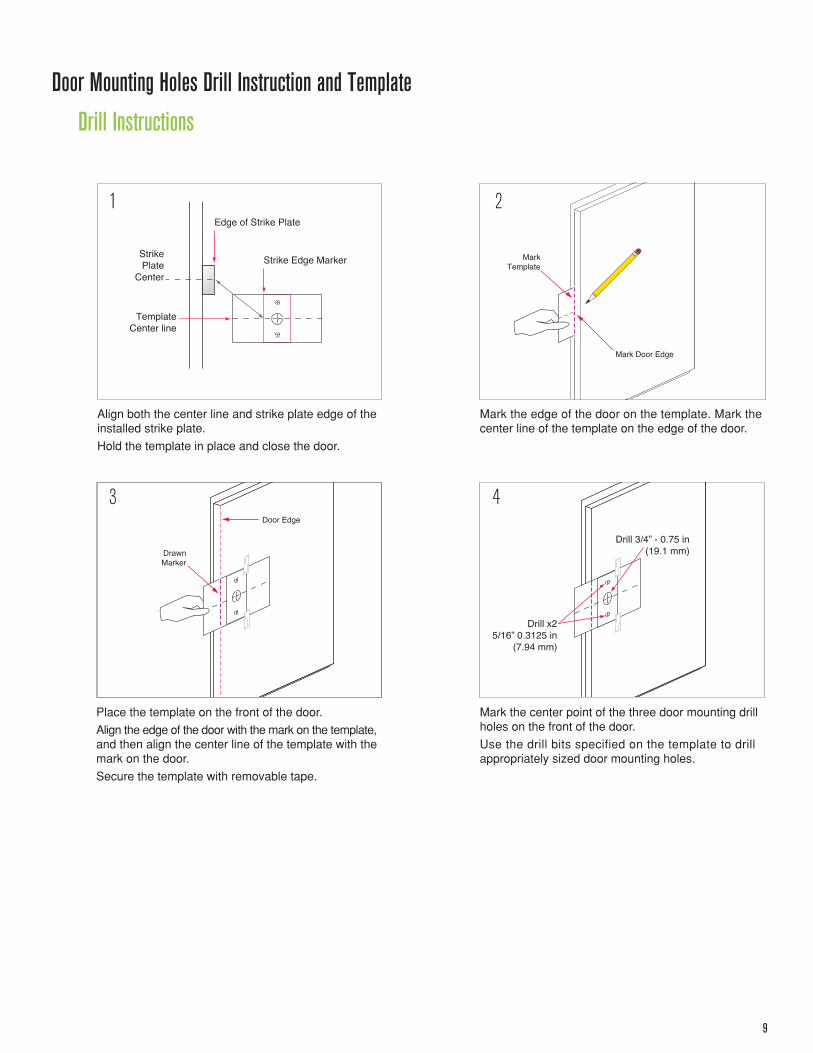
Door Mounting Holes Drill Instruction and Template
Drill Instructions
Place the template on the front of the door.
Align the edge of the door with the mark on the template, and then align the center line of the template with the mark on the door.
Secure the template with removable tape.
TemplateCenter line
StrikePlate
Center
Edge of Strike Plate
Strike Edge Marker
MarkTemplate
Mark Door Edge
Door Edge
DrawnMarker
Drill x25/16” 0.3125 in
(7.94 mm)
Drill 3/4” - 0.75 in(19.1 mm)
Mark the center point of the three door mounting drill holes on the front of the door.
Use the drill bits specified on the template to drill appropriately sized door mounting holes.
TemplateCenter line
StrikePlate
Center
Edge of Strike Plate
Strike Edge Marker
MarkTemplate
Mark Door Edge
Door Edge
DrawnMarker
Drill x25/16” 0.3125 in
(7.94 mm)
Drill 3/4” - 0.75 in(19.1 mm)
Align both the center line and strike plate edge of the installed strike plate.
Hold the template in place and close the door.
TemplateCenter line
StrikePlate
Center
Edge of Strike Plate
Strike Edge Marker
MarkTemplate
Mark Door Edge
Door Edge
DrawnMarker
Drill x25/16” 0.3125 in
(7.94 mm)
Drill 3/4” - 0.75 in(19.1 mm)
Mark the edge of the door on the template. Mark the center line of the template on the edge of the door.
TemplateCenter line
StrikePlate
Center
Edge of Strike Plate
Strike Edge Marker
MarkTemplate
Mark Door Edge
Door Edge
DrawnMarker
Drill x25/16” 0.3125 in
(7.94 mm)
Drill 3/4” - 0.75 in(19.1 mm)
1
3
2
4

10
Template for Door Mounting Holes
Templates may not print to scale. Check all measurements before proceeding.
!! Before printing, turn off auto scaling in printer setup and print at 100%. !!
All measurements in thousandths of an inch and millimeters
.3007.62 (mm)
use 5/16" bit
.90523 (mm)
.90523 (mm).300
7.62 (mm)
.75019.05 (mm) use 3/4" bit
001.1)
mm( 9.72
001.1)
mm( 9.72
001.
1)
mm(
9.72
001.
1)
mm(
9.72
ALIGN EDGE OFSTRIKE PLATE HERE
FOR LEFTCLOSING DOOR
ALIGN EDGE OFSTRIKE PLATE HEREFOR RIGHTCLOSING DOOR
ALIGN EDGE OFSTRIKE PLATE HERE
FOR LEFTCLOSING DOOR
ALIGN EDGE OFSTRIKE PLATE HEREFOR RIGHTCLOSING DOOR
CENTER LINE
CENTER LINE

11
Metal Door Preparation
Compatibility GuideDigilock is compatible with a majority of 3-hole configuration, latch, and handle door types. Some doors may require modification to clear obstructions.
SinglePointLatch
Handle
StandardLift
BoxLockerPadlockHasp

12
Exam
ple1
Removal of 3-hole Lock Plug
Remove any obstructions to the door mounting holes.
RearViewofLockerDoor
withLockPlug
FrontViewofLockerDoor
withLockPlug

13
The padlock hasp must be removed
Removal of Padlock HaspEx
ample
Open the door then cut the padlock hasp on the marked cut-line.
Smooth out rough or sharp edges.
Close the door and make sure that nothing is protruding above the surface of the door.
1*-MetalFile1*-HandheldGrinderorHackSaw
IG-NL-A-DEN072716
707 766 6000 | [email protected] | www.digilock.com
Close the door and mark the area to cut the padlock hasp.
*Not included


![FLAT TRACK SLIDING BARN DOOR HARDWARE Face Mount ... Door hardware... · 4 Prep Door for Hangers & Floor Guide Drill Holes in door for hanger bolt by using a 19/32” bit. 19/32 [15.1]](https://img.pdfslide.us/doc/110x75/5ee4235aad6a402d666d7977/flat-track-sliding-barn-door-hardware-face-mount-door-hardware-4-prep-door.jpg)