Embed Size (px)
Citation preview
1
www.marcometa ls .com
Installation Catalog
P
REM
IUM ROOFING. LEGENDARY SERVICE.
2
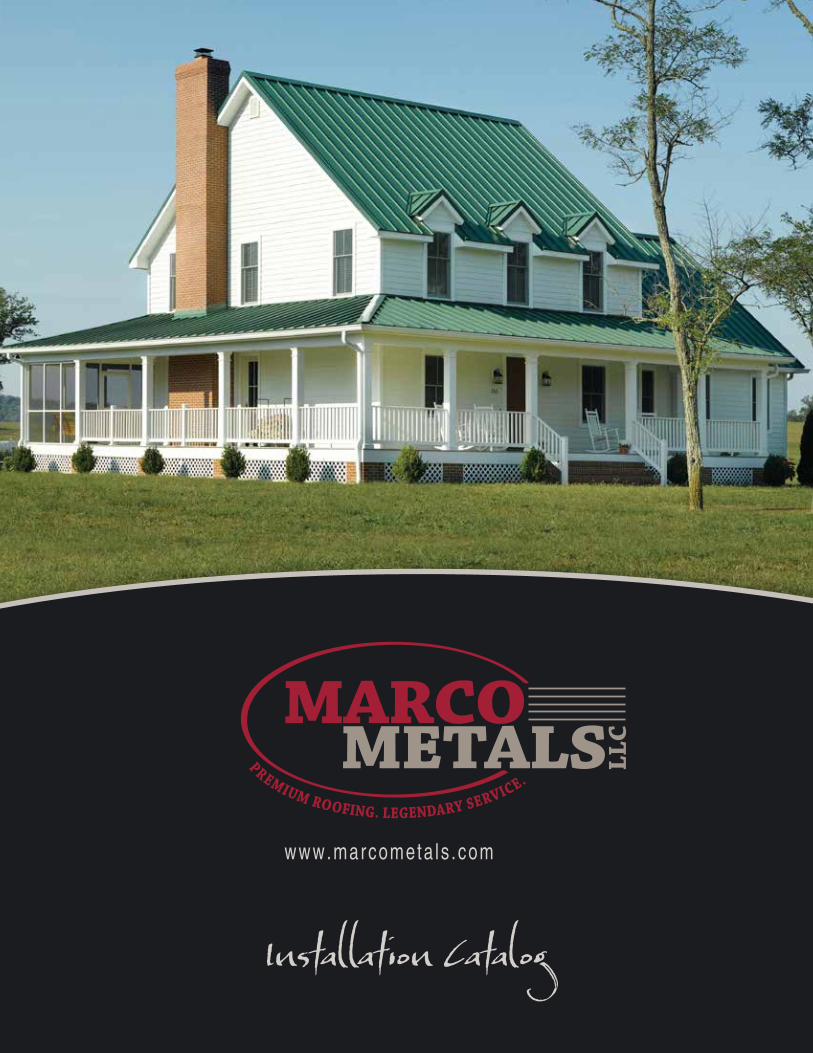
Marco Metals, LLC is a family-owned and operated company with its origin
in the small town of Chuckey, Tennessee. We’ve offered quality metal roofing, siding, and post-frame
building products to contractors and the general public since 1994.
Five years later, the home based retail business had grown to be a significant producer of metal roofing,
vertical siding and accessories for many satisfied customers. Due to our ability to serve the public with
quality and service, we became a major manufacturer in northeast Tennessee and surrounding markets.
In 2003, the company opened an outlet in Stuarts Draft, Virginia to provide prompt, courteous
service to the Shenandoah Valley region and surrounding areas. In 2012, the decision was made to
sell the Tennessee division and refocus toward other markets. A manufacturing plant was opened in
Harrisonburg, Virginia to better serve Virginia and reach new markets in Maryland and West Virginia
under the name of Marco Metals, LLC.
Solid family ties and, more importantly, a solid Biblical foundation have proven to be an effective
launching pad for this expansion.
We confidently credit the success of our business to the company’s
Biblical motto:
“Therefore all things whatsoever ye would that men should do to you, do ye
even so to them: for this is the law and the prophets.” Matt. 7:12 KJV
We at Marco Metals, are committed to providing our customers with
the highest quality product and service in the industry. Our mission
statement is: “To offer quality metal roofing and post-frame products
at competitive prices, while demonstrating the Biblical standard of
graciously serving our fellowman.”
Our reputation is built on Biblical principles that call for us to be fair and equitable in the treatment of all
our customers. Whether your business is large or small, we will treat you with the same courtesy and respect
that we like to receive. Give us a try and see the difference these principles make in your next purchase.
MARCO METALS, LLC“Premium roofing. Legendary service.”
Proud member of the:
P
REM
IUM ROOFING. LEGENDARY SERVICE.
Quality • Service • Custom Trims • Accessories • Quality • Service • Custom Trims • Accessories • Quality • Service • Custom Trims • Accessories
3
The Marco Metals Tuff-Rib® Roofing Panel
Marco Metals Tuff-rib® panels are a strong, durable,
economical, and attractive answer to the growing demand for
metal roofing needs in the Eastern United States. Extremely
versatile, they are suitable for homes and businesses as well
as agricultural and utility buildings. Tuff-rib® panels give
36-inch coverage with ¾ inch ribs on 9 inch centers. An
anti-siphoning channel provides protection from severe
weather conditions. Both panels and trim are fabricated
using state-of-the-art computerized equipment at our
facility in Harrisonburg, Virginia to assure uniformity and
consistency. Panels are roll-formed to the lengths specified
by customers in either Acrylic-coated Galvalume® or any of
our twenty one colors of painted Galvalume® in 29-gauge
and 26-gauge high-tensile metal. We also offer Kynar®
painted 26 gauge Tuff-rib panels in several colors. Your
Marco Metals dealer will be happy to assist you in making
the best choice for your particular roofing needs.
Marco Metals Tuff-rib® panels are fabricated from AZ-
50 (painted) or AZ-55 (Acrylic-coated) Galvalume ® grade
80 coil stock. The Acrylic finish is not only durable and
cost effective, but also offers valuable reflectivity as well.
The paint system used on painted products offers optimum
exterior protection and superior resistance to corrosion and
ultraviolet radiation while reflecting significant amounts of
heat away from the building. Acrylic coated Galvalume®
carries a 20-year limited finish warranty, while most
painted metal carries a 40-year warranty.
Marco Metals stocks a complete line of fasteners,
sealants, sliding door parts, and other accessories to meet
the needs of the metal roofing contractor. A complete line
of in-stock flashings and trims are available in all colors.
We will also fabricate whatever custom trims you may need
to complete your project.
Material Handling
Be careful when handling metal panels and trim. Edges
are sharp and proper safety equipment should be worn to
prevent injury. Forklifts can damage the underside and
edges of panels so extreme caution is necessary when
using such equipment. Do not drag panels off the stack
to remove; either lift or “roll” the panels off. Panels should
be carried vertically by the panel edge. Panels over 20’ long
may require extra help to handle. Long panels can also be
lifted with a forklift if lift straps are used to “roll” the panel
or a spreader bar is used.
Material Storage
Paint and finishes of Marco Metals panels and trim
are designed to withstand severe rain and wet weather
conditions. Neither paint, galvanized, nor Galvalume®
finishes, however, are designed to be in continuous contact
with water for long periods of time. Irreparable damage will
result if uninstalled panels or trim are allowed to remain wet
in storage. Be sure to store material that will not be installed
immediately in a dry location. Wet material should be air-
dried and re-stacked if installation is not planned right
away. DO NOT cover metal panels with plastic or tarps
without leaving adequate ventilation (at least 12 inches)
under the cover and metal stack. Neglecting this will result
in significant collection of moisture between panels and
void the paint warranty.
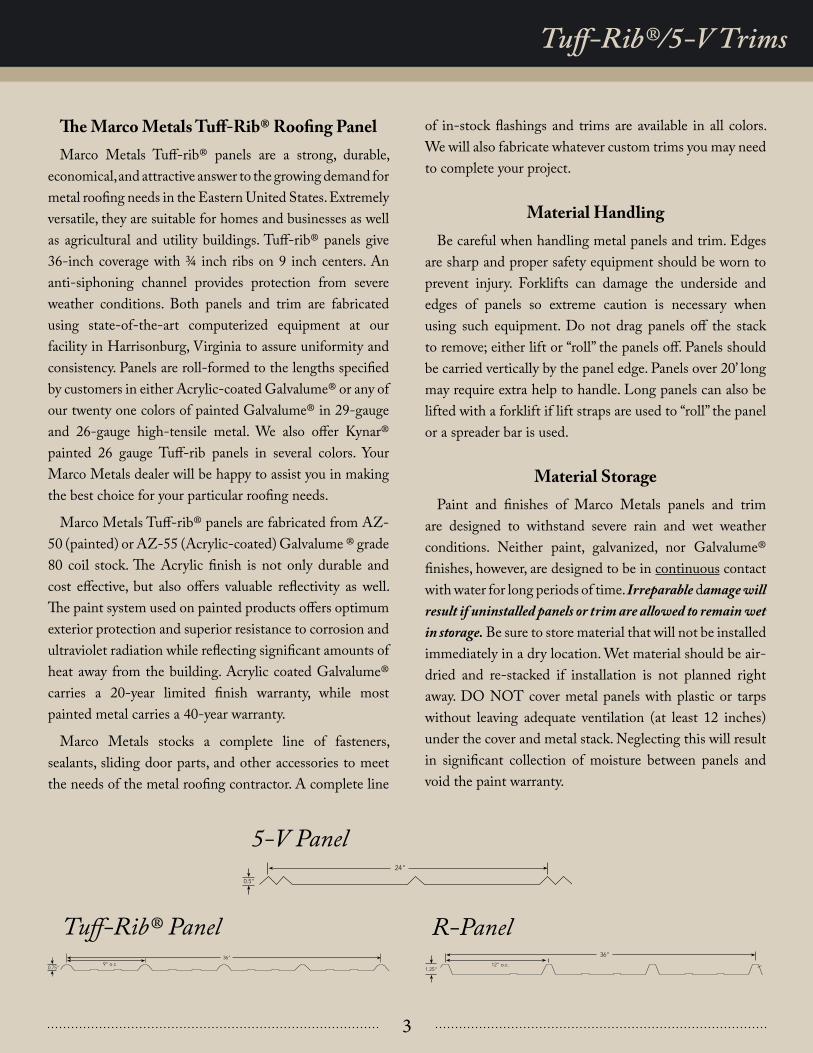
5-V Panel
0.5"
24"
Tuff-Rib® Panel0.75"
36"
9" o.c.
Tuff-Rib® Panel R-Panel
1.25"12" o.c.
36"
Tuff-Rib®/5-V Trims
4
Trimming and Cutting Steel Panels
The best device for cutting steel panels across the profile is
a good-quality offset hand snips, a nibbler or a power shear.
Use of circular or reciprocating saws to cut metal panels
is not recommended and will void the paint warranty. If
you do use a saw, cut with the bottom side up to prevent
hot shavings from contacting the painted side. Be sure
other panels are protected from hot shavings.
To cut panels lengthwise: Note Carefully where the panel
is to be cut, and using a straight-edge, score deeply down
the length of the panel with a sharp-pointed utility knife.
Folding the panel along the score mark, and bending back
again if necessary, should produce a clean break in the
panel. Snips or shears may also be used.
Cutting holes in the metal panel is done by drilling a starter
hole big enough to accommodate the cutting tool to be used.
Pre-drilling metal panels before installation is a common
practice, but doing so while in the stack can result in burrs
that leave scratches in the painted surface of the panel
below. Should such scratches be exposed and rust they are
not covered by the paint warranty.
Metal filings from cutting or the installation of screws, if
left on the panel, can cause rust spots to form. Care should
be taken to brush all such particles from the roof surface
after installation to maintain paint integrity.
CAUTION! - Clean all metal shavings and particles off the roof to avoid unsightly rust stains.
INSTALLATION OF PANELS
Roof Pitch
Marco Metals roofing panels require adequate pitch to
ensure proper water drainage. Stitch screws and butyl tape are
optional for side laps when the pitch is 4/12 or greater. Stitch
screws and butyl tape are recommended on side laps when
the pitch is less than 4/12. As a general principle, the lower
the pitch the more necessary that screws and tape be used on
the side-laps. Consult your dealer for recommendations for
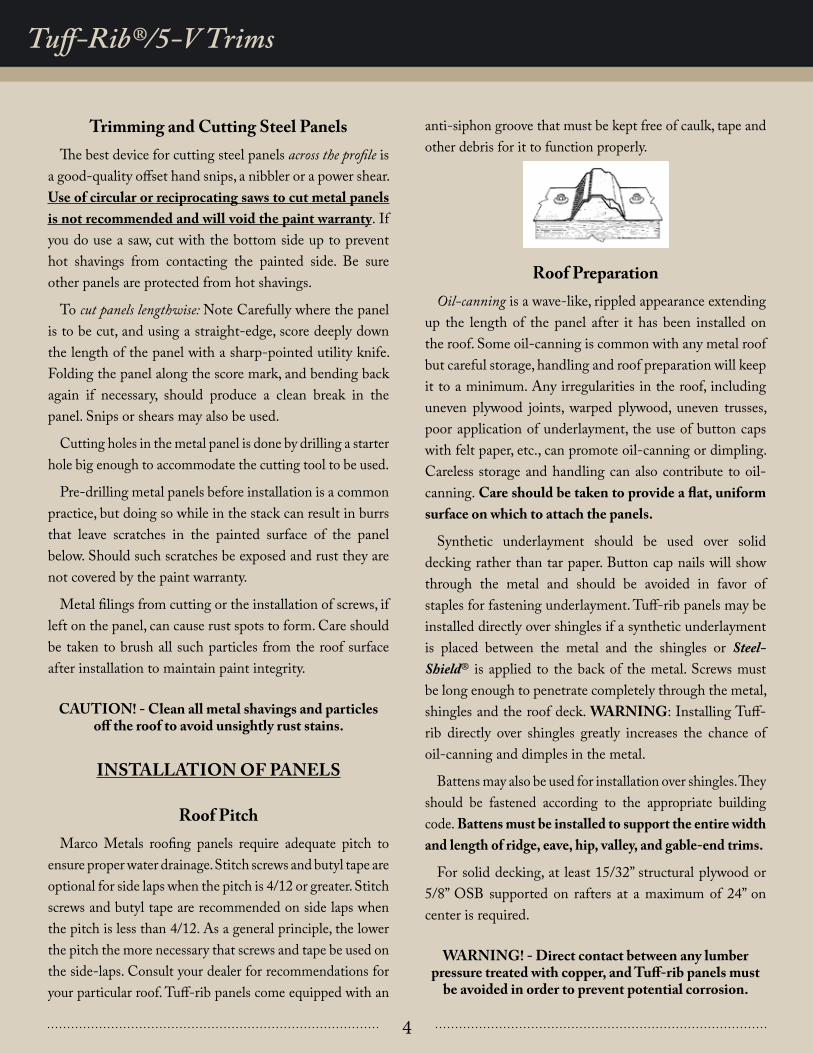
your particular roof. Tuff-rib panels come equipped with an
anti-siphon groove that must be kept free of caulk, tape and
other debris for it to function properly.
Roof Preparation
Oil-canning is a wave-like, rippled appearance extending
up the length of the panel after it has been installed on
the roof. Some oil-canning is common with any metal roof
but careful storage, handling and roof preparation will keep
it to a minimum. Any irregularities in the roof, including
uneven plywood joints, warped plywood, uneven trusses,
poor application of underlayment, the use of button caps
with felt paper, etc., can promote oil-canning or dimpling.
Careless storage and handling can also contribute to oil-
canning. Care should be taken to provide a flat, uniform
surface on which to attach the panels.
Synthetic underlayment should be used over solid
decking rather than tar paper. Button cap nails will show
through the metal and should be avoided in favor of
staples for fastening underlayment. Tuff-rib panels may be
installed directly over shingles if a synthetic underlayment
is placed between the metal and the shingles or Steel-
Shield® is applied to the back of the metal. Screws must
be long enough to penetrate completely through the metal,
shingles and the roof deck. WARNING: Installing Tuff-
rib directly over shingles greatly increases the chance of
oil-canning and dimples in the metal.
Battens may also be used for installation over shingles. They
should be fastened according to the appropriate building
code. Battens must be installed to support the entire width
and length of ridge, eave, hip, valley, and gable-end trims.
For solid decking, at least 15/32” structural plywood or
5/8” OSB supported on rafters at a maximum of 24” on
center is required.
WARNING! - Direct contact between any lumber pressure treated with copper, and Tuff-rib panels must
be avoided in order to prevent potential corrosion.
Tuff-Rib®/5-V Trims
5
Roof Application
Panel installation should begin at the gable end of the
roof opposite the prevailing rain-bearing wind (this will
provide added assurance against wind-driven rain being
forced under the laps). Measure one panel width in from
the roof edge. At this point chalk a line from ridge to eave.
Place the leading edge of the first panel along this line.
It is extremely important that this panel be laid square to
the eave and ridge so that the remaining panels will line
up square on the roof frame. It is wise to have a person at
the eave and at the ridge to ensure that the proper panel
coverage is being maintained across the roof. Also be sure
that the panels are properly side-lapped.
In applications where end-lapping is necessary, the upper
panel should lap over the lower panel by a minimum of 6
inches. Lower pitches require a greater amount of panel
overlap. All end-lap applications should use two horizontal
rows of butyl tape across the panel and proper fastening to
provide a maximum water seal.
An overhang of 1.5 inches on the eave is recommended
to provide a drip edge. The open panel ribs at the eave can
be sealed with inside closures.
Ventilation
Metal panels exposed to air will experience condensation
of moisture under certain conditions. To avoid this,
installation of plastic coated insulation or some other
product to keep moist air from contacting the panel is
helpful. Drip Stop® works well to absorb condensation and
prevent dripping. As with any other type of roof, adequate
ventilation through the attic cavity below is essential for
proper function and long service life.
Fastening
Specially-washered 1 ½” screws applied through the flat
of the Tuff-rib panel are the recommended method for
attaching roofing panels. Marco Metals carries wood screws
in 5 different lengths: 1”, 1 ½”, 2”, 2 ½”, and 3”(3” is a special
order). Self-tapping screws are available for fastening to
steel substrates. 1 ½” screws are the best all-purpose size
but make sure that the screw shank will penetrate at least 1”
into the substrate. 2 ½” screws are necessary for attaching
ridge caps and endwall/transition flashing.
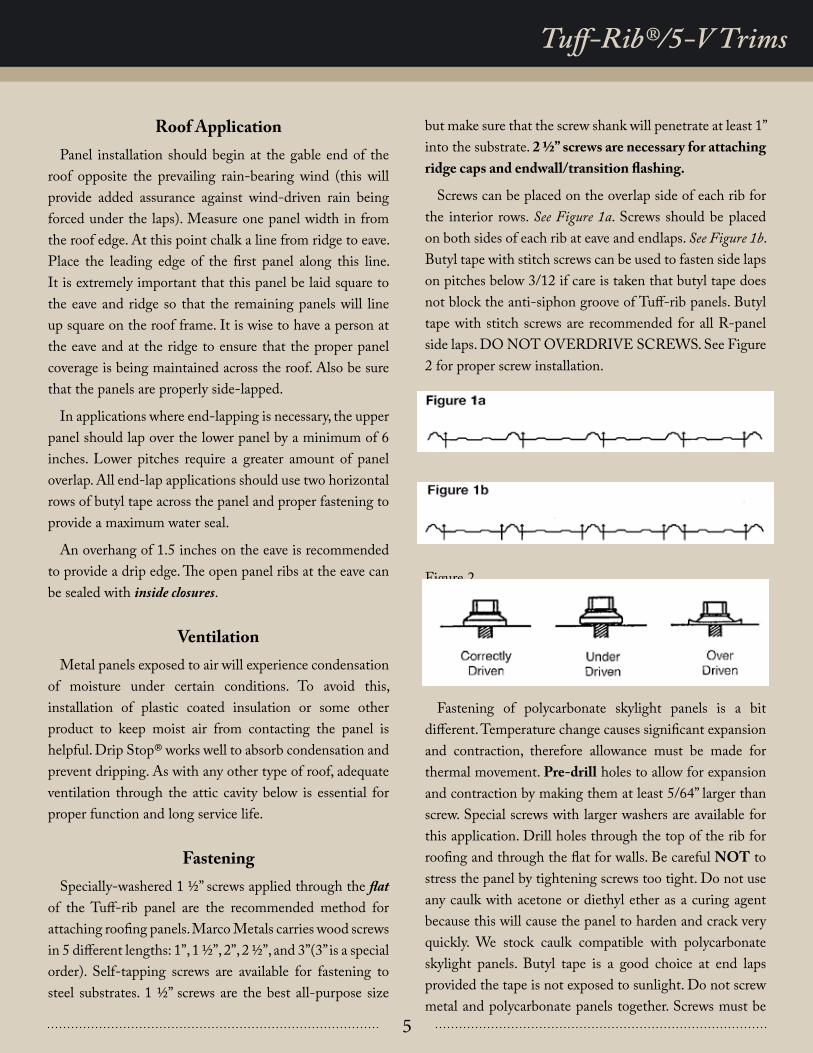
Screws can be placed on the overlap side of each rib for
the interior rows. See Figure 1a. Screws should be placed
on both sides of each rib at eave and endlaps. See Figure 1b.
Butyl tape with stitch screws can be used to fasten side laps
on pitches below 3/12 if care is taken that butyl tape does
not block the anti-siphon groove of Tuff-rib panels. Butyl
tape with stitch screws are recommended for all R-panel
side laps. DO NOT OVERDRIVE SCREWS. See Figure
2 for proper screw installation.
Figure 2
Fastening of polycarbonate skylight panels is a bit
different. Temperature change causes significant expansion
and contraction, therefore allowance must be made for
thermal movement. Pre-drill holes to allow for expansion
and contraction by making them at least 5/64” larger than
screw. Special screws with larger washers are available for
this application. Drill holes through the top of the rib for
roofing and through the flat for walls. Be careful NOT to
stress the panel by tightening screws too tight. Do not use
any caulk with acetone or diethyl ether as a curing agent
because this will cause the panel to harden and crack very
quickly. We stock caulk compatible with polycarbonate
skylight panels. Butyl tape is a good choice at end laps
provided the tape is not exposed to sunlight. Do not screw
metal and polycarbonate panels together. Screws must be
Tuff-Rib®/5-V Trims
6
placed above and below, or beside overlaps because the
metal and plastic do not expand and contract at the same
rate and need opportunity to move past each other.
Ordering Roof Panels and Screws
Care should be taken to order panels of the correct
length (We will cut to the inch) to minimize cutting after
purchase. Panel lengths should fall 1-2 inches past the eave
to allow a sufficient drip edge. When a roof transition is
involved, panels of the upper portion should be ordered
short to allow proper placement of the transition flashing
(see diagram on pg. ?).
Two ways to figure the amount of screws needed for 2’ on-
center spacing is to multiply the total linear feet of panel by
2.4 or the figure 70 screws per 100 square feet of roof covered.
Example: your order is 1250’ of Tuff-rib roofing to be
installed on purlins placed 2’ on-center.
1250 x 2.4 = 3000 screws 3000 ÷ 250 = 12 bags
Example: Your order is for a roof of 4162 square feet with
rows of screws spaced 2’ on center.
4162 ÷ 100 = 41.62 square. 41.62 x 70 = 2913 screws
2913 ÷ 250 = 11.66 or 12 bags
Please confirm all estimates with your Marco Metals
dealer when you place your order.
Ordering and Applying Trim
The most common flashing for metal roofing is the ridge
cap, which is used at the peak of a roof. Drip edge is used
at the eave and is often applied above fascia trim. When
roof pitch exceeds 5/12 the slope of the roof should be
mentioned when ordering ridge cap, endwall, and drip edge.
At the gable edge, the use of rake & gable or outside
corner trim adds to the appearance of the structure and
protects the fly-rafter. Sidewall flashing is used where the
side of the panel butts up against an adjacent wall. For both
gable and sidewall trim the installer should be careful to
seal between the flashing and the roof panel with butyl tape
before fastening. Endwall flashing is used where the top
of a roof slope meets a vertical wall. Transition flashing
is used where two different roof pitches meet along the
length of the roof. Both slopes should be mentioned when
ordering transition flashing, upper pitch first (ie. lower roof
at 4/12 and upper at 10/12 would be ordered “10/12 to
4/12 transition). Valley flashing is used at the intersection
of two perpendicular roof planes and should be sealed
between the flashing and the roof panel with a row of butyl
tape and expanding foam closure.
To prevent penetration of water, insects, and debris,
outside closures should be inserted between the ridge cap
or endwall/transition and the top end of the panel. Inside
closures are used for the same reason over drip edge or the
top of transition flashing. For endwall, transition and ridge,
screws are applied through the trim, closure, and rib in at
least every other rib of the panels. 2 ½ inch screws should
be used for attaching ridge caps. Various types of vented
ridge closures are available if needed.
Marco Metals Policies
Warrantied Products: A 40-year paint warranty applies
to most material (excluding liner panel) manufactured
from painted coil stock, and a 20-year “no rust” warranty
on Acrylic coated material. Copies of these warranties can
be provided on request. Ask for details.
Indemnity: All prices and designs are subject to change
without notice.
Disclaimer: While we have made every attempt
at accuracy in this manual, we are not responsible for
typographic, printing, or technical errors.
Oil Canning: A repeating, wave-like appearance in the
length of a panel is a common, and often unavoidable,
phenomenon in metal panels that have large, flat areas
within the panel. It is therefore not a defect, nor a cause for
rejection. See pg. 3 for details on how to avoid oil-canning.
Return Policy: All panel orders, and stock and special-
order trim are considered the property of the customer
and non-refundable once they are manufactured. Standard
accessories (not trims) are refundable providing they are
returned in a clean, resalable condition. Restocking charges
will apply to any items at the discretion of Marco Metals.
Tuff-Rib®/5-V Trims
7
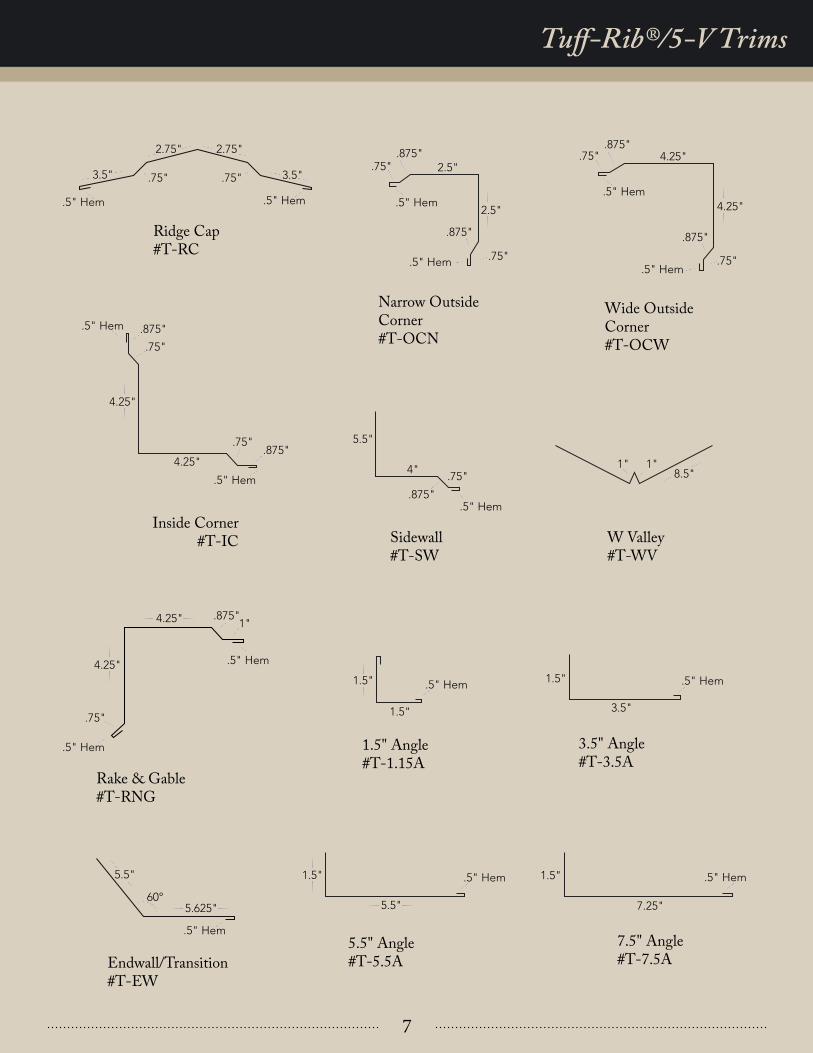
Ridge Cap#T-RC
Narrow Outside Corner#T-OCN
Wide Outside Corner#T-OCW
Rake & Gable#T-RNG
W Valley#T-WV
Sidewall#T-SW
1.5" Angle#T-1.15A
3.5" Angle#T-3.5A
5.5" Angle#T-5.5A
7.5" Angle#T-7.5AEndwall/Transition
#T-EW
Inside Corner#T-IC
.5" Hem1.5"
1.5"
.5" Hem1.5"
3.5"
.5" Hem1.5"
5.5"
.5" Hem1.5"
7.25"
5.5"
.5" Hem
60°5.625"
.5" Hem
.75".875"
4.25"
4.25"
.75"
.875"
.5" Hem
.5" Hem
.5" Hem4.25"
4.25"
.75"
.875"1"
.5" Hem
.75".875"
2.5"
2.5"
.5" Hem.75"
.875"
5.5"
.875".5" Hem
4".75".5" Hem
.5" Hem
4.25"
4.25".875"
.75"
.75"
.875"
8.5"1" 1"
.5" Hem
3.5" .75"
2.75"
.75"
2.75"
3.5"
.5" Hem
Tuff-Rib®/5-V TrimsTuff-Rib®/5-V Trims
8
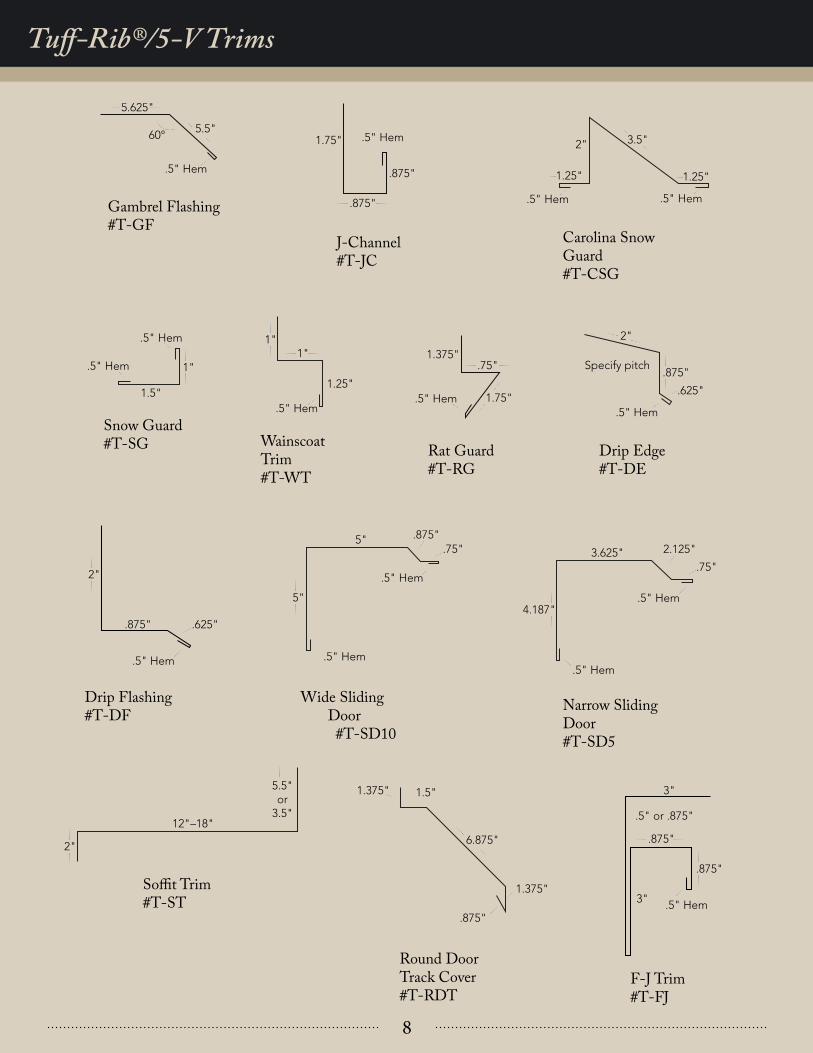
J-Channel#T-JC
Snow Guard#T-SG Wainscoat
Trim#T-WT
Drip Edge#T-DE
Drip Flashing#T-DF
Narrow Sliding Door#T-SD5
Rat Guard#T-RG
Wide Sliding Door #T-SD10
Carolina Snow Guard#T-CSG
Gambrel Flashing#T-GF
.5" Hem .5" Hem
1.25"
3.5"
1.25"
2"
4.187"
3.625"
.5" Hem
.75"
.5" Hem
2.125"
2"
.625"
.875"
.5" Hem
Specify pitch
.625"
.5" Hem
2"
.875"
.5" Hem
5.625"
60°5.5"
.875"
1.75"
.875"
.5" Hem
5"
5"
.5" Hem
.75"
.5" Hem
.875"
.75"1.375"
1.75".5" Hem
1"1"
1.25"
.5" Hem
.5" Hem
.5" Hem
1.5"
1"
Round Door Track Cover#T-RDT
Soffit Trim#T-ST
F-J Trim#T-FJ
5.5"or
3.5"12"–18"
2"
.875"
3"
.5" Hem
.5" or .875"
3"
.875"
1.375" 1.5"
6.875"
1.375"
.875"
Tuff-Rib®/5-V Trims
9
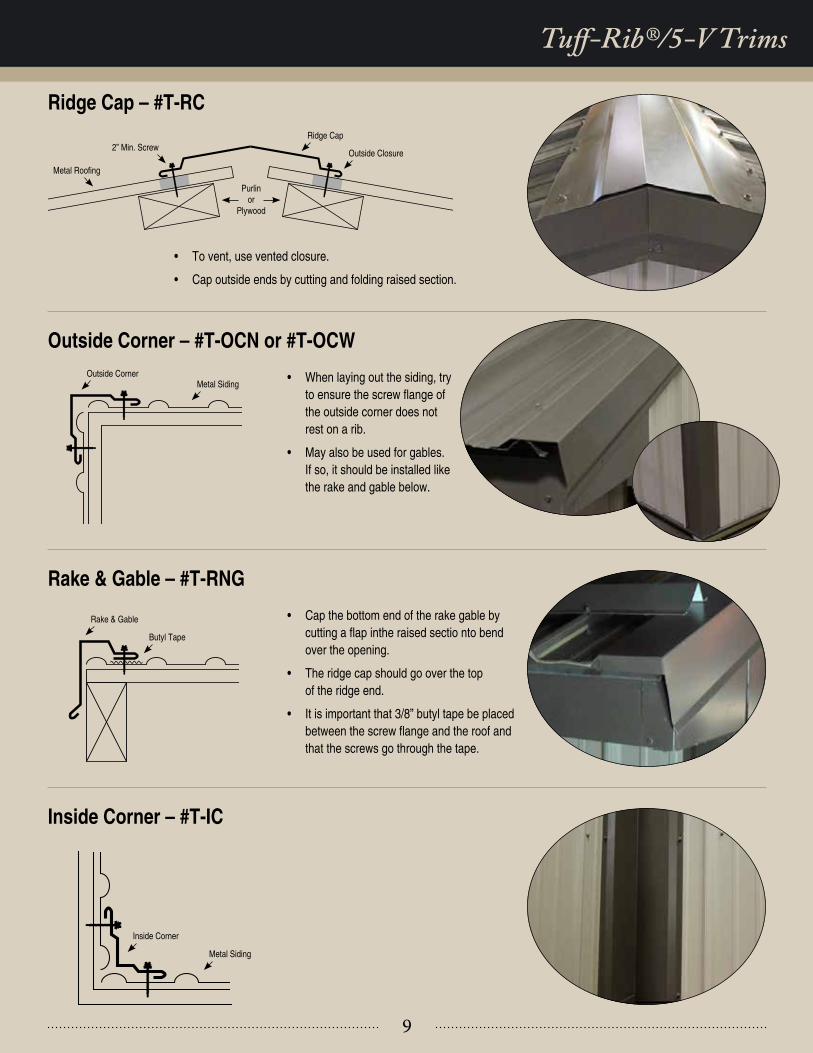
• To vent, use vented closure.
• Cap outside ends by cutting and folding raised section.
Metal Roofing
Outside Corner
Rake & Gable
Inside Corner
Metal Siding
Butyl Tape
Metal Siding
2” Min. Screw
Ridge Cap
Purlin
or
Plywood
Outside Closure
Ridge Cap – #T-RC
Outside Corner – #T-OCN or #T-OCW
Inside Corner – #T-IC
Rake & Gable – #T-RNG
• When laying out the siding, try
to ensure the screw flange of the outside corner does not
rest on a rib.
• May also be used for gables.
If so, it should be installed like
the rake and gable below.
• Cap the bottom end of the rake gable by
cutting a flap inthe raised sectio nto bend over the opening.
• The ridge cap should go over the top
of the ridge end.
• It is important that 3/8” butyl tape be placed
between the screw flange and the roof and that the screws go through the tape.
Tuff-Rib®/5-V Trims
10
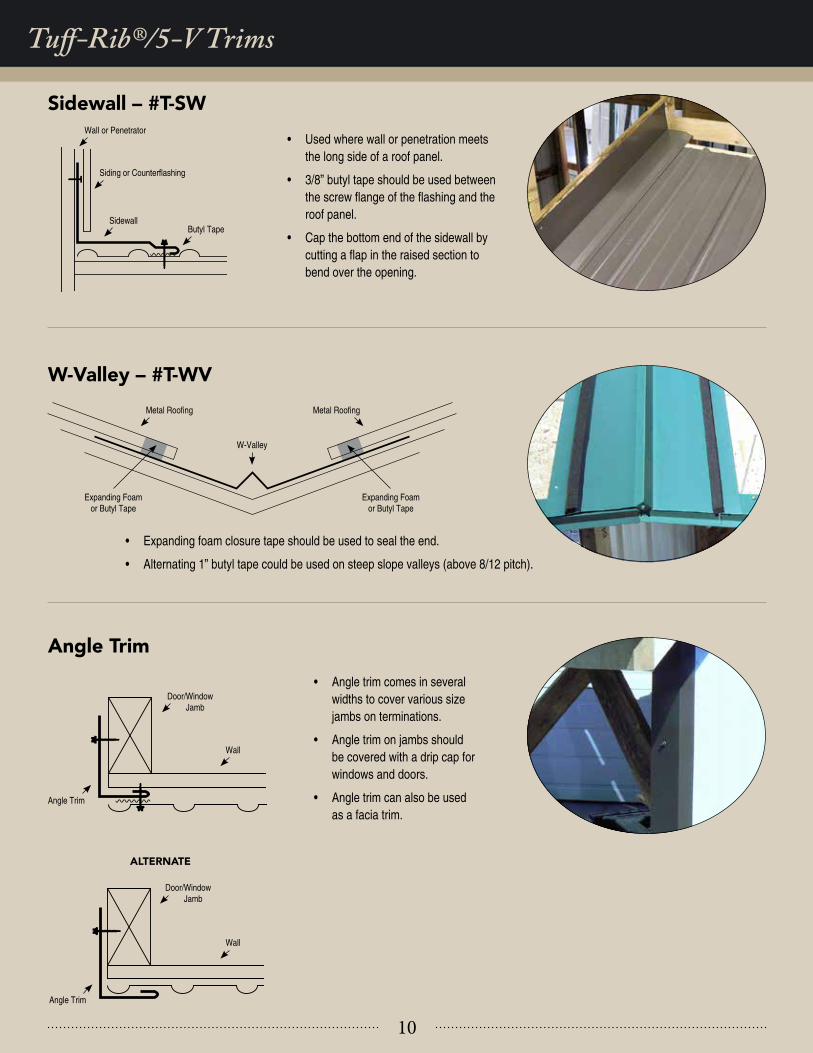
Sidewall – #T-SW
W-Valley – #T-WV
Angle Trim
ALTERNATE
• Used where wall or penetration meets
the long side of a roof panel.
• 3/8” butyl tape should be used between
the screw flange of the flashing and the roof panel.
• Cap the bottom end of the sidewall by
cutting a flap in the raised section to bend over the opening.
• Expanding foam closure tape should be used to seal the end.
• Alternating 1” butyl tape could be used on steep slope valleys (above 8/12 pitch).
• Angle trim comes in several
widths to cover various size
jambs on terminations.
• Angle trim on jambs should
be covered with a drip cap for
windows and doors.
• Angle trim can also be used
as a facia trim.
Wall or Penetrator
Door/Window
Jamb
Wall
Angle Trim
Angle Trim
Wall
Door/Window
Jamb
Siding or Counterflashing
Sidewall
Expanding Foam
or Butyl Tape
Expanding Foam
or Butyl Tape
W-Valley
Butyl Tape
Metal Roofing Metal Roofing
Tuff-Rib®/5-V Trims
11
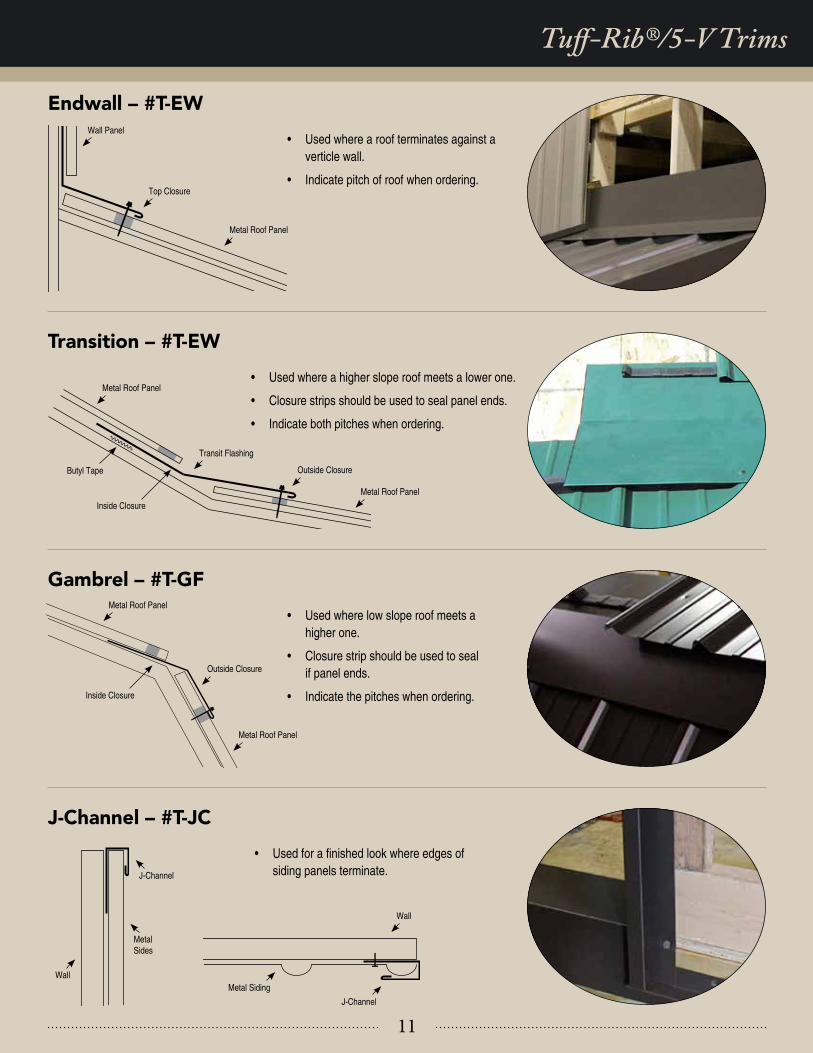
Endwall – #T-EW
Gambrel – #T-GF
J-Channel – #T-JC
Transition – #T-EW
• Used where a roof terminates against a
verticle wall.
• Indicate pitch of roof when ordering.
• Used where low slope roof meets a
higher one.
• Closure strip should be used to seal
if panel ends.
• Indicate the pitches when ordering.
• Used for a finished look where edges of siding panels terminate.
• Used where a higher slope roof meets a lower one.
• Closure strips should be used to seal panel ends.
• Indicate both pitches when ordering.
Wall
J-Channel
Metal Siding
J-Channel
Metal
Sides
Wall Panel
Top Closure
Metal Roof Panel
Metal Roof Panel
Metal Roof Panel
Outside Closure
Transit Flashing
Inside Closure
Butyl Tape
Inside Closure
Metal Roof Panel
Wall
Metal Roof Panel
Outside Closure
Tuff-Rib®/5-V Trims
12
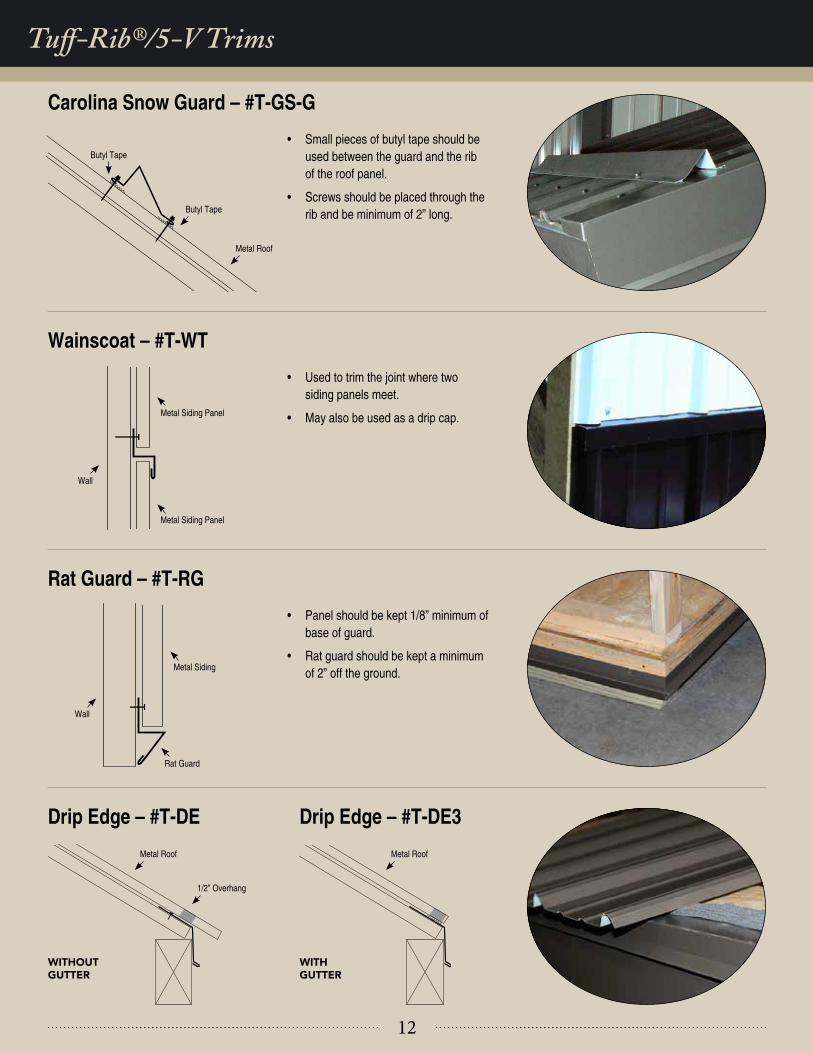
Carolina Snow Guard – #T-GS-G
Wainscoat – #T-WT
Rat Guard – #T-RG
Drip Edge – #T-DE Drip Edge – #T-DE3
• Small pieces of butyl tape should be
used between the guard and the rib
of the roof panel.
• Screws should be placed through the
rib and be minimum of 2” long.
• Used to trim the joint where two
siding panels meet.
• May also be used as a drip cap.
• Panel should be kept 1/8” minimum of
base of guard.
• Rat guard should be kept a minimum
of 2” off the ground.
Butyl Tape
Butyl Tape
Metal Roof
Wall
Wall
Metal Siding Panel
Metal Siding Panel
Rat Guard
Metal Siding
WITHOUTGUTTER
WITHGUTTER
Metal Roof
1/2” Overhang
Metal Roof
Tuff-Rib®/5-V Trims
13
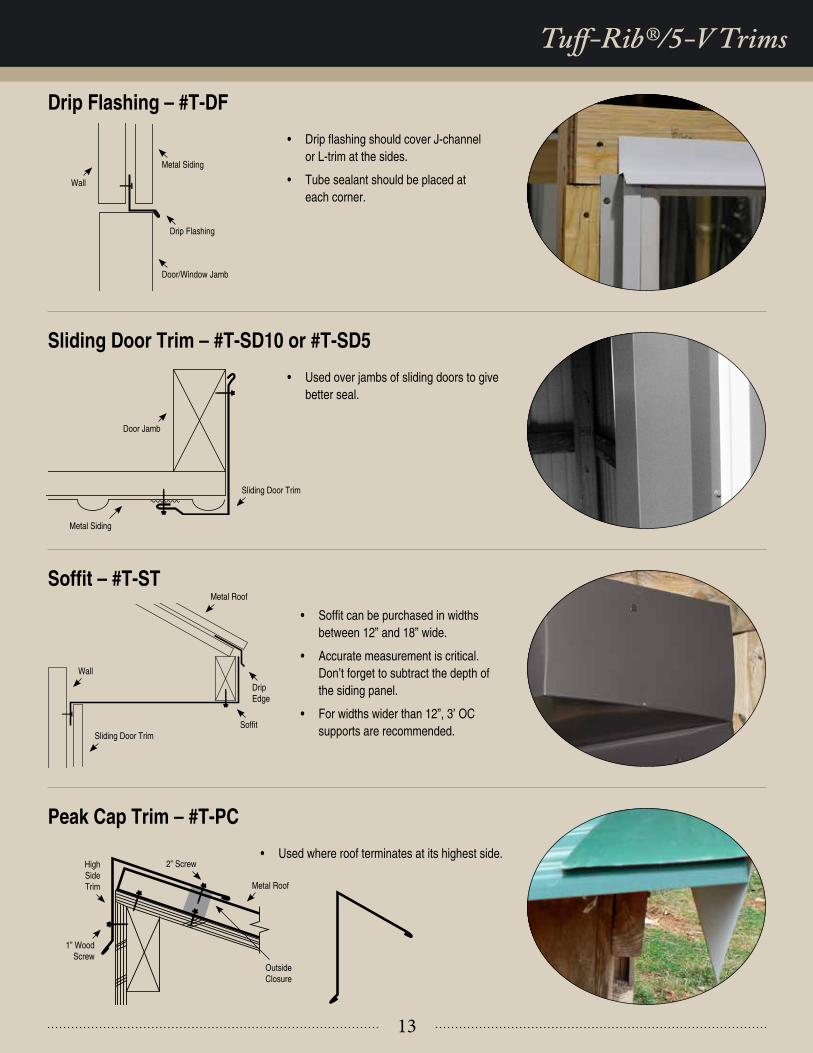
Sliding Door Trim – #T-SD10 or #T-SD5
Soffit – #T-ST
Drip Flashing – #T-DF
• Used over jambs of sliding doors to give
better seal.
• Soffit can be purchased in widths between 12” and 18” wide.
• Accurate measurement is critical.
Don’t forget to subtract the depth of
the siding panel.
• For widths wider than 12”, 3’ OC
supports are recommended.
• Drip flashing should cover J-channel or L-trim at the sides.
• Tube sealant should be placed at
each corner.
Sliding Door Trim
Sliding Door Trim
Wall
Metal Roof
Metal Roof
Wall
Door Jamb
1” Wood
Screw
Metal Siding
Metal Siding
Drip Flashing
Door/Window Jamb
Peak Cap Trim – #T-PC
• Used where roof terminates at its highest side.
Soffit
Drip
Edge
Outside
Closure
High
Side
Trim
2” Screw
Tuff-Rib®/5-V Trims
14
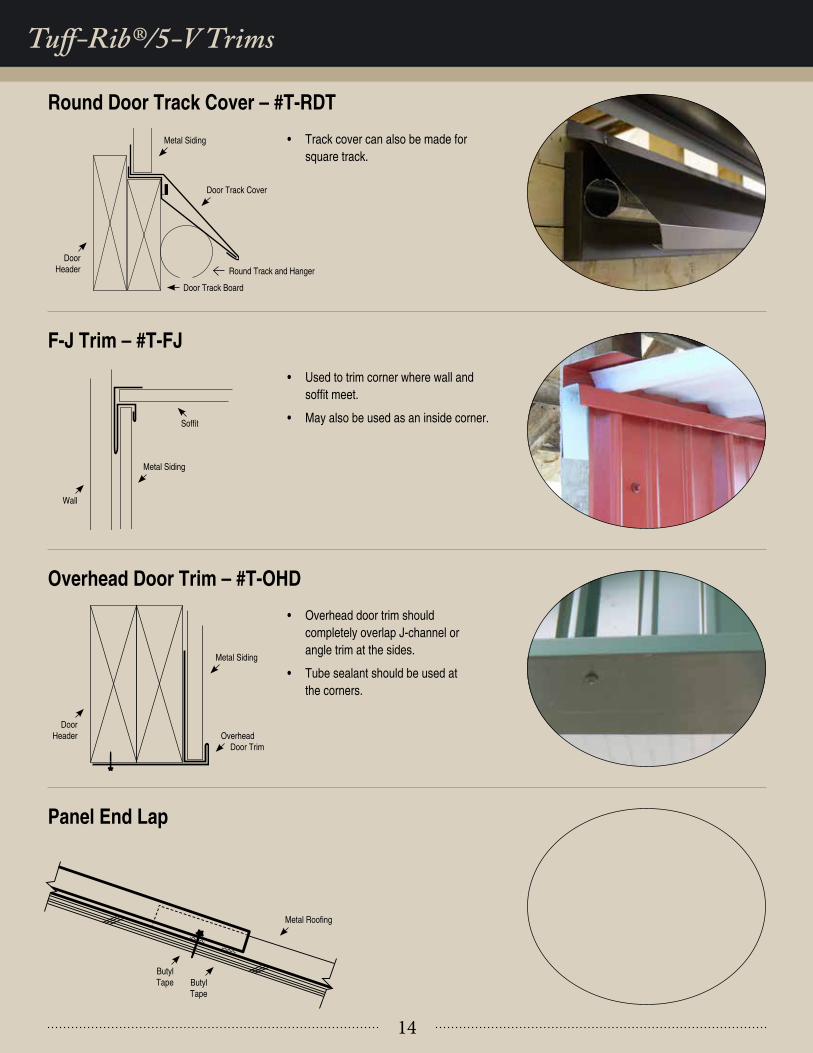
Round Door Track Cover – #T-RDT
F-J Trim – #T-FJ
Overhead Door Trim – #T-OHD
Panel End Lap
• Track cover can also be made for
square track.
• Used to trim corner where wall and
soffit meet.
• May also be used as an inside corner.
• Overhead door trim should
completely overlap J-channel or
angle trim at the sides.
• Tube sealant should be used at
the corners.
Metal Siding
Metal Siding
Metal Siding
Metal Roofing
Overhead
Door Trim
Door Track Cover
Door Track Board
Round Track and Hanger
Door
Header
Wall
Door
Header
Soffit
Butyl
Tape Butyl
Tape
Tuff-Rib®/5-V Trims
15
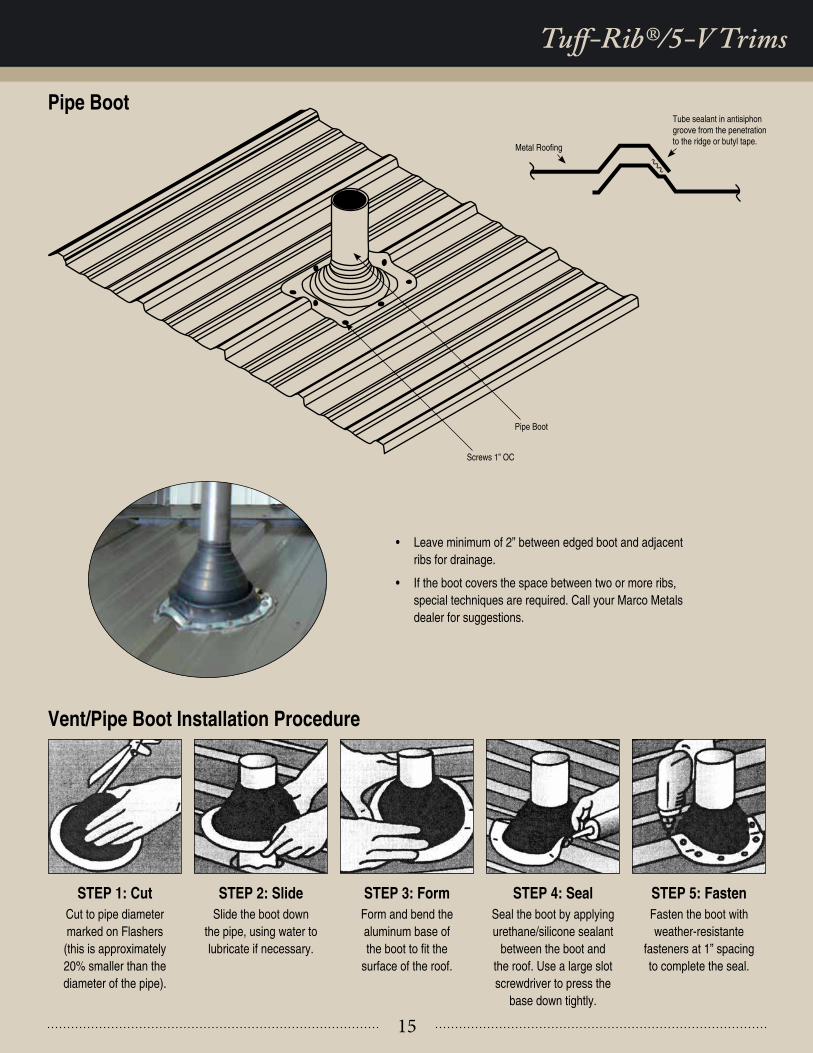
Pipe Boot
Vent/Pipe Boot Installation Procedure
STEP 1: Cut
Cut to pipe diameter
marked on Flashers
(this is approximately
20% smaller than the
diameter of the pipe).
STEP 4: Seal
Seal the boot by applying
urethane/silicone sealant
between the boot and
the roof. Use a large slot
screwdriver to press the
base down tightly.
STEP 5: Fasten
Fasten the boot with
weather-resistante
fasteners at 1” spacing
to complete the seal.
STEP 2: Slide
Slide the boot down
the pipe, using water to
lubricate if necessary.
STEP 3: Form
Form and bend the
aluminum base of
the boot to fit the surface of the roof.
• Leave minimum of 2” between edged boot and adjacent
ribs for drainage.
• If the boot covers the space between two or more ribs,
special techniques are required. Call your Marco Metals
dealer for suggestions.
Pipe Boot
Screws 1” OC
Metal Roofing
Tube sealant in antisiphon
groove from the penetration
to the ridge or butyl tape.
Tuff-Rib®/5-V Trims

16
Tuff-Rib®/5-V Trims
Double Ridge – Valley Junction
Valley Dormer
Roofing Nail
Roofing Nail
Butyl Tape
Butyl Tape
Install Valley
Install Valley
Install Roofing Metal
Expanding foam
closure set over first row of butyl tape
Install expanding foam
closure set over first row of butyl tape
Install dormer
roofing metal
Install ridge cap
with field cut flange
Install flat shield with field cut
Insert butyl tape between flat shield and ridge cap and stitch screwInstall roofing metal
Field cut
Install ridge cap with
field cut flange
STEP 1
STEP 1
STEP 2
STEP 3
STEP 4
STEP 5STEP 6
STEP 2
STEP 4
STEP 5
STEP 3
Metal
Roofing
Use expanding foam closure
to seal top of valley
Install ridge cap with field cut
Use butyl tape between the
two ridge caps and fasten
with stich screws
17
Tuff-Rib®/5-V Trims
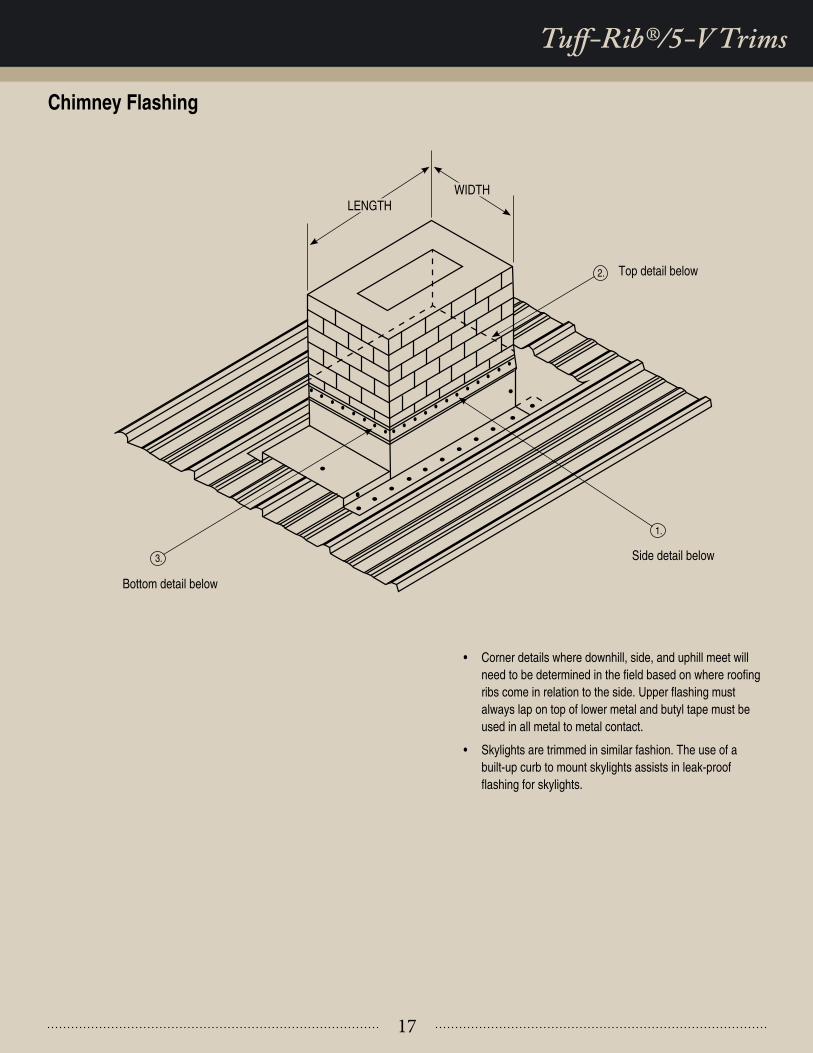
Chimney Flashing
• Corner details where downhill, side, and uphill meet will
need to be determined in the field based on where roofing ribs come in relation to the side. Upper flashing must always lap on top of lower metal and butyl tape must be
used in all metal to metal contact.
• Skylights are trimmed in similar fashion. The use of a
built-up curb to mount skylights assists in leak-proof
flashing for skylights.
LENGTHWIDTH
3.
1.
2. Top detail below
Side detail below
Bottom detail below
18
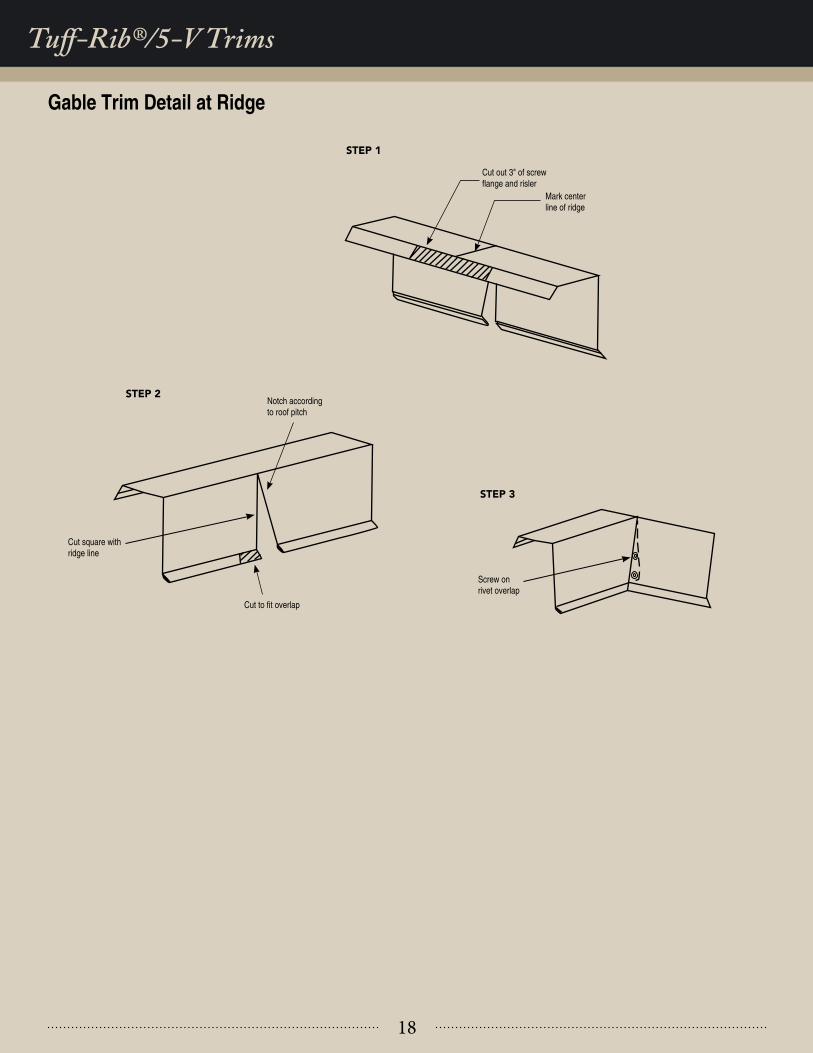
Gable Trim Detail at Ridge
Tuff-Rib®/5-V Trims
Cut out 3" of screw
flange and risler
Notch according to roof pitch
Cut square with
ridge line
Screw on
rivet overlap
Cut to fit overlap
Mark center
line of ridge
STEP 1
STEP 2
STEP 3
19
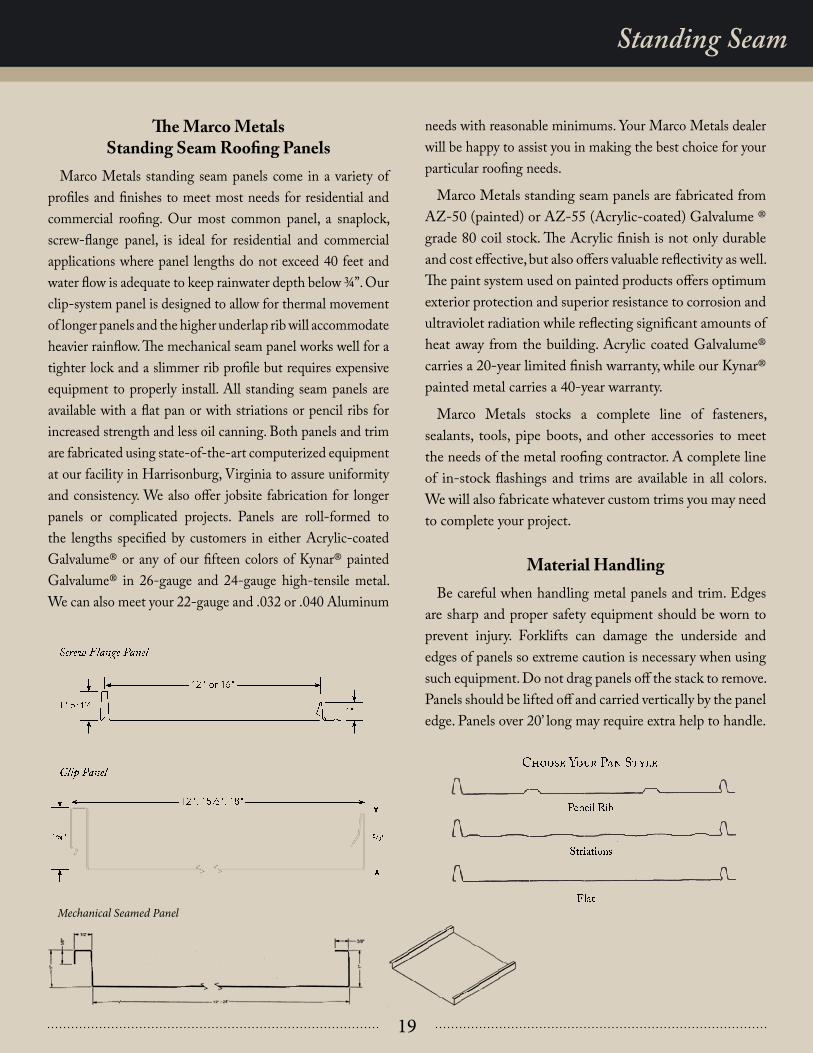
The Marco Metals Standing Seam Roofing Panels
Marco Metals standing seam panels come in a variety of
profiles and finishes to meet most needs for residential and
commercial roofing. Our most common panel, a snaplock,
screw-flange panel, is ideal for residential and commercial
applications where panel lengths do not exceed 40 feet and
water flow is adequate to keep rainwater depth below ¾”. Our
clip-system panel is designed to allow for thermal movement
of longer panels and the higher underlap rib will accommodate
heavier rainflow. The mechanical seam panel works well for a
tighter lock and a slimmer rib profile but requires expensive
equipment to properly install. All standing seam panels are
available with a flat pan or with striations or pencil ribs for
increased strength and less oil canning. Both panels and trim
are fabricated using state-of-the-art computerized equipment
at our facility in Harrisonburg, Virginia to assure uniformity
and consistency. We also offer jobsite fabrication for longer
panels or complicated projects. Panels are roll-formed to
the lengths specified by customers in either Acrylic-coated
Galvalume® or any of our fifteen colors of Kynar® painted
Galvalume® in 26-gauge and 24-gauge high-tensile metal.
We can also meet your 22-gauge and .032 or .040 Aluminum
needs with reasonable minimums. Your Marco Metals dealer
will be happy to assist you in making the best choice for your
particular roofing needs.
Marco Metals standing seam panels are fabricated from
AZ-50 (painted) or AZ-55 (Acrylic-coated) Galvalume ®
grade 80 coil stock. The Acrylic finish is not only durable
and cost effective, but also offers valuable reflectivity as well.
The paint system used on painted products offers optimum
exterior protection and superior resistance to corrosion and
ultraviolet radiation while reflecting significant amounts of
heat away from the building. Acrylic coated Galvalume®
carries a 20-year limited finish warranty, while our Kynar®
painted metal carries a 40-year warranty.
Marco Metals stocks a complete line of fasteners,
sealants, tools, pipe boots, and other accessories to meet
the needs of the metal roofing contractor. A complete line
of in-stock flashings and trims are available in all colors.
We will also fabricate whatever custom trims you may need
to complete your project.
Material Handling
Be careful when handling metal panels and trim. Edges
are sharp and proper safety equipment should be worn to
prevent injury. Forklifts can damage the underside and
edges of panels so extreme caution is necessary when using
such equipment. Do not drag panels off the stack to remove.
Panels should be lifted off and carried vertically by the panel
edge. Panels over 20’ long may require extra help to handle.
Striations
Flat
Choose Your Pan Style
Pencil Rib
Clip Panel
1¾"
12", 15½", 18"
15/8"
Screw Flange Panel
1"1" or 1½"
12" or 16"
Standing Seam
Mechanical Seamed Panel
20
Material Storage
Paint and finishes of Marco Metals panels and trim are
designed to withstand severe rain and wet weather conditions.
Neither paint, galvanized, nor Galvalume® finishes, however,
are designed to be in continuous contact with water for long
periods of time. Irreparable damage will result if uninstalled
panels or trim are allowed to remain wet in storage. Be sure to
store material that will not be installed immediately in a dry
location. Wet material should be air-dried and re-stacked
if installation is not planned right away. DO NOT cover
metal panels with plastic or tarps without leaving adequate
ventilation (at least 12 inches) under the cover and metal
stack. Neglecting this will result in significant collection of
moisture between panels and void the paint warranty.
Trimming and Cutting Steel Panels
Mark metal with a marker or pen, not a pencil. The
graphite in pencils will eventually cause rust to develop.
The best device for cutting steel panels across the profile is
a good-quality offset hand snips, a nibbler or a power shear.
Use of circular or reciprocating saws to cut metal panels
is not recommended and will void the paint warranty. If
you do use a saw, cut with the bottom side up to prevent
hot shavings from contacting the painted side. Be sure
other panels are protected from hot shavings.
To cut panels lengthwise: Note Carefully where the panel
is to be cut, and using a straight-edge, score deeply down
the length of the panel with a sharp-pointed utility knife.
Folding the panel along the score mark, and bending back
again if necessary, should produce a clean break in the
panel. Snips or shears may also be used.
Cutting holes in the metal panel is done by drilling a starter
hole big enough to accommodate the cutting tool to be used.
Metal filings from cutting or the installation of screws, if
left on the panel, can cause rust spots to form. Care should
be taken to brush all such particles from the roof surface
after installation to maintain paint integrity.
CAUTION! - Clean all metal shavings and particles off the roof to avoid unsightly rust stains.
INSTALLATION OF PANELS
Roof Pitch
Marco Metals roofing panels require adequate pitch to
ensure proper water drainage. Use of these panels on pitches
lower than 3/12 are not recommended. It is important to
remember that metal will not leak. Leaks happen at ends,
sides and penetrations of metal panels. Metal roof panels
are designed to shed water, not contain it. Flashing and
installation must be designed with that principle in mind.
Our 1 ¾” rib, clipped panel will give the best protection if
extra run-off accumulation is expected because of the pitch
of the roof or the length of the panel.
Roof Preparation
Oil-canning is a wave-like, rippled appearance extending
up the length of a metal roof panel after it has been installed
on the roof. Some oil-canning is common with any metal
roof but careful storage, handling and roof preparation
will keep it to a minimum. Any irregularities in the roof,
including uneven plywood joints, warped plywood, uneven
trusses, poor application of underlayment, the use of button
caps with underlayment, etc., can promote oil-canning or
dimpling. Careless storage and handling can also contribute
to oil-canning. Care should be taken to provide a flat,
uniform surface on which to attach the panels. Striations
or pencil-ribs may be added to the panel to minimize oil
canning. Alternatively, 3/8” backer rod may be taped to
the back center of a flat panel for the same purpose. Oil
canning is normal and is not cause for rejection.
Synthetic underlayment should be used over solid decking
rather than tar paper. Button cap nails will show through the
metal and should be avoided in favor of staples for fastening
underlayment. Standing seam panels should not be installed
directly over shingles unless purlins are used over the shingles.
Screws must be long enough to penetrate completely through
the metal, shingles and the roof deck. They should be fastened
according to the appropriate building code. Battens must be
installed to support the entire width and length of ridge,
eave, hip, valley, and gable-end trims.
Standing Seam
21
For solid decking, at least 15/32” structural plywood or
5/8” OSB supported on rafters at a maximum of 24” on
center is required.
WARNING; Direct contact between any lumber pressure treated with copper, and standing seam panels must be avoided in order to prevent potential corrosion.
Roof Application
Panel installation should begin at the gable end of the
roof opposite the prevailing rain-bearing wind (this will
provide added assurance against wind-driven rain being
forced under the laps). Measure one panel width in from
the roof edge. At this point chalk a line from ridge to eave.
Place the leading edge of the first panel along this line.
It is extremely important that this panel be laid square to
the eave and ridge so that the remaining panels will line
up square on the roof frame. It is wise to have a person at
the eave and at the ridge to ensure that the proper panel
coverage is being maintained across the roof. Also be sure
that the panels are properly side-lapped and snapped down.
It is recommended that the eave end of the panel be hemmed
around the drip edge. The open panel ribs at the eave can be
sealed with caulk or trimmed to provide a cover flap.
Ventilation
Since standing seam panels are usually installed over
solid decking, any ventilation issues arise from improper
construction or installation and are not caused by the metal
roofing itself. The temperature differences between shingle
roofs and metal ones may require that ventilation will have
to work differently and must be taken into account.
Fastening
1” flat-head screws are the most common method used
for installing screw-flange panels or panel clips. Screw and
clip spacing must be done according to local wind codes.
Most areas require a screw or clip at the eave and another
1’ above that, with the same at the ridge. 14” to 24” spacing
should be adequate for the rest of the panel depending on
the wind load. For screw-flange panels it is important that
screws be placed in the center of the slot and not over-
tightened. To allow for thermal movement the panel should
only be fastened tightly at one end. Usually that is at the
ridge since fastening z-bar there pins the panel tightly.
Color-matched pop rivets are used to fasten trims together.
Remember that each pop rivet has a hole in the center and
should be placed so that water dripping through will fall
onto the roof pan. Pop rivets should be installed 2’ on center.
Ordering Roof Panels and Screws
Care should be taken to order panels of the correct length
(We will cut to the inch) to minimize cutting after purchase.
You should add 2” to the roof plane length to allow for the
hem over the extended eave trim. When a roof transition
is involved, panels of the upper portion should be ordered
short to allow proper placement of the transition flashing (see
diagram on pg. ?). The end user is responsible to verify all
measurements in the field and provide a detailed cut list when
placing the order. Improper measurements or relying only on
a blueprint for ordering will result in errors for which the
customer is fully responsible even if we did the take-off. Our
take-offs are for estimating purposes only not for ordering.
Order about 70 screws per 100 square feet of roof or 2
screws per clip.
Please confirm all estimates with your Marco Metals
dealer when you place your order.
Ordering and Applying Trim
The most common flashing for metal roofing is the ridge
cap, which is used at the peak of a roof. Extended eave is used
at the eave and is often applied above fascia trim. When roof
pitch exceeds 5/12 the slope of the roof should be mentioned
when ordering ridge cap, endwall, and extended eave.
At the gable edge, the use of rake with z-rake cleat, or
extended rake trim adds to the appearance of the structure
and protects the fly-rafter. Sidewall flashing is used where
the side of the panel butts up against an adjacent wall.
Endwall flashing is used where the top of a roof slope
meets a vertical wall. Transition flashing is used where
two different roof pitches meet along the length of the
Standing Seam

22
roof. Both slopes should be mentioned when ordering
transition or gambrel flashing, upper pitch first (ie.
lower roof at 4/12 and upper at 10/12 would be ordered
“10/12 to 4/12 transition”). Valley flashing is used at the
intersection of two perpendicular roof planes. Z-bar
is used with ridge and hip caps, endwall, and sidewall
flashing. Offset cleat is used with valley and transition.
Order two z-bar for each piece of ridge, or hip, and
one piece of z-bar for each piece of sidewall, endwall
or transition. Order two offset cleat per valley and one
per transition. 1” wide butyl tape must be used to seal
between offset cleat or z-bar and the roof panel.
Extended Rake#S-ER
.5" Hem
5"
1.5"1.5"
Ridge Cap#S-RC
.5" Hem.5" Hem
7"7"
.5" Hem.5" Hem
5.5"5.5"
Hip Cap#S-HC
Snaploc Standing Seam Trims
Endwall/Transition
C-Channel#S-CC
4.5"
.5" Hem
5.5"
Specify pitch
2"
.5" Hem
.875"
2.25"
.75"
1.25"
.5" Hem1.375"or
1.875"
3"
Painted side
Endwall/Transition#S-EW
Reglet Flashing#S-RF
Extended Eave#S-EE Sidewall
#S-SW
3.937"
3"
.5" Hem
1"or
1.5".5" Hem
1".625"
4.25"
1.5"
Z-Bar
1.56"
1"
1"
Z- Rake Cleat#S-ZRC
.625"
1.56"
2.625"
1"
1"
Rake#S-RT
Offset Cleat#S-OC
Valley#S-WV
3"
5"
.625"
1.125"or
1.625"
.5" Hem
.5" Hem.75" .75" 8.5"8.5"
1.5"1.5"
Standing Seam
23
Standing Seam
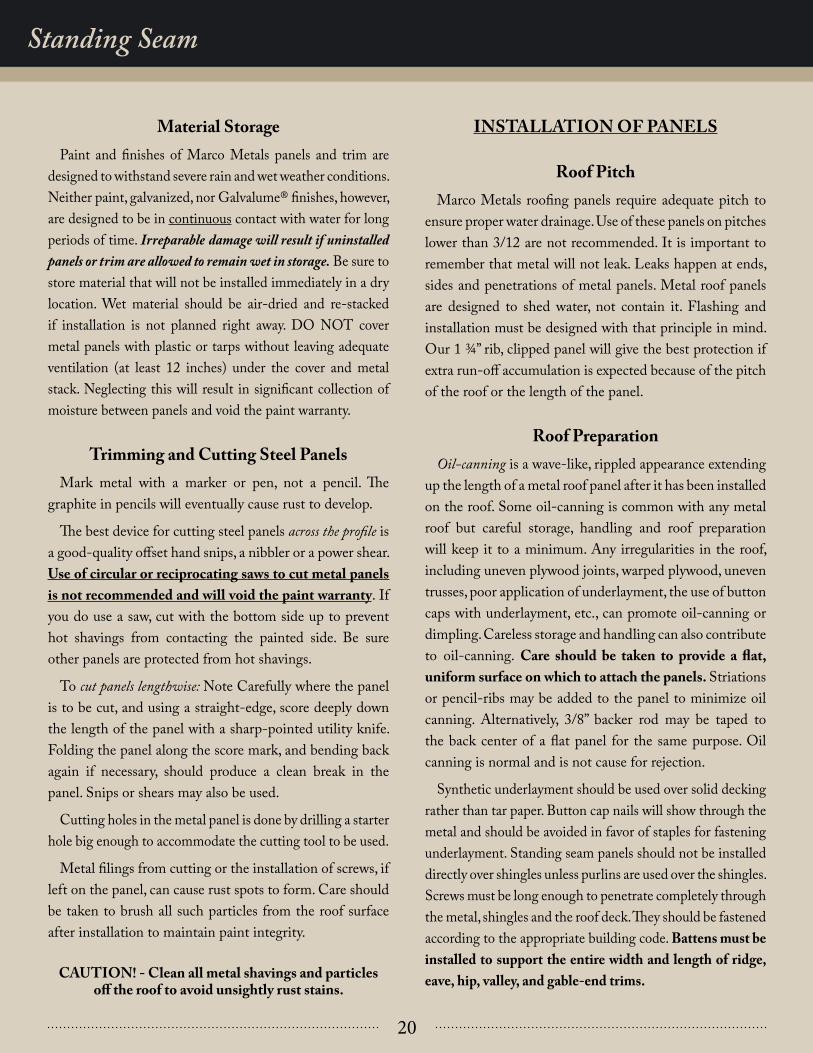
C-Channel – #S-CC
Vented Ridge Flashing
Reglet Flashing – #S-RF
Transition – #S-EW
• Used for vented ridge alternative
• Bullet Points
• Used as counter flashing
• Used at ptich changes
• The more flat the transition, the more desirable to suppor the back of the
transition
Metal Roofing
Siding
Reglet Flashing
Metal roofing hemed as at eave
Wedge Support
Butyl tape
3"
Z-bar
Offset cleat
Endwall or Sidewall
C-Channel
Tube Sealant
or Master
Ridge Cap – #T-RC
24
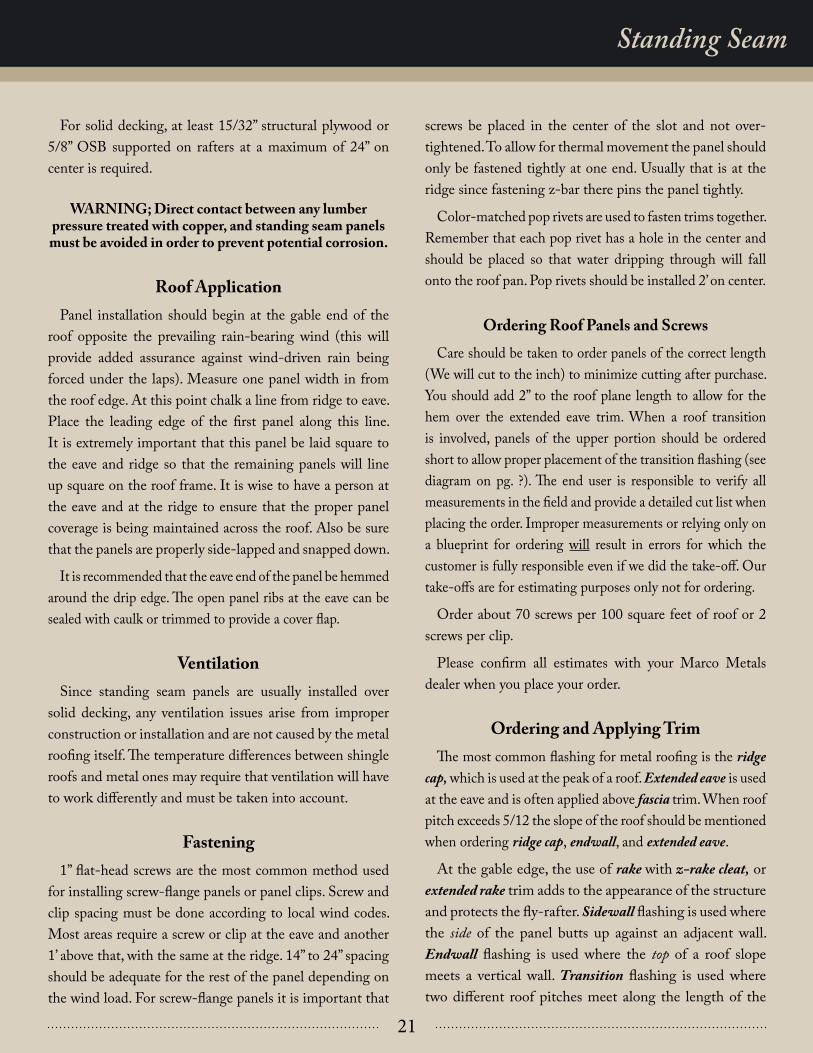
Ridge Cap – #S-RC
Hip Cap – #S-HC
Z-Bar – #S-ZB / Perforated Z-Bar – #S-ZBP
• Caulk end of 2-bar
• Use perforated 2-bar if venting is desired
• Carefully measure from the peak and snap a chalk mark on panel ribs before
placing 2-bar so that the ridge cap will hook over the 2-bar. Place so that slight
pressure can’t expand the ridge up to spread over and snap to the 2-bar
• Caulk all 2-bar ends
• Use butyl tape between the 2-bar and the
roof panel
• Carefully measure from the peak and snap a
chalk mark on panel ribs before placing 2-bar
so that the ridge cap will hook over the 2-bar.
Place so that slight pressure can’t expand the
ridge up to spread over and snap to the 2-bar
• Use perforated Z-bar where
venting is desired
Standing Seam
Pop Rivet
Butyl Tape
Outer Flashing Pop Rivet
2-Bar
Metal Roofing
Butyl Tape
25
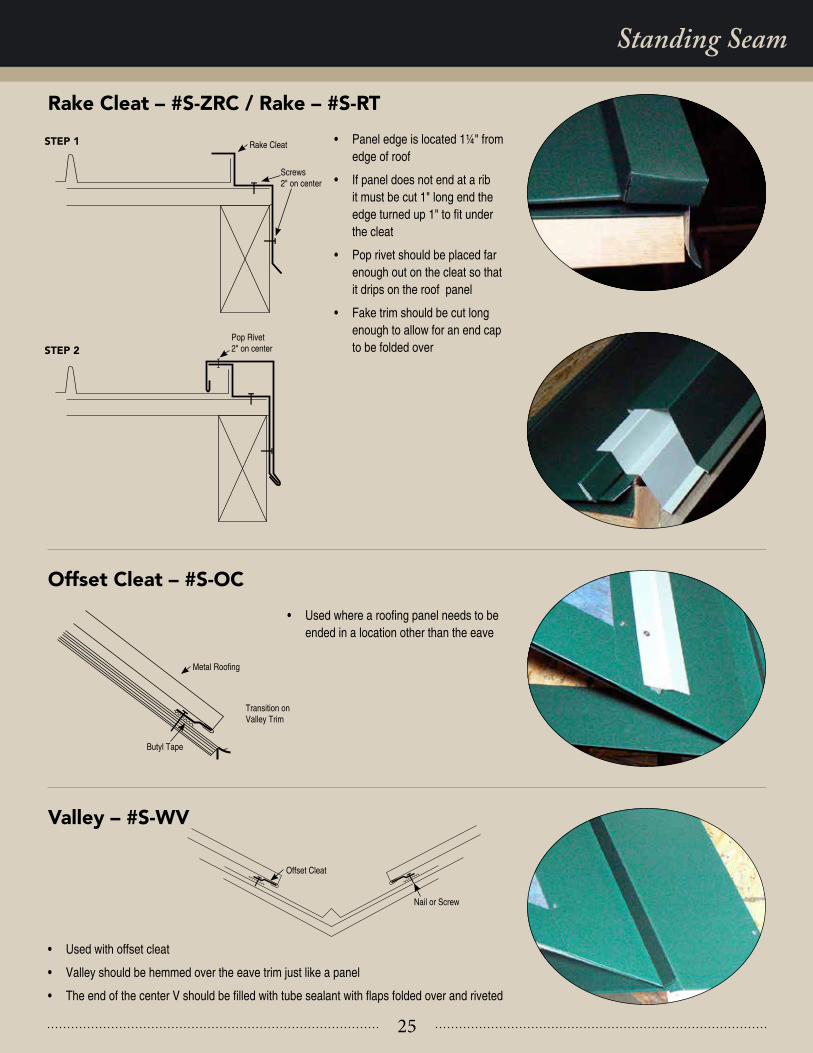
Rake Cleat – #S-ZRC / Rake – #S-RT
Offset Cleat – #S-OC
Valley – #S-WV
• Panel edge is located 1¼" from
edge of roof
• If panel does not end at a rib
it must be cut 1" long end the
edge turned up 1" to fit under the cleat
• Pop rivet should be placed far
enough out on the cleat so that
it drips on the roof panel
• Fake trim should be cut long
enough to allow for an end cap
to be folded over
• Used where a roofing panel needs to be ended in a location other than the eave
• Used with offset cleat
• Valley should be hemmed over the eave trim just like a panel
• The end of the center V should be filled with tube sealant with flaps folded over and riveted
Standing Seam
STEP 1
STEP 2
Rake Cleat
Metal Roofing
Butyl Tape
Transition on
Valley Trim
Pop Rivet
2" on center
Screws
2" on center
Offset Cleat
Nail or Screw
26
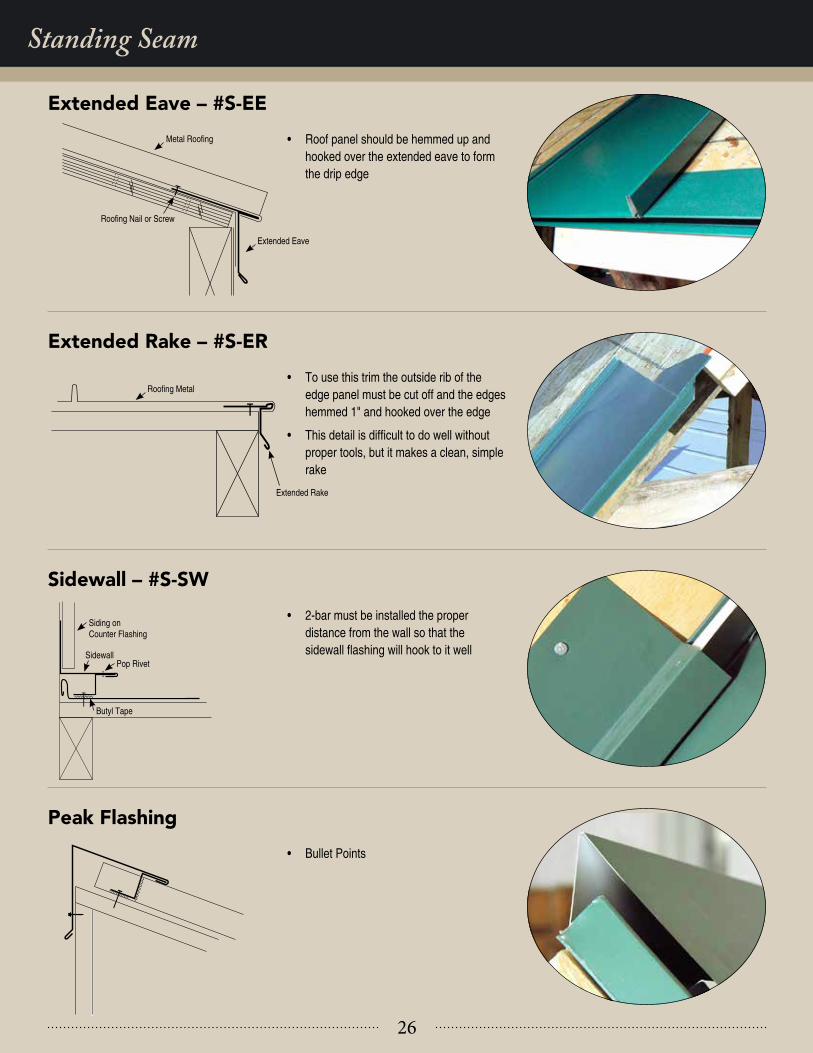
Extended Eave – #S-EE
Extended Rake – #S-ER
Sidewall – #S-SW
Peak Flashing
• Roof panel should be hemmed up and
hooked over the extended eave to form
the drip edge
• To use this trim the outside rib of the
edge panel must be cut off and the edges
hemmed 1" and hooked over the edge
• This detail is difficult to do well without proper tools, but it makes a clean, simple
rake
• 2-bar must be installed the proper
distance from the wall so that the
sidewall flashing will hook to it well
• Bullet Points
Standing Seam
Roofing Metal
Metal Roofing
Roofing Nail or Screw
Extended Eave
Extended Rake
Siding on
Counter Flashing
SidewallPop Rivet
Butyl Tape
27
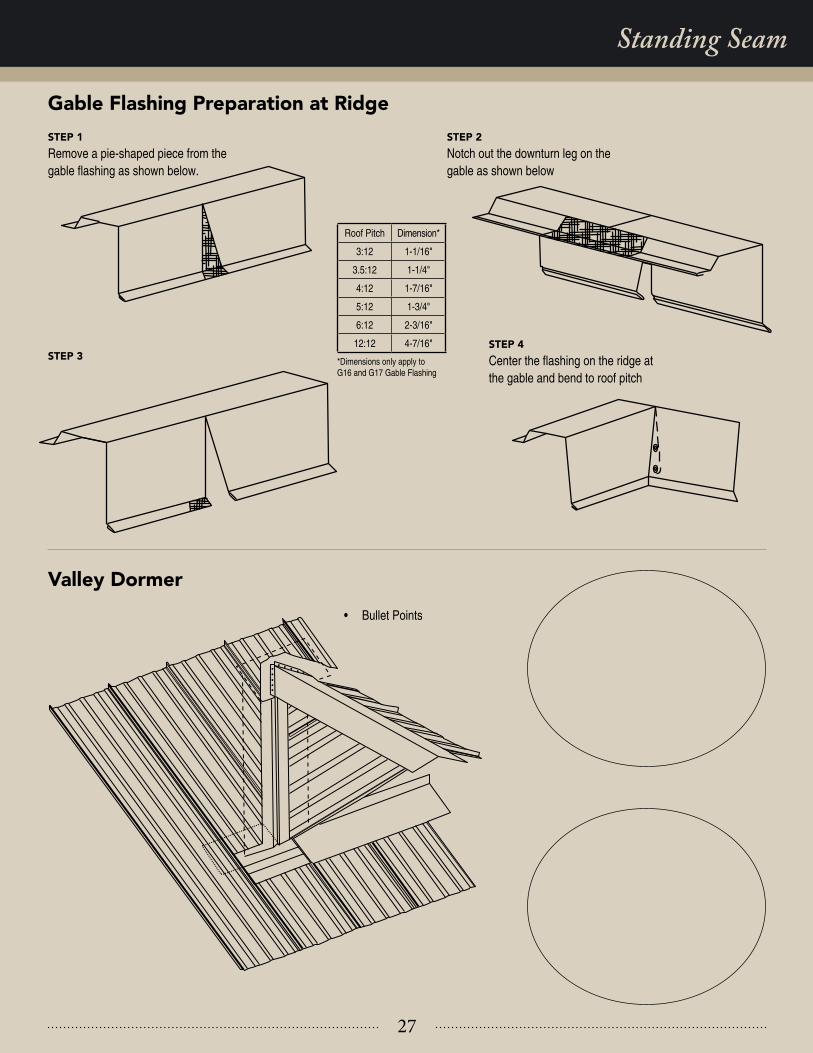
Gable Flashing Preparation at Ridge
Valley Dormer
• Bullet Points
Standing Seam
STEP 1
Remove a pie-shaped piece from the
gable flashing as shown below.
STEP 2
Notch out the downturn leg on the gable as shown below
STEP 4
Center the flashing on the ridge at the gable and bend to roof pitch
STEP 3
Roof Pitch Dimension*
3:12 1-1/16"
3.5:12 1-1/4"
4:12 1-7/16"
5:12 1-3/4"
6:12 2-3/16"
12:12 4-7/16"
*Dimensions only apply to
G16 and G17 Gable Flashing
28
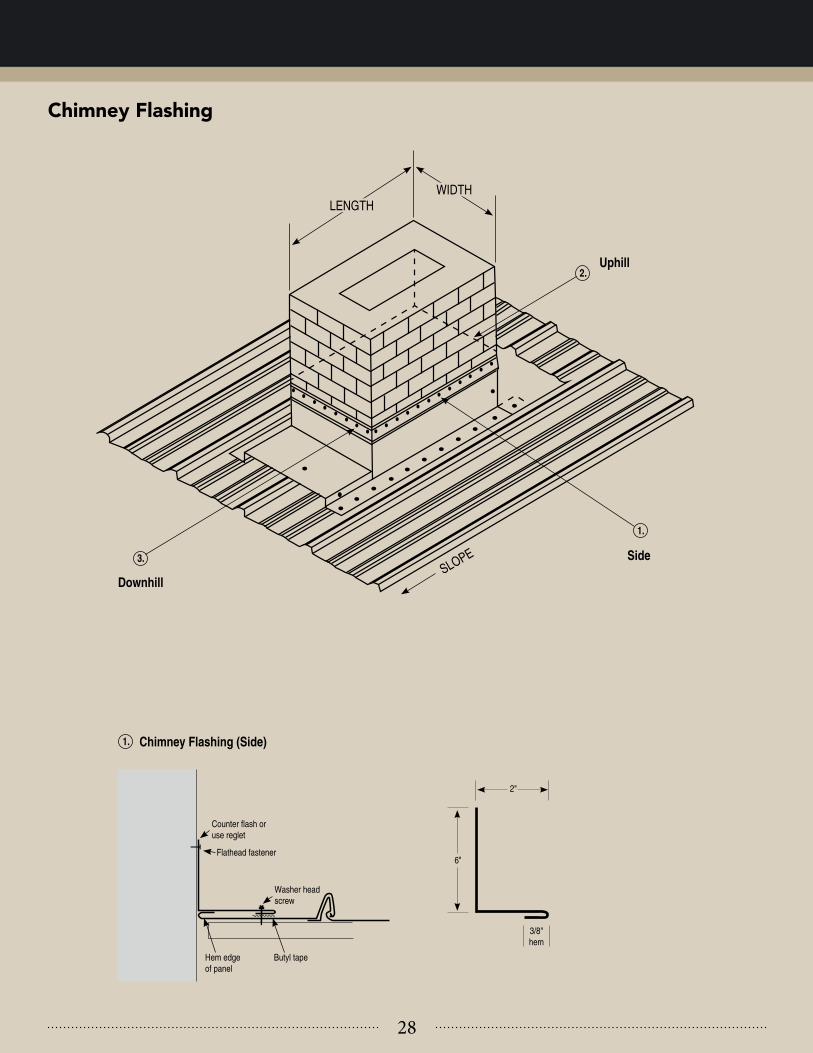
Chimney Flashing
LENGTH
SLOPE
WIDTH
3.
1.
1.
2.Uphill
Side
Chimney Flashing (Side)
Downhill
Counter flash or use reglet
Washer head
screw
2"
6"
3/8"
hem
Butyl tapeHem edge
of panel
Flathead fastener
29
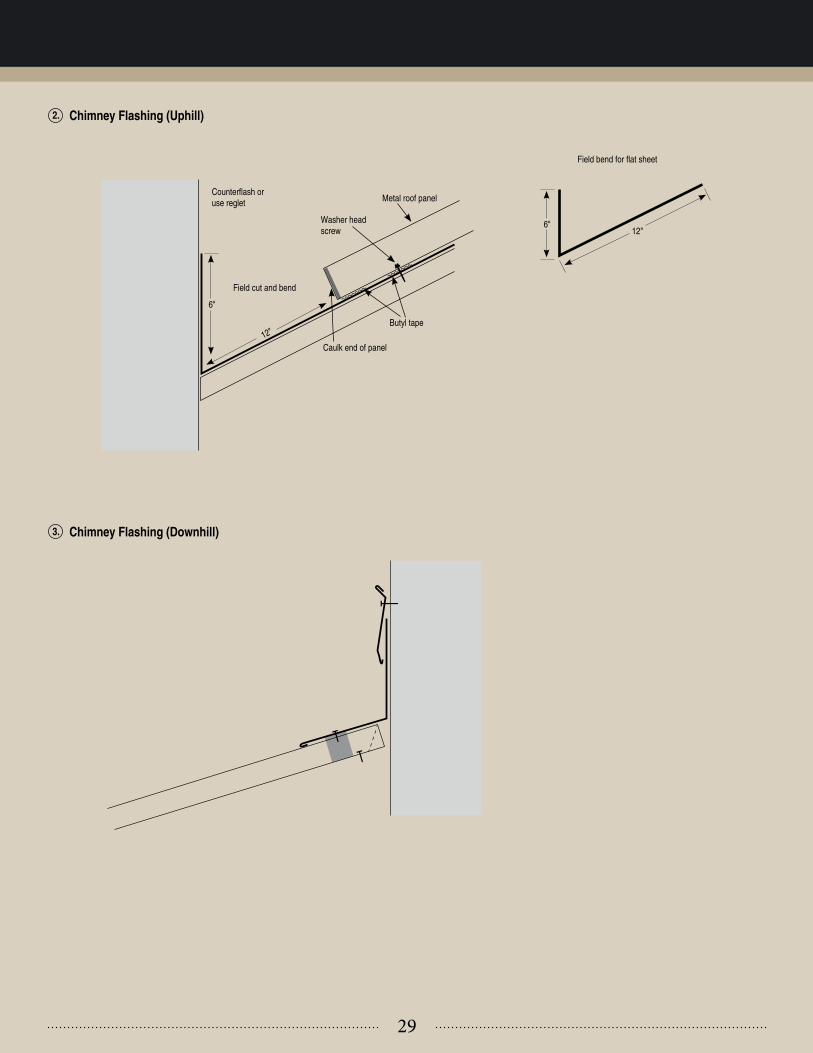
2.
3.
Chimney Flashing (Uphill)
Chimney Flashing (Downhill)
Caulk end of panel
Butyl tape
Washer head
screw
Field cut and bend
Counterflash or use reglet
Field bend for flat sheet
6"
6"12"
12"
Metal roof panel
30
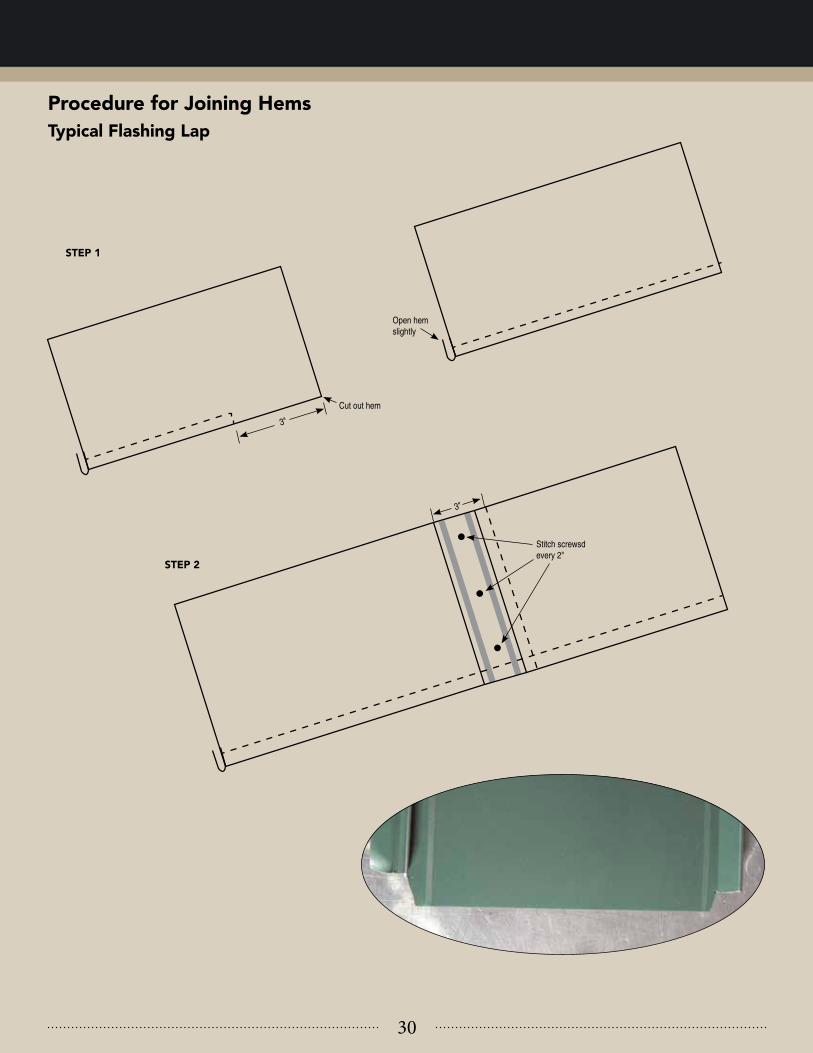
Procedure for Joining Hems
Typical Flashing Lap
Cut out hem
Open hem
slightly
Stitch screwsd
every 2"
3"
3"
STEP 1
STEP 2
31
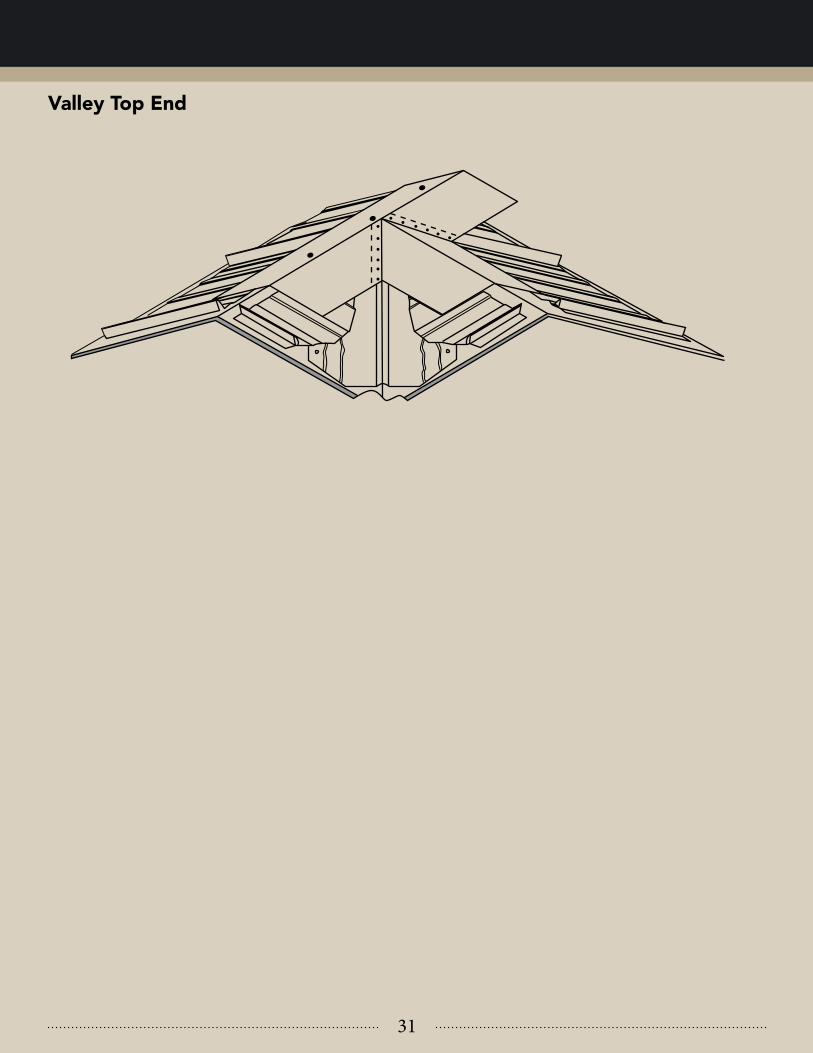
Valley Top End
32
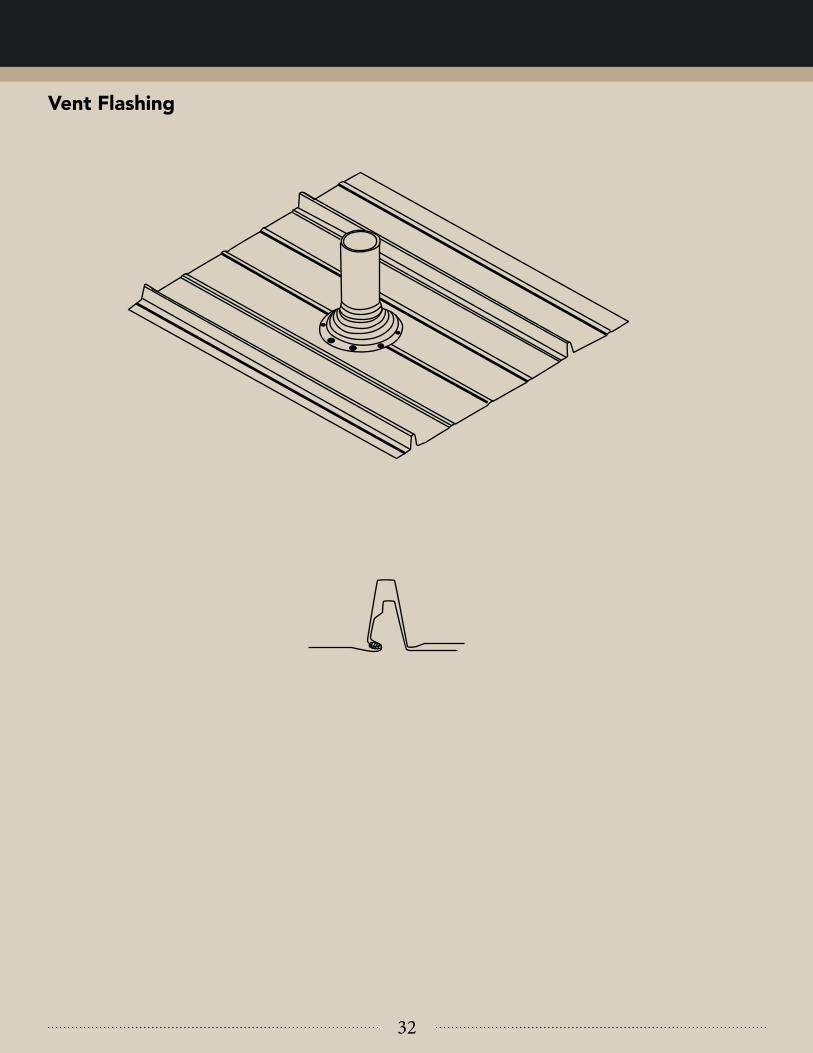
Vent Flashing
33
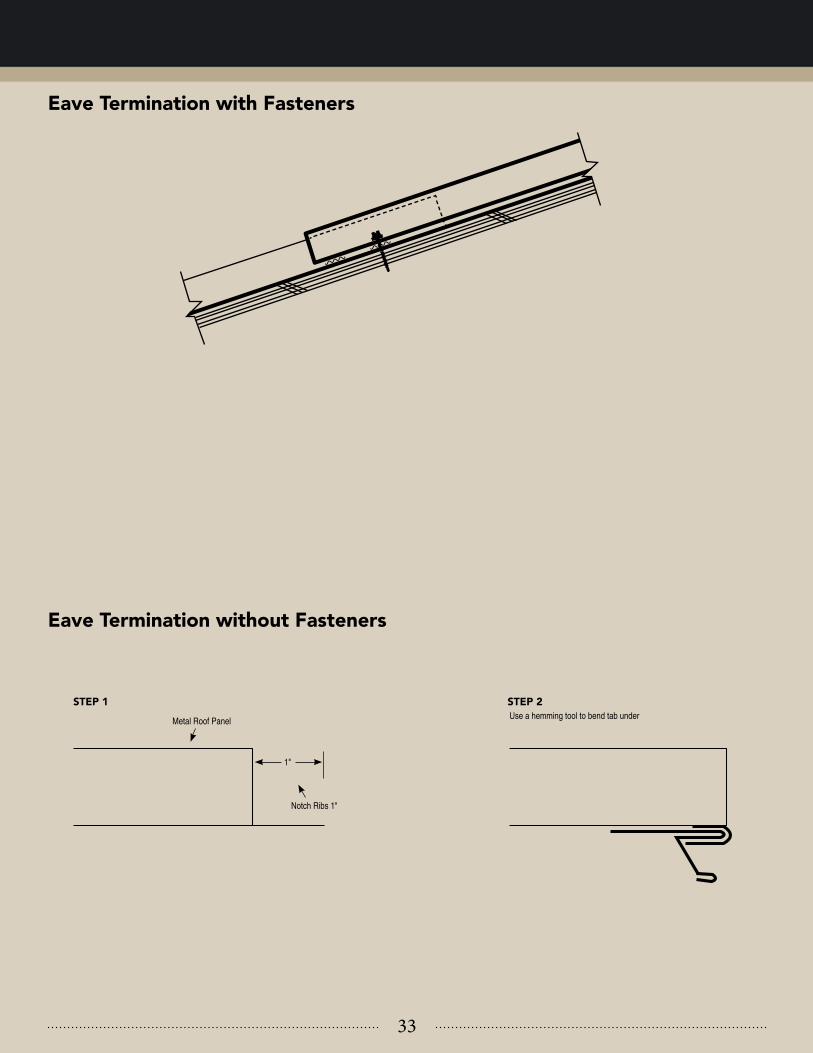
Eave Termination with Fasteners
Eave Termination without Fasteners
Metal Roof PanelUse a hemming tool to bend tab under
Notch Ribs 1"
1"
STEP 1 STEP 2

34

35

36

37

38

39

40