Embed Size (px)
Citation preview

iPECS is an Ericsson-LG Brand
iPECS Communicator
Installation and Operation Guide
Please read this manual carefully beforeoperating your set. Retain it for future reference.
Communicator
Installation and Operation Guide Issue 1.1
Copyright© 2012 Ericsson-LG Co., Ltd. All Rights Reserved
This material is copyrighted by Ericsson-LG Co., Ltd. Any unauthorized reproductions, use or disclosure of this material, or any part thereof, is strictly prohibited and is a violation of Copyright Laws. Ericsson-LG reserves the right to make changes in specifications at any time without notice. The information furnished by Ericsson-LG in this material is believed to be accurate and reliable, but is not warranted to be true in all cases.
Ericsson-LG and iPECS Communicator are trademarks of Ericsson-LG Co., Ltd.
Revision History
Issue Date Description of Changes
1.0 July, 2012 Initial Release
1.1 September, 2012

Communicator
Installation and Operation Guide Issue 1.1
i
Table of contents
1.1 iPECS Communicator Client Screen ........................................................................................ 1
2.1 Hardware requirements ............................................................................................................. 3
2.2 iPECS Client Download ............................................................................................................ 3
2.3 Client Account Configuration and Registration ........................................................................ 5
3.1 Place a Call ................................................................................................................................ 7
3.2 Answer a Call ............................................................................................................................ 8
3.3 Place a Call On Hold ................................................................................................................. 8
3.4 Transfer a Call ........................................................................................................................... 9
3.5 Conference Calls ..................................................................................................................... 10
3.6 Receive a Call while Busy ...................................................................................................... 11
4.1 Call Forward ............................................................................................................................ 12
4.2 Do Not Disturb (DND) ............................................................................................................ 13
4.3 Voice Mail ............................................................................................................................... 13
4.4 Call Logs ................................................................................................................................. 14
4.5 Contacts ................................................................................................................................... 14
4.6 Short Message Service (SMS) ................................................................................................ 16
4.6.1 Receiving an SMS .......................................................................................................................... 16
4.6.2 Sending an SMS.............................................................................................................................. 17
4.6.3 Managing SMS Mail boxes ............................................................................................................ 18
4.7 Paging ...................................................................................................................................... 19
4.8 Call Recording ........................................................................................................................ 19
5.1 Call options setting .................................................................................................................. 21
5.1.1 Use WLAN ..................................................................................................................................... 21
5.1.2 Integrated Dial Features .................................................................................................................. 22
5.1.3 Outbound Selection ......................................................................................................................... 23
5.1.4 Enable Mobile Data ........................................................................................................................ 24
5.1.5 Auto Answer on Page ..................................................................................................................... 24
5.1.6 Auto Reject CDMA Call ................................................................................................................. 25
5.1.7 Speaker phone On/Off .................................................................................................................... 25
5.1.8 Trunk Access Code ......................................................................................................................... 25
5.1.9 DTMF Type .................................................................................................................................... 27
5.1.10 Codec Priority ................................................................................................................................. 27
5.2 Notifications ............................................................................................................................ 28
5.2.1 Status Bar Notification – Missed Call ............................................................................................ 28
5.2.2 Status Bar Notification - SMS ........................................................................................................ 29

Communicator
Installation and Operation Guide Issue 1.1
ii
5.2.3 SMS Notification ............................................................................................................................ 29
5.2.4 Sound & vibration ........................................................................................................................... 30
5.2.5 Voice Message Box ......................................................................................................................... 30
5.3 Audio settings .......................................................................................................................... 31
5.4 Audio Advanced settings ......................................................................................................... 31
5.5 List count and Back-Up .......................................................................................................... 33
5.5.1 Maximum List Count ...................................................................................................................... 33
5.5.2 Backup User Data -Export/Import- ................................................................................................. 33
5.5.3 Backup User Preference -Export/Import- ....................................................................................... 35
5.6 Service on OS Startup ............................................................................................................. 36
5.7 Setup Wizard ........................................................................................................................... 36
5.7.1 Reset Settings .................................................................................................................................. 37
5.7.2 Audio easy settings 1 ...................................................................................................................... 37
5.7.3 Audio easy settings 2 ...................................................................................................................... 38
Appendix A - Status Bar Icons .......................................................................................... 39
Appendix B - Troubleshooting ......................................................................................... 40
Appendix C - Open Source Notice ................................................................................... 41

Communicator
Installation and Operation Guide Issue 1.1
1
1. Introduction iPECS Communicator is an Android Smartphone multimedia communication application for iPECS
platforms. As an iPECS client device, iPECS Communicator has access to the resources (Intercom,
Trunks, Paging, etc) and features of the iPECS host. iPECS Communicator clients employ WiFi or
mobile data services available through the Smartphone to ‘connect with’ the iPECS system for business
communication services such as transfer and conference. The client is presented to the user in a simple
to understand and use GUI on the Smartphone screen. The client incorporates contact and call log
databases (lists) that integrate with the call control functions of the client,
iPECS Communicator can be used by connecting to the host platform including iPECS-CM, iPECS-LIK
and iPECS-MG. There are differences in the iPECS Communicator functions depending on which host
system is used, and the function screen may be different as a result. Basic features of the iPECS host
available to iPECS Communicator include:
Call Forward
Call Park
Call Waiting
Conference, 3-way
Do Not Disturb (DND)
Hold
Paging
Pick-up
Transfer
Voice Mail
1.1 iPECS Communicator Client Screen
iPECS Communicator’s main screen displays various function modules to enable simple and effective use. Each of the modules is depicted in the diagram below. For reference purposes, Appendix A presents a list of icons for the Status bar.

Communicator
Installation and Operation Guide Issue 1.1
2
Entry box, enter number to dial, etc.
Call Log, Contacts, and SMS display
Basic Dial pad display
Write SMS
Dial pad display button, toggles dial pad screen
Clear Entry box button
Function buttons for Dial pad, Call Logs, Contacts and SMS
Icon Status bar: displays status icons including registration icon, see Appendix A

Communicator
Installation and Operation Guide Issue 1.1
3
2. Installation Installation of iPECS Communicator is a 3-step process as outlined below.
Verify compatibility, section 2.1
Download the iPECS Communicator Android application, section 2.2
Configure the client and register with the iPECS host, section 2.3
2.1 Hardware requirements The minimum and recommended Smartphone requirements to operate iPECS Communicator are as follows. The application has been operated with LGE and other Smartphone brands. Note iPECS Communicator cannot be executed with Android Tablet 3.0. For a list of compatible models, contact your Ericsson-LG representative.
Minimum Requirements
Operating system: Android 2.2
CPU: 600Mhz or higher
Available memory: 10Mbytes RAM
Recommended Requirements
Operating system: Android 2.2 or more
CPU: 1Ghz or higher
Available memory: 10Mbytes RAM
Resolution: 480 * 800
Firmware: 2.2 or more
iPECS Communicator is optimized for 480-pixel by 800-pixel resolution, the size, arrangement and characteristics of images will be different with other resolutions.
Note the sequence to add or view contacts may vary between different Smartphone models.
2.2 iPECS Client Download The iPECS Communicator application is downloaded directly to the Smartphone from the Android application store, generally displayed on the Smartphone as the ‘Play Store’. Once downloaded, the client application will be available for execution on the phone.

Communicator
Installation and Operation Guide Issue 1.1
4
To download the client:
1. Open the Play Store application on the Smartphone.
2. When the store opens, type iPECS Communicator in the search box
and touch the search Spyglass.
3. In the Search results screen, touch iPECS Communicator.
4. In the Apps description screen touch Install and in the Permissions screen touch Accept &
Download, the download process screen displays.

Communicator
Installation and Operation Guide Issue 1.1
5
5. When the installation is complete, verify
the iPECS Communicator icon appears
in the Smartphone Apps menu; go to the
last page of the Smartphone main menu to
view the icon. Touching the icon opens
iPECS Communicator
2.3 Client Account Configuration and Registration iPECS Communicator must be configured to register with the host iPECS platform. This will require assistance from the iPECS system administrator. For proper registration, SIP Account information matching the iPECS system configuration must be entered including:
iPECS Host IP address
iPECS host port
Display Name
Name (User ID)
Authentication name
Authentication password
Transport Protocol (UDP/TCP) For mobile data use, TCP Transport protocol is recommended.
To set, modify or view the SIP Account data,
1. In the Smartphone’s basic screen, touch the menu button.
2. Select the Setting tool in the iPECS Communicator menu popup at the
bottom of the client screen.
1
Register
handset
Setting icon

Communicator
Installation and Operation Guide Issue 1.1
6
3. In the setup screen, select SIP Account
Settings. In the Account Setting screen,
enter values for the Server address,
User Id (Name) and other Account
parameters to match the iPECS host
system. The client’s IP address can also be
determined; scroll down to see more
selections in the Account Setting screen.
After completing entry of the Account information, touch the Register handset icon in the iPECS Communicator menu. iPECS Communicator will register with the iPECS host; a registration status message is displayed and the registration icon in the upper left of the client screen turns green. In addition, the number input pane indicates the call status of the client (idle) and the station number.
The registration icon indicates status by using color as below.
Green:
Grey:
Red:
Notes:
As a default, iPECS Communicator employs the Smartphone’s WiFi radio to communicate with
the host iPECS system. If no WiFi network is available and 3G/4G mobile data service is
enabled (refer to section 5.1.3), the client attempts to employ the mobile data service to register
and connect to the host iPECS system. Otherwise, the connection and registration will fail.
When automatic service execution is selected after the first registration, the client will register
with the iPECS host automatically when the Smartphone is turned on.

Communicator
Installation and Operation Guide Issue 1.1
7
3. Basic phone functions With iPECS Communicator, calls can be placed, received and transferred employing the resources of the host iPECS platform.
3.1 Place a Call iPECS Communicator can place internal calls to other users and external calls over CO lines and trunks of the iPECS host. Calls can be placed by dialing the number with the dial pad, using speed dial or selecting a number from the Call Log or Contacts lists; refer to section 4.4 and section 4.5 for Call Logs and Contacts, respectively.
After dialing or selecting a number from a list, the Call button places the call. When the party answers, the active call screen, shown below, displays the call information and various call controls (Hold, Transfer, Mic, Speaker, etc.) described in later sections.
To place a call using speed dial,
1. Dial the speed dial access code for the iPECS host
2. Dial the speed bin number and
3. Select the Call button
Notes:
Touching the lower right Dial pad icon in the idle screen for more than 1 second will display the
recent Call Log. A record can be selected from the Log to place the call.
Speed dial may not be available with all iPECS systems.
If a WiFi network is not available to place the call and mobile data use is allowed, iPECS
Communicator will attempt to place the call over the mobile data network. A warning message

Communicator
Installation and Operation Guide Issue 1.1
8
may be given to the user indicating mobile data charges may apply to the mobile data call. Refer
to section 5.1.3 for more details.
If a call can be completed with either a WiFi network or the Mobile Data network, a message is
presented for the user to select the network (General Call-Mobile data or Internet-WiFi).
3.2 Answer a Call When a call arrives, the call screen displays the incoming caller information and the phone will notify you according to the Smartphone configuration and the client Notification setting (refer to section 5.3.4). The call is answered by selecting the Answer button at the bottom left of the client and the active call screen displays.
Notes:
The name of the calling party may not be available until the call is
connected; the display will indicate the name when received from
the host iPECS system or the name matches a Contact.
If name associated with an incoming caller matches a Contact Name,
the Contact’s record will pop-up to indicate the caller’s information.
During a call, pressing the Call icon for more than one second will display the record.
3.3 Place a Call On Hold You can place an active call in a waiting state where the held party will receive music on hold and you will be free to place another call or other for other activity.
To place a call on hold, simply touch the Hold check box below the call information.
To access a held call, touch the checked Hold box.

Communicator
Installation and Operation Guide Issue 1.1
9
You can also access the Hold menu where you can hold or end a call. Touch the Call icon for more than one second, the Hold menu displays.
3.4 Transfer a Call You can send an active call to another user of the iPECS host. You can announce the transfer to the receiving party or transfer the call without announcing it to the receiver.
To transfer the active call,
1. Press the Transfer button.
2. Dial the user to receive the call.
3. Press the Call button.
4. To announce the call, wait for the receiver to answer.
5. Press the End button to disconnect and complete the transfer.

Communicator
Installation and Operation Guide Issue 1.1
10
By touching the Transfer button for more than one second while on a call, the Transfer menu displays. From this menu, you can select to transfer the call with or without an announcement, or establish a conference.
3.5 Conference Calls With iPECS Communicator, you can join several calls in a three party conference. To conference two calls,
1. Place or receive the first call.
2. Select the dial icon, the first call is placed on hold automatically.
3. Place the second call as normal.
4. When connected, touch the checked Hold box under the first call icon.

Communicator
Installation and Operation Guide Issue 1.1
11
During the conference, you can place one or both calls on hold and end a call. You can also employ the Hold menu by touching one of the Call icons for more than one second. Then the call can be placed on hold or ended while the remaining party is on hold.
3.6 Receive a Call while Busy While on a call with iPECS Communicator, you can receive and answer calls from the cellular service provider. In this case, the Caller Id is displayed and you can accept or reject the call. If the call is accepted, the existing iPECS Communicator call is placed on hold.
When the cellular call is received, the Incoming call selection screen appears. You can select the left green handset to accept the call or the red handset on the right to reject the call.
Note:
In the Call Options setting menu, iPECS Communicator can be set to reject incoming cellular
calls while you are on an iPECS Communicator call.
When an iPECS call is received during a cellular call, the Smartphone will not recognize or notify
you of the incoming call.

Communicator
Installation and Operation Guide Issue 1.1
12
4. Other Phone Functions
4.1 Call Forward The host iPECS system can be instructed to send calls to another destination. You define the client state that will forward calls and the receiving destination. When Call Forward is active, the Registration status icon will change to a red color.
To forward calls,
1. Select the Smartphone menu icon.
2. Select the iPECS Communicator Setting tool icon.
3. Select Call Forward from the iPECS Communicator Setting menu.
4. Select the forward type.
5. Enter the destination number to receive the calls.
6. Select OK to activate the Call Forward setting.
Notes:
Call Forward can be disabled, set to None, without deleting the destination. When Call Forward
is activated, a new destination can be entered.
Communicator
Installation and Operation Guide Issue 1.1
13
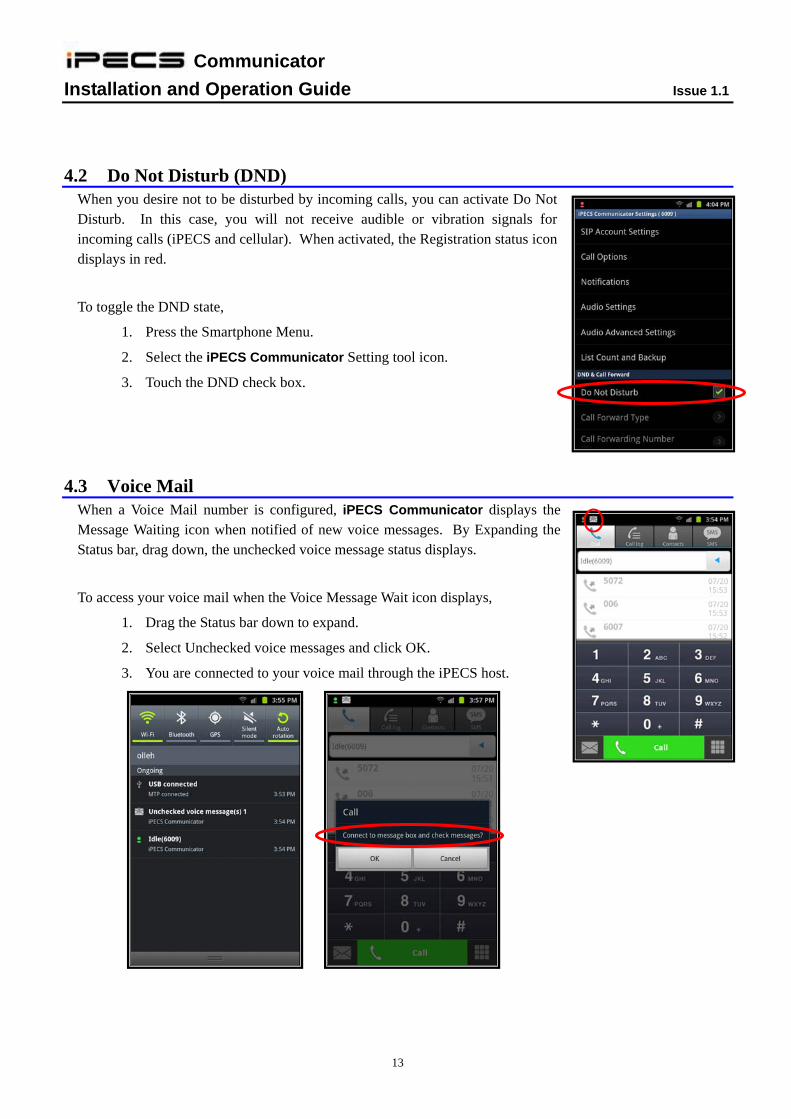
4.2 Do Not Disturb (DND) When you desire not to be disturbed by incoming calls, you can activate Do Not Disturb. In this case, you will not receive audible or vibration signals for incoming calls (iPECS and cellular). When activated, the Registration status icon displays in red.
To toggle the DND state,
1. Press the Smartphone Menu.
2. Select the iPECS Communicator Setting tool icon.
3. Touch the DND check box.
4.3 Voice Mail When a Voice Mail number is configured, iPECS Communicator displays the Message Waiting icon when notified of new voice messages. By Expanding the Status bar, drag down, the unchecked voice message status displays.
To access your voice mail when the Voice Message Wait icon displays,
1. Drag the Status bar down to expand.
2. Select Unchecked voice messages and click OK.
3. You are connected to your voice mail through the iPECS host.
Communicator
Installation and Operation Guide Issue 1.1
14
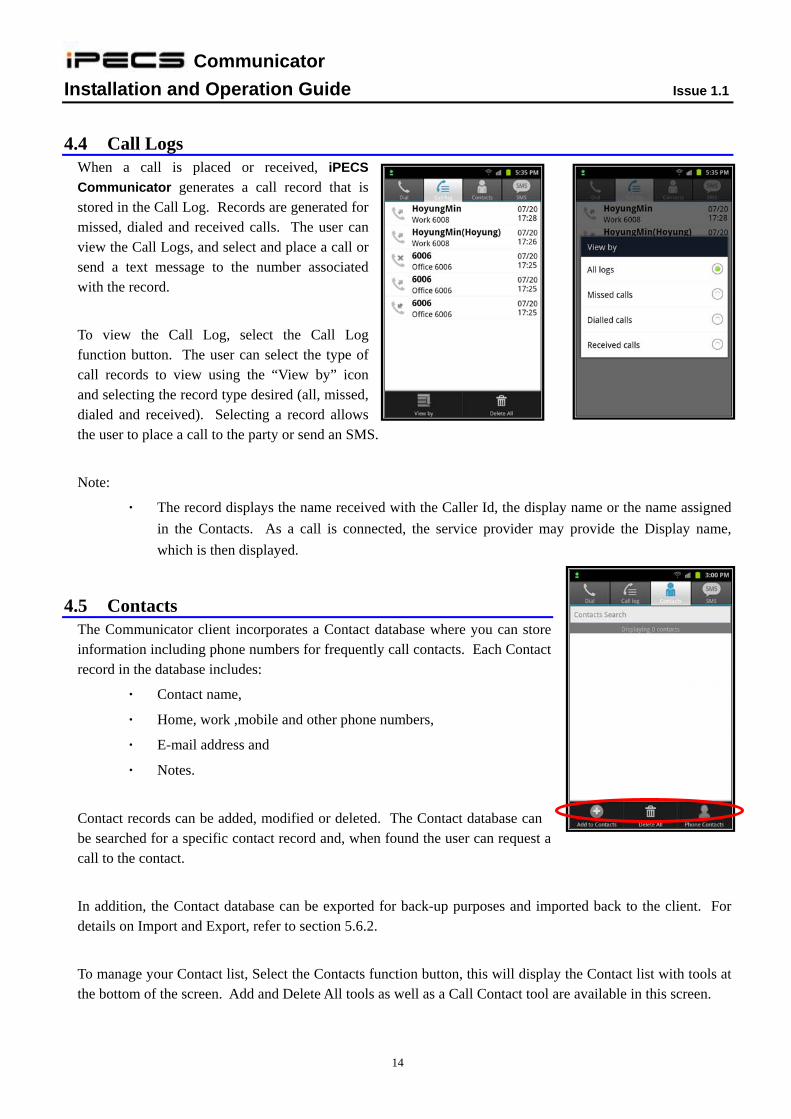
4.4 Call Logs When a call is placed or received, iPECS
Communicator generates a call record that is stored in the Call Log. Records are generated for missed, dialed and received calls. The user can view the Call Logs, and select and place a call or send a text message to the number associated with the record.
To view the Call Log, select the Call Log function button. The user can select the type of call records to view using the “View by” icon and selecting the record type desired (all, missed, dialed and received). Selecting a record allows the user to place a call to the party or send an SMS.
Note:
The record displays the name received with the Caller Id, the display name or the name assigned
in the Contacts. As a call is connected, the service provider may provide the Display name,
which is then displayed.
4.5 Contacts The Communicator client incorporates a Contact database where you can store information including phone numbers for frequently call contacts. Each Contact record in the database includes:
Contact name,
Home, work ,mobile and other phone numbers,
E-mail address and
Notes.
Contact records can be added, modified or deleted. The Contact database can be searched for a specific contact record and, when found the user can request a call to the contact.
In addition, the Contact database can be exported for back-up purposes and imported back to the client. For details on Import and Export, refer to section 5.6.2.
To manage your Contact list, Select the Contacts function button, this will display the Contact list with tools at the bottom of the screen. Add and Delete All tools as well as a Call Contact tool are available in this screen.

Communicator
Installation and Operation Guide Issue 1.1
15
To add a contact from the menu,
1. Select the Add tool from the Contact list.
2. Enter values for the various fields in the Add contact screen.
3. Touch Save to store the contact.
You can also access the Add Contact screen by selecting a Contact. In addition, you can edit a contact’s record by touching the contact name for more than one second.
To search the Contacts list, select the Contacts function icon, this displays the input Dial pad. To change to a QWERTY keyboard, select the text icon as shown.

Communicator
Installation and Operation Guide Issue 1.1
16
In the search box, after entering two (2) or more characters, the client searches the database starting with the Name field and progressing through the Number fields. When a contact is selected for more than one second, the contact’s number displays and a call can be placed with the Call button.
4.6 Short Message Service (SMS) Short Message Service (SMS) enables system users to exchange text messages. An SMS is prepared and sent to another user. When an SMS is received, you are notified with an audible alert or vibration alert and the new SMS status icon. Each SMS is stored in an SMS mailbox. Each user has an inbox, Sent box and draft box.
4.6.1 Receiving an SMS
When alerted to a new SMS mail,
1. Select the SMS function button, the message list displays messages in
the Inbox with the sender, time and date.
2. Select the message for display.
Note:
At the bottom of the SMS screen
are tools to call the sender, reply to
the sender or delete the message.

Communicator
Installation and Operation Guide Issue 1.1
17
4.6.2 Sending an SMS
To send an SMS to others,
1. Select the SMS function button.
2. In the lower part of the screen, touch “Write msg”.
3. In the “SMS Write screen”, touch the
receiver input box and enter the
station number for each recipient.
4. Touch the message area of the display
and enter your message.
5. Touch “Send message”.
Notes:
You can send a message to up to ten (10) receivers at one time. The station number of each
receiver is entered and separated by a comma.
Initially, the Entry dial pad may be shown, touch the Text ion to switch to the keyboard view.
A message can contain no more than 100-bytes with the iPECS-CM and MG or 80-bytes with the
iPECS LIK. Any byte limit assigned in the Smartphone may override these character limits.

Communicator
Installation and Operation Guide Issue 1.1
18
4.6.3 Managing SMS Mail boxes
When an SMS is sent, received or under preparation, it is assigned to one of the three mailbox types. In the SMS screen, you may select to change the current mailbox view.
To change the view,
1. Touch the bar indicating the current mailbox for more than one
second, the mailbox menu displays.
2. Select the radial button for the desired
mailbox, the list of messages in the
mailbox displays with the Delete All
icon at the bottom.
Notes:
For the Inbox, the number of both read and unread messages in indicted in the A/B format.
If a Message fails to send, it is stored in the Draft box and can be sent again from the draft box.
The message will be moved to the Sent box when the message is sent successfully.

Communicator
Installation and Operation Guide Issue 1.1
19
4.7 Paging The iPECS platforms incorporate a paging function where users can broadcast their voice to the speaker of phones of other users. iPECS Communicator can receive the page automatically by answering the page or you may need to answer the page. To enable automatic answer of a page, refer to section 5.2.4 for information on configuring automatic answer of a page.
To respond to a page when automatic answer is not enabled, touch the Answer button.
Note, when you answer a page with the Answer button, the page may be in progress.
4.8 Call Recording iPECS Communicator can record the audio for iPECS calls to the iPECS
Communicator memory. The recording is stored in the ‘sdcard/iPECS-Communicator/’ directory. The file is named with the year, month, day, minute and second the recording was started. The recording can be played using the media management application in the Smartphone.
To record calls, select the record button in the iPECS Communicator active call screen. The record button will turn red while recording is in-progress.
To stop recording, select the lit record button or terminate the call, recording stops and the record button will turn off. In addition, iPECS Communicator saves a wave file named for the year, month, day, hour, minute and second the recording started to the Smartphone sdcard/iPECS-Communicator/ directory.

Communicator
Installation and Operation Guide Issue 1.1
20
Note the file can be viewed by a standard multi-media application on the Smartphone, accessing the sdcard/iPECS-Communicator/name.wav recording file where the name is the year, month, day, minute, hour and second of the recording.

Communicator
Installation and Operation Guide Issue 1.1
21
5. Advanced Client Settings Advanced client settings are configured through the iPECS Communicator
Settings menu. The Setting menu is accessed via the main menu of the
Smartphone screen.
5.1 Call options setting Call Options allow configuration of various characteristics for the call environment. Characteristics including Codec type, DTMF type, WLAN and Mobile data use, Trunk Access Codes, etc. can be configured in the Options menu.
5.1.1 Use WLAN
As a default, iPECS Communicator employs WiFi to register and connect
with the iPECS host. To use WiFi technology to register and connect,
“Use WLAN” must be checked (enabled). When WLAN is not
enabled or available, iPECS Communicator may employ cellular data
service for registration and connection if mobile data is enabled as
discussed in section 5.1.3.
When a call is placed using mobile data, a warning message, indicating data
use charges may apply to the call, is displayed; the user can accept or
reject processing the mobile data call.

Communicator
Installation and Operation Guide Issue 1.1
22
5.1.2 Integrated Dial Features
Where desirable, calls can be placed over an available WiFi network or the
cellular mobile data network. When placing a call with “Integrated dial
features” enabled, the iPECS Communicator displays the Call Type
screen. You can select General Call to place the call over the cellular
mobile data network, or select Internet Call to use the available WiFi
network to place the iPECS call.
You can select General Call to place the call over the cellular mobile data
network, or select Internet Call to use the available WiFi network to place
the iPECS call.

Communicator
Installation and Operation Guide Issue 1.1
23
5.1.3 Outbound Selection
Where desirable, The default dialer calls can be placed over an available
WiFi network or the cellular mobile data network.
When placing a call with “Preferred Call Type → Always ask ” selected,
the default dialer calls displays the Call Type screen.
You can select General Call to place the call over the cellular
mobile data network, or select Internet Call to use the available WiFi
network to place the iPECS call.
You can select General Call to place the call over the cellular mobile data
network, or select Internet Call to use the available WiFi network to place
the iPECS call.

Communicator
Installation and Operation Guide Issue 1.1
24
5.1.4 Enable Mobile Data
As a default, iPECS Communicator employs an available WiFi network to
register and connect to the resources of the host iPECS platform. If enabled,
iPECS Communicator can register and connect to the host employing the
cellular carrier mobile data network. To allow operation of iPECS
Communicator over the mobile data network, check Enable mobile data.
You must have a mobile data subscription with a service provider and the
service must be available. Using mobile data services for iPECS
Communicator, you may incur service usage charges
Note that for more stable operation, it is recommended that TCP be
employed as the Transport Protocol. Note that the QOS when using mobile
data cannot be guaranteed.
When check disable mobile data alert, the assistance window according to
the mobile data usage charges can not come.
5.1.5 Auto Answer on Page
Users of the iPECS host can broadcast announcements employing the
paging feature. The page is delivered to the speaker of the standard iPECS
IP and digital phones. For iPECS Communicator, the user will receive
notification of the page but must answer the page in order to listen.
The client can be configured to answer the page signal automatically and play
the announcement over the speaker without the need for the user to take
any action. To allow iPECS Communicator to answer pages
automatically, “Auto-answer on page” must be enabled by checking the
associated box.

Communicator
Installation and Operation Guide Issue 1.1
25
5.1.6 Auto Reject CDMA Call
While you are on an iPECS call and a call arrives from your cellular
service provider, iPECS Communicator can automatically reject the call
or present the call to you as discussed in section 3.6. In the Call Options
menu, enable (check) “Auto reject CDMA call” so cellular calls are rejected
automatically during an iPECS call.
Note:
The cellular network does not recognize incoming iPECS calls; you
will not be notified of incoming iPECS calls while on a cellular call.
5.1.7 Speaker phone On/Off
The client can activate the Smartphone speaker if the Speakerphone
function is enabled. When enabled and activated, audio is delivered to the
speaker of the Smartphone.
To enable the Speakerphone function, touch “Speakerphone On/Off”.
5.1.8 Trunk Access Code
Trunk Access Code
In order to provide a consistent dialing pattern between iPECS
Communicator and normal Smartphone cellular calls, the iPECS host
Trunk Access Code can be inserted automatically when dialing an external
iPECS call. The Trunk Access Code is inserted as the first digit when seven
or more digits are dialed.
To activate the automatic insertion of the access code,
1. From the Call Options screen, select Trunk Access Code.
2. Select Trunk Access Code from the Trunk Access Code screen.

Communicator
Installation and Operation Guide Issue 1.1
26
3. Enter the iPECS host Trunk Access Code.
4. Touch OK to store the data.
Note for the iPECS-CM, trunk access codes should not be configured. The iPECS-CM will analyze the dialed number to determine routing.
Station Start Digit Pattern (SSDP)
When the Trunk Access code is configured and seven or more digits are used in the Station Numbering Plan of the iPECS host, the client can be configured not to insert the access code when the digit pattern matches the start digits of a Station number. For this, the client must be configured with the first digits of stations with more than a six-digit number, the Station Start Digit Pattern. The ‘#’ digit may be entered as a wild card digit and any digit dialed will be accepted as a match for the ‘#’. Note multiple SSDPs can be configured when the iPECS host station numbers vary in length. Only the SSDP for station numbers of seven or more digits need be entered.
To configure the SSDP,
1. Select Trunk Access Code from the
Call Options screen.
2. Select one of the SSDP entries.
3. Enter the first digits of the Station
numbering plan (maximum 6 digits).
4. Touch OK to store the data.

Communicator
Installation and Operation Guide Issue 1.1
27
5.1.9 DTMF Type
The client can send DTMF (Dual Tone Multi-Frequency) dialing signals to the iPECS host primarily for voice mail access. The iPECS host must also be set to the same DTMF signaling type. The client can be configured to send DTMF as In-band, RFC2833 or Info signals.
To configure the DTMF type,
1. select DTMF type from the Call
Options screen,
2. Touch the radial button for the type
of DTMF signal desired.
5.1.10 Codec Priority
iPECS Communicator employs a codec to convert analog audio signals to a digital representation. As a default, the G.729 codec is employed. The codec can be changed to improve voice quality however, this increases the bandwidth required. The G.729 codec requires about 24-kbps while the G.711 u-Law (US standard) and A-law (European standard) codecs each require about 80-kbps.
To select a codec,
1. Select the Codec Sequence from the Call
Options screen.
2. Select the codec radial button.
Communicator
Installation and Operation Guide Issue 1.1
28
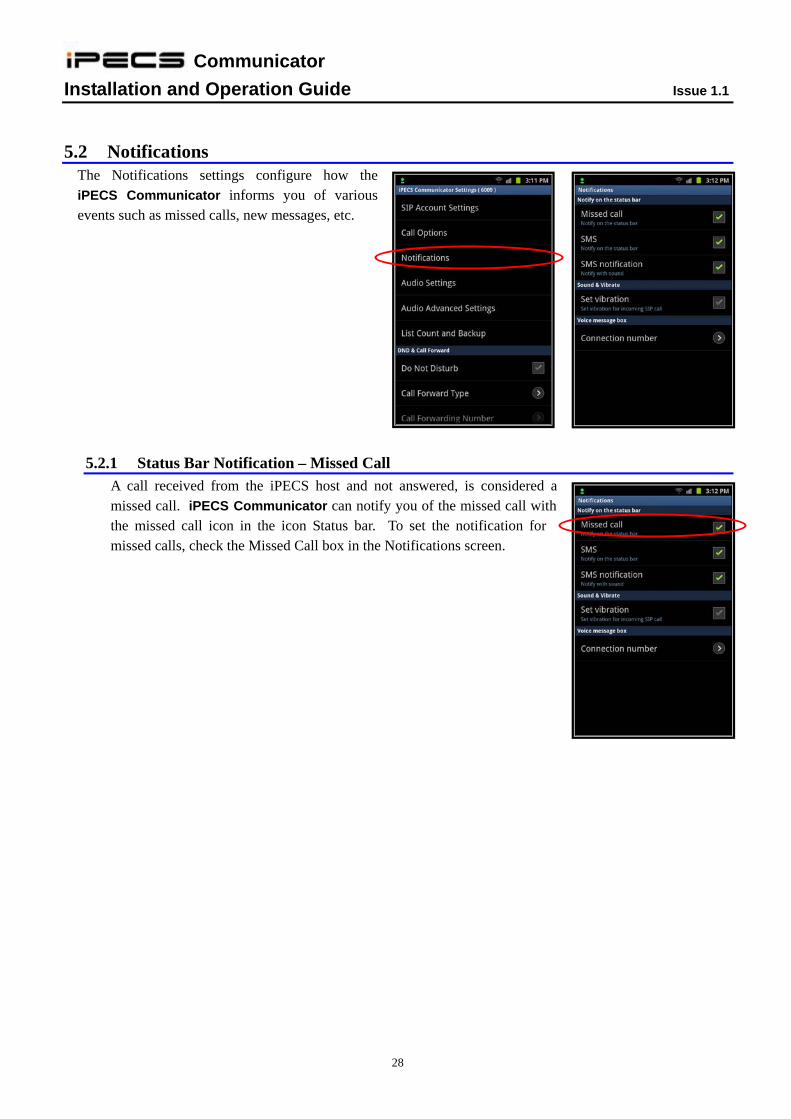
5.2 Notifications The Notifications settings configure how the iPECS Communicator informs you of various events such as missed calls, new messages, etc.
5.2.1 Status Bar Notification – Missed Call
A call received from the iPECS host and not answered, is considered a missed call. iPECS Communicator can notify you of the missed call with the missed call icon in the icon Status bar. To set the notification for missed calls, check the Missed Call box in the Notifications screen.

Communicator
Installation and Operation Guide Issue 1.1
29
5.2.2 Status Bar Notification - SMS
Generally, you are notified of a new SMS with a short alert tone. In lieu of the tone, iPECS Communicator can alert you of received text messages with the SMS icon in the Status bar. To receive the SMS notification via the Status bar icon, the SMS check box in the Notifications setting screen. Note this will disable the audible alerting.
5.2.3 SMS Notification
When an SMS is received, iPECS Communicator normally provides a short tone burst. This can be disabled with the SMS notification icon. If icon notification refer to section 5.2.2 is enabled, the audible SMS notification is disabled.

Communicator
Installation and Operation Guide Issue 1.1
30
5.2.4 Sound & vibration
Normally, iPECS Communicator employs audible signals to notify you of new calls (ringing) and a short tone signals a new SMS message. In some situations, a vibration can be used in place of the audible signal.
To set vibration as the notification, in the Notifications screen select Set Vibration.
Note:
For a new SMS, if Status bar notification is enable (refer to section
5.2.2), audible alerting is disabled.
If Vibration alerting is set in the Smartphone, vibration notification
is used even though vibration is not enabled in the Communicator
client.
5.2.5 Voice Message Box
For proper operation of Voice Mail services, iPECS Communicator must be configured with the Voice Mail number. This is the number that the iPECS Communicator calls to retrieve voice messages; typically, the Voice Mail group number in the host iPECS system is used.

Communicator
Installation and Operation Guide Issue 1.1
31
5.3 Audio settings iPECS Communicator provides a default volume adjustment for receive audio gain to the Smartphone earpiece and headset, as well as transmit audio gain for the Smartphone microphone and headset Mic. One of six levels can be selected for the default audio levels.
To set the audio levels,
1. Select the device (Earpiece, Microphone, Headset earpiece or Headset
Mic.
2. Select the desired default audio level from lowest to highest as shown in
the figure below. Note the default level for all gains is set at ‘Little
High’.
5.4 Audio Advanced settings Various digital audio processing characteristics of the client can be modified to best suit the environment. The following characteristics can be defined. Note several preset processing characteristics can be selected from the Setup Wizard as detailed in section 5.7.
Use NS, Noise suppression on/off, default on
NS Mode, Noise suppression mode, default mode 3,
0: NS Unchanged
1: NS Default
2: NS Conference
3: NS Low Suppression

Communicator
Installation and Operation Guide Issue 1.1
32
4: NS Moderate Suppression
5: NS High Suppression
6: NS_VERY_HIGH_SUPPRESSION
Use AGC, Automatic Gain Control on/off control, default on
AGC Mode, default 3
0: AGC Unchanged
1: AGC default
2: AGC Adaptive Analog
3: AGC Adaptive Digital
4: AGC Fixed Digital
Use EC, Echo Cancelation, default off,
EC mode, default 5
0: EC_UNCHANGED
1: EC_DEFAULT
2: EC_CONFERENCE
3: EC_AEC
4: EC_AES
5: EC_AECM
6: EC_NEC_IAD
AECM Mode, Automatic Echo Cancellation mode, default 3
0: VAD_CONVENTIONAL
1: VAD_AGGRESSIVE_LOW
2: VAD_AGGRESSIVE_MID
3: VAD_AGGRESSIVE_HIGH
AES Mode
AES Attenuation
Enable CNG, off
Use VAD, Voice Activity Detection, default off
VAD Mode, default 0
0: VAD_CONVENTIONAL
1: VAD_AGGRESSIVE_LOW
2: VAD_AGGRESSIVE_MID
3: VAD_AGGRESSIVE_HIGH
VAD Disable DTX
Volume scaling, default 1.2

Communicator
Installation and Operation Guide Issue 1.1
33
5.5 List count and Back-Up
5.5.1 Maximum List Count
A large number of records in the Call log, Contact list and SMS boxes may introduce delays in database search processes. To avoid this issue, you can adjust the maximum number of records in the Call log, Contact list and SMS boxes. When the maximum number of records in the Call log or SMS boxes is reached, the oldest item is deleted. If the number of contacts reaches the maximum, you must erase a contact to enter a new one. As a default, the maximum number of records for the Call log and Contact list is 500 each. The maximum number of SMS messages is 1000.
To adjust the number of records for a list,
1. Select the desired list from the List
Count and Backup screen.
2. Enter the desired maximum number
of records for the list.
5.5.2 Backup User Data -Export/Import-
User data including the Call log, Contact list and SMS boxes can be exported as a backup and, if needed, imported to the client. The data is stored in the Smartphone SD card as an XML file.

Communicator
Installation and Operation Guide Issue 1.1
34
To export user data,
1. Select Data Export/Import from the List Count and Backup screen.
2. Select Export User Data, the data is stored in the sdcard/iPECS-Communicator/User_Data.xml file.
To import the Backup User Data,
1. From the List Count and Backup screen, select Data Export/Import.
2. Select Import User Data, the client will upload the sdcard/iPECS-Communicator/User_Data.xml
file.
Note the file can be viewed by a standard browser or other xml file viewer
Communicator
Installation and Operation Guide Issue 1.1
35
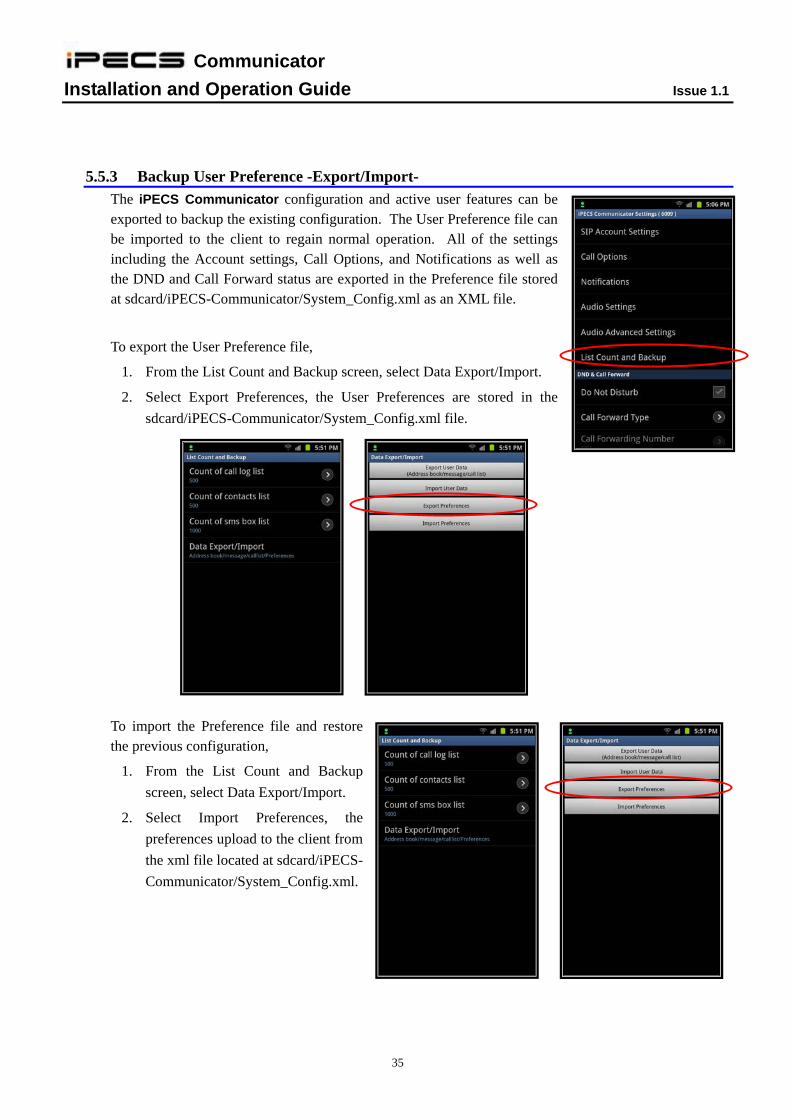
5.5.3 Backup User Preference -Export/Import-
The iPECS Communicator configuration and active user features can be exported to backup the existing configuration. The User Preference file can be imported to the client to regain normal operation. All of the settings including the Account settings, Call Options, and Notifications as well as the DND and Call Forward status are exported in the Preference file stored at sdcard/iPECS-Communicator/System_Config.xml as an XML file.
To export the User Preference file,
1. From the List Count and Backup screen, select Data Export/Import.
2. Select Export Preferences, the User Preferences are stored in the
sdcard/iPECS-Communicator/System_Config.xml file.
To import the Preference file and restore the previous configuration,
1. From the List Count and Backup
screen, select Data Export/Import.
2. Select Import Preferences, the
preferences upload to the client from
the xml file located at sdcard/iPECS-
Communicator/System_Config.xml.

Communicator
Installation and Operation Guide Issue 1.1
36
A sample of the User Preference file is shown and can be viewed by a standard browser of any XML viewer application.
5.6 Service on OS Startup iPECS Communicator can be configure to open and register with the iPECS host when the Smartphone is turned on. In this way, there is no need to register the iPECS Communicator manually each time the application is opened. Refer to section 2.3 for details on registration.
To configure the client to open and register when the Smartphone is turned on, from the iPECS Communicator Setting screen check the “Service on OS startup” box.
5.7 Setup Wizard The Setup Wizard permits the Client to return to default values, and several preset audio processing configurations are provided.

Communicator
Installation and Operation Guide Issue 1.1
37
5.7.1 Reset Settings
All the settings for the client including the Account settings are returned to the default values using the “Reset settings” selection. After the settings are reset, in order to register the client with a host iPECS, the Account will need to be configured as detailed in section 2.3. Selecting OK returns the client to default.
5.7.2 Audio easy settings 1
Audio easy setting 1 is intended for general office environments. Audio processing characteristics, refer to section 5.5, of this setting are:
NS enable
NS mode: 3
AGC enable
AGC mode: 3
EC disable
AECM mode: 3
CNG disable
VAD disable

Communicator
Installation and Operation Guide Issue 1.1
38
5.7.3 Audio easy settings 2
Audio easy setting 2 is intended for office environments with high ambient noise. Audio processing characteristics, refer to section 5.5, of this setting are:
NS enable
NS enable: 3
AGC enable
AGC mode: 1
EC disable
AECM mode: 3
CNG disable
VAD disable

Communicator
Installation and Operation Guide Issue 1.1
39
Appendix A - Status Bar Icons Below is a description of the icons shown in the Status bar. The order of the icons is generally left to
right but may vary based on the Smartphone model and manufacturer. In addition, other icons may be
displayed by the phone depending on manufacturer.
Registration status icon,
green indicates registered with iPECS host
Registration status icon,
red indicates not registered or registered in DND or Call Forward
Missed Call icon,
an incoming call was not answered
Voice Message icon,
one or more new Voice messages have been received
SMS icon,
one or more SMS messages have been received
Audible Alert icon,
phone is in silent alert mode, no ring
Rotation icon,
auto-rotation active
GPS icon,
GPS is active
Bluetooth icon
Bluetooth wireless connection active
WiFi icon,
WiFi network connected
RSSI (Received Signal Strength Indicator) icon
typically one to four bars depending on strength of received signal
Battery state icon,
green color indicates battery condition is good
Communicator
Installation and Operation Guide Issue 1.1
40
Appendix B - Troubleshooting
1. The call does not end using the End button
While on a call the End button does not terminate the call. If the connection to the iPECS host is lost during a call due to loss of the wireless connection or other network problem, the End button will not terminate the call. To terminate the call, select the Back button, when the recent call list appears, touch record for the call.
2. While on the phone there is a high level of echo
In certain network situations where delay is high or when using the speakerphone, echo can become excessive. In this case, try modifying the Echo cancellation settings of the client. Use of a headset may be helpful when the cause of the Echo is the speakerphone or Smartphone.
3. The screen turns off after a call is placed or answered
When a call comes in, the screen illuminates. Depending on the no action timer in the Smart Phone, the screen turns off. With some Smartphones, tilting the phone may turn the display back on.
4. The iPECS host does not respond when the VM is called
Calls to the VM employ DTMF to signal the user authorization code and other information to the VM. The DTMF Type configured for the client must match the configuration in the iPECS Host.
5. Phone shows green registration icon but cannot place or receive
When the WiFi Access point or iPECS Communicator configuration change after registration or if a call ends due to a network failure, the iPECS Communicator may no longer be in communication with the iPECS host. In this case, the registration icon may indicate registered for the duration of the register timer, usually 1-hour. To correct the problem, unregister and register the client again. Refer to section 2.3 for registration details. Note if “Auto reject CDMA call” or the Smartphone equivalent is enabled, this is expected performance; calls are blocked but the client is registered with an iPECS host.
6. Call loses audio during a call
Audio may drop due to network issues or, with some Smartphones, when the phone is connected to the charger.

Communicator
Installation and Operation Guide Issue 1.1
41
Appendix C - Open Source Notice
Code Name Library or Function License Style
ld-2.3.1.so Shared Library
LGPL
libc-2.3.1.so GNU C Library
libcrypt-2.3.1.so Security-related library
libcrypto.so.0.9.8
libdl-2.3.1.so Dynamic Link Library
libm-2.3.1.so Math Library
libnss_ Detailed
instructions.so Name service switch Library
libpthread-0.10.so POSIX Thread Library
librt-2.3.1.so POSIX Real-time extensions
interface
libssl.so.0.9.8 SSL
libz.so.1.1.4 Compression library
RTP RTP
sRTP sRTP
SIP SIP Protocol
OpenSSL Secure Network BSD

www.ericssonlg.com© Ericsson-LG Co., Ltd. 2012
The contents of this document are subject to revision without notice due to continued progress in methodology, design and manufacturing. Ericsson-LG shall have no liability for any error or damage of any kind resulting from the use of this document.
CONNECTION A/S • LOKESVEJ 8 • 3400 HILLERØD • WWW.CONNECTION.DK • TELEFON 7010 6600


![iPECS CMdownload.ortemir.kiev.ua/EricssonLG/iPECS/CM/ELGE_iPECS... · 2018. 9. 3. · iPECS-CM Installation Manual Issue 1.2 [EU] European Union Declarations of Conformity Ericsson-LG](https://img.pdfslide.us/doc/110x75/6122db4eda2bba43a876244e/ipecs-2018-9-3-ipecs-cm-installation-manual-issue-12-eu-european-union-declarations.jpg)