Embed Size (px)
Citation preview
Installation and Configuration Manual

SharePoint Image Maps (V5.0.0.0) Manual
IMPORTANT YOU MUST READ AND AGREE TO THE TERMS AND CONDITIONS OF THE LICENSE BEFORE CONTINUING WITH THIS PROGRAM INSTALLATION. CIRRUS SOFT LTD End-User License Agreement ("EULA") is a legal agreement between you (either an individual or a single entity) and CIRRUS SOFT LTD. For the CIRRUS SOFT LTD software product(s) identified above which may include associated software components, media, printed materials, and "online" or electronic documentation ("SOFTWARE PRODUCT"). By installing, copying, or otherwise using the SOFTWARE PRODUCT, you agree to be bound by the terms of this EULA. This license agreement represents the entire agreement concerning the program between you and CIRRUS SOFT LTD, (referred to as "licenser"), and it supersedes any prior proposal, representation, or understanding between the parties. If you do not agree to the terms of this EULA, do not install or use the SOFTWARE PRODUCT. The SOFTWARE PRODUCT is protected by copyright laws and international copyright treaties, as well as other intellectual property laws and treaties. The SOFTWARE PRODUCT is licensed, not sold.
Page ii
©2018 SharePoint Image Maps (CIRRUS SOFT LTD). All rights reserved.
SharePoint Image Maps (V5.0.0.0) Manual
Page iii
©2019 SharePoint Image Maps (CIRRUS SOFT LTD). All rights reserved.
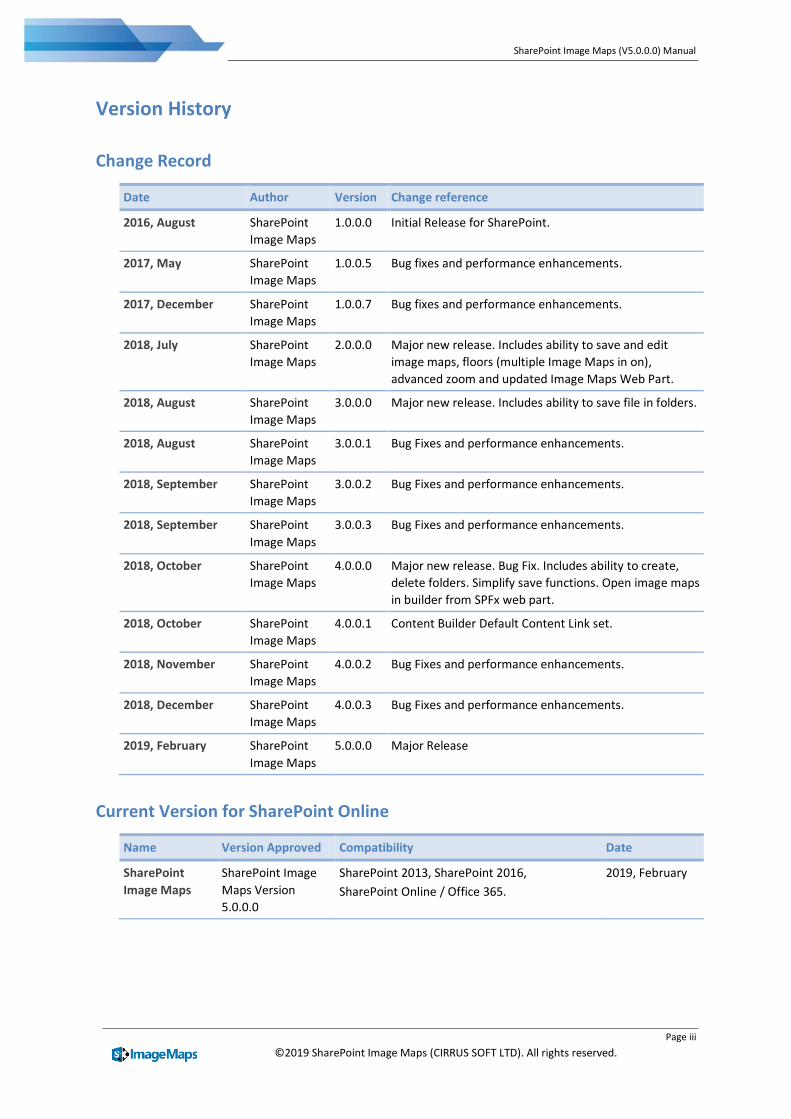
Version History
Change Record
Date Author Version Change reference
2016, August SharePoint
Image Maps
1.0.0.0 Initial Release for SharePoint.
2017, May SharePoint
Image Maps
1.0.0.5 Bug fixes and performance enhancements.
2017, December SharePoint
Image Maps
1.0.0.7 Bug fixes and performance enhancements.
2018, July SharePoint
Image Maps
2.0.0.0 Major new release. Includes ability to save and edit
image maps, floors (multiple Image Maps in on),
advanced zoom and updated Image Maps Web Part.
2018, August SharePoint
Image Maps
3.0.0.0 Major new release. Includes ability to save file in folders.
2018, August SharePoint
Image Maps
3.0.0.1 Bug Fixes and performance enhancements.
2018, September SharePoint
Image Maps
3.0.0.2 Bug Fixes and performance enhancements.
2018, September SharePoint
Image Maps
3.0.0.3 Bug Fixes and performance enhancements.
2018, October SharePoint
Image Maps
4.0.0.0 Major new release. Bug Fix. Includes ability to create,
delete folders. Simplify save functions. Open image maps
in builder from SPFx web part.
2018, October SharePoint
Image Maps
4.0.0.1 Content Builder Default Content Link set.
2018, November SharePoint
Image Maps
4.0.0.2 Bug Fixes and performance enhancements.
2018, December SharePoint
Image Maps
4.0.0.3 Bug Fixes and performance enhancements.
2019, February SharePoint
Image Maps
5.0.0.0 Major Release
Current Version for SharePoint Online
Name Version Approved Compatibility Date
SharePoint
Image Maps
SharePoint Image
Maps Version
5.0.0.0
SharePoint 2013, SharePoint 2016,
SharePoint Online / Office 365.
2019, February
SharePoint Image Maps (V5.0.0.0) Manual
Page iv
©2019 SharePoint Image Maps (CIRRUS SOFT LTD). All rights reserved.
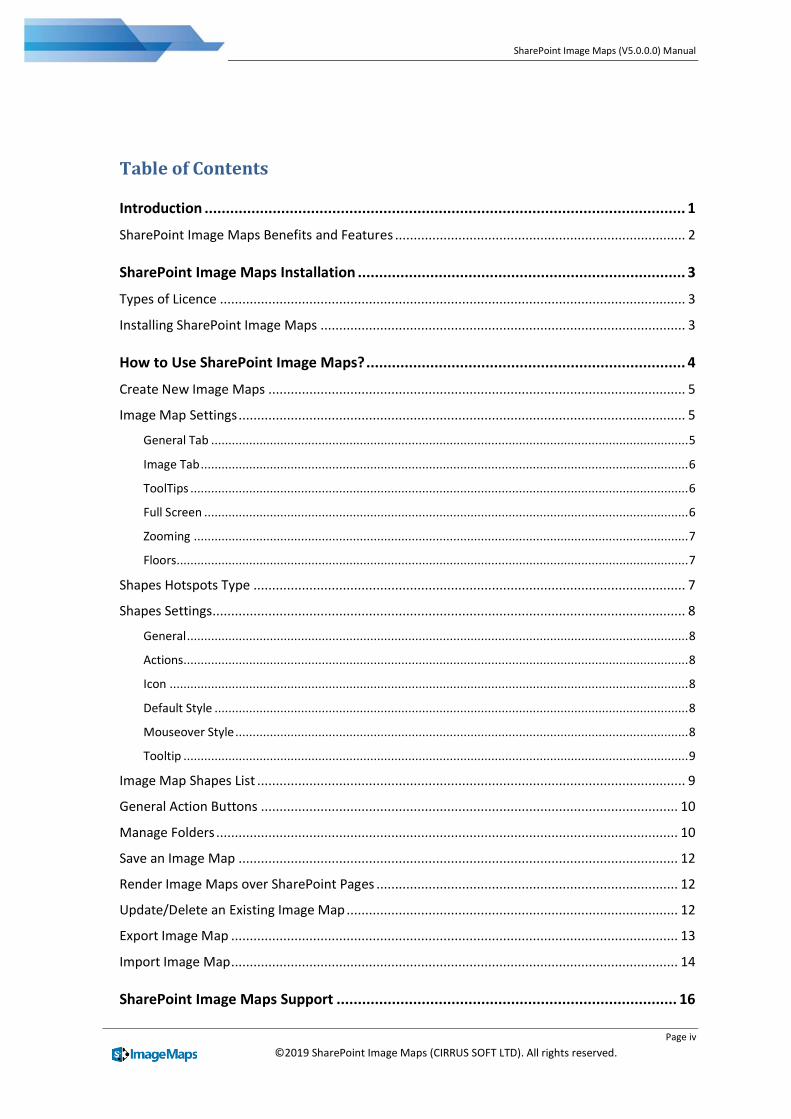
Table of Contents
Introduction ................................................................................................................. 1
SharePoint Image Maps Benefits and Features .............................................................................. 2
SharePoint Image Maps Installation ............................................................................. 3
Types of Licence ............................................................................................................................. 3
Installing SharePoint Image Maps .................................................................................................. 3
How to Use SharePoint Image Maps? ........................................................................... 4
Create New Image Maps ................................................................................................................ 5
Image Map Settings ........................................................................................................................ 5
General Tab .......................................................................................................................................... 5
Image Tab ............................................................................................................................................. 6
ToolTips ................................................................................................................................................ 6
Full Screen ............................................................................................................................................ 6
Zooming ............................................................................................................................................... 7
Floors.................................................................................................................................................... 7
Shapes Hotspots Type .................................................................................................................... 7
Shapes Settings............................................................................................................................... 8
General ................................................................................................................................................. 8
Actions.................................................................................................................................................. 8
Icon ...................................................................................................................................................... 8
Default Style ......................................................................................................................................... 8
Mouseover Style ................................................................................................................................... 8
Tooltip .................................................................................................................................................. 9
Image Map Shapes List ................................................................................................................... 9
General Action Buttons ................................................................................................................ 10
Manage Folders ............................................................................................................................ 10
Save an Image Map ...................................................................................................................... 12
Render Image Maps over SharePoint Pages ................................................................................. 12
Update/Delete an Existing Image Map ......................................................................................... 12
Export Image Map ........................................................................................................................ 13
Import Image Map ........................................................................................................................ 14
SharePoint Image Maps Support ................................................................................ 16

SharePoint Image Maps (V5.0.0.0) Manual
Page v
©2019 SharePoint Image Maps (CIRRUS SOFT LTD). All rights reserved.
SharePoint Image Maps (V5.0.0.0) Manual
Page 1
©2019 SharePoint Image Maps (CIRRUS SOFT LTD). All rights reserved.
Introduction
SharePoint Image Maps is THE SharePoint Add-in to create interactive images with eye-catching
content from within SharePoint. For the uninitiated, an image map is one image with multiple
"clickable" hotspots.
An image like this with clickable regions, can replace the need for custom page layout design and
several text links or buttons on a SharePoint page, making the page look sharper and offering visitors
a more intuitive user interface.
How does SharePoint Image Maps Work?
With our easy to use, advanced drag and drop editor you can quickly customise, edit and generate
image maps for any image without coding. Simply choose your Image, define the selected areas of
your image, set actions and display content for when you roll over these areas.
Images contained within a Picture Library will have the option to create an Image Map directly from
the image's Context Menu. You can even set the content text to be taken from a SharePoint List for
easy updates. The generated Image Map is fully responsive and optimised to work across all devices.
SharePoint Image Maps (V5.0.0.0) Manual
Page 2
©2019 SharePoint Image Maps (CIRRUS SOFT LTD). All rights reserved.
SharePoint Image Maps Benefits and Features
SharePoint Image Maps SharePoint Image Maps is THE SharePoint Add-in to create interactive images
with eye-catching content from within SharePoint. Create stunning user-facing content and interfaces.
• ADVANCED DRAG-AND-DROP EDITOR
• SAVE IMAGE MAPS WITH FOLDER STRUCTURE FOR EASY ACCESS
• RESPONSIVE AND OPTIMIZED FOR TOUCHSCREEN
• IMAGE MAP WEB PART TO INSERT INTO ANY SHAREPOINT PAGE
• POLYGON, ICON, RECTANGLE AND ELLIPSE SHAPES
• READ TOOLTIP CONTENT FROM SHAREPOINT LIST
• MULTIPLE FLOORS
• IMPORT SVG
• DRAW TEXT
• FONT AWESOME ICONS LIBRARY
• CONNECTED SHAPES
• ZOOMING CAPABILITY
• RUN SCRIPT ON SHAPE CLICK
• CUSTOM TOOLTIP POSITION
• IMAGE BACKGROUNDS
• MENU
• EXCELLENT CUSTOMER SUPPORT!
SharePoint Image Maps (V5.0.0.0) Manual
Page 3
©2019 SharePoint Image Maps (CIRRUS SOFT LTD). All rights reserved.
SharePoint Image Maps Installation
Types of Licence
SharePoint Image Maps is made available from the Office Store (per user licence) and directly from Cirrus Soft (for Site, Site Collection and Farm/Tenant licence)
Installing SharePoint Image Maps
To add an app from the SharePoint Store
1. Verify that the user account that is performing this procedure is a member of the site owners
group.
2. On the home page, under ‘Get started’ with your site click Add lists, libraries, and other apps.
3. If the Get started with your site control does not appear on the home page, click the settings
icon, and click view site contents, and then on the site contents page, click add an App.
4. Click SharePoint Store.
5. Browse the SharePoint Store for “SharePoint Image Maps”.
6. Click the SharePoint Image Maps App.
7. Click details, and then click Buy It.
8. Follow the steps to log in and purchase the App, if required.
9. In the grant permission to an App dialog box, if you trust the App, click allow access.
10. The SharePoint Image Maps App is now added and appears in the Apps section of your site
contents list.
*For SharePoint 2013/2016 on premise installations you will be provided with the ‘imagemaps.app’
file to add to the app catalogue for the SharePoint Image Maps Add-in to be made available within
your SharePoint environment.
SharePoint Image Maps (V5.0.0.0) Manual
Page 4
©2019 SharePoint Image Maps (CIRRUS SOFT LTD). All rights reserved.
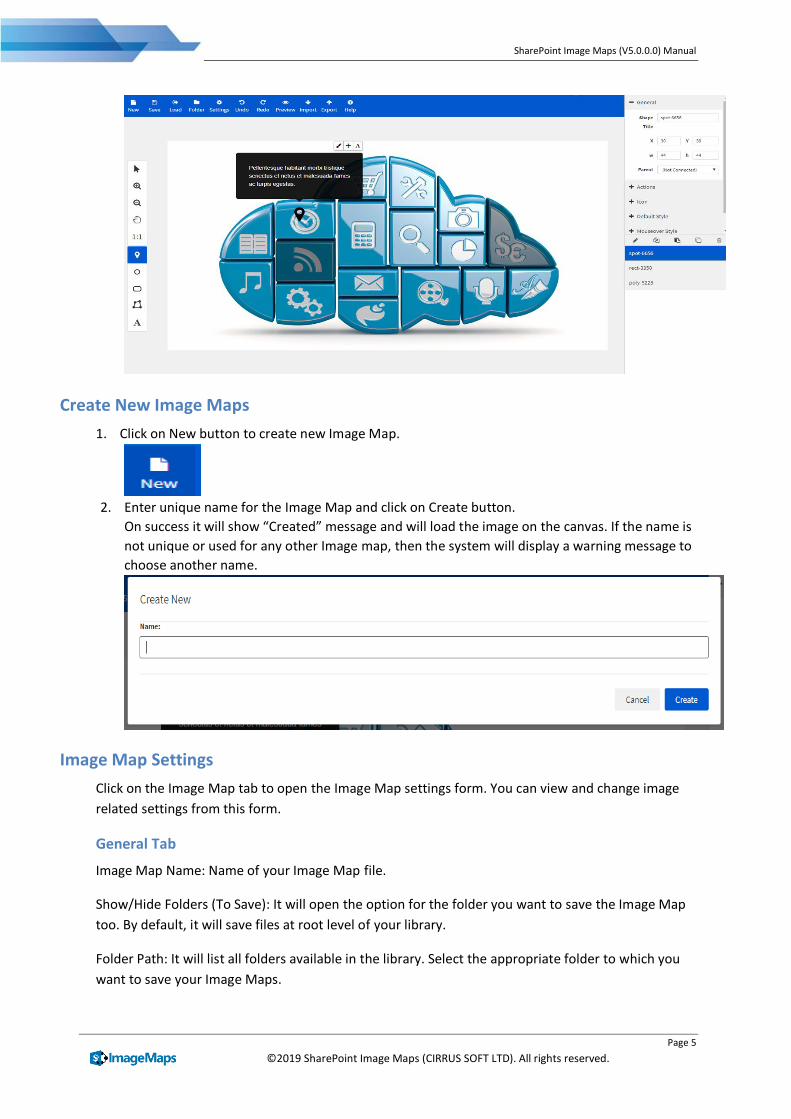
How to Use SharePoint Image Maps?
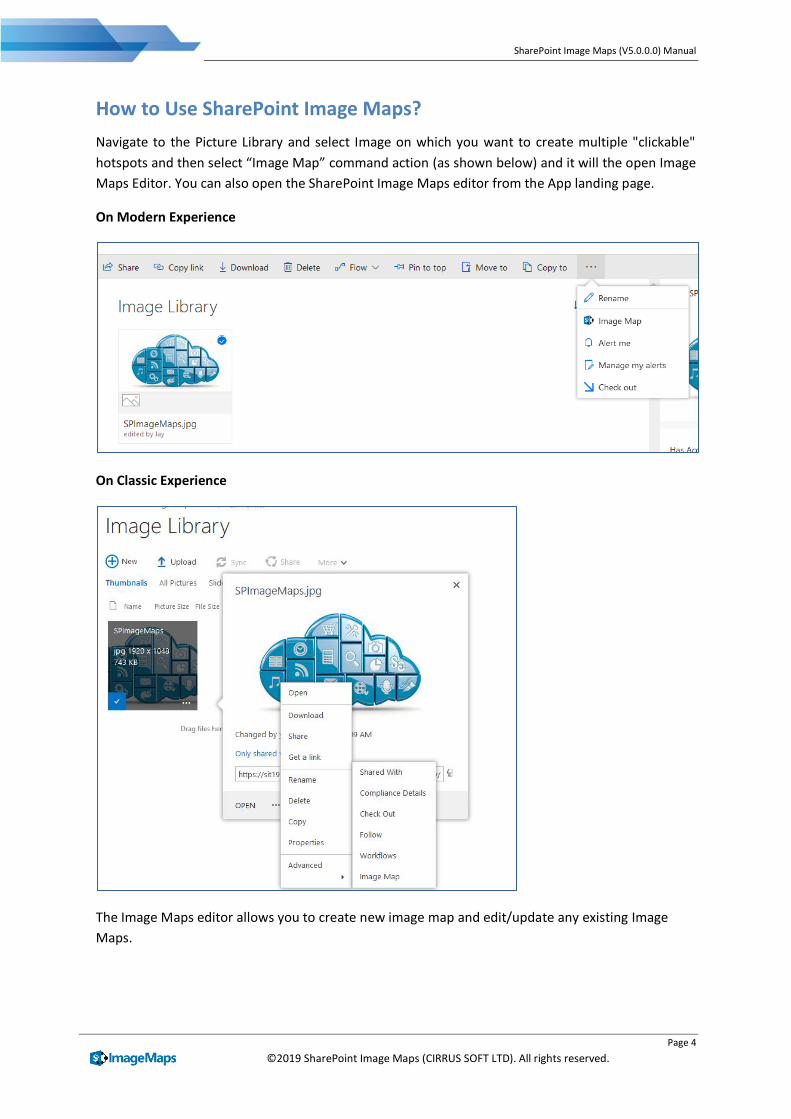
Navigate to the Picture Library and select Image on which you want to create multiple "clickable"
hotspots and then select “Image Map” command action (as shown below) and it will the open Image
Maps Editor. You can also open the SharePoint Image Maps editor from the App landing page.
On Modern Experience
On Classic Experience
The Image Maps editor allows you to create new image map and edit/update any existing Image
Maps.
SharePoint Image Maps (V5.0.0.0) Manual
Page 5
©2019 SharePoint Image Maps (CIRRUS SOFT LTD). All rights reserved.
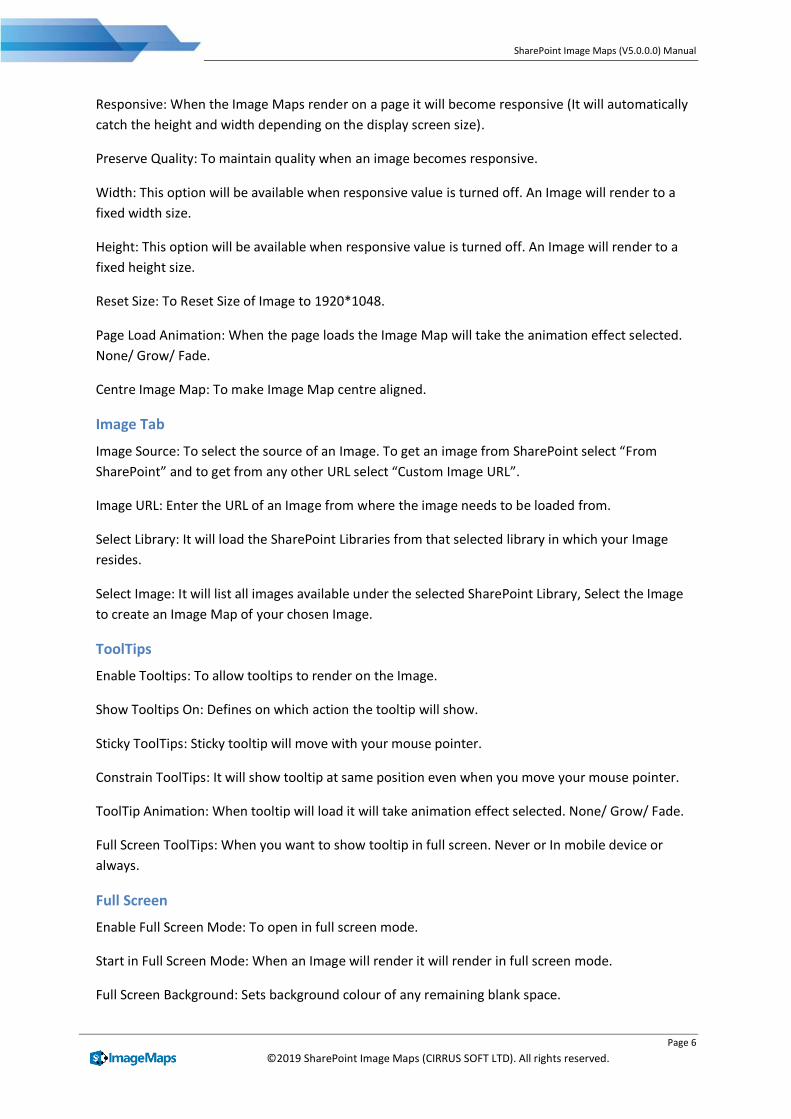
Create New Image Maps
1. Click on New button to create new Image Map.
2. Enter unique name for the Image Map and click on Create button.
On success it will show “Created” message and will load the image on the canvas. If the name is
not unique or used for any other Image map, then the system will display a warning message to
choose another name.
Image Map Settings
Click on the Image Map tab to open the Image Map settings form. You can view and change image
related settings from this form.
General Tab
Image Map Name: Name of your Image Map file.
Show/Hide Folders (To Save): It will open the option for the folder you want to save the Image Map
too. By default, it will save files at root level of your library.
Folder Path: It will list all folders available in the library. Select the appropriate folder to which you
want to save your Image Maps.
SharePoint Image Maps (V5.0.0.0) Manual
Page 6
©2019 SharePoint Image Maps (CIRRUS SOFT LTD). All rights reserved.
Responsive: When the Image Maps render on a page it will become responsive (It will automatically
catch the height and width depending on the display screen size).
Preserve Quality: To maintain quality when an image becomes responsive.
Width: This option will be available when responsive value is turned off. An Image will render to a
fixed width size.
Height: This option will be available when responsive value is turned off. An Image will render to a
fixed height size.
Reset Size: To Reset Size of Image to 1920*1048.
Page Load Animation: When the page loads the Image Map will take the animation effect selected.
None/ Grow/ Fade.
Centre Image Map: To make Image Map centre aligned.
Image Tab
Image Source: To select the source of an Image. To get an image from SharePoint select “From
SharePoint” and to get from any other URL select “Custom Image URL”.
Image URL: Enter the URL of an Image from where the image needs to be loaded from.
Select Library: It will load the SharePoint Libraries from that selected library in which your Image
resides.
Select Image: It will list all images available under the selected SharePoint Library, Select the Image
to create an Image Map of your chosen Image.
ToolTips
Enable Tooltips: To allow tooltips to render on the Image.
Show Tooltips On: Defines on which action the tooltip will show.
Sticky ToolTips: Sticky tooltip will move with your mouse pointer.
Constrain ToolTips: It will show tooltip at same position even when you move your mouse pointer.
ToolTip Animation: When tooltip will load it will take animation effect selected. None/ Grow/ Fade.
Full Screen ToolTips: When you want to show tooltip in full screen. Never or In mobile device or
always.
Full Screen
Enable Full Screen Mode: To open in full screen mode.
Start in Full Screen Mode: When an Image will render it will render in full screen mode.
Full Screen Background: Sets background colour of any remaining blank space.
SharePoint Image Maps (V5.0.0.0) Manual
Page 7
©2019 SharePoint Image Maps (CIRRUS SOFT LTD). All rights reserved.
Full Screen Button Position: Defines the position where the full screen button (To Go into Full screen
and Close Full Screen mode) will appear.
Button Type: Style of Full Screen Button (Icon/Text/Icon and Text)
Button Colour: Sets full Screen button background colour.
Button Icon/Text Colour: Sets full Screen button text/icon colour.
Zooming
Enable Zooming: To enable zoom mode for the Image Map.
Max Zoom: To set maximum zoom level.
Limit Max Zoom to Image Size: To set maximum zoom level same as the Image size.
Enable Navigator: To open a small window of your Image to navigate the Image during zooming
level.
Enable Zoom buttons: Enables zoom in and zoom out button.
Floors
Enable Floors: To create multi floor Image Map.
To add new floor, click on “+” icon available bottom of the floors list panel. Give a name to the floor
and select library and image to render on that floor.
To delete floor, select floor and click on “-“icon available bottom of the floors list panel. If you are
sure, on the confirmation page click “Delete” or “Cancel”.
To move level of floor, select up/down arrows. Down arrow is to move level down and up arrow is to
move level up.
To edit floor details, select floor from list and click on “Edit” button.
Shapes Hotspots Type
Icon: Select and click on the canvas where you want to put an icon hotspot.
Ellipse: Select and draw ellipse on canvas area where you want your hotspot.
Rectangle: Select and draw rectangle on canvas area where you want your hotspot.
Polygon: Select and put points to draw polygon on canvas. To complete drawing either press enter
or click on the first point of polygon.
Text: Select and put on canvas where you want to put a text hotspot.
SharePoint Image Maps (V5.0.0.0) Manual
Page 8
©2019 SharePoint Image Maps (CIRRUS SOFT LTD). All rights reserved.
Shapes Settings
General
X: Sets X co-ordinates of shape.
Y: Sets Y co-ordinates of shape.
Width: Sets width of shape.
Height: Sets height of shape.
Connected to Shape: To link two different shapes. Select the shape with which you want to connect
current shape. It will highlight both shapes at a time.
Actions
Click Action: When you click on a shape it will perform this action. Run script will run your script and
follow link will help to open a new link.
Link URL: Specify URL of the link that needs to be followed when clicked.
Open Link in New Window: To open link entered in the link URL section in a new window instead of
on the same window.
Script to Run: Specify the script which you need to run when the shape click action triggers.
Icon
Use Icon: To enable use of icon as a tooltip
Library: To get icons from library. Click on Choose from Library, select the icon which you want to
insert.
Custom: To get icons from any other URL, not from your library. Specify the icon URL in the Icon URL
input box.
Icon is a Pin: To show an icon as a Pin. It will show at little height like pinning to an area if selected.
Otherwise it will show at the same point where you placed it.
Icon Shadow: Show icon shadows.
Default Style
Opacity: Sets value of shapes background opacity.
SVG Icon Fill Colour: Sets colour of Icon inserted from library.
Mouseover Style
Copy from Default Styles: Sets same style as default style for the shape when mouse over action
trigger for the shape.
Opacity: Sets value of shapes background opacity to show when mouse over action triggers.
SharePoint Image Maps (V5.0.0.0) Manual
Page 9
©2019 SharePoint Image Maps (CIRRUS SOFT LTD). All rights reserved.
SVG Icon Fill Colour: Sets colour of Icon inserted from library to show when mouse over action
triggers.
Tooltip
Enable Tooltip: To enable tooltip on shapes click, mouseover or any action.
Border Radius: Sets radius of the tooltip shape.
Padding: Sets the space between content and the border of tooltip.
Background Colour: Sets background colour of the tooltip.
Background Opacity: Sets opacity of the tooltip background.
Position: At which position tooltip should show when it appears.
Auto width: To enable auto width of the tooltip.
ToolTip Content: Defines types of tooltip content. Plain Text or any builder like paragraph, image,
video, heading, video, YouTube or button to show content from SharePoint list item.
ToolTip content
Click on Edit Content Builder, it will open the builder menu to build various types of tooltip content.
Drag and drop any element from Elements tab in container area and set property of it. To set
property of any element in container area and click on Gear Icon which will open settings form.
To add more element, click on Add Container button from container area. To delete any element,
select element and go to settings form and then click delete button.
Once you are done with building tooltip content close container area which will save your changes.
Plain Text
Tooltip Content: Shows entered text as tooltip content.
From SharePoint
Select List: Select list from which you want to take content for tooltip.
Select Field: Select field which you want to display from selected item as part of tooltip content.
Select Item: Select Item (record) which will be render as text content for tooltip.
Image Map Shapes List
This panel will list all shapes put on image. By clicking on a shape it will highlight the respected
element on image canvas.
Rename: Select shape and rename that shape to identify as per your descriptive name.
Copy Style: Select any shape form pane and click on Copy style and it will copy all text related styles.
SharePoint Image Maps (V5.0.0.0) Manual
Page 10
©2019 SharePoint Image Maps (CIRRUS SOFT LTD). All rights reserved.
Paste Style: Select any shape from pane and click on Paste Style and this will paste all copied style to
selected shape.
Duplicate Style: Select shape from pane and click on duplicate style and this will generate duplicate
shape on image with all styles.
Delete: To delete shape, select shape and click on delete and this will delete the shape drawn from
image.
General Action Buttons
Select: To Select any area of canvas.
Zoom In: To zoom in any area of canvas.
Zoom Out: To zoom out any area of canvas.
Drag Canvas: Hold spacebar or mouse key and drag canvas in editor window. Release at point where
you want to move canvas.
1:1: To Reset canvas zooms and pan level.
Undo: To undo last action performed.
Redo: To recover last deleted action performed.
Help: Opens Image Maps tool which presents how to use Image Map builder.
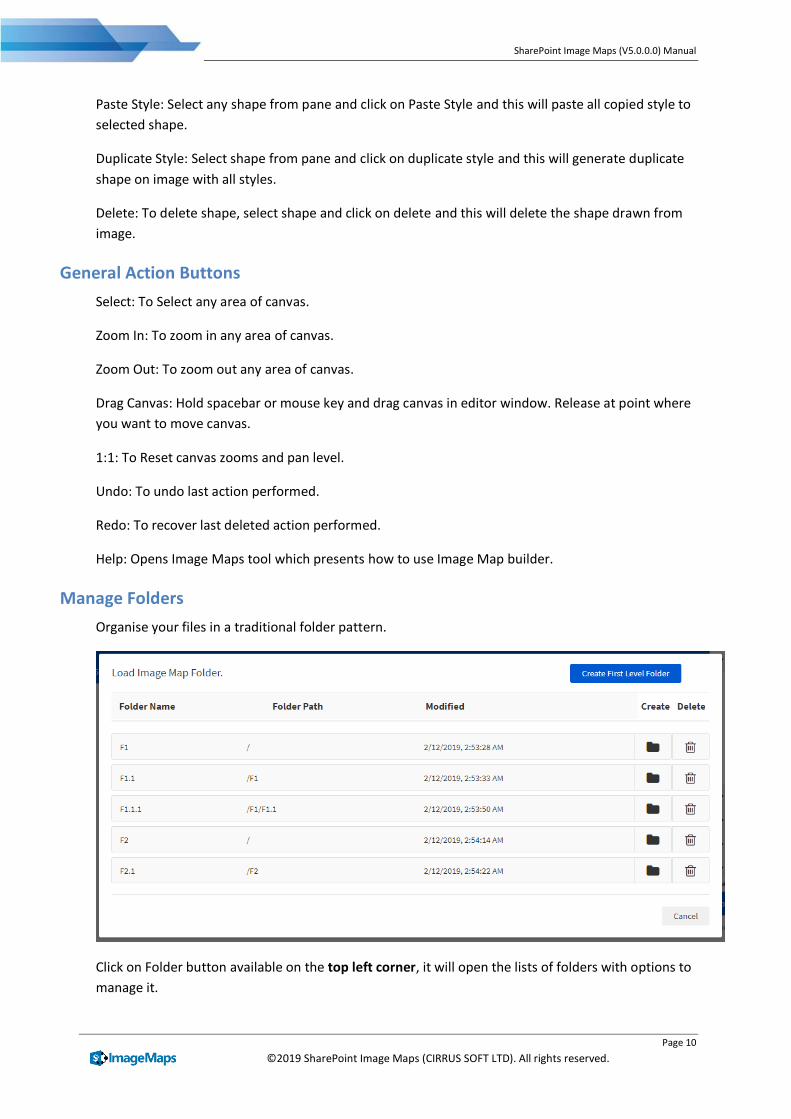
Manage Folders
Organise your files in a traditional folder pattern.
Click on Folder button available on the top left corner, it will open the lists of folders with options to
manage it.
SharePoint Image Maps (V5.0.0.0) Manual
Page 11
©2019 SharePoint Image Maps (CIRRUS SOFT LTD). All rights reserved.
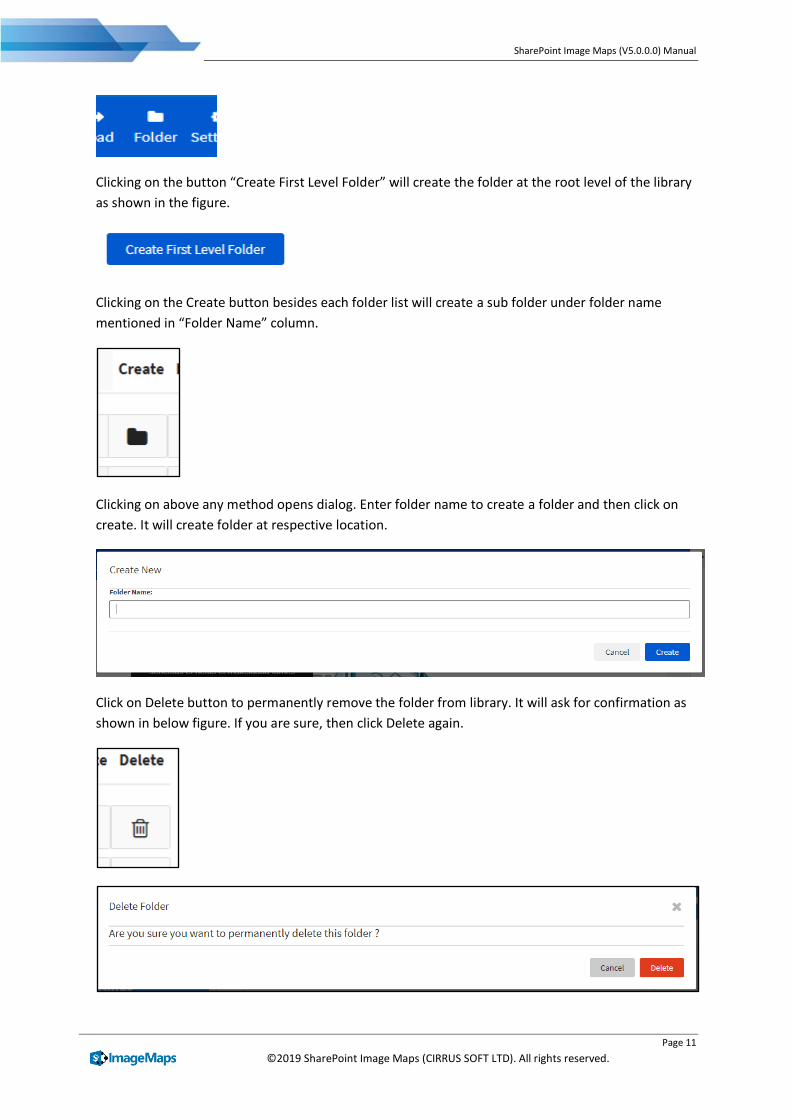
Clicking on the button “Create First Level Folder” will create the folder at the root level of the library
as shown in the figure.
Clicking on the Create button besides each folder list will create a sub folder under folder name
mentioned in “Folder Name” column.
Clicking on above any method opens dialog. Enter folder name to create a folder and then click on
create. It will create folder at respective location.
Click on Delete button to permanently remove the folder from library. It will ask for confirmation as
shown in below figure. If you are sure, then click Delete again.
SharePoint Image Maps (V5.0.0.0) Manual
Page 12
©2019 SharePoint Image Maps (CIRRUS SOFT LTD). All rights reserved.
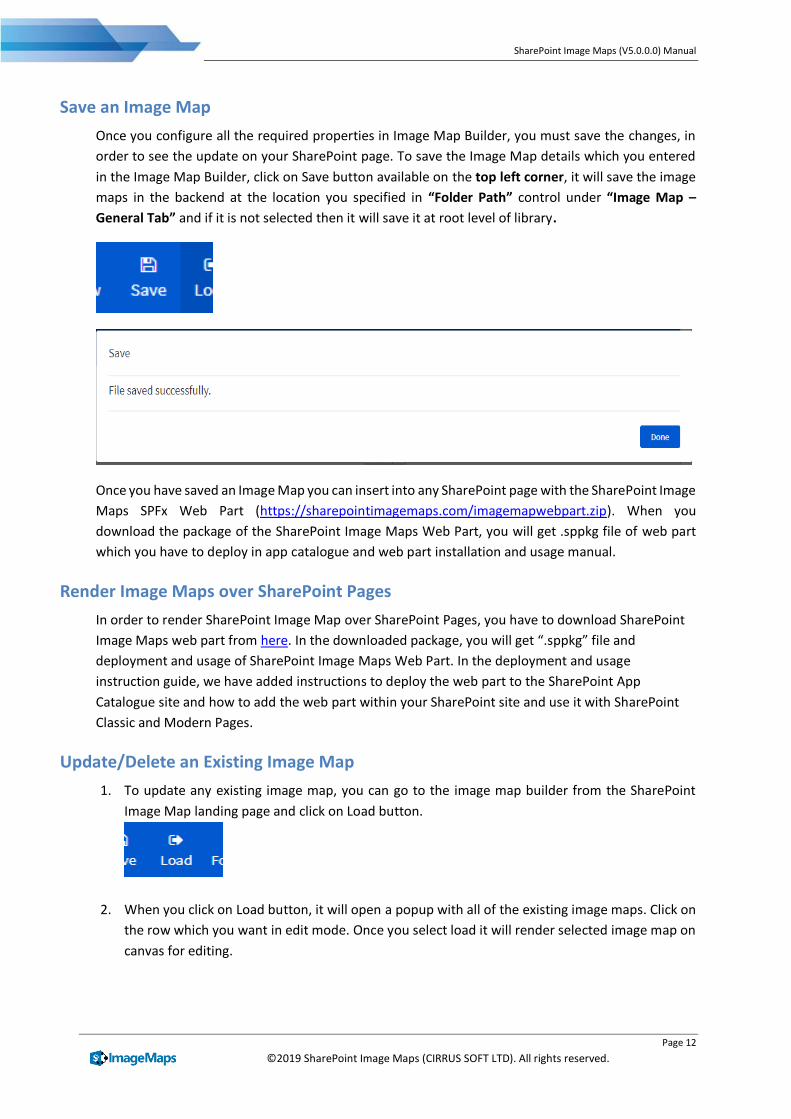
Save an Image Map
Once you configure all the required properties in Image Map Builder, you must save the changes, in
order to see the update on your SharePoint page. To save the Image Map details which you entered
in the Image Map Builder, click on Save button available on the top left corner, it will save the image
maps in the backend at the location you specified in “Folder Path” control under “Image Map –
General Tab” and if it is not selected then it will save it at root level of library.
Once you have saved an Image Map you can insert into any SharePoint page with the SharePoint Image
Maps SPFx Web Part (https://sharepointimagemaps.com/imagemapwebpart.zip). When you
download the package of the SharePoint Image Maps Web Part, you will get .sppkg file of web part
which you have to deploy in app catalogue and web part installation and usage manual.
Render Image Maps over SharePoint Pages
In order to render SharePoint Image Map over SharePoint Pages, you have to download SharePoint
Image Maps web part from here. In the downloaded package, you will get “.sppkg” file and
deployment and usage of SharePoint Image Maps Web Part. In the deployment and usage
instruction guide, we have added instructions to deploy the web part to the SharePoint App
Catalogue site and how to add the web part within your SharePoint site and use it with SharePoint
Classic and Modern Pages.
Update/Delete an Existing Image Map
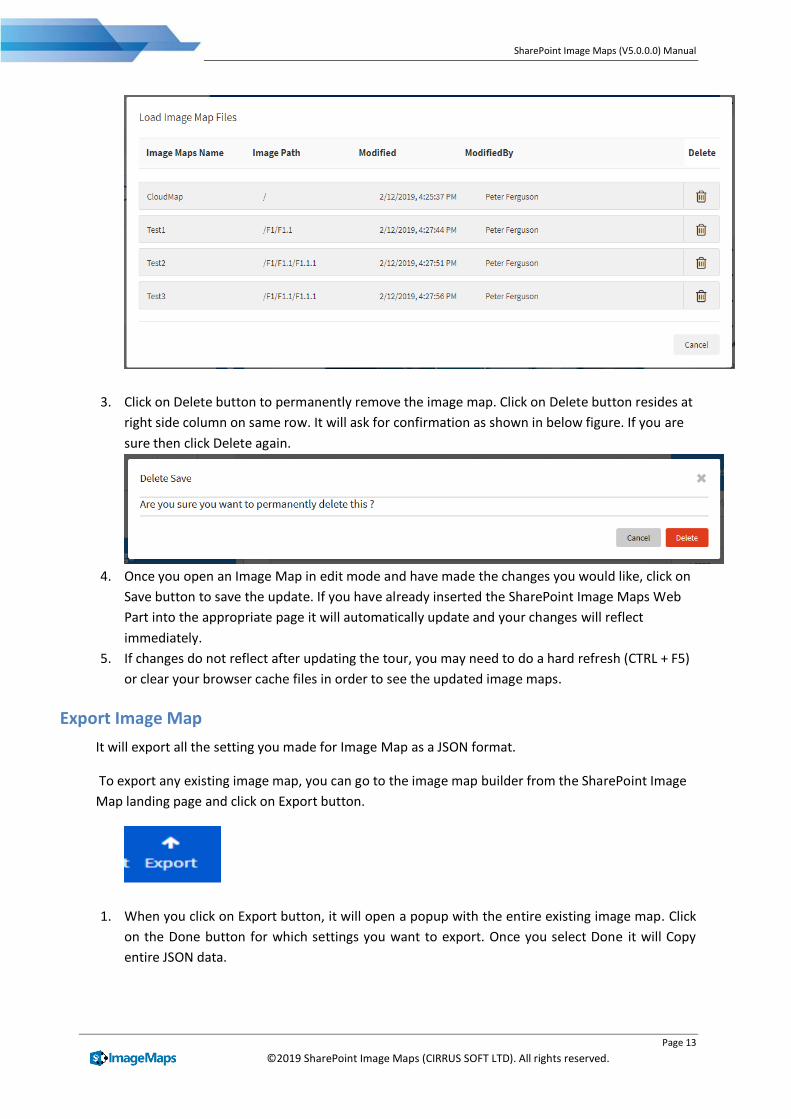
1. To update any existing image map, you can go to the image map builder from the SharePoint
Image Map landing page and click on Load button.
2. When you click on Load button, it will open a popup with all of the existing image maps. Click on
the row which you want in edit mode. Once you select load it will render selected image map on
canvas for editing.
SharePoint Image Maps (V5.0.0.0) Manual
Page 13
©2019 SharePoint Image Maps (CIRRUS SOFT LTD). All rights reserved.
3. Click on Delete button to permanently remove the image map. Click on Delete button resides at
right side column on same row. It will ask for confirmation as shown in below figure. If you are
sure then click Delete again.
4. Once you open an Image Map in edit mode and have made the changes you would like, click on
Save button to save the update. If you have already inserted the SharePoint Image Maps Web
Part into the appropriate page it will automatically update and your changes will reflect
immediately.
5. If changes do not reflect after updating the tour, you may need to do a hard refresh (CTRL + F5)
or clear your browser cache files in order to see the updated image maps.
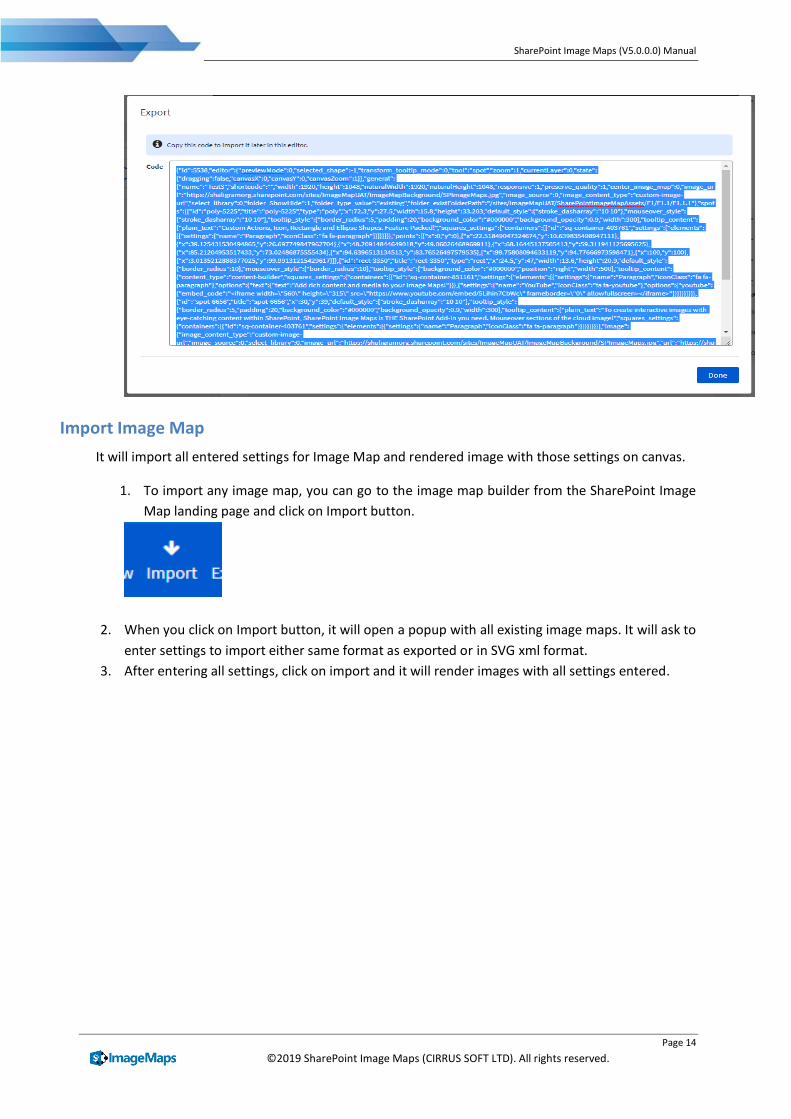
Export Image Map
It will export all the setting you made for Image Map as a JSON format.
To export any existing image map, you can go to the image map builder from the SharePoint Image
Map landing page and click on Export button.
1. When you click on Export button, it will open a popup with the entire existing image map. Click
on the Done button for which settings you want to export. Once you select Done it will Copy
entire JSON data.
SharePoint Image Maps (V5.0.0.0) Manual
Page 14
©2019 SharePoint Image Maps (CIRRUS SOFT LTD). All rights reserved.
Import Image Map
It will import all entered settings for Image Map and rendered image with those settings on canvas.
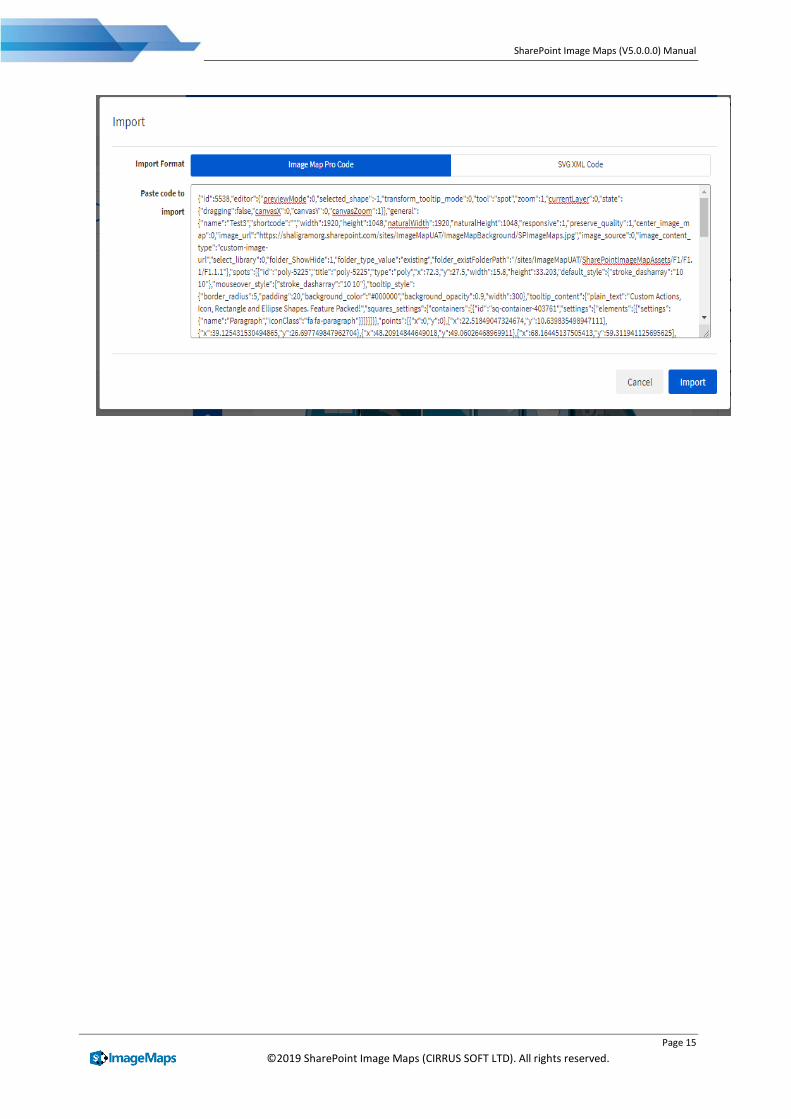
1. To import any image map, you can go to the image map builder from the SharePoint Image
Map landing page and click on Import button.
2. When you click on Import button, it will open a popup with all existing image maps. It will ask to
enter settings to import either same format as exported or in SVG xml format.
3. After entering all settings, click on import and it will render images with all settings entered.
SharePoint Image Maps (V5.0.0.0) Manual
Page 15
©2019 SharePoint Image Maps (CIRRUS SOFT LTD). All rights reserved.

SharePoint Image Maps (V5.0.0.0) Manual
Page 16
©2019 SharePoint Image Maps (CIRRUS SOFT LTD). All rights reserved.
SharePoint Image Maps Support
Thank you for choosing SharePoint Image Maps. If you require any further assistance please visit our online Support Centre or Contact Us.
http://cirrussoft.support https://sharepointimagemaps.com/support/