Embed Size (px)
Citation preview

Installation and Administration Guide
SMB/CIFS, AFP and HTTP
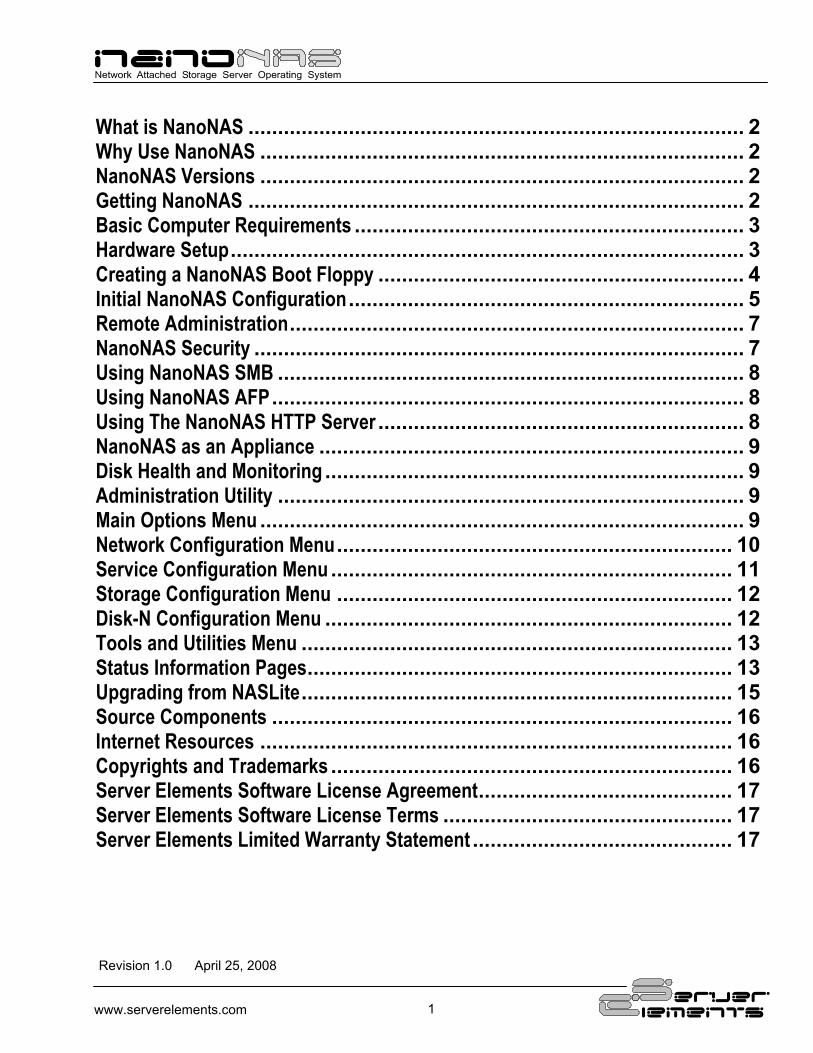
What is NanoNAS .................................................................................... 2 Why Use NanoNAS .................................................................................. 2 NanoNAS Versions .................................................................................. 2 Getting NanoNAS .................................................................................... 2 Basic Computer Requirements .................................................................. 3 Hardware Setup....................................................................................... 3 Creating a NanoNAS Boot Floppy .............................................................. 4 Initial NanoNAS Configuration ................................................................... 5 Remote Administration............................................................................. 7 NanoNAS Security ................................................................................... 7 Using NanoNAS SMB ............................................................................... 8 Using NanoNAS AFP ................................................................................ 8 Using The NanoNAS HTTP Server .............................................................. 8 NanoNAS as an Appliance ........................................................................ 9 Disk Health and Monitoring ....................................................................... 9 Administration Utility ............................................................................... 9 Main Options Menu .................................................................................. 9 Network Configuration Menu ................................................................... 10 Service Configuration Menu .................................................................... 11 Storage Configuration Menu ................................................................... 12 Disk-N Configuration Menu ..................................................................... 12 Tools and Utilities Menu ......................................................................... 13 Status Information Pages........................................................................ 13 Upgrading from NASLite......................................................................... 15 Source Components .............................................................................. 16 Internet Resources ................................................................................ 16 Copyrights and Trademarks .................................................................... 16 Server Elements Software License Agreement........................................... 17 Server Elements Software License Terms ................................................. 17 Server Elements Limited Warranty Statement ............................................ 17
erver
lements www.serverelements.com 1
Revision 1.0 April 25, 2008

What is NanoNAS NanoNAS is a Network Attached Storage (NAS) Server Operating System designed to transform a basic computer into a dedicated HTTP, SMB/CIFS or AFP file server. NanoNAS is intended for use in any low-security environment or application that requires the simultaneous availability of large amounts of inexpensive networked storage. A single NanoNAS server is capable of exporting terabytes of networked storage and is capable of handling 50 or more networked users easily and efficiently even when running on modest hardware. By design, NanoNAS is a community workgroup server and does not support features such as user management, disk quotas or the ability to join domains. However, it is very easy to set-up, to administer and to use.
Why Use NanoNAS NanoNAS is optimized to perform at maximum efficiency with minimum of hardware requirements. Designed with simplicity in mind, NanoNAS is compact, stable and very reliable. NanoNAS boots directly into RAM where it runs in a modestly sized 4MB RAM-Disk. This approach ensures consistent and reliable OS operation. NanoNAS offers the following features and benefits:
• Easy to operate and to administer • Inexpensive to run and maintain • Boots directly into RAM • Remote administration through TELNET • Simple configuration menus • Stable and reliable • SMB/CIFS and HTTP or AFS and HTTP
exported file systems • BIOS independent fixed disk drive support • Support for IDE (PATA) connected fixed
disk drives • Support for multiple IDE (PATA) interfaces • HTML-based status report pages • S.M.A.R.T. support • Large partition and file support • Extremely compact in size (Runs in an 4MB
RAM Disk) • Low hardware requirements
• Wide range of PCI hardware support (ISA and EISA not supported)
NanoNAS is designed to operate on commodity x86 computers. It is also well suited for re-using older PCs that are still operational but are too limited or slow for use as desktop computers. In addition, NanoNAS enables older computers with BIOS limitations to use contemporary, large-capacity IDE fixed disk drives without the need for additional hardware. As a network file server, NanoNAS may very well offer the highest possible storage capacity for the money. NanoNAS servers of 1 terabyte or more in storage space can be built for only a few hundred US dollars. For example, with NanoNAS you can easily take a retired Pentium 200MHz computer, install a couple of 300GB fixed disk drives and have a fast, reliable 600GB NanoNAS file server for a few dollars above the cost of the fixed disk drives. NOTE: NanoNAS is fully compatible with storage media from previous NASLite file server versions.
NanoNAS Versions NanoNAS is available in two versions as follows:
• NanoNAS SMB � Boots off of and saves configuration settings to floppy disk. Designed primarily for use with WindowsTM clients, it exports all available storage space via SMB/CIFS and HTTP.
• NanoNAS AFP � Boots off of and saves configuration settings to floppy disk. Designed primarily for use with Apple OS X clients, it exports all available storage space via AFP and HTTP.
Getting NanoNAS Downloadable ISO image of the NanoNAS Installation CD-ROM is available for purchase directly from the Server Elements website (www.serverelements.com). NOTE: NanoNAS is a commercial product and is not freely distributable. Please do not make or distribute
erver
lements www.serverelements.com 2

illegal copies. Doing so is not only illegal, but undermines our efforts and impedes our ability to develop the product.
Basic Computer Requirements NanoNAS is a network file server, so a fast computer is usually not necessary. Basic system requirements are:
• Pentium or better processor • PCI bus • 32M or more of RAM • 1 or more fixed disk drives • Conventional 3.5 inch floppy disk drive • PCI or on-board network interface adapter
NOTE: NanoNAS requires a conventional 3.5 inch high density floppy disk drive. The floppy disk drive must be set in the BIOS as the primary floppy disk drive (DOS drive A: or Linux device /dev/fd0). NOTE: USB floppy disk drives are not supported by NanoNAS. In dedicated file servers, the performance is most often limited by the network speed. Although fast processors will usually not improve performance, there are cases where low-quality network cards may generate large amount if interrupt request traffic, thus drastically increasing the CPU workload. In most cases however, that should not be a problem and therefore fast processor may not be required. A 200 MHz Pentium with 64M of RAM will be more than capable of servicing a typical small office. Additional RAM may be necessary if large-capacity fixed disks are used. For example, if 250GB fixed disks are used, 128M or more of RAM may be necessary for optimum performance.
Hardware Setup If you are preparing a computer for conversion to a NanoNAS file server and wish to replace or add fixed disk drives, do this now and be sure the computer will boot with the new fixed disk drives installed. If you are adding new PCI-to-IDE interfaces, ensure that system IRQs are properly assigned and no conflicts exist. In addition, since NanoNAS boots from a floppy disk, it is necessary to verify and set the BIOS boot order accordingly.
NOTE: On older computers, it�s recommended that you set the BIOS IDE fixed disk drive configuration for all large IDE fixed disk drives to �NOT INSTALLED� in order to avoid boot problems. NanoNAS does not use the BIOS to identify the available fixed disk drives. Computers with older BIOS may refuse to boot if unable to properly identify the installed fixed disk drives. Unlike its predecessors, NanoNAS supports additional PCI-to-IDE interfaces that can be used in order to increase the total number of storage disks. IDE storage interface drivers included with NanoNAS are as follows:
- ADMA100 IDE Driver - ALi 15x3 IDE Driver - AMD PCI IDE Driver - ARTOP AEC62xx IDE Driver - ATI IXP IDE Driver - CMD64x IDE - Compaq Triflex IDE - Cypress CY82C693 IDE - Cyrix/NS 5530 IDE - Highpoint 34x IDE - Highpoint HPT366 IDE - Intel PIIX IDE - NS SC1200 IDE - NS87415 IDE - Older Promise IDE - Opti621 IDE - Promise PDC20268 and higher - RZ1000 IDE - Serverworks OSB4/CSB5/CSB6 IDE - SiI IDE - SIS IDE - SLC90E66 IDE - Tekram TRM290 IDE - VIA IDE - Generic IDE (Without DMA Support)
For a complete list of IDE storage interface devices supported by the above drivers, refer to the NanoNAS Hardware Reference Guide To connect the NanoNAS server to the network, a PCI network interface is required. Many computers utilize a motherboard with a built-in or on-board PCI network interface and therefore will work fine. A general list of included PCI network interface adapters drivers as follows:
• 3Com 3c59x/3c9xx Ethernet Driver • 3Com Typhoon Family Ethernet Driver
erver
lements www.serverelements.com 3

• 8390 Ethernet Driver • Adaptec Starfire Ethernet Driver • AMD8111 based 10/100 Ethernet Driver • Broadcom 4400 10/100 Ethernet Driver • Davicom DM910X Ethernet Driver • DE4x5 Ethernet Driver • Digi Ethernet Driver • Digital 21*4* Tulip Ethernet Driver • HP CASCADE Ethernet Driver • Intel(R) PRO/100 Ethernet Driver • MII Ethernet Driver • Myson MTD-8xx Ethernet Driver • National Semiconductor DP8381x Ethernet
Driver • NE2000 Ethernet Driver • PCnet32 and PCnetPCI Ethernet Driver • RealTek RTL-8139 Ethernet Driver • RealTek RTL-8139C+ Ethernet Driver • Reverse Engineered nForce Ethernet Driver • SiS 900 PCI Ethernet Driver • SMC 83c170 EPIC Ethernet Driver • Sundance Alta Ethernet Driver • TI ThunderLAN Ethernet Driver • VIA Rhine Ethernet Driver • Winbond W89c840 Ethernet Driver
For a complete list of PCI network interface devices supported by the above drivers, refer to the NanoNAS Hardware Reference Guide
Creating a NanoNAS Boot Floppy In order to fit the operating system on a single 3.5 inch floppy disk, NanoNAS uses a specialized format of 1.72M as opposed to the 1.44M standard. In order to easily create such a floppy disk, the NanoNAS distribution CD-ROM includes an installation utility that aides in that process. The process of creating a NanoNAS boot floppy is as follows: Step 1 � Start the NanoNAS Installation Utility by booting your computer using the NanoNAS distribution CD-ROM. Note that the configuration and/or contents of your computer will remain intact since the NanoNAS Installation Utility runs entirely in memory. Step 2 � Once the boot process completes, the RAMDisk file system will be initialized and the CD-ROM mounted. Press ENTER to initialize the NanoNAS Installation Utility Menu.
Step-2
Step 3 � At the NanoNAS Installation Menu, select the version of the NanoNAS floppy disk you wish to make and press ENTER. Two versions are available as described earlier in the NanoNAS Versions section of this manual.
Step-3
Step 4 � Insert a blank, good quality 3.5 inch floppy disk in the floppy disk drive and press ENTER.
Step-4
erver
lements www.serverelements.com 4

Step 5 � The NanoNAS Installation Utility will format, transfer the software and verify the floppy disk. When finished, you will have a ready-to-use NanoNAS floppy disk of your choice.
Step-5
Initial NanoNAS Configuration Once the bootable NanoNAS floppy disk is created, the new server must be configured for use. After booting NanoNAS for the first time, Initial configuration can be summarized as follows:
1. Initial Login to NanoNAS 2. Provide License ID 3. Configure Network Settings 4. Change Administration Password 5. Save Configuration Settings 6. Reboot to Apply Configuration 7. Unlock NanoNAS 8. Configure storage disks 9. Save Configuration Settings 10. Reboot to unlock and mount storage disks
Detailed explanation of each configuration step follows: Step 1 - Initial Login to NanoNAS - At this stage of the configuration, NanoNAS is in Default Administration Mode. Synonymous to Factory Settings, Default Administration Mode is intended primarily to allow the administrator to configure the NanoNAS network settings, supply a valid License ID and change the default administration password. During Default Administration Mode, services are not started and fixed disk drives are not checked or mounted.
The administrative login name is always admin (in lower case letters). During Default Administration Mode, the admin password is always nas (also in lower case letters). When you have successfully logged in, the NanoNAS Administration Utility Main Options Menu will be displayed. Detailed description of the NanoNAS Administration Utility menus and options is provided in the Administration Utility section. All configuration settings are done using this menu.
Typical Console Login Screen Default Administration Mode
Step 2 - Supply License ID � NanoNAS requires a valid License ID in order to enable NAS functionality. A typical License ID consists of 5 sets of 5 alphanumeric characters and should be unique for each running instance of NanoNAS. A unique license ID is supplied with each copy of NanoNAS at the time of purchase. You can enter a valid License ID by using License (Option L) of the Administration Utility Main Options Menu. Step 3 - Configure Network Settings � Basic NanoNAS network configuration consists of setting the IP Address, Server Name and Workgroup Name. That can be achieved in the Network Configuration Menu (Option 1). Make sure that the IP address is unique and is in the same subnet as the rest of the local computers. The server name is what you will see when you browse the workgroup or network from your computer and should also be unique. When all network settings are entered and satisfactory, return to the Main Options Menu (Option R). NOTE: Setting a valid default gateway may make the server contents world-visible. Take particular care with your network setup especially if a
erver
lements www.serverelements.com 5

broadband Internet connection is available via the same gateway. Step 4 - Change Administration Password � It is recommended that the default NanoNAS password be changed to something more effective than the Default Administration Mode password. Change the admin password (Option 5) at this time. Step 5 - Save Configuration Settings - The network settings, licensing info as well as the administration password are stored on the NanoNAS floppy disk, so when you have set the new network settings, licensing information and the administration password, the new settings must be saved (Option 9). Step 6 - Reboot to Apply Configuration - To apply the new configuration settings the NanoNAS server must be rebooted (Option 7). At this stage, booting NanoNAS with the new configuration settings will launch only TELNET and HTTP services. Now it is good to ensure that the network interface was detected and properly initialized. The Detecting Network Device line should indicate the current status. If the network device is initialized and ready, the READY audible prompt will be generated (see NanoNAS as an Appliance). If NanoNAS fails to detect and initialize the network interface, NanoNAS generates the CHECK NETWORK audible prompt. In this case, the network interface may be damaged or not supported. A compatible, working network interface must be installed.
Typical Console Login Screen Normal Administration Mode � Locked
NOTE: Previously configured storage drives or storage drives configured with other versions of NASLite will be mounted and exported accordingly at this time.
Step 7 - Unlock NanoNAS � Currently, NanoNAS is locked with only TELNET and HTTP available for access via the network. Use another networked computer with a web browser to access the NanoNAS Status pages via HTTP. Once you have access to the Status pages, navigate to the Unlock page. Here you�ll be presented with directions and basic facilities that will allow you to easily retrieve an appropriate unlock code for your NanoNAS server. You must have internet access for that to take place.
NanoNAS Unlock Screen Detail
A typical unlock code consists or 5 alphanumeric characters and is unique to your particular NanoNAS installation. Once you have the unlock code, continue by returning to the Administration Utility. Use Unlock (Option U) to enter the unlock code. The unlock code is network hardware-specific and will not work on other installations. Adding or removing storage disks will not affect unlock code requirements. Step 8 - Configure Storage Disks � NanoNAS fixed disk drives need to be set up next (Option 3). The Storage Configuration Menu screen will list all available storage disks and the associated interface details. From the Storage Configuration Menu, select the storage disk you wish to configure. That will display the associated Disk-N Configuration Menu. Use
erver
lements www.serverelements.com 6

Format Disk-N (Option 8) to partition and format the disk. Allow a few minutes for larger drives to complete the initialization process. NOTE: During storage disk configuration, all data currently on the fixed disk will be lost. If you wish to preserve the data, make sure it�s properly backed up before configuring the fixed disk for use as NanoNAS storage. With format complete, at the Disk-N Configuration Menu, select the appropriate settings for Export Disk-N (Option 1), Set Disk-N Capacity Alarm (Option 2) and Set Disk-N S.M.A.R.T. (Option 3) options. Refer to the Administration Utility section for complete details on all options. When all Disk-N configuration settings are complete and satisfactory, return to the Storage Configuration Menu (Option R). Repeat Disk-N configuration for each available disk as necessary. Step 9 - Save Configuration Settings - The new configuration settings, containing the unlock code must be stored on the NanoNAS configuration media, so when you have completed the configuration the new settings must once again be saved (Option 9). Step 10 � Reboot to unlock and mount storage disks - To finalize the NanoNAS configuration, mount all newly configured storage disks and launch all NAS services, a final reboot is necessary. Reboot the NanoNAS server (Option 7). Assuming all configuration settings are correct, the NanoNAS server should now be online and ready for use.
Typical Console Login Screen Normal Administration Mode - Unlocked
Remote Administration NanoNAS can be administered remotely via TELNET. All administration options available via the console are also available remotely via TELNET. To confirm remote access, it is a good idea to log in to the NanoNAS server using TELNET from any computer on your network at this point. For example, to login via TELNET from Windows, follow these steps:
1. Click Start, then click Run.
2. Open a TELNET session by Typing telnet and a space and then type the IP address of the NanoNAS server. For example: telnet 192.168.1.251, then click OK
3. You should get the NanoNAS login prompt. Login and you should see the NanoNAS Administration Utility Options Menu.
4. Log out (Option E).
5. Your TELNET window will close. NOTE: While in Default Administration Mode, the NanoNAS Administration Utility will not be accessible remotely via TELNET.
NanoNAS Security The storage made available by NanoNAS can be set as Read/Write or as Read-Only. The same is also true for the individual export services. Other than that, storage is not restricted in any way. As a community file server, any user capable of accessing the NanoNAS server via SMB/CIFS or AFP can read and write openly. Only the NanoNAS Administration Utility is password protected in order to restrict unauthorized access to the Options Menu. Data stored on a NanoNAS server can easily be secured using a number of client-side applications. One such solution is TrueCrypt. TrueCript is a freely available disk encryption software for Windows XP/2000/2003 and Linux and can be downloaded from the TrueCript website (http://www.truecrypt.org/)
erver
lements www.serverelements.com 7

Using NanoNAS SMB NanoNAS SMB exports all available storage disks to the local network via SMB/CIFS (Server Message Block)/ (Common Internet File System), commonly known as Microsoft Windows Networking. NanoNAS SMB will export all installed and configured fixed disk drives available on the server computer as Disk-0 through Disk-N in consecutive order where N will be based on the total number of installed disks. These names are fixed and cannot be changed. All Disk-N folders are accessible by all users. NanoNAS SMB also exports two additional shares as follows:
1. Shares � Exports all available storage volumes via a single share.
2. Status � Exports NanoNAS status
information pages. NanoNAS SMB will appear as a member of the local workgroup when the Network Neighborhood is browsed. Accessing the NanoNAS SMB storage drives is exactly the same as accessing remote windows shares. In addition to Windows, NanoNAS SMB/CIFS shares can be accessed by most operating systems including OS X and Linux.
Typical NanoNAS SMB Workgroup Shares
Using NanoNAS AFP NanoNAS AFP exports all storage disks to the local network via AFP (Apple Filing Protocol). NanoNAS AFP will name all installed and configured fixed disk drives available on the server computer as Disk-0 through Disk-N in consecutive order where N will be based on the total number of installed disks. These names are fixed and cannot be changed. All Disk-N folders are accessible by all users. NanoNAS AFP also exports a Status folder containing system status information pages.
You will be able to connect to the NanoNAS AFP server via any AFP client as illustrated in the OS X example shown below:
Connecting to NanoNAS AFP exports via OS X
When connecting to NanoNAS via AFP, make sure to select �Connect As: Guest� as apposed to a Registered User. When the AFP service is enabled NanoNAS will also advertise all available resources via Bonjour.
Using The NanoNAS HTTP Server The NanoNAS storage contents can be accessed using any web browser via HTTP (Hypertext Transfer Protocol). For example assuming that your NanoNAS server IP address is 192.168.1.251. Entering http://192.168.1.251 in the browser�s address bar can then access the server content inside the browser window. All NanoNAS storage contents are made available via HTTP as read only regardless of the storage drive access setting.
Typical NanoNAS HTTP Content
The NanoNAS HTTP server supports a complete set of mime types, making it the perfect solution for serving music files, digital images, scanned forms and documents, HTML files, PDF documents, movie files or any other content suitable for read-only intranet web distribution.
erver
lements www.serverelements.com 8

NanoNAS as an Appliance NanoNAS is well suited for operation as a network appliance, remotely administered and without an attached monitor and keyboard. Remote administration can be performed from any computer on the same network via TELNET. To compensate for the lack of visible indicators on the physical server, NanoNAS employs a number of audible prompts that indicate states and or conditions. The audible prompts are generated via the PC speaker, so no additional sound hardware is necessary.
AUDIBLE PROMPT STATE
2 x 300Hz 1 x 700Hz
READY - Server is online and ready for use.
2 x 700Hz 1 x 300Hz
SHUTDOWN - Power may be shut down manually in 5 seconds.
5 x 200Hz CHECK NETWORK - Unable to detect or initialize network interface card.
3 x 700Hz 3 x 300Hz
CHECK DISK - Fixed disk drive fails overall SMART self-assessment.
3 x 700Hz CHECK DISK CAPACITY - Fixed disk drive usage at or above capacity alarm monitor.
5 x 700Hz DEFAULT ADMINISTRATION MODE �Server started without a configuration floppy disk.
NanoNAS Audible Prompts
NOTE: In reference to the NanoNAS Audible Prompts table, the information provided in the AUDIBLE PROMPT column represents the number of beeps and their pitch. For example, when the NanoNAS server is ready for use, it will generate a READY prompt by sounding two 300Hz beeps followed by a single 700Hz beep.
Disk Health and Monitoring When the NanoNAS server boots, each fixed disk drive filesystem is identified and checked. If a filesystem is identified and maintenance is scheduled, NanoNAS automatically analyzes and
attempts to fix any existing filesystem problems before storage is made available for use. NOTE: When a fixed disk drive filesystem is being checked, NanoNAS storage will not be available for use. The pending check may take anywhere from 1 to 20 or more minutes depending on the fixed disk drive size and contents. A pending check can be identified by observing the associated fixed disk drive activity LED shortly after booting NanoNAS. The associated fixed disk drive activity LED will be continuously on for the duration of the check. Current initialization status can also be observed by examining the console screen if an attached monitor is present. NanoNAS also monitors the health of the storage fixed disk drives using Self-Monitoring, Analysis and Reporting Technology (S.M.A.R.T.) built into most modern fixed disk drives. In many cases, NanoNAS will provide advanced warning of fixed disk drive degradation and failure. The S.M.A.R.T. status of the configured storage fixed disk drives may be checked every time the status pages are updated. The fixed disk drives S.M.A.R.T. status can be viewed using the NanoNAS Status pages made available through the Status share. In the event of approaching failure, if S.M.A.R.T. support is available, NanoNAS will begin generating a 5-beep audible CHECK DISK alarm every time the status pages are updated. At that time it is best to take the necessary precautions to remove important data from the affected disk.
Administration Utility The NanoNAS Administration Utility is a console-based menu-driven utility that can be accessed at the server computer via a locally connected monitor and keyboard, or remotely through TELNET. The NanoNAS Administration Utility presents all available configuration options via an easy to use multi-level menu structure. Available option menus and associated configuration options are covered in detail below.
Main Options Menu The Main Options Menu is the first level configuration menu displayed by the NanoNAS Administration Utility. All secondary menus and
erver
lements www.serverelements.com 9

options can be accessed from this location. The Main Options Menu provides access to the following:
• Network Configuration (Option 1) - Provides access to the Network Configuration Menu covered in detail below.
• Services Configuration (Option 2) - Provides access to the Services Configuration Options Menu covered in detail below.
NanoNAS Administration Utility Main Options Menu
• Storage Configuration (Option 3) - Provides access to the Storage Configuration Options Menu covered in detail below.
• Set Administrative Password (Option 5) - Changes the admin user password. During Default Administration Mode, the admin user password is always nas.
• Set System Date and Time (Option 6) - Sets the NanoNAS computer date and time. Provided values must be in GMT time.
• Reboot (Option 7) - Reboots the NanoNAS server.
• Shutdown (Option 8) - Shuts down the NanoNAS server.
• Save Configuration (Option 9) - Saves NanoNAS configuration settings to the associated configuration media.
• About (Option A) - Displays a basic description of NanoNAS.
• License (Option L) � Sets a valid License ID.
• Unlock (Option U) - Sets a valid system unlock code.
• Tools and Utilities (Option T) - Provides access to the Tools and Utilities Menu covered in detail below.
• Exit (Option E) - Exits the NanoNAS Administration Utility and returns to the login prompt.
NOTE: While in Default Administration Mode, the NanoNAS Administration Utility will not be accessible remotely via TELNET.
Network Configuration Menu The Network Configuration Menu allows access to all NanoNAS network configuration options. Each configuration option screen provides sufficient instructional assistance and feedback to help ensure a properly configured server. The Network Configuration Menu provides access to the following:
NanoNAS Administration Utility Network Configuration Menu
• Change IP Address (Option 1) � Sets the NanoNAS network IP address. Calculates and sets the appropriate netmask and broadcast based on the supplied network IP
erver
lements www.serverelements.com 10

address.
• Change Netmask (Option 2) � Sets the NanoNAS netmask. Calculates and sets the appropriate broadcast value based on the supplied network IP address and netmask.
• Change Gateway (Option 3) � Sets the default network gateway IP address. NOTE: Setting a valid default gateway may make the server contents world visible. Take particular care with your network setup especially if a broadband Internet connection is available via the same gateway.
• Change Name (Option 4) � Sets the NanoNAS name. This value is especially important if NanoNAS is a part of a Microsoft network workgroup. The supplied name should be unique on the associated network.
• Change Comment (Option 5) � Sets a generic short comment that is used by select export services for share and export identification.
• Change Workgroup (Option 6) � Sets the NanoNAS workgroup. This value is especially important if NanoNAS is a part of a Microsoft network workgroup. The supplied name should match the associated network workgroup.
• Change Time Server (Option 7) � Sets a remote timeserver to be used for automatic synchronization of the NanoNAS system clock. The provided value must be a valid IP address and not an URL. Synchronization occurs once per day. If an Internet timeserver is used, then NanoNAS must also have access to a valid gateway as set by Option 3 above.
• Return To Main Option Menu (Option R) � Exits the Network Configuration Menu and returns to the Main Options Menu.
Service Configuration Menu The Service Configuration Menu provides the means to make pertinent adjustments to all NanoNAS
services. Currently active and running services are also displayed. All available options are designed to behave as rotating selectors, meaning that selecting the option will simply change it�s status to the next available state. For example selecting Option 1 will change the state of the TELNET service from [ON] to [--](disabled) and back again. The Service Configuration Menu provides the following options:
NanoNAS Administration Utility Service Configuration Menu
• TELNET (Option 1) � Sets the TELNET service as ON or disabled. If the TELNET service is set to disabled, remote access to the Administration Utility will be disabled.
• HTTP (Option 2) � Sets the HTTP service as ON or disabled.
• SMB/CIFS (Option 3) � Sets the SMB/ CIFS service as Read-Only, Read/Write or disabled. SMB/CIFS support is provided by NanoNAS SMB only.
• AFP (Option 3) � Sets the AFP service as Read-Only, Read/Write or disabled. AFP support is provided by NanoNAS AFP only.
• Status Update (Option 4) � Sets the Status Pages update time interval. An interval of 1, 5, 10, 15, 30, and 45 minutes as well as 1, 4 and 8 hours can be set.
• Return To Main Option Menu (Option R) � Exits the Service Configuration Menu and returns to the Main Options Menu.
erver
lements www.serverelements.com 11

Storage Configuration Menu The Storage Configuration Menu provides the means to configure and maintain all NanoNAS storage. The Storage Configuration Menu provides access to the following:
• Disk-N (Options 0 through N) - Provides access to the Disk-N Configuration Menu covered in detail below.
• Return To Main Option Menu (Option R) � Exits the Storage Configuration Menu and returns to the Main Options Menu.
NanoNAS Administration Utility Storage Configuration Menu
Disk-N Configuration Menu The Disk-N Configuration Menu provides all necessary options required for individual storage disk configuration and maintenance. Hardware-specific information as well as disk usage are displayed for proper device identification. The Disk-N Configuration Menu provides the following options:
• Export Disk-N (Option 1) - Sets the Disk-N export as Read/Write, Read-Only or parked (Idle).
• Set Disk-N Capacity Alarm (Option 2) � Sets Disk-N capacity alarm. If Disk-N capacity exceeds the capacity alarm setting, NanoNAS will sound the CHECK DISK CAPACITY audible prompt on Status update. Capacity alarm values of 75, 80, 85, 90, 95 and 99 percent can be set. The
capacity alarm can also be disabled.
• Set Disk-N S.M.A.R.T. (Option 3) � Sets Disk-N periodic S.M.A.R.T. status check. If Disk-N S.M.A.R.T. status fails, NanoNAS will sound the CHECK DISK audible prompt on Status update.
NanoNAS Administration Utility Disk-N Configuration Menu
• Run Disk-N Extended S.M.A.R.T. Self-Test (Option 4) � Executes Disk-N extended S.M.A.R.T. self-test.
• Check Disk-N Filesystem (Option 5) � Executes a read-only Disk-N filesystem check. This is a diagnostic only test and will not modify disk contents in any way.
• Check and Repair Disk-N Filesystem (Option 6) � Executes a complete Disk-N filesystem check and repair. Disk will be temporarily unmounted. This option will detects and repairs filesystem anomalies.
• Apply Journal to Disk-N Filesystem (Option 7) � Applies a filesystem journal to an existing filesystem, effectively converting ext2 filesystems to ext3. It is generally a good idea to use a journal with every NanoNAS storage disk filesystem.
• Format Disk-N (Option 8) � Formats Disk-N. In order to prevent data loss, Only unformatted or parked (See Export Disk-N) disks can be formatted. Formatting will be denied on disks that are currently mounted and exported by NanoNAS.
erver
lements www.serverelements.com 12

• Return To Storage Configuration Menu (Option R) � Exits the Disk-N Configuration Menu and returns to the Storage Configuration Menu.
Tools and Utilities Menu The Tools and Utilities menu provides a number of useful diagnostic and monitoring tools that can be invaluable for server maintenance and troubleshooting. The Tools and Utilities Menu provides the following options:
• Show Kernel Route Table (Option 1) - Displays the current kernel route table.
• Ping Remote Computer (Option 2) - Pings a remote IP address and displays the results.
• Show Network Configuration (Option 3) - Displays hardware details and configuration settings of the current network interface.
NanoNAS Administration Utility Tools and Utilities Menu
• Reset Configuration to Factory Defaults (Option D) - Resets configuration to defaults. This option has the same general effect as booting NanoNAS for the first time where all unique configuration parameters are reset including License ID and Unlock Code. Disk-specific options are saved on the associated storage disks and are therefore preserved.
• Return To Main Options Menu (Option R) - Exits the Tools and Utilities Menu and returns to the Main Options Menu.
Status Information Pages NanoNAS exports a special Status share for the purpose of providing server status information. The status information is made available via a number of HTML pages that are automatically updated periodically per the Status Update setting (See Service Configuration Menu). To access the server status pages, click on the index.htm page located immediately inside of the Status folder. Your default HTML browser will open and display the initial Status page. At that time you can navigate between the individual status pages by using the provided links. The initial Status page shows only very basic information about the associated NanoNAS server. It�s intended to provide a quick overview and is useful to quickly identify the current device in networks with multiple NanoNAS servers. From this point, by clicking on the provided link button, the browser will display additional server information with various details regarding server hardware, settings and status. Navigation between the Status pages is done via the link buttons to the left of each page. The following status pages are available:
Server Status - The Server Status page displays general server configuration settings including network and services. Server Storage - The Server Storage page displays capacity and usage information for all currently shared storage volumes. Additional filesystem and S.M.A.R.T. information for storage disks is available via the Disk-N links provided on each line. Network Status - The Network Status page provides a list of connected clients as well as other network-specific information. System Status - The System Status page displays system information and status details. Kernel version, system load, RAM usage, CPU type and active process details. Server Message Log - The Server Message Log page provides a viewable copy of the current system message log. The system
erver
lements www.serverelements.com 13

message log contains valuable information that can help in troubleshooting as well as aid in general system administration and maintenance.
About NanoNAS - The About NanoNAS page provides general product description, copyright and licensing information pertaining to NanoNAS.
Unlock - The Unlock page is used to help unlock the NanoNAS server during initial setup. When the server is unlocked, this page displays Unlock Code details.
Administer NanoNAS - This is not really a status page but rather a preformatted link to remotely launch the NanoNAS Administration Utility via TELNET. If your browser is properly configured, clicking on this link will open the local TELNET client and display the associated NanoNAS login.
Server Elements Online - This is not really a status page but a web link to the Server Elements website. The server Elements website will always provide information on the latest NanoNAS releases and well as details on related products and updates.
Since status pages are not rendered in real time, it is important to keep in mind that the displayed data is a status snapshot of the system state and not current information. Details about update frequency and last update can be found at the bottom-left of each page. Update frequency can be set to various intervals, from 1 minute to 8 hours. It should be noted that generating the status pages can become a workload burden if set to update every minute, that being especially true on servers with a slower processor or servers that are under constant load. A number of typical NanoNAS Status pages illustrating some of the more notable features are shown below:
Typical Status Entry Page
Typical Server Status Page
Typical Server Storage Page
erver
lements www.serverelements.com 14

Typical Network Status Page
Typical System Status Page
Typical Server Message Log Status Page
Typical Unlock Status Page
Upgrading from NASLite Aside from the obvious differences between previous version of NASLite and NanoNAS, there are a number of subtle changes that may
erver
lements www.serverelements.com 15

cause some confusion when upgrading an existing NASLite server to a NanoNAS server. The most important difference to note is the storage disk naming convention. Due to increased hardware support and storage disk capabilities of NanoNAS, the naming convention for locally mounted storage disks is no longer statically associated with the corresponding hardware port. Disks are now consecutively numbered in order starting from 0 to N where N is based on the total number of disks involved. This difference should be taken into consideration if client machines with pre-mapped network drives will be connecting to the upgraded server. In most cases, without the necessary changes, the results will be less than desirable. To eliminate confusion, ensure that all clients are properly mapped to the correct disks as exported by NanoNAS. Another note of importance is that disk names may change as storage disks are added or subtracted from the NanoNAS server. For example, if a NanoNAS server has 4 IDE storage disks numbered 0 through 3, and the primary slave is removed, on reboot, the server will display available disks 0 through 2. The disks previously named Disk-2 and Disk-3 will now appear as Disk-1 and Disk-2 respectively. NASLite configuration settings are not compatible with NanoNAS configuration settings. NanoNAS servers have to be configured manually during initial setup.
Source Components NanoNAS is built using a number of proprietary Server Elements components as well as one or more components of the following:
• Linux Kernel (www.kernel.org) - POSIX compliant Unix clone
• Samba (www.samba.org) - SMB/CIFS file services
• uClibc (www.uclibc.org) - Compact C library
• BusyBox (www.busybox.net) - Compact Unix utilities
• e2fsprogs (e2fsprogs.sourceforge.net) - Second extended file system utilities
• webfs (www.bytesex.org) - Simple HTTP Server
• smartmontools (smartmontools.sourceforge.net) - S.M.A.R.T. utility toolset.
Internet Resources Additional information, the latest releases, as well as well-mediated user forums covering NanoNAS and related OS products can be found on the Server Elements (www.serverelements.com) website. In addition to this manual, the user forums are the best place for information regarding the use, administration and maintenance of your NanoNAS file server.
Copyrights and Trademarks © 2008 Tony Z. Tonchev ([email protected]) © 2008 Ralph Hargis ([email protected]) This manual may be reproduced in whole or in part, without fee, subject to the following restrictions:
• The copyright notice above and this permission notice must be preserved complete on all complete or partial copies.
• Any translations or derived works must be approved in writing by the author before distribution.
• If you distribute this work in part, instructions and means for obtaining the complete version of this manual must be included.
• Small portions may be reproduced as illustrations for reviews or quotes in other works without this permission notice if proper citation is given.
erver
lements www.serverelements.com 16
Server Elements Software License Agreement Server Elements software consists of Open Source software components and proprietary Server Elements software components. The Open Source components are freely distributed under the respective Open Source licenses, Server Elements software is distributed under Server Elements' terms. ATTENTION: USE OF THE SOFTWARE IS SUBJECT TO THE SERVER ELEMENTS SOFTWARE LICENSE TERMS SET FORTH BELOW. USING THE SOFTWARE INDICATES YOUR ACCEPTANCE OF THESE LICENSE TERMS. IF YOU DO NOT ACCEPT THESE LICENSE TERMS, YOU MUST NOT USE THE SOFTWARE.
Server Elements Software License Terms The following terms govern your use of the NanoNAS Software unless you have a separate written agreement with Server Elements. LICENSE GRANT Server Elements grants you a license to Use one copy of the Software. "Use" means storing, loading, installing, executing or displaying the Software. You may not modify the Software or disable any licensing or control features of the Software. If the Software is licensed for "concurrent use", you may not allow more than the maximum number of authorized users to Use the Software concurrently. OWNERSHIP The Software is owned and copyrighted by Server Elements or its third party suppliers. Your license confers no title or ownership in the Software and is not a sale of any rights in the Software. Server Elements� third party suppliers may protect their rights in the event of any violation of these License Terms. COPIES AND ADAPTATIONS You may only make copies or adaptations of the Software for archival purposes or when copying or adaptation is an essential step in the authorized Use of the Software. You must reproduce all copyright notices in the original Software on all copies or adaptations. You may not copy the Software onto any bulletin board or similar system. NO DISASSEMBLY OR DECRYPTION You may not disassemble or decompile the Software unless Server Elements� prior written consent is obtained. In some jurisdictions, Server Elements� consent may not be required for disassembly or decompilation. Upon request, you will provide Server Elements with reasonably detailed information regarding any disassembly or decompilation. You may not decrypt the Software unless decryption is a necessary part of the operation of the Software.
TRANSFER Your license will automatically terminate upon any transfer of the Software. Upon transfer, you must deliver the Software, including any copies and related documentation, to the transferee. The transferee must accept these License Terms as a condition to the transfer. TERMINATION Server Elements may terminate your license upon notice for failure to comply with any of these License Terms. Upon termination, you must immediately destroy the Software, together with all copies, adaptations and merged portions in any form.
Server Elements Limited Warranty Statement THIS SOFTWARE IS PROVIDED BY THE COPYRIGHT HOLDERS AND CONTRIBUTORS "AS IS" AND ANY EXPRESS OR IMPLIED WARRANTIES, INCLUDING, BUT NOT LIMITED TO, THE IMPLIED WARRANTIES OF MERCHANTABILITY AND FITNESS FOR A PARTICULAR PURPOSE ARE DISCLAIMED. IN NO EVENT SHALL THE REGENTS OR CONTRIBUTORS BE LIABLE FOR ANY DIRECT, INDIRECT, INCIDENTAL, SPECIAL, EXEMPLARY, OR CONSEQUENTIAL DAMAGES (INCLUDING, BUT NOT LIMITED TO, PROCUREMENT OF SUBSTITUTE GOODS OR SERVICES; LOSS OF USE, DATA, OR PROFITS; OR BUSINESS INTERRUPTION) HOWEVER CAUSED AND ON ANY THEORY OF LIABILITY, WHETHER IN CONTRACT, STRICT LIABILITY, OR TORT (INCLUDING NEGLIGENCE OR OTHERWISE) ARISING IN ANY WAY OUT OF THE USE OF THIS SOFTWARE, EVEN IF ADVISED OF THE POSSIBILITY OF SUCH DAMAGE.
erver
lements www.serverelements.com 17