Embed Size (px)
Citation preview
Flexible
Solutions
for
Electronic
Archiving
Perennity Archiving Edition
Installation and administration guide
Version 3.00
Copyright E.C. Intl sprl-bvba
Administration guide 2 Perennity Archiving edition v3.00
Table of Contents
Table of Contents ................................................................................2 Introduction........................................................................................6 Perennity Concepts .............................................................................7
Understanding Perennity data sources...................................................7 Understanding Perennity targets......................................................... 11 Understanding Perennity triggers........................................................ 12
Capacity threshold........................................................................ 12 Trigger file .................................................................................. 12 Folder latency .............................................................................. 13
Perennity scanning and scheduling...................................................... 14 Scan Interval ............................................................................... 14 The Perennity Schedule ................................................................. 14
The Perennity workflow explained....................................................... 15 Using a database and Perennity Finder ................................................ 16
Perennity application examples ........................................................17 Compliance recording ....................................................................... 17 Report and log file archiving .............................................................. 17 Personal backup and archiving ........................................................... 17
System requirements ........................................................................18 Hardware + operating systems........................................................... 18 Software ......................................................................................... 18
Java VM 1.6................................................................................. 18 Rimage Software Suite.................................................................. 18 MySQL, Microsoft SQL Server or MSDE ............................................ 20 Perennity Finder........................................................................... 20
Installation .......................................................................................21 Installing Perennity........................................................................... 21 Installing the MySQL database engine ................................................. 25
Licensing Perennity...........................................................................27 Configuring Perennity .......................................................................31
Create a Target................................................................................ 31 Rimage settings ........................................................................... 32 Epson settings ............................................................................. 33
Administration guide 3 Perennity Archiving edition v3.00
Configuring Sources.......................................................................... 37 Configuring an Archive folder ............................................................. 38
Source identification and general settings ........................................ 38 Create the archive folder path ........................................................ 40 Output settings ............................................................................ 42 Thumbnail settings ....................................................................... 43 Advanced settings ........................................................................ 45 Triggers ...................................................................................... 47 Capacity threshold........................................................................ 47 Trigger file .................................................................................. 48 Folder latency .............................................................................. 48 None .......................................................................................... 48 Schedule..................................................................................... 49 Email notification.......................................................................... 50 Database configuration.................................................................. 51
Configuring a Multiple Archive folder ................................................... 54 Source identification and general settings ........................................ 54 Create the Multiple archive folder path ............................................ 56 Output settings ............................................................................ 58 Thumbnail settings ....................................................................... 59 Advanced settings ........................................................................ 61 Triggers ...................................................................................... 63 Capacity threshold........................................................................ 63 Trigger file .................................................................................. 64 Folder latency .............................................................................. 64 None .......................................................................................... 64 Schedule..................................................................................... 65 Email notification.......................................................................... 66 Database configuration.................................................................. 67
Configuring a CD/DVD Image Folder ................................................... 70 Source identification and general settings ........................................ 70 Define the Image Folder path list .................................................... 71 Output settings ............................................................................ 73 Triggers ...................................................................................... 74 Capacity threshold........................................................................ 75 Trigger file .................................................................................. 76
Administration guide 4 Perennity Archiving edition v3.00
Folder latency .............................................................................. 76 None .......................................................................................... 76 Schedule..................................................................................... 77 Email notification.......................................................................... 78 Database configuration.................................................................. 79
Main settings window........................................................................ 82 Configuring Perennity Finder .............................................................. 84
Using and monitoring Perennity ........................................................85 Source window ................................................................................ 85 Logs window.................................................................................... 86 Target window ................................................................................. 86 Start/Stop button............................................................................. 87 View source settings ......................................................................... 87 Main menu ...................................................................................... 88
File menu.................................................................................... 88 Tools menu ................................................................................. 88 Help menu .................................................................................. 90
Data integrity check tool ................................................................... 91 Perennity at work............................................................................. 93
Perennity Finder..............................................................................100 Browsing the database.................................................................... 100 Querying the database .................................................................... 102
Technical support............................................................................104 Appendix .........................................................................................105
Appendix 1 - XML syntax for CD/DVD image folders ............................ 105 Appendix 2 - XML syntax of trigger file .............................................. 107 Appendix 4 – Label Customization .................................................... 110 Appendix 4 – Label Customization .................................................... 110 Appendix 5 – Installing and using MySQL GUI Tools ............................ 112 Appendix 6 – Installing and using Epson TD-Bridge ............................. 122 Appendix 7 – Release notes ............................................................. 128

Administration guide 5 Perennity Archiving edition v3.00
Perennity Archive (version 3.00) ....................................................128 Performance improvement............................................................... 128 Windows Services........................................................................... 128
Incremental archiving improvement .............................................. 128 Encryption................................................................................. 128 Database improvement ............................................................... 128 Support of Epson Autoloader........................................................ 128
Administration guide 6 Perennity Archiving edition v3.00
Introduction
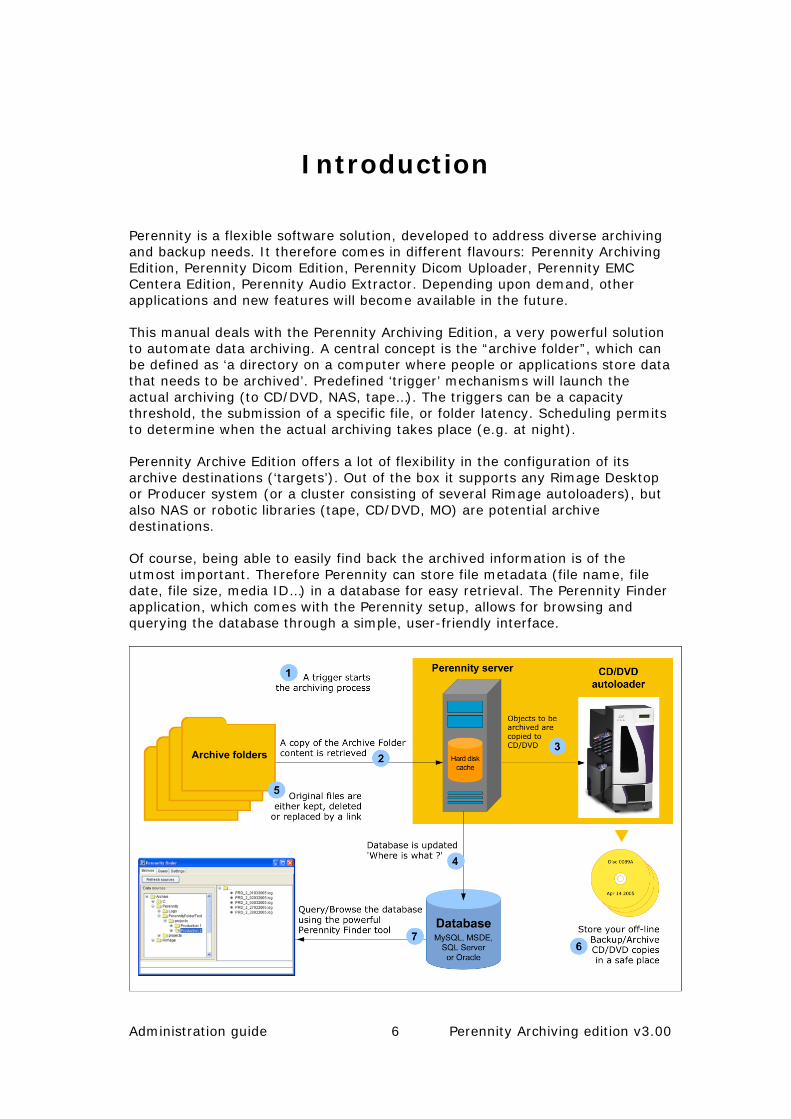
Perennity is a flexible software solution, developed to address diverse archiving and backup needs. It therefore comes in different flavours: Perennity Archiving Edition, Perennity Dicom Edition, Perennity Dicom Uploader, Perennity EMC Centera Edition, Perennity Audio Extractor. Depending upon demand, other applications and new features will become available in the future.
This manual deals with the Perennity Archiving Edition, a very powerful solution to automate data archiving. A central concept is the “archive folder”, which can be defined as ‘a directory on a computer where people or applications store data that needs to be archived’. Predefined ‘trigger’ mechanisms will launch the actual archiving (to CD/DVD, NAS, tape…). The triggers can be a capacity threshold, the submission of a specific file, or folder latency. Scheduling permits to determine when the actual archiving takes place (e.g. at night).
Perennity Archive Edition offers a lot of flexibility in the configuration of its archive destinations (‘targets’). Out of the box it supports any Rimage Desktop or Producer system (or a cluster consisting of several Rimage autoloaders), but also NAS or robotic libraries (tape, CD/DVD, MO) are potential archive destinations.
Of course, being able to easily find back the archived information is of the utmost important. Therefore Perennity can store file metadata (file name, file date, file size, media ID…) in a database for easy retrieval. The Perennity Finder application, which comes with the Perennity setup, allows for browsing and querying the database through a simple, user-friendly interface.

Administration guide 7 Perennity Archiving edition v3.00
Perennity Concepts
This part of the manual describes important terms and concepts that you should understand in order to use Perennity to its full potential. We therefore highly recommend you to get acquainted with the notions in this section before you start installing and configuring Perennity.
Perennity basically functions as a sort of ‘connector’ between one or more data sources (where the data are originally stored), and one or multiple data targets (the archive storage media). Perennity continuously scans its defined sources (folder scans) and trigger mechanisms (production rules) and schedules will determine when the actual archiving will happen.
We will also explain the Perennity workflow concept and discuss the Perennity Finder (which requires a database implementation).
UNDERSTANDING PERENNITY DATA SOURCES
A ‘Data Source’ is a source from which data will be copied or moved to archive media (called the ‘target’).
An ‘Archive Folder’ is a directory, located either locally on the PC running the Perennity Server software or on a remote network volume which will receive the files/folders that need to be archived to the target device(s). The archiving itself is a fully automated process, requiring little or no administrative intervention once the rules have been established.
When Archive folders are located on the Perennity Server, they may be shared over the network, so that workstation clients or applications running on other machines can write their data to them in order to get it archived.
Alternatively the source folders can be located on network servers or client PCs. In such case, there is no need to copy the data to a dedicated archive folder, but obviously the Perennity Server service account needs read/write or full control access to these folders.
Perennity automatically spans the archive data over multiple media if it doesn’t fit on one media. Individual files that exceed media capacity will be split over several media and the media itself contains the tool to reconstruct the file from its different fragments.
Hereunder we will discuss the three types of Archive folders supported by Perennity: the (simple) Archive folder, the Multiple Archive folder and the CD/DVD Image folder.
Administration guide 8 Perennity Archiving edition v3.00
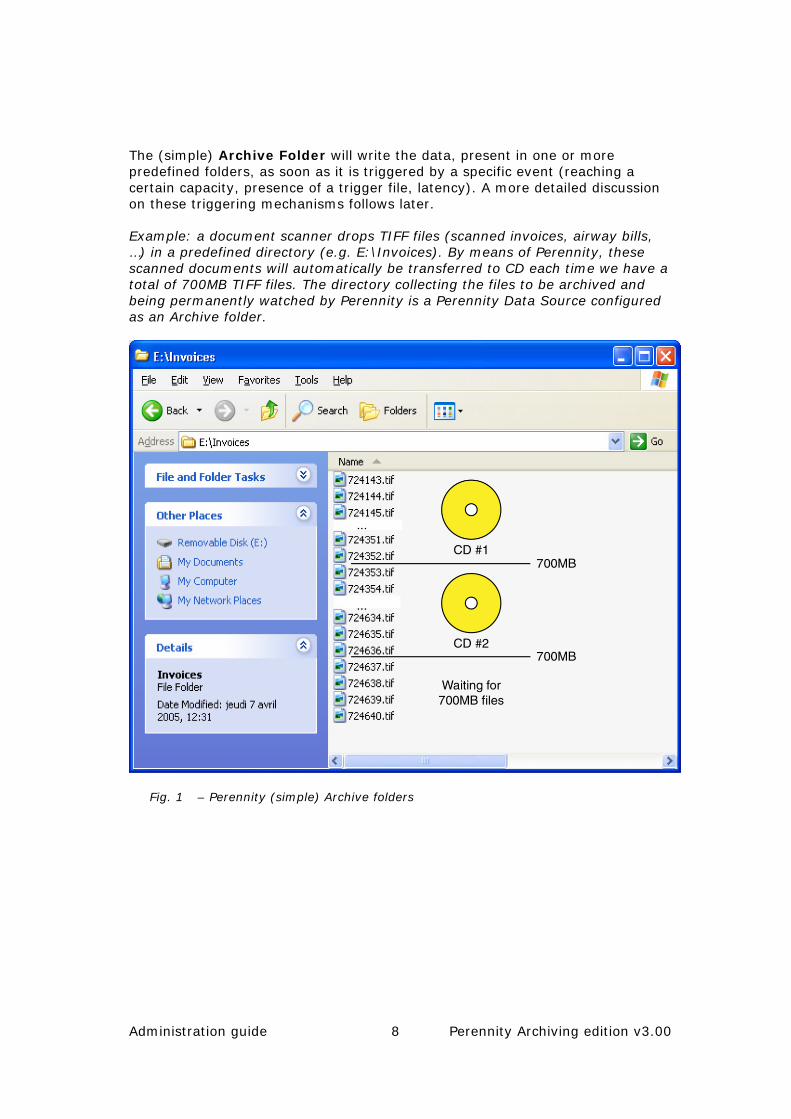
The (simple) Archive Folder will write the data, present in one or more predefined folders, as soon as it is triggered by a specific event (reaching a certain capacity, presence of a trigger file, latency). A more detailed discussion on these triggering mechanisms follows later.
Example: a document scanner drops TIFF files (scanned invoices, airway bills, …) in a predefined directory (e.g. E:\Invoices). By means of Perennity, these scanned documents will automatically be transferred to CD each time we have a total of 700MB TIFF files. The directory collecting the files to be archived and being permanently watched by Perennity is a Perennity Data Source configured as an Archive folder.
Fig. 1 – Perennity (simple) Archive folders
Administration guide 9 Perennity Archiving edition v3.00
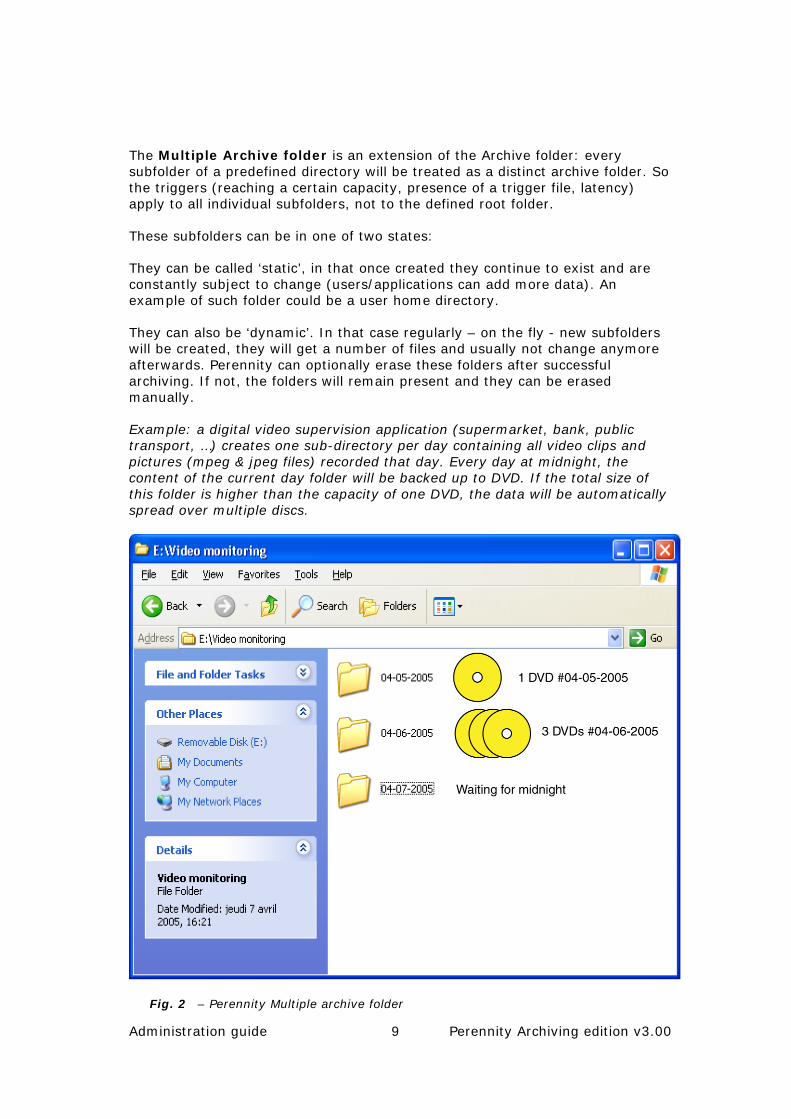
The Multiple Archive folder is an extension of the Archive folder: every subfolder of a predefined directory will be treated as a distinct archive folder. So the triggers (reaching a certain capacity, presence of a trigger file, latency) apply to all individual subfolders, not to the defined root folder.
These subfolders can be in one of two states:
They can be called ‘static’, in that once created they continue to exist and are constantly subject to change (users/applications can add more data). An example of such folder could be a user home directory.
They can also be ‘dynamic’. In that case regularly – on the fly - new subfolders will be created, they will get a number of files and usually not change anymore afterwards. Perennity can optionally erase these folders after successful archiving. If not, the folders will remain present and they can be erased manually.
Example: a digital video supervision application (supermarket, bank, public transport, …) creates one sub-directory per day containing all video clips and pictures (mpeg & jpeg files) recorded that day. Every day at midnight, the content of the current day folder will be backed up to DVD. If the total size of this folder is higher than the capacity of one DVD, the data will be automatically spread over multiple discs.
Fig. 2 – Perennity Multiple archive folder

Administration guide 10 Perennity Archiving edition v3.00
The CD/DVD Image Folder enables the burning of CD/DVD images created with third party CD/DVD mastering applications (like for example a Roxio Toast HFS image, or a video DVD image from a custom video authoring software).
Example: In a prepress company, different network users create HFS CDs and DVDs using Toast Titanium directly from their Macintosh computer. The Perennity Client will be installed on every system. One dedicated CD/DVD Image Folder is configured per user on the Perennity Server. The users create new projects using Toast and save them as an image file to their respective Perennity Image Folder. A popup window will then invite the user to specify the number of copies and what needs to be printed on the CD or DVD.
CD/DVDAutoloader
Perennity server
CacheCache
Create your project with Toast and save it as CD/DVD image file to a
predefined network folder
Record & Print to
CD/DVD
3
Specify how many copies must be produced and what label needs to be printed
1
2
Fig. 3 – Perennity CD/DVD Image folder
Perennity CD/DVD Image Folder supports the following image file extensions: .img, .dmg, .iso, .raw and .toast. If you need support for additional extensions, please contact our technical support department. Also, we only support image file types supported by the Rimage software.

Administration guide 11 Perennity Archiving edition v3.00
UNDERSTANDING PERENNITY TARGETS
A Perennity target is a storage device to which data from a source will be written (archived). In the current release, out of the box, Perennity Archive Edition supports Rimage autoloaders equipped with CD/DVD/Blu-Ray writers and Epson PP-100(N). On request, we can propose implementations with NAS or robotic libraries (CD/DVD, tape, MO). Furthermore Perennity can be connected to any backup application that supports scripting.
Perennity offers support for any type of Rimage autoloader, as well Producer as Desktop. The Rimage Software Suite must be version v6.5.6.1 or later. Older versions will not work. We recommended using version 8.x which provides much more flexibility when customizing print templates. The Rimage software suite may run on the Perennity Server or on a dedicated system.
The Rimage target configuration is intentionally kept very simple, and only the messaging server connection must be configured. All other parameters are part of the source configuration, which offers a far-reaching flexibility.
Perennity currently supports one Rimage target, which can of course be a Rimage cluster consisting of several autoloaders.
Administration guide 12 Perennity Archiving edition v3.00
UNDERSTANDING PERENNITY TRIGGERS
A trigger is defined as an event that, when its predefined conditions are fulfilled, instructs Perennity to launch an archiving process (that is if the folder schedule -see later - permits it). All Perennity data sources can be associated with a trigger. For example, you may want to start writing files from an Archive folder to CD when you have enough data to fill this CD. In that case, the trigger is a capacity threshold of for instance 700MB.
You have the choice between three trigger mechanisms:
Capacity threshold
You may decide to launch the actual archiving when the total capacity of the archive folder reaches a minimum predefined capacity (e.g. start the archiving process when the total size of the archive folder exceeds 650MB).
By default only full media will be written out. ‘Full media’ is a configurable parameter (e.g. 650 or 700 MB for a full CD). For long term archiving applications, it is recommended to limit the usable (full) media capacity to 90% of the total available capacity since media deterioration over time is most likely to happen at the outer side of the media (the edge).
Alternatively the writing can be forced for all data present in the archive folder as soon as the threshold capacity is reached. This will write out all data present in the archive folder on one or several media, without media fill optimisation.
If the total size of the files/folders to be archived exceeds the maximum capacity of the CD/DVD, Perennity will simply spread the files over several discs.
Individual files surpassing the media capacity will be split over several media (e.g. a 10GB video file may be split over 3 DVDs).
When reaching the capacity threshold, Perennity will always make sure that all files are ready to be archived (e.g. new files still being added, locked files, …).
Trigger file
If you want to have full control over when the recording should start, the trigger file might be your best option. For instance you might use an archiving application that generates the data and you want to determine exactly what data must go on what media (and when). By adding a trigger file to the root of the Archive folder, Perennity knows it can start burning to media. The trigger file itself can optionally be included on the media.
If the total size of the files/folders to be archived exceeds the capacity of a CD/DVD, Perennity will simply spread the files over several discs.
The name of the trigger file must be defined in the source configuration (e.g. ‘start.txt’). You may also use special XML trigger files with a ‘.xml’ extension. Then, using specific tags, you can overwrite certain parameters defined by default for this Archive folder (number of copies, print template, values to be printed, volume name, …) and even add custom metadata (for printing and/or
Administration guide 13 Perennity Archiving edition v3.00
writing to the database). Refer to appendix 2 of this manual for a complete description of the XML trigger file.
Folder latency
Latency time can be defined as the time during which an Archive folder is not changing anymore, after a folder scan has run.
An example will make this clear: a mini-lab for photo development generates one folder per film, to which are then copied all the scanned photos for this film. In normal circumstances this is an uninterrupted process and all files are copied one after the other to the folder. Once the last file is copied the latency trigger signals no changes anymore and Perennity processing starts.
It is important to decide upon a ‘correct’ latency time value, since this will determine when a folder is considered complete and not subject to changes anymore. Putting the value too low might trigger the archiving when not all files are present yet. Putting the value too high will result in longer, less efficient archiving cycles. Specifying a minimum number of files and/or a minimum folder size allows for fine-tuning the correct triggering.

Administration guide 14 Perennity Archiving edition v3.00
PERENNITY SCANNING AND SCHEDULING
Scan Interval
Perennity regularly scans the contents of the active Archive folders to check whether folders are eligible for archiving (trigger conditions met).
The scan interval parameter (found in the Archive folder general source settings) determines how often Perennity will scan the Archive folder to check if conditions are met. A low value will flag more rapidly, but involves more processing; a high value will check less often but also require less processing. When Perennity doesn’t run on a dedicated system (for instance on a Rimage server, being used more or less intensively for other purposes too) it is advisable to put a higher value.
The Perennity Schedule
Perennity has a built-in scheduling feature, which allows you to determine during which time frames Perennity production may happen. This permits for instance to schedule Perennity production at night, freeing the Rimage system for other jobs at daytime.
The schedule is also very important when no trigger is specified. If in that case the schedule is enabled, media production will start as soon as the schedule gets active. It will immediately write out all data found in the archive folder to one or multiple media. Any data added to the archive folder afterwards will not be taken into account and will be written the next time the schedule becomes active.
Finally, when no trigger is specified and the schedule is not enabled, the archiving process must be manually forced.

Administration guide 15 Perennity Archiving edition v3.00
THE PERENNITY WORKFLOW EXPLAINED
Now that all Perennity concepts should be clear to you from the previous paragraphs, it is time to have a look at the overall picture. In other words, what is happening when, and why?
According to the scan settings discussed earlier, Perennity will at regular intervals check its active Archive folders against the configured triggers. For eligible folders (triggering criteria met) the archiving will start immediately if the folder schedule permits it. If not, the processing for these folders will only start during a later scan when both conditions are met (triggered and schedule active).
When a Perennity archiving process has been successfully completed, the files and folders of the Archive folder can be automatically deleted, they can be left in the folder, or they can optionally be moved to another destination. If you choose to delete the files/folders after archiving, Perennity will proceed to the deletion only after receiving the confirmation from the Rimage Production Server that the CD/DVD recording has been successful.
If you choose to keep the original files/folders in the Archive folder after they have been recorded to CD/DVD, Perennity will reset the archive bit of these files and folders to exclude them from further processing. Only new files, added to the Archive folder after the previous archive cycle, will be considered.
Moving the files/folders to another destination may be interesting in cases where the data should be kept online or nearline for fast access, while a CD/DVD copy is used for backup, long-term archiving or legal purposes.
Administration guide 16 Perennity Archiving edition v3.00
USING A DATABASE AND PERENNITY FINDER
It is of course very convenient to be able to archive or backup your data to off-line media, but after recording hundreds of media how find out where is what file? This is where the Perennity database and the Finder come in.
Perennity indeed offers the possibility to store all file metadata in a database, which can then be interrogated through the Perennity Finder application. The Finder can be installed as part of the Perennity Server installation, or it can also be installed separately, for instance on client PCs.
The Perennity Finder application offers two possible ways to consult the database:
By browsing the contents of all archived folders: the Finder presents the same folder structures as they were originally present in the Archive folders, so this is a very easy way to find back files in a well structured folder organisation.
By launching queries using one or a combination of several criteria: file name, content (when using the full-text indexing option), date, size, folder names, … This can be interesting to search for files when you know (part of) the file name/content or when you want to search for files in a specific time range.
Please consult the chapter Perennity Finder in this manual for concrete instructions on the use of the Finder.
Administration guide 17 Perennity Archiving edition v3.00
Perennity application examples
As you will probably have noticed, Perennity is a very flexible software solution, which can be deployed to answer several types of archiving, backup and CD/DVD production needs.
The following cases give some practical examples on how Perennity can fit your particular needs.
COMPLIANCE RECORDING
Customers in audio/video broadcasting are using Perennity for compliance recording. All radio and TV emissions are saved to disk first in a digital format (WMA, MP3, mpeg or other) and by defining the destination folder(s) as Perennity Archive folder(s), the burning to DVD is triggered automatically by the amount of data present in the Archive folder. As soon as 4,3 GB is present, 2 or more DVDs are written: a master and one or more backups that will often be stored off-site. After successful recording, the files are automatically removed from the Archive folder.
REPORT AND LOG FILE ARCHIVING
Lots of companies and institutions have to keep several types of log files and reports for legal purposes. They must be stored on WORM (write once read many) type media, to guarantee their non-modifiability over time.
CD and DVD are thus perfectly suited for storing this kind of information, since they have this WORM character and are legally accepted.
Perennity permits to easily automate these types of archive processes. By defining Archive folders where the data will be output by the generating application or an archiving routine, the data will be automatically picked up by Perennity and burned to media.
Perennity offers a far-reaching flexibility in determining the rules for media creation: for instance the archiving can happen every day at a specified time, it can be based on the capacity of the media, or it can be triggered by the presence of a special file.
PERSONAL BACKUP AND ARCHIVING
Several customers use Perennity to allow their users to archive data on CD or DVD through Personal Archive Folders. For instance people might want to regularly backup or archive the contents of their My Documents folder, or their Outlook PST files.
In this kind of application, one central CD/DVD production system will deal with the data archiving, and there is no need to have local CD/DVD writers and recording software installed on every desktop.
Administration guide 18 Perennity Archiving edition v3.00
System requirements
HARDWARE + OPERATING SYSTEMS
Minimum Intel Pentium IV 2,4Ghz or equivalent processor
Microsoft Windows 2000 Professional or Server, XP Professional
Microsoft Windows 2003
Minimum 2 GB RAM
SOFTWARE
Java VM 1.6
Perennity has been developed in JAVA and it needs a JAVA Virtual Machine (VM) to function. As the actual Perennity build has been developed with the JAVA SDK 1.6, it is highly recommended to use at least this VM version.
Rimage Software Suite
The Rimage Software Suite should be at least version 6.5.6. Older versions will not work. We recommended to use version 8.x providing much more flexibility when customizing print templates.
Perennity can be installed on the workstation where the Rimage Software Suite runs, or it can be installed on a different machine. The Rimage software suite must be installed in network mode, and the Perennity settings should reflect the correct Rimage configuration. When in doubt, please check with your Rimage administrator.
When Archive Folders are created on a network server or client PC, make sure they are accessible from the Perennity server as well as from the Rimage Control Center (the Windows PC to which the Rimage system is physically connected). In that case, they must be shared with read/write or full control access for the logged on user. For systems that are part of a workgroup, not a domain, you should create a user with identical name and password on both machines.
Pay attention that the Rimage Imaging Server is running as a Windows service. As result you must grant the current user defined for this service with full control access too.
The share permissions have to be either read/write or full control. As Perennity needs to be able to switch the archive bit of files for its internal functioning, it has to be allowed to do so. When Perennity is configured to delete the original files after successfully burning them, it must have full control permissions. Since

Administration guide 19 Perennity Archiving edition v3.00
Perennity runs with the logged on user account, it is this user that should have the appropriate rights.
More information on Rimage networking issues can be found in the Rimage Advanced Administrator Guide.

Administration guide 20 Perennity Archiving edition v3.00
MySQL, Microsoft SQL Server or MSDE
Perennity can run with or without a database. If you choose to use a database to store file metadata (file name, file size, file date, media ID, …) you should plan to have an installation of MySQL, Microsoft SQL Server or MSDE.
MySQL Server v5.1 is included on your Perennity software CD. You can also use an existing MySQL server if desired, but please note that we currently only support v5 and v5.1. Please refer to the Perennity configuration section for more detailed instructions on how to work with the MySQL database.
When using MySQL, and if the MySQL instance is not installed locally on the Perennity server, the MySQL administrator must configure the database security settings accordingly.
Since version 2.1, Perennity also supports MS SQL Server. You should have at least SQL Server 2000 SP3, which support connections with JAVA based programs.
We don’t discuss the installation and usage of MS SQL Server in this manual. Those who want to use one of these database engines should be familiar with their functioning and administration.
Perennity Finder
When running Perennity with a database to store file metadata, a search tool - called Perennity Finder - can be used to query the database. The Perennity Finder will be automatically installed with Perennity Archive.
The Finder allows performing simple queries using one or several search criteria, and it also offers a browsing functionality presenting the original file system structure (including all folders and subfolders) from the archive folders.
Administration guide 21 Perennity Archiving edition v3.00
Installation
INSTALLING PERENNITY
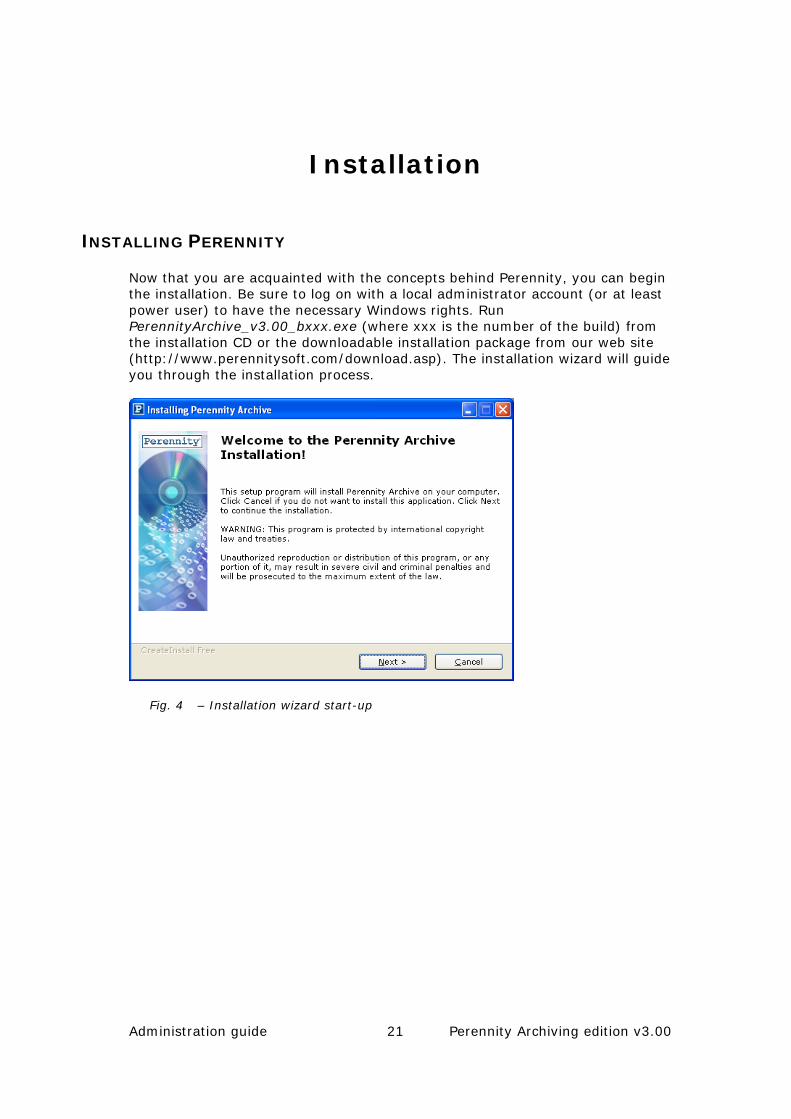
Now that you are acquainted with the concepts behind Perennity, you can begin the installation. Be sure to log on with a local administrator account (or at least power user) to have the necessary Windows rights. Run PerennityArchive_v3.00_bxxx.exe (where xxx is the number of the build) from the installation CD or the downloadable installation package from our web site (http://www.perennitysoft.com/download.asp). The installation wizard will guide you through the installation process.
Fig. 4 – Installation wizard start-up
Administration guide 22 Perennity Archiving edition v3.00
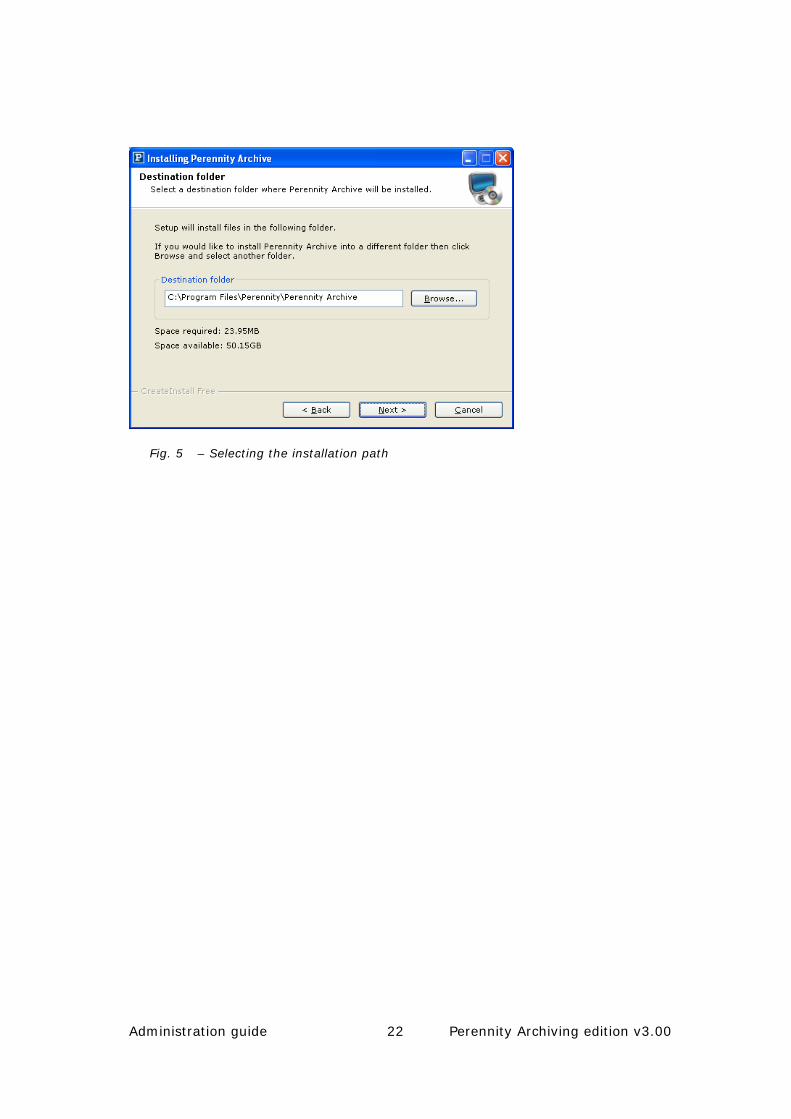
Fig. 5 – Selecting the installation path
Administration guide 23 Perennity Archiving edition v3.00
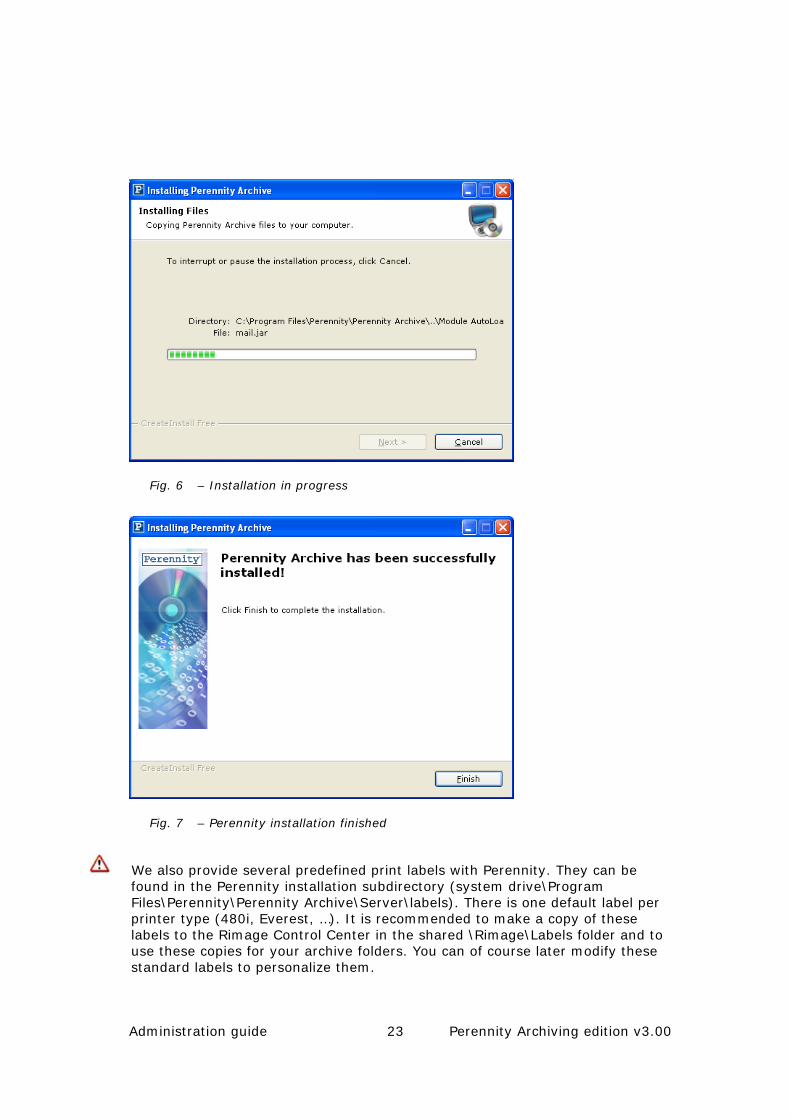
Fig. 6 – Installation in progress
Fig. 7 – Perennity installation finished
We also provide several predefined print labels with Perennity. They can be found in the Perennity installation subdirectory (system drive\Program Files\Perennity\Perennity Archive\Server\labels). There is one default label per printer type (480i, Everest, …). It is recommended to make a copy of these labels to the Rimage Control Center in the shared \Rimage\Labels folder and to use these copies for your archive folders. You can of course later modify these standard labels to personalize them.

Administration guide 24 Perennity Archiving edition v3.00
That’s it for the installation. Perennity is now ready to be licensed and configured.
Administration guide 25 Perennity Archiving edition v3.00
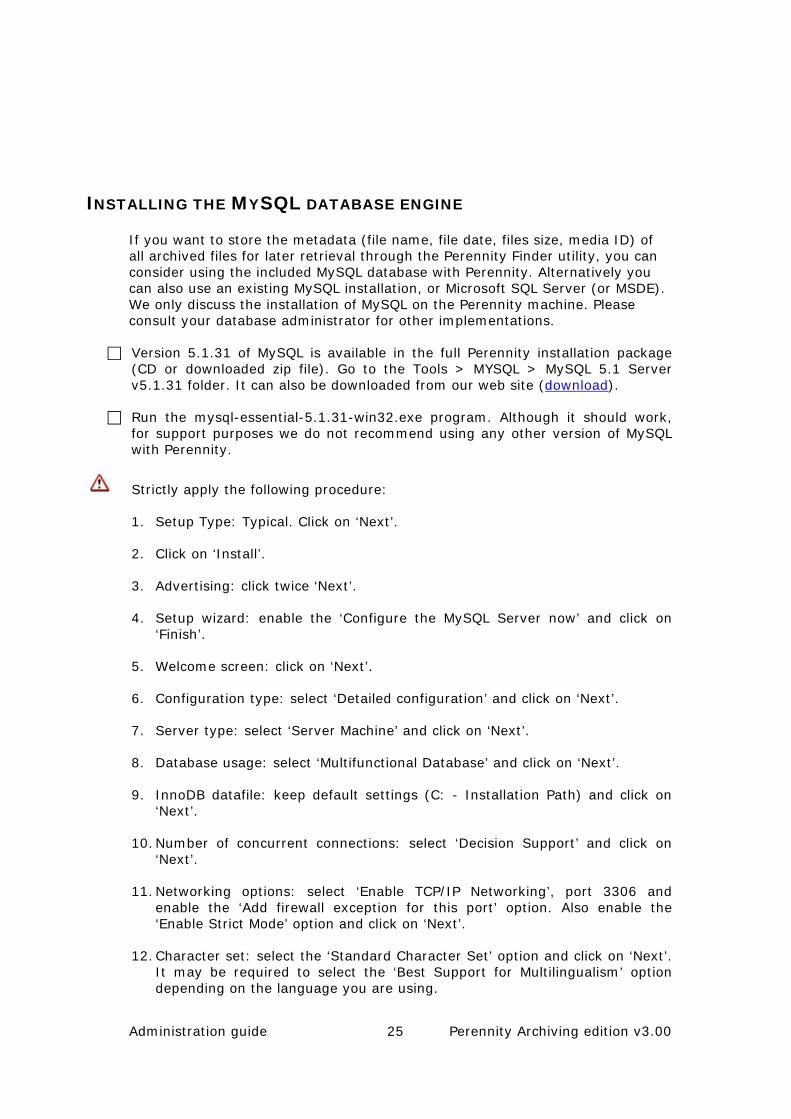
INSTALLING THE MYSQL DATABASE ENGINE
If you want to store the metadata (file name, file date, files size, media ID) of all archived files for later retrieval through the Perennity Finder utility, you can consider using the included MySQL database with Perennity. Alternatively you can also use an existing MySQL installation, or Microsoft SQL Server (or MSDE). We only discuss the installation of MySQL on the Perennity machine. Please consult your database administrator for other implementations.
Version 5.1.31 of MySQL is available in the full Perennity installation package (CD or downloaded zip file). Go to the Tools > MYSQL > MySQL 5.1 Server v5.1.31 folder. It can also be downloaded from our web site (download).
Run the mysql-essential-5.1.31-win32.exe program. Although it should work, for support purposes we do not recommend using any other version of MySQL with Perennity.
Strictly apply the following procedure:
1. Setup Type: Typical. Click on ‘Next’.
2. Click on ‘Install’.
3. Advertising: click twice ‘Next’.
4. Setup wizard: enable the ‘Configure the MySQL Server now’ and click on ‘Finish’.
5. Welcome screen: click on ‘Next’.
6. Configuration type: select ‘Detailed configuration’ and click on ‘Next’.
7. Server type: select ‘Server Machine’ and click on ‘Next’.
8. Database usage: select ‘Multifunctional Database’ and click on ‘Next’.
9. InnoDB datafile: keep default settings (C: - Installation Path) and click on ‘Next’.
10. Number of concurrent connections: select ‘Decision Support’ and click on ‘Next’.
11. Networking options: select ‘Enable TCP/IP Networking’, port 3306 and enable the ‘Add firewall exception for this port’ option. Also enable the ‘Enable Strict Mode’ option and click on ‘Next’.
12. Character set: select the ‘Standard Character Set’ option and click on ‘Next’. It may be required to select the ‘Best Support for Multilingualism’ option depending on the language you are using.
Administration guide 26 Perennity Archiving edition v3.00
13. Windows options: enable the ‘Install As Windows Service’. Keep the default ‘MySQL’ as Service Name. Enable also the ‘Launch the MySQL Server automatically’ and ‘Include Bin Directory in Windows PATH’ options. Then click on ‘Next’.
14. Security options: FIRST enable the ‘Create An Anonymous Account’ option. THEN disable the ‘Modify Security Settings’ option and click on ‘Next’.
15. Click on ‘Execute’
16. Make sure that the ‘Prepare configuration’, ‘Write configuration file’ and the ‘Start service’ steps have been processed. Click on ‘Finish’.
Check if the MySQL service is well started. If the installer window tells you there was a problem starting the service, please check the Windows services console. If the MySQL service is started you may disregard the error and continue with the installation. If however the service cannot be started, you should usually look for port conflicts.
Administration guide 27 Perennity Archiving edition v3.00
Licensing Perennity
Start the “Perennity Archive” application using the link in the Start > All Programs > Perennity menu. A shortcut is also available on the Desktop. Moreover Perennity will be automatically launched every time your start the computer it runs on, since it has been added to the “Startup” program group during the installation process.
The Perennity Archive server needs a license key in order to run. To access the Perennity registration window from within Perennity, open the ‘Help’ menu and select ‘Register’.
The license code (activation key) is based on the following elements:
- The hardware address (MAC) of the Perennity PC network adapter. If you have multiple network adapters only 1 will be used.
- A unique serial number. This is a six digit hexadecimal number (e.g. a63d67) printed on the installation CD. When downloading a demo version from the web, the serial number will be provided in the e-mail containing the download instructions.
Several licenses are available. At present, there are two types:
Full-text indexing of the content of the text based files (pdf, doc, xls, txt, xml and eml).
Encryption: allows protecting the content of the archived media with .
- Annual Maintenance Program: if purchased, you are eligible for updates and upgrades.
- An expiration date. If you have bought an official Perennity license, it will never expire. However, if you request a demo license, it will run until the expiration date.
Without a valid license, Perennity will start in ‘trial mode’. Trial mode allows you to evaluate Perennity by trying out its features and functionalities for a limited period of time. You can start Perennity in trial mode an unlimited number of times.
To effectively register Perennity, open the web link ‘Online registration’ at the bottom of the registration screen. This will open the registration web page on our Perennitysoft server. If you have no Internet access on the Perennity workstation, you can copy the link and open it from another PC. This procedure is fully automated and you should get your license key in minutes.
Administration guide 28 Perennity Archiving edition v3.00
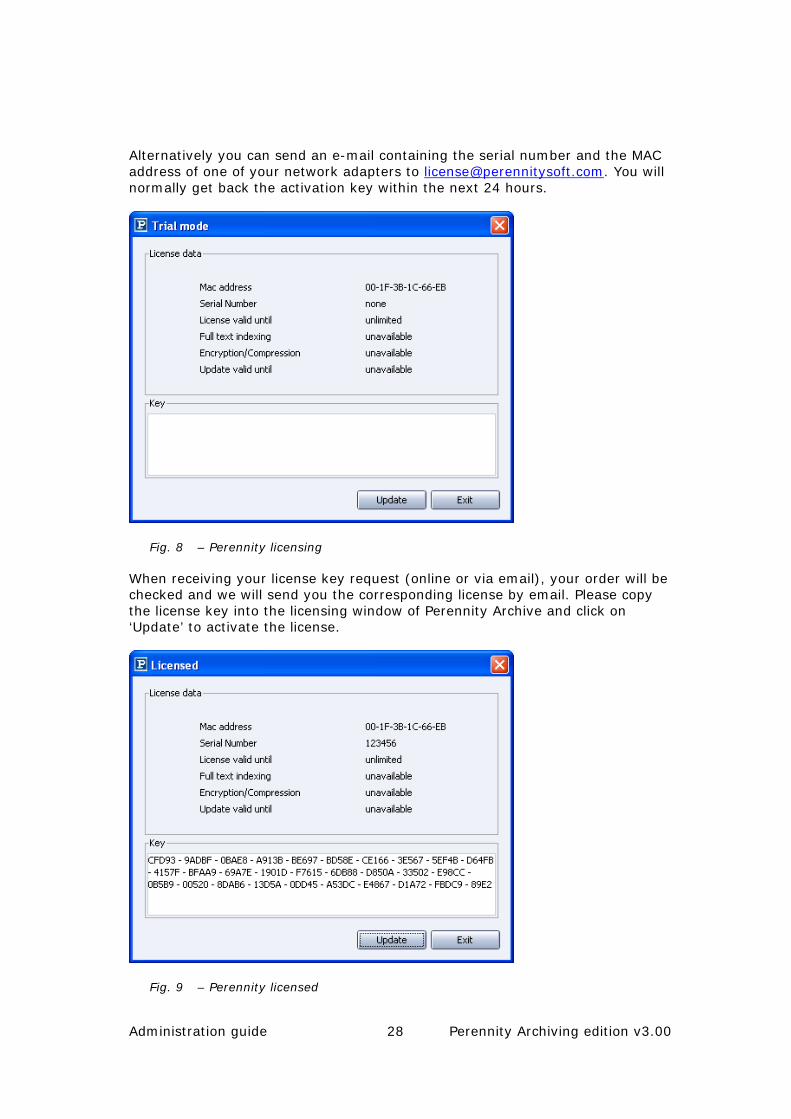
Alternatively you can send an e-mail containing the serial number and the MAC address of one of your network adapters to [email protected]. You will normally get back the activation key within the next 24 hours.
Fig. 8 – Perennity licensing
When receiving your license key request (online or via email), your order will be checked and we will send you the corresponding license by email. Please copy the license key into the licensing window of Perennity Archive and click on ‘Update’ to activate the license.
Fig. 9 – Perennity licensed

Administration guide 29 Perennity Archiving edition v3.00
You notice easily that the serial number is now present and that the title of the registration window changed from ‘Trial mode’ to ‘Licensed’.
Administration guide 30 Perennity Archiving edition v3.00
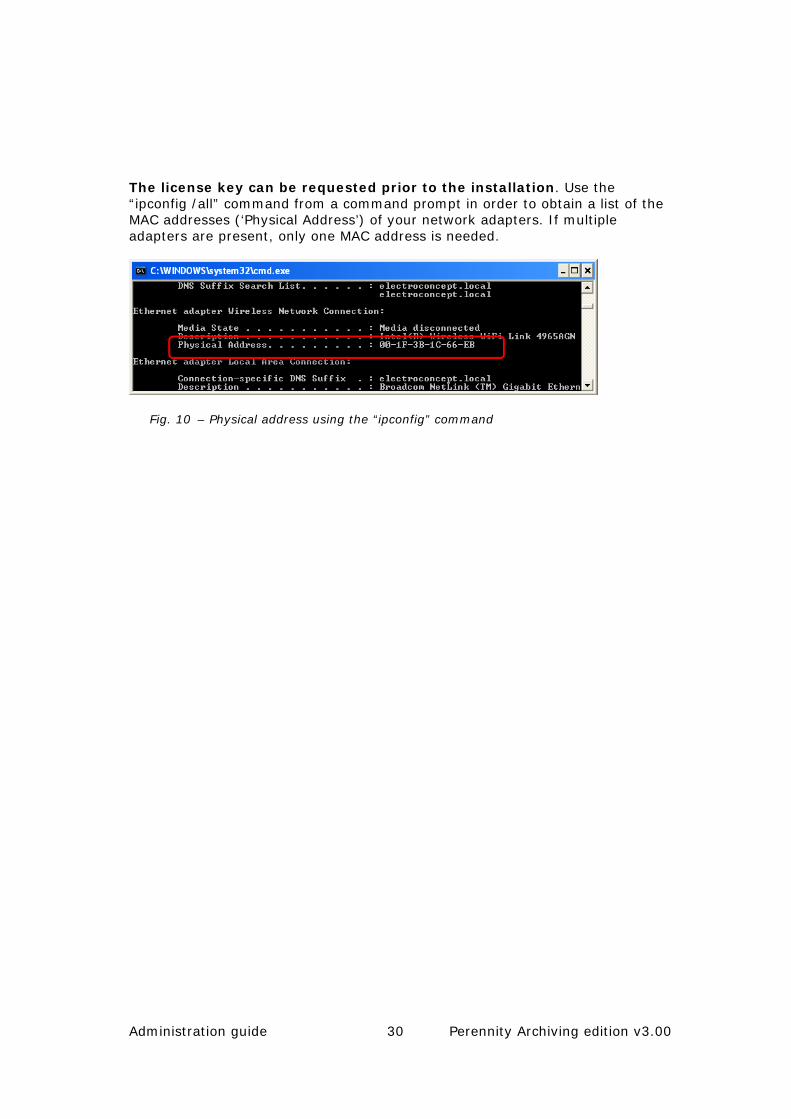
The license key can be requested prior to the installation. Use the “ipconfig /all” command from a command prompt in order to obtain a list of the MAC addresses (‘Physical Address’) of your network adapters. If multiple adapters are present, only one MAC address is needed.
Fig. 10 – Physical address using the “ipconfig” command
Administration guide 31 Perennity Archiving edition v3.00
Configuring Perennity
The first time you start up, Perennity will automatically open the settings window so you can create and define a target, the working folder and then the sources.
CREATE A TARGET
The first step is to configure a Target that in this case will be a Rimage CD/DVD production system (autoloader). Perennity supports any type of network able Rimage system (Desktop or Producer range). You can even simulate the presence of a Rimage unit (which will create folders on hard disk containing the data that would otherwise be recorded to CD or DVD).
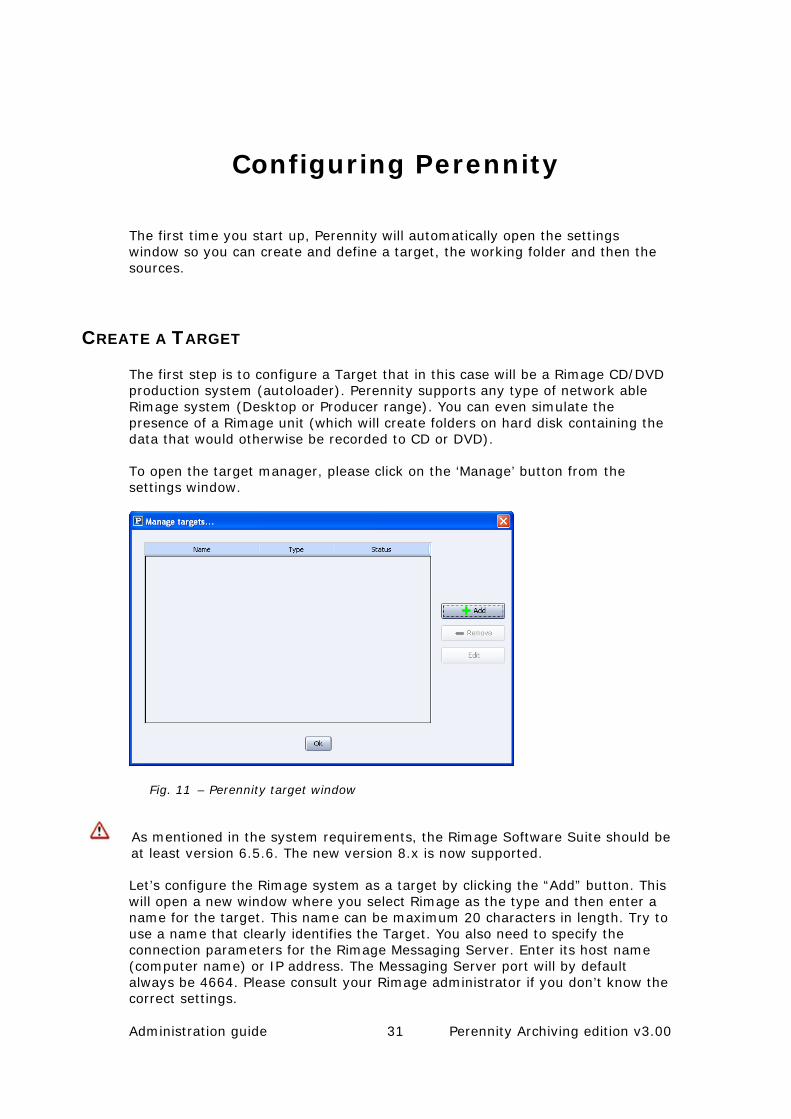
To open the target manager, please click on the ‘Manage’ button from the settings window.
Fig. 11 – Perennity target window
As mentioned in the system requirements, the Rimage Software Suite should be at least version 6.5.6. The new version 8.x is now supported.
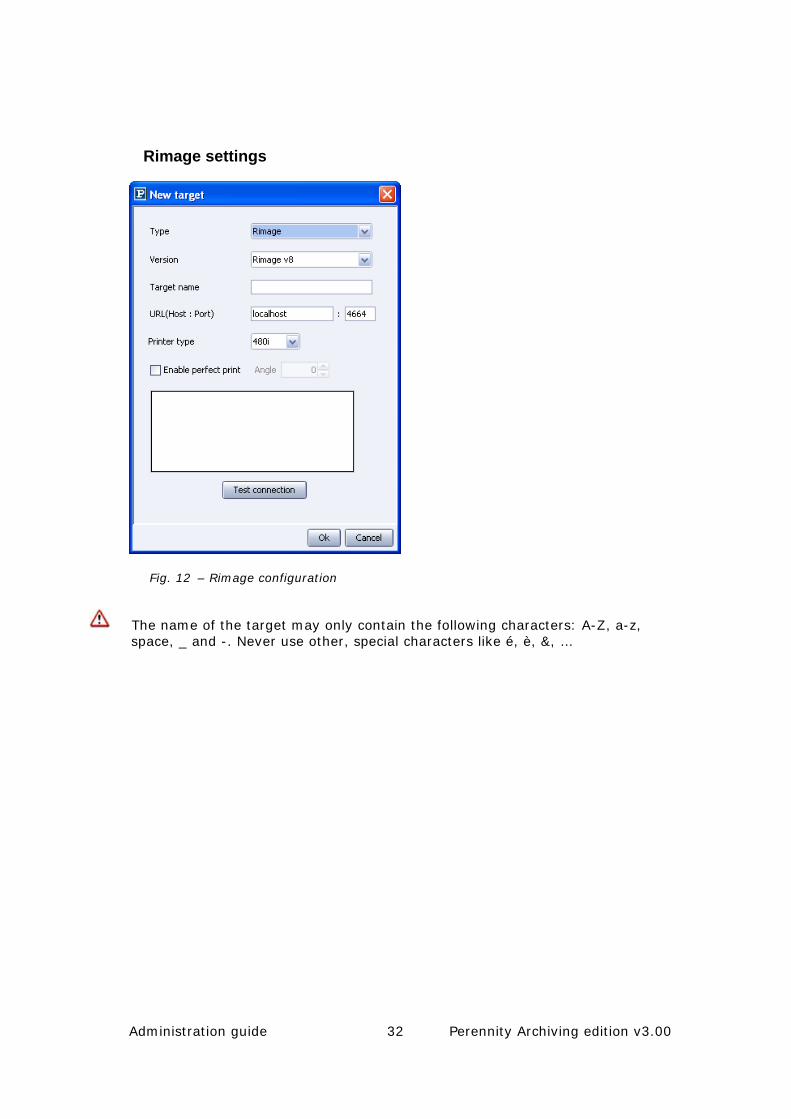
Let’s configure the Rimage system as a target by clicking the “Add” button. This will open a new window where you select Rimage as the type and then enter a name for the target. This name can be maximum 20 characters in length. Try to use a name that clearly identifies the Target. You also need to specify the connection parameters for the Rimage Messaging Server. Enter its host name (computer name) or IP address. The Messaging Server port will by default always be 4664. Please consult your Rimage administrator if you don’t know the correct settings.
Administration guide 32 Perennity Archiving edition v3.00
Rimage settings
Fig. 12 – Rimage configuration
The name of the target may only contain the following characters: A-Z, a-z, space, _ and -. Never use other, special characters like é, è, &, …
Administration guide 33 Perennity Archiving edition v3.00
Epson settings
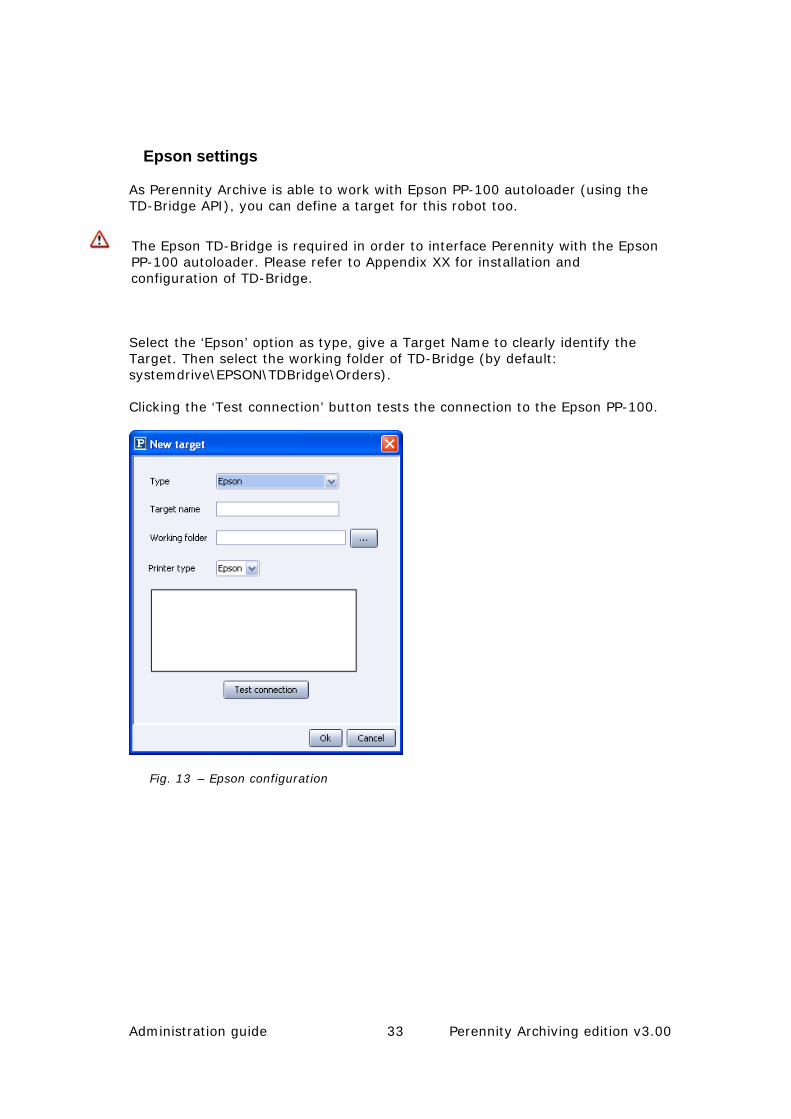
As Perennity Archive is able to work with Epson PP-100 autoloader (using the TD-Bridge API), you can define a target for this robot too.
The Epson TD-Bridge is required in order to interface Perennity with the Epson PP-100 autoloader. Please refer to Appendix XX for installation and configuration of TD-Bridge.
Select the ‘Epson’ option as type, give a Target Name to clearly identify the Target. Then select the working folder of TD-Bridge (by default: systemdrive\EPSON\TDBridge\Orders).
Clicking the ‘Test connection’ button tests the connection to the Epson PP-100.
Fig. 13 – Epson configuration
Administration guide 34 Perennity Archiving edition v3.00
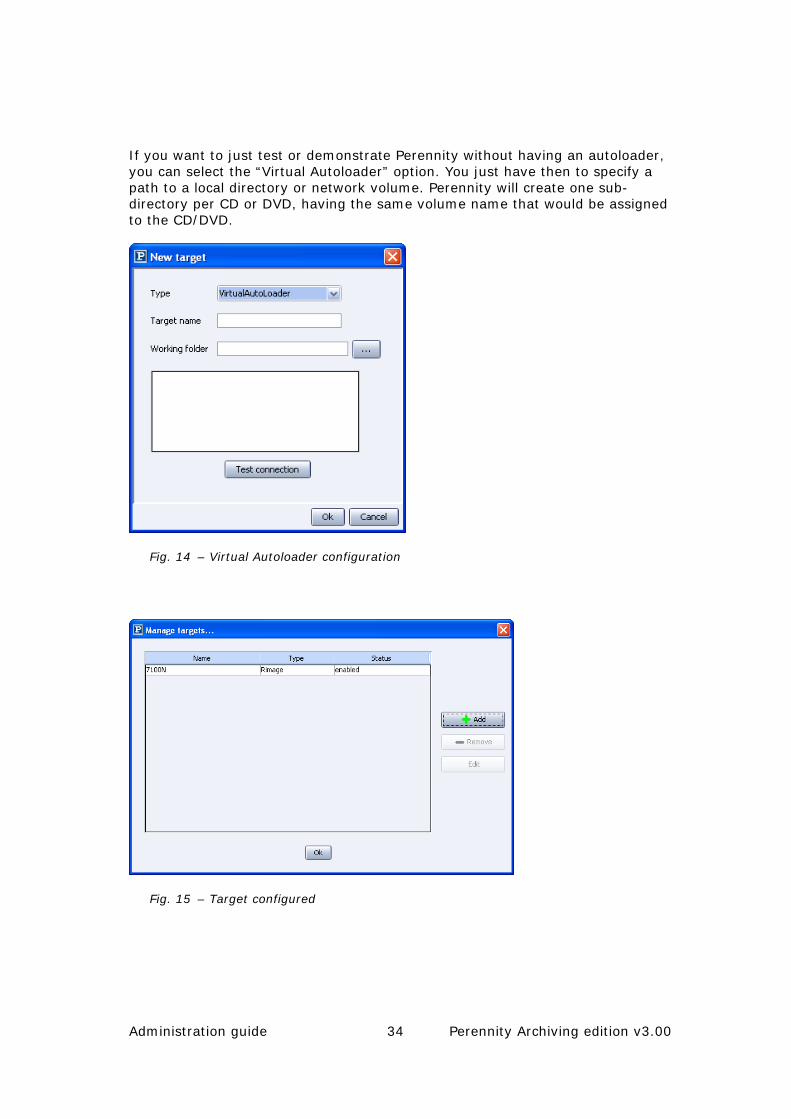
If you want to just test or demonstrate Perennity without having an autoloader, you can select the “Virtual Autoloader” option. You just have then to specify a path to a local directory or network volume. Perennity will create one sub-directory per CD or DVD, having the same volume name that would be assigned to the CD/DVD.
Fig. 14 – Virtual Autoloader configuration
Fig. 15 – Target configured
Administration guide 35 Perennity Archiving edition v3.00
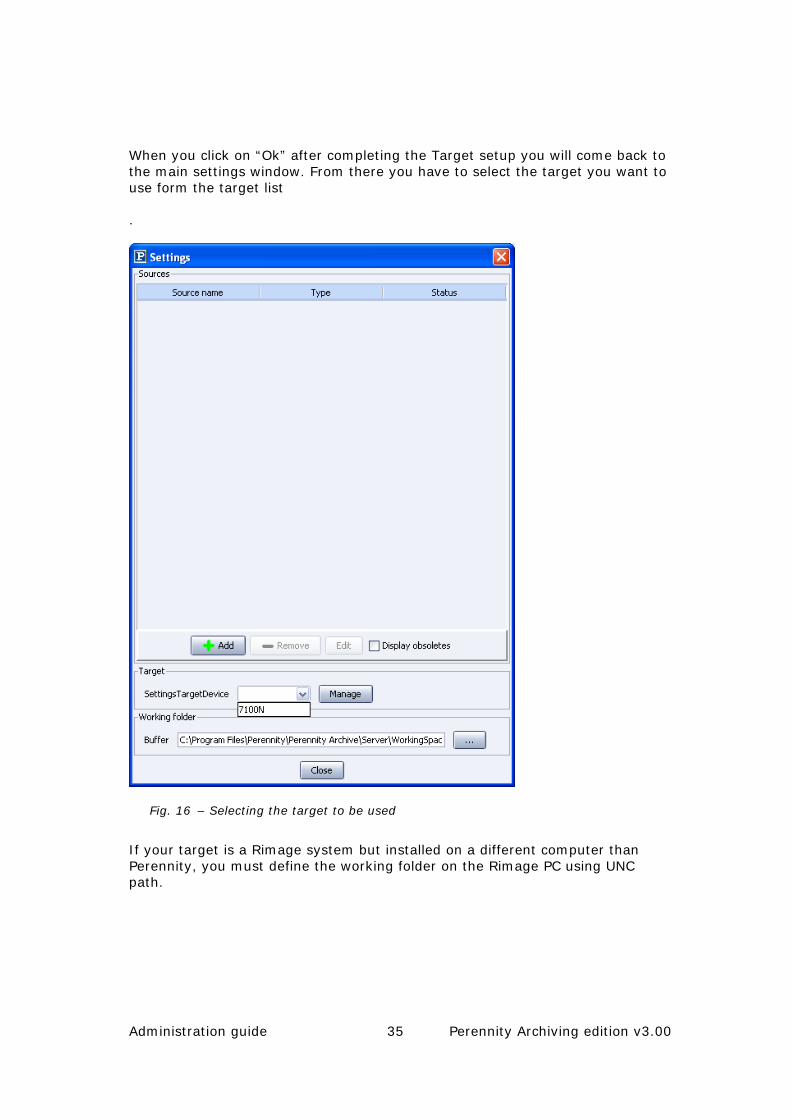
When you click on “Ok” after completing the Target setup you will come back to the main settings window. From there you have to select the target you want to use form the target list
.
Fig. 16 – Selecting the target to be used
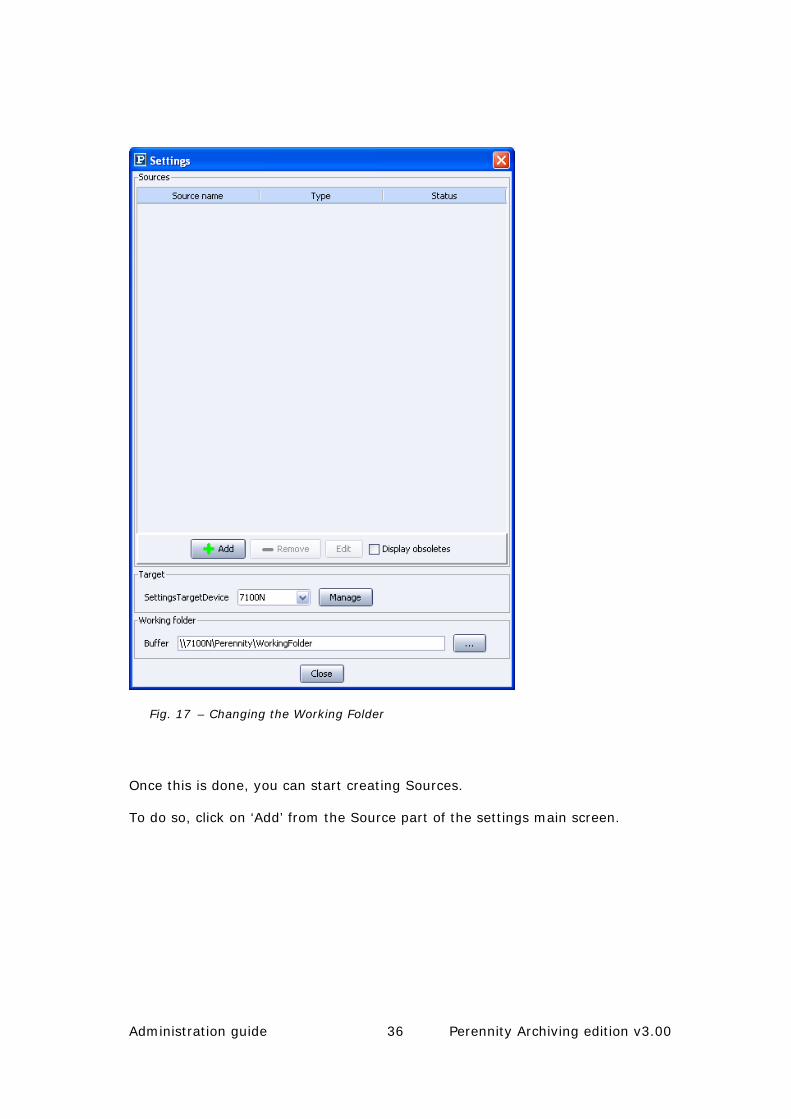
If your target is a Rimage system but installed on a different computer than Perennity, you must define the working folder on the Rimage PC using UNC path.
Administration guide 36 Perennity Archiving edition v3.00
Fig. 17 – Changing the Working Folder
Once this is done, you can start creating Sources.
To do so, click on ‘Add’ from the Source part of the settings main screen.
Administration guide 37 Perennity Archiving edition v3.00
CONFIGURING SOURCES
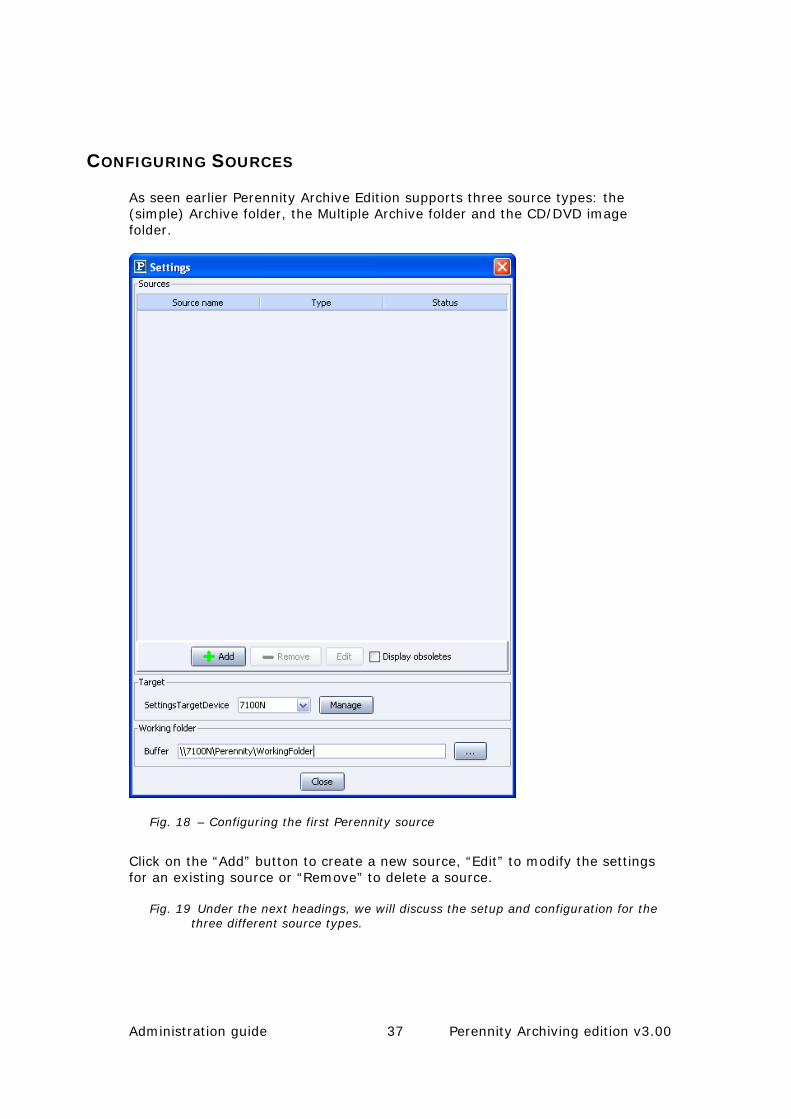
As seen earlier Perennity Archive Edition supports three source types: the (simple) Archive folder, the Multiple Archive folder and the CD/DVD image folder.
Fig. 18 – Configuring the first Perennity source
Click on the “Add” button to create a new source, “Edit” to modify the settings for an existing source or “Remove” to delete a source.
Fig. 19 Under the next headings, we will discuss the setup and configuration for the three different source types.
Administration guide 38 Perennity Archiving edition v3.00
CONFIGURING AN ARCHIVE FOLDER
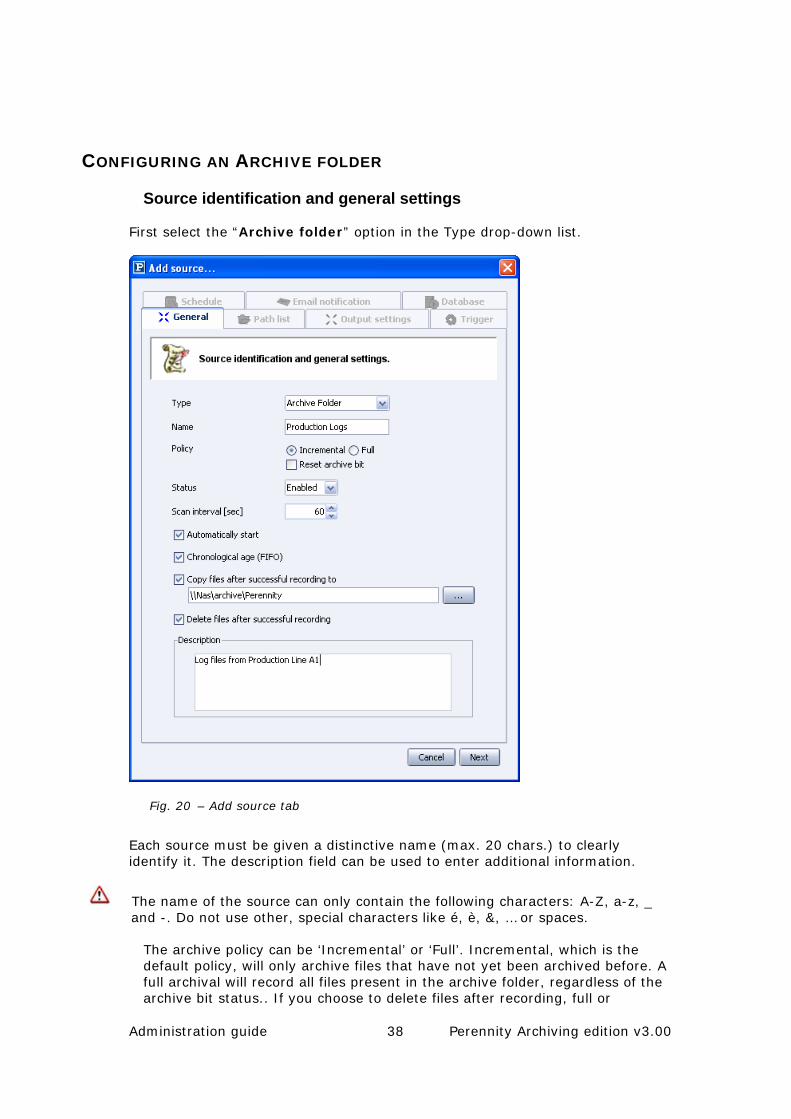
Source identification and general settings
First select the “Archive folder” option in the Type drop-down list.
Fig. 20 – Add source tab
Each source must be given a distinctive name (max. 20 chars.) to clearly identify it. The description field can be used to enter additional information.
The name of the source can only contain the following characters: A-Z, a-z, _ and -. Do not use other, special characters like é, è, &, … or spaces.
The archive policy can be ‘Incremental’ or ‘Full’. Incremental, which is the default policy, will only archive files that have not yet been archived before. A full archival will record all files present in the archive folder, regardless of the archive bit status.. If you choose to delete files after recording, full or

Administration guide 39 Perennity Archiving edition v3.00
incremental doesn’t matter, since the outcome will be the same. The incremental process needs the use of a database. Optionally you can also ask to reset the archive bit of the files but this can take a long time!
Sources can be in one of three different states: enabled, disabled or obsolete. Use the drop-down arrow to alter the state. Unlike targets, multiple sources can be enabled and thus active concurrently.
The scan interval determines how often Perennity will scan the Archive folder to check if the trigger conditions are met. A low value will flag more rapidly, but involves more processing; a high value will check less often but also require less processing. When Perennity doesn’t run on a dedicated system (for instance on a Rimage server, being used intensively for other purposes too) it is advised to put a higher value here.
When selecting the “Automatically start” option, Perennity will start up the Archive folder as soon as the Perennity application is launched. Otherwise, you will need to start the processing manually.
Selecting “Process chronologically” allows for sorting the files and folders by creation date/time (FIFO = First In First Out). Older files will be recorded before newer ones.
If after successful recording you want all archived files to be copied to another destination (on the local server or to a share), select the option “Copy files after successful recording to” and type the path or browse to select it.
Files can be automatically deleted when the recording has been successful by checking the “Delete files after successful recording” option. If not, they will stay present in the archive folder
Administration guide 40 Perennity Archiving edition v3.00
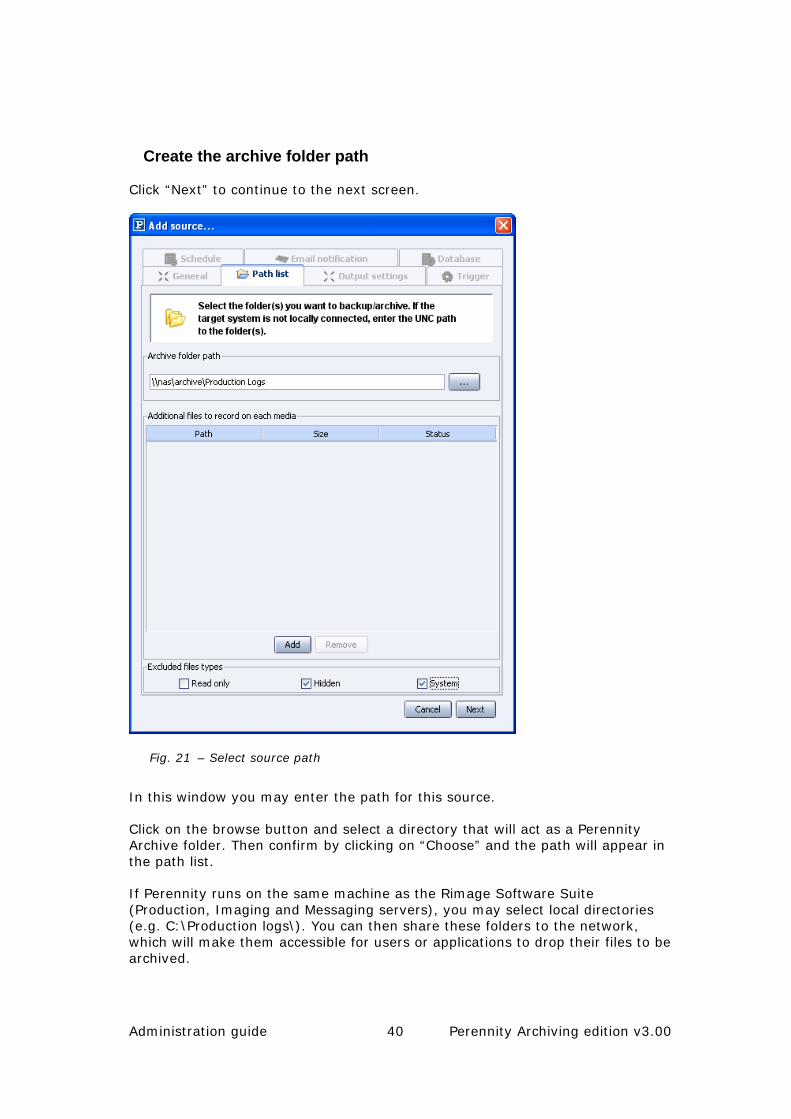
Create the archive folder path
Click “Next” to continue to the next screen.
Fig. 21 – Select source path
In this window you may enter the path for this source.
Click on the browse button and select a directory that will act as a Perennity Archive folder. Then confirm by clicking on “Choose” and the path will appear in the path list.
If Perennity runs on the same machine as the Rimage Software Suite (Production, Imaging and Messaging servers), you may select local directories (e.g. C:\Production logs\). You can then share these folders to the network, which will make them accessible for users or applications to drop their files to be archived.
Administration guide 41 Perennity Archiving edition v3.00
If Perennity runs on another machine than the Rimage Software Suite or if your archive folder is created on different systems (server or client workstations), you must always use UNC paths (browse through My Network Places). It is mandatory that both Perennity and the Rimage Imaging server can access the files and folders to be archived (with the logged on user account). Be sure to provide read/write or full control access to the Perennity Archive folders and sub-folders.
Please make sure you have the necessary rights to access these shares before trying to add them to your configuration, otherwise you will not be successful in doing so.
You can add some additional files and folders to every disc (e.g. Acrobat Reader, picture viewer, …).
You may also exclude system files, hidden files and/or read-only files.
When finished, click the “Next” button.

Administration guide 42 Perennity Archiving edition v3.00
Output settings
The following screen will ask you to select a target to make an association with. You can only link to one target, even if multiple exist.
Under the “Output settings” tab you can define all settings with respect to the imaging and production of your CDs and DVDs.
Fig. 22 – Enter Rimage settings
In most cases, it will probably be sufficient to configure the General settings, which include:
The Media type: CD-R, DVD-R, DVD-R Dual Layer (DVDR-DL), Blu-Ray and Blu-Ray Dual Layer. Since Rimage also supports CD-RW, DVD-RW and DVD+R(W) you may of course also use one of these media types. For archiving however we strongly recommend CD-R or DVD-R, since these media offer the best guarantees for long-term storage. For backup you might envisage using RW media (remember that via the Rimage software you cannot erase these).

Administration guide 43 Perennity Archiving edition v3.00
Selecting ‘Auto Select’ will make Perennity choosing the media type that fits the best the size of the data that will be archived.
The Number of copies
The Label file: select the correct label template for your type of printer (Everest, Prism, 480i, Epson). This can be the standard label template provided with Perennity, or a custom label template of your own. Please consult appendix 4 if you want to find out how to make your own personalized Perennity labels. Perennity will open the default label directory it created at installation time, but you can also browse to another location to choose a label. If Perennity is not installed on the Rimage Control Center, you will need to use a UNC path to the label. Also make sure that the Rimage Production Server can access and open the label file. When the files to be recorded are pictures, you have the option to also print thumbnails. This is very convenient to visually identify the media. Default labels with the suffix “_thumbnails” allow for printing such thumbnails.
The CD/DVD Volume name: it is composed of a prefix (Source Name, Login, Folder Name or a custom text), a media ID or current date and a suffix (Target Name, Login, Folder Name or a custom text), divided by underscores. The prefix and/or suffix fields can be edited to input a custom text or they can be emptied. Also, the number of digits of the media ID can be defined (5, 05, 005, 0005…). You will get an example of what the volume name will look like.
Thumbnail settings
The ‘Thumbnails’ settings define what pictures will be printed on the media. Supported pictures are jpeg (.jpeg or .jpg), tiff (.tif or .tiff), png or bmp. Gif pictures are not supported.
Be sure to use a template that allows for printing thumbnails. Several default templates are available (file name ends in “_thumbnail”).
Fig. 23 – Thumbnail print settings

Administration guide 44 Perennity Archiving edition v3.00
You may select to use the pictures located in:
• The root of the archive folder.
• All pictures located in sub-directories, up to a specified folder depth.
• Pictures located in a specific sub-directory.
These options can be combined.
The number of pictures to be printed is defined by the used CD Designer template. You can modify it to suit your needs.
You may also decide what pictures will be printed:
• Every x pictures (e.g. every 5 pictures: will print pictures 5, 10, 15, …)
• Every x percent (e.g. every 20% for a total of 50 pictures; this will print pictures 10, 20, 30, 40 and 50)
Fig. 24 Example of CD printed with thumbnails

Administration guide 45 Perennity Archiving edition v3.00
Advanced settings
There are two sections in the advanced settings window: Media Content and Media Format.
Fig. 25 – Advanced media settings
Under Media Content settings you can specify:
Add XML info file to media: this file contains a description of what is on the media (complete file listing with metadata, label information…).
Compute checksum: a checksum will be calculated and added to the XML info file for every file on the media, allowing for later data integrity checks. You can choose between CRC32, MD5 and SHA checksum algorithms.
File spanning: when activating this option files that do not fit on a media (max. authorized capacity) will be split over several media. File splitting information will be stored in the XML info file and a checksum will always be calculated to assure data integrity. The Perennity File Restore utility should be used to re-create split files.
Under Media Format settings you can specify:
Encoding format: Perennity supports ISO level 1, ISO level 2 (default) and UDF (1.02, 1.5 and 1.5 Unicode). You may also choose to include the Microsoft
Administration guide 46 Perennity Archiving edition v3.00
specific Joliet extensions. The Audio CD format is also supported (CD-R only) if you have WAV or MP3 music files as source data. And also WMA files are supported with Rimage Software Suite version 7. Consult your Rimage manual for more information about these formats.
Bad files ignored: you can ask to ignore all bad files that Perennity would meet during the archiving process. This is useful to ensure the readability of your media.
Use of Joliet extensions: .
Enforce ISO folder depth limit: if this option is checked, the maximum folder depth accepted will be of 8 levels (ISO specification). Default: not enforced.
Next media ID: this field shows the media ID for the next media to be produced and it is updated continuously. You can change its value to restart the numbering.
Clicking “Next” opens the Trigger window.
Administration guide 47 Perennity Archiving edition v3.00
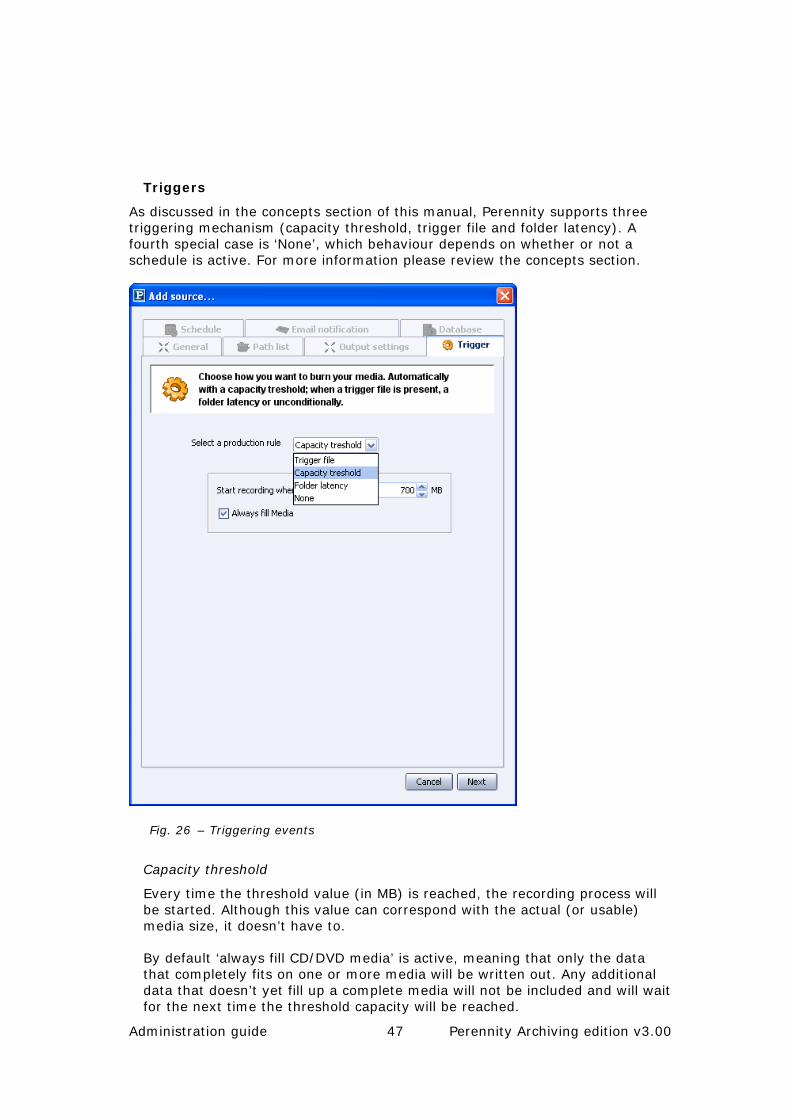
Triggers
As discussed in the concepts section of this manual, Perennity supports three triggering mechanism (capacity threshold, trigger file and folder latency). A fourth special case is ‘None’, which behaviour depends on whether or not a schedule is active. For more information please review the concepts section.
Fig. 26 – Triggering events
Capacity threshold
Every time the threshold value (in MB) is reached, the recording process will be started. Although this value can correspond with the actual (or usable) media size, it doesn’t have to.
By default ‘always fill CD/DVD media’ is active, meaning that only the data that completely fits on one or more media will be written out. Any additional data that doesn’t yet fill up a complete media will not be included and will wait for the next time the threshold capacity will be reached.
Administration guide 48 Perennity Archiving edition v3.00
Trigger file
Enter the name for the trigger file, which must be copied to the root of the Archive folder to start its processing. Optionally you can add the trigger file to the media. You may also specify a file extension as trigger (e.g. *.arc).
Folder latency
Specify a latency time in seconds. When a folder scan is performed and no more changes are detected in the folder after applying the latency time, the recording will start. You can however specify that a minimum number of files and/or a minimum capacity must be present in the folder.
None
When a schedule is enabled (next step), the recording of all data present in the Archive folder will start when the schedule gets active. Any data added later (even when the schedule is still running) will wait for the next schedule activation. Without scheduling, the recording must be manually forced from the main Perennity window.
Select “Next” to go to the “Schedule” tab.
Administration guide 49 Perennity Archiving edition v3.00
Schedule
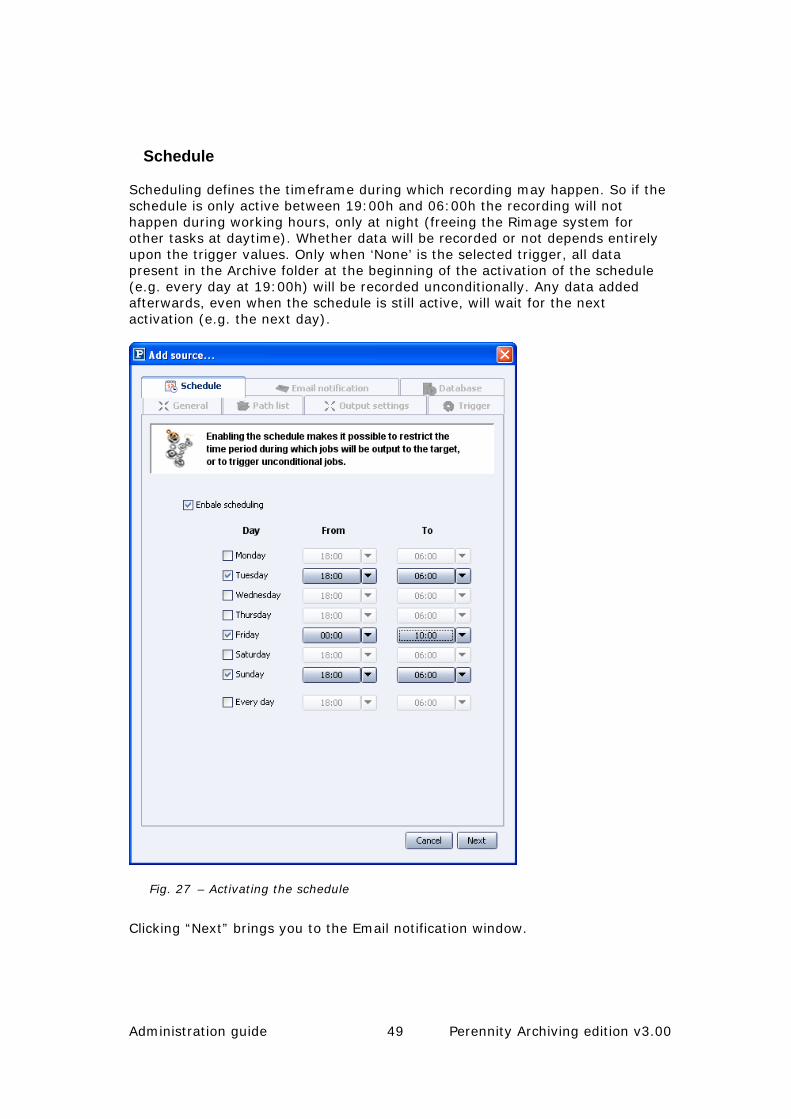
Scheduling defines the timeframe during which recording may happen. So if the schedule is only active between 19:00h and 06:00h the recording will not happen during working hours, only at night (freeing the Rimage system for other tasks at daytime). Whether data will be recorded or not depends entirely upon the trigger values. Only when ‘None’ is the selected trigger, all data present in the Archive folder at the beginning of the activation of the schedule (e.g. every day at 19:00h) will be recorded unconditionally. Any data added afterwards, even when the schedule is still active, will wait for the next activation (e.g. the next day).
Fig. 27 – Activating the schedule
Clicking “Next” brings you to the Email notification window.

Administration guide 50 Perennity Archiving edition v3.00
Email notification
By activating the email notification functionality, one or multiple recipients can receive an email in any of the following cases:
• A job is completed
• The Rimage Imaging server has generated an error
• Connection problems with the Rimage Messaging server
• Perennity errors
The only prerequisite to use email notification is to have access to a valid SMTP server.
Fig. 28 Email notification configuration

Administration guide 51 Perennity Archiving edition v3.00
Enter a valid SMTP host (DNS or IP address) and the email address that Perennity will use to send its emails. If the SMTP server requires authentication, enter the login and password.
Add one or multiple email addresses. You can test the email functionality by selecting one or more recipients and clicking on the “Test” button.
You may also define per user what kind of messages they should get: job completion notifications, errors with Rimage Imaging/Messaging and/or Perennity errors.
Database configuration
Clicking “Next” brings you to the database window. Enable the database if you want to use it for the current Archive folder and configure it correctly (make sure that your database setup is correct).
Fig. 29 – Perennity database configuration

Administration guide 52 Perennity Archiving edition v3.00
First select the type of database you want to use (SQL server type): MySQL or Microsoft SQL Server. Since MSDE is a feature-limited version of SQL Server, select SQLServer if you want to use MSDE. Please note that when we will talk about SQL Server hereunder, this also refers to MSDE.
By ticking the “Index file content” option, Perennity will store all different keywords of text documents (pdf, doc, xls, txt, xml and eml) in the Perennity database. This will allow searching on the content of the files using the Perennity Finder tool.
You can create a separate database per Archive folder or use the same database for all Archive folders (which is not recommended if you want to use the Finder AND security is an issue). When MySQL runs on the Perennity server enter user name ‘user’ without a password, otherwise check with your database administrator. Always check with your database administrator when using SQL Server.
The Perennity database user must have the right to create a new database, create tables, modify the structure and insert data.
By default, all local users can access all MySQL databases. Of course it is possible to restrict access to specific authorized users.
When the “Dump database” checkbox is selected, Perennity makes an up-to-date backup copy (including the current CD/DVD) of the complete MySQL database on each media being produced. In this way there is no need to manually backup the database, since the last produced media will always contain the latest database contents. This option is not available for SQL Server (backups must be performed by the database administrator).
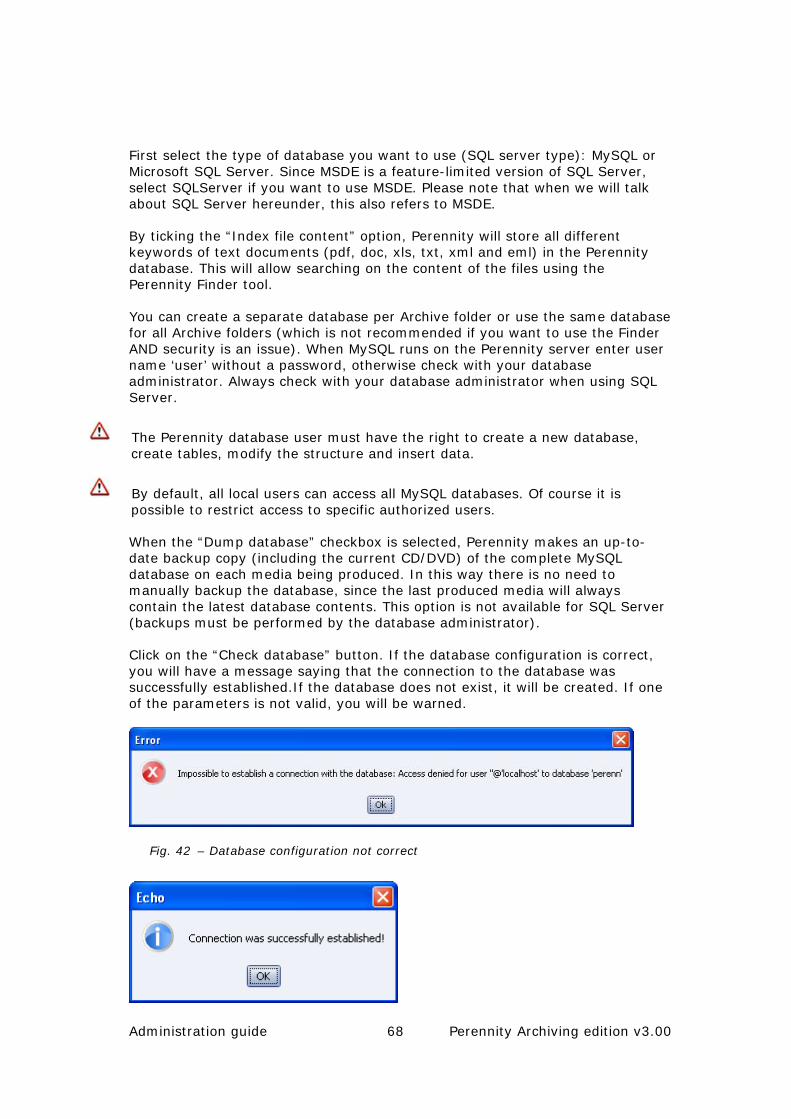
Click on the “Check database” button. If the database configuration is correct, you will have a message saying that the connection to the database was successfully established.If the database does not exist, it will be created. If one of the parameters is not valid, you will be warned.
Fig. 30 – Database configuration not correct

Administration guide 53 Perennity Archiving edition v3.00
Fig. 31 - Confirmation of database creation
Click on Yes. The structure will be modified without data loss. However, it is highly recommended to backup the database prior to any update or modification.
From now on, all archival operations for this archive folder will be logged into the just configured MySQL or SQL Server database.
In case of a power failure or interruption of an archiving process of Perennity, it is possible that the Perennity contains records related to files that have not be burned to CD or DVD. You should then clean the database by clicking on the “Clean database” button. It will remove all unnecessary records.
Your Perennity Archive folder is now ready to be used.
Administration guide 54 Perennity Archiving edition v3.00
CONFIGURING A MULTIPLE ARCHIVE FOLDER
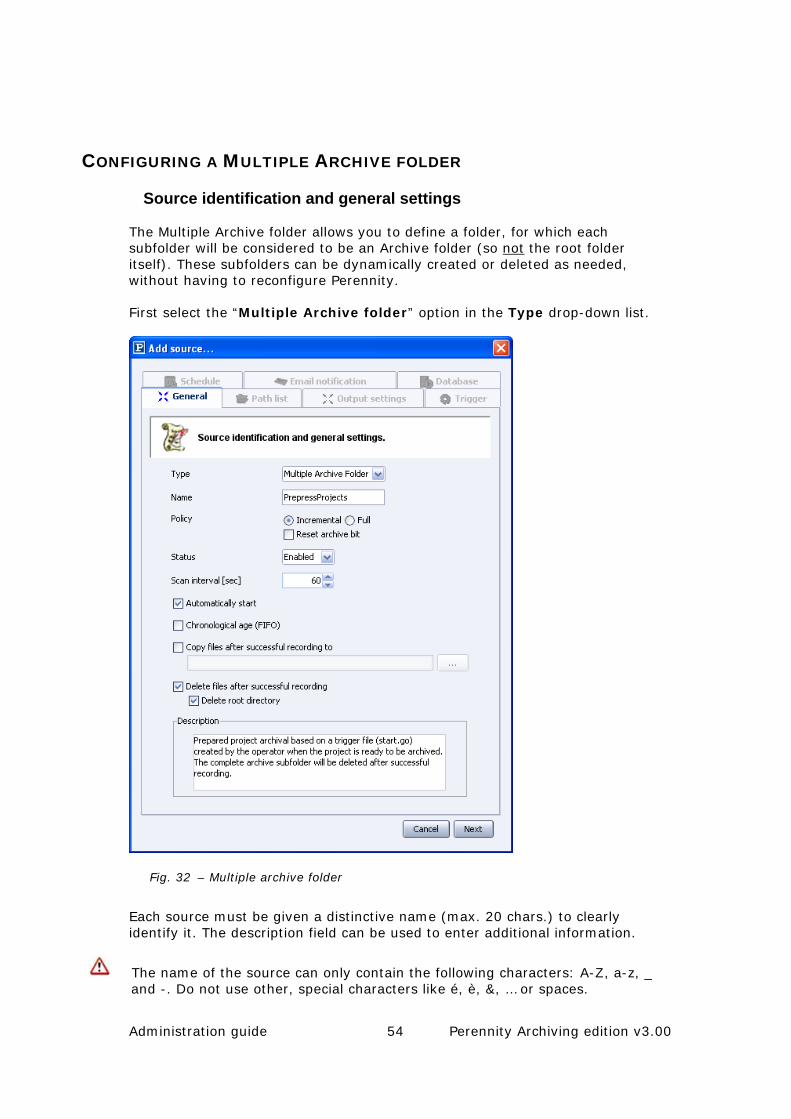
Source identification and general settings
The Multiple Archive folder allows you to define a folder, for which each subfolder will be considered to be an Archive folder (so not the root folder itself). These subfolders can be dynamically created or deleted as needed, without having to reconfigure Perennity.
First select the “Multiple Archive folder” option in the Type drop-down list.
Fig. 32 – Multiple archive folder
Each source must be given a distinctive name (max. 20 chars.) to clearly identify it. The description field can be used to enter additional information.
The name of the source can only contain the following characters: A-Z, a-z, _ and -. Do not use other, special characters like é, è, &, … or spaces.

Administration guide 55 Perennity Archiving edition v3.00
The archive policy can be ‘Incremental’ or ‘Full’. Incremental, which is the default policy, will only archive files that have not yet been archived before. A full archival will record all files present in the archive folder, regardless of the archive bit status. If you choose to delete files after recording, full or incremental doesn’t matter, since the outcome will be the same.
The incremental process needs the use of a database. Optionally you can also ask to reset the archive bit of the files but this can take a long time!
Sources can be in one of three different states: enabled, disabled or obsolete. Use the drop-down arrow to alter the state. Unlike Rimage targets, multiple sources can be enabled and thus active concurrently.
The scan interval determines how often Perennity will scan the Archive folder to check if the trigger conditions are met. A low value will flag more rapidly, but involves more processing; a high value will check less often but also require less processing. When Perennity doesn’t run on a dedicated system (for instance on a Rimage server, being used intensively for other purposes too) it is advised to put a higher value here.
When selecting the “Automatically start” option, Perennity will start up the Archive folder as soon as the Perennity application is launched. Otherwise, you will need to start the processing manually.
Selecting “Process chronologically” allows for sorting the files and folders by creation date/time (FIFO = First In First Out). Older files will be recorded before newer ones.
If after successful recording you want all archived files to be copied to another destination (on the local server or to a share), select the option “Copy files after successful recording to” and type the path or browse to select it.
Files can be automatically deleted when the recording has been successful by checking the “Delete files after successful recording” option. If not, they will stay present in the archive folder
Administration guide 56 Perennity Archiving edition v3.00
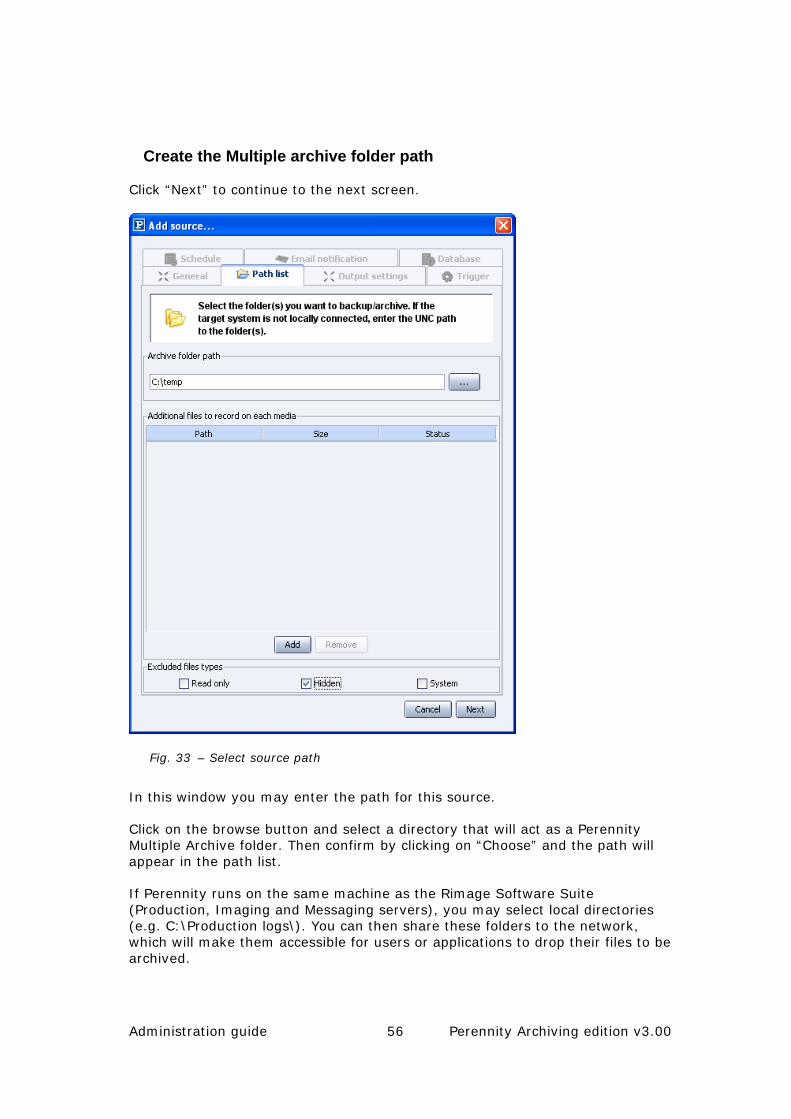
Create the Multiple archive folder path
Click “Next” to continue to the next screen.
Fig. 33 – Select source path
In this window you may enter the path for this source.
Click on the browse button and select a directory that will act as a Perennity Multiple Archive folder. Then confirm by clicking on “Choose” and the path will appear in the path list.
If Perennity runs on the same machine as the Rimage Software Suite (Production, Imaging and Messaging servers), you may select local directories (e.g. C:\Production logs\). You can then share these folders to the network, which will make them accessible for users or applications to drop their files to be archived.
Administration guide 57 Perennity Archiving edition v3.00
If Perennity runs on another machine than the Rimage Software Suite or if your multiple archive folder is created on different systems (server or client workstations), you must always use UNC paths (browse through My Network Places). It is mandatory that both Perennity and the Rimage Imaging server can access the files and folders to be archived (with the logged on user account). Be sure to provide read/write or full control access to the Perennity Archive folders and sub-folders.
Please make sure you have the necessary rights to access these shares before trying to add them to your configuration, otherwise you will not be successful in doing so.
You can add some additional files and folders to every disc (e.g. Acrobat Reader, picture viewer, …).
You may also exclude system files, hidden files and/or read-only files.
When finished, click the “Next” button.

Administration guide 58 Perennity Archiving edition v3.00
Output settings
The following screen will ask you to select a target to make an association with. You can only link to one target, even if multiple exist.
Under the “Output settings” tab you can define all settings with respect to the imaging and production of your CDs and DVDs.
Fig. 34 – Enter Output settings
In most cases, it will probably be sufficient to configure the General settings, which include:
The Media type: CD-R, DVD-R, DVD-R Dual Layer (DVDR-DL), Blu-Ray and Blu-Ray Dual Layer. Since Rimage also supports CD-RW, DVD-RW and DVD+R(W) you may of course also use one of these media types. For archiving however we strongly recommend CD-R or DVD-R, since these media offer the best guarantees for long-term storage. For backup you might envisage using RW media (remember that via the Rimage software you cannot erase these).
Administration guide 59 Perennity Archiving edition v3.00
Selecting ‘Auto Select’ will make Perennity choosing the media type that fits the best the size of the data that will be archived.
The Number of copies
The Label file: select the correct label template for your type of printer (Everest, Prism, 480i, Epson). This can be the standard label template provided with Perennity, or a custom label template of your own. Please consult appendix 4 if you want to find out how to make your own personalized Perennity labels. Perennity will open the default label directory it created at installation time, but you can also browse to another location to choose a label. If Perennity is not installed on the Rimage Control Center, you will need to use a UNC path to the label. Also make sure that the Rimage Production Server can access and open the label file. When the files to be recorded are pictures, you have the option to also print thumbnails. This is very convenient to visually identify the media. Default labels with the suffix “_thumbnails” allow for printing such thumbnails.
The CD/DVD Volume name: it is composed of a prefix (Source Name, Login, Folder Name or a custom text), a media ID or current date and a suffix (Target Name, Login, Folder Name or a custom text), divided by underscores. The prefix and/or suffix fields can be edited to input a custom text or they can be emptied. Also, the number of digits of the media ID can be defined (5, 05, 005, 0005…). You will get an example of what the volume name will look like.
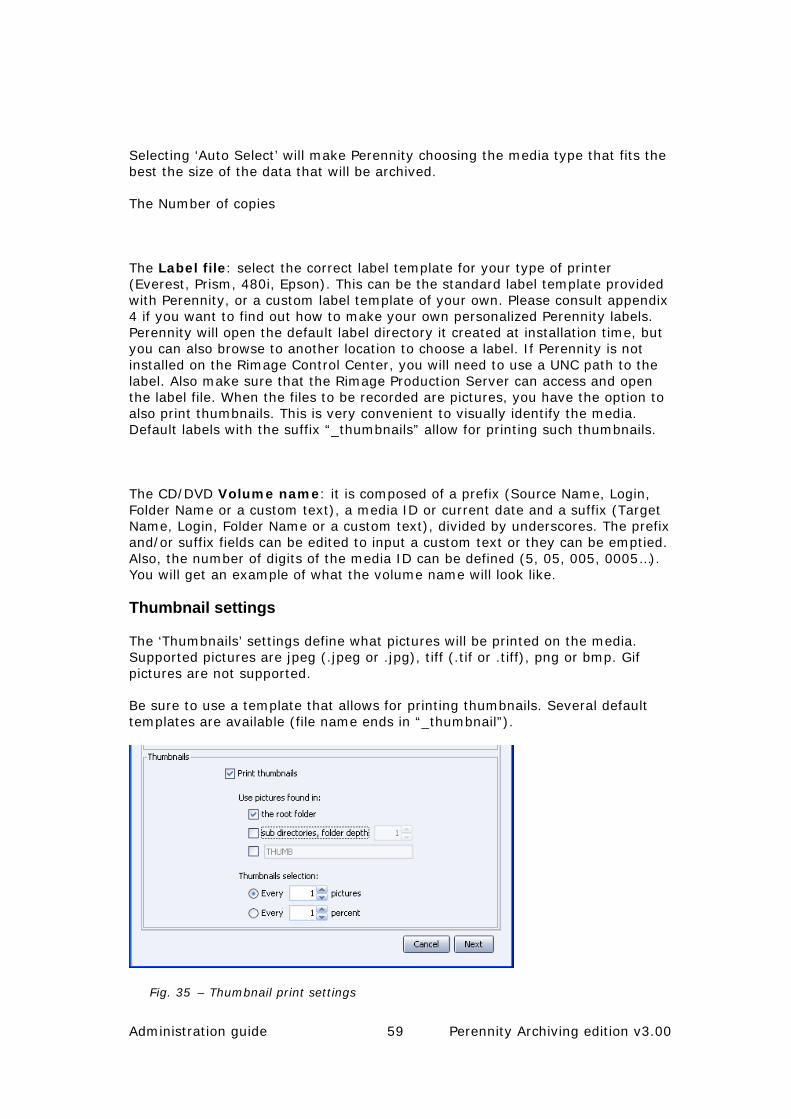
Thumbnail settings
The ‘Thumbnails’ settings define what pictures will be printed on the media. Supported pictures are jpeg (.jpeg or .jpg), tiff (.tif or .tiff), png or bmp. Gif pictures are not supported.
Be sure to use a template that allows for printing thumbnails. Several default templates are available (file name ends in “_thumbnail”).
Fig. 35 – Thumbnail print settings
Administration guide 60 Perennity Archiving edition v3.00
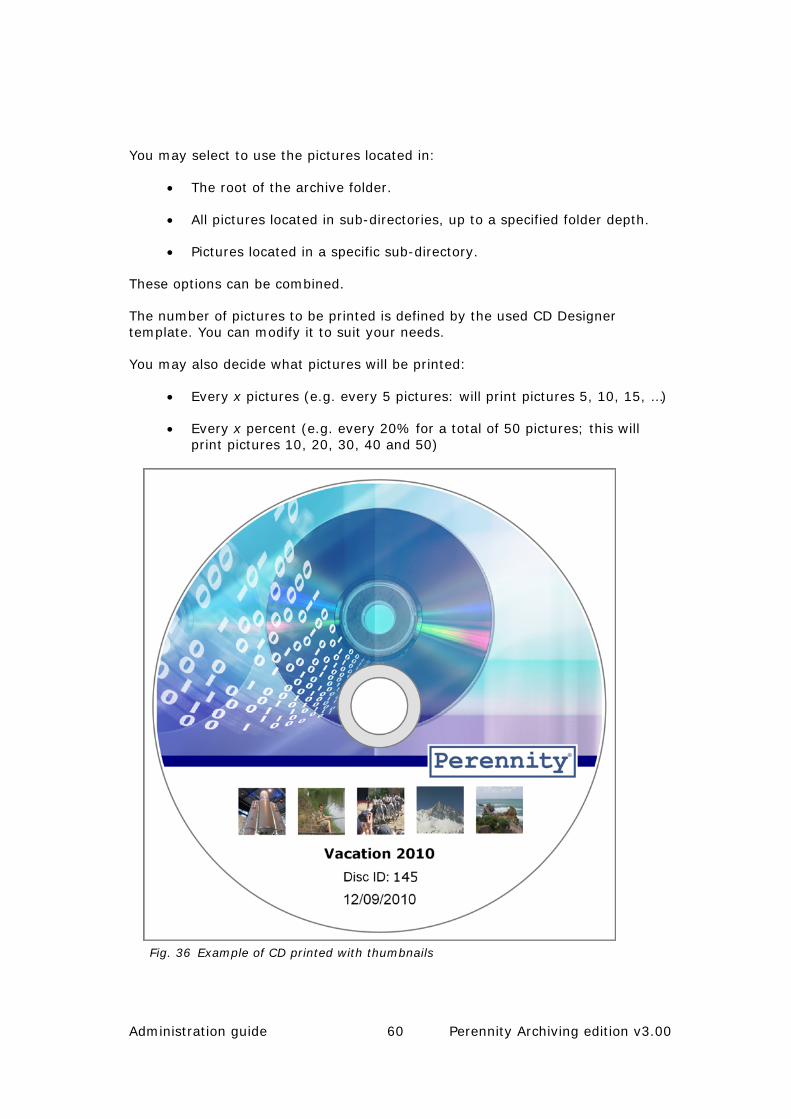
You may select to use the pictures located in:
• The root of the archive folder.
• All pictures located in sub-directories, up to a specified folder depth.
• Pictures located in a specific sub-directory.
These options can be combined.
The number of pictures to be printed is defined by the used CD Designer template. You can modify it to suit your needs.
You may also decide what pictures will be printed:
• Every x pictures (e.g. every 5 pictures: will print pictures 5, 10, 15, …)
• Every x percent (e.g. every 20% for a total of 50 pictures; this will print pictures 10, 20, 30, 40 and 50)
Fig. 36 Example of CD printed with thumbnails

Administration guide 61 Perennity Archiving edition v3.00
Advanced settings
There are two sections in the advanced settings window: Media Content and Media Format.
Fig. 37 – Advanced media settings
Under Media Content settings you can specify:
Add XML info file to media: this file contains a description of what is on the media (complete file listing with metadata, label information…).
Compute checksum: a checksum will be calculated and added to the XML info file for every file on the media, allowing for later data integrity checks. You can choose between CRC32, MD5 and SHA checksum algorithms.
File spanning: when activating this option files that do not fit on a media (max. authorized capacity) will be split over several media. File splitting information will be stored in the XML info file and a checksum will always be calculated to assure data integrity. The Perennity File Restore utility should be used to re-create split files.
Under Media Format settings you can specify:
Encoding format: Perennity supports ISO level 1, ISO level 2 (default) and UDF (1.02, 1.5 and 1.5 Unicode). You may also choose to include the Microsoft

Administration guide 62 Perennity Archiving edition v3.00
specific Joliet extensions. The Audio CD format is also supported (CD-R only) if you have WAV or MP3 music files as source data. And also WMA files are supported with Rimage Software Suite version 7. Consult your Rimage manual for more information about these formats.
Bad files ignored: you can ask to ignore all bad files that Perennity would meet during the archiving process. This is useful to ensure the readability of your media.
Use of Joliet extensions: .
Enforce ISO folder depth limit: if this option is checked, the maximum folder depth accepted will be of 8 levels (ISO specification). Default: not enforced.
Next media ID: this field shows the media ID for the next media to be produced and it is updated continuously. You can change its value to restart the numbering.
Clicking “Next” opens the Trigger window.
Administration guide 63 Perennity Archiving edition v3.00
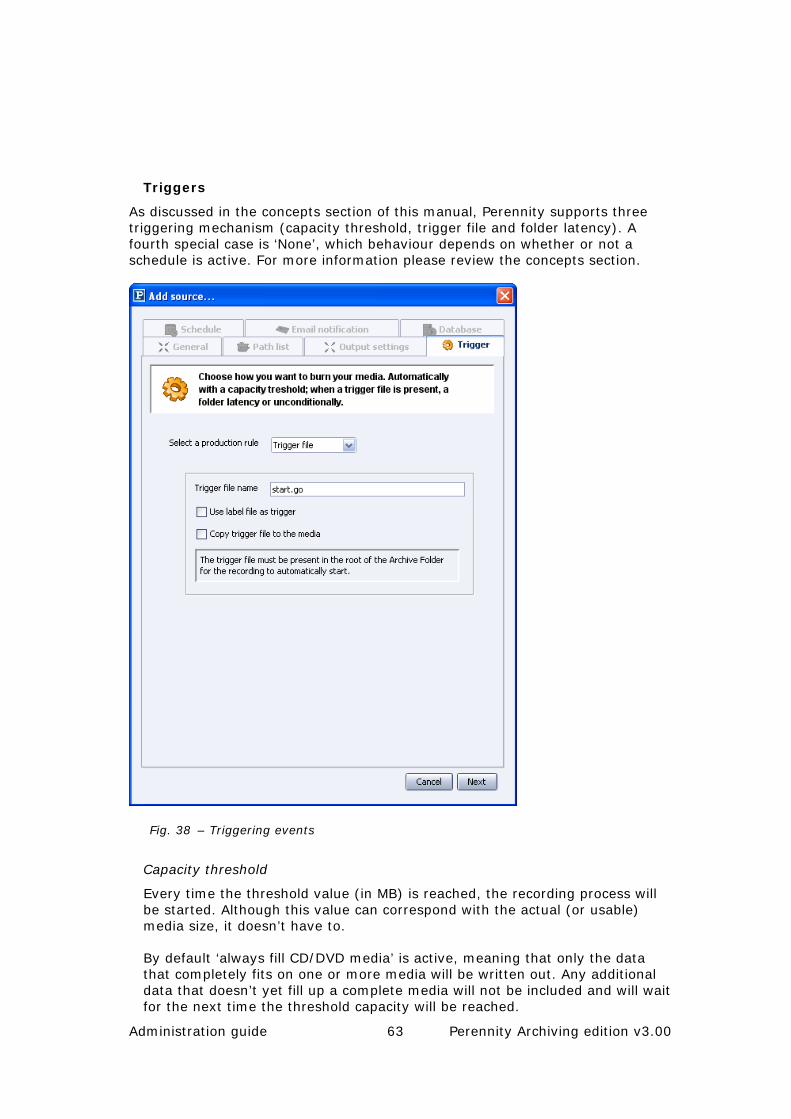
Triggers
As discussed in the concepts section of this manual, Perennity supports three triggering mechanism (capacity threshold, trigger file and folder latency). A fourth special case is ‘None’, which behaviour depends on whether or not a schedule is active. For more information please review the concepts section.
Fig. 38 – Triggering events
Capacity threshold
Every time the threshold value (in MB) is reached, the recording process will be started. Although this value can correspond with the actual (or usable) media size, it doesn’t have to.
By default ‘always fill CD/DVD media’ is active, meaning that only the data that completely fits on one or more media will be written out. Any additional data that doesn’t yet fill up a complete media will not be included and will wait for the next time the threshold capacity will be reached.

Administration guide 64 Perennity Archiving edition v3.00
Trigger file
Enter the name for the trigger file, that must be copied to the root of the Archive folder to start its processing. Optionally you can add the trigger file to the media. You may also specify a file extension as trigger (e.g. *.arc).
Folder latency
Specify a latency time in seconds. When a folder scan is performed and no more changes are detected in the folder after applying the latency time, the recording will start. You can however specify that a minimum number of files and/or a minimum capacity must be present in the folder.
None
When a schedule is enabled (next step), the recording of all data present in the Archive folder will start when the schedule gets active. Any data added later (even when the schedule is still running) will wait for the next schedule activation. Without scheduling, the recording must be manually forced from the main Perennity window.
Select “Next” to go to the “Schedule” tab.
Administration guide 65 Perennity Archiving edition v3.00
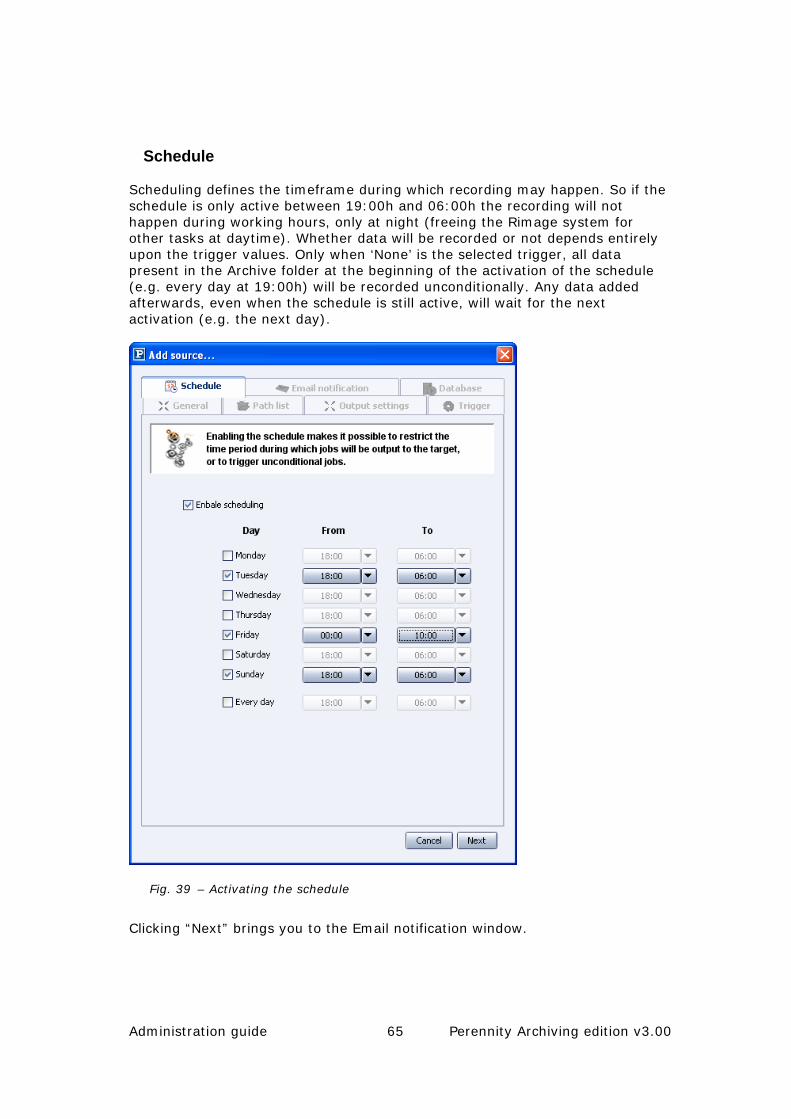
Schedule
Scheduling defines the timeframe during which recording may happen. So if the schedule is only active between 19:00h and 06:00h the recording will not happen during working hours, only at night (freeing the Rimage system for other tasks at daytime). Whether data will be recorded or not depends entirely upon the trigger values. Only when ‘None’ is the selected trigger, all data present in the Archive folder at the beginning of the activation of the schedule (e.g. every day at 19:00h) will be recorded unconditionally. Any data added afterwards, even when the schedule is still active, will wait for the next activation (e.g. the next day).
Fig. 39 – Activating the schedule
Clicking “Next” brings you to the Email notification window.
Administration guide 66 Perennity Archiving edition v3.00
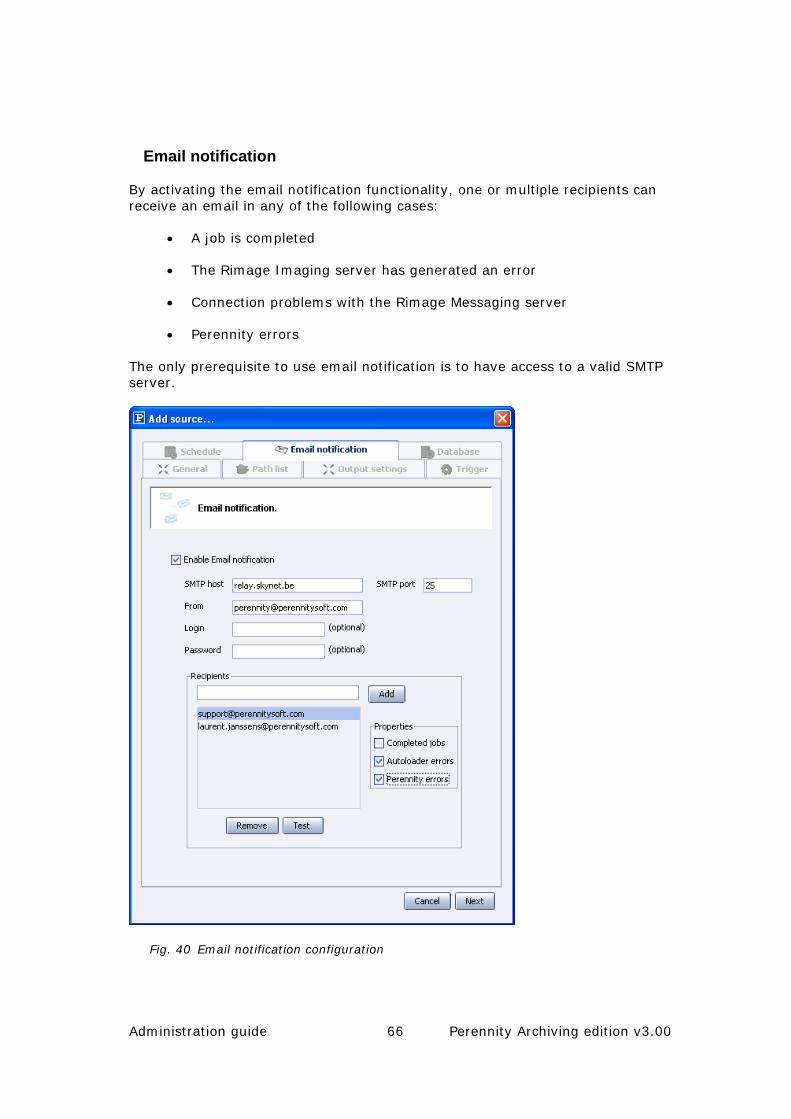
Email notification
By activating the email notification functionality, one or multiple recipients can receive an email in any of the following cases:
• A job is completed
• The Rimage Imaging server has generated an error
• Connection problems with the Rimage Messaging server
• Perennity errors
The only prerequisite to use email notification is to have access to a valid SMTP server.
Fig. 40 Email notification configuration
Administration guide 67 Perennity Archiving edition v3.00
Enter a valid SMTP host (DNS or IP address) and the email address that Perennity will use to send its emails. If the SMTP server requires authentication, enter the login and password.
Add one or multiple email addresses. You can test the email functionality by selecting one or more recipients and clicking on the “Test” button.
You may also define per user what kind of messages they should get: job completion notifications, errors with Rimage Imaging/Messaging and/or Perennity errors.
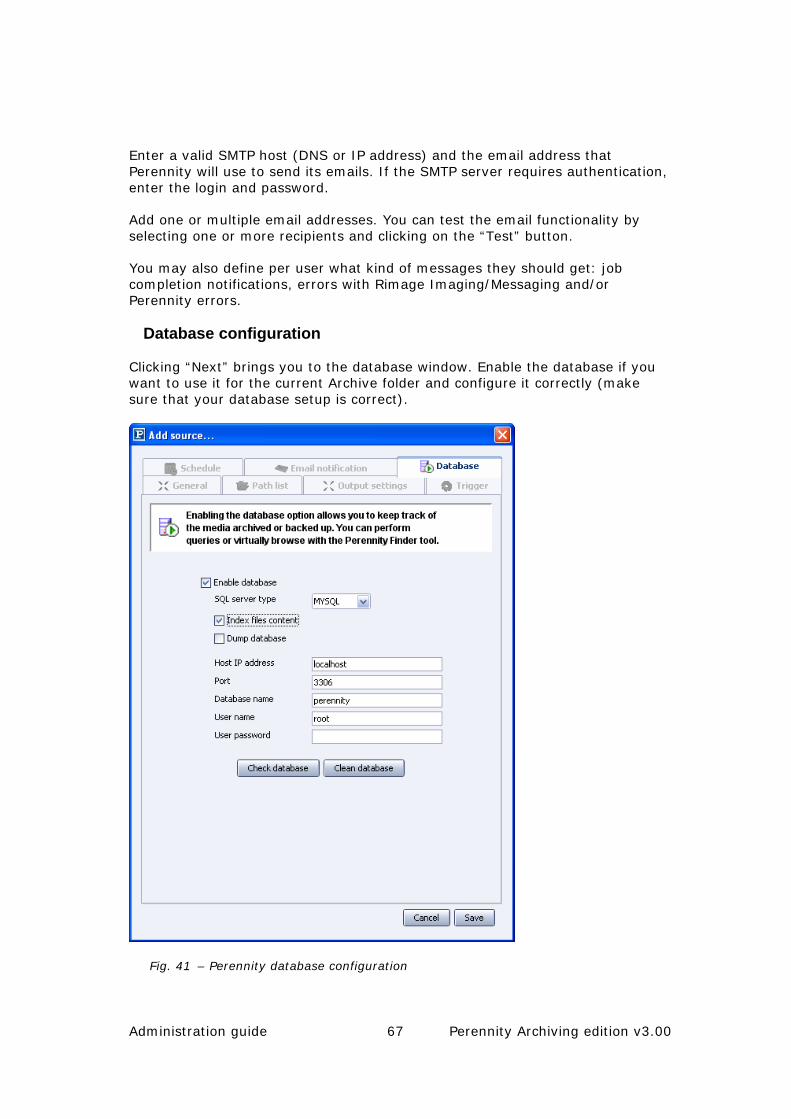
Database configuration
Clicking “Next” brings you to the database window. Enable the database if you want to use it for the current Archive folder and configure it correctly (make sure that your database setup is correct).
Fig. 41 – Perennity database configuration
Administration guide 68 Perennity Archiving edition v3.00
First select the type of database you want to use (SQL server type): MySQL or Microsoft SQL Server. Since MSDE is a feature-limited version of SQL Server, select SQLServer if you want to use MSDE. Please note that when we will talk about SQL Server hereunder, this also refers to MSDE.
By ticking the “Index file content” option, Perennity will store all different keywords of text documents (pdf, doc, xls, txt, xml and eml) in the Perennity database. This will allow searching on the content of the files using the Perennity Finder tool.
You can create a separate database per Archive folder or use the same database for all Archive folders (which is not recommended if you want to use the Finder AND security is an issue). When MySQL runs on the Perennity server enter user name ‘user’ without a password, otherwise check with your database administrator. Always check with your database administrator when using SQL Server.
The Perennity database user must have the right to create a new database, create tables, modify the structure and insert data.
By default, all local users can access all MySQL databases. Of course it is possible to restrict access to specific authorized users.
When the “Dump database” checkbox is selected, Perennity makes an up-to-date backup copy (including the current CD/DVD) of the complete MySQL database on each media being produced. In this way there is no need to manually backup the database, since the last produced media will always contain the latest database contents. This option is not available for SQL Server (backups must be performed by the database administrator).
Click on the “Check database” button. If the database configuration is correct, you will have a message saying that the connection to the database was successfully established.If the database does not exist, it will be created. If one of the parameters is not valid, you will be warned.
Fig. 42 – Database configuration not correct
Administration guide 69 Perennity Archiving edition v3.00
Fig. 43 - Confirmation of database creation
Click on Yes. The structure will be modified without data loss. However, it is highly recommended to backup the database prior to any update or modification.
From now on, all archival operations for this archive folder will be logged into the just configured MySQL or SQL Server database.
In case of a power failure or interruption of an archiving process of Perennity, it is possible that the Perennity contains records related to files that have not be burned to CD or DVD. You should then clean the database by clicking on the “Clean database” button. It will remove all unnecessary records.
Your Perennity Multiple Archive folder is now ready to be used.

Administration guide 70 Perennity Archiving edition v3.00
CONFIGURING A CD/DVD IMAGE FOLDER
The CD/DVD Image folder type allows you to automatically record CD/DVD physical images that have been premastered with third party applications. This can be useful for image formats that are not supported on Windows platforms (like HFS for Macintosh), or in cases where specific mastering applications (e.g. for DVD Video) can directly output to a CD/DVD image. Two conditions are required for Perennity to be able to record your CD/DVD image: a valid image file and an XML file containing several instructions like the number of copies and what needs to be printed on the CD or DVD. You can create this XML file manually or through another application (see Appendix 1 for more information about the structure of this file).
Source identification and general settings
Create a CD/DVD Image Folder by selecting “CD/DVD Image Folder” from the Type drop-down list in the Source settings window.
Fig. 44 – CD/DVD Image Folder
Administration guide 71 Perennity Archiving edition v3.00
Each source must be given a distinctive name (max. 20 chars.) to clearly identify it. The description field can be used to enter additional information.
The name of the source can only contain the following characters: A-Z, a-z, _ and -. Do not use other, special characters like é, è, &, … or spaces.
Sources can be in one of three different states: enabled, disabled or obsolete. Use the drop-down arrow to alter the state. Unlike Rimage targets, multiple sources can be enabled and thus active concurrently.
The scan interval determines how often Perennity will scan the Archive folder to check if the trigger conditions are met. A low value will flag more rapidly, but involves more processing; a high value will check less often but also require less processing. When Perennity doesn’t run on a dedicated system (for instance on a Rimage server, being used intensively for other purposes too) it is advised to put a higher value here.
When selecting the “Automatically start” option, Perennity will start up the Archive folder as soon as the Perennity application is launched. Otherwise, you will need to start the processing manually.
Define the Image Folder path list
Click the “Next” button to continue.

Administration guide 72 Perennity Archiving edition v3.00
Fig. 45 – Select source path (UNC)
In this window you may enter one or more paths for this source. Perennity will treat every path separately for processing, but the same rules will apply to all. This means you don’t have to create multiple identically configured archive folders, but just one with multiple paths. If you need different settings, you need to create different CD/DVD Image folders.
Click on the “Add path” button and select a directory that will act as a Perennity CD/DVD Image folder. Then confirm with “Choose directory” and the path will appear in the path list. The number of paths you can add here is unlimited.
If Perennity runs on the same machine as the Rimage Software Suite (Production, Imaging and Messaging servers), you may select local directories (e.g. C:\Production logs\). You can then share these folders to the network, which will make them accessible for users or applications to drop their image files to be recorded.
If Perennity runs on another machine as the Rimage Software Suite or if your Image folder is created on different systems (server or client workstations), you
Administration guide 73 Perennity Archiving edition v3.00
must always use UNC paths (browse through My Network Places). It is mandatory that both Perennity and the Rimage Imaging server can access the image files to be archived (with the logged on user account). Be sure to provide read/write or full control access to the Perennity Archive folders and sub-folders.
Please make sure you have the necessary rights to access these shares before trying to add them to your configuration, otherwise you will not be successful in doing so.
When finished, click the “Next” button.
Output settings
Under the “Output settings” tab you find settings with respect to the label you want to apply to your project.
Specify the correct default Label file for your type of equipment. This can be the standard label template provided with Perennity, or a custom label template of your own. Please consult appendix 4 if you want to find out how to make your own personalized Perennity labels. Perennity will open the default label directory it created at installation time, but you can also browse to another location to choose a label. If Perennity is not installed on the Rimage Control Center, you will need to use a UNC path to the label. Also make sure that the Rimage Production Server can access and open the label file.
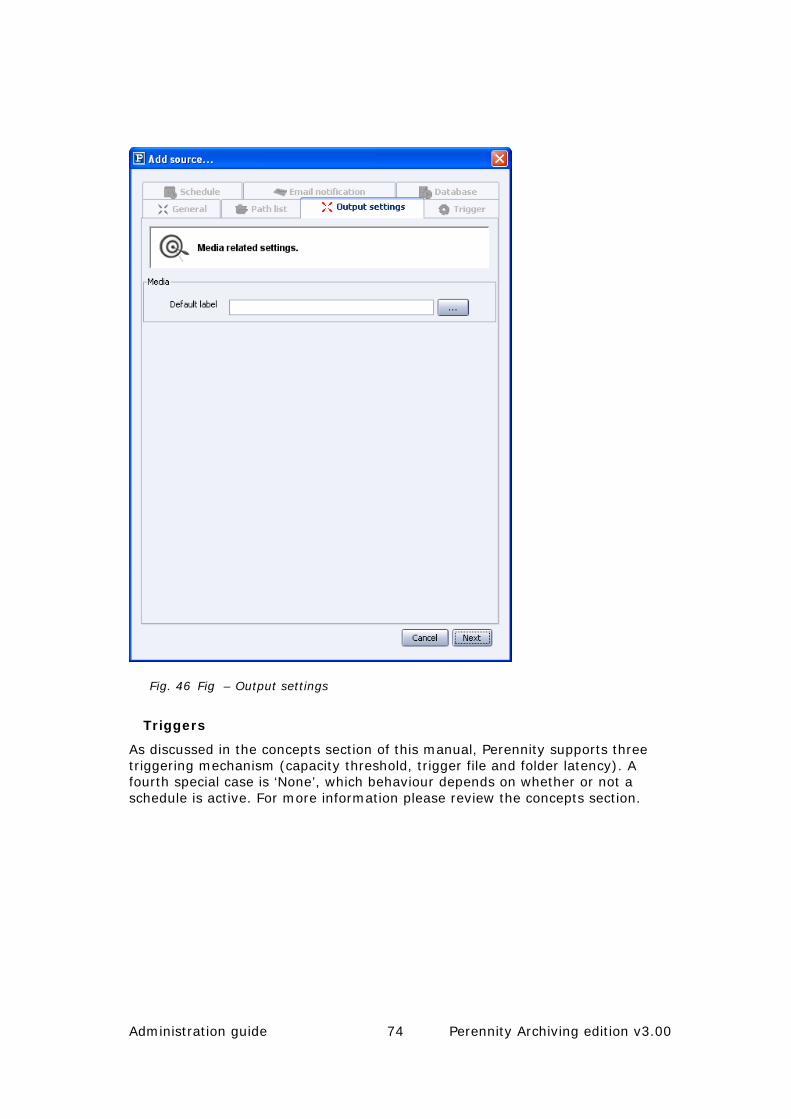
Administration guide 74 Perennity Archiving edition v3.00
Fig. 46 Fig – Output settings
Triggers
As discussed in the concepts section of this manual, Perennity supports three triggering mechanism (capacity threshold, trigger file and folder latency). A fourth special case is ‘None’, which behaviour depends on whether or not a schedule is active. For more information please review the concepts section.

Administration guide 75 Perennity Archiving edition v3.00
Fig. 47 – Triggering events
Capacity threshold
Every time the threshold value (in MB) is reached, the recording process will be started. Although this value can correspond with the actual (or usable) media size, it doesn’t have to.
By default ‘always fill CD/DVD media’ is active, meaning that only the data that completely fits on one or more media will be written out. Any additional data that doesn’t yet fill up a complete media will not be included and will wait for the next time the threshold capacity will be reached.

Administration guide 76 Perennity Archiving edition v3.00
Trigger file
Enter the name for the trigger file, that must be copied to the root of the Archive folder to start its processing. Optionally you can add the trigger file to the media. You may also specify a file extension as trigger (e.g. *.arc).
Folder latency
Specify a latency time in seconds. When a folder scan is performed and no more changes are detected in the folder after applying the latency time, the recording will start. You can however specify that a minimum number of files and/or a minimum capacity must be present in the folder.
None
When a schedule is enabled (next step), the recording of all data present in the Archive folder will start when the schedule gets active. Any data added later (even when the schedule is still running) will wait for the next schedule activation. Without scheduling, the recording must be manually forced from the main Perennity window.
Select “Next” to go to the “Schedule” tab.
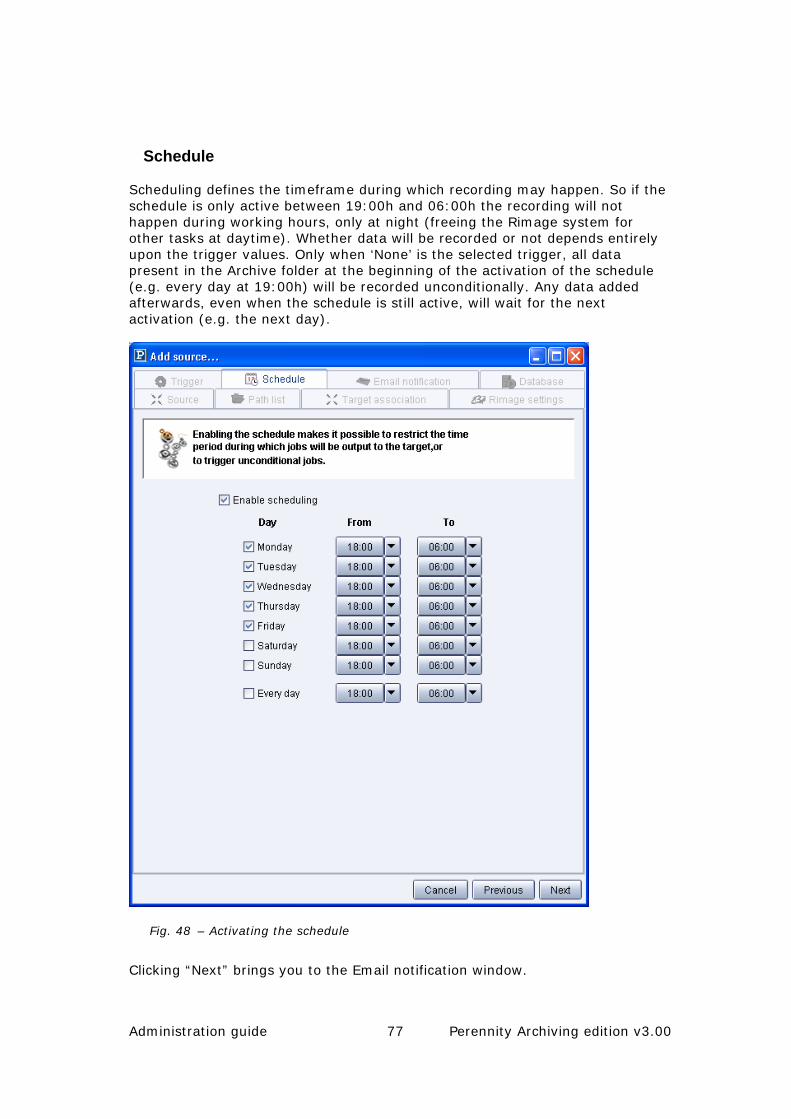
Administration guide 77 Perennity Archiving edition v3.00
Schedule
Scheduling defines the timeframe during which recording may happen. So if the schedule is only active between 19:00h and 06:00h the recording will not happen during working hours, only at night (freeing the Rimage system for other tasks at daytime). Whether data will be recorded or not depends entirely upon the trigger values. Only when ‘None’ is the selected trigger, all data present in the Archive folder at the beginning of the activation of the schedule (e.g. every day at 19:00h) will be recorded unconditionally. Any data added afterwards, even when the schedule is still active, will wait for the next activation (e.g. the next day).
Fig. 48 – Activating the schedule
Clicking “Next” brings you to the Email notification window.
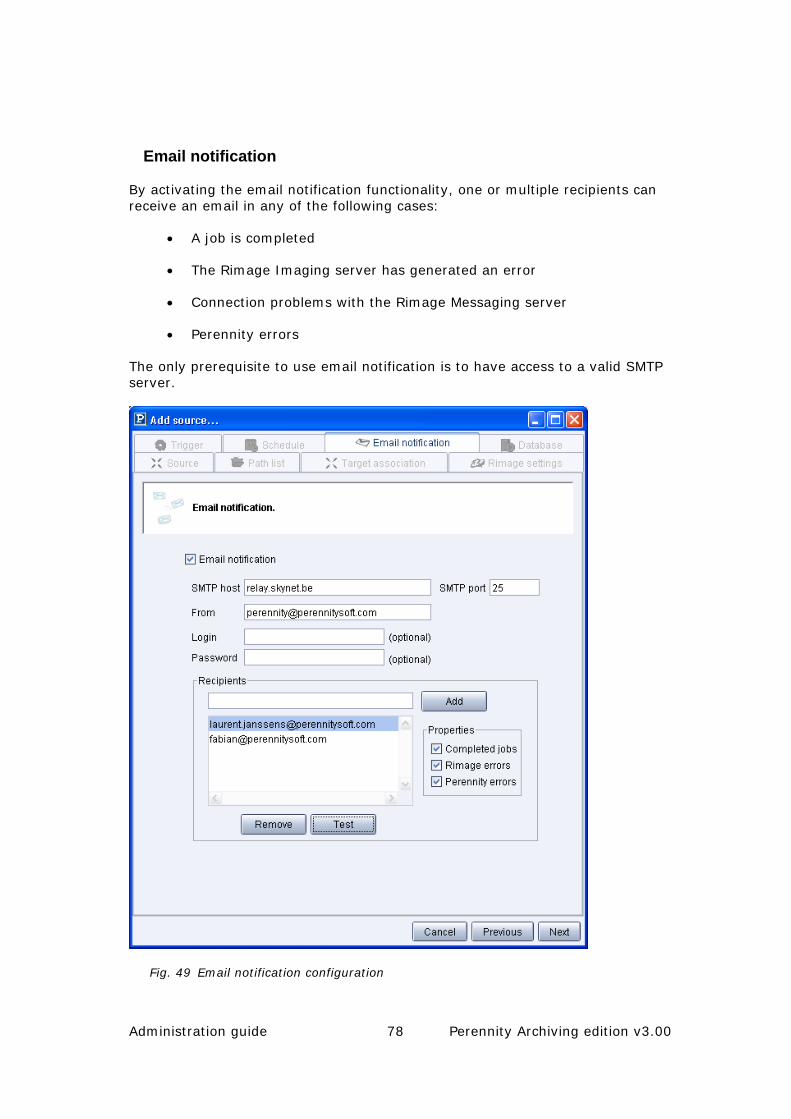
Administration guide 78 Perennity Archiving edition v3.00
Email notification
By activating the email notification functionality, one or multiple recipients can receive an email in any of the following cases:
• A job is completed
• The Rimage Imaging server has generated an error
• Connection problems with the Rimage Messaging server
• Perennity errors
The only prerequisite to use email notification is to have access to a valid SMTP server.
Fig. 49 Email notification configuration
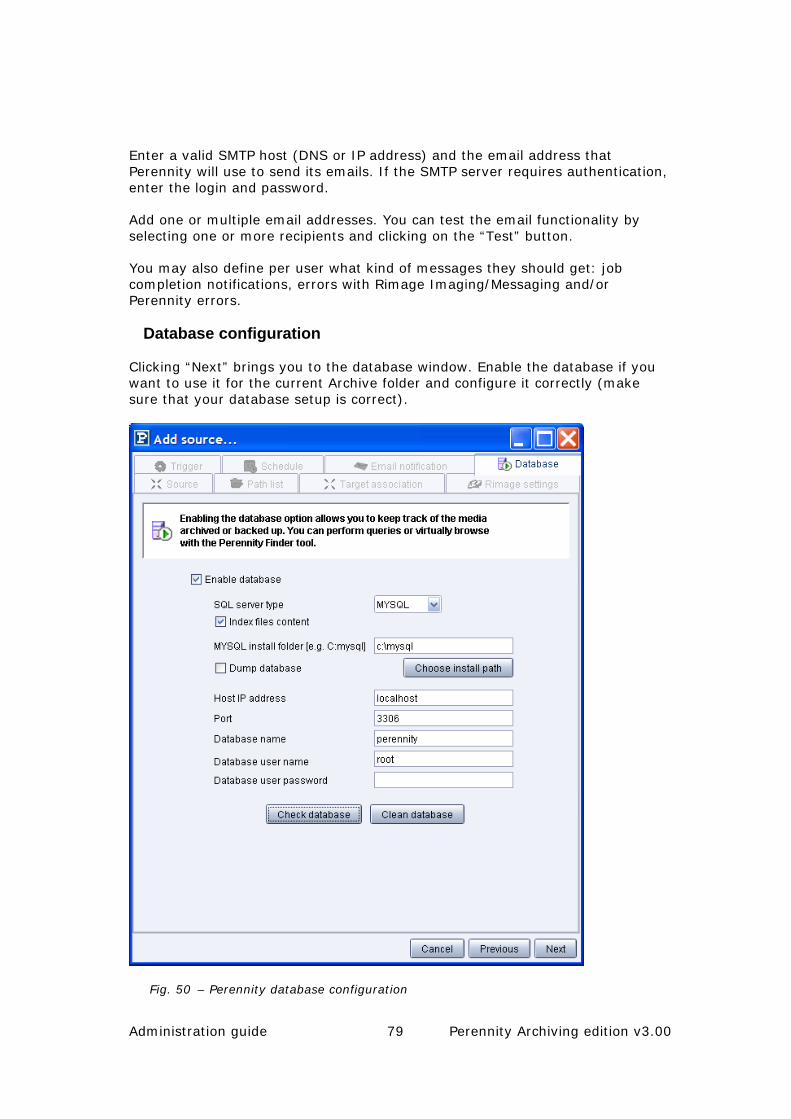
Administration guide 79 Perennity Archiving edition v3.00
Enter a valid SMTP host (DNS or IP address) and the email address that Perennity will use to send its emails. If the SMTP server requires authentication, enter the login and password.
Add one or multiple email addresses. You can test the email functionality by selecting one or more recipients and clicking on the “Test” button.
You may also define per user what kind of messages they should get: job completion notifications, errors with Rimage Imaging/Messaging and/or Perennity errors.
Database configuration
Clicking “Next” brings you to the database window. Enable the database if you want to use it for the current Archive folder and configure it correctly (make sure that your database setup is correct).
Fig. 50 – Perennity database configuration
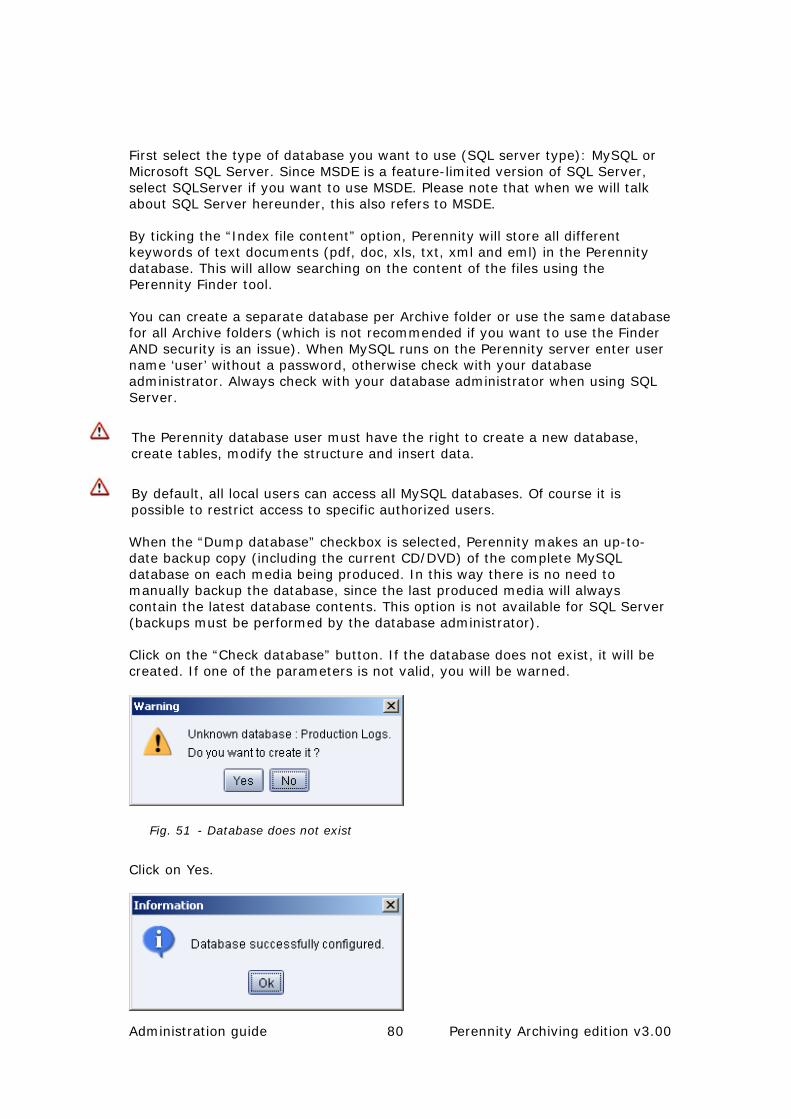
Administration guide 80 Perennity Archiving edition v3.00
First select the type of database you want to use (SQL server type): MySQL or Microsoft SQL Server. Since MSDE is a feature-limited version of SQL Server, select SQLServer if you want to use MSDE. Please note that when we will talk about SQL Server hereunder, this also refers to MSDE.
By ticking the “Index file content” option, Perennity will store all different keywords of text documents (pdf, doc, xls, txt, xml and eml) in the Perennity database. This will allow searching on the content of the files using the Perennity Finder tool.
You can create a separate database per Archive folder or use the same database for all Archive folders (which is not recommended if you want to use the Finder AND security is an issue). When MySQL runs on the Perennity server enter user name ‘user’ without a password, otherwise check with your database administrator. Always check with your database administrator when using SQL Server.
The Perennity database user must have the right to create a new database, create tables, modify the structure and insert data.
By default, all local users can access all MySQL databases. Of course it is possible to restrict access to specific authorized users.
When the “Dump database” checkbox is selected, Perennity makes an up-to-date backup copy (including the current CD/DVD) of the complete MySQL database on each media being produced. In this way there is no need to manually backup the database, since the last produced media will always contain the latest database contents. This option is not available for SQL Server (backups must be performed by the database administrator).
Click on the “Check database” button. If the database does not exist, it will be created. If one of the parameters is not valid, you will be warned.
Fig. 51 - Database does not exist
Click on Yes.
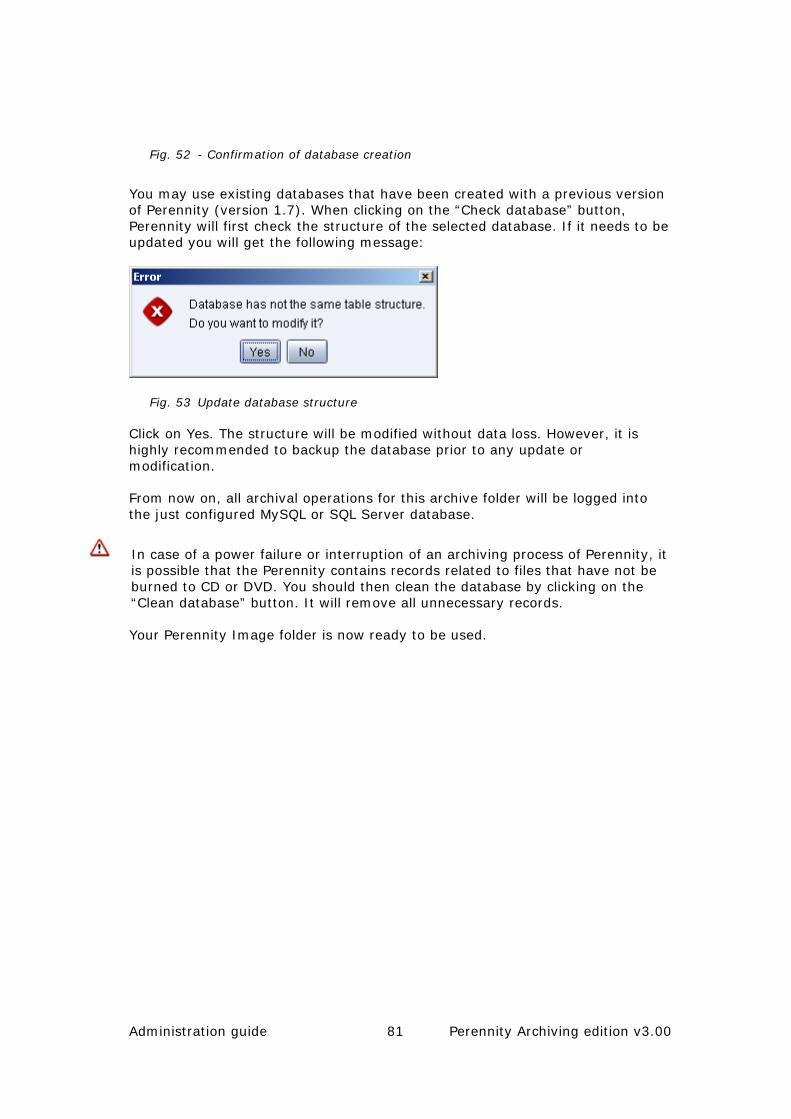
Administration guide 81 Perennity Archiving edition v3.00
Fig. 52 - Confirmation of database creation
You may use existing databases that have been created with a previous version of Perennity (version 1.7). When clicking on the “Check database” button, Perennity will first check the structure of the selected database. If it needs to be updated you will get the following message:
Fig. 53 Update database structure
Click on Yes. The structure will be modified without data loss. However, it is highly recommended to backup the database prior to any update or modification.
From now on, all archival operations for this archive folder will be logged into the just configured MySQL or SQL Server database.
In case of a power failure or interruption of an archiving process of Perennity, it is possible that the Perennity contains records related to files that have not be burned to CD or DVD. You should then clean the database by clicking on the “Clean database” button. It will remove all unnecessary records.
Your Perennity Image folder is now ready to be used.
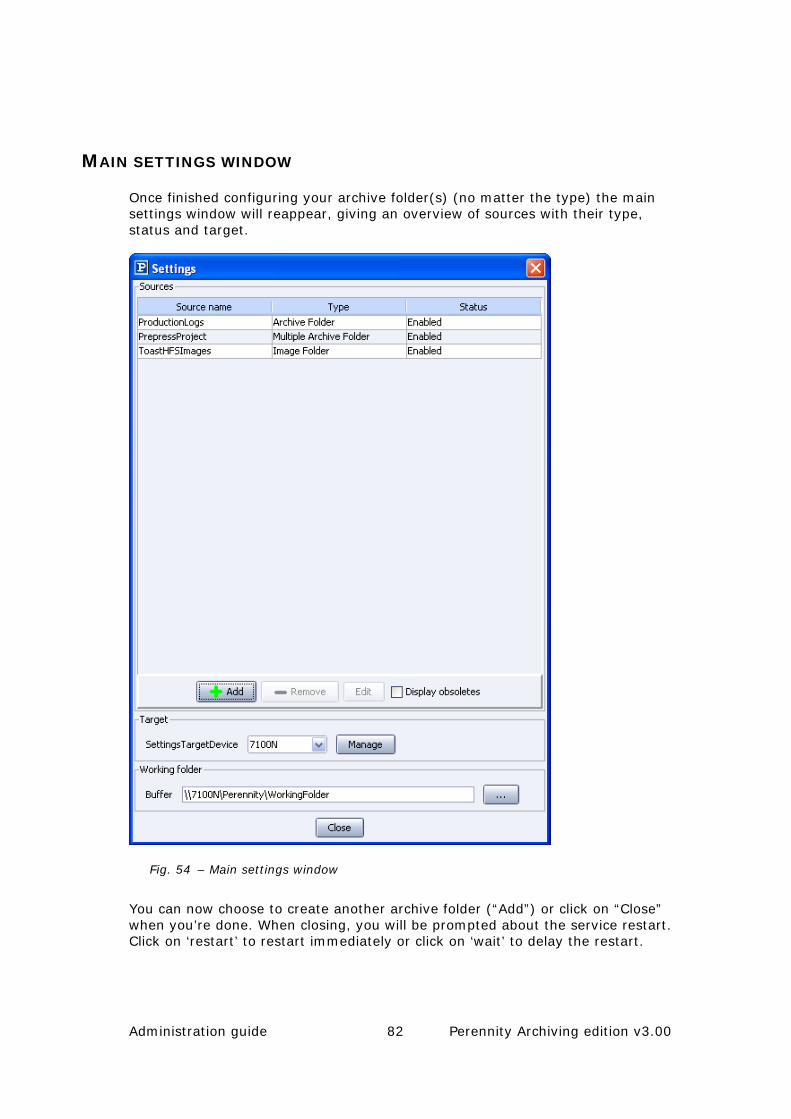
Administration guide 82 Perennity Archiving edition v3.00
MAIN SETTINGS WINDOW
Once finished configuring your archive folder(s) (no matter the type) the main settings window will reappear, giving an overview of sources with their type, status and target.
Fig. 54 – Main settings window
You can now choose to create another archive folder (“Add”) or click on “Close” when you’re done. When closing, you will be prompted about the service restart. Click on ‘restart’ to restart immediately or click on ‘wait’ to delay the restart.

Administration guide 83 Perennity Archiving edition v3.00
Fig. 55 – Restart Service to apply new settings
After the installation, you may start configuring and using the Perennity Finder. Launch it using the shortcut created in the Start menu.
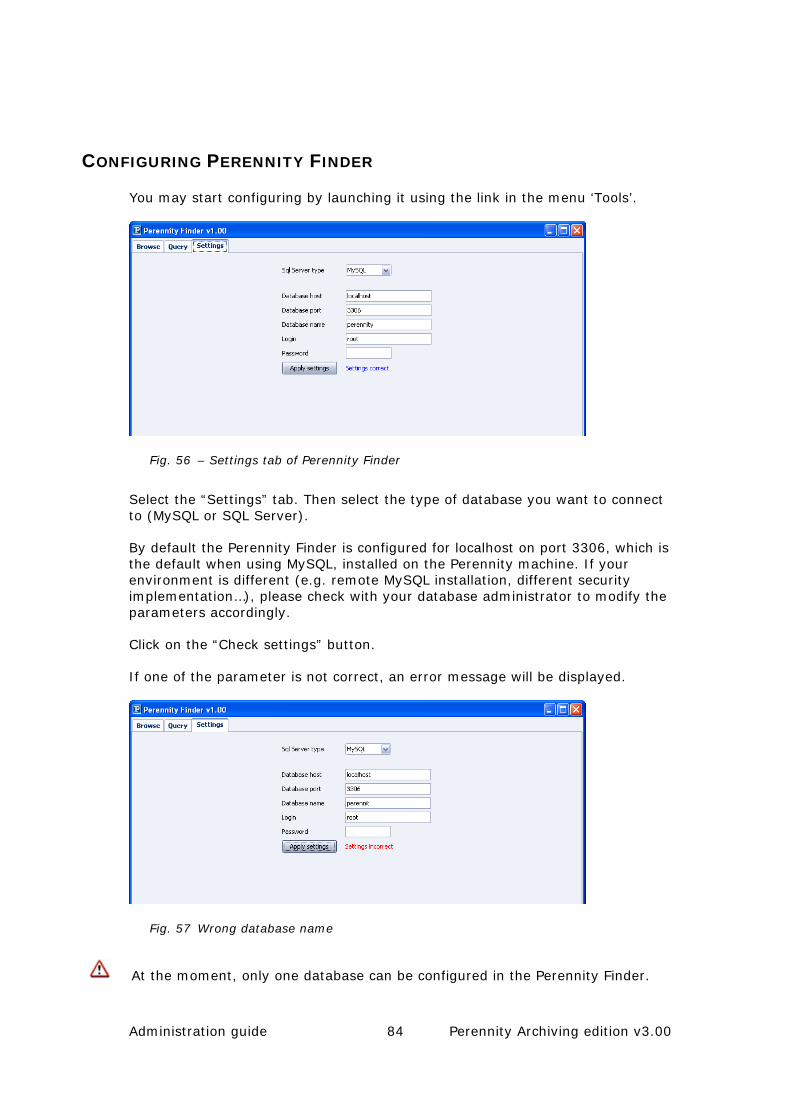
Administration guide 84 Perennity Archiving edition v3.00
CONFIGURING PERENNITY FINDER
You may start configuring by launching it using the link in the menu ‘Tools’.
Fig. 56 – Settings tab of Perennity Finder
Select the “Settings” tab. Then select the type of database you want to connect to (MySQL or SQL Server).
By default the Perennity Finder is configured for localhost on port 3306, which is the default when using MySQL, installed on the Perennity machine. If your environment is different (e.g. remote MySQL installation, different security implementation…), please check with your database administrator to modify the parameters accordingly.
Click on the “Check settings” button.
If one of the parameter is not correct, an error message will be displayed.
Fig. 57 Wrong database name
At the moment, only one database can be configured in the Perennity Finder.

Administration guide 85 Perennity Archiving edition v3.00
Using and monitoring Perennity
Once the basic configuration of Perennity is finished, the main window will show up, with one or more Source tabs (one per source).
Fig. 58 – Perennity main window
Under the source tabs you find three window sections: Source, Logs and Target. Their content is specific for the tab currently selected, except for the Logs window that will also always shows all general Rimage messages.
SOURCE WINDOW
The Source window (top) content shows the archive folders containing at least some data that is ready to be archived. Of course the actual archiving will only happen when trigger conditions are met.
The Source window displays the following information:
Source: the path of the archive folder(s)
Files/Folders: the number of files and folders
Total size: the total size of the files and folders
Administration guide 86 Perennity Archiving edition v3.00
Status: between two scan intervals, the status is “Idle” which means that Perennity wait until the next scan. A “Scanning” status means that Perennity checks if the conditions (trigger) are met to start the recording process. Perennity will then organize files by CD/DVD media (“Preparing files” status).
If files are larger than the capacity of the media and that you allow file splitting, they will be split during the preparation of the files(“Splitting files”). If this option has been selected, the checksum will be computed and information files will be created (“Preparing job” status). Finally the recording jobs will be prepared and submitted to the target device (“Waiting production” status).
Right-clicking a selected source permits to:
Force Scan of the archive folder: Perennity will not wait for the next scheduled scan (defined by the scan interval) to perform.
Force Recording: Perennity will not wait for the trigger value to be met.
LOGS WINDOW
The Logs window (middle) reports status messages, errors or warnings with respect to the Rimage system and job-specific log entries for the selected archive folder. By double-clicking a log entry, it will open in a new window.
TARGET WINDOW
The Target window (bottom) shows the jobs currently being processed by the Rimage or Epson autoloader for the selected archive folder tab with their status and a progress bar.
The Target window displays the following information:
Source: the path of the archive folder(s).
Job: the volume name of the recorded media.
Status: Waiting, Imaging, Downloading, Recording, Printing or Completed. The status is returned by the Rimage Messaging server or by the Epson TD-Bridge.
Progress: a progress bar
Copies: the number of completed copies and the total number of copies to be processed.
Right-clicking a job with an error gives you the opportunity to “Retry media with error(s)”. A job may have errors for several possible reasons: locked files, corrupt files, Rimage server problems…
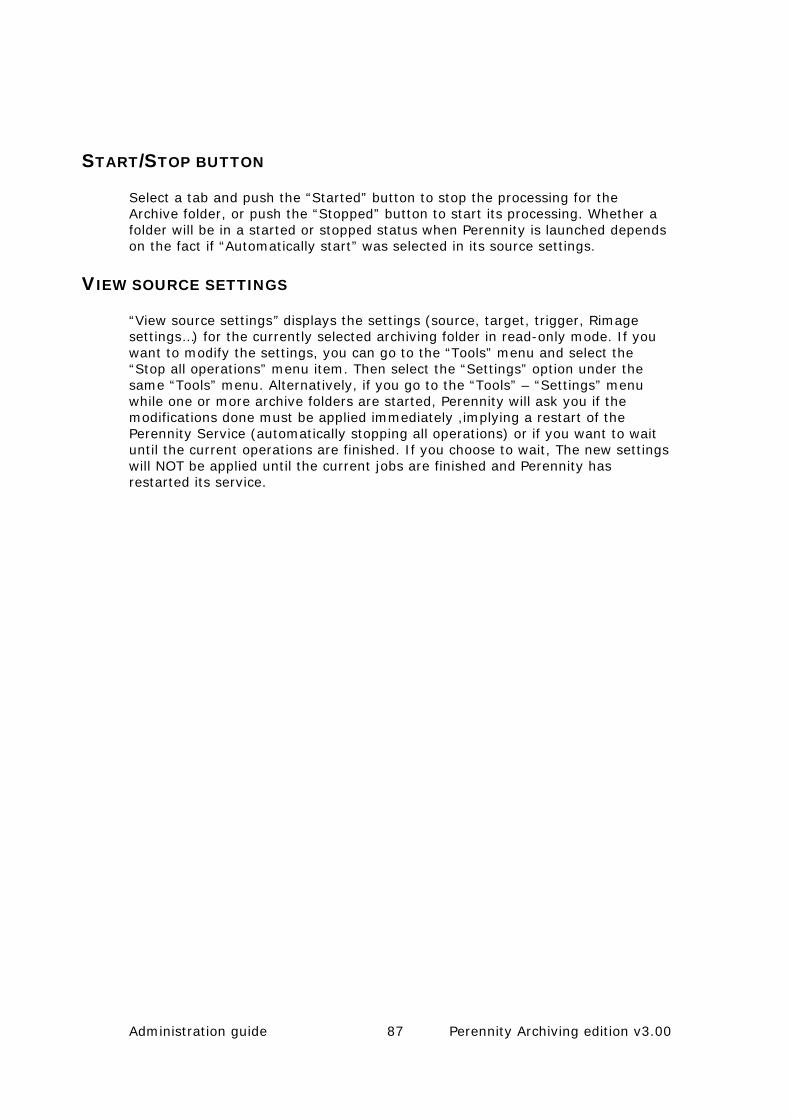
Administration guide 87 Perennity Archiving edition v3.00
START/STOP BUTTON
Select a tab and push the “Started” button to stop the processing for the Archive folder, or push the “Stopped” button to start its processing. Whether a folder will be in a started or stopped status when Perennity is launched depends on the fact if “Automatically start” was selected in its source settings.
VIEW SOURCE SETTINGS
“View source settings” displays the settings (source, target, trigger, Rimage settings…) for the currently selected archiving folder in read-only mode. If you want to modify the settings, you can go to the “Tools” menu and select the “Stop all operations” menu item. Then select the “Settings” option under the same “Tools” menu. Alternatively, if you go to the “Tools” – “Settings” menu while one or more archive folders are started, Perennity will ask you if the modifications done must be applied immediately ,implying a restart of the Perennity Service (automatically stopping all operations) or if you want to wait until the current operations are finished. If you choose to wait, The new settings will NOT be applied until the current jobs are finished and Perennity has restarted its service.

Administration guide 88 Perennity Archiving edition v3.00
MAIN MENU
The Perennity main window also has 3 menu items: File, Tools and Help.
File menu
The “File” menu item has 3 options: “Force Recording”, “Restart Service” and “Exit”. “Force Recording” will force the burning of the contents of the selected archive folder to CD or DVD, even if its processing should normally not yet happen based on the trigger values. Forcing the recording for a folder starts the recording process immediately (a running scan is interrupted). “Restart Service” will force Perennity to restart its Windows Service immediately. “Exit” shuts down Perennity (after asking for confirmation).
Fig. 59 – Perennity File menu
Tools menu
The “Tools” menu gives access to the “Settings” window, which was discussed in great detail in the configuration section. From here you can easily reconfigure sources and targets by editing them (“Edit” button or double-click the source or target), create new ones (“Add”) or remove them (“Remove”).
Fig. 60 – Perennity Tools menu
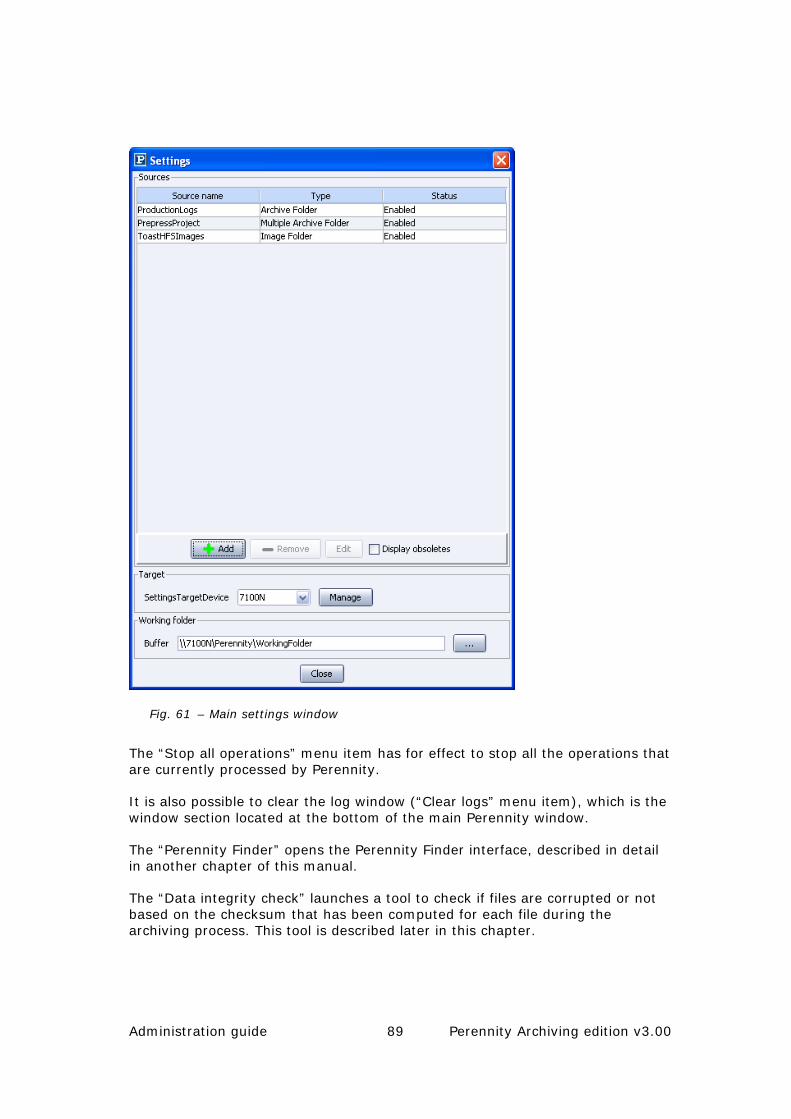
Administration guide 89 Perennity Archiving edition v3.00
Fig. 61 – Main settings window
The “Stop all operations” menu item has for effect to stop all the operations that are currently processed by Perennity.
It is also possible to clear the log window (“Clear logs” menu item), which is the window section located at the bottom of the main Perennity window.
The “Perennity Finder” opens the Perennity Finder interface, described in detail in another chapter of this manual.
The “Data integrity check” launches a tool to check if files are corrupted or not based on the checksum that has been computed for each file during the archiving process. This tool is described later in this chapter.
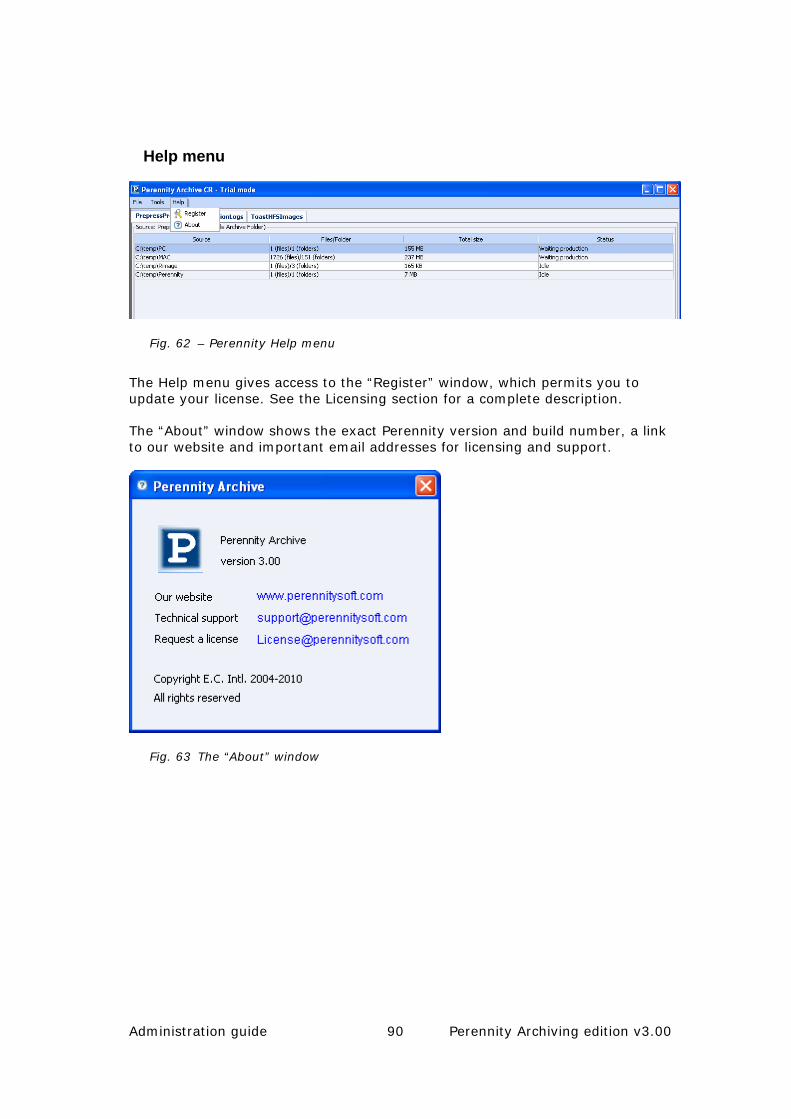
Administration guide 90 Perennity Archiving edition v3.00
Help menu
Fig. 62 – Perennity Help menu
The Help menu gives access to the “Register” window, which permits you to update your license. See the Licensing section for a complete description.
The “About” window shows the exact Perennity version and build number, a link to our website and important email addresses for licensing and support.
Fig. 63 The “About” window
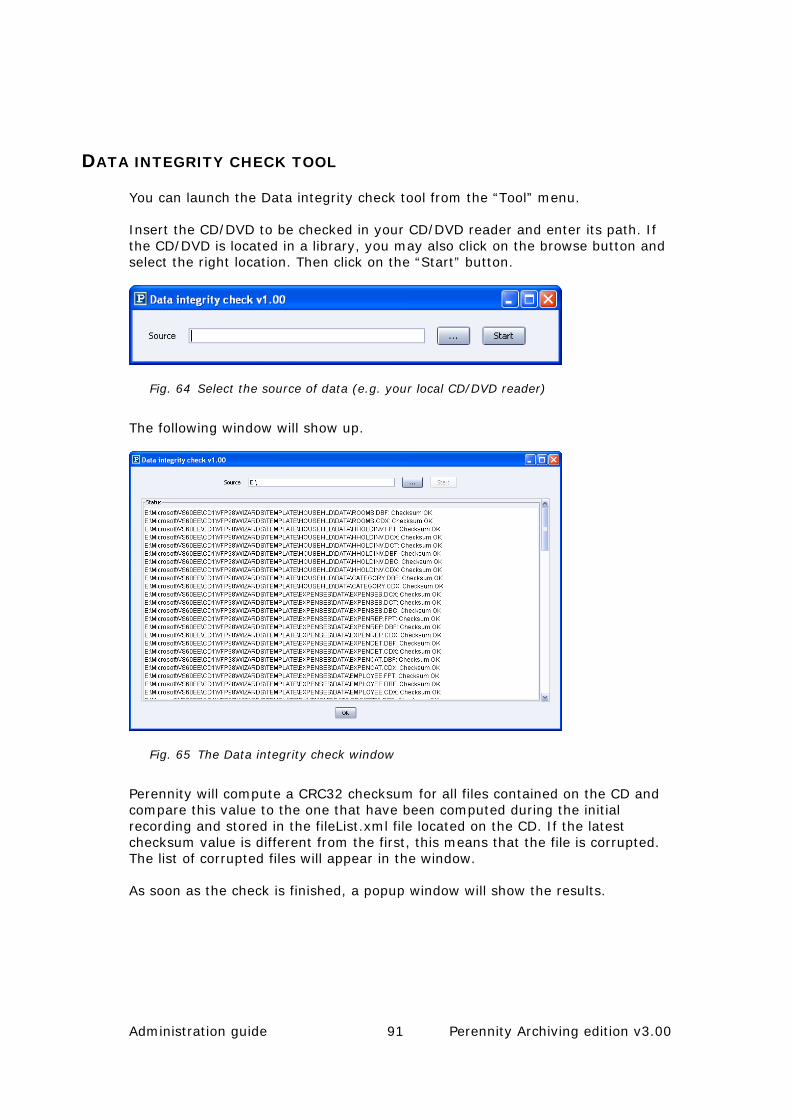
Administration guide 91 Perennity Archiving edition v3.00
DATA INTEGRITY CHECK TOOL
You can launch the Data integrity check tool from the “Tool” menu.
Insert the CD/DVD to be checked in your CD/DVD reader and enter its path. If the CD/DVD is located in a library, you may also click on the browse button and select the right location. Then click on the “Start” button.
Fig. 64 Select the source of data (e.g. your local CD/DVD reader)
The following window will show up.
Fig. 65 The Data integrity check window
Perennity will compute a CRC32 checksum for all files contained on the CD and compare this value to the one that have been computed during the initial recording and stored in the fileList.xml file located on the CD. If the latest checksum value is different from the first, this means that the file is corrupted. The list of corrupted files will appear in the window.
As soon as the check is finished, a popup window will show the results.

Administration guide 92 Perennity Archiving edition v3.00
Fig. 66 Checksum operation results
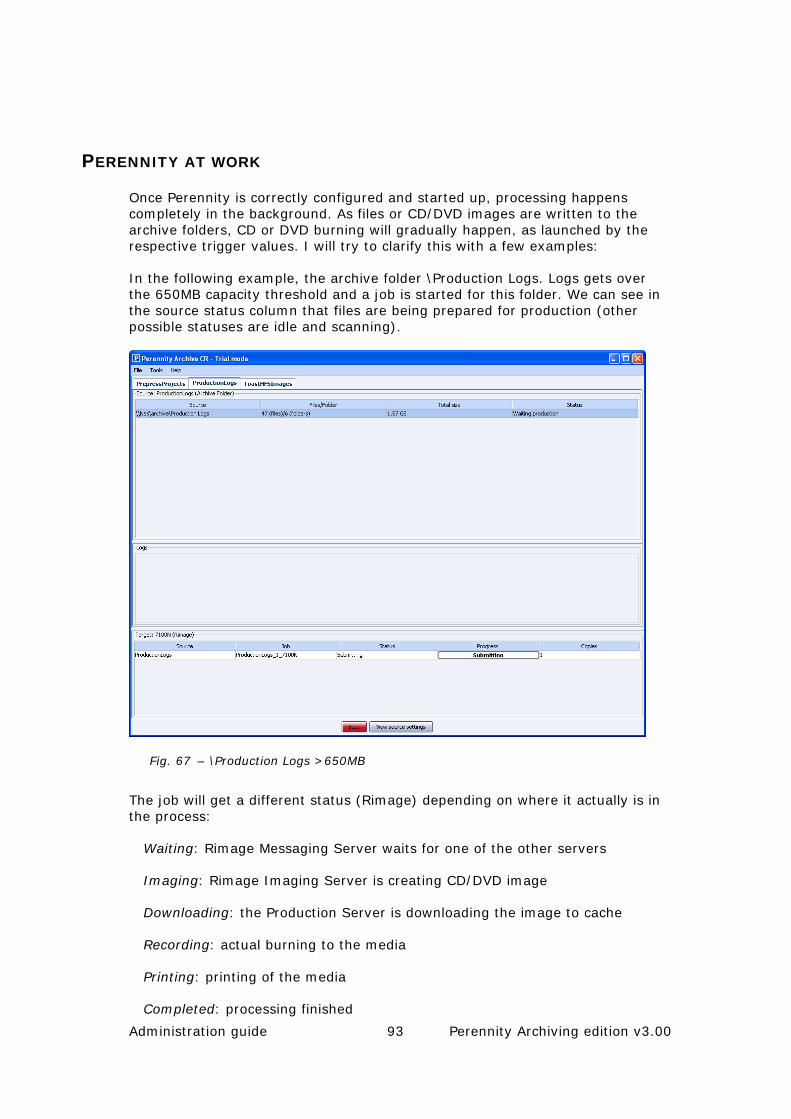
Administration guide 93 Perennity Archiving edition v3.00
PERENNITY AT WORK
Once Perennity is correctly configured and started up, processing happens completely in the background. As files or CD/DVD images are written to the archive folders, CD or DVD burning will gradually happen, as launched by the respective trigger values. I will try to clarify this with a few examples:
In the following example, the archive folder \Production Logs. Logs gets over the 650MB capacity threshold and a job is started for this folder. We can see in the source status column that files are being prepared for production (other possible statuses are idle and scanning).
Fig. 67 – \Production Logs >650MB
The job will get a different status (Rimage) depending on where it actually is in the process:
Waiting: Rimage Messaging Server waits for one of the other servers
Imaging: Rimage Imaging Server is creating CD/DVD image
Downloading: the Production Server is downloading the image to cache
Recording: actual burning to the media
Printing: printing of the media
Completed: processing finished

Administration guide 94 Perennity Archiving edition v3.00
When finished, the job entry will be removed from the Target job window and a message will be logged in the bottom (general log) window.
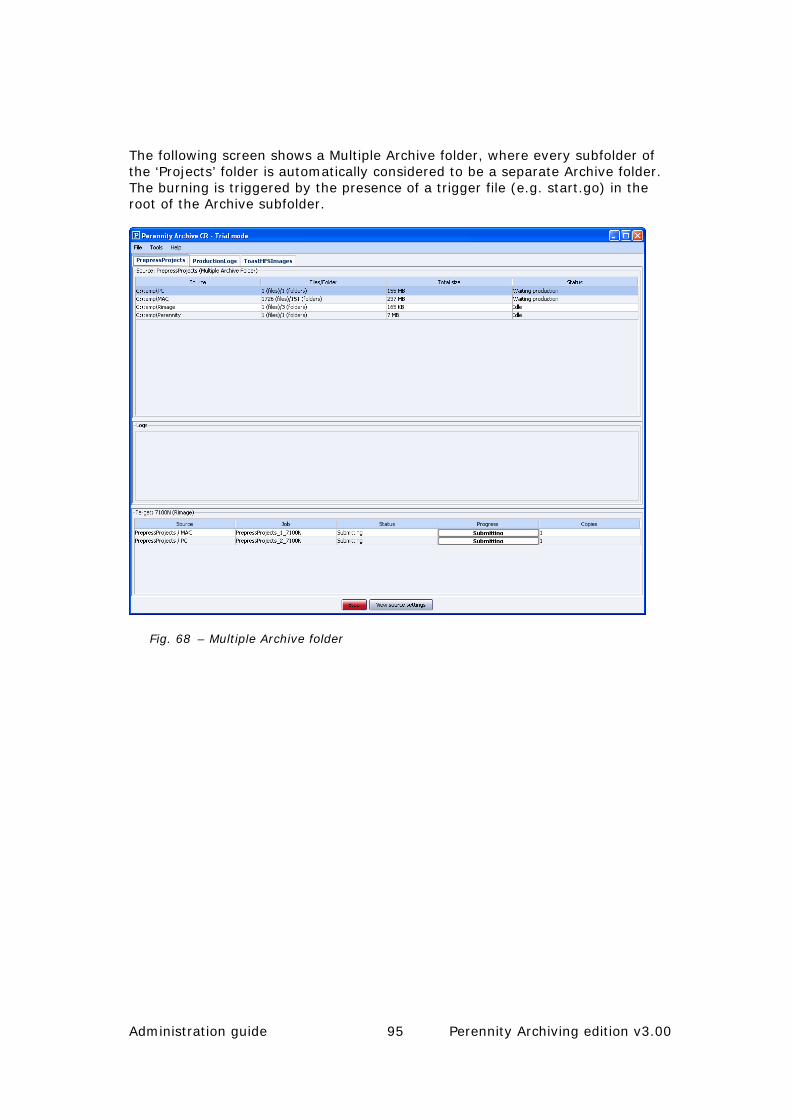
Administration guide 95 Perennity Archiving edition v3.00
The following screen shows a Multiple Archive folder, where every subfolder of the ‘Projects’ folder is automatically considered to be a separate Archive folder. The burning is triggered by the presence of a trigger file (e.g. start.go) in the root of the Archive subfolder.
Fig. 68 – Multiple Archive folder
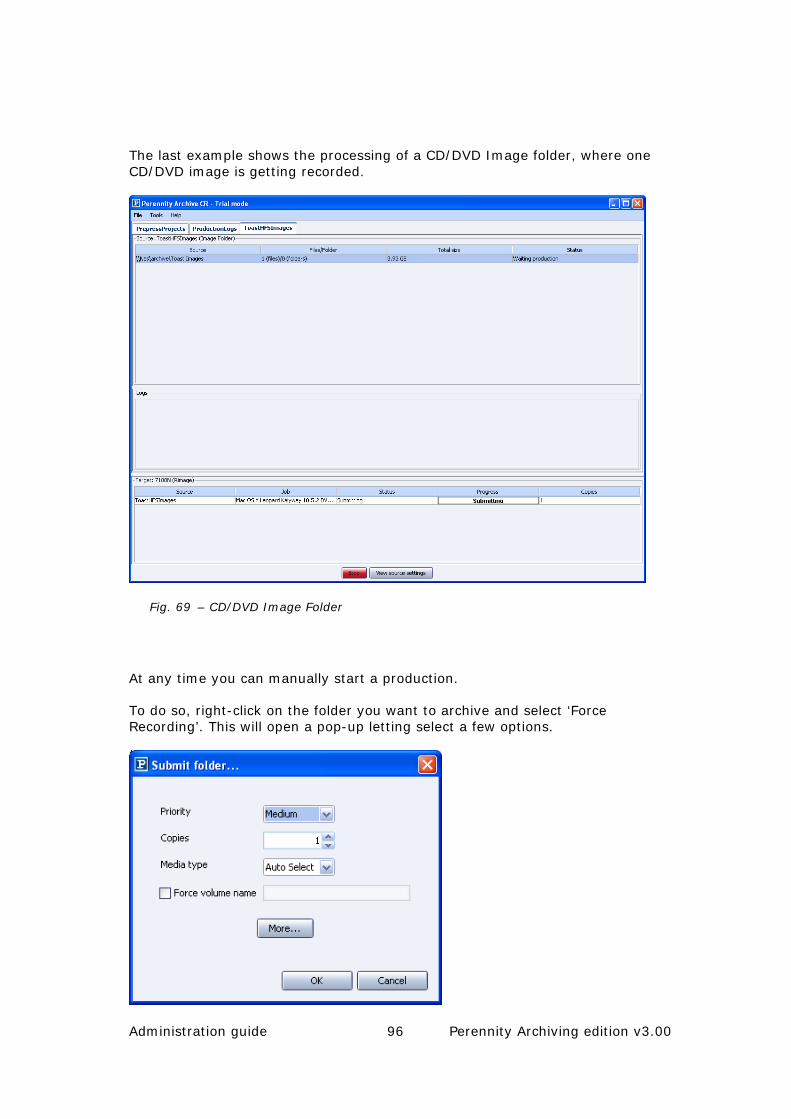
Administration guide 96 Perennity Archiving edition v3.00
The last example shows the processing of a CD/DVD Image folder, where one CD/DVD image is getting recorded.
Fig. 69 – CD/DVD Image Folder
At any time you can manually start a production.
To do so, right-click on the folder you want to archive and select ‘Force Recording’. This will open a pop-up letting select a few options.
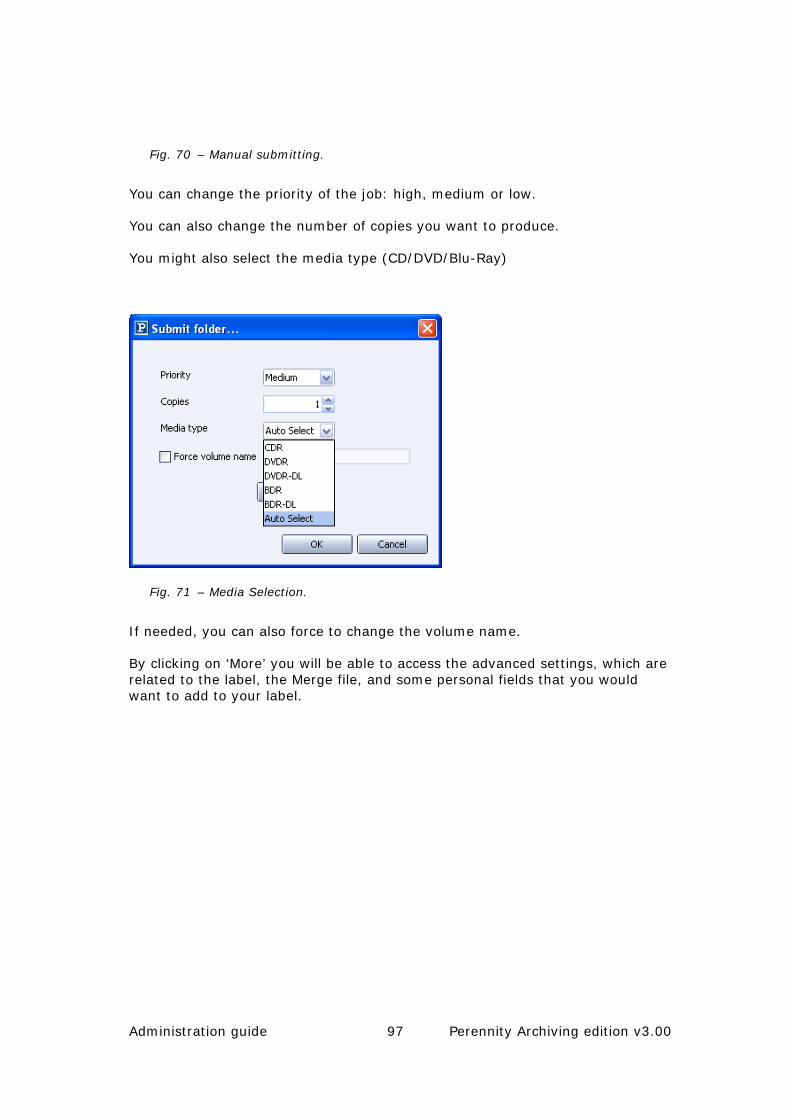
Administration guide 97 Perennity Archiving edition v3.00
Fig. 70 – Manual submitting.
You can change the priority of the job: high, medium or low.
You can also change the number of copies you want to produce.
You might also select the media type (CD/DVD/Blu-Ray)
Fig. 71 – Media Selection.
If needed, you can also force to change the volume name.
By clicking on ‘More’ you will be able to access the advanced settings, which are related to the label, the Merge file, and some personal fields that you would want to add to your label.
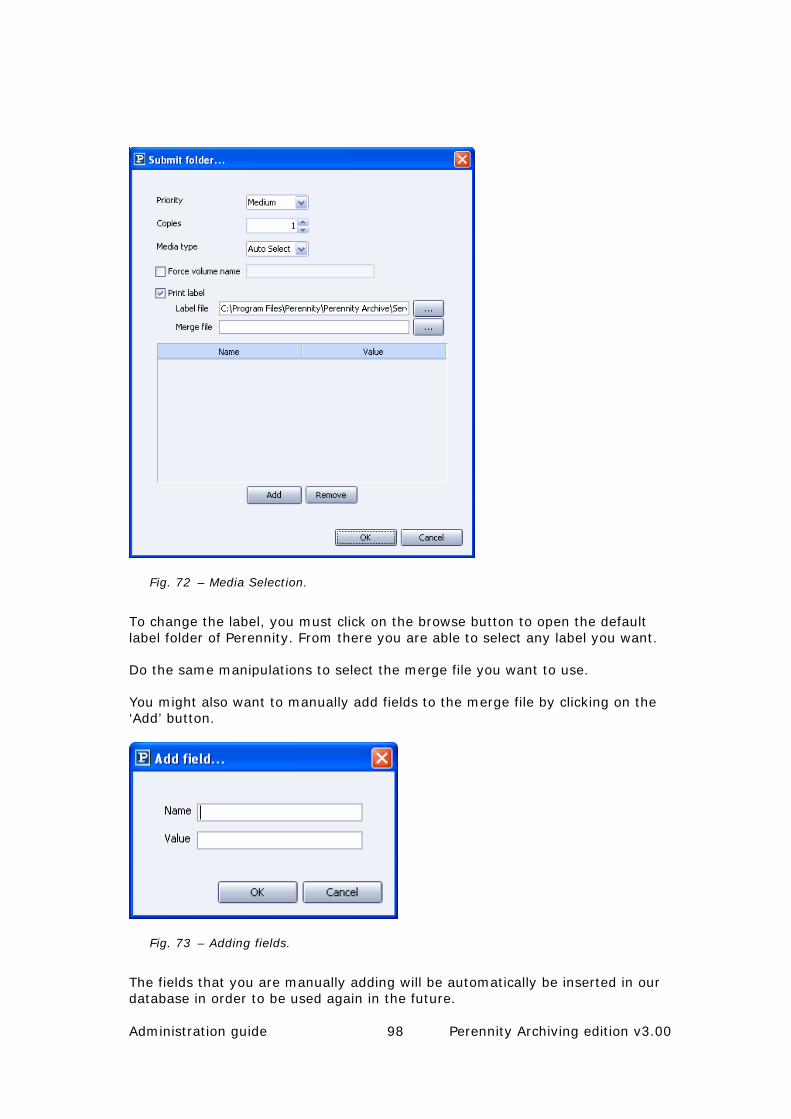
Administration guide 98 Perennity Archiving edition v3.00
Fig. 72 – Media Selection.
To change the label, you must click on the browse button to open the default label folder of Perennity. From there you are able to select any label you want.
Do the same manipulations to select the merge file you want to use.
You might also want to manually add fields to the merge file by clicking on the ‘Add’ button.
Fig. 73 – Adding fields.
The fields that you are manually adding will be automatically be inserted in our database in order to be used again in the future.
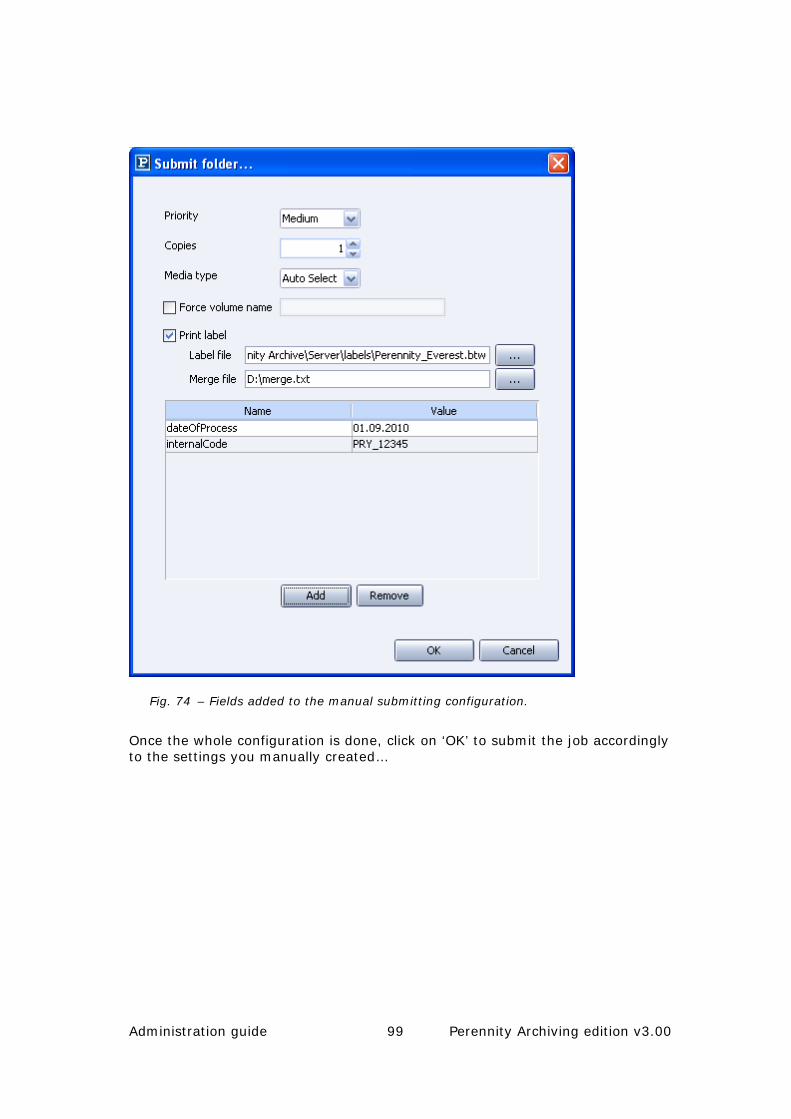
Administration guide 99 Perennity Archiving edition v3.00
Fig. 74 – Fields added to the manual submitting configuration.
Once the whole configuration is done, click on ‘OK’ to submit the job accordingly to the settings you manually created…
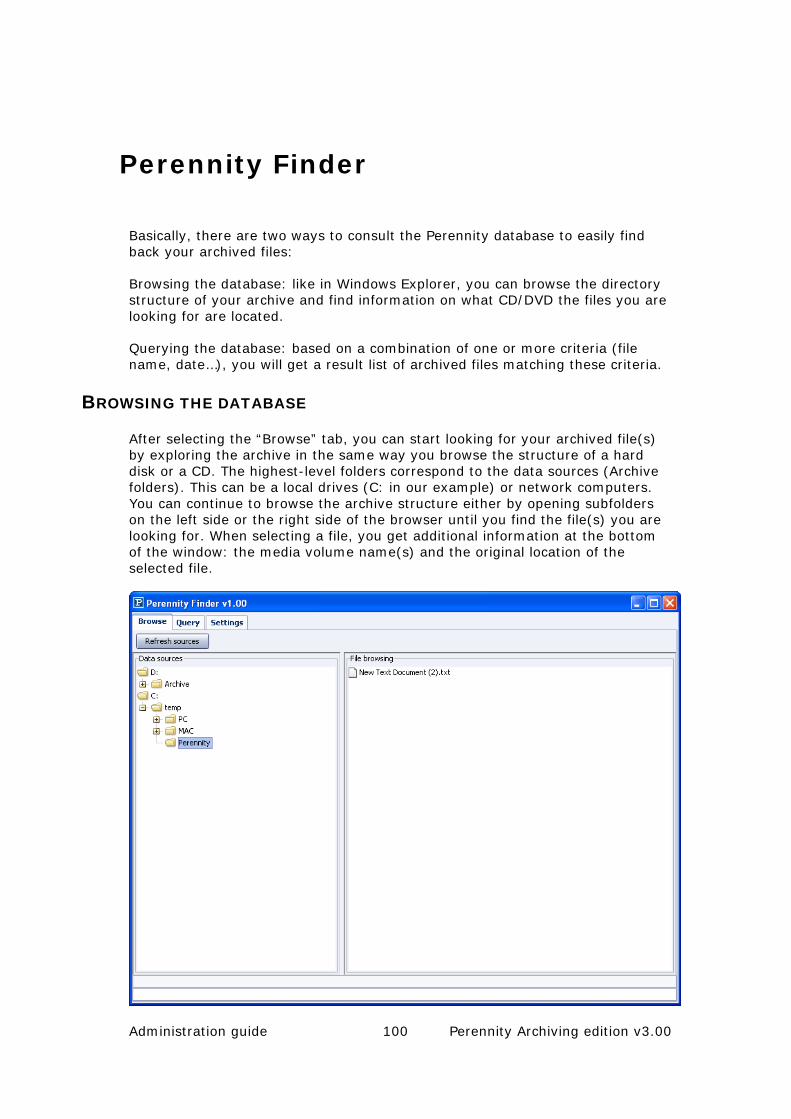
Administration guide 100 Perennity Archiving edition v3.00
Perennity Finder
Basically, there are two ways to consult the Perennity database to easily find back your archived files:
Browsing the database: like in Windows Explorer, you can browse the directory structure of your archive and find information on what CD/DVD the files you are looking for are located.
Querying the database: based on a combination of one or more criteria (file name, date…), you will get a result list of archived files matching these criteria.
BROWSING THE DATABASE
After selecting the “Browse” tab, you can start looking for your archived file(s) by exploring the archive in the same way you browse the structure of a hard disk or a CD. The highest-level folders correspond to the data sources (Archive folders). This can be a local drives (C: in our example) or network computers. You can continue to browse the archive structure either by opening subfolders on the left side or the right side of the browser until you find the file(s) you are looking for. When selecting a file, you get additional information at the bottom of the window: the media volume name(s) and the original location of the selected file.
Administration guide 101 Perennity Archiving edition v3.00
Fig. 75 – Browsing the Perennity archive database.
Click on the “Refresh sources” button in order to update the Data source display.
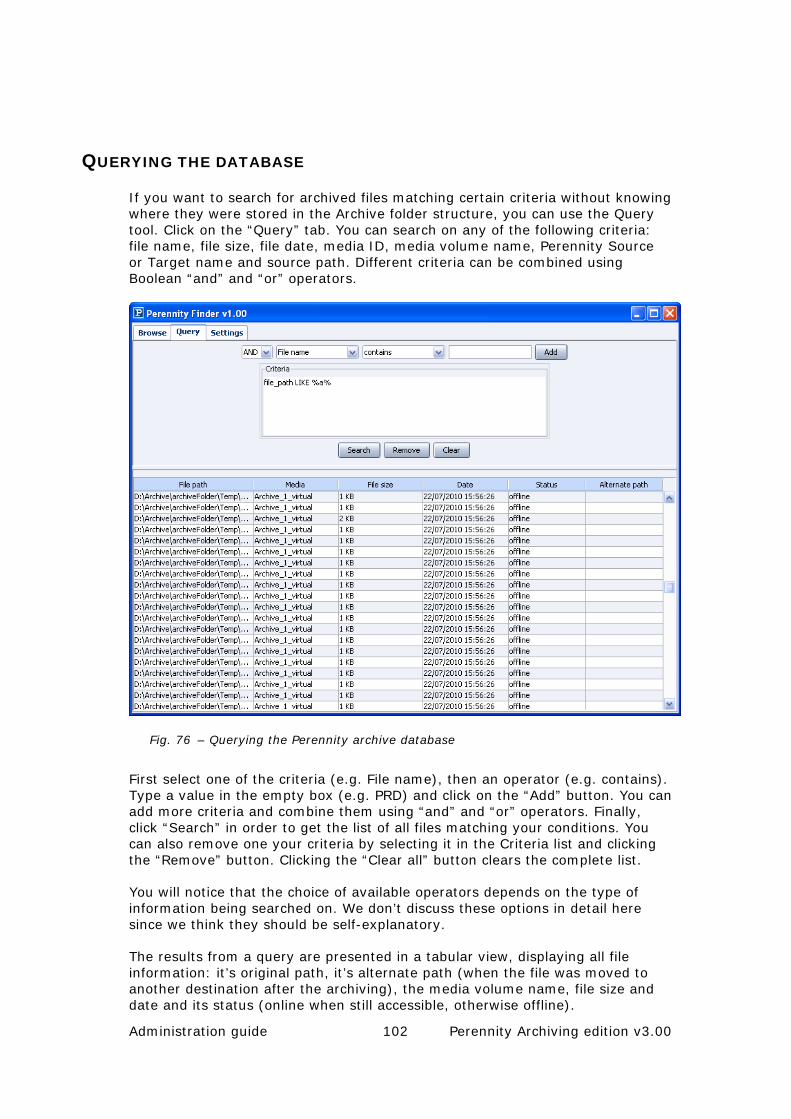
Administration guide 102 Perennity Archiving edition v3.00
QUERYING THE DATABASE
If you want to search for archived files matching certain criteria without knowing where they were stored in the Archive folder structure, you can use the Query tool. Click on the “Query” tab. You can search on any of the following criteria: file name, file size, file date, media ID, media volume name, Perennity Source or Target name and source path. Different criteria can be combined using Boolean “and” and “or” operators.
Fig. 76 – Querying the Perennity archive database
First select one of the criteria (e.g. File name), then an operator (e.g. contains). Type a value in the empty box (e.g. PRD) and click on the “Add” button. You can add more criteria and combine them using “and” and “or” operators. Finally, click “Search” in order to get the list of all files matching your conditions. You can also remove one your criteria by selecting it in the Criteria list and clicking the “Remove” button. Clicking the “Clear all” button clears the complete list.
You will notice that the choice of available operators depends on the type of information being searched on. We don’t discuss these options in detail here since we think they should be self-explanatory.
The results from a query are presented in a tabular view, displaying all file information: it’s original path, it’s alternate path (when the file was moved to another destination after the archiving), the media volume name, file size and date and its status (online when still accessible, otherwise offline).

Administration guide 103 Perennity Archiving edition v3.00
From the results list, you can select a single file and right-click it to open the file or save it to disk. Alternatively double-clicking the file will also open it. Of course these options are only interesting when the file is has not been deleted from its original location or when it has been copied to an alternate destination and is still accessible from there (in other words the file is still online).
Administration guide 104 Perennity Archiving edition v3.00
Technical support
Technical support is available from 9AM to 6PM (GMT +1).
Please find hereunder our full coordinates:
E.C. Intl sprl-bvba
136 avenue Firmin Lecharlierlaan
1090 Brussels (Belgium)
Phone: 32 (0)2/421.59.66
Fax: 32 (0)2:421.59.69
When sending an email to the support department, always attach the config.txt files located in the Program Files/Perennity/Perennity Archive/Server/config/ folder. This helps us to recreate your environment.
http://www.perennitysoft.com
If you need a license key, please send an e-mail to [email protected]
Administration guide 105 Perennity Archiving edition v3.00
Appendix
APPENDIX 1 - XML SYNTAX FOR CD/DVD IMAGE FOLDERS
What follows is an example of the correct XML syntax to be used for the CD/DVD Image job tickets. When you plan to generate the job tickets yourself or through a custom application, you need to conform to this syntax for your jobs to be processed properly.
<PerennityMac>
<Login>
Laurent user name that will (optionally) printed
</Login>
<Image>
Project_X.img name of the CD/DVD image
</Image>
<MediaType>
CDR can be CDR or DVDR (if applicable)
</MediaType>
<NbCopiesRequested>
2 number of copies to be produced
</NbCopiesRequested>
<NbCopiesDone>
0 internal field, always put ‘0’ here
</NbCopiesDone>
<LabelPath>
nothing name of the label (‘nothing’ = no label, ‘default’ = default label)
</LabelPath>
<MergeFilePath>
Administration guide 106 Perennity Archiving edition v3.00
nothing name of the merge file (nothing = no merge file)
</MergeFilePath>
<Status>
waiting internal field, always put ‘waiting’ here
</Status>
<Date> internal field, leave empty
</Date>
<LongDate> internal field, leave empty
</LongDate>
<Percentage>
0 internal field, always put ‘0’ here
</Percentage>
<Comment> internal field, don’t put a value in here
</Comment>
</PerennityMac>
Please note that all tags are required, even when empty. For the internal fields, use the default values as stated. These fields will be dynamically updated during Perennity processing, which gives you the opportunity to check on job status by reading out these values through a custom application.
It is equally very important to put the tag values ‘waiting’, ‘nothing’, ‘default’ in lowercase. Otherwise the processing will not run successfully.
All files (CD/DVD image, label file and merge file) should be copied to the Image folder before submitting the job using the XML order. If the image file is not present, Perennity will reject the XML order. If the label (and optionally the merge file) is not present, Perennity will not start processing until it has been copied over.
Administration guide 107 Perennity Archiving edition v3.00
APPENDIX 2 - XML SYNTAX OF TRIGGER FILE
When using an XML trigger file, you can overwrite default parameters of the archive folder like the number of copies and the volume name. You may also add some extra fields to be printed on the CD/DVD media.
Only the <Trigger> tag and the following tags will be taken into account :
<Copies>: specify the number of copies.
<VolumeName>: specify the volume name of the CD/DVD. According to ISO and UDF rules, the volume name may not contain special characters (only A-Z, a-z, 0-9, - and _).
<Field>: extra information to be printed on the CD/DVD and optionally stored in the Perennity database. You may have an unlimited number of <Field> tags in the <Fields> section. In order to get these extra fields printed on the CD/DVD, you must modify the print label using CD Designer. Refer to the Label Customization appendix for more information. If you want to store the value in the Perennity database, you must manually add the parameter ‘dbColumn’ as it is shown in the sample here below.
<Label>: specifies the CD Designer template that replaces the default one.
<Merge>: specifies the optional merge file coupled with the CD Designer template.
You may add your own tags into the Trigger section. However, do not forget to modify the triggerFileXml.dtd file accordingly.
<?xml version = "1.0" encoding = "UTF-8"?>
<Trigger>
<Copies>3</Copies>
<VolumeName>Perennity version 1.5</VolumeName>
<Fields>
<Field name="Field1" dbColumn="info1">value 1</Field>
<Field name="Field2" dbColumn="info2">value 2</Field>
. . .
</Fields>
<Label deleteAfterRecording="true">c:\mylabels\label.btw</Label>
<Merge>c:\mylabels\merge.txt</Merge>
</Trigger>
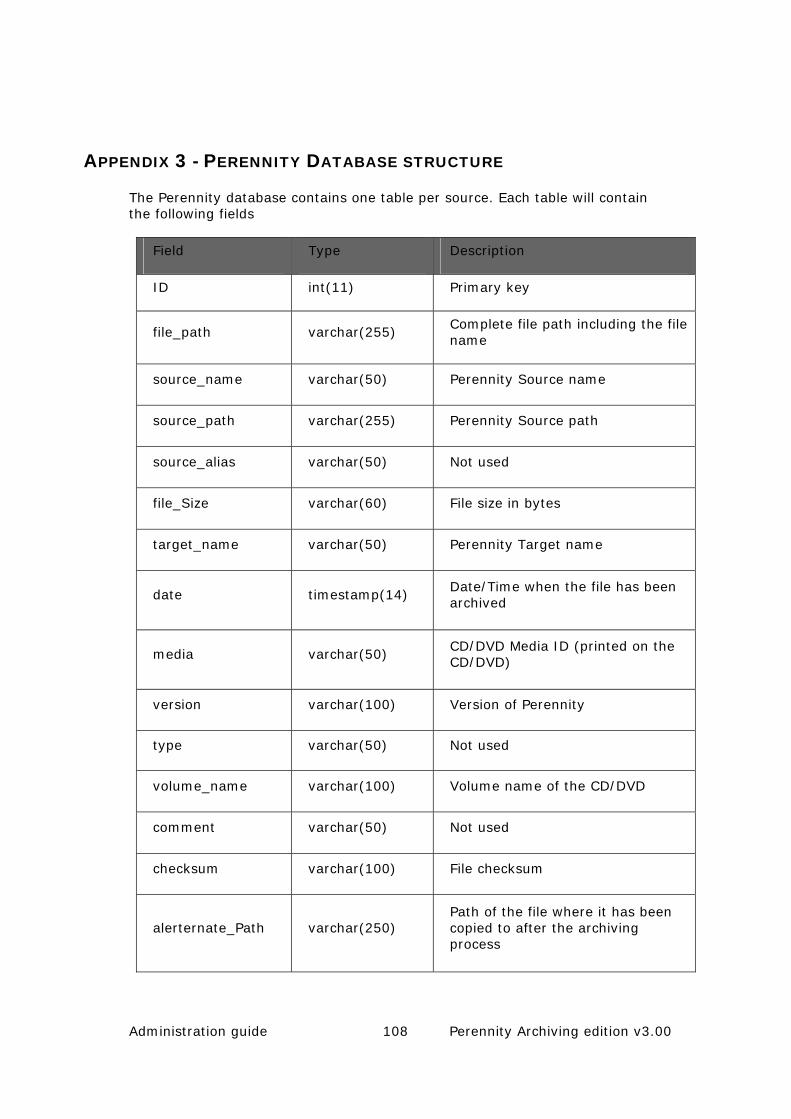
Administration guide 108 Perennity Archiving edition v3.00
APPENDIX 3 - PERENNITY DATABASE STRUCTURE
The Perennity database contains one table per source. Each table will contain the following fields
Field Type Description
ID int(11) Primary key
file_path varchar(255) Complete file path including the file name
source_name varchar(50) Perennity Source name
source_path varchar(255) Perennity Source path
source_alias varchar(50) Not used
file_Size varchar(60) File size in bytes
target_name varchar(50) Perennity Target name
date timestamp(14) Date/Time when the file has been archived
media varchar(50) CD/DVD Media ID (printed on the CD/DVD)
version varchar(100) Version of Perennity
type varchar(50) Not used
volume_name varchar(100) Volume name of the CD/DVD
comment varchar(50) Not used
checksum varchar(100) File checksum
alerternate_Path varchar(250) Path of the file where it has been copied to after the archiving process
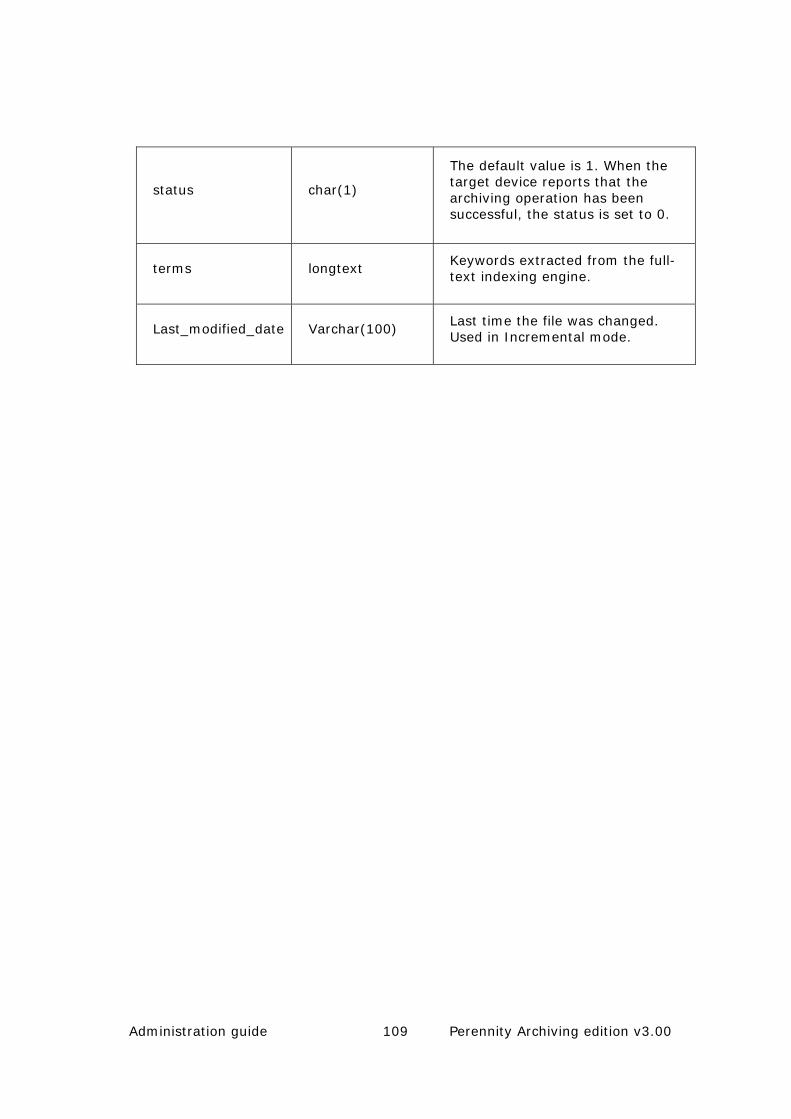
Administration guide 109 Perennity Archiving edition v3.00
status char(1)
The default value is 1. When the target device reports that the archiving operation has been successful, the status is set to 0.
terms longtext Keywords extracted from the full-text indexing engine.
Last_modified_date Varchar(100) Last time the file was changed. Used in Incremental mode.
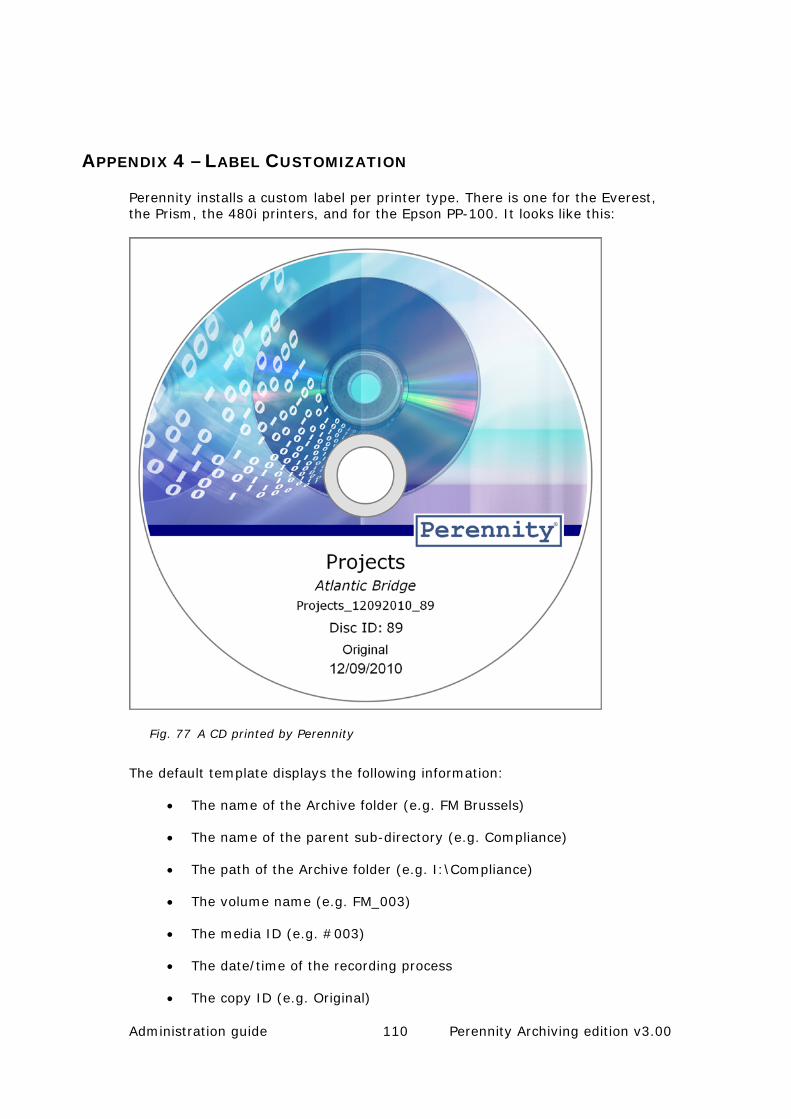
Administration guide 110 Perennity Archiving edition v3.00
APPENDIX 4 – LABEL CUSTOMIZATION
Perennity installs a custom label per printer type. There is one for the Everest, the Prism, the 480i printers, and for the Epson PP-100. It looks like this:
Fig. 77 A CD printed by Perennity
The default template displays the following information:
• The name of the Archive folder (e.g. FM Brussels)
• The name of the parent sub-directory (e.g. Compliance)
• The path of the Archive folder (e.g. I:\Compliance)
• The volume name (e.g. FM_003)
• The media ID (e.g. #003)
• The date/time of the recording process
• The copy ID (e.g. Original)

Administration guide 111 Perennity Archiving edition v3.00
The default layout can be modified using CD Designer. You may add your logo, some fixed text or custom elements.
Never delete one of the predefined fields. If you do not want to print one, move it outside to the printing zone of the CD/DVD or switch the color to white.
When using XML trigger files, you can add some more fields.
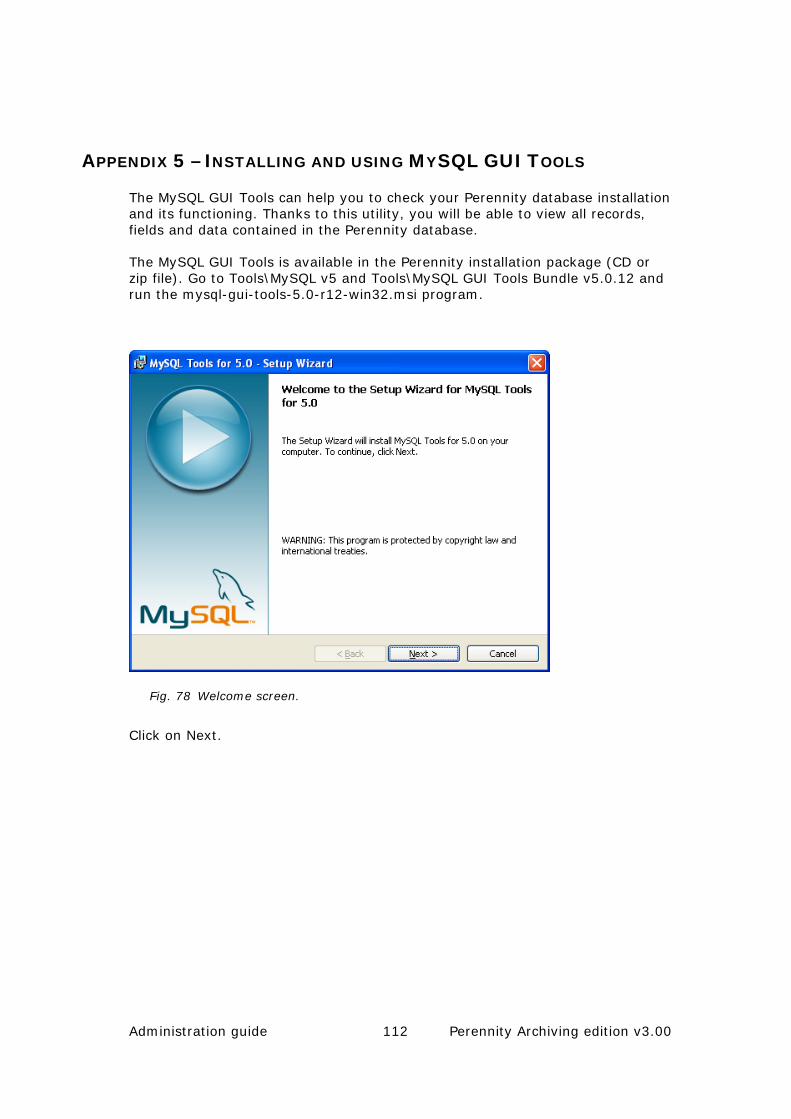
Administration guide 112 Perennity Archiving edition v3.00
APPENDIX 5 – INSTALLING AND USING MYSQL GUI TOOLS
The MySQL GUI Tools can help you to check your Perennity database installation and its functioning. Thanks to this utility, you will be able to view all records, fields and data contained in the Perennity database.
The MySQL GUI Tools is available in the Perennity installation package (CD or zip file). Go to Tools\MySQL v5 and Tools\MySQL GUI Tools Bundle v5.0.12 and run the mysql-gui-tools-5.0-r12-win32.msi program.
Fig. 78 Welcome screen.
Click on Next.
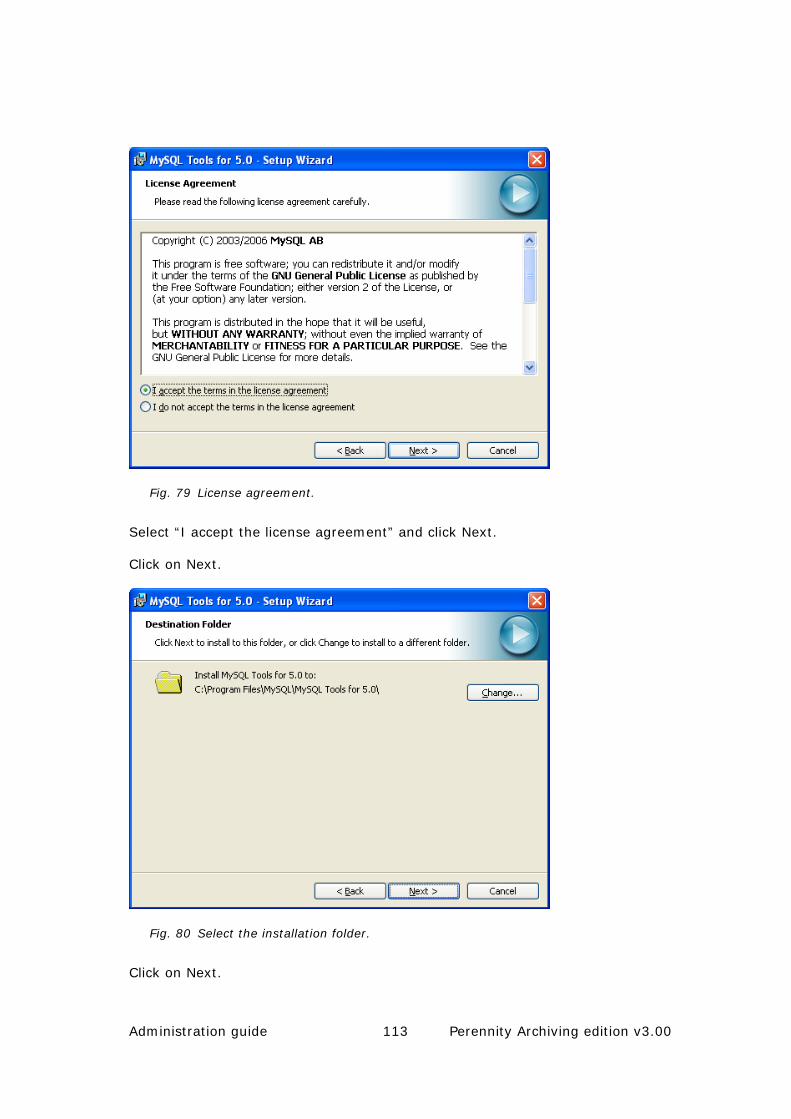
Administration guide 113 Perennity Archiving edition v3.00
Fig. 79 License agreement.
Select “I accept the license agreement” and click Next.
Click on Next.
Fig. 80 Select the installation folder.
Click on Next.
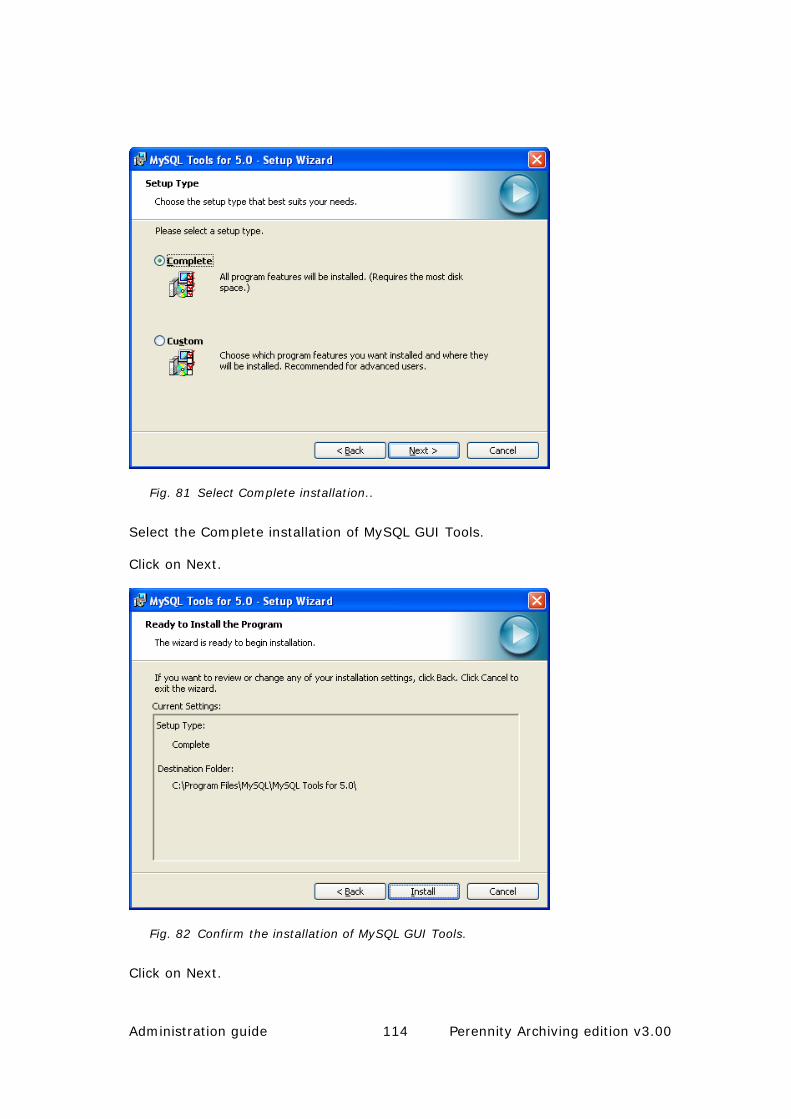
Administration guide 114 Perennity Archiving edition v3.00
Fig. 81 Select Complete installation..
Select the Complete installation of MySQL GUI Tools.
Click on Next.
Fig. 82 Confirm the installation of MySQL GUI Tools.
Click on Next.

Administration guide 115 Perennity Archiving edition v3.00
After the installation process, you have to click twice on Next to skip some advertising about MySQL.
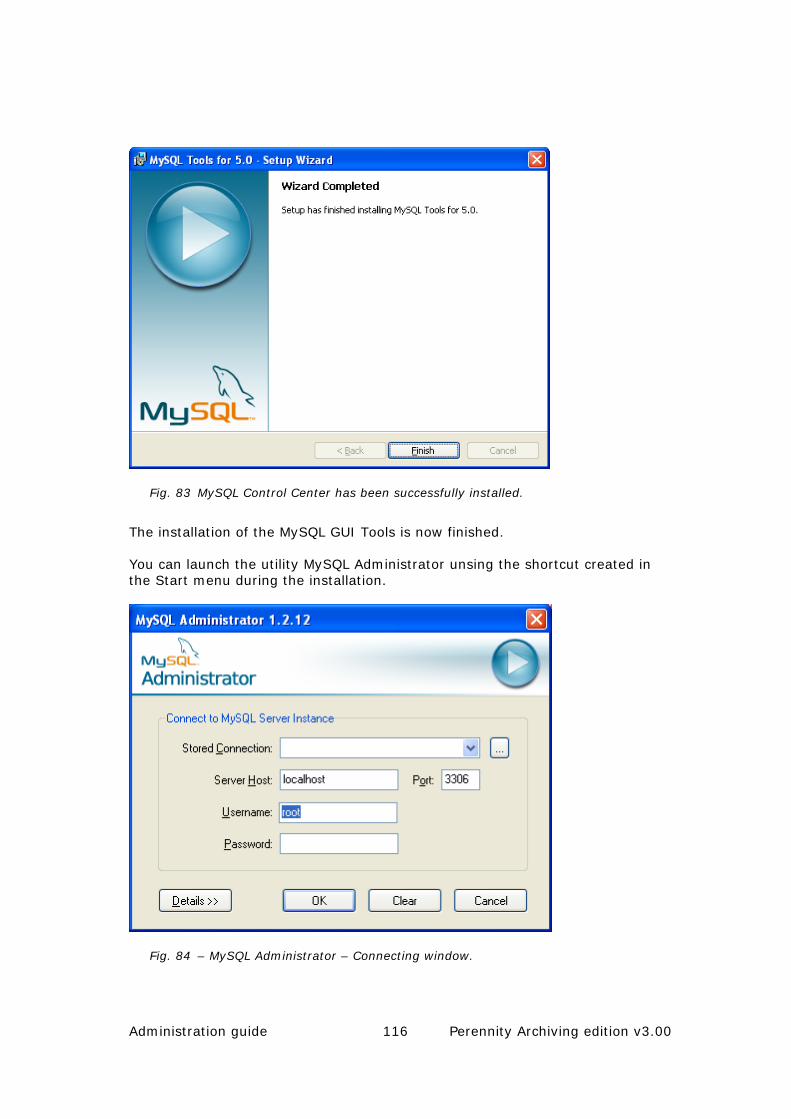
Administration guide 116 Perennity Archiving edition v3.00
Fig. 83 MySQL Control Center has been successfully installed.
The installation of the MySQL GUI Tools is now finished.
You can launch the utility MySQL Administrator unsing the shortcut created in the Start menu during the installation.
Fig. 84 – MySQL Administrator – Connecting window.
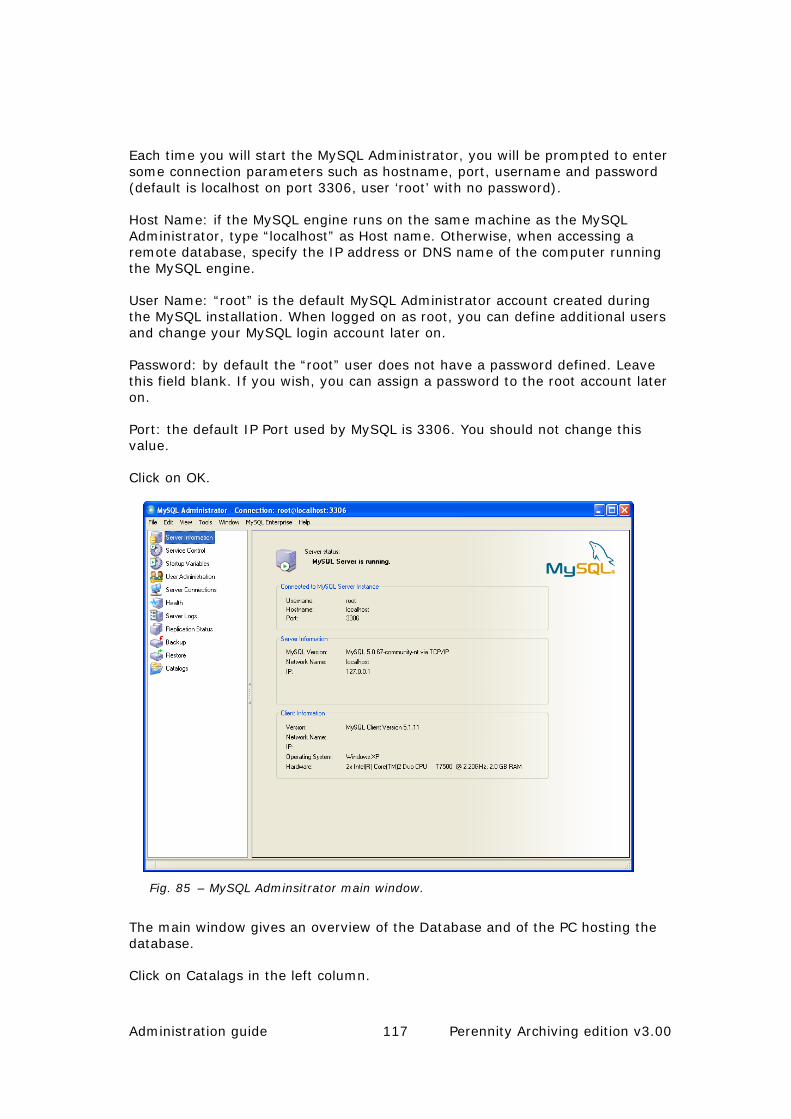
Administration guide 117 Perennity Archiving edition v3.00
Each time you will start the MySQL Administrator, you will be prompted to enter some connection parameters such as hostname, port, username and password (default is localhost on port 3306, user ‘root’ with no password).
Host Name: if the MySQL engine runs on the same machine as the MySQL Administrator, type “localhost” as Host name. Otherwise, when accessing a remote database, specify the IP address or DNS name of the computer running the MySQL engine.
User Name: “root” is the default MySQL Administrator account created during the MySQL installation. When logged on as root, you can define additional users and change your MySQL login account later on.
Password: by default the “root” user does not have a password defined. Leave this field blank. If you wish, you can assign a password to the root account later on.
Port: the default IP Port used by MySQL is 3306. You should not change this value.
Click on OK.
Fig. 85 – MySQL Adminsitrator main window.
The main window gives an overview of the Database and of the PC hosting the database.
Click on Catalags in the left column.

Administration guide 118 Perennity Archiving edition v3.00
The “Perennity” database should appear in the list. The “test” and “mysql” databases have been created during the MySQL installation and you should keep them.
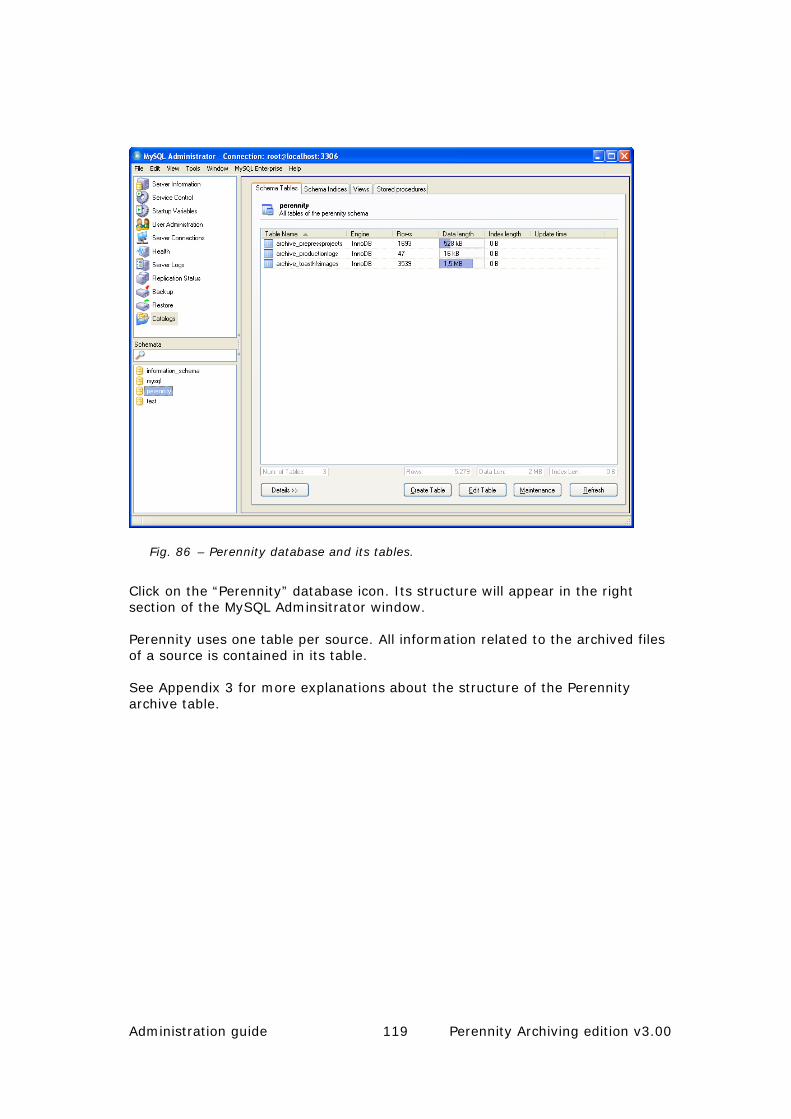
Administration guide 119 Perennity Archiving edition v3.00
Fig. 86 – Perennity database and its tables.
Click on the “Perennity” database icon. Its structure will appear in the right section of the MySQL Adminsitrator window.
Perennity uses one table per source. All information related to the archived files of a source is contained in its table.
See Appendix 3 for more explanations about the structure of the Perennity archive table.
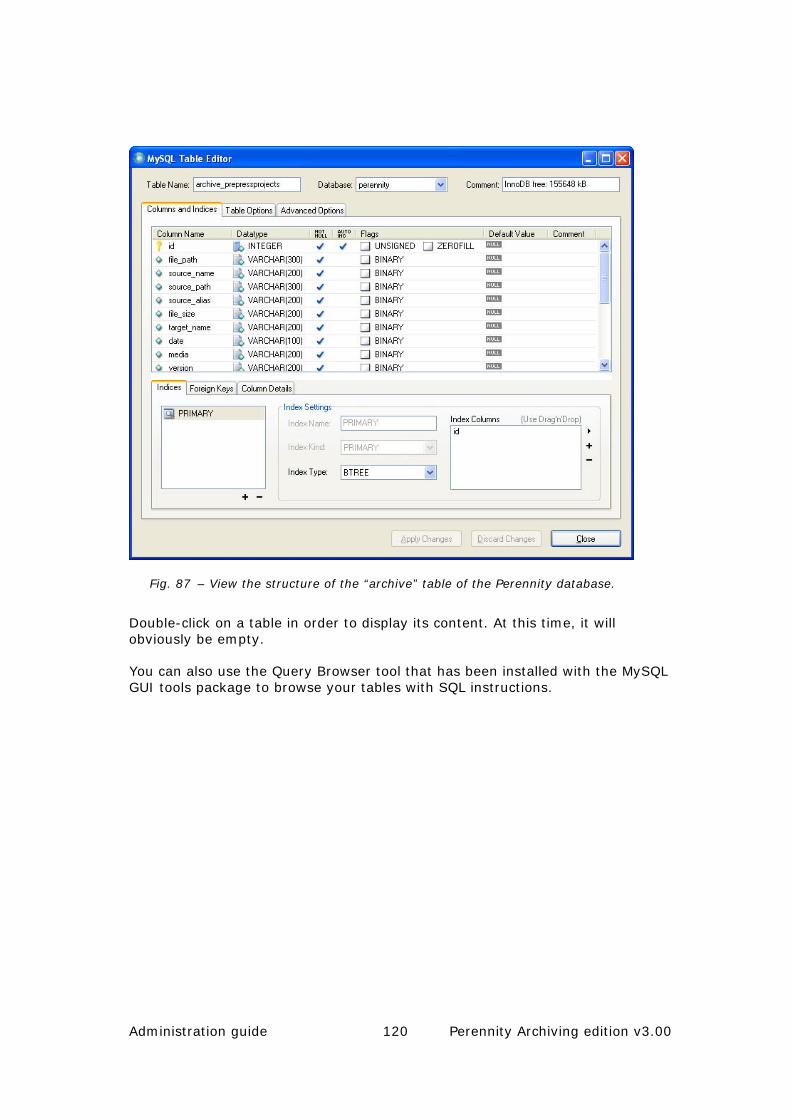
Administration guide 120 Perennity Archiving edition v3.00
Fig. 87 – View the structure of the “archive” table of the Perennity database.
Double-click on a table in order to display its content. At this time, it will obviously be empty.
You can also use the Query Browser tool that has been installed with the MySQL GUI tools package to browse your tables with SQL instructions.
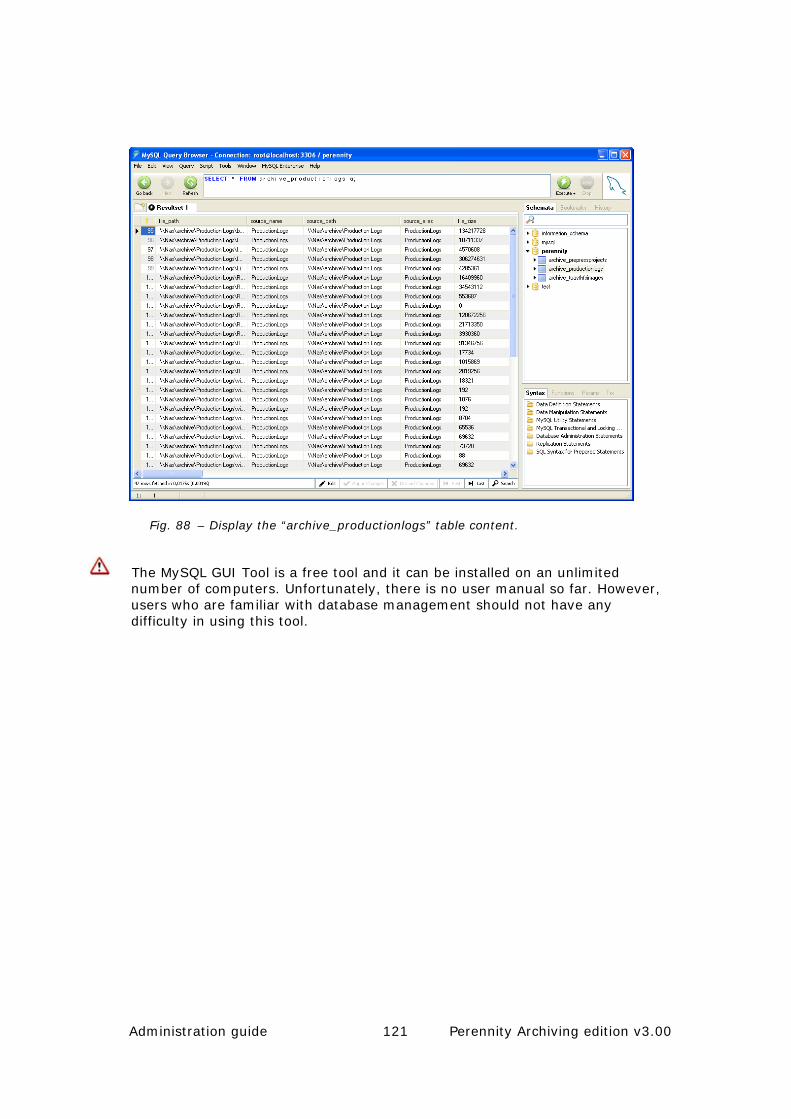
Administration guide 121 Perennity Archiving edition v3.00
Fig. 88 – Display the “archive_productionlogs” table content.
The MySQL GUI Tool is a free tool and it can be installed on an unlimited number of computers. Unfortunately, there is no user manual so far. However, users who are familiar with database management should not have any difficulty in using this tool.
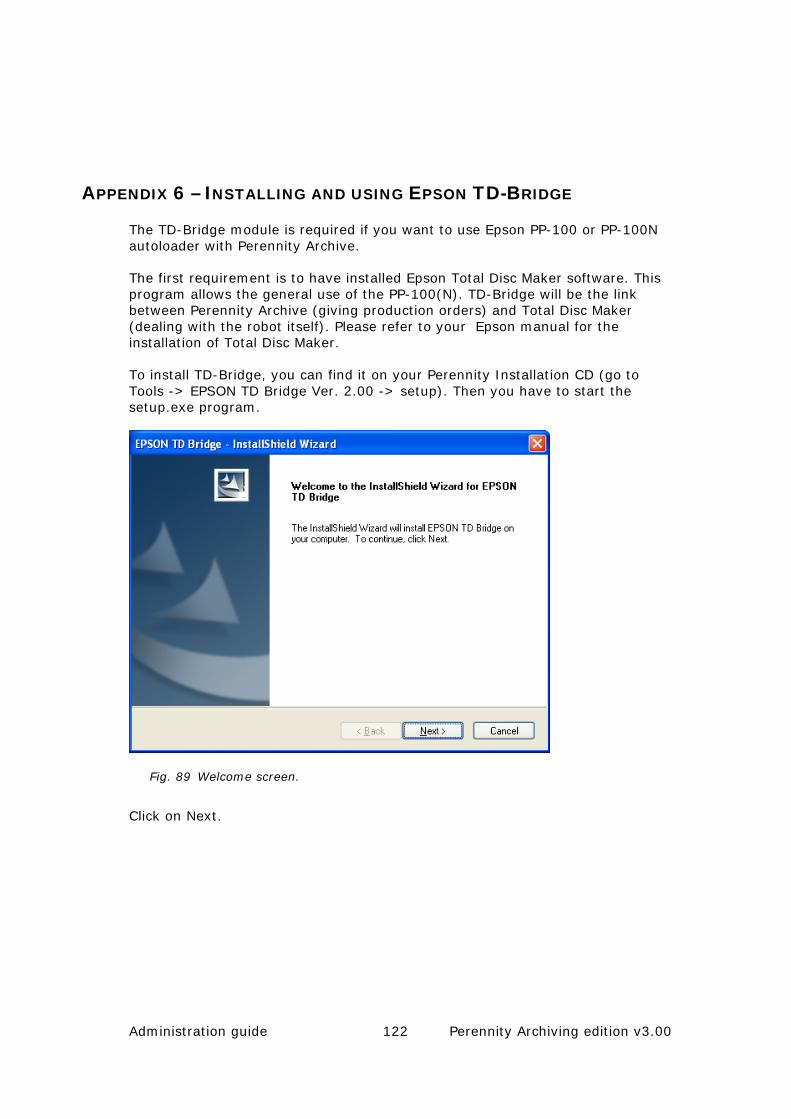
Administration guide 122 Perennity Archiving edition v3.00
APPENDIX 6 – INSTALLING AND USING EPSON TD-BRIDGE
The TD-Bridge module is required if you want to use Epson PP-100 or PP-100N autoloader with Perennity Archive.
The first requirement is to have installed Epson Total Disc Maker software. This program allows the general use of the PP-100(N). TD-Bridge will be the link between Perennity Archive (giving production orders) and Total Disc Maker (dealing with the robot itself). Please refer to your Epson manual for the installation of Total Disc Maker.
To install TD-Bridge, you can find it on your Perennity Installation CD (go to Tools -> EPSON TD Bridge Ver. 2.00 -> setup). Then you have to start the setup.exe program.
Fig. 89 Welcome screen.
Click on Next.
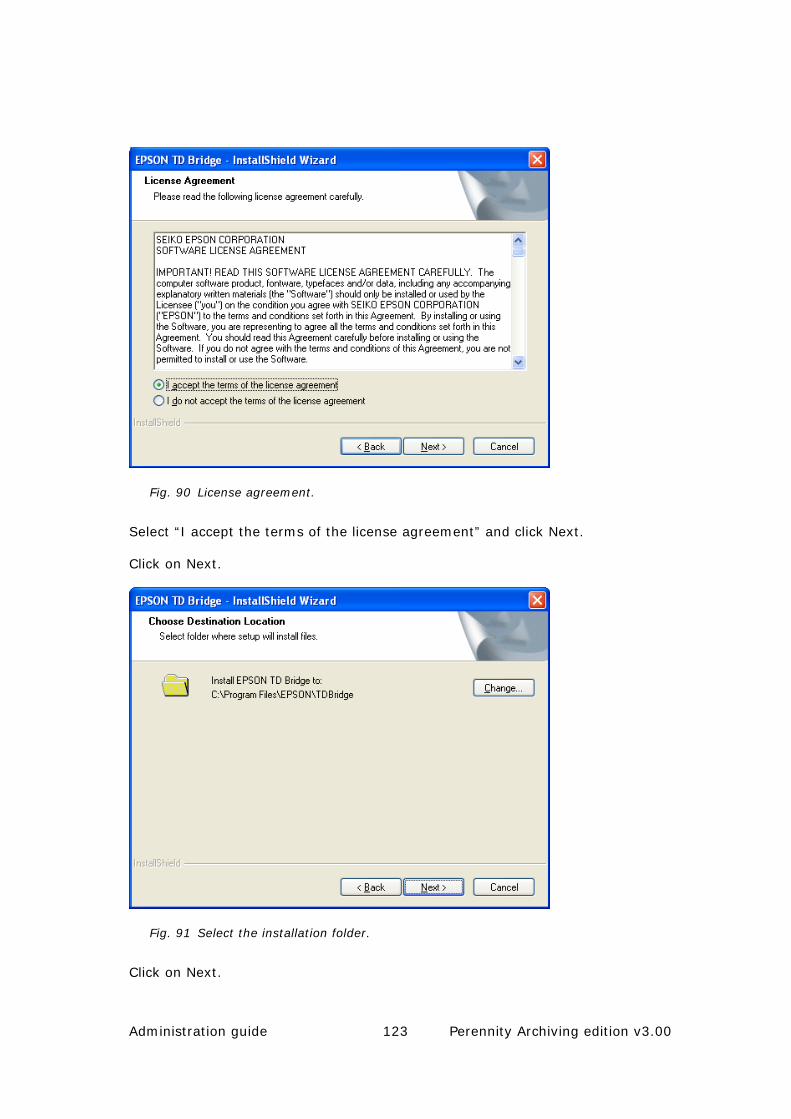
Administration guide 123 Perennity Archiving edition v3.00
Fig. 90 License agreement.
Select “I accept the terms of the license agreement” and click Next.
Click on Next.
Fig. 91 Select the installation folder.
Click on Next.

Administration guide 124 Perennity Archiving edition v3.00
Fig. 92 Select the Monitoring Folder.
Preferably let the Monitoring folder to default (systemdrive\EPSON\TDBidge\Orders)
Click on Next.
Fig. 93 Start the installation.
Click on Install.
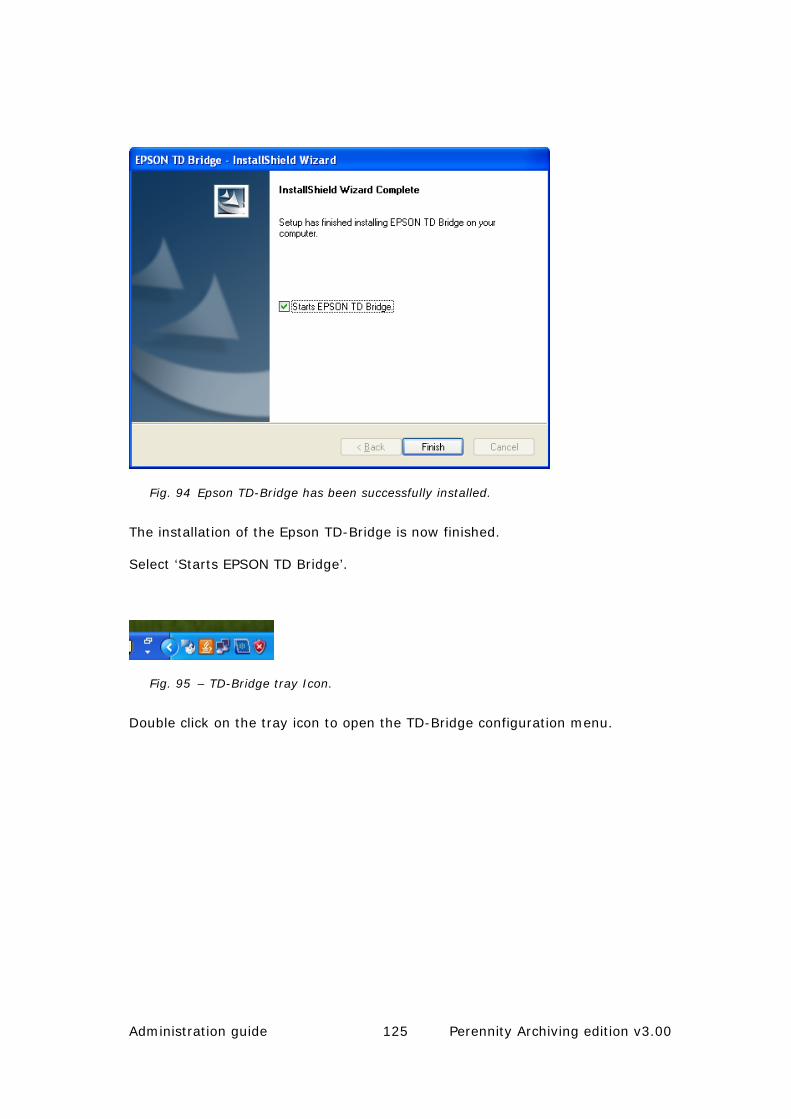
Administration guide 125 Perennity Archiving edition v3.00
Fig. 94 Epson TD-Bridge has been successfully installed.
The installation of the Epson TD-Bridge is now finished.
Select ‘Starts EPSON TD Bridge’.
Fig. 95 – TD-Bridge tray Icon.
Double click on the tray icon to open the TD-Bridge configuration menu.
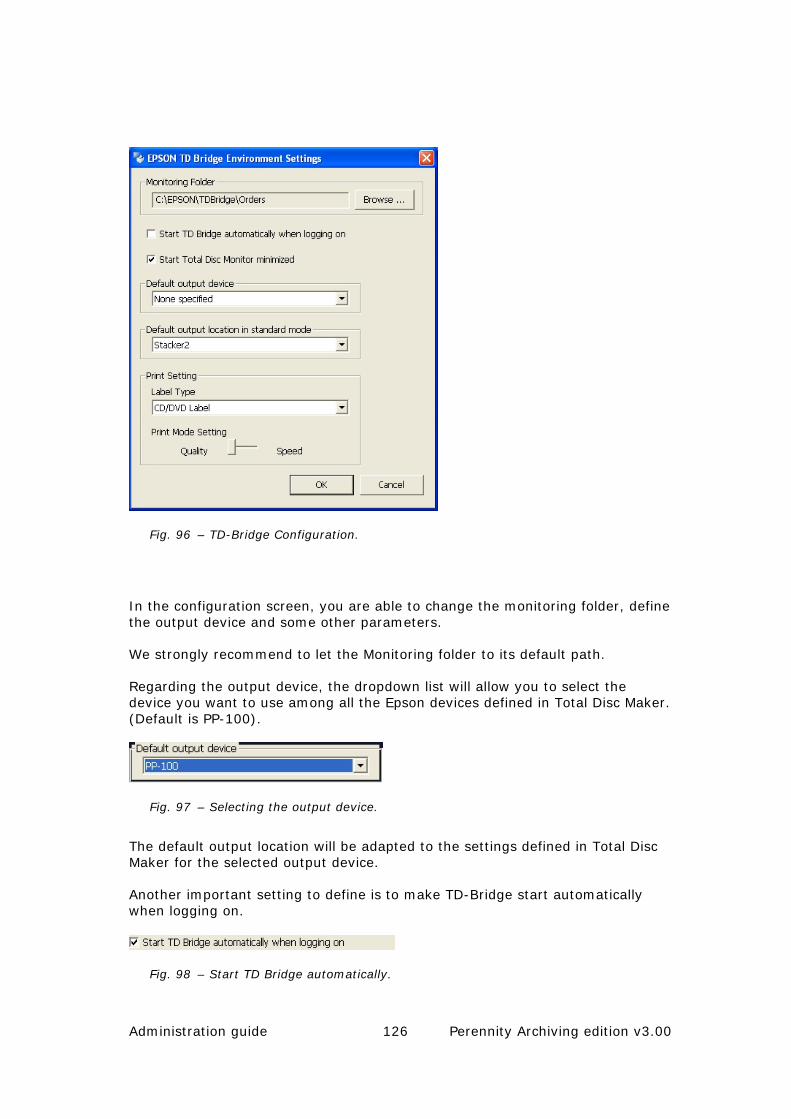
Administration guide 126 Perennity Archiving edition v3.00
Fig. 96 – TD-Bridge Configuration.
In the configuration screen, you are able to change the monitoring folder, define the output device and some other parameters.
We strongly recommend to let the Monitoring folder to its default path.
Regarding the output device, the dropdown list will allow you to select the device you want to use among all the Epson devices defined in Total Disc Maker. (Default is PP-100).
Fig. 97 – Selecting the output device.
The default output location will be adapted to the settings defined in Total Disc Maker for the selected output device.
Another important setting to define is to make TD-Bridge start automatically when logging on.
Fig. 98 – Start TD Bridge automatically.
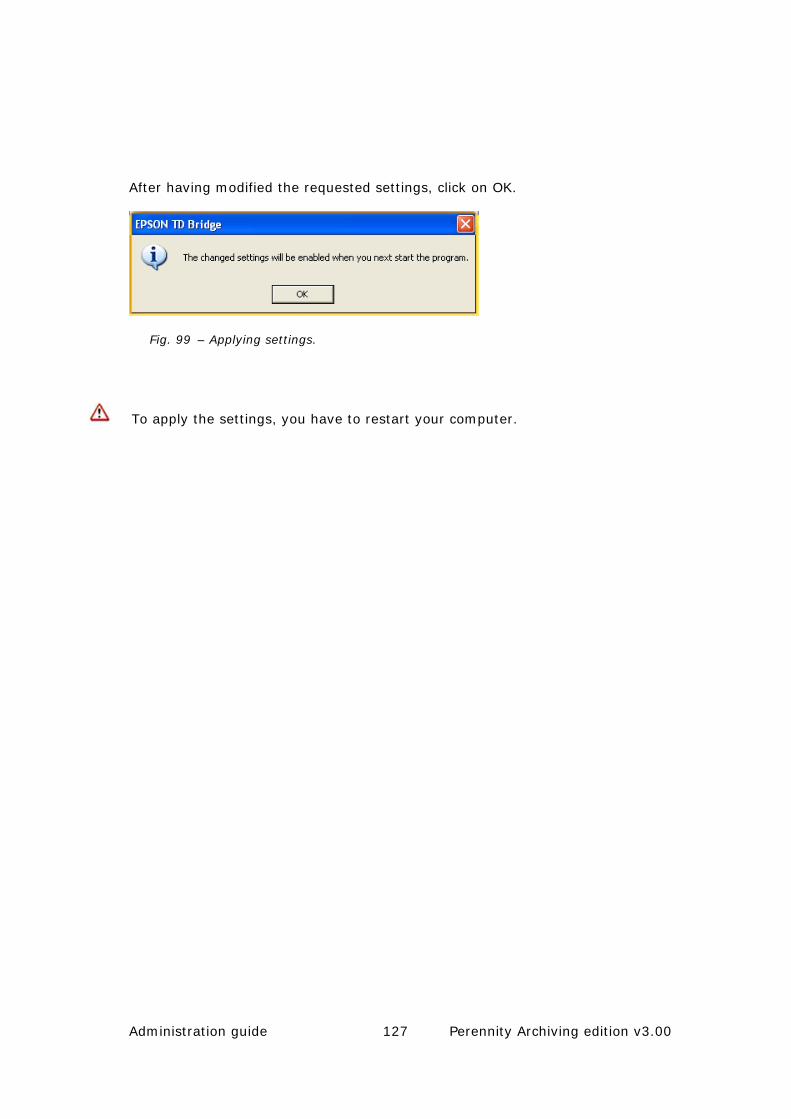
Administration guide 127 Perennity Archiving edition v3.00
After having modified the requested settings, click on OK.
Fig. 99 – Applying settings.
To apply the settings, you have to restart your computer.
Administration guide 128 Perennity Archiving edition v3.00
APPENDIX 7 – RELEASE NOTES
Perennity Archive (version 3.00)
Current version: 3.00 Build 286
Release date: September 15, 2010
Performance improvement
The program core has been rewritten from the ground to dramatically improve its stability and performance, especially when working with very large number (millions) of small files. Additionally, a better memory management ensures that memory is freed up when not needed anymore.
Windows Services
Perennity Archive now executes as two windows services:
• Perennity Archive Service: the core of the program is running as a service, which means that the user interface application (GUI) does not have to remain opened at all times.
• Perennity Autoloader Server: this service deals with interfacing to supported autoloaders. Using this framework, any changes in Autoloaders APIs have no influence on the Perennity Archive core functionality.
The program also runs without a user being logged on.
Incremental archiving improvement
Incremental archiving works differently than before. Where Perennity made use of the archive bit in the past to defect file changes, now it uses the database (which is thus obligatory with incremental archiving) and considers the last modification date. This is both more reliable and much faster for large file quantities.
Encryption
Perennity Archive Edition now offers an optional AES-256 data encryption feature (only available with Rimage autoloaders). This encryption is one of the most efficient ways to protect your data.
Database improvement
Perennity Archive now uses a dedicated table per source.
Support of Epson Autoloader
The Epson PP-100 and PP-100N autoloaders are now supported by Perennity.


![DICOM Conformance Statement9d48995e-cb8b-4ac4-ae9b... · 2020. 2. 20. · DICOM protocol. 1.5 References [DICOM PS 3 2006] The Digital Imaging and Communications in Medicine (DICOM)](https://img.pdfslide.us/doc/110x75/60e78a442d236e0f92518d06/dicom-conformance-statement-9d48995e-cb8b-4ac4-ae9b-2020-2-20-dicom-protocol.jpg)