Embed Size (px)
Citation preview
LINE
N e w G e n e r a t i o n Ta p w a r e
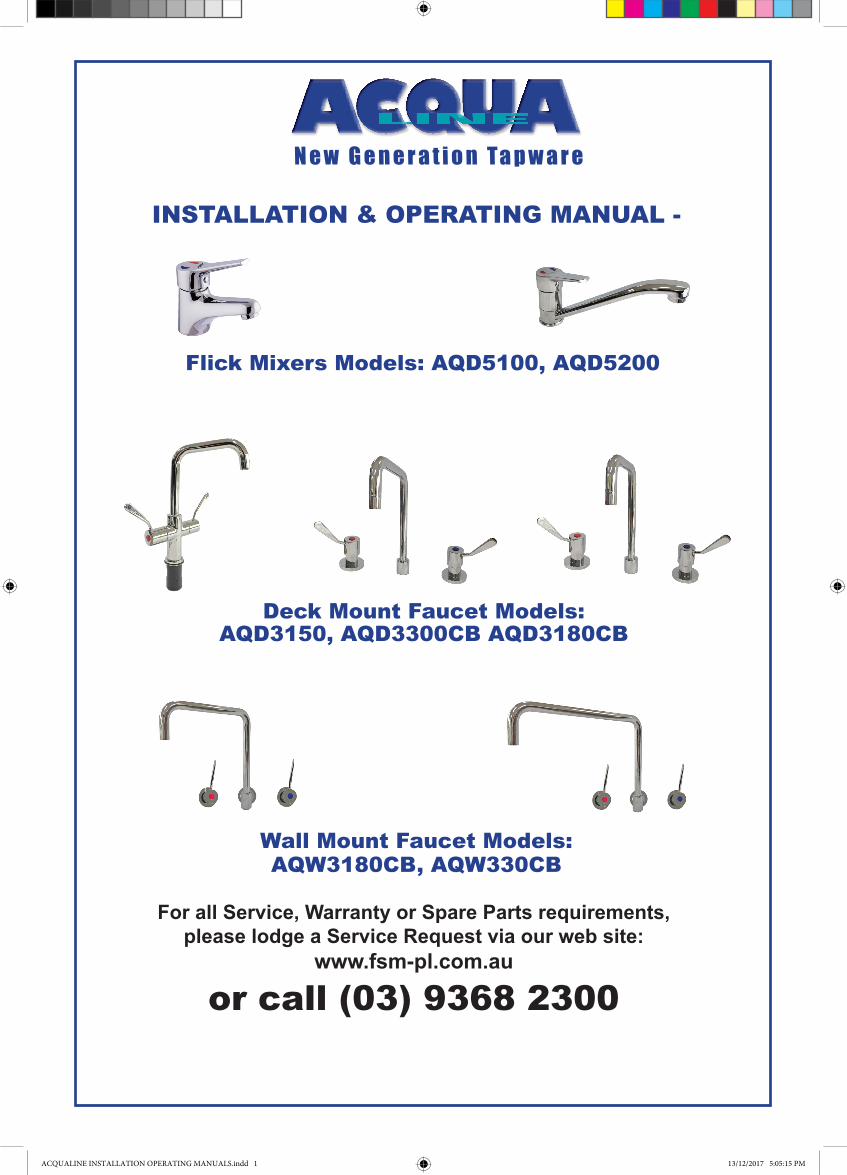
INSTALLATION & OPERATING MANUAL -
Deck Mount Faucet Models: AQD3150, AQD3300CB AQD3180CB
Wall Mount Faucet Models: AQW3180CB, AQW330CB
Flick Mixers Models: AQD5100, AQD5200
For all Service, Warranty or Spare Parts requirements, please lodge a Service Request via our web site:
www.fsm-pl.com.au
or call (03) 9368 2300
ACQUALINE INSTALLATION OPERATING MANUALS.indd 1 13/12/2017 5:05:15 PM
LINE
N e w G e n e r a t i o n Ta p w a r e
INSTALLATION INSTRUCTIONS
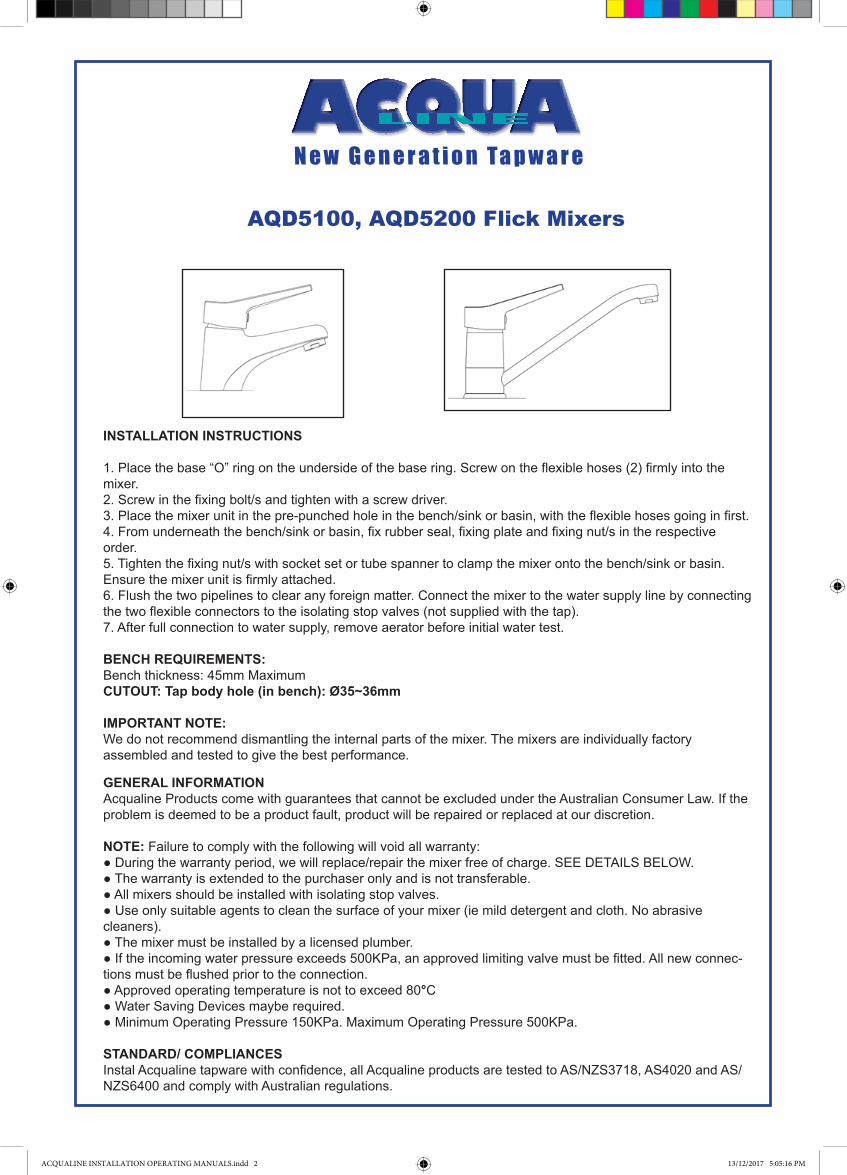
1. Place the base “O” ring on the underside of the base ring. Screw on the flexible hoses (2) firmly into themixer.2. Screw in the fixing bolt/s and tighten with a screw driver.3. Place the mixer unit in the pre-punched hole in the bench/sink or basin, with the flexible hoses going in first.4. From underneath the bench/sink or basin, fix rubber seal, fixing plate and fixing nut/s in the respectiveorder.5. Tighten the fixing nut/s with socket set or tube spanner to clamp the mixer onto the bench/sink or basin.Ensure the mixer unit is firmly attached.6. Flush the two pipelines to clear any foreign matter. Connect the mixer to the water supply line by connectingthe two flexible connectors to the isolating stop valves (not supplied with the tap).7. After full connection to water supply, remove aerator before initial water test.
BENCH REQUIREMENTS:Bench thickness: 45mm MaximumCUTOUT: Tap body hole (in bench): Ø35~36mm
IMPORTANT NOTE:We do not recommend dismantling the internal parts of the mixer. The mixers are individually factory assembled and tested to give the best performance.
GENERAL INFORMATIONAcqualine Products come with guarantees that cannot be excluded under the Australian Consumer Law. If the problem is deemed to be a product fault, product will be repaired or replaced at our discretion.
NOTE: Failure to comply with the following will void all warranty:● During the warranty period, we will replace/repair the mixer free of charge. SEE DETAILS BELOW.● The warranty is extended to the purchaser only and is not transferable.● All mixers should be installed with isolating stop valves.● Use only suitable agents to clean the surface of your mixer (ie mild detergent and cloth. No abrasivecleaners).● The mixer must be installed by a licensed plumber.● If the incoming water pressure exceeds 500KPa, an approved limiting valve must be fitted. All new connec-tions must be flushed prior to the connection.● Approved operating temperature is not to exceed 80°C● Water Saving Devices maybe required.● Minimum Operating Pressure 150KPa. Maximum Operating Pressure 500KPa.
STANDARD/ COMPLIANCESInstal Acqualine tapware with confidence, all Acqualine products are tested to AS/NZS3718, AS4020 and AS/NZS6400 and comply with Australian regulations.
AQD5100, AQD5200 Flick Mixers
ACQUALINE INSTALLATION OPERATING MANUALS.indd 2 13/12/2017 5:05:16 PM
LINE
N e w G e n e r a t i o n Ta p w a r e
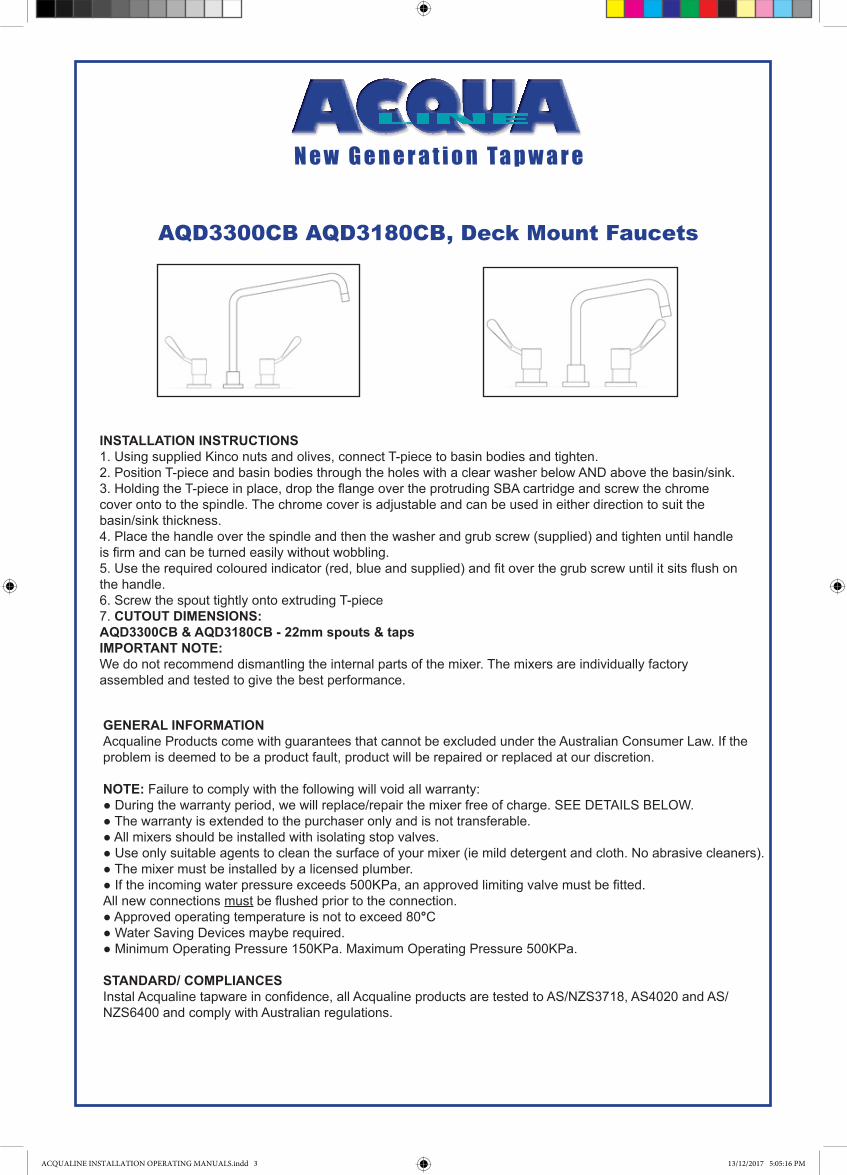
AQD3300CB AQD3180CB, Deck Mount Faucets
INSTALLATION INSTRUCTIONS1. Using supplied Kinco nuts and olives, connect T-piece to basin bodies and tighten.2. Position T-piece and basin bodies through the holes with a clear washer below AND above the basin/sink.3. Holding the T-piece in place, drop the flange over the protruding SBA cartridge and screw the chromecover onto to the spindle. The chrome cover is adjustable and can be used in either direction to suit thebasin/sink thickness.4. Place the handle over the spindle and then the washer and grub screw (supplied) and tighten until handleis firm and can be turned easily without wobbling.5. Use the required coloured indicator (red, blue and supplied) and fit over the grub screw until it sits flush onthe handle.6. Screw the spout tightly onto extruding T-piece7. CUTOUT DIMENSIONS:AQD3300CB & AQD3180CB - 22mm spouts & tapsIMPORTANT NOTE:We do not recommend dismantling the internal parts of the mixer. The mixers are individually factoryassembled and tested to give the best performance.
GENERAL INFORMATIONAcqualine Products come with guarantees that cannot be excluded under the Australian Consumer Law. If the problem is deemed to be a product fault, product will be repaired or replaced at our discretion.
NOTE: Failure to comply with the following will void all warranty:● During the warranty period, we will replace/repair the mixer free of charge. SEE DETAILS BELOW.● The warranty is extended to the purchaser only and is not transferable.● All mixers should be installed with isolating stop valves.● Use only suitable agents to clean the surface of your mixer (ie mild detergent and cloth. No abrasive cleaners).● The mixer must be installed by a licensed plumber.● If the incoming water pressure exceeds 500KPa, an approved limiting valve must be fitted.All new connections must be flushed prior to the connection.● Approved operating temperature is not to exceed 80°C● Water Saving Devices maybe required.● Minimum Operating Pressure 150KPa. Maximum Operating Pressure 500KPa.
STANDARD/ COMPLIANCESInstal Acqualine tapware in confidence, all Acqualine products are tested to AS/NZS3718, AS4020 and AS/NZS6400 and comply with Australian regulations.
ACQUALINE INSTALLATION OPERATING MANUALS.indd 3 13/12/2017 5:05:16 PM
LINE
N e w G e n e r a t i o n Ta p w a r e
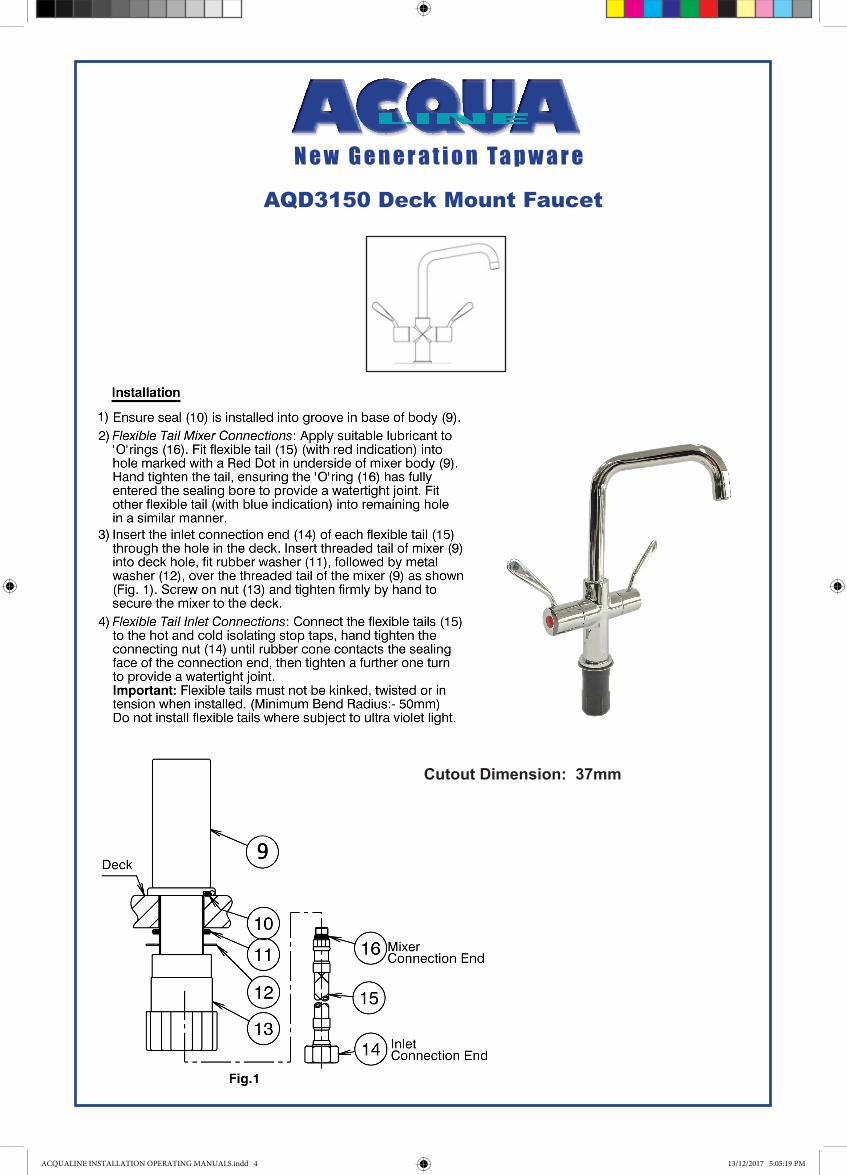
AQD3150 Deck Mount Faucet
Cutout Dimension: 37mm
ACQUALINE INSTALLATION OPERATING MANUALS.indd 4 13/12/2017 5:05:19 PM
LINE
N e w G e n e r a t i o n Ta p w a r e
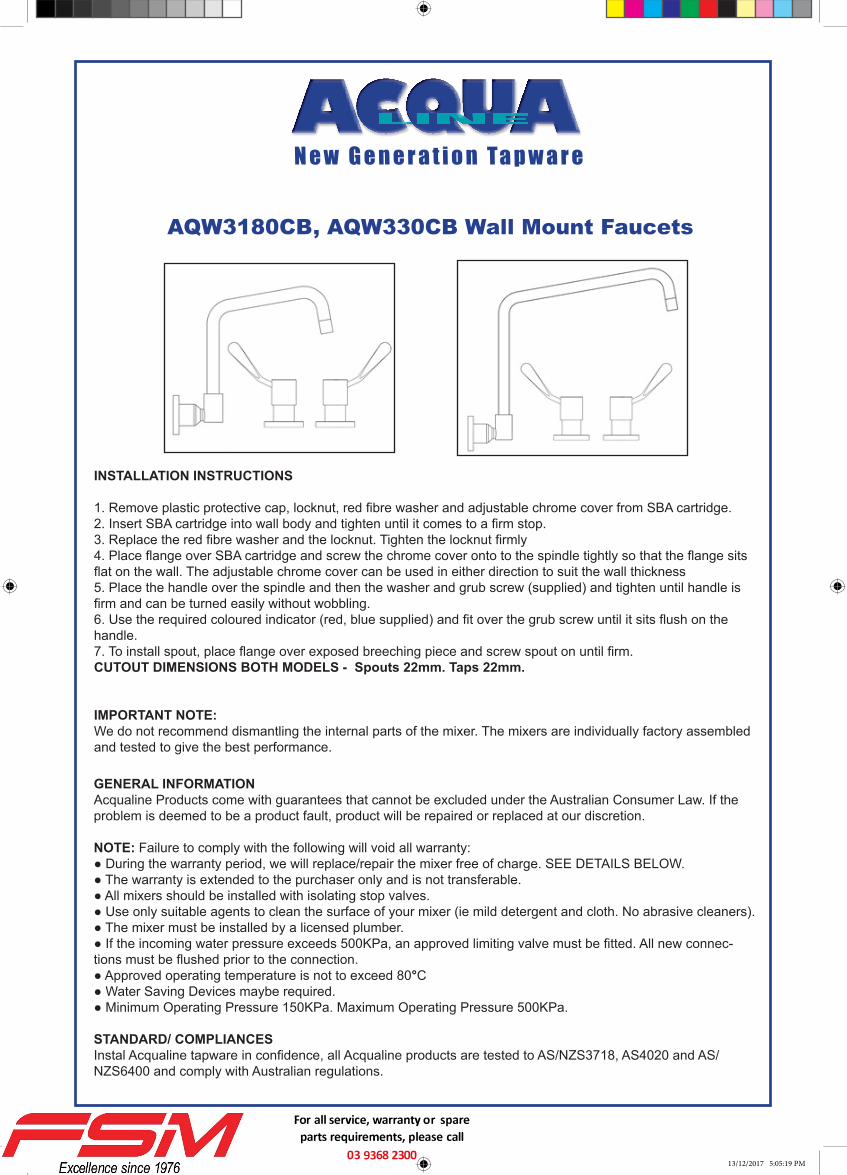
AQW3180CB, AQW330CB Wall Mount Faucets
INSTALLATION INSTRUCTIONS
1. Remove plastic protective cap, locknut, red fibre washer and adjustable chrome cover from SBA cartridge.2. Insert SBA cartridge into wall body and tighten until it comes to a firm stop.3. Replace the red fibre washer and the locknut. Tighten the locknut firmly4. Place flange over SBA cartridge and screw the chrome cover onto to the spindle tightly so that the flange sitsflat on the wall. The adjustable chrome cover can be used in either direction to suit the wall thickness5. Place the handle over the spindle and then the washer and grub screw (supplied) and tighten until handle isfirm and can be turned easily without wobbling.6. Use the required coloured indicator (red, blue supplied) and fit over the grub screw until it sits flush on thehandle.7. To install spout, place flange over exposed breeching piece and screw spout on until firm.CUTOUT DIMENSIONS BOTH MODELS - Spouts 22mm. Taps 22mm.
IMPORTANT NOTE:We do not recommend dismantling the internal parts of the mixer. The mixers are individually factory assembled and tested to give the best performance.
GENERAL INFORMATIONAcqualine Products come with guarantees that cannot be excluded under the Australian Consumer Law. If the problem is deemed to be a product fault, product will be repaired or replaced at our discretion.
NOTE: Failure to comply with the following will void all warranty:● During the warranty period, we will replace/repair the mixer free of charge. SEE DETAILS BELOW.● The warranty is extended to the purchaser only and is not transferable.● All mixers should be installed with isolating stop valves.● Use only suitable agents to clean the surface of your mixer (ie mild detergent and cloth. No abrasive cleaners).● The mixer must be installed by a licensed plumber.● If the incoming water pressure exceeds 500KPa, an approved limiting valve must be fitted. All new connec-tions must be flushed prior to the connection.● Approved operating temperature is not to exceed 80°C● Water Saving Devices maybe required.● Minimum Operating Pressure 150KPa. Maximum Operating Pressure 500KPa.
STANDARD/ COMPLIANCESInstal Acqualine tapware in confidence, all Acqualine products are tested to AS/NZS3718, AS4020 and AS/NZS6400 and comply with Australian regulations.
13/12/2017 5:05:19 PM
For all service, warranty or spare
parts requirements, please call
03 9368 2300


![FSM [Autosaved]](https://img.pdfslide.us/doc/110x75/577cda6c1a28ab9e78a5a27e/fsm-autosaved.jpg)