Embed Size (px)
Citation preview
7/30/2019 Install Printer on Mac
http://slidepdf.com/reader/full/install-printer-on-mac 1/12
INSTALL PRINTER ON MAC
Download a Printer Driver Installation Package
Alt 1: Install a Printer via Bonjour
Alt 2: Install a Printer using its IP Number
Configuring an Installed Printer Driver after Printer Installation
When you install a printer, anywhere, you need to make sure of two things:
The printer driver software for your printer must be installed on your computer
The printer configuration must have been added to the list of printers accessible from your computer
Printer drivers for most modern printer brands, including the models we have at Nordita, are usually shipped with newer versions of MacOS X, so most likely
you will only have to do the second step, install the printer definition on your computer, to get going. Below you find instructions on how to download printer
drivers from the net.
A printer can be made accessible over a network to a user with a Mac computer in a variety of ways. The Nordita printers are accessible via both Bonjour (only
locally at Nordita) and TCP/IP, and the procedures for installing a printer is only slightly different for the two choices. You should try t o follow the Bonjour instructions below first, and if that doesn't work, try the IP option.
DOWNLOAD A PRINTER DRIVER INSTALLATION PACKAGE
The printer drivers needed for the printers we have at Nordita are installed in the newer versions of the operating systems (MacOS X, Linux, Windows). Only if
you have an older OS you will need to download and install the driver.
If you are uncertain if you have the necessary driver installed, you can j ust follow the installation instructions below, step by step. You will then know that you
need to obtain the driver if neither the automatic driver search described in the sections on installation via Bonjour andTCP/IP, nor the manual driver search
described in the section on how to selecting a driver gave a result. In that case, install the printer with a generic driver, as described, and then afterwards
download and install the correct driver.
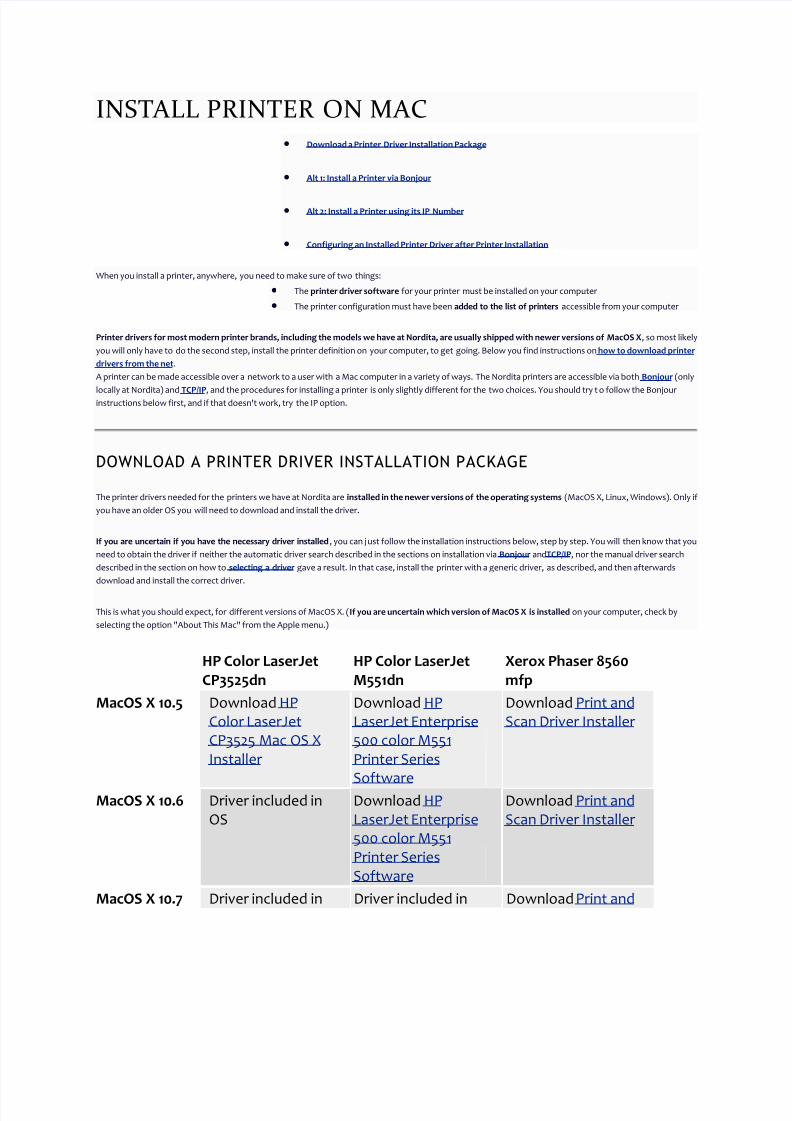
This is what you should expect, for different versions of MacOS X. (If you are uncertain which version of MacOS X is installed on your computer, check by
selecting the option "About This Mac" from the Apple menu.)
HP Color LaserJetCP3525dn
HP Color LaserJetM551dn
Xerox Phaser 8560mfp
MacOS X 10.5 Download HPColor LaserJetCP3525 Mac OS XInstaller
Download HPLaserJet Enterprise500 color M551Printer SeriesSoftware
Download Print andScan Driver Installer
MacOS X 10.6 Driver included inOS
Download HPLaserJet Enterprise500 color M551Printer SeriesSoftware
Download Print andScan Driver Installer
MacOS X 10.7 Driver included in Driver included in Download Print and
7/30/2019 Install Printer on Mac
http://slidepdf.com/reader/full/install-printer-on-mac 2/12
OS OS Scan Driver Installer
Download the driver installation package (a DMG file) from the link i ndicated in the table above
Double-click the downloaded DMG file to mount the installation program volume
Run the installation program
Continue with installing the printer on your computer as described below.
ALT 1: INSTALL A PRINTER VIA BONJOUR
This installation alternative assumes that you are connected to a Nordita or AlbaNova network , either via a cable or wireless.
The images in the descriptions below are taken from MacOS X 10.6 for an installation of the Nordita HP Color LaserJet CP3525 printer. If you have a different version
of the operating system or want to install another printer at Nordita, the details in the procedure may vary.
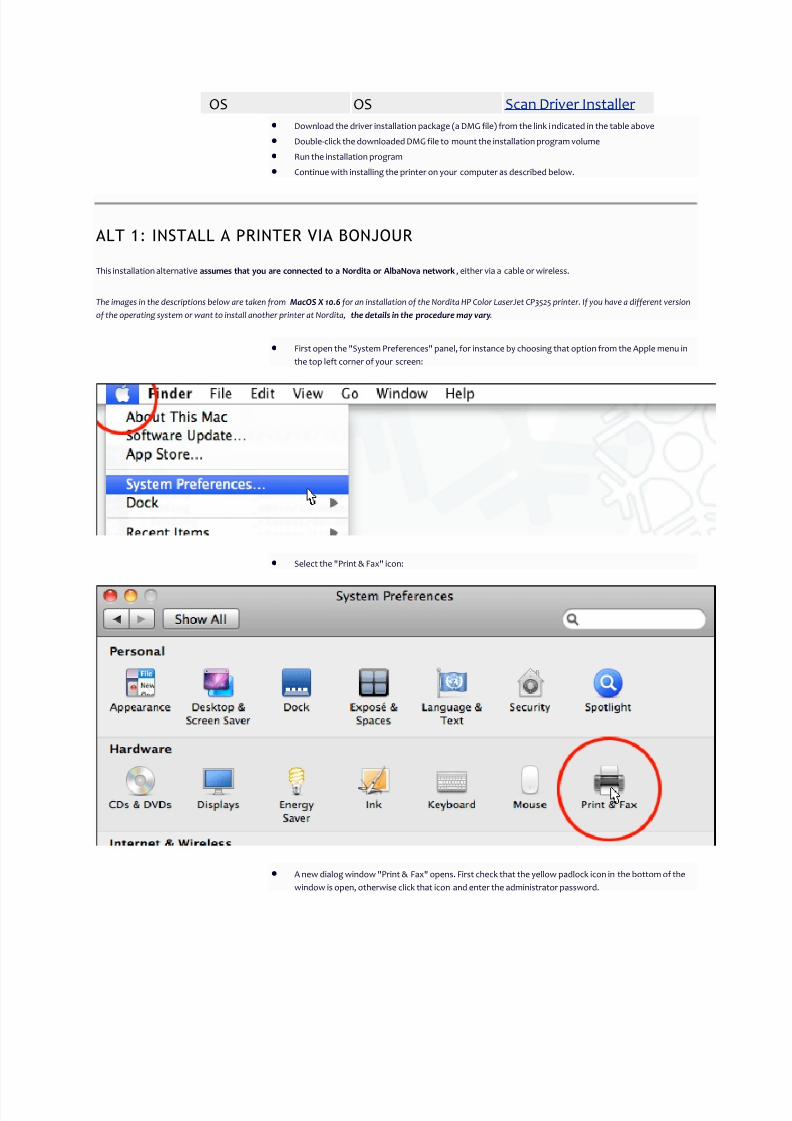
First open the "System Preferences" panel, for instance by choosing that option from the Apple menu in
the top left corner of your screen:
Select the "Print & Fax" icon:
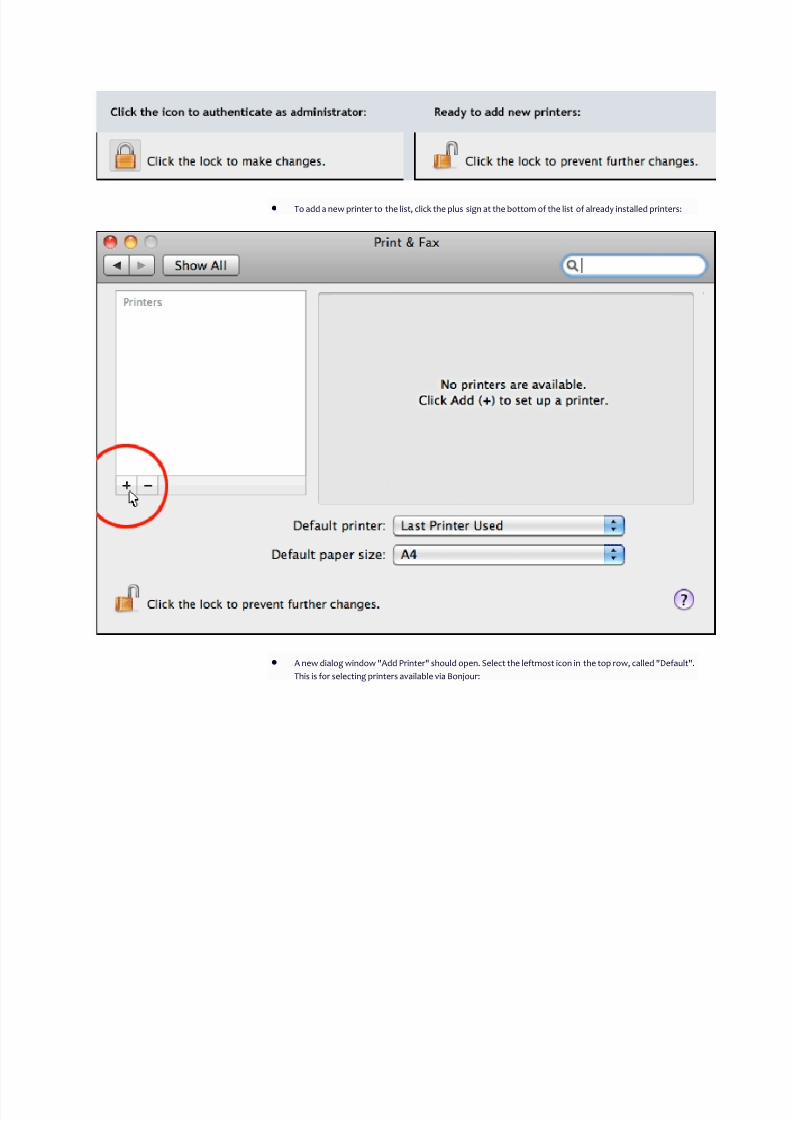
A new dialog window "Print & Fax" opens. First check that the yellow padlock icon in the bottom of the
window is open, otherwise click that icon and enter the administrator password.
7/30/2019 Install Printer on Mac
http://slidepdf.com/reader/full/install-printer-on-mac 3/12
To add a new printer to the list, click the plus sign at the bottom of the list of already installed printers:
A new dialog window "Add Printer" should open. Select the leftmost icon in the top row, called "Default".
This is for selecting printers available via Bonjour:
7/30/2019 Install Printer on Mac
http://slidepdf.com/reader/full/install-printer-on-mac 4/12
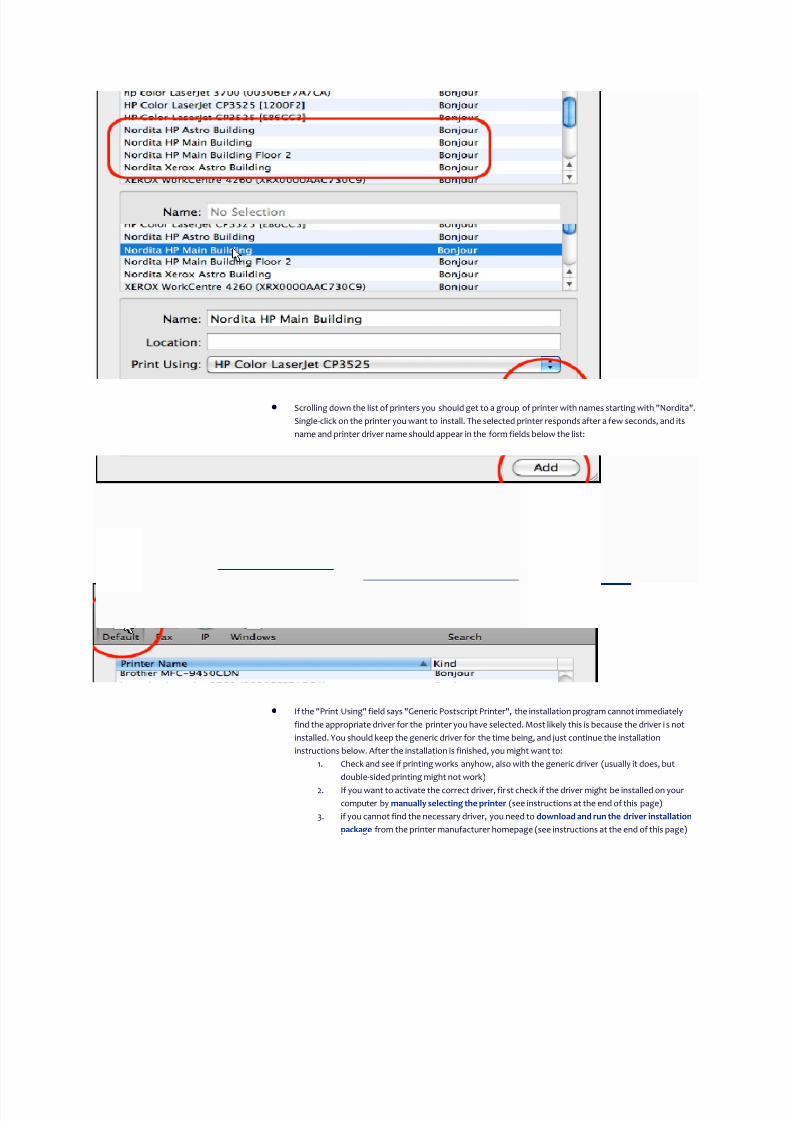
Scrolling down the list of printers you should get to a group of printer with names starting with "Nordita".
Single-click on the printer you want to install. The selected printer responds after a few seconds, and its
name and printer driver name should appear in the form fields below the list:
If the "Print Using" field says "Generic Postscript Printer", the installation program cannot immediately
find the appropriate driver for the printer you have selected. Most likely this is because the driver i s not
installed. You should keep the generic driver for the time being, and just continue the installation
instructions below. After the installation is finished, you might want to:
1. Check and see if printing works anyhow, also with the generic driver (usually it does, but
double-sided printing might not work)
2. If you want to activate the correct driver, first check if the driver might be installed on your
computer by manually selecting the printer (see instructions at the end of this page)
3. if you cannot find the necessary driver, you need to download and run the driver installation
package from the printer manufacturer homepage (see instructions at the end of this page)

7/30/2019 Install Printer on Mac
http://slidepdf.com/reader/full/install-printer-on-mac 5/12
Confirm with the [Add] button.
[For some drivers, a new dialog window "Installable Options" appears. If the dri ver is such that there is a
Duplex option shown here, make sure is s elected, since all Nordita printers provide this functionality,
double-sided printing. Confirm with the [Continue] button.]
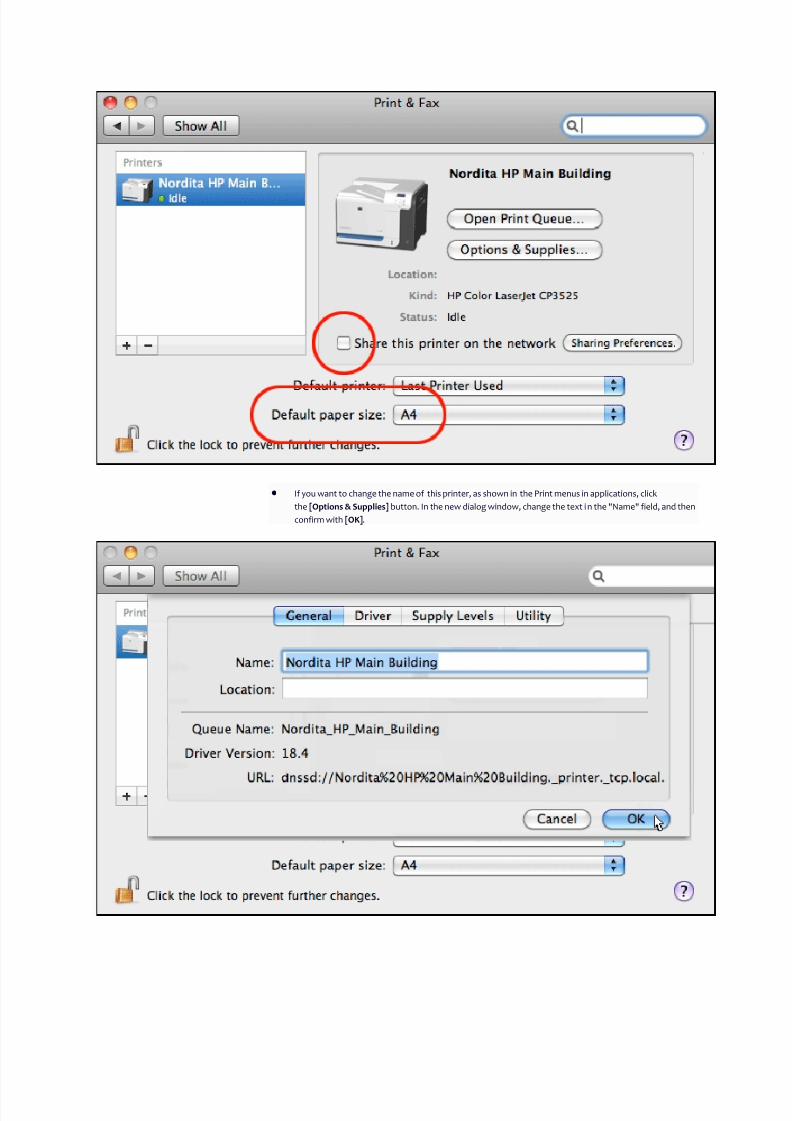
The printer should now be added to the li st in the "Print & Fax" window. Make sure that the printer is NOT
shared! The paper size used in the Nordita printers i s "A4".
7/30/2019 Install Printer on Mac
http://slidepdf.com/reader/full/install-printer-on-mac 6/12
If you want to change the name of this printer, as shown in the Print menus in applications, click
the [Options & Supplies] button. In the new dialog window, change the text i n the "Name" field, and then
confirm with [OK].

7/30/2019 Install Printer on Mac
http://slidepdf.com/reader/full/install-printer-on-mac 7/12
You can now close the System Preferences window.
When printing from an application, just select the Nordita printer in the usual way. Remember that the printers can print double-sided.
ALT 2: INSTALL A PRINTER USING ITS IP NUMBER
If the IP number of the printer you want to install starts with "192" (see the printing help page), you must be connected to a Nordita or AlbaNova network
when installing or using the printer. Printers with IP numbers starting with "13 0" can be installed from any network.
The images in the instructions below are taken from an installation of the Xerox Phaser 8530MFP printer at Nordita on a computer with MacOS X 10.6. Again the
details in the procedure may vary between the instructions below and the system dialog windows on your computer, depending on the operating system version or
the printer you want to install.
The installation proceeds just as for installing a Bonjour printer, see above, until you reach the "Add
Printer" dialog window. Now select the icon "IP" at the top. Select the protocol "Line Printer Deamon -
LPD", and in the "Address" field enter either the IP number or domain name of the printer you want to
install:
After some time the printer will respond, and its name and printer driver name should appear in the form
fields below the list. If everythink seems OK, confirm with the [Add] button.
7/30/2019 Install Printer on Mac
http://slidepdf.com/reader/full/install-printer-on-mac 8/12
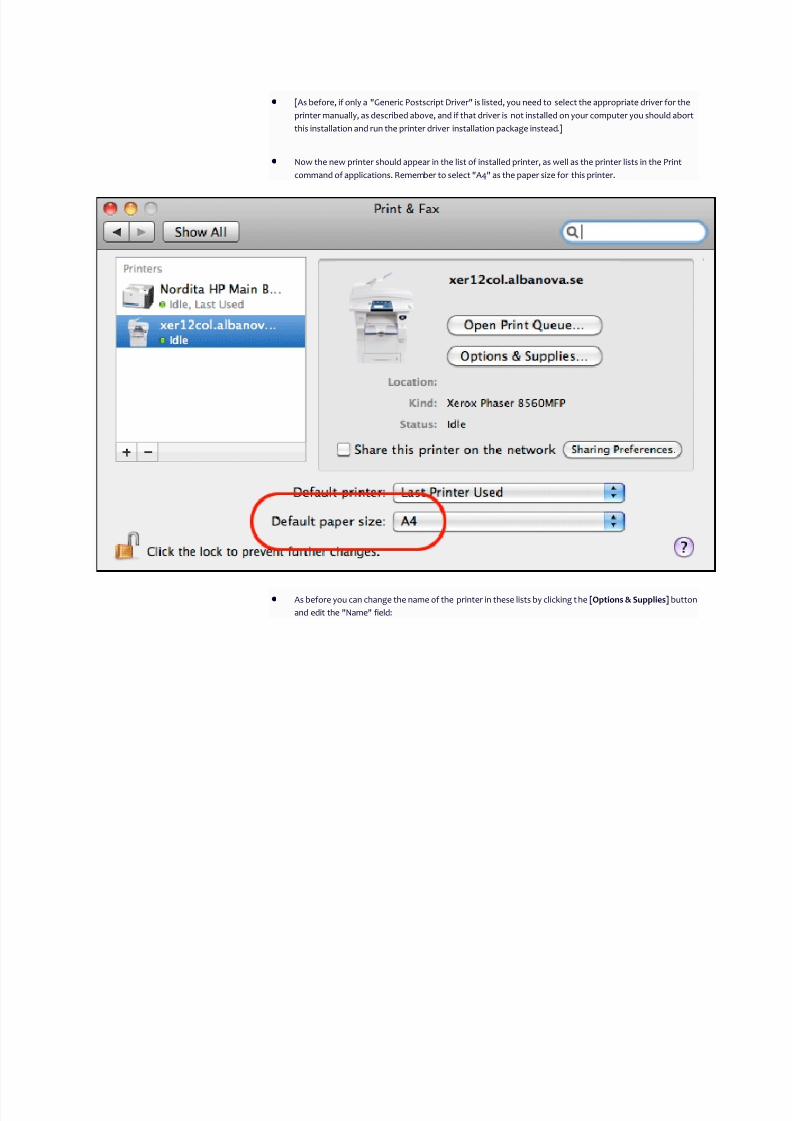
[As before, if only a "Generic Postscript Driver" is listed, you need to select the appropriate driver for the
printer manually, as described above, and if that driver is not installed on your computer you should abort
this installation and run the printer driver installation package instead.]
Now the new printer should appear in the list of installed printer, as well as the printer lists in the Print
command of applications. Remember to select "A4" as the paper size for this printer.
As before you can change the name of the printer in these lists by clicking t he [Options & Supplies] button
and edit the "Name" field:

7/30/2019 Install Printer on Mac
http://slidepdf.com/reader/full/install-printer-on-mac 9/12
CONFIGURING AN INSTALLED PRINTER DRIVER AFTER PRINTER INSTALLATION
Say that you have installed a printer on your computer, but the installer could not find the appropriate printer driver. After opening the "System Preferences"
panel, then selecting the "Print & Fax" icon, and finally single -clicking on the printer in your list of installed printers, you would then see "Generic Postscript
Printer" in the field "Kind" to the right of the window. Now do the following:
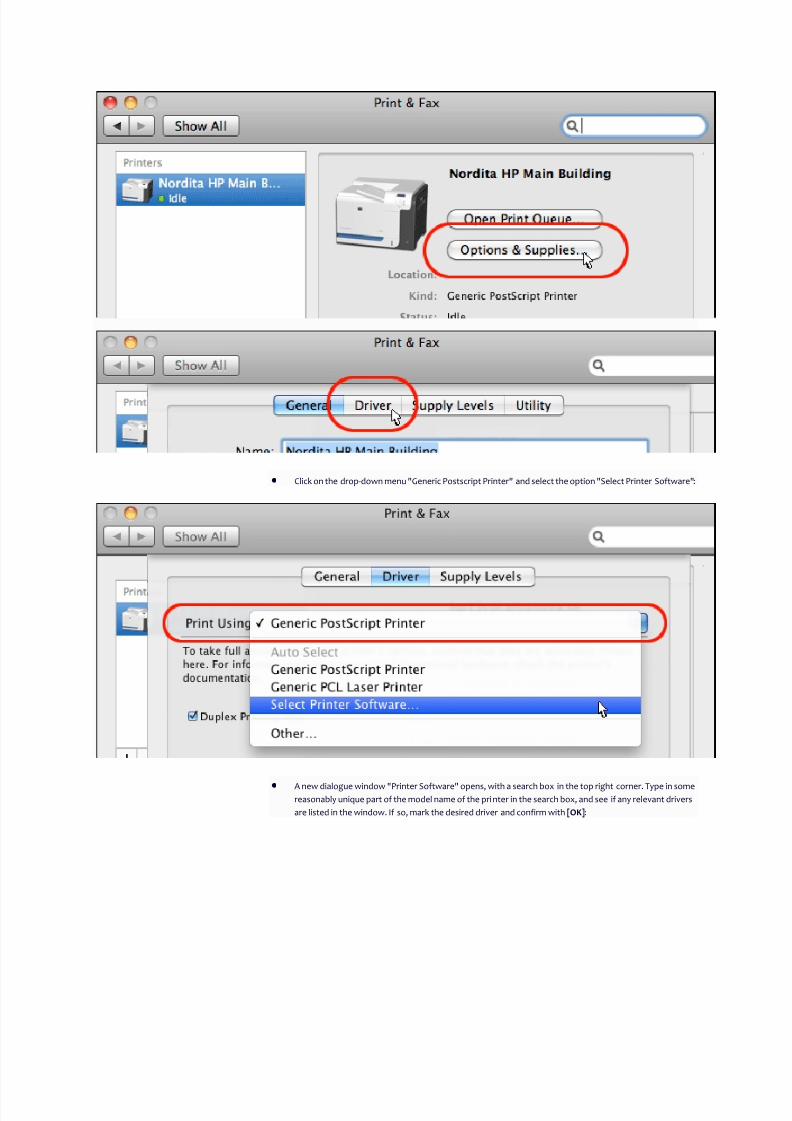
Click on the button [Options & Supplies], then select the top-menu item [Driver]:
7/30/2019 Install Printer on Mac
http://slidepdf.com/reader/full/install-printer-on-mac 10/12
Click on the drop-down menu "Generic Postscript Printer" and select the option "Select Printer Software":
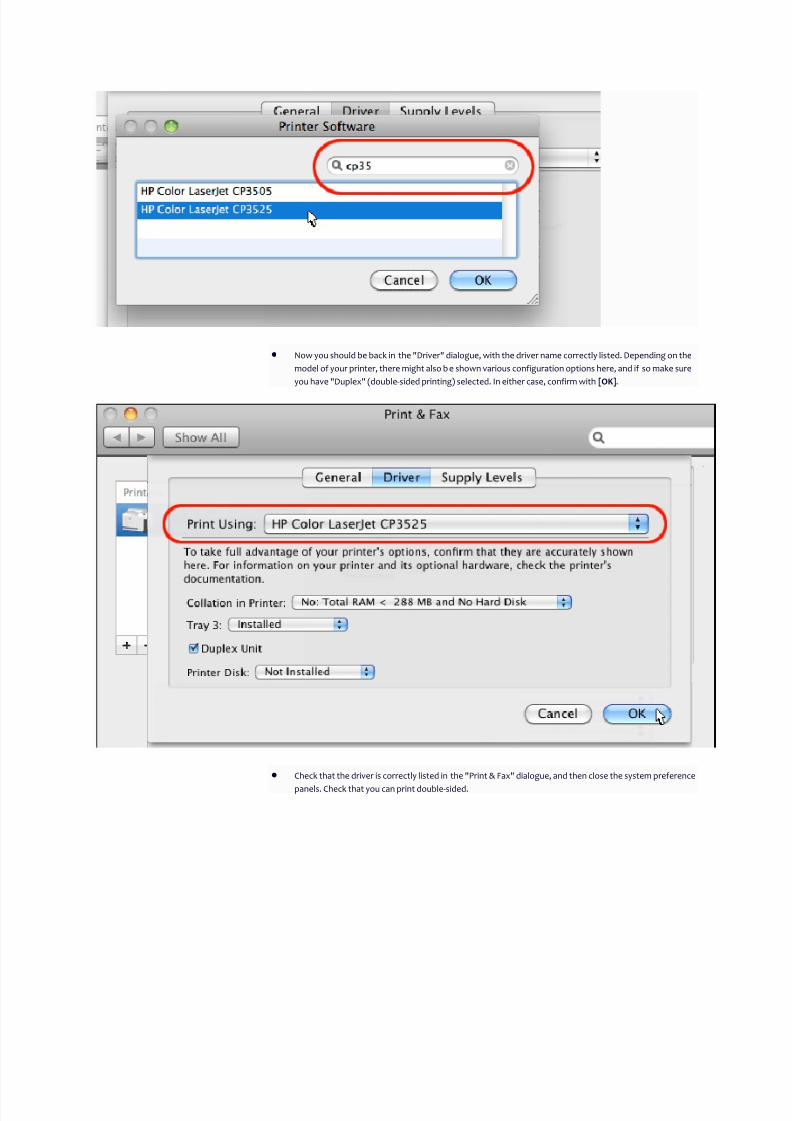
A new dialogue window "Printer Software" opens, with a search box in the top right corner. Type in somereasonably unique part of the model name of the pri nter in the search box, and see if any relevant drivers
are listed in the window. If so, mark the desired driver and confirm with [OK]:
7/30/2019 Install Printer on Mac
http://slidepdf.com/reader/full/install-printer-on-mac 11/12
Now you should be back in the "Driver" dialogue, with the driver name correctly listed. Depending on the
model of your printer, there might also b e shown various configuration options here, and if so make sure
you have "Duplex" (double-sided printing) selected. In either case, confirm with [OK].
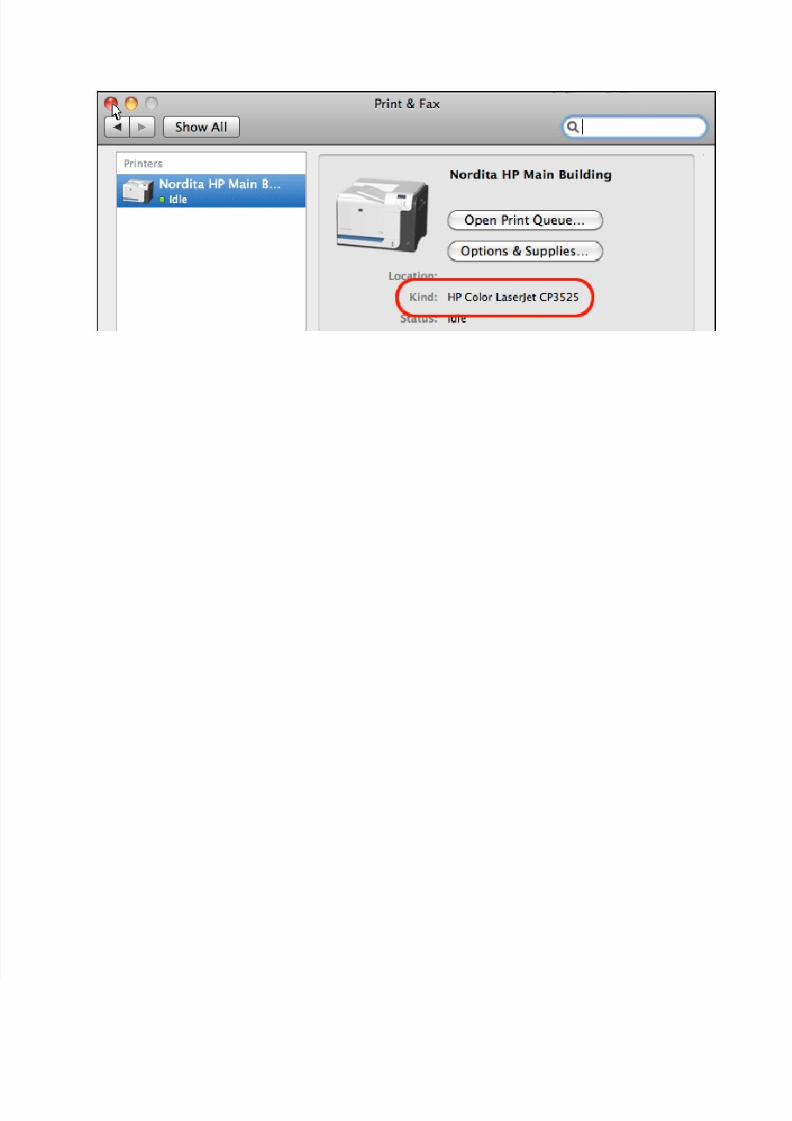
Check that the driver is correctly listed in the "Print & Fax" dialogue, and then close the system preference
panels. Check that you can print double-sided.
7/30/2019 Install Printer on Mac
http://slidepdf.com/reader/full/install-printer-on-mac 12/12