Embed Size (px)
Citation preview

Implementation and Troubleshooting Guide, Part: VMS2-1
C H A P T E R 4
OpenAM ConfigurationThis section describes OpenAM configuration via the OpenAM Admin Console when all VMs are located in the same domain (private network). For OpenAM to be configured successfully, all procedures outlined must be completed. The URLs for OpenAM and Agent URL, as well as FQDN (or IP address) of OpenDJ are subject to change, depending on where components are deployed.
Install Pre-Requisite softwareBefore installing OpenAM, you must have OpenDJ installed and configured. OpenDJ will be used as a user store by OpenAM. The OpenDJ backend root suffix as well as rootUser credentials (e.g. cn=Directory Manager and Password ) will be used in Step 6 of OpenAM Initial Setup, page 4-1.
OpenAM Initial SetupPerform the following procedure to execute the initial setup of OpenAM.
Step 1 In the browser, access the OpenAM URL. The following screen appears.
4-1Cisco Virtual Managed Services (VMS) 2.0
Chapter 4 OpenAM Configuration OpenAM Initial Setup
a. Click Create Configuration Link.
Step 2 On the following screen, scroll to the bottom, and check the box entitled,
I accept the license agreement, then click the Continue tab.
Step 3 On the following screen, enter the Password for OpenAM super user: amAdmin. Re-enter the password to confirm.
4-2Cisco Virtual Managed Services (VMS) 2.0
Implementation and Troubleshooting Guide, Part: VMS2-1

Chapter 4 OpenAM Configuration OpenAM Initial Setup
a. Click Next.
Step 4 The next screen is for Server settings.
4-3Cisco Virtual Managed Services (VMS) 2.0
Implementation and Troubleshooting Guide, Part: VMS2-1

Chapter 4 OpenAM Configuration OpenAM Initial Setup
All parameters are picked up by OpenAM configurator.
For this kind of installation/configuration (private network), leave all parameters by default unchanged.
Step 5 On the following screen, enter parameters for embedded OpenDJ, used for storing OpenAM configuration parameters.
4-4Cisco Virtual Managed Services (VMS) 2.0
Implementation and Troubleshooting Guide, Part: VMS2-1

Chapter 4 OpenAM Configuration OpenAM Initial Setup
The parameters are picked up by OpenAM configurator.
You can change the value for the Root Suffix parameter from (dc=openam, dc=forgerock, dc=org) to (dc=openam,dc=thunderhead,dc=io), but do not change other parameters.
Step 6 The following screen provides parameters for external OpenDJ dedicated for user data store.
Note The OpenDJ must have been installed and configured.
4-5Cisco Virtual Managed Services (VMS) 2.0
Implementation and Troubleshooting Guide, Part: VMS2-1

Chapter 4 OpenAM Configuration OpenAM Initial Setup
• Directory Name—may have FQDN or IP address of host where OpenDJ is installed.
• Port—port OpenDJ is listening.
• Root Suffx—root suffix of your OpenDJ.
• LoginID and Password—enter OpenDJ’s root user (cn=Directory Manager) credentials.
Step 7 Click Next on the following screen (in Step 5).
Step 8 In Step 6, enter any 8 character length password for Default Policy Agent, then click Next.
Step 9 On the following screen, Configurator Summary Details, you can review all configuration parameters and go to the Previous screen to modify previous field values. If all parameters are correct, click the Create Configuration tab.
4-6Cisco Virtual Managed Services (VMS) 2.0
Implementation and Troubleshooting Guide, Part: VMS2-1

Chapter 4 OpenAM Configuration OpenAM Initial Setup
The configuration may take up to 4-5 min. Upon successful completion the following screen appears.
4-7Cisco Virtual Managed Services (VMS) 2.0
Implementation and Troubleshooting Guide, Part: VMS2-1

Chapter 4 OpenAM Configuration OpenAM Initial Setup
Once the Custom Configuration is completed, you will not be able to access the OpenAM admin console.
Re-Accessing OpenAM Admin ConsoleTo re-access the OpenAM Admin console, run SSOAdminTools , provided with OpenAM. The procedure for installing and running this tool are documented below (this needs to be performed manually). SSH to the inception VM and continue by performing the following procedure.
Step 1 Transfer the SSOAdminTools zip to OpenAM VM.
a. Copy the zip file to the home directory.
scp -i /opt/cisco/vms-installer/tenant-{SUBDOMAIN}/ssh/admin-key-{SUBDOMAIN} /opt/cisco/vms-intsaller/apps/idm/openam/SSOAdminTools.zip cloud-user@<IPofOpenAM VM>:/home/cloud-user
b. Unzip the zip file to the final destination directory.
ssh -i /opt/cisco/vms-installer/tenant-{SUBDOMAIN}/ssh/admin-key-{SUBDOMAIN} cloud-user@<IPofOpenAMVM>
sudo su
cd /opt/cisco
mkdir ssoadm
cd ssoadm
unzip / home/cloud-user/SSOAdminTools*.zip .
4-8Cisco Virtual Managed Services (VMS) 2.0
Implementation and Troubleshooting Guide, Part: VMS2-1

Chapter 4 OpenAM Configuration Configuring Web Agent Profile
Step 2 Browse to the directory where SSOAdminTools was unzipped and run setup.
./setup
Step 3 The setup script will prompt for the following values, enter them as follows:
• Do you accept the license? y
• Path to config files of OpenAM server [/root/openam]: <Press Enter>
• Debug Directory: /opt/cisco/ssoadm/debug
• Log Directory: /opt/cisco/ssoadm/log
Step 4 Create the password text file with the amAdmin password and change permissions.
cd /root/openam
vi passwd
a. Enter the amAdmin password into the file and save it. Make this file read-only.
chmod 400 passwd
Step 5 Run AuthService commands.
cd /opt/cisco/ssoadm/bin
./ssoadm set-attr-defs -s iPlanetAMAuthService -t Global -u amAdmin -f passwd -a openam-xui- interface-enabled=false class="p2"
./ssoadm set-attr-defs -s iPlanetAMAuthService -t Global -u amAdmin -f passwd -a "com.sun.identity.server.fqdnMap[$FQDN_OF_HAPROXY_HOST]= [$FQDN_OF_HAPROXY_HOST]"
where $FQDN_OF_HAPROXY_HOST – is FQDN of host of HA PROXY. e.g. vms.128.107.1.70.xip.io
After the steps above are completed, you will be able to log in to the OpenAM admin console using the amAdmin credentials.
Step 6 Proceed to Login, and log in as amAdmin, as used in Step 3 of OpenAM Initial Setup, page 4-1. After logging in to the Admin Console, continue the configuration of Web Agent profile, OAUTH client, Agent Policy, and other parameters described in the following sections.
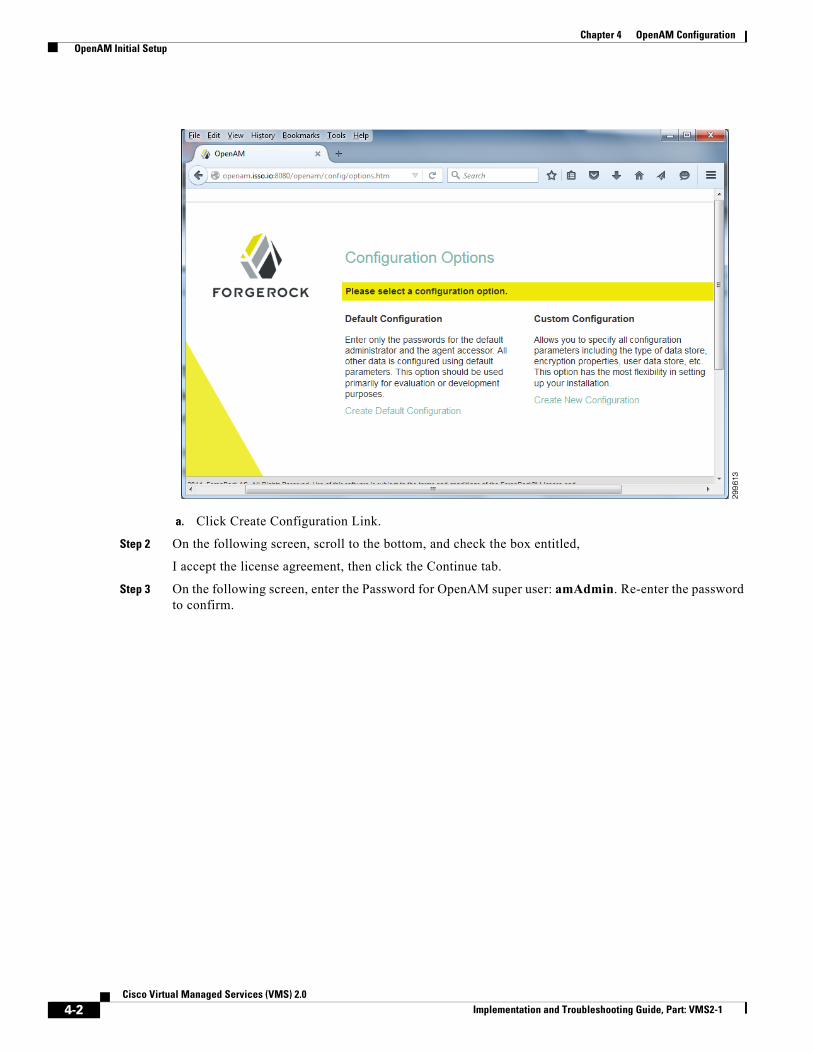
Configuring Web Agent ProfileAfter logging in to the Admin Console, click on AccessControl | TopRealm | Agents | Web.
4-9Cisco Virtual Managed Services (VMS) 2.0
Implementation and Troubleshooting Guide, Part: VMS2-1
Chapter 4 OpenAM Configuration Configuring Web Agent Profile
Step 1 Under Agent, click New tab.
4-10Cisco Virtual Managed Services (VMS) 2.0
Implementation and Troubleshooting Guide, Part: VMS2-1

Chapter 4 OpenAM Configuration Configuring Web Agent Profile
Step 2 Populate text fields:
• Name—SkyFall-Agent
• Password—cisco123
• Re-Enter Password—cisco123
• Server URL—<URL of OpenAM>
• AgentURL—URL of SkyFall portal, or in other words, the URL of installed Web Agent protecting resource
Note Make sure to enter the same Name and Password, since Web Agent will be installed with the same credentials. The Server URL and Agent URL – depend on your OpenAM and SkyFall portal deployments (hosts were these components will be deployed).
a. Click Create. On the following screen, click on the name of the newly created agent, SkyFall-Agent.
4-11Cisco Virtual Managed Services (VMS) 2.0
Implementation and Troubleshooting Guide, Part: VMS2-1

Chapter 4 OpenAM Configuration Configuring Web Agent Profile
Step 3 On the following screen, click the Application tab.
a. Uncheck Ignore Path Info for Not Enforced URLs.
4-12Cisco Virtual Managed Services (VMS) 2.0
Implementation and Troubleshooting Guide, Part: VMS2-1

Chapter 4 OpenAM Configuration Configuring Web Agent Profile
b. Enter the list of Not Enforced URLs (below) by entering their values in text fields labeled New Value, and clicking Add.
List of Not Enforced URLs
– http://skyfallui.thunderhead.io:80/#/changepassword?token=*
– http://skyfallui.thunderhead.io:80/skyfall.css
– http://skyfallui.thunderhead.io:80/main.js
– http://skyfallui.thunderhead.io:80/views/*
– http://skyfallui.thunderhead.io:80/
– http://skyfallui.thunderhead.io/vendor/*
– http://skyfallui.thunderhead.io/fonts/*
– http://skyfallui.thunderhead.io/modules/*
– http://skyfallui.thunderhead.io:80/images/*
– http://skyfallui.thunderhead.io:80/undefined*
c. Upon completion, click Save (top right corner).
d. On the same screen, scroll down to section Profile Attributes Processing.
e. In the Profile Attributes Fetch Group, check radio box HTTP_HEADER.
f. In Profile Attribute Map enter in text fields labeled:
New Value / Map Key—uid
New/Value/ Corresponding Map Value—IDM_userid
4-13Cisco Virtual Managed Services (VMS) 2.0
Implementation and Troubleshooting Guide, Part: VMS2-1

Chapter 4 OpenAM Configuration Configuring OAUTH Client
g. Click Add.
h. Scroll to the top, click Save (right top corner).
i. Click Back to Main page.
j. Proceed with configuration.
Configuring OAUTH ClientPerform the following to configure the OAUTH Client.
Step 1 Create the OAUTH client.
a. On the Main Page, go to Agents | OAuth 2.0/OpenID Connect Client, and in the Agent panel, click New.
b. In text fields enter:
– Name: SkyFall-app
– Password: cisco123
– Re-Enter Password: cisco123
Note Make sure to enter the same Name and Password, since IDM API uses the same credentials.
c. Click Create.
d. On the following screen, click the name of OAUTH client: SkyFall-app. The screen for configuring the OAUTH client appears.
4-14Cisco Virtual Managed Services (VMS) 2.0
Implementation and Troubleshooting Guide, Part: VMS2-1

Chapter 4 OpenAM Configuration Configuring OAUTH Client
Step 2 Configure the OAUTH Client.
a. Go to Redirection URI’s. In the text field labeled, New Value, enter: https://localhost:3001/token. Click Add.
b. Scroll down to the section labeled Scopes (see screen hot). Input new Scope(s) values (openid, profile, uid, mail, cn, isMemberOf) in the text field labeled, New Value. Click Add.
4-15Cisco Virtual Managed Services (VMS) 2.0
Implementation and Troubleshooting Guide, Part: VMS2-1

Chapter 4 OpenAM Configuration Disabling XUI Interface
c. Scroll down to text field ID Token Signed Response Algorithm. Change the value from RS2566 to HS256.
d. Scroll to the top, and click Save.
The OAUTH client is configured.
Disabling XUI InterfaceTo allow custom UI pages (Login and others), you should disable XUI interface.
4-16Cisco Virtual Managed Services (VMS) 2.0
Implementation and Troubleshooting Guide, Part: VMS2-1

Chapter 4 OpenAM Configuration Disabling XUI Interface
From the WebAgent or OAUTH client configuration page, you can click on Back To Main Page | Back To Access Control to return to the Admin Console or you can log out and log back in to the Admin Console.
Step 1 Go to Configuration | Authentication.
Step 2 Click on Core link. On the panel, scroll down to the check box labeled, XUI Interface, and uncheck that box.
4-17Cisco Virtual Managed Services (VMS) 2.0
Implementation and Troubleshooting Guide, Part: VMS2-1

Chapter 4 OpenAM Configuration User Group Membership Retrieval Optimization
Step 3 Scroll to the top, and click Save.
User Group Membership Retrieval OptimizationFor optimizing performance IDM API is using virtual attribute “isMemberOf” for users’ group membership retrieval. Some configuration has to be done on OpenAM to allow this option.
Step 1 Add isMemberOf attribute to the LDAP User attribute.
Goto Access Control | /(Top Level Realm) | Data Stores.
4-18Cisco Virtual Managed Services (VMS) 2.0
Implementation and Troubleshooting Guide, Part: VMS2-1

Chapter 4 OpenAM Configuration User Group Membership Retrieval Optimization
a. Click on Sun DS with AM schema. On the panel, scroll down to section LDAP User Attributes.
b. In the text field New Value, enter isMemberOf, and click Add.
c. Scroll to the top, and click Save (top right corner).
Step 2 Turn off User Data Caching.
Step 3 In the OpenAM console, browse to Configuration | Servers and Sites | Server Name | Advanced.
4-19Cisco Virtual Managed Services (VMS) 2.0
Implementation and Troubleshooting Guide, Part: VMS2-1

Chapter 4 OpenAM Configuration Configuring Authorization Policy
a. On this panel, click Add (top left corner). In the empty text field, enter com.iplanet.am.sdk.caching.enabled, and set the value to false.
b. Click Add again, and enter, com.sun.identity.sm.cache.enabled, and set value to true.
c. Click Save (top right corner) to save updates.
Configuring Authorization PolicyThis section outlines steps for configuring authorization policy. Login to Admin Console and browse to Access Control | / (Top Level Realm) | Policies.
4-20Cisco Virtual Managed Services (VMS) 2.0
Implementation and Troubleshooting Guide, Part: VMS2-1

Chapter 4 OpenAM Configuration Configuring Authorization Policy
Step 1 Click on iPlanetAMWebAgentService | Add new Policy.
Step 2 Enter the name for the Policy: SkyFall- Rules, then click Next.
Step 3 Under available patterns, select the first pattern by clicking on the blue arrow. In the check boxes on the right side, enter http:// skyfallui.thunderhead.io:80/*.
4-21Cisco Virtual Managed Services (VMS) 2.0
Implementation and Troubleshooting Guide, Part: VMS2-1

Chapter 4 OpenAM Configuration Configuring Authorization Policy
Step 4 Click on + and the resource will be added.
Step 5 Click Next. Click on Actions check box to select all actions. Click Next.
4-22Cisco Virtual Managed Services (VMS) 2.0
Implementation and Troubleshooting Guide, Part: VMS2-1

Chapter 4 OpenAM Configuration Configuring Authorization Policy
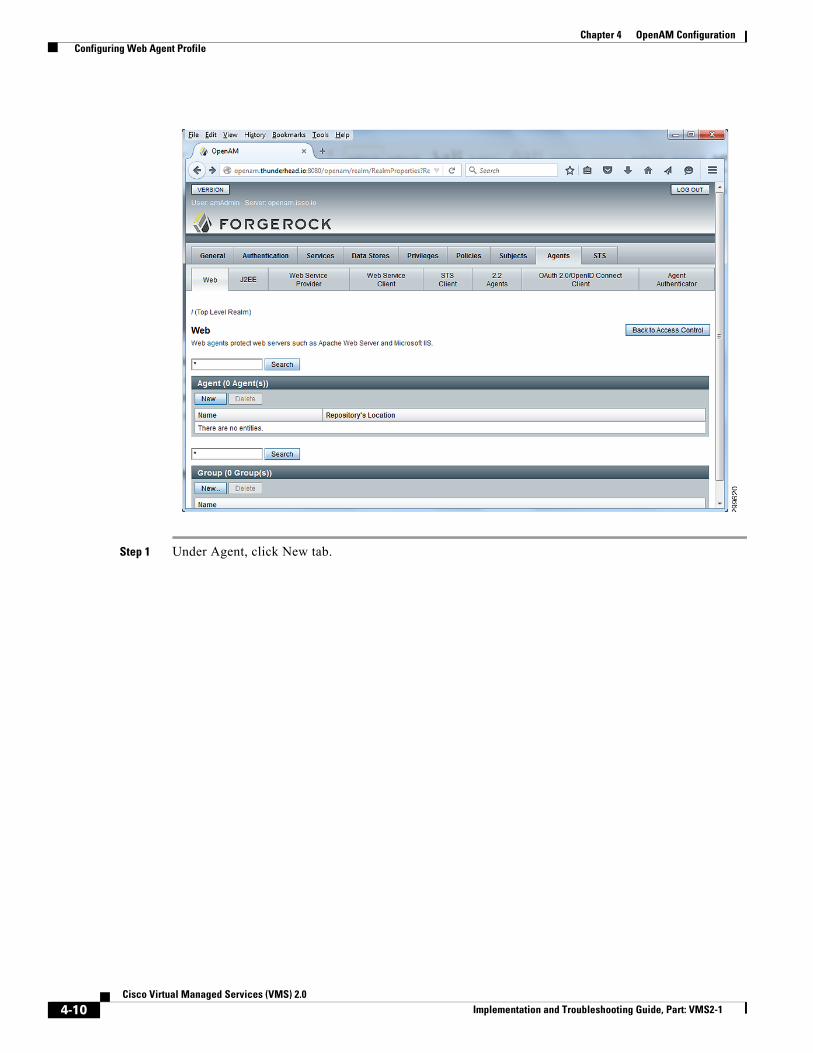
Step 6 Click on Subject Condition, and in the combo box labeled Type, select Authenticated Users.
4-23Cisco Virtual Managed Services (VMS) 2.0
Implementation and Troubleshooting Guide, Part: VMS2-1
Chapter 4 OpenAM Configuration Configuring Authorization Policy
Step 7 Highlight the gray bar with type Authenticated Users, and move the bar to the blue area above.
4-24Cisco Virtual Managed Services (VMS) 2.0
Implementation and Troubleshooting Guide, Part: VMS2-1

Chapter 4 OpenAM Configuration Configuring Authorization Policy
Step 8 Pass Steps 5 and 6 by clicking Next twice. In Step 7 you can review all parameters of the policy created by clicking Switch to Minimized View.
4-25Cisco Virtual Managed Services (VMS) 2.0
Implementation and Troubleshooting Guide, Part: VMS2-1

Chapter 4 OpenAM Configuration Configuring Authorization Policy
Step 9 If all parameters are correct, click Finish.
4-26Cisco Virtual Managed Services (VMS) 2.0
Implementation and Troubleshooting Guide, Part: VMS2-1

Chapter 4 OpenAM Configuration Configuring Authorization Policy
Step 10 The policy creation is finished. Click Back to return to the Admin Console.
4-27Cisco Virtual Managed Services (VMS) 2.0
Implementation and Troubleshooting Guide, Part: VMS2-1

Chapter 4 OpenAM Configuration Configuring Authorization Policy
4-28Cisco Virtual Managed Services (VMS) 2.0
Implementation and Troubleshooting Guide, Part: VMS2-1