Embed Size (px)
Citation preview

Amicus Attorney Install Guide © 2020 Abacus Data Systems Canada, Inc. 1
INSTALL GUIDE: AMICUS ATTORNEY
Who should use this Guide: • Firms who are installing Amicus Attorney for the first time • Firms who are upgrading from Amicus Small Firm Version 5.5 and above *
* Converting from Small Firm? Conversion is a process that is performed AFTER you install Amicus Attorney at your Server. Refer to the Amicus Small Firm Conversion Guide. You will require Amicus Professional Services if you are running an earlier version of Small Firm.
Need Assistance? Contact Amicus Technical Support at 800-472-2289 or email us at [email protected].
Basics ........................................................... 1 Server Install ................................................. 2 Workstation Install ........................................ 6 Installing SQL Server .................................... 8
Basics Installing and configuring Amicus Attorney is a multi-step process. This Guide provides important information about each of the following:
1 System readiness 2 SQL Server readiness 3 Installing Amicus Server (and converting data from an earlier Amicus Version, if applicable) 4 Setting up your Amicus environment 5 Installing Amicus Workstation on each Firm Member computer
Licensing See the Online Administrator Help available from the Help menu in Amicus Attorney or contact Amicus Sales at 800-472-2289.
Servers and workstations • Amicus Application Server (or Amicus Server) – Primary computer on which you install the
Amicus software.
• Amicus Database Server – Computer running Microsoft SQL Server and hosting your Amicus database. Your Amicus Application and Database Servers may be installed on the same computer (an embedded install) or separate computers (a split install). A split install is especially useful if your firm already has SQL Server installed and wishes to install the Amicus application on a separate computer. We recommend that these servers reside in the same subnet and domain.

Amicus Attorney Install Guide © 2020 Abacus Data Systems Canada, Inc. 2
• Amicus Workstation – Computer from which Firm Members will be using Amicus. For best performance and full functionality, ensure that these workstations are on your firm’s network, within the same domain or workgroup as the Amicus Server.
Your Amicus Server may also be used as a workstation but must remain running and connected to the Internet to ensure accessibility by other Firm Members. Even if you do not intend using your Server as a regular workstation, we recommend that you install Workstation components as some configuration steps require you to be logged in to Amicus at the Server.
SQL Server database The Amicus Server installation requires a version of Microsoft SQL Server® (with the latest Service Packs) that’s supported for use with your version of Amicus Attorney. See the Amicus Attorney System Requirements, available from our website. Both 32-bit and 64-bit editions of SQL are supported. A Runtime-Restricted Use version of SQL Server and sufficient Microsoft Client Access Licenses (CALs) may have been provided to you.
If you already have an existing licensed full-use supported version of SQL Server with sufficient CALs to cover the maximum number of users and/or devices that will access Amicus, you will not need to install SQL Server but you will need an AMICUS instance (see the SQL Server readiness section).
Standalone environment You may optionally install and run Amicus on a single computer only, with or without network access.
Installation considerations for larger firms We recommend that firms with more than 40 Amicus users consult with Amicus Professional Services or use the services of an Amicus Independent Consultant before deciding on their server configuration requirements.
Terminal server network Amicus can be used in a terminal server environment, which enables users to access their Amicus Office without the need to install Amicus Workstation on their individual computers. We recommend that the Amicus Application Server not be installed on the terminal server computer as performance, security, and third-party links may be affected. Installing Amicus Workstation on a terminal server will automatically install to all terminal server workstations.

Amicus Attorney Install Guide © 2020 Abacus Data Systems Canada, Inc. 3
Server Install
Step A: Before installing Amicus on your server
System readiness Ensure that: • The computer you wish to use as your Amicus Application Server meets the Amicus Attorney System
Requirements, available from our website. • There is sufficient free disk space available on the Amicus Application Server, on the drive where your Temp
folder resides. 6 GB is recommended. More might be required, depending on your database size. If a split install, ensure that your Amicus Database Server has at least 2 GB free.
• The latest Windows updates have finished installing.
TIP: Check their status from Start > Windows Updates.
• The computer is set to never hibernate or sleep. Do this from Control Panel > Power Options. If SQL Server
is on a separate computer, ensure that it is also set to never hibernate or sleep. • ASP.NET is enabled in order to support Amicus printing. In the Windows Control Panel at the server, choose
Programs and Features, choose “Turn Windows features on or off” in the left panel, browse to Internet Information Services > World Wide Web Services > Application Development Features, and select the ASP.NET checkbox.
• If the server is a Domain Controller, Microsoft recommends that SQL Server be installed on a different computer. For further information, consult Microsoft’s website.
• If Microsoft SQL Server Management Studio Express is present on the server where SQL Server is to be installed, remove it using Windows Control Panel > Programs and Features.
SQL Server readiness Ensure that a supported version of SQL Server is installed and configured on the computer you wish to use as your Amicus Database Server.
1 If you will be using the SQL Server provided with Amicus Attorney, proceed to install it as instructed in the Appendix to this Guide. If you will be using a new or existing full-use SQL Server, it is important to install an “AMICUS” named instance of SQL. (This isolates Amicus from any other SQL applications you might have on the server.)
2 Ensure that the latest SQL Server updates available from Microsoft are installed to your Amicus instance.
TIP: Consider enabling Microsoft Update to help keep that SQL Server up-to-date.

Amicus Attorney Install Guide © 2020 Abacus Data Systems Canada, Inc. 4
3 Ensure that your Amicus SQL instance is configured appropriately. At the computer running SQL Server: • Open SQL Server Management Studio, connect to your AMICUS instance, and then check that
Authentication Mode is set to either SQL or Mixed (which requires you to have a password). In the list at the left, right-click on the SQL Server name and choose Properties. Then choose Security.
Under “Server authentication”, select the “SQL Server and Windows Authentication mode” option.
Click OK and enter a SQL Server password if prompted.
• Next, open SQL Server Configuration Manager, and ensure that the SQL services are set properly: - In the list at the left, choose SQL Server Services.
For each of the services listed at the right (SQL Server Browser, SQL Server Reporting Services (AMICUS), SQL Server (AMICUS), and SQL Server Agent (AMICUS)), check that Start Mode is set to “Automatic”, and Log On As is set to a user with system administrator privileges (e.g. “LocalSystem”, “NT AUTHORITY”, or “NT Service”). If necessary, double-click a service and edit its setting.
- In the list at the left, choose SQL Server Network Configuration > Protocols for Amicus.
In the list at the right, ensure that Named Pipes and TCP/IP are both Enabled.
4 Ensure that you have your SQL credentials for your Amicus instance: SQL Server Name (in the format SQLServerName\InstanceName such as “myserver\AMICUS”), User Name (typically “sa”), and login password. The SQL Server Name is typically the name of the computer on which SQL Server is installed.

Amicus Attorney Install Guide © 2020 Abacus Data Systems Canada, Inc. 5
Step B: Installing Amicus Server components Installing Amicus Attorney on your server will take less than 30 minutes. 1 Log onto the computer you wish to use as your Amicus Application Server, as a user with Windows
“Administrators” Group rights. 2 Shut down all running programs. 3 If you have an Amicus Attorney DVD, insert it into the disk drive. The Setup program should start
automatically. If not, click the Windows Start button, choose Run, and enter: [disk drive letter]:\Setup.exe Or if you downloaded the DVD image, double-click setup.exe in the extracted contents.
4 If a message appears saying that specific version(s) of Microsoft .NET Framework must be installed or enabled in order to support basic Amicus functionality, complete the following before proceeding: • Your Windows operating system might already include the required version(s). Simply enable them as
follows: a Go to Windows Control Panel > Programs and Features. b Choose “Turn Windows features on or off” in the left panel. c Select the Microsoft .NET Framework checkbox and click OK.
• Otherwise, download and install applicable version(s) from the Microsoft Download Center. Then restart the installation of Server components at step 1.
5 Follow the onscreen instructions 6 A System Check will be run to ensure that your server meets system requirements. If any tests fail, the results
are displayed in an Amicus System Check Utility window. (We recommend that you save the results from the File menu on the next window.) If your server fails any essential requirements, you will not be permitted to proceed with the install—click Exit.
7 Install Amicus Server. Follow the onscreen instructions. • For the Amicus Attorney Database, enter your SQL credentials that you previously noted. • Enter basic information about the firm and the user who will be automatically set up as the initial Amicus
Administrator. Information is required in all fields except Middle Name. Write down the following information as it will be required to log in successfully after installation:
Firm ID:_________________ User ID:___________________ Password:_____________________
DO NOT INTERRUPT THE INSTALL PROCESS, AND DO NOT RUN OTHER PROCESSES ON THE SERVER DURING THIS PERIOD.
8 Log in to Amicus to verify that the application is running properly. • Double-click the “Amicus Attorney” icon on your Desktop. Or open Amicus Attorney from your Windows
Start menu. • In the Amicus Login window, type your User ID if necessary, and your Password. If you cannot log in successfully, see “Troubleshooting the Server installation” on page 7.
9 If applicable, convert your existing Amicus Small Firm database. For instructions, see the Amicus Small Firm Conversion Guide.
Note: You will require Conversion Services if your current version of Small Firm is 5.1.1 or below.
10 Configure your Amicus environment as appropriate. See the Setting up your Amicus environment section. 11 The workstation on the Server is automatically installed. For other workstations, go to the Workstation Install
section and follow the instructions.

Amicus Attorney Install Guide © 2020 Abacus Data Systems Canada, Inc. 6
Step C: Setting up your Amicus environment Most of your work as an Amicus Administrator can be done from the Office module of Amicus, at any Workstation. For full details on all administrative functions, see the online Administrator Help and various Guides, available from the Help Center in Amicus. You may now prepare Amicus for use:
1 From the Firm Settings view of the Office module, configure: • All General Firm Settings, including the Firm Record and Notifications. • Document Management settings. • All lists according to your firm’s needs. • All applicable third-party links (including your accounting system and Outlook/Exchange). • Amicus Anywhere / Amicus TimeTracker accessibility (if included in your firm's Amicus Subscription or
Amicus Advantage Plan). Amicus Anywhere is a browser-based hybrid Cloud solution that provides remote access to a Firm Member's Amicus core data without the need for storing that data in the Cloud.
2 From the Security Profiles view of the Office module, configure access settings according to the needs of your firm.
3 From the User Management view of the Office module, add Firm Members and complete individual Firm Member information, including Admin and Office Access settings.
4 If desired, log in as individual Firm Members and configure their preferences.
5 When ready, advise users of their individual User ID and Password. (The default User ID for new users is their Full Name, and their default password is “password”.)
6 If SQL Server-based Reports or Billing Templates need to be created or edited by a user, ensure that they have an appropriate version of Microsoft Report Builder installed on their workstation. For details of this feature, see the Using SQL Reporting Services with Amicus guide.
Important: • Remember to license users. For instructions, see Administrator Help. • Do not delete, rename, or move any of the \AMICUS subfolders or files that were created
during your Amicus Server installation. • If your firm intends to license Amicus Billing for the first time, we recommend that you
run the Billing Consistency Checker before using billing functionality. This will ensure that your bills and billing reports are accurate. The utility checks for Primary Clients and missing Responsible Lawyers on billable files, for example. Refer to the “Getting Started” topic in the Amicus Billing Administrator Help for this and other important setup steps.

Amicus Attorney Install Guide © 2020 Abacus Data Systems Canada, Inc. 7
Troubleshooting the Server installation If you need assistance with any of the following procedures, please contact Technical Support.
The Amicus Install Manager log is available on the Server at %temp%\AmicusLogs
If you get a connection failure message after you enter your SQL credentials for a split install: Ensure that the firewall does not block connections to SQL Server. Either disable the firewall or include the following applications in the firewall’s exceptions list:
Under SQL Server 2014 C:\Program Files\Microsoft SQL Server\MSSQL12.AMICUS\MSSQL\Binn\sqlservr.exe C:\Program Files\Microsoft SQL Server\MSSQL12.AMICUS\MSSQL\Binn\sqlagent.exe
Under SQL Server 2012, the files are under \MSSQL11.AMICUS
If you cannot log in to Amicus (or a third-party application cannot communicate with Amicus) and are running a firewall: Ensure that the firewall does not block connections to Amicus components and SQL Server. Either disable the firewall or include the following applications in the firewall’s exceptions list: • Amicus Application Server and Workstation:
…\Amicus\Amicus Attorney Workstation\AmicusAttorney.XWin.exe …\Amicus\Amicus Attorney Server\SmartClient\Server\AmicusAttorney.XOL.ServerService.exe
• Amicus Database Server: Under SQL Server 2014: C:\Program Files\Microsoft SQL Server\MSSQL12.AMICUS\MSSQL\Binn\sqlservr.exe C:\Program Files\Microsoft SQL Server\MSSQL12.AMICUS\MSSQL\Binn\sqlagent.exe Under SQL Server 2012, the files are under \MSSQL11.AMICUS
If the installation was not successful and you need to reinstall: Complete the following steps to remove any leftover settings or files BEFORE attempting to reinstall Amicus:
1 From the Windows Control Panel > Programs and Features function, remove Amicus Attorney Server and Amicus Installation Manager if present in the list.
2 Open SQL Management Studio from the Windows Start menu. Expand the Databases item at the left, right-click on each of Amicus and AmicusMedia, and choose Delete.
3 In Windows Explorer, browse to the data folder: folder. Under SQL Server 2014 : C:\Program Files\Microsoft SQL Server\MSSQL12.AMICUS\MSSQL\Data Under SQL Server 2012, the files are under \MSSQL11.AMICUS
Delete the following files if present: Amicus.mdf, Amicus_log.LDF, AmicusMedia_Data.mdf, and AmicusMedia_Log.ldf.
Workstation Install
Before you begin, ensure that: • The Amicus Server installation has completed. • The workstation meets the hardware and software requirements detailed in the Amicus Attorney System
Requirements, available from our website. • The workstation and Amicus Server are in the same domain or workgroup, and the workstation has access to
the Amicus Server. • All folders in Windows Explorer are set to show file extensions. (This is necessary for the later installation of
the Amicus Tasks or Merge Toolbars.) • If a computer is shared, one of the Firm Members must log into their Windows account and then install
Amicus Workstation as detailed below. This will automatically install Amicus for all users on that computer. • In a terminal server environment, a single user must log in with rights to install and run applications and then
install Amicus Workstation as detailed below. This will automatically install Amicus to all terminal server workstations.

Amicus Attorney Install Guide © 2020 Abacus Data Systems Canada, Inc. 8
Installing an Amicus Attorney Workstation The workstation on the Server is automatically installed. Install other workstations as follows.
1 Log onto the workstation as a user with Windows “Administrators” or “Power Users” Group rights. 2 In Windows Explorer, enter \\YourAmicusServerName\Install\Workstation in the Address field, and
then double-click setup.exe in the folder shown. 3 The Welcome dialog appears. Click Next and follow the onscreen instructions. 4 If a message appears saying that specific version(s) of Microsoft .NET Framework must be installed or
enabled in order to support basic Amicus functionality, complete the following before proceeding: • Your Windows operating system might already include the required version(s). Simply enable them as
follows: a Go to Windows Control Panel > Programs and Features. b Choose “Turn Windows features on or off” in the left panel. c Select the Microsoft .NET Framework checkbox and click OK.
• Otherwise, download and install applicable version(s) from the Microsoft Download Center. Then restart the installation of the Workstation at step 1.
5 When the installation process has completed, log in to Amicus at the workstation. 6 A prompt to automatically add Amicus to your Windows Firewall’s exceptions list might appear. Click OK. 7 A prompt might appear, saying that a Workstation update is available and asking whether to apply it now.
Click OK. If additional prompts appear, click Run. Wait for the update process to complete. 8 If you intend on leaving Amicus running overnight at the Workstation, ensure that the computer is set to never
hibernate or sleep. Do this from Control Panel > Power Options.
Using Amicus Attorney for the first time After logging in to Amicus, go to the Office module. From there you can set your personal Preferences so that Amicus best meets your needs, in particular: • From General > My Profile, click Edit. Adjust your personal information if necessary, and then click Office
Access to change your initial Password for security reasons. • Configure your Document Assembly settings and install Amicus Tasks Toolbars as required. For template
merge functionality and other Toolbar integration, ensure that your firewall does not block Microsoft Office applications (Word, Excel, and Outlook) or Corel WordPerfect, as appropriate.
• With the guidance of your Amicus Administrator, install and set up any third-party Links (Exchange/Outlook E-mail, etc.) you might wish to use.
You can safely explore the many features that Amicus offers from the Tutorial Office. Choose Open Tutorial in the Office module. Don't forget to return to your Office when you are ready to start using Amicus.
For detailed instructions and videos on using the many features of Amicus, including setting your personal preferences, see the User Help.available from the Help menu in Amicus.

Amicus Attorney Install Guide © 2020 Abacus Data Systems Canada, Inc. 9
Installing SQL Server This section covers installating SQL Server. Topics include:
• Instructions
• Configuring SQL Reporting Services (SSRS)
• Scheduling a Database Backup
Instructions These instructions are applicable if you have chosen to install SQL Server provided to you for use with Amicus Attorney. SQL Server must be installed on your Database Server prior to installing Amicus Server. See the “SQL Server readiness” section on page 3. If you were provided with a 64-bit edition of SQL Server but require a 32-bit edition, please contact Customer Care. Below are basic instructions for installing SQL Server. Full general instructions are available onscreen during the install.
Note: The following screenshots are based on SQL 2014, but the same steps apply to SQL 2017 and SQL 2019.
1 Log onto the computer you wish to use as your Amicus Database Server, as a user with Windows “Administrators” Group rights. This may be a different computer than your Amicus Application Server.
2 Insert “SQL Add On” DVD into the disk drive. The Setup program should start automatically. If not, click the Windows Start button, choose Run, and enter [disk drive letter]:\setup.exe
3 At the end of this preliminary install, you might be prompted to restart the computer. To resume the installation, insert DVD into the disk drive again.
4 In the SQL Server Installation Center screen, click Installation at the left, and then click the “New SQL Server stand-alone installation…” option at the right.
The SQL Server Setup wizard starts. Accept the default settings in the subsequent dialogs, EXCEPT:
• Feature Selection
Choose the following Instance Features: Database Engine Services Reporting Services - Native Choose the following Shared Features: Management Tools – Basic Management Tools – Complete

Amicus Attorney Install Guide © 2020 Abacus Data Systems Canada, Inc. 10
• Instance Configuration
Important: Select “Named instance” option and enter AMICUS Failure to do this might
affect other applications you have running under SQL.
• Server Configuration
On the Service Accounts tab, ensure that the SQL Server Agent, SQL Server Database Engine, SQL Server Reporting Services, and SQL Server Browser, services have Account Name set to a user with system administrator privileges (e.g. “LocalSystem”, “NT AUTHORITY” or “NT Service”). Also ensure that these services have Startup Type set to “Automatic”.
• Database Engine Configuration
On the Server Provisioning tab, select Mixed Mode authentication mode and enter a SQL Server password. (You’ll need to use this password later, during the Amicus application installation.) Click Add Current User or click Add and specify a SQL Server administrator.

Amicus Attorney Install Guide © 2020 Abacus Data Systems Canada, Inc. 11
• Reporting Services Configuration
Important: In the Reporting Services Native Mode section, select the “Install only” option.
Follow the on-screen instructions to complete the install.
5 Return to page 3 of this Guide and complete the “SQL Server readiness” procedure.

Amicus Attorney Install Guide © 2020 Abacus Data Systems Canada, Inc. 12
Configuring SQL Reporting Services (SSRS)
SQL 2017 SQL Server must be installed on your Database Server prior to installing Amicus Server. See the “SQL Server readiness” section on page 3. If you were provided with a 64-bit edition of SQL Server but require a 32-bit edition, please contact Customer Care.
Note: SSRS (SQL Server Reporting Service) needs to be installed as well, but it can be done before or after Amicus Attorney is installed.
Important: The following instructions must be done after Amicus Attorney is installed as the SQL login “AmicusUser” must exist in the SQL server.
Below are basic instructions for installing SQL Server 2017. Full general instructions are available onscreen during the install.
1 Run Report Server Configuration Manager.
2 Select Database from the left navigation pane, and click Change Database, to manually create a Report Server Database.
o Click Next, there will be 2 prompts for credentials, use AmicusUser for both.

Amicus Attorney Install Guide © 2020 Abacus Data Systems Canada, Inc. 13
3 In the Report Server Configuration Manager, select Encryption Keys from the left navigation pane.
o A prompt displays click Yes to Delete All Encrypted Content.
4 Using Amicus, navigate to Firm Settings -> Reporting Services. Follow the usual process for configuring SSRS (Configure -> Test -> Publish).
Amicus Attorney Install Guide © 2020 Abacus Data Systems Canada, Inc. 14
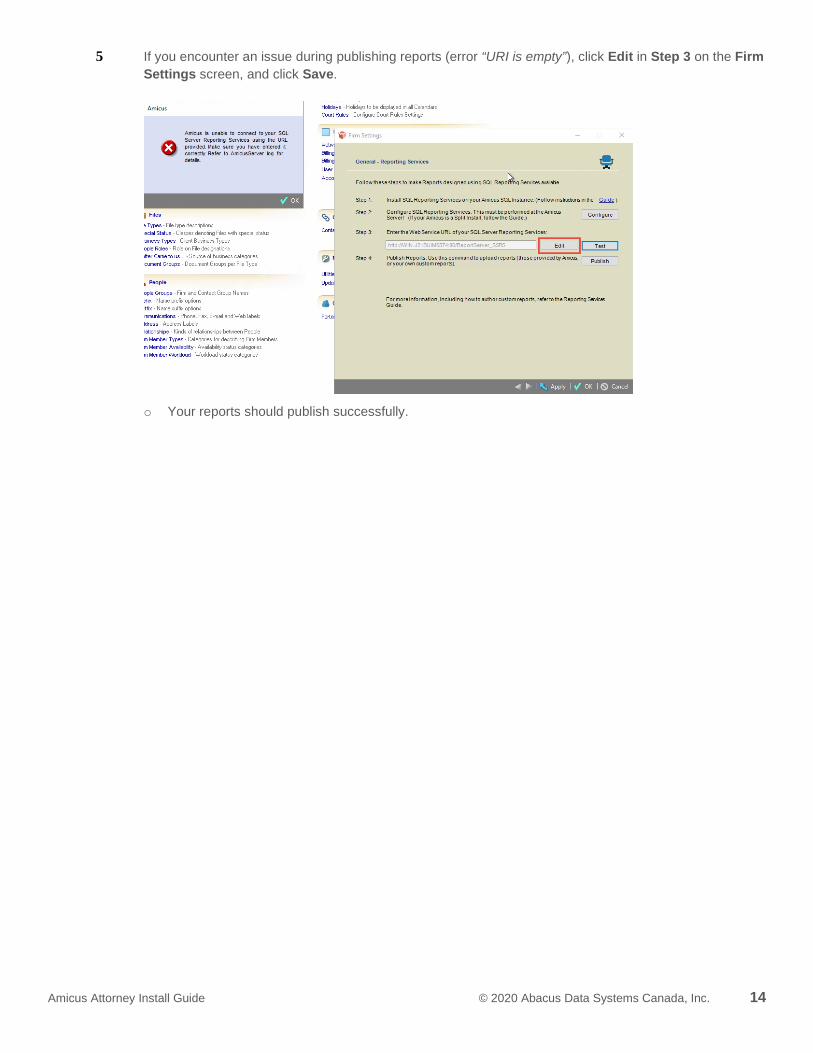
5 If you encounter an issue during publishing reports (error “URI is empty”), click Edit in Step 3 on the Firm Settings screen, and click Save.
o Your reports should publish successfully.

Amicus Attorney Install Guide © 2020 Abacus Data Systems Canada, Inc. 15
SQL 2019
Important: The following instructions must be done after Amicus Attorney is installed as the SQL login “AmicusUser” must exist in the SQL server.
1 Go this folder on the Amicus Server:
C:\Amicus\Amicus Attorney Server\SmartClient\Server\SQL2019
2 Click on the ReportServerConfiguration.exe link to display the ConfigurationForm dialog.
Complete all the fields:
• Amicus SQL Instance – Enter your Server name\Amicus
• SSRS Instance – Enter your Server name\SSRS
• Windows User Name – Administrator
• Windows User Password – Enter your Windows password
• SQL User Name – AmicusUser
• SQL User Password – Enter your SQL User password
3 Click OK to complete the process.

Amicus Attorney Install Guide © 2020 Abacus Data Systems Canada, Inc. 16
Scheduling a Database Backup
Warning: Scheduling a Database Backup using Amicus Firmsettings/utilities will not work if you are using SQL Server 2016, SQL 2017 or SQL 2019. In these cases you must manually schedule a Database Backup.
To schedule a database backup operation start SQL Server Management Studio:
1 In the Connect to Server dialog box, enter the appropriate values in the Server type.
2 Expand Databases in Object Explorer and right-click the database that you want to back up.
3 Select Tasks > Back Up from the pop-up menus to display the Back Up Database – DatabaseName
dialog box.

Amicus Attorney Install Guide © 2020 Abacus Data Systems Canada, Inc. 17
• In the Source section, select the name of the backup set from the Database field drop-down list. • In the Destination section, select a destination from the Back up to field drop-down list and enter a
path and a file name in the textbox, then click Add. 4 Select Script from the taskbar to display the Script pull-down menu and select Script Action to Job.

Amicus Attorney Install Guide © 2020 Abacus Data Systems Canada, Inc. 18
5 In the New Job dialog box that appears, select Steps from the left pane.
• Click Edit if you want to change the job parameters.
Note: You can see the backup command in the Job Step Properties – 1 dialog box.
6 Select Schedules from the left pane.
7 Click New to display the New Job Schedule dialog box, enter the job name in the Name box, specify the job schedule.

Amicus Attorney Install Guide © 2020 Abacus Data Systems Canada, Inc. 19
Note: To configure alerts or notifications click Alerts or Notifications in the left pane.
8 Click OK two times, the following message displays under Progress:

Amicus Attorney Install Guide © 2020 Abacus Data Systems Canada, Inc. 20
9 To verify the backup job, expand SQL Server Agent in Object Explorer, then expand Jobs.
Important: When you verify the backup job, the SQL Server Agent service must be running.
Abacus Data Systems Canada, Inc. Phone: 800-472-2289 416-977-6633 www.abacusnext.com [email protected]
Copyright © 2020 Abacus Data Systems Canada, Inc. All rights reserved. AMICUS and AMICUS ATTORNEY are registered trademarks, and AMICUS ANYWHERE, AMICUS BILLING, and AMICUS TIMETRACKER are trademarks, of Abacus Data Systems Canada, Inc. All other trademarks referenced are the property of their respective owner. Abacus Data Systems Canada, Inc. disclaims any proprietary interest in trademarks other than its own.
July 2020