Embed Size (px)
Citation preview

ENGLISH
Insight GenesisUser Guide
www.insightgenesis.com
www.lowrance.comwww.bandg.com
www.simrad-yachting.com
2 | Contents | Insight Genesis User Guide
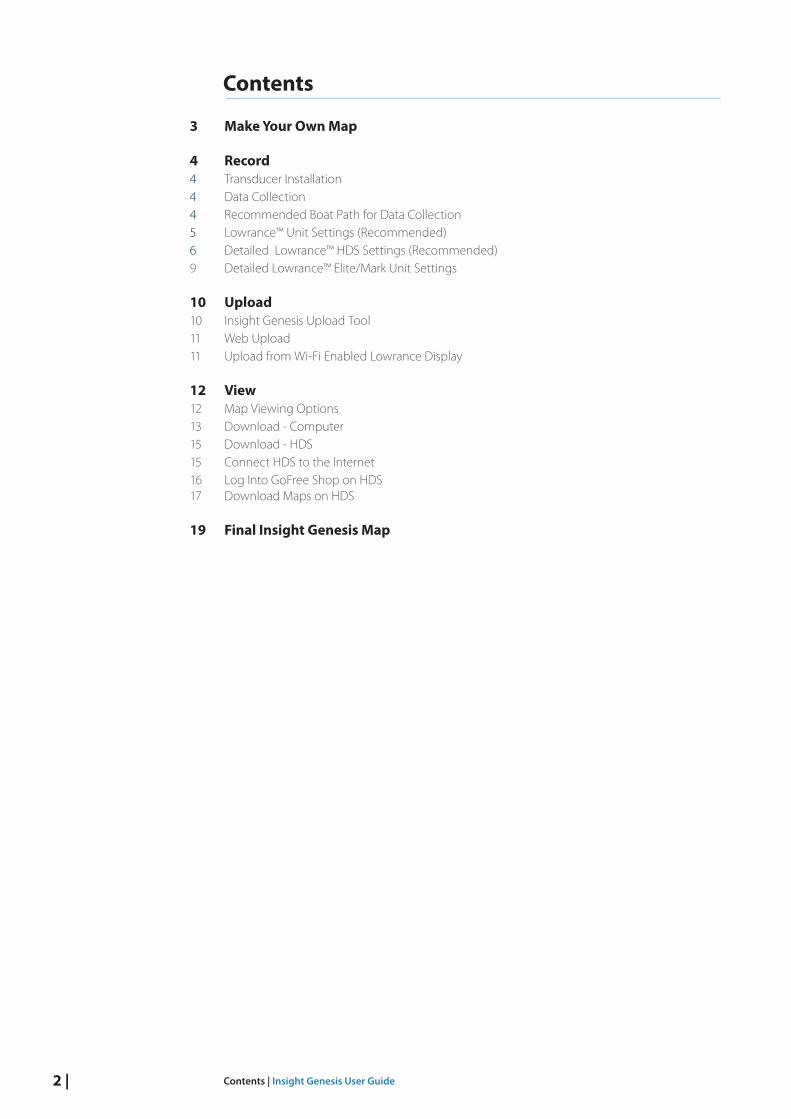
Contents
3 Make Your Own Map
4 Record4 Transducer Installation4 Data Collection4 Recommended Boat Path for Data Collection5 Lowrance™ Unit Settings (Recommended)6 Detailed Lowrance™ HDS Settings (Recommended)9 Detailed Lowrance™ Elite/Mark Unit Settings
10 Upload10 Insight Genesis Upload Tool11 Web Upload 11 Upload from Wi-Fi Enabled Lowrance Display
12 View12 Map Viewing Options13 Download - Computer15 Download - HDS15 Connect HDS to the Internet16 Log Into GoFree Shop on HDS 17 Download Maps on HDS
19 Final Insight Genesis Map
| 3Make Your Own Map | Insight Genesis User Guide
Make Your Own Map
Insight Genesis allows you to create customized maps in 3 easy steps:
1 Record Record a sonar log using your Lowrance™ chartplotter and save it to an m/SD card.
2 Upload Upload the sonar logs directly from your Wi-Fi enabled HDS unit or from the m/SD card via your computer to the Insight Genesis cloud service.
3 Use Use Custom and Social Maps in multiple ways.
- View the maps on your computer or tablet.
- Download directly to your Wi-Fi enabled HDS unit.
- Download to your computer for use on your Mark, Elite, or HDS chartplotter.
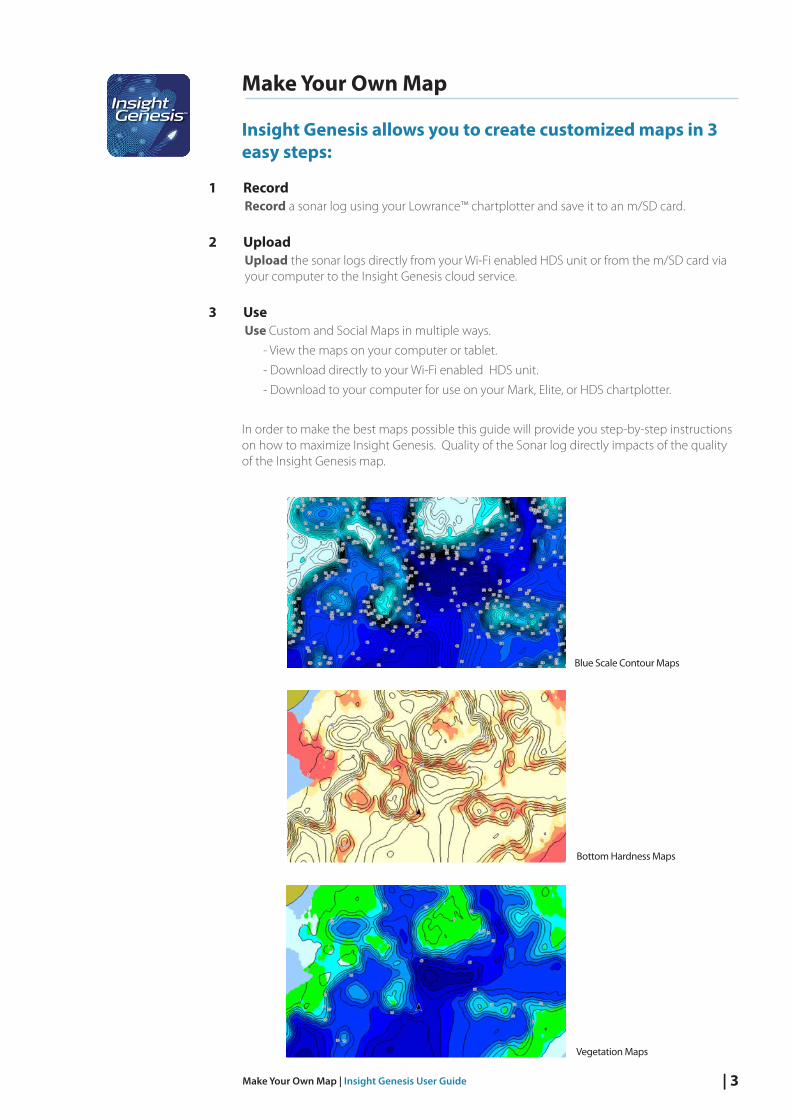
In order to make the best maps possible this guide will provide you step-by-step instructions on how to maximize Insight Genesis. Quality of the Sonar log directly impacts of the quality of the Insight Genesis map.
Blue Scale Contour Maps
Bottom Hardness Maps
Vegetation Maps
4 | Record | Insight Genesis User Guide
Record
In order to record a quality sonar log on your Lowrance™ chartplotter you will need to make sure your transducer is properly installed, you are using an Insight Genesis compatible chartplotter (https://www.gofreeshop.com/supported-products), and the settings are optimized.
Transducer InstallationA Transducer is the part of the fish finder that functions like an antenna to send out sonar signals (sound waves) and receive return echoes that are displayed as pictures on the sonar screen. Lowrance transducers can be attached to the transom or inside the hull of a boat, or even to a trolling motor using a special mounting.
We recommend following the Lowrance unit installation instructions that accompany the unit:
• Do not mount the transducer less than 1 foot from the boat’s lower unit and ensure that the mount location will be in the water at all times during data collection.
• Be sure that the location of the transducer will not interfere with the hauling of the boat.
• The bottom face of the transducer must be aligned parallel with the ground to send and receive clear soundings.
• The center line of the transducer should be even with the bottom of the boat hull to prevent interference.
• Failing to install the transducer correctly may interfere with the cone angle of the sonar signal, excessive cavitation, and prevent the gathering of accurate data. If the output looks bad on your depth finder, it probably looks bad to our algorithms.
Data Collection• Data will be collected using m/SD cards and Lowrance™ Sport chartplotter.
• We recommend carrying or storing two 4GB+ m/SD cards to mitigate lost, damaged, corrupt or full cards. We recommend recording no longer than two hours per file. You can create a new file, by simply stopping the recording and immediately restarting it.
• Note the depth of the transducer under the surface of the water. The difference can be applied as a Data Offset tab in the Insight Genesis
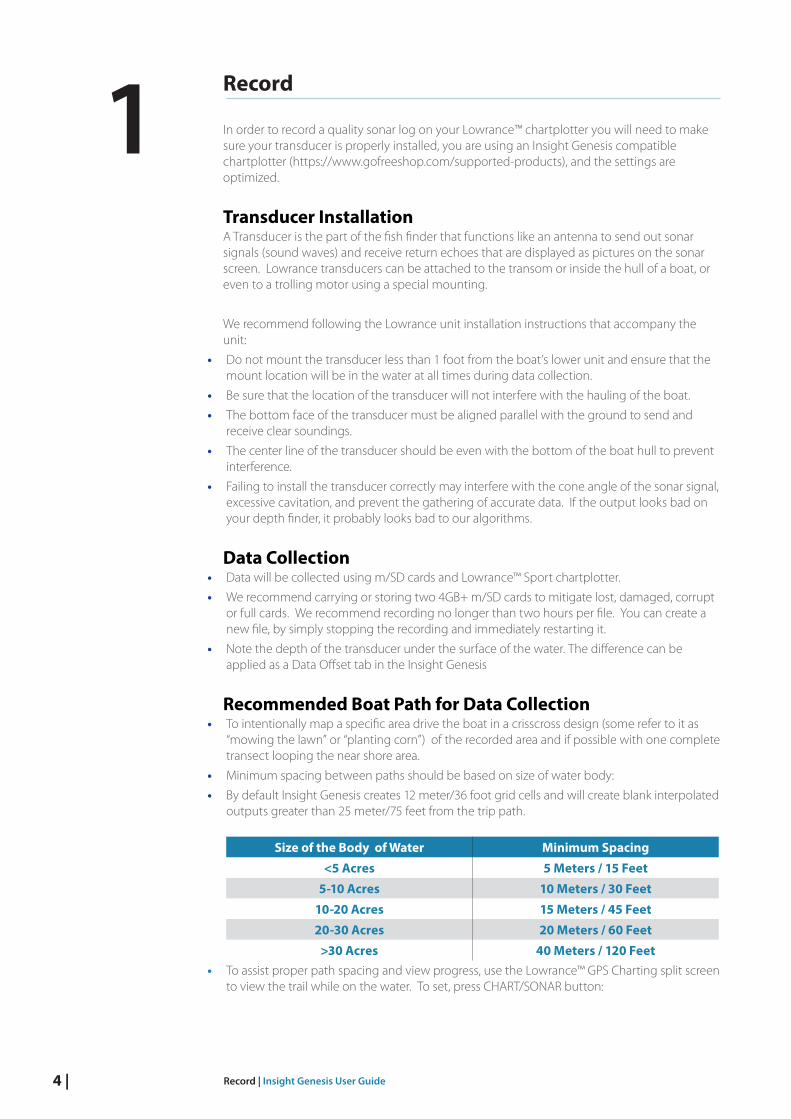
Recommended Boat Path for Data Collection• To intentionally map a specific area drive the boat in a crisscross design (some refer to it as
“mowing the lawn” or “planting corn”) of the recorded area and if possible with one complete transect looping the near shore area.
• Minimum spacing between paths should be based on size of water body:
• By default Insight Genesis creates 12 meter/36 foot grid cells and will create blank interpolated outputs greater than 25 meter/75 feet from the trip path.
Size of the Body of Water Minimum Spacing
<5 Acres 5 Meters / 15 Feet
5-10 Acres 10 Meters / 30 Feet
10-20 Acres 15 Meters / 45 Feet
20-30 Acres 20 Meters / 60 Feet
>30 Acres 40 Meters / 120 Feet• To assist proper path spacing and view progress, use the Lowrance™ GPS Charting split screen
to view the trail while on the water. To set, press CHART/SONAR button:
1
| 5Record | Insight Genesis User Guide
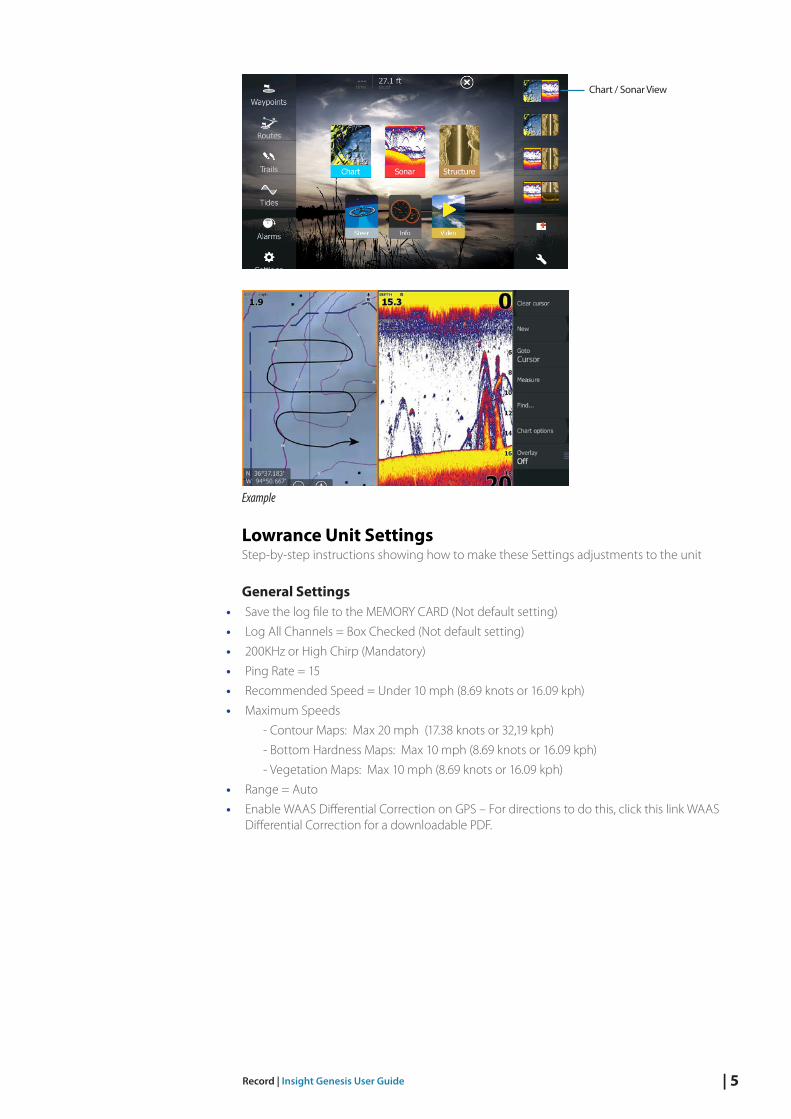
Example
Lowrance Unit Settings Step-by-step instructions showing how to make these Settings adjustments to the unit
General Settings• Save the log file to the MEMORY CARD (Not default setting)
• Log All Channels = Box Checked (Not default setting)
• 200KHz or High Chirp (Mandatory)
• Ping Rate = 15
• Recommended Speed = Under 10 mph (8.69 knots or 16.09 kph)
• Maximum Speeds
- Contour Maps: Max 20 mph (17.38 knots or 32,19 kph)
- Bottom Hardness Maps: Max 10 mph (8.69 knots or 16.09 kph)
- Vegetation Maps: Max 10 mph (8.69 knots or 16.09 kph)
• Range = Auto
• Enable WAAS Differential Correction on GPS – For directions to do this, click this link WAAS Differential Correction for a downloadable PDF.
Chart / Sonar View
6 | Record | Insight Genesis User Guide
Summary of Recording Sonar Log Pages button - Home Screen - Choose Sonar - Advanced - Log Sonar
• Filename: Defaults to “Sonar”. The default, or a modified name, can be used. The log name is not used by Insight Genesis, but a more specific name can be helpful for future reference.
• File Format: Choose .slg or sl2.
- slg: Used to create all layers for Insight Genesis mapping and submission into the Social Map. Creates a smaller file size than the .sl2 format, but doesn’t offer the option to replay Structure Scan log in the online personal log map viewer.
- sl2: Allows you to playback your StructureScan logs in the Insight Genesis viewer. Also, works for Insight Genesis map creation and Social Map contributions.
- xtf: Will not work to create an Insight Genesis map.
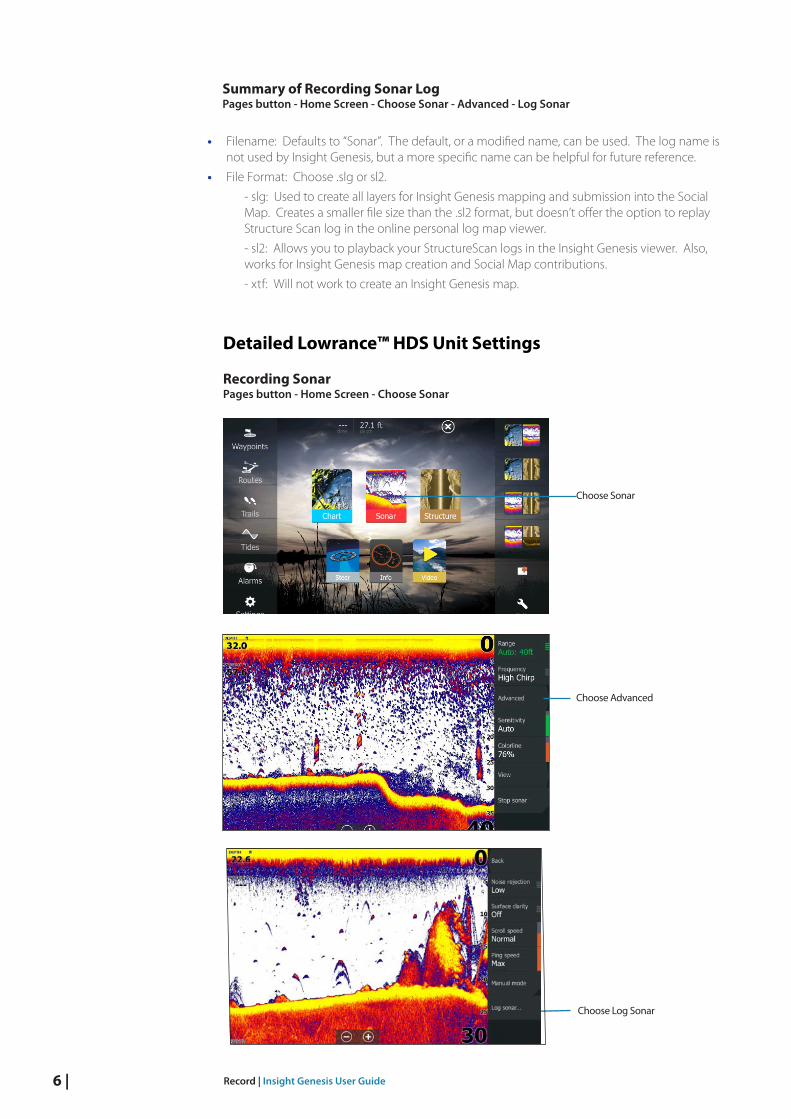
Detailed Lowrance™ HDS Unit Settings
Recording Sonar Pages button - Home Screen - Choose Sonar
Choose Sonar
Choose Advanced
Choose Log Sonar
| 7Record | Insight Genesis User Guide
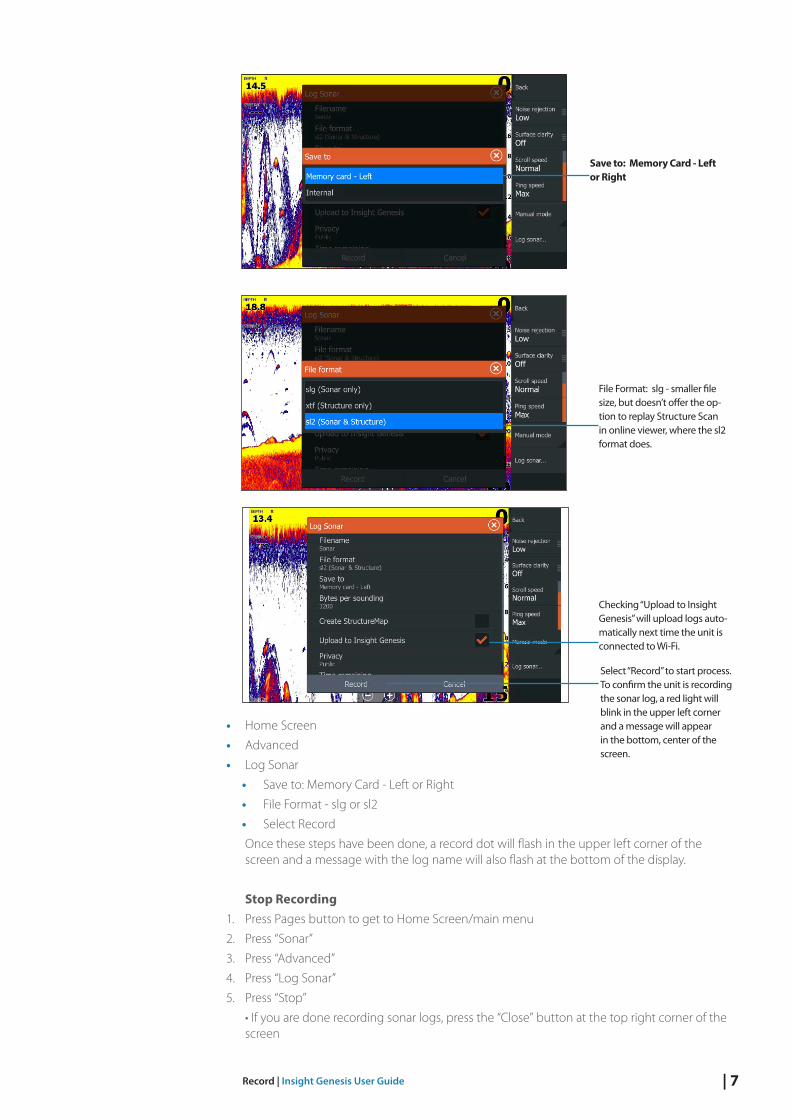
• Home Screen
• Advanced
• Log Sonar
• Save to: Memory Card - Left or Right
• File Format - slg or sl2
• Select Record
Once these steps have been done, a record dot will flash in the upper left corner of the screen and a message with the log name will also flash at the bottom of the display.
Stop Recording1. Press Pages button to get to Home Screen/main menu
2. Press “Sonar”
3. Press “Advanced”
4. Press “Log Sonar”
5. Press “Stop”
• If you are done recording sonar logs, press the “Close” button at the top right corner of the screen
Save to: Memory Card - Left or Right
Checking “Upload to Insight Genesis” will upload logs auto-matically next time the unit is connected to Wi-Fi.
File Format: slg - smaller file size, but doesn’t offer the op-tion to replay Structure Scan in online viewer, where the sl2 format does.
Select “Record” to start process. To confirm the unit is recording the sonar log, a red light will blink in the upper left corner and a message will appear in the bottom, center of the screen.
8 | Record | Insight Genesis User Guide
• If you want to record another sonar log, press “Log sonar” again and repeat the steps described above select Record Sonar and select STOP LOGGING.
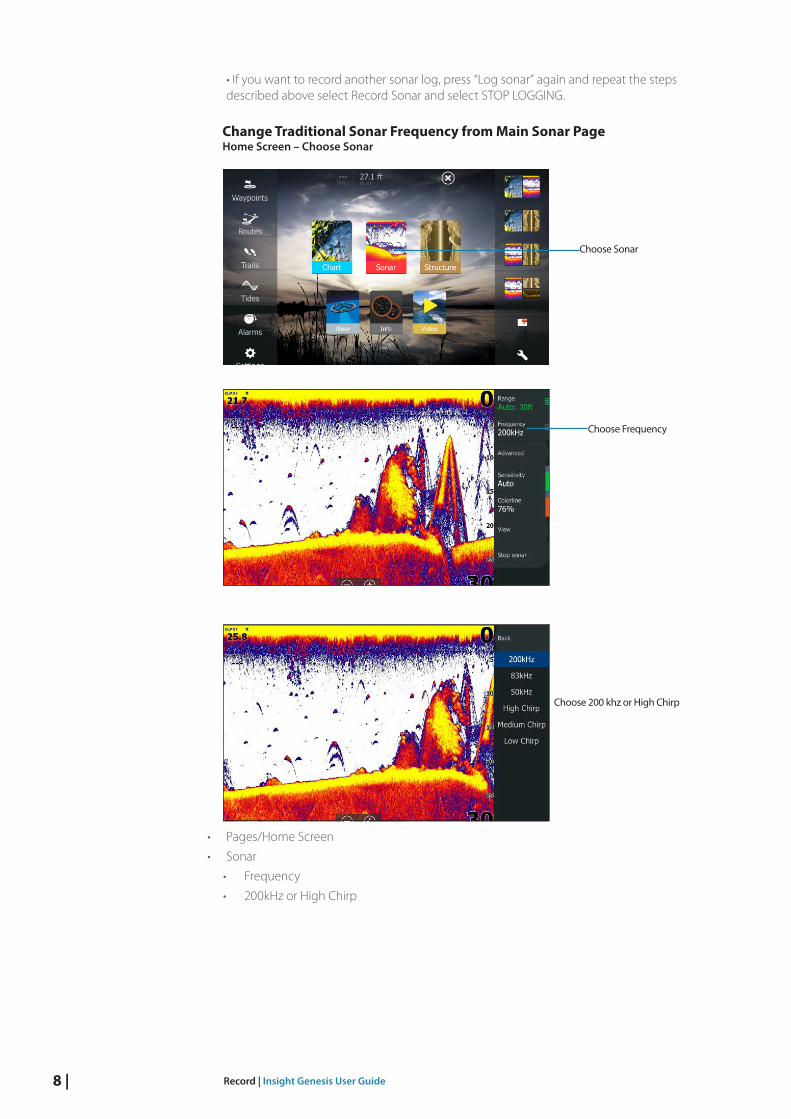
Change Traditional Sonar Frequency from Main Sonar Page Home Screen – Choose Sonar
• Pages/Home Screen
• Sonar
• Frequency
• 200kHz or High Chirp
Choose Sonar
Choose Frequency
Choose 200 khz or High Chirp
| 9Record | Insight Genesis User Guide
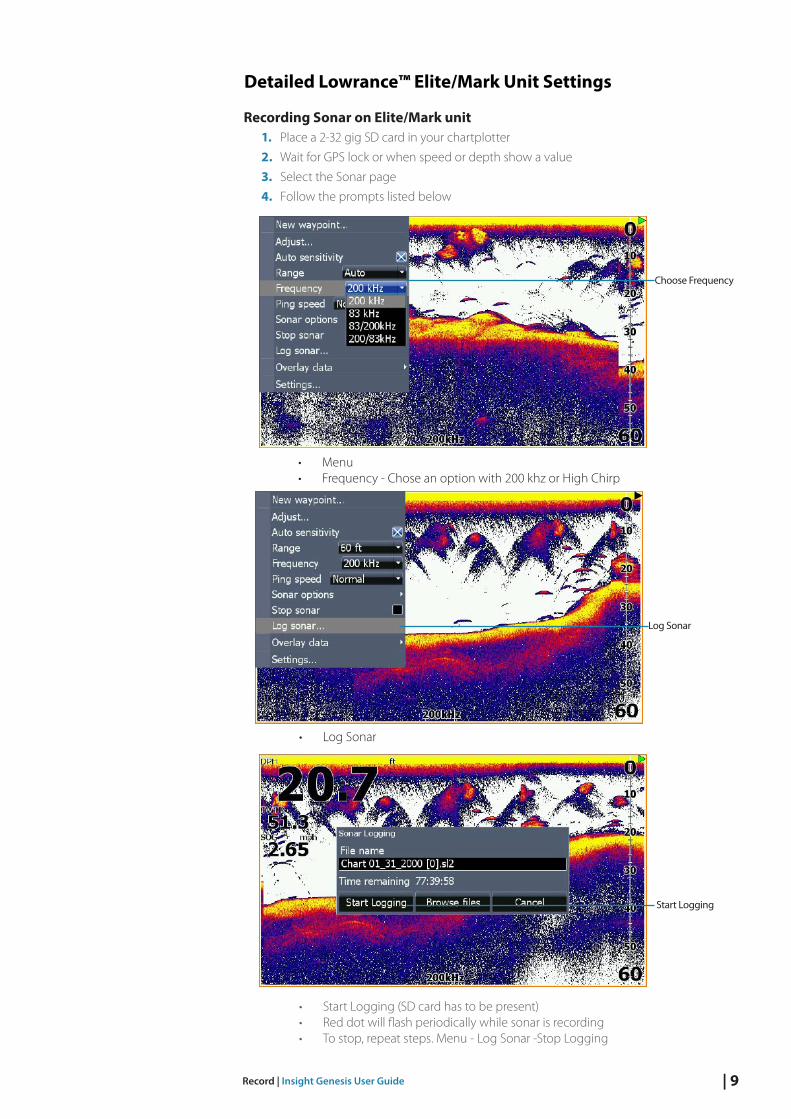
Detailed Lowrance™ Elite/Mark Unit Settings
Recording Sonar on Elite/Mark unit 1. Place a 2-32 gig SD card in your chartplotter
2. Wait for GPS lock or when speed or depth show a value
3. Select the Sonar page
4. Follow the prompts listed below
• Menu• Frequency - Chose an option with 200 khz or High Chirp
• Log Sonar
• Start Logging (SD card has to be present)• Red dot will flash periodically while sonar is recording• To stop, repeat steps. Menu - Log Sonar -Stop Logging
Choose Frequency
Log Sonar
Start Logging
10 | Upload | Insight Genesis User Guide
Upload
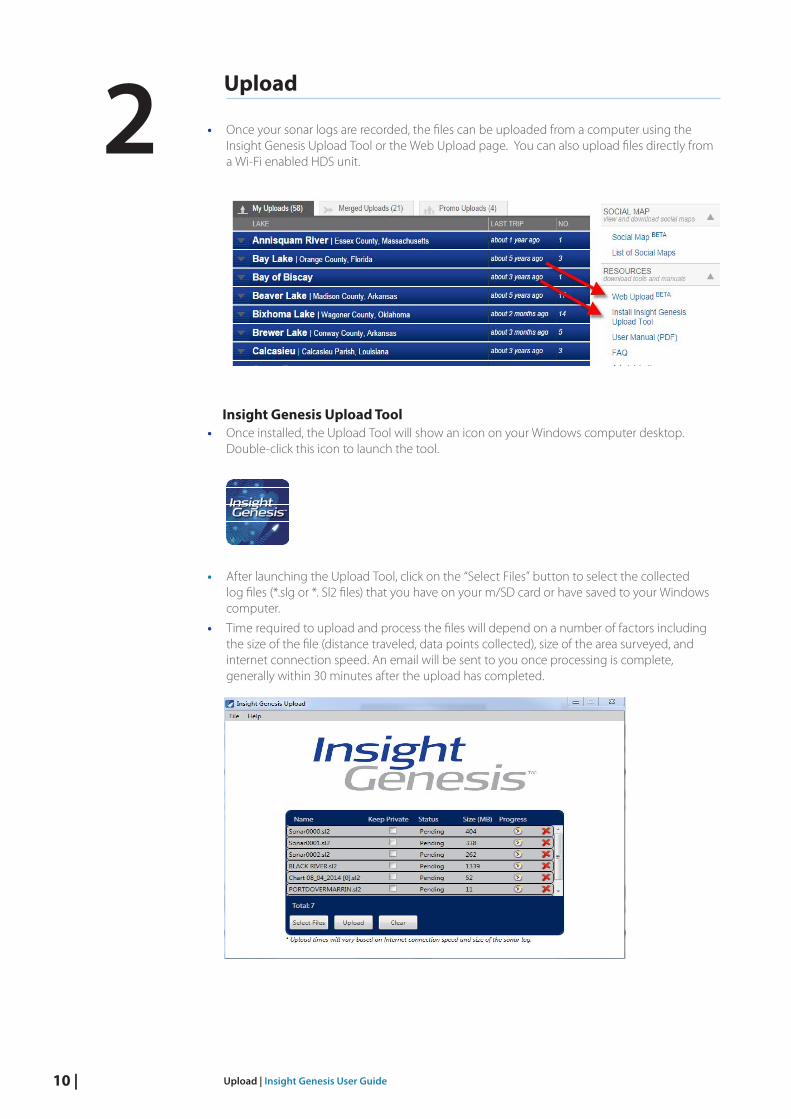
• Once your sonar logs are recorded, the files can be uploaded from a computer using the Insight Genesis Upload Tool or the Web Upload page. You can also upload files directly from a Wi-Fi enabled HDS unit.
Insight Genesis Upload Tool• Once installed, the Upload Tool will show an icon on your Windows computer desktop.
Double-click this icon to launch the tool.
• After launching the Upload Tool, click on the “Select Files” button to select the collected log files (*.slg or *. Sl2 files) that you have on your m/SD card or have saved to your Windows computer.
• Time required to upload and process the files will depend on a number of factors including the size of the file (distance traveled, data points collected), size of the area surveyed, and internet connection speed. An email will be sent to you once processing is complete, generally within 30 minutes after the upload has completed.
2
| 11Upload | Insight Genesis User Guide
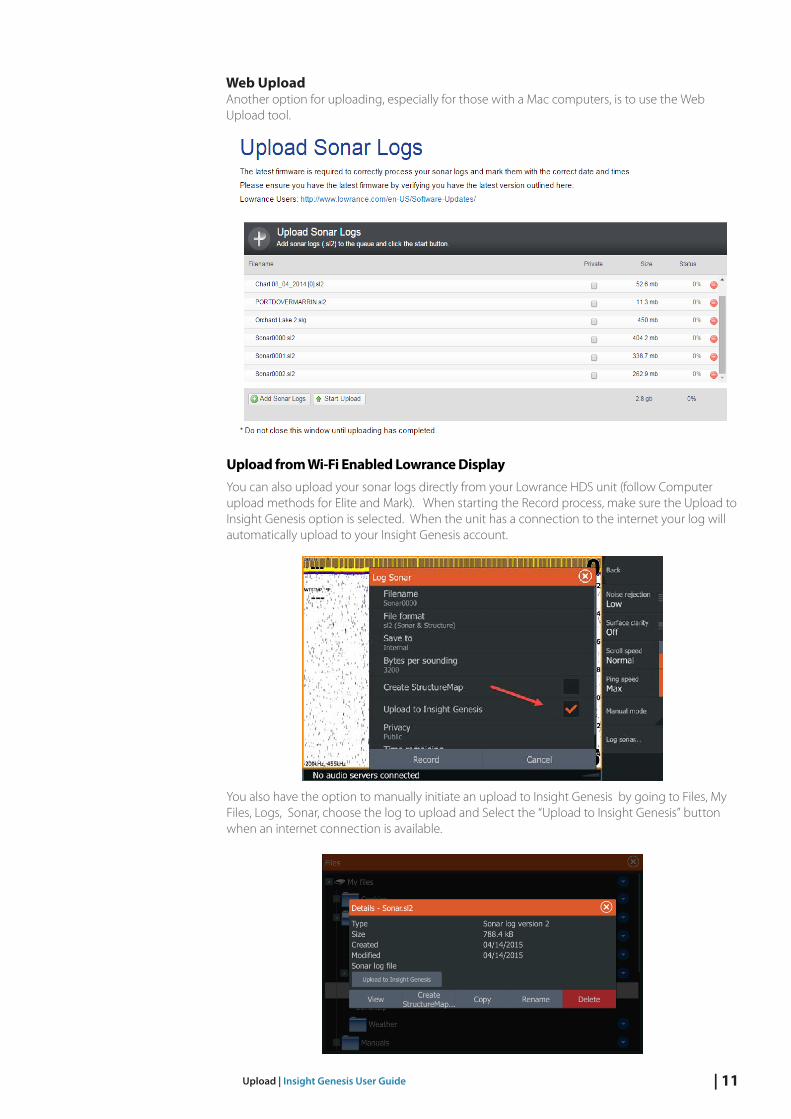
Upload from Wi-Fi Enabled Lowrance DisplayYou can also upload your sonar logs directly from your Lowrance HDS unit (follow Computer upload methods for Elite and Mark). When starting the Record process, make sure the Upload to Insight Genesis option is selected. When the unit has a connection to the internet your log will automatically upload to your Insight Genesis account.
You also have the option to manually initiate an upload to Insight Genesis by going to Files, My Files, Logs, Sonar, choose the log to upload and Select the “Upload to Insight Genesis” button when an internet connection is available.
Web UploadAnother option for uploading, especially for those with a Mac computers, is to use the Web Upload tool.
12 | View | Insight Genesis User Guide
View
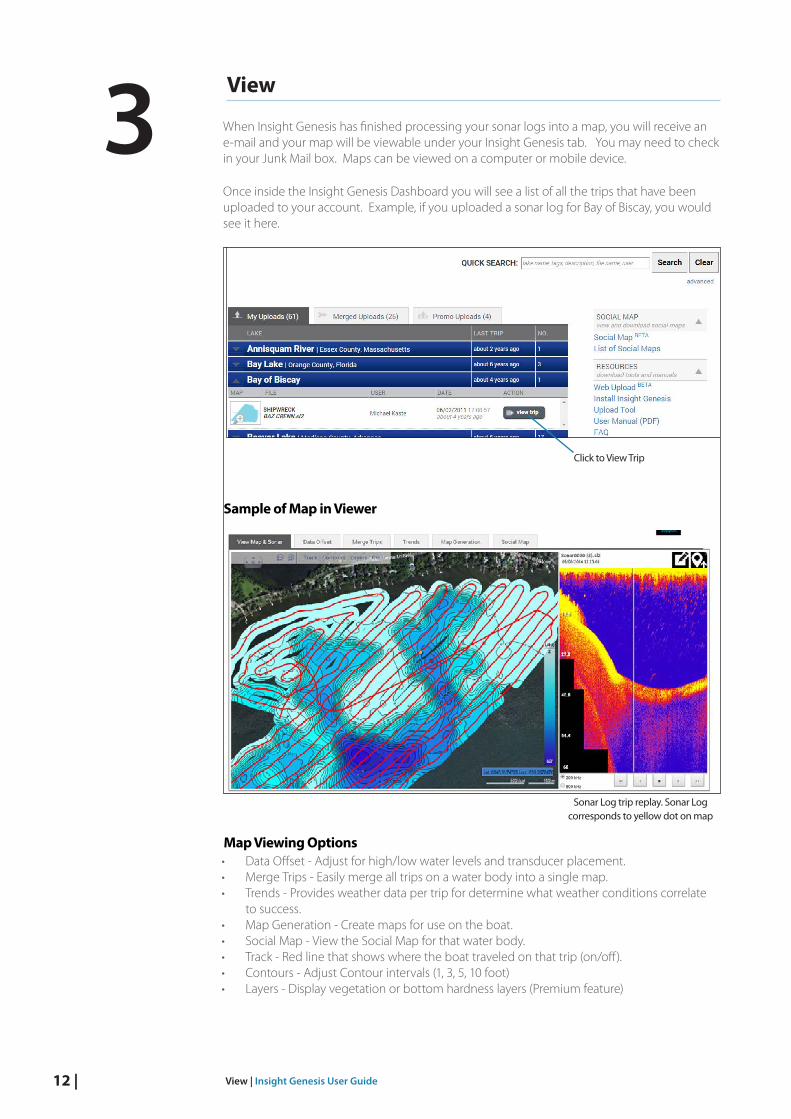
When Insight Genesis has finished processing your sonar logs into a map, you will receive an e-mail and your map will be viewable under your Insight Genesis tab. You may need to check in your Junk Mail box. Maps can be viewed on a computer or mobile device.
Once inside the Insight Genesis Dashboard you will see a list of all the trips that have been uploaded to your account. Example, if you uploaded a sonar log for Bay of Biscay, you would see it here.
3
Click to View Trip
Sonar Log trip replay. Sonar Log corresponds to yellow dot on map
Map Viewing Options
Sample of Map in Viewer
• Data Offset - Adjust for high/low water levels and transducer placement.• Merge Trips - Easily merge all trips on a water body into a single map.• Trends - Provides weather data per trip for determine what weather conditions correlate
to success.• Map Generation - Create maps for use on the boat.• Social Map - View the Social Map for that water body.• Track - Red line that shows where the boat traveled on that trip (on/off).• Contours - Adjust Contour intervals (1, 3, 5, 10 foot)• Layers - Display vegetation or bottom hardness layers (Premium feature)
| 13 View | Insight Genesis User Guide
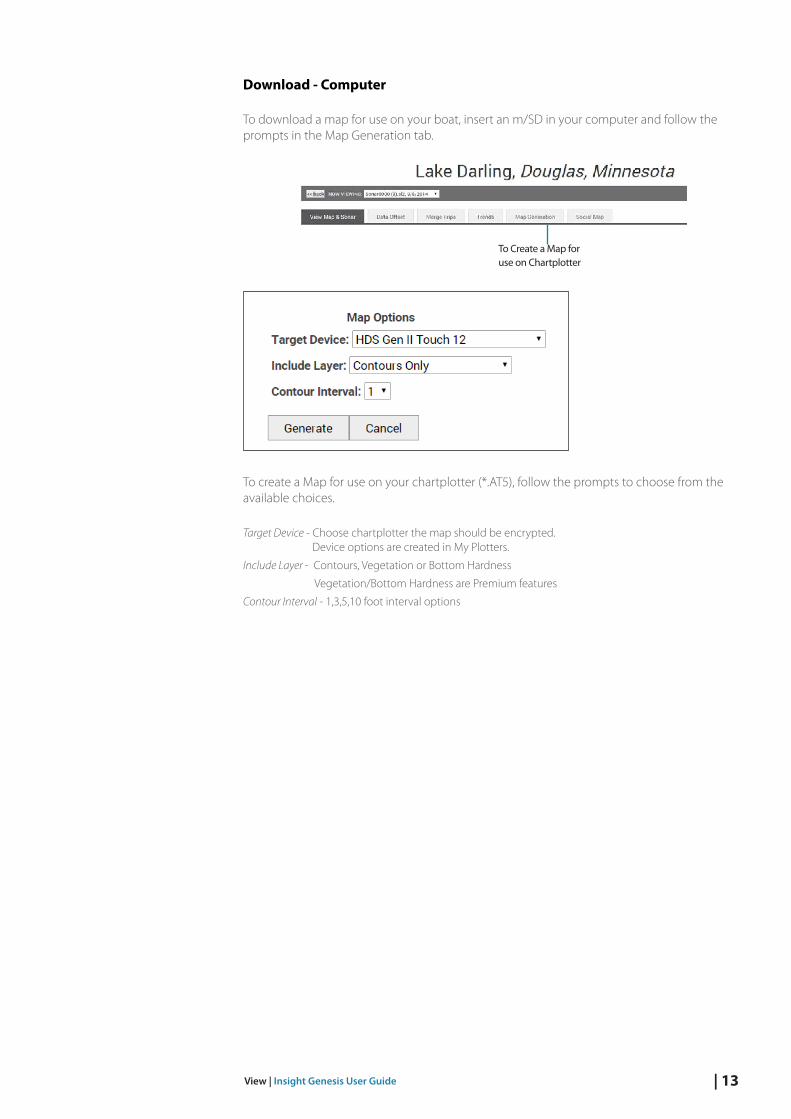
To download a map for use on your boat, insert an m/SD in your computer and follow the prompts in the Map Generation tab.
To create a Map for use on your chartplotter (*.AT5), follow the prompts to choose from the available choices.
Target Device - Choose chartplotter the map should be encrypted. Device options are created in My Plotters.
Include Layer - Contours, Vegetation or Bottom Hardness
Vegetation/Bottom Hardness are Premium features
Contour Interval - 1,3,5,10 foot interval options
To Create a Map for use on Chartplotter
Download - Computer
14 | View | Insight Genesis User Guide
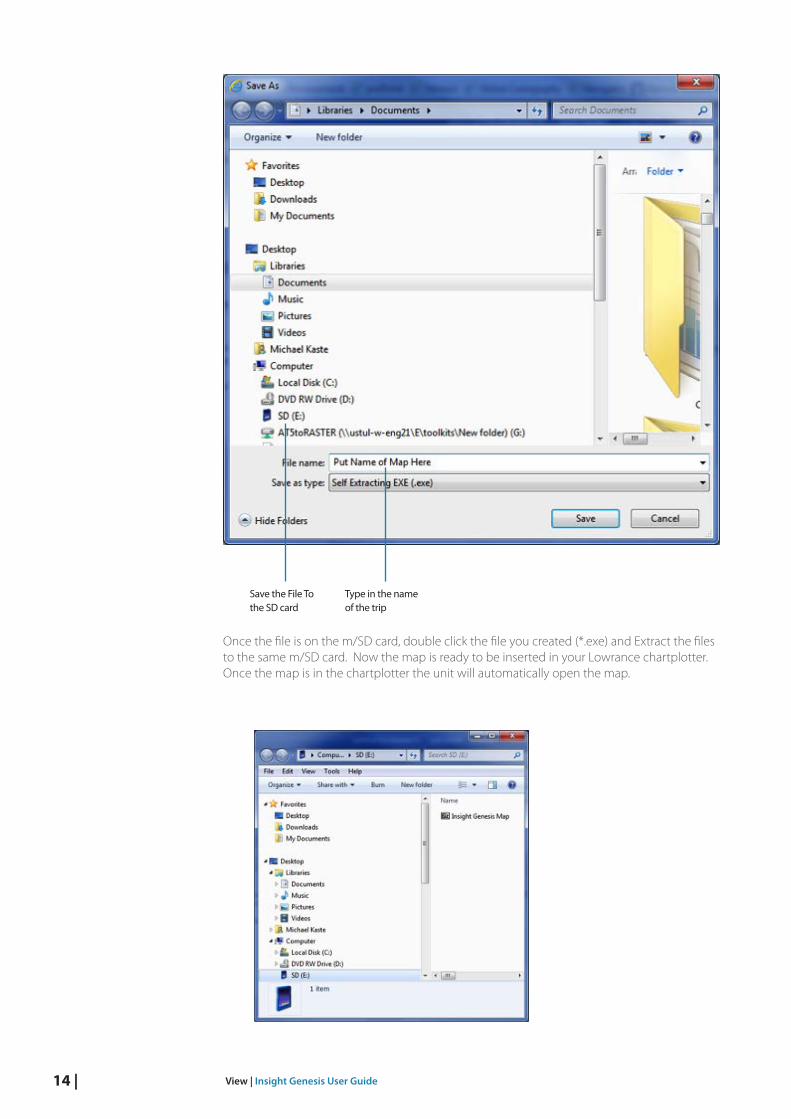
Once the file is on the m/SD card, double click the file you created (*.exe) and Extract the files to the same m/SD card. Now the map is ready to be inserted in your Lowrance chartplotter. Once the map is in the chartplotter the unit will automatically open the map.
Save the File To the SD card
Type in the name of the trip
| 15 Download - HDS | Insight Genesis User Guide
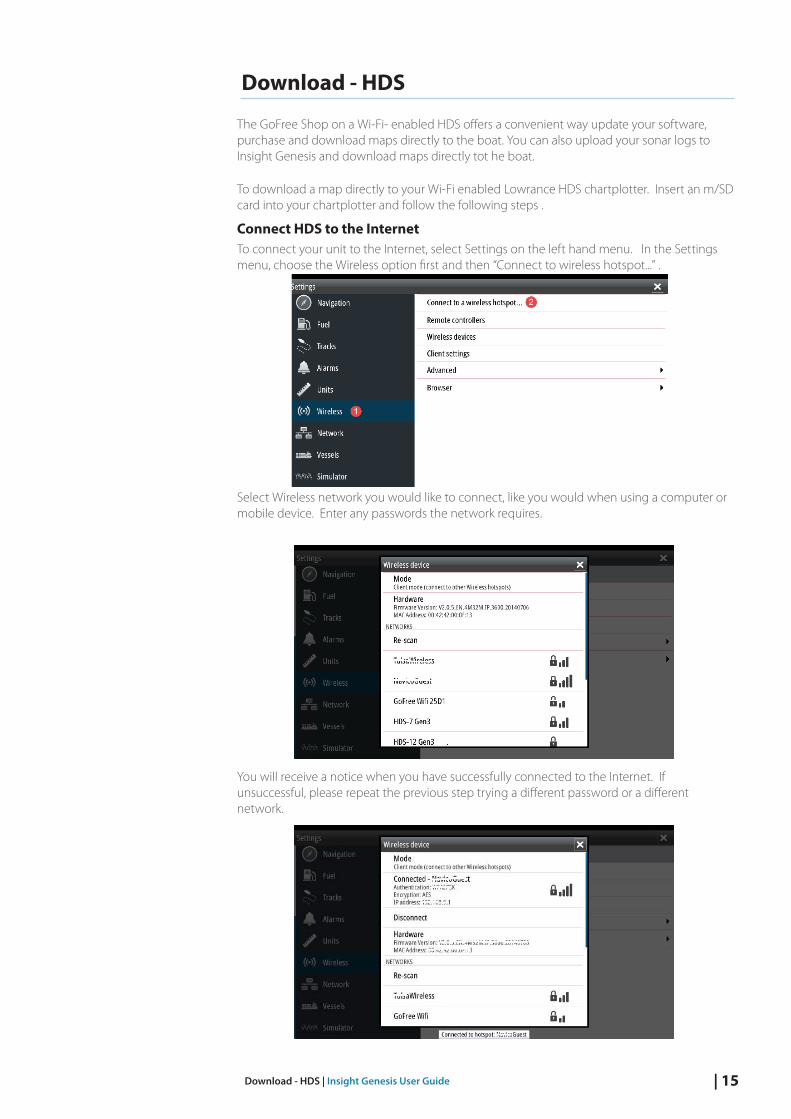
Download - HDS
The GoFree Shop on a Wi-Fi- enabled HDS offers a convenient way update your software, purchase and download maps directly to the boat. You can also upload your sonar logs to Insight Genesis and download maps directly tot he boat.
To download a map directly to your Wi-Fi enabled Lowrance HDS chartplotter. Insert an m/SD card into your chartplotter and follow the following steps .
Connect HDS to the InternetTo connect your unit to the Internet, select Settings on the left hand menu. In the Settings menu, choose the Wireless option first and then “Connect to wireless hotspot...” .
Select Wireless network you would like to connect, like you would when using a computer or mobile device. Enter any passwords the network requires.
You will receive a notice when you have successfully connected to the Internet. If unsuccessful, please repeat the previous step trying a different password or a different network.
16 | Download - HDS | Insight Genesis User Guide
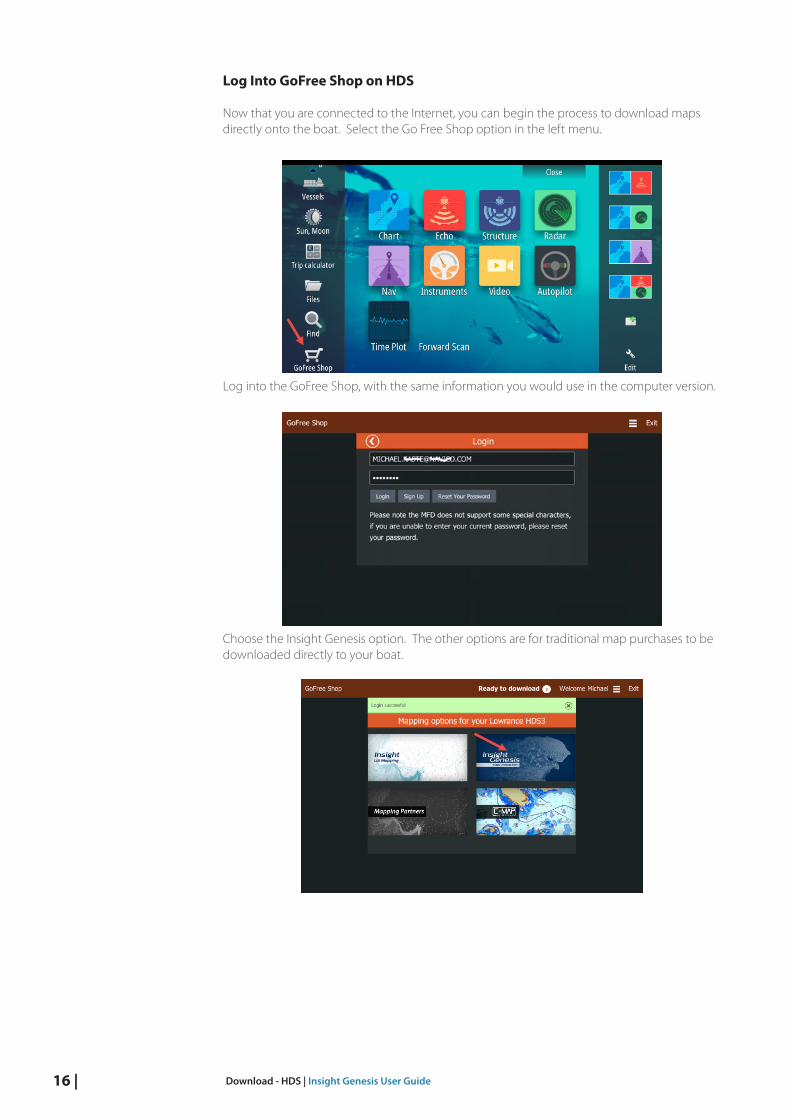
Log Into GoFree Shop on HDS
Now that you are connected to the Internet, you can begin the process to download maps directly onto the boat. Select the Go Free Shop option in the left menu.
Log into the GoFree Shop, with the same information you would use in the computer version.
Choose the Insight Genesis option. The other options are for traditional map purchases to be downloaded directly to your boat.
| 17 Download - HDS | Insight Genesis User Guide
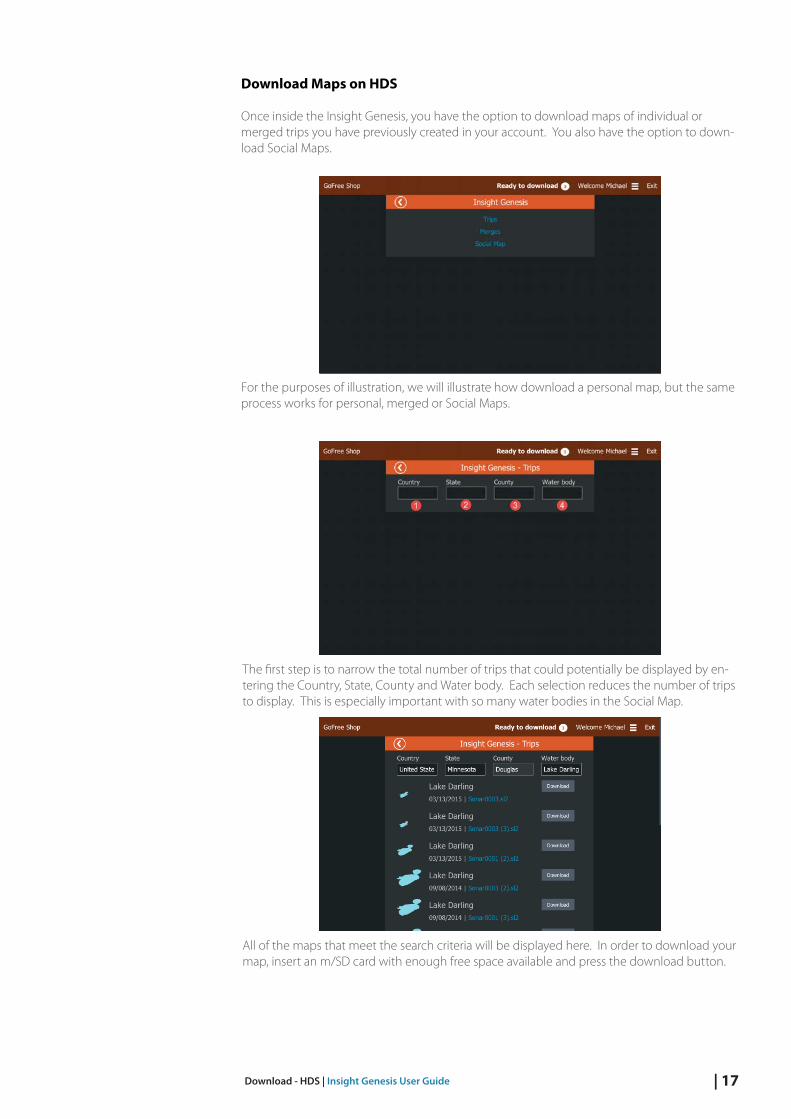
For the purposes of illustration, we will illustrate how download a personal map, but the same process works for personal, merged or Social Maps.
The first step is to narrow the total number of trips that could potentially be displayed by en-tering the Country, State, County and Water body. Each selection reduces the number of trips to display. This is especially important with so many water bodies in the Social Map.
Download Maps on HDS
Once inside the Insight Genesis, you have the option to download maps of individual or merged trips you have previously created in your account. You also have the option to down-load Social Maps.
All of the maps that meet the search criteria will be displayed here. In order to download your map, insert an m/SD card with enough free space available and press the download button.
18 | Download - HDS | Insight Genesis User Guide
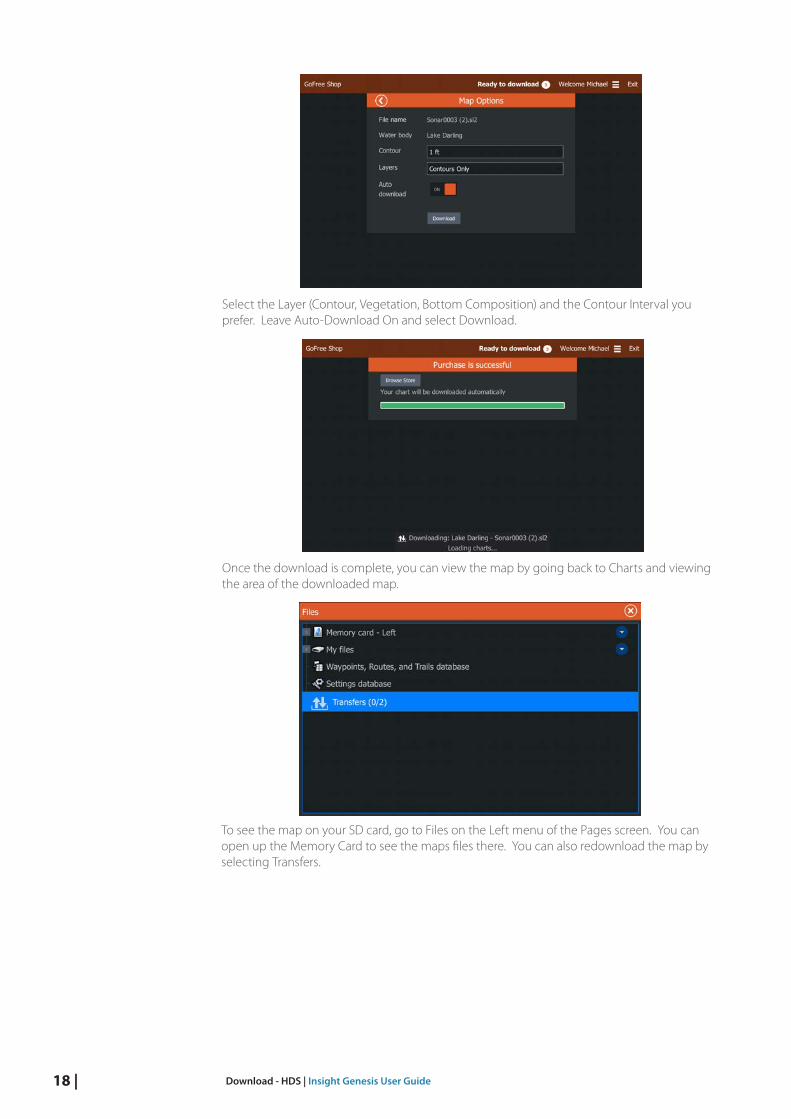
Once the download is complete, you can view the map by going back to Charts and viewing the area of the downloaded map.
Select the Layer (Contour, Vegetation, Bottom Composition) and the Contour Interval you prefer. Leave Auto-Download On and select Download.
To see the map on your SD card, go to Files on the Left menu of the Pages screen. You can open up the Memory Card to see the maps files there. You can also redownload the map by selecting Transfers.
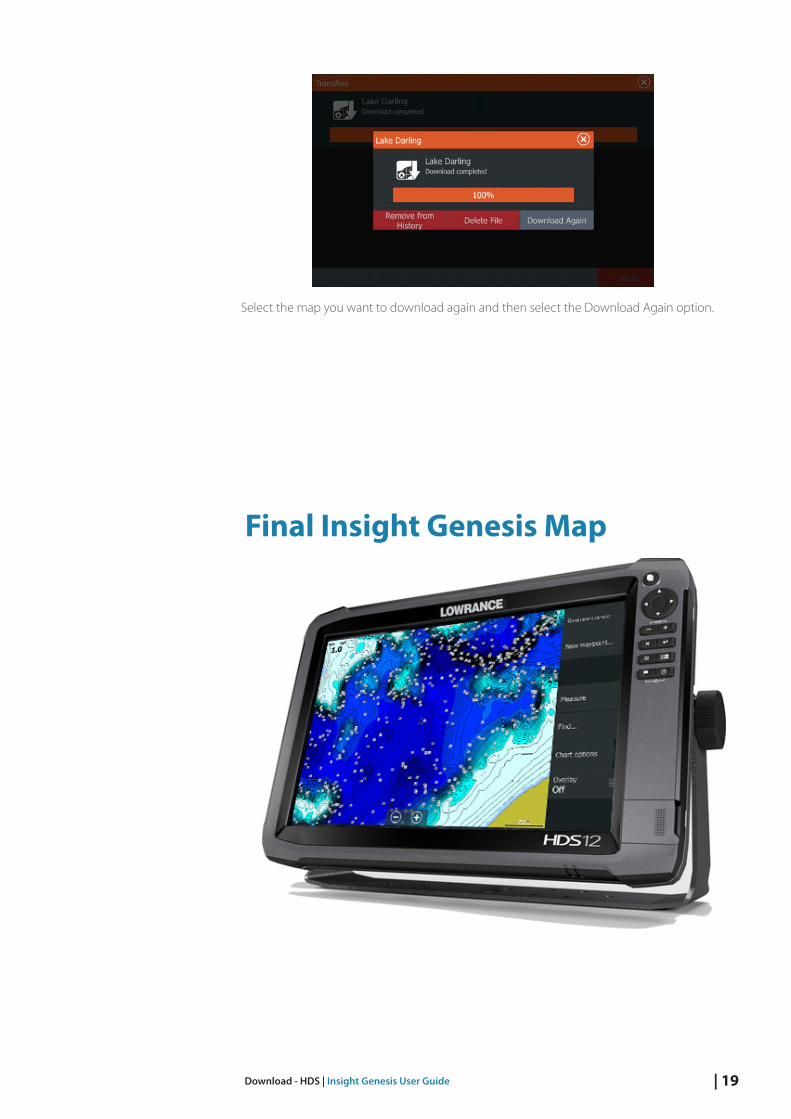
| 19 Download - HDS | Insight Genesis User Guide
Select the map you want to download again and then select the Download Again option.
Final Insight Genesis Map

Navicowww.navico.com
www.bandg.comwww.simrad-yachting.com
www.lowrance.com