Embed Size (px)
Citation preview

84 inside dentistry | May 2013 | www.dentalaegis.com/id
Part 1 of this two-part series discussed the rationale and development of the Bonded Functional esthetic Prototype (BFeP). this pretreatment restoration (formerly called a mock-up, long-term provi-
sional, or temporary) enables fabrication of 14 teeth from composite in 1 hour. it also allows patients to preview their ultimate restorative treatment while simultaneously providing a so-lution until further treatment can be completed.
this article elaborates on the clinical and chairside technical steps necessary to create functional and esthetic BFePs.
DiagnosticsWith the exception of correcting or repairing previous restorative work, diagnostic infor-mation should be collected prior to designing
and treating the case (Figure 1). An occlusal analysis should be performed initially us-ing a semi-adjustable articulator, which is recommended because it facilitates adjust-ments to the plane of occlusion and vertical dimension of occlusion. A facebow record should be taken and transferred, along with jaw registration mounting, especially if the patient’s vertical dimension must be altered.
Impressionsdetailed impressions are made and, crucial to the success of the BFeP, should demon-strate ideal interproximal and gingival mar-gin detail without voids or air bubbles. When
The Bonded Functional Esthetic Prototype: Part 2A patient-friendly pretreatment restoration with excellent esthetic resultsEdward A. McLaren, DDS, MDC
an impression is free of defects and highly de-tailed, the matrix will fit the teeth tightly and the composite will adapt well to the tooth sur-faces. if a proper impression is taken and the matrix fits well, the BFeP will only need min-imal finishing after placement.
then, prior to creating the 2-dimension-al (2d) smile design, stone casts are created from the preoperative impressions and a cal-iper used to measure the height of the maxil-lary central incisors (Figure 2).
Smile Designthe concept and utilization of digital smile design has become common practice in many dental offices and can be completed without the use of challenging or expensive equip-ment. instead, the author begins with a cost-effective and user-friendly 2d digital editing software (Photoshop Cs5, Adobe systems incorporated, www.adobe.com) in a tech-nique called Photoshop smile design.
Various photographic editing tools provid-ed with the software (ie, Clone, Liquefy, dodge, Grids) enable the operator to move and graft
EDwarD a. McLarEn, DDS, MDcclinical ProfessorFounder and DirectorUcLa Post Graduate Esthetics
DirectorUcLa center for Esthetic Dentistry
Founder and DirectorUcLa Master Dental ceramist ProgramUcLa School of DentistryLos Angeles, California
Private Practice limited to Prosthodontics and Esthetics DentistryLos Angeles, California
Continuing EDuCAtion
ESthEtiCSiMpLAntSpEDiAtriCS
Inside
PRELIMINARY STEPS (1.) Close-up preoperative view demonstrating wear, improper inclination, and other esthetic issues. (2.) Stone models were made from the preoper-ative impressions and calipers used to measure vertical height of the maxillary central incisors. (3.) Digital smile design techniques were used to help the patient visualize proposed improvements. (4.) Photoshop applications were used to demonstrate how bleaching would change the appearance of the patient’s smile.
fIg. 3
fIg. 1
fIg. 4
fIg. 2
86 inside dentistry | May 2013 | www.dentalaegis.com/id
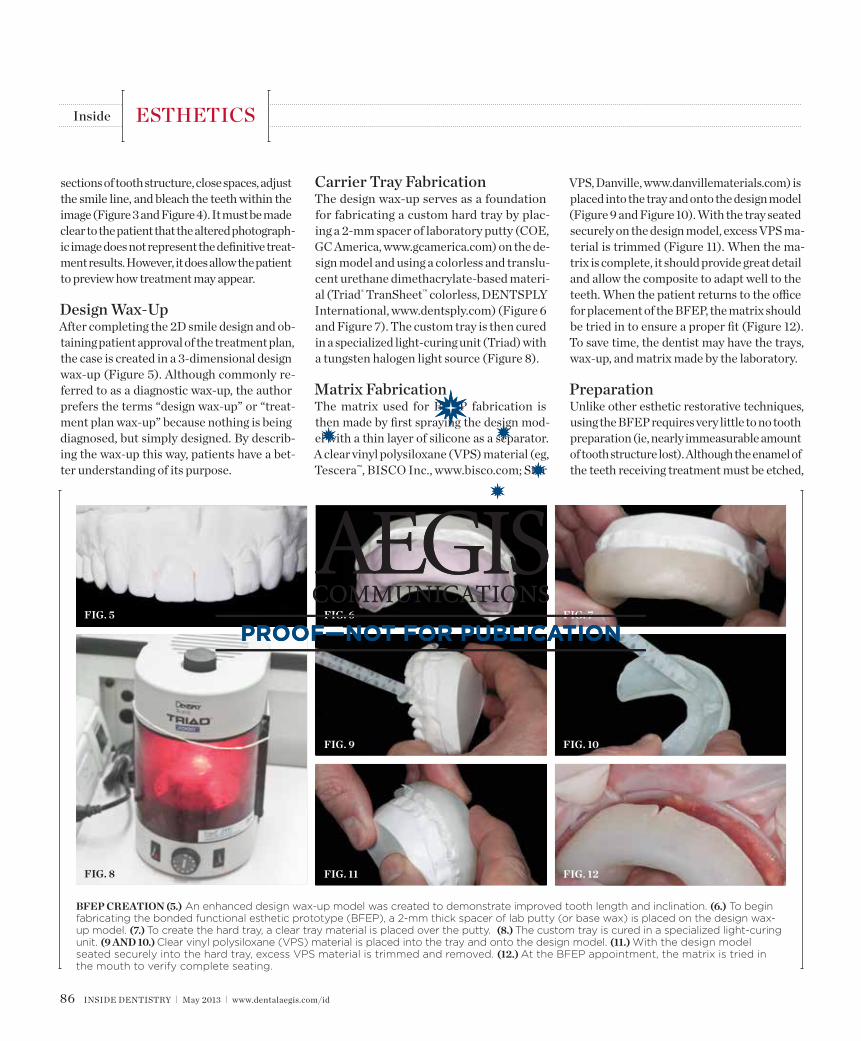
carrier Tray Fabricationthe design wax-up serves as a foundation for fabricating a custom hard tray by plac-ing a 2-mm spacer of laboratory putty (COe, GC America, www.gcamerica.com) on the de-sign model and using a colorless and translu-cent urethane dimethacrylate-based materi-al (triad® transheet™ colorless, dentsPLy international, www.dentsply.com) (Figure 6 and Figure 7). the custom tray is then cured in a specialized light-curing unit (triad) with a tungsten halogen light source (Figure 8).
Matrix Fabricationthe matrix used for BFeP fabrication is then made by first spraying the design mod-el with a thin layer of silicone as a separator. A clear vinyl polysiloxane (VPs) material (eg, tescera™, BisCO inc., www.bisco.com; star
VPs, danville, www.danvillematerials.com) is placed into the tray and onto the design model (Figure 9 and Figure 10). With the tray seated securely on the design model, excess VPs ma-terial is trimmed (Figure 11). When the ma-trix is complete, it should provide great detail and allow the composite to adapt well to the teeth. When the patient returns to the office for placement of the BFeP, the matrix should be tried in to ensure a proper fit (Figure 12). to save time, the dentist may have the trays, wax-up, and matrix made by the laboratory.
PreparationUnlike other esthetic restorative techniques, using the BFeP requires very little to no tooth preparation (ie, nearly immeasurable amount of tooth structure lost). Although the enamel of the teeth receiving treatment must be etched,
sections of tooth structure, close spaces, adjust the smile line, and bleach the teeth within the image (Figure 3 and Figure 4). it must be made clear to the patient that the altered photograph-ic image does not represent the definitive treat-ment results. However, it does allow the patient to preview how treatment may appear.
Design wax-Up After completing the 2d smile design and ob-taining patient approval of the treatment plan, the case is created in a 3-dimensional design wax-up (Figure 5). Although commonly re-ferred to as a diagnostic wax-up, the author prefers the terms “design wax-up” or “treat-ment plan wax-up” because nothing is being diagnosed, but simply designed. By describ-ing the wax-up this way, patients have a bet-ter understanding of its purpose.
inside ESthEtiCS
fIg. 8
fIg. 10fIg. 9
fIg. 12fIg. 11
fIg. 5 fIg. 7fIg. 6
BfEP CREATION (5.) An enhanced design wax-up model was created to demonstrate improved tooth length and inclination. (6.) To begin fabricating the bonded functional esthetic prototype (BFEP), a 2-mm thick spacer of lab putty (or base wax) is placed on the design wax-up model. (7.) To create the hard tray, a clear tray material is placed over the putty. (8.) The custom tray is cured in a specialized light-curing unit. (9 AND 10.) Clear vinyl polysiloxane (VPS) material is placed into the tray and onto the design model. (11.) With the design model seated securely into the hard tray, excess VPS material is trimmed and removed. (12.) At the BFEP appointment, the matrix is tried in the mouth to verify complete seating.
88 inside dentistry | May 2013 | www.dentalaegis.com/id
When the BFeP will function longer (eg, 8 weeks to 6 months), a larger etch pat-tern is required to prevent chipping, break-ing, leaking, and dislodging, because more stress will be placed on the bonded surfac-es.1,2 the full-facial etch pattern just short of the gingival margins and proximal con-tacts3,4 is most commonly used. it is critical to remain short of the gingival margins be-cause when the very thin composite finish line is placed, it will be very difficult to see, even under magnification. As a result, when the BFeP is removed during normal prepa-ration for veneer placement, it will be much easier to remove the composite in these re-gions. in addition, if the composite is not removed during preparation, it may come off during classic temporary removal at the cement appointment, leaving a void at the margins that may affect the fit of the final.
Further, depending on the coverage necessary, the incisal edge may also require etching on the lingual.1,5 For example, when only lengthening by 1 mm, often a small slot is placed on the inci-sal edge to help prevent BFeP fracture during function. When restoring the lingual, the same
protocol is followed (ie, 2-mm to 3-mm spot-etch and avoid the margins).
Occasionally, a full-etch pattern is done on every area of the tooth to receive compos-ite. Cases that will be in the mouth for longer than 6 months for whatever reason should be fully etched and bonded to prevent microle-akage and recurrent caries. this technique will make it more difficult to finish removal of composite at the preparation appointment.
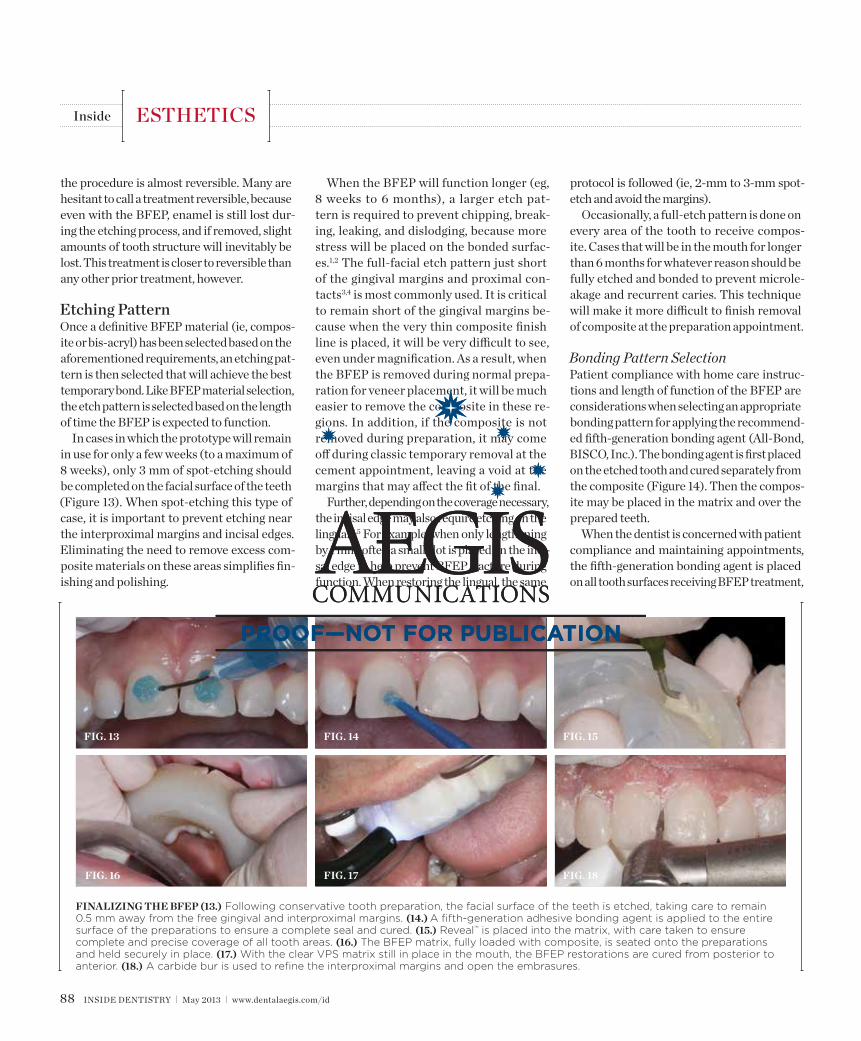
Bonding Pattern SelectionPatient compliance with home care instruc-tions and length of function of the BFeP are considerations when selecting an appropriate bonding pattern for applying the recommend-ed fifth-generation bonding agent (All-Bond, BisCO, inc.). the bonding agent is first placed on the etched tooth and cured separately from the composite (Figure 14). then the compos-ite may be placed in the matrix and over the prepared teeth.
When the dentist is concerned with patient compliance and maintaining appointments, the fifth-generation bonding agent is placed on all tooth surfaces receiving BFeP treatment,
the procedure is almost reversible. Many are hesitant to call a treatment reversible, because even with the BFeP, enamel is still lost dur-ing the etching process, and if removed, slight amounts of tooth structure will inevitably be lost. this treatment is closer to reversible than any other prior treatment, however.
Etching PatternOnce a definitive BFeP material (ie, compos-ite or bis-acryl) has been selected based on the aforementioned requirements, an etching pat-tern is then selected that will achieve the best temporary bond. Like BFeP material selection, the etch pattern is selected based on the length of time the BFeP is expected to function.
in cases in which the prototype will remain in use for only a few weeks (to a maximum of 8 weeks), only 3 mm of spot-etching should be completed on the facial surface of the teeth (Figure 13). When spot-etching this type of case, it is important to prevent etching near the interproximal margins and incisal edges. eliminating the need to remove excess com-posite materials on these areas simplifies fin-ishing and polishing.
inside ESthEtiCS
fIg. 18fIg. 17fIg. 16
fIg. 13 fIg. 15fIg. 14
fINALIZINg THE BfEP (13.) Following conservative tooth preparation, the facial surface of the teeth is etched, taking care to remain 0.5 mm away from the free gingival and interproximal margins. (14.) A fifth-generation adhesive bonding agent is applied to the entire surface of the preparations to ensure a complete seal and cured. (15.) Reveal™ is placed into the matrix, with care taken to ensure complete and precise coverage of all tooth areas. (16.) The BFEP matrix, fully loaded with composite, is seated onto the preparations and held securely in place. (17.) With the clear VPS matrix still in place in the mouth, the BFEP restorations are cured from posterior to anterior. (18.) A carbide bur is used to refine the interproximal margins and open the embrasures.

90 inside dentistry | May 2013 | www.dentalaegis.com/id
intraorally (Figure 15 and Figure 16). After the composite is allowed to flow, the hard tray is re-moved and the loaded matrix remains on the teeth. At this time, the matrix is evaluated to ensure complete seating. if the matrix is not completely seated, the hard tray is repositioned onto the matrix and pressure applied again.
After determining that the matrix is seat-ed properly, the BFeP is cured through the matrix (Figure 17); if the matrix encompasses molars, light curing should begin at the poste-rior, where it tends to be more challenging to control saliva. to further prevent contamina-tion of the posterior composite, cotton rolls, dry angles, and the saliva ejector have proved useful. specialized curing lights may also be used, which provide retraction and suction when curing (isodry/isolite™, isolite systems, www.isolitesystems.com) to expedite this process. these tools may only be used when curing one quadrant at a time, however, per manufacturer’s instructions.
When learning the technique, the dentist may opt to only do one quadrant at a time, or the posterior followed by the anterior. the technique becomes much easier to complete once it is learned. the author now enlists the
help of his staff, for example, with one per-son applying the bonding agent while anoth-er dries and cures, after which another staff member places the tray.
Finishing and PolishingWith the BFeP bonded in place, finishing and polishing become predictable tasks, providing the impressions were free of voids and the de-finitive matrix fit well. in some cases, the com-posite may appear slightly underfilled or over-filled. When underfilled, there may be a void at a margin that can be easily corrected by flowing more of the same composite into the void, then curing. When overfilled, the flange will require simple trimming or adjustment with a carbide or diamond bur, providing the BFeP fits tightly. However, if the BFeP ap-pears grossly underfilled or overfilled, the case may need to be redone, because compos-ite will either dislodge or appear very porous.
After evaluating the fit of the BFeP, trim any small amount of flash on the margins and open the embrasures with a carbide or diamond bur. For this process, 12-fluted red-stripe et car-bide burs are recommended, because these will not cut through tooth structure.6 Additionally, red-stripe et carbide burs work well on com-posite.6 if the composite is too thick, however, red-stripe et diamonds are more effective.6 Only use red-stripe burs/diamonds for this process; white and yellow have been found to be ineffective for this technique.
After removing the flash, slightly open the in-terproximal using a serrated cutting instrument (eg, Cerisaw™, denMat, www.denmat.com; iPr strips, ContaceZ, www.contacez.com). the in-terproximal should be opened only enough to allow the patient to use a floss threader.
Because the BFeP is basically a 14-unit splint, the dentist must decide whether to separate the teeth. separating each individ-ual tooth can only be accomplished during the matrix design stage of fabrication, however.
After trimming and opening the interprox-imal spaces (Figure 18), occlusal adjustments are completed using the articulating paper, bite down, and protrude technique. if any occlusal or protrusive adjustments are necessary, a fine diamond is used.6 Once occlusal and protrusive
including areas that were not etched. this bonding pattern is preferred because it pro-vides some sealing and enhances retention, even when the teeth have only undergone a 3-mm to 4-mm etch.1,5 in the author’s expe-rience, an acceptable short-term bond is still achievable in areas that have not been etched.
if the dentist is convinced that the patient will follow the treatment and appointment schedule, however, the bonding agent may be restricted to only etched tooth surfaces; this ensures easy and swift removal of the proto-type when the final restorations are placed.
SeatingPrior to placing the tray and matrix intraorally, the dentist should ensure that the two could be easily separated, which is essential for com-plete curing of the BFeP composite. Because the tray and matrix are both 2 mm thick, cur-ing is more difficult and time consuming if they cannot be separated. Additionally, when the tray and matrix are separated, the dentist can better view the BFeP and ensure com-plete coverage and seating.
reveal™ (BisCO, inc.) is placed in the matrix that is carried in the hard tray and then seated
inside ESthEtiCS
fINISHINg AND POLISHINg TECHNIQUE (19.) Polishing paste and felt cups are used to polish the facial surface of the BFEP composite restorations. (20.) A leather buff and polishing paste complete the BFEP restorations. (21.) Close-up view of the patient’s BFEP restorations. (22.) Close-up view of the patient’s final restorations.
fIg. 21
fIg. 19
fIg. 22
fIg. 20
www.dentalaegis.com/id | May 2013 | inside dentistry 91
19).6 Final polishing is then completed with a leather buff (Brasseler UsA, www.brasselerusa.com) and polishing paste to enhance the gloss (Figure 20). Further, if the dentist would like to bring the final polish to the line angle, leath-er buffs designed for laboratory use have prov-en useful. However, the buffs are particularly large and can only be used to the first bicuspid.
Overall, the entire finishing and polishing technique should take only 2 to 5 minutes per tooth. Further, when finished, the composite BFeP should display a pleasing luster, polish, and the esthetics required to meet the needs of the patient until the definitive treatment can be completed (Figure 21).6 Figure 22 demon-strates the final restorations after cementation.
DiscussionAn invaluable tool, BFeP can make patients truly happy with the appearance of their teeth
after treatment, and they often receive many compliments from friends and family mem-bers. these compliments often improve pa-tient compliance and motivate patients to un-dergo final treatment sooner.7 Additionally, when the dentist removes the BFeP for defini-tive treatment with porcelain or other materi-als, preparation is simpler because the shape of the teeth has already been worked out.
Although the BFeP is a simplified treatment to satisfy immediate needs, a certain skill set is required and, therefore, dentists should not provide full-arch treatment initially. instead, they should begin with relatively straightfor-ward cases that require only four to six provi-sionals to gain experience in fabricating proper BFePs. during this time, it may also be bene-ficial to complete all restorative dentistry cas-es in composite to understand the form, func-tion, and esthetics of the different materials
adjustments have been made, final finishing and polishing can be completed.
Definitive Finishing and Polishing Techniqueto impart a natural and lifelike appearance to the BFeP, a silicone point (enhance®, dentsPLy Caulk, www.caulk.com) is quick-ly grazed over the surface of the composite.6 Water should be used at this point to prevent scorching.6 the composite is then gone over quickly with the diamond-impregnated point (PoGo®, dentsply Caulk).23 Polishing paste (enhance) is placed on the same point, and the composite is polished.
Once a satisfactory polish is achieved, the process is repeated with a felt cup or felt point (FlexiCups/FlexiPoints, Cosmedent, www.cosmedent.com) and the same polishing paste to give the BFeP even more luster (Figure
inside ESthEtiCS
YOUR PATH TO IMPLANT MAINTENANCE
Hu-Friedy’s latest development in implant maintenance, Implacare II, provides thinner working ends and new designs so you have the choices you need for the best adaptation and efficiency. More importantly, since Implacare II is made from Plasteel, a high-grade, unfilled resin, it will cause the least amount of alteration to implant abutment surfaces.*
Implacare® II: THE WAY TO GO FROM THE ONES WHO KNOW
Visit us online at Hu-Friedy.com
©2013 Hu-Friedy Mfg. Co., LLC. All rights reserved.*Data on file.
> PLASTEEL™ > 20% THINNER TIP DESIGNS > 5 TIP OPTIONS
(Circle 66 on Reader Service Card)

and clinical indications. Med Oral Patol Cir Bucal. 2006;11(2):e215-e220.4. Barghi n. to silanate or not to silanate: making a clin-ical decision. Compend Contin Educ Dent. 2000;21(8): 659-662, 664.5. Lopes GC, thys dG, Klaus P, et al. enamel acid etching: a review. Compend Contin Educ Dent. 2007;28(1):18-24.6. Jefferies sr. Abrasive finishing and polishing in restorative dentistry: a state-of-the-art review. Dent Clin North Am. 2007;51(2):379-397, ix.7. Becker MH, Maiman LA. sociobehavioral determi-nants of compliance with health and medical care rec-ommendations. Med Care. 1975;13(1):10-24.8. Junnila t. Growing your practice in a down econ-omy. Northwest Dent. 2010;89(3):49-51.9. Levin rP. How dentistry weathers a slow economy. J Am Dent Assoc. 2007;138(3):391-392.10. McLaren eA, Lesage BP. Feldspathic veneers: what are their indications. Compend Contin Educ Dent. 2011;32(3):44-49.
available. this will enable dentists to base their BFeP material decisions on the shape, strength, and esthetics required of each case.
After two or three cases, working only back to the bicuspids, the dentist may feel suffi-ciently comfortable to treat more complex cases. eventually, after mastering the BFeP concept, dentists can provide their patients with flexible options that incorporate BFePs for 14 teeth in 1 hour.
conclusion Although dentists want to provide complete dentistry and understand what that often re-quires, there is still a cognitive dissonance with patients who demand the best in treatment in the shortest time, and for the lowest cost.8,9 Providing a solution to this problem, the BFeP allows dentists to provide complete dentistry, but on the patient’s terms. Although the author
prefers to work in porcelain, the BFeP allows the best in function, stability, and esthetics in the interim, all while spreading the cost of de-finitive treatment over time to reduce the ini-tial economic impact to the patient.10
Disclaimerthe author did not receive any financial com-pensation/royalties from any manufacturers of any products used or discussed in this article.
References1. Hobson rs, McCabe JF, rugg-Gunn AJ. the relation-ship between acid-etch patterns and bond survival in vivo. Am J Orthod Dentofacial Orthop. 2002;121(5):502-509.2. Jefferies sr. the art and science of abrasive finish-ing and polishing in restorative dentistry. Dent Clin North Am. 1998;42(4):613-627.3. Hervas-Garcia A, Martinez-Lozano MA, Cabanes-Vila J, et al. Composite resins. A review of the materials
inside ESthEtiCS
(Circle 67 on Reader Service Card)