Embed Size (px)
Citation preview

Electric FireplaceInstruction Manual
Electric Fireplace Packing List
1
1
2
1
1
www.YosemiteHomeDecor.com
Electric Fireplace Instruction Manual
Electric Fireplace Packing List
Electric Fireplace
Remote Control
AAA battery
Fastener Package
Instruction Manual
Yosemite Home Décor
1-800-305-9872
www.YosemiteHomeDecor.com
1 | P a g e

2 | P a g e
Quick Reference Guide
I. Prior to installation, please ensure:
1. The rated voltage of your firebox fits the output voltage of your outlet;
2. The light bulbs in your firebox are in good condition. To check this, please follow
the instructions for replacing the light bulbs on section MAINTENANCE.
II. The heater on your electric fireplace may emit a slight, harmless odor when first used. This
odor is a normal condition caused by the initial heating of internal heater parts and will not
occur again.
III. If your heater does not emit heat, please ensure the Heater Switch is on. For further
information, please consult section Operation of the Practical User's Guide.
NOTE
Procedures and techniques that are considered important enough to emphasize.
CAUTION
Procedures, which if not carefully followed, will result in damage to the equipment.
WARNING
Procedures, which if not carefully followed, will expose the user to the risk of serious injury,
illness or death.

3 | P a g e
IMPORTANT INSTRUCTIONS
WARNING
You should read and always follow the important instructions below to reduce the risk of
fire, electric shock, and injury to persons.
1. Read all instructions before using this heater.
2. This heater is hot when in use. To avoid burns, do not let bare skin touch hot surfaces, such
as surfaces near the heater outlet or light bulbs. The grill directly in front of the heater
outlet becomes hot during heater operation. If provided, use handles when moving this
heater. Keep combustible materials, such as clothes, pillows, furniture, bedding, papers and
curtains at least 3 feet from the front of this appliance.
3. CAUTION: Whenever the heater is left operating and unattended, extreme caution is
necessary if children or invalids are nearby.
4. Do not install the heater directly on carpet or a similar surface, which may restrict air
circulation beneath the unit.
5. Always unplug heater when not in use.
6. To disconnect heater, turn controls to off then remove plug from outlet.
7. Do not use outdoors.
8. This heater is not intended for use in wet locations, such as bathrooms, laundry areas and
similar indoor locations. Never locate heater where it may fall into a bathtub or other water
container.
9. Do not operate any heater with a damaged cord or plug, or if the heater has malfunctioned,
or if the heater has been dropped or damaged in any manner. Discard heater, or Return
heater to authorized service for examination, adjustment or repair.
10. Do not run cord under carpeting. Do not cover cord with throw rugs and runners. Arrange
cord away from traffic areas and where it will not be tripped over. Do not route cord under
furniture or appliances
11. Do not insert or allow foreign objects to enter any ventilation or exhaust opening as this
may cause an electric shock, fire, or may damage the heater.
12. To prevent a possible fire, do not block heater outlet or any ventilation or exhaust in any
manner. Do not use on soft surfaces, like a bed, where openings may become blocked.
Front view Upper view
Air outlet 50mmm
250mm
Air inlet 175mm
360mm
4 | P a g e
13. All electrical heaters have hot and arcing or sparking parts inside. Do not use it in areas
where gasoline, paint, or flammable liquids are used or stored or where the unit will be
exposed to flammable vapours.
14. Do not modify this heater. Use it only as described in this manual. Any other use not
recommended by the manufacturer may cause fire, electric shock or injury to persons.
15. Always plug heaters directly into a wall outlet/receptacle. Never use with an extension cord
or relocatable power tap (outlet/power strip).
16. Do not burn wood or other materials in this heater.
17. Do not strike heater glass.
18. Always use a certified electrician should new circuits or outlets be required.
19. Always use properly grounded, fused and polarized outlets.
20. Always use ground fault protection where required by electrical code.
21. Always disconnect power before performing any cleaning, maintenance or relocation of the
heater.
22. When transporting or storing the heater and cord, keep in a dry place and free from
excessive vibration.
23. The heater must not be located immediately below a socket-outlet.
24. This appliance is not intended for use by persons (including children) with reduced
physical, sensory or mental capabilities, or lack of experience and knowledge, unless they
have been given supervision or instruction concerning use of the appliance by a person
responsible for their safety.
25. Children should be supervised to ensure that they do not play with the appliance.
26. Heater is for household use only.


5 | P a g e
INSTALLATION
This section provides step-by-step instructions for installation of your fireplace insert.
Site Selection
Review and consider all of the following conditions for installation:
• Dimensions of the unit
• Unit requires a minimum of two (2) wall studs in order to ensure a secure installation.
The fireplace insert comes completely assembled and wired. Some tools may be required to prepare
the site and assembly/install the trim. It can be installed to:
• Existing Fireplace
• Custom Mantel Surround
• Wall Construction
WARNING
The outlet must be 15A/120V. If there is no 15A/120V outlet near the desired location, install
a new one.
CAUTION
Do not remove the four rubber feet at the bottom of the heater or install the heater directly on
soft surfaces, which may restrict air circulation. Otherwise, it may cause a risk of fire or
damage.
NOTE
It is a good idea to place your fireplace insert near an existing outlet, for ease of electrical
hook up.
WARNING
Do not attempt to wire your own new outlets or circuits. To reduce the risk of fire, electric
shock or injury to persons, always use a licensed electrician.

6 | P a g e
Existing Fireplace Installation
1. Seal all drafts and vents with non-fibrous insulation materials to prevent chimney debris from
falling into the fireplace insert.
CAUTION
Do not install into an existing fireplace that is prone to leaks or dampness.
2. Cap the top of the chimney flue to prevent rain from entering.
3. Plug the fireplace into a 15A/120V outlet.
4. The power cord can run along the front of the hearth to an outlet near the fireplace.
WARNING
To prevent personal injury you should hire a professional to cap the chimney flue or cut a
hole in the existing fireplace for wiring. If you wish to return your existing fireplace to its
original use (e.g. wood burning) it should be inspected by the local building department
prior to use.
Custom Made Mantel Surround
1. Place the fireplace mantel in the desired location to see how it will look in the room.
2. Leave a clearance allowance around the insert of ¾” (2.0cm) to ease installation.
3. Push the fireplace insert into place so that the panel and the finished mantel surround are in
the same plane.

7 | P a g e
Wall Construction Installation
1. Select a suitable location that is not susceptible to moisture or dust. Keep away from high
traffic areas. Also, keep away from things that may catch fire such as drapes and furniture etc.
2. Use studs to frame an opening, make sure to create an allowance of ¾ inches (2.0 cm) based on
the inserts’ dimension to ensure that the fireplace could be inserted without any problems.
3. Plug the fireplace into a 15A/120V outlet.
CAUTION
Store your fireplace insert in a dry, safe and dustless place when placing the mantel or
building the wall construction.

8 | P a g e
GROUNDING INSTRUCTIONS
This heater is for use on 120 volts. The cord has a plug as shown at A in Figure. An adapter as
shown at C is available for connecting three-blade grounding-type plugs to two-slot receptacles.
The green grounding lug extending from the adapter must be connected to a permanent ground
such as a properly grounded outlet box. The adapter should not be used if a three-slot grounded
receptacle is available.
Figure
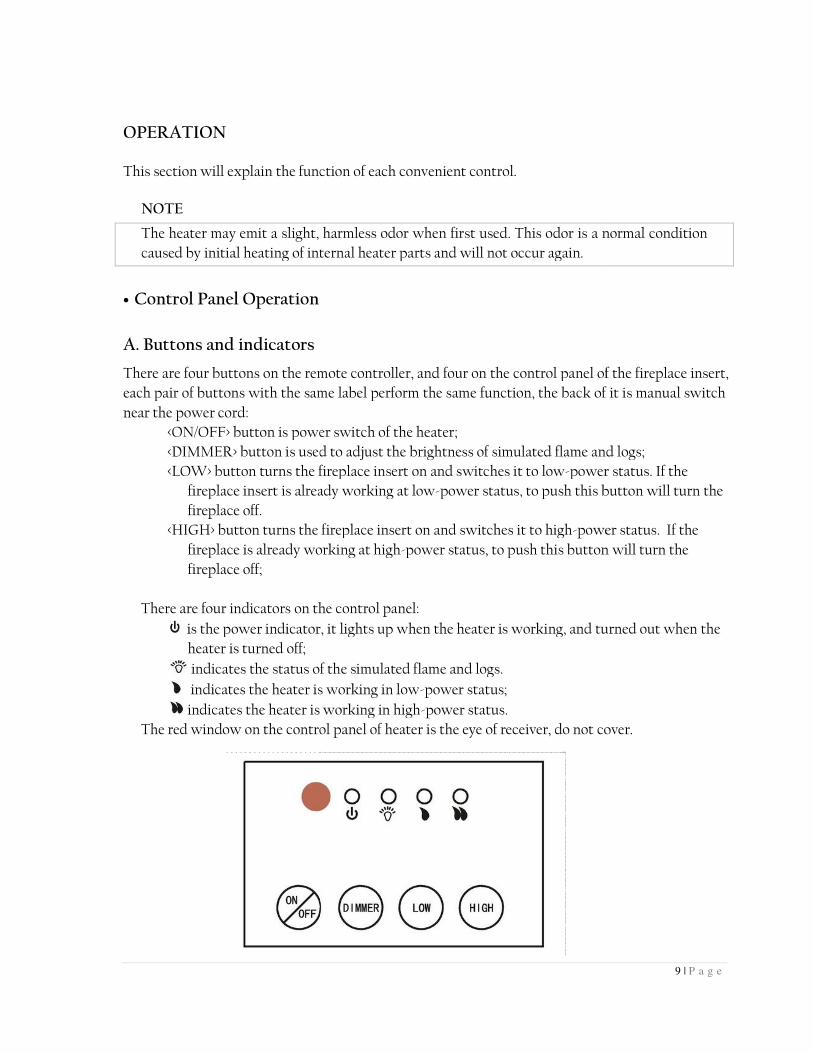
OPERATION
This section will explain the function of each convenient control.
NOTE
The heater may emit a slight, harmless odor when first used. This odor is a
caused by initial heating of internal heater parts and will not occur again.
• Control Panel Operation
A. Buttons and indicators
There are four buttons on the remote controller, and four on the control panel of the
each pair of buttons with the same label perform the same function, the back of it is manual switch
near the power cord:
<ON/OFF> button is power switch of the heater;
<DIMMER> button is used to adjust the brightness of simulated flame and logs;
<LOW> button turns the fireplace insert on and switches it to low
fireplace insert is already working at low
fireplace off.
<HIGH> button turns the fireplace insert on and switches it to high
fireplace is already working at high
fireplace off;
There are four indicators on the control panel:
is the power indicator, it lights up when the
heater is turned off;
indicates the status of the simulated flame and logs.
indicates the heater is working in low
indicates the heater is working in high
The red window on the control panel of
This section will explain the function of each convenient control.
The heater may emit a slight, harmless odor when first used. This odor is a normal condition
caused by initial heating of internal heater parts and will not occur again.
There are four buttons on the remote controller, and four on the control panel of the
each pair of buttons with the same label perform the same function, the back of it is manual switch
<ON/OFF> button is power switch of the heater;
<DIMMER> button is used to adjust the brightness of simulated flame and logs;
tton turns the fireplace insert on and switches it to low-power status.
fireplace insert is already working at low-power status, to push this button will turn the
<HIGH> button turns the fireplace insert on and switches it to high-power status.
fireplace is already working at high-power status, to push this button will turn the
There are four indicators on the control panel:
is the power indicator, it lights up when the heater is working, and turned out when
indicates the status of the simulated flame and logs.
indicates the heater is working in low-power status;
indicates the heater is working in high-power status.
The red window on the control panel of heater is the eye of receiver, do not cover.
9 | P a g e
normal condition
There are four buttons on the remote controller, and four on the control panel of the fireplace insert,
each pair of buttons with the same label perform the same function, the back of it is manual switch
<DIMMER> button is used to adjust the brightness of simulated flame and logs;
power status. If the
power status, to push this button will turn the
er status. If the
power status, to push this button will turn the
is working, and turned out when the
is the eye of receiver, do not cover.

10 | P a g e
B. Operation
On the first use of remote controller, install the batteries first: open the battery box by sliding its
cover along the arrow, install two AAA batteries according to the marks in the box, and slide the
cover to its original position. If no batteries installed or the batteries are not working, the
remote controller will be unusable.
To use the remote controller effectively, point it to the electric fireplace and keep a distance of
1-5 meters.
There are four buttons marked the same as buttons on the remote controller, each pair of them
perform the same function, choose as you favor.
1. On/Off Switch. Press on/off switch to turn fire on. The indicator lamp will brighten
up in the control panel. Press the <ON/OFF> button again; the fireplace insert will be
powered off.
2. Flame Effect Dimmer. Adjust the brightness of simulated flame and logs. When the
fireplace insert is powered on, flame is turned on automatically. Press <DIMMER> button
to adjust the brightness, the lamp will be flashing. During the dimming cycle the fire
will slowly dim then brighten allowing user to choose suitable level. Press a second time
to stop cycle when the desired brightness level is obtained.
3. Heater Low Heat (750 W). Press <LOW> button once to switch the fireplace insert to
low-power status. The indicator lamp will brighten up. Press again the <LOW> button
to turn it off.
4. Heater High Heat (1500 W). Press <HIGH> button once to switch the fireplace insert to
high-power status. The indicator lamp will brighten up. Press again the <HIGH>
button will turn it off.
NOTE
Before the heater emits heat or after it stops producing heat, the hot air outlet may output air
for 10 seconds. This is designed to protect the circuit.
6. Switch off the heater when you leave it for a long time.
7. Remove the two alkaline batteries from the appliance before it is scrapped.
8. The alkaline batteries need to be disposed of safely.
9. Roll up the power cord in the supports when the fireplace is not in use. If you select to
store your heater fully assembled, be sure to cover it, to protect it from accumulating dust.
10. Temperature Limiting control will automatically turn the unit off if it reaches a certain
temperature. Unplug the unit. When the temperature falls, the thermostat will be
restored. Connect the plug to power and heater will work.
11 | P a g e
MAINTENANCE
WARNING
Disconnect power before attempting any maintenance or cleaning to reduce the risk of fire,
electric shock to persons or damage.
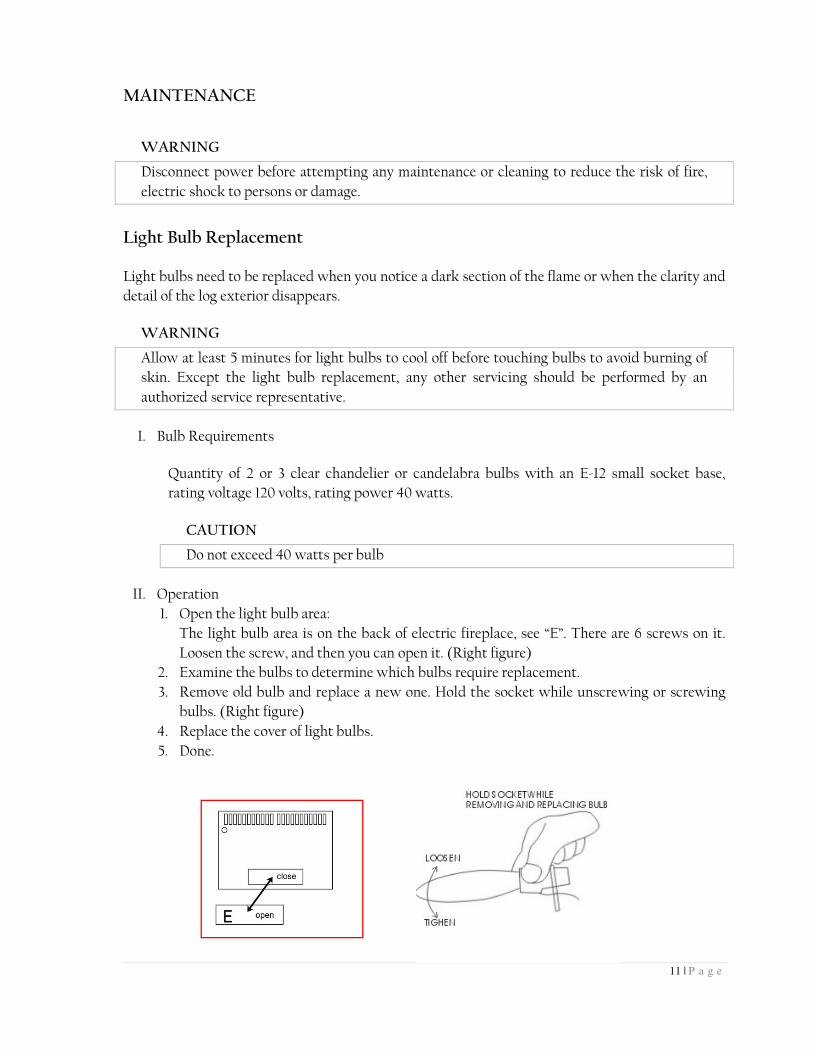
Light Bulb Replacement
Light bulbs need to be replaced when you notice a dark section of the flame or when the clarity and
detail of the log exterior disappears.
WARNING
Allow at least 5 minutes for light bulbs to cool off before touching bulbs to avoid burning of
skin. Except the light bulb replacement, any other servicing should be performed by an
authorized service representative.
I. Bulb Requirements
Quantity of 2 or 3 clear chandelier or candelabra bulbs with an E-12 small socket base,
rating voltage 120 volts, rating power 40 watts.
CAUTION
Do not exceed 40 watts per bulb
II. Operation
1. Open the light bulb area:
The light bulb area is on the back of electric fireplace, see “E”. There are 6 screws on it.
Loosen the screw, and then you can open it. (Right figure)
2. Examine the bulbs to determine which bulbs require replacement.
3. Remove old bulb and replace a new one. Hold the socket while unscrewing or screwing
bulbs. (Right figure)
4. Replace the cover of light bulbs.
5. Done.

12 | P a g e
Correct Disposal of this product
This marking indicates that this product should not be disposed with
other household wastes throughout the EU. To prevent possible harm to
the environment or human health from uncontrolled waste disposal,
recycle it responsibly to promote the sustainable reuse of material
resources. To return your used device, please use the return and
collection systems or contact the retailer where the product was
purchased. They can take this product for environmental safe recycling.